1
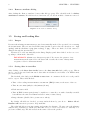
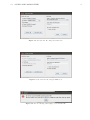
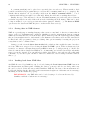
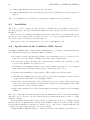
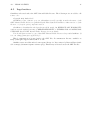
1
CamMeter webcam
measurement software
version 1.0.1
User Manual and Documentation
Attila Szabó
2014
2
Copyright 2014 Attila Szabó
Permission is granted to copy, distribute and/or modify this document under the terms of the
GNU Free Documentation License, Version 1.3 or any later version published by the Free Software
Foundation; with no Invariant Sections, no Front-Cover Texts, and no Back-Cover Texts.
You should have received a copy of the GNU Free Documentation License along with the
EX 2ε version of this documentation. If not, see http://www.gnu.org/licenses/.
LAT
Preface
In sub-research level physics (that is, in secondary school and even in the first years of undergraduate
physics courses) the most used experimental tools—if experiments are done at all—are handheld
meters (electric multimeters, thermometers and the like) and naked eye observation of mechanical
phenomena. Normally, we need to record more quantities, each read off from different places,
possibly as a function of time which means an other reading from a stopwatch. For example, we
may want to measure the resistance of a circuit element (e. g. a thermistor) as a function of
temperature and also the cooling curve of the element (i. e. the temperature versus time).
From a point on, taking readings of multiple meters (let alone more difficult tasks) at the same
time is very difficult and can only be done with teamwork of multiple people and/or great discipline
and organisation. This is difficult. A good solution can be taking photos of the equipment at times
and read off from the pictures afterwards. This can however easily go very cumbersome: we would
normally view the photos back on the computer where we would record the data too; taking photos
requires a camera and attendance (this can become a problem in a long experiment); we still need
a stopwatch to time the photos properly;. . .
CamMeter is a lightweight program to overcome most of such difficulties. It uses a webcam
joined to the computer: webcams are cheap, may already be present in labs and are already built
in laptops. Readings are automatically timed by a ‘stopwatch’ based on the computer; they can
be triggered manually or automatically, allowing us to leave the experiment alone. The application
window also contains a panel where readings can be recorded in the same window as the pictures
are shown.
This document is the user manual of CamMeter. I tried to give a simple and complete description of the program’s features and a step-by-step guide to using the program in usual measuring
scenarios.
I am happy to see that experiments carried out by students gain larger importance in secondary
school education too. I hope that CamMeter will be a tool of good use in such experiments and
will allow students to do more complicated but also more interesting measurements.
Best of luck with CamMeter!
Attila Szabó
3
Contents
1 Features
5
1.1
Image Display . . . . . . . . . . . . . . . . . . . . . . . . . . . . . . . . . . . . . . . .
5
1.2
Camera Selection . . . . . . . . . . . . . . . . . . . . . . . . . . . . . . . . . . . . . .
6
1.3
Timer . . . . . . . . . . . . . . . . . . . . . . . . . . . . . . . . . . . . . . . . . . . .
6
1.3.1
Taking automated readings . . . . . . . . . . . . . . . . . . . . . . . . . . . .
6
Measurement and Data . . . . . . . . . . . . . . . . . . . . . . . . . . . . . . . . . .
7
1.4.1
Add attribute dialog . . . . . . . . . . . . . . . . . . . . . . . . . . . . . . . .
7
1.4.2
Remove attribute dialog . . . . . . . . . . . . . . . . . . . . . . . . . . . . . .
8
Saving and loading files . . . . . . . . . . . . . . . . . . . . . . . . . . . . . . . . . .
8
1.5.1
Images . . . . . . . . . . . . . . . . . . . . . . . . . . . . . . . . . . . . . . . .
8
1.5.2
Saving data in text files . . . . . . . . . . . . . . . . . . . . . . . . . . . . . .
8
1.5.3
Saving data in XML format . . . . . . . . . . . . . . . . . . . . . . . . . . . . 10
1.5.4
Loading back from XML files . . . . . . . . . . . . . . . . . . . . . . . . . . . 10
1.4
1.5
2 An average session with CamMeter
11
2.1
Preparation and measurement . . . . . . . . . . . . . . . . . . . . . . . . . . . . . . . 11
2.2
Processing the pictures . . . . . . . . . . . . . . . . . . . . . . . . . . . . . . . . . . . 11
2.3
Saving data, further work . . . . . . . . . . . . . . . . . . . . . . . . . . . . . . . . . 12
A Technical details
13
A.1 System requirements . . . . . . . . . . . . . . . . . . . . . . . . . . . . . . . . . . . . 13
A.2 Organisation of code . . . . . . . . . . . . . . . . . . . . . . . . . . . . . . . . . . . . 13
A.3 Availability . . . . . . . . . . . . . . . . . . . . . . . . . . . . . . . . . . . . . . . . . 14
A.4 Specification of the CamMeter XML format . . . . . . . . . . . . . . . . . . . . . . . 14
A.5 Legal notices . . . . . . . . . . . . . . . . . . . . . . . . . . . . . . . . . . . . . . . . 15
4
Chapter 1
Features
The application normally consists of one single window containing a number of panels, each responsible for some functions. There are some additional dialogs for certain functions which pop up
occasionally. The subsequent sections introduce these layout elements and explain the functions
available through them.
Figure 1.1: a screenshot.
1.1
Image Display
The simplest panel of the program is the image display. It provides no interactive features, its
only function is to display an image recorded by the webcam. This panel is used by the preview
(see Camera Selection) and measurement annotation functions (see Measurements and Data). The
panel also provides a facility for selecting areas of the picture (this is for a planned OCR backend).
5
6
CHAPTER 1. FEATURES
1.2
Camera Selection
This panel allows choosing from the webcams attached to the computer or switching them off
altogether. The resolution can also be selected for each camera and a preview can be displayed.
Camera: the box contains all cameras attached to the computer and a special value ‘No camera
selected’. When selected, the camera is opened at its highest resolution (or any open camera is
closed).
Resolution: this box contains all resolutions supported by the selected camera, in decreasing
order. When selected, the camera is reopened at the chosen resolution.
IMPORTANT: opening a camera or changing its resolution takes a few seconds,
during this time the program does not respond. By a useful bug the boxes don’t
close up during this time: don’t click on anything in the window during this time.
Always set up the camera before starting the measurement! It may be a good
idea to take a preview photo before starting: this would confirm everything is set
up correctly and the camera sees what it should.
Preview: if a camera is open, pressing the Preview button takes a picture with the camera at
the given resolution and displays it in the Image Display panel. The picture is not saved anywhere.
The aim of this function is to check what is shown by the camera before starting the measurement.
IMPORTANT: a webcam can be used by only one program at a time. While
using the webcam to record for CamMeter, it is unavailable to other programs (e.
g. you can’t take a video recording).
1.3
Timer
This panel is dealing with everything related to timing, including starting and stopping measurements, taking readings and setting up automatic readings. The timer itself is located at the top of
the panel.
Start: when clicked on, the button pops up a file opener dialog, which allows to choose a folder
where all files (pictures and text outputs) are saved. If you cancel, the reading doesn’t start; upon
choosing the folder, the timer starts running from 0. At this point, the button label changes to
‘Stop’, so clicking again stops this measurement (it can’t be restarted).
Take reading: obvious.
Under these buttons, a message ‘Files are saved to. . . ’ is displayed during running measurements.
IMPORTANT: image filenames are always saved by full (absolute) path. Do not
change the path of the files saved by the program: set up a folder the program may
use happily before starting the measurement, so you don’t want to move anything
later.
1.3.1
Taking automated readings
A facility is available to take readings at given intervals without pressing the ‘Take reading’ button
repeatedly.
Automatic reading interval: the number entered here gives the period of readings in seconds.
Enter a number without any units or anything else not intelligible as a number. You may enter
non-integer numbers as well.
1.4. MEASUREMENT AND DATA
7
IMPORTANT: it takes about 0.1–0.2 seconds of machine time to take and save
a picture. If you set a period shorter than this, readings will still be taken at about
this rate: the data stacking up may crash the program. A period shorter than 0.25
seconds is not recommended, values over 0.4 seconds are absolutely fine.
Start automatic readings: obvious. You should always set a period before clicking the
button. After clicking, the label changes to ‘Stop automatic readings’, clicking again stops the
reading series. It is possible to start automatic readings more than once in the same measurement,
possibly with different periods.
1.4
Measurement and Data
This window contains the table where all data in the current measurement are displayed. Annotations can be entered directly in the table but time and image fields cannot be modified.
Initially the data bear no annotation fields, the only coloumns are ‘Time’ and ‘Image filename’
(if pictures were taken). Fields may be added using the Add attribute button and removed using
the Remove attribute button.
To enter an annotation, click on the appropriate cell of the table and type. If pictures were
taken, the picture corresponding to this reading is displayed in the Image Display panel, allowing
to take the reading from the picture without switching windows.
IMPORTANT: take care of decimal separators! Command-line tools (e. g. gnuplot) always require a dot (e.g. 1.234). For Excel, it depends on the language (dot in
English, comma in most other European languages: 1,234). Enter the numbers with
the decimal separator that fits your program as it is not corrected by CamMeter
anyway (if you won’t process them further, use whatever you like).
1.4.1
Add attribute dialog
After clicking the ‘Add attribute’ button, this dialog pops up. You may select where you want to
place the new annotation field and what its name should be.
Place the new attribute before: specifies the place of the new field in the table. The default
is ‘to end’ meaning the new field appears right before the ‘Image filename’ field which always comes
last (or to the right end if there are no pictures). You may select any of the annotation coloumns,
then the new coloumn comes before that one.
Attribute name: obvious.
IMPORTANT: the dialog does not work before starting the measurement.
Figure 1.2: the ‘Add attribute’ dialog.
8
CHAPTER 1. FEATURES
1.4.2
Remove attribute dialog
After clicking the ‘Remove attribute’ button, this dialog pops up. The only field is the box Select
attribute to remove. If a field is selected and removed, all data from that coloumn are removed.
Figure 1.3: the ‘Remove attribute’ dialog.
1.5
1.5.1
Saving and loading files
Images
Pictures taken during measurements are saved automatically in the folder specified before starting
the measurement. They are saved in PNG format (as this doesn’t reduce the already not too high
quality) with the filenames 0.png (first reading), 1.png,. . . These are hard-coded and cannot be
changed through the user interface.
Pictures are loaded automatically in the Image Display panel when clicked on the row corresponding to them in the data table.
IMPORTANT: filenames are always as specified. If you save the pictures of two
measurements in the same folder, the latter will overwrite the former. Always make
a separate folder for all measurements!
1.5.2
Saving data in text files
After clicking on the Save data in file button, the Save into file dialog will pop up. This is
used to export the saved and annotated data either in tabulated text format or in XML format
(see next section).
The left half of the dialog is the Fields to save frame: it contains a checkbox for each possible
field to export. These fields include:
• Time of the reading in hour:minute:second.mil (HMS) format, at the start of the row
• Time in some units (mils/seconds/minutes/hours)
• Each annotation field
• Time in HMS format again (it may be useful not to start the row with a basically text field
but still have the time in a human-readable format; revisited later)
• Image filename (disabled if no pictures were taken)
By default, all fields are checked, you may uncheck them by your choice. Select all and
Deselect all buttons are present to help with this.
The right half allows some fine tuning and setting the filename. We may enter the filename
which is set to measure by default (not that this does not contain any extensions—this may be a
problem on Windows). The file is saved in the same folder as the pictures.
1.5. SAVING AND LOADING FILES
Figure 1.4: the ‘Save into file’ dialog in text file mode.
Figure 1.5: the ‘Save into file’ dialog in XML mode.
Figure 1.6: the error message after trying to load an invalid file.
9
10
CHAPTER 1. FEATURES
A comment mark (#) can be placed at a specified place in each row. This is useful to hide
possible text fields from programs that process text files containing numbers (e. g. gnuplot). By
default, this is switched off: by selecting a field from the Add a comment mark. . . box, a
comment mark will appear right before that field, hiding the field and everything that follows.
Finally, the type of the file may be chosen. The Save as text option saves the selected data in
a tabulator-separated text table with a short header including the field names. This can be used
to import in Excel or process by professional software (gnuplot, Matlab,. . . ). The Save as XML
option saves the data in an XML file (more on that in the next section).
1.5.3
Saving data in XML format
XML is a general-purpose markup language that can store any kind of data in a format that is
easy to read for both humans and computers. CamMeter can save measurement data in a custom
XML-based format and also reload these files. (The format is specified in detail in appendix.) XML
files are less straightforward to understand by the human reader than a table and also unreadable
for Excel and other programs for data processsing: this option is mainly for saving the project in
a way that it can be continued later.
Saving goes also from the Save data in file dialog which works roughly the same, but there
are some differences, triggered by selecting the Save as XML option. Time is always saved (it
is vital to reconstruct a measurement series) in HMS format (i.e. to full precision), so checkboxes
related to time fields are disabled in XML mode. ‘Commenting out’ is diabled as well (it only makes
sense for text file output). You can still select which other fields to save and save the result with
a filename of your choice (the extension .xml is recommended, but reloading works fine without
that, too).
1.5.4
Loading back from XML files
An XML file saved by CamMeter can be reloaded using the Load data from XML button in
the Measurement and Data panel. Clicking the button opens up a file chooser dialog where any
file can be selected. If the file was a valid CamMeter XML file, the data of the measurement are
loaded and displayed in the data table as if it was measured right now. Otherwise an error message
informing about the invalid file pops up.
IMPORTANT: only XML files can be loaded, trying to load a text file saved by
CamMeter will also result in an error message.
Chapter 2
An average session with CamMeter
This chapter describes how to use CamMeter in an actual measurement and collect the data from
the picture in a way that makes saving and further use convenient. Along with usage details, some
general ideas about data reading and processing are described too.
2.1
Preparation and measurement
Place everything you want to take a reading of reasonably close to each other so that you can put
them in the scope of the camera at one time with everything well readable. This is easy with digital
meters but can be tricky with analogue devices or mechanical phenomena (you may want to use a
high resolution webcam or attach a digital camera).
Then adjust the webcam so that it sees everything you want to record in a quality that allows
taking readings. For this, open the webcam in the Camera Selection panel (use the highest (default)
resolution unless you have a very good reason to do otherwise), check the picture with the Preview
button and adjust until you are happy with what you see. Remember, the only information you
will get to take the reading is the camera picture.
If the preparation is ready, you can start doing the actual measurement. Prepare the equipment,
then choose a folder for saving files (the best is to create a new one) and hence start the timer. If
you wish to use automated readings, enter the period and press ‘Start automatic readings’ after
the ‘Start’ button. Now start the experiment: if you don’t use automated readings, press the ‘Take
reading’ button when you want to take a picture. When the experiment is over, press the ‘Stop’
button.
2.2
Processing the pictures
Decide what quantities you want to record from the pictures. Generally it is not worth to record
anything but the very raw data you can directly read off, since you can compute these later with the
computer, saving manual work. Also, CamMeter can’t produce graphs or the like, you’ll eventually
need to export the data in some software capable of this: they normally can deal with computations.
Create coloumns for each such quantity using the ‘Add attribute’ button. Each field name
should make obvious what is recorded there and in what units (always record pure numbers in the
table). If you have any fields that would bear text information, it is a good idea to put them at the
end of the row, placing all numbers in the front. Field names can’t (yet) be corrected, if you want
to change one, remove it and add again (that’s why you should set up the coloumns in advance).
Now start reading off the pictures and record the data you see. If you click on any cell, the
picture corresponding to it will appear in the Image Display panel. Enter the numbers without any
11
12
CHAPTER 2. AN AVERAGE SESSION WITH CAMMETER
non-numeric character (e. g. units), taking care of the decimal separator convention your other
software uses.
If you need to interrupt the readings, make sure you save the data in XML format, so you can
reload it later and continue. This may be a good idea anyway.
2.3
Saving data, further work
When all data are recorded, they can be saved in both text or XML formats. It can be recommended
to save everything (selecting all checkboxes) in XML format anyway, so the data can be reopened
in CamMeter if needed. It may happen that you are working further by hand, then no other action
is needed.
To save a text output, select the fields you want to export.
If you are going to use a program that reads tabulated text files (gnuplot, for example), make
sure it will read only numeric fields: uncheck the first ‘Time (H:MM:SS.mmm)’ field (this is not
a simple number) and place a comment mark in front of the first text field (that’s why collecting
them at the end is a good idea).
If the file is going to be read in by some other application (e. g. Excel), there is no need for
the comment marks and you can export whichever field you want. Give it an appropriate filename
and extension (.csv works well with Excel) and save.
A text file with properly placed comment marks can be used directly with programs like gnuplot
and Matlab. To import in Excel, you can open it (provided it has a good extension): the only
important issue is checking the delimiter settings (the default might be something else than the
tabulator, this requires adjusting). The first three rows are headlines which can be ignored.
Appendix A
Technical details
A.1
System requirements
CamMeter is written in Java. It can be run on all common operating systems (Windows, Mac,
Linux,. . . ) provided the Java Virtual Machine is installed: this is free and already installed on
most computers.
A webcam is very useful for using the program, though it would run without one. There are
no other hardware requirements: the program is lightweight, it uses only a few memory and hard
drive space (of course, saving the pictures needs space).
No special libraries or drivers are needed: if a webcam is recognised by the computer (so it can
be used in e. g. Skype), it will work well for CamMeter.
A.2
Organisation of code
CamMeter is open source (see details below). All program files are in the folder uk/ac/cam/as2372/,
their content is as follows:
1. stopwatch/Runner.java: base class of the timer, generates Reading objects upon request.
2. stopwatch/Reading.java: stores a timer reading and returns it in various formats.
3. cammeter/AnnotatedReading.java: subclass of Reading, stores image filename and annotation fields as well.
4. cammeter/Measurement.java: all data related to one reading series. Stores annotation field
names and readings, provides methods for saving and loading files.
5. cammeter/MeasurementTableModel.java: subclass of Java’s AbstractTableModel which
renders a Measurement object for a Java table.
6. cammeter/TimerPanel.java: the Timer panel.
7. cammeter/CameraSetupPanel.java: the Camera Selection panel.
8. cammeter/PicturePanel.java: the Image Display panel.
9. cammeter/MeasurementPanel.java: the Measurement and Data panel.
10. cammeter/AddAnnotationDialog.java: the ‘Add attribute’ dialog.
11. cammeter/RemoveAnnotationDialog.java: the ‘Remove attribute’ dialog.
13
14
APPENDIX A. TECHNICAL DETAILS
12. cammeter/SaveDialog.java: the ‘Save into file’ dialog.
13. cammeter/MainFrame.java: the main class of the whole program that creates the application
window.
The code is explained more in detail by accompanying comments in the program files.
A.3
Availability
The source code, the compiled program and this documentation are all available from the website http://people.ds.cam.ac.uk/as2372/cammeter/ where updates and new versions may be
published.
Everyone is free to redistribute CamMeter in any way, either as it is, or in any modified form.
You are, however, legally required to make the source code of the program available for anyone
who can access the executable program through you.
Any queries or discovered bugs should be reported to [email protected].
A.4
Specification of the CamMeter XML format
A CamMeter XML file shall contain a single <measurement> root element, containing all information. This shall contain the following three kinds of elements:
• One <meta> element: any metadata relating to the measurement can be recorded here. Contents are not specified further, CamMeter 1.0 adds a single <vendor> field.
• One <record> element: this may only contain <field> elements, each describing one field
recorded in the XML file as specified below.
• Any number of <reading> elements: each of them contains data related to one reading in
time, annotation, and image elements. Their contents is specified below.
A <field> element shall have a type attribute. This can have the following values:
• time/hms: time in HMS format. Such a field must appear here and implies a <time> element
of type attribute hms within each <reading> element.
• annotation: an annotation field. The element must have text content: this gives the name
of the field. Such a field implies an <annotation> element in each <reading> element with
a type attribute of the specified field name.
• image: image filename field. This element implies an <image> element in each <reading>
element.
The order of annotation <field> elements in the file shall indicate their order in the CamMeter
data table: as a good practice, the time element should come first and the image one last, to comply
with this ordering.
Each <reading> element shall contain exactly one <time> and at most one <image> element
and any number of <annotation> elements. They all shall be indicated by the <field> elements
in <record> and shall have attributes as described above. All of these elements shall have the
contents of the appropriate data table cell as text contents.
A valid CamMeter XML file shall not contain any elements other than those specified above.
A.5. LEGAL NOTICES
A.5
15
Legal notices
CamMeter is licensed under the GNU General Public License. The following notice is added to all
source code:
Copyright 2014 Attila Szabó
CamMeter is free software: you can redistribute it and/or modify it under the terms of the
GNU General Public License as published by the Free Software Foundation, either version 3 of the
License, or (at your option) any later version.
CamMeter is distributed in the hope that it will be useful, but WITHOUT ANY WARRANTY;
without even the implied warranty of MERCHANTABILITY or FITNESS FOR A PARTICULAR
PURPOSE. See the GNU General Public License for more details.
You should have received a copy of the GNU General Public License along with CamMeter. If
not, see <http://www.gnu.org/licenses/>.
This documentation is licensed under the GNU Free Documentation License, available at
http://www.gnu.org/licenses/fdl-1.3.txt.
CamMeter uses an additional webcam capture library for Java, written by Bartosz Firyn (available at http://webcam-capture.sarxos.pl/). This library is licensed under the MIT License.
16
APPENDIX A. TECHNICAL DETAILS