1
Search
(courtesy of Google)
The online journal of the
TeX Users Group
ISSN 1556-6994
About The PracTeX
Journal
General information
Submit an item
Download style files
Copyright
Contact us
About RSS feeds
Archives of The PracTeX
Journal
Back issues
Author index
Title index
BibTeX bibliography
Next issue
Spring 2013
Editorial board
Lance Carnes, editor
Kaja Christiansen
Peter Flom
Hans Hagen
Robin Laakso
Tristan Miller
Tim Null
Arthur Ogawa
Steve Peter
Yuri Robbers
Will Robertson
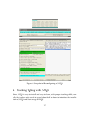
Table of Contents
Issue 2012, Number 1
[Published 2012-10-22]
The PracTeX Journal 2012-1
Editorial: LaTeX in the IT World
News from Around
Feedback from readers - math formatting, missing chess piece
Whole issue PDF
Articles
Formatting Sweave and LaTeX Documents in APA Style, Brian D. Beitzel
The Vocal Tract LaTeX Package, Dimitrios Ververidis, Daniel Schneider, and Joachim Köhler
Writing Posters with Beamerposter Package in LaTeX, Han Lin Shang
Seeing Stars, Jim Hefferon
TeX in the eBook Era, Luca Merciadri
Easy-to-use Chinese MTEX Suite, Hongbin Ma
Bashful Writing and Active Documents, Yossi Gil
Documenting ITIL processes with LaTeX (Portuguese), Rayans Carvalho and Francisco Reinaldo
Technical Notes
Avoid eqnarray!, Lars Madsen
Columns
Ask Nelly
Distraction - Guitar Chords and Font quizzes
Book Reviews - LaTeX and Friends by Marc R.C. van Dongen
Other key people
More key people wanted
Sponsors:
Web site Generated October 22, 2012 (wiki); TUG home page; search; contact webmaster.
Be a sponsor!
Search
(courtesy of Google)
The online journal of the
TeX Users Group
ISSN 1556-6994
Table of Contents
Francisco Reinaldo
Paul Blaga
Comment on this
General information
Submit an item
Download style files
Copyright
Contact us
About RSS feeds
Back issues
Author index
Title index
BibTeX bibliography
Next issue
Spring 2013
Editorial board
Lance Carnes, editor
Kaja Christiansen
Peter Flom
Hans Hagen
Robin Laakso
Tristan Miller
Tim Null
Arthur Ogawa
Steve Peter
Yuri Robbers
Will Robertson
Other key people
More key people wanted
[Published 2012-10-22]
Editorial — LaTeX in the IT World
About The PracTeX
Journal
Archives of The PracTeX
Journal
Issue 2012, Number 1
In This Issue
Software systems for document preparation, project management, and requirements analysis are continually evolving.
There is no limit to how much these systems can expand and become a more significant force in computerized
automation. In this issue of the PracTeX Journal we present several articles by authors involved in these areas, with the
hope that their experiences and techniques using LaTeX and other TeX tools will be useful to others.
Not too long ago there was a fairly small number of LaTeX and TeX users, and they concentrated mostly on math and
scientific documents. As LaTeX and TeX matured over the years and became more accessible, it was natural that they
would be used more in Information Technology. Today, there are countless universities, research organizations, and
commercial enterprises using TeX in IT.
This issue grew beyond what we expected at the outset. Although it's a very specific area, it generated a lot of interest --we had over 1,800 hits on the pre-release web site.
I hope you enjoy reading the articles, and be sure to give us feedback by clicking the links next to each article.
Articles
The first article, Formatting Sweave and LaTeX Documents in APA Style, by Brian D. Beitzel, explains the use of the class
aps6.cls for preparing manuscripts to be submitted to American Psychological Association's journals, according to its 6th
edition Publication Manual.
The second paper, The Vocal Tract LaTeX Package, by Dimitrios Ververidis, Daniel Schneider, and Joachim Köhler, is
dealing with the package VocalTract.sty, devoted to the visualisation of the vocal tract.
The next paper, Writing Posters with Beamerposter Package in LaTeX, by Han Lin Shang, discusses the use of the
package beamerposter, a LaTeX tool for creating conference posters as well as some connected packages.
In Seeing stars, James S. Hefferon shows how to create star symbols with MetaPost for rating a web page.
In TeX in the eBook Era, Luca Merciadri emphasizes the advantages of using eBooks, in connection with LaTeX-composed
documents.
The following paper, Easy-to-use Chinese MTEX Suite, Hongbin Ma describes, to use his own words, "an easy-to-use and
easy-to-learn Chinese MTeX Suite". It was developed by Hongbin Ma and friends in order to provide Chinese LaTeX users
with a compact TeX distribution.
In Bashful Writing and Active Documents, Joseph Gil discusses a new paradigm in computer science, active documents.
These offer ways of presenting users with documents that change in response to exterior events. The author proposes a
new package, bashful, and documents created with this package, in the author's own words, "extend the user interaction
offered by active documents to the time of the document creation".
Finally, the article by Rayans Carvalho and Francisco Reinaldo, Documenting ITIL processes with LaTeX (Portuguese),
presents a LaTeX-based processes and services documentation tool, as suggested by the Information Technology
Infrastructure Library .
Columns
Ask Nelly answers some questions about the customization of lists in LaTeX and about creating logos with LaTeX.
The Distraction demonstrates a package writing guitar chords, and offers some entertaining font quizzes.
Thanks
The PracTeX Journal thanks the production editors - Lance Carnes and Yogeshwarsing Calleecharan - who worked hard
with us to create this issue. Dave Witte Morris carefully copy edited several articles. Thanks to all for helping out. It takes
many hours to edit the articles and put together the web site, and working with this team makes it a pleasure to do.
Colin Shanafelt of Gatsbylight.com provided a free license of "Easy Grader" publishing software for each production editor.
This software is a a useful tool for teachers, reviewers, and others who evaluate written material. This donation is much
appreciated.
Francisco Reinaldo
Paul Blaga
Sponsors:
Web site Generated October 22, 2012 (wiki); TUG home page; search; contact webmaster.
Be a sponsor!
Search
(courtesy of Google)
The online journal of the
TeX Users Group
ISSN 1556-6994
About The PracTeX
Journal
Table of Contents
Issue 2012, Number 1
News from Around
News From Around
General information
Submit an item
Download style files
Copyright
Contact us
About RSS feeds
Archives of The PracTeX
Journal
Back issues
Author index
Title index
BibTeX bibliography
[Published 2012-10-22]
Editors
Comment on this article
LaTeX Blogs
See the LaTeX Community blog
Beginner's Guide.
for LaTeX articles, blogs, and contests. It is edited by Stefan Kottwitz, author of LaTeX
Next issue
Spring 2013
Editorial board
Lance Carnes, editor
Kaja Christiansen
Peter Flom
Hans Hagen
Robin Laakso
Tristan Miller
Tim Null
Arthur Ogawa
Steve Peter
Yuri Robbers
Will Robertson
Other key people
More key people wanted
Sponsors:
Web site Generated October 22, 2012 (wiki); TUG home page; search; contact webmaster.
Be a sponsor!
Search
(courtesy of Google)
The online journal of the
TeX Users Group
ISSN 1556-6994
Table of Contents
Archives of The PracTeX
Journal
Back issues
Author index
Title index
BibTeX bibliography
[Published 2012-10-22]
Feedback from readers
About The PracTeX
Journal
General information
Submit an item
Download style files
Copyright
Contact us
About RSS feeds
Issue 2012, Number 1
Editors
Comment on this article
Contents
1 Feedback from readers
1.1 Math italic d vs roman d
1.2 Displayed equations
1.3 Redefining LaTeX math commands
1.4 Missing chess piece
Next issue
Spring 2013
Editorial board
Lance Carnes, editor
Kaja Christiansen
Peter Flom
Hans Hagen
Robin Laakso
Tristan Miller
Tim Null
Arthur Ogawa
Steve Peter
Yuri Robbers
Will Robertson
Other key people
More key people wanted
Math italic d vs roman d
While preparing the article LaTeX teaching techniques, Lenore Horner
disagreed over the use of an italic d vs an upright or roman d.
for the 2011-1 issue the proofreader and author
Proofreader Calleecharan
[Horner] writes $ \frac{ds}{dt} $ on page 3. The differential operator "d" should be upright and not in italic.
Author Horner
I made the changes in the derivative notation because the argument that the derivative is an operation and so
shouldn't look like a variable made sense to me. I later checked every single math and physics book on my
shelves at home (I have another shelf-full at school that I keep forgetting to check) and not a single one of
them - including the one by an author who had his wife write a font for the TRS-80 to properly typeset his
book - writes the derivative in any way differently from the variable d. I guess LaTeX is out to change the way
we write math in this case.
We asked a well-known math book publisher and TeX expert, Michael Spivak.
Should dx/dy have an italic d or a roman d? For centuries, of course, mathematicians have used an italic d.
Then some standards committee or other decided it should be roman d, since italic letters are reserved for
variables. As far as I know, $e^{i\pi}=-1$ is still written with an italic e and an italic i, but perhaps they were
worried about Emerson's hobgoblin of small minds.
I believe the roman d flag is now carried by physicists and engineers, but don't know that many
mathematicians who use it. I haven't yet seen a Calculus book that uses a roman d, though there's almost
certainly an enthusiast somewhere who has written one.
Claudio Beccari cites the ISO standard for this (and also published an article on it in TUGBoat ten years ago):
The roman d (differential), the roman i or j (imaginary unit), the roman e (base of natural logarithms) must be
typed in upright type by an ISO regulation, but it deals only with typesetting mathematics in Science and
Technology. See the paper sp811.pdf http://physics.nist.gov/cuu/pdf/sp811.pdf issued by the NIST
(National Institute for Science and Technology, the successor of the US National Bureau of Standards).
The ISO regulations, I must underline, deal only with Science and Technology, not with pure mathematics,
and mathematicians are not bound to such regulations. It applies to physicists, engineers, chemists, and
others dealing with measurable sciences. (Of course, mathematics is a science, but the term science used
by the regulation implies sciences that deal with measurable physical quantities). The underlying ratio legis is
that physical quantity symbols should not be confused with symbols that do not represent quantities;
furthermore, physical quantities have similar symbols, where d, i and e are used very frequently for diameters,
distances, diffraction indices, electric current, electron charge, and the like. The italic physical quantities
should not be confused either with the units of measurement that, again, must be in upright type, and not
italic, slanted, or oblique forms.
As a university engineer and professor I published using mathematics during the whole length of my research
career, and I find these regulations very wise and very convenient to use in practical situations, as well as the
obligation to use roman type in subscripts and superscripts that do not represent physical quantities or
mathematical entities, so that the i-th element of a succession of voltages should be $V_i$ while the input
voltage should be $V_{\mathrm{i}}$.
I underline that the ISO regulations apply to Science and Technology, so the use of, say, upright or italic d for
the differential depends on the field where that symbol is used; roman type is compulsory in Science and
Technology, optional in pure mathematics.
Since the proofreader is an engineer he recommended the roman d. Mathematicians apparently almost always use the
italic d. The author is a physicist and chose to use the italic d. Now this all makes sense ... or does it?
Displayed equations
After the article LaTeX teaching techniques, Lenore Horner
was published we received the following comment:
Ross Moore 2011-09-20
One extra thing that I do is use \tfrac{1}{2} so that the fraction looks nice, even in displays, where otherwise it
can dominate an expression (as in one of your early examples).
Horner 2011-10-11
I have to disagree with Ross. See attached examples and pedagogical discussion of why using universal
small halves in displayed equations doesn't make sense. What it comes down to is that I agree with LaTeX
default choices on appropriate sizing within expressions and disagree with Ross's suggestion to override
those defaults.
Redefining LaTeX math commands
Juan Luis Varona 2011-09-20
Comment on Speedy LaTeX on the Mac, Lenore Horner
In general, it is not a good idea to redefine TeX commands. But sometimes it is a very bad idea. For instance, redefining
\renewcommand{\[}{\left[}
\renewcommand{\]}{\right]}
because in this way you cannot use
\[
formula
\]
Note that
\[
formula
\]
Is not the same as
$$
formula
$$
although it seems similar (for instance, you can not to use \qedhere with $$...$$).
Horner 2011-10-21
Juan Luis makes a good point that redefining has dangers. In this case I think the advantages outweigh the
dangers, although I do see that I should not have recommended $$ $$ as the replacement for \[ \] but rather
either \begin{equation*} \end{equation*} or \begin{align*} \end{align*} since $$ $$ (I think) triggers TeX on
which displaymath, equation, and align are built but is different from all of them. Personally, I prefer the align
environments over the equation environments since I don't have to change the environment if I need to add
extra lines of math later. Because I can insert any of the options with the same number of key-strokes and it
makes sense to put the opening and closing statements of the displayed math on their own lines, there is no
disadvantage in editing to using the longer forms. However, the longer \left( \right) or \left[ \right] necessary for
most sets of parenthesis in an equation make editing and proofreading the equations themselves much
harder for me. Sample of math redefinitions
Missing chess piece
Luis A. Dissett 2011-10-21
In Distractions — Some chess problems created in LaTeX the solution to "Additional chess problem 2" reads: "If it is
white’s turn, then white plays 1. 0-0 and, irrespective of what black does, mates with 2. Rd4d1."
However, black can escape by 1. 0-0 Kd4-d5 2. Re1-d1 Ke6.
A black pawn is missing on e6.
Sponsors:
Web site Generated October 22, 2012 (wiki); TUG home page; search; contact webmaster.
Be a sponsor!
Search
(courtesy of Google)
The online journal of the
TeX Users Group
ISSN 1556-6994
About The PracTeX
Journal
Table of Contents
Back issues
Author index
Title index
BibTeX bibliography
Next issue
Spring 2013
[Published 2012-10-22]
Formatting Sweave and LATEX Documents in APA Style
Brian D. Beitzel
Article PDF
Article source
Comment on this article
General information
Submit an item
Download style files
Copyright
Contact us
About RSS feeds
Archives of The PracTeX
Journal
Issue 2012, Number 1
Abstract: Journals in the social sciences typically require manuscripts to be formatted according to the
American Psychological Association's Publication Manual, which is now in its 6th Edition. The apa6 class is
an update of the popular apa class (often referred to as “apa.cls”), bringing it into compliance with 6th Edition
requirements and adding a few new features. This article describes the major features of apa6 and presents
results from testing apa6 with four bibliographic package scenarios; the output of these bibliographic
packages is compared with 6th Edition requirements. The article concludes with information regarding how to
easily convert a document from LaTeX to Microsoft Word for the purpose of submitting manuscripts to
journals that require APA style.
Editorial board
Lance Carnes, editor
Kaja Christiansen
Peter Flom
Hans Hagen
Robin Laakso
Tristan Miller
Tim Null
Arthur Ogawa
Steve Peter
Yuri Robbers
Will Robertson
Brian Beitzel. I am an Associate Professor in the Department of Educational Psychology, Counseling and
Special Education at SUNY Oneonta in Oneonta, NY. I started learning and using LaTeX because of the
potential of the apa class for formatting manuscripts (including Sweave for reproducible research) and
because of the capabilities of the beamer package for presentations. You can contact Brian at brian at
beitzel dot com.
Other key people
More key people wanted
Sponsors:
Web site Generated October 22, 2012 (wiki); TUG home page; search; contact webmaster.
Be a sponsor!
The PracTEX Journal, 2012, No. 1
Article revision 2012/03/08
Formatting LATEX Documents in APA Style
(6th Edition) Using the apa6 Class
Brian D. Beitzel
Email [email protected]
Abstract Journals in the social sciences typically require manuscripts to be formatted according to the American Psychological Association’s Publication
Manual, which is now in its 6th Edition. The apa6 class is an update
of the popular apa class (often referred to as “apa.cls”), bringing it into
compliance with 6th Edition requirements and adding a few new features. This article describes the major features of apa6 and presents results
from testing apa6 with four bibliographic package scenarios; the output of
these bibliographic packages is compared with 6th Edition requirements.
The article concludes with information regarding how to easily convert a
document from LATEX to Microsoft Word® for the purpose of submitting
manuscripts to journals that require APA style.
1
Background
Journals in psychology and other social sciences typically require authors to format their manuscripts in compliance with the guidelines published by the American Psychological Association (APA) in its Publication Manual, which APA updates periodically. The 6th Edition of the Manual (American Psychological Association, 2009) significantly altered the formatting guidelines for section headings
and other aspects of manuscripts. These changes rendered existing formatting
systems (e.g., the apa LATEX class) inadequate for publication venues that require
strict compliance with the 6th Edition.
The apa6 LATEX class is an update of the apa class (frequently referred to as
“apa.cls”), bringing the printed output into compliance with 6th Edition requirements. Because the author of the apa class is no longer maintaining it, I updated
the code and released it under a new name, apa6.
Copyright © 2012 Brian D. Beitzel
Permission is granted to distribute verbatim copies
of this document provided this notice remains intact.
In addition to the formatting updates (described in Section 2) required by the
changes introduced in the 6th Edition, I added a few new features that were not
available in the apa class. I describe these briefly in Section 3 of this article; for
more detail, please consult the apa6 documentation.
Central to the requirements of APA style is the citing of sources. Several LATEX
bibliography packages are available for this. I tested the most common ones and
have included my results in Section 4 of this article.
One additional aspect of preparing manuscripts for publication is the frequent
stipulation that manuscripts be submitted in Microsoft Word® format. Microsoft
Windows® users need look no further than Section 5 of this article for a relatively
easy solution for accurately converting LATEX documents into Word documents.
Although I refer exclusively to LATEX documents throughout this article, all
the information applies equally to Sweave documents (cf. Zahn, 2008). Sweave is
a function in the open-source statistical software R (R Development Core Team,
2011). An Sweave document contains both directives for statistical analysis (conceptually similar to SPSS commands) and prose (abstract, introduction, etc.). The
Sweave function processes the statistical analyses and “weaves” the statistical output with the prose to produce a complete manuscript. Thus, the researcher no
longer must re-type, copy, or paste statistical results into a word-processing file.
And if the data to be analyzed should change for any reason (e.g., one decides
to exclude a few outlier cases), one only needs to re-run the Sweave command
in order to produce an updated manuscript with the latest statistical results. The
details of Sweaving are beyond the scope of this article, but a quick web search
will turn up many useful results.
2
Compliance with 6th Edition Requirements
This section describes the updates made necessary by requirements appearing for
the first time in the 6th Edition.
Like apa, apa6 has three modes that generate a different visual result when
the document is compiled: jou mode (the default), which has a two-column,
printed-journal appearance; man mode, which follows APA’s requirements for formatting manuscripts for publication; and doc mode, which has a standard LATEXdocument appearance. Although some of the 6th-Edition changes (e.g., format
of section headings) apply equally to jou and doc modes, in this article I will be
2
discussing the much-more-detailed specifications from the Manual pertaining to
man mode.
2.1
Section Headings
Perhaps the biggest change introduced in the 6th Edition is the way section headings are formatted. Prior to the 6th Edition, headings were formatted based on
how many levels of heading (think of levels in a hierarchical, Roman-numeral
outline) were present in the document. In the 6th Edition, regardless of the number of heading levels in the manuscript, the top heading level is always centered,
boldfaced, and set in upper- and lower-case. Other heading levels have similarly
specific requirements. (In APA style, headings are not numbered.) The apa6 class
complies with all of the 6th Edition heading requirements.
2.2
Float Placement
According to the 6th Edition, tables and figures (in that order) must appear after
the references but before the appendices. This creates something of an enigma regarding what should happen with floats (i.e., tables or figures) that are ultimately
typeset within an appendix. The choices we are left with are to place appendix
floats (a) along with the floats from the main part of the manuscript, which would
mean that appendix floats appear prior to the point at which they are mentioned;
(b) within the appendices themselves, which is not consistent with how floats in
the main part of the manuscript are handled; or (c) in a separate float section that
follows the appendices, which results in two sections of floats. Obviously none
of these choices is satisfactory, so I posed the question to APA’s Style Expert. He
responded that at least for APA’s journals, “it doesn’t matter whether appendix
tables are submitted with text tables or separately, as long as they are numbered
correctly (e.g., Table A1, Table B1, etc.).” (J. Hume-Pratuch, personal communication, June 15, 2011). Therefore, apa6 takes the most straightforward approach and
includes all appendix floats within the body of the relevant appendix. This also
has the advantage of making the appendices more readable.
Because the 6th Edition requires figure captions to be printed on the same
page as their respective figures, apa6 does not produce any Figure Captions pages.
3
2.3
Author Note
According to the 6th Edition, the Author Note must appear on the title page
rather than on a separate page of the manuscript. The apa6 class typesets the
Author Note at the bottom of the title page, per 6th Edition specifications.
3
New features
In addition to providing compatibility with the 6th Edition of the Manual, I have
implemented several new features beyond those available in the apa class.
3.1
Repositioned Floats
When revising and proofreading a manuscript, it is most helpful to have the
tables and figures readily available (rather than turning most of the way to the
end of the manuscript to access them). If the user invokes the floatsintext
option (in the \documentclass line), tables and figures will be integrated in the
text approximately at the point where they are mentioned.
3.2
Masked References
Most often when authors submit manuscripts for peer review, the manuscripts
must have all identifying information stripped so that reviewers do not know who
the author of the manuscript is. If the user specifies the mask option, apa6 will
suppress the author’s name and affiliation, the Author Note, and any references
that are marked as being the author’s own.
The apa6 class replaces masked citations with the text, (2 citations removed for
masked review) (in the case of two masked citations) and removes the corresponding entries from the reference list.
For final production of the manuscript there is no need to revise how the
previously masked references are cited. Removing the mask option from the
\documentclass line will unmask all in-text citations and display all sources in
the reference list.
4
3.3
Flexible Bibliographies
The apa6 class supports three bibliography packages: apacite, natbib, and biblatex.
Section 4 describes how well each of these packages complies with 6th Edition
requirements.
3.4
Smaller Changes
I also added several new features for convenience, and will give them only passing attention here. First, the user can specify the desired font size (within the
standard set of 10pt, 11pt, and 12pt that LATEX provides). Second, with the
draftfirst or draftall options, a “DRAFT” watermark (which the user can
further customize with different text or font size) will be placed on either the first
page or on all pages. Finally, the user can specify keywords to facilitate electronic
indexing of the article after publication; many journals (including APA journals)
request authors to provide these. If specified, keywords are displayed on a line
beneath the abstract.
4
Compliance of Bibliography Packages with 6th
Edition Requirements
Although apa6 supports the apacite, natbib, and biblatex bibliography packages,
not all of them are equally precise with regard to 6th Edition requirements. This
section compares the output of these packages, highlighting inaccuracies that
authors should be aware of when using them. For details on how to use each of
these packages with the apa6 class, please refer to the apa6 documentation.
4.1
Citation Tests
The test cases for looking at formatting come from the file bibliography.bib,
which is located in the “samples” subfolder of the apa6 installation. There are
several situations that we will need to examine in order to be satisfied that we are
complying with APA requirements. Please note that the following tests are not
intended to be comprehensive tests of APA citation style; rather, they cover some
of the more rigorous APA-style challenges for bibliographic citation software.
5
1. Joining Multiple Author Names Outside Parentheses. With a multiple-author
source and when all authors must be listed (as opposed to the situations in
Tests #4 and #5 below), write out the word “and” prior to the last author’s
name if the authors are named outside parentheses.
2. Joining Multiple Author Names Within Parentheses. In the same situation as
above, but when the authors’ names are cited inside parentheses, use the
symbol “&” in place of the word “and.”
3. Order Citations Alphabetically. When multiple sources are cited within parentheses, sort them in the same order in which they appear in the reference list
at the end of the manuscript. For this test, I purposely entered the citations
in reverse alphabetical order.
4. Truncating 3-5 Author Names. When there are 3-5 authors, list all authors’
names for the first citation; for subsequent citations, list only the first author’s name followed by “et al.”
5. Truncating Six or More Author Names. When there are more than six authors,
list only the first author’s name, followed by “et al.”
6. Same Author(s), Same Year. When different articles have the identical author(s) in the same year, give the year followed by “a,” “b,” etc.
7. Same Author(s), In Press. When different in-press articles have identical author(s), use “in press-a”, “in press-b”, etc., instead of the year.
8. Same Author(s), Different Articles. When citing two or more articles by the
same author(s) within parentheses, do not repeat the author name(s).
9. Different First Authors, Same Last Name. When two first authors have the
same last name, include their initials to clarify which one is being cited.
10. Multiple Authors, Same Year. When two or more articles have a subset of the
same authors in the same order, all citations must include as many author
names as necessary to make the citation unique. Note that the “al.” in “et
al.” is plural and therefore must replace at least two names.
11. Suppress Name Suffixes. Do not include the suffix of author names (e.g., “Jr.”)
when citing their work in the body of the text.
12. Capitalizing Initial Lower-Case Names. If the first word in a sentence is an
author name that begins with a lower-case letter (e.g., “de Waal”), capitalize
6
that name.
4.2
Results of Citation Tests
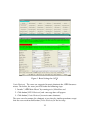
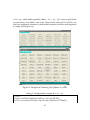
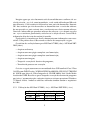
Table 1 presents the results of these citation tests. First it should be noted that
most of these packages handle basic citations very well. Only one of them passed
all 12 tests, but two others did very well. Additionally, not all failures in Table 1
are equally egregious; for example, the single biblatex-biber failure (Test #9b) will
never cause confusion as to which source is being cited.
Before we look at the results, I wish to applaud the developers of apacite and
biblatex-apa for responding to my initial citation results and modifying their
packages to better comply with 6th Edition requirements. There are now many
fewer failed tests in this series than there were when I first ran these tests with
then-current versions of these packages just a few months ago.
I summarize the results for each package next. No reviewer or journal editor
will comment on “the amazing accuracy of your citations”; but comments to the
opposite effect may end up in your Inbox. So unfortunately, we need to focus on
the non-compliance here rather than what each package does right.
4.2.1 apacite
I loaded the apacite package using the apacite option of the apa6 class, as follows:
\documentclass[jou,apacite]{apa6}
There were two apacite errors: (a) in Test #3, the references were not sorted
alphabetically within the parentheses; and (b) in Test #12, the prefix “De” was
not capitalized (because there is no capitalization command in apacite).
To overcome the failures of Test #3, one must manually sequence the parenthetical citations; this is entirely feasible but does require a certain level of alertness
on the part of the author. There is no cure for the failure of Test #12 without
adding on the natbib package (see next section).
4.2.2 apacite-natbib
I loaded both the apacite package and the natbib package implicitly using the
natbib option when calling the apa6 class: \documentclass[jou,natbib]{apa6}
7
Table 1: Citation test results
Test
Expected
Results
apacitea apacite-natbibb biblatexc biblatex-biberd
1
2
3
4a
4b
5
6a
6b
7
8
9a
9b
10a
10b
10c
11
12
Herbst-Damm and Kulik (2005)
(Herbst-Damm & Kulik, 2005)
(Haybron, 2008; Mayer, 2008a)
Lassen, Steele, and Sailor (2006)
Lassen et al. (2006)
Gilbert et al. (2004)
Mayer (2008a)
Mayer (2008b)
Mayer (in press-a, in press-b)
(Mayer, 2008a, 2008b)
J. R. Levin and O’Donnell (2000)
M. E. Levin and Levin (1990)
(Borst, Kosslyn, et al., 2011)
(Borst, Kievit, et al., 2011)
(Borst, Thompson, & Kosslyn, 2011)
Franklin and Adams (2010)
De Waal and Grosser (2009)
a apacite
Passed
Passed
Failed
Passed
Passed
Passed
Passed
Passed
Passed
Passed
Passed
Passed
Passed
Passed
Passed
Passed
Failed
Passed
Passed
Passed
Passed
Passed
Passed
Passed
Passed
Passed
Passed
Passed
Passed
Passed
Passed
Passed
Passed
Passed
Passed
Passed
Passed
Passed
Passed
Passed
Passed
Passed
Passed
Passed
Failed
Failed
Failed
Failed
Failed
Passed
Passed
Passed
Passed
Passed
Passed
Passed
Passed
Passed
Passed
Passed
Passed
Passed
Failed
Passed
Passed
Passed
Passed
Passed
b natbib version 8.31b (2010/09/13)
c biblatex version 1.7
version 6.01 (2012/02/25)
d
(2011/11/13), biblatex-apa version 4.6 (2012/02/08), BibTEX version 0.99d
biblatex version 1.7
(2011/11/13), biblatex-apa version 4.6 (2012/02/08), biber version 0.9 (2012/02/17)
8
There were no apacite-natbib errors, thanks to some clever programming by
the apacite developer. The natbib package does not contain a bibliographic style;
therefore, apacite is required when using natbib with apa6. The apa6 user simply
needs to specify the natbib option to load both of these packages properly.
4.2.3 biblatex with BibTEX
I loaded the biblatex package with the following options specified:
\usepackage[style=apa,sortcites=true,sorting=nyt]{biblatex}
There were five biblatex (with BibTEX) errors: (a) in Test #9a,the first author’s
initials were not given; this is a serious error, explicitly violating APA requirements because another author has the same surname; (b) in Test #9b, the same
problem occurred; (c–e) in Tests #10a, #10b, and #10c, the references were identified as “(Borst et al., 2011a),” “(Borst et al., 2011b),” and “(Borst et al., 2011c).”
Although the Test #10 results do not cause confusion in identifying the intended
source, this format does not conform to APA requirements.
4.2.4 biblatex with biber
I loaded the biblatex package and biber with the following options specified:
\usepackage[style=apa,sortcites=true,
sorting=nyt,backend=biber]{biblatex}
There was only one minor biblatex (with biber) error: In Test #9b, the second
author’s initials were given when they should have been omitted.
4.3
Conclusions from Citation Tests
For APA-style citations, the apacite-natbib and biblatex-biber solutions are clearly
the most competent; the only error was relatively minor and would never cause
confusion as to which source is being cited (unlike the biblatex-BibTEX errors).
Time for a personal admission: For several months after learning about biber I
was daunted by using it because for some reason I thought that once I converted
to biber I was more or less committing myself to it for life. However, that is not
so; to use biber, there are no changes required in the .bib file (although some
advantages can be gained from a few label changes). All it takes is including
9
the backend=biber option when loading the biblatex package. It could hardly be
simpler!
4.4
Reference Tests
The in-text citations are only part of the battle; formatting the reference list correctly is the other critical test for a bibliography package. I checked the reference
list output from each package against 6th Edition requirements and found no errors that could not have been predicted by the results of the citation tests already
described.
4.4.1 apacite
The apacite package produced a perfect reference list for my sample sources.
4.4.2 apacite-natbib
The apacite-natbib solution also had no errors in the reference list.
4.4.3 biblatex with BibTEX
Strangely, biblatex (with BibTEX) erred in sorting two of the references: Borst,
Kosslyn, et al., 2011 was listed prior to Borst, Kievit, et al., 2011. I don’t have
a clue as to why this would be; I even tried switching the BibTEX keys but the
sorting remained unchanged.
Additionally there is the problem of the three Borst references having “a,”
“b,” and “c” (respectively) appended to their publication dates. This violates
APA guidelines because the author lists for these three references are unique.
4.4.4 biblatex with biber
The biblatex-biber package also produced a perfect reference list.
4.4.5
Attention to the Details
To conclude, let’s show off a 6th Edition formatting requirement that all four of
these bibliography solutions are now capable of producing. D. Gilbert and eight
10
other individuals published an article in 2004. Check out the reference below and
you will see that the first six authors are listed, followed by an ellipsis, followed
by the final author. This way of handling more than six authors in the reference
list is a new stipulation in the 6th Edition.
Gilbert, D., McClernon, J., Rabinovich, N., Sugai, C., Plath, L., Asgaard, G., ... Botros,
N. (2004). Effects of quitting smoking on EEG activation and attention last
for more than 31 days and are more severe with stress, dependence, DRD2
A1 allele, and depressive traits. Nicotine & Tobacco Research, 6(2), 249–267.
doi:10.1080/14622200410001676305
4.5
EndNote® Results
For comparison with a leading commercial bibliographic manager, I also subjected the latest version of EndNote® (X5.0.1) to each of these tests. EndNote
failed citation tests #10c (substituting “et al.” in place of only one author name,
the same error as biblatex) and #12 (with no capitalization available for a lowercase name, the same flaw as apacite). There were no errors on the reference list.
5
Converting Documents from LATEX to Word®
There are many recommendations online regarding how to solve the problem
of submitting a LATEX document to a journal that requires submissions to be in
Word® format. The most common recommendation is to convert from LATEX to
HTML and then open the HTML file in Word. Various open-source converters are
available, such as htlatex, tth, and others; see http://www.tug.org/utilities/
texconv/textopc.html for a good listing of available programs.
An HTML-converter solution is quite unsatisfactory for APA style, however,
because such converters cannot precisely maintain page formatting (e.g., title
page, abstract page, etc.).
After much searching and experimenting, I found the TeX2Word™ software
(http://www.chikrii.com/products/tex2word/) from Chikrii Softlab to be an excellent conversion utility. It is commercial software but has a free 30-day trial
period available. TeX2Word allows customized conversion of documents from
LATEX to Word format (Microsoft Windows® only). Although TeX2Word does
11
not utilize a TEX distribution in its conversion (and thus cannot access the apa6
class directly), it has extensive customization capabilities that allow one to specify the formatting of section headings and other aspects of the resulting Word
document. These customizations are contained in files with a .ptex extension.
I have written the apa6.ptex file that facilitates conversion of apa6 documents
and have included it with the apa6 class, available from CTAN. Conversion from
LATEX to Word with the apa6.ptex file properly formats section headings, the
title page, abstract page, double-spacing, any boldfaced and italicized text (e.g.,
statistical results), and table and figure captions. Some editing must be done by
hand, such as inserting figures and moving tables from their in-text positions to
separate pages at the end of the document. After the conversion is complete, the
user will see some final editing directions on the title page of the Word document.
My biggest disappointment with TeX2Word is its current inability to competently
handle bibliographic information. See the apa6 documentation for more details.
Overall, TeX2Word is relatively painless to use, and in my opinion it should
be the first choice for anyone wishing to convert an apa6 document to Word.
References
American Psychological Association. (2009). Publication manual of the American Psychological Association. Washington, DC: American Psychological Assocation.
R Development Core Team. (2011). R: A language and environment for statistical
computing. R Foundation for Statistical Computing. Vienna, Austria.
Zahn, I. (2008). Learning to Sweave in APA style. The PracTEX Journal, 2008(1).
12
Search
(courtesy of Google)
The online journal of the
TeX Users Group
ISSN 1556-6994
Table of Contents
Dimitrios Ververidis, Daniel Schneider, and Joachim Köhler
Article PDF
Article source
Comment on this article
General information
Submit an item
Download style files
Copyright
Contact us
About RSS feeds
Back issues
Author index
Title index
BibTeX bibliography
Next issue
Spring 2013
Editorial board
Lance Carnes, editor
Kaja Christiansen
Peter Flom
Hans Hagen
Robin Laakso
Tristan Miller
Tim Null
Arthur Ogawa
Steve Peter
Yuri Robbers
Will Robertson
[Published 2012-10-22]
The Vocal Tract LaTeX Package
About The PracTeX
Journal
Archives of The PracTeX
Journal
Issue 2012, Number 1
Abstract: VocalTract.sty is a package to visualize the vocal tract. Vocal tract is manipulated by a vector of
articulation parameters according to S. Maeda model. Animation can be achieved by providing a sequence of
vectors over time, e.g. from Matlab©. An embedded sequence of vectors in the VocalTract.sty for certain
German phonemes allows for a sequence of phonemes animation when no vector is available.
Dimitrios Ververidis graduated from the Department of Mathematics of the Aristotle University of
Thessaloniki in Greece in 2001. He continued his studies at the School of Medicine of the same University
until 2003, where he obtained the M.Sc. in Medical Informatics. In 2008, he earned a Ph.D. in Informatics with
a thesis entitled Digital Processing Techniques in Speech Emotion Recognition, also at the Computer
Science faculty of the same University. In 2009, he was with VTT Technical Research Center of Finland. In
2010–2011, he was with IAIS Fraunhofer Institute in Bonn, Germany. He has been a LaTex and PSTricks
user since 2003. He has used LaTeX for writing his publications, PSTricks for drawing figures and plotting
mathematics, and beamer for presenting publications. The Vocal Tract LaTeX package can be fully
downloaded from CTAN at [1] . You can reach Dimitrios at [2] or jimver04 at gmail dot com.
Other key people
More key people wanted
Sponsors:
Web site Generated October 22, 2012 (wiki); TUG home page; search; contact webmaster.
Be a sponsor!
The PracTEX Journal, 2012, No. 1
Article revision 2012/2/17
The vocal tract LATEX package
Dimitrios Ververidis, Daniel Schneider, and Joachim Köhler
Email [email protected]; [email protected]
Website dimitriosververidis.blogspot.com;
Address Fraunhofer Institute for Intelligent Analysis & Information Systems
(IAIS), St. Augustin, Germany
Abstract VocalTract.sty is a package to visualize the vocal tract. Vocal tract is
manipulated by a vector of articulation parameters according to S. Maeda
model. Animation can be achieved by providing a sequence of vectors
over time, e.g. from Matlab® . An embedded sequence of vectors in the
VocalTract.sty for certain German phonemes allows for a sequence of
phonemes animation when no vector is available.
1
Introduction
The package provided is a vocal tract visualization tool to be used in speech research. The LATEX/PSTricks engine used provides non-aliazed vocal tract images
in postscript or portable document format (PDF) suitable for manuscripts. The
package is also loaded through the VTCalcs software, a software for simulating
vocal tract in Matlab® [4].
The vocal tract is manipulated with a vector of variables that vary over time.
These are denoted as articulatory model (AM) parameters. The certain 10 AM
parameters used here were proposed in [8, 9], where the number of variables
related to the tongue was minimized by using factor analysis on vocal tract x-ray
animations. The first simulation of the vocal tract was written in Fortran and
could solve the differential equations for the voice to vocal tract and the inverse
problem [8]. Faster implementations in C++ and Matlab® appeared [4]. Later, the
model was augmented to provide control for the vocal chords tension [5]. In our
work, the breathing is also simulated by an additional parameter. We consider
that the provided package will enhance the vocal tract drawings to appear in
manuscripts and help to understand the origins of speech production.
D. Ververidis work was carried out during the tenure of an ERCIM fellowship;
The outline of this manuscript is as follows. A study about the phonemes of
the German language and their respective vocal tract set up using our package
is shown in Section 2. Details about how to use the the vocal tract package are
described in Section 3. Future work is discussed in Section 4.
2
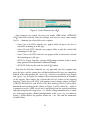
German phonemes categorization
German language phonemes are categorized into vowels, unvoiced consonants,
and voiced consonants according to the oscillation source, that is glottal, contrived or both types, respectively. Vowels are presented in Figure 1(a) and are
produced with glottis oscillation. The alphabet used is the speech assessment
methods phonetic alphabet (SAMPA) that is widely used in computer science [15].
Unvoiced consonants are shown in Figure 1(b) and are generated from the oscillation (due to turbulence) of a constriction formed by a part of the oral cavity
with the tongue. Voiced consonants depicted in Figure 1(c) are generated by both
sources of oscillation. Apart from the 26 German phonemes shown here, the phoneticians recognize 18 to 20 other phonemes [3]. In our work we assumed that
the additional phonemes combine the 26 basic phonemes, i.e. the affricative ‘ts’
for the word ‘Zahl’ (tsa:l) can be considered as a sequence of the plosive ‘t’ and
the fricative ‘s’.
Vowels are separated into front, central and back depending on the position of
the tongue; Rounded and unrounded depending on the shape of the lips; Close
to open depending on the distance between the tongue and the ceiling. Unvoiced
consonants are classified depending on which part of the oral cavity is coupled
with the tongue to provide an oscillation source into 4 categories, namely: bilabial,
labio-dental, alveolar, and velar. They can be also categorized into plosives and
frivatives depending on the amount of pressure accumulated before pronunciation, i.e. high pressure for plosives and low for fricatives. The voiced consonants
are classified according to the tongue position and the lips aperture into bilabial,
labiodental, alveolar, palatal, velar and uvular. Special cases are the ‘r’ that is
pronounced with a movement of the tongue from palatal to alveolar position and
‘l’ that is generated with air escape from the sides of the tongue when the latter
is raised [3, 9].
The sequence of the certain 26 vectors of 10 parameters each is embedded in
the style file, so that visualization is possible when no vectors are available. The
2
1
3
2
Vowels
1.Tongue-Ceiling
section width
3.Lips
Front
Close
U
R
Close-mid
Open-Mid
Near-Open
Open
U
R
U
U
R
2.Tongue-Pos.
i
y(ü)
•
e
2(ö)
E(ä)
Central
@(Scwa)
•
a
Back
u
•
o
1.Vocal
tract set up
Unvoiced
UPlosives
Bilabial
Labiodental
Alveolar
Velar
2. Pressure
accumulation
p
Yes
t
k
UFricatives
f
No
s
x
1.Vocal tract set
up
VConsonants
VPlosives
Bilabial
Labiodental
Alveolar
Palatal
Velar
Uvular
2. Pressure
Accumulation
3. Nasal
Cavity
Port
4.
Lateral
Tongue
airway
b
d
No
Yes
g
Rolled
Lateral
Approximants
←r←
Closed Yes
l
R
j
VFricatives
No
v
No
z
Nasals
Open
m
n
Figure 1: German phonemes categorization into (a) Vowels (b) Unvoiced
consonants. (c) Voiced consonants. Legend: U=Unrounded; R=Rounded;
Pos.=Position.
3
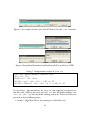
breathing parameter is set as 0.5 for normal breathing (0.1 for short and slow
breath to 0.9 for deep and fast breath). The output is the animation of Figure 2.
The red space corresponds to the pressure accumulated for generating plosive
phonemes.
3
Installation and examples
VocalTract.sty can be downloaded from [13]. In order to be compiled, a LATEX2e
package [7], such as Miktex for Windows [10] and TexLive for Linux [12] must
be already installed. The following PSTricks packages have been included in the
preample of the style file: pstricks, pst-coil for drawing lines and patches;
arrayjob, ifthen, fp, fltpoint for algebraic operations among variables; and
multimedia, multido, animate for rendering animations [14].
In Figure 3, a logic diagram of scripts to call the package either from LATEX or
Matlab® is depicted. ‘vtLatex_FigureDemo.tex’ produces a visualization of the
vocal tract in DVI, PS, or PDF format. ‘vtLatex_AnimationDemo.tex’ produces a
i
b
b
10
b
b
b b
b
bb
b b
b
b
b
b
b b
b
b
b
b
b
b
b
b b b b
bb b
b b bb b
b
b b
b
4
56
23
1
7,8,9
1. JW: Jaw Position = 0.5
2. TP: Tongue Position = -2
3. TS: Tongue Shape = 1
4. TA: Tongue Apex = -2
5. LA: Lips Aperture = 1
6. LP: Lips Protrusion = -1
7. LH: Larynx Heigh = 0
8. GA: Glottis Aperture= 0
9. FX: Fund. Frequency = 3
10. NS: Nasal Cavity = 0
b
b
b
b
Figure 2: Vocal tract system for the vowel ‘i’. Left: using sp-lines; Right: using
lines only.
4
vtLatex FigureDemo.tex
Latex user
vtLatex AnimationDemo.tex
VocalTract.sty
vtMAINVisual.m
vtLatex FigureLauncher.tex
vtQueryVisual.m
vtLatex AnimationLauncher.tex
Matlab user
vtLatex TimeParams.tex
(Optional)
Figure 3: Functions that generate figures or animation. Two functions named as
Launchers are responsible for connecting Matlab® functions with LATEX engine.
sequence of ordered visualizations of the vocal tract in a PDF animation object.
Figure 2 presents the compilation result of ‘vtLatex_AnimationDemo.tex’ as it
follows:
%======= Vocal Tract Animation Demo =======
\documentclass{article}\pagestyle{empty}
\usepackage{VocalTract}
%\input{vtLatex_TimeParams} % AM Parameters (if commented, use the embedded
%
vectors in the Style file)
\begin{document}
\def\BreathType{0.5} % Normal Breathing [slow:0.1 to fast:0.9]
\begin{animateinline}[poster=first,loop,controls]{1}%
\multiframe{\Nframes}{IndexStepVocalTract=0+1}{% Nframes defined in
%
vtLatexTimeParams.tex
\begin{pspicture}(0,-0.5)(6,8)
\SetOscAmp{\IndexStepVocalTract}{\BreathType} % Sinusoid generator for breathing
\UpdateVocalTract{\IndexStepVocalTract} % in the respective time
\VocalChords
% Show VCords
\StomachCompartment
% Show Stomach Compartment
\rput(1.75,7){\ShowPhonemesGerman{\IndexStepVocalTract}} % Transcriptions
\ShowPressure{\IndexStepVocalTract} % Show Pressure as Red Space
\rput(2,0){\ShowLinearTubes{\IndexStepVocalTract}\VocalChords} % The linear
%
model next to the human
\rput(2.5,0){\ShowParameters} % Explain the parameters
\end{pspicture}}% Multiframe
\end{animateinline}
\end{document}
5
In order to produce an animation for a certain word, e.g. ‘satz’, the ‘vtLatex_AnimationDemo.tex’ should be compiled and the third line should be uncommented. In the end, the ‘VocalTract_TimeParams.tex’ should be:
%============== VocalTract_TimeParams.tex ==================
\newarray\SpeakVec
\readarray{SpeakVec}{%
%%========================================================================================
%% 1. Jaw Position
4. Tongue Apex
7. Larynx Height
10. Nasal Cavity
%% 2. Tongue Position 5. Lip Aperture
8. Glottal Aperture
11. Phoneme Label
%%
3. Tongue Shape
6. Lip Protrusion 9. Glottal Frequency
%%========================================================================================
%% 1
2
3
4
5
6
7
8
9
10
11
%% JW
TP
TS
TA
LA
LP
LH
GA
FX
NS
%% 3
3
3
3
3
3
3
3
3
3
Max
%% 0
0
0
0
0
0
0
0
0
0
Relax
%% -3
3
-3
-3
-3
-3
-3
-3
-3
-3
Min
%%========================================================================================
2.5 & 0
& 0
& 0.4 & 0 & 0
& 0 & -1 & 0 & 0 &z& % 24
-1.5
& 2.5 & 0
&-0.5
& 0.5& -0.5 & 0 & 0 & 0 & 0 &a& % 7
0
& -0.5 &-1
& 2.3 & 0 & 0
& 0 &-3 & -3 & -3 &t& % 11
2.5 & 0
& 0
& 0.4 & 0 & 0
& 0 &-3 & -3 & -3 &s& % 14
\dataheight=11
}
\dataheight=11
\def\Nframes{5}
‘vtMAINVisual.m’ is a Matlab® function designed as a plug-in function for the
VTCalcs package [4]. It can be fed with Maeda’s articulatory parameters to visualize the vocal tract in DVI, PS or PDF. The ‘vtQueryVisual.m’ provides a PDF animation from Matlab® command line when a sequence of phonemes from the set
of the phonemes described in Section 2 is given, e.g. » vtQueryVisual("zats")
stands for the visualzation of word ‘satz’.
4
Future work
A method to depict the vocal tract using the LATEX and the PSTricks engine was
presented. Although the functionality of the method is high, several issues should
be addressed in the future, namely:
– The shape of the curves generated by sp-lines in PSTricks to connect nodes
are erroneously estimated among several postscript zoom levels. That is a
curve is not the same at 100% zoom level compared with 200% zoom level.
6
It might happen due to the different step size in sp-line estimation through
zoom levels.
– Audio should be included in PDF animations. Phonemes can be synthesized
with VTCalcs [4];
– The floating point operations should be faster in order to improve compilation speed which is now 1 second per frame;
– The 2D model should become 3D model as in [1, 2] and [6];
– The set of 26 German phonemes should be augmented to include phonemes
from other languages;
– Functions to call the package from Python language [11] or C should be
written.
Acknowledgment
We would like to thank Prof. Mark Huckvale for his offer to provide code and
to explain the S. Maeda model. We would like to thank also Prof. Francisco
Reinaldo for the useful comments on the paper.
References
[1] P. Birkholz, D. Jackél, and K.J. Kroger. Construction and control of a threedimensional vocal tract model. In Proc. IEEE Intern. Conf. Acoustics, Speech
and Signal Processing (ICASSP), 2006.
[2] J. Dang and K. Honda. Estimation of vocal tract shapes from speech sounds
with a physiological articulatory model. J. Phonetics, 30(3):511–532, 2002.
[3] K.
Duden.
The
Phonetic
Dictionary.
Mannheim/Leipzig/Wien/Zürich, 2005.
Dudenverlag:
[4] S. Ghosh. VTCalcs for Matlab: http://www.cns.bu.edu/~speech/VTCalcs.php,
2000.
7
[5] M. Huckvale. VTDemo: Vocal Tract Acoustics Demonstrator. Web site:
http://www.phon.ucl.ac.uk/resource/vtdemo/, 2005.
[6] H. Kjellström and O. Engwall. Audiovisual-to-articulatory inversion. Speech
Communication, 51(3):195 – 209, 2009.
[7] D. E. Knuth. Computers & Typesetting. Addison-Wesley Reading, MA, 1986.
[8] S. Maeda. A digital simulation method of the vocal-tract system. Speech
Communication, 1(3-4):199 – 229, 1982.
[9] S. Maeda. Compensatory articulation during speech: Evidence from the analysis and synthesis of vocal tract shapes using an articulatory model. In W. J.
Hardcastle and A. Marchal, editors, Speech Production and Speech Modelling,
pages 131–149. Kluwer Academic Publisher, Boston, 1990.
[10] Miktex. Project page: http://miktex.org, 2010.
[11] Python Software Foundation. Python Programming Language, Official Website: http://www.python.org, 1990.
[12] TexLive. Tex users group web site: http://www.tug.org, 2010.
[13] D. Ververidis. Blog page. dimitriosververidis.blogspot.com, 2011.
[14] H. Voß. PSTricks: Grafik für TEX und LATEX. Lehmanns Fachbuchh., 2007.
[15] J. C. Wells. SAMPA computer readable phonetic alphabet. In D. Gibbon,
R. Moore, and R. Winski, editors, Handbook of Standards and Resources for Spoken Language Systems, volume 4B. Berlin and New York: Mouton de Gruyter,
1989.
8
Search
(courtesy of Google)
The online journal of the
TeX Users Group
ISSN 1556-6994
About The PracTeX
Journal
Table of Contents
Back issues
Author index
Title index
BibTeX bibliography
Next issue
Spring 2013
Editorial board
Lance Carnes, editor
[Published 2012-10-22]
Writing Posters with Beamerposter Package in LaTeX
Han Lin Shang
Article PDF
Article source
Comment on this article
General information
Submit an item
Download style files
Copyright
Contact us
About RSS feeds
Archives of The PracTeX
Journal
Issue 2012, Number 1
Abstract: The beamerposter package in LaTeX is an excellent tool for the creation of posters. There are
several options available using the beamerposter package, when writing a poster in LaTeX. Here, I would like
to present some of these options associated with the beamerposter package. I shall introduce the basics and
some useful companion packages that make a poster look neat and nice.
Han Lin Shang is a postdoctoral research fellow at the Department of Econometrics & Business Statistics,
Monash University, Melbourne, Australia. He has published research papers in the areas of functional data
analysis and Bayesian computation in statistics. TeX has been his hobby and favourite tool for text editing.
Contact him at HanLin dot Shang at monash dot edu or http://monashforecasting.com/index.php?
title=User:Han .
Kaja Christiansen
Peter Flom
Hans Hagen
Robin Laakso
Tristan Miller
Tim Null
Arthur Ogawa
Steve Peter
Yuri Robbers
Will Robertson
Other key people
More key people wanted
Sponsors:
Web site Generated October 22, 2012 (wiki); TUG home page; search; contact webmaster.
Be a sponsor!
The PracTEX Journal, 2012, No. 1
Article revision 2012/06/25
Writing posters with beamerposter package in LATEX
Han Lin Shang
Department of Econometrics & Business Statistics,
Monash University, Melbourne, VIC 3145, Australia
Email
Abstract
1
1.1
[email protected]
The beamerposter package in LATEX is an excellent tool for the creation of posters.
There are several options available using the beamerposter package, when writing
a poster in LATEX. Here, I would like to present some of these options associated
with the beamerposter package. I shall introduce the basics and some useful
companion packages that make a poster look neat and nice.
The beamerposter package
Learning the basics
The beamerposter package [3] has been developed by Philippe Dreuw and Thomas Deselaers, which allows to write poster presentations in various font sizes in a straightforward manner. As shown in Table 1, the package on CTAN is composed of the following
files:
beamerposter.sty
beamerposter.tex
beamerposter.pdf
example.tex
Define the font sizes
Manual in English
Compiled manual in English
Example of a poster created by the package
Table 1: Content in the beamerposter package.
The beamerposter package allows you to define a poster of sizes from A0 to A4. In
particular, it also allows you to benefit from the nice color box handling and alignment
in the beamer class to create nice posters.
The beamerposter package is an extension of the LATEX beamer [2] and a0poster [1]
classes. It has the advantages of both classes. On the one hand, the beamer class is
considered as the standard class for presentation and offers a great variety of beamer
themes; on the other hand, a0poster class allows a poster in either landscape or portrait
orientation and offers great flexibility in font size and font style.
Beamerposter is a package used within the class of beamer. Therefore, the beginning of
a LATEX file would be something like
\documentclass{beamer}
\usepackage[orientation=portrait, size=a0, scale=1.4]{beamerposter}
\begin{document}
Write something here
\end{document}
Within the document, you can write the content of your poster, as you would write
for any other documents in LATEX. If you prefer your poster to be in the landscape
orientation, then simply replace the option portrait with landscape.
All that remains to be done is to compile your document in the usual way using
A
L TEX’s PDFTeXify, dvips and dvipdf, as described in Table 2.
PDFTeXify your_doc.tex
dvips
your_doc.tex
dvipdf
your_doc.tex
Table 2: Various ways of compiling a LATEX file.
1.2
Structuring the poster
With the help of textpos package [4], you can easily divide a poster into different columns
and sections. The package textpos facilitates placing boxes at relative or absolute position
at the LATEX page. As pointed out by Norman Gray (the creator of the textpos package),
the main reason for creating textpos package is to help produce a large format conference
poster. We can load this package as usual with \usepackage[absolute,overlay]{textpos}
in the preamble.
The textpos package works in two modes, namely relative and absolute. In the relative
mode, the block positioning coordinates in the textblock environment are taken to be
relative to an ‘anchor point’, which is the current position. It follows by other blocks
that may locate above or below. However, if the entire environment is to be laid out
individually, then the absolute mode should be used, where the anchor point is the fixed
top left corner of the page. When using the absolute position mode, the textblocks are
placed under any other text on the page (imagine purple color background). The option
overlay allows the positioned blocks of text overlay any other page content.
2
As a main function of the textpos package, the syntax of the textblock environment
is described as follows
\begin{textblock}{<hsize>}{<hpos>,<vpos>}
Write something here
\end{textblock}
The <hsize> and <hpos> are arguments given in units of a module \TPHorizModule,and
<vpos> is given in units of a module \TPVertModule.These parameters can be set by
\setlength{\TPHorizModule}{<dimen>} and for \TPVertModule as well. Customarily,
<dimen> is set to be 1cm. <hsize> is a whole or fraction number that controls the size of
textblock, <hpos> and <vpos> are two whole or fraction numbers that jointly determine
the horizontal and vertical positions.
Within the textblock, you may divide the page into several columns and create
different sections with
\begin{block}{Title of section}
Write something here
\end{block}
Although this could be done using package multicol or minipage environment, I prefer
to use the block environment instead, as this is more versatile. The block environment
allows to include a block inside your poster. Unlike the minipage environment, the
block environment does not require to specify a given length and width of block, since
these information are specified through the textblock environment. So, to write two
blocks in the same column, the following code
\begin{block}{Title of block 1}
First block
\end{block}
\begin{block}{Title of block 2}
Second block
\end{block}
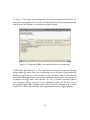
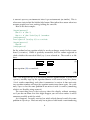
produces Figure 1.
Figure 1: An illustration of writing two blocks with full page width.
3
Of course, you can also define the block environment within the textblock environment. For instance, one would like to produce two column posters; and within each
column, there are a number of blocks. The following code
\begin{textblock}{30}(0.1,1.6)
\begin{block}{Title of block 1}
First block
\end{block}
\begin{block}{Title of block 2}
Second block
\end{block}
\end{textblock}
\begin{textblock}{30}(30.1,1.6)
\begin{block}{Title of block 3}
Third block
\end{block}
\begin{block}{Title of block 4}
Fourth block
\end{block}
\end{textblock}
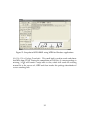
produces Figure 2.
Figure 2: An illustration of writing two blocks with two columns.
For instance, you can include a textblock environment with another textblock environment, so that the possibilities are enormous. For example, the following code
\begin{textblock}{60}(0.1,1.65)
\begin{block}{Title of block 1}
Let $\mathbf{y}$ and $\mathbf{x}$ be the response and predictor
vectors, whose observations are denoted as $y_i$ and
$\mathbf{x}_i$. The nonparametric regression model is $\dots$
\end{block}
\end{textblock}
\begin{textblock}{30}(0.1,9.25)
4
\begin{block}{Title of block 1}
Let $\mathbf{y}$ and $\mathbf{x}$ be the response and predictor
vectors, whose observations are denoted as $y_i$ and
$\mathbf{x}_i$. The nonparametric regression model is $\dots$
\end{block}
\end{textblock}
\begin{textblock}{16}(0.1,20.2)
\begin{block}{Title of block 1}
Let $\mathbf{y}$ and $\mathbf{x}$ be the response and predictor
vectors, whose observations are denoted as $y_i$ and
$\mathbf{x}_i$. The nonparametric regression model is $\dots$
\end{block}
\end{textblock}
produces Figure 3.
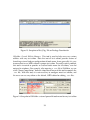
Figure 3: An illustration of one textblock environment within another textblock environment using the beamer theme of Frankfurt.
With the tools of textblock and block, we are now in position to create a poster
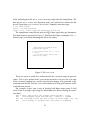
using the beamerposter package. Figure 4 provides a simple illustration. The source code
for producing Figure 4 can be obtained upon requested from the author.
5
Bayesian
bandwidth
for340nonparametric
regression
mm 40 60 80 100
120 140 160 180 200estimation
220 240 260 280 300 320
360 380 400 420 440 460 480 500
520 540 560 580
model
with
an
unknown
error
density
40
60
Nonparametric
regression setting
80
Author A, Author B, Author C∗
Sampling algorithm
Let
100y and x be the response and predictor vectors, whose
observations are denoted as yi and xi . The nonparametric
120
regression model is
140
yi = m(xi ) + i , i = 1, 2, . . . , n
160 is assumed to be i.i.d. with an unknown density
where
A MCMC algorithm, such as random-walk Metropolis, is
used to sample h and b. The ergodic averages of the
sample values of {(h(i), b i ), i = 1, . . . , 10, 000} are used as
the estimates of h and b.
Simulation
i
180 by f (). It is assumed that cor (i , xi ) = 0.
denoted
0
200
Nadaraya-Watson kernel estimator
220
The unknown m(xi ) is estimated by the Nadaraya-Watson
240
(NW) kernel estimator
260
n
1
X
K ( x−xi )
wi (x)yi , wi (x) = Pnh 1 h x−xi .
280m̂(xi ; h) =
i=1 h K ( h )
i=1
300 K (·) is a kernel function, and the bandwidth vector h
where
is320
treated as a parameter. The NW estimator m̂(xi ; h)
includes
340 an undesirable term, K (0)/h. Therefore, we use the
leave-one-out NW kernel estimator,
P
x −x
360
(n − 1)−1 nj=1;j6=i h1 K ( i h j )yj
m̂i (xi ; h) =
P
x −x ,
n
380
(n − 1)−1 j=1;j6=i h1 K ( i h j )
400
Estimation
of an unknown error density
420
440propose to approximate f ( ) by a kernel density given by
We
i
n
460
X
1
1 ˆi − ˆj
fˆ(i ; b) =
K(
),
480
n−1
b
b
j=1;j6=i
500 b is the bandwidth. Efromovich (2005) justified that
where
residuals
are proxies of errors.
520
540
Likelihood
560
0
The likelihood of y given (h, b) is approximated by
580
n
n
Y
1 X 1 ˆi − ˆj
600 L(y|h, b) =
K(
)
n − 1
b
b
i=1
j=1;j6=i
620
720
π(hi ) =
1
,
π(1 + hi2)
π(b) =
The following table presents the parameters estimated by
the Bayesian algorithms with the assumptions of unknown,
Student t and Gaussian error densities.
Error
Parameter Estimate 95% Bayesian
SIF
density
credible intervals
Unknown b
0.2387 (0.1691, 0.3187) 5.64
h1
0.0874 (0.0693, 0.1070) 21.41
h2
0.0594 (0.0339, 0.0879) 30.54
h3
0.2008 (0.1611, 0.2481) 13.24
LML
-1444.19
Student t ν
10.0169 (7.1201, 14.0821) 6.66
h1
0.0827 (0.0622, 0.1048) 8.86
h2
0.0701 (0.0401, 0.0989) 12.69
h3
0.1908 (0.1448, 0.2459) 9.81
LML
-1457.07
Gaussian σ
1.0523 (1.0109, 1.0983) 1.16
h1
0.0773 (0.0544, 0.0924) 14.49
h2
0.0797 (0.0572, 0.1121) 17.36
h3
0.1879 (0.1438, 0.2333) 16.21
LML
-1485.72
Note: LML refers to log marginal likelihood, and SIF refers to
simulation inefficient factor.
640
Prior
660
Let π(h) and π(b) denote the priors of h and b, which are
680
assumed
to follow a Cauchy distribution
700
Consider the relationship between y and x = (x1, x2, x3)
given by
2x3,i
yi = sin(2πx1,i ) + 4(1 − x2,i )(1 + x2,i ) +
2 + i ,
1 + 0.8x3,i
for i = 1, 2, . . . , 1000. A sample was generated by drawing
x1i , x2i , x3i independently from U(0, 1), and i from the
mixture of two Gaussian densities defined as
0.7N(0, 0.72) + 0.3N(0, 1.52).
Conclusion
Based on Bayes factors, the Bayesian algorithm with an
unknown error density performs better than the wrongly
specified error distributions, although it performs slightly
worse than the correctly specified error distributions in
other simulations.
1
.
π(1 + b 2)
740
Posterior
760
0
0
The posterior of (h , b) is approximated as (up to a
780
normalising constant)
800
π(h, b|y) ∝ π(h)π(b)L(y|h, b).
Reference
Efromovich, S. (2005), ‘Estimation of the density of
regression errors’, The Annals of Statistics, 33(5),
2194-2227.
820
∗
Contact Author C@edu for the draft
Figure 4: An illustration of a poster produced by the beamerposter package using the
beamer theme of Frankfurt.
6
1.3
Adding color
Previous section should allow you to obtain a structure of your poster, but you may like
to add some color to the poster. This can be achieved in beamerposter package, because
you can define any color using the rgb scale, just put \definecolor{colorname}{rgb}{r,g,b}
in the preamble. The r,g,b are numbers within 0 and 1, they express the amount of red,
green and blue you add to create each color. For example, \definecolor{lightpurple}
{rgb}{0.8,0.3,0.7}.You can now obtain any word in color by typing any word. Colors
can also be defined by other scales, such as gray scale.
You may also want to consider packages color and xcolor which provide access to
several kinds of colors, tints, shades, tones of arbitrary colors.
1.4
Obtaining smaller or larger size posters
The option scale=number for making posters from A0 to A4 is easily accessible in the
beamerposter package. Thus, you can always rescale the poster to smaller or larger page
size. For completeness, Table 3 lists different page sizes from A0 to A4. For different
page sizes, you may have to re-position the textblock coordinates accordingly.
A0
A1
A2
A3
A4
w(in)
33.07
23.39
16.54
11.69
8.26
h(in)
46.77
33.07
23.39
16.53
11.69
w(mm)
840
594
420
297
210
h(mm)
1188
840
594
420
297
w(ft)
2.76
1.95
1.38
0.97
0.69
h(ft)
3.90
2.76
1.95
1.38
0.97
Table 3: Width and height of different page sizes.
2 Beamer themes
Beamer class supports the concept of a theme, with which you can alter the appearance
of your poster, such as the color of block. It is this feature that truly separates the
beamerposter package from the a0poster class. Possible beamer themes are listed in alphabetical order: AnnArbor, Antibes, Bergen, Berkeley, Berlin, Boadilla, CambridgeUS,
Copenhagen, Darmstadt, default, Dresden, Frankfurt, Goettingen, Hannover, Ilmenau,
JuanLesPins, Luebeck, Madrid, Malmoe, Marburg, Montpellier, PaloAlto, Pittsburgh,
Rochester, Singapore, Szeged, Warsaw.
While the code for producing Figure 3 uses the beamer theme of Frankfurt, an example
of blocks created by \usetheme{Singapore} is exhibited in Figure 5.
7
Figure 5: An illustration of one textblock environment within another textblock environment using the beamer theme of Singapore.
3
Conclusion
We have now seen some of the options offered by the beamerposter package for writing a
poster presentation in LATEX. It is an extension of the beamer class and a0poster class. An
introduction of a0poster class can be found in [5]. However, it is highly recommended
to use the beamerposter package with the textpos package as a way of locating different
blocks of texts. The orientation of a poster can be portrait or landscape, font size can
easily be scaled up or down, and best of all, the beamer themes can easily be adopted
into a poster created by the beamerposter package.
References
[1] The a0poster class and manual.
http://www.ctan.org/tex-archive/macros/latex/contrib/a0poster/
[2] The beamer class.
http://www.ctan.org/tex-archive/macros/latex/contrib/beamer/
[3] The beamerposter package.
http://www.ctan.org/tex-archive/macros/latex/contrib/beamerposter
[4] The textpos package.
http://www.ctan.org/tex-archive/macros/latex/contrib/textpos/
[5] T. Morales de Luna (2008) Writing posters in LATEX, The PracTex Journal, No. 3.
http://www.tug.org/pracjourn/2008-3/morales/
8
Search
(courtesy of Google)
The online journal of the
TeX Users Group
ISSN 1556-6994
Table of Contents
Jim Hefferon
Article PDF
Article source
Comment on this article
General information
Submit an item
Download style files
Copyright
Contact us
About RSS feeds
Back issues
Author index
Title index
BibTeX bibliography
Next issue
Spring 2013
[Published 2012-10-22]
Seeing Stars
About The PracTeX
Journal
Archives of The PracTeX
Journal
Issue 2012, Number 1
Abstract: MetaPost is a great tool for line art. We walk through creating a rate one-to-five graphic with it,
highlighting some of its advantages over a mouse-driven graphics tool..
Jim Hefferon is a frequent contributor to PracTeX. He teaches Mathematics at Saint Michael's College in
Colchester Vermont, USA. He runs http://az.ctan.org and has been using TeX and friends for twenty years,
including authoring two textbooks that are freely available with TeX source. You can reach him at jhefferon
at smcvt dot edu.
Editorial board
Lance Carnes, editor
Kaja Christiansen
Peter Flom
Hans Hagen
Robin Laakso
Tristan Miller
Tim Null
Arthur Ogawa
Steve Peter
Yuri Robbers
Will Robertson
Other key people
More key people wanted
Sponsors:
Web site Generated October 22, 2012 (wiki); TUG home page; search; contact webmaster.
Be a sponsor!
The PracTEX Journal, 2012, No. 1
Article revision 2012/06/25
Seeing Stars
Jim Hefferon
Many web sites let users rate content. On a site of mine, visitors can rate
things on a scale of 0 to 5 stars and then the page shows the overall rating.
This is probably not an integer. (It is not quite an average of all user ratings,
since averages are a problem when there are only a few votes, but it is close to an
average.) For instance, I may need to display 2.5 stars out of 5.
Cascading Style Sheets can do this. The idea is that I write a box with a
repeating background of stars in some muted color, with the width of the box
set to exactly the width of five stars. Over that I draw repeating stars in a more
distinctive color, with the width of this overlay box set to show the correct number
of stars. Here is the HTML.
< span class =" rating_bar " > < span style =" width :{{ rating }}%" > </ span > </ span >
Muted stars are drawn in the <span> with class rating_bar. Distinctively-colored
stars are drawn in the inside <span>. I use the Django web framework,1 and to
produce the above screenshot the {{rating}} is replaced by the number 50.0,
leaving style="width:50.0%".
Here is the CSS.
. rating_bar {
display : inline - block ;
width : 100 px ;
background : url (/ graph / star - grey . png ) 0 0 repeat - x ;
}
. rating_bar span {
display : inline - block ;
height : 20 px ;
background : url (/ graph / star - rust . png ) 0 0 repeat - x ;
}
1. www.djangoproject.org
The stars are the graphics /graph/star-grey.png and /graph/star-grey.png.
This is the problem. I cannot do art. I tried opening a drawing program and
making a muted star for a half hour before giving up, no closer than when I
began.
But there is a happy ending. METAPOST drew my stars.
A star is made
METAPOST
is a programming language for drawing graphics, especially twodimensional line art. It is closely related to METAFONT, the language in which
TEX’s original fonts were specified. METAPOST is not interactive, that is, it does
not entail drawing with the mouse and menus (good thing, because I cannot do
interactive). Instead, you make up an input file and run it through a compiler.
I started by sketching a star.
I told you that I cannot do art.
I started by labeling the points of interest. In the METAPOST source file below
they are called z1, z2, etc.
The stars, like rust
Here is the input file star.mp. I’ll go through part-by-part at the bottom.
2
% star . mp
%
% 2011 - Oct -29 Jim Hefferon j he ff er o n@ sm cv t . edu
outp uttemplat e := "% j -% c . mps ";
Written
numeric l i n e _ w i d t h _ li g h t ;
l i n e _ w i d t h _ li g h t :=0.4 pt ; % TeX ’ s rule width
color rust ;
rust =(171/255 ,50/255 ,41/255);
def draw_star ( expr c ) =
save width , height ;
numeric width , height ;
width =20 pt ; height = width ;
z0 =(.5 width ,.5 height );
% center
z1 =( x0 , height );
% top corner ; 12 oclock
z2 =(( z1 - z0 ) rotated (360/5))+ z0 ; % mid right corner
z3 =(( z1 - z0 ) rotated (2*360/5))+ z0 ; % bot right corner
z4 =(( z1 - z0 ) rotated (3*360/5))+ z0 ; % bot left corner
z5 =(( z1 - z0 ) rotated (4*360/5))+ z0 ; % mid left corner
z6 = whatever [ z1 , z3 ]= whatever [ z2 , z5 ]; % mid right of internal pentagon
z7 = whatever [ z1 , z3 ]= whatever [ z2 , z4 ]; % bot right of internal pentagon
z8 = whatever [ z2 , z4 ]= whatever [ z3 , z5 ]; % bot of internal pentagon
z9 = whatever [ z1 , z4 ]= whatever [ z3 , z5 ]; % bot left of internal pentagon
z10 = whatever [ z1 , z4 ]= whatever [ z2 , z5 ]; % mid left of internal pentagon
% Outline
path p ;
p = z1 - - z6 - - z2 - - z7 - - z3 - - z8 - - z4 - - z9 - - z5 - - z10 - - cycle ;
fill p withcolor c ;
pickup pencircle scaled l i n e _ wi d t h _ l i g h t ;
draw p ;
enddef ;
beginfig (0) % muted star
draw_star (.9[ black , white ]);
endfig ;
beginfig (4) % exciting star
draw_star ( rust );
endfig ;
end
A percent sign marks the rest of the line as a comment. The outputtemplate
line determines the name of the files that METAPOST outputs. Here, stars.mp
will output two files, named stars-0.mps and stars-4.mps because further down
in the file there are sections for beginfig(0) and beginfig(4) (I have other colors
in my file but I’ve cut them out for this discussion).
Next I give a width for lines, and I define a color. One of the colors for my
site I named rust. Its RGB specification is (171, 50, 41). It is what I used for the
3
distinctively-colored stars in the screenshot from the start of this article.
Then comes the main work. As I described above, I will draw two same-sized
stars in different colors, so I defined a single section of code to draw a star and
I’ll call that code once with a gray color and once with rust.
That draw_star code starts by defining the five points z1 through z5, by making the first at the top and then rotating for the other four. No artistic eye required.
Making the interior points z6 through z10 is where we get a peek at METAPOST’s powers. It will find intersections. For instance, to find z6 it intersects the
line from z1 to z3 with the line from z2 to z5. (Because METAPOST is finding the
intersection, I don’t have to. This is particularly useful when I fiddle with a drawing somewhat, trying to get it right. I don’t have to recompute the intersection
each time with METAPOST.)
Here is the construct to intersect the lines.
z6 = whatever [ z1 , z3 ]= whatever [ z2 , z5 ];
The square brackets find “of-the-way” points. Thus .25[z1,z3] is the point one
quarter of the way from z1 to z3. To intersect the lines we want a point that is an
unknown part of the way from z1 to z3, and also is an unknown part of the way
from z2 to z5. METAPOST’s whatever is a throwaway variable, so with the above
code the system knows that z6 is on both lines. There is only one such point and
METAPOST is smart enough to find it.
At the end of the definition, I give the star’s outline path p, fill it with the
color, set the line width with the pickup command, and draw the path around
the now colored-in star.
To output the files with the star graphics I now run the two routines with
different colors. I had to decide how gray to make the muted star. After a couple
of tries I decided that a good choice was the color 0.9 of the way from black to
white.
Done.
4
When you wish you had a star
To get the graphic files, I followed these steps.2 I first ran METAPOST.
$ mpost stars
I next made a proof sheet to see how it looked.
$ tex mproof stars -0. mps stars -4. mps
$ dvips - Ppdf - omproof . ps mproof
Now I can view the output with Ghostview.3
$ gv mproof . ps
Browsers want the graphic in PNG format so I used the swiss-army knife
graphics conversion program.4
$ convert star -4. mps star - rust . png
I copied the two files to the directory where my web server could find them.
My stars!
Here are the completed images, post processing.5
Now they are the right colors, they look like stars, and they are in a format that
browsers can understand. Success.
2. I run Ubuntu Linux with TEX Live. Your setup may require variations on these steps.
3. See http://pages.cs.wisc.edu/~ghost/.
4. See http://www.imagemagick.org/script/index.php.
5. The graphics conversion program made each graphics 20 pixels wide. I believe this is because
I defined them to be 20 pt wide in the METAPOST file and a point is close to a PostScript big
point.
5
Search
(courtesy of Google)
The online journal of the
TeX Users Group
ISSN 1556-6994
Table of Contents
Issue 2012, Number 1
TeX in the eBook Era
About The PracTeX
Journal
Luca Merciadri
Article PDF
Article source
Art of War source
Comment on this article
General information
Submit an item
Download style files
Copyright
Contact us
About RSS feeds
Archives of The PracTeX
Journal
Back issues
Author index
Title index
BibTeX bibliography
Next issue
Spring 2013
[Published 2012-10-22]
Abstract: There are many advantages to reading eBooks, and their usage is ever increasing. There are those
who prefer traditional printed books, but there is also a growing audience whose lifestyle and taste is suited
to eBooks. We discuss some advantages of using eBooks, and creating them with LaTeX. We continue by
explaining technical aspects that might improve and help you with your LaTeX eBook. We end with a short
discussion about the PDF file format and its use with eBook documents.
You can reach the author at Luca
dot Merciadri at student dot ulg dot ac dot be.
Editorial board
Lance Carnes, editor
Kaja Christiansen
Peter Flom
Hans Hagen
Robin Laakso
Tristan Miller
Tim Null
Arthur Ogawa
Steve Peter
Yuri Robbers
Will Robertson
Other key people
More key people wanted
Sponsors:
Web site Generated October 22, 2012 (wiki); TUG home page; search; contact webmaster.
Be a sponsor!
The PracTEX Journal, 2012, No. 1
Article revision 2011/11/27
TEX in the eBook era: a simple –yet fully
working– approach
Luca Merciadri
Email [email protected]
Website http://www.student.montefiore.ulg.ac.be/~merciadri/
Abstract
1
There are many advantages to reading eBooks, and their usage is ever increasing. There are those who prefer traditional printed books, but there
is also a growing audience whose lifestyle and taste is suited to eBooks.
We discuss some advantages of using eBooks, and creating them with
LATEX. We continue by explaining technical aspects that might improve
and help you with your LATEX eBook. We end with a short discussion
about the PDF file format and its use with eBook documents.
eBooks: Why?
We are concerned here with LATEX eBooks. Some (traditional) books are written
using LATEX, and then printed. In some situations, reading an eBook is more
effective than reading hard copy.
Most LATEX books are scientific or technical texts. As a result, many LATEX
documents are long, and thus
– heavy (to carry with you),
– bad for the environment if you print them,
– difficult to handle.
Moreover, you do not necessarily need to read an entire book in many cases.
Using eBooks gives you numerous advantages. For example, with an eBook
you can
1. quickly search and find some keywords in a text;
2. close and open it again easily;
3. do many other well-known things.
Our aim here is not to discuss the interests of using eBooks, which are already
well-known, but to explain why eBook versions could be useful for LATEX documents, and how they could be created.
2
LATEX and eBooks
LATEX offers many advantages over traditional typesetting, and its merits do not
need to be explained again.
2.1 Why?
Many scientific books, proceedings, papers, and some novels are already printed
as ‘hard copy’ but composed using LATEX. As a result, electronic versions of the
documents are generally available.
However, these documents are rarely adapted to eBook readers. Why wouldn’t
we try to write LATEX eBooks, or at least eBook versions of our LATEX documents?
1. LATEX provides the reader with many useful features: hyperlinks, glossaries,
indexes, etc., that are easier to use with an electronic version of a document.
Consider, for example, going to page x. Is it not simpler to click on the page
number than to move a pack of sheets until you find the correct number?
2. You will see in this article that writing an eBook using LATEX is an easy task
for a person who is familiar with LATEX;
3. There is no reason to make LATEX-composed documents unavailable to eBook
readers, especially since these readers are quickly becoming more widespread.
It is useful to know how to write LATEX documents that can be read on eBooks.
2.2 How?
However, making an eBook-compatible LATEX document is not easy, especially if
you have never tried it. We all know that, at the beginning, LATEX was not designed with eBooks in mind! That does not mean that making LATEX documents
2
available to eBook readers is an impossible task, but that it will not be straightforward if you are not accustomed to it (just as with many other things in LATEX,
but we all appreciate it when the excellent results appear in our documents.)
To get an idea of the possibilities, I used a web engine and typed related
keywords. Needless to say I did not encounter many related results. But on-topic
results were interesting. Among them, I found three topics on a forum: [4, 5, 6].
What are the biggest problems one needs to solve when considering an eBook
audience, where formerly there was a hard-copy audience only?
1. Dimensions of eBooks are smaller;
2. eBooks are electronic.
The biggest difference is that the dimensions of an eBook are smaller. An eBook
reader does not scale down your document proportionally. You need to scale your
document to the appropriate size. The dimensions 90 mm× 120 mm are generally
used, because the majority of eBook readers have a 6′′ diagonal, with 3 : 4 aspect
ratio.
Now, what might improve the document’s readability and effectiveness? You
want
1. to put ‘as much text as possible’ on each page of the document. However,
‘as much text as possible’ needs to be understood clearly: that does not
mean you can forget every typographic rule! Use different margins if you
feel the need to do it;
2. characters to be easy to read. This means that you might choose a new font;
3. text to be easy to read. Do not use long sentences: break them up into
bulleted lists or divide separate thoughts into different paragraphs. Large
blocks of text are difficult to read and do not have enough white space to
give the reader’s eye a break [3];
4. things to be clickable: glossary entries, indexes, and any other hyperreflinked element.
A first minimal example was submitted at [6] by ‘frabjous’:
3
\documentclass[12pt,oneside]{book}
\usepackage[papersize={90mm,120mm},%
margin=2mm]{geometry}
\usepackage[T1]{fontenc}
\usepackage[charter]{mathdesign}
\usepackage[normalmargins]{savetrees}
\sloppy
\pagestyle{empty}
\usepackage{titling}
\title{The title}
\author{The author}
\date{\today}
\usepackage{hyperref}
\hypersetup{pdftitle={\thetitle},%
pdfauthor={\theauthor}}
% ...
\begin{document}
\maketitle
\tableofcontents
% ...
\end{document}
The important thing to notice is that this minimal example is extremely straightforward, and it produces a simple yet functional output.
It uses minimal margins and displays no page numbering, thus allowing each
page to contain as much material as possible.
Some examples to consider: an online contributor named ‘ahi’ posted at [6] a
4
translation of ‘The Art of War,’ a book originally written by Sun Tzǔ. The same
person posted at [5] ‘The Complete Memoirs of Casanova,’ which I personally
find LATEX-ly readable.
Let us consider the code of ‘The Art of War,’ that was provided with the output.
The document body is simple. As is typical, though, the preamble is somewhat
tricky, and some of its aspects need to be discussed:
– The class of the document is memoir, with 10pt and openany options. The
openany option allows chapters to begin on the next page available, and not
just on odd-numbered pages.
This helps create a short document containing as much material as possible
on the fewest number of pages.
The advantage of the memoir class is that it automatically writes the name
of the current chapter on each page, separated from the text by a rule. This
helps the reader to remember the subject of what (s)he is currently reading
(in case (s)he would have forgotten it!). As we will see on the next page, the
memoir class also lets you use different styles for titles.
– Fonts are also different:
\usepackage{kerkis}
\usepackage{yfonts}
– The microtype package is used.
– Margins are different too:
hmargin={0.17in, 0.17in}
and
vmargin={0.50in, 0.17in}
are used in the geometry package’s parameters, with the same papersize as
in the minimal example provided above.
– The following penalties are imposed:
\widowpenalty 3999
\clubpenalty 3999
5
I find that these settings make a pleasant page appearance. Note that
\clubpenalty is the penalty for a broken page, with a single line of a paragraph remaining on the bottom of the preceding page.
– The title of the book is written on each page:
\makeevenhead{ruled}{\small%
\emph{\rightmark}}{}{\small%
\scshape The Art of War, Sun Tz\u{u}}
\makeatletter
\makeoddhead{ruled}{\small%
\emph{\rightmark}}{}{\small%
\scshape The Art of War, Sun Tz\u{u}}
– The following lengths are redefined:
\setlength\beforechapskip{0pt}
\setlength\midchapskip{5pt}
\setlength\afterchapskip{30pt}
– A chapter style is defined:
\makechapterstyle{plroman}{
\renewcommand\chapternamenum{}
\renewcommand\printchaptername{}
\renewcommand\printchapternum{%
\color{gray}\centering\MakeUppercase%
{\fontsize{1in}{2in}\selectfont%
\romannumeral\thechapter}}
\renewcommand\chapnumfont{\HUGE%
\rmfamily\centering\romannumeral}
\renewcommand\chaptitlefont{\Huge%
\centering\color{black}\vskip%
\midchapskip\vskip\midchapskip}
6
\renewcommand\afterchapternum{%
\par\nobreak\vskip\midchapskip%
\vskip%\midchapskip}
\renewcommand\printchapternonum{%
\vphantom{\chapnumfont \thechapter}
\par\nobreak\vskip\midchapskip%
\hrule\vskip\midchapskip}
}
This style is not necessary: the document stills looks great without it. This
simply adds a personal touch to it, which does no harm. Another advantage
of the memoir class is that you can use many different styles; see e.g. [2].
The document can be compiled using PDFLaTeX only.
Note that there are different ways to specify the global dimensions and the
margins. The advantage of using the geometry package is that it automatically
deals with your input in relation to the PDF output. That is, if you had specified
\textheight=120mm
\textwidth=90mm
at the place of using
papersize={90mm,120mm}
in geometry’s arguments, you would have ended up with a PDF document with
large margins and standard dimensions, but with a printed area of 120 mm×
90 mm.
Some authors use the \sloppy command, pretending this is the miracle solution for preventing overfull boxes (because of overfull lines). (You might have
noticed that \sloppy was used in the minimal example given at the beginning of
this article.)
Without it, LATEX will truncate words that it cannot fit in a line due to its
standards. [4] As said in [4], ‘it is certainly less annoying to have extra whitespace
in lines than having parts of words missing due to not fitting on the page.’
7
The problem with this command is that you get ugly justification and instead
of using hyphenation, it will add white spaces most of the time. The best solution
here is to make small changes to the advanced settings for hyphenation. [4]
But how can you change these settings, and which settings would you change?
We saw above that penalties could be adapted to your needs. With larger values
for these penalties LATEX will work harder to avoid widows and orphans. However,
1. setting them to the maximum value of 10000 is evidently not the solution;
2. keep in mind that mid-range values do not have a large influence on the
result.
The role of the microtype package is to deal with these problems too. (But either
modify the penalties manually or let it try.)
Sample output of ‘The Art of War’ is given at p. 11 and 12.
2.3 Is PDF the right format?
Many eBook readers are not capable of reflowing text, hyphenating, or allowing
for font size changes. Either they do not support this, or the PDF file they are
dealing with might not be ‘reflowable.’ The reflowable attribute is a recent PDF
capability, and is not supported in some PDF creators.
For this reason, PDF is sometimes considered a poor choice of format for
eBooks, because its purpose is to give a static representation of a document in
a dimensional point of view. That is, the PDF specification was built with the
‘reproducing image’ capability in mind. For some [7], it is inherently not suited
to eBooks, and thus not an eBook format.
One of the problems is that the screen dimensions of the readers are not standard. As a result, if you provide an eBook whose size does not match the reader’s
size, the reader will need to adapt the PDF output to its screen. If the eBook
reader and the PDF file are compatible, there should be no problem, but having a
compatible (i.e. reflowable) PDF file is not typical. By default, neither the ps2pdf
nor the pdfLaTeX routes give a reflowable PDF.
Ideally, one would need a reader with a TEX engine that re-typesets the document every time the user changes the font size or orientation, which has obviously
not been implemented. [1]
8
Many people find that ‘EPubs’ are better than PDFs on eBook readers, both in
appearance and also in efficiency. With EPubs, if you have a separate html file for
each chapter, only the current chapter needs to be loaded rather than the entire
book. This provides many advantages. The EPub format is actually XHTML and
the tex4ht package can genenerate XHTML. With a little post-processing, the
output from tex4ht can be made into a .epub file. Since an EPub is XHTML, it is
not bound to ‘pages’ at all and is implicitly reflowed, depending on the e-reader
screen size. EPubs can be generated using latex + tex4ht. [1]
3
Conclusion
Despite shortcomings of the PDF format, producing a PDF file for a predefined
screen dimension is sufficient to give a correct eBook composed using LATEX.
Several other solutions do exist, and can be implemented if necessary. Meanwhile, it is possible to produce an eBook using LATEX by writing a simple LATEX
document as was shown above. LATEX can thus be used to produce eBooks, but
with some restrictions. These restrictions might be overcome, if needed, by implementing other solutions such as the .epub format.
References
[1] Robert Heller, Nicola Talbot, and Luca Merciadri. LATEX, eBooks and reflowable PDFs questions, 2011. http://groups.google.com/group/comp.text.
tex/browse_thread/thread/45757e8435f04f2d#.
[2] Lars Madsen. Various chapter styles for the memoir class, 2010. http://
ftp.ktug.or.kr/tex-archive/info/latex-samples/MemoirChapStyles/
MemoirChapStyles.pdf.
[3] MakeMoneyLog. Creating Your Own eBook - The Two Golden Rules
When Writing eBooks For Profit, 2010. http://www.makemoneylog.com/
creating-your-own-ebook-the-two-golden-rules-when-writing-ebooksfor-profit.html.
9
[4] MobileRead. LATEX template for Sony reader (PDF), 2007.
mobileread.com/forums/showthread.php?t=12872.
http://www.
[5] MobileRead. Casanova, The Complete Memoirs – Comments, please!, 2009.
http://www.mobileread.com/forums/showthread.php?t=54190.
[6] MobileRead. LATEX eBook Templates, 2009. http://www.mobileread.com/
forums/showthread.php?t=57861.
[7] MobileRead. PDF is not an eBook format, 2009. http://www.mobileread.com/
forums/showthread.php?t=22858.
10
Sun Tzŭ’s
Contents
The Art of War
Introduction . . . . . . . . . . . . . . . . . . . . . . . . . . . . . . . . . .
6
I. Laying Plans . . . . . . . . . . . . . . . . . . . . . . . . . . . . . . . . . . 10
translated by Lionel Giles, M.A.
II. Waging War . . . . . . . . . . . . . . . . . . . . . . . . . . . . . . . . . . 15
III. Attack by Stratagem . . . . . . . . . . . . . . . . . . . . . . . . 20
IV. Tactical Dispositions . . . . . . . . . . . . . . . . . . . . . . . . . 25
V. Energy . . . . . . . . . . . . . . . . . . . . . . . . . . . . . . . . . . . . . . . . 29
VI. Weak Points and Strong . . . . . . . . . . . . . . . . . . . . . 34
VII. Manœuvring . . . . . . . . . . . . . . . . . . . . . . . . . . . . . . . . . . 41
VIII. Variation in Tactics . . . . . . . . . . . . . . . . . . . . . . . . . . 48
IX. The Army on the March . . . . . . . . . . . . . . . . . . . . . 52
X. Terrain . . . . . . . . . . . . . . . . . . . . . . . . . . . . . . . . . . . . . . . . 61
XI. The Nine Situations . . . . . . . . . . . . . . . . . . . . . . . . . . 68
XII. The Attack by Fire . . . . . . . . . . . . . . . . . . . . . . . . . . . 81
Pax Librorum
Publishing House
2009
XIII. The Use of Spies . . . . . . . . . . . . . . . . . . . . . . . . . . . . . . 85
Introduction
Introduction
Sun Tzŭ Wu was a native of the Ch‘i State. His Art
of War brought him to the notice of Ho Lu, King of
Wu. Ho Lu said to him: “I have carefully perused your
13 chapters. May I submit your theory of managing
soldiers to a slight test?”
Sun Tzŭ replied: “You may.”
Ho Lu asked: “May the test be applied to women?”
The answer was again in the affirmative, so arrangements were made to bring 180 ladies out of the
Palace. Sun Tzŭ divided them into two companies,
and placed one of the King’s favourite concubines at
the head of each. He then bade them all take spears
in their hands, and addressed them thus: “I presume
you know the difference between front and back, right
hand and left hand?”
The girls replied: “Yes.”
Sun Tzŭ went on: “When I say ‘Eyes front,’ you
11
The Art of War, Sun Tzŭ
must look straight ahead. When I say ‘Left turn,’ you
must face towards your left hand. When I say ‘Right
turn,’ you must face towards your right hand. When
I say ‘About turn,’ you must face right round towards
your back.”
Again the girls assented. The words of command
having been thus explained, he set up the halberds
and battle-axes in order to begin the drill. Then, to
the sound of drums, he gave the order “Right turn.”
But the girls only burst out laughing. Sun Tzŭ said: “If
words of command are not clear and distinct, if orders
are not thoroughly understood, then the general is to
blame.”
So he started drilling them again, and this time
gave the order “Left turn,” whereupon the girls once
more burst into fits of laughter. Sun Tzŭ: “If words of
command are not clear and distinct, if orders are not
thoroughly understood, the general is to blame. But
if his orders are clear, and the soldiers nevertheless
disobey, then it is the fault of their officers.”
So saying, he ordered the leaders of the two companies to be beheaded. Now the King of Wu was
watching the scene from the top of a raised pavilion;
and when he saw that his favourite concubines were
Introduction
Introduction
The Art of War, Sun Tzŭ
about to be executed, he was greatly alarmed and
hurriedly sent down the following message: “We are
now quite satisfied as to our general’s ability to handle
troops. If We are bereft of these two concubines, our
meat and drink will lose their savour. It is our wish
that they shall not be beheaded.”
Sun Tzŭ replied: “Having once received His
Majesty’s commission to be the general of his forces,
there are certain commands of His Majesty which,
acting in that capacity, I am unable to accept.”
Accordingly, he had the two leaders beheaded, and
straightway installed the pair next in order as leaders
in their place. When this had been done, the drum
was sounded for the drill once more; and the girls
went through all the evolutions, turning to the right or
to the left, marching ahead or wheeling back, kneeling
or standing, with perfect accuracy and precision, not
venturing to utter a sound. Then Sun Tzŭ sent a
messenger to the King saying: “Your soldiers, Sire,
are now properly drilled and disciplined, and ready for
your majesty’s inspection. They can be put to any use
that their sovereign may desire; bid them go through
fire and water, and they will not disobey.”
But the King replied: “Let our general cease drilling
and return to camp. As for us, We have no wish to
come down and inspect the troops.”
Thereupon Sun Tzŭ said: “The King is only fond of
words, and cannot translate them into deeds.”
After that, Ho Lu saw that Sun Tzŭ was one who
knew how to handle an army, and finally appointed
him general. In the west, he defeated the Ch‘u State
and forced his way into Ying, the capital; to the north
he put fear into the States of Ch‘i and Chin, and spread
his fame abroad amongst the feudal princes. And Sun
Tzŭ shared in the might of the King.
— Ssŭ-ma Ch‘ien (c. 145 BC – 86 BC)
I. Laying Plans
I
7. Heaven signifies night and day, cold and heat,
times and seasons.
8. Earth comprises distances, great and small;
danger and security; open ground and narrow
passes; the chances of life and death.
1. Sun Tzŭ said: The art of war is of vital importance to the State.
9. The Commander stands for the virtues of wisdom, sincerity, benevolence, courage and strictness.
2. It is a matter of life and death, a road either to
safety or to ruin. Hence it is a subject of inquiry
which can on no account be neglected.
4. These are: (1) the Moral Law; (2) Heaven;
(3) Earth; (4) the Commander; (5) method and
discipline.
The Art of War, Sun Tzŭ
5, 6. The Moral Law causes the people to be in complete accord with their ruler, so that they will
follow him regardless of their lives, undismayed
by any danger.
Laying Plans
3. The art of war, then, is governed by five constant factors, to be taken into account in one’s
deliberations, when seeking to determine the
conditions obtaining in the field.
The Art of War, Sun Tzŭ
12
10. By method and discipline are to be understood
the marshaling of the army in its proper subdivisions, the graduations of rank among the
officers, the maintenance of roads by which supplies may reach the army, and the control of
military expenditure.
11. These five heads should be familiar to every
general: he who knows them will be victorious;
he who knows them not will fail.
Search
(courtesy of Google)
The online journal of the
TeX Users Group
ISSN 1556-6994
Table of Contents
Issue 2012, Number 1
Easy-to-use Chinese MTEX Suite
About The PracTeX
Journal
Hongbin Ma
Article PDF
Article source
Slide
Comment on this article
General information
Submit an item
Download style files
Copyright
Contact us
About RSS feeds
Archives of The PracTeX
Journal
Back issues
Author index
Title index
BibTeX bibliography
Next issue
Spring 2013
Editorial board
Lance Carnes, editor
Kaja Christiansen
Peter Flom
Hans Hagen
Robin Laakso
Tristan Miller
Tim Null
Arthur Ogawa
Steve Peter
Yuri Robbers
Will Robertson
Other key people
More key people wanted
[Published 2012-10-22]
Abstract: Although there are many free and commercial TeX collections and distributions, Chinese TeXers
still have many difficulties in TeXing Chinese documents. Some of the problems Chinese TeX users confront
with TeX distributions are: the huge size, complex structure, nontrivial installation and configuration, lack of a
full-featured Chinese editor, and lack of other needed add-ons. These difficulties may prevent many people
from becoming TeXers or TeX experts. Motivated by these issues and many other practical demands, the
author and several friends developed an easy-to-use and easy-to-learn Chinese MTeX Suite, which is a
green*, compact, free, convenient, pragmatic and powerful TeX distribution with many add-ons and unique
features which are seldom available in other TeX distributions. The developers of MTeX have made continuous
efforts to make this software more powerful and suitable for TeXers, programmers, teachers, and scientists.
This article gives a brief introduction to the MTeX suite, including its motivation, main features, installation,
usage instructions, kernel, default editor (Sc1IDE), and other add-ons.
Hongbin Ma is a professor at the School of Automation, Beijing Institute of Technology. He was born in
Henan, China, in 1978. He received a B.Sc. from Zhengzhou University, China in 2001, and Ph.D from the
Academy of Mathematics and Systems Science, Chinese Academy of Sciences in 2006. After three years
service as a Research Scientist in Temasek Laboratories, National University of Singapore from August 2006
to July 2009, he joined School of Automation, Beijing Institute of Technology in September 2009, as a
professor via the 100 Talents Scheme of BIT. He was recognized as one of New Century Excellent Talents in
University in 2009, and was awarded the Huo Yingdong Young Teacher Prize in 2012. He is a fan of
mathematics, programming and LaTeX, and hence he developed Chinese MTeX Suite to satisfy the needs of
his research, work, and life. Currently MTeX is a small yet powerful TeX collection and software platform,
which is green* and portable with many unique features, and has many Chinese users. You can reach
Hongbin Ma at mathmhb at bit dot edu dot cn.
* Green software helps reduce the impact on the environment, usually indirectly by reducing the demand for
new computing equipment. See
http://wiki.cs.vu.nl/green_software/index.php/Green_software_%28definition%29
Sponsors:
Web site Generated October 22, 2012 (wiki); TUG home page; search; contact webmaster.
Be a sponsor!
The PracTEX Journal, 2012, No. 1
Article revision 2012/06/25
Easy-to-use Chinese MTEX Suite
Hongbin Ma
Email [email protected]
Address School of Automation, Beijing Institute of Technology, Beijing 100081, P.
R. China
1
Motivation of Developing MTEX
As the main developer of Chinese MTEX Suite , or simply MTEX [1], I started to fall
in love with TEX[2] and LATEX[3] in 2002 when I was still a graduate student majoring in mathematics and cybernetics at the Academy of Mathematics and Systems
Science, Chinese Academy of Sciences. At that time, recommended by some senior students, I started to use Chinese CTEX Suite , or simply CTEX[4], which was
maintained by Dr. Lingyun Wu[5], a researcher in our academy, and is roughly
a collection of pre-configured MiKTEX system[6] packaged with other tools such
as customized WinEdt[7] for Chinese TEXers. CTEX brings significant benefits to
China TEX users and it helps much to popularize the use of LATEX in China, especially in the educational and academic areas with large requirement on mathematics typesetting. Furthermore, at that time, CTEX provides one way to typeset
Chinese documents easily with LATEX and CCT [8] (Chinese-Typesetting-System ),
which was initially developed by another researcher Prof. Linbo Zhang[9] in our
academy since 1998 for the purpose of typesetting Chinese with LATEX. Besides
CCT system, another system called TY (Tian-Yuan ) system [10] was invented
by a group in Eastern China Normal University so as to overcome the difficulties
of typesetting Chinese with LATEX using different idea. These work make considerable efforts to address the nature of Chinese itself, for example, using certain
widely used Chinese fonts, adopting proper Chinese font sizes, carefully coping
with the spacing of characters, breaking the lines according to Chinese culture,
and so on. Due to the complexities involved in Chinese typesetting, in the last
decade, Chinese TEX users are mainly using CTEX so as to avoid the nontrivial
configuration procedure of Chinese typesetting for the Chinese fonts and tools
used.
As a user of CTEX suite, gradually I found some disadvantages of CTEX suite
despite that it has many benefits.
– First, it is a huge software collection which takes hundreds of megabytes,
which makes it time-consuming to download and install. Either the installation or uninstallation process needs to take a long time.
– Second, it is not portable not only because it is very big but also because
an installation process is necessary. We often need to work on different
computers, hence a green and portable TEX system without configuration is
desirable.
– Third, it lacks many features and tools I want. Here are some examples:
· TY system is not included and configured in CTEX .
· I hope to make LATEX can include graphics files of any commonly used
format (e.g., .gif , .tif , .bmp , .png , png , .eps , .pdf graphics files).
· I hope the compilation process can be smarter than before so that
proper TEX engine (TEX, eTEX, LATEX, LATEX209, pdfLATEX, XeTEX, XeLATEX,
LuaTEX[11], etc.) can be invoked with necessary options and proper
tools (such as bibtex [12], makeindex , cct , patchdvi , ty , gbk2uni [13],
fixbbl [14], ppower4 [15], etc.) can be invoked automatically to correctly
process Chinese typesetting, generate references, make index list, and
so on.
· I hope to be able to insert LATEX symbols or commands or any code
snippets or any document template in any text file editor (even notepad
in windows) with a simple individual tool.
· I hope to be able to conveniently use formulas generated by LATEX in
any Windows © applications like PowerPoint ©, WinWord ©, WPS ©, and
so on.
· I hope to be able to support TEX engines, .dvi viewers, .ps viewers,
.pdf viewers, editors, spell checkers in unified ways and the users can
have the right to choose from a list of available choices. For example,
besides the commercial Adobe Acrobat Reader © or Adobe Acrobat ©, we
have other possible choices like SumatraPDF , PdfXCView , Foxit PDF
Reader , or even GsView .
2
· I hope to be able to switch to proper place in .tex files when viewing
.pdf files, just like the inverse search feature of some .dvi viewers
like YAP or DviWin .
– Furthermore, I hope to do all text editing jobs (such as TEXing, programming, designing web, and so on) with a powerful,customizable yet small
editor which does not fit the purpose of TEXing only. WinEdt [7] is simply too large and not quite powerful for general-purpose text editing and
customization. For example, I hope the editor can automatically complete
proper right bracket when I type left bracket, e.g. completing \right] automatically for \le f t[.
– I hope to integrate more utilities in the editor, for example, various compilers, code formatting tool, subversion version control, and so on.
– Finally, the MiKTEX shipped with CTEX looks very complex with thousands
of files (many files are outdated and many files may never be used), difficult
to configure Chinese fonts, highly dependent of Windows registry, very
complicated for directory structure.
Motivated by the above issues and my own long learning experience for LATEX,
I hope to make an easy-to-learn and easy-to-use unique TEX distribution with
clean directory structure, very necessary files, small size, valuable extra features,
selected documents, and so on. To this end, I started to investigate various kinds
of TEX distributions, including fpTEX [16], MiKTEX [6], DosTP [17], EmTeX [18],
BakomaTEX [19], and so on. From these existing TEX distributions, by studying
the whole directory structure, the file searching mechanism, the complex font
processing mechanism, the main command-line tools, the configuration files, and
even the monitored registry changes, it became clearer and clearer to me on how
the existing TEX systems work. Based on these continuously-growing understanding, I started to build my own initial MTEX system on the basis of EmTeX with
reorganized directory structure plus a bundle of home-made batch scripts running with 4DOS ©, as well as some unique tools and wrappers which are mainly
developed with Delphi ©, Tiny C Compiler , and MASM32 . The rar-packed archive
of the initial MTEX occupies less than 20 Megabytes disk space, integrating carefully customized 4DOS [20]©(JP Soft), EmTeX , EditPlus [21]©, Acrobat Reader 4 ©,
Ghost Script [22], CCT , TY , my own batch scripts and small tools developed to fit
my needs. Upon the requests of some friends, the early version of MTEX was re3
leased in CTEX forum in 2005. From then on, according to my growing needs and
the users’ bug reports as well as feature requests, I made continuous efforts to
improve MTEX to make it as modern as other TEX distributions, especially since
2007, great changes were introduced into MTEX to make it cutting edge with
the latest TEX engines/utilities/macros/fonts/documents and extendable with a
unified mechanism, implemented with Take Commander Console [23] batch scripts,
to manage all the components of MTEX. Currently, the TEX engines (executable
files) of MTEX are mainly taken from W32TEX directly, while the fonts and the
macros are updated from CTAN with the batch scripts. Note that due to the open
extendable framework of MTEX, any other TEX engines (e.g. MiKTEX,DosTP) can
be used by making minor changes to MTEX configuration files, where command
aliases, environment variables, searching paths, and other settings are defined by
text files. Now MTEX has been used by many Chinese users and some friends in
other countries including Singapore, U.S., U.K., and so on.
2
2.1
Main Features of MTEX
MTEX Is Free
Roughly speaking, MTEX (kernel itself) is released as a freeware for non-commercial
use and users can use it as is without any fee in their personal studies or work.
The source codes of MTEX kernel files can be found in http://mtex-kernel.
googlecode.com/. We do not plan to make money from this software, however,
we would like to accept donations so as to provide certain financial support to
our great efforts in maintaining and enhancing this software. As to the detailed
licensing description of MTEX, the users may refer to files LICENSE.* in the folder
of MTEX.
The licensing of the components of MTEX should not be affected by the license
of MTEX kernel, and we do not provide registration or crack for the sharewares
or commercial softwares which are included in MTEX. Although theoretically
speaking, any software can be made as one component of MTEX according to the
unified packaging rule, normally we mainly select and put free, small and useful
softwares in the repository of MTEX servers.
We need also remark that MTEX is virus-less and it does not contain any
viruses or malwares. However, some anti-virus softwares may issue wrong alerts
4
for some tiny or packed .exe files in MTEX due to their (imperfect or stupid)
virus detection mechanism. Note that we may use upx [24] to pack some big .exe
files to save disk space and we also use optimized compilers or libraries to generate very small .exe files, for example, several useful tools in MTEX are compiled
with Delphi © compiler DCC32 and KOL [25], which can generate very small .exe
file. In such cases, the users need to add the folder of MTEX to the white list or
safe area of the anti-virus software so that the anti-virus software can trust the
files in MTEX directly.
2.2
MTEX Is Integrated
MTEX is a self-contained integrated TEX distribution, hence, by using MTEX, the
users need not install any other TEX distributions like MiKTEX, and the users need
not install other related softwares such as Adobe Acrobat Reader ©, Ghost Script
[22], GsView [26], WinEdt ©, Perl , etc. since MTEX has provided such utilities or
replacements.
2.3
MTEX Is Powerful
Exactly speaking, MTEX is not only a TEX distribution since it has many unique
features and many useful addons organized in unified elegant ways. In fact,
MTEX is a powerful software platform, which contains a suite of home-made and
third-party selected utilities/documentations/engines/fonts/macros, aiming at
providing an integrated software solution for almost all the jobs in the authors’ studies and work, vast from scientific typesetting, scientific computation, scientific
drawing, to programming design, website design, spelling checking, file conversion, and so on.
2.4
MTEX Is Small
Comparing with most other TEX distributions, MTEX is very small which is mainly
due to careful design, selection, reduction and refinement of its components. A
typical MTEX installation occupying less than 200 Megabytes disk space, whose
packed self-extractor is only about 50 Megabytes, can fit most needs of the users.
5
Noting of the famous 80-20 rule, we have made the following efforts to make
MTEX very compact yet functional:
– Reducing unnecessary files which are seldom-used in daily work.
– Placing infrequently used components in the MTEX servers.
– Optimizing and customizing important components.
– Stripping comments of macro packages to save space.
– Designing the MTEX kernel elaborately to make it flexible and extendable.
– Selecting many small command-line tools and combining them efficiently
by using batch scripts.
– Developing our own MTEX tools via outstanding compilers and libraries.
2.5
MTEX Is Extendable
MTEX provides one unique download-and-install-on-the-fly mechanism for the TEX
engines, editors, utilities, fonts, macros, and documentations, which means that
the users need not install many seldom-used components yet the users are able
to invoke full functions provided in the MTEX servers when necessary. On MTEX
servers, currently dozens of editors, hundreds of utilities, over five hundred fonts,
near one thousand documentations, and about two thousand macro packages
have been provided to cover various needs of the users. With this mechanism, we
are able to provide MTEX users more ready-to-use components than existing TEX
distributions, and this mechanism greatly extends the practical usages of MTEX
so that MTEX does not restrict in serving as a TEX distribution only. Note that,
according to this mechanism, almost any software can be packed as MTEX components with minor efforts, hence the number of MTEX components is gradually
growing upon the the requirement of ourselves and the users.
2.6
MTEX Is Green and Portable
MTEX is green and portable. This means that the users can put the MTEX folder
into thumb drive or removable disk or even compact disk and use it anywhere
anytime without a specific installation process like most Windows applications.
6
Many efforts are conducted to make MTEX easy-to-use without special configuration, especially, it does not need to modify Windows registry unless certain
third-party utility requires to do so, in which case we use the auto-configuration
mechanism of MTEX designed for all utilities to make every utility portable and
re-configurable without concerning the actual path of MTEX folder. Furthermore,
the portability of MTEX makes MTEX co-existable with other TEX distributions in
the same computer, although installation of other TEX distributions is completely
not necessary or recommended if the users use MTEX for TEXing.
2.7
MTEX Is Cutting Edge
Some well known TEX distributions, e.g. emTeX and fpTeX , have stopped maintaince and updating. However, we know that although the most fundamental
TEX engine invented by D. E. Knuth[27] have been frozed, the techniques related
with TEX have been changing always in recent years, and some new TEX engines,
macros, tools, and fonts have emerged. As far as I know, many people are still using the out-dated MiKTEX 2.4. To enable the users to try the latest TEX techniques,
MTEX is very cutting edge in sense that it is often updated with the latest TEX
engines, macros, tools, and fonts which are downloaded and processed by our
own batch scripts. As a small yet featureful TEX distribution, MTEX allows the
users to update to the latest version easily by clicking the button [Update MTeX
Components] in the MTEX Main Menu. All installed components can be updated
automatically or manually.
2.8
MTEX Has Multi-language Interface
MTEX supports multiple-language user interface and has been configured well for
Chinese users to typeset Chinese. With MTEX, users can easily switch among user
interfaces for different code pages provided that corresponding configuration files
(language files) of the requested code page exist in MTEX. Currently, since the
users of MTEX are mainly Chinese students or teachers or researchers, besides
the default English (codepage:437) user interface for non-Chinese code pages, we
have mainly provided language files for Simplified Chinese (codepage:936) and
Traditional Chinese (codepage:950) user interfaces. So if the users have interests to
translate the language files, please contact the author so as to make MTEX more
7
international.
2.9
MTEX Has Special Design for Chinese
As mentioned before, typesetting Chinese documents may be more complex than
typesetting English documents, and hence Chinese TEX community has made
many efforts and invented number of tools and macro packages to make the
Chinese typesetting happier. However, unfortunately, most of them are only released in Chinese forums and hence most of them are not available in CTAN[28]
or western world. As a TEX system mainly for Chinese users, MTEX integrates
most existing tools and macro packages for Chinese typesetting, and provides corresponding compilation options in the settings dialog for the main compilation
command clatex, which is in charge of almost all the smart compilation procedure
for various TEX source files.
2.10
MTEX Has Special Design for Beginners
As a LATEX user, I know that many people feel that LATEX is very difficult to learn.
To help MTEX users to learn and practice, MTEX provides many demo examples,
templates, selected documents, as well as some tips for beginners. From my own
learning experience and teaching experience, I think LATEX can be easy to learn in
the right way:
– Use existing examples to demonstrate the basic compilation procedure and
the great power of LATEX;
– Use one simple example to illustrate the key philosophy of LATEX — focusing
on the structure and contents rather than typesetting details, i.e. What You
Think Is What You Get rather than What You See Is What You Get;
– Add more elements to the simple example to illustrate more elements of
LATEX such as mathematics, tables, figures, references, and so on;
– Read the selected documents (such as lshort.pdf [29]) to gain comprehensive
understanding to LATEX;
– Learn from continuous practice, gradually practice will make perfect. In
this process, users are suggested to learn to search the local macro files and
read the documents provided in the MTEX servers.
8
With MTEX, following the above ideas, in my graduate courses, for those students
who never know LATEX before, I usually just use 20 to 30 minutes to introduce the
installation of MTEX and basic usage of LATEX by examples, then almost all the
students can use LATEX to complete their assignments and projects in my courses,
which shows that TEXing with MTEX is not difficult for most students.
Installation of MTEX
3
3.1
Fresh Installation
We provide two ways to “install” a fresh MTEX suite: one way is to download an
self-extraction archive which contains a pre-configured typical installation, and
the other way is to download a tiny installer which allows the user to customize,
download and install chosen components. Both ways essentially unpack some
archives to the specified installation folder. Note that MTEX is green hence the
users may also copy an existing MTEX folder to removable disks or other computers.
Existing MTEX Servers With the help of some friends and users of MTEX, we
have set up several MTEX servers, and a list of them can be found in the official website of MTEX: http://mtex.sf.net. Among these servers, we mainly
recommend two servers:
– ftp://ftp.ctex.org/pub/tex/systems/mtex/
– ftp://mtex:[email protected]/mtex/
where the last one is only accessible in the campus of Beijing Institute of Technology and it is the recommended server for the students and the researchers
of Beijing Institute of Technology due to its fastest download speed of intra-net.
More servers can be added if users would like to provide mirrors; in this case,
please contact the author directly.
Typical Installation This approach is recommended for most users. The following
steps are needed with this approach:
1. Download self-extractor mtex20??.exe (about 50 Megabytes) from any server.
9
2. Run the downloaded self-extractor and input the destination of MTEX folder
when prompted.
3. Wait one minute until the self-extractor finishes extraction and quits.
In the second step, the users are suggested to type “c:\” or “d:\” as destination,
i.e. the MTEX suite will be installed to folder c:\mtex or d:\mtex. Note that the
destination path should not contain space or Chinese characters so as to avoid
unnecessary troubles of path parsing in the batch scripts.
Customized Installation This approach is suitable for experts who want to customize the components upon installation. Note that this approach is not recommended since the users can always add new components after a typical installation. The following steps are needed with this approach:
1. Download the tiny installer m-setup.exe (about 80 Kilobytes) and all configuration files m-setup.*.* from the “current” folder of any server and save them
to a temporary folder, say e.g. e:\m-setup;
2. Run the installer and input the destination path of MTEX folder (the default
path is c:\mtex).
3. Click the button [Setup network] to configure and test the internet connection: first click the button [1. Test Internet connection], the installer will test
the network and prompt the users the network status, then if the network
is okay, the users can click the button [2 .Download and load config files] to
download files needed by the installer.
4. Close the dialog of [Setup network], and then the users are able to customize
the components needed. Description of each component will be shown on
the right side if the mouse is put over that component.
5. Once the user has chosen the components to install, the user can click the
button [Install now] to start the installation. The installer will download the
components from MTEX servers, and then it will extract them to proper
sub-folders of the destination path.
6. Wait until the installer finishes downloading and extraction, then the installer will automatically launch the configuration dialog (see §3.3).
10
In the second step, the users are suggested to type “c:\” or “d:\” as destination,
i.e. the MTEX suite will be installed to folder c:\mtex or d:\mtex. Note that the
destination path should not contain space or Chinese characters so as to avoid
unnecessary troubles of path parsing in the batch scripts.
3.2
Software Updating
MTEX users can update MTEX suite to latest version directly from “MTEX Main
Menu ” by running mtex\MainMenu.cmd. Then just click button [Update MTeX
Component] and follow the instructions step by step.
3.3
Configuration
Basic Settings Most basic settings of MTEX can be customized, for example, the
language interface, the default MTEX server, the proxy server, the default editor,
the default .dvi /.ps /.pdf viewer, and so on. Usually all these settings are
not necessary to change since MTEX will detect and provide proper defaults. For
example, if the user is running on Simplified Chinese Windows, then it will automatically use Simplified Chinese interface; if the user is running a non-Chinese
Windows, it will use the default English interface.
1. Invoke “MTEX Main Menu” by running mtex\MainMenu.cmd.
2. Click button [Basic Settings] and a dialog of MTeX Basic Settings will appear.
3. Make necessary customization in the dialog.
4. Click button [Save] if some settings were changed; otherwise, just click button [Cancel] or button [Reset Defaults] and then quit.
To save space, here we do not introduce the details of basic settings. In current
typical installation of MTEX, the default TEX editor is Sc1IDE [30], the default
.dvi viewer is DviWin [31], the default .ps viewer is automatically chosen as
GsView [26], and the default .pdf viewer is SumatraPDF [32].
11
Figure 1: Basic Settings for MTEX
Create Shortcuts The users are suggested to create shortcuts for MTEX for convenience. To do this, the users just need to do the following steps:
1. Invoke “MTEX Main Menu” by running mtex\MainMenu.cmd.
2. Click button [MTeX Shortcuts] and a message box will appear.
3. Click button [Create Shortcuts] to create some shortcuts.
The users can also remove the shortcuts at any time by similar operations except
that the users need to click button [Delete Shortcuts] in the last step.
12
Figure 2: Create Shortcuts for MTEX
Once shortcuts are created, the users can invoke MTEX editor, MTEX-DOS,
MTEX Main Menu directly from the desktop, and user can access some unique
Send To ... shortcuts for selected file in the explorer:
– Smart Open with MTeX: Smartly uses proper utility to open/view the selected file according to its file type.
– Smart Edit with MTeX: Smartly uses proper utility to edit the selected file
according to its file type.
– Smart Convert with MTeX: Smartly uses proper utility to convert the selected
file according to its file type.
– MTeX Dos Prompt: Provides a unique DOS prompt window which is much
more powerful than Microsoft Command Prompt.
– MTeX IDE: Edits the file with the default TEX editor.
Note that the first three shortcuts are very powerful since they support arbitrary file types, and the actions they will do for different file types are completely
defined in the configuration file openx.cfg , which in fact provides one elegant
and “green” way to replace the complex file association mechanism of Windows
via the registry. For example, for a selected file hello.idle written in Idle scripting
language, Smart Open with MTeX will prompt several choices (shown in Figure
3) like Idle,IdleW,Idle2Exe and Idle2Exe-GUI, then clicking [Idle2Exe] will result in
download-and-install-on-the-fly (shown in Figure 4) of the utility Idle , which is
a component on the MTEX servers and is not packed into the typical installation,
and converting this idle script to an .exe file by calling command idlec in utitity
idle with proper options. Related configurations in file openx.cfg are shown in
Listing 1, which defines the possible actions for .idle files and the commands
to launch them.
13
Figure 3: An example of Smart Open with MTeX for a file with .idle extension
Figure 4: Snapshot of Download-and-Install-on-the-Fly of utility in MTEX
Listing 1: Configuration example of openx.cfg
. i d l e = I d l e /IdleW/ I d l e 2 E x e /Idle2Exe −GUI
! Idle=util idle
! IdleW= u t i l : i d l e i d l e w
! I d l e 2 E x e = u t i l : i d l e i d l e c −x $N . e x e $F
! I d l e 2 E x e −GUI= u t i l : i d l e i d l e c −w − c −x $N . e x e $F
File Associations For convenience, the users are also suggested to associate certain files with MTEX so that users can edit .tex files by double-clicking, view
.dvi /.ps /.pdf /.eps files by double clicking, and so on. To this end, the users
just need to do the following steps:
1. Invoke “MTEX Main Menu” by running mtex\MainMenu.cmd.
14
2. Click button [RightMenu+FileAssocs] and a message box will appear.
3. Click button [Associate MTeX Files] and a dialog MTeX Files Association will
appear.
4. Customize file association and click [OK] to associate files related with
MTEX.
Note that the users can also restore the file associations at any time by similar
operations except that the users need to click button [Clear file associations] in the
third step.
Figure 5: Snapshot of Associating Files in MTEX
Other Possible Configurations Besides the above suggested configurations, users
can also reconfigure any utilities shipped with MTEX in a unified way when
necessary. We take one example to explain this configuration. MTEX provides
one component RedMon [33], which can be used to create virtual .pdf Printer
and .eps Printer, tiny replacements of Adobe Distiller ©. Of course, such an utility
needs to modify the Windows registry, hence if the users want to use such virtual
printers, the users need to configure it once. To this end, the users just need to
do the following steps:
15
1. Invoke “MTEX Main Menu” by running mtex\MainMenu.cmd.
2. Click button [Reconfigure MTeX] and a dialog on License for MTeX will appear.
3. Click button [I agree] to accept the license agreement and choose [Custom
Configuration].
4. In the dialog the users can customize some features and utilities in MTEX,
for example, select only RedMon in the right panel, and then click button
[Configure Utils Only] to configure RedMon , which will install virtual .pdf
Printer and .eps Printer step by step.
Note that the users can also let MTEX to make [Default Configuration] in the third
step, which will automatically make full configuration for MTEX including creating shortcuts, associating files, font configurations, and so on.
16
Figure 6: Snapshot of Reconfiguring of MTEX
4
Teaching TEXing with MTEX
Since MTEX is easy-to-install and easy-to-learn, with proper teaching skills, usually the teacher only needs to spend about half an hour to introduce the installation of MTEX and basic usage of LATEX.
17
4.1
One Demo
Here is one simple demo to use MTEX:
1. Invoke the default editor Sc1IDE by running mtex\MTeX-IDE.cmd or from
desktop shortcut.
2. Open any demo file, e.g. mtex\demo\e-sample.tex, then the users will see
LATEX codes are syntax highlighted with code folding.
3. Click toolbar button
(or hot key Ctrl+Alt+3) to smartly compile the TeX
file with engine pdflatex.
4. Click toolbar button
(or hot key Ctrl+7) to view the generated .pdf file.
Note that by double-clicking anywhere in the .pdf view, the editor will
locate the cursor at corresponding line of the source file.
Figure 7: TEXing in MTEX: source view and .pdf view
In this step, it would be much attracting for students if the teacher can compile
more interesting examples in the demo folder such as e-chess.tex, e-carom.tex, and
so on. These fancy examples on Chess, Chemistry, etc. can inspire the students
to discover the great power of TEX and LATEX, which will motivate them to study
LATEX by reading documents and learning by practice.
18
4.2
One Example
To edit a new TeX file, the teacher can do the following steps:
1. Press Ctrl+N to open a new buffer and press Ctrl+S to save it as a TeX file
with .tex extension.
2. Type doc followed by Ctrl+B to generate one simple LATEX template.
3. Edit the file by adding some basic commands and arbitrary text.
4. Compile the file like the above to see the effects.
5. Change the document class to ieeetran (or other) and recompile the file like
the above.
In this step, the teacher should highlight the following important points to
students:
– Firstly, LATEX is to represent what you think rather than what it looks like, so we
need not focus on the typesetting details of a document; instead, we need
to think over the structure and contents of the document. This point is the
most critical philosophy which distinguishes LATEX from WinWord ©.
– Secondly, learning to use LATEX is not difficult at all if starting with a simple
easy-to-understand LATEX template. This point is of significance for LATEX
beginners so that they are not lost at the starting point.
– Thirdly, MTEX provides many convenient ways (abbreviation expanding,
sidebar panels, templates and macros pad, etc.) to allow the user quickly
typeset LATEX commands, environment, or even a somewhat complex document template. This point will help students to gain confidence in “writing”
LATEX codes efficiently.
– Lastly, learning LATEX by practice and searching is the most important key to
help a LATEX beginner become an expert gradually. This point is the most
important thing for the students, hence the teacher should give enough
chances for students to learn by practice. In my graduate courses, I always
ask the students to finish their assignments with LATEX by using MTEX. Note
that the teacher need not introduce many LATEX commands to students since
the students are suggested to read the classic document shipped with MTEX
19
such as lshort.pdf and all the students will grasp LATEX in continuous exercises of using LATEX.
Figure 8: Snapshot of Sc1IDE: a fully functional all-in-one editor
Some editing tips will be briefly introduced in Section 6.
During the editing, users can also click the toolbar button
to launch a temA
plate and symbol pad for easy inserting of L TEX commands or symbols.
20
Figure 9: Snapshot of MTEX TMac: a template and symbol pad
4.3
Smart Compilation
MTEX provides one unique smart compilation script, clatex.btm, for .tex files
and other files. Roughly speaking, this script can do some clever jobs to handle
files with different extensions and different formats. For non-TEX files, it invokes
command openx -compile to compile files via the compiler settings given in file
openx.cfg . For TEX files, this script can do the following jobs:
– For .ctx file, make necessary pre-processing and post-processing needed
by CCT system.
– For .ty file, make necessary pre-processing and post-processing needed by
TY system.
– Do proper actions for all kinds of TEX files so as to make it inverse searchable
for both .dvi and .pdf output.
– Generate missing pixel fonts before previewing the .dvi file.
21
– Invoke bibtex or bibtex8 automatically to support use of .bib reference
database.
– Invoke makeindex or cctmkind to support index generating when necessary,
even for Chinese documents.
– According to file contents, automatically determine and invoke proper TEX
engine (tex, latex, pdftex, pdflatex, xetex, xelatex, etc.) to compile .tex file.
– Automatically determine whether to compile the .tex file twice, three times
or four times.
– Support graphics inclusion of arbitrary image format by automatic image
format conversion to required format (.eps , .pdf , or .jpg ) provided that
users do not explicitly give the extension of the graphics file.
– Automatically invoke metapost for the inclusion of metapost figures (*.1, *.2,
and so on).
– Automatically invoke dvipdfm , dvips , ps2pdf , ppower when necessary.
– Support specific pre-processing and post-processing for Chinese typesetting,
for example, use fixbbl and gbk2uni to fix possible errors of .bbl and .out
generated.
– Pass proper options to invoked programs so as to be able to embed Type 1
fonts.
– Automatically preview generated .dvi or .pdf file if the compilation is
successful.
– Make necessary processing to support special packages such as psfrag ,
pdftricks , mfpic , asymptote and so on.
– Pass proper options to invoked programs so as to typeset documents in
landscape view or specified paper format.
– Invoke certain user-specified programs during the compilation process according to the user’s clatex setup.
– Clean temporary files generated in the compilation.
– Specify the .pdf compatibilty level (version) for the final .pdf file.
– More jobs can be found from the Clatex Options dialog shown in Figure 10.
22
Figure 10: Snapshot of Clatex Settings
5
Brief Overview to Typical Installation
In the above, we have seen some unique features of MTEX. In this section, we’d
like to give a brief overview to the components provided in the typical installation.
5.1
MTEX Kernel
The kernel of MTEX (mainly the scripts and tools in folder mtex\bin) is the heart of
MTEX suite, which distinguishes MTEX from most other TEX distributions. Some
useful MTEX tools in the kernel will be introduced in next subsection. Here we
only list several examples of batch scripts in MTEX to illustrate some unique
features of MTEX.
23
– clatex.btm: a script for smart compilation for all files.
– add_doc.btm: a script to download and install one document from the servers.
– add_font.btm: a script to download and install one font family from the
servers or local archives.
– add_map.btm: a script to add one font map file and make necessary changes
to map files for dvipdfm ,dvips and pdftex .
– add_pkg.btm: a script to download and install one font family from the
servers or local archives.
– add_util.btm: a script to download and install one utility from the servers or
local archives.
– ask_server.btm: a script to show available MTEX servers and confirm user’s
choice for later downloading.
– bit_server.btm: a script to determine the MTEX server by detecting whether
the user is in the campus of Beijing Institute of Technology.
– chkmsetup.btm: a script to check local repository if it exists.
– chkproxy.btm: a script to check the Internet Explorer © proxy settings.
– compile.btm: a script to compile a TeX file especially the TeX file generated
by TpX .
– context.btm: a script to compile ConTEXT file.
– copyfnts.btm: a script to copy font files to proper font folders from arbitrary
font archives containing font files.
– cropbmp.btm: a script to crop bitmap images automatically.
– cropeps.btm: a script to crop .eps images automatically.
– cropimg.btm: a script to crop any image files automatically.
– croppdf.btm: a script to crop .pdf images automatically.
– delx.btm: a script to clean temporary files.
– dir_server.btm: a script to list files in the specified server path.
– doc.btm: a script to search and view local documents and even server-side
documents.
24
– dos2unix.btm: a script to convert text files from DOS format to Unix format.
– down_src.btm: a script to download and run installer or package according
to the settings given in specified utility folder.
– dvi2img.btm: a script to convert .dvi file to images, supporting frequently
used image formats.
– dvicpy.btm: a script to expand virtual fonts to practical fonts in .dvi file.
– dvimerge.btm: a script to merge two .dvi files.
– dvinup.btm: a script to convert .dvi file by putting several pages on one
page.
– dviview.btm: a script to view .dvi files, supporting most known .dvi viewers including DviWin, DviOut, WinDvi, Yap, CCTWin32, Dviscr.
– editx.btm: a script to invoke openx.btm -edit.
– emf2eps.btm: a script to convert .emf figure to .eps figure.
– eps2pdf.btm: a script to convert .eps figure to .pdf figure.
– EqnEdit-Web.btm: a script to invoke on-line equation editor.
– fast-cfg.btm: fast configuration for MTEX.
– gconvert.btm: a script to make arbitrary image conversion.
– gen_pkg_list.btm: a script to batchly generate an Excel © file from .tpm files.
– genfontdb.btm: a script to generate font database file fonts_db.cfg.
– genmakefile.btm: a script to generate a Makefile template based on files in
current folder.
– genpkgdb.btm: a script to generate package database file pkgs_db.cfg.
– htmview.btm: a script to view HTML files via installed or known web browser.
– l2t.btm: a script to convert LATEX file to pure text file.
– latex-dtx.btm: a script to batchly compile .dtx files.
– latex-ins.btm: a script to batchly compile .ins files.
– license.btm: a script to display license dialog.
– main.btm: a script to show the main menu of MTEX.
25
– makecmap.btm: a script to generate *.cmap files for using package [ccmap].
– makefmts.btm: a script to make various TEX /Metafont /Metapost formats,
supporting most known TEX engines.
– makefnt.btm: a script to make configuration for True Type font.
– makepk.btm: a script to make .pk files from True Type fonts, Type1 fonts,
metafont fonts, and Chinese fonts.
– maketex.btm: a script to invoke download-and-install-on-the-fly for missing
macro packages.
– maketfm.btm: a script to make .tfm files from True Type fonts, Type1 fonts,
metafont fonts, and Chinese fonts, supporting automatic download-andinstall-on-the-fly for missing fonts when necessary.
– mchange.btm: a script to batchly make replacements to files via sed .
– m-conv.btm: a script to simply invoke smart conversion, i.e. openx.btm convert.
– mergefiles.btm: a script to merge text files.
– mergepdf.btm: a script to merge .pdf files.
– mftoeps.btm: a script to convert .mf file to .eps file using mftoeps package.
– mktexlsr.btm: a script to generate file name database for MTEX.
– mp2eps.btm: a script to convert .mp file to .eps file.
– mp2pdf.btm: a script to convert .mp file to .pdf file.
– mproof.btm: a script to compile .mp file and view generated mps file.
– mrun.btm: a script to run various commands conviniently, designed for configuring tools menu for other editors.
– mtex-assoc.btm: a script to help users to associate files.
– mtexcfg.btm: a script to configure basic settings of MTEX.
– mtex-cfg.btm: a script to configure utilities in MTEX.
– mtex-edit.btm: a script to invoke text editor.
– mtex-env.btm: a script to generate MTEX environment cache file mtex.env.
26
– mtex-font.btm: a script to help users configure TrueType fonts via graphical
user interface.
– mtex-guru.btm: a script to help users search or view macro files, useful for
finding certain commands.
– mtex-lfn.btm: a script to resolve long file name problem in early MTEX.
– mtex-lnk.btm: a script to create shortcuts for MTEX.
– mtex-pkg.btm: a script to install or uninstall extra packages.
– mtex-reg.btm: a script to register right menu commands for MTEX.
– newer.btm: a script to detect whether one file is newer than the other file.
– notfind.btm: a script to display an error message box when a file is not found.
– openx.btm: a script capable to open, view, edit, or convert any files, according
to the settings of configuration file openx.cfg .
– pdf2txt.btm: a script to convert .pdf file to text file.
– pdffrag.btm: a script to convert .eps figures to .pdf figures, with symbols
replaced with LATEX commands specified in a .tex file.
– pdfmerge.btm: a script to merge .pdf files into one .pdf file.
– pdfnup.btm: a script to convert .pdf file by placing several pages into one
page.
– pdfselect.btm: a script to select or extract certain pages from a .pdf file.
– pdfview.btm: a script to view .pdf files, supporting most .pdf viewers such
as SumatraPDF, PdfXCView, GsView, Acrobat Reader, and so on.
– pdfview-s.btm: a script to view .pdf files with forward searching feature,
mainly supporting SumatraPDF .
– pfshow.btm: a script to view Type 1 fonts, i.e. .pfb /.pfa files.
– picutil.btm: a script to invoke picture utilities.
– ppower.btm: a script to post-process .pdf files to add movie effects generated
by pause macro package.
– preview.btm: a script to preview multiple files.
– ps2pdf.btm: a script to convert .ps file to .pdf file.
27
– psmerge.btm: a script to merge .ps files.
– pst2pdf.btm: a script to produces .pdf files for all files of the form *-fig*.tex.
– pstex2eps.btm: a script to convert .pstex file to .eps file.
– pstex2jpg.btm: a script to convert .pstex file to .jpg file.
– pstex2pdf.btm: a script to convert .pstex file to .pdf file.
– psview.btm: a script to view .ps /.eps files, supporting most PostScript
viewers such as GsView , GS , RoPS , GsV .
– regtool.btm: a script to operate Windows registry.
– res2dll.btm: a script to convert .res file to .dll file via Delphi © compiler.
– rtfview.btm: a script to view .rtf file via the associated application.
– run.btm: a script to run an editable command.
– run-edt.btm: a script to run WinEdt ©commands.
– runx.btm: a script to ask for actions for given file, whose extension determines the possible actions.
– search.btm: a script to search for an executable file.
– set_msg.btm: a script to set an internal environment variable _MSG.
– setclatex.btm: a script to show a dialog for customize the options of smart
compilation.
– setemtex.btm: a script to set environments for using EmTeX .
– setjava.btm: a script to search or set the path of java.exe.
– setlang.btm: a script to set up the language interface of MTEX.
– setproxy.btm: a script to set the proxy server for commands including wget ,
curl and svn .
– setttfpk.btm: a script to set environment variables for program ttf2pk .
– spell.btm: a script to detect and invoke available speller shipped with MTEX,
supporting 4spell , aspell , ispell , amspell , Word-Spell , WPS-Spell , and WinEdtSpell .
– striptex.btm: a script to strip line comments in TeX files.
28
– svn-checkout.btm: a script to emulate svn checkout command without installing
utility svn .
– t2h.btm: a script to convert text file to HTML file.
– t2l.btm: a script to convert text file to LATEX file.
– t2r.btm: a script to convert text file to .rtf file.
– tcstart.btm: a script to be called before any other batch scripts, mainly preparing necessary environments for MTEX.
– testspeed.btm: a script to test speed of specified servers.
– tex_cmd.btm: a script to determine the proper TEX engine of a .tex file.
– texscan.btm: a script to preprocess figures included in the TEX file by scanning contents of TEX file.
– tpx2eps.btm: a script to convert .tpx image file to .eps image file.
– tpx2jpg.btm: a script to convert .tpx image file to .jpg image file.
– tpx2PDF.btm: a script to convert .tpx image file to .pdf image file.
– tpxscale.btm: a script to process .tpx file so as to make it scalable by any
factor defined in TEX file.
– txt2dvi.btm: a script to convert text file to .dvi file.
– txt2eps.btm: a script to convert text file to .eps file.
– txt2img.btm: a script to convert text file to image file of any format.
– txt2pdf.btm: a script to convert text file to .pdf file.
– txt2ps.btm: a script to convert text file to .ps file.
– un_inst.btm: a script to uninstall MTEX utility if un-installer found.
– unbib.btm: a script to post-process .bib file generated by BibEdit so as to
use Chinese references.
– uninstall.btm: a script to uninstall MTEX (removing temporary folders and
changes to the registry).
– unix2dos.btm: a script to convert Unix text file to DOS text file.
– unknown_cmd.btm: a script to be invoked when unknown command found
in the MTEX DOS prompt.
29
– upd_map.btm: a script to update map files in MTEX.
– upd_mtex.btm: a script to update MTEX components from servers.
– updafm.btm: a script to update .afm files from .pfb files in MTEX.
– updpkg.btm: a script to update the list of installed macro packages.
– updtfm.btm: a script to update .tfm files for fonts in MTEX.
– updvf.btm: a script to update vf.cfg from .vf files in MTEX.
– userutil.btm: a script to ask user to choose from user-defined user utilities.
– util.btm: a script to search or download-and-install-on-the-fly one utility.
– view.btm: a script to view .dvi file using dviscr , only for old EmTeX .
– viewfont.btm: a script to view any font file.
– virfnt.btm: a script to display real font name of a virtual font.
– w-close.btm: a script to close windows with certain title.
– writable.btm: a script to check whether a file/folder is writable.
5.2
Useful MTEX Tools
TMac: Template and Macro Pad This small tool can help users to insert templates
or code snippets to editor. This tool is fully configurable by editing the configuration file tmac.ini. Once a symbol is clicked, its corresponding code will be put
into the clipboard and inserted into the active editor window. Hence this tool
can be used with any editor. We have provided many templates and macros in
the default configuration file, and two groups of HTML codes snippets. Besides
normal code insertion, we have also implemented some unique special features,
for example, it is possible to launch certain program by clicking an icon; or it is
possible to pop up a color dialog so as to insert RGB values of selected colors.
Therefore, this small tool can also serve as a small floating toolbar and a color
picker for all applications.
BibX: Reference Extractor This small tool can help users to extract bibitem in
BibTEX format from some text containing a reference. This tool is very useful to
generate bibitem from searching references in database like Web of Science © and
30
Ei Village ©. This tool is also configurable to add more formats of references. Its
principle is to compare the text with each format defined in the configuration file,
and generate the bibitem via the most matchable format.
Figure 11: Snapshot of BibX: one small reference extraction tool
MTEX-BMP: LATEX Bitmap Tool This small tool can help users to generate bitmap
image from LATEX codes so as to use such image in any Windows © application like
WinWord © or PowerPoint ©. This feature is very useful to “embed” powerful and
beautiful LATEX mathematics typesetting in Windows applications. Its principle is
to compile the LATEX codes, then convert .dvi to .ps format, and then convert
.ps to bitmap image and put it in the clipboard, which will be then sent to
the specified application window. Note that this tool can not only help to make
PowerPoint © slides, but also help other applications to insert LATEX equations.
31
Figure 12: Snapshot of MTeX-BMP: using LATEX for Windows applications
Net_Pkg: File or Package Downloader This small tool is used to search and download files from CTAN. During the compilation of TeX files, if a macro package is
missing, MTEX will launch a script make-tex.btm, which will search the missing
macro file in the servers of MTEX and then invoke this package downloader if
server searching fails.
32
Figure 13: Snapshot of Net_Pkg: File or Package Downloader
UtilsMan: General Utilities Manager This tool is used to help users use various
utilities with any text editor. Note that not all text editors provide feature of
launching external tools or configuration of tools menu, hence generally it is very
inconvenient to use LATEX without a proper text editor. To resolve such a problem,
this tool is invented to provide an external tools menu for all editors, even for
notepad in windows. For example, after opening a .tex file in UtilsMan, we can
select “Smart Compilation” from the drop-down menu of this tool to compile the
.tex file. With this tool, it is not necessary to configure most text editors, and
the users can use any editor as the default MTEX editor for editing .tex files.
Figure 14: Snapshot of UtilsMan: external powerful tools menu for any text editor
33
M-Timer: Mini Timing Tool This tool is very helpful for timing reminder during
rehearsal of slides.
5.3
Other Components
In the typical MTEX installation, besides the MTEX kernel, the following components are provided:
– Almost all standard macro packages in CTAN are provided in the compact
form. Only macro files (e.g. *.sty,*.cls,*.cfg) are included while their documents are packed as document archives and put on the servers of MTEX
for possible download-and-install-on-the-fly later. For example, typing doc
listings in the MTEX DOS Prompt will view the document after downloadand-install-on-the-fly for document listings.pdf if it is not available in the
local documents folder. It is also convenient to check all local documents
and server documents via the MTEX Main Menu.
– Almost all macro packages made by Chinese TEXers are provided also with
brief usage introduction.
– Some selected documents for beginners (such as lshort.pdf ) are provided in
the doc folder of MTEX. All local documents can be accessed directly by
invoking MTEX Main Menu/MTEX Documents.
– To help users, a specific demo folder is provided in MTEX so as to provide
many simple TeX files for illustrating the straight-forward use of TEX, LATEX,
and many macro packages.
– Some selected fonts are shipped with the typical installation, while most
other fonts which are not likely to be used in daily work are packed and
placed on the servers of MTEX for possible download-and-install-on-the-fly
later. For example, with the default installation, during the compilation of
this article, the compiler requests for font lmss12, whose .tfm file cannot be
found, hence MTEX will search it in the font database file fonts_db.cfg and
discover this font file belongs to lm (Latin Modern ) font family, then MTEX
will try to download-and-install-on-the-fly lm font family which makes later
compilation okay after automatic configuration of lm fonts. Note that lm
font family is very large and not needed by most LATEX files, we do not put
34
it in the typical installation although XeTEX and ConTEXT users may highly
depend on this font family.
– Main components of Web2C are included in the typical installation so as
to provide basic TEX engines (tex, latex, pdftex, pdflatex) and command-line
utilities (such as metafont, dvips, ttf2pk, gftodvi, etc.). Other TEX engines
and utilities are packed and placed on the servers of MTEX for possible
download-and-install-on-the-fly later. For example, when a user tries to do
smart comilation for demo file mtex\demo\xetex\example-1.tex, MTEX will automatically detect that this file needs xelatex to compile it while XeTEX is
not shipped with the typical installation, hence MTEX will download and
install XeTEX component on the fly and then use this engine to compile the
document successfully.
– A customized Ghost Script as well as GsView are provided in the typical
installation.
– The following selected utilities are shipped with the typical installation:
· Aspell [34]: the default spell checker which can be used in any text
editor.
· Bibedit [35]: one simple reference management program to generate
.bib files.
· Dviwin [31]: the default .dvi viewer with many features.
· Gnuplot [36]: one powerful scientific drawing software by scripts, used
also by some other MTEX utilities such as Rlab [37].
· IrfanView [38]: one small picture viewer and converter, providing arbitrary image file conversion.
· l2h [39]: one component to convert LATEX to HTML (web page).
· l2r [40]: one component to convert LATEX to .rtf file (Word © document).
· latexmac : a tiny tool to insert LATEX commands or symbols.
· metapost [41]: a small powerful drawing program to generate PostScript
figures.
· ppower [15]: a small java application to assist the slides making with
macro package pause.sty .
35
· RedMon [33]: a small utility to provide free .pdf and .eps printers by
the help of GhostScript for converting any document to .pdf or .eps
files in any Windows applications.
· SumatraPDF [32]: the default .pdf viewer capable of inverse searching.
· TeXaide [42]: a small utility to help LATEX beginners to typeset formulas
in the way of Equation Editor like in Microsoft Office.
· TpX [43]: a small drawing utility for most drawing jobs.
· x2l [44]: a small plugin of Excel © to help Excel © users to generate LATEX
tables from Excel © tables.
6
Sc1IDE: All-In-One IDE
Currently, the default editor in MTEX is Sc1IDE , or All-In-One IDE , which is
developed based on free software SciTE and mainly maintained by the author
and two another researchers in China.
6.1
Brief Introduction
Sc1IDE is released as a free open-source software, whose source codes can be
found from http://code.google.com/p/scitelatexide. The initial name of Sc1IDE
was SciteLatexIDE , which was coined by Instanton[45], who made some changes
and special configurations to enhance the official SciTE so that it can be more
suitable for editing and compiling TEX files as well as using some related tools
conveniently. Later, the author and another researcher, Hongsheng Qi, took over
the job of enhancing and maintaining this software. We made significant improvements to previous SciteLatexIDE, and rename it to Sc1IDE, or All-In-One IDE, to
reflect the nature that it aims to be a general-purpose text editor and integrated
development environment which is suitable for TEXing, programming, web design and so on, supporting most file types as well as compilers and tools.
Roughly speaking, Sc1IDE not only keeps all features of SciTE [46], but also
incorporates most enhancements made by SciTE-Ru [47], and it adds more unique
features for TEXing and programming jobs. We made many efforts to make this
small text editor as powerful as other editors and easy to use by providing preconfigured settings for TEX files and many programming languages in unified
36
ways. In this section, due to the page limit, we only introduce some features of
Sc1IDE by example.
6.2
Main Features
Briefly speaking, Sc1IDE has the following main features:
– Customizable locales;
– Support Unicode encoding;
– Customizable tools menu even submenus;
– Customizable toolbar buttons;
– Customizable keyboard shortcuts;
– Multi-buffer editing;
– Row block and column block operations;
– Output buffer for running commands;
– Richful command-line arguments;
– Customizable language support;
– Customizable syntax highlight;
– Customizable code folding;
– Customizable code auto-completion;
– Customizable code API call-tips;
– Customizable abbreviation expansion;
– Built-in lua [48] scripting;
– Customizable lua extensions;
– Regular expression searching and replacing;
– Full-screen editing;
– Editing macros support;
– Compilation error locating;
– Brace auto matching;
37
– Block or line commenting;
– Unique Files panel to show files in current folder, favorite files, and project
files;
– Unique Outline panel to show structure and bookmarks of current file;
– Unique Abbrev panel to show available abbreviations and code completion
API;
– Unique Docs panel to show classified help documents or on-line documents
and even searching engines;
– Unique Ltx-Labels panel to show labels, bibitems, and included filenames in
current file;
– Unique Ltx-Cmds panel to show insertable LATEX Greek commands, environments, mathematics functions;
– Unique integrated debugging for C/C++,Pascal,C#,and Lua with the help of
gdb [49]/mdb [50];
– Unique integrated subversion version control;
– Unique LATEX block compilation;
– Unique customizable F1 keyword help;
– Unique embedded expression calculator;
– Unique E-book mode for viewing or reading files;
– Unique preconfigured monofont schemes for programming jobs;
– Unique Hex editing mode for editing arbitrary files;
– Unique word counting for both ASCII files and Chinese files;
– Spell checking by internal or external spell checkers;
– Many additional features provided by lua scripts.
Among these features, we need to remark that the abbreviation expansion is
very convenient. For example, with Sc1IDE , typing eq followed by hot key Ctrl+B
will generate an empty equation environment, similarly itm can expand to an
empty itemize environment, fig can expand to an empty figure environment, and
so. Note that the abbreviation settings can be configured for each file type, and
the users can arbitrarily add new abbreviations or modify existing abbreviations.
38
6.3
TEXing Support
As to TEXers, we have some special features for happy TEXing:
– Automatic brace completion, e.g. completing { by }, completing \left( by
\right).
– Automatic environment completion, e.g. completing \begin{xyz} by \end{xyz}.
– Automatic ConTEXT command completion, e.g. completing \starttext by
\stoptext.
– Automatic inserting matching $ when typing $.
– Automatic quote replacement, e.g. typing " yielding ‘‘ and ’’ in turn.
– Automatic inserting braces for mathematics typesetting when typing _ or ^,
e.g. typing _ yielding _{} with cursor inside the braces.
– Customizable folding support for sectioning commands (like \section, subsection,
etc.), environments (\begin{...} and \end{...}), code blocks (like \if,
\def, etc.).
– Two useful sidebar panels for LATEX labels, references, subfiles, commands.
– Easy inserting of label references and citations, e.g. clicking the braces of
\ref{} or \cite{} yielding a pop-up list of defined labels or found bibitems
for selection.
– Integrating support to more TEX engines such as XeTEX.
– Integrating many tools related with LATEX in the Tools menu, e.g. converting
LATEX file to HTML or RTF file.
– Smart compilation for TeX files.
– Support for compiling selected text only.
– Switching between TeX file and log file.
7
Other Addons of MTEX
With MTEX, we do not only provide essentially necessary tools for TEXing, but
also provide many other utilities which are unlikely to be included in other TEX
39
distributions. All the utilities provided in MTEX were carefully chosen, and most
of them are less than 2 Megabytes if packed with Rar .
The utilities provided in MTEX can be roughly classified into the following
categories:
– Picture viewing and converting: for example, Irfan View [38], XnView [51],
etc.
– Picture drawing and scientific drawing: for example, TpX [43],TeXCAD32
[52], GnuPlot [36],Asymptote [53],Kseg [54],GraphViz [55],JsPlot ,EDraw , PhotoFiltre [56], and so on.
– .dvi /.ps /.pdf file viewers: for example, DviOut [57], MuPdf .
– .pdf tools: for example, PdfTk [58], xpdf [59].
– References management: for example, BibDB [60], JabRef [61].
– Equation editing: for example, LatexMac , TeXaide [42], EqmLite [62].
– Scientific computing: for example, Rlab [37], Yacas [63].
– Version control: for example, SVN [64], RapidSVN [65], CVS [66].
– Demo making: for example, Wink [67], InstantDemo [68]©.
– Packing and unpacking: for example, Rar [69], Wim [70], Upx [24].
– Embedded system compiler: for example, C51 [71],SDCC [72],Arm-Gcc ,AvrGCC .
– Compilers and interpreters: for example, MinGW [73], Tiny C Compiler [74],Lua
[48], Perl [75].
– Code formators: for example, Astyle [76], Uncrustify ,Ctags .
– Spell checkers: for example, Aspell [34], Ispell [77], 4Spell [78].
– Font utilities: for example, FontViewer [79], TypoGraf [80].
– Misc utilities: for example, Zoomer , Mempad [81], Qemu [82], Commander
[83].
– More useful utilities of other types.
Most third-party utilities can be accessed by invoking MTEX Main Menu/[Choose
User Utils]. The utilities in this menu can be customized in configuration file
40
utils.cfg , which defines possible editors, .dvi /.ps /.pdf viewers, spell checkers, converters, user utilities, and so on. Note that the menu of User Utilities can
also have configured submenus, which make hundreds of utilities well organized
in simple and elegant way.
Figure 15: Snapshot of Choosing User Utilities in MTEX
Listing 2: Configuration example of utils.cfg
[ Utils ]
E d i t o r s =Sc1IDE/WinEdt/ E d i t P l u s /Sc1/SciTE/ED / . . .
DviViewers=#Auto/DviWin/Yap/Dviout/WinDvi/CCTWin32 / . . .
41
PsViewers =#Auto/GsView/RoPS/PsV/Gs/Ps2pdf/Open / . . .
PdfViewers =#Auto/SumatraPdf/MuPdf/Open/GsView/PsV/Gs / . . .
S p e l l C h e c k e r s =4 S p e l l /ASpell/ I S p e l l w / I S p e l l /AmSpell / . . .
P i c U t i l s =TpX/MDraw/PageDraw/TkPaint/LatexCAD/TexCad32/
TeXCad / . . .
C o n v erters=Gconvert/GS−c o n v e r t / l t x 2 t x t / t x t 2 l t x / . . . / ?
D e f U s e r U t i l s =M−Timer/LyX/LatexMac/TeXaide/ B i b E d i t /WBibDB/
JabRef / . . .
U s e r U t i l s = o f f i c e : [ O f f i c e ]/ e d i t : [ E d i t o r s ]/draw : [ DrawiSystem
]/ b ib : [ R e f e r e n c e s ]/ eq : [ Equations ]/ math : [ Mathematics ]/ vcs
: [ Subversion ]/demo : [ DemoMaking]/ t v : [ TV]/ media : [ P l a y e r s ]/
a r c : [ Archives ]/ browser : [ Browsers ]/im : [ C h a t t i n g ]/game : [
Games]/ dev : [ Programming ]/emb : [ Embedded]/% D e f U s e r U t i l s
Formats= t e x / e t e x / l a t e x /ptex/ p l a t e x / p d f t e x / p d f l a t e x / x e t e x
/...
[ Menus ]
menu . misc=MemPad/I C a l C l k/M−Timer/Zoomer/Lingoes / . . .
menu . s p e l l = F r e e S p e l l / P r o S p e l l/%S p e l l C h e c k e r s
menu . math=Rlab/FreeMat/MathViews/MLAB/Jmath/Yoric k/SysQuake
/...
menu . vcs=RapidSVN/SVN−Checkout/SVN/CVS
menu . sys=Commander/QEmu/UltraISO/ E v e r e s t / . . .
menu . b i b= B i b E d i t /BibDB/WBibDB/ J a b R e f
...
[Commands]
Note that any utility (say xyz ) can be easily invoked via command like util xyz
in the MTEX DOS Prompt, which will invoke add_util.btm to start download-andinstall-on-the-fly if the utility is not installed with MTEX.
8
Additional Notes
Users of MTEX may send suggestions, comments, or bug reports to mtex-suite@
googlegroups.com or submit/reply posts in MTEX-Suite Googlegroup[84]. Users
of MTEX are suggested to subscribe to MTEX-Suite Googlegroup by sending an
42
email to [email protected]. After subscription, users will
be able to receive latest updates or messages on using MTEX, and can also post
questions or suggestions in using MTEX or LATEX or XeTEX or any meaningful
related things. Usually, the authors of MTEX or other MTEX users may help to
answer the questions soon. The official website[1] of MTEX is still under construction and it will be updated soon with a new release in year 2012. And the users
can find more personal information of the author on the author’s homepage [85].
References
[1] H. Ma, “MTeX HomePage.” [Online]. Available: http://mtex.sf.net
[2] “TeX - Wikipedia, the free encyclopedia.” [Online]. Available:
//en.wikipedia.org/wiki/TeX
http:
[3] “LaTeX - Wikipedia, the free encyclopedia.” [Online]. Available:
//en.wikipedia.org/wiki/LaTeX
http:
[4] “CTeX HomePage.” [Online]. Available: http://www.ctex.org/HomePage
[5] “Aloft: Lingyun Wu.” [Online]. Available:
LingyunWu
http://aloft.ctex.org/wiki/
[6] “MikTeX Project Page.” [Online]. Available: http://miktex.org
[7] “WinEdt Web Site.” [Online]. Available: http://www.winedt.com
[8] “CCT’s User Manual.” [Online]. Available:
CCTLaTeX.pdf
ftp://ftp.cc.ac.cn/pub/cct/
[9] “Zhang Linbo’s home page.” [Online]. Available: lsec.cc.ac.cn/~zlb
[10] “Tian Yuan System Web Site.” [Online]. Available: http://wims.math.ecnu.
edu.cn/ty/index-ty.html
[11] “Luatex home page.” [Online]. Available: http://www.luatex.org
[12] “BibTeX HomePage.” [Online]. Available: http://www.bibtex.org
43
[13] “TeX applet used to generate correct Chinese PDF bookmarks .” [Online].
Available: http://www.freebsdsoftware.org/chinese/gbk2uni.html
[14] “The TeX Catalogue OnLine, Entry for fixbbl, Home Edition.” [Online].
Available: http://texcatalogue.sarovar.org/entries/fixbbl.html
[15] “PPower4 Manual.” [Online]. Available: http://www.tex.ac.uk/tex-archive/
support/ppower4/manual.pdf
[16] “fpTeX : teTeX for Win32.” [Online]. Available: http://www.slac.stanford.
edu/comp/unix/package/tex/fptex/fptex.html
[17] “Index of /systems/e-tex/v2.1/dostp.” [Online]. Available: http://ctan.
mirrorcatalogs.com/systems/e-tex/v2.1/dostp
[18] “CTAN web interface: Directory listing for /systems/msdos/emtex.” [Online]. Available: http://tug.ctan.org/tex-archive/systems/msdos/emtex
[19] “BaKoMa TeX Site - The Home of TeXWord .” [Online]. Available:
http://www.bakoma-tex.com
[20] “4DOS - Wikipedia, the free encyclopedia.” [Online]. Available:
//en.wikipedia.org/wiki/4DOS
http:
[21] “EditPlus Web Site.” [Online]. Available: http://www.editplus.com
[22] “Ghostscript: Ghostscript.” [Online]. Available: http://www.ghostscript.
com
[23] “TCC/LE: A Better Windows CMD Shell for Free.” [Online]. Available:
http://jpsoft.com/tccle_cmd_replacement.html
[24] “UPX: the Ultimate Packer for eXecutables - Homepage.” [Online]. Available:
http://upx.sourceforge.net
[25] “KOL and MCK Web page.” [Online]. Available: http://kolmck.net
[26] “Gsview.” [Online]. Available: htpp://pages.cs.wisc.edu/~ghost/gsview
[27] “Donald Knuth - Wikipedia, the free encyclopedia.” [Online]. Available:
http://en.wikipedia.org/wiki/Donald_Knuth
44
[28] “CTAN.” [Online]. Available: http://ctan.org
[29] T. Oetiker, “The Not So Short Introduction to LATEX2e.” [Online]. Available:
http://tobi.oetiker.ch/lshort/lshort.pdf
[30] “Sc1IDE: An All-In-One IDE.” [Online]. Available: http://code.google.com/
p/scitelatexide
[31] “DVIWIN Home Page.” [Online]. Available: http://dviwin.keystone.gr
[32] K. Kowalczyk, “Free PDF Reader - Sumatra PDF.” [Online]. Available:
http://blog.kowalczyk.info/software/sumatrapdf
[33] “RedMon - Redirection Port Monitor.” [Online]. Available:
//pages.cs.wisc.edu/~ghost/redmon
http:
[34] “Gnu aspell.” [Online]. Available: http://aspell.sourceforge.net
[35] “BibEdit - SWiK.” [Online]. Available: http://swik.net/bibtex/del.icio.us/
tag/bibtex/BibEdit/npef
[36] “gnuplot homepage.” [Online]. Available: http://www.gnuplot.info
[37] “Rlab Web Site.” [Online]. Available: http://rlab.sourceforge.net
[38] “IrfanView - Official Homepage - one of the most popular viewers.”
[Online]. Available: http://www.irfanview.com
[39] “Tth: the TEX to html translator.” [Online]. Available: http://hutchinson.
belmont.ma.us/tth
[40] “LaTeX2rtf Home.” [Online]. Available: http://latex2rtf.sourceforge.net
[41] “MetaPost - TeX Users Group.” [Online]. Available: http://www.tug.org/
metapost.html
[42] “Design Science: TeXaide.” [Online]. Available: http://www.dessci.com/
features/taform.stm
[43] “TpX Project.” [Online]. Available: http://tpx.sourceforge.net
45
[44] “CTAN web interface: Directory listing for /support/excel2latex.” [Online].
Available: http://ctan.org/tex-archive/support/excel2latex
[45] “Instanton’s Blog.” [Online]. Available: http://blog.163.com/soft_share@
126
[46] “Scintilla and SciTE.” [Online]. Available: http://www.scintilla.org/SciTE.
html
[47] “scite-ru - SciTE-Ru .” [Online]. Available:
scite-ru
http://code.google.com/p/
[48] “The Programming Language Lua.” [Online]. Available: http://www.lua.
org
[49] “GDB: The GNU Project Debugger.” [Online]. Available: http://www.gnu.
org/s/gdb
[50] “Guide:Debugger - Mono.” [Online]. Available: http://www.mono-project.
com/Guide:Debugger
[51] “XnView Software - Free graphic and photo viewer, converter.” [Online].
Available: http://www.xnview.com
[52] “CTAN web interface: package texcad32.” [Online]. Available:
//www.ctan.org/pkg/texcad32
http:
[53] “Asymptote.” [Online]. Available: http://asymptote.sourceforge.net
[54] “Kseg.” [Online]. Available: http://www.mit.edu/~ibaran/kseg.html
[55] “Graphviz | Graphviz - Graph Visualization Software.” [Online]. Available:
http://www.graphviz.org
[56] “PhotoFiltre Studio.” [Online]. Available: http://www.photofiltre.com
[57] “CTAN web interface:
//ctan.org/pkg/dviout
package dviout.” [Online]. Available:
http:
[58] “Pdftk - The PDF Toolkit.” [Online]. Available: http://www.pdflabs.com/
tools/pdftk-the-pdf-toolkit
46
[59] “Xpdf - GnuWin32 - SourceForge.” [Online]. Available: http://gnuwin32.
sourceforge.net/packages/xpdf.htm
[60] “BibDB - MacKichan Software, Inc.” [Online]. Available:
mackichan.com/bibdb.html
http://www.
[61] “JabRef reference manager.” [Online]. Available: http://jabref.sourceforge.
net
[62] “Download: Equation Magic Lite.” [Online]. Available:
micropress-inc.com/eqmlite.htm
http://www.
[63] “The Yacas computer algebra system.” [Online]. Available:
//yacas.sourceforge.net
http:
[64] “subversion.tigris.org.” [Online]. Available: http://subversion.tigris.org
[65] “RapidSVN.” [Online]. Available: http://www.rapidsvn.org
[66] “CVS - Open Source Version Control.” [Online]. Available:
//cvs.nongnu.org
http:
[67] “Wink - [Homepage].” [Online]. Available: http://www.debugmode.com/
wink
[68] “Instant Demo.” [Online]. Available: http://www.instant-demo.com
[69] “WinRAR archiver, a powerful tool to process RAR and ZIP files.” [Online].
Available: http://www.rarlab.com
[70] “Windows Imaging Format - Wikipedia, the free encyclopedia.” [Online].
Available: http://en.wikipedia.org/wiki/Windows_Imaging_Format
[71] “C51 - Keil Software, Inc.” [Online]. Available: http://www.keil.com/c51
[72] “SDCC - Small Device C Compiler.” [Online]. Available:
sourceforge.net
http://sdcc.
[73] “MinGW | Minimalist GNU for Windows.” [Online]. Available:
//www.mingw.org
47
http:
[74] “TCC : Tiny C Compiler.” [Online]. Available: http://tinycc.org
[75] “The Perl Programming Language - www.perl.org.” [Online]. Available:
http://www.perl.org
[76] “Artistic Style - Index.” [Online]. Available: http://astyle.sourceforge.net
[77] “Ispell.” [Online]. Available: http://www.gnu.org/software/ispell
[78] “CTAN web interface: Directory listing for /support/4spell.” [Online].
Available: http://ctan.org/tex-archive/support/4spell
[79] “dp4 Font Viewer - OpenType ? und TrueType Schriften verwalten.”
[Online]. Available: http://font.dp4.de
[80] “Typograf - font management for OpenType, TrueType and Type 1 fonts.”
[Online]. Available: http://www.neuber.com/typograph
[81] “MemPad - Horst Schaeffer’s Software Pages.” [Online]. Available:
http://www.horstmuc.de/wmem.htm
[82] “QEMU.” [Online]. Available: http://qemu.org
[83] “Commander.” [Online]. Available: http://logicnet.dk/Commander
[84] H. Ma, “MTeX-Suite Google Group.” [Online]. Available: http://groups.
google.com/group/mtex-suite?hl=zh-CN_US
[85] ——, “Hongbin Ma’s HomePage.” [Online]. Available: http://mathmhb.sf.
net
48
Search
(courtesy of Google)
The online journal of the
TeX Users Group
ISSN 1556-6994
Table of Contents
Yossi Gil
Article PDF
Article source
Full source (all you need to process the source (XeLaTeX))
Comment on this article
General information
Submit an item
Download style files
Copyright
Contact us
About RSS feeds
Back issues
Author index
Title index
BibTeX bibliography
Next issue
Spring 2013
Editorial board
Lance Carnes, editor
Kaja Christiansen
Peter Flom
Hans Hagen
Robin Laakso
Tristan Miller
Tim Null
Arthur Ogawa
Steve Peter
Yuri Robbers
Will Robertson
Other key people
More key people wanted
[Published 2012-10-22]
Bashful Writing and Active Documents
About The PracTeX
Journal
Archives of The PracTeX
Journal
Issue 2012, Number 1
Abstract: Computerized typesetting still relies on metaphors drawn from the letterpress printing domain and
is still concerned largely with the production of documents printed on paper. Active documents is an
emerging technology by which the product of computerized typesetting is more than an aesthetically pleasing
composition of letters, words and punctuation characters broken into lines and pages. An active document
offers modes of interaction with its reader, while the document itself may change its content in response to
events taking place in the external world. Bashful documents, the concept proposed by the bashful package,
and discussed in this article, extend the user interaction offered by active documents to the time of the
document creation. For example, the author of a textbook on computer programming may use bashful to
automatically include in the text a transcript of a demonstration program, that is a precise replica of the
program's execution at the time the document was authored. When writing a report on an important
experiment, a scientist may employ bashful to automatically execute the experiment, whenever the report's
text is run through LaTeX, and even include the experiment's results in the output document.
Joseph Gil, known as Yossi or Yogi, is on the faculty of the department of computer science at the
Technion, Israel Institute of Technology. He first came to appreciate LaTeX while working as a summer an
intern at Dec SRC, and meeting Leslie Lamport there. Ever since then, he wrote all his papers in LaTeX. Gil's
research interests are diverse, but his main interest is in programming languages. In fact, the bashful
package was developed as part of his work on writing a new text book on programming languages for the
Technion students. You can reach him at yogi at cs dot technion dot ac dot il.
Sponsors:
Web site Generated October 22, 2012 (wiki); TUG home page; search; contact webmaster.
Be a sponsor!
The PracTEX Journal, 2012, No. 1
Article revision 2012/10/18
Bashful Writing and Active Documents
Joseph (Yossi) Gil∗
Abstract In many ways, computerized typesetting still relies on metaphors drawn
from the letterpress printing domain and is concerned largely with the
production of documents printed on paper. Active documents is an
emerging technology by which the product of computerized typesetting
is more than an aesthetically pleasing composition of letters, words and
punctuation characters broken into lines and pages. An active document
offers modes of interaction with its reader, while the document itself may
change its content in response to events taking place in the external world.
Bashful documents, the concept proposed by the LATEX bashful package (implemented as a wrapper around the \write18 internal macroa extend this interaction to the time of the document creation. The author of
a textbook on computer programming, may use bashful to automatically
include in the text a transcript of a demonstration program, as it was executed in the time the document was authored. When writing a report
on an experiment, a scientist may employ bashful to automatically execute
the experiment, whenever the report text is run through LATEX, and even
include the results in the output document. In fact, using bashful a document may include anything that can be computed, at the time of creation,
by bash, and the numerous Unix commandsb it may invoke.
a In
this document, I refer to TEX commands or macros, also called control
sequences, solely as “macros”.
b The term “commands” shall refer both to Unix programs which can be invoked from the command line prompt, and to Bash internal commands.
1 Introduction
At the time I run this document through LATEX, the temperature in Jerusalem,
Israel, was 18°C, while the weather condition was clear.
You may not care so much about these bits of truly ephemeral value, but you
may be surprised that this information was produced automatically by the very
∗ [email protected]
process of LATEXing. The LATEX source of this document included two sequences
of commands, the first responsible for producing the temperature and the second
for producing the weather condition. Each of these sequences was executed as
the source was run through LATEX; the output of this execution then replaced the
sequence and then laid out as part of the text.
1.1 Dynamic Web Pages
It should be mentioned that the entire bashful process is similar to the method of
generating dynamic web pages by “server-side scripting”, including processors
such as PHP, ASP, and Java server pages.
An author of a web site which employs PHP technology may start the creation of a page in his site by writing a simple text file named good.php, with the
following content
< html >
< body bgcolor =" black " text =" yellow " >
<? php
$hour = date (" G ");
if ( $hour < 12)
echo " Good morning , dear surfer !";
else
echo " Good evening , dear surfer !";
?>
</ body >
</ html >
Just before this web page is delivered to the surfing user, the web server
runs the page through a PHP processor, which executes all text enclosed between “<?php” and “?>” as a PHP program, replacing this text with the output of
this program. The PHP program in this case is
$hour = date (" G ");
if ( $hour < 12)
echo " Good morning , dear surfer !";
else
echo " Good evening , dear surfer !";
while the output of this program is either
Good morning , dear surfer !
or
2
Good evening , dear surfer !
Thus, depending on the time of day in which the request was made to the
web server, file good.php will be sent to the user’s browser as either
< html >
< body bgcolor =" black " text =" yellow " >
Good morning , dear surfer ! </ body >
</ html >
or
< html >
< body bgcolor =" black " text =" yellow " >
Good evening , dear surfer ! </ body >
</ html >
And, the display on the user’s web browser will be as in Figure 1.
(a)
(b)
Figure 1: Two views of the same dynamic web page
1.2 Dynamic vs. Active vs. Bashful Documents
As we have seen a dynamic document is a document whose content may change
just before it is delivered to the end user. Active documents go a step further,
allowing the user to interact with document, by e.g., filling in forms included
in the document, to click on buttons, navigate within and outside the document
etc. This is made possible by technologies such as “client-side scripting”, HTML
forms and PDF interactive elements.
3
In contrast, bashful documents are characterized by the fact that their generation
may yield different results, based on the time and the environment of the creation.
For example, the weather report at the beginning of this document was produced
by employing the bashful package to automatically make an HTTP connection to
Google’s weather service and then incorporate the result into the document.
We can also distinguish a class of introspective documents, whose content depends on meta-information of the contents. The sentence
“The document you are reading now was prepared from a single input file
named 00.tex, containing 737 lines and 3790 words of text.”
is an example of an introspective content in this article.
The main application of the bashful package is in the preparation of computer
programming articles and textbooks. Ideally, such a textbook would not use a
single programming example without testing it. My inspiration in writing the
bashful package dates to back to first edition of the seminal “The C Programming
Language” book by Kernighan and Ritchie, widely known as K&R. The preface
of this first edition tells its reader:
All examples have been tested directly from the text, which is in machinereadable form.
And the second edition of K&R reiterates:
As before, all examples have been tested directly from the text, which is in
machine-readable form.
Bashful documents extend this idea a step further by executing and testing the
programs directly by the processing of the text by LATEX.
The article you are reading now is in itself a bashful document. The little
PHP program you have just seen was generated and executed directly by the text
processor, which was even employed to generate the screen captures in Figure 1.
This article also makes an example of an introspective document: It not only
uses the bashful package a number of times to show programming examples; it
also shows the reader what exactly I wrote in the input to produce this examples.
And, as you may expect, the macros that I used are not shown to you by me manually copying the LATEX input and then pasting it into a verbatim environment.
Instead, the text processor is employed to introspectively fetch these macros from
the input text. Clearly, one of the main applications of introspection is for writing
documents that teach their readers how to use LATEX.
4
Outline The remainder of this article is organized as follows. Section 2 explains
the bashful basics and demonstrates how it can be used for writing computer
programming textbooks. If you are interested in using bashful for writing documents discussing computer programming, this section, together with the bashful
package documentation should suffice.
The process by which the weather report at the time of authoring was included
in the beginning of this article is revealed in Section 3. Section 4 sheds some light
on bashful internals, providing hints on dealing with errors.
As you read this article, note that document introspection is used extensively
to show the actual input text in which the bashful package was used. I explain
how this was done in Section 5.
For the sake of completeness, the full LATEX source of this article is offered in
Appendix A. Interested readers may examine this source to learn more, e.g., how
Figure 1 was generated.
2 Bashful in Action
To demonstrate the bashful process, I now present a simple story of writing, compiling and executing and a simple program: Hello, World! in the C programming
language: Then, I shall explain how the bashful package was employed to play the
story live, that is, authoring the program, compiling it and executing it, all from
within LATEX.
2.1 “Hello, World!”, Said Again
My story begins with the creation of a text file named hello.c, in which the
program is stored.
% cat << EOF > hello . c
/*
** hello . c : My first C program ; it prints
** " Hello , World !" , and dies .
*/
# include < stdio .h >
int main ()
{
printf (" Hello , World !\ n ");
5
return 0;
}
EOF
(In the above, I used the cat Unix command to create a file in a manner known
as here document, where my delimiting identifier was the string EOF.)
Once I have written my program, it is only natural to invoke the C compiler
to translate it into an executable.
% cc hello . c
My little story reaches its climax when the program I created and compiled is
executed, making sure that it prints the desired “Hello, World!” greeting.
% ./ a . out
Hello , World !
2.2 Retrospection
The document you are reading was generated from a LATEX input file whose name
is 00.tex. Examining file 00.tex, you can see what I wrote in it to tell my story
of the creation of file hello.c at the beginning of Section 2.1 above.
325
326
327
328
329
330
331
332
333
334
335
336
337
338
339
340
341
\ subsection { ` ` Hello , World ! ' ' , Said Again }\ label { Section : story }
My story begins with the creation of a text file named
\ texttt { hello . c } , in which the program is stored .
\ bash [ environment = quote , script ]
cat << EOF > hello . c
/*
** hello . c : My first C program ; it prints
** " Hello , World !" , and dies .
*/
# include < stdio .h >
int main ()
{
printf (" Hello , World !\ n ");
return 0;
}
EOF
\ END
In doing so, all the text between the \bash (line 328) and \END (line 341) was
copied by LATEX to a temporary script file; this script is then sent for execution by Bash. The script option instructed the \bash macro to list this file in
6
the main document, while the environment=quote option instructed the \bash
macro enclose the listing in a quote environment, i.e., between \begin{quote}
and \end{quote}.
Note that two characters, “%␣”, were automatically prepended to the script
by the \bash macro. This is not an incident: %␣ is the default Bash prompt.
Prepending it makes it clear to the reader that the script file is input to bash.
(The prefix option to the \bash macro can be used to change this prefix string.)
To compile file hello.c that I just created, my 00.tex included another \bash
. . . \END pair.
347
348
349
350
351
Once I have written my program , it is only natural to invoke
the ~ C compiler to translate it into an executable .
\ bash [ environment = quote , script , stderr ]
cc hello . c
\ END
As before, in writing these I achieved two objectives: first, when LATEX processed 00.tex, it also invoked the C compiler to compile file hello.c, the file
which I just created. Second, thanks to the script option, the command for compiling this program was included in the typeset version of this document. The
stderr flag instructed the \bash macro to record the standard error stream of the
script’s execution, and layout this record further to the script. As can be seen
above, the program I wrote was correct, the compilation process did not generate
any error messages, and the standard error stream was left empty.
Finally, I executed the program I wrote. Here is another excerpt of 00.tex
showing how this was done.
352
353
354
355
356
357
My little story reaches its climax when the program I created
and compiled is executed , making sure that it prints the
desired `` Hello , World ! ' ' greeting .
\ bash [ environment = quote , script , stdout ]
./ a . out
\ END
The stdout flag passed to the \bash macro above, instructs it to append to the
script’s listing the standard output stream that this execution produces, i.e., the
string Hello, World!, as printed by program a.out to its standard output stream.
7
2.3 Input Processing
The \bash command is defined in package bashful. To make use of this package,
I wrote in the preamble of 00.tex:
4
\ usepackage [ verbose , unique ]{ bashful }
The verbose boolean package option instructed the bashful package to be
chatty, typing out for me a lot of information on what it does as the document
is processed by LATEX. The unique option instructs the package to use unique
names, generated from the TEX’s job name (\jobname) and the current line number. This option is essential for documents, such as the present document, in
which the \bash command is used many times.
Allowing LATEX to run arbitrary shell commands can be dangerous—you never
know whether that nice looking .tex file you received by email was prepared by
a friend or a foe. This is the reason that you have to tell LATEX explicitly that shell
escapes are allowed. The -shell-escape command line flag does that. To process
my document, I typed, at the command line,
% xelatex -shell-escape 00.tex
3 Producing The Weather Information
A similar application of \bash to escape to shell was also used to produce the
above Jerusalem weather report. However, since I wanted this information inlined
in the text, I could not rely on the stdout flag to list the standard output of
commands.
Instead, I wrote a series of shell commands that retrieve the current temperature, and another such series to obtain the current weather conditions. The
command series to obtain the current temperature, was placed in a file named
temperature.sh:
location = Jerusalem , Israel
server =" http :// www . Google . com / ig / api "
request =" $server ? weather = $location "
wget -q -O - $request |\
tr " < >" "\012\012" |\
grep temp_c |\
sed 's /[^0 -9]// g '
8
while the weather condition was placed in a file named condition.sh
location = Jerusalem , Israel
server =" http :// www . Google . com / ig / api "
request =" $server ? weather = $location "
wget -q -O - $request |\
tr " < >" "\012\012" |\
grep " condition data " |\
head -n 1 |\
sed -e 's /^.*="// ' -e 's /"\/*// ' |\
tr 'A -Z ' 'a -z '
I then executed the scripts temperature.sh, and temperature.sh, redirecting
their output to files temperature.tex and condition.tex. All that remained was
\input these two files in my 00.tex.
90
91
92
93
94
95
At the time I run this document through
\ href { http :// www . latex - project . org /}{\ LaTeX } ,
the \ hypertarget { report }{ temperature } in
\ href { http :// en . wikipedia . org / wiki / Jerusalem }{ Jerusalem } ,
Israel , was ~\ emph {\ input { temperature }\ unskip \ celsius } ,
while the weather condition was \ emph {\ input { condition }}\ unskip .
I could have created files temperature.sh and condition.sh manually, but it
made much more sense to both create and execute these using the \bash macro.
For temperature.sh, I wrote in 00.tex
67
68
69
70
71
72
73
74
75
\ bash [ scriptFile = temperature . sh , prefix ={} , stdoutFile = temperature . tex ]
location = Jerusalem , Israel
server =" http :// www . Google . com / ig / api "
request =" $server ? weather = $location "
wget -q -O - $request |\
tr " < >" "\012\012" |\
grep temp_c |\
sed 's /[^0 -9]// g '
\ END
Passing the option scriptFile=temperature.sh instructed \bash to use the name
temperature.sh to the script file it generated. The prefix={} option eliminated
the Bash prompt that is normally prepended to the script. The third option,
stdoutFile=temperature.tex saved the redirected output in a file named temperature.tex.
Since none of the script, stdout and stderr flags was used, the execution of the
script did not generate any text for typesetting by LATEX.
What I wrote for generating condition.sh, executing it, and saving the output in
9
condition.tex was very similar.
78
79
80
81
82
83
84
85
86
87
88
\ bash [ scriptFile = condition . sh , prefix ={} , stdoutFile = condition . tex ]
location = Jerusalem , Israel
server =" http :// www . Google . com / ig / api "
request =" $server ? weather = $location "
wget -q -O - $request |\
tr " < >" "\012\012" |\
grep " condition data " |\
head -n 1 |\
sed -e 's /^.*="// ' -e 's /"\/*// ' |\
tr 'A -Z ' 'a -z '
\ END
4 Dealing with Errors
Using bashful to demonstrate my Hello, World! program, made sure that the story
I told is accurate: I really did everything I told the reader I did. More accurately,
the \bash command, acting as my proxy, did it for me.
Luckily, the program I wrote was correct. But, if it was not, the \bash macro
would have detected the error, and would have stopped the LATEX process, indicating that the compilation did not succeed. To manage errors you should
understand that the execution of the \bash macro involves the following steps:
1. collecting all text up to \END;
2. placing this text in a script file;
3. executing this script file, redirecting its standard output and its standard
error streams to distinct files;
4. checking whether the exit code of the execution indicates an error (i.e., exit
code which is different from 0), and if so, place this exit code in a distinct
file;
5. checking whether the file containing the standard error is empty, and if not,
pausing execution after displaying an error message; and,
6. checking whether the file containing the exit code is empty, and if not, pausing execution after displaying an error message;
10
After the completion of these steps, the \bash macro may incorporate for typesetting three files in order: the script file (if the script flag is present), the standard
output file (if the stdout flag is present), and then the standard error file (if the
stderr flag is present).
Let me demonstrate a situation in which the execution of the script generates
an error. To do that, I will write a short LATEX file, named error.tex which tries
to use \bash to compile an incorrect C program. Since error.tex contains \END,
I will have to author this file in three steps:
1. Creating the header of error.tex:
% cat << EOF > error . tex
\ documentclass { article }
\ usepackage [ a6paper ]{ geometry }
\ usepackage { bashful }
\ pagestyle { empty }
\ begin { document }
This document creates a simple erroneous C program
and then compiles it .
\ bash [ script , stdout ]
echo " main (){ return int ;}" > error . c
cc error . c
EOF
2. Adding \END to error.tex
% echo "\\ END " >> error . tex
3. Finalizing error.tex
% cat << EOF >> error . tex
( I do not really expect the one - line
program generated above to compile .)
\ end { document }
EOF
Let me verify that error.tex is what I expect it to be:
% cat error . tex
\ documentclass { article }
\ usepackage [ a6paper ]{ geometry }
\ usepackage { bashful }
\ pagestyle { empty }
\ begin { document }
This document creates a simple erroneous C program
and then compiles it .
11
\ bash [ script , stdout ]
echo " main (){ return int ;}" > error . c
cc error . c
\ END
( I do not really expect the one - line
program generated above to compile .)
\ end { document }
I am now ready to run error.tex through LATEX, but since I will not run the
latex command myself, I will send a “q” character to it to abort execution when
the anticipated error occurs.
% yes q | xelatex - shell - esc error . tex | sed / texmf - dist / d
This is XeTeX , Version 3.1415926 -2.3 -0.9997.5 ( TeX Live 2011)
\ write18 enabled .
entering extended mode
(./ error . tex
LaTeX2e <2011/06/27 >
Babel < v3 .8 m > and hyphenation patterns for english , dumylang , nohyphenation , ge
rman -x -2011 -07 -01 , ngerman -x -2011 -07 -01 , afrikaans , ancientgreek , ibycus , arabi
c , armenian , basque , bulgarian , catalan , pinyin , coptic , croatian , czech , danis
h , dutch , ukenglish , usenglishmax , esperanto , estonian , ethiopic , farsi , finnis
h , french , galician , german , ngerman , swissgerman , monogreek , greek , hungarian ,
icelandic , assamese , bengali , gujarati , hindi , kannada , malayalam , marathi , or
iya , panjabi , tamil , telugu , indonesian , interlingua , irish , italian , kurmanji ,
lao , latin , latvian , lithuanian , mongolian , mongolianlmc , bokmal , nynorsk , pol
ish , portuguese , romanian , russian , sanskrit , serbian , serbianc , slovak , sloven
ian , spanish , swedish , turkish , turkmen , ukrainian , uppersorbian , welsh , loaded
.
Document Class : article 2007/10/19 v1 .4 h Standard LaTeX document class
* geometry * driver : auto - detecting
* geometry * detected driver : xetex
Standard error not empty . Here is how
file error . stderr begins :
>>>> error . c : In function main :
>>>>
but , you really ought to examine this file yourself !
! Your shell script failed ....
\ c h e c k S c r i p t E r r o r s @ B L ... r shell script failed ...}
\ BL @verb osetru e \ logBL { Sw ...
l .11 \ END
? OK , entering \ batchmode
(Observe that in the above I used the sed command to remove the mundane
and lengthy logging messages of my textmf distribution.1 )
You can see that when LATEX tried to process error.tex, it stopped execution
1. I also switched to a smaller font size, to allow the output to fit within the boundaries of the
printed page.
12
while indicating that file error.stderr was not empty after the compilation. The
first line of error.stderr was displayed, and I was advised to examine this file
myself. Inspecting error.stderr, we see the C compiler error messages:
% cat error . stderr
error . c : In function main :
error . c :1:15: error : expected expression before int
The compilation error did not prevent LATEX from typesetting my document.
This final layout is presented in Figure 2. Note that the failure to compile hello.c,
did not stop \bash from including this file in the source.
This document creates a simple erroneous C
program and then compiles it.
% echo " main (){ return int ;}" > error . c
cc error . c
(I do not really expect the one-line program
generated above to compile.)
Figure 2: File error.pdf
There are cases in which the author intends the executed script to generate
errors. The stderr option to the \bash macro instructs it to ignore the exit code
of the executed programww, and the fact that that output was generated to the
standard error stream. Instead, \bash will include in its listing the contents of the
standard error stream.
For example, to give you a taste of dealing with Bash script errors, I shall
write below a passage expressing the frustration over Bash insisting on syntax
trivialities.
638
639
640
641
A space must follow the opening square bracket ; if not
\ textsc { Bash } would not find the ~ ` `\ verb +[+ ' ' command .
The following script may seem correct on first sight , yet , the
error message it produces may seem weird to beginners .
13
642
643
644
645
646
647
\ bash [ prefix ={} , script , stdout , stderr ]
if [2+2==5] ; then
echo " Freedom is the freedom to say that two plus two "
echo " make four . If that is granted , all else follows ."
fi
\ END
Indeed, newcomers to Bash may find conditionals confoudning. Annoying
as it may sound, you have to remember rules such as: A space must follow
the opening square bracket; if not Bash would not find the “[” command. The
following script may seem correct on first sight, yet, the error message it produces
may seem weird to beginners.
if [2+2==5] ; then
echo " Freedom is the freedom to say that two plus two "
echo " make four . If that is granted , all else follows ."
fi
00 @647 . sh : line 1: [2+2==5]: command not found
The error message in the above was anticipated; it was included in the listing
thanks to the stderr option. As explained, listing stdout instructs \bash to ignore
the script’s error code. LATEX processing of 00.tex does not stop as a result of this
error.
5 Introspection
This article uses document introspection to show the actual input used to produce
the examples. To achieve this, I used Unix commands to retrieve portions of
00.tex, my input file, and \input these. As we shall see, the sed command
proved instrumental in doing this.
Recall that at the beginning of Section 2.1, I wrote
My story begins with the creation of a text file named hello.c, in which the
program is stored.
Recall also that later, at the beginning of Section 2.2, I wrote
Examining file 00.tex, you can see what I wrote in it to tell my story of the
creation of file hello.c at the beginning of Section 2.1 above.
And, immediately afterwards, I gave an excerpt of file 00.tex.
14
To produce this excerpt, I applied the sed command to search in 00.tex.
Specifically, what I wrote in 00.tex was the following
362
363
364
365
366
367
368
Examining file \ me , you can see what I wrote in it to
tell my story of the creation of file \ texttt { hello . c }
at the beginning of \ autoref { Section : story } above .
\ bash [ stdout ]
cat -n 00. tex | sed -n '/ Said Again / ,// { p
/ END / q } '
\ END
I used the cat command to number my input lines, and then the sed command
to printing these lines, starting at the first line that contains the string “Said
Again”, and ending with line that contains the string “END”.
My use of sed implies that file 00.tex includes the string “Said Again” at
least twice. The first such occurrence was in the title of Section 2.1; the second
occurrence was in the application of sed to introspectively search for the use of the
\bash that followed this title. Subsequently, this document included several other
occurrences of “Said Again” (including this sentence itself); but let us concentrate
on the first two.
The search succeeded in finding the correct occurrence, since the search instructions occurred after it. You would need to apply a more sophisticated search
in the case that you wish to present an input excerpt prior to its actual occurrence
in the text. This was, for example, the case in the “taste” of Bash script errors
offered in the previous section. I applied Gawk for this search. In case you are
interested, the actual Unix pipeline I wrote was:
633
cat -n 00. tex | gawk '/ A space must /{ c ++} c >1{ print }/ END /{ if (c >1) exit } '
Acknowledgments The manner by which \bash collects its arguments is based on
that of tobiShell. Martin Scharrer tips on TEX internals were invaluable in writing
bashful.
A Source of 00.tex
1
\ documentclass { pracjourn }\ TPJrevision {2012}{10}{ 18}
\ TPJissue {2012}{1} \ TPJcopyright { }
\ usepackage [ verbose , unique ]{ bashful }
\ usepackage { gensymb , graphicx , xspace , amsmath }
15
\ newcommand \ bashful {\ textsf { bashful }\ xspace }
\ newcommand \ Bash {\ texttt {\ textup {\ textbackslash bash }}\ xspace }
\ newcommand \ me {\ texttt {\ textup {\ jobname . tex }}\ xspace }
10
\ lstdefinestyle { input }{ basicstyle =\ ttfamily \ footnotesize ,
keywords ={} , upquote = true , extendedchars = false ,
sh o ws tringspaces = false , aboveskip =0 pt , belowskip =0 pt }
\ lstdefinestyle { scriptsize }{ style = input , basicstyle =\ ttfamily \ scriptsize }
20
% listings style for the script , standard output file , and standard error file .
\ lstdefinestyle { bashfulScript }{ style = input }
\ lstdefinestyle { bashfulStdout }{ style = input }
\ lstdefinestyle { bashfulStderr }{ style = input ,
basicstyle =\ ttfamily \ footnotesize \ color { red }}
\ newcommand \ listFile [1]{%
\ vspace {0.8 em plus 0.3 em minus 0.3 em }%
\ l stinputlisting [ style = input , frameround = ftttt , frame = trBL ]{#1}%
\ vspace {0.8 em plus 0.3 em minus 0.3 em }}
30
40
50
\ title { Bashful Writing and Active Documents }
\ author { Joseph ( Yossi ) Gil \ thanks { yogi@CS . Technion . AC . IL }}
\ abstract {%
In many ways , computerized typesetting still relies on metaphors drawn from the
\ href { http :// en . wikipedia . org / wiki / L e t t e r p r e s s _ p r i n t i n g } { letterpress
printing } domain and is concerned largely with the production of documents
printed on paper .
Active documents is an emerging technology by which the product of computerized
typesetting is more than an aesthetically pleasing composition of letters ,
words and punctuation characters broken into lines and pages .
An active document offers modes of interaction with its reader , while the
document itself may change its content in response to events taking place in
the external world .
\ par
\ emph { Bashful documents } , the concept proposed by the \ LaTeX {}
\ href { http :// ctan . org / tex - archive / macros / latex / contrib / bashful }{\ bashful }
package ( implemented as a wrapper around the \ texttt {\ textbackslash write18 }
internal macro \ footnote {%
In this document , I refer to \ TeX {} commands or macros , also called control
sequences , solely as `` macros ' '.}\ mbox { }
extend this interaction to the \ emph { time of the document creation }.
The author of a textbook on computer programming , may use \ bashful to
automatically include in the text a transcript of a demonstration program , as
it was executed in the time the document was authored .
When writing a report on an experiment , a scientist may employ \ bashful to
automatically execute the experiment , whenever the report text is run through
\ LaTeX {} , and even include the results in the output document .
In fact , using \ bashful a document may include anything that can be computed ,
at the time of creation , by
\ href { http :// en . wikipedia . org / wiki / Bash \ _ ( Unix \ _shell )}{\ textsc { bash }} ,
and the numerous Unix commands \ footnote { The term `` commands ' ' shall
refer both to \ href { http :// en . wikipedia . org / wiki / Unix }{ Unix } programs which
can be invoked from the command line prompt , and to \ textsc { Bash } internal
16
60
commands .}\ mbox { } it may invoke .
}
\ begin { document }
\ maketitle
70
80
90
100
110
\ section { Introduction }
\ bash [ scriptFile = temperature . sh , prefix ={} , stdoutFile = temperature . tex ]
location = Jerusalem , Israel
server =" http :// www . Google . com / ig / api "
request =" $server ? weather = $location "
wget -q -O - $request |\
tr " < >" "\012\012" |\
grep temp_c |\
sed 's /[^0 -9]// g '
\ END
\ bash [ scriptFile = condition . sh , prefix ={} , stdoutFile = condition . tex ]
location = Jerusalem , Israel
server =" http :// www . Google . com / ig / api "
request =" $server ? weather = $location "
wget -q -O - $request |\
tr " < >" "\012\012" |\
grep " condition data " |\
head -n 1 |\
sed -e 's /^.*="// ' -e 's /"\/*// ' |\
tr 'A -Z ' 'a -z '
\ END
At the time I run this document through
\ href { http :// www . latex - project . org /}{\ LaTeX } ,
the \ hypertarget { report }{ temperature } in
\ href { http :// en . wikipedia . org / wiki / Jerusalem }{ Jerusalem } ,
Israel , was ~\ emph {\ input { temperature }\ unskip \ celsius } ,
while the weather condition was \ emph {\ input { condition }}\ unskip .
You may not care so much about these bits of truly ephemeral value ,
but you may be surprised that this information was produced automatically
by the very process of \ LaTeX {} ing .
The \ LaTeX {} source of this document included two sequences of commands , the
first responsible for producing the temperature and the second for producing
the weather condition .
Each of these sequences was executed as the source was run through \ LaTeX {};
the output of this execution then replaced the sequence and then laid out as
part of the text .
\ subsection { Dynamic Web Pages }
It should be mentioned that the entire bashful process is similar to the method
of generating \ href { http :// en . wikipedia . org / wiki / D y n a m i c _ w e b _ p a g e }{ dynamic
web pages } by ` `\ href { http :// en . wikipedia . org / wiki / Server - side _scrip ting }
{ server - side scripting } ' ' , including processors such as
\ href { http :// en . wikipedia . org / wiki / PHP }{ PHP } ,
17
\ href { http :// en . wikipedia . org / wiki / A c t i v e _ S e r v e r _ P a g e s }{ ASP } , and
\ href { http :// en . wikipedia . org / wiki / Ja v aSe r ver _ P a g e s }{ Java server pages }.
120
130
140
150
160
An author of a web site which employs PHP technology may start the creation of
a page in his site by writing a simple text file named \ texttt { good . php } , with
the following content
\ bash [ scriptFile = good . sh ]
cat << EOF > good . php
< html >
< body bgcolor =" black " text =" yellow " >
<? php
\ $hour = date (" G ");
if (\ $hour < 12)
echo " Good morning , dear surfer !";
else
echo " Good evening , dear surfer !";
?>
</ body >
</ html >
EOF
\ END
\ listFile { good . php }
Just before this web page is delivered to the surfing user , the web server runs
the page through a \ emph { PHP processor } , which executes all text enclosed
between ~ ` `\ texttt { <? php } ' ' and ` `\ texttt {? >} ' ' as a PHP program , replacing
this text with the output of this program .
The PHP program in this case is
\ bash [ stdout , stdoutFile = good . html , scriptFile = good . php . sh ]
sed -n "/ hour / ,/ evening / p " good . php
\ END
while the output of this program is either
\ bash [ stdout , stdoutFile = morning . out , scriptFile = morning . sh ]
grep morning good . php | sed -e s / echo // -e " s /;//" -e " s /\"// g "
\ END
or
\ bash [ stdout , stdoutFile = evening . out , scriptFile = evening . sh ]
grep evening good . php | sed -e s / echo // -e " s /;//" -e " s /\"// g "
\ END
Thus , depending on the time of day in
server , file \ texttt { good . php } will
\ bash [ scriptFile = morning . html . sh ]
php good . php | sed s / evening / morning /
\ END
\ listFile { morning . html }
or
\ bash [ scriptFile = evening . html . sh ]
php good . php | sed s / morning / evening /
\ END
\ listFile { evening . html }
which the request was made to the web
be sent to the user ' s browser as either
> morning . html
> evening . html
And , the display on the user ' s web browser will be
18
as in \ autoref { Figure : firefox }.
170
180
190
200
\ begin { figure }[! h ]
\ bash [ scriptFile = firefox . sh , ignoreStderr ]
rm evening . png morning . png
firefox = ` pgrep firefox `
if [ -n " $firefox " ]; then
wmctrl -c firefox
kill $firefox
killall firefox
fi
firefox - CreateProfile delme
firefox -P delme morning . html &
sleep 2
wmctrl -r " Mozilla Firefox " -b remove , maximized_vert , ma ximiz ed_hor z
wmctrl -r " Mozilla Firefox " -e 0 ,0 ,0 ,270 ,150
sleep 1
scrot -u morning . png
wmctrl -c firefox
killall firefox
firefox -P delme evening . html &
sleep 2
wmctrl -r " Mozilla Firefox " -b remove , maximized_vert , ma ximiz ed_hor z
wmctrl -r " Mozilla Firefox " -e 0 ,0 ,0 ,270 ,150
scrot -u evening . png
wmctrl -c firefox
killall firefox
if [ -n " $firefox " ]; then
echo $firefox
firefox -P default &
fi
\ END
\ centering
\ begin { tabular }{ cc }
\ inc ludegraphics [ width =0.4\ textwidth ]{ morning . png }
&
\ inc ludegraphics [ width =0.4\ textwidth ]{ evening . png }
\\
\ bfseries ( a ) & \ bfseries ( b )
\ end { tabular }
\ caption { Two views of the same dynamic web page }
\ label { Figure : firefox }
\ label { firefox }
\ end { figure }
210
\ subsection { Dynamic vs . Active vs . Bashful Documents }
As we have seen a \ emph { dynamic document } is a document whose content may
change just before it is delivered to the end user .
\ emph { Active documents } go a step further , allowing the user to interact with
document , by e . g . , filling in forms included in the document , to click on
buttons , navigate within and outside the document etc .
This is made possible by technologies such as
\ href { http :// en . wikipedia . org / wiki / Client \ _side \ _scripting }{ ` ` client - side
19
220
230
240
250
260
270
scripting ' '} , \ href { http :// en . wikipedia . org / wiki / HTML \ _forms }{ HTML forms }
and \ href { http :// en . wikipedia . org / wiki /%
Portable \ _Document \ _Format \# Interactive \ _elements }
{ PDF interactive elements }.
In contrast , \ emph { bashful documents } are characterized by the fact that their
\ emph { generation } may yield different results , based on the time and the
environment of the creation .
For example , the weather report at the \ hyperlink { report }{ beginning } of this
document was produced by employing the \ bashful package to automatically make
an \ href { http :// en . wikipedia . org / wiki / H y p e r t e x t _ T r a n s f e r _ P r o t o c o l }{ HTTP }
connection to \ href { http :// www . Google . com / support / forum / p / apps - apis / thread ?%
tid =0 c95e45bd80def1a & hl = en }{ Google ' s weather service } and then incorporate
the result into the document .
We can also distinguish a class of \ emph { introspective documents } , whose
content depends on meta - information of the contents . The sentence
\ begin { quote }
\ bash
wc -l 00. tex | sed s /00. tex // > lines . tex
wc -w 00. tex | sed s /00. tex // > words . tex
\ END
` `\ textsl { The document you are reading now was prepared from a single input file
named \ me , containing \ emph {\ input { lines }\ unskip } lines and
\ emph {\ input { words }\ unskip } words of text .} ' '
\ end { quote }
is an example of an introspective content in this article .
The main application of the \ bashful package is in the preparation of computer
programming articles and textbooks .
Ideally , such a textbook would not use a single programming example without
testing it .
My inspiration in writing the \ bashful package
dates to back to first edition of the seminal
\ href { http :// en . wikipedia . org / wiki / T h e _ C _ P r o g r a m m i n g _ L a n g u a g e }
{ ` ` The C Programming Language ' '} book by
\ href { http :// en . wikipedia . org / wiki / Bria n_K e rnig h an }
{ Kernighan } and
\ href { http :// en . wikipedia . org / wiki / Dennis \ _Ritchie }
{ Ritchie } , widely known as K \& R .
The preface of this first edition tells its reader :
\ begin { quote }
\ textit { All examples have been tested directly from the text ,
which is in machine - readable form .}
\ end { quote }
And the second edition of K \& R reiterates :
\ begin { quote }
\ textit { As before ,
all examples have been tested directly from the text ,
which is in machine - readable form .}
\ end { quote }
Bashful documents extend this idea a step further by executing and testing the
programs directly by the processing of the text by \ LaTeX .
20
The article you are reading now is in itself a bashful document .
The little PHP program you have just seen was generated and executed directly
by the text processor , which was even employed to generate the screen captures
in \ autoref { Figure : firefox }.
280
This article also makes an example of an introspective document :
It not only uses the \ bashful package a number of times to show programming
examples ; it also shows the reader what exactly I wrote in the input to
produce this examples .
And , as you may expect , the macros that I used are not shown to you by me
manually copying the \ LaTeX {} input and then pasting it into a
\ texttt { verbatim } environment .
Instead , the text processor is employed to in tro sp ec t iv el y fetch these macros
from the input text .
Clearly , one of the main applications of introspection is for writing documents
that teach their readers how to use \ LaTeX {}.
290
\ renewcommand \ s ec t io n au t or e fn a me { Section }
\ renewcommand \ s u b s e c t i o n a u t o r e f n a m e { Section }
\ paragraph { Outline }
The remainder of this article is organized as follows .
\ autoref { Section : action } explains the \ bashful basics and demonstrates how it
can be used for writing computer programming textbooks .
If you are interested in using \ bashful for writing documents discussing
computer programming , this section , together with the \ bashful package
documentation should suffice .
300
The process by which the weather report at the time of authoring was included
in the \ hyperlink { report }{ beginning } of this article is revealed in
\ autoref { Section : weather }.
\ autoref { Section : errors } sheds some light on \ bashful internals , providing hints
on dealing with errors .
As you read this article , note that document introspection is used extensively
to show the actual input text in which the \ bashful package was used . I
explain how this was done in \ autoref { Section : introspection }.
310
320
For the sake of completeness , the full \ LaTeX {} source of this article is
offered in \ autoref { Section : source }.
Interested readers may examine this source to learn more , e . g . , how
\ autoref { Figure : firefox } was generated .
\ section { Bashful in Action }\ label { Section : action }
To demonstrate the bashful process , I now present a simple story of writing ,
compiling and executing and a simple program :
\ href { http :// en . wikipedia . org / wiki / H e l l o _ w o r l d _ p r o g r a m }{ Hello , World !} in the
\ href { http :// en . wikipedia . org / wiki / C_ ( p r o g r a m m i n g _ l a n g u a g e )}{ C programming
language }:
Then , I shall explain how the \ bashful package was employed to play the story
live , that is , authoring the program , compiling it and executing it , all from
within \ LaTeX {}.
21
330
340
350
360
\ subsection { ` ` Hello , World ! ' ' , Said Again }\ label { Section : story }
My story begins with the creation of a text file named
\ texttt { hello . c } , in which the program is stored .
\ bash [ environment = quote , script ]
cat << EOF > hello . c
/*
** hello . c : My first C program ; it prints
** " Hello , World !" , and dies .
*/
# include < stdio .h >
int main ()
{
printf (" Hello , World !\ n ");
return 0;
}
EOF
\ END
( In the above , I used the \ href { http :// en . wikipedia . org / wiki / Cat \ _ ( Unix )}
{\ texttt { cat }} Unix command to create a file in a manner known as
\ href { http :// en . wikipedia . org / wiki / Here_document }{\ emph { here document }} , where
my delimiting identifier was the string \ texttt { EOF }.)
Once I have written my program , it is only natural to invoke
the ~ C compiler to translate it into an executable .
\ bash [ environment = quote , script , stderr ]
cc hello . c
\ END
My little story reaches its climax when the program I created
and compiled is executed , making sure that it prints the
desired `` Hello , World ! ' ' greeting .
\ bash [ environment = quote , script , stdout ]
./ a . out
\ END
\ subsection { Retrospection }\ label { Section : retrospection }
The document you are reading was generated from a \ LaTeX {} input file whose name
is \ me .
Examining file \ me , you can see what I wrote in it to
tell my story of the creation of file \ texttt { hello . c }
at the beginning of \ autoref { Section : story } above .
\ bash [ stdout ]
cat -n 00. tex | sed -n '/ Said Again / ,// { p
/ END / q } '
\ END
% Applies sed to introspectively search the input
370
\ bash
cat -n 00. tex | sed -n '/ Said Again / ,// {
/\\ bash / { =
q
}
}'
\ END \ let \ firstBash \ bashStdout
22
380
390
400
410
420
430
\ bash
cat -n 00. tex | sed -n '/ Said Again / ,// {
/ END / {
=
q
}
}'
\ END \ let \ lastBash \ bashStdout
In doing so , all the text between the \ Bash ( line \ firstBash ) and \ verb +\ END +
( line \ bashStdout ) was copied by \ LaTeX {} to a temporary script file ; this
script is then sent for execution by \ textsc { Bash }.
The \ texttt { script } option instructed the \ Bash macro to list this file in the
main document , while the \ texttt { environment = quote } option instructed the
\ Bash macro enclose the listing in a \ texttt { quote } environment , i . e . , between
\ verb +\ begin { quote }+ and \ verb +\ end { quote }+.
Note that two characters , ` `\ verb *+% + ' ' , were automatically prepended to the
script by the \ Bash macro .
This is not an incident : \ verb *+% + is the default \ textsc { Bash }
\ href { http :// en . wikipedia . org / wiki / Command - l ine_in terfac e \# Comman d_prom pt }
{ prompt }.
Prepending it makes it clear to the reader that the script file is input to
\ textsc { bash }.
( The \ texttt { prefix } option to the \ Bash macro can be used to change this
prefix string .)
To compile file \ texttt { hello . c } that I just created , my \ texttt {00. tex }
included another \ Bash \ ldots \ verb +\ END + pair .
\ bash [ stdout ]
cat -n 00. tex | sed -n '/ Once I have written / ,// { p
/ END / q } '
\ END
As before , in writing these I achieved two objectives : first , when \ LaTeX {}
processed \ me , it also invoked the ~ C compiler to compile file
\ texttt { hello . c } , the file which I just created .
Second , thanks to the \ texttt { script } option , the command for compiling this
program was included in the typeset version of this document .
The \ texttt { stderr } flag instructed the \ Bash macro to record the standard
error stream of the script ' s execution , and layout this record further to the
script .
As can be seen above , the program I wrote was correct , the compilation process
did not generate any error messages , and the standard error stream was left
empty .
Finally , I executed the program I wrote .
Here is another excerpt of \ me showing how this was done .
\ bash [ stdout ]
cat -n 00. tex | sed -n '/ climax / ,// { p
/ END / q } '
\ END
The \ texttt { stdout } flag passed to the \ Bash macro above , instructs it to
append to the script ' s listing the standard output stream that this execution
23
produces , i . e . , the string \ texttt { Hello , World !} , as printed by program
\ texttt { a . out } to its standard output stream .
440
450
\ subsection { Input Processing }
The \ Bash command is defined in package \ bashful .
To make use of this package , I wrote in the preamble of \ me :
\ bash [ stdout ]
cat -n 00. tex | sed -n '/ bashful / ,// { p
/ bashful / q } '
\ END
The \ texttt { verbose } boolean package option instructed the \ bashful package to
be chatty , typing out for me a lot of information on what it does as the
document is processed by \ LaTeX {}.
The \ texttt { unique } option instructs the package to use unique names ,
generated from the \ TeX {} ' s job name (\ verb +\ jobname +) and the
current line number .
This option is essential for documents , such as the present document ,
in which the \ verb +\ bash + command is used many times .
Allowing \ LaTeX {} to run arbitrary shell commands can be dangerous - - - you never
know whether that nice looking \ texttt {. tex } file you received by email was
prepared by a friend or a foe .
This is the reason that you have to tell \ LaTeX {} explicitly that shell escapes
are allowed .
The \ texttt { - shell - escape } command line flag does that .
To process my document , I typed , at the command line ,
\ begin { quote }
\ texttt {\% xelatex - shell - escape \ me }
\ end { quote }
460
\ section { Producing The Weather Information } \ label { Section : weather }
A similar application of \ Bash to escape to shell was also used to
produce the above Jerusalem weather report .
However , since I wanted this information inlined in the text , I could not rely
on the \ texttt { stdout } flag to list the standard output of commands .
470
480
Instead , I wrote a series of shell commands that retrieve the current
temperature , and another such series to obtain the current weather conditions .
The command series to obtain the current temperature , was placed in a file
named \ texttt { temperature . sh }:
\ listFile { temperature . sh }
while the weather condition was placed in a file named \ texttt { condition . sh }
\ listFile { condition . sh }
I then executed the scripts \ texttt { temperature . sh } , and
\ texttt { temperature . sh } , redirecting their output to files
\ texttt { temperature . tex } and \ texttt { condition . tex }.
All that remained was \ verb +\ input + these two files in my \ texttt {\ jobname . tex }.
\ bash [ stdout , stdoutFile = weather . tex ]
cat -n 00. tex | sed -n '/ At the time I run / ,// { p
/ while the weather condition / q } '
\ END
24
490
500
I could have created files \ texttt { temperature . sh } and \ texttt { condition . sh }
manually , but it made much more sense to both create and execute these using
the \ Bash macro .
For \ texttt { temperature . sh } , I wrote in \ texttt {\ jobname . tex }
\ bash [ stdout , stdoutFile = temperature . lst ]
cat -n 00. tex | sed -n '/ temperature . sh / ,// { p
/ END / q } '
\ END
\ noindent
Passing the option \ texttt { scriptFile = temperature . sh } instructed \ Bash to
use the name \ texttt { temperature . sh } to the script file it generated .
The \ verb + prefix ={}+ option eliminated the \ textsc { Bash } prompt that is normally
prepended to the script .
The third option , \ verb + stdoutFile = temperature . tex + saved the
redirected output in a file named \ texttt { temperature . tex }.
Since none of the \ texttt { script } , \ texttt { stdout } and \ texttt { stderr } flags
was used , the execution of the script did not generate any text for
typesetting by \ LaTeX {}.
\ noindent What I wrote for generating \ texttt { condition . sh } ,
executing it , and saving the output in \ texttt { condition . tex }
was very similar .
\ bash [ stdout ]
cat -n 00. tex | sed -n '/ condition . sh / ,// { p
/ END / q } '
\ END
510
\ section { Dealing with Errors }\ label { Section : errors }
Using \ bashful {} to demonstrate my \ emph { Hello , World !} program , made sure that
the story I told is accurate :
I really did everything I told the reader I did .
More accurately , the \ Bash command , acting as my proxy , did it for me .
520
530
Luckily , the program I wrote was correct .
But , if it was not , the \ Bash macro would have detected the error , and
would have stopped the \ LaTeX {} process , indicating that the compilation did
not succeed .
To manage errors you should understand that the execution of the \ Bash
macro involves the following steps :
\ begin { enumerate }
\ item collecting all text up to \ verb +\ END +;
\ item placing this text in a script file ;
\ item executing this script file , redirecting its standard output
and its standard error streams to distinct files ;
\ item checking whether the exit code of the execution indicates an error ( i . e . ,
exit code which is different from ~ $0$ ) , and if so , place this exit code in a
distinct file ;
\ item checking whether the file containing the standard error is empty , and if
not , pausing execution after displaying an error message ; and ,
\ item checking whether the file containing the exit code is empty , and if not ,
pausing execution after displaying an error message ;
\ end { enumerate }
After the completion of these steps , the \ Bash macro may incorporate for
25
typesetting three files in order : the script file ( if the \ text { script } flag
is present ) , the standard output file ( if the \ text { stdout } flag is present ) ,
and then the standard error file ( if the \ text { stderr } flag is present ).
540
550
560
570
Let me demonstrate a situation in which the execution of the script generates
an error .
To do that , I will write a short \ LaTeX {} file , named \ texttt { error . tex } which
tries to use \ Bash to compile an incorrect ~ C program .
Since \ texttt { error . tex } contains \ verb +\ END + , I will have to author this file
in three steps :
\ begin { enumerate }
\ item Creating the header of \ texttt { error . tex }:
\ bash [ script ]
cat << EOF > error . tex
\ documentclass { article }
\ usepackage [ a6paper ]{ geometry }
\ usepackage { bashful }
\ pagestyle { empty }
\ begin { document }
This document creates a simple erroneous C program
and then compiles it .
\ bash [ script , stdout ]
echo " main (){ return int ;}" > error . c
cc error . c
EOF
\ END
\ item Adding \ verb +\ END + to \ texttt { error . tex }
\ bash [ script ]
echo "\\ END " >> error . tex
\ END
\ item Finalizing \ texttt { error . tex }
\ bash [ script ]
cat << EOF >> error . tex
( I do not really expect the one - line
program generated above to compile .)
\ end { document }
EOF
\ END
\ end { enumerate }
Let me verify that \ texttt { error . tex } is what I expect it to be :
\ bash [ script , stdout ]
cat error . tex
\ END
580
I am now ready to run \ texttt { error . tex } through \ LaTeX {} , but since I will not
run the \ texttt { latex } command myself , I will send a ` `\ texttt { q } ' ' character
to it to abort execution when the anticipated error occurs .
\ lstdefinestyle { bashfulScript }{ style = scriptsize }
\ lstdefinestyle { bashfulStdout }{ style = scriptsize }
\ bash [ script , stdout ]
yes q | xelatex - shell - esc error . tex | sed / texmf - dist / d
\ END
26
590
\ lstdefinestyle { bashfulScript }{ style = input }
\ lstdefinestyle { bashfulStdout }{ style = input }
( Observe that in the above I used the
\ href { http :// www . gnu . org / software / sed / manual / sed . html }{\ texttt { sed }}
command to remove the mundane and lengthy logging messages of my
\ texttt { textmf } distribution .%
\ footnote { I also switched to a smaller font size , to allow
the output to fit within the boundaries of the printed page .})
600
610
You can see that when \ LaTeX {} tried to process \ texttt { error . tex } , it stopped
execution while indicating that file \ texttt { error . stderr } was not empty
after the compilation . The first line of \ texttt { error . stderr } was displayed ,
and I was advised to examine this file myself .
Inspecting \ texttt { error . stderr } , we see the C compiler error messages :
\ bash [ script , stdout ]
cat error . stderr
\ END
The compilation error did not prevent \ LaTeX {} from typesetting my document .
This final layout is presented in \ autoref { Figure : error }.
Note that the failure to compile \ texttt { hello . c } , did not stop \ Bash
from including this file in the source .
\ begin { figure }[! h ]
\ begin { center }
\ fbox {\ includegraphics [ scale =0.8 , trim =0 200 0 0]{ error . pdf }}
\ end { center }
\ caption { File \ texttt { error . pdf }}\ label { Figure : error }
\ end { figure }
620
There are cases in which the author intends the executed script to generate
errors .
The \ texttt { stderr } option to the \ Bash macro instructs it to
\ emph { ignore } the exit code of the executed programww , and the fact that that
output was generated to the standard error stream .
Instead , \ Bash will include in its listing the contents of the standard
error stream .
630
640
For example , to give you a taste of dealing with \ textsc { Bash } script errors , I
shall write below a passage expressing the frustration over \ textsc { Bash }
insisting on syntax trivialities .
\ bash [ stdout ]
cat -n 00. tex | gawk '/ A space must /{ c ++} c >1{ print }/ END /{ if (c >1) exit } '
\ END
Indeed , newcomers to \ textsc { Bash } may find conditionals confoudning .
Annoying as it may sound , you have to remember rules such as :
A space must follow the opening square bracket ; if not
\ textsc { Bash } would not find the ~ ` `\ verb +[+ ' ' command .
The following script may seem correct on first sight , yet , the
error message it produces may seem weird to beginners .
\ bash [ prefix ={} , script , stdout , stderr ]
27
if [2+2==5] ; then
echo " Freedom is the freedom to say that two plus two "
echo " make four . If that is granted , all else follows ."
fi
\ END
650
660
670
680
690
The error message in the above was anticipated ; it was included
in the listing thanks to the \ texttt { stderr } option .
As explained , listing \ texttt { stdout } instructs \ Bash to ignore
the script ' s error code .
\ LaTeX {} processing of \ texttt {\ jobname . tex }
does not stop as a result of this error .
\ section { Introspection }
\ label { Section : introspection }
This article uses document introspection to show the actual input used to
produce the examples .
To achieve this , I used Unix commands to retrieve portions of
\ texttt {\ jobname . tex } , my input file , and \ verb +\ input + these .
As we shall see , the \ texttt { sed } command proved instrumental in doing this .
Recall that at the beginning of \ autoref { Section : story } , I wrote
\ bash [ stdoutFile = begins . tex ]
cat 00. tex | sed -n '/ begins / ,// { p
/ stored / q } '
\ END
\ begin { quote }
\ textit {\ input { begins . tex }}
\ end { quote }
Recall also that later , at the beginning of
\ autoref { Section : retrospection } , I wrote
\ bash [ stdoutFile = examining . tex ]
cat 00. tex | sed -n '/ Examining / ,// { p
/ above / q } '
\ END
\ begin { quote }
\ textit {\ input { examining . tex }}
\ end { quote }
And , immediately afterwards , I gave an excerpt of file \ texttt {\ jobname . tex }.
To produce this excerpt , I applied the \ texttt { sed }
command to search in \ texttt {\ jobname . tex }.
Specifically , what I wrote in \ texttt {\ jobname . tex } was the following
\ bash [ stdout ]
cat -n 00. tex | sed -n '/ Examining / ,// {
/ i ntrospectively search the input / q
p }'
\ END
I used the \ texttt { cat } command to number my input lines , and then the
\ texttt { sed } command to printing these lines , starting at the first line that
contains the string `` Said Again ' ' , and ending with line that contains the
string `` END ' '.
28
700
710
720
730
My use of \ texttt { sed } implies that file \ texttt {\ jobname . tex } includes
the string `` Said Again ' ' at least twice .
The first such occurrence was in the title of \ autoref { Section : story }; the
second occurrence was in the application of \ texttt { sed } to in t ro s pe ct i ve ly
search for the use of the \ Bash that followed this title .
Subsequently , this document included several other occurrences of
`` Said Again ' ' ( including this sentence itself ); but let us concentrate
on the first two .
The search succeeded in finding the correct occurrence , since the search
instructions occurred \ emph { after } it .
You would need to apply a more sophisticated search in the case that you
wish to present an input excerpt prior to its actual occurrence in the text .
This was , for example , the case in the `` taste ' ' of \ textsc { Bash } script errors
offered in the previous section .
I applied \ href { http :// www . gnu . org / software / gawk /}{ Gawk }
for this search .
In case you are interested , the actual \ href { http :// en . wikipedia . org / wiki /%
Pipeline \ _ ( Unix )} { Unix pipeline } I wrote was :
\ bash [ stdout ]
cat -n 00. tex | sed -n '/ gawk / ,// { p
q }'
\ END
\ paragraph { Acknowledgments }
The manner by which \ Bash collects its arguments is based on that of
\ href { http :// www . tn - home . de / Tobias / Soft / TeX / tobiShell . pdf }{\ textsf { tobiShell }}.
Martin Scharrer tips on \ TeX {} internals were invaluable in writing \ bashful .
\ appendix
\ section { Source of \ texttt {\ jobname . tex }}
\ label { Section : source }
\ l stinputlisting
[
style = input ,
basicstyle =\ scriptsize \ ttfamily ,
numbers = left ,
stepnumber =10 ,
firstnumber =1 ,
numberfirstline = true ,
numberstyle =\ scriptsize \ rmfamily \ bfseries
]
{\ jobname . tex }
\ end { document }
29
Search
(courtesy of Google)
The online journal of the
TeX Users Group
ISSN 1556-6994
About The PracTeX
Journal
Table of Contents
Back issues
Author index
Title index
BibTeX bibliography
Next issue
Spring 2013
Editorial board
Lance Carnes, editor
Kaja Christiansen
Peter Flom
Hans Hagen
Robin Laakso
Tristan Miller
Tim Null
Arthur Ogawa
Steve Peter
Yuri Robbers
Will Robertson
[Published 2012-10-22]
Documenting ITIL processes with LaTeX (Portuguese)
Rayans Carvalho and Francisco Reinaldo
Article PDF
Article source
Comment on this article
General information
Submit an item
Download style files
Copyright
Contact us
About RSS feeds
Archives of The PracTeX
Journal
Issue 2012, Number 1
Abstract: Many companies have evolved with the implementation of the Information Technology Infrastructure
Library (ITIL), using the best practices and processes to achieve practical results. Good practice suggests
what to do, but at the same time raise doubts about how to do it and which tools to use to get better work
performance in ITIL. Noting these facts, this article presents a LaTeX-based processes and services
documentation tool, as suggested by ITIL.
Rayans Carvalho is an undergraduate student of Computer Science - Information Systems at Unileste,
Brazil. Additionaly, he is a trainee of the Laboratory of Computational Intelligence (LIC). Francisco Reinaldo
is titular professor at Unileste, Brazil. His main research interest is Computational Intelligence (Director of
LIC), but devotes much of his time collaborating with the LaTeXian community, and is an editor of The
PracTeX Journal. You can reach them at lic at unilestemg dot br .
Other key people
More key people wanted
Sponsors:
Web site Generated October 22, 2012 (wiki); TUG home page; search; contact webmaster.
Be a sponsor!
The PracTEX Journal, 2012, No. 1
Article revision 2012/01/12
Documentação em Processos ITIL com LATEX
Rayans Carvalho e Francisco Reinaldo
Email [email protected]
Resumo Muitas empresas evoluiram com a implantação da ITIL, utilizando as
boas práticas e processos constituídos que apresentam a transparência
da eficiência e eficácia. As boas práticas sugerem o que fazer, mas ao
mesmo tempo geram dúvidas sobre como fazer, quais são as ferramentas
de trabalho existentes no mercado para desenvolver a atividade em ITIL.
Observando estes pontos, o artigo apresenta uma opção de ferramenta de
documentação dos processos e serviços sugeridos pela ITIL com LATEX a
um caso de uso com ITIL.
1
Introdução
Quando a questão é sobre gerenciamento de serviços para propor processos de
melhoria, a ITIL (Information Technology Infrastructure Library) já mostrou ser eficiente e eficaz em seu ciclo de vida. Gerentes de TI (Tecnologia da Informação)
aprendem o que fazer com as boas práticas da ITIL, mas muitos não atingem a
qualidade do como fazer. Neste sentido algumas caracteristicas devem ser anotadas, tais como as ferramentas a utilizar para atingir a sustentabilidade do projeto
e da empresa.
Uma parte muito importante da ITIL que está em todos em seus processos,
é a questão da documentação desenvolvida. Independente do tipo de objeto desenvolvido, tal como os processos e os SLAś (Service Level Agreement) é sempre
necessário documentar. Em posse da documentação, o gerente de TI tem controle e respaldo a qualquer problema que possa surgir. A documentação é um
facilitador para escolhermos a sequência apropriada para desenvolver e migrar
sistemas, por exemplo. Podemos gerenciar projetos, antecipar ações, executar
planejamento de capacidade, gerenciar expectativas, enfim, podemos ter controle
das mudanças.
É incrível como gerentes de TI não tem conhecimento horizontal, tampouco
vertical das diferentes ferramentas voltadas à documentação que existem no mercado, ou somente tem as que chamam de homologadas, tal como o MS Word.
Felizmente, existe um universo de ferramentas voltadas para edição de texto e
muitas com qualidade superiores ao MS Word. E é neste foco que o artigo aborda,
apresentando LATEX como ferramenta de documentação.
2
LATEX como ferramenta para TI
LATEX foi desenvolvido por Leslie Lamport na década de 80 como sendo um conjunto de macros de alto nível para facilitar o processamento de textos com TEX.
LATEX é utilizado amplamente para a produção de textos acadêmicos, matemáticos e científicos devido à sua alta qualidade tipográfica.
O sistema LATEX é utilizado para produção de cartas pessoais, artigos e livros. Também possui abstrações para lidar com bibliografias, citações, formatos
de páginas, e referência cruzada. Para manter os padrões LATEX, o designer disponibiliza um modelo, com tamanhos de margens, letras e espaçamento para o
utilizador.
Com LATEXe templates, o gerente de TI irá se preocupar somente com o conteúdo, economizando tempo e dinheiro das organizações. Para este primeiro
momento, podemos ter o designer como a pessoa responsável em desenvolver
modelos em LATEX para diferentes situações. Pode-se criar vários modelos de documentação como por exemplo de diversas normas decorrente de sua empresa
de trabalho. Além disso, o arquivo PDF pode ser gerado sem a necessidade de
outros programas pagos.
3
Casos de Uso para TI
Abaixo, apresentamos dois importantes casos de uso comumente relacionados ao
mundo da TI.
3.1
Caso de Uso I
Para melhor entendimento vamos aplicar LATEX a uma documentação em ITIL.
2
Imagine que uma empresa chamada MaxSolutions, trabalha com o desenvolvimento de softwares e irá desenvolver um software que necessita ser documentado.
A empresa ContabilPorticus encomendou o software e irá estabelecer acordos de
SLA. Tal como o software, os acordos de SLA também necessitam ser documentados.
O profissional responsável pela documentação estabeleceu ao final do planejamento da documentação que serão necessários sete documentos diferentes e
contendo 134 páginas em média. Em cada etapa da documentação existe um
conjunto de normas a ser seguida sobre a formatação do texto. Nesta vertente,
LATEXfoi desenvolvido justamente para trabalhar com estes modelos. Assim, respondendo a questão de economia de tempo já relatada.
3.1.1
Estrutura dos Arquivos
Antes de implementar os modelos propostos, é necessário estruturar os arquivos
que serão utilizados, como por exemplo o diretório de figuras, os arquivos de formatação cada parte da documentação e outros. Abaixo apresenta-se os modelos
tipo padrão para a estrutura de arquivos.
Arquivo raiz que terá a documentação completa:
– doc-exemplo.tex
Arquivos modelos que contém as formatações criadas em LATEX para cada
parte da documentação:
– cap-rosto.tex
– cap-sobcapa.tex
– cap-introducao.tex
– cap-resumo.tex
– cap-desenvolvimento.tex
– cap-final.tex
Arquivo de bibliografia responsável pela a biblioteca necessária para que o
LATEX possa carregar toda a documentação bibliográfica:
– bibliografia.bib
3
Diretório de figuras que armazenará quaisquer imagens utilizadas pela documentação:
– ./figuras/
Cabeçalho a ser utilizado dentro do documento principal .tex:
\documentclass[a4paper,10pt]{article}
\usepackage{hyperref}
% para inserir hiperlinks ao texto.
\usepackage{xunicode}
% para caracteres Unicode.
\setmainlanguage{brazil} % para especificar a linguagem da escrita.
\setmainfont{Minion Pro} % define a fonte principal.
\setsansfont{Myriad Pro} % define a fonte sem serif.
\usepackage{graphicx}
% para adicionar figuras ao texto.
3.2
Caso de Uso II
Um problema encontrado em muitos editores de textos WYSIWYG “What You See
Is What You Get” é a questão de um mesmo documento ser utilizado por vários
usuários e ser salvo por extensões de arquivos diferentes, causando variações no
tamanho do arquivo, futura incompatibilidade, inconsistênica e lixo de código
interno.
Imagine o seguinte cenário onde o usuário A salva o documento em uma extensão .xyz - que é a extensão da versão do software do ano passado. Suponhamos que esta versão adiciona 123KB de informação além do texto desenvolvido a
cada novo salvamento automático, envolvendo data de modificação, entre outros
dados pertinentes ao documento e ao software utilizado.
Neste ano, a mesma fabricante de software desenvolve uma nova versão e
a extensão de arquivo é modificada para .xyza. Esta nova extensão tem novas
bibliotecas, novas funções de processamento de textos e passará a gravar 170KB
de informações além do texto criado. Este novo software carrega os arquivos
.xyz, quanto .xyza assim podendo gravar o documento nas duas versões. Ao
princípio parece que só há vantagens neste processo. Mas observa-se que para o
programa fazer esta permutação entre as duas extensões, é adicionado mais KB de
informação, pois o software que lê .xyza também lê .xyz uma questão chamada
compatibilidade. Então vamos adicionar mais 10KB para esta compatibilidade.
Seria no total de 180KB no total além do conteúdo do texto.
4
Imagine agora que este documento está desenvolvido com o software da versão da extensão .xyz, é de suma importância, e está sendo utilizado por 100 usuários diferentes. Cada usuário irá desenvolver uma parte do documento. Somente
50% dos usuários que irão desenvolver o documento tem a versão do software
do ano passado e a parte restante tem a versão mais nova deste mesmo software.
Com isso é observado que quando o software for salvo em .xyz e depois ser salvo
em .xyza e continuar permutando, então haverá a adição de mais e mais KB de
informação além do texto do usuário já inserido.
É perceptível o tamanho que ficará o documento com informações sem necessidade. Uma prática disso é observando as tabelas de comparação a seguir:
Os critérios de avaliação foram para MS Word 97-2003 (.doc) e MS Word 20072010 (.docx):
– Arquivo em branco;
– Arquivo com uma página completa sem formatação;
– Arquivo com uma página completa com formatação;
– Arquivo com imagem;
– Tempo de execução de abertura do programa;
– Tamanho do processo em execução.
Os testes a seguir, ocorreram em um notebook Acer 5920 com Intel Core 2 Duo
1,66GHz com 2MB L2 cache, 3GB RAM DDR2 de 800 MHz, HD SATA 2 7200 RPM
de 160GB, com placa de Video Integrada de 358 MB Mobile Intel Grafic Media
Accelerator X3100. Ressalta-se que o tempo de execução de abertura do programa
nos testes, é o momento após a máquina iniciar no sistema operacional Windows
7 Ultimate 64 bits. Ambos os softwares utilizados também contém a arquitetura
de 64bit.
3.2.1
Utilização dos MS Word 97-2003 (.doc) e MS Word 2007-2010 (.docx)
Documento Teste Gerado sem Conteúdo
Office
Programa Tamanho
Extensão
97-2003
Word
22,016 bytes .doc
2007-2010 Word
12,541 bytes .docx
Tabela 1 - Documento Teste Gerado sem Conteúdo
5
Documento Teste Somente com Texto Não Formatado
Office
Programa Tamanho
Extensão
97-2003
Word
25,600 bytes .doc
2007-2010 Word
13,431 bytes .docx
Tabela 2 - Documento Teste Somente com Texto Não Formatado
Documento Teste com Conteúdo Formatado
Office
Programa Tamanho
Extensão
97-2003
Word
26,112 bytes .doc
2007-2010 Word
14,480 bytes .docx
Tabela 3 - Documento Teste com Conteúdo Formatado
Documento Teste com Conteúdo e Imagem
Imagem
Office
Programa Tamanho
Extensão Tamanho
Extensão
97-2003
Word
138,752 bytes .doc
115,32 bytes .png
2007-2010 Word
128,980 bytes .docx
115,32 bytes .png
Tabela 4 - Documento Teste com Conteúdo e Imagem
Imagem:
Nota-se que mesmo o arquivo em branco já ocupa um espaço que deveria ser
de 0 a 1 byte, tendo em vista que o documento não contém informação. Este é um
aspecto de desperdício de espaço no disco rígido ou durante envio/recebimento
por e-mail.
3.2.2
Tempo de execução de abertura do programa
Ao requisito tempo de execução de abertura do programa, o tempo utilizado
no teste é o momento após iniciar o computador, e o LATEX compilou a 1,023
segundos e o MS Word 2010 abriu o arquivo a 6,742 segundos.
6
3.2.3
Tamanho do processo em execução e Tempo de execução de abertura do
programa
No conceito tamanho do processo em execução, nota-se que o programa de LATEX
ocupa 16.732 KB de memória e que o MS Word 2010 atingiu 32.068 KB, representando quase o dobro de tamanho.
Nome da imagem
————————WINWORD.EXE
texmaker.exe
notepad.exe
Tempo de Execução
—————————2,453 segundos
6,742 segundos
1,048 segundos
Uso de memória
———————–
32.068 KB
16.732 KB
1.404 KB
Obs: O notepad também foi listado pois muitos utilizadores de LATEX podem
utilizar o mais simples editor de texto.
Outro problema encontrado ao MS Word, é a utilização de macros ao qual o
documento pode estar infectado por vírus. Não há este problema para LATEX.
Também LATEX trata o texto somente como texto puro, sem parafernálias envolvendo o arquivo. Assim, o texto em LATEX é simples, leve, ágil, eficiente e eficaz.
Porque texto é texto, não há necessidade de ser mais do que isso.
4
Conclusão
Da perspectiva da Tecnologia da Informação, realizar a documentação é fator
crítico para o sucesso. Então, documentação é o centro dos componentes para
suportar a gerência de mudança com sucesso. A importância do artigo é sim
demostrar a ferramenta em um caso aplicado a ITIL para que os Gerentes de TI
tenham mais uma opção para desenvolver as documentações necessárias sugeridas pela ITIL.
Assim, LATEX apresenta muitas vantagens em questão de tempo de execução
de abertura do programa, tamanho de seu processo em execução e tamanho de
arquivo armazenado.
7
5
Bibliografia
Cox, J. & Lambert, J. Microsoft® Word 2010 Step by Step ,2010
Helmut Kopka, P. W. D. A Guide to LATEX2ε : Document Preparation for Beginners
and Advanced Users (3rd Edition) , 1999.
OFFICE OF GOVERNMENT COMMERCE. IT: Infrastructure Library: Continual
Service Improvement. London: OGC, 2007.
OFFICE OF GOVERNMENT COMMERCE. IT: Infrastructure Library: Service
Design. London: OGC, 2007.
8
Search
(courtesy of Google)
The online journal of the
TeX Users Group
ISSN 1556-6994
Table of Contents
[Published 2012-10-22]
Avoid eqnarray!
About The PracTeX
Journal
Lars Madsen
Article PDF
Article source
Comment on this article
General information
Submit an item
Download style files
Copyright
Contact us
About RSS feeds
Archives of The PracTeX
Journal
Issue 2012, Number 1
Back issues
Author index
Title index
BibTeX bibliography
Abstract: Whenever the eqnarray environment appears in a question or example of a problem on
comp.text.tex, tex.stackexchange.com or other forums there is a high probability that someone will tell the
poster not to use eqnarray. This article will provide some examples of why many of us consider eqnarray to be
harmful and why it should not be used.
Next issue
The article is an updated edition, first published in PracTeX Journal 2006-4.
Spring 2013
Lars Madsen holds a master's degree in mathematics from the Department of Mathematics, Aarhus Aarhus,
Denmark, where he is also currently employed doing user support including quite a lot of LaTeX editing and
general support.
Editorial board
Lance Carnes, editor
Kaja Christiansen
Peter Flom
Hans Hagen
Robin Laakso
Tristan Miller
Tim Null
Arthur Ogawa
Steve Peter
Yuri Robbers
Will Robertson
Lars is a regular on comp.text.tex, tex.stackexchange.com plus the Danish TeX User Group's mailing list. As
he witnesses a lot of normal LaTeX users, Lars is a bit concerned on how new users learn LaTeX. As a result
of this, he is currently (still) working on the third edition of his Danish LaTeX introduction, now spanning
almost 500 pages.
He can be contacted at daleif at imf dot au dot dk.
Other key people
More key people wanted
Sponsors:
Web site Generated October 22, 2012 (wiki); TUG home page; search; contact webmaster.
Be a sponsor!
The PracTEX Journal, 2012, No. 1
Article revision 2012/02/16
Avoid eqnarray!
Lars Madsen
Email [email protected]
Address Department of Mathematics
Aarhus University
Denmark
Abstract Whenever the eqnarray environment appears in a question or example
of a problem on comp.text.tex, tex.stackexchange.com or other fora
there is a high probability that someone will tell the poster not to use
eqnarray. This article will provide some examples of why many of us
consider eqnarray to be harmful and why it should not be used.
Introduction
When someone asks a question on comp.text.tex, tex.stackexchange.com or
other fora about the eqnarray environment or shows an example using it, there
will always be someone that instructs the poster to stop using eqnarray and use
something better instead. This article provides an example-based overview of
some of the reasons why many people consider eqnarray to be obsolete. Thus,
this article can be used as a reference when a poster asks for an explanation.
The prerequisites for this article are a basic knowledge of LATEX and knowledge of the syntax used by eqnarray. Experience with the environments from the
amsmath package is a plus but not mandatory.
1
The basics
In plain LATEX, the eqnarray environment is basically the only construction available for numbered multi-line equations. The eqnarray environment is similar
to
Copyright © 2006, 2012 Lars Madsen
Permission is granted to distribute verbatim or modified
copies of this document provided this notice remains intact
Originally published in The PracTEX Journal 2006-4.
\begin{array}{rcl}
...
\end{array}
with the difference being that the first and last cell in each row are automatically
typeset as display style mathematics, and not as text style math as it would be in
the array environment; also, eqnarray supports automatic equation numbers.
The principal eqnarray usage is similar to this example:
\begin{eqnarray}
y &=& (x+1)^2 \\
\end{eqnarray}
&=& x^2+2x+1
which results in (without the box):
y = ( x + 1)2
2
= x + 2x + 1
(1)
(2)
In the examples that follow, we use the command \dbx instead of writing some
meaningless arbitrary mathematical formula. \dbx is a simple macro, defined by
the author, that writes a box to simulate some random mathematical material.
Using an optional argument we can adjust the width of the box created by \dbx.
The reason for using simulated math instead of actually writing something is
that removing the actual text makes the reader more aware of the actual problem,
which is not the text but rather the construction/surroundings themselves. The
example above will be shown like this instead:
\begin{eqnarray*}
\dbx &=& \dbx[5cm] \\
\end{eqnarray*}
&=& \dbx
which results in:
=
=
2
2
2.1
Behold the problems
The primary problem: Spacing inconsistency
Most commonly, eqnarray-users write their displayed equations by mixing eqnarray
and eqnarray* with equation, \[...\], or $$...$$ constructions. Some even mix
it with environments from the amsmath package (though this is mostly seen when
a document has been written by more than one author).
This mixing results in the primary problem with eqnarray — spacing inconsistency. In the following example we consider a single line equation versus a
multi-line eqnarray equation.
\[ \dbx = \dbx \]
whereas
\begin{eqnarray*}
\dbx &=& \dbx[3cm] \\
\end{eqnarray*}
&=& \dbx
which results in
=
whereas
=
=
Can you spot the problem?
It is even more obvious when we place the same code using eqnarray and
equation next to each other:
\begin{eqnarray} \dbx &=& \dbx[3cm]
\end{eqnarray}
versus
\begin{equation} \dbx = \dbx[3cm]
\end{equation}
which results in
3
=
(3)
=
(4)
versus
Can you see the difference?
We notice how the spacings around the =’s are inconsistent, i.e., not equal. Consistency being one of the key values in any good document design, the spacing
around the = signs should be equal on both sides (not counting stretch), no matter
which construction is used.
Since eqnarray is (naively) built on top of the array environment we still have
the \arraycolsep space between columns, which then affects the spacing around
the =’s in our case. We could change the value of \arraycolsep:
\setlength\arraycolsep{1.4pt}% some length
\[ \dbx = \dbx \]
\begin{eqnarray*}
\dbx & = & \dbx \\ &= & \dbx
\end{eqnarray*}
Resulting in:
=
=
=
Changing the value of \arraycolsep, however, will also change the appearance
of any other construction that might be using array, so this does not suffice; see
the following example.
Before the change:
\begin{eqnarray*}
A &=& \left(\begin{array}{cc}\dbx&\dbx\\
\dbx&\dbx\end{array}\right)
4
\end{eqnarray*}
after the change:
\setlength\arraycolsep{1.4pt}% some length
\begin{eqnarray*}
A &=& \left(\begin{array}{cc}\dbx&\dbx\\
\dbx&\dbx\end{array}\right)
\end{eqnarray*}
Resulting in:
Before the change:
A =
after the change:
A=
Some people argue that this larger spacing is a good thing, that it helps understanding the equations in question. For that to be true the author should do this
with every single equation, whether the equation was written using eqnarray or
not. Consistency above all. We can plainly see that eqnarray does not follow the
spacing conventions Knuth set out in TEX, whereas both equation and \[. . . \]
do.
Here is another example from a set of notes I have been editing (actual code
from the original unedited notes).
\begin{eqnarray*}
{\cal C}_{0} &\subseteq& {\cal C}\subseteq
\sigma ({\cal C}_{0},{\cal N}) ,
\end{eqnarray*}
C0 ⊆ C ⊆ σ(C0 , N ),
5
Which makes one wonder if LATEX authors even notice the difference in spacing,
or do they just accept it as a fact of life?
Even though eqnarray might not be recommended for one-liners, they do still
appear quite a lot in the ‘wild’.
As eqnarray is the only multi-line construction for plain LATEX, what should
be used instead? Short answer: Use the environments from the amsmath package,
in particular the align environment.
Longer answer: There are a few packages that can help including nath, mathenv
and amsmath. Using amsmath is highly recommended since it is already included
as part of every LATEX installation.
For those not familiar with the amsmath package we present a few useful constructions in Appendix A.
2.2
Problem #2: eqnarray can overwrite equation numbers
Given a long formula which happens to fit within one line were it not for the
equation number, eqnarray will happily just ignore the equation number, without
any warnings.
\begin{eqnarray}
\dbx &=& \dbx[12cm]
\end{eqnarray}
=
(5)
It can get even worse. Assume we are using the leqno class option, i.e. equation numbers on the left. Then assume we have a math line that is slightly longer
than the text width:1
Left text edge \hfill right text edge%
\begin{eqnarray}
\dbx &=& \dbx[13.5cm]
\end{eqnarray}
1. Example provided by Barbara Beeton.
6
Left text edge
(6)
right text edge
=
No offence, but why on earth is eqnarray moving the equation number? Let
us see what happens if we take the same example and switch back to equation
numbers on the right:
Left text edge \hfill right text edge%
\begin{eqnarray}
\dbx &=& \dbx[13.5cm]
\end{eqnarray}
Left text edge
right text edge
=
(7)
Sigh. . .
Well, at least that will teach authors to remember to break their equations
properly.
At least the environments from the amsmath bundle take the equation number
into consideration. Here is an example using align:
\begin{align}
\dbx &= \dbx[12.5cm]
\end{align}
=
(8)
2.3
Problem #3: Silence of the labels
Part of my job is to process a preprint series published by my department. This
brings me into contact with many different styles of LATEX writing and usage.
One thing that I frequently do (as part of my visual improvement procedures)
7
is convert eqnarray environments into align environments (or similar). This is
where one starts to find the hidden label errors. Most often these occur when two
or more people have been writing/editing the same file.
Here is the first example:
\begin{eqnarray}
\dbx & = & \dbx \\
\dbx & = & \dbx \label{eq:2} \nonumber
\end{eqnarray}
From equation (\ref{eq:2}) we conclude
\begin{equation}
\dbx=42.
\end{equation}
So the author had an equation which he or she no longer wanted to have numbered (\nonumber). Which is perfectly reasonable, but the author neglected to
check whether the now-dead label (eq:2) was referred to. The result is as follows:
=
=
(9)
From equation (10) we conclude
= 42.
(10)
Huh? This might end up as an interesting form of argumentation. It seems as if
eqnarray actually steps up the equation counter at the start of every line (hence
\label catches something) and when it encounters \nonumber it does not write
any equation number and steps the equation counter one down again. On a side
note, equation has the same problem if one mixes it with \nonumber (something
which is not fixed by using amsmath).
The worst thing here is that eqnarray does this silently, without warnings,
so if you do not know that this might happen you will never notice it unless
someone carefully reads the article.
As it happens, I recently received an article which showed exactly the same
problem in eqnarray*. Here one only has to place a label inside a non-numbering
8
eqnarray* (we use \theequation to show the current value of the equation number):
Equation number before the equation: \theequation
\begin{eqnarray*}
\label{eq:4}
\text{Inside the equation \theequation} & = & \dbx
\end{eqnarray*}
The reference is \eqref{eq:4}.
Equation number after the equation: \theequation
Resulting in:
Equation number before the equation: 10
Inside the equation 11 =
The reference is (11). Equation number after the equation: 10
Who smells a rat? So, even in eqnarray* the equation counter is stepped up, and
later stepped down at the end of each line. As we have seen, this is a problematic
approach.
2.4
Problem #4: The amsthm package vs. the eqnarray
environment
If one uses the amsthm package, and its proof environment, then you will get
automatic placement of an “end of proof ” marker. Sometimes one ends a proof
with a displayed formula and may want to place the end marker near the equation
number. This may be achieved by simply issuing \qedhere on the last line of the
formula.
\begin{proof}
\dots
\begin{equation*}
a=0. \qedhere
\end{equation*}
\end{proof}
9
Proof. . . .
a = 0.
This handy little feature, as one might guess by now, does not work with eqnarray!
3
Solution
The best solution is to not use the eqnarray environment at all. Use the environments from amsmath instead. If in some case that will not do, the mathenv
package reimplements eqnarray to work more rationally. It also removes the restraint on the number of columns in an eqnarray. (Unfortunately, mathenv is not
compatible with certain useful modern packages, notably siunitx.)
Sadly we see many journals and publishers who still recommend (or at least
mention) the use of eqnarray in their guides for authors.
A
The amsmath package
For more information about amsmath see [2], [1] and [4] (in order of recommended
reading). This appendix gives a few interesting constructions, mainly showing
replacements for common eqnarray usage.
All of the following examples require amsmath, hence the document preamble
must include:
\usepackage{amsmath}
One thing to note about amsmath is that every environment from amsmath that
provides equation numbers also has a *-version which does not. The package
also includes an equation* environment which is missing from plain LATEX.
Now the first thing we need is a replacement for eqnarray. We choose align,
which has a slightly different syntax than eqnarray:
10
\begin{eqnarray*}
\dbx &=& \dbx[1.5cm]\\
&=& \dbx
\end{eqnarray*}
\begin{align*}
\dbx &= \dbx[1.5cm]\\
&= \dbx
\end{align*}
=
=
=
=
Note the reduced number of &’s.
Here is another common eqnarray construction and its align counterpart:
\begin{eqnarray*}
\dbx &=& \dbx[1cm]\\
& & + \dbx
\\
&=& \dbx
\end{eqnarray*}
\begin{align*}
\dbx = {} & \dbx[1cm]\\
& + \dbx
\\
= {} & \dbx
\end{align*}
=
=
+
+
=
=
Notice the use of {} when the & is placed to the right of a relational symbol. Also
note that the spacing around the + is correct in the align case but not when using
eqnarray.
One construction not easily achieved with base LATEX is a formula spread over
several lines but with only one equation number for the entire formula. Again,
this is easy using constructions from the amsmath package:
\begin{equation}
\begin{split}
\dbx & =\dbx[3cm] \\
& =\dbx
\end{split}
\end{equation}
11
=
=
(11)
Notice how the equation number is vertically centred. The syntax for split is
otherwise more or less the same as for align*.
The amsmath package also provides the aligned (and alignedat) environment,
which is basically the full align environment, but for inner use. (Like eqnarray,
split can only have one so-called alignment column, while align and aligned
can have several.)
\begin{equation}
\begin{aligned}
\dbx & =\dbx &\qquad
& =\dbx &
\end{aligned}
\end{equation}
\dbx & =\dbx \\
& =\dbx
=
=
A.1
=
=
(12)
What about \lefteqn?
amsmath has no direct equivalent to \lefteqn, but the idea is still useful. To recap,
using the \lefteqn macro inside eqnarray, one can force that particular line to
be moved to the left:
\begin{eqnarray*}
\lefteqn{\dbx[2cm] = \dbx[2cm]} \\
&& = \dbx[2cm] \\
&& = \dbx[2cm]
\end{eqnarray*}
12
=
=
=
One usually uses this to mark the first line, and then give the impression of the
rest of the lines being indented.
The mathtools package does provide an alternative, namely \MoveEqLeft:
\begin{align*}
\MoveEqLeft \dbx[3cm] = \dbx[2cm] \\
& = \dbx[3cm] \\
& = \dbx[3cm]
\end{align*}
=
=
=
The idea is that the \MoveEqLeft marks an alignment point (which is what the
ampersands follow), and then pulls the line backwards in a suitable fashion. It
does not take any required arguments, unlike \lefteqn.
13
Acknowledgements
Special thanks to Barbara Beeton from the AMS for comments and suggestions
for this revised version. Also many thanks to the various people who provided
examples for the original version of the article.
References
[1] American Mathematical Society, User’s Guide for the amsmath Package, 2002.
Normally included in every LATEX installation as amsldoc; also available via
http://mirror.ctan.org/macros/latex/required/amslatex/math.
[2] Michael Downes, Short Math Guide, 2002. Short introduction to the
amsmath and amssymb packages. ftp://ftp.ams.org/pub/tex/doc/amsmath/
short-math-guide.pdf
[3] Morten Høgholm, Lars Madsen, Will Robertson and Joseph Wright (maintainers), The mathtools package, 2011. Various extensions to amsmath and others.
http://mirror.ctan.org/macros/latex/contrib/mh.
[4] Herbert Voß, Math mode, 2006. Extensive summary describing various mathematical constructions, both with and without the amsmath package. http:
//mirror.ctan.org/info/math/voss/mathmode/Mathmode.pdf.
14
Search
(courtesy of Google)
The
online
journal
of the
TeX
Users
Group
ISSN
15566994
About
The
PracTeX
Journal
General
information
Submit an
item
Download
style files
Copyright
Contact us
About RSS
feeds
Archives
of The
PracTeX
Journal
Back issues
Author
index
Title index
BibTeX
bibliography
Next
issue
Table of Contents
Issue 2012, Number 1
[Published 2012-10-22]
Ask Nelly
Comment on this article
Contents
1 Ask Nelly
1.1 Customizing lists
1.2 Producing logos
Customizing lists
Dear Nelly,
In my document I often use the main three list environments of LaTeX: enumerate, description and itemize. Unfortunately, I'm not always pleased with
the results I get, especially the spacing. Is there a way to customize these lists?
Sincerely,
Alex
Dear Alex,
Actually, there is. LaTeX has a built-in system of parameters that can be adjusted by the user. Not all LaTeX books discuss these fine-tuning issues.
A place where you can find a complete discussion is, of course, the LaTeX Companion.
I would recommend, however, another way. I think you should use the package enumitem, by Javier Bezos, available from CTAN. You simply have to
load the package with a
\usepackage{enumitem}
command. The parameters of the lists become optional parameters of the corresponding environment. See the package documentation for the list of
parameters. For instance, if you want to adjust the separation of items and the left margin of an itemize list, you just begin the environment with a
command of the form:
\begin{itemize}[itemsep=0.5ex,leftmargin=1.2cm]
Spring 2013
Editorial
board
Lance
Carnes,
editor
Kaja
Christiansen
Peter Flom
Hans Hagen
Robin
Laakso
Tristan
Miller
Tim Null
Arthur
Ogawa
Steve Peter
Yuri
Robbers
Will
Robertson
Other key
people
More key
people
wanted
Best regards,
Paul (on behalf of Nelly)
The above question was answered by Paul Blaga, a member of the editorial board of this journal. He can be reached at pracjourn
at tug dot org.
Producing logos
Dear Nelly,
I've seen documents and books with logos for different "components" of LaTeX, for example Metafont, BibTeX, AMS-LaTeX. How are they produced?
Sincerely,
John
Dear John,
It depends. Some of them are built-in. For instance, we use
\LaTeX
for producing the LaTeX logo or
\AmS-\LaTeX
to produce the AMS-Latex logo. For other logos, however, you have to load various packages. A package that contains many logos is texlogos, by
Jacek Ruzyczka, available from CTAN. It has no documentation, so you will have to look into the style file to figure out what's in it. It includes
redefinition of some of the logos of the LaTeX world, but also, for instance, logos for some international currencies. Other sources of useful logos are
the files ltugboat.cls and ltugcomm.sty, also available from CTAN. These two files also include a logo for XeTeX, which is not present in texlogos.
Best regards,
Paul (on behalf of Nelly)
The above question was answered by Paul Blaga, a member of the editorial board of this journal. He can be reached at pracjourn
at tug dot org.
Sponsors:
Web site Generated October 22, 2012 (wiki); TUG home page; search; contact webmaster.
Be a sponsor!
Search
(courtesy of Google)
The online journal of the
TeX Users Group
ISSN 1556-6994
About The PracTeX
Journal
General information
Submit an item
Download style files
Copyright
Contact us
About RSS feeds
Table of Contents
[Published 2012-10-22]
Contents
1 Distraction
1.1 Writing guitar chords with LaTeX
1.2 Font quizzes
1.2.1 Typography terms
1.2.2 Kerning test
Archives of The PracTeX
Journal
Distraction
Back issues
Author index
Title index
BibTeX bibliography
Writing guitar chords with LaTeX
Next issue
Issue 2012, Number 1
We selected to illustrate a very recent package, gtrcrd, by Riccardo Bresciani, allowing the guitar players to add chords on
top of the text. For exemplification, we chose the well known Beatles song And I Love Her. Here is the pdf and the
source .
Spring 2013
Font quizzes
Editorial board
Below are some font-related curiosities. Try your hand at some quizzes on typography terms, and a kerning test.
Lance Carnes, editor
Kaja Christiansen
Peter Flom
Hans Hagen
Robin Laakso
Tristan Miller
Tim Null
Arthur Ogawa
Steve Peter
Yuri Robbers
Will Robertson
Typography terms
Play Cheese or font http://cheeseorfont.com/
Can you tell whether these are fontography terms or just pretentious blather?
http://blogs.msdn.com/b/oldnewthing/archive/2011/11/15/10237051.aspx
A reader comment from this blog:
Q: "Which of them are terms used in fontography, and which are just pretentious blather?"
A: Is this a trick question?
Other key people
More key people wanted
Kerning test
We look at typeset material daily, but can you position the letters like a type designer? http://type.method.ac
Sponsors:
Web site Generated October 22, 2012 (wiki); TUG home page; search; contact webmaster.
Be a sponsor!
Search
(courtesy of Google)
The online journal of the
TeX Users Group
ISSN 1556-6994
Table of Contents
Issue 2012, Number 1
Book Review: LaTeX and Friends
About The PracTeX
Journal
Editors
Article PDF
Article source
Comment on this article
General information
Submit an item
Download style files
Copyright
Contact us
About RSS feeds
Archives of The PracTeX
Journal
Back issues
Author index
Title index
BibTeX bibliography
[Published 2012-10-22]
This new feature of the PracTeX Journal includes, from time to time, short reviews of newly published textbooks or reference
books on LaTeX and friends. For this issue, we selected a Springer book, LaTeX and Friends by Marc R.C. van Dongen
Next issue
Spring 2013
Editorial board
Lance Carnes, editor
Kaja Christiansen
Peter Flom
Hans Hagen
Robin Laakso
Tristan Miller
Tim Null
Arthur Ogawa
Steve Peter
Yuri Robbers
Will Robertson
Other key people
More key people wanted
Sponsors:
Web site Generated October 22, 2012 (wiki); TUG home page; search; contact webmaster.
Be a sponsor!
Book Review
Marc van Dongen – LaTeX and Friends, Springer-Verlag (X. Media Publishing Series), 2012,
Hardback, 324 pp., ISBN-10: 3642238157, ISBN-13: 978-3642238154
In the last quarter of the century since its creation, and especially in the past ten
years, a large number of books have been devoted to LATEX, some of them extremely well
written. Every time a new one is published (or is about to published) it is natural to ask
whether it was, indeed, necessary or at least useful.
Although I was initially a little skeptical, after reading Marc van Dongen’s book I
discovered that it covers many topics that are not usually touched on in textbooks.
Most LATEX books (and this one is no exception) start with a list of Pros and Cons:
“Why should I switch to LATEX?” or “Why should I not?”. The first argument the author
mentions against LATEX is its complexity: “It may take one to several months to learn.”
Is this really true? Not in the opinion of some of my students in mathematics and
computer science who usually think they can learn LATEX in a day or two. The problem
with LATEXis exactly this: it is very easy to learn enough to be able to produce a not very
complicated document. But what happens next? Unfortunately, in most cases, you need
a considerable amount of effort to become a decent user of LATEX. Not all users are willing
to make this effort. One of the reasons for this is the lack of intermediate textbooks, and
van Dongen’s intention is to fill this gap.
The “philosophy” of the book is quite different from that of your “usual” textbook.
The aim of the author is, as I see it, to teach you how to produce beautiful documents,
not just functional ones. The structure of the book reflects directly the philosophy I was
mentioning previously. What I want to say is that the most important thing is the result,
what we want to achieve, rather than the tools we use.
The first two parts cover the basic stuff: how LATEX works, and how to typeset text
and lists. The third part deals with Tables, Diagrams and Data Plots. A good title for this
part would have been Graphics, and it is, probably, the most useful of the entire book.
There are only a few sources where tables are looked at from a graphical point of
view. Van Dongen first describes briefly how to include graphics produced with other
programs in a LATEX document. In the remaining chapters of this “graphics” part, the
author’s aim is to explain how to present the information using LATEX.
The Diagrams are described by using the tikZ package, a favorite of the author. A
short introduction to the package is provided, enough to acquire a working knowledge
(and, of course, to produce diagrams). The chapter about tables is about presenting data
in tables, rather than just the mechanics of making a table. While the approach is far from
being exhaustive, there is enough so that the reader can produce a presentable result. In
particular, I noted the care he used to produce beautiful tables, and not just to present
data in a suitable tabular manner. Finally, he again shows how to use tikZ to describe
the presentation of data using different kinds of plots.
The fourth part (Mathematics and Algorithms) is fairly standard. I particularly liked
the part about Algorithms, and the author’s style: he focuses on a very small number
of packages and describes each in detail. He shows how these packages can be used to
achieve the goal, in this particular case to present an algorithm.
The fifth part is, again, a little bit more advanced and covers both standard material
(defining commands, counters, etc.) and material that is usually avoided in elementary
textbooks, but which is essential in many situations (for instance, the use of keys).
In the sixth part, I was impressed by the chapter on the use of OpenType fonts, although this material is for more advanced users.
The book covers everything a beginner needs to know as well as a significant number
of topics not present in elementary textbooks. Van Dongen’s style is easy to read and
never dull. The author avoids the temptation of covering entire areas or describing all
the packages dealing with a particular subject. He prefers instead to focus on the subject
and on a small number of appropriate packages.
What I particularly like is his attention to detail. You can find many small things
which are usually skipped, but which contribute to the effectiveness of the book.
In fact, this is one of the very few books on LATEX that really takes into consideration
the beauty of the document as a whole, and not just particular constructions: You can
have beautiful fonts or beautiful equations (and LATEX is famous for them) but it is rare
that a LATEX user knows how to arrange them esthetically on the page. Van Dongen’s
book itself is a good example of its principles. I liked very much the book’s page design,
as well as the appearance of figure and table captions.
There is, however, a notable absence in the book: a listing of van Dongen’s page
layout. It would be useful for readers, and I’m sure my LATEX students would have liked
to see this. Perhaps Dr. van Dongen could post this online, for example on the PracTEX
Journal site?
In conclusion, this is an excellent introduction to LATEX and some of the associated
software, suitable both for self-study and as a reference. It is written in a very innovative
manner and can be used both by newcomers and more advanced users.
Paul A. Blaga
July 2012
2