1
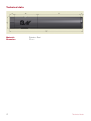
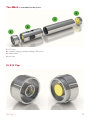
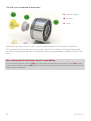
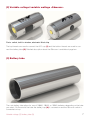
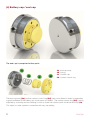
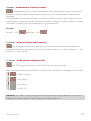
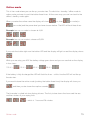
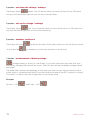
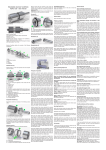
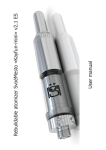
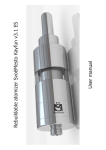
The Difference.
APV (Advanced Personal Vaporiser)
Nivel v3 – user manual
The PV SM Nivel v3 (SMv3) is the electronic switch module used to regulate the voltage you
desire to operate an atomizer (not for medical use), and called the electronic cigarette.
Inhaltsverzeichnis
Index
Technical data . . . . . . . . . . . . . . . . . . . . . . . . . . . . . . . . . . . . . . . . . . . . . . . . . . . . . . . . . . . . . 4
SMv3 . . . . . . . . . . . . . . . . . . . . . . . . . . . . . . . . . . . . . . . . . . . . . . . . . . . . . . . . . . . . . . . . . . . 5
(1) 510 Cap . . . . . . . . . . . . . . . . . . . . . . . . . . . . . . . . . . . . . . . . . . . . . . . . . . . . . . . . . . . . . . 5
(2) Variable voltage . . . . . . . . . . . . . . . . . . . . . . . . . . . . . . . . . . . . . . . . . . . . . . . . . . . . . . . . . . 7
(3) Battery tube . . . . . . . . . . . . . . . . . . . . . . . . . . . . . . . . . . . . . . . . . . . . . . . . . . . . . . . . . . . . 7
(4) End Cap . . . . . . . . . . . . . . . . . . . . . . . . . . . . . . . . . . . . . . . . . . . . . . . . . . . . . . . . . . . . . . . 8
Add-ons . . . . . . . . . . . . . . . . . . . . . . . . . . . . . . . . . . . . . . . . . . . . . . . . . . . . . . . . . . . . . . . . . 9
User manual «Sëmovar» . . . . . . . . . . . . . . . . . . . . . . . . . . . . . . . . . . . . . . . . . . . . . . . . . . . . . 10
Technical data of the unit . . . . . . . . . . . . . . . . . . . . . . . . . . . . . . . . . . . . . . . . . . . . . . . . . . . . 10
Operation description . . . . . . . . . . . . . . . . . . . . . . . . . . . . . . . . . . . . . . . . . . . . . . . . . . . . . . 11
Standby-Modus . . . . . . . . . . . . . . . . . . . . . . . . . . . . . . . . . . . . . . . . . . . . . . . . . . . . . . . . . . 11
Online mode . . . . . . . . . . . . . . . . . . . . . . . . . . . . . . . . . . . . . . . . . . . . . . . . . . . . . . . . . . . . . 15
Error reports . . . . . . . . . . . . . . . . . . . . . . . . . . . . . . . . . . . . . . . . . . . . . . . . . . . . . . . . . . . . . 17
Warnings . . . . . . . . . . . . . . . . . . . . . . . . . . . . . . . . . . . . . . . . . . . . . . . . . . . . . . . . . . . . . . . . 19
Index
3
Technical data
Material: Diameter: 4
Stainless Steel
22mm
Technical data
The SMv3 is assembled of four parts:
1
2
3
4
510 cap
variable voltage / variable wattage «Sëmovar»
battery tube
end cap
(1) 510 Cap
SW Cap (1)
5
The 510 cap is comprised of three parts:
1a positive contact
1b insulator
1c body
At the atomizer side of the 510 cap is a built in thread where all 510 connectors will fit.The
510-connector will allow the use of all atomizers with a 510 connection. The adjustable center
pin allows screwing your atomizer to the perfect position and guarantees a perfect contact all the
time.
We recommend the following steps for assembling:
First screw the positive contact (1a) out, then screw on the atomizer to the 510 cap (1c). Finally
screw in the positive contact (1a) until it touches the positive pin of the atomizer to have a secure
and positive connection.
6
SW Cap (1)
(2) Variable voltage / variable wattage «Sëmovar»
Parts: switch, built in window, electronic Nivel chip
The top threads are used to connect the 510 cap (1) and the bottom threads are used to connect the battery tube (3). Detailed description about the Sëmovar is available at page ten.
(3) Battery tube
The main battery tube allows for use of 18650, 18500, or 18350 batteries depending on the tube
you select. On the end of the tube the battery cap (4) is screwed on and the Sëmovar switch is
connected on top.
Variable voltage (2) / battery tube (3)
7
(4) Battery cap / end cap
The end cap is comprised of four parts:
4a
4b
4c
4d
end cap body
spring
contact cap
contact control ring
The end cap body (4a) and the contact control ring (4d) have some drilled in holes to guarantee
a good ventilation of the battery gas in the event of a defect. The contact control ring (4d) is easily
adjusted by screwing and unscrewing to raise or lower the contact point inside the end cap (4a).
This helps to make a perfect connection with any size battery.
8
End Cap
Add-ons
Optional parts available:
5a 510 cap 14mm
5b 510 cap 18mm
5c electronic switch
5d mechanical bottom switch with locking ring
5e kick extension
5f collector tank to connect Kayfun v3.0 and v3.1 directly to the switch
5g 18500 battery tube
5h 18350 battery tube
5isticker
Batteries
Use only high quality batteries.
SMv3 is working only with ONE battery.
Never use two batteries at the same time (stacking)!
How to insert the battery
Unscrew the end cap (4), put the battery inside the battery tube (3) positive pole first! Screw on
the end cap (4). During the assembly take care of a sturdy connection between the parts. Don’t
screw them too hard to prevent damage.
Add-ons
9
User manual «Sëmovar»
(Version 1.80)
The Semovar is made to regulate the output power to guarantee the maximum flavor and vapor
production to help each user find the perfect performance of any atomizer, which is connected.
IMPORTANT!
Before you start running the PV for the first time please read the user manual thoroughly!
Technical data
Battery power range: 3,2 Volt – 4,2 Volt (one Li-Ion-battery)
Working range: 3,0 Volt – 6,0 Volt
Maximum power: 15 Watt
Lowest atomizer resistance: 1,0 Ohm
Maximum amperage: 3,0A – 3,5A
Digital screen: two digit screen and LED lighted button,
reverse-pole-protection displayed by a separate LED
Control system: by button
Variable voltage mode: selectable in offline menu
Voltage increments: 0,1V
Variable wattage mode: selectable in offline menu
Wattage increments: 0,2W (3,0W – 10,0W) / 0,5W (10,0W – 15,0W)
Control button protection: turn device on / off by pressing button three times
Showing battery power: yes (online and offline menu)
Battery power bar: yes – four-step at home display
Adjustable display light: yes – five steps
Vapetime counter: yes – up to 99h 59 min (resettable at offline menu)
Atomizer resistance display: yes (online and offline menu)
Drag timer: 15sec / after 30sec, device switch to standby mode
Overheat protection: yes – at 60°C – failure displayed
Short-circuit protection: yes – failure displayed
Barricade operation if chosen output power is too high: yes – failure displayed
Reverse battery pole protection: yes – failure displayed by LED
10
User manual «Sëmovar» Operation description
The APV is operated by pushing the button min. one time a second. During operation the button
letters will be showed on the display.
To enter the menus click the button three times – you can then operate through the different
options. After one second without pushing the button you are entering the menu point you have
chosen.
The display picture
shows pushing the button at the time you stay in the offline menu
without entering the menu.
Standby-mode
The standby-mode is made to carry the APV for short times or for short storage times. In standby-mode you are not able to fire your atomizer but you are able to enter the operation mode or
the offline menu.
Menu
To enter the service-mode push the button 6-13 times. The function available with each push will
be shown as a code. If you don’t push the button during 4 seconds the APV will be go back to
the standby-mode and save the last setup you have made.
Operation description / Standby-Modus
11
6 pushes – power-mode (variable wattage)
(Set Power) and after a moment the last power setup you have
The display shows
made. Each time of pushing the button during the time you stay in this point of menu you can
step up the wattage in the following increments: 3-10W: 0,2 increments 10-15W: 0,5 increments
(xx,5 increment will be shown by a point in the right bottom corner of the display)
Beispiel:
(this setup shows the power of 12,5W)
When you set up wattage inside the menu the APV will start in VW-mode when you turn it on.
7 pushes – voltage-mode (variable voltage)
(Set Voltage) and after a moment the last voltage setup you have
The display shows
made. Each time you push the button now the voltage will be step up in 0,1 increments.
When you set up voltage inside the menu the APV will start in VV-mode when you turn it on.
This mode will be shown in the display like this:
will be shown in the display.
After this the voltage you set up
8 pushes – atomizer resistance
will be shown at the display. After this the resistance of the atomizer.
(or whatever your atomizer resistance is at the time) will be shown.
12
Standby-Modus
9 pushes – measurement of battery voltage
(voltage battery) will be shown at the display. If you push the button one more time now
the battery voltage under load will be shown. After this you will see the battery voltage without
load again.
The under load measurement depends on the setup you have chosen, the resistance of the atomizer which is connected with the APV and the inside resistance of the APV (contact to contact).
This option is made to show the voltage drop of your whole setup.
Example:
No load – 4,2V
under load – 4,0V
10 pushes – setup of display light intensity
(set display) will be shown. At each time you push the button now the light intensity of
the display will be changed, during this time you will see numbers from 1-5 at the display (1 - low
intensity / 5 - high intensity).
11 pushes - setup button and display LED
(set LED): Here you can chose which LED will work during you vape.
Each push changes the setup of the LED in working mode. The following combinations are possible:
button + display,
only display,
only button,
all LED off.
Important: This setup is only impinging at the time you are firing up your atomizer. If you want to
change your setups inside the menu the display will work all the time.
Standby-Modus
13
12 pushes – counter / vape timer reset
will be shown on the display you can check the vape counter. The timecode is shown in
If
two display pictures. The first picture shows the hours and the second the minutes of your vaping
time. This is the total actual time you have activated the device.
– which is 1 hour and 25 minutes
If you push the button a second time now you can see the following picture
A third time pushing the button will reset the counter.
(cleaning).
If you don’t push the button a third time you will go back to the standby mode without resetting
the counter.
13 pushes – firmware version
(firmware) will be shown at the display, after this you can see the number of the firmware
version.
14
Standby-Modus
Online mode
This is the mode where you can fire up your atomizer. To switch from standby / offline mode to
online mode you have to push the button three times. At the same way you can turn back to the
offline / standby mode again.
When you enter the online menu the display will show
first, than
(vv-mode) or
(vw-mode) and the power level you have chosen before. The LED will flash three times.
Example: turn on, vv-mode is chosen at 4,5V:
Example: turn on, vw-mode is chosen at 9,0W
If you push the button right now the button LED and the display will light on and the display shows
While you are using your APV the battery voltage goes down and you can see that on the display
in four steps:
100 % –
, 75 % –
, 50 % –
, 25 % –
If the battery is fully discharged the LED will flash five times – at this time the APV will not fire up
the atomizer.
If you want to leave the online mode (pushing the button three times) the display will show you
, and then you be shown the vaptime counter
.
The timecode is spited into two display pictures. The first picture shows the hours and the second the minutes of your vaping time.
– which is 1 hour and 25 minutes
Online mode
15
4 pushes – set down the voltage / wattage
(down). You will see the setup you have set the last time. With each
The display shows
time you push the button right now you set one increment down.
5 pushes – set up the voltage / wattage
The display shows
(up). You will see the setup you have set the last time. With each time
you push the button right now you set one increment up.
6 pushes – atomizer resistance
The display will show
of your atomizer
(resistance atomizer)..At the next picture you can see the resistance
(or whatever your atomizer resistance is at the time).
7 pushes - measurement of battery voltage
(voltage battery) is shown on the display. If you push the button one more time now
the battery voltage under load will be shown. After this you will see the battery voltage without
load again.
The under load measurement depends on the setup you have chosen, the resistance of the atomizer which is connected with the APV and the inside resistance of the APV (contact to contact).
This option is made to show the voltage drop of your whole setup.
Example:
No load – 4,2V
16
under load – 4,0V
Online mode
Error reports
If you have an error, which is causing a system shutdown of the APV, the electronic part will stop
firing up the atomizer and the LED is flashing at a frequency of 0,5Hz (it doesn’t matter if the setup
in the menu is right or wrong). At the display you will see an error code. In case of this situation
the Sëmovar will switch to the standby mode automatically. Exception being the error E5 – at this
time the Sëmovar will stay at the online mode.
Error codes:
atomizer resistance is too low – it could cause a short-circuit > replace the atomizer or
renew your coil.
it is impossible to hold the voltage level > count down the voltage. This error can be
caused by a too low resistance in combination with a too high chosen level of output voltage /
wattage. Maximum ampere (3,0-3,5A) is reached.
it is impossible to hold the level of output voltage / wattage. This error can be caused if
the output power you have set up passed the voltage range of 3V-6V with the atomizer resistance
you are using.
It will be shown too if you are passing the wattage range of 3W-15W.
To fix it adjust your setup in the menu.
This error will mostly be shown if the atomizer has no contact to the Sëmovar. The electronic part
thinks at this moment the resistance of the atomizer is too high.
overheat protection of the electronic part is online. Don’t use the APV for a while to let it
cool down.
it is impossible to hold the output voltage / wattage anyhow the battery voltage isn’t high
enough.
This can be caused in too high crossover resistance of the parts of the APV or too high internal
resistance of the battery.
Error reports
17
Important: common error E5, is usually caused by the use of low quality battery or end of the
battery life span.
Reverse polarity protection:
If the battery is inserted upside down, a red LED will light up next to the display. Please change
battery alignment.
18
Error reports
Warnings:
1.
Please read this manual carefully before using the unit!
2.Do not connect batteries in series! The variable voltage / variable wattage «Sëmovar» is
powered by a single Lithium-Ionen-battery!
3.
Please keep the device dry.
4.
Do not use it for other purposes!
5.Connect the unit only to suitable power supply!
6.
Do not apply electrical voltage to the device!
7.Non-compliance with these requirements can not only cause serious damage to the device, but also fire or explosion of your Lithium-Ionen-battery.
8.
The manufacturer is not liable for damaged atomizers.
9.Usage on high voltage or without liquid can damage the atomizer.
10.
Keep away from heating elements.
11.
Unsuitable for children. Keep it away from children!
12.
Keep battery away from metallic objects.
13.If battery shows any sign of deformation, leakage or strange smell – please do not use it
anymore.
14.Wash hands after contact with leaking battery. Ensure that no battery acid gets into your
eye, otherwise consult your doctor immediately!
Attention!
We can not guarantee a flawless functionality of the device with protected batteries.
Warnings
19
SMtec GmbH – 2013
www.svoemesto.de