1
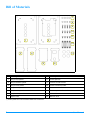
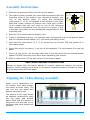
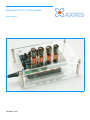
Enclosure for IV-3 VFD Shield
User Manual
October 2015
Bill of Materials
7
8
9
10
11
1
2
12
3
4
13
5
[1]
2
6
#
Description
#
Description
1
Acrylic top panel
8
5 mm spacers
2
Acrylic bottom panel
9
12 mm screws inside
3
Acrylic side panel
10
6 mm screws top side
4
Acrylic side panel
11
8 mm countersunk screws bottom side
5
Acrylic side panel
12
30 mm spacers female-female
6
Acrylic side panel
13
Rubber feet
7
Nylon nuts
14
Arduino Uno
[1]
These parts are not included with the enclosure.
User Manual
Assembly Instructions
1. Remove the protective films from the acrylic panels.
2. The bottom panel provides four holes that correspond with the
mounting holes in the Arduino Uno. Mount the Arduino Uno
(14) to the bottom panel (2) using the mechanical
components (7, 8, 9) as indicated in the picture to the right.
Note that recent versions of Arduino Uno come with a wider,
10-pin header that sits very close to one of the mounting
holes making it impossible to fit the nylon nut in place. If this
is the case, just leave out the mechanical components for that
mounting hole.
7
14
8
2
9
3. Stick the IV-3 shield onto the Arduino Uno.
4. Insert a countersunk screw (11) through each countersunk hole of the bottom panel
and fix a female-female spacer (12) onto each protruding screw.
5. Place the four side panels (3, 4, 5, 6) around the IV-3 shield. The side panels fit in
the bottom panel.
6. Mount the acrylic top panel (1) on top of the assembly. The side panels fit in the top
panel.
7. Drive a 6 mm screw (10) through each hole of the top panel into the female-female
spacer. DO NOT exert too much force when tightening the screws!
8. Stick a rubber foot (13) on each corner of the bottom panel.
ADDITIONAL ASSEMBLY INSTRUCTIONS
Please be gentle with the acrylic panels. If a panel refuses to assume the correct
position, avoid exerting more force on the panel. Instead go back a number of steps
and try assembling the case again.
Aligning the Tubes during Assembly
When you're assembling the
IV-3 shield, you'll have to align
the tubes at some point. You
can use the top panel and
bottom panel as an aid.
The picture to the right shows
an example construction using
the top panel and bottom
panel. Note that the spacers in
the picture are not part of the
enclosure and other setups are
possible.
User Manual
3
Contact Information
Official website: http://www.axiris.eu/
4
User Manual