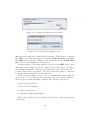
1
CCTC - Computer Science and Technology Center, University
of Minho
IBB - Institute for Biotechnology and Bioengineering, Centre
of Biological Engineering, University of Minho
SING - Next Generation Computer Systems Group, School of
Informatics Engineering, University of Vigo
@Note Biomedical Text Mining
Workbench
User Guide of @Note-Basics
Anália Lourenço, Rafael Carreira, Paulo Maia, Sónia
Carneiro, Daniel Glez-Peña, Florentino Fdez-Riverola,
Eugénio C. Ferreira, Isabel Rocha, Miguel Rocha
2008
Contents
1 Basic concepts and interaction
1.1 Introduction . . . . . . . . . .
1.2 Datatypes and operations . .
1.3 User interaction . . . . . . . .
1.4 Getting started . . . . . . . .
.
.
.
.
.
.
.
.
.
.
.
.
.
.
.
.
.
.
.
.
.
.
.
.
.
.
.
.
2 Main functionalities of @Note-Basics
2.1 @Note Projects . . . . . . . . . . . . . . .
2.1.1 Creating a new project . . . . . . .
2.1.2 Saving a project . . . . . . . . . . .
2.1.3 Loading an existing project . . . .
2.2 Handling database connections . . . . . . .
2.2.1 Connecting to an existing database
2.2.2 Creating a local database . . . . .
2.2.3 Loading default data . . . . . . . .
2.3 PubMed Searches . . . . . . . . . . . . . .
2.4 Journal Retrieval . . . . . . . . . . . . . .
2.5 Named Entity Recognition . . . . . . . . .
2.5.1 Document View . . . . . . . . . . .
2.6 Manual Annotation . . . . . . . . . . . . .
2.6.1 Annotating a new term . . . . . . .
2.6.2 Correcting an annotation . . . . . .
2.6.3 Removing an annotation . . . . . .
2.7 Handling lexical resources . . . . . . . . .
2.7.1 Handling dictionaries . . . . . . . .
2.7.2 Loading lookup tables . . . . . . .
2.8 Project Settings . . . . . . . . . . . . . . .
i
.
.
.
.
.
.
.
.
.
.
.
.
.
.
.
.
.
.
.
.
.
.
.
.
.
.
.
.
.
.
.
.
.
.
.
.
.
.
.
.
.
.
.
.
.
.
.
.
.
.
.
.
.
.
.
.
.
.
.
.
.
.
.
.
.
.
.
.
.
.
.
.
.
.
.
.
.
.
.
.
.
.
.
.
.
.
.
.
.
.
.
.
.
.
.
.
.
.
.
.
.
.
.
.
.
.
.
.
.
.
.
.
.
.
.
.
.
.
.
.
.
.
.
.
.
.
.
.
.
.
.
.
.
.
.
.
.
.
.
.
.
.
.
.
.
.
.
.
.
.
.
.
.
.
.
.
.
.
.
.
.
.
.
.
.
.
.
.
.
.
.
.
.
.
.
.
.
.
.
.
.
.
.
.
.
.
.
.
.
.
.
.
.
.
.
.
.
.
.
.
.
.
.
.
.
.
.
.
.
.
.
.
.
.
.
.
.
.
.
.
.
.
.
.
.
.
.
.
.
.
.
.
.
.
.
.
.
.
.
.
.
.
.
.
1
1
2
2
3
.
.
.
.
.
.
.
.
.
.
.
.
.
.
.
.
.
.
.
.
4
4
4
6
6
7
7
8
9
9
10
13
18
20
20
20
23
23
24
25
26
List of Figures
2.1
2.2
2.3
2.4
2.5
2.6
2.7
2.8
2.9
2.10
2.11
2.12
2.13
2.14
2.15
2.16
2.17
2.18
2.19
2.20
2.21
2.22
2.23
Creating a new project. . . . . . . . . . . . . . . . . . . .
Configuring a new project. . . . . . . . . . . . . . . . . .
Saving a project. . . . . . . . . . . . . . . . . . . . . . .
Loading a project. . . . . . . . . . . . . . . . . . . . . .
Creating a database connection . . . . . . . . . . . . . .
Connecting to an existing database. . . . . . . . . . . . .
Creating a new local database. . . . . . . . . . . . . . . .
Listing PubMed queries. . . . . . . . . . . . . . . . . . .
Viewing a Result Set. . . . . . . . . . . . . . . . . . . . .
Checking detailed information about a publication. . . .
Viewing the PDF file of a publication. . . . . . . . . . .
Setting the publication’s relevance. . . . . . . . . . . . .
Selecting the publication set. . . . . . . . . . . . . . . . .
Viewing the Publication Set. . . . . . . . . . . . . . . . .
Selecting the Publication Set for NER. . . . . . . . . . .
Selecting the dictionary and the classes to annotate. . . .
Annotation options. . . . . . . . . . . . . . . . . . . . . .
NER running operation. . . . . . . . . . . . . . . . . . .
ANoteNerBox view. . . . . . . . . . . . . . . . . . . . . .
Document view. . . . . . . . . . . . . . . . . . . . . . . .
Adding a NER term annotation. . . . . . . . . . . . . . .
Dictionary enrichment . . . . . . . . . . . . . . . . . . .
Diagram illustrating the options of adding new terms to
dictionary. . . . . . . . . . . . . . . . . . . . . . . . . . .
2.24 Correcting a term annotation. . . . . . . . . . . . . . . .
2.25 Changing project settings. . . . . . . . . . . . . . . . . .
ii
. .
. .
. .
. .
. .
. .
. .
. .
. .
. .
. .
. .
. .
. .
. .
. .
. .
. .
. .
. .
. .
. .
the
. .
. .
. .
.
.
.
.
.
.
.
.
.
.
.
.
.
.
.
.
.
.
.
.
.
.
4
5
6
7
8
8
9
10
11
12
13
14
14
15
16
16
17
18
19
21
22
23
. 24
. 25
. 26
Chapter 1
Basic concepts and interaction
1.1
Introduction
@Note is a Biomedical Text Mining workbench that integrates current Biomedical Text Mining (BioTM) methods and provides biologists with intuitive
tools capable of supporting their bibliographic searches and further literature curation. The major guidelines of its development were interoperability,
extensibility and user-friendly interface. The workbench is meant for both
BioTM research and curation. On one hand, it supports regular curation activities, providing an intuitive Graphical User Interface (GUI) interface that
does not require any knowledge about workbench or technique implementation. On the other hand, it is also meant for people with programming skills
that might wish to extend the workbench capabilities.
@Note is implemented over AIBench, a JAVA framework meant to ease
the development of Artificial Intelligence and Data Analysis applications.
The main strengths of AIBench are its clear design and available services.
Its design is problem-independent, minimum framework-related code is required in order to produce new functionalities. Moreover, it generates GUI
code and enforces well-designed MVC code, supporting three main artifacts:
operations, data types and views. Operations and data types are used in
problem modelling while views display data in a ”friendly” way.
Regarding operations, @Note sustains the general workflow of BioTM,
fully covering all activities performed in manual curation. The workbench
supports the retrieval, processing and annotation of documents as well as
their analysis at different levels. So far, only dictionary and ontology-based
annotation are supported as it was considered more important to provide
means for the creation of annotated corpora rather than the construction of
models based on general biomedical corpora.
1
This document briefly explains the functionalities of the @Note-Basics
application and the way it can presently be used. This application brings
together a number of basic components of the full @Note platform in a single
application with the basic tools of BioTM, oriented towards the basic needs
of biologists. This is still a preliminary version of the documentation.
1.2
Datatypes and operations
Every application built based on AIBench is organized around the concepts
of datatypes and operations, defined as follows:
• Datatypes: define the types of data that are of interest to a given application. For each data object, one or more visualizers can be defined
to show its content to the user in a given perspective. Data objects
can have a hierarchy, where a given object A contains objects B and C
(these objects are called compound objects).
The set of data objects and their hierarchy in a given application are
shown in a tree (the clipboard), typically appearing in the left side of
the screen. In this tree, compound objects can be opened to show their
contents (a list of other data objects). When a given data object is
selected (double clicked), the available visualizers (if any) are launched
in the right area of the screen.
• Operations: each operation defines a function that takes zero or more
data objects as its inputs and can create as an output zero or more
data objects and/or merely change the input data objects. Operations
can be accessed through the menu options, being typically grouped in
several menus and sub-menus. Operations can also be run from the
clipboard, by right clicking a data object (this will show the list of all
available operations using that data object as an input).
1.3
User interaction
Since @Note-Basics is an AIBench based application, the user interaction
is thought to be as simple as possible. The Model-View-Controller (MVC)
architectural pattern has been used in every step of development of AIBench
as well as of @Note, resulting in a great deal of decoupling between the
operational data and the views.
As referenced before, a View is related to a given Datatype. If there is
no View associated with a Datatype, a Default View is launched (a bean
2
inspector). The Views will, by default, be launched on the right side of the
work area.
So, the original layout of the components has three major areas: the
menus on the top, the clipboard on the left and the view’s area on the right.
1.4
Getting started
The concepts within @Note can be overwhelming for a beginner in BioTM.
Therefore, we provide a guideline to start using @Note-Basics.
The first two steps that are needed are: (i) to create a new project (see
Section 2.1.1) and (ii) to create a new database - see Section 2.2.2 (in alternative, the user can create a connection to an existing database as explained
in Section 2.2.1).
From this point on, the user has two alternatives: (i) to use the application
with some sample data provided, by using the option Load sample data
in the Database menu; (ii) to start their own case study from scratch.
We would recommend the first option to start with. In this case, the
results of a pre-defined query to PubMed are loaded into the catalogue and
a dictionary with terms related to the organism E. coli is loaded into the
database. Alternatively, at this step, a query can be performed by the user
(see Section 2.3) and there is also the need to create specific lexical resources
(check Section 2.7 for details).
The next logical step will be to select a number of documents and to load
them. The user selects the set of interesting documents (or all of them) and
chooses if only abstracts or full texts will be used. The first option reduces
the time since abstracts are already loaded from PubMed. The latter implies
the journal retrieval of the available full texts (see Section 2.4), an operation
that can take quite a while if the number of selected documents is big.
The set of selected documents can then be annotated using the available
lexical resources (see Section 2.5 for details). A final step is the visualization
of the annotation results and the manual curation of the user desires to
correct errors and enrich the lexical resources (see Section 2.6).
The next sections will give further detail in the operations mentioned in
this brief introduction.
3
Chapter 2
Main functionalities of
@Note-Basics
2.1
2.1.1
@Note Projects
Creating a new project
To create a new project, the user chooses the corresponding operation in the
File menu, selecting New Project.
Figure 2.1: Creating a new project.
In the following popup window, a name for the project has to be chosen.
When the name is set, the Validate button is pressed. If no project with
the chosen name exists, it is accepted and the user is able to proceed with
4
the configuration. At this point, there are two mandatory fields to configure
(Figure 2.2):
1. Firstly, the Local Documents Path is set, which is the local folder for
the pdf original documents handled by the project. In this folder, all
pdf documents captured in Journal Retrieval processes will be saved.
2. Secondly, the Root Path is defined. This is the folder where all the
project documents processed by @Note will be saved. This includes all
the annotated documents, documents created as a result from pdf to
txt processes, among others.
At this stage, the user can also select a path to save the project main file
(anp extension) and also define proxy configurations if they are needed by
the available internet connection. The configurations carried out in this step,
can be changed later in the Project settings menu. When the OK button
is pressed, the project is created and a data item of the type ANoteProject is
added to the clipboard. This will be the root of all objects of a given working
session.
Figure 2.2: Configuring a new project.
When a project is created, it has two different objects under its clipboard
tree:
5
• A Catalogue: that represents the object used to perform queries to
PubMed and store the results;
• LexicalResources, a sub-tree that handles the resources for performing annotation. These include dictionaries and lookup tables. This set
is initially empty.
In the project tree, other types of objects will appear as a result of the
operations described in the next few sections.
2.1.2
Saving a project
To save a project, the user chooses the File menu option, and then Save
Project. In the popup window, a project and a file to save it are selected
(as before the file must have extension ”.anp”).
Figure 2.3: Saving a project.
2.1.3
Loading an existing project
If there are previously saved projects, it is possible to load them. To load a
project, the user selects the File menu and the option Load Project. In
the popup window, the user chooses the file where the project was saved
(”.anp” extension) and clicks Load to perform the operation (Figure 2.4).
As a result, an ANoteProject object is added to the clipboard.
6
Figure 2.4: Loading a project.
2.2
Handling database connections
An @Note project needs to have a database connection associated with it
(the MySQL database engine is used) since many operations work over data
in the database. The database connection is created in the context of the
Catalogue datatype (Figure 2.5) or under the menu option Databases. The
user can choose to create a connection to an existing database or to create a
new local database.
2.2.1
Connecting to an existing database
To create a connection to a previously existing database, the user selects the
option Create DB Connection.
In the popup window (Figure 2.6), the user can select previously saved
connection parameters and edit them if necessary or define a new connection.
The user saves the new configuration by clicking in the Add button. The
user can also remove a previous connection configuration.
After configuring all the connection fields (host, port, database schema,
user and password) the Connect button must be pressed. A new item of
datatype Database Connection is added to the clipboard and the view for
this datatype includes information about the host, port and database name.
7
Figure 2.5: Creating a database connection
Figure 2.6: Connecting to an existing database.
2.2.2
Creating a local database
To create a new local database, the user selects the option Create Local
DB. In the popup window, two fields have be to filled (Figure 2.7). The first
is the MySql root password on the local host (given in the instalation) and
the second is the new database name. When all the fields have been set and
the Create button is pressed, @Note will create a new database predefined
schema. As before an object representing the new connection will be added
to the clipboard.
8
Figure 2.7: Creating a new local database.
2.2.3
Loading default data
The option Load sample data in the Database menu loads some predefined data, allowing for the beginner user to get acquainted with the application with a reduced effort and time.
In this case, the results of a pre-defined query to PubMed are loaded
into the catalogue (the query uses the keywords Escherichia coli stringent
response) and a dictionary with terms to the organism E. coli is loaded to
the database. The data source used for this dictionary is the BioWarehouse
integrated repository.
2.3
PubMed Searches
To perform PubMed searches, a database connection has to be previously
and successfully established. The user clicks in the project’s catalogue, and
a view will appear in the working area of the application. A list of the
database’s existing queries is given.
If none of the listed queries is wanted, the user can add a new query
(pressing the New Query button). This option is also available in the
menu Database, option New Query.
A new PubMed search will be performed using the keywords selected
by the user in the popup window. The Execute button starts the search
process. This new query, if succeed, will be added to the previous list.
A query has an associated list of publications. The user can select the
query he intends to work on and click in the Load button. This action
will load the information about all the publications of the selected query.
Information about these publications will be listed on a new datatype item,
named ResultSet that is loaded into the clipboard. By clicking in the
9
Figure 2.8: Listing PubMed queries.
ResultSet, the user can analyse the set of loaded publications.
2.4
Journal Retrieval
In the ResultSet view, the list of publications is presented. This list contains all the publications that were selected from PubMed using the original
query. In this step, it is possible to select what are the publications the user
really wants to retrieve to the project. Each line of the view’s table, corresponds to one publication, and contains the title, author’s list and date of
the publication.
If this information is not sufficient for the user to decide if he/she wants
to get the publication, more detailed information about a publication can be
viewed by clicking on the leftmost side button on the publication’s row.
The publication information view shows the available data about the
publication, and also implements two other features:
• to view the PDF document;
• to view and edit the publication’s relevance to the query.
In case the publication holds the respective PDF document locally, i.e.
the pdf file is in the project local document’s folder, it is possible to visualise
this PDF. This typically occurs when a previous Journal Retrieval (JR)
process has been performed. In this case, the PDF button will be enabled,
and the user can click it to see the document (Figure 2.11).
10
11
Figure 2.9: Viewing a Result Set.
Figure 2.10: Checking detailed information about a publication.
In the publication’s details view, a weight relevance measure is presented.
If the publication belongs to more than one query, a average of all relevance
for those queries is calculated and presented. The user can visualise the
actual relevance of the document for each query it belongs to and edit it
(Figure 2.13). If the same relevance is pretended for all the queries, it is
possible to select all queries and then choose the relevance level.
Let us now define how the user can retrieve the documents from the
editor’s sites (when these are available according to the user’s permissions).
By default, all the publications in the Result Set are selected, but the user
can select the intended publications. If the Download Non-available Full
Text (PDF) (bottom right) option is selected, the application will invoke
the Journal Retrieval operation.
The Journal Retrieval operation will try to find, on the Web, the PDFs
of the selected publications. For each document found, the application will
download it to the project’s local directory and this PDFs will be available
for future work. After downloading all the PDFs available, a pdf to text
conversion will be conducted.
By default, this option is not selected, because this take a few minutes to
process. When the user presses the ”Get Publications” button, if JR option
was selected, the preceding process will be done, and the selected publication
will be loaded to the application.
In the end of the process, a window will be presented to the user that
will choose the Publication Set where the publications will be loaded. It is
possible to add new publications to an existing Publication Set or to create
a new one (Figure 2.13]. A Publication Set can have documents coming
from distinct queries and it is also possible to add previously non selected
publications from the same query.
12
Figure 2.11: Viewing the PDF file of a publication.
If a new Publication Set is selected, a new instance of Publication Set
will be added to the clipboard. All the instances of that type will be squat
on a root object of the type WorkingSets.
2.5
Named Entity Recognition
When there are one or more Publication Sets available in a project, it is
possible to execute the Named Entity Recognition (NER) operation over
one of these sets (right clicking it). When the user clicks on a Publication set,
a view is presented with information about the publications added to it (Figure 2.14) and some more information about the sets of processed documents
associated to it.
When the ”@” button in the view is pressed, the Txt Structuring and
NER option on the Document menu or by right clicking on a Publication
13
Figure 2.12: Setting the publication’s relevance.
Figure 2.13: Selecting the publication set.
Set item of the clipboard, a wizard will be presented. This allows to configure
the NER process. The first step is to select the Publication Set over which
the NER will be performed (Figure 2.15). When the desired Publication
Set is selected, the Next button is pressed.
In the next step, a dictionary must be selected for the NER. Here, a new
dictionary can be imported (how to import dictionaries will be described
later in this document). After the dictionary has been chosen, the list of
possible classes will be presented. The user selects the classes to annotate
by moving them from the left to the right list.
In the next step (Figure 2.17), a set of complementary classes that the
user can choose to be annotated are presented. Those are classes which are
given by lists of terms manually compiled. The available options are:
• Biology-related Verbs;
• Laboratory Techniques;
• Physiological States;
• Predefined Expert Hand Rules.
In the same window the user defines if he decides to annotate abstracts
or full texts.
14
15
Figure 2.14: Viewing the Publication Set.
Figure 2.15: Selecting the Publication Set for NER.
Figure 2.16: Selecting the dictionary and the classes to annotate.
After all the configurations have been made, the Execute button (gear
icon) has to be pressed. When the button is pressed, the NER operation
will start and a small window will appear, indicating the execution of the
operation (Figure 2.18). The NER operation will take a few minutes.
When the process is finished, a new Ner Box List object will be added
to the clipboard. This object contains a list of items of the datatype ANoteNerBox, each being the result of a NER operation. The Ner Box
List exists because it is possible to create different kinds of configurations
to NER (e.g. distinct dictionaries), and each configuration yields a distinct
NerBox.
By clicking on a NERBox in the clipboard, the respective view window is
presented (Figure 2.19). In the upper part of this window the keywords that
originated the original Publication Set are given. The used dictionary,
the annotated entities, the number of publications annotated and all the
16
Figure 2.17: Annotation options.
annotation options are also presented. In the bottom part of the window,
there are two sections. The Search section allows to search a publication in
the list. A search can be done by different contents that can be selected in
the list at the right hand side of the search’s text field. If there are matches
between the text typed in the text field and the document’s selected content,
the matched publications will be highlighted.
The View section shows the types of documents that is possible to choose.
The types are:
• Abstract: the publication’s abstract, without any annotation;
• Full Text: the unstructured full text of the publication without any
annotation, this is the direct result of the PdfToTxt operation;
• Structured: the entire text of the publication without annotations, but
with a base structuring, i.e., the text is split in the areas containing
the title, authors, abstract, paper sections and others;
• NER: in case of NER been made to abstracts, this shows the publication’s annotated abstract, if the NER was made over full texts, it
shows the entire annotated document.
To view a document, the user just has to click in the right publication’s
row button. The type of document that will be opened is the selected in the
View section.
17
Figure 2.18: NER running operation.
2.5.1
Document View
When the user selects a document, an item representing this document is
added to the clipboard, under the tree of the respective ANoteNerBox
represented by its name. The PublicationSet item on the clipboard will
have nested boxes of documents. There are four types of boxes that a PublicationSet can enclose, namely:
• ANoteNerBox: box with abstracts or fulltexts curated by NER;
• Structured Text Box: box with structured documents, but without
annotations;
• Full Text Box: box with unstructured documents and without annotations;
• Abstract Box: box with just the abstracts without annotations.
To view the document, the user has to click on the document’s item in
the clipboard and a view will be opened. The document’s view is structured
in the following sections:
18
19
Figure 2.19: ANoteNerBox view.
• A section with buttons to save the changes done in the document, doing
zoon in and zoon out in the text, undo the last change carried out and
a field to search text’s excerpt in the document;
• A section to change the colours of annotated entities;
• A section with the annotated classes, and the terms of each class;
• A section with the structure of the text, the user can click on a section
and skip to the respective section in the text;
• A central section with the text.
2.6
Manual Annotation
A number of options are available to the user under the document’s view
described in the previous section. These allow the manual curation of the
automatic NER annotations.
2.6.1
Annotating a new term
To annotate a new term, the user must select the term and a popup window
will appear with the possible options, i.e. biological classes. The Add Tag
option must be chosen and the intended class is selected. If the selected term
is already annotated, it can’t be annotated again.
After adding a new annotation, the new term can be added to the currently used dictionary if that is intended by the user. The changes will be
made in the underlying database supporting the dictionary and can therefore
be used to annotate other documents in the future.
The diagram depicted in Figure 2.23 explains how this option works and
the effects of the user’s choices over the dictionary.
2.6.2
Correcting an annotation
It is also possible for the user to correct an annotation. This correction can be
done in the lexical form of the term or in the class that the term is annotated.
To do so, the user selects the term and chooses the Correct Tag option in
the popup displayed. When this option is selected, a window appears where
the user can correct the annotation. The window contains the current class
of the term, the new term, initially identical to the selected term and a list
with all the classes that the user can choose to the term.
20
21
Figure 2.20: Document view.
22
Figure 2.21: Adding a NER term annotation.
Figure 2.22: Dictionary enrichment
To change the class of the term, the user just has to select one of the
classes in the given list. If the user wants to correct the term, she/he can
edit the term in the New Text field; if not, she/he just clicks the Apply
button without editing the term.
When the Apply button is pressed, the changes will be made and the
window to add a term to the dictionary will appear. The process of adding
a term to the dictionary is the same as described above.
2.6.3
Removing an annotation
If the user knows that the term’s annotation is incorrect and that the term
should not be annotated with any of the possible classes, she/he can remove
the annotation of that term. To do that, the user has just to select the term
and choose the option Remove Tag from the popup. This action will only
remove the annotation but not the term from the dictionary.
2.7
Handling lexical resources
The menu Lexical resources contains a number of operations to manage the
lexical resources of a project, namely dictionaries and lookup tables. Both
the set of dictionaries and lookup tables are represented by clipboard objects
and the current state can be viewed by clicking on each of these datatypes.
The sub-menus Dictionaries and Lookup tables handle the operations
regarding each resource type. The options for each case are given below.
23
Figure 2.23: Diagram illustrating the options of adding new terms to the
dictionary.
2.7.1
Handling dictionaries
Three distinct operations can be performed in dictionary management, that
are given by three options in the Dictionaries sub-menu (or by right clicking
a dictionary object):
• New dictionary: creates a new (empty!) dictionary in the project.
• Dictionary contents: allows the user to add contents to a dictionary,
which can come from several sources.
• Merging dictionaries: allows the user to merge the contents of several dictionaries into a new one (only allowed for dictionaries where the
sets of classes do not overlap!).
The second option (adding contents) deserves a more complete explanation. The process starts by the selection of the dictionary where the contents
24
Figure 2.24: Correcting a term annotation.
will be added. In the bottom part, the data source is configured. Currently,
the system supports the following sources:
• BioWarehouse integrated databases (http://biowarehouse.ai.sri.
com/);
• BioCyc flatfile(http://biocyc.org/download.shtml) ;
• ChEBI flatfiles (http://www.ebi.ac.uk/chebi/downloadsForward.
do);
• NCBI Taxnonomy flatfiles (ftp://ftp.ncbi.nih.gov/pub/taxonomy/);
• UniProtKB/Swiss-Prot flatfiles (http://www.uniprot.org/downloads);
• MGI Entrez Genes flatfiles (ftp://ftp.informatics.jax.org/pub/
reports/index.html).
The user may choose to upload all contents available at a given source
or, according to source specifications, he can restrict data upload to a given
organism and a subset of the embraced classes.
2.7.2
Loading lookup tables
This option allows to load pre-defined lookup tables for a number of biological classes. These are, at current version, only available for three classes:
biological related verbs, physiological states and experimental techniques.
25
2.8
Project Settings
It is possible to change the settings of a project after it has been created.
To do so, the user should select the Settings option on the menu bar and
then Project Settings, or click with the right button over a project on the
clipboard.
In the popup window (Figure 2.25) it is possible to change the location of
the project’s local documents, the root directory of the documents, the file
to where the project could be saved and editing the proxy’s configuration.
To define the host and port for the proxy, the user has to activate the option
Use proxy and then type the host and port.
Figure 2.25: Changing project settings.
26