1
Trueflow DTP Output Guideline
The 14th Edition for Ver.5.01, Ver.6.01, Ver.7.10 and later
Dainippon Screen Mfg. Co., Ltd.
This output guide supports Trueflow SE Ver5.01 TF175, Ver6.01 TF135, Ver7.10 TF110 and later.
Guidelines for transitioning to a PDF workflow
Recommended Trueflow workflow environments..........1
Recommendation of using PDF/X.................................2
Adobe PDF Print Engine...............................................3
DTP applications and creating data...............................4
Differences between Conventional and Advanced........ 7
Technical information on PDF workflow
Transparency effect.....................................................10
Overprint......................................................................19
Overprint mode............................................................29
Specification of spot colors..........................................32
Bleed...........................................................................37
In-RIP separation workflow..........................................40
Color management and RGB workflow.......................43
Running PDF/X
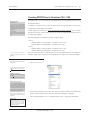
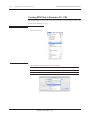
Creating PDF/X Files in InDesign CS2 - CS5..............50
Creating PDF/X Files in Illustrator CS2 - CS5.............55
Creating PDF/X-1a Files in InDesign CS.....................58
Creating PDF1.3 Files in Illustrator CS........................60
Creating PDF/X-1a Files in QuarkXPress 7.0 / 8.0..... 62
Creating PDF/X-1a Files in Acrobat Distiller................ 66
Verification and confirmation of PDF...........................67
Running PostScript
Creating PostScript Files in InDesign CS2 - CS5........69
Creating EPS Files in Illustrator CS - CS5.................. 74
Creating PostScript Files in InDesign CS....................76
Creating PostScript Files in QuarkXPress 7.0 / 8.0..... 80
Creating PostScript Files in QuarkXPress 6.5.............84
Points to Note
PDF/X-4 workflow........................................................88
PDF/X-1a workkflow....................................................90
InDesign CS - CS5......................................................91
Illustrator CS - CS5......................................................94
Photoshop CS - CS5...................................................96
QuarkXPress 6.5 - 8....................................................96
Installing and setting up
Presets for Adobe CS2 - CS5, Acrobat 7 - 9............... 99
Common Presets for Adobe CS2 - CS5....................101
Presets for InDesign CS............................................107
Print Style for QuarkXPress 7.0 / 8.0.........................109
Print Style for QuarkXPress 6.5................................. 113
Default settings of Mac OS X.................................... 115
Default settings of Windows XP................................ 117
Appendix :
Detail table of contents..............................................120
Dainippon Screen Mfg. Co., Ltd.
Recommended Trueflow workflow environments
Guidelines for transitioning to a PDF workflow
1
Guidelines for transitioning to a PDF workflow
*1)
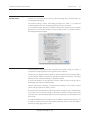
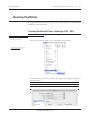
This document provides recommended
standards for balancing the factors
involved in the output of DTP data such as
the quantity of output transparency effects,
the amount of support information, and
the future potential of that workflow.
This does not mean that no other
workflow can be used.
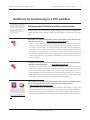
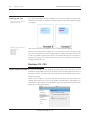
Recommended Trueflow workflow environments
Trueflow supports many input file formats, multiple RIP'ing systems, and many DTP applications,
but this document describes the DTP workflow environment that we recommend*1) most at this
time.
PDF/X workflow
For Trueflow, we recommend using PDF/X, which is ISO-compliant, rather than PostScript,
which was used in the past.
-> "Recommendation of using PDF/X" (P2)
PDF/X is a subset of the PDF standard for printing that was developed to run printing more
efficiently. It has been formalized as an ISO 15930 standard, so it is possible to output safely.
For example, PDF code that is not related to printing and fonts that are not embedded are
prohibited. Even if you enter normal PDF data, if it includes information that is not appropriate
for printing, it may not be possible to print, and it may take time and effort to modify it from
the native data. With PDF/X, the data must comply with a formalized standard before the PDF
can be created and input, so it is possible to eliminate this type of time and effort and create a
practical workflow.
Adobe PDF Print Engine
In Trueflow, we recommend using Advanced PDF, which uses the Adobe PDF Print Engine,
rather than Conventional PS/PDF.
->"Adobe PDF Print Engine" (P3)
The Adobe PDF Print Engine is new Adobe RIP technology, and rather than processing
PostScript in a traditional CPSI RIP, the Adobe PDF Print Engine can process the PDF directly.
In direct processing of PDF using the Adobe PDF Print Engine, it is not necessary to use
device-dependent processing in advance, such as flattening transparency effects or converting
RGB images to CMYK. It is possible to process the PDF in the RIP as is. Trueflow uses unique
technology to improve transparency effects in the Adobe PDF Print Engine.
Optimal DTP applications
With Trueflow, we recommend using Adobe Creative Suite 3 and later or QuarkXPress 8 and
later as your DTP applications in order to get the most from Trueflow's features.*2)
-> "DTP applications and creating data" (P4)
*2)
This means how to make the best
possible use of Trueflow's features, not
that other applications are not supported.
*3)
One countermeasure to avoid streaking
in images is to embed the images, but this
leaves you with a restricted workflow. See
"II. RGB workflow using Illustrator CS3 or
later" (P48) for more information.
Adobe Creative Suite 2 and earlier had serious problems with streaking in images. *3)We
recommend Adobe Creative Suite 3 and later as your DTP application because the problems in
the earlier versions have been fixed and the later versions also support direct output of PDF/X-4.
We recommend QuarkXPress 8 as the first Quark application that supports direct output of PDF/X.
Dainippon Screen Mfg. Co., Ltd.
2
Trueflow DTP Output Guideline The 14th Edition
Recommendation of using PDF/X
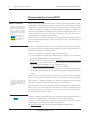
Recommendation of using PDF/X
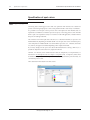
PDF/X-1a and PDF/X-4
The points to note and required technical
information for PDF/X-1a and PDF/X-4 are
different, and in this document the issues
for which it is necessary to differentiate
them are given below. If you do not have
either display, please read this as general
information.
Information necessary for a
PDF/X-1a workflow
Information necessary for a
PDF/X-4 workflow
PDF/X is ISO 15930 compliant and has several variations. These include PDF/X-1a, which
prohibits the use of RGB images and transparency effects, PDF/X-3, which allows the use of RGB
images, PDF/X-4, which allows transparency effects as well as RGB images, and PDF/X-5, which
in addition to the features of PDF/X-4 allows external references for graphics. In addition, from
2010, PDF called "PDF/VT" for variable data printing, which was published in ISO 16612-2, was
standardized based on PDF/X-4 and PDF/X-5 technology, and a PDF/X workflow is
recommended from the standpoint of future potential.
With Trueflow SE, we recommend using PDF/X-4 for data that includes transparency effects as
well as data that includes RGB images, and for all other types of data, we recommend using a
PDF/X-1a workflow.
PDF/X-4 workflow
PDF/X-4 is an indispensable standard for device-independent PDF workflows. Unlike PDF/
X-1a, where it is necessary to flatten transparency objects and convert to CMYK in advance, it is
possible to make the fullest use of that advantage.
There are two advantages to using PDF/X-4, which are explained below.
1. In an RGB workflow where the data includes transparency effects, you can use PDF that
preserves the transparency effects as is (live transparency).*
Basically, as you can see in the table under "Recommended Trueflow workflows by DTP
application" (P3), it is possible to have a workflow that makes use of high quality RGB to
CMYK conversion using InDesign CS2 - CS5 or Illustrator CS3 - CS5.
See "Color management and RGB workflow" (P43) for more information.
2. As for improving text quality, if you process PDF/X-4 using the Adobe PDF Print Engine,
you have the advantage of being able to reproduce the data without losing the original data
images.
PDF/X-4 allows you to include transparency effects and layers in the earlier PDF/X-3. Although
the base version of PDF has advanced from PDF1.3, which does not support transparency
*1)The version of PDF/X-4 should have
been PDF1.6 or earlier, but CS3 - CS5
only supports data created in PDF1.4, and
it is not possible to create PDF/X-4 that
includes layers.
effects, to PDF1.6,*1) which does support them, its restrictions are about the same as those for the
earlier PDF/X-3 with the exception of allowing transparency effects and layers.
By using PDF/X-4, it is possible to improve RGB workflows where the data includes transparency
effects as well as text quality, but unlike with a PDF/X-1a workflow, transparency effects
are handled by the RIP, so it is necessary to be more aware of the characteristics of the RIP
processing than with a PDF/X-1a workflow.
PDF/X-1a workflow
A PDF/X-1a workflow requires RGB images to be converted to CMYK images and requires all of
the fonts to be embedded, but the most difficult task is to flatten transparent objects.
For objects for which Transparency was specified in an application, is necessary to separate
"objects that appear to be transparent but that are not transparent".
See "Transparency effect" (P10) for information about flattening transparent objects.
Dainippon Screen Mfg. Co., Ltd.
Adobe PDF Print Engine
Guidelines for transitioning to a PDF workflow
3
Adobe PDF Print Engine
Adobe PDF Print Engine of
Trueflow SE
Trueflow SE Version 5.00 and later incorporates the Adobe PDF Print Engine as the PDF
processing engine, and it also supports printing such as a POD (Print-on-Demand) workflow. It
does not create PDF that is optimized for each device but instead offers flexible processing that
supports a wide variety of devices with a single PDF format.
In Trueflow SE, you can choose between the earlier method of Trueflow RIP'ing for PDF and
PostScript (Conventional PS/PDF) and the method using the newly installed Adobe PDF Print
*1)
Trueflow SE is a dual coreconfiguration,
so if compatibility with earlier versions for
RIP'ing is important, it is also possible to
use the Trueflow processing engine.
Engine (Advanced PDF).*1)
As described in "Recommended Trueflow workflows by DTP application" (P3), using the
Adobe PDF Print Engine in Trueflow SE offers many advantages, including a simpler workflow
and quality improvements.
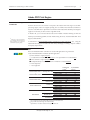
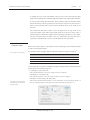
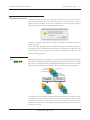
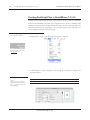
Recommended Trueflow workflows
The recommended Trueflow workflows for various DTP applications are given below.
•Recommended Trueflow workflows by DTP application
◎:Direct PDF/X-4 output (P50)(P55)
○:Create PDF for an RGB workflow(P50)(P55) -> Fix up to PDF/X-4 in Acrobat 8/9(P67)
●:Direct PDF/X-1a output (P50)(P55)
■:Output PostScript > Convert to PDF/X-1a in Distiller 7 or later(P69)(P66)
□:EPS output only
×:Not supported
RGB workflow
Adobe Creative Suite 3 InDesign CS3 - CS5 CMYK workflow
|
RGB workflow
Adobe Creative Suite 5 Illustrator CS3 - CS5
CMYK workflow
RGB workflow
InDesign CS2
CMYK workflow
Adobe Creative Suite 2
RGB workflow
Illustrator CS2
CMYK workflow
RGB workflow
InDesign CS
CMYK workflow
Adobe Creative Suite
RGB workflow
Illustrator CS
CMYK workflow
RGB workflow
QuarkXPress 6.5
CMYK workflow
RGB workflow
QuarkXPress 7 *4)
QuarkXPress
CMYK workflow
RGB workflow
QuarkXPress 8
CMYK workflow
*2)
Trueflow SE
or later*2)
◎
◎
◎
◎
○
○
× *3)
●
×
●
×
□
×
■
×
●
×
●
For a workflow using the Adobe PDF Print Engine with Trueflow SE.
Not possible because images are flattened.(P95)
*4)
QuarkXPress 7 has been released in Europe and the USA.
*3)
Dainippon Screen Mfg. Co., Ltd.
Up to Trueflow 3
Ver4.01
◎
●
◎
●
○
●
× *3)
●
×
●
×
□
×
■
×
●
×
●
4
Trueflow DTP Output Guideline The 14th Edition
DTP applications and creating data
DTP applications and creating data
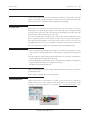
Supported DTP applications
In the Trueflow DTP Output Guideline, the DTP applications listed in "Recommended Trueflow
*1)
See "Notes on Using Trueflow",
which is included with Trueflow SE, for
information about other applications.
workflows" (P3) are supported,*1)but we recommend Adobe Creative Suite 3 and later as well
as QuarkXPress 8 and later as the DTP applications that can take the best advantage of the
Adobe PDF Print Engine and PDF/X-4.
It is not simply important to use these DTP applications. It is also important to make the optimal
settings in them (see "PDF export presets" (P107)) and create data that conforms to those settings
(see "Recommendations for direct output of PDF and native import" (P6)).
•Trueflow Output Guideline support
Recommend
Trueflow Output Guideline
recommended DTP
Applications
DTP Applications
Adobe Creative Suite 3
|
Adobe Creative Suite 5
QuarkXPress 7 / 8
Adobe Creative Suite 2
Adobe Creative Suite
QuarkXPress 6.5
Workflow
Direct PDF/X-4 Output
Direct PDF/X-1a Output
Direct PDF/X-1a Output
Restrictions apply(P95)
PostScript Output and
convert to PDF/X-1a by
Distiller
Adobe PDF presets
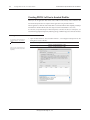
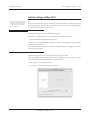
Trueflow provides preset files that make it possible to easily make the required settings for PDF/X
X-1a X-4
export correctly.
Preset files for writing to PDF are shared among all of the CS2 , CS3 and CS4 applications.
InDesign CS2
Preset file
for CS2
Distiller 7
Illustrator CS2
InDesign CS3 - CS5
Preset file
for CS3 - CS5
Distiller 8 / 9
Illustrator CS3 - CS5
Preset files are shared between Creative Suite 2 applications (InDesign CS2, Illustrator CS2,
Acrobat 7).
Preset files are shared between Creative Suite 3 - 5 applications (InDesign CS3 - 5, Illustrator CS3
- 5, Acrobat 8 / 9).
(They can also be used with Photoshop and so on, but that is not described here.)
It also provides dedicated output style files for QuarkXPress 8.
Dainippon Screen Mfg. Co., Ltd.
DTP applications and creating data
Guidelines for transitioning to a PDF workflow
5
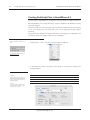
The following preset files are provided as Trueflow support.
•Preset file support table
Output format
PDF/X-1a
PDF/X-4
CS
Trueflow PDF-X-1a 1.0.pdfs
CS2
TrueflowPDFX1a1.3J.joboptions
Trueflow RGBwf 1.3J.joboptions
n/a
CS3 - CS5
TrueflowPDFX1a1.3J.joboptions
Trueflow PDFX4 1.3J.joboptions
Trueflow RGBwf 1.3J.joboptions*1)
Distiller 7 or later TrueflowPDFX1a1.3J.joboptions
QuarkXPress 8
TrueflowPDFX1a Style 3.1J.xml
n/a
n/a
*1)
Used only in a "Versioning workflow" (P89)
Although this preset file is slightly different in some details from the standard PDF/X-1a:2001
preset file provided by Adobe, it can be used to create PDF files that comply with each PDF/X
standard.
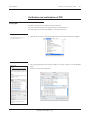
The preset file save location is different in Creative Suite 2 and Creative Suite 3 - 5. See "Presets
for Adobe CS2 - CS5, Acrobat 7 - 9" (P99) for more information.
See "Print Style for QuarkXPress 7.0 / 8.0" (P109) for information about QuarkXPress 8.
Differences from standard
settings of Adobe
There are several differences between the Adobe standard settings in Adobe Acrobat and
Trueflow's recommended settings.
•Distiller 7, 8 and 9 has been set so that when an RGB image is imported, it is not automatically
converted into a CMYK image, instead the program ends with an error.
•To guarantee image quality, the ZIP file format is used to compress images.
•The bleed settings are mostly enabled in InDesign CS2 - CS5 and Illustrator CS2 - CS5.
•The setting has been optimized so that the output quality and transparency effect have
improved greatly when data is processed in Trueflow.
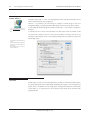
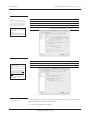
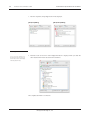
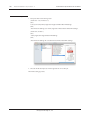
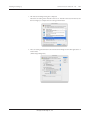
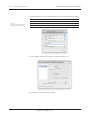
Change to preset settings
Since the Adobe PDF preset file is locked,
if you modify the setting and then click
the OK button, the message "An error
occurred writing the Adobe PDF Setting
File." will be displayed. Therefore, after
modifying the setting, click the Save
As button and save the setting under a
different name.
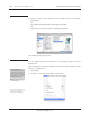
It is possible to change and re-save settings in PDF export preset files for each application in
Adobe Creative Suite.
However, you may obtain unexpected results if you make the settings in an application and then
use a preset that was saved in a different version of that application (CS3 / CS4 / CS5, Distiller 8
and later). Be sure to use a preset file that is specifically for the version in which the settings were
saved. Only the default settings file can be shared by all versions.
Even when an equivalent setting change is required in all applications (e.g., compressing images
in the JPEG format), an individual preset file must be created for each application.
Dainippon Screen Mfg. Co., Ltd.
6
Trueflow DTP Output Guideline The 14th Edition
DTP applications and creating data
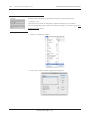
Recommendations for direct
output of PDF and native import
PDF/X-4 that cannot be created
in Distiller
As you can see in the table under "Recommended Trueflow workflows" (P3), in all cases we
recommended workflows using direct output of PDF, not PostScript for the Adobe Create Suite
series and QuarkXPress 8 (QuarkXPress 7 in Europe and America). Direct output is particularly
critical for PDF/X-4, which allows the inclusion of transparency and layer information.
To process PDF/X-4 data in Distiller, you must first convert it to PostScript, but since PostScript
cannot encode transparency effects and layers, the data is flattened.
To preserve transparency and layer information, it is necessary to output PDF/X-4 data directly
from the DTP application.
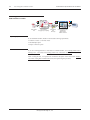
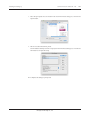
Illustrator CS2 - CS5 native
workflows
In the past we recommended that you import EPS data if you were importing Illustrator data into
InDesign, but as described in "PDF/X-4 workflow" (P2) , to create PDF with the transparency
effects preserved as is (Live Transparency), it is necessary to import native Illustrator format
data when importing Illustrator data into InDesign, not EPS data whose transparency effects are
flattened.
Trueflow SE uses the Adobe PDF Print Engine, so we recommend that you import native
Illustrator data (.ai) into InDesign.
•Illustrator data support table
To use RGB workflow, import with JPEG,
TIFF or Photoshop native format(.psd)
(P48)
◎:Link support including transparency
○:Link support with transparency effects flattened
△:Restrictions apply (not recommended)
×:Not supported
InDesign
2.0 and
earlier
6.5
7*1)
8
△ *2) △ *2) △ *2) △ *2)
○
○
○
Native
×
×
×
×
×
×
×
EPS
×
○
×
×
○
○
○
×
×
×
×
×
○
×
○
○
○
×
×
×
○
Illustrator
10 and earlier
CS
CS2
CS3 - CS5
QuarkXPress
CS3
EPS
CS
Native
×
○
EPS
×
×
CS2
*3)
*4)
|
CS5
Native
×
×
◎
EPS
×
×
×
○
○
○
○
Native
×
×
×
◎ *5)
×
×
○
*1)
QuarkXPress 7 has been released in Europe and the USA.
An error occurs if spot colors are used, and this does not mean it is recommended even if only CMYK
colors are used.
*3)
It is possible to import native format data, but a PDF/X-4 workflow is not supported in InDesign.
*4)
Only recommended if you are using the Adobe PDF Print Engine with Trueflow SE. (CMYK only, and
cannot be mixed with RGB)
*5)
Need to match CS version between Illustrator and InDesign. Only recommended if you are using the
Adobe PDF Print Engine with Trueflow SE. (Mixing with RGB is OK)
*2)
Dainippon Screen Mfg. Co., Ltd.
Differences between Conventional and Advanced
Guidelines for transitioning to a PDF workflow
7
Differences between Conventional and Advanced
Adobe PDF Print Engine and
conventional RIP'ing
In Trueflow SE, you can choose between the earlier method of Trueflow RIP'ing (Conventional
PS/PDF) and the method using the Adobe PDF Print Engine (Advanced PDF).
In Trueflow SE Version 7.10, it has become possible to process PostScript even in Advanced PDF,
*1)
With strict digital plate inspection, there
are times when differences of just a few
dots, which do not affect the quality, are
detected.
so Advanced PDF and Conventional PS/PDF can be used the same way.
There are almost no discernable differences between these two processing methods,*1) but for
particularly different overprint processing, there are rare times when differences can be detected.
However, if you understand the following points, almost no differences are evident when you
check them.
•There are many cases where the target design (for example, overprinting of gradients) is
normally not set.
•Advanced PDF is correct as the PDF standard, and it also matches the display in Acrobat,
so it is possible to check in Acrobat in advance.
Trueflow "Overprint mode"
settings
In Conventional PS/PDF, there are settings called "Overprint mode", but these settings do not just
mean the overprint mode in the PDF standard (see "Overprint mode" (P29)). They also mean
matching Conventional PS/PDF results to Advanced PDF results.
In Advanced PDF, there are no "Overprint mode" settings. Normally, overprints are handled using
the "Based on the PDF Overprint Mode" setting.
Process Mode Trueflow "Overprint mode" setting
Use system default setting
Conventional
PS/PDF
Based on the PDF Overprint Mode
Advanced PDF
(no setup)
*1)
Result of processing
Acrobat Display
Conventional PostScript
Unmatched *1)
The PDF standard
Matched
It is not that they do not match at all. Differences only occur in the areas described in "Differences due
to two settings" (P8)" below.
Dainippon Screen Mfg. Co., Ltd.
8
Differences between Conventional and Advanced
Processing using "Use system
default setting" in Trueflow
*2)
The "system settings" are Trueflow
internal settings that define OPM
processing in detail. These system settings
are described for standard status.
Trueflow DTP Output Guideline The 14th Edition
When the overprint mode setting is "Use system default setting",*2)operations based on different
PDF standards should be used for objects for which "Differences due to two settings" (P8) is
indicated.
The special characteristic of this setting is that even if the overprint mode is set inappropriately,
the data appears to match and is processed in a way close to what the user expects.
In addition, several special processes are included to preserve exact compatibility for processing
OutlinePDF, so if you are using an OutlinePDF workflow, use this setting.
"Based on the PDF Overprint
Mode" processing in Trueflow
*3)
Automatic overprint settings are used
during input processing, and if you set up
input so that overprints are not imported,
the PDF overprint settings are changed at
that point, so OPM also does not output
according to specification.
If "Based on the PDF Overprint Mode" is specified in Conventional PS/PDF, processing compliant
with the PDF standard is run.
For Advanced PDF, this setting does not exist, and RIP'ing is normally done according to the PDF
standard. RIP'ing is also based on the formal specification described in "Overprint mode" (P29)
for overprint processing.*3)
The special characteristic of this setting is that processing is run according to the standard, so this
setting should be used if PDF output from a regular DTP application is output as it looks, overprints
are present, or if you try to output special PDF, such as with the overprint setting encoded as "0". In
other words, for output other than OutlinePDF, we recommend that you use this setting.
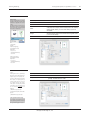
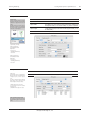
Differences due to two settings
The differences in output between these two settings are summarized in the table below.
If "Based on PDF Overprint Mode" is set for all of the objects, output is performed correctly
according to the PDF standard.
Trueflow "Overprint mode" setting
Use system default Based on the PDF
setting
Overprint Mode
Overprint DeviceCMYK gradients
valid
invalid
Overprint DeviceCMYK images
valid
invalid
Overprint DeviceCMYK patterns
valid
invalid
Overprint DeviceGray objects
valid
invalid
Overprint mode setting specified in PDF
valid: /OPM 1 process
basis of the PDF
White overprint using DeviceN or Separation data
Drop out white object
Output as white
Overprints on DeviceRGB or spot colors converted
to proxy colors*4)
CMYK basis process
invalid
*4)
For example, RGB = 0, 0, 0% overprint objects are processed as K=100% black overprint objects by
using input ticket settings.
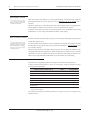
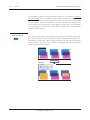
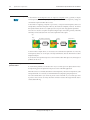
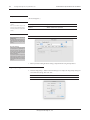
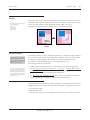
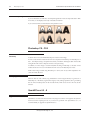
The differences between DeviceCMYK gradients and images are shown as examples in the
illustrations below.
Dainippon Screen Mfg. Co., Ltd.
Differences between Conventional and Advanced
Guidelines for transitioning to a PDF workflow
9
Trueflow Conventional
M=100%
Trueflow Conventional
Shading
Overprint : On
Y=100%
C=100%
M=100%
C=100%
Device CMYK
Image without cyan
Overprint : On
Trueflow Advance
According to the PDF standard
Trueflow Advance
According to the PDF standard
Shading
Overprint : On
C=100%
Y=100%
C=100%
Device CMYK
Image without cyan
Overprint : On
Process-independent overprint
coding
As shown in the examples above, it is very likely for objects such as those marked as "Differences
due to two settings" (P8) to be interpreted differently depending on the RIP, there is a lot of
*1)
You can render overprints with little
device dependence using OutlinePDF
the same way, and no differences
appear between the overprints
generated using these two settings.
Conversely, for OutlinePS/EPS, the "Use
device-dependent encoding, and in the latest DTP applications, processing to avoid this type of
code is built in.
For example, according to the PDF standard, overprinting of DeviceCMYK gradients, patterns,
and images is disabled, and by overwriting with DeviceN, which can clearly specify the
system default setting" setting must
presence of separations in the DTP application, it is possible to render overprints as much as
be used in Conventional PS/PDF (in
possible.*1)
other words, output is highly devicedependent), so Separation Black and
In this example, encoding the data using DeviceN does not depend on the overprint processing
DeviceN (Black only) input data is
specification in the RIP, and the same overprints can be rendered regardless of the overprint
converted to DeviceGray and encoded
as OutlinePS/EPS.
mode settings as well.
If that data is processed according
In an In-RIP separation workflow, which is currently popular, it is necessary to clearly specify In-
to the PDF standard, overprints are
RIP separations from the DTP application, and it is possible to replace them with DeviceN in
ignored because Black is specified as
DeviceGray in the input data.
order to clearly specify that.
If these are black overprints, this can
This is one reason why it is important to understand DeviceN in a PDF workflow that requires In-
be avoided using automatic overprints
RIP separations.
in Trueflow. To enable black overprints
other than those, you can avoid the
When Illustrator 10 and InDesign 2.0.2 were in use, they were part of a transition period for
problem by converting OutlinePS/EPS
clear interpretation of overprints. In the RIPs used in Trueflow at that time, which included
to OutlinePDF in advance to replace
conventional RIP'ing, overprint processing that took this situation into account was implemented,
DeviceGray data with Separation or
DeviceN data.
so now there are times when the results are different from those from the current RIP.
In actual production work, it is possible to create PDF that depends little on the output
environment by replacing overprints of these objects with transparent objects and not using
DeviceGray.
Dainippon Screen Mfg. Co., Ltd.
10
Trueflow DTP Output Guideline The 14th Edition
Transparency effect
Technical information on PDF workflow
Transparency effect
What is a transparency effect
The transparency effect is a new function added in Illustrator 9 and InDesign2.0 and later. If
you use this transparency effect, problems may occur during output depending on the settings
that have been made. However, it is possible to successfully output files with the appropriate
processing in almost all cases if you understand the mechanism and how to make the settings.
If you use transparency effects, you must always flatten the objects when you output using
PDF/X-1a. Transparency flattening can be performed in advance in a DTP application that can
use "Transparency", such as Illustrator or InDesign, so it becomes unnecessary to perform the
flattening in the RIP.
However, the settings for flattening transparent objects differ depending on the content of the
data, so there are times when output using the default settings in the application does not yield
the expected results. If this happens, it is necessary to change the settings.
Examples of data that are
made transparent
Data that includes "transparency" also includes data with the following styles, symbols
and effects to which transparency is applied in advance in addition to operations set in the
Transparency palette.
It is important to check whether the transparency effect has actually been applied using the
procedure explained on "How to check transparency" (page13) .
Some elements in the Symbols and Graphic Styles palettes
Some options in the Effect menu
( = menus that can only apply effects to vector objects)
- SVG filter
- Stylize options (Feather, Drop Shadow, Outer Glow, Inner Glow)
- Blur
- Pixelate (all submenus)
- Sharpen, etc.
Overview of flattening
In PDF1.3, which is the basis of PostScript and PDF/X-1a, there are no commands for rendering
transparency. It is necessary to convert all of the transparent objects in an application into data
for objects that are 100% opaque while still preserving the appearance of transparency. This
process is called flattening. If you use transparency effects this flattening process must be run at
some stage in the data processing.
Dainippon Screen Mfg. Co., Ltd.
Transparency effect
Technical information on PDF workflow
11
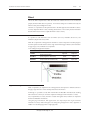
Example of flattening :
flattening
Transparent Objects
At what point is the flattening
performed?
Opaque Objects
If you perform one of the following operations, the file will be flattened.
•If a file including transparent elements is output to a PostScript printer.
•If a file including transparent elements is in Illustrator 8 or earlier format * (Illustrator (.ai),
*1)
For Illustrator (.ai) and Illustrator
EPS, you must select either Preserve
Appearance or Preserve Appearance
and Overprints.
Illustrator EPS, PDF 1.3, etc.) or in a file format that does not recognize transparency (PICT,
EMF, WMF).
•If the Flatten Transparency command is used.
•If Preserve Appearance is selected in AICB (no transparency support) in Files & Clipboard, and
the transparent objects are pasted into another application.
How is it flattened?
Opaque objects
*1)
Only areas where transparent gradients
overlap gradients are rasterized.
Before flattening
Flattened
After flattening
Vectors
Not flattened
---
Transparent objects
Vectors
Flattened
Vectors
Transparent gradients
Vectors
Flattened
Rasters*1) / Vectors
Images
Rasters
Flattened
Rasters
I. Opaque objects & transparent
objects
flattening
Dainippon Screen Mfg. Co., Ltd.
12
Trueflow DTP Output Guideline The 14th Edition
Transparency effect
II. Images & transparent objects /
Images & transparent gradients
Areas where images and transparent
objects overlap are rasterized.
flattening
III. Transparent gradients &
gradients
If transparent gradients overlap gradients
(either transparent or opaque), the
overlapping areas are rasterized.
flattening
Dainippon Screen Mfg. Co., Ltd.
Transparency effect
Technical information on PDF workflow
13
More information about the
Transparency Flattener Options
I. Raster / Vector Balance
If you use transparency effects, Raster/Vector Balance setting is extremely important.
The area of the vector data that is rasterized (image quality), file size and processing times differ
as a consequence of the Raster/Vector Balance.
It is not necessarily the case that a higher value is better for this setting.
We recommend using a setting of "100" for normal operations, but on rare occasions, problems
occur during output of complex data that includes transparency. You can prevent this from
happening by moving the slider to a setting of "99" to "75". Which setting is most appropriate
differs depending on the data, so if the data is complex, we recommend checking the Flattener
Preview palette as you change the setting to determine the best value, and then generate a proof.
If the setting is "100"
If the Rasters/Vectors slider is set to 100,
areas overlapped by images or gradient
areas overlapped by transparent gradients
are always rasterized.
•Checking the Flattener Preview palette
In the following example, the Rasters/Vectors Balance is changed and the effects on the
"Rasterized Complex Regions" are displayed and compared.
Dainippon Screen Mfg. Co., Ltd.
14
Trueflow DTP Output Guideline The 14th Edition
Transparency effect
II. Resolution of line art and text
Here we set the resolution for the rasterized line art and text areas.
This example uses sample data included
with Illustrator 10 flattened to "75" in
"Rasters / Vectors" that was output via
DotTIFF output (Y separation) at 2400dpi
from Trueflow.
[ Rasterization Resolut0on ]:
If the output device resolution setting in
"Rasterization Resolution" above is the
same, you can achieve the best quality, but
the PostScript data you create increases in
size, which lowers performance. Adjust
the balance of quality and performance
by setting a resolution that can be divided
by an integer that yields sufficiently high
quality.
III. Other options
[Gradient Mesh Resolution]
Here we set the resolution for rasterized gradient and mesh areas. You can also set the maximum
resolution for drop shadows and blurs.
[Convert All Text to Outlines]
Converts all of the text objects to outlines and discards the text character information. When you
select this option, the effect on the text width from the flattening process is suppressed, but small
fonts become slightly thicker.
[Convert All Strokes to Outlines]
Converts all of the strokes to outlines. The paths for the areas of transparent objects that overlap
areas are converted to outlines.
[Clip Complex Regions]
[ Clip Complex Regions ] :
We recommend turning this On when the
Raster/Vector Balance is other than 100.
Processes the edges between vector areas and the rasterized areas so that the object paths
overlap. If only some of the vector objects are to be rasterized, this reduces jaggies in the border
areas, but the paths become more complex.
Dainippon Screen Mfg. Co., Ltd.
Transparency effect
Technical information on PDF workflow
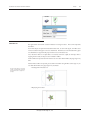
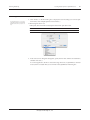
Illustrator rasterization effect
settings
15
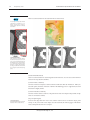
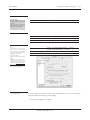
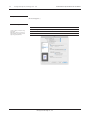
In Illustrator, you can set rasterization effects for the document.
Rasterization effects have enormous effects on artwork that you create.
As a result, be sure to check the settings before using filters or effects. If these settings are too
low, banding may occur in the output.
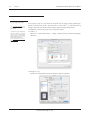
Choose "Document Raster Effects Settings..." from the "Effect" menu.
Resolution 72dpi
Dainippon Screen Mfg. Co., Ltd.
Resolution 300dpi
16
Trueflow DTP Output Guideline The 14th Edition
Transparency effect
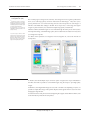
How to check transparency
We recommend that you also use the Flattener Preview palette to see in advance where
It is still important to check in advance
where transparency is being used, even in
a PDF/X-4 workflow.
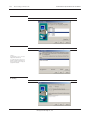
I. Pages palette
*1)
In InDesign CS3 and later, if you use
transparency effects on a page, a small
icon that indicates transparency effects
is displayed for that page in the "Pages"
palette.
In CS4 and later, if you make setting
changes in "Panel Options" in the "Pages"
palette, it is now possible to check
whether or not transparency effects were
applied by the display of a small icon that
indicates transparency effects.
transparency objects are used in the file and whether or not they are flattened. If you cannot
predict the output results, print a proof and check whether or not there are problems.
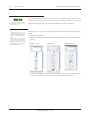
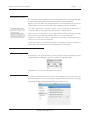
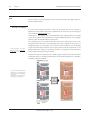
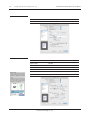
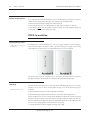
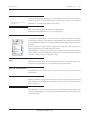
In InDesign CS - CS5, the presence of transparent objects can be checked using the Pages
palette.
1. Display the Pages palette
When any transparent object is included in the page, the pages icon displays a checkerboard
pattern.*1)
InDesign CS / CS2
InDesign CS3
InDesign CS4 / CS5
2. To check the transparent objects and the normal objects affected by the transparency effect
in detail, use the Flattener Preview palette, which is described in the next section.
Dainippon Screen Mfg. Co., Ltd.
Transparency effect
Technical information on PDF workflow
II. Transparency Flattener
Preview
Installing the plug-in into Illustrator 10
It is necessary to install the Flattening
Preview palette plug-in to display the
Flattening Preview palette.
17
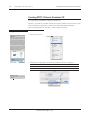
Below we focus primarily on how to check transparency in Illustrator CS2.
However, the concept is basically the same for other applications (InDesign and Acrobat).
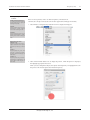
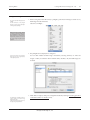
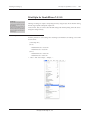
1. Select Window / TranspareAAncy Flattener Preview to display the dialog box.
(Windows):
Drag the "Flattening Preview.aip" file in
the Illustrator10 \ Utilities \ Flattening
Preview folder into the Plug-ins folder.
(Macintosh):
Drag the "Flattening Preview Plug-in"
file in the Adobe Illustrator10 / Utilities /
Flattening Preview folder into the plug-in
folder.
Displaying the preview window
(InDesign CS - CS5):
Display the palette using Window >
Output > Flattener Preview. The preview
appears directly in the layout, so check it
there.
(Acrobat 7):
Display the palette using Tools > Print
Production > Transparency Flattening.
The preview appears in that dialog box, so
check it there.
(Acrobat 8 / 9):
Display the palette using Advanced >
Print Production > Flattener Preview. The
preview appears in that dialog box, so
check it there.
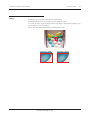
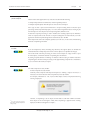
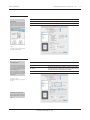
2. Then click the Refresh button once to display the preview. When the preview is displayed,
the Highlight: pop-up becomes active.
When you select Transparent Objects, the objects with transparency are highlighted in red in
the preview. This includes places that include transparency.
Dainippon Screen Mfg. Co., Ltd.
18
Trueflow DTP Output Guideline The 14th Edition
Transparency effect
III. Other menus of Flattener
Preview
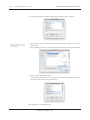
This section describes other highlight menus that you can check in Flattener Preview.
[ None (Color Preview) ]
Displays a color preview of the artwork without any highlighting.
[ Rasterized Complex Regions ]
Highlights rasterized areas. There may be some differences on the borders of the areas highlighted here
(color stitching caused by color matching and resolution and tonality differences,) due to the rasterization.
(this differs depending on the printer driver settings and the rasterization resolution)
[ All Affected Objects ]
Highlights transparent objects as well as objects affected by transparency due to overlapping with
transparent objects. The highlighted objects are affected by the flattening process.
[ Affected Linked EPS Files ]
Highlights placed-linked EPS files that are affected by transparency.
[ Expanded Patterns ]
Patterns affected by transparency are handled as groups of individual images and objects rather than
patterns. These areas are all highlighted.
[ Outlined Strokes ]
Highlights outlined strokes. Highlights transparent areas of strokes because they have been converted to
outlines or the Convert All Strokes to Outlines option is selected.
[ Outlined Text ]
Highlights text that has been converted to outlines. Highlights transparent areas of text because they have
been converted to outlines or the Convert All Text to Outlines option is selected.
[ All Rasterized Regions ]
Highlights areas where rasterized objects overlap other objects. This means areas that could not be
expressed in any other way than in PostScript or areas more complex than those specified with the
threshold value in the Raster/Vector Balance.
Dainippon Screen Mfg. Co., Ltd.
Overprint
Technical information on PDF workflow
19
Overprint
The overprint effect is similar to the transparency effect. However, when PDF/X-1a is used, these
effects differ significantly. In PDF/X-1a, as the transparency effect does not work, transparency
objects must be flattened and then combined. On the other hand, the attributes of overprint
objects can be retained.
To adopt a PDF/X-1a standard data workflow, it is a prerequisite that all overprint attributes be
loaded into Trueflow, and it is important to create data with overprints in mind, from the object
import stage through the creation of the final data.
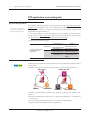
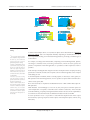
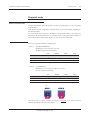
What is overprinting
Overprinting means to print the objects on one separation so they overlap the objects on a
different separation in print.
It was originally intended to prevent white gaps from appearing between the background color
and layered objects due to misregistration during printing.
Process overprint
White overprint
Black overprint
[Color values for overprint areas]
•If the Forward separation is 0%, the Backward separation color will be output
•Even if the Forward color is 1%, the Forward color is output
(Process overprint)
Cyan
Magenta
Yellow
Black
70
90
20
5
Forward
0
90
20
5
Backward
70
30
0
10
Cyan
Magenta
Yellow
Black
Output results
70
30
0
10
Forward
0
0
0
0
Backward
70
30
0
10
Cyan
Magenta
Yellow
Black
Output results
70
30
0
100
Forward
0
0
0
100
Backward
70
30
0
10
Output results
(White overprint)
(Black overprint)
Dainippon Screen Mfg. Co., Ltd.
20
Trueflow DTP Output Guideline The 14th Edition
Overprint
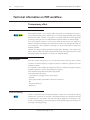
Difference between overprint
and transparent
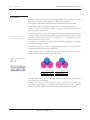
When two objects overlap, the behavior of the program differs when overprinting is set for the
Forward object compared to when transparency is set for the Forward object.
It is important to understand this difference in order to obtain the expected output results.
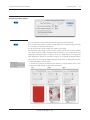
In the example in [Fig.1], the output results are the same for overprinting and transparency.
However, if C=1% is set for the Forward object, as in [Fig.2], overprinting and transparency
generate completely different results.
As in this example, if there are no cyan components in the Forward objects when overprinting
*1)
Even if the Forward is, for example,
Cyan=1%, the 1% cyan is overprinted.
is set, the C=100% of the Backward is visible through the Forward objects, but if there are cyan
components in the Forward objects, the cyan is overprinted*1), so the overlapping areas of the
Backward objects are no longer visible.
If transparency is set, the Backward objects continue to be visible through the Forward objects
even if the same changes are added.
The behavior of the program is similar for overprinting and transparency, so one may be used for
the other during internal processing in the application.
What is important is that if you make appropriate transparency division settings and set all
overprints to load in Trueflow, the data is processed correctly.
[ Fig. 1 ]
[ Fig. 2 ]
Transparency settings in the illustration on
the right
[mode] : multiply
[Opacity] : 100%
Overprint
Transparency*
C M Y K
Forward
0 80 0 0
Backward 100 0 0 0
Overprint
Transparency*
C M Y K
Forward
1 80 0 0
Backward 100 0 0 0
Although overprint is rarely set for process colors intentionally, it is important to check whether
such a case has occurred mistakenly.
In addition, if it is necessary to have non-K process colors be overprinted as an intentional part
of the design, using transparency to achieve the same overprint results as in [Fig. 1] makes it
possible to accurately communicate the intention of the design to the prepress department.
Dainippon Screen Mfg. Co., Ltd.
Overprint
Technical information on PDF workflow
Relation between overprints &
"Color Separation (In-RIP)"
21
You may be able to achieve different results by switching between the "Color Separation (In-RIP)"
and "Composite CMYK" options to handle various problems related to overprinting.
However, even if the results using "Composite CMYK" are more desirable for some data, the
related problems will not be resolved unless overprint importing is turned on in Trueflow.
*1)
<Quoted from InDesign CS2 Help>
"If you are using a PPD file for a RIP that
supports in-RIP color separation, select
'Color Separation (In-RIP)'."
<Quote from QuarkXPress 6.5 Help>
"QuarkXPress now supports DeviceN.
This function makes it possible to create
composite PostScript files and output using
a device that supports in-RIP separation."
First, what is important is to load the overprints, and you should think of the selection of
"Composite CMYK" or "Color Separation (In-RIP)" options as a separate problem.
When you select color separation, if you are using a RIP that creates the separations in the RIP,
such as Trueflow, the DTP application manuals instruct you to use the in-RIP option.*1)
Furthermore, for PDF/X-1a or PDF/X-4 output, DeviceN encoding is used automatically as
necessary, so you can create your output data.
For the above reasons, we recommend using in-RIP color separation or DeviceN in Trueflow for
Adobe Creative Suite and later data as well as QuarkXPress 6.5 and later data.
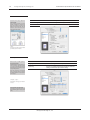
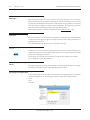
How to make the settings
I. Settings in the application
In Illustrator CS - CS5, select the object you want to overprint, and turn overprinting on in the
"Attributes Palette". In InDesign CS - CS5, this is set in the "Print Attributes Palette".
QuarkXPress 6.5 - 8.0, it is set in the "Trap Information Palette".
II. Settings in Trueflow
In Trueflow, the "Overprint" function allows you to set overprinting for process colors, spot colors
and white individually as well as process black overprints automatically, but when you change
these settings and output, the output results differ, even for PDF/X-1a data.
Dainippon Screen Mfg. Co., Ltd.
22
Trueflow DTP Output Guideline The 14th Edition
Overprint
How to check correct overprint
I. Checking using comp output
(checking by outputting from a printer)
*1)
See "Overview of flattening" (P10)
for more information about dividing
overprinted areas.
*2)
Confirmation using this method divides
and unites overprints as transparent
objects for output, so overprint output
is not actually 100% simulated. Some
differences appear, such as text in the
overprint areas becoming thicker.
See "V. Overprints are output as
transparent objects" (P27) for technical
information.
If you output a comp on a color printer, the overprints may not output correctly, depending on
the RIP connected to the printer. The overprints are also divided
*1)
, so make the following
settings to obtain the same results without using the overprint coding in the PostScript.
(if outputting to a normal color printer, select "Composite CMYK").
•Acrobat 7 - 9
Select Print > Advanced Print Setup > Output and then check the "Simulate Overprinting"
checkbox.*2)
•InDesign CS - CS5
Select Print > Output and then check the "Simulate Overprint" checkbox.
Dainippon Screen Mfg. Co., Ltd.
Overprint
Technical information on PDF workflow
II. Checking using an overprint
preview
(simulating the output results)
23
In InDesign CS - CS5, if you turn on "Overprint Preview" in the "View" menu, the "Simulate
Overprint" screen is displayed, allowing you to check the overprints at the editing stage.
In the default Acrobat 9 settings, "Only For
PDF/X Files" is set. In addition, when you
open an output preview, you can see the
preview even if "Simulate Overprinting" is
turned on.
III. Checking using an output
preview
(checking the areas with overprint settings)
[ Illustrator CS - CS5 ] : View menu / Overprint Preview : On
[ Acrobat 7 ] : Advanced menu / Overprint Preview : On
[ Acrobat 8 ] : Advanced menu / Print Pruduction / Overprint Preview : On
[ Acrobat 9 ] : Acrobat menu / Preferences / Page Display / Overprint Preview : On
In the "Output Preview" function in Acrobat 7 - 9, turn on "Show Overprinting" to highlight the
places in the PDF where overprints are set so you can easily check them.
Dainippon Screen Mfg. Co., Ltd.
24
Trueflow DTP Output Guideline The 14th Edition
Overprint
Overprint related Points to
Note
An actual example is used to illustrate the effects of overprint settings on the output and how to
prevent overprint mistakes.
I. "Color Separation (In-RIP)" &
"DeviceN" color handling
If you use "Color Separation (In-RIP)" or "DeviceN" to generate the colors for printing in
applications such as Adobe Creative Suite or QuarkXPress, all of the colors are encoded as spot
colors in the PS. ("About DeviceN" (P41))
In InDesign CS - CS5, process colors in IllustratorEPS and other imported objects are encoded
as spot colors in the PS, but in QuarkXPress 6, imported IllustratorEPS objects are not changed
internally, so the colors defined there are encoded as is.
If PS containing spot colors is input into Trueflow, process colors and true spot colors are still
distinguished from each other, so the appropriate processing is applied, but that process of
distinguishing them occurs after input, so it is necessary to be aware that all colors are handled
*1)
When this happens, set overprint
loading for spot colors (see "Specification
of spot colors" (P32) for information
about spot colors).
as spot colors when "Import overprint" is set for input.*1)In other words, the "Import Process Color
Overprint Information" setting for overprinting in Trueflow is not applied, and the "Import Spot
Color Overprint Information" setting is enabled.
In addition, the "Import overprint" function in Trueflow applies overprints to the entire document,
including the objects, so depending on the behavior of the individual application, it is difficult to
completely control this in the RIP.
QuarkXPress 6.5 - 8.0
Spot colors within objects imported into
QuarkXPress 6.5 - 8.0 are handled as spot
colors, and process colors are handled as
process colors.
In other words, colors within objects are
handled as they are without change.
EPS
PS
InDesign CS - CS5
EPS
Save as PS
(DeviceN
or
In-RIP
Separation)
PS
EPS
= Process color
= Spot color
Dainippon Screen Mfg. Co., Ltd.
EPS
Overprint
Technical information on PDF workflow
II. Automatically (unintentionally)
placed overprints
25
Adobe Creative Suite applications may create PS encoded with the following:
•Overprint objects that are automatically created in gradient positions
•Multiple overprint objects where the process colors are mixed on output
If this type of data is processed with Trueflow's overprint loading function OFF, the input
processing cannot be performed properly. As a result, tints and gradients may be missing in part
from the output or some objects may be output using totally different colors.
If automatic overprint processing is used in Trueflow, the resulting output may be different to
what was expected due to the mixture of overprint settings that are automatically set in the
application and the overprint settings that are automatically set in the RIP.
If the output results cannot be completely predicted, as in this case, we do not recommend using
automatic overprinting in Trueflow.
III. Automatically overprinting
K=100%
If you use transparency effects (including drop shadows), the original objects are divided and
united (divided into multiple objects and some of those objects are expanded into images).
Due to the divide and unite processing, K=100% text and objects no longer remain as pure
K=100% objects, so Trueflow automatic overprinting does not function.
By setting overprint attributes in InDesign or Illustrator without relying on Trueflow automatic
overprinting, the divide and unite processing can be applied taking overprints into consideration,
so you can achieve the results you expect.
IV. White overprinting
•If white overprints are set by mistake
If white overprints are set by mistake
Generally, white overprints make objects transparent, so nothing is output. However, it is
necessary to be careful because white overprints may be set by mistake.
For example, in Illustrator CS - CS5, if you set white objects or text to overprint, the following
warning is displayed.
However, if overprinting is set for objects and text that are other than CMYK=0 and then
*1)
This white overprinting generally
makes objects completely transparent and
nothing is output.
those objects or text are changed to white, white overprinting is applied with no warning
displayed, and the text disappears on output.*1)
Dainippon Screen Mfg. Co., Ltd.
26
Trueflow DTP Output Guideline The 14th Edition
Overprint
When the same operation is performed in InDesign CS - CS5, the overprint will be
If you set "Overprint Preview" mode in
the application while you are editing, it
is possible to view on screen how the
objects will be output so you can check
the output results in advance.
automatically canceled when the text color is changed to white.
During edit in Illustrator
Output result
(Overprint preview=OFF)
ABCDEFGHIJKL
Output
MNOPQRSTUVW
XYZABCDEFGH
CMYK=0 Overprint
•Restriction of white overprinting specified in Illustrator
When the Illustrator data, which includes the white overprint setting (tint, CMYK=0%, or
overprint), is processed on Trueflow, the overprint setting does not work properly on the K
separation. The specified overprint area on the K separation is output as 0% even when the
"Use white setting" checkbox (under "Overprint loading") has been marked in the import
template.
For CMYK=0% objects, 0.05% is actually set as the color value, so even if they appear to be
CMYK=0%, this can cause overprint effects in the K separation.
•Standards for determining what is considered "white"
It is not always the case that 0% areas in the data are determined to be "white".
In the Illustrator CS, CS2 , CS3 and CS4 overprint preview, color values of 0.19% and lower
are also considered to be white, and K=0.19% overprint objects disappear (in InDesign CS CS5, 0.196% and lower objects disappear.
Cases where 0.19% and lower is specified intentionally as the actual color value are unique,
and it is rare that this causes any actual problems, but it is important to understand in
advance the logic of how white is determined.
In almost all DTP applications, the color depth in overprint preview processing is 8-bit,
which means that 256 colors can be rendered. With a color depth of 256, the smallest step
is 0.4%, and as you can see from the calculations below, K=0.19% becomes "0" and is
determined to be white.
[ For 0.19% ] :
256 x 0.0019 = 0.4864 -> If you round off : "0"
[ For 0.2% ] :
256 x 0.0020 = 0.512 -> If you round off : "1"
However, in the internal PS or PDF that is actually output, the color depth is higher at 16
bits, which means that colors are rendered using 65,536 levels. Therefore the smallest color
*1)
The number 0.00076% is a number
that is not actually rendered internally.
step is 0.0015%, and anything below 0.00076%*1) is logically determined to be white.
In Trueflow, colors may be processed using either 8 or 16 bits, depending on the version and
processing settings.
Dainippon Screen Mfg. Co., Ltd.
Overprint
Technical information on PDF workflow
27
If overprints are set for colors with densities of about 0.19% or lower, the results may differ
between the overprint preview in the DTP application and the actual output results in Trueflow.
If we look at the example described above, where CMYK=0% objects in Illustrator actually
become K=0.005%, if they are processed as 16-bit color, the 0.005% color value is left as is,
but if it is processed using 8-bit color, K=0.005% is handled as K=0%, so the results are not
the same.
The standard that determines "white", such as the application, the type of RIP or the
processing settings, affects other results besides 8-bit and 16-bit color values, and it is
difficult to predict in advance the output results of overprinting colors that are close to white.
The data presented in these examples is not very "intentionally specified" data. This is
important to understand before you try to learn the potential causes of problems.
V. Overprints are output as
transparent objects
There are times when objects in a document for which overprinting is set are divided and united
as if they were transparent objects.
*1)
Text is outlined or converted to images.
As a result, the results are slightly different compared to when true overprints are output.*1)
Saving the PS
Saving the EPS
Saving the PDF
OK
NG
NG
2) IllustratorCS / CS2 / CS3 / CS4
OK
NG
NG
3) Illustrator10
OK
OK
OK
1) InDesignCS / CS2 / CS3 / CS4
OK = Divided and united; NG = Not divided and united
As in the table above, overprints are handled as transparent objects and are divided and united if
applications are run in the following ways.
1) InDesign CS - CS5 (saved as PS)
When "Simulate Overprint" is turned on for "Output" in the "Print" dialog box
2) Illustrator CS - CS5 (saved as PS)
When "Simulate Overprints" is set in the "Advanced" settings in the "Print" dialog box
3) Illustrator 10 (when saving as PS, EPS or PDF)
*2)
The default is for "Preserve Overprints
When Possible" to be OFF when "Simulate
Overprints" is selected.
When "Preserve Overprints When Possible"*2) is set for "Transparency" in "Document Setup" (However, if
there are no transparent objects on the page at all, the file is output with the overprints as is.)
Dainippon Screen Mfg. Co., Ltd.
28
Trueflow DTP Output Guideline The 14th Edition
Overprint
By simulating the overprints as transparent objects in this way, as described in "I. Checking
using comp output" (P22) , it is possible to output comps that enable you to check overprints
on a normal color printer (on most color printers, overprints cannot be output correctly if they
are not converted). However, for Illustrator 10, as shown in the table, this simulation is not
only for when the data is saved as PS, but it also applies to saving as EPS, so if you mistakenly
set overprinting where it is not necessary, the overprints are output as if they were loaded into
Trueflow even if they were not.
VI. Transparent areas are
output as overprints
There are times when objects set to be transparent are processed as overprints during output.
For example, if transparency effects are applied to objects or gradients that include spot colors,
when the data is saved as EPS or PDF, overprints are applied to the areas that overlap with the
transparent objects. For process colors, overprints are not applied under the same conditions,
and the transparent objects are divided.
Data creation
OverPrint
Transparency
(process)
Save as PDF, EPS
After save
Dainippon Screen Mfg. Co., Ltd.
Transparency
(Spot)
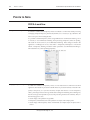
Overprint mode
Technical information on PDF workflow
29
Overprint mode
What is a Overprint mode
Overprint mode (OPM) defines the operation mode for overprinting text as is and is described
within the PDF.
In the RIP, the way that overprints that include this PDF are processed changes, depending on
this OPM description.
It is not necessary to be conscious of the OPM in a general DTP workflow, such as the one
described in this document, but there are exceptions, and in some special PDF workflows, it
may not be possible to obtain proper output if you are not conscious of this OPM.
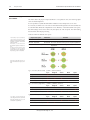
The two overprint modes
There are two operation modes for overprint mode.
/OPM 1 : NON ZERO OVERPRINT
Interpretation of color value 0% = No color
The bottom object is made transparent
Cyan
Magenta
Yellow
Black
Output results
70
90
20
5
Forward (DeviceCMYK)
0*1)
90
20
5
Backward (DeviceCMYK)
70
30
0
10
*1)
No color (The bottom object is made transparent)
/OPM 0 : FULL OVERPRINT
Interpretation of color value 0% = There is a 0% color
0% color is painted from the top
Cyan
Magenta
Yellow
Black
0
90
20
5
90
20
5
30
0
10
Output results
*1)
Forward (DeviceCMYK)
0
Backward (DeviceCMYK)
70
*1)
There is a 0% color (0% color is painted from the top)
e.g. )
The normal mode is "/OPM1", and the description in "Overprint" (P19) in this document
illustrates the workflow when you select "/OPM1".
Dainippon Screen Mfg. Co., Ltd.
30
Trueflow DTP Output Guideline The 14th Edition
Overprint mode
OPM affected only by
DeviceCMYK
This means that if the proper overprint definition is "no separation color", the following object
colors are made transparent.
It is also possible to say that the OPM defines whether or not to interpret 0% as "no color".
It is necessary to define a 0% color value for unwanted CMYK separations in DeviceCMYK, and
it is the OPM that defines this interpretation of 0%. Therefore, in the DeviceCMYK color space,
the OPM settings can be said to affect only the objects set with overprints. The OPM setting
does not affect other object processing.
•Effects of OPM on different color spaces
*1)
DeviceGray may be converted to
a DeviceCMYK K separation in the
application or the RIP, and if this happens,
overprints are applied and the OPM
setting has an effect.
D e v i c e G r ay i s c o n v e r t e d t o t h e
DeviceCMYK K separation in Trueflow as
well.
In addition, objects defined as Gray
in Illustrator 9 or later are output as
DeviceCMYK (DeviceN, depending on
the processing), so they are overprinted.
Object color space
DeviceCMYK
OPM effect
Affected
DeviceN / Separation
DeviceRGB / DeviceGray*1)
Remarks
Because it is necessary to define a 0% color value.
Because it is not necessary to define a 0% color value,
since color values are set only for the required separations.
Because the definition is for logical colors, not
Not affected
separations.
Not affected
In the figure to the right, Device N is in
back and individual color spaces are in
front.
e.g. 1 ) Forward is [Device CMYK] ([ /OPM 1] [/OPM 0] different)
Cyan
Magenta
Yellow
Black
Spot 1
Output results /OPM 1
40
70
50
0
None
Output results /OPM 0
0
70
50
0
None
Forward (DeviceCMYK)
0
70
50
0
None
Backward (DeviceCMYK)
40
0
70
0
None
e.g. 2 ) Forward is [Separation] ([ /OPM 1] [/OPM 0] same as)
Output results
Forward (Separation)
Backward (DeviceCMYK)
Cyan
Magenta
Yellow
Black
Spot 1
40
0
70
0
50
None
None
None
None
50
40
0
70
0
None
Black
Spot 1
e.g. 3 ) Forward is [Device N] ([ /OPM 1] [/OPM 0] same as)
Cyan
*2)
To specify colors that include spot
colors using DeviceN format, use "Mixed
Ink Swatch" in InDesign CS2 / CS3 / CS4
and "Multi-Ink" in QuarkXPress.
Output results
Forward (DeviceN) *2)
Backward (DeviceCMYK)
Magenta
Yellow
40
0
20
5
70
None
None
20
5
70
40
0
70
0
None
Dainippon Screen Mfg. Co., Ltd.
Overprint mode
Technical information on PDF workflow
Overprint mode settings for
Acrobat Distiller
31
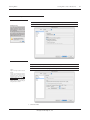
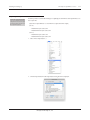
Normally, it is not necessary to be conscious of the OPM setting, but in Acrobat Distiller, you
can change the OPM setting.
The advanced setting of Adobe PDF Settings Dialogbox for "/OPM 1" is to check the
"Overprinting default is nonzero overprinting" checkbox, and this is the default.
If you change this setting, there may be differences between the overprint preview in the DTP
application as well as the Acrobat display and actual output results, so for normal workflows,
this setting should not be changed.
Proper overprint operations
In the PostScript or PDF standard that existed before the OPM concept was defined, a
prerequisite for overprint operations was an operation such as "/OPM 0".
However, this was designed to make it possible to obtain results like those from setting "/OPM 1"
for DeviceCMYK overprints if the data was separated and output from Illustrator, so the output
differed from when composite PostScript was separated in the RIP.
To resolve this problem, we introduced the concept of OPM as a RIP processing mode for
achieving the same results from different output.
After this, specification in Illustrator was implemented in InDesign as well, and the overprint
preview was also made into an "/OPM 1" preview.
This means that it is derived from the overprint specification in Illustrator, and in Acrobat Distiller
5 and earlier versions, the OPM setting was described as "Illustrator Overprint Mode". This
means the same as the "Overprinting default is nonzero overprinting" in Acrobat Distiller 6 and
later versions.
In a CPSI-based RIP that processes PostScript such as SCREEN's AD-810MX, the CPSI core is set
to operate as "/OPM 0", but it has become possible to RIP using "/OPM 1" in the AD-810MX as
necessary by setting "Apply process colors".
Dainippon Screen Mfg. Co., Ltd.
32
Trueflow DTP Output Guideline The 14th Edition
Specification of spot colors
Specification of spot colors
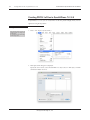
Accurately specifying spot
colors
Converting data containing spot colors that were specified when the data was created into
process colors during output (proxy colors) causes problems under a wide variety of conditions.
It is possible to convert spot colors to process colors and output even from Trueflow, but it is
important to set whether to convert the spot colors to proxy colors using process colors or handle
them as spot color separations as they are in advance in the DTP application, and then finalize
the spot color settings in the PDF.
This is because even if the input data is the same, it is controlled in the RIP, so spot colors are
handled differently depending on whether the RIP is set for spot colors to be converted to proxy
colors and printed or whether the RIP is set to handle the spot colors as is. Therefore, the results
vary and may not appear as intended depending on the output environment.
By correctly setting how the spot colors should be handled before creating a PDF file, it is
possible to output the same results in any output environment.
However, it is necessary to be careful because if there are transparency or overprint effects, as
described in "VI. Transparent areas are output as overprints" (P28) , transparency effects must
be handled as overprints, and the overprints will not be as expected at the point when they are
converted to process colors.
This is described in more detail in the next section.
Dainippon Screen Mfg. Co., Ltd.
Specification of spot colors
Technical information on PDF workflow
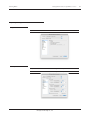
Applying transparency effects
and overprints to spot colors
33
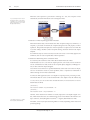
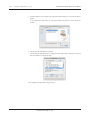
If transparency effects or overprints are applied to spot colors, the expected results are almost
never achieved if the spot colors are converted to process colors in the RIP for output. If
transparency effects are applied to spot colors in Illustrator CS2 - CS5, the following message is
displayed when the data is saved as EPS, reporting the condition.
If overprints are applied to spot colors, this message is not displayed, but similarly, the data is not
output as expected.
Specific cases where transparency effects and overprints are used are shown below, but the spot
color settings are only made at the stage when the data is created for the areas where spot colors
are actually output, and loading spot color information and overprints into the RIP is only one
method of solving the problem.
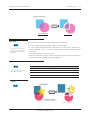
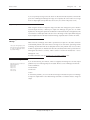
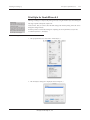
Applying overprints to spot
colors
When overprinting true spot color separations, spot color inks are printed in the areas where the spot
color objects and other objects overlap using separate separations, so the output is a mix of both
types of objects. However, the results are completely different when those spot colors are converted
to process colors and overprinted as compared to when they are output as spot color separations.
[ Forward ]
PANTONE 143 C
Overprint & Opaque
[ Backward ] C100
[ Forward ]
PANTONE 340 C
Overprint & Opaque
Output with spot color
conversion into
process colors
C0, M35 Y85, K0
Output without
spot color conversion
PANTONE 143 C
C100, M0, Y66, K9
PANTONE 340 C
It is important to use the colors that are generated when the spot colors are converted to process
colors at the stage when the data is created, and always turn on "Overprint Preview" to check
the output results in advance. If you convert to process colors in Trueflow, you cannot check the
output results in advance, so it is not possible to guarantee that the output will be the same as
what appears on screen.
Dainippon Screen Mfg. Co., Ltd.
34
Trueflow DTP Output Guideline The 14th Edition
Specification of spot colors
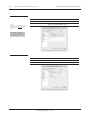
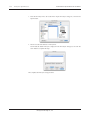
Spot color transparency effects
As described in "VI. Transparent areas are output as overprints" (P28) , generally if objects
with transparency effects overlap objects with spot colors, some of the transparency settings are
converted to overprints and the data is saved.
As described in "Applying overprints to spot colors," if objects with transparency effects are
unexpectedly converted to overprints in this way, the results are completely incorrect. To achieve
the expected results, the rule is to output spot colors as spot colors using separate separations.
Of course it is critical to set up the overprint loading and spot color loading correctly in the RIP,
and if they are not loaded, this will cause serious problems in the output.
e.g. )
Image
Drop Shadow (=Transparency)
Data is
output
Overprint
[ Overprint=OFF ]
Output
in Trueflow
Spot
As shown in the example above, it is necessary to be careful because problems occur not only
if transparency effects are set for spot color objects themselves, but also when there are other
transparent objects.
If you use the colors specified as process colors in advance rather than spot colors, these types of
problems do not occur.
Ways to convert spot colors to
process colors
To resolve these problems, we introduce two ways to convert spot color objects that are not to
be output using spot color separations into process colors in the DTP application.
When the colors are converted, the behavior of the transparency effects and overprints may yield
unexpected results. It is necessary to check this behavior by displaying overprint previews.
You cannot check them if you convert to process colors in the RIP. If you convert spot colors
to process colors, be sure to always check the conversion results at the stage when the data is
created, before RIP'ing.
Dainippon Screen Mfg. Co., Ltd.
Specification of spot colors
Technical information on PDF workflow
I. [Swatch Options] setting
Icons on the Swatches palette
35
Convert the colors in the document using "Swatch Options".
1. It is possible to check the spot color state and change the settings for each color from the
Swatches palette.
Select "Swatch Options..." from the submenu (or double-click the swatch to be edited in the
Swatches palette) to display a dialog box.
In this example, the setting procedure
is described using InDesign CS5. The
procedure is the same when InDesign CS
- CS4 or Illustrator CS - CS5 is used.
When you import other application data
that includes spot colors into InDesign,
the definitions of the spot colors used in
the InDesign data can be changed, but
they can only be changed to InDesign's
color format.
To modify a color in the original
image, you must define the color in the
application that was used to create the
image.
2. In the Swatch Options dialog box, set as shown below and then click the OK button.
Colour Type
Process
Colour Mode
CMYK
Dainippon Screen Mfg. Co., Ltd.
36
Trueflow DTP Output Guideline The 14th Edition
Specification of spot colors
3. Check that the icon to the right of the list has been changed.
This completes the setting.
II. [Ink Manager] setting
In this example, the setting procedure
is described using InDesign CS5. The
procedure is the same when InDesign
CS - CS4 or Acrobat 7 - 9 is used. You
can make the same settings in the "Print"
dialog box in Illustrator CS - CS5.
Changes to the colors in the document set in "Ink Manager" are not made, but rather the colors
are converted during output. With this conversion, spot colors in imported Illustrator data can
also be converted to process colors at the same time.
Of course it is also possible to set batch conversion of all of the spot colors to process colors for
each separation.
1. Display the "Ink Manager" dialog box in one of the following ways.
•Swatchs palette menu
•Separations Preview menu
•[ Output ] in "Print" dialog box
•[ Advanced ] in "Export PDF" dialog box
In "Ink Manager", it is also possible to
output spot colors with different names,
such as "Green1" and "Green2" using the
same separation.
2. Icons are displayed to the left of the individual colors.
If you click the spot color icon on the left, it changes to a process color icon. This finishes
the setup.
In addition, if you want to convert the spot colors to process colors in batch, turn on "All
Spots to Process". All of the spot colors are converted to process colors.
If Illustrator EPS format data is imported
into InDesign, objects are already divided
at the point that the EPS is created, and
converted to overprints after that, so
unexpected results may occur.
If unexpected colors are appear in
the overprint preview with these ink
management settings, it is necessary to
edit the original data in Illustrator.
Dainippon Screen Mfg. Co., Ltd.
Bleed
Technical information on PDF workflow
37
Bleed
One of the PDF/X requirements is that "the media size and the trim size or art size must be
properly defined in PDF (bleed is optional)". Even if these settings are not defined correctly, the
PDF/X-1a data passes Preflight in Acrobat.
However, it is important to set the specified items in the DTP application and the RIP in order to
correctly output the PDF/X-1a data, including the bleed area. This section presents information
that should be noted in order to output the PDF/X-1a data correctly.
TrimBox / BleedBox /MediaBox
It is possible to add information such as TrimBox (trim size), BleedBox (bleed size), and
MediaBox (output media size) to PDF.
When PS is output from a DTP application and then it is used for imposition in another program,
PS will be positioned with reference to the origin of the finished page. Therefore, the information
for page origin, size, and bleed area is important.
•Box settings and application notation
TrimBox
BleedBox
MediaBox
Trim size
(actual final page size)
Bleed size
(actual page size + bleed area)
Media size
(output media size encoded in PS)
InDesign
QuarkXPress
Page size
Page size
Bleed
Bleed
Paper Size
Paper Size
Support in each application
What is important if you output PS from a DTP application and impose it in different software is
the page origin and size as well as the object bleed area information.
In InDesign, it is possible to create PDF with TrimBox and BleedBox information (the resulting
PDF is the same as when you convert PS output from InDesign to PDF in Distiller 5 or later).
Also, in QuarkXPress 6 or later, when PS is created with register marks, Trueflow can import the
TrimBox and BleedBox information.
Using this page information, DTP applications can import/export the origin and bleed
information correctly without the paper size setting being changed from "Auto", regardless of
whether it is a double-page spread or single-page data.
Dainippon Screen Mfg. Co., Ltd.
38
Trueflow DTP Output Guideline The 14th Edition
Bleed
*1)
The Japanese version is supported
by the PDF Boxer XTension, which is
distributed by Quark, Inc. (English version
6.5 has already been supported.)
PS
PDF
InDesign CS - CS5
OK
OK
Illustrator CS - CS5
OK
OK
QuarkXPress 6.5
OK
OK
QuarkXPress 7.0/8.1
OK
OK
*1)
Confirmation on Acrobat 7 - 9
You can visually check the individual Box settings in Acrobat 7 - 9 Professional.
Since this function is off as a default setting, select "Preference" - "Page Display" from the menu,
and then turn on "Display art, trim, bleed boxes". Once the Acrobat function is activated, each
area will be displayed using different colors.
As shown in the figure in "TrimBox / BleedBox /MediaBox" (P37) , the TrimBox (green line),
the Bleed box (blue line), and the MediaBox (paper area).
Setting the "PDF Origin" on
Trueflow
When PS or PDF data is input, of the three parameters that are accurately encoded, the box that
will be the origin is specified.
[ TrimBox ] : Loads the PS or PDF data using the trim size.
[ BleedBox ] : Loads the PDF data using the bleed size.
[ MediaBox ] : Loads the PDF data using the media size
Specify the PDF origin during the Trueflow input processing.
If you input PS or PDF output from a supported application, you can set TrimBox as the PDF
origin.
Dainippon Screen Mfg. Co., Ltd.
Bleed
Technical information on PDF workflow
Points to note on ArtBox in
Illustrator CS
39
The figure below shows PDF created in Illustrator CS using Acrobat 7. The red line represents
the ArtBox.
Even when objects are positioned outside the bleed area, as seen in this figure, all ArtBox areas
will be included in the paper size to be determined. Therefore, be aware that the PDF's paper
size (MediaBox) is larger than the paper size that was set in Illustrator CS.
Also, note that if there is an object that is not actually viewed or output (for example, when a
clipping mask is used), the object is also included in ArtBox.
If PDF is RIP'ed or impositioned with reference to a box other than TrimBox, the page origin may
shift.
If these PDFs are RIP'd or imposed, process them in Trueflow using TrimBox as the origin. If you
use other than TrimBox, the page origins may not match.
The figure on the right shows an example
of when a round object that is positioned
beyond the bleed area is clipped into a
star shape.
•Creating PDF in Illustrator CS
•Displaying in Acrobat 7
Dainippon Screen Mfg. Co., Ltd.
40
Trueflow DTP Output Guideline The 14th Edition
In-RIP separation workflow
In-RIP separation workflow
We formerly recommended that you select "Composite CMYK" in the earlier color separation
settings when setting up PostScript output to Trueflow. This has changed, so now we recommend
If you output PDF directly from an
application without going through
PostScript, the PDF file itself becomes
an all-color composite, so an in-RIP
separation workflow is assumed.
that you select in-RIP color separation or DeviceN for Adobe Creative Suite and QuarkXPress 6
and later.
In-RIP color separation and DeviceN are functions for creating PostScript assuming that color
separation is performed in the RIP, and they are implemented to obtain the same results as when
color separation is performed in the application, even when using a composite workflow
(possible to convert to normal PDF).
Merits of In-RIP separation
In various applications, an in-RIP separation workflow has the following advantages compared
to using composite CMYK settings.
QuarkXPress 6.5 - 8.1
In earlier versions of QuarkXPress, a separation workflow was assumed, so for a composite
CMYK workflow, the colors were converted to proxy colors. In QuarkXPress 6.5 and later, if
PostScript is created from the following types of data using DeviceN format, spot colors can be
processed without converting them to proxy colors.
•QuarkXPress blends that use spot colors
•Gray TIFFs (colorized TIFFs) in which spot colors were specified
•Multi-ink colors that include spot colors
InDesign CS - CS5
Color separation is performed correctly even on duotones from Photoshop 5.0 and later that are
used in InDesign CS and later.
In addition, it is also possible to correctly output traps created in InDesign.
If you select "Application Built-In" in the "Trapping" pull-down menu in "Output" in the "Print"
dialog box, you can perform simple trapping, but it is necessary to be aware of the following.
•It does not work unless you select in-RIP color separation.
•Trap widths are restricted to a maximum of four points.
•It is disabled for imported EPS files and is only enabled for InDesign objects.
You can set up trapping details using "Window" - "Output" - "Trap Presets". Unnecessary traps
are output if you make these settings incorrectly, so it is necessary to be careful. Traps are not
reflected in direct PDF output from InDesign.
Dainippon Screen Mfg. Co., Ltd.
In-RIP separation workflow
Technical information on PDF workflow
41
About DeviceN
DeviceN is a device color space in PostScript or PDF that has been supported from PostScript
3 and PDF1.3. There are other device color spaces, including DeviceGray, DeviceRGB and
DeviceCMYK, but DeviceN is the color space that allows you to specify multi-ink colors or
multi-tone colors (including duotones) that use more than the four colors of the basic color
space.
If you output PostScript 3 by specifying in-RIP color separation or DeviceN from various
applications, the DeviceN code is used internally in the PostScript. By converting this PostScript
file into a PDF 1.3 or later file using Distiller, DeviceN is encoded in the PDF file.
In addition, in PDF that is directly output from an application, DeviceN encoding is used for
duotones or spot colors matched using mixed ink swatches.
The special characteristics of DeviceN become evident if you compare it to typical DeviceCMYK
as another device color space.
With DeviceCMYK, it is always necessary to specify the color values for the four colors. If you
print with solid black, the specification is simply "CMYK=0,0,0,100%". In other words, it is
necessary to explicitly specify 0% even for colors that are not used.
To express solid black using DeviceN, the specification becomes "(Spot Color) Black=100%",
and the reserved name of "(Spot Color) Black" is interpreted as the process color "Black". In this
case, if you use DeviceCMYK, the colors C, M, and Y are handled as "None". No other color
specification is necessary. The differences between these methods of specification become
important when you process overprints.
*1)
Spot colors cannot be expressed using
DeviceCMYK.
In addition, it can be said that that the expression of spot colors using DeviceN is universal.*1)
In PostScript or PDF that includes DeviceN encoding, process colors are also defined as spot
colors. Spot colors and process colors are both printed the same way, and whether or not the
color name is a reserved name is what determines whether a color is a spot color or a process
color.
For example, there are times when the process color cyan is defined as the spot color called
"Cyan", and if the reserved name "Cyan" is used in normal processing, there is no problem
because it is processed as the process color "Cyan". However, if spot colors and process colors
are processed differently (see "II. Settings in Trueflow" (P21)) , there are times when it does not
work as expected.
However, it is not always the case that DeviceN encoding is required if you use spot colors.
*2)
The Separation color space is supported
from PostScript 2 and PDF1.2.
If you print using a single spot color and you use the Separation color space*2) encoding, you can
express it even using a composite CMYK PostScript output specification.
The DeviceN color space in PDF1.3 supports up to 8 colors, and in PDF1.5 it supports up to 31
colors (which includes process colors). This number of colors is of course "the number of colors
used in a single object", and is not "the number of colors used in the entire document."
Dainippon Screen Mfg. Co., Ltd.
42
Trueflow DTP Output Guideline The 14th Edition
In-RIP separation workflow
In-RIP separation workflow
using DeviceN
*1)
PostScript output to RIPs that support
color separation processing
The advantage of DeviceN discussed earlier is that you can expect the benefits of a PDF
workflow or a PostScript workflow.*1) It is possible to express all of the colors in a single piece of
data, and all of the separations can be computed at the same time, so processing can be faster.
You can create "data created for in-RIP separations" that takes into consideration the output of
all of the separations using DeviceN. In addition, to output all of the functions in the application
completely using an in-RIP separation workflow, you must using DeviceN format encoding.
However, if the output device is PostScript Level 2 or the DTP application is QuarkXPress 3.3/4.1
and DeviceN is not supported, it is also true that in-RIP separations are output by specifying
composite CMYK.
*2)
Output of color separations from a DTP
application rather than in-RIP separation
In this type of DTP environment, a pre-separation workflow*2) is what should be specified in
QuarkXPress 3.3/4.1, but if you use in-RIP separations, the only method is to output composite
CMYK.
With composite CMYK output, there are restrictions for output in QuarkXPress and InDesign, so
*3)
QuarkXPress spot color gradations, etc.
various fixes were made in the RIP and several restrictions*3) were overcome.
However, it is not necessarily the case that everything can be completely output.
One condition for taking advantage of the benefits of DeviceN is that it should be supported in
both the RIP and the DTP application.
Currently, both the RIP and the DTP application support DeviceN, and it has become possible to
use a PDF workflow that uses the appropriate DeviceN as necessary.
In a PostScript workflow, we recommend that you select in-RIP color separation or DeviceN. In
a PDF workflow, it is assumed that you are using an in-RIP separation workflow, so DeviceN is
used automatically.
Dainippon Screen Mfg. Co., Ltd.
Color management and RGB workflow
Technical information on PDF workflow
43
Color management and RGB workflow
RGB workflow and PDF/X-4
In Acrobat 8, use the "PDF/X-4" preset
and verify. To verify using Acrobat 7, verify
using the dedicated "Trueflow RGBwf
1.3US.kfp", "Trueflow RGBwf 1.3EU.kfp"
Trueflow RGB workflow preflight profile.
See "Verification and confirmation of
PDF" (P67) for more information.
You cannot use RGB images as they are when using PDF/X-1a. As a result, if you use an RGB
workflow, a prerequisite is that you use PDF/X-3 format that recognizes the use of RGB format or
Lab format with an ICC profile embedded in the PDF/X-1a data.
However, there are several restrictions, such as that in PDF/X-3, it is necessary to convert objects
with transparency effects from RGB to CMYK and flatten them, so in actual operations, you
cannot use transparency effects.
It is now possible to include transparency effects in PDF/X-4, so in Trueflow, we recommend
using PDF/X-4 for RGB workflows. (If you use InDesign CS2, we recommend that you use PDF
for an RGB workflow that has roughly the same characteristics as PDF/X-4.)
Handling CMYK in an RGB
workflow
In Trueflow, it is possible to use a function
that converts RGB=0,0,0 to K=100, but if
you use a DTP application, you must not
create data that relies on this function.
Even if it is called an RGB workflow, not all of the page objects are necessarily rendered using
RGB data. For example, K=100 black text is more desirable than RGB=0,0,0, and it is difficult to
reverse the coding for M=100 and Y=100 colors accurately using RGB, so it is desirable to print
using solid M and Y inks.
As a result, the RGB workflow discussed here means to recognize an "RGB and CMYK mixed workflow".
In addition, RGB data is converted to CMYK using an appropriate method, and it is necessary to
process that CMYK data so that those values are not changed.
Dainippon Screen Mfg. Co., Ltd.
44
Trueflow DTP Output Guideline The 14th Edition
Color management and RGB workflow
Color management in Adobe
Creative Suite 2- 5
In Adobe Creative Suite 2 - 5, the color management functions have been enhanced, and we
always recommend using color management.
However, it is possible to prevent making any changes to CMYK images in the color
management setting, so quality-guaranteed CMYK images can be used as with earlier versions.
*1)
See "Color setting file" (P101) for
information about these color settings
files.
A color settings file has been prepared for Adobe Creative Suite 2 - 5 for a PDF/X-1a workflow in
Trueflow.*1)
A "Trueflow Color Pro 1.0US.csf" and "Trueflow Color Std 1.0US.csf" file are available for the
US version and a "Trueflow Color Pro 1.0EU.csf" and "Trueflow Color Std 1.0EU.csf" file are
available for the European version, and using these settings makes it possible to preserve the
CMYK image values.
The illustration to the right shows the US
version.
For the European version, select "Trueflow
Color Pro 1.0EU.csf" and "Trueflow Color
Std 1.0EU.csf".
In the European version, "CMYK:" is
"Euroscale Coated v2".
Avoiding automatic color
conversion
If RGB images are used in various DTP applications, the RGB is converted to CMYK based on
ICC profiles appropriate for the output settings embedded in the images as well as output device
profiles, but it is undesirable from an image quality management standpoint to inadvertently
convert them, so it is important to be aware that they have already been converted when
preparing the files.
Dainippon Screen Mfg. Co., Ltd.
Color management and RGB workflow
Technical information on PDF workflow
How to resolve RGB image
color issues
45
To output professional-quality results using an RGB image, it is important to define a correct ICC
profile for the RGB image. This ICC profile allows you to know the information on the color
space used for expressing the image. This information is required when the image is converted
into a CMYK image.
In addition to the color conversion based on the ICC profile, image quality adjustment and
adequate sharpness adjustment should be performed depending on the image type to obtain
better-quality results.
There are two major color management solutions for positive image quality management in
the operation using RGB images. With either method, you can achieve significant results by
avoiding automatic conversion.
1. Converting an RGB image to a CMYK image before using it
RGB images taken by a digital camera, for example, are converted into CMYK images using
ColorgeniusDC before layout. The resulting image quality is equivalent to those created by a
professional scanner.
In this case, the is compliant with a PDF/X-1a workflow, and the methods, points to note and
restrictions are the same as for a CMYK-only workflow.
2. Performing color conversion during RIP computation
RGB images are used for layout after being set with color adjustment instructions. The actual
color conversion is performed during output computation in the RIP.
In this case, PDF/X-1a is not used in the DTP application, so "RGB workflow PDF" is created.
Recipe and color profile
A recipe file defines how the images will be converted. Images are converted based on ICC
profile information, which indicates the color space used, and the quality defined in the recipe
file.
Recipe file information includes subjects, finish keyword, and quality definition data. A system
that incorporates a recipe file and a recipe conversion engine (i.e., Colorgenius DC, Colorgenius
ID, Colorgenius LE, Colorgenius AC, Trueflow) allows transmission of the correct information on
intended and preferred image quality. Therefore, anyone can perform high quality setup easily.
Dainippon Screen Mfg. Co., Ltd.
46
Trueflow DTP Output Guideline The 14th Edition
Color management and RGB workflow
Processing procedure of the
RGB workflow on Trueflow
Adobe Acrobat
Pro / Std
RGB
CMYK
RGB
Colorgenius AC
Colorgenius LE
RGB workflow
PDF
Operating requirements
Color simulation
Assigning recipe / Adjusting
RGB workflow
PDF
with recipe
Recipe conversion option,
SpektacolorIn
(RGB to CMYK,
multiple conversion)
To use this RGB workflow, Trueflow must meet the following requirements.
•Trueflow 3 Version 3.12 TF209 or later
•PolishedInput option
•Recipe conversion option
I. Create RGB workflow PDF
If you use a DTP application to create data in an RGB workflow, see "Creating PDF/X Files in
InDesign CS2 - CS5" (P50) and "Creating PDF/X Files in Illustrator CS2 - CS5" (P55) to create
the PDF data.
When creating the data, it is important to consider the description of the next section "Points to
note when creating RGB workflow PDF" (P48) when performing the procedure.
Dainippon Screen Mfg. Co., Ltd.
Color management and RGB workflow
Technical information on PDF workflow
II. Recipe assignment in
Colorgenius AC (LE)
*1)
Colorgenius LE, which is available for
free from our web site, allows you to select
an appropriate recipe file from several that
are already prepared and simulate output
on screen by applying those files.
In Colorgenius AC, you can make fine
adjustments to existing recipe files as well
as create new ones.
47
The Acrobat plug-ins Colorgenius LE (freeware) and Colorgenius AC are software products that
allow you to add image quality conversion instructions for RGB images.*1) They allow you to
specify parameters for color conversion using what are called "recipe files" for each image in a
PDF file* and embed those settings in the PDF file as recipe files.*2) At this stage, the original
images are preserved as they are, and the final output image quality is determined.
With this workflow, the RGB images are not converted through the entire process from layout to
final output rendering, so the RGB image quality does not deteriorate no matter how many times
*2)
Use the recipe for RGB to CMYK
conversion when using data in the recipe
conversion option, and use the recipe for
Spektacolor (RGB to RGB conversion,
recipe name with "SC" prefixed) when
using data in the SpektacolorIn option.
III. Processing in Trueflow
you change the recipe files.
For details on the operations of Colorgenius LE and Colorgenius AC, refer to the manuals for
each product.
In Trueflow, the PolishedInput recipe conversion option recognizes the recipes embedded in
the PDFs and makes it possible to convert RGB images using the recipes to print high quality
images.
Furthermore, when digital RGB images are used, with a variable scale depending on layout, it is
possible to output these images with optimal sharpness effect applied in their actual sizes after
changing the magnification.
For details on the use and points to be noted regarding the support of these RGB workflows, refer
to the information provided from each product.
Dainippon Screen Mfg. Co., Ltd.
48
Trueflow DTP Output Guideline The 14th Edition
Color management and RGB workflow
Points to note when creating
RGB workflow PDF
See "PDF/X-4 workflow" (P2) for more
information.
I. Format and ICC profile
In the RGB workflow, points that are different from the conventional CMYK workflow must be
noted when preparing data and editing a document as well as when outputting data.
To save a file with an ICC profile embedded, it is recommended to use Adobe PDF (.pdf),
Illustrator (.ai), Photoshop (.psd), InDesign (.indd), TIFF, and JPEG formats. However, InDesign
CS - CS5 can recognize the ICC profile that is embedded in Photoshop EPS.
In InDesign CS2 - CS5, while the ICC profile for each imported image can be changed, an ICC
profile that is embedded in a Photoshop EPS format file cannot be changed.
II. RGB workflow using
Illustrator CS3 or later
*1)
RGB data that can be mixed with
other data is limited to images placed in
Illustrator, and other objects created in
Illustrator are encoded using the color
space defined by the Illustrator color
mode. Normally they are created in
CMYK color mode.
In earlier versions of Illustrator, it was possible to mix RGB images and CMYK images by
positioning them using image links*1) but as in the (P95) points to note, images positioned by
linking are flattened, and there are problems with striping, so it is not practical.
In Illustrator CS3 or later, this problem was fixed, so by positioning RGB images using links, it is
now possible to mix RGB images and CMYK images in Illustrator.
ICC profiles are embedded, so it is necessary for positioned images to also be JPEG, TIFF or
Photoshop native format (.psd).
If you use this workflow, you must be sure to either export the page data in PDF/X-4 format or
position it in InDesign CS3 or later in native Illustrator format as is.
III. Overprint
In the same manner as that of the transparency effect described above, regarding overprint, the
data may not be processed as you expected when different color modes are present on the same
page and special care must be taken when creating data.
•RGB objects and overprint
Since overprint is an independent process that is applied for each separation used for printing,
it is only available for CMYK and spot color.
Basically, overprint cannot be set to RGB objects that use a color value. However, overprint
can be set to a spot color that will be printed using a different separation.
In the actual processing, RGB objects are converted to CMYK objects and they are affected by
overprint processing.
The detailed processing results are shown in the table below.
Since overprint is an independent process that is applied for each separation used for printing,
it is only available for CMYK and spot color.
Basically, overprint cannot be set to RGB objects that use a color value. However, overprint
can be set to a spot color that will be printed using a different separation.
In the actual processing, RGB objects are converted to CMYK objects and they are affected by
overprint processing.
Dainippon Screen Mfg. Co., Ltd.
Color management and RGB workflow
Technical information on PDF workflow
49
The detailed processing results are shown in the table below.
Forward (Set Overprint)
CMYK
Backward
RGB
OK
OK
OK
*1)
OK
RGB
*1)
Spot color
Spot color OK
CMYK
*1)
*1)
OK
OK
NG
NG
RGB objects are converted to CMYK objects and overprint processing is applied to them.
The "NG" symbol does not indicate that overprint is not applied, but indicates that the result is
undefined. This means the result may vary depending on the algorithm of the RGB to CMYK
conversion. For this reason, using overprint with the "NG" symbol is not recommended.
For example, the overprint is applied in the following situations even in the RGB workflow.
•Overprint can be applied for the overlapping spot color object and RGB object regardless
of the overlay priority.
•Overprint can be applied for the black text of the CMYK mode laid out on the RGB image.
IV. Preparation of appropriate
RGB images
In order to perform color conversion correctly in the RGB workflow, it is necessary to define a
correct ICC profile for an original image. If an ICC profile is not defined, default profile "sRGB
IEC61966-2.1" will be defined in Adobe Creative Suite 2 that is set up to be used in conjunction
with Trueflow.
In addition, Colorgenius LE and Ritefinisher, which allow you to set recipe files, handle RGB
format images, so it is necessary to prepare all Lab format images as RGB images.
V. Handling spot colors in
SpektacolorIn
In a general processing, different from RGB and CMYK objects, spot color objects are separated
as a spot color separation.
However, as a specific function of SpektacolorIn, it is possible to simulate a spot color separation
by reproducing a spot color mixing 4 to 8 process colors for multi-color printing.
This function enables spot color simulation at high level and increases the possibility of
omitting a spot color separation by using a combination of an FM screening, such as Spekta and
Randot-X, and very fine screening.
Dainippon Screen Mfg. Co., Ltd.
50
Trueflow DTP Output Guideline The 14th Edition
Creating PDF/X Files in InDesign CS2 - CS5
Running PDF/X
This chapter describes the procedure, points to be noted, and restrictions on creating PDF/X files
that are to be used in Trueflow.
Creating PDF/X Files in InDesign CS2 - CS5
In InDesign CS2 , CS3 and CS4, you can directly create PDFs that can pass the preflight for PDF/
X using the procedure below.
If you create PDF/X-1a, transparency objects are flattened based on the set parameters.
If an RGB image is included, apply an appropriate countermeasure while referring to "Color
management and RGB workflow" (P43) so that the required quality will result. Do not output
the RGB image without a countermeasure applied.
Refer to "Versioning workflow" (P89) when running versioning that uses a layered PDF and
performs computation with the Adobe PDF Print Engine.
The following presets are available in Trueflow for PDF/X output.
[ for US ]
•Trueflow PDFX1a 1.3US.joboptions (for PDF/X-1a CS2 - CS)
•Trueflow PDFX4 1.3US.joboptions (for PDF/X-4 CS3 - CS5)
•Trueflow RGBwf 1.3US.joboptions (for RGB workflow CS2, Versioning workflow CS2 - CS5)
[ for EU ]
•Trueflow PDFX1a 1.3EU.joboptions (for PDF/X-1a CS2 - CS)
•Trueflow PDFX4 1.3EU.joboptions (for PDF/X-4 CS3 - CS5)
•Trueflow RGBwf 1.3EU.joboptions (for RGB workflow CS2, Versioning workflow CS2 - CS5)
This section describes how to create PDF/X-4, but only the differences from what appears in
"PDF/X-1 output", which assumes you are using PDF/X-1a for output, are written in the sidebar.
Dainippon Screen Mfg. Co., Ltd.
Creating PDF/X Files in InDesign CS2 - CS5
Running PDF/X
51
Preflight in InDesign
This section describes InDesignCS2/CS3
preflight.
For the information of live preflight
function on CS4/CS5, see the description
of InDesignCS2/CS3 preflight.
1. Before saving data in the PDF format, a preflight is performed in InDesign to check for any
RGB image included in the data.
Select File /s Preflight... .
RGBs that cannot be checked by preflight
As InDesign cannot detect RGB images
that are embedded in a laid out EPS file,
Adobe Illustrator file, and Macromedia
FreeHand file, check the color data of
the layout images using the original
application.
In the RGB workflow, check that the
RGB images are laid out appropriately
in the required positions.
2. The preflight result is displayed in a dialog box.
You can check whether an RGB image is included by selecting "Summary" or "Links and
Images". When you check the "Show Problems Only" checkbox, only the RGB images can
be listed.
If an RGB image is included for PDF/X-1a
output, convert it into a CMYK image
before using the data.
Otherwise, the RGB image portion may
be output using unexpected colors.
3. When PDF/X-4 output, make prior arrangement needed by referring "Processing procedure
of the RGB workflow on Trueflow" (P46).
Dainippon Screen Mfg. Co., Ltd.
52
Trueflow DTP Output Guideline The 14th Edition
Creating PDF/X Files in InDesign CS2 - CS5
PDF Export
(when using Joboption for Trueflow PDF/
X-4 with CS3 - CS5)
1. Select "File / Adobe PDF Presets / Trueflow PDFX4 1.3US... or Trueflow PDFX4 1.3EU...
For procedure to install presets, refer to
"Adobe PDF presets" (P99)
Summary warning (CS3)
If you use presets for Trueflow PDF/X-1a, a
warning is displayed in Summary in CS3.
If the warning indicates that the colors will
be converted to CMYK, either convert the
places where RGB is used to CMYK in
advance, or place RGB images by linking
them and output PDF/X-4.
PDF/X-1a output
Select "Trueflow PDFX1a 1.3US..." or
"Trueflow PDFX1a 1.3EU..." in the preset
for Trueflow.
PDF/X-4 output (for CS2)
Select "Trueflow RGBwf 1.3US..." or
"Trueflow RGBwf 1.3EU..." in the preset
for Trueflow.
2. Specify the file name and save location in the Export dialog box, which is displayed, and
click the "Save" button. The "Export PDF" dialog box is displayed.
Make settings for each panel according to the descriptions below.
I. General
Standard
PDF/X-4:2008
Compatibility
Acrobat 5 (PDF 1.4)
Pages
Make the setting as necessary.
PDF/X-1a Output
[Standard] : PDF/X-1a:2001
[Compatibility] : Acrobat 4 (PDF1.3)
PDF/X-4 Output (CS2)
[Standard] : None
[Compatibility] : Acrobat 7 (PDF1.6)
Dainippon Screen Mfg. Co., Ltd.
Creating PDF/X Files in InDesign CS2 - CS5
Running PDF/X
II. Compression
Compression setting
The lossless compression setting is used
because the emphasis is on quality in the
Presets files.
When performing JPEG compression,
make sure that there is no problem with
quality before changing the setting.
Compression
Make the setting as necessary.
Marks
Make the setting as necessary.
Bleed and Slug
Make the setting as necessary.
Bleed
Same value as Trueflow
III. Marks and Bleeds
IV. Output
We recommend the setting shown on the
right, but change the setting as is necessary.
Output
A change of setting will affect the image
quality output.
If the setting is changed, it is necessary to
ensure that there is no problem with the
output image quality beforehand.
Color
Color Conversion
[Color Conversion] : No Color Conversion
Destination
N/A
PDF/X
Output Intent Profile Name
[for US] U.S. Web Coated (SWOP) v2
(Custom)
[for EU] Euroscale Coated v2
(Custom)
[Color Conversion] :
If you select "None", it will not be PDF/X-1a.
PDF/X-1a Output
[Color Conversion]:Convert to Destination
(Preserve Numbers)
[Destination] :
[for US] U.S. Web Coated (SWOP) v2 (Custom)
[for EU] Euroscale Coated v2 (Custom)
PDF/X-4 Output (CS2)
[Color] : No Color Conversion
[Profile Inclusion Policy] : Include All RGB
and Tagged Source CMYK Profile
[Output Intent Profile Name] : N/A
Dainippon Screen Mfg. Co., Ltd.
53
54
Trueflow DTP Output Guideline The 14th Edition
Creating PDF/X Files in InDesign CS2 - CS5
V. Advanced
Transparency Flattener
Preset
[High Resolution]
[ Transparency Flattener ]:
Output with "High Resolution" selected
normally.
If an error occurs when RIP'ing very
complex data, including data with
transparency processing, review "More
information about the Transparency
Flattener Options" (P13) and then change
the settings using "Edit" - "Transparency
Flattener Presets".
VI. Security
(Do not make any settings.)
Security settings
If security settings are made, there will
be times when Trueflow ends in an error,
resulting in improper output. Do not make
any security settings.
3. Click the "Export" button to save the file.
Dainippon Screen Mfg. Co., Ltd.
Creating PDF/X Files in Illustrator CS2 - CS5
Running PDF/X
55
Creating PDF/X Files in Illustrator CS2 - CS5
Handling RGB images
(For CS3 - CS5)
Up to now we have recommended
embedding images, but for PDF/X-4
output, place RGB images by linking
them. If they are placed with links, they
are not converted to CMYK and the RGB
is preserved.
(For CS2 and CS)
PDF/X-4 output is not supported. Embed
CMYK images without including RGB
data.
In Illustrator CS2 - CS5, you can directly create PDFs that can pass the preflight for PDF/X using
the procedure below.
In addition, in Illustrator CS3 or later, the earlier Points to Note have been revised, and a
workflow that includes RGB is now possible.
If RGB images are included, see "Color management and RGB workflow" (P43), and take
the steps that will give you the quality that you need. Do not output the RGB image without a
countermeasure applied.
The following presets are available in Trueflow for PDF/X output.
[ for US ]
•Trueflow PDFX1a 1.3US.joboptions (for PDF/X-1a CS2 - CS5)
•Trueflow PDFX4 1.3US.joboptions (for PDF/X-4 CS2 - CS5)
[ for EU ]
•Trueflow PDFX1a 1.3EU.joboptions (for PDF/X-1a CS2 - CS5)
•Trueflow PDFX4 1.3EU.joboptions (for PDF/X-4 CS2 - CS5)
If you create PDF/X-1a, transparency
objects are flattened based on the set
parameters.
This section describes how to create PDF/X-4, but only the differences from what appears in
"PDF/X-1 output", which assumes you are using PDF/X-1a for output, are written in the sidebar.
PDF Export
(when using Joboption for Trueflow PDF/X-4
with CS3 - CS5)
1. Select "File / Save As...".
For procedure to install presets, refer to
"Presets for Adobe CS2 - CS5, Acrobat 7 9" (P99).
Embedding of images (CS2)
Embed the images rather than linking
them. (P95)
CS3 or later does not have this restriction.
Summary warning (CS3 or later)
If you use presets for Trueflow PDF/X-1a,
a warning is displayed in Summary in CS3
or later. If the warning indicates that the
colors will be converted to CMYK, either
convert the places where RGB is used to
CMYK in advance, or place RGB images
by linking them and output PDF/X-4.
2. In the "Save As" dialog box, specify the name and save location of the file, select "Adobe PDF
When you do this, select either the US or
the EU preset (US screens are used in this
explanation).
(pdf)" in "Format" and click "Save". The "Save Adobe PDF" dialog box is displayed.
3. Select "Trueflow PDFX4 1.3US..." or "Trueflow PDFX4 1.3EU..." in the preset for Trueflow.
PDF/X-1a output
Select "Trueflow PDFX1a 1.3US..."
or "Trueflow PDFX1a 1.3EU..." in the
Adobe PDF presets, and make the
settings in each of the panels according
to the information below.
Dainippon Screen Mfg. Co., Ltd.
56
Trueflow DTP Output Guideline The 14th Edition
Creating PDF/X Files in Illustrator CS2 - CS5
I. General
*1)
In case of CS3, [Standard] is displayed as
"PDF/X-4:2007" instead of "PDF/X-4:2008".
Standard
PDF/X-4:2008*1)
Compatibility
Acrobat 5 (PDF1.4)
Compression
Make the setting as necessary.
Marks
Make the setting as necessary.
Bleeds
Same value as Trueflow
PDF/X-1a Output
[Standard] : PDF/X-1a:2001
[Compatibility] : Acrobat 4 (PDF 1.3)
II. Compression
Compression setting
The lossless compression setting is used
because the emphasis is on quality in the
Presets files.
When performing JPEG compression,
make sure that there is no problem with
quality before changing the setting.
III. Marks and Bleeds
[ Bleeds ]:
The value to be set here must be matched
up with the set value in Trueflow.
Dainippon Screen Mfg. Co., Ltd.
Creating PDF/X Files in Illustrator CS2 - CS5
Running PDF/X
57
IV. Output
[PDF/X]:
We recommend "U.S. Web Coated
(SWOP) v2" for the US version and
"Euroscale Coated v2" for the European
version, but you can choose whichever
setting you want. Change as necessary.
PDF/X-1a Output
[Color Conversion] : Convert to Destination
(Preserve Numbers)
[Destination] :
[for US] U.S. Web Coated (SWOP) v2 (Custom)
[for EU] Euroscale Coated v2 (Custom)
Color
Color Conversion
No Color Conversion
Destination
N/A
PDF/X
Output Intent Profile Name
[for US] U.S. Web Coated (SWOP) v2
(Custom)
[for EU] Euroscale Coated v2
(Custom)
V. Advanced
Overprint and Transparency Flattener Options (PDF 1.3 Only)
PDF/X-1a Output
[ Transparency Flattener ]:
Output with "High Resolution" selected
normally.
If errors occur while RIP'ing extremely
complex data, including processing
transparency effects, refer to "More
information about the Transparency Flattener
Options" (P13) , and then change the
setting using Edit > Transparency Flattener
Presets, or change the setting by clicking the
"Custom..." button.
VI. Security
(Do not make any settings.)
Overprints
Grayed out because flattening is not required
Preset
Grayed out because flattening is not required
If security settings are made, there will be times when Trueflow ends in an error, resulting in
improper output. Do not make any security settings.
4. Click the "Export" button to save the file.
Dainippon Screen Mfg. Co., Ltd.
58
Trueflow DTP Output Guideline The 14th Edition
Creating PDF/X-1a Files in InDesign CS
Creating PDF/X-1a Files in InDesign CS
In InDesign CS, you can directly create PDFs that can pass the preflight for PDF/X-1a using the
procedure below.
The transparent objects are tiled in accordance with the preset parameters.
PDF Export
(when using Presets for Trueflow PDF/X-1a)
1. Select "File / PDF Export Presets / Trueflow PDF/X-1a 1.0...".
For procedure to install presets, refer to
"PDF export presets" (P107).
2. Specify the file name and save location in the Export dialog box, and click the Save button to
display the Export PDF dialog box.
Make settings for each panel according to the descriptions below.
I. General
Pages
Make the setting as necessary.
Options
Compatibility
Acrobat 4 (PDF 1.3)
Standard
PDF/X-1a
Dainippon Screen Mfg. Co., Ltd.
Creating PDF/X-1a Files in InDesign CS
Running PDF/X
59
II. Compression
Compression setting
The lossless compression setting is used
because the emphasis is on quality in the
Presets files.
When performing JPEG compression,
make sure that there is no problem with
quality before changing the setting.
Compression
Make the setting as necessary.
Marks
Make the setting as necessary.
Bleed and Slug
Make the setting as necessary.
Bleed
Same value as Trueflow
PDF/X
[for US] U.S. Web Coated (SWOP) v2
(Custom)
[for EU] Euroscale Coated v2
(Custom)
III. Marks and Bleeds
IV. Advanced
[PDF/X]:
We recommend "U.S. Web Coated
(SWOP) v2" for the US version and
"Euroscale Coated v2" for the European
version, but other settings are also
acceptable. Change as necessary.
Transparency Flattener
Preset
[High Resolution] Trueflow
[ Transparency Flattener ]:
Output with "High Resolution" selected
normally.
If an error occurs when RIP'ing very
complex data, including data with
transparency processing, review the
information in "More information about
the Transparency Flattener Options"
(P13) and then change the settings using
Edit > Transparency Flattener Presets.
V. Security
(Do not make any settings.)
If security settings are made, there will be times when Trueflow ends in an error, resulting in
improper output. Do not make any security settings.
3. Click the "Export" button to save the file.
Dainippon Screen Mfg. Co., Ltd.
60
Trueflow DTP Output Guideline The 14th Edition
Creating PDF1.3 Files in Illustrator CS
Creating PDF1.3 Files in Illustrator CS
It is not possible to create PDF/X-1a directly in Illustrator CS.
However, it is possible to create PDF with the same quality as PDF/X-1a from any PDF 1.3 data
saved in Illustrator CS except PDF 1.3 that does not include OutputIntent information.
This section describes how to create PDF 1.3 that is reliable for printing.
Saving as PDF 1.3 format
Paper size issue for PDF1.3 made by
IllustratorCS
If PDF1.3 is made by IllustratorCS, the
paper size is decided to include in all
of objects (including invisible objects)
which are placed out of bleed area. It is,
therefore, if there are objects which are
placed out of bleed area, PDF's paper
size (MediaBox) will be larger than
IllustratorCS's document size. If using
Trueflow to process PDF1.3 made by
IllustratorCS, you must set "TrimBox" for
PDF Origin in the import setup.
1. Select "File / Save As... "
2. Make the following settings and click the "Save" button in the Save As dialog box.
Save As
Specify a file name.
Where
Specify a save location for the file.
Format
Adobe PDF (pdf)
Embedding of images
Embed the images rather than linking
them. (P95)
Dainippon Screen Mfg. Co., Ltd.
Creating PDF1.3 Files in Illustrator CS
Running PDF/X
Adobe PDF Preset Options
I. General
Warning upon saving
If you save with the Preserve Illustrator
Editing Capabilities option Off, the
following dialog box is displayed. Click
Yes to save the data.
This message warns that you will not be
able to edit areas where transparency has
been applied because the transparency is
flattened when the file is saved.
Compatibility
Acrobat 4 (PDF 1.3)
Preserve Illustrator Editing Capabilities
Either On or Off
II. Advanced
Overprint and Transparency Flattener Options (PDF 1.3 Only)
[ Preset ]
Output with "High Resolution" selected
normally.
If errors occur while RIP'ing extremely
complex data, including processing
transparency effects, refer to "More
information about the Transparency
Flattener Options" (P13), and then
change the setting using Edit > Transparency
Flattener Presets, or change the setting by
clicking the "Custom..." button.
Overprints
Preserve
Preset
[ High Resolution ]
3. Click Save PDF.
Dainippon Screen Mfg. Co., Ltd.
61
62
Creating PDF/X-1a Files in QuarkXPress 7.0 / 8.0
Trueflow DTP Output Guideline The 14th Edition
Creating PDF/X-1a Files in QuarkXPress 7.0 / 8.0
In QuarkXPress 7.0 / 8.0, you can create PDF/X-1a that has passed Preflight directly from an
application using the steps below.
Saving as PDF/X-1a format
There are times when you may get
unexpected results if you change any of
the other settings.
Do not change any of the other settings
with following procedure.
1. Select " File / Export / Layout as PDF... "
2. The Export as PDF dialog box is displayed.
Specify the save location, select "TrueflowPDF-X-1a Style 3.0US" in PDF Style:, and then
click the Save button to save it.
Dainippon Screen Mfg. Co., Ltd.
Creating PDF/X-1a Files in QuarkXPress 7.0 / 8.0
Running PDF/X
Output Style settings
I. Pages
Spreads
Either On or Off
Compression
Make the setting as necessary.
Resolution
Make the setting as necessary.
II. Compression
Dainippon Screen Mfg. Co., Ltd.
63
64
Trueflow DTP Output Guideline The 14th Edition
Creating PDF/X-1a Files in QuarkXPress 7.0 / 8.0
III. Color
Color Options
[ Setup ] :
Use the special Color Setup file provided
with Trueflow. See "Color Setup" (P109)
for more information about the Color
Setup file.
Mode
Composite
Setup
[for US] Trueflow PDF Color 1.0US
[for EU] Trueflow PDF Color 1.0EU
Color separation and section settings
If you specify color separation, do not
specify anything other than numbers for
the "Page Numbering Options" section.
IV. Bleed
Bleed Options
Bleed Type
Symmetric
Amount
Same value as Trueflow
Dainippon Screen Mfg. Co., Ltd.
Creating PDF/X-1a Files in QuarkXPress 7.0 / 8.0
Running PDF/X
V. Transparency
Transparency Options
[Flattening Resolution]
Change the setting as appropriate
according to the content of the imported
data. Custom resolution
VI. OPI
Vector Images
400 dpi
Blends
400 dpi
Drop Shadows
400 dpi
Transparent Objects In Imported
PDF & AI Files
Flattening Resolution
Custom resolution
(PDF/X-1a is a standard that prohibits OPI. Please do not select OPI.)
Dainippon Screen Mfg. Co., Ltd.
65
66
Trueflow DTP Output Guideline The 14th Edition
Creating PDF/X-1a Files in Acrobat Distiller
Creating PDF/X-1a Files in Acrobat Distiller
When you use an application that cannot create a PDF/X-1a file directly, create a PDF/X-1a file
from the PostScript file that was output from the application using Acrobat Distiller 9.
In these applications, a PPD file called "Adobe PDF" is used as the PPD file when outputting a PostScript
file rather than a Trueflow PPD file. (The same steps are used in Acrobat Distiller 7 / 8 as well.)
It is necessary to export PostScript in which transparency cannot be encoded, so at that point, you
must make the appropriate transparency flattening settings, and RGB images also cannot be included.
Creating in Acrobat Distiller 9
For procedure to install presets, refer to
"Presets for Adobe CS2 - CS5, Acrobat 7 9" (P99).
1. Open Acrobat Distiller 9, select "Trueflow PDFX1a 1.3" and drag the PostScript file into the
dialog box to create a PDF file.
Adobe PDF Settings
Default Settings
When you do this, select either the US or
the EU preset (US screens are used in this
explanation).
[for US] Trueflow PDFX1a 1.3US
[for EU] Trueflow PDFX1a 1.3EU
Dainippon Screen Mfg. Co., Ltd.
Verification and confirmation of PDF
Running PDF/X
67
Verification and confirmation of PDF
Verifying PDF
After PDF creation has been completed, perform verification.
This section describes the steps for verifying using Acrobat 9 Professional.
(The same steps are used in Acrobat Distiller 7 / 8 Professional as well.)
I. Using Acrobat 9 Professional
If you use Adobe Creative Suite 3, you
must update Acrobat 8 to 8.1.
1. Open the file you wish to verify using Acrobat 9 Professional, and select "Document / Preflight...".
II. Preflight
2. Select the appropriate profile from the Preflight list, and click "Execute" to run the Preflight
PDF/X-4 Output
(Acrobat 7)
See "Preflight profiles for an RGB workflow"
(P106), and then load the "Trueflow RGBwf
1.1US.kfp", "Trueflow RGBwf 1.1EU.kfp" RGB
workflow profile provided in Trueflow and
verify.
(Acrobat 8)
Use the "Verify compliance with PDF/X-4
(Draft)" PDF/X-4 profile
and verify.
check.
(PDF/X-1a is used in this explanation).
(Acrobat 9)
Use the "Verify compliance with PDF/X-4"
and verify.
Dainippon Screen Mfg. Co., Ltd.
68
Trueflow DTP Output Guideline The 14th Edition
Verification and confirmation of PDF
3. After the completion, the preflight results will be displayed.
[OK (acceptable)]
[NG (unacceptable)]
III. Preflight: results in detail
You can view more information on
the verification results by selecting an
item from the "Overview" and "Preflight
information" pulldown menus.
4. Information such as "Overview" and "Preflight information" is displayed when you check the
"Show detailed information about document" checkbox.
This completes the PDF/X-1a verification.
Dainippon Screen Mfg. Co., Ltd.
Creating PostScript Files in InDesign CS2 - CS5
Running PostScript
69
Running PostScript
This chapter describes the procedure, points to be noted, and restrictions on creating PostScript
files that are to be used in Trueflow.
Creating PostScript Files in InDesign CS2 - CS5
Settings in the Print dialog box
(when using Presets for Trueflow)
1. Select "File / Print Presets / Trueflow 1.1E..." to display the "Print" dialog box.
For procedure to install presets, refer to
"Print presets for PS output" (P104).
2. In the "Print" dialog box, which is displayed, make settings for each panel according to the
descriptions below.
Print Presets
Trueflow 1.1E
Printer
PostScript File
PPD
The latest version contained in Trueflow
Dainippon Screen Mfg. Co., Ltd.
70
Trueflow DTP Output Guideline The 14th Edition
Creating PostScript Files in InDesign CS2 - CS5
I. General
Pages
Make the settings as necessary.
Options
Make the settings as necessary.
Paper Size
Custom
Width / Height
Auto (a value with brackets is displayed when Auto is
selected)
Orientation
Vertical (the left most icon)
Offset
0 mm
Gap
0 mm
II. Setup
Paper Size setup
Set "Auto" for both "Width" and "Height".
Regardless of the settings for register marks
and bleeds, an appropriate size is used for
output.
By setting "TrimBox" for the PDF origin in
the Import on Trueflow, even if the paper
size is set to "Auto", accurate page origin
information can be imported.
Options
Page Position
Upper Left
Dainippon Screen Mfg. Co., Ltd.
Creating PostScript Files in InDesign CS2 - CS5
Running PostScript
III. Marks and Bleed
Precautions when using the Imposition
scheme template
When using the Imposition scheme
template in Trueflow to output facing
pages from InDesign CS, Please set
"Spread" at imposition setup. See the
Trueflow User's Manual for more
information about this setting.
Marks
Make the settings as necessary.
Bleed and Slug
Make the settings as necessary.
Bleed
Same value as Trueflow
Color
In-RIP Separations
Trapping
Make the settings as necessary.
Screening
Screening: Set the same screening as for the output device
setting. If there is no setting that is exactly the same, select
the setting closest to the output device setting.
Inks
ON for all inks
[ Bleed ]:
The value to be set here must be matched
up with the set value in Trueflow.
IV. Output
Differences between "In-RIP Separations"
and "Composite CMYK"
When the duotone mode in Photoshop 5.0
or later is set up for a document, or when
you want to output the trap specified
using InDesignCS, it is necessary to output
using "In-RIP Separations".
Spot color information is still retained
even if "Composite CMYK" is specified,
but "In-RIP Separations" must be used for
normal output.
[ Frequency ] [ Angle ]:
The frequency and angle set on Trueflow
are used.
Color separation and section settings
If you specify color separation, do not use
"Page Numbering Options" section prefix
names.
Dainippon Screen Mfg. Co., Ltd.
71
72
Trueflow DTP Output Guideline The 14th Edition
Creating PostScript Files in InDesign CS2 - CS5
V. Graphics
( Do not change this. )
VI. Color Management
Options
A change of setting will affect the image
quality output.
If the setting is changed, it is necessary to
ensure that there is no problem with the
output image quality beforehand.
Color Handling
PostScript Printer Determ...
Output Color
Preserve CMYK Numbers
ON
Dainippon Screen Mfg. Co., Ltd.
Creating PostScript Files in InDesign CS2 - CS5
Running PostScript
VII. Advanced
OPI operation
In Trueflow, the OPI processing that replaces
low res EPSs with high res EPSs is support.
While in InDesign CS, when low res EPSs
created in Photoshop are used, the original
file name information is not included in
the PostScript data, resulting in the OPI
processing not being performed and the
low res images being output as they are.
The operation that uses EPS files created in
applications other than Photoshop as low
res images for OPI, such as low res images
created in GTP, will not cause a problem.
OPI
OPI Image Replacement
OFF
Omit For OPI
All OFF
Transparency Flattener
Preset
[ High Resolution ]
Ignore Spread Overrides
OFF
[ OPI Image Replacement ] :
InDesign CS performs the OPI processing
when outputting the PostScript data. This
setting to OFF normally.
[ Omit For OPI ] :
The OPI processing is not performed
on InDesign CS, and OPI comments
are embedded instead of including the
specified image in the PostScript data.
For example, when "EPS" is specified,
all images included in the document are
targeted for OPI, and you need to prepare
all the EPS elements on Trueflow. Set all
the settings to OFF normally.
[ Transparency Flattener ] :
Output with "High Resolution" selected
normally. If extremely complicated data
that requires transparency processing ends
in a RIP processing error, create preset
data in which the "Raster / Vector Balance"
value is lowered to around 75 to 99
using "Transparency Flattener Presets..."
in the Edit menu, and try to output the
data again. When you do this, the output
quality may be affected, so check that
there is no problem with the output
quality.
3. After making all the settings above, click the "Save" button.
VIII. Save PostScript File
4. Specify the file name and save location, and click the "Save" button to save the file.
Dainippon Screen Mfg. Co., Ltd.
73
74
Trueflow DTP Output Guideline The 14th Edition
Creating EPS Files in Illustrator CS - CS5
Creating EPS Files in Illustrator CS - CS5
The description below is given using screen shots of Illustrator CS4. The setting procedure is the
same if you use Illustrator CS - CS5.
Saving as EPS format
1. Select "File / Save As...".
I. Save As dialog box
2. After making the settings below, click the "Save" button.
Save As
Specify a file name.
Where
Specify a save location for the file.
Format
Illustrator EPS (eps)
Dainippon Screen Mfg. Co., Ltd.
Creating EPS Files in Illustrator CS - CS5
Running PostScript
II. EPS Options
[ Preset ]:
Output with "High Resolution" selected
normally.
If errors occur while RIP'ing extremely
complex data, including processing
transparency effects, refer to "More
information about the Transparency
Flattener Options" (P13), and
then change the setting using Edit >
Transparency Flattener Presets, or change
the setting by clicking the "Custom..."
button.
3. Make each setting as necessary, and click "OK" to save your settings.
[ Compatible Gradient and Gradient Mesh
Printing ]:
Set this setting to OFF normally.
If this setting is turned ON, a problem may
occur in the gradient quality.
Dainippon Screen Mfg. Co., Ltd.
75
76
Trueflow DTP Output Guideline The 14th Edition
Creating PostScript Files in InDesign CS
Creating PostScript Files in InDesign CS
Settings in the Print dialog box
(when using Presets for Trueflow)
1. Select "File / Print Presets / Trueflow 1.0..." to display the "Print" dialog box.
For procedure to install presets, refer to
"Print presets for PS output" (P108).
2. In the "Print" dialog box, which is displayed, make settings for each panel according to the
descriptions below.
Print Presets
Trueflow 1.0
Printer
PostScript File
PPD
The latest version contained in Trueflow
Dainippon Screen Mfg. Co., Ltd.
Creating PostScript Files in InDesign CS
Running PostScript
I. General
Pages
Make the settings as necessary.
Options
Make the settings as necessary.
II. Setup
Paper Size setup
Set "Auto" for both "Width" and "Height".
Regardless of the settings for register marks
and bleeds, an appropriate size is used for
output.
By setting "TrimBox" for the PDF origin in
the Import on Trueflow, even if the paper
size is set to "Auto", accurate page origin
information can be imported.
Paper Size
Custom
Width / Height
Auto (a value with brackets is displayed when Auto is
selected)
Orientation
Vertical (the left most icon)
Offset
0 mm
Gap
0 mm
Options
Page Position
Upper Left
Dainippon Screen Mfg. Co., Ltd.
77
78
Trueflow DTP Output Guideline The 14th Edition
Creating PostScript Files in InDesign CS
III. Marks and Bleed
Precautions when using the Imposition
scheme template
When using the Imposition scheme
template in Trueflow to output facing
pages from InDesign CS, Please set
"Spread" at imposition setup. See the
Trueflow User's Manual for more
information about this setting.
Marks
Make the settings as necessary.
Bleed and Slug
Make the settings as necessary.
Bleed
Same value as Trueflow
[ Bleed ]:
The value to be set here must be matched
up with the set value in Trueflow.
IV. Output
Differences between "In-RIP Separations"
and "Composite CMYK"
When the duotone mode in Photoshop 5.0
or later is set up for a document, or when
you want to output the trap specified
using InDesignCS, it is necessary to output
using "In-RIP Separations".
Spot color information is still retained
even if "Composite CMYK" is specified,
but "In-RIP Separations" must be used for
normal output.
Color
In-RIP Separations
Trapping
Make the settings as necessary.
Screening
Set the same screening as for the output device setting.
If there is no setting that is exactly the same, select the
setting closest to the output device setting.
[ Frequency ] [ Angle ]:
The frequency and angle set on Trueflow
are used.
Color separation and section settings
If you specify color separation, do not use
"Page Numbering Options" section prefix
names.
Dainippon Screen Mfg. Co., Ltd.
Creating PostScript Files in InDesign CS
Running PostScript
V. Graphics
VI. Color Management
Normally, the color management setting
area is grayed out.
H o w e v e r, i f yo u t u r n o n " C o l o r
Management" in the "Edit" menu, setting
will be enabled.
79
( Do not change this. )
(This setting is generally not used.)
VII. Advanced
OPI operation
In Trueflow, the OPI processing that
replaces low res EPSs with high res EPSs
is support. While in InDesign CS, when
low res EPSs created in Photoshop are
used, the original file name information
is not included in the PostScript data,
resulting in the OPI processing not being
performed and the low res images being
output as they are. The operation that
uses EPS files created in applications other
than Photoshop as low res images for OPI,
such as low res images created in GTP,
will not cause a problem.
OPI
OPI Image Replacement
OFF
Omit For OPI
All OFF
Transparency Flattener
Preset
[High Resolution] Trueflow
Ignore Spread Overrides
OFF
[ OPI Image Replacement ]:
InDesign CS performs the OPI processing
when outputting the PostScript data. This
setting to OFF normally.
[ Omit For OPI ]:
The OPI processing is not performed
on InDesign CS, and OPI comments
are embedded instead of including the
specified image in the PostScript data.
For example, when "EPS" is specified,
all images included in the document are
targeted for OPI, and you need to prepare
all the EPS elements on Trueflow. Set all
the settings to OFF normally.
[ Transparency Flattener ]:
Output with "High Resolution" selected
normally. If extremely complicated data
that requires transparency processing ends
3. After making all the settings above, click the "Save" button.
4. In the displayed Save PostScript File dialog box, specify the name of the file and location
where it is to be created, and click the Save button.
in a RIP processing error, create preset
data in which the "Raster / Vector Balance"
value is lowered to around 75 to 99
using "Transparency Flattener Presets..."
in the Edit menu, and try to output the
data again. When you do this, the output
quality may be affected, so check that
there is no problem with the output
quality.
Dainippon Screen Mfg. Co., Ltd.
80
Trueflow DTP Output Guideline The 14th Edition
Creating PostScript Files in QuarkXPress 7.0 / 8.0
Creating PostScript Files in QuarkXPress 7.0 / 8.0
In earlier versions of QuarkXPress and later, it was possible to use TP-X, which was a dedicated
Xtension, but in QuarkXPress 6 and later, it is no longer necessary to use TP-X, and therefore the
method for creating PS has also changed. The functions that were in TP-X, the page origin load
function and the function for recognizing C / CV / CVC Pantone spot colors as the same color,
are now supported in Trueflow import processing.
Print Dialog setting
(when using Presets for Trueflow Style)
1. Select the "File" - " Print...". The "Print Layout" dialog box is displayed.
There are times when you may get
unexpected results if you change any of
the other settings.
Do not change any of the other settings
with following procedure.
For procedure to install presets, refer to
"Output Style Setup" (P111).
2. In the Dialog box, which is displayed, make settings for each panel according to the
descriptions below.
I. Print Layout
[ Spreads ] :
Either of the settings for "Spreads" is
acceptable, but if you check the "Spreads"
option, you must make the page size
larger. (See Setup tab)
Print Style
TrueflowPS Style 3.0US
Spreads
ON / OFF (Both are possible)
Dainippon Screen Mfg. Co., Ltd.
Creating PostScript Files in QuarkXPress 7.0 / 8.0
Running PostScript
II. Device
Paper Size setup
Set "Auto" for both "Width" and "Height".
Regardless of the settings for register marks
and bleeds, an appropriate size is used for
output.
By setting "TrimBox" for the PDF origin in
the Import on Trueflow, even if the paper
size is set to "Auto", accurate page origin
information can be imported
Device Options
PPD
use the latest version provided with Trueflow
Paper Size
Custom
As long as the sizes in "Paper Width" are larger than the size
of the paper to be output plus the bleed (same as the "Offset")
and the register marks (17 mm for both sides), any size is
acceptable.
"Paper Height" can be set to "Automatic." or larger than the
size of the paper height plus the bleed and the register marks
(17 mm for both sides).
Width
Height
Resolution
Set the "Resolution" appropriate for the actual output device.
[ Paper Width ] :
Example)
Letter size (Single Page),
8.5inch,Bleed:0.125inch:
Paper Width
=8.5+(0.125x2)
+0.669(Register Mark Size)
= 9.419 inch
Letter size (Facing Page),
8.5inch,Bleed:0.125inch:
Paper Width
=17+(0.125x2)
+0.669(Register Mark Size)
=7.919 inch
III. Colors
[ Setup ]:
In the English version of QuarkXPress6,
Color Options
the spot color used on the objects below is
Mode
Separation
Setup
[for US] Trueflow PS Color 1.0US
[for EU] Trueflow PS Color 1.0EU
output as a proxy color of a process color.
In order to output documents containing
these objects, can output properly by
selecting "Truflow PS Color 1.0US" (for
US) or "Truflow PS Color 1.0EU" (for EU)
in the special Color Setup file provided
with Trueflow (see "Color Setup" (P109)
for more information about the Color
Setup file).
1) Blend: When a spot color is used
2) Colorized TIFF: Gray TIFF colorized with a
spot color
3) Multi-Ink: When a spot color is used
Color separation and section settings
If you specify color separation, do not
specify anything other than numbers for
the "Page Numbering Options" section.
Dainippon Screen Mfg. Co., Ltd.
81
82
Trueflow DTP Output Guideline The 14th Edition
Creating PostScript Files in QuarkXPress 7.0 / 8.0
IV. Marks
[ Offset ] :
Even if the unit that is displayed is "pt",
you can also enter a value such as [3mm]
(=8.504pt) or [0.125"] (=9pt)
Registration Marks Options
Mode
Centered
Width, Length
Offset
Same value as Bleed of Trueflow
V. Bleed
[ Amount ] :
Even if you set different values for the
top, bottom, left and right bleed values, it
will not be possible to process the bleeds
correctly.
Bleed Options
Bleed Type
Symmetric
Amount
Set the same values for the bleeds as are set for the
"Offset" values in the Marks tab.
VI. Transparency
[Flattening Resolution]
Change the setting as appropriate
according to the content of the imported
data. Custom resolution
Transparency Options
Vector Images
400 dpi
Blends
400 dpi
Drop shadows
400 dpi
Transparent Objects In Imported
PDF & AI Files
Flattening Resolution
Custom resolution
VII. OPI
Effects of the OPI setting
OPI Options
When a data file created by importing
OPI Active
OFF
an EPS illustration in QuarkXPress 6 is
processed in Trueflow, the output result
3. After you finish making the above settings, output the PS file using the steps below.
may be incorrect (e.g., the EPS is scaled
down). Create a PS with the "OPI Active"
checkbox unchecked.
It is possible to perform OPI processing
for EPS image files on Trueflow even if the
OPI has been deselected. TIFF image files
imported with the above setting are output
as they are.
Dainippon Screen Mfg. Co., Ltd.
Creating PostScript Files in QuarkXPress 7.0 / 8.0
Running PostScript
83
Page Setup dialog box
4. Click the Page Setup... button in the bottom left of the Printer Layout dialog box, check the
settings in the Page Setup dialog box that is displayed, and click the OK button.
Orientation
vertical (The leftmost icon)
Scale
100%
Print dialog box
5. Click "Printer..." in the Print dialog box to display the OS Print dialog box.
The description below is given using
screen shots of Mac OS X 10.6. The setting
procedure is the same if you use 10.4 or
10.5.
•When using Mac OS X 10.6
At this point, select "Save PDF as PostScript" from the "PDF" pull-down menu.
Printer
Trueflow
Presets
Standard
6. In the "Save to File" dialog box that appears, specify the file name and the save destination,
and then click "Save...".
In a normal application, the file is saved at this stage. However, in QuarkXPress 6 and later
version, the file is created when you click "Print" in the QuarkXPress Print dialog box.
Dainippon Screen Mfg. Co., Ltd.
84
Trueflow DTP Output Guideline The 14th Edition
Creating PostScript Files in QuarkXPress 6.5
Creating PostScript Files in QuarkXPress 6.5
In earlier versions of QuarkXPress, it was possible to use TP-X, which was a dedicated Xtension,
but in QuarkXPress6, it is no longer necessary to use TP-X, and therefore the method for creating
PS has also changed.
The functions that were in TP-X, the page origin load function and the function for recognizing
C / CV / CVC Pantone spot colors as the same color, are now supported in Trueflow import
processing.
This document uses QuarkXPress running on Mac OS X 10.4 for purposes of explanation, but it
is possible to use the same settings on Mac OS X 10.2 and higher.
Print Dialog setting
(when using Presets for Trueflow Print
Style)
1. Select the "File" - " Print...". The "Print Layout" dialog box is displayed.
There are times when you may get
unexpected results if you change any of
the other settings.
Do not change any of the other settings
with following procedure.
For procedure to install presets, refer to
"Install Print Style" (P113).
2. In the Dialog box, which is displayed, make settings for each panel according to the
descriptions below.
I. Layout
[ Spreads ] :
Either of the settings for "Spreads" is
acceptable, but if you check the "Spreads"
option, you must make the page size
larger. (See Setup tab)
Print Style
Trueflow Style x.xx
Spreads
ON / OFF (Both are possible)
Registration
Center...
Offset
Same value as Bleed of Trueflow
[ Offset ] :
Even if the unit that is displayed is "pt",
you can also enter a value such as [3mm]
(=8.504pt) or [0.125"] (=9pt)
Dainippon Screen Mfg. Co., Ltd.
Creating PostScript Files in QuarkXPress 6.5
Running PostScript
II. Setup
Paper Size setup
Printer Description
use the latest version provided with Trueflow
Set "Auto" for both "Width" and "Height".
Regardless of the settings for register marks
and bleeds, an appropriate size is used for
output.
By setting "TrimBox" for the PDF origin in
the Import on Trueflow, even if the paper
size is set to "Auto", accurate page origin
information can be imported
Paper Size
Custom
Paper Width
Paper Height
Orientation
As long as the sizes in "Paper Width" are larger than the size of
the paper to be output plus the bleed (same as the "Offset") and
the register marks (17 mm for both sides), any size is acceptable.
"Paper Height" can be set to "Automatic." or larger than the size
of the paper height plus the bleed and the register marks (17 mm
for both sides).
vertical (left icon)
[ Paper Width ] :(Example)
Letter size (Single Page),
8.5inch,Bleed:0.125inch:
Paper Width
=8.5+(0.125x2)
+0.669(Register Mark Size)
= 9.419 inch
Letter size (Facing Page),
8.5inch,Bleed:0.125inch:
Paper Width
=17+(0.125x2)
+0.669(Register Mark Size)
=7.919 inch
III. Output
[Print Colors]:
In the English version of QuarkXPress6,
the spot color used on the objects below
is output as a proxy color of a process
color.
In order to output documents containing
these objects, select "DeviceN". This
ensures output is carried out correctly.
Print Colors
DeviceN
Resolution
Set the "Resolution" appropriate for the actual output device.
1) Blend: When a spot color is used
2) Colorized TIFF: Gray TIFF colorized
with a spot color
3) Multi-Ink: When a spot color is used
Color separation and section settings
If you specify color separation, do not use
"Page Numbering Options" section prefix
names.
Dainippon Screen Mfg. Co., Ltd.
85
86
Trueflow DTP Output Guideline The 14th Edition
Creating PostScript Files in QuarkXPress 6.5
IV. Options
( Do not change this. )
V. Bleed
[ Amount ] :
Even if you set different values for the
top, bottom, left and right bleed values, it
Bleed Type
Symmetric
Amount
Set the same values for the bleeds as are set for the
"Offset" values in the Layout tab.
OPI Active
OFF
will not be possible to process the bleeds
correctly.
VI. OPI
Relationship between the OPI and
printing format
You cannot change the OPI setting even
if the printing format in the Trueflow style
sheet is used. Be sure to change the setting
manually.
Effects of the OPI setting
When a data file created by importing
an EPS illustration in QuarkXPress 6 is
processed in Trueflow, the output result
may be incorrect (e.g., the EPS is scaled
down). Create a PS with the "OPI Active"
checkbox unchecked.
It is possible to perform OPI processing
for EPS image files on Trueflow even if the
OPI has been deselected. TIFF image files
imported with the above setting are output
as they are.
3. When you finish making the above settings, output the PS file using the steps below.
Page Setup dialog box
4. Select the "Page Setup..." button in the Print dialog box to display the "Page Setup" dialog box
and confirm the settings, then click "OK".
Orientation
vertical (The leftmost icon)
Scale
100%
Dainippon Screen Mfg. Co., Ltd.
Creating PostScript Files in QuarkXPress 6.5
Running PostScript
87
Print dialog box
5. Click "Printer..." in the Print dialog box to display the OS Print dialog box. From the pullThe description below is given using
screen shots of Mac OS X 10.6. The setting
procedure is the same if you use 10.4 or
10.5.
down menu, select "Output Options" and click "Save...".
•When using Mac OS X 10.6
At this point, select "Save PDF as PostScript" from the "PDF" pull-down menu.
Printer
Trueflow
Presets
Standard
6. In the "Save to File" dialog box that appears, specify the file name and the save destination,
and then click "Save...".
In a normal application, the file is saved at this stage. However, in QuarkXPress 6 and later
version, the file is created when you click "Print" in the QuarkXPress Print dialog box.
Dainippon Screen Mfg. Co., Ltd.
88
Trueflow DTP Output Guideline The 14th Edition
PDF/X-4 workflow
Points to Note
PDF/X-4 workflow
Transparent Blend Space
In a PDF/X-4 workflow, the transparency effects are reflected as is in the PDF, and the processing
of merging transparent objects is performed by the RIP, so it is necessary to pay attention to the
device color space when creating the data.
It is possible to blend transparency effects using RGB-based or CMYK-based rendering, and it
is necessary to use CMYK-based rendering when processing transparency effects for printing.
The results will not be correct if you use RGB-based rendering. These settings are made in the
application. In InDesign CS2 or CS3, select "Edit" > "Transparency Blend Space" > "Document
CMYK". Transparency blending in Trueflow makes it possible to use CMYK-based rendering so
PDF created this way can be printed appropriately.
Merging transparent objects
In a PDF/X-4 workflow, transparency effects are not flattened and combined in the DTP
application, but instead are processed in the RIP. These are processed internally in Trueflow with
quality as the priority, so if you have extremely complex data that uses a lot of transparency
effects, processing times become long and the data resulting from flattening and combining may
become too large and impossible to process. The processing load becomes extremely heavy in
the following types of cases.
•Nature images or drop shadows on gradients
•Transparency-related effects such as drop shadows on objects with complex paths
•Nature images with transparency effects on blends that use multiple objects in objects such as
3D text
Dainippon Screen Mfg. Co., Ltd.
PDF/X-4 workflow
Points to Note
89
Placing data with effects into
InDesign
If you export data created in Illustrator or Photoshop with special effects such as outer glow as
native data or PDF exported from an application, place it in InDesign, and then export it as PDF/
With following versions of Trueflow, this
problem has been fixed.
•Ver5.01 TF175
•Ver6.01 TF135
•Ver7.10 TF110
•Ver7.20 or later
X-4, there are times when the output from Trueflow Advanced PDF is not correct.
This problem cannot be confirmed in Acrobat and occurs in output from Trueflow.
C:100%
Opacity:100%
Glow(Outer)
CMYK:0%
Opacity:70%
M:40% Opacity:100%
Illustrator+
InDesign
Output Result
Versioning workflow
A versioning workflow that uses these PDF
layers is supported by a workflow that uses
Adobe PDF Print Engine for Trueflow SE
Version 6.00 and later. See the Versioning
Operation Manual that is included with
Trueflow SE for more information.
A versioning workflow uses layers rendered using PDF and is a method for output of multiple
versions of the same document, which enables both a workflow with layered output function
and support for multiple languages. This workflow can also be used with PDF/X-4 data.
This workflow is supported by InDesign CS2 - CS5 and Illustrator CS2 - CS5.
Follow the steps below to create the data.
1. Create the data for the application layers (see the manuals for the individual applications).
You cannot create PDF with layers even
if you use the "Trueflow PDFX4 1.3J.
joboptions" PDF preset file for creating
PDF/X-4 that is provided in Adobe CS3 CS5. If you use a versioning workflow, use
"Trueflow RGBwf 1.3J.joboptions" even
for Adobe CS3 - CS5.
2. See "Creating PDF/X Files in InDesign CS2 - CS5" (P50) or "Creating PDF/X Files in
Illustrator CS2 - CS5" (P55) select "Trueflow RGBwf 1.3J.joboptions" in "PDF Export
Presets", and create PDF data containing PDF1.6 format layers.
3. See "Verification and confirmation of PDF" (P67), and convert the PDF1.6 to PDF/X-4 in
the PDF fixup settings in Acrobat 8 to create the PDF/X-4 data with layers.
Font preflight problems
If you input PDF that uses functions from PDF1.4 and higher or separated PDF, the font results in
Preflight may be NG if one of the following conditions is present. Corrupted characters do not
occur in the actual output.
•Embedded Type 3 fonts
•Fonts that are not actually used in an illustration but for which there is information in the PDF
Dainippon Screen Mfg. Co., Ltd.
90
Trueflow DTP Output Guideline The 14th Edition
PDF/X-1a workkflow
PDF with transparency effects
outputs completely blank
If you input PDF that includes transparency effects and the following conditions are present,
illustrations may shift position on the page or the output may be completely blank.
•When the "Prepress Margins" setting in the "Other" tab is Off
•When a negative value is set for the MediaBox or other origin coordinates in a PDF file
As described in "Bleed" (P37) this problem can be avoided by accurately designing bleeds and
creating data with an awareness of the page origin.
PDF/X-1a workkflow
Text missing on vertical text
with transparency effects
This bug has been fixed in InDesign CS5
and Illustrator CS5
In InDesign CS2 - CS4 and Illustrator CS2 - CS4, if you apply transparency and overprints to
vertical text and output it in PDF/X-1 format, a problem causing text to appear to be missing
when displayed in Acrobat 9 may occur. This problem does not occur in Acrobat 8.
This problem does not occur in Trueflow, but it is necessary to be careful because if you place
that data in InDesign CS4 or Illustrator CS4, the data ends up with unavoidable bugs.
Acrobat Distiller 6 font
embedding
This bug has been fixed in Acrobat 7.
We have discovered that there are serious bugs when embedding Japanese fonts in Acrobat
Distiller 6. As of now, we have confirmed that the bug occurs under the following rare
conditions.
•When an Illustrator native file or PDF is imported into InDesign
•When the PostScript output from that document is converted to PDF using Distiller 6.
If these conditions exist, on rare occasions, font embedding is not performed correctly, and when
the data is opened in Acrobat 6, the following error message is displayed. When you check the
font area of the Document Properties dialog box, Embedded Subset may not be displayed for the
font, or no error message appears and some characters are missing.
As a result, characters are either corrupted or missing in the output.
Dainippon Screen Mfg. Co., Ltd.
InDesign CS - CS5
Points to Note
91
We have confirmed that this problem can be avoided using any of the following methods.
•If you are importing an Illustrator document, import it in EPS format.
•Directly output PDF/X-1a format from InDesign CS.
In addition, the PDF/X-1a data may pass Preflight in Acrobat 6 with No problems found even if
this type of bug occurs, so if you cannot create data that meets the conditions above, if you are
concerned about a complex document, it is necessary to check it very carefully by eye.
With PS created in InDesign
2.0.2
When PS created in InDesign 2.0.2 is converted to PDF/X-1a data using Acrobat Distiller 7,
the data may not pass the check in Acrobat Distiller 7 due to an "Invalid BleedBox Offset". This
occurs because information is encoded in PS created in InDesign 2.0.2 so that MediaBox is
slightly smaller than BleedBox (MediaBox is included in BleedBox). Although Acrobat Distiller 6
accepted such data, it seems that Acrobat Distiller 7 does not accept it.
When you create a PDF/X-1a from a document created in InDesign 2.0.2, enlarge the page size
(MediaBox), for example, by adding register marks and then create a PS or convert the data into
a InDesign CS/CS2 document and then output it as a PDF/X-1a directly.
InDesign CS - CS5
Multiscreening
There is a problem where by PostScript data output from InDesign does not include halftone
screening information that is included in imported PhotoshopEPS. Therefore, multiscreening
cannot be used on InDesign. Even in this case, it is possible to specify multiscreening using
TrapEditor MS after inputting data into Trueflow.
Application of Transfer
Function
In order to apply the Transfer Function specified in Photoshop on InDesign CS or later, the
"Override Printer's Default Functions" checkbox must be checked in the Transfer Functions setup
window of Photoshop.
At the same time, the "Include Transfer Function" checkbox in "EPS Options" must be checked
when saving as an EPS. (In InDesign 2.0.2 or earlier, there was a bug whereby the Transfer
Function was not applied properly.)
Dainippon Screen Mfg. Co., Ltd.
92
Trueflow DTP Output Guideline The 14th Edition
InDesign CS - CS5
Operation using DCS format
EPS images
When DCS format images were used in previous versions of InDesign, it was necessary to
perform the OPI processing in Trueflow. In InDesign CS, however, DCS images can be converted
to composite and embedded in PostScript data, so the OPI processing in Trueflow is not required.
Since this function is designed for images created in Photoshop, the OPI processing must be
performed for DCS format images created in other applications as before.
Perform OPI processing in accordance with the description, "[ Omit For OPI ] :" (P73)
Illustrator EPS data containing
spot colors
If data from Illustrator 10 or earlier contains EPS data that includes spot colors and that EPS data
is imported into InDesign and output as PostScript, PostScript with coding inconsistencies is
generated and an error occurs.
If you use EPS data that includes spot colors, use Illustrator CS or later.
Specifying an RGB color of
"0, 0, 0"
If an RGB "0, 0, 0" color is specified for objects such as text, keylines and fills in InDesign, the K
separation does not become 100% during output, and the data is converted into the four CMYK
process colors. (InDesign specification)
Do not specify colors as RGB colors in InDesign, and specify them as CMYK colors instead.
(* It is not applicable for the RGB workflow.)
Transparency and blurring
effects
When processing grayscale images with transparency and blurring effects applied in InDesign,
unwanted lines may appear on the images depending on the resolution.
OPI settings for GrayTIFF data
If you process PS with values other than 100% specified for the shading (density) on GrayTIFFs
colorized in InDesign, turn on the following OPI options in the Trueflow import job ticket.
•ALD
•EPS
•GrayTiff
Dainippon Screen Mfg. Co., Ltd.
InDesign CS - CS5
Points to Note
93
If you set up OPI processing such as the above for data that includes GrayTIFFs colorized with
spot colors in InDesign and the high res images are not present, the colors in the low res image
areas are output lighter. (This problem does not occur if you colorize with process colors).
Layered output function
When using the function to output the image with other data overlapped in part in Trueflow
(layered output function), if PostScript is output from InDesign using the color of "In-RIP
Separations", the image that positioned underneath will be hidden by the overlapped data. This
occurs because a white object that is the same size as the image will be output. When using the
layered output function for the data created in InDesign, output the data in a PDF/X-1A format.
Positioning of PDFs in
InDesign
*1)
This occurs with high frequency when
PDFs output directly from QuarkXPress
6.x, which is not supported by Trueflow,
are positioned in InDesign.
With all versions of InDesign, when a PDF is positioned as an object in a document, it has been
confirmed that problems such as the omission of images occur.*1)Due to this, positioning of PDFs
in InDesign documents should not be attempted. However, this problem does not occur when,
for PDF/X-4 applications, an IllustratorCS2 native file (structurally PDF format) is positioned in an
InDesignCS2 document or, similarly, when a transfer is made from IllustratorCS3 - CS5 to
InDesignCS3 - CS5.
For further information, refer to "Illustrator CS2 - CS5 native workflows" (P6) .
"Effects" in InDesign CS3 - CS5
If you use the following from "Effects", which are supported in InDesign CS3 and later, output
With following versions of Trueflow, this
problem has been fixed.
•Ver4.01 TF185
•Ver5.01 TF175
•Ver6.01 TF135
•Ver7.10 TF110
•Ver7.20 or later
problems may occur if the target objects are rotated. This also occurs in InDesign CS4 and CS5.
•Bevel and Emboss
•Inner Shadow
•Inner Glow
•Satin
To avoid these problems, you can create the same design in Illustrator and place it in InDesign
for output or output PDF/X-1a from that InDesign document to convert the effects to images for
output.
Dainippon Screen Mfg. Co., Ltd.
94
Trueflow DTP Output Guideline The 14th Edition
Illustrator CS - CS5
Problem with composite fonts
in InDesign CS2 - CS4
If you directly output PDF/X-1a from an InDesign CS2 - CS4 document that uses composite fonts
This InDesign bug has been fixed with
InDesign CS4 6.0.4 or later.
With following versions of Trueflow, this
problem has been fixed.
•Ver4.01 TF180
•Ver5.01 TF168
•Ver6.01 TF125
•Ver7.00 TF017
•Ver7.10 or later
and display it in Acrobat 7 or Acrobat 9 (or Acrobat 8), there are times when differences appear
in the display.
There are times when the same problem occurs in conventional Trueflow RIP'ing.
When you look at the problem, it appears as if it was corrected in Acrobat 8 and later, but the
actual cause of this problem is in the encoding of the PDF output from InDesign. We know that
Acrobat 7 and Trueflow output results conform to the PDF standard (differ from the display in
InDesign). For printing, if you cannot achieve the results you see in Acrobat 9, which is to say
InDesign, problems will occur.
Illustrator CS - CS5
"Replace vignettes" in Trueflow
If you process data that includes gradients using the import processing with the "Convert
Gradients to Smooth Shades" option set to OFF, there are times when the gradients are left out or
the quality is lowered. Normally, set the "Convert Gradients to Smooth Shades" option to ON in
the import processing.
However, as an exception, if you process data that contains objects with special effects over
vignettes, density differences may occur in the vignettes around the objects. If this happens, you
can turn the "Convert Gradients to Smooth Shades" option off in Input processing and avoid this
problem by not replacing the vignettes.
Dainippon Screen Mfg. Co., Ltd.
Illustrator CS - CS5
Points to Note
Objects converted to images
95
If data contains Illustrator effects such as transparency, blurring or drop shadows, the target
objects are converted to images and saved. As a result, there are times when the output results
from the areas that were converted to images are blurred or have banding.
Conversion to proxy colors
from spot colors
When spot colors with the same name but different proxy color values are used and
impositioned on an identical page / signature, even if these spot colors are imported with the
"Load spot colors" option set to ON in the import processing template, all the spot colors with
the same name will have an identical proxy color value.
If you want to register them as temporary spot colors for data creation and then later convert
them to separation process colors for output, set OFF for the "Load spot colors" option in
the import processing template to convert spot colors to process colors. If you want to use
QuarkXPress Versions 4.1 and 5.0, it is possible to convert spot colors to process colors from the
proxy color values set for each object by using the TP-X spot color adjustment function.
PDF
•PDF1.4 format data directly output from Illustrator CS2 cannot be output properly. Use data
saved as PDF/X-1a or EPS, not the PDF 1.4 format data that is output directly from Illustrator
CS2.
•If both transparency effects and the gradient mesh function are used when creating PDFs in
Illustrator, the gradient mesh objects may be left out.
•When outputting PDF from Illustrator CS / CS2, embed the images rather than linking them. If
images are linked, unwanted lines may appear on the images.
This problem was fixed in Illustrator CS3.
OutlinePS / EPS in Trueflow
There are some points to note when creating OutlinePSs and EPSs in Trueflow from jobs that
include Illustrator data.
Refer to "Notes on Using Trueflow" for more information.
Transparency gradation in the
IllustratorCS4 or later
Adobe Creative Suite 2 and Acrobat 7 or before are not functional for transparency
gradation data which is newly supported in the IllustratorCS4. To output the data in the
InDesign, use the InDesignCS4. (see "Illustrator CS2 - CS5 native workflows" (P6))
Dainippon Screen Mfg. Co., Ltd.
96
Trueflow DTP Output Guideline The 14th Edition
Photoshop CS - CS5
Text and transparent gradients
If you use Illustrator CS4 and later, use transparent gradients on text and export the data in PDF/
X-4 format, it is not displayed correctly in Acrobat 8 and earlier.
If you convert to PDF1.3 in Trueflow, the same problem occurs.
Photoshop CS - CS5
When DCS is created in
Photoshop
As above reason we recommend Photoshop CS or later for DCS image.
If a file is saved in DCS or later format with "No Composite" in Photoshop 7 or Photoshop CS or
later , the OPI processing is not performed correctly in Trueflow. This bug has been fixed so that
saving the file with "Color Composite" ensures correct processing.
In addition, if a DCS image is created with JPEG encoding in Photoshop 7, the data will be
invalid and an error will occur in Trueflow. This will not occur in Photoshop CS or later.
With a DCS2 image created using Photoshop 6 or earlier, lack of any CMYK separations will
cause an invalid data error.
History Log
When an EPS file with a history log embedded is saved using the History Log function of
Photoshop CS, if the history log becomes large by many editing operations, the log exceeding
the size limit of PostScript text will be recorded in EPS, which causes an error. Do not use this
function.
QuarkXPress 6.5 - 8
Upgrade recommendation
QuarkXPress 6.5 has been released with many bugs fixed and it now supports the dynamic
download of the OpenType fonts. If you have any problem with QuarkXPress 6.1, we
recommend that you upgrade it to QuarkXPress 6.5.
Dainippon Screen Mfg. Co., Ltd.
QuarkXPress 6.5 - 8
Points to Note
97
About direct exported PDF
Direct exported PDF by QuarkXPress 6.5 is not supported. And PS file which is created by
*1)
QuarkXPress 7 has been released in
Europe and the USA.
"Create PostScript File for Later Distilling" option (in "Preferences" - "PDF") is not supported.
QuarkXPress7*1) and later support PDF/X-1a direct export.
Separation PS
With using Trueflow, it is not recommended to use Separation PS.
SeparationPS with QuarkXPress 6.5 / 7.0 / 8.0 is not supported.
QuarkXPress 6 gradients
The gradients set in QuarkXPress 5 or an earlier version were replaced in Trueflow and output as
smooth gradients. However, as the gradient encoding pattern has been changed in QuarkXPress
6, the QuarkXPress 6 gradients are not replaced in Trueflow and output as they were coded in
PostScript.
Therefore, the quality of the QuarkXPress 6 gradients may be degraded when compared to the
output of gradients that were created in the earlier versions.
With QuarkXPress 7 and later, the software has been modified so that gradients are encoded as
smooth shading for both PDF and PostScript output. There is no need for encoding replacement
in Trueflow in order to achieve smooth gradient output.
Length limit for spot color
name
When a spot color name has 32 or more characters and "DeviceN" is selected for the print color,
an error may occur in Trueflow. Use 31 or less characters for a spot color name.
Spot color for the box frame
With QuarkXPress 6, even if spot colors are set for the frames of boxes, they cannot always be
output correctly.
Table creation function
With the QuarkXPress 6 table creation function, the on-screen image is different from the output
result depending on the conditions. Before the table function is used, confirm that the output
result is appropriate.
Page information text
With QuarkXPress 6 , Document name, Date, Page text, which appears beside the register marks
outside the finished page area, is output as bitmap. With QuarkXPress 7 and above, there are no
recognized problems.
Dainippon Screen Mfg. Co., Ltd.
98
Trueflow DTP Output Guideline The 14th Edition
QuarkXPress 6.5 - 8
Support of DCS2
When you output documents in a DCS (or DCS2) file that is intended for color separation
process, copy the image to Trueflow and perform the OPI processing in Trueflow. This enables
you to output the documents correctly even in composite printing.
When a document containing DCS (or DCS2) images is output in a DeviceN form using
QuarkXPress 6, the message "You are about to print pages that contain DCS graphics which may
produce unpredictable behavior when using DeviceN. Do you want to continue?appears. If,
however, the OPI processing in Trueflow is effective for all the DCS images in the document, the
output can be done with no noticeable problem.With QuarkXPress 7 and above, OPI processing
is not supported for DCS files in Trueflow.
Print Style files
From QuarkXPress 6.5, it is possible to set the bleed value in the printing format file.Note,
however, that "Trueflow Style ver2.1" does not include the bleed value. Therefore,before
outputting PS, set the bleed value to the same as the offset value in the Layaut tabas instructed
in the PS creation procedure or create a new printing format file that includes the same bleed
value.With QuarkXPress 7 and above, the output style also includes the bleed values.
Blank plate auto detection
function restrictions
If images with CMYK components are included in the import data, all of the process colors are
output regardless of the pixel count of the image data.
When the image data that include gradations are processed, unnecessary plates may be output
due to improper color detection.
(Example: rectangular blend and diamond blend generated in QuarkXPress)
Transparency effects
If you use transparency effects in QuarkXPress 7 or 8, objects may shift slightly or streaks may
become apparent in the places that were flattened during output.
Importing native Illustrator files
If you import native Illustrator files into QuarkXPress 8, data on which the opacity mask function
was used may not be output properly.There is no problem if you import the data in EPS format.
Dainippon Screen Mfg. Co., Ltd.
Presets for Adobe CS2 - CS5, Acrobat 7 - 9
Installing and setting up
99
Installing and setting up
This chapter describes the settings required before using data files created in DTP applications in
Trueflow and important information on output settings that are recommended for Trueflow.
•Trueflow preset file support table
PDF/X-1a Output
.joboptions
Trueflow PDF-X-1a 1.0
(.pdfs)
CS
CS2
TrueflowPDFX1a1.3
CS3
TrueflowPDFX1a1.3
CS5
Distiller
TrueflowPDFX1a1.3
7-9
PDF/X-4 Output
.joboptions
Color setting
.csf
-
-
Trueflow RGBwf 1.3
Trueflow PDFX4 1.3
Trueflow RGBwf 1.3*1)
Trueflow Color Std 1.0
Trueflow Color Pro 1.0
Trueflow Color Std 1.0
Trueflow Color Pro 1.0
-
PS Output
.prst
Trueflow 1.1
Trueflow 1.1
Trueflow 1.1
-
-
*1)
Used only in a "Versioning workflow" (P89) .
Presets for Adobe CS2 - CS5, Acrobat 7 - 9
Adobe PDF presets
Trueflow provides preset files that are recommended settings for PDF/X output.
For RGB workflow presets for Trueflow,
"TrueflowRGBwf1.3J.joboptions" is
available for CS2.
For PDF/X-1a
•TrueflowPDFX1a1.3US.joboptions (for US)
•TrueflowPDFX1a1.3EU.joboptions (for EU)
For PDF/X-4
•TrueflowPDFX41.3US.joboptions (for US)
•TrueflowPDFX41.3EU.joboptions (for EU)
This preset file is used to create PDF/X that is optimized for Trueflow using Acrobat 8. See
"Adobe PDF presets" (P4) for more information about presets.
I. Cautions
•The storage location for the PDF preset files has changed, and preset files saved to user folders
by individual users cannot be shared among all users. It is necessary to set these separately.
•Set preset files can be shared between Acrobat and all of the Creative Suite applications.
Dainippon Screen Mfg. Co., Ltd.
100
Trueflow DTP Output Guideline The 14th Edition
Presets for Adobe CS2 - CS5, Acrobat 7 - 9
II. Adobe PDF settings
1. Store preset files in the following folder
[ Adobe CS3 - CS5, Acrobat 8 / 9 ]
(Mac)
/Users/[User Name]/Library/Application Support/Adobe/Adobe PDF/Settings/
(Win)
\Documents and Settings\[User Name]\Application Data\Adobe\Adobe PDF\Settings\
[ Adobe CS2, Acrobat 7 ]
(Mac)
/Library/Application Support/Adobe PDF/Settings/
(Win)
\Documents and Settings\All Users\Shared Documents\Adobe PDF\Settings\
2. Once this file has been placed, all of the applications can use this job.
This finishes setting up presets.
Dainippon Screen Mfg. Co., Ltd.
Common Presets for Adobe CS2 - CS5
Installing and setting up
101
Common Presets for Adobe CS2 - CS5
The following three default setting files are available for Adobe CS2 - CS5.
•Color setting file (.csf)
•PS output print preset file (.prst)
•Preflight profiles for an RGB workflow (.kfp)
The description below is given using Preset for US. The setting procedure is the same if you use
Preset for EU.
Color setting file
When the "Trueflow Color Pro 1.0US",
"Trueflow Color Pro 1.0EU" file is used, a
warning regarding inconsistency of the color
profile set for the document will be displayed
whenever necessary. However, when the
"Trueflow Color Std 1.0US", "Trueflow Color
Std 1.0EU" file is used, no warning related to
profiles will be displayed.
Trueflow provides the following two color setting files (.csf) as recommended color settings.
(for US)
•Trueflow Color Std 1.0US.csf
•Trueflow Color Pro 1.0US.csf
(for EU)
•Trueflow Color Std 1.0EU.csf
•Trueflow Color Pro 1.0EU.csf
These color setting files can be shared by all applications.
Set "sRGB IEC61966-2.1" for an RGB image workspace, and for a CMYK image workspace,
choose "U.S. Web Coated (SWOP) v2" for the US version and "Euroscale Coated v2" for the
European version.
In these settings, the profile linked to a CMYK image is ignored and the color values are retained.
As for inconsistency of the color profiles for which you must pay attention during an operation, a
warning indication will be displayed whenever necessary.
Dainippon Screen Mfg. Co., Ltd.
102
Trueflow DTP Output Guideline The 14th Edition
Common Presets for Adobe CS2 - CS5
I. Preset color setting
1. Store the two preset color files (Trueflow Color Pro 1.0, Trueflow Color Std 1.0) in the folder
specified below.
(Mac)
/Library/Application Support/Adobe/Color/Settings/Recommended/
(Win)
\Program Files\Common files\Adobe\Color\Setting\Recommended\
This completes the setting for preset color.
II. Color setting synchronization
If you use multiple applications from Adobe CS2 - CS5, use Bridge to set the colors before
beginning work.
These color settings are automatically synchronized, so the same colors are rendered in all of the
"Not Synchronized" message
When color settings are not synchronized,
a warning message will appear on the
top of the "Color Settings" dialog box
in each application of Creative Suite.
It is recommended to synchronize color
settings before starting the work.
Adobe CS2 - CS5 applications.
1. Start up Bridge.
2. Select "Edit" - "Creative Suite Color Settings..." from the menu.
When "Creative Suite Color Settings..." is not
displayed in the menu of Bridge, perform the
same color settings in each application.
Screen shots for the US version are used here.
Dainippon Screen Mfg. Co., Ltd.
Common Presets for Adobe CS2 - CS5
Installing and setting up
103
3. The "Suite Color Settings" dialog box is displayed.
Select the color setting, either "Trueflow Color Pro" or "Trueflow Color Std", from the list, and
then click "Apply" to complete the color setting synchronization.
4. This color setting synchronization can be checked from Bridge and all other applications of
Creative Suite.
[ When using InDesign CS3 ]
Dainippon Screen Mfg. Co., Ltd.
104
Trueflow DTP Output Guideline The 14th Edition
Common Presets for Adobe CS2 - CS5
Print presets for PS output
Setting presets
Once presets are set up, there is no need
to set up the same presets again unless
they are deleted.
Also, because the settings of preset file are
loaded into InDesign, it is not necessary
to keep the loaded preset file in the setting
location.
Trueflow provides the settings recommended for PostScript as a print preset file (.prst).
•Trueflow 1.1.prst
This preset file is used when a PostScript file is output from InDesign CS2, CS3 and CS4.
The color management setting is different from that for InDesign CS (Trueflow 1.0.prst) "Print
presets for PS output" (P108).
I. Setting print presets
1. Select File > Print Presets > Define... .
2. Click "Load..." in the Print Presets dialog box that is displayed.
Dainippon Screen Mfg. Co., Ltd.
Common Presets for Adobe CS2 - CS5
Installing and setting up
105
3. Select the print preset file to be loaded in the "Load Print Presets" dialog box, and click the
"Open" button.
4. The file is loaded and added as presets.
Confirm that the added preset name is displayed in the Print Presets dialog box, and click the
"OK" button to complete the setup.
This completes the setting for print presets.
Dainippon Screen Mfg. Co., Ltd.
106
Trueflow DTP Output Guideline The 14th Edition
Common Presets for Adobe CS2 - CS5
Preflight profiles for an RGB
workflow
To verify whether the PDF is recommended for Trueflow or not using Acrobat 7 - 9, it is
necessary to load a dedicated Preflight profile for an RGB workflow.
The profiles are provided in Trueflow. Load the profile and verify the data.
•Trueflow RGBwf 1.1US.kfp (for US)
•Trueflow RGBwf 1.1EU.kfp (for EU)
The steps for loading a profile are described here.
I. Loading a profile
1. In Acrobat 7 - 9, select "Advanced / Import Preflight Profile..." from the menu.In the file
selection dialog box that is displayed, select the Preflight profile for the RGB workflow that
has been prepared.
2. In the list in the Preflight dialog box, the "Trueflow RGB workflow 1.1US" profile that was
added is displayed. This completes loading of the profile.
Dainippon Screen Mfg. Co., Ltd.
Presets for InDesign CS
Installing and setting up
107
Presets for InDesign CS
By using Presets that define all output settings as one style, automation of the output operation
can be established.
Trueflow provides recommended settings for outputting PS and PDF files from InDesign as
Presets files.
•Preset file for writing to PDF (.pdfs)
•Print preset file (.prst)
PDF export presets
Trueflow provides the settings recommended for the PDF/X-1a as a PDF export preset file (.pdfs).
•Trueflow PDF-X-1a 1.0.pdfs
I. Setting PDF Export presets
1. Select "File / PDF Export Presets / Define...".
2. Click "Load..." in the "PDF Export Presets" dialog box, which is displayed.
Dainippon Screen Mfg. Co., Ltd.
108
Trueflow DTP Output Guideline The 14th Edition
Presets for InDesign CS
3. Select the Presets file to be loaded in the "Load PDF Export Presets" dialog box, and click the
"Open" button.
4. The file is loaded and added as a Presets file.
Confirm that the added Presets name is displayed in the "Print Presets" dialog box, and click
the "OK" button to complete the setup.
This completes the PDF Export Presets setup procedure.
Print presets for PS output
Trueflow provides the settings recommended for PostScript as a print preset file (.prst).
•Trueflow 1.0.prst
Trueflow1.0.prst contains presets used for InDesign CS; when you use CS2, use Trueflow1.1.prst.
I. Setting print presets
(The setting procedure is the same as that for InDesign CS2. Follow the setting procedure for
InDesign CS2 on "Print presets for PS output" (P104). )
Dainippon Screen Mfg. Co., Ltd.
Print Style for QuarkXPress 7.0 / 8.0
Installing and setting up
109
Print Style for QuarkXPress 7.0 / 8.0
Style File setup
Once Style file are set up, there is no need
to set up the same Style file again unless
they are deleted.
Also, because the setup contents are
loaded into QuarkXPress, it is not
necessary to keep placing a Style file that
has been loaded in the same folder as
when setting up.
Defining all settings for output as the printing format by using the style file for Trueflow during
the first stage simplifies subsequent output work.
Note, however, that you cannot control the OPI setting (link) with the printing format. Be sure to
change the setting manually.
Color Setup
Trueflow provides two color settings files containing recommended color settings, one for PDF
and one for PS.
[ Color Setup file ]
(for US)
•TrueflowPDF Color 1.0US.xml
•TrueflowPS Color 1.0US.xml
(for EU)
•TrueflowPDF Color 1.0EU.xml
•TrueflowPS Color 1.0EU.xml
1. Select " Edit / Color Setups... / Output... " .
Dainippon Screen Mfg. Co., Ltd.
110
Trueflow DTP Output Guideline The 14th Edition
Print Style for QuarkXPress 7.0 / 8.0
2. Click the Import button in the Default Output Setups dialog box that is displayed.
The icons for the Color Style files may not always
be displayed properly, but the files can still be
used with no difficulty.
3. Select the Style file to be loaded in the "Import Output Setups" dialog box, and click the
"Open" button.
If you repeat Steps 2 and 3 here, you can load more than one Style File, such as for PS and for PDF.
4. The file is loaded and added as a Style.
Confirm that the added Style name is displayed in the "Defaut Output Setups" dialog box,
and click the "Save" button to complete the setup.
This completes the Color Setup procedure.
Dainippon Screen Mfg. Co., Ltd.
Print Style for QuarkXPress 7.0 / 8.0
Installing and setting up
111
Output Style Setup
Importing and exporting Output Style Files
If you use non-alphanumeric characters
in the path for the save location for output
style files, both import and export of style
files is not performed properly.
Trueflow provides recommended settings for outputting PS and PDF files from QuarkXPress 7.0 /
8.0 as style files.
[Style files for QuarkXPress 7.0 / 8.0 PDF/X-1a output and for PS output]
(for US)
•TrueflowPS Style 3.00US.xml
•TrueflowPDFX1a Style 3.00US.xml
(for EU)
•TrueflowPS Style 3.00EU.xml
•TrueflowPDFX1a Style 3.00EU.xml
1. Select "Edit / Output Styles... ".
2. Click the Import button in the Output Styles dialog box that is displayed.
Dainippon Screen Mfg. Co., Ltd.
112
Trueflow DTP Output Guideline The 14th Edition
Print Style for QuarkXPress 7.0 / 8.0
3. Select the Style File to be loaded in the "Import Print Styles" dialog box, and click the "Open"
button.
If you repeat Steps 2 and 3 here, you can load more than one Style File, such as for PS and
for PDF.
4. The file is loaded and added as a Style file.
Confirm that the added Style name is displayed in the "Output Styles" dialog box, and click
the "Save" button to complete the setup.
This completes the Output Style setup procedure.
Dainippon Screen Mfg. Co., Ltd.
Print Style for QuarkXPress 6.5
Installing and setting up
113
Print Style for QuarkXPress 6.5
Print Style setup
Once Print Style are set up, there is no
need to set up the same Print Style again
unless they are deleted.
Also, because the setup contents of
Trueflow Style files are loaded into
QuarkXPress, it is not necessary to keep
placing a Style file that has been loaded in
the same folder as when setting up.
Defining all settings for output as the printing format by using the Trueflow style sheet during the
first stage simplifies subsequent output work.
Note, however, that you cannot control the OPI setting (link) with the printing format. Be sure to
change the setting manually.
Trueflow provides recommended settings for outputting files from QuarkXPress as Style files.
•Trueflow Style Ver2.1 (Print Style)
Install Print Style
1. Start up QuarkXPress 6.5, select "Edit" - "Printer Styles...".
2. The "Print Styles" dialog box is displayed.And click "Import..." .
Dainippon Screen Mfg. Co., Ltd.
114
Trueflow DTP Output Guideline The 14th Edition
Print Style for QuarkXPress 6.5
3. Select the Print Style file to be loaded in the "Import Print Style" dialog box, and click the
"Open" button.
4. The file is loaded and added as a Print Style file.
Confirm that the added Print Style is displayed in the "Print Styles" dialog box, and click the
"Save" button to complete the setup.
This completes the Print Styles setup procedure.
Dainippon Screen Mfg. Co., Ltd.
Default settings of Mac OS X
Installing and setting up
115
Default settings of Mac OS X
This section introduces information using
the Mac OS X 10.6 window, so make the
same settings as with an OS that complies
with the "Required system configuration"
for each DTP application.
This section describes points to note and settings required on the Mac OS X side before using a
new DTP application, which is mentioned in this document. The settings are completely different
from those in Mac OS 9 and an earlier system.
Install the PPD file
You must install using a User with Administrator privileges.
The PPD uses "DS TRUEFLOW_E V1.4" and is installed in the following directory.
/Library/Printers/PPDs/Contents/Resources/en.lproj/
Log in as any user, and QuarkXPress running, select "Utilities > PPD Manager...," and check that
the PPD was loaded correctly.
If the PPD is not loaded because it was installed while QuarkXPress was running, it is possible to
load it by clicking "Update".
Virtual printer settings
This section describes how to set up a virtual printer for output to Trueflow.
The following steps set up an IP printer, but you are not printing to an actual printer, so use the
virtual printer for which the Trueflow PPD is set to create PS files.
1. Start "Print & Fax" in System Preferences.
2. Click the "+" icon next to "Printing" to add a printer.
Dainippon Screen Mfg. Co., Ltd.
116
Trueflow DTP Output Guideline The 14th Edition
Default settings of Mac OS X
3. Make the settings for "IP" in the displayed dialog box. Click "Add" to complete the settings.
[ Print Using ] :
In "Print Using" select "Other..." and then
"DS Trueflow_E V1.4" and click "Open".
Protocol
Line Printer Daemon - LPD
Address
localhost
Name
Optional printer name (example: Trueflow)
Print Using
DS TRUEFLOW_E V1.4
4. Confirm that the printer has been added to the printer list and then exit.
This completes the virtual printer setup procedure.
Dainippon Screen Mfg. Co., Ltd.
Default settings of Windows XP
Installing and setting up
117
Default settings of Windows XP
This section introduces information using
the Windows XP window, so make the
same settings as with an OS that complies
with the "Required system configuration"
for each DTP application.
Install the PostScript
Printerdriver
The following describes the required settings in Windows before starting the work.
Basically, these settings are the same as those for the systems up to Windows XP.
By installing Adobe PS in the computer on which a Windows DTP application is to run, a PS file
that is suitable for Trueflow can be created.
Before starting the work, prepare the PPD file provided with Trueflow and download the
PostScript printer driver (Adobe Universal PostScript Windows Driver Installer 1.0.6 - English)
from the Adobe Web site.
1. Double click the "winsteng.exe" file downloaded from the Adobe Web site. After the file is
decompressed, "Adobe PostScript Driver Installer" starts up automatically.
Continue the installation procedure following the wizard displayed. For the dialog boxes
shown below, make the settings according to the following description.
I. Printer Connection Type
It is directly connected to your computer (Local Printer)
Dainippon Screen Mfg. Co., Ltd.
ON
118
Trueflow DTP Output Guideline The 14th Edition
Default settings of Windows XP
II. Local Port Selection
Available ports :
FILE : Local Port
Printers :
DS TRUEFLOW_E V1.4
Not shared
ON
III. Select Printer Model
[ Printers ] :
"DS TRUEFLOW_E V1.4" will not be
displayed here for the first time.
It is displayed after the PPD file for
Trueflow is specified in the dialog box to
browse for printers, which is displayed
using the "Browse" button.
IV. Sharing
Dainippon Screen Mfg. Co., Ltd.
Default settings of Windows XP
Installing and setting up
119
V. Printer Information
[ Printer name ] :
"DS TRUEFLOW_E V1.4" is specified for
the printer name as a default.
Printer Name :
Optional printer name
2. Click "Next" to start the installation process.
Make settings as necessary after this and continue the installation process following the wizard.
After the installation process has been finished, restart the computer to complete the installation
procedure.
Dainippon Screen Mfg. Co., Ltd.
120
Trueflow DTP Output Guideline The 14th Edition
Detail table of contents
Appendix :
Detail table of contents
Guidelines for transitioning to a PDF workflow
Recommended Trueflow workflow environments----------------- 1
PDF/X workflow------------------------------------------------------------ 1
Adobe PDF Print Engine------------------------------------------------ 1
Optimal DTP applications----------------------------------------------- 1
Recommendation of using PDF/X------------------------------------ 2
PDF/X-1a and PDF/X-4-------------------------------------------------- 2
PDF/X-4 workflow--------------------------------------------------------2
PDF/X-1a workflow-------------------------------------------------------2
II. Checking using an overprint preview--------------------------- 23
III. Checking using an output preview----------------------------- 23
Overprint related Points to Note--------------------------------------24
I. "Color Separation (In-RIP)" & "DeviceN" color handling---- 24
II. Automatically (unintentionally) placed overprints---------- 25
III. Automatically overprinting K=100%--------------------------- 25
IV. White overprinting------------------------------------------------- 25
V. Overprints are output as transparent objects----------------- 27
VI. Transparent areas are output as overprints------------------- 28
Overprint mode---------------------------------------------------------- 29
Adobe PDF Print Engine------------------------------------------------ 3
What is a Overprint mode----------------------------------------------29
DTP applications and creating data---------------------------------- 4
OPM affected only by DeviceCMYK---------------------------------30
Overprint mode settings for Acrobat Distiller----------------------31
Proper overprint operations--------------------------------------------31
Adobe PDF Print Engine of Trueflow SE --------------------------- 3
Recommended Trueflow workflows----------------------------------- 3
The two overprint modes--------------------------------------------- 29
Supported DTP applications-------------------------------------------- 4
Adobe PDF presets------------------------------------------------------- 4
Specification of spot colors------------------------------------------- 32
Recommendations for direct output of PDF and native import-6
Applying overprints to spot colors---------------------------------- 33
Spot color transparency effects-------------------------------------- 34
Differences from standard settings of Adobe-----------------------5
Change to preset settings-----------------------------------------------5
Accurately specifying spot colors-------------------------------------32
Applying transparency effects and overprints to spot colors--33
PDF/X-4 that cannot be created in Distiller------------------------6
Illustrator CS2 - CS5 native workflows-------------------------------6
Ways to convert spot colors to process colors--------------------34
Differences between Conventional and Advanced--------------- 7
Adobe PDF Print Engine and conventional RIP'ing-------------- 7
Trueflow "Overprint mode" settings----------------------------------- 7
Processing using "Use system default setting" in Trueflow------8
"Based on the PDF Overprint Mode" processing in Trueflow---8
Differences due to two settings---------------------------------------- 8
Process-independent overprint coding------------------------------9
Technical information on PDF workflow
Transparency effect---------------------------------------------------- 10
What is a transparency effect-----------------------------------------10
Examples of data that are made transparent----------------------10
Overview of flattening---------------------------------------------------10
At what point is the flattening performed?--------------------------11
How is it flattened?-------------------------------------------------------11
I. Opaque objects & transparent objects-------------------------- 11
II. Images & transparent objects / Images & transparent
gradients------------------------------------------------------------ 12
III. Transparent gradients & gradients----------------------------- 12
I. [Swatch Options] setting------------------------------------------- 35
II. [Ink Manager] setting--------------------------------------------- 36
Bleed----------------------------------------------------------------------- 37
TrimBox / BleedBox /MediaBox---------------------------------------37
Support in each application--------------------------------------------37
Confirmation on Acrobat 7 - 9-----------------------------------------38
Setting the "PDF Origin" on Trueflow--------------------------------38
Points to note on ArtBox in Illustrator CS---------------------------39
In-RIP separation workflow------------------------------------------- 40
Merits of In-RIP separation--------------------------------------------40
QuarkXPress 6.5 - 8.1-------------------------------------------------- 40
InDesign CS - CS5------------------------------------------------------ 40
About DeviceN------------------------------------------------------------41
In-RIP separation workflow using DeviceN------------------------42
Color management and RGB workflow--------------------------- 43
I. Raster / Vector Balance--------------------------------------------- 13
II. Resolution of line art and text------------------------------------ 14
III. Other options-------------------------------------------------------- 14
RGB workflow and PDF/X-4-------------------------------------------43
Handling CMYK in an RGB workflow--------------------------------43
Color management in Adobe Creative Suite 2- 5----------------44
Avoiding automatic color conversion--------------------------------44
How to resolve RGB image color issues---------------------------45
Recipe and color profile-------------------------------------------------45
Processing procedure of the RGB workflow on Trueflow------46
I. Pages palette---------------------------------------------------------- 16
II. Transparency Flattener Preview--------------------------------- 17
III. Other menus of Flattener Preview----------------------------- 18
Points to note when creating RGB workflow PDF----------------48
More information about the Transparency Flattener Options-13
Illustrator rasterization effect settings-------------------------------15
How to check transparency--------------------------------------------16
Overprint------------------------------------------------------------------ 19
What is overprinting------------------------------------------------------19
Difference between overprint and transparent------------------- 20
Relation between overprints & "Color Separation (In-RIP)"-- 21
How to make the settings----------------------------------------------21
I. Settings in the application----------------------------------------- 21
II. Settings in Trueflow------------------------------------------------ 21
How to check correct overprint----------------------------------------22
I. Checking using comp output-------------------------------------- 22
Operating requirements---------------------------------------------- 46
I. Create RGB workflow PDF------------------------------------------ 46
II. Recipe assignment in Colorgenius AC (LE)------------------- 47
III. Processing in Trueflow-------------------------------------------- 47
I. Format and ICC profile--------------------------------------------- 48
II. RGB workflow using Illustrator CS3 or later------------------ 48
III. Overprint------------------------------------------------------------- 48
IV. Preparation of appropriate RGB images----------------------- 49
V. Handling spot colors in SpektacolorIn------------------------- 49
Running PDF/X
Creating PDF/X Files in InDesign CS2 - CS5------------------- 50
Preflight in InDesign-----------------------------------------------------51
PDF Export-----------------------------------------------------------------52
Dainippon Screen Mfg. Co., Ltd.
Detail table of contents
Appendix :
I. General----------------------------------------------------------------- 52
II. Compression--------------------------------------------------------- 53
III. Marks and Bleeds-------------------------------------------------- 53
IV. Output---------------------------------------------------------------- 53
V. Advanced-------------------------------------------------------------- 54
VI. Security--------------------------------------------------------------- 54
Creating PDF/X Files in Illustrator CS2 - CS5------------------- 55
PDF Export-----------------------------------------------------------------55
I. General----------------------------------------------------------------- 56
II. Compression--------------------------------------------------------- 56
III. Marks and Bleeds-------------------------------------------------- 56
IV. Output---------------------------------------------------------------- 57
V. Advanced-------------------------------------------------------------- 57
VI. Security--------------------------------------------------------------- 57
121
III. Marks and Bleed---------------------------------------------------- 78
IV. Output---------------------------------------------------------------- 78
V. Graphics--------------------------------------------------------------- 79
VI. Color Management------------------------------------------------ 79
VII. Advanced------------------------------------------------------------ 79
Creating PostScript Files in QuarkXPress 7.0 / 8.0------------ 80
Print Dialog setting-------------------------------------------------------80
I. Print Layout----------------------------------------------------------- 80
II. Device----------------------------------------------------------------- 81
III. Colors----------------------------------------------------------------- 81
IV. Marks------------------------------------------------------------------ 82
V. Bleed------------------------------------------------------------------- 82
VI. Transparency-------------------------------------------------------- 82
VII. OPI-------------------------------------------------------------------- 82
Creating PDF/X-1a Files in InDesign CS------------------------- 58
Page Setup dialog box--------------------------------------------------83
Print dialog box-----------------------------------------------------------83
I. General----------------------------------------------------------------- 58
II. Compression--------------------------------------------------------- 59
III. Marks and Bleeds-------------------------------------------------- 59
IV. Advanced------------------------------------------------------------- 59
V. Security---------------------------------------------------------------- 59
Creating PostScript Files in QuarkXPress 6.5------------------- 84
PDF Export-----------------------------------------------------------------58
Creating PDF1.3 Files in Illustrator CS---------------------------- 60
Saving as PDF 1.3 format----------------------------------------------60
Adobe PDF Preset Options--------------------------------------------61
I. General----------------------------------------------------------------- 61
II. Advanced-------------------------------------------------------------- 61
Creating PDF/X-1a Files in QuarkXPress 7.0 / 8.0------------ 62
Saving as PDF/X-1a format--------------------------------------------62
Output Style settings----------------------------------------------------63
I. Pages-------------------------------------------------------------------- 63
II. Compression--------------------------------------------------------- 63
III. Color------------------------------------------------------------------ 64
IV. Bleed------------------------------------------------------------------ 64
V. Transparency--------------------------------------------------------- 65
VI. OPI-------------------------------------------------------------------- 65
Creating PDF/X-1a Files in Acrobat Distiller--------------------- 66
Creating in Acrobat Distiller 9-----------------------------------------66
Verification and confirmation of PDF------------------------------- 67
Verifying PDF--------------------------------------------------------------67
I. Using Acrobat 9 Professional-------------------------------------- 67
II. Preflight--------------------------------------------------------------- 67
III. Preflight: results in detail----------------------------------------- 68
Running PostScript
Creating PostScript Files in InDesign CS2 - CS5-------------- 69
Settings in the Print dialog box----------------------------------------69
I. General----------------------------------------------------------------- 70
II. Setup------------------------------------------------------------------- 70
III. Marks and Bleed---------------------------------------------------- 71
IV. Output---------------------------------------------------------------- 71
V. Graphics--------------------------------------------------------------- 72
VI. Color Management------------------------------------------------ 72
VII. Advanced------------------------------------------------------------ 73
VIII. Save PostScript File----------------------------------------------- 73
Print Dialog setting-------------------------------------------------------84
I. Layout------------------------------------------------------------------ 84
II. Setup------------------------------------------------------------------- 85
III. Output---------------------------------------------------------------- 85
IV. Options--------------------------------------------------------------- 86
V. Bleed------------------------------------------------------------------- 86
VI. OPI-------------------------------------------------------------------- 86
Page Setup dialog box--------------------------------------------------86
Print dialog box-----------------------------------------------------------87
Points to Note
PDF/X-4 workflow------------------------------------------------------ 88
Transparent Blend Space----------------------------------------------88
Merging transparent objects-------------------------------------------88
Placing data with effects into InDesign-----------------------------89
Versioning workflow------------------------------------------------------89
Font preflight problems-------------------------------------------------89
PDF with transparency effects outputs completely blank------90
PDF/X-1a workkflow--------------------------------------------------- 90
Text missing on vertical text with transparency effects---------90
Acrobat Distiller 6 font embedding-----------------------------------90
With PS created in InDesign 2.0.2 ----------------------------------91
InDesign CS - CS5----------------------------------------------------- 91
Multiscreening-------------------------------------------------------------91
Application of Transfer Function--------------------------------------91
Operation using DCS format EPS images-------------------------92
Illustrator EPS data containing spot colors------------------------92
Specifying an RGB color of "0, 0, 0"---------------------------------92
Transparency and blurring effects------------------------------------92
OPI settings for GrayTIFF data---------------------------------------92
Layered output function-------------------------------------------------93
Positioning of PDFs in InDesign--------------------------------------93
"Effects" in InDesign CS3 - CS5--------------------------------------93
Problem with composite fonts in InDesign CS2 - CS4----------94
Illustrator CS - CS5----------------------------------------------------- 94
I. Save As dialog box--------------------------------------------------- 74
II. EPS Options---------------------------------------------------------- 75
"Replace vignettes" in Trueflow---------------------------------------94
Objects converted to images------------------------------------------95
Conversion to proxy colors from spot colors----------------------95
PDF--------------------------------------------------------------------------95
OutlinePS / EPS in Trueflow-------------------------------------------95
Transparency gradation in the IllustratorCS4 or later-----------95
Text and transparent gradients----------------------------------------96
Creating PostScript Files in InDesign CS------------------------- 76
Photoshop CS - CS5--------------------------------------------------- 96
Creating EPS Files in Illustrator CS - CS5----------------------- 74
Saving as EPS format---------------------------------------------------74
Settings in the Print dialog box-------------------------------------- 76
I. General----------------------------------------------------------------- 77
II. Setup------------------------------------------------------------------- 77
When DCS is created in Photoshop---------------------------------96
History Log-----------------------------------------------------------------96
QuarkXPress 6.5 - 8--------------------------------------------------- 96
Dainippon Screen Mfg. Co., Ltd.
122
Trueflow DTP Output Guideline The 14th Edition
Detail table of contents
Upgrade recommendation---------------------------------------------96
About direct exported PDF---------------------------------------------97
Separation PS-------------------------------------------------------------97
QuarkXPress 6 gradients-----------------------------------------------97
Length limit for spot color name--------------------------------------97
Spot color for the box frame-------------------------------------------97
Table creation function--------------------------------------------------97
Page information text----------------------------------------------------97
Support of DCS2---------------------------------------------------------98
Print Style files------------------------------------------------------------98
Blank plate auto detection function restrictions-------------------98
Transparency effects----------------------------------------------------98
Importing native Illustrator files---------------------------------------98
Installing and setting up
Presets for Adobe CS2 - CS5, Acrobat 7 - 9--------------------- 99
Adobe PDF presets------------------------------------------------------99
I. Cautions---------------------------------------------------------------- 99
II. Adobe PDF settings----------------------------------------------- 100
Common Presets for Adobe CS2 - CS5-------------------------101
Color setting file--------------------------------------------------------- 101
I. Preset color setting------------------------------------------------ 102
II. Color setting synchronization---------------------------------- 102
Print presets for PS output------------------------------------------- 104
I. Setting print presets----------------------------------------------- 104
Preflight profiles for an RGB workflow---------------------------- 106
I. Loading a profile--------------------------------------------------- 106
Presets for InDesign CS---------------------------------------------107
PDF export presets---------------------------------------------------- 107
I. Setting PDF Export presets--------------------------------------- 107
Print presets for PS output------------------------------------------- 108
I. Setting print presets----------------------------------------------- 108
Print Style for QuarkXPress 7.0 / 8.0-----------------------------109
Color Setup-------------------------------------------------------------- 109
Output Style Setup----------------------------------------------------- 111
Print Style for QuarkXPress 6.5------------------------------------ 113
Install Print Style-------------------------------------------------------- 113
Default settings of Mac OS X--------------------------------------- 115
Install the PPD file------------------------------------------------------ 115
Virtual printer settings------------------------------------------------- 115
Default settings of Windows XP------------------------------------ 117
Install the PostScript Printerdriver---------------------------------- 117
I. Printer Connection Type-----------------------------------------II. Local Port Selection---------------------------------------------III. Select Printer Model--------------------------------------------IV. Sharing-------------------------------------------------------------V. Printer Information-----------------------------------------------
117
118
118
118
119
Appendix :
Detail table of contents-----------------------------------------------120
Dainippon Screen Mfg. Co., Ltd.
Document No : 100259610V00
The contents of this booklet may be changed without notice following program revisions. Program names and system names appearing in this booklet are
trademarks or registered trademarks of their respective manufacturers.
May 21, 2004
The 1st Edition
(Ver2.20)
June 29, 2004
Nov. 19, 2004
Mar. 3, 2005
The 4th Edition
The 5th Edition
The 6th Edition
(Ver2.21 / 3.00)
(Ver2.21 / 3.02)
(Ver2.21 / 3.02)
July 22, 2005
The 7th Edition
(Ver2.21 / 3.03)
Oct. 25, 2005
Apr. 24, 2006
Sept. 7, 2006
Nov. 28, 2006
The 8th Edition
The 9th Edition
The 10th Edition
The 11th Edition
(Ver2.21 / 3.03 / 3.11)
(Ver2.21 / 3.03 / 3.12)
(Ver2.21 / 3.03 / 3.12 / 4.00)
(Ver2.21 / 3.03 / 3.12 / 4.01)
July. 25, 2007
Sept. 22, 2008
Jan. 30, 2009
Jun. 30, 2010
The 12th Edition
The 12th Revised Edition
The 13th Edition
The 14th Edition
(Ver3.03 / 3.12 / 4.01 / 5.00)
(Ver3.12 / 4.01 / 5.01 / 6.00)
(Ver4.01 / 5.01 / 6.00)
(Ver5.01 / 6.01 / 7.10 / later)
Descriptions of how to create PS in InDesign CS and how to create EPS in
Illustrator CS
Support for Trueflow Version 3.00
Addition of a PDF/X-1a workflow
Addition of overprints and bleeds to the PDF/X-1a workflow, Updates for
QuarkXPress 6.5 and Acrobat 7
Changes to the document configuration, Support for Adobe Creative Suite 2,
Color management, CS2 presets, addition of spot color specification
Addition of an RGB workflow, Windows XP initial settings
Revisions to the RGB workflow, overprints, bleeds
Support for QuarkXPress 7.0
Support for Acrobat 8, Revisions to the RGB workflow and white overprints,
Addition of OPM
Support for Trueflow SE and Adobe Creative Suite 3. Revisions to the OPM
Support for QuarkXPress 8 , Acrobat 9 ,Versioning workflow
Support for Adobe Creative Suite 4
Support for Adobe Creative Suite 5. Update PDF/X-4 & Adobe PDF Print
engine detail information, Improve style of writing.
Download the latest Output Gudeline from Dainippon Screen Mfg. site [http://www.screen.co.jp/ga_dtp/en/product/wf_rip/trueflow_se/].
Dainippon Screen Mfg. Co., Ltd.
Dainippon Screen Mfg. Co., Ltd.