1
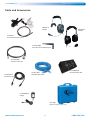
User Manual
w i r e l e s s
h e a d s e t
s y s t e m
Rev. 8
0311 UM-CONNEXSYS
Connex Wireless Headset System
CoachComm, LLC
Table of Contents
Introduction.................................................................................................................3
General Description ............................................................................................................3
System Features ................................................................................................................3
System Overview .........................................................................................................4
Unpacking .......................................................................................................................4
Command Center ...............................................................................................................5
Wired Beltpack .................................................................................................................6
Wireless Beltpack ..............................................................................................................6
Equipment Set-up ........................................................................................................7
Command Center (in the Press Box) .........................................................................................7
Wired Beltpack (in the Press Box) ...........................................................................................7
Wireless Beltpack ..............................................................................................................8
Directional Antenna (Optional)...............................................................................................8
System Operation.........................................................................................................9
Command Center ...............................................................................................................9
Wired Beltpacks ................................................................................................................11
Wireless Beltpacks .............................................................................................................12
Pre-Game Checklist ......................................................................................................14
Two to Three Days Before the Game ........................................................................................14
Game Day ........................................................................................................................14
Post Game....................................................................................................................14
Important System Storage ....................................................................................................14
Troubleshooting ...........................................................................................................14
Wireless Beltpack is Dead ..................................................................................................... 14
Wired Beltpack is Dead or Will Not Communicate ........................................................................14
Command Center is Dead .....................................................................................................15
Multiple Command Centers Experiencing “Crosstalk” ....................................................................15
Specifications ...............................................................................................................16
System ...........................................................................................................................16
Command Center ...............................................................................................................16
Wired Beltpack .................................................................................................................16
Wireless Beltpack ..............................................................................................................16
Parts and Accessories ..................................................................................................17
Customer Support ........................................................................................................18
Returning Equipment for Repair or Maintenance ..........................................................................18
Warranty......................................................................................................................18
FCC Statement .............................................................................................................19
Important FCC and Safety Information .........................................................................19
About CoachComm, LLC ................................................................................................20
© CoachComm, LLC 2011
1.800.749.2761
2
www.coachcomm.com
CoachComm, LLC
Connex Wireless Headset System
Introduction
Congratulations and thank you for choosing the CoachComm Connex® wireless headset system. CoachComm is the undisputed leader
in coaches’ sideline communications with more than 95% of Division 1A college football programs using our systems. Now CoachComm
brings our experience, expertise and commitment to quality to a broad range of high school and small college football programs
with CoachComm Connex. Using unparalleled technology, Connex is a powerful, reliable and easy-to-use solution to your coaching
communications needs. There is no FCC license requirement and since Connex does not use traditional Radio Frequencies, there is no
need to worry about TV transmitters in your area. In addition, with Secure Link™ Key Codes there is no need to coordinate frequencies
with opposing teams regardless of what system they are using. In order to get the most out of your new CoachComm Connex system
please take a few moments to read this manual completely so that you better understand the operation of this product. For questions
not addressed in this manual, feel free to contact CoachComm directly. CoachComm support and service personnel are ready to help.
General Description
The CoachComm Connex wireless headset system is a secure and reliable sideline to press box full duplex communication system.
Connex is designed for high school and small college environments. An optional remote antenna is available for system operation
in large stadiums or where extreme interference environments are prevalent. Connex noise suppression system design allows every
member of your coaching staff to communicate clearly even in high noise situations. Each Connex system consists of a small command
center and one or more wireless beltpacks. The command center acts as a high-tech hub for the wireless beltpacks and is placed in
or near the press box. There are two coaching positions on the command center. Two more coaches can be added in the press box via
wired beltpacks for a total of four coaches in the press box (per command center). Up to five wireless beltpacks (per command center)
can operate on the field. Each coach, whether in the press box or on the field, can switch between offense and defense as necessary.
All coaching stations offer full duplex communication with hands free operation. As many as 18 coaches can communicate on Connex
at any given time by linking two command centers together.
System Features
•
No FCC license or frequency coordination required. Advanced digital FHSS technology does all the work for you.
•
Full duplex communication with hands free operation. Full duplex means that multiple coaches can be speaking at the same
time and everyone will be heard.
•
The convenient talk button allows each coach to momentarily turn off his microphone for private conversations without having
to remove his headset.
•
Up to four coaches in the press box and up to five coaches on the field per command center. Two command centers can be linked
and used at one time for a total of eight coaches in the press box and ten coaches on the field.
•
All coaches, whether on the field or in the press box, have access to both the offense and the defense channel. Coaches can
easily “come together” for meetings with the push of a button.
•
If desired, each unit can be locked into a designated channel.
•
The ultra small command center ensures proper antenna position and better system performance than belt-worn relay stations
while maintaining a small “out of the way” footprint.
•
The command center supports battery powered operations so AC power is not required at game time. Internal Lithium Ion
batteries provide up to 16 hours of continuous system operation while eliminating the problems found in other rechargeable
batteries.
•
A unique battery monitor system shows current battery charge status in the form of a bar graph “fuel gauge” so that you always
know how much charge is left on your batteries.
•
Rapid-charge battery technology allows command center batteries to be charged in less than six hours and beltpack batteries
to be charged in less than three hours. Chargers can be plugged in continuously without harming batteries. Once charge cycle
is complete, the units automatically shut off.
www.coachcomm.com
3
1.800.749.2761
Connex Wireless Headset System
CoachComm, LLC
System Overview
Number of Users—CoachComm Connex systems support up to nine coaches per command center. There are two coach locations on the
front of the command center. Two more hardwired coaches can be added in the press box using Connex Wired Beltpacks. Up to five
wireless coach field positions can be in place using Connex Wireless Beltpacks. All coach positions, whether at the command center or
via wired or wireless beltpack are capable of talking and listening on either the X channel or the O channel by pushing the appropriate
button.
Dual Command Center System Operation—Dual Connex Command Centers may be combined into one system so that more coaches can
communicate or so that more than 2 channels can be used. In many cases it is desirable to have a secondary offense or defense channel
for private conversations. This is easily done with CoachComm Connex. For details about how to hook up two command centers please
see the command center section on page 10.
Connex on Both Sidelines—CoachComm Connex systems are designed with our exclusive Secure Link Key Code technology. Secure Link
ensures that only the beltpacks on your system will log on to your command center. When you play a team that also uses CoachComm
Connex you do not have to do anything differently to ensure successful communications. Simply go through the normal pre-game setup
procedure and both systems will operate independently of each other.
System Range—CoachComm Connex wireless systems have an operating range of greater than 1000 feet under ideal conditions. Under
normal operating conditions in typical High School and smaller College stadiums, system range should be more than adequate to
support both home and away sideline operation. To maximize range and avoid noise or drop-outs, a clear line of sight should exist
between the command center antenna and the beltpacks on the field.
Audio Quality—CoachComm Connex wireless and wired components are designed to the highest communications audio standards.
Extended dynamic range, frequency response and low total harmonic distortion will ensure that each coach can be heard and
understood even in loud environments such as during heavy crowd noise. This may not seem important as you try out your system in a
quiet room, but you can bet that it will make a big difference at a key moment in a big game.
Unpacking
Your new CoachComm Connex wireless headset system comes complete with everything you need to get started. Please take a few
moments to unpack your system and check for any damage that may have occurred in shipping. Below is a list of things that you should
have received. (Please note that the exact items and the quantity of what you receive will vary depending on the number of wired
and wireless coaches in your system.)
•
Connex Command Center (1)
•
Omni-directional Whip Antenna (1)
•
Connex Wireless Beltpack (1 per field coach)
•
CoachComm Headsets (1 per coach per system)
•
AC Power Adapter (1 per command center and each wireless beltpack in system)
•
Wired Beltpacks (if more than two coaches needed in the press box)
•
Wired Beltpack connection cable (1 per wired beltpack)
•
User Manual and QuickStart Guide
•
All-in-One Pelican® Carrying Case with die-cut foam insert
1.800.749.2761
4
www.coachcomm.com
CoachComm, LLC
Connex Wireless Headset System
Command Center
1 - AC Power LED—Lights blue when connected to an AC power source and command center is turned on
2 - Battery Power LED—Lights blue when command center is turned on and is not plugged into AC Power (or when AC power is lost)
3 - Battery Gauge LEDs—Indicates amount of charge left on the battery; scrolling indicates when battery is charging; blinking indicates
connection to wireless beltpack. All blue except for far left LED is red indicating low battery
4 - Power On/Off Button—Turns command center on and off
5 - Headset Connectors—Plug in Headset
6 - Volume Control—Controls listening level at respective position
7 - Channel X LED—Lights blue when channel X is selected at respective position
8 - Channel X Button—Push to select channel X at respective position
9 - Talk LED—Lights green when microphone is active (not muted) at respective position
10 - Talk Button—Push to toggle microphone on or off at respective position
11 - Channel O LED—Lights blue when channel O is selected at respective position
12 - Channel O Button—Push to select channel O at respective position
13 - Wired Beltpack Connectors—Connect wired beltpacks to the command center (1 beltpack per connector)
14 - Antenna Connector—Attach the antenna
15 - Program Port—New wireless beltpack programming port
16 - Link Connecters—Hook two command centers together for more users or additional channel options
17 - External Power/Wall Charger Port—Connect the AC Power wall transformer for AC operation or when charging
www.coachcomm.com
5
1.800.749.2761
Connex Wireless Headset System
CoachComm, LLC
Wired Beltpack
1 - On/Off/Volume Control
2 - Channel X and O LEDs (Blue)
3 - Channel X and O Buttons
4 - Talk LED (Green)
5 - Talk Button
6 - Wired Beltpack Connector (RJ45)
7 - Headset Connector
Wireless Beltpack
1 - On/Off/Volume Control
2 - Channel X and O LEDs (Blue)
3 - Channel X and O Buttons
4 - Talk LED (Green)
5 - Talk Button
6 - Battery Gauge LEDs (Blue/Red)
7 - Wall Charger Port
8 - Program Port
9 - Headset Connector
The Wired and Wireless Beltpack are distinguishable by the fact that the wired beltpack has no Battery Gauge LEDs on
the front, and by the connections on the bottom of the unit.
1.800.749.2761
6
www.coachcomm.com
CoachComm, LLC
Connex Wireless Headset System
Equipment Set-up
Command Center (in the Press Box)
1.
Position the command center in the press box or some other elevated area where
the antenna will have “line of sight” with the field. Connect the Omni-directional
whip antenna to the Antenna Connector on the back of the command center.
Adjust the antenna so that it points to the side (horizontally).
If you are using the Optional Directional Antenna you do not need to
connect the Omni-directional Whip Antenna. Please see the section on the
Directional Antenna on page 8 for more information.
2.
If AC power is available, connect the AC Power Adapter to the external power
connector on the back of the command center. Plug the AC power adapter into a
standard 110VAC wall outlet.
3.
Turn the command center on via the On/Off button on the front of the command center. Press and hold the On/Off button for 3
seconds. If using external AC power the AC Power LED should light blue. If using battery power the Battery LED should also light
blue and the Battery Gauge bar graph should indicate the current battery charge condition. If using battery power make sure that
the battery is fully charged prior to the game.
4.
Connect a headset to one of the command center headset connectors. Put the headset on and position the microphone directly in
front of your mouth as close as it will go without touching your lips.
5.
Push the Talk (T) button directly above the headset connector that the headset is plugged into. The Talk “T” LED should light
green. Once the Talk “T” LED is lit, speak with a normal voice into the microphone and adjust the volume control so that you hear
your voice in the headset at a comfortable level.
6.
Push the channel “X” Button or the channel “O” Button to select the appropriate channel for that coaching position. The selected
channel will be indicated by either the “X” or “O” LED being lit blue. To lock a position into a single channel, the command center
must be powered down and then re-powered while either the channel “X” or “O” button is being held down.
7.
Repeat this procedure for the other command center coaching position (if it will be used.)
Wired Beltpack (in the Press Box)
1.
If you have more than 2 coaches in the press box (and are not using dual Connex Command
Centers) you will need to utilize a Connex Wired Beltpack. Locate one of the blue 15 foot
long RJ45 cables. Plug one end of the cable into one of the wired beltpack connectors on the
back of the command center. Plug the other end of the cable into the RJ45 connector on the
bottom of the wired beltpack.
2.
Connect a headset to the headset connector on the bottom of the wired beltpack. Put the
headset on and position the microphone directly in front of your mouth as close as it will go
without touching your lips.
3.
Using the On/Off/Volume control on the top of the wired beltpack, turn the wired beltpack
on by rotating the knob in a clockwise direction. Either the channel X or the channel O LED
should light to indicate that the wired beltpack has power.
4.
Push the Talk Button on the front of the wired beltpack. The Talk “T” LED should light green.
Once the Talk LED is lit, speak with a normal voice into the microphone and adjust the On/Off/Volume control so that you hear
your voice in the headset at a comfortable level.
5.
Push the channel X Button or the channel O Button to select the appropriate channel for that wired beltpack. The selected channel
will be indicated by either the “X” or “O” LED being lit blue. To lock a wired beltpack into a single channel, the unit must be
turned off and back on while either the channel “X” or “O” button on the wired beltpack is being held down.
6.
Repeat this procedure for the other wired beltpack (if it will be used.)
www.coachcomm.com
7
1.800.749.2761
Connex Wireless Headset System
CoachComm, LLC
Wireless Beltpack
1.
Each coach on the field will need a wireless beltpack to communicate on the Connex
system. Connect a headset to the Headset Connector on the bottom of the wireless
beltpack. Put the headset on and position the microphone directly in front of your
mouth as close as it will go without touching your lips.
2.
Using the On/Off/Volume Control on the top of the wireless beltpack turn the wireless
beltpack on by rotating the control knob in a clockwise direction. Either the channel
“X” or the channel “O” LED should light blue to indicate that the wireless beltpack has
power. The Battery Gauge bar graph should light momentarily to indicate the current
battery charge condition. Make sure that the battery is fully charged prior to any
game. If the On/Off/Volume control is on and there are no lights lit on the wireless
beltpack the battery is probably dead and needs to be charged. Please see the section
on charging batteries on page 13.
3.
Once the Battery Gauge bar graph goes out one of the LEDs in the bar graph should
flash. This light flashes to show that the wireless beltpack is logged on to the command
center and also represents the level of charge on the battery. This light should flash as
long as the wireless beltpack and command center are turned on and communicating
properly. This light will stay on (i.e. not flash) if the wireless beltpack is not communicating with the command center.
4.
Push the Talk button on the front of the wireless beltpack. The Talk “T” LED should light green. Once the Talk LED is lit,
speak with a normal voice into the microphone and adjust the On/Off/Volume control so that you hear your voice in the
headset at a comfortable level.
5.
Push the channel “X” button or the channel “O” button to select the appropriate channel for that wireless beltpack. The
selected channel will be indicated by either the “X” or “O” LED being lit blue. To lock a position into a single channel,
the wireless beltpack must be turned off and then back on while either the channel “X” or “O” button is being held down.
6.
Repeat this procedure for the other wireless beltpacks that will be in use.
Directional Antenna (Optional)
If you are using the optional Connex Directional Antenna you will need to install
it at the command center instead of the standard omni-directional whip antenna.
1.
Locate the black antenna cable and connect one end to the antenna connector
on the back of the command center.
2.
Connect the other end of the cable to the directional antenna. (Please note
that the connectors on each end are different.)
3.
Clamp the directional antenna to the window sill (or on some other appropriate
fixture) at the front of the press box.
4.
Point the directional antenna toward the center of the sideline that your
team will be on.
For the best results the front of the directional antenna should have a clear lineof-sight to the sideline location. Also keep the antenna “fin” orientation vertical as shown in the picture.
To ensure maximum system range and performance it is best to have the command center antenna and the
wireless beltpacks in clear line of sight with each other. Always try to position the command center antenna so
that it is unobstructed and clear of any nearby metal. Also, people must not stand in front of antenna. Please
see important FCC and Saftey Information on page 19 of this guide.
1.800.749.2761
8
www.coachcomm.com
CoachComm, LLC
Connex Wireless Headset System
System Operation
Command Center
CoachComm Connex Command Centers have been designed to be easy to use with a very low learning curve. Once you have completed
the system setup procedures listed under Equipment Set-Up on pages 7-8 your Connex Command Center is ready to use. The following
operational tips should help you get the most out of your Connex Command Center.
There are two coaching stations on a Connex Command Center. They are both identical and either can be used
independently of the other. Both are capable of communicating on either the “X” channel or the “O” channel.
On/Off Button—The On/Off Button on the front of the command center toggles power on or off to the command center. Press and
hold the On/Off Button for three seconds to turn the command center On or Off.
Volume Control—There are two Volume Control knobs on the top of the command center, one for each coaching station. The Volume
Control knob adjusts the audio level you hear in the headset for that particular coaching station. This control only affects the audio
you hear; it has no affect at all on the outbound audio going to the other coaches on the system.
To ensure that you are clearly heard by other coaches you must always have your headset microphone directly in front
of your mouth as close as it will go without touching your lips whenever you are talking on the system.
Headset Connection—There are two Headset Connectors on the front of the command center, one for each coaching station. The
headset is connected to your Connex Command Center via a 4-Pin XLR connector on the front of the command center. Push the headset
connector all the way into the front of the command center until you hear a click. Do not force the connector. Connex supports the
CoachComm Edge series and Sabre series headsets.
Talk Button—There are two (round) Talk Buttons on the top of the command center, one for each coaching station. The talk button is
round and part of the three button control interface. The talk button toggles the microphone of the headset on and off. The Talk LED
which is located directly above the talk button will light green whenever the microphone is on. When the Talk LED is on, anything you
say into the headset microphone will be communicated to all other coaches on the system that are on the same channel to which your
coaching station is set. You can push the Talk Button to turn on the Talk LED and forget it, or use it as a momentary mute function to
have off-line conversations during the game.
Channel Select Buttons—There are two sets of channel select buttons
on the top of the command center, one set for each coaching station. The
channel X and channel O buttons are triangular and part of the three button
control interface. Pushing either the channel X button or the channel O button
will set the coaching station to that communication channel (indicated with
blue “X” or “O”.) Pushing the channel button to which the coaching station
is already set does not change or modify channel selection. Once you decide
which channel will be for offense and which will be for defense you are ready
to go. Connex now offers a channel-lock feature that allows coaches to be
locked onto a single channel as opposed to having access to both channels.
See the section on “Equipment Set up” for more information.
Only coaches who are on the same communication channel (X or O) will be able to hear each other.
www.coachcomm.com
9
1.800.749.2761
Connex Wireless Headset System
CoachComm, LLC
Command Center Power—The Connex Command Center is capable of being powered by the AC Power
Adapter or by internal advanced Lithium Ion rechargeable batteries. If there is AC power available it is
recommended that you power the command center by that method. In this case the Lithium Ion Batteries
will act like a UPS (Uninterruptible Power Supply) in case AC power is lost. Lithium Ion batteries offer
longer life and lighter weight than other rechargeable battery types, and do not exhibit any of the
problems often found in other types. The internal Lithium Ion batteries in your Connex Command Center
will provide up to 15 hours of continuous operation when fully charged. These batteries should keep their
ability to provide power to the command center for many years to come without any user maintenance.
Battery Status Indication—Any time you turn on the Connex Command Center the Battery
Status LED bar graph will display the current charge left on the battery. The Battery Gauge bar
graph is made up of five LEDs. Each light represents approximately 2-3 hours of normal beltpack
operation. The far left (last) LED is red to visually indicate a low battery.
Battery Charging—Any time the Connex Command Center is plugged into an AC outlet the
battery is automatically charging. To charge the batteries without having the command center in
operation follow these steps:
1.
Turn the command center off by holding the On/Off Button on the front of the command center for three seconds.
2.
Plug the External AC Power Adapter into the External Power connector on the back of the command center. Plug the other end of
the Adapter into any standard 110VAC wall outlet.
3.
The Battery Status LED bar graph should scroll from left to right to show that the battery is charging. The number of lights that
are on solid (not flashing) indicate the amount of charge the battery currently has.
4.
Starting with a completely empty battery, the Lithium Ion Batteries in the command center will take approximately six hours to
fully charge.
Once the battery is completely charged, all of the Battery Status LEDs will light solid for approximately one minute and then go out.
To verify the status of the battery charge simply turn the command center on and observe the Battery Status LED bar graph.
Remember to turn the command center off before storing so the batteries will be fully charged for the next game.
Link—Two CoachComm Connex Command Centers may be combined into one system so that more
coaches can communicate or so that more than 2 channels can be used. To connect 2 command centers
together so that both the X and the O channels are common to both command centers you must link the
two command centers together:
1.
Locate the two black, 6 foot long Link cables. Both cables are exactly the same.
2.
Position the two command centers at least 5 feet apart but no more than 9 feet apart.
3.
Using one of the Link cables, connect one end to the Link X connector on the back of the first
command center. Connect the other end to the Link X connector on the other command center.
4.
Repeat the same process with the other cable using the O connectors.
The command centers are now linked and will function as one system for all of the beltpacks regardless
of which command center they are assigned to. If you only want one channel to be linked, only use one
of the two cables. The cable you choose will depend upon which channel you want to be linked.
1.800.749.2761
10
www.coachcomm.com
CoachComm, LLC
Connex Wireless Headset System
Programming—Connex Wireless Beltpacks are programmed at the factory to work with only one Connex Command Center. This
ensures that only your coaches will be able to hear your conversations. If you purchase additional wireless beltpacks or send a wireless
beltpack in for service they may come from the factory with a generic program that needs to be overwritten by your command center.
This process assures that only your wireless beltpacks will work with your system. For more information on programming new wireless
beltpacks, please see the instruction sheet that came with your new wireless beltpack.
Wired Beltpacks
CoachComm Connex Wired Beltpacks have been designed to be easy to use with a very low learning curve. Once you have completed
the system setup procedures under the Equipment Set-Up on pages 7-8 your Connex Wired Beltpack is ready to use. The following
operational tips should help you get the most out of your Connex Wired Beltpack.
On/Off/Volume Control—The On/Off/Volume Control knob on the top of the wired beltpack serves
two main functions. First it is the On/Off switch for the beltpack. To turn on the beltpack, turn the
knob clockwise and watch for the LEDs on the front to come on. To turn the beltpack off, turn the
knob all the way in a counterclockwise direction until you feel a click. All of the lights on the beltpack
should go off and you should not hear any audio in the headset. The other function this control knob
serves is to adjust the audio level you hear in the headset. This control only affects the audio you
hear; it has no affect at all on the outbound audio going to the other coaches on the system.
To ensure that you are clearly heard by other coaches you must always have your headset microphone directly in front
of your mouth as close as it will go without touching your lips whenever you are talking on the system.
Headset Connection—The headset is connected to your Connex Wired Beltpack via the 4-Pin XLR connector on the bottom of the
beltpack. Connex Wired Beltpacks support only the following headsets; push the headset connector all the way into the bottom of the
beltpack until you hear a click. Do not force the connector. Connex supports the CoachComm Edge series and Sabre series headsets.
Talk Button—The talk button is part of the three button control interface. The
talk button toggles the microphone of the headset on or off. The Talk LED which is
located directly above the talk button will light green whenever the microphone
is on. When the Talk LED is on, anything you say into the headset microphone will
be communicated to all other coaches on the system that are on the same channel
to which your beltpack is set. You can push the Talk Button to turn on the Talk LED
and forget it, or use it as a momentary mute function to have off-line conversations
during the game.
Channel Select Buttons—The channel X and channel O buttons are part of the
three button control interface. Pushing either the channel X button or the channel
O button will set the beltpack to that communication channel (indicated with blue
“X” or “O”.) Pushing the channel button to which the beltpack is already set does not change or modify channel selection. Once you
decide which channel will be for offense and which will be for defense you are ready to go. Connex now offers a channel-lock feature
that allows coaches to be locked onto a single channel as opposed to having access to both channels. See the section on “Equipment
Set up” for more information.
Only coaches who are on the same communication channel (X or O) will be able to hear each other.
www.coachcomm.com
11
1.800.749.2761
Connex Wireless Headset System
CoachComm, LLC
Wireless Beltpacks
CoachComm Connex Wireless Beltpacks have been designed to be easy to use with a very low learning curve. Once you have completed
the system setup procedures under the Equipment Set-Up on pages 7-8 your Connex Wireless Beltpack is ready to use. The following
operational tips should help you get the most out of your Connex Wireless Beltpacks.
On/Off/Volume Control—The On/Off/Volume Control knob on the top of the wireless beltpack
serves two main functions. First it is the On/Off switch for the beltpack. To turn on the beltpack,
turn the knob clockwise and watch for the LEDs on the front to come on. To turn the beltpack off,
turn the knob all the way in a counterclockwise direction until you feel a click. All of the lights on
the beltpack should go off and you should not hear any audio in the headset. The other function this
control knob serves is to adjust the audio level you hear in the headset. This control only affects the
audio you hear; it has no affect at all on the outbound audio going to the other coaches on the system.
To ensure that you are clearly heard by other coaches you must always have your headset microphone directly in front
of your mouth as close as it will go without touching your lips whenever you are talking on the system.
Headset Connection—The headset is connected to your Connex Wireless Beltpack via the 4-Pin XLR connector on the bottom of the
beltpack. Connex Wireless Beltpacks support only the following headsets; push the headset connector all the way into the bottom of
the beltpack until you hear a click. Do not force the connector. Connex supports the CoachComm Edge series and Sabre series headsets.
Talk Button—The talk button is part of the three button control interface. The
talk button toggles the microphone of the headset on or off. The Talk LED which is
located directly above the talk button will light green whenever the microphone
is on. When the Talk LED is on, anything you say into the headset microphone will
be communicated to all other coaches on the system that are on the same channel
to which your beltpack is set. You can push the Talk Button to turn on the Talk LED
and forget it, or use it as a momentary mute function to have off-line conversations
during the game.
Channel Select Buttons—The channel X and channel O buttons are part of the
three button control interface. Pushing either the channel X button or the channel
O button will set the beltpack to that communication channel (indicated with blue
“X” or “O”.) Pushing the channel button to which the beltpack is already set does not change or modify channel selection. Once you
decide which channel will be for offense and which will be for defense you are ready to go. Connex now offers a channel-lock feature
that allows coaches to be locked onto a single channel as opposed to having access to both channels. See the section on “Equipment
Set up” for more information.
Only coaches who are on the same communication channel (X or O) will be able to hear each other.
Battery Operation and Status—Connex Wireless Beltpacks run off of advanced Lithium Ion rechargeable batteries. Lithium Ion
batteries offer longer life and lighter weight than other rechargeable battery types, and do not exhibit any of the problems often found
in other types. The internal Lithium Ion battery in your Connex Wireless Beltpack will provide at least 16 hours of continuous operation
when fully charged. This battery should keep its ability to provide power to the beltpack for many years to come without any user
maintenance. Please see the next section for more information on charging batteries and monitoring battery status.
1.800.749.2761
12
www.coachcomm.com
CoachComm, LLC
Connex Wireless Headset System
Battery Status Indication—Any time you turn on a Connex Wireless Beltpack the Battery
Status LED bar graph will display the current charge left on the battery. The Battery Gauge bar
graph is made up of five LEDs. Each light represents approximately 2-3 hours of normal beltpack
operation. The far left LED is red to visually indicate a low battery. The particular LED that
will flash is indicative of the current battery charge. This light will stay on (i.e. not flash) if the
wireless beltpack is not communicating with the command center.
Battery Charging—Charging the internal Lithium Ion battery in the Connex Wireless Beltpack
is quick and easy:
1.
Turn the beltpack off using the On/Off/Volume control knob.
2.
Plug the External AC Power Adapter into the Battery Charge connector on the bottom of the wireless beltpack. Plug the other end
of the Adapter into any standard 110VAC wall outlet.
3.
The Battery Status LED bar graph should scroll from left to right to show that the battery is charging. The number of lights that
are on solid (not flashing) indicate the amount of charge the battery currently has.
Starting with a completely empty battery, the Lithium Ion Battery in the wireless beltpack will take approximately three hours to fully
charge. Once the battery is completely charged, all of the Battery Status LEDs will light solid for approximately one minute and then
go out. To verify the status of the battery charge simply turn the beltpack on and observe the battery status LED bar graph.
Remember to turn the wireless beltpack off before storing so the battery will be fully charged for the next game.
Programming—Connex Wireless Beltpacks are programmed at the factory to work with only one Connex Command Center. This
ensures that only your coaches will be able to hear your conversations. If you purchase additional wireless beltpacks or send one in for
service, they will come from the factory with a generic program that needs to be overwritten by your command center so that it will
work with your system. For more information on programming new wireless beltpacks, please see the instruction sheet that came
with your new wireless beltpack.
www.coachcomm.com
13
1.800.749.2761
Connex Wireless Headset System
CoachComm, LLC
Pre-Game Checklist
Just like in football, the key to successful communications is proper preparation. To ensure that your CoachComm Connex system is
up and running at game time take a few minutes to follow the procedures below.
Two to Three Days Before the Game
•
Locate and inspect the command center, wireless beltpacks, wired beltpacks, headsets and cables for any obvious damage.
Make sure you have everything you need for system operation. (Refer to the equipment setup section on pages 7-8)
•
Charge the batteries in the command center and the wireless beltpacks so that they have a full charge. (The Lithium Ion
batteries used in this system will hold their charge for the coming game.)
Game Day
1.
Once at the stadium take the carrying case to the press box and unpack the command center and related gear.
2.
Take the wireless beltpacks to the sideline on which they will be used during the game.
3.
Go through the equipment setup procedure and ensure that the system is fully operational.
4.
After the system check is complete, leave the system up and running through game time. (This is assuming you have fully
charged batteries. If for some reason the batteries are not fully charged, you should charge them at this time.)
Post Game
Important System Storage
•
Do not put a wet or damp system back in the case immediately after use. Wipe excess moisture off of the beltpacks, command
center and headsets with a towel. Allow system components to completely dry before putting the system back into the case.
Be sure all equipment is thoroughly dry before using again.
•
Repair or replacement due to excessive moisture damage caused by neglect is not covered under warranty.
Troubleshooting
Wireless Beltpack is Dead
Before starting the troubleshooting procedures here, go to the equipment setup section and make sure that the equipment is
properly configured. The most common reason for a dead (no lights, no audio) CoachComm Connex Wireless Beltpack is a completely
drained battery. If the beltpack is left on during storage or by some other means the battery becomes completely discharged, the
beltpack will be completely dead. If the battery is completely dead it must be charged prior to use. Please refer to the section on
battery charging on page 13. If you have charged the battery and the beltpack is still dead make sure the On/Off/Volume control is
in the On position. To ensure that the beltpack is turned on, remove the headset from your head and turn the On/Off/Volume control
knob all the way clockwise. If the beltpack still shows no LEDs, call CoachComm Customer Support.
Wired Beltpack is Dead or Will Not Communicate
CoachComm Connex Wired Beltpacks do not operate from battery power and need to be connected via the provided cable to the
command center for the beltpack to operate. Before starting the troubleshooting procedures here, go to the equipment setup
section and make sure that the equipment is properly configured.
If you have the wired RJ45 cable properly connected between the command center and the wired beltpack and the beltpack is still
dead make sure the On/Off/Volume control is in the On position. To ensure that the beltpack is turned on, remove the headset from
your head and turn the On/Off/Volume control knob all the way clockwise.
1.800.749.2761
14
www.coachcomm.com
CoachComm, LLC
Connex Wireless Headset System
If you are sure the beltpack is connected to the command center and is turned on, but the beltpack is still dead, make sure the
command center is turned on and operating properly. The command center needs to be powered up and operating from AC power or
Battery power for the wired beltpack to work.
If the beltpack is still dead substitute a different wired RJ45 cable. If you do not have another cable in your system, any RJ45 cable
will work. You can pick up one of these cables at virtually any store that sells electronics. If the beltpack still shows no LEDs, call
CoachComm Customer Support.
Command Center is Dead
CoachComm Connex Command Centers can operate either from External AC power or from internal battery power. If there is AC
power available it is recommended that you use that method of powering the command center. Before starting the troubleshooting
procedures here, go to the equipment setup section and make sure that the equipment is properly configured.
If the command center is not plugged into External AC Power and there are no LEDs lit, press and hold the On/Off Button on the
front of the command center for at least four seconds then release the button. If the Battery LED still does not light, the problem is
probably that the battery is not charged. If the command center is left on during storage or by some other means the battery becomes
completely discharged the command center will be completely dead if not plugged into External AC Power. Please refer to the section
on battery charging on page 10.
If the command center is plugged in and there are no LEDs lit, press and hold the On/Off Button on the front of the command center
for at least four seconds then release the button. The command center should power up and you should see the LEDs light. If the
command center is still dead it may be the wall AC outlet is not providing power or the Wall Power Supply is not functioning. Substitute
one of the other Wall Power Supplies that are used to charge the wireless beltpack batteries for the Wall Power Supply that is currently
plugged into the command center.
To check the wall outlet, unplug the Wall Power Supply from the outlet and plug in a known good electrical device such as a radio
or lamp. If the known good device does not power up the outlet is not providing power. If the known good device does power up call
CoachComm Customer Support.
Multiple Command Centers Experiencing “Crosstalk”
When connecting two CoachComm Connex Command Centers together it is necessary to make sure that the Link cables are not crossed.
This will cause coaches on channel “X” to hear coaches on channel “O” and vice versa. On the back of the command centers, make
sure that the cable that is connected to the X port on the first command center is also connected to the X port on the second command
center. Make sure that the O cable is connected properly as well. If you are using two command centers in a “3 channel” configuration
it is only necessary to connect one of the cables between the command centers. The cable should be connected either X to X or O to
O so that channels are not crossed.
www.coachcomm.com
15
1.800.749.2761
Connex Wireless Headset System
CoachComm, LLC
Specifications
System
Wireless System Range: 1000 feet with clear line of site under ideal conditions; 550
feet under normal operating conditions; 850 Feet with Optional
Directional Antenna under normal operating conditions
Operating Temperature: -4° F to 131° F (-20° C to 55° C)
Storage Temperature: -22° F to 158° F (-30° C to 70° C)
Audio Dynamic Range: > 80 dB
Audio Frequency Response: 200 Hz to 4 KHz
Audio Total Harmonic Distortion: ≤ 1%
Command Center
Dimensions: 6” x 4” x 3.25”
Weight: 2 lbs 12 ounces (including batteries)
Power Requirements: 5VDC from supplied wall power supply or internal battery
Current Draw: 385 mA at 5VDC (worst case)
Battery Capacity and Run Time: 2 Lithium Ion 2000 mA batteries for at least 15 hours of contiuous
run time
Wired Beltpack
Dimensions: 5.28” x 3.8” x 1.15”
Weight: 0.5 lbs
Power Requirements: 200 mW
Current Draw: 38 to 54 mA
Wireless Beltpack
Dimensions: 5.28” x 3.8” x 1.15”
Weight: 10 ounces (including battery)
Power Requirements: internal battery for normal operation 5VDC from supplied wall
power supply for battery charging
Current Draw: 208 mA operating from internal battery (worst case)
Battery Capacity and Run Time: 1 Lithium Ion 2000 mA battery for at least 16 hours of continuous
run time
1.800.749.2761
16
www.coachcomm.com
CoachComm, LLC
Connex Wireless Headset System
Parts and Accessories
EDGE90-1E
Headset
EDGE90-2E
Headset
CX-ANTSYS
Directional Antenna System
PC-ANT2-2dBO
Omni-Directional Whip Antenna
PC-ANTCABLE
PC
ANTCABLE
Antenna Cable (4ft)
CX-CONNEXTER
Isolate/Combine Box
CX-WB-CAB15
Wired BP Cable (15ft)
CX-LINKCAB12
Link Cable (12ft)
PC-5VWALLW-03
Charger
PEL-CONN
Pelican®Storage/Travel Case
www.coachcomm.com
17
1.800.749.2761
Connex Wireless Headset System
CoachComm, LLC
Customer Support
Technical Support for CoachComm Connex products is offered from 8 AM to 5 PM Central Time Monday through Friday. CoachComm,
LLC support and service personnel are ready to help you with any issues you may have. All questions and/or requests for a Return
Authorization Number should be directed to:
Customer Service Department
CoachComm, LLC
Voice: 800-749-2761 or 334-321-2300
Fax: 866-793-SERV (7378) or 334-821-0397
Do not return any equipment directly to the factory without first obtaining a Return Authorization Number.
Obtaining a Return Authorization Number will ensure that your equipment is handled promptly.
Returning Equipment for Repair or Maintenance
All shipments of CoachComm Connex products should be made via UPS or the best available shipper, prepaid and insured. The
equipment should be shipped in the original packing carton; if that is not available, use any suitable container that is rigid and of
adequate size to surround the equipment with at least four inches of shock-absorbing material. All shipments should be sent to the
following address and must include a Return Authorization Number.
CoachComm, LLC
Customer Service Department
Attn: Return Authorization #
205 Technology Parkway
Auburn, AL 36830-0500
Warranty
CoachComm Connex products are warranted by CoachComm, LLC to be free from defects in materials and workmanship for a period
of two years from the date of sale. The sole obligation of CoachComm, LLC during the warranty period is to provide, without charge,
parts and labor necessary to remedy covered defects appearing in products returned prepaid to CoachComm, LLC. This warranty does
not cover any defect, malfunction or failure caused by circumstances beyond the control of CoachComm, LLC, including but not limited
to unreasonable or negligent operation, abuse, accident, failure to follow instructions in the User Manual, defective or improper
associated equipment, attempts at modification and/or repair not authorized by CoachComm, LLC, and shipping damage. Products
with their serial numbers removed or effaced are not covered by this warranty. This limited warranty is the sole and exclusive express
warranty given with respect to CoachComm Connex products. It is the responsibility of the user to determine before purchase that this
product is suitable for the user’s intended purpose.
ANY AND ALL IMPLIED WARRANTIES, INCLUDING THE IMPLIED WARRANTY OF MERCHANTABILITY ARE LIMITED TO THE
DURATION OF THIS EXPRESS LIMITED WARRANTY.
NEITHER COACHCOMM, LLC NOR ANY DEALER WHO SELLS COACHCOMM CONNEX PRODUCTS IS LIABLE FOR INCIDENTAL
OR CONSEQUENTIAL DAMAGES OF ANY KIND.
1.800.749.2761
18
www.coachcomm.com
CoachComm, LLC
Connex Wireless Headset System
FCC Statement
Note:
This unit has been tested and found to comply with the limits for a class A digital device, pursuant to part 15 of the FCC
Rules. These limits are designed to provide reasonable protection against harmful interference when the equipment is operated in a
commercial environment. This equipment generates, uses, and can radiate radio frequency energy and, if not installed and used in
accordance with the instruction manual, may cause harmful interference to radio communications. Operation of this equipment in a
residential area is likely to cause harmful interference in which case the user will be required to correct the interference at his own
expense. Commensurate with EIRP limits specified in FCC Rules 15.247b, this device may not be used with antennas that exceed 36dB
of gain in point-to-point applications or 16dB of gain in multi-point applications. For use in RF exposure mobile or fixed condidtions,
the antenna(s) used for this transmitter must be installed to provide a separation distance of at least 20 cm from all persons.
Contains
Transmitter Module FCCID: HSW-2410M
or
Transmitter Module FCCID: HSW-2492
Important FCC and Safety Information
I. Digital Device Statement
a) CoachComm Connex Command Centers and Wireless Beltpacks have been tested and found to comply with the limits for Class
A digital devices, pursuant to Part 15 of the Rules and Regulations of the U.S. Federal Communications Commission (the FCC).
These limits are designed to provide reasonable protection against harmful interference when the equipment is operated in a
commercial environment.
b) This equipment generates, uses, and can radiate radio-frequency energy. If not installed and used in accordance with CoachComm’s
instructions, it may cause harmful interference to radio communications.
c) Operation of this equipment in a residential area is likely to cause harmful interference, in which case the user will be required
to correct the interference at his own expense.
II. Intentional Radiator Statement
a) CoachComm Connex Command Centers and Wireless Beltpacks each employ a modular, low-power radio transceiver module that
operates pursuant to Part 15 of the FCC’s Rules. The module’s FCC Identifier is either HSW-2410M, HSW-2410P, or HSW-2492,
depending on which module CoachComm has employed in manufacturing a given unit.
b) Operation is subject to the following conditions:
i)
A Connex system may not cause harmful interference to other users of the radio spectrum.
ii)
Upon notification by a representative of the FCC that a Connex system is causing harmful interference, use of the system
must be suspended. Operation must not resume until the condition causing the harmful interference has been corrected.
iii) A Connex system must accept any interference received, including interference that may cause undesired operation.
c) Connex Wireless Beltpacks contain an internal antenna that is not user replaceable. Connex Command Centers must be used
only with CoachComm-approved antenna: either the standard 4” Rubber Whip Antenna supplied with every Connex Command
Center, or with the Directional Antenna that is available from CoachComm as an option. Use of any non-approved antenna, or any
modification to any part of a Connex unit, violates the Connex System’s warranty, and also constitutes a violation of the FCC’s
Rules and Regulations and of § 302 of the Communications Act of 1934, as amended.
www.coachcomm.com
19
1.800.749.2761
Connex Wireless Headset System
CoachComm, LLC
III. RF-Exposure Statement
a) The FCC has adopted limits on the exposure to radio-frequency energy from devices such as the CoachComm Connex system.
The FCC adopted these limits by drawing upon the efforts of independent scientific organizations that have engaged in periodic
evaluations of the scientific literature. The FCC’s standards are intended to assure the safety of all persons, regardless of age or
health.
b) CoachComm has designed and manufactured the Connex system to comply with the FCC’s exposure limits. When used with
CoachComm-approved antennas, and when used in accordance with CoachComm’s instructions, the Connex system complies with
those exposure limits. No other antennas must be used with the Connex system.
c) CoachComm has designed the Connex Beltpack Unit to be worn and used in close proximity to the human body.... what the FCC
calls a “portable” use. The beltpack unit complies with FCC exposure limits for portable use.
d) To ensure compliance with FCC exposure limits, no person must come closer than 26 cm (ten inches) from either the standard Omnidirectional Whip Antenna supplied by CoachComm, or the optional Directional Antenna available from CoachComm, whichever of
the two is used with the Connex Command Center. If used, the Directional Antenna must be mounted and aimed so that people do
not obstruct the antenna’s view of the sideline and the playing field.
e) If two Connex Command Centers are employed together, the two Command Centers, should be placed at least four feet apart from
each other. To ensure compliance with FCC exposure limits, no person must come closer than 26 cm (ten inches) from the antenna
connected to either of the Connex Command Centers. As before, the optional Directional Antenna available from CoachComm, if
used with either or both of the Connex Command Center in a two-Command-Center Connex system, must be mounted and aimed
so that people do not obstruct either Directional Antenna’s view of the sideline and the playing field.
IV. Safety Information
a) When using the optional Directional Antenna, do not install it near any exposed electrical wiring.
b) Route and secure any and all wires and cables so that they do not pose a tripping hazard.
c) Do not plug an ac adaptor for a command center into an electrical outlet if weather conditions are wet or if the power socket is
not intact, dry, and shielded from the elements.
About CoachComm, LLC
CoachComm, LLC is the established leader in sports technology, providing wireless headsets, video equipment and game analysis
software to athletic programs nationwide. CoachComm, LLC is proud to be the wireless sideline communication provider for more than
95% of Division 1-A colleges as well as thousands of high school and small college football programs across the country. CoachComm,
LLC has also partnered with industry leaders such as Gameplan, GoPro, Panasonic, Canon, JVC, Sony, Eiki and others to offer the very
best in video and game analysis solutions. In addition to our external partners, our in-house development team is constantly looking
for ways to revolutionize sports technology.
Great people, products and service… CoachComm, LLC, the only name you need to know in sports electronics.
© CoachComm, LLC 2011
CoachComm, LLC
205 Technology Parkway
Auburn, Alabama 36830
1.800.749.2761
www.coachcomm.com
CoachComm and the CoachComm logo are registered trademakrs of CoachComm, LLC.
Connex and the Connex logo are registered trademarks of CoachComm, LLC.
Rev. 8
0311 UM-CONNEXSYS
1.800.749.2761
20
www.coachcomm.com