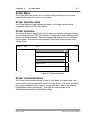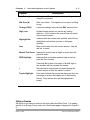
1
DTN DataConnect™ Satellite User Guide Contents Preface .......................................................................................................................... iv Chapter 1 - Introduction Introducing the DTN Color System ....................................................................1-1 How to Use this Manual .....................................................................................1-2 Technical Support ..............................................................................................1-3 Chapter 2 - Getting Around How to Get Started ............................................................................................2-1 Main Menu, System Menu and Help Menu ........................................................2-2 Title Line ............................................................................................................2-3 Receiver.............................................................................................................2-3 Mouse ...............................................................................................................2-6 Page Function Menu..........................................................................................2-6 Chapter 3 - Accessing the System How to Begin .....................................................................................................3-1 Using Keys On the Receiver..............................................................................3-2 Using the Page Function Menu..........................................................................3-3 Title Line - Special Codes and Messages........................................................3-18 Chapter 4 - System Menu Accessing System Information...........................................................................4-1 Statistic Pages ..................................................................................................4-2 Systems Log .....................................................................................................4-3 Printer Menu .....................................................................................................4-7 Set Alarm Volume Level ...................................................................................4-9 Alarms On/Off ..................................................................................................4-9 High Interest Window Configuration ................................................................4-10 User Custom Segment.....................................................................................4-12 Screen Saver Setup.........................................................................................4-12 Set Passwords ..................................................................................................4-? Passthrough ......................................................................................................4-? Keyword Search Setup ....................................................................................4-13 Time Zone Configuration ..................................................................................4-? Restart Receiver ................................................................................................4-? Shutdown Receiver............................................................................................4-? March 21, 2005 DTN Color System User's Manual Contents ii Chapter 5 - Help Menu Accessing Help.................................................................................................. 5-1 Accessing Help from the Main Menu ................................................................. 5-2 Accessing Help when a Page is Displayed........................................................ 5-2 Phone Support Available from DTN................................................................... 5-3 Chapter 6 - Futures and Charts Introduction........................................................................................................ 6-1 Futures and Options Quotes ............................................................................. 6-2 Technical Charts................................................................................................ 6-4 Chart Analysis ................................................................................................... 6-5 Chart Selection .................................................................................................. 6-9 Chart Window Options..................................................................................... 6-10 Chart Parameter Options................................................................................. 6-12 Other Options .................................................................................................. 6-14 Intraday Pro Charts ......................................................................................... 6-15 Chapter 7 - Programmable Quotes Introduction........................................................................................................ 7-1 Programming the Quote Page ........................................................................... 7-2 Program Futures Contracts ............................................................................... 7-2 Formatting the Quote Page ............................................................................... 7-5 Other Options .................................................................................................... 7-6 Chapter 8 - Energy Programmable Weather Introduction........................................................................................................ 8-1 Programming the Weather Segment ................................................................ 8-2 Appendix A - Troubleshooting Guide Introduction........................................................................................................A-1 Physical Signs of a Problem ..............................................................................A-2 Monitoring Your Statistics Page.........................................................................A-5 Error Messages .................................................................................................A-6 Blinking Error Messages....................................................................................A-7 DTN Color System User's Manua March 21, 2005 Preface Welcome! Congratulations on the acquisition of your DTN Color System and welcome to our family of subscribers! With your DTN satellite service you will have access to the latest information available regarding industry-specific financial news, market and weather information. The DTN Color System is easy to install, and the system can begin receiving information within minutes, with your service completely activated within 2-3 days. Accessing the information is then as simple as touching a few keys or clicking a mouse. March 21, 2005 DTN Color System User's Manual Preface V We Want to Hear from You! We are interested in hearing from you, whether about our product or this manual. Please call us at our Customer Service Department, (800) 779-5779 with your comments and suggestions. A Subscriber Questionnaire has also been provided at the back of this manual. Information On Services For the latest information on all services and products offered by DTN please call us or visit our Web site, www.dtn.com Sales (800)391-1175 Web site www.dtn.com DTN Color System User's Manua March 21, 2005 Chapter 1 Introduction Introducing the DTN Color System The DTN Color System allows you to access the latest information on the topics for which you have subscribed. All of the information is sent by satellite to a receiver in your home or office, where it is stored and available for your access. Your DTN Color System utilizes full color photos and graphics. For example, it can display color weather maps similar to the ones used by the National Weather Service and local television stations. Likewise, commodity price trends are displayed in easy to follow color graphs. The DTN Color System allows you to monitor the energy futures and options markets. You can utilize the pre-formatted pages; or by entering only a few commands, you can customize chart and quote pages to meet your special interests. This User's Manual and the "on-screen" HELP segment will assist you as you use all of the features available with the DTN Color System and aid you in resolving problems when necessary. March 21, 2005 DTN Color System User's Manual 1-2 Chapter 1 Introduction How to Use this Manual This manual was developed to help you get the most from the DTN service once your system is installed. Because of the rapid and ongoing advances in the communications industry in general and with DTN's products in particular, we recommend you use this document as an introduction to your system. The online help system will always be the most up-to-date source of answers to your questions. We encourage you to experiment with the system as you are reading this manual. There is nothing to break if you press a key in the wrong sequence! Please refer to the manual that came with your equipment for installation instructions. Chapters 2 - 8 Chapter 2 provides you with basic instructions for getting started to access the many screens of information available with your subscription. Chapter 3 provides you with step by step instructions to access information in the Main Menu and describes the special system features available in the Page Function Menu. Chapter 4 describes the System Menu. Information is provided to help you setup a printer if you plan to use one. The Statistics Page can assist you in resolving problems. Chapter 5 describes the Help Menu. As mentioned earlier, this on-line Help system is updated far more frequently than any written document, so use it as your first source for assistance. Chapter 6 provides you with step by step instructions for displaying the Futures Charting functions of the service. You can select individual contracts and display charts as a full page, in a two window or three window format. Chapter 7 provides you with information to build Intraday Charts. You can create 1 to 60 minute bar charts on Futures and Options contracts. Chapter 7 also provides instructions for customizing the Programmable Quotes pages with selected Futures and Options contracts. This allows you the ability to follow the contracts or options you select on three different pages. DTN Color System User's Manua March 21, 2005 Chapter 1 Introduction 1-3 Chapter 8 provides you with step by step instructions on programming the Programmable Weather Segment. Appendices A - B Appendix A is a reference list of the Basic and Optional Service features. Appendix B is the Troubleshooting Guide. Should a problem occur, refer to this appendix for suggestions on how to resolve the problem. Most frequently reported problems and their resolutions are included in this section. Of course, you can always call our customer support number for FREE assistance. The number is listed at the end of this page. Technical Support If you have questions about the operation of your system or experience technical problems, DTN provides FREE customer support. Help is available from 6:30 a.m. to 6:30 p.m. Central Time, Monday through Friday. Call (800) 779-5779 March 21, 2005 DTN Color System User's Manua Chapter 2 Getting Around How to Get Started The receiver, along with the video monitor, allows you to access and view the segments and pages for which you have subscribed. The starting point for accessing information is from the Main Menu; (see Figure 2-1). When you turn your receiver and monitor on, you can always return to the Main Menu, System Menu or Help Menu by pressing the Menu key or click the Right <Menu> mouse button. If you do not reach the menu after pressing the Menu key or clicking the right mouse <Menu> button the first time, do so a second time. The Main Menu lists the segments for your product (and may vary from the example in the figure). Think of segments for your product as “chapters” in a book. The highlight bar is a colored bar that covers one of the menu listings. It indicates which item will be accessed when the Enter key is pressed or the Left <Enter> mouse button is clicked. March 21, 2005 DTN Color System User's Manual 2-2 Chapter 2 Getting Around Main Menu, System Menu, and Help Menu 06/01/99 13:00 Main Menu ENERGY: User Custom Optional Services Overview City Forecasts DTN System Menu Pg # Help Menu Weather: Energy HDD/CDD (US and Canada) Today's Report Today's Conditions Figure 2-1 (Main Menu) There are three main categories displayed on the gray line of the Main Menu. To move from one category to another, use the Left and Right Arrow Keys; or with a mouse, move the pointer on top of the category desired and click once with the left mouse <Enter> button. Note as you move from one category to another, a menu is displayed. By selecting topics on these menus (using either the keys on the receiver or by using your mouse), you can move about the segments and pages within the system. Main Menu The menu under Main Menu lists all of the segments for which you have subscribed. You may move the highlight bar from one segment to another by using the Up and Down Arrow Keys; or with a mouse, move the pointer on top of the segment desired and click once with the left button. (When using the mouse, you are automatically taken to the page menu for the segment after clicking on the segment.) This menu is further described in Chapter 3. A scrollable menu will have a bar on the right side. This indicates that more segments are available than can be listed on the screen at one time. Use the Segment FWD or Segment BKWD keys or drag the moveable bar with the mouse to access these additional pages. Note: For names of segments that are gray instead of black, no pages of information have been transmitted to your receiver. If they remain gray for more than 48 hours, contact DTN's Customer Service Department. DTN Color System User's Manua March 21, 2005 Chapter 2 Getting Around 2-3 System Menu The System category consists of the statistics' page, systems log, printer operations pages, high interest and alarms setups, password setups, changing the time zone, restarting/shutting down the receiver and the user custom segment options. These pages are used for monitoring the system, connecting a printer, selecting various options and resolving problems. These functions are described in Chapter 4. Help Menu Help screens are available for using the DTN Color System. These screens are accessed in the same way that you access the segments for which you have subscribed. They can also be accessed from each page as it is selected. See Chapter 5 for further information. Title Line The line of information displayed along the top of every screen you access is called the title line (Figure 2-1). It includes the following information: date, time (24 hour clock, Time Zone), segment name (which you are currently accessing or the previous segment accessed if a menu is currently displayed), page name (which you are accessing or the previous page accessed if a menu is currently displayed), page number (first page of a segment is page number 1 and so on), and any special code or message for the screen displayed. The Special Codes and Messages on the title line are explained in Chapter 3. Receiver Along with receiving and storing the information being transmitted to you on a regular basis, the receiver also provides you with the keys (and a mouse connection) to move around the system. The front panel of the receiver consists of eight keys, a turbo and a power indicator (Figure 2-2). The eight keys allow you to move among the segments and pages. Chapter 3 explains how each key is used. The turbo and power indicator lights when the system is plugged in; and updates of information are transmitted to the receiver frequently throughout the day and night. It is recommended that the receiver be left on at all times during normal operation. Note: During an electrical storm, it is advised that the receiver be turned OFF by selecting Shutdown Receiver on the Systems Menu. March 21, 2005 DTN Color System User's Manua 2-4 Chapter 2 Getting Around The power indicator is also used to signal error messages to you. See Appendix B – Trouble-Shooting Guide for a description of how to read the blinking error messages. NEWS . . . NOT DTN DA TA TRA NSM IS SIO N NE TW O RK CO RPO R ATIO N P ow er S egm ent FW D M enu A lt E nter P age FW D P age BKW D S egm ent BKW D P rint Figure 2-2 (Receiver) Keys on the Receiver The eight keys located on the front panel of the receiver are used as follows on the next page: DTN Color System User's Manua March 21, 2005 Chapter 2 Getting Around Key 2-5 Description Menu This key moves you back one screen each time it is pressed until you get back to the Main Menu. Alt This key is used in conjunction with the other keys to access certain features of the system such as programming, system statistics, print functions and page function menu. Arrow Keys In addition to the titles imprinted on the keys, the next four keys are also referred to as the Arrow Keys. (The arrow on each key is the direction you can move the highlight bar by pressing the key - arrow up, arrow down, arrow left, arrow right.) Segment FWD Pressing this key moves the highlight bar to the preceding line or the first page of the next segment. Segment BKWD Pressing this key moves the highlight bar to the next line or will display the first page of the previous segment. Page FWD Pressing this key allows you to move among the Main Menu, System Menu and Help Menu. The highlight bar moves to the next selection or the next page is displayed. Page BKWD Pressing this key allows you to move among the Main Menu, System Menu and Help Menu. Enter Press this key to display the currently highlighted selection or to listen to the audio portion of a page. Print If you have a printer (optional), press this key to print the screen currently displayed. March 21, 2005 DTN Color System User's Manua 2-6 Chapter 2 Getting Around Mouse Accessing information can also be accomplished using a mouse (Figure 2-3) to make selections. The mouse controls the pointer on your screen. Move the pointer on the screen by moving the mouse in the direction you want the pointer to move. The clicking or quickly pressing and then releasing one of the buttons on the mouse carries out the action you wish to perform. 2 3 Figure 2 - 3 (mouse) By pointing to something on your screen and then clicking the Left button, you select the object underneath the pointer. By clicking the Right button, you generally return to the previous screen displayed. Mouse functions are as noted left mouse button = <Enter> and the right mouse button =<Menu>. "Dragging" the mouse (holding the left mouse <Enter> button down) to a new position activates some functions of the system. It will be explained when "Dragging" is used to activate a feature in future chapters. Note: On the side of the mouse, there is a switch that must be set to two (versus three) because only two buttons (left and right) are used with the DTN Color System. If the switch is set to three or between two and three, errors may occur. Page Functions Menu When you are on a page, pressing the Alt Key then the Menu Key or clicking the left mouse <Enter> button accesses the Page Function menu. The features available on that page will be listed in a table in the upper left corner of the screen. Some of the general page functions are listed below and are explained further in Chapter 3. DTN Color System User's Manua March 21, 2005 Chapter 2 Getting Around Feature 2-7 Description Help This allows the Help Menu to be directly accessed from a page. It is then not necessary to exit from the Main Menu and to move to the Help Menu. Program HIW Quotes The Quote lines of the High Interest Window can be programmed through this function, allowing two quotes per line. HIW features will not show up in the Page Function Menu unless turned on in the System Menu. View HIW Quote/Page This function allows viewing of all programmed quotes and headlines in the High Interest Window. Magnifying Glass This feature activates the magnification (factor of 2) available on text pages. Play Audio When a recorded message is attached to a page, this activates the audio portion of a page. Personal Library With this feature, you can save the page of information for future reference to a page in a special segment. Note: the page will not continue to update. Alarms This feature allows you to set price limits for specific contracts and if the limit is met, an audio tone sounds and the Alarm page appears on the screen. Alarms will not show up in the Page Function Menu unless turned on in the System Menu. Scroll Page This feature is available when a page is longer than one screen. The screen is scrolled to view the additional page. Start Motion This activates the motion feature available on some weather pages. You can follow the progress of storms as they move across the country. User Custom With this page feature, you can save the pages of information you access most often into a segment titled User Custom. Note: the page will continue to update when saved to the User Custom segment. Zoom into Page This activates the zoom feature available on graphics pages. You can enlarge a portion of a page 2, 4, or 8 times. Keyword Search This feature enables you to perform a search in the AP Online News Segments, based off a keyword chosen by March 21, 2005 DTN Color System User's Manua 2-8 Chapter 2 Feature Getting Around Description you. Quick Quote This feature gives various information about a certain stock. ie. Bid Price, Ask Price, Open, last, etc... Formulas DTN Color System User's Manua This feature allows you to enter a mathematical calculation and have the output displayed either on a programmable Quote page, an Intraday Chart, or in the High Interest Window. March 21, 2005 Chapter 3 Accessing the System How to Begin As discussed in Chapter 2, the starting point for accessing information is from the Main Menu. You can always return to the Main Menu, System Menu, or Help Menu by pressing the Menu Key one or more times. (Each time you press the Menu Key, you move one screen closer to the menu screen until you are there.) The Main Menu contains the segments or services you can access based on your subscription. Use the Left and Right Arrow Keys; or with a mouse, move the pointer on top of the Main Menu and click once with the Left button to highlight the Main Menu category if it is not already highlighted. March 21, 2005 DTN Color System User's Manual Chapter 3 3-2 Accessing the System Using Keys On the Receiver Selecting a Segment Once you have the Main Menu displayed, select a segment to access: Move the highlight bar up or down by using the Segment FWD and Segment BKWD (Up and Down Arrow Keys). Press the Enter Key or the click the Left <Enter> mouse button. The pages for the segment selected are displayed. Selecting a Page Once you have a Segment displayed , select a page to access: Move the highlight bar up or down the page menu by using the Up and Down Arrow Keys. Press the Enter Key or the click Left <Enter> mouse button and the page of information is displayed. Note: Any page with an asterisk (*) preceding its title means you have received new information since last viewing the page. Moving from One Page to Another To move from one page to another within a segment one of two methods can be used: First, use the Page BKWD and Page FWD Keys (Left and Right Arrow Keys); press the Left Arrow Key to go to the preceding page within the current segment or press the Right Arrow Key to go to the next page within the current segment. Second, press the Menu Key or click the right <Menu> mouse button; the page menu for the current segment is displayed. Choose a new page by moving the highlight bar to the desired page, then press the Enter Key. Note: If you are on the last page of a segment and you page forward, you automatically go to the first page of the next segment listed on your segment menu. Likewise, if you are on the first page of a segment and you page backward, you automatically go to the last page of the preceding segment listed on your segment menu. Moving from a Page to Another Segment To move from your current page to another segment, press the Menu Key or click the right <Menu> mouse button to move to the page menu for the current segment. Press the Menu Key or click the right <Menu> mouse button a second time to get to the Main menu. Move the highlight bar to the desired segment, then press the Enter Key or click the left <Enter> mouse button. DTN Color System User's Manua March 21, 2005 Chapter 3 Accessing the System 3-3 To move from your current page to the first page for the preceding segment, press the Down Arrow Key. To move from your current page to the first page for the next segment, press the Up Arrow Key. Accessing the Page Function Menu from a Page Once a page is selected, the Page Function Menu can be accessed. To display the menu using the keys on your receiver: Press the Alt Key then the Menu Key for the Page Function Menu or move the mouse pointer to the left side of the screen and click the Left <Menu> mouse button. Move the highlight bar to the desired function by using the Up and Down Arrow Keys. To exit from the page function menu, press the Menu Key or click the right <Enter> mouse button. Using the Page Function Menu The Page Function Menu lists the special functions available on the specific page. Not all of the following functions are available on each page. Some functions need to be activated before they are available; see Chapter 4. Scroll Page When a page is longer than can be shown on one screen, the screen is scrolled to view the next page or pages. You may view the additional pages by using the keypad or the mouse. When Scroll Down is displayed at the bottom of the screen, another screen is available following the current screen. If Scroll Up is displayed at the top of the screen, another screen is available preceding the current screen. Select the scroll page feature by pressing Alt then the Down Arrow on the keypad, or using the Left <Menu> mouse button. Press the Up or Down Arrow Keys to view the additional page or click the mouse on the Red Bar on the top or bottom of the screen. Play Audio If you are located on a page that has the Audio feature, there will be a musical note in the right corner of the Title Line. When this feature is activated, the audio sounds and a volume control window appears on the lower right portion of the screen. March 21, 2005 DTN Color System User's Manua 3-4 Chapter 3 Accessing the System Adjust the volume with the Arrow Keys or drag the mouse on the volume bar. After a few seconds, the volume control window disappears; press the Up or Down Arrow Key or click on the window area for it to be redisplayed. While the audio is playing, you can turn it off by pressing any key other than the Up and Down Arrow Keys. Start Motion DTN weather tracker radar makes it possible to follow the progress of storm systems as they move across the country. Select the feature and press on the Enter key or click on the Left <Enter> mouse button to activate. To return to the Page Function Menu, press the Menu or Enter key, or by clicking on the Right <Menu> mouse button. Magnifying Glass The magnifying glass is used to display text pages as if they were under a magnifying glass. When activated, the upper left portion of the page is displayed with a magnification factor of two (2). To view different parts of the page, use the Arrow Keys or press the Left <Enter> mouse button and drag the mouse on the screen. To return to the Page Function Menu, press the Menu key or click on the Right <Menu>mouse button. Zoom into Page The zoom feature is used to magnify into a specific area of a graphics page. The area to be magnified is defined by a box located on the screen. When activated, this feature will allow you to select and zoom in 4, 16, or 64 times. Select the area to magnify, by using the Arrow Keys or holding the Left <Enter> mouse button and drag the box to the location desired. Press Enter or the Right <Menu> mouse button to view. Press the Menu key or click the Right <Menu> mouse button to exit the page. Personal Library This segment on the Main Menu allows you to save pages of news stories, maps, DTN special research studies and ONE MINUTE of audio. Because of the amount of memory required, it cannot save quote pages. Personal library pages do not change as the system updates. When selected, a Personal Library Segment Page Selection Menu appears. Select the page for the library using the Arrow Keys or highlighting the page with the mouse. Press Enter or click the Left <Enter> mouse button. Press Enter or DTN Color System User's Manua March 21, 2005 Chapter 3 Accessing the System 3-5 click on YES with the mouse to add the page to the library. The date and time the page was added are displayed with the title of the page. You are then returned to the Page Function Menu. Energy User Custom This is a segment on the Main Menu. The user can program their most used pages (weather maps, quotes, news, and charts) into the pages of this segment. User Custom pages will update as the system changes. When activated, a User Custom page selection Menu appears. Select the page in the segment by using the Arrow Keys or the mouse. Press Enter or click on YES with the Right <Menu> mouse button to add the page to the Custom Segment. You are then returned back to the original page. Note: The only pages that cannot be programmed are the "scrolling pages,” such as in the AP Online segments. Keyword Search This feature is used to perform a quick search through all News Source Segments. A keyword is programmed in by you, and any story containing the word in the Headline, will appear on the screen showing source segment and headline. Clicking on the headline allows you to read the story. Select the feature and access the select keyword menu. Choose the Add/Reprogram Keyword option by using the Enter key or clicking the Left <Enter> mouse button. The Select Keyword table will appear, allowing you to program a word or title. Move through the table using the Segment Keys. Press Enter as letter or number is highlighted. The letters selected will appear above. The mouse can be used to select, also. Point to the desired letter or number and click the Left <Enter> mouse button. After you have chosen a word or title, select enter on the Keyword table. A select box will ask you if the word chosen will be saved before you search. If the title is satisfactory, choose yes. Your store keyboard will appear. Move the highlight bar to the space you want the title to occupy. Press Enter or click the Left <Enter> mouse button. Once you have programmed your selections, simply activate the Keyword Search menu and select the title you desire. All titles containing that word will appear. Click on the headline(s) you wish to read. Note: A wildcard asterisk may be used next to the word to search for root Keywords, i.e. Gas* will find titles having any form of gas in the title. Check Help for other search options. Quick Quote March 21, 2005 DTN Color System User's Manua Chapter 3 3-6 Accessing the System This selection on the Page Functions Menu allows you to access the Quick Quote from a page without actually exiting the page. You then can locate the quote in the Quick Quote Segment and return back to the original page. This feature has been enhanced so the quote information will update while it is displayed. Using The DTN Mouse: Selecting Quote By Ticker Symbol To access the Page Functions menu from any page, click the Left <Enter> mouse button. From any menu, point the mouse cursor to the a/m box located in the upper left corner and click the Left <Enter> mouse button. From the Page Functions menu, select Quick Quote by pointing the mouse cursor to the Quick Quote option and clicking the Left <Enter> mouse button. This will bring up a virtual keyboard with an entry field to type in the ticker symbol. **Ticker symbol must be entered in CAPITAL LETTERS. After typing in ticker symbol, point mouse cursor to <Enter> key on virtual keyboard and click Left <Enter> mouse button to view the extended quoted display. Selecting Quote Via Symbol Lookup If the ticker symbol is unknown, press the Right <Menu> mouse button. This will bring up a screen with the Symbol Lookup button. Point the mouse to the Symbol Lookup button and click the Left <Enter> mouse button. This will access the Select Type menu. From the Select Type menu, select the type of quote to be displayed. Now the Search menu is displayed. Selecting by Issuer Name: will access a virtual keyboard with the command Enter Company Name:. Type in Company Name by pointing the mouse cursor at each letter of the company name and clicking the Left <Enter> mouse button. NOTE: Company name must be “typed” using CAPITAL LETTERS. After you have typed the Company name, click the Left <Enter> mouse button. Remember to use spaces as needed. If there is only one matching company found, it will automatically bring up the Quick Quote. If there is more than one matching company or only a partial company name is entered, a Select Issuer Name picklist will appear with all similar company names and ticker symbol information. Click on the company name, it will automatically bring up the Quick Quote. DTN Color System User's Manua March 21, 2005 Chapter 3 Accessing the System 3-7 Selecting by Ticker Symbol: will access a virtual keyboard. With the <Enter> Ticker Symbol command, typing one letter or a portion of the ticker symbol in this field and selecting the <Enter> box on the virtual keyboard will bring up the Find Ticker picklist. This picklist contains all similar ticker symbols with company name information. Point the mouse cursor to your selection and click the Left <Enter> mouse button. The Quick Quote will automatically come up once selected. USING A KEYBOARD: SELECTING QUOTE VIA SYMBOL LOOKUP: While holding the <Alt> key down, press the <Esc> key. This will access the Page Functions menu. Select Quick Quote by pressing the <Enter> key. The Quick Quote screen will then display with the cursor flashing in the ticker symbol field. Simply enter the ticker symbol and press <Enter> to view the extended quote information. Ticker symbol must be entered in CAPITAL LETTERS! This feature has been enhanced so the quote information will update while it is displayed. SELECTING QUOTE VIA SYMBOL LOOKUP: If the ticker symbol is unknown, press the Tab key to move the flashing cursor to the Symbol Lookup button and then press the Enter key. This will bring up the Select Type menu. Using the directional arrows, highlight the desired quote type in blue and press the Enter key. The next screen to display is the Search method screen, which gives the option of searching for a quote By Issuer Name, or By Ticker Symbol. A white highlight surrounding the function button indicates which search method is selected. The white highlight may be moved by pressing the Tab key. Once you have highlighted the desired search method, press the Enter key. Selecting By Issuer Name allows you to search for stocks, bonds, futures options and index options by easy menu selections. For stocks, bonds and funds, selecting By Issuer Name will bring up a By Issuer Name screen, with the cursor flashing in the Issuer Name field. Type in Company Name and press the Enter key. If there is a corresponding match found, the extended quote information will automatically be displayed. Selecting By Ticker Symbol will bring up a Search by Ticker Symbol screen, with he cursor flashing in the ticker symbol field. Simply type one letter or a portion of the ticker symbol in this field and press the Enter key to access the Select Ticker Symbol picklist with all similar ticker symbols and company names. Highlight your selection in blue and press the Enter key. The extended quote information will be displayed. NOTE: FUNCTION KEYS March 21, 2005 DTN Color System User's Manua Chapter 3 3-8 Accessing the System Located at the bottom of the displayed Quick Quote page are four buttons or function keys for your convenience: Previous Screen, Print, Get Another Quote and Exit. Use the <Tab> key to highlight a desired selection and press the <Enter> key. The function keys may also be selected by using the specified red letter (or Function Key letter) found on each button. Simply hold down the <Alt> key and press the corresponding Function Key on your keyboard. For example, pressing <Alt> R will take you to the Previous screen. Formulas This feature allows you to create and monitor up to 20 user--defined formulas. Ticker symbols, for the instruments you are authorized to receive, and their data fields can be used in formulas to calculate ratios, spreads, reciprocals, etc. The results can be displayed in a quote page, intraday chart, or in the high interest window. HOW TO ACCESS: The formula feature is available from any Segment or page by accessing the Page Functions menu. To do this, either press <Alt> then <Menu> using the keypad, click on the a/m box in the upper left hand corner of the screen using the mouse, or press <Alt/Esc> keys using the keyboard. Select the Formulas option. User Formula Library The first screen to be displayed is the User Formula Library page. The Formula Library has the capability of storing up to twenty formulas. The three function buttons across the bottom of the screen allow you to Edit a formula, delete a formula from the User List or Exit the program. You may select a Programmable Formula line (numbered 1-20) or a function button by pointing the mouse cursor on the desired location and clicking the Left <Enter> mouse button. (You can either program a blank line or over a previously programmed formula). Next will come up the Formula Parameters screen. Formulas are created by first entering setup information on this screen; and then specifying the mathematical equation to use on the Program Formula Screen. Formula Parameters Predefined Formulas: This button will be highlighted in white when the page is first displayed. Press the Enter key or click on it using the Left <Enter> mouse button to view a predefined list of commonly used formulas. The Predefined Formulas were created for you convenience and may be easily edited to further customize them for your own use. To select one of the Predefined Formulas, highlight the selection using the directional keys and press the Enter key. This will return you to the Formula Parameters screen. You will notice that the Formula Name, number of decimal places and the Open/Close time fields have been filled in with DTN defaults for DTN Color System User's Manua March 21, 2005 Chapter 3 Accessing the System 3-9 the selected predefined formula. You may modify any of these parameters simply by pressing the Tab key to highlight the desired field or point the mouse pointer to the desired field and begin typing in any desired changes. Creating a New Formula To bypass the Predefined Formula button and move to the next entry field, press the Tab key or click the Left <Enter> mouse button on the Enter Formula Name field. You may enter a custom name for your formula here by using the keyboard or pointing the cursor to the appropriate letter on the virtual keyboard and clicking the Left <Enter> mouse button. After entering the Formula Name, you must then specify the number of decimal places for the formula calculation, as well as the open and close times for the formula calculation. Note: The open and close times specified will also be used for building an intraday chart for this formula if it is programmed for that feature. Below is an explanation of the fields found on the Formula Parameters Screen. Example: Enter Formula Name: Natural Gas Spread Formula name can be 20 Characters in maximum length; uppercase, lowercase and spaces allowed. Number of Decimal Places in Formula (0-5) 03 Determines how many numbers after the decimal to display for this formula and may be a number between zero and five. Enter Formula Trading Hours in Military Time (0-24 CDT) 09:00 Open Time Close Time 14:10 Indicates when the formula will be calculated. For a continual calculation of a formula, enter the same time for both the open and closing time. Upon completion of the formula setup parameters, the Next function button will be highlighted. Press the Enter key to advance to the next screen or point the cursor to the Next button and click the Left <Enter> mouse button. Program Formula Screen This will access the Program Formula screen. The Program Formula screen is where you will input/edit the mathematical equation for a formula. Valid symbols to be used in a formula must contain the Ticker Symbol (Symbol) and an associated field identifier for that symbol. For example, if you want to use a Natural Gas contract in a formula, you must also specify which field of data is to be used for that contract, e.g., Last Price, Daily High, Close, etc. March 21, 2005 DTN Color System User's Manua Chapter 3 3-10 Accessing the System Therefore, Formula Symbols must adhere to the following format: Ticker Symbol, Field Identifier Examples: NGK1,T = Natural Gas May 2001, Last price PDDXX,7D = Putnam money Mkt Fund, 7-Day Yield DTLN,H = Data Transmission Network, daily high price Valid operators for a formula are: + (plus), - (minus), * (multiplied by), and / (divided by). Parentheses' signs ( ) may be used to separate operations and/or indicate the order of operations. Spaces between operators are allowed. NOTE: Commas are used to separate the symbol and field identifier. Spaces in the symbol format are NOT allowed. Steps for Programming a Formula (from Formula Scratch Pad) A formula may be created by typing it directly onto the Formula entry. Additionally, the Formula Scratch Pad may be used for assistance in building a formula as follows: To find a symbol to be used in a formula, press Tab to move to the Symbol Lookup button and press the Enter key or point the mouse cursor tot he Symbol Lookup button and click the Left <Enter> mouse button. From Select Type menu, use the directional arrows to highlight instrument type in blue and press the <Enter> key or point the mouse cursor to the desired instrument type and click the left <Enter> mouse button. Make menu selections or input company information until desired symbol is found. The selected Symbol will be displayed in the gray entry field located in the upper right corner of the Formula Scratch Pad. Tab to the Field Lookup button and press the <Enter> key or point the mouse cursor to the Field Lookup button and click the Left <Enter> mouse button. Select the Field that corresponds with desired data to be used in the formula. Press the Enter key to make the selection or click the Left <Enter> mouse button. If the symbol and field selected are correct and you wish to use them in a formula, Tab to the Insert button and press Enter or click the Left <Enter> mouse button. This will move the valid symbol to the Formula Entry line. Tab through the Number Pad, pressing the Enter key, or clicking the Left <Enter> mouse button to move numbers and operators directly into the Formula Entry line located at the top of the page. After completing a Formula, <Tab> or move the mouse cursor to the Save button and press the <Enter> key. The Formula Processor will scan and save the formula. If there is an error in the formula format, an error message will appear and you will need to edit your formula. DTN Color System User's Manua March 21, 2005 Chapter 3 Accessing the System 3-11 NOTE: You need to Save your formula before exiting the Program Formula screen. Failure to do so will result in the loss of the Formula. Tab to the Verify Formula button and press the <Enter> key. The Verify Formula function will automatically calculate the formula and display its current value. We recommend use of the Verify Formula function to verify the formulas meaningfulness, approve the number of decimal places and determine if adjustments are necessary before exiting the program. How to use Formulas The User Defined formulas allow you to enter a mathematical calculation and have the output displayed either on a programmable quote page or on an intraday chart. You can choose which fields to have calculated (i.e., close, contract high, volume, etc..). Below is a list of different ways to use the formula feature; however, the possibilities are endless of how you can utilize formulas. As you become more and more accustomed to using them, you will develop your own calculations that will help you with your trading decisions. The following are examples of ways to use formulas: 1.) Compare relationships between commodities. Inter-exchange relationships are commonly used calculations, such as Natural Gas versus the COB Electric. More complex commodity relationships can also be compared and calculated. An energy crack spread is a good example of this, crude oil, heating oil and unleaded gasoline have a relationship. So does the soybean crush spread. The soybean, soyoil and soymeal prices all have price relationships. Ratios are also available; since the formulas are capable of four basic math functions. For example, you can do a bond/bill ratio. 2.) Basis differential. This way you will know at a glance what your cash bid will be without having to calculate it every time. For example, Jan. beans -.27 local basis = cash bid. 3.) Calculate the total or net value of your positions. Formula Programming Options Once a formula has been created, it may be programmed onto a Programmable Quote Page, Intraday Chart and/or placed in the High Interest Window. Programming Formulas on Programmable Quote Pages USING A KEYBOARD March 21, 2005 DTN Color System User's Manua 3-12 Chapter 3 Accessing the System From any User Programmable Quotes Page: Hold the <ALT> key down while pressing the <Esc> key. This brings up the Page Functions menu. Two selections on this menu relate to programming a formula: Program Quote Page and Program Quote Header/Edit Page. You will want to program in the Formula Header first, then the formulas on the lines below; so the data fields displayed for each formula is labeled correctly. For additional programming instructions, refer to the Programming Futures and Programming Headers pages located in the Help Segment. USING THE DTN MOUSE From any User Programmable Quotes Page, click the Left <Enter> mouse button. This brings up the Page Functions menu. Two selections on this menu relate to programming a formula: Program Quote Page and Program Quote Header/Edit Page. You will want to program in the Formula Header first, then the formulas on the lines below; so the data fields displayed for each formula is labeled correctly. For additional programming instructions, refer to the Programming Futures and Programming Headers pages located in the Help Segment. Programming Formulas on an Intraday Chart USING A KEYBOARD From any chart in the Intraday Pro: Charts, while holding down the <Alt> key, press the <Esc> key. This will bring up the Page Functions menu. Use directional arrows to move highlight bar to Chart Selection and press the <Enter> key. This brings up the Select Intraday Chart Function menu. Select Program Intraday Into Watch List. Next, select a line in the watch list and press Enter. You must select a line in the Current Intraday Watch List to program. From the Select Type menu, move the highlight bar to the User Formula Library option and press <Enter>. A picklist will appear containing the names of all formulas currently defined in the User Formula Library. Move highlight bar to the formula to be charted and press <Enter>. This will access the Select Intraday Chart Function menu. To display the formula on a chart page, choose the option: Select Intraday Chart to Display. Select the formula from the Current Intraday Watch List and press Enter. The formula will now be displayed on the current chart page and will begin updating with the next calculation of the formula. For additional programming instructions, see Intraday Chart Help in the Help segment. USING THE DTN MOUSE DTN Color System User's Manua March 21, 2005 Chapter 3 Accessing the System 3-13 From any chart in the Intraday Pro: Charts, click the Left <Enter> mouse button to access the Page Functions menu. Point the mouse pointer to Chart Selection and click the Left <Enter> mouse button. This will access the Select Intraday Chart Function menu. Select Program Intraday Into Watch List. Next, select a line in the watch list by placing the mouse cursor on that line and clicking the Left <Enter> mouse button . You must select a line in the Current Intraday Watch List to program. From the Select Type menu, point the mouse cursor to the User Formula Library option and click the Left <Enter> mouse button. Select a formula from the list by placing the mouse cursor on the formula to be charted and click the Left <Enter> mouse button. This will access the Select Intraday Chart Function menu. To display the formula on a chart page, choose the option: Select Intraday Chart to Display. Select the formula from the Current Intraday Watch List displayed and press the Left <Enter> mouse button. The formula will be displayed on the current chart page and will begin updating with the next calculation of the formula. For additional programming instructions, see Intraday Chart Help in the Help segment. Programming a Formula into the High Interest Window USING A KEYBOARD From the System Menu, select High Interest Window Configuration to bring up the High Interest Window Configuration menu. Select Define High Interest Window. Select the number of lines up to 7. Once the number of desired lines has been entered, the High Interest Line Configuration window will appear. Each line can be configured as either a Quote Line or a News Headline, but clicking the Left <Enter> mouse button or pressing the <Enter> key to toggle between the headings. To save all configured lines, exit the screen by pressing <Menu> or clicking the Right <Menu> mouse button. Enter Yes on the Save Configuration prompt. Select Program Quote Line. Use the directional arrows to move the blue highlight bar to a programmable slot and press the <Enter> key or point the mouse cursor and click the Left <Enter> mouse button. this will bring up the Select Function menu. Select Program Quote and then the User Formula Library option. Choose a formula from the Select User Programmed Formula menu be highlighting the selection and then pressing <Enter> or click the Left <Enter> mouse button. Press the <Esc> key or the Right <Menu> mouse button to initialize the quotes. For additional programming instructions, see High Interest Window (HIW) Help in the Help segment. March 21, 2005 DTN Color System User's Manua Chapter 3 3-14 Accessing the System Help This selection on the Page Functions Menu allows you to access the Help Segment from a page without actually exiting the page. You then can locate the information in the Help Segment and return back to the Page Functions Menu. To activate, select and press Enter or click with the Left <Enter> mouse button on Help to access. Select the page. Press the Menu Key twice or click with the Right <Menu> mouse button twice to return back to the Page Functions Menu. View High Interest Window Quotes This feature can be addressed once you have accessed a page in a segment in the Main Menu. This window appears at the bottom of the page and allows continuous observation of up to 7 lines of Quotes and News Headlines while viewing another page. This needs to be activated (Chapter 4) before the High Interest Window Options are listed in the Page Functions Menu. When Program HIW Quotes is selected, the pre-programmed HIW lines will display. Only the Quote lines can be programmed from this window. Select the quote line (indicated by the blue high light bar) to be programmed and a Select Function window will appear in the upper left corner of the screen. You must indicate if you want to program a Header or a Quote. To Indicate the type of Header, click or enter on the space and choose Program Header from the Select Function Menu. Click or enter on the appropriate header from the Select Header Type list. (The quote can be listed on the space below.) To program a Quote, select the line you wish to use. Choose Program Quote in the Select Function Menu. Indicate the type of Quote in the Select Type window. If selecting Indexes/Statistics/Indicators, U.S. Stocks, Index Options, Mutual Funds and Money Market Funds, you must indicate the Search Method. A list of Ticker Symbols and Issuers Names is provided, along with the ability to search alphabetically. Futures and Futures Options allow for a specific commodity to be programmed. Select the line you wish to use and click or enter. Select either the Futures or Futures Options. You then select the commodity you want to display from the following menu... Grains Livestock Other Ag Financials Currencies Energies Metals DTN Color System User's Manua March 21, 2005 Chapter 3 Accessing the System 3-15 Indexes A window of specific commodities appears next to the list of areas. You then select the specific commodity to display from the window by pressing Enter or the left mouse <Enter> button. You then select the specific contract month to display. If you are adding a Future Option, you also select from the following windows. Select Put or Call Select Strike Repeat the above process to program additional contracts in the High Interest Window. To clear entries from the customized lines, use the Arrow Keys and select DTN Default and press Enter or the left mouse <Enter> button. Once you have completed programming your selections, press Menu or the right mouse <Menu> button to exit the High Interest Window menu and Page Functions Menu and return to the original page. Alarms Programmable Alarms allow you to set an upper or lower price limit for a specific Futures Contract or Option, and have the system watch for the limit to be reached. If this price is met, an audio tone sounds, and the "USER PROGRAMMABLE ALARMS" page will appear on the screen, notifying you of the time, date, and price that was met. This feature needs to be activated (Chapter 4) before the feature is listed in the Page Functions Menu. When selected, the following Select Option menu appears in the upper left corner. The Programmable Price Alarms window is displayed on the screen. Select the line to be programmed by moving the BLUE bar with the Arrow Keys or "dragging" the mouse. To activate the Alarm options, click or enter on the blue line. Select Program Alarm. Use the Arrow Keys and select Indexes/Indicators, Index Options, Futures, Futures Options, Future Spreads, Bonds and press Enter or the left mouse <Enter> button. The Indexes/Indicators, U.S. Stocks, Index Options, and U.S. Corporate Bonds will be followed by the Search Method with the ability to do an alphabetical search. Choose the appropriate Ticker Symbol or Issuer Name. Once the Programmable Price Alarm window appears, the Symbol/Name will appear along with the Last. To set Upper and Lower values, click left <Enter> mouse button or press the Enter key on the blue line to activate the Alarm Options window. At this point, you can choose to Program, Set Upper\Lower March 21, 2005 DTN Color System User's Manua Chapter 3 3-16 Accessing the System Values, or Remove Alarm. Click left mouse <Enter> button or use the arrow up and down keys to highlight your choice. Press Enter on the option you would like to use. When setting Upper and Lower values, a numeric keypad window appears allowing the user to enter the values desired. 06/01/97 13:00 DTN Pg # XXX.XX is Current LAST Value, Enter Lower or Upper Alarm Value 0000.00 7 8 9 Clear 456 123 + 0 - Enter Figure 3-9 (Numeric Keypad) Using the Keypad and the Arrow Keys select each digit of the upper or lower value desired and press Enter or click on the left mouse <Enter> button. Enter the left most digit first; it will slide over as other numbers are entered. You are returned to the Programmable Commodity Alarms page when Enter is pressed. To set alarms on specific Futures and Futures Options, click the left mouse <Enter> button or press the Enter key on the line you wish to program. Choose Program Alarm and indicate Futures or Futures Options in the Select Type window. You then select the commodity you want to display from the following menu. Grains Livestock Other Ag Financials Currencies Energies Metals Indexes DTN Color System User's Manua March 21, 2005 Chapter 3 Accessing the System 3-17 Next a list of specific commodities appears on the screen. You then select the specific commodity to display from the window by pressing Enter or the left mouse <Enter> button. You then select the specific contract month to display. If you are adding a Future Option, you also select from the following windows. Select Put or Call Select Strike You are returned to the Programmable Commodity Alarms page, when a contract has been selected. Select Set Upper Value or Set Lower Value using the Arrow Keys and press Enter or the left mouse <Enter> button. Program the values using the numeric keypad. If you want to delete a line, move the BLUE bar to the line, select Remove Alarm from the Alarm Options menu. This allows you to clear an entire line. If you want to remove only the upper and lower alarms and save the commodity and last price, select Clear Set Values from the Alarm Options Menu. This will allow you to choose which item you would like to clear. (Upper value, Lower value, or both) Once contracts have been programmed, the Programmable Commodity Alarms page will appear with a list of all the alarms and their current status. They will be in RED with a time and date next to them if they have been met. The line will be in black if the alarm is still active and the price has not yet been hit since the alarm was set. Once you have completed programming your selections, press Menu or the right mouse <Menu> button to exit the Alarm Options menu and Page Functions Menu and return to the original page. Title Line - Special Codes and Messages The line of information displayed along the top of every screen you access is called the title line (Figure 2-1). It includes the following information: date, time (24 hour clock, Central Time Zone), segment name (which you are currently accessing or the previous segment accessed if a menu is currently displayed), page name (which you are accessing or the previous page accessed if a menu is currently displayed), page number (first page of a segment is page number 1 and so on), and any special code or message for the screen displayed. From time to time, a special code or message may be displayed on the title line (extreme right side). These are defined as follows; Special Code/Message QM March 21, 2005 Meaning Quote Mode. You have accessed a page of information that is being updated continuously. For example, QM DTN Color System User's Manua Chapter 3 3-18 Special Code/Message Accessing the System Meaning displayed on the Energy Futures Quotes page means that the information will continue to be updated even as you are viewing it. * When an asterisk is displayed, your receiver has received new information. An asterisk is also displayed next to each page title on the page menu that has been updated since you last viewed it. When the musical note symbol is displayed, audio is available for the page. Note the audio on some pages may automatically begin once you access the page. Alt When Alt is displayed, the Alt Key is active; the system is waiting for you to press the next key for the command you want to enter. You have about two seconds to do so. Otherwise, you will need to press the Alt Key again. See Chapter 6 and Chapter 7 for use of the Alt Key as you customize Futures and Options charts and utilize programmable pages. /SM When more lines of information exist for a page than can be displayed on one screen, the or SM (Scroll Mode) symbol appears. A scrollable page has a GREEN BAR at the bottom page and a line of instructions. Once in the Scroll Mode, you can move among the screens of information by using the Up and Down Arrow Keys or mouse. Alarm The Alarm message is flashing in RED when an Alarm has been set and the price of a commodity meets the upper or lower value. This message will flash until the next Ask, Bid or Trade has taken place. System Busy The System Busy message is displayed when the system is working and cannot accept any entry from the user (either using the keys or a mouse). The message is usually displayed for only a few seconds at a time. Check Reception This message will appear if more than 20 errors (CRC's, Frame length Message, Other) are received in 4 of 6 one hour time blocks. The Check Reception message will go away after the unit has had less than 20 errors in 4 of 6 one hour time blocks, or when the unit is rebooted. DTN Color System User's Manua March 21, 2005 Chapter 3 Accessing the System Special Code/Message Signal Loss Waiting for... (Seg Def, Routing Table, Seg List, ...) March 21, 2005 3-19 Meaning This message will appear if the unit has Transponder lock but no data or no Transponder and no Data lock for 2 minutes or more. This message will leave your screen the very moment Data Lock has been regained. These messages may display at the time of connection to the satellite. If one of the messages displays longer than four hours, contact DTN’s Customer Service 1-800-7795779. DTN Color System User's Manua Chapter 4 System Menu Accessing System Information The System Menu on the home screen consists of several pages you can access. (See Figure 4-1) You can select the pages within the System Menu just as you selected segments and pages within the Main Menu (Chapter 3). Likewise, the first line of information on each page is the title line. To activate each window, highlight your selection using Arrow Keys, then press the Enter key or click the left mouse <Enter> button. 06/01/97 13:00 Main Menu DTN System Menu Pg # Help Menu Statistic Pages Printer Menu System Log Set Alarm Volume Level Alarms On High Interest Window Configuration User Custom Segment Off Screen Saver Set Up Set Passwords Passthrough Segment Configuration Keyword Search Set Up Time Zone Configuration Restart Receiver Shutdown Receiver Figure 4-1 (System Menu) Statistics Pages March 21, 2005 DTN Color System User's Manual Chapter 4 4-2 System Menu Page one of the general statistics is divided into four sections. (See Figure 4-2.) The first section contains information relating to your printer if you have one attached. The other three sections, Data Receiver, Data Statistics, and Disk Statistics, contain information regarding data reception. All four sections can be helpful when resolving problems, whether you are doing so yourself or working with one of DTN's Customer Service Representatives. If you are experiencing problems, please refer to Appendix B - Troubleshooting Guide for assistance. TID Model FF01-A4AC VERSION V3.08.01-V3.19.02 D7001 Communications: Parallel Driver: HP 550C Print Queue Entries: 0 Data Receiver Transponder Lock 0 0 2 4 6 8 Signal Level LNB: Offset -1 Data Lock 0 10 Alignment Tone 0 Connected 0 Overload 0 High 0 Low 0 Data Statistics Communication Reception: Packets Received 154,256 Messages Processed 12,741 Characters Processed 7,104 Characters Corrected 0 Communication Errors: CRC 17 Frame Length 4 Buffer Overflow 0 Message 0 Other 0 Disc Statistics Free Characters 135,069,784 Characters Used 27,693 Accesses 86,192 Unusable Sectors 52 Transaction #1: 00E3A6EB Transaction #1:00E3A6EB Figure 4 - 2 (Statistics Page 1) The line of information following the title line contains your Terminal IDentification (TID), version numbers of your communications processor (first four characters in the format xx.xx) and graphics processor (second four characters in the format xx.xx), and the model of your receiver. DTN Color System User's Manua March 21, 2005 Chapter 4 System Menu 4-3 Whenever contacting DTN, be sure to have your Terminal Identification available for the Customer Service Representative. This identifier allows the Representative to access all of the information about your system on record with DTN. Printer The following information is contained in the Printer section of the Statistics Page. Title Description Communications Parallel or Serial, depending on your printer. If Serial, the baud rate is also displayed. Status Off-line (printer not connected) or on-line (printer connected). Driver Type of printer you have selected to use. Paper Empty If you are out of paper, the oval is black. Otherwise, it is empty. Error If any error exists, the oval is black. Otherwise, it is empty. For example, if you are out of paper or your printer is not connected to the receiver, the oval will be black. Print Queue Entries March 21, 2005 If you have selected multiple pages to be printed, the number of pages remaining to be printed is displayed. DTN Color System User's Manua 4-4 Chapter 4 System Menu Data Receiver The following information is contained in the Data Receiver section of the Statistics Page. Title Description Transponder Lock If your satellite dish is aligned with the satellite, this oval is black. If it is empty, you need to check the alignment on your satellite dish. Data Lock If your system is receiving information from DTN, this oval is black. If it is empty, no data is being received. If it remains empty for an extended period of time, you need to check the alignment on your satellite dish. Alignment Tone If the alignment tone switch on the back of the receiver is turned on, this oval is black. If it is empty, the alignment tone is turned off. Signal Level Relative strength of the signal. Used when aligning your satellite dish. Ideally, the signal level will be eight. LNB Offset When the LNB Offset is +/-12 or beyond, or constantly fluctuating, contact DTN Customer Service Connected The receiver supplies power to the LNB. When power is being supplied to the LNB as it should, this oval is black. If it is empty, power is not being supplied to the LNB. Overload If too much current is being supplied from the receiver to the LNB, the oval is black. High/Low Indicates if the satellite receiver needs to be adjusted. If the oval remains black longer than one hour, contact the Customer Service Department. Data Statistics DTN Color System User's Manua March 21, 2005 Chapter 4 System Menu 4-5 The following information is contained in the Data Statistics section of the Statistics Page. Title Description Communication Reception: Packets Received Each time a packet of information is received from the satellite, the number displayed is increased. The increasing number indicates your system is receiving data as it should. Messages Processed Each time a complete message is received from the satellite for which your system is authorized (based on your subscription), the number displayed is increased. (Each message is made up of one or more packets.) The increasing number is a further indication your system is receiving data as it should. Characters Processed As characters of information are received from the satellite, the number displayed is increased. (Characters Processed equals the number of messages received multiplied by the size of each message.) The increasing number is an indication your system is receiving data as it should. Characters Corrected For future use. Communication Errors: CRC Cyclic Redundancy Check. When a packet is sent to your receiver and it has an error, the CRC is increased by one. Frame Length Number of times your system was not able to distinguish that a single transmitted packet was actually two different packets. Buffer Overflow If your receiver has received more information than it can handle, this number is increased by one. Message Each time there is a message error (caused by a packet error), this number is increased by one. Other Number of times errors other than those tallied above have occurred. March 21, 2005 DTN Color System User's Manua Chapter 4 4-6 System Menu You may reset the above counters to zero by pressing the Alt Key while on the Statistics Page. In working with one of DTN's Customer Service Representatives, you may be asked to reset the values to zero and then call back in an hour or so to report the new values to assist in problem resolution. Disk Statistics The following information is contained in the Disk Statistics section of the Statistics Page. Title Description Free Characters Number of characters available for use on the receiver's hard drive. Characters Used Number of characters in use for storage of data on the receiver's hard drive. Accesses Number of times data has been accessed on the receiver's hard drive. Unusable Sectors Number of bad sectors (not available for use) on the receiver's hard drive. Extended Statistics The extended statistics pages can be accessed by pressing the Page FWD key of the receiver, while in the first statistics page. These pages contain information relating to receiver statistics, hardware statistics, and service codes. These pages are used by the Customer Service Department, as an aid to technical problem solving. To return to the General Statistics page, press the Page BKWD key of the receiver. DTN Color System User's Manua March 21, 2005 Chapter 4 System Menu 4-7 Printer Menu The Printer Menu will contain a list of printer settings and options to be used based on the make and model of your printer. Printer Selection Help The Printer Selection Help segment will assist you finding a printer that is compatible with your DTN Color System. Printer Selection The Printer Selection page (Figure 4-3) is where you specify what type of printer you are using with your DTN Color System. Highlight the Printer Selection line to access the printer database. Select the appropriate print driver to be initialized on the system. This selection now appears in the Printer Driver section of the Statistic Page. 06/01/97 13:00 DTN Pg # Printer Selection Apple ImgWtr II ASCII Dump Citizen GSX 190 Epson FX-80 *** Many More *** Figure 4-3 (Printer Selection) Printer Communications The Printer Communications page (Figure 4-4) is where you specify how your printer will be communicating with your DTN Color System. For serial, the baud rate is given followed by N (no parity), 8 (eight data bits), and 1 (one stop bit). Highlight and make your selection. This selection now appears in the Communications section of the Statistics Page. March 21, 2005 DTN Color System User's Manua Chapter 4 4-8 06/01/97 13:00 System Menu DTN Pg # Printer Communication Parallel Serial 9600 N81 Serial 1200 N81 Figure 4-4 (Printer Communication) Typically either the Parallel or Serial 9600 is selected. For further information, refer to your printer manual. Printer Options The Printer Options page (Figure 4-5) is where you specify how your printer will be communicating with your DTN Color System. 06/01/97 13:00 DTN Pg # Printer Options Color Off Image Normal Form Feed On Text On Low Resolution Off Finished Figure 4-5 (Printer Options) The following options are selected in the Printer Options section of the System Menu. The availability depends upon the Printer Driver Selected. Highlight and make your selection, Option Description Color When highlighted the Color indicator changes to either ON or OFF. Image When highlighted, the Image selection changes to either the NORMAL or REVERSED mode. Form Feed on Text The Form Feed indicator changes to either ON or OFF DTN Color System User's Manua March 21, 2005 Chapter 4 System Menu 4-9 Option Description when highlighted. Low Resolution The Low Resolution changes to either ON or OFF. If choosing ON, your printing will be faster, but offers less quality. Finished When all Printer Options have been set, highlight FINISHED and the Print Driver will be set. Delete Printer Queue The Delete Printer Queue option (Figure 4-6) will let you delete any selected pages from the print queue before they are printed. 06/01/97 13:00 DTN Pg # Printer Menu Printer Selection Printer Communications Printer Option Delete Printer Queue Figure 4-6 (Delete Printer Queue) System Log This page is used by the Customer Service Department, as an aid to technical problem solving. The log entries will include error messages, the time the system starts up, and when the first time stamp is received. The log will contain up to 150 records and will allow multi-line entries per error message. When the log is viewed, the errors will be displayed in chronological order from newest to oldest. Set Alarm Volume Level The volume level is adjusted to suit your situation. The volume can be set at 0 to offer no sound or adjusted up to a distinctly audible level to attract attention. This alarm will sound when a programmed high or low is attained, or any headline filter programmed to beep. March 21, 2005 DTN Color System User's Manua Chapter 4 4-10 System Menu Alarms This message (Figure 4-6) is an indicator of the current status of the Price Alarm function. The User Programmable Price Alarm feature allows you to set an upper or lower price limit for specified futures options or contracts and directs the system to watch for these limits. As a selection is made the function toggles between ON or OFF. Refer to Chapter 3 for information on setting the Alarm. To activate the Programmable Price Alarm feature, the Alarm must be "ON". 06/01/97 13:00 DTN Pg # Message Alarms ON!! OK Figure 4-6 (Alarms) High Interest Window Configuration High Interest Window This window (Figure 4-7), when activated, appears at the bottom of a page within a segment after a period of keyboard inactivity. When ON, you can observe up to 7 lines of news headlines and/or options and contracts while viewing another page. The ability to activate a beep with Keyword headlines is provided along with the option to limit the display of information lines. Define High Interest Window Lines Select the number of lines up to 7. Once the number of desired lines has been entered, the High Interest Line Configuration Window will appear. Each Line can be configured as either a Quote Line or a News Headline, by clicking the left button of the mouse or pressing the Enter Key to toggle between headings. To save all configured lines, exit the screen by pressing Menu or clicking the right mouse button. Enter Yes on the save configuration prompt. Set Window Delay Time Select the delay in seconds after which you want the window to appear on a page. Select the seconds desired using Arrow Keys or mouse, then press the Enter key or click the right mouse button on Enter. Refer to Chapter 3 for information on displaying Futures or Options contracts in the High Interest DTN Color System User's Manua March 21, 2005 Chapter 4 System Menu 4-11 Window. To activate the High Interest Window when you are on a page, the indicator must be "ON". 06/01/97 13:00 DTN Pg # Enter Delay Time in Seconds (3 - 60) 40 7 8 9 Clear 4 5 6 1 2 3 + 0 - Enter Figure 4-7 (High Interest Window) Select News Source Segments Sources of News information can be programmed to reflect the user's preference. By clicking the left mouse <Enter> button or pressing the Enter key on the highlighted news segment. These news sources will be included in the headline searches. As the source is chosen, an * will appear next to the news source. To remove from the list of sources, click the left mouse <Enter> button or press the Enter key. (The (*) will be removed.) HIW Headline Filter Configuration This option can be used to allow a search or filtering of news headlines. To activate this option, click left mouse <Enter> button or press the Enter key to display Filter options. By clicking left mouse <Enter> button or pressing the Enter key on the first line, the on\off command can be set. Once on, highlight the Program Headline Filter and press the Enter key or click left mouse <Enter> button. The Select Keyword window will appear. By using the Add/Reprogram Keyword function, a title or string of words can be programmed to pull headlines. (See Keyword Search, Chapter 3). Once the Keyword has been entered, indicate Yes on the save prompt. To save on the Keyword List, click on any program line ( The previous word will be replaced.) The programmed word will be highlighted on the screen below the Select Keyword window. Move the highlight bar to next option; Display All Headlines - Highlight Filtered headlines\ Display Filtered Headlines Only. By clicking the left mouse <Enter> button or pressing the Enter key, the display is set to your viewing preference. “*Display Filtered Headlines Only” will show as a blank window until the Keyword search is successful. An alarm can be set to coincide with the filtered Headlines. March 21, 2005 DTN Color System User's Manua Chapter 4 4-12 System Menu Highlight Beep on Filtered Headlines On\Off and click the left mouse <Enter> button or press the Enter key to engage or disengage the sound. Program Quote Line This function allows the programming of each Quote line configured in Define High Interest Window Lines. Access this function by highlighting and pressing the Enter key or pressing the left mouse <Enter> button. Those lines configured as Quote lines will show in a blue highlight. Enter or click on the blue highlight bar and select Program Quote or Program Header. Choose the appropriate heading and select the Commodity or symbol to be displayed. Set to DTN Default This function is used to restore the High Interest Window to default settings: High Interest Window Off, 3 Quote lines, Window delay time of 10 seconds, Headline Features Off, Two Futures Headers, and 5 blank lines. *When the default setting is selected, all of the previously programmed information will be lost. User Custom Segment This message (Figure 4-8) is an indicator of the current status of the User Custom Segment which is either ON or OFF. When ON is selected, the selection bar on the Main Menu will automatically default to the User Custom Segment on the Main Menu. When OFF is selected, the selection bar will return to the line in the Main Menu where you last were. Make your selection, then press the Enter key or click the left mouse <Enter> button. 06/01/97 13:00 DTN Pg # Message User Custom Segment OFF! OK Figure 4-8 (User Custom Segment) Screen Saver Setup DTN Color System User's Manua March 21, 2005 Chapter 4 System Menu 4-13 Your service may not include the Screen Saver (Figure 4-9) function for general purposes. When activated, the screen saver feature helps preserve the overall color and image quality of the pages appearing on your monitor. You will be able to turn off the screen saver feature for up to a 12-hour period each day. Select Screen Saver Setup. From here, you can enter the starting time and period you wish to begin disabling the screen saver function. Enter a beginning time in military format (07 for 7:00 AM) for the Screen Saver to be disabled. Select the time desired using Arrow Keys or mouse, then press the Enter key or click the right mouse <Enter> button on Enter. Enter the number of hours (08 for 8 hours) for the Screen Saver to be disabled. Select the time desired using Arrow Keys or mouse, then press the Enter key or click the right mouse <Enter> button on Enter. 06/01/97 13:00 DTN Pg # Enter the Hour to Turn Off the Screen Saver (0 - 23) or Enter the Period to Deactivate the Screen Saver ( 0 - 12 hrs) 00 7 8 9 Clear 4 5 6 1 2 3 + 0 - Enter Figure 4-9 (Screen Saver Set Up) Set Passwords The password protection feature can be programmed to specific segments to limit viewing capability. If you choose to access this function, make certain to WRITE DOWN your password as you will be locked out of any segments you have setup with password protection. Passthrough This section lists all segments that are authorized to pass data to a computer. March 21, 2005 DTN Color System User's Manua 4-14 Chapter 4 System Menu Segment Configuration This segment allows you to select and display your favorite segments on the Main Menu. Keyword Search Set Up The Sources of News information are indicated with this function. Click the left mouse <Enter> button or press the Enter key on highlight bar. Next, the “Tag Segments for Keyword Search” will appear. Click the left mouse <Enter> button or press the Enter key to choose the News Source (indicated by an *). To remove choices, click on highlight bar and the * is removed. Once all News Sources are satisfactory, click the right mouse <Menu> button or press the Menu key. Time Zone Configuration This segment allows you set the DTN Color System time to reflect the Time Zone where you are located. Restart Receiver This is used to reboot the DTN Color System. Shutdown Receiver This is used to power down the DTN Color System. DTN Color System User's Manua March 21, 2005 Chapter 5 Help Menu Accessing Help Help is readily available on the DTN Color System in many different ways. To initially assist, a Help window is available on the bottom of each page. Help is one of the three main categories (Main Menu, System Menu, and Help Menu) displayed on the second line of the Main Screen (Chapter 2). Help can also be accessed through the Page Functions Menu when a page is displayed (Chapter 3). A Help window also appears at the bottom of the screen to assist as you set many of the System function selections (Chapter 4) and as you customize the Futures and Options chart pages (Chapter 6) and Programmable Quote pages (Chapter 7). March 21, 2005 DTN Color System User's Manual Chapter 5 5-2 Help Menu Accessing Help From the Main Menu When the Main Menu or System Menu is displayed on the second line after the Title Line, move to the Help Menu using the Arrow Keys and press Enter or by moving the mouse cursor to the Help Menu and pressing the left mouse <Enter> button. Select the Help Menu topic desired with the highlight bar, then press the Enter key or clicking the left mouse <Enter> button. Accessing Help When a Page is Displayed When a page is displayed, press the Alt Key, then the Menu key or press the left mouse <Enter> button. In the Page Functions Menu, select Help with the highlight bar, then press the Enter key or click the left mouse <Enter> mouse button. Select the Help Menu topic desired. To return to the page or segment you were on originally, press the Menu key or click the right mouse <Menu> button. Phone Support Available from DTN When you have a question or cannot resolve a problem using this manual or online help as a resource, please contact DTN's Customer Service Department. The hours are 6:00 a.m. - 7:00 p.m. Central Time, Monday through Friday: CALL (800) 779-5779 DTN Color System User's Manua March 21, 2005 Chapter 6 Futures/Options and Charts Introduction This section of the DTN Color System manual explains both the Energy Futures and Charts segment and the Intraday Pro segment. The Energy Futures and Charts segment contains several fixed Futures and Options quote pages and pages of technical charts. You select the commodities to chart and the technical charting tools to analyze the daily, weekly, and monthly moves in the market. The Intraday Pro Charts segment has additional chart pages that can be customized to chart future and option contracts in a one minute to one hour time interval. Futures and Options Quotes March 21, 2005 DTN Color System User's Manual Chapter 6 6-2 Futures/Options and Charts The Energy Futures and Options segment have fixed quote pages for NYMEX futures and options, NYMEX futures openings, and NYMEX ACCESS trading activity. The trading activity is in BLUE for Instant Quotes and Black for Delayed Quotes. The Energy Futures and Options from the following exchanges are displayed on the fixed pages. * NYMEX (New York Mercantile Exchange) * NYMEX ACCESS (Evening Electronic Exchange) * IPE (International Petroleum Exchange) * KCBT (Kansas City Board of Trade) Futures Quote A future is a contract for the purchase or sale of a commodity which is traded for future delivery. The trading activity of an Energy Future on a fixed quote page is displayed in Figure 6-1. NATURAL GAS HEATING OIL HIGH LOW LAST CHG PROPANE HIGH LOW LAST CHG HIGH LOW LASTCHG APR 2230 2180 2207 -51 APR 5950 5750 5927 +51 APR 3425 3425 3425 -38 MAY 2220 2180 2205 -29 MAY 5565 5410 5534*+57 MAY 3375 3375 3375 -30 JUN 1950 1945 1948 -6 JUN 5410 5275 5379 +72 JUN 3525 3440 3490* -40 JUL 1955 1922 1932 -8 JUL 5360 5240 5339 +72 JUL *** MORE *** *** MORE *** *** MORE *** Figure 6-1 (Energy Futures) The following symbols are used in the Futures fixed quotes pages. Symbol DTN Color System User's Manua Description March 21, 2005 Chapter 6 Futures/Options and Charts Symbol 6-3 Description Ask Price (a) Asking price. The lowest price seller is willing to accept on a contract. Bid Price (b) Offer on contract. The highest price a buyer is willing to pay. Change (CHG) Last quote change from previous DAY session close. High, Low Highest/Lowest price from current day trading sessions. If this is blank, the contract has not traded in the current session. Highlight Bar Indicates that the contract has updated, and will stay highlighted until another contract on that page updates. Last Most recent trade from the current session. May be ask bid, or trade. Market Tick Arrow Indicates if current trade is higher or lower than the previous trade. RED Highlight Indicates that new trading session high or low has been set for a contract. " If an initial Bid or Ask is recorded, a BLANK high or low remains until the contract first trades. " * Purple Highlight Denotes that a contract has not traded during the current session or that the market is closed. Fast alerts indicate that quotes are being set from the exchange on a best effort basis due to fast trading activity. Only the last price will be highlighted in purple. Options Quotes An Option is a contract to sell at a set price called the Strike Price. The trading activity of an Energy Future option on a fixed quote page is displayed in Figure 62. March 21, 2005 DTN Color System User's Manua Chapter 6 6-4 CRUD E PT-MAY-CL 18.5 Futures/Options and Charts PT-JUN-CL 369* 1* 251* *** MORE *** 31 186* *** MORE *** 3 *** MORE *** 19.0 1* 319* 1 19.5 1* 269* 2* 20.0 1a 219* 20 42 20.5 1 140 7 154* 108 21.0 2 90 49 15 140 21.5 7 67 22.0 12 6* 201 298* PT-JLY-CL 280* *** MORE *** 1 90 303* 76* *** MORE *** *** MORE *** 40* *** MORE *** 35* *** MORE *** 9 *** MORE *** Figure 6-2 (Options Quotes) Technical Charts The Energy Futures and Charts segment have five pages of technical charts. Initially, these charts have been preset to various Energy commodities. These Charts may also be customized. You can display charts of your own selection from Energy and non-Energy commodities in daily, weekly continuation, or monthly continuation format. Individual contract months can be chosen and displayed. The chart can be customized into a full page, one, two, or three window displays. To begin, select a chart you want to customize and access the Page Functions Menu (Figure 6-3). Press the Alt Key then the Menu Key or move the mouse pointer to the screen and press the click one time with the left mouse <Enter> button. 06/01/97 13:00 DTN DTN Color System User's Manua Pg # March 21, 2005 Chapter 6 Futures/Options and Charts 6-5 Page Function Menu Chart Analysis Chart Selection Chart Window Options Chart Parameter Options DTN Default Quick Quote Keyword Search Formulas Alarms Personal Library User Custom Help Figure 6-3 (Page function menu) Chart Analysis This section explains how to set various features to analyze commodity market movement. Select Chart Analysis and the following Page Functions Menu items are displayed. Select from the Chart Analysis items. Price Bar Mode Draw Trend Lines Erase Single Trend Line Erase Trend Lines Draw Retracement Clear Retracement Zoom In Scroll Price Bar Mode Select Price Bar Mode from the Page Functions Menu. A yellow indicator line is displayed on the chart on the left side of the screen. Actual data corresponding to the location of the yellow indicator is displayed along the bottom of the screen. Use the Arrow Keys to move the yellow indicator left and right; the data along the bottom of the screen will change appropriately, reflecting the proper information for the day, week or month. March 21, 2005 DTN Color System User's Manua Chapter 6 6-6 Futures/Options and Charts You can also use the mouse to move the yellow indicator by positioning the pointer anywhere on one of the windows on the page. Then, as you hold down the left button, move the mouse pointer to position the yellow indicator as desired. Once you let up on the left mouse button, the yellow indicator will remain in its current position. Press the Menu Key or the right button on the mouse while mouse pointer points to the blue portion of screen to return to the previous menu. Note: The yellow indicator "wraps" around the screen. For example, to quickly move it to the extreme right side of the screen from its original position, press the Left Arrow Key. Draw Trend Lines Select Draw Trend Lines from the Page Functions Menu. A small red cursor (in the shape of a circle) is displayed in the upper left corner of the top window (if more than one window is displayed). Use the Arrow Keys to the point where you want to begin the trend line and quickly push the Enter key to anchor the start of your trend line. Move the cursor to the second reference point and press the Enter key again. The trend line will extend to the edge of the chart. You can also use the mouse to draw trend lines. Hold down the left button to move the cursor to the point where you want to begin the trend line, release the left button, then click the right button to anchor the start of your trend line. Hold down the left button again to locate the second reference point, release the left button, then click the right button to complete the trend line. You can repeat the above process again to create a second trend line. The trend lines will automatically extend each day as the charts are updated. To remove the trend lines at any time, select Erase Single Trend Line or Erase Trend Lines on the menu. Erasing trend lines is explained in detail below. Press the Menu key or the Right <Menu> mouse button to return to the previous menu. Note: If you hold the Enter Key or the right mouse button too long while locating a point for your trend line, a vertical line is displayed. Press the Menu key or left mouse <Menu> button to reach the previous menu and select Erase Trend Lines. Press the Enter key or right mouse button and the chart is displayed with no trend lines so you can start over by selecting Draw Trend Lines. Erase Single Trend Line or Erase Trend Lines If you want to erase only ONE Trend Line, select Erase Single Trend Line from the Page Functions Menu. A small green cursor (in the shape of a circle) is displayed in the upper left corner of the top window (if more than one window is DTN Color System User's Manua March 21, 2005 Chapter 6 Futures/Options and Charts 6-7 displayed). Use the Arrow Keys to move the cursor to the trend line you want to erase and quickly push the Enter Key. You can also use the mouse to erase trend lines. Hold down the left button to move the cursor to the trend line you want to erase. Release on the left button, then click the right button. Click on YES to erase trend line with the right button on the mouse. If you want to remove ALL Trend Lines, select Erase Trend Lines from the Page Functions Menu and all will be deleted. Draw Retracement A retracement is a price move in the opposite direction from the previous trend. There are certain key percentages of retracement where market psychology rebels and the winners from the previous move attempt to re-establish the trend. Further Retracement information is located in the Help Menu. Select Draw Retracement from the Page Functions Menu. A small gold arrow and a capital "R" will appear at the upper left corner of the bar chart. Use the Arrow Keys or hold the left mouse <Enter> button to move the "R" to the first major high or low you select. Press Enter or the right mouse button. A small green dot will confirm the first location. Move the "R" to the second major point. If the first was a low, the second should be a high, and visa versa. Press Enter or the right mouse button. The retracement ratios are represented by three horizontal gold lines. Note: Retracements may be drawn on both full screen and zoomed charts. Clear Retracement To clear the retracements, press the left mouse <Enter> button or Menu key to return to the Page Functions Menu. Select Clear Retracement and press Enter or click the left mouse <Enter> button. Zoom In When using Trend Lines or Retracements, the full screen chart may make detail difficult to see. Use the Zoom feature to magnify a portion of the chart to the full size of the window, with a minimum of 10 days. Select Zoom In and press Enter or click the left mouse <Enter> button. A Red vertical line appears in the left corner of the window. Use the Arrow Keys or hold the left mouse button to move the Red vertical line to the first position of the period in time selected. Press Enter or click the right mouse button and a Green vertical line marks the first position. Use the Arrow Keys or hold the left mouse button to move the Red vertical line to the last position of the period in time March 21, 2005 DTN Color System User's Manua Chapter 6 6-8 Futures/Options and Charts selected. Press Enter or the right button. The area between the Red and Green lines will be expanded to fill the chart window. Note: Once the Zoom In has been set, you can return to the Page Functions Menu and draw Trend Lines or Retracements. Zoom Lock The Zoom Lock feature allows you to keep a chart in Zoom mode even if you leave the page. To Zoom Lock, after zooming in on the desired area, the Analysis Function window will appear on the screen with Zoom Lock highlighted. Press Enter or click on the left mouse <Enter> button. When Zoom Lock is active, the chart will display the word Zoom in the upper right corner of the chart. To deactivate the Zoom Lock, repeat the Zoom Out function. Note: The Zoom Lock does not permanently anchor your position. If you leave the page and return on a chart, the most current datapoint will be displayed; however the zoom mode will still be in effect. . Zoom Out When finished, you can return to the full screen display by selecting Zoom Out on the Page Functions Menu. Choosing a different chart to display will also result in a Zoom Out. Scroll When in the Zoom In function, you can scroll the days displayed in the window. Select Scroll on the Page Functions Menu. A Red "S" in a Green circle appears in the upper left corner of the window. Use the Arrow Keys or the left mouse <Enter> button to scroll the days displayed in the window. If more data points are available, the daily, weekly, and monthly information will scroll, also. Chart Selection This section shows you how to change a displayed chart to one of your choice. You begin by selecting the chart you want to change. Go to Page Functions Menu by pressing the Alt button then Menu button. Select Chart Selection from Page Functions Menu and the following items will be displayed. DTN Color System User's Manua March 21, 2005 Chapter 6 Futures/Options and Charts 6-9 Indexes Futures Futures Spreads International Futures To begin, select the type of chart you wish to display from the menu, move to either the Indexes, Futures, Futures Spreads, or International Futures line using the Arrow Keys or the mouse. Press Enter or the left mouse <Enter> button to select. Then follow the prompts to set up your chart. Once your chart is complete, you may use the Chart Window Options and Chart Parameters Options to customize the display you see on the screen. Chart Window Options This section shows you how to customize the window arrangement on your screen. Select Chart Window Options from the Page Functions Menu and the following menu is displayed. To begin, from the Page Functions Menu, move to the window arrangement desired with the Arrow Keys and press Enter or by clicking the left mouse <Enter> button on the selection. Full Page 2 Window 3 Window 1 Window + High Interest 2 Window + High Interest Full Page or 1 Window + High Interest Next select the window option by pressing the Enter key or the left mouse <Enter> button. When a Full Page or 1 Window + High Interest selection is chosen, the following window of Window 1 Study options appears. Each is toggled as ON or OFF using the Enter key or the left mouse <Enter> button. Bar Chart Parabolic Moving Average 1 Moving Average 2 Moving Average 3 BCI Bollinger Band Finished March 21, 2005 DTN Color System User's Manua 6-10 Chapter 6 Futures/Options and Charts Select an option, then press the Enter key or click the left mouse <Enter> button. Repeat this step to make all option selections, turning each option either ON or OFF. Once you are finished, select Finished. Press the Menu key or click the right mouse <Menu> button to remove the Page Functions Menu displayed in the upper left corner and view the chart. 2 Window, 3 Window, 2 Window + High Interest If you select "2 Window", "3 Window", or "2 Window + High Interest" from the Chart Windows menu, the Study On menu is displayed. Select the desired window to customize. Toggle each of the Window Study option either ON or OFF and select Finished. Repeat this for each window. When all windows are customized, select Finished on the Study On menu. With the "2 or 3 Window + High Interest" option, you can program the High Interest window as one of the chart windows. Press the Menu key or the right mouse <Menu> button to remove the Page Functions Menu displayed in the upper left corner and view the chart. Study On Menu Technical Indicators Moving Average This “Technical analysis“ tool is well suited to identify long term trends. The method used applies the averages of near-term prices in relation to long-term prices, allowing you to stay on the right side of the market’s trend. RSI The Relative Strength Index indicates the probability that timing is correct for a purchase or sale. A common characteristic of the RSI is that it rarely falls below 25% and rarely rises above 75% ( This may vary by commodity). The RSI indicator is in best conjunction with a daily chart, allowing easy observation of a trend. Stochastics This indicator supplies calculations based on rate of change in the high, low, and close. When the %K line crosses the % D line, this may signal a Market move in the opposite direction. It is best to use stochastics as a confirming indicator along with other technical signals. MACD This indicator is a cross between an oscillator and a moving average. One unique feature is its use of exponential moving averages (EMA’s) rather than simple moving averages (SMA’s). SMA’s can swing quickly when “outlier” days enter/leave the window of days used for the average. DTN Color System User's Manua March 21, 2005 Chapter 6 Futures/Options and Charts 6-11 ADX The ADX stands for Average Directional Movement Index. A 14 day ADX is used on DTN. The ADX shows whether the market is trending, or mostly moving sideways. CCI The Commodity Channel Index was devised as a way to measure the trendlines of the market, with rising values confirming a market that was trending higher. Many traders now use it as a contrarian indicator, much like RSI or Stochastics. Bollinger Bands Bollinger Bands are envelopes which surround the price bars on a chart. Bollinger Bands are plotted two standard deviations away from a simple moving average. This is the primary difference between Bollinger Bands and envelopes. Envelopes are plotted a fixed percentage above and below a moving average. Because standard deviation is a measure of volatility, the Bollinger Bands adjust themselves to the market condition. They widen during volatile market periods and contract during less volatile periods. Bollinger Bands become moving standard deviation bands. Chart Parameter Options This section shows you how to customize the lengths used in chart studies. You can change the number of days used in the moving average, RSI, or stochastic calculations or to change the percentages used for retracements. Select Chart Parameter Options from the Page Functions Menu and the following Chart Parameter menu will display. Moving Average 1 (# Days) Moving Average 3 (# Days) Stochastics (# Days) MACD CCI (# Days) Bollinger Bands (# Days) 06/01/97 13:00 Moving Average 2 (# Days) RSI (# Days) Retracements (# Days) ADX (# Days) BCI DTN Pg # Enter Moving Average Days (1-200) 005 7 8 9 Clear 4 5 6 March 21, 2005 DTN Color System User's Manua Chapter 6 6-12 Futures/Options and Charts 1 2 3 + 0 - Enter Figure 6-4 (Parameter Options) Use the Arrow Keys and press Enter for each selected three digit setting. If the number is less than 100, enter a leading "0". Press Enter again or the left mouse button to return to the Select Chart Parameters menu. Repeat the selection to change each parameter desired. The commonly used settings for the technical studies are listed below. MOVING AVERAGES 4-19-18, 3-10-18, 5-10-20, 30 Day, 45 Day STOCHASTICS 5 Day, 14 Day, 20 Day RSI 5 Day, 9 Day, 14 Day, 30 Day RETRACEMENTS 25-50-75%, 0-33-66%, 38.2-50-61.8% Other Options DTN Default The DTN Default is used to return the Energy Futures and Charts page to the original chart displayed. To begin, from the Page Functions Menu, move to the DTN Default item with the Arrow Keys and press Enter or click the left mouse <Enter> mouse . Quick Quote This function can be accessed in this menu. The Quick Quote function is explained in Chapter 3. Keyword Search The search or programming function can be accessed in this menu. Choose the Keyword Search from the menu. Click the left mouse <Enter> button or press the Enter key. The Keyword Search Setup is explained in Chapter 3. DTN Color System User's Manua March 21, 2005 Chapter 6 Futures/Options and Charts 6-13 Formulas This function can be accessed through this menu. The Formula function is explained in Chapter 3. To begin, from the Page Functions Menu, move to the item with the Arrow Keys and press Enter or click the left mouse <Enter> button. The High Interest Window function is explained in Chapter 3. Personal Library User Custom The pages within the Energy Futures and Options segment may be saved to either Personal Library or User Custom pages. To save a page to the Personal Library or the User Custom segments, move to the item with the Arrow Keys and press Enter or click the left mouse <Enter> button. The function of the Personal Library or the User Customs pages is explained in Chapter 3. Help The Help Menu can be directly accessed from the Page Function Menu. Move to the Help item with the Arrow Keys and press Enter or click the left mouse <Enter> button. Move within the Help Menu and access the desired information. Press the Menu key or click the right mouse <Menu> button twice to return to the Page Functions Menu. Refer to Chapter 5 for further information on accessing the Help Menu. Intraday Pro Charts The Intraday Pro Charts segment contains additional chart pages. These pages can be customized to chart Future and Option contracts in a one minute to one hour time intervals. The DTN Color System begins capturing Intraday Chart data once the commodities are added to the watch list. Upon entering an Intraday Chart, the time, open, high, low, and last for the last time increment is displayed. When the commodity has traded in the last time increment, the time, high, low, and last are displayed. When the commodity has NOT traded in the last time increment, only the time and last trade are displayed. March 21, 2005 DTN Color System User's Manua Chapter 6 6-14 Futures/Options and Charts The charts may be customized as described earlier in this chapter. The following features differ from those described earlier and pertain only to the Intraday Pro Chart segment. The Personal Library is NOT operational with the Intraday Pro Charts. To begin, select a chart you want to customize and access the Page Functions Menu (Figure 6-3). Either press the Alt Key then the Menu Key or move the mouse pointer to the screen and click the left mouse <Enter> button, one time. Select “Chart Selection” from the Page Functions Menu. *Intraday Pro Charts only charts the “actual trades”, not the bids and asks. Program Item Into Watch List Delete Item From Watch List Select Intraday Chart to Display The DTN Color System begins to build the Intraday Chart once you have "Set Commodity Watch" as explained below. To begin, select Program Item Into Watch List from the Select Intraday Chart Function menu. Select a commodity line to add to the watch list. Use the Arrow Keys and press Enter or click the left mouse <Enter> button. Select a commodity area, specific commodity and contract month for the watch list. Use the Arrow Keys and press Enter for each selected digit or click on each digit with the left mouse <Enter> button. Repeat the above steps to select up to 20 contracts for the Intraday Charts. Press the Enter Key or the right mouse <Menu> button three times to display the Intraday Pro Chart. Chart Selection - Select Intraday Chart to Display You can now select a commodity from the watch list for each page of the segment. To begin, use the Arrow Keys and press Enter or click the left mouse <Enter> button to select a page to chart. Access the Page Functions Menu and select “Chart Selection”, then “Select Intraday Chart to Display” menu item. Use the Arrow Keys and press Enter or click the left mouse <Enter> button to select a contract from the Current Intraday Watch list. Press the Enter key or the right mouse <Menu> button twice to display the Intraday Pro Chart. Repeat the above steps to select additional commodities to display in Intraday Pro Chart segment. Chart Selection - Delete Item from Watch List This functions allows you to delete commodities from your list. DTN Color System User's Manua March 21, 2005 Chapter 6 Futures/Options and Charts 6-15 To begin, use the Arrow Keys and press Enter or click the left mouse <Enter> button to select a chart. Press the <Alt>, then Menu to access the Page functions Menu and select the Delete Item From Watch List. The next menu that will appear is the “Current Intraday Watch List”. Now choose which item you wish to delete and highlight it. Then press Enter or click the left mouse <Enter> button. “Warning commodity data will be deleted” will appear next. Choose yes, by pressing Enter or click the left mouse <Enter> button. Then press Menu or click the right mouse <Menu> button. Chart Selection - Edit Futures Exchanges can and do transmit erroneous price quotes. The Edit Function allows you to change the data at one minute increments. Take the following steps to take out or change this data. From the Page Functions Menu select Chart Analysis and then Edit. A green vertical bar appears on the left side of the chart. This bar can be placed over the bar containing the bad data. Select the minute by moving the green bar either using the Arrow Keys or dragging with the left mouse button. Press Enter or click the right mouse button. The values selected are displayed horizontally across the page i.e. date, time, open, high, low, and close. Press Enter and use the Arrow Keys to select the desired value to change or click the left mouse <Enter> button. Arrow or click on the value to be changed. A keypad appears. Enter the desired value to be changed. Use the Arrow Keys and press Enter for each selected digit or click on each digit with the left mouse <Enter> button. Clear the register before entering new values for the open, high, low, and close. Press Enter or click the left mouse <Enter> button. When changes are completed, press Menu or the right mouse button to exit the Edit function. The chart will be redrawn with the new values in it. Note: The High or Low will automatically be changed if the Open or Close corresponds to the either of those values. Therefore, you only need to make one change in that case. Chart Analysis - Scroll The DTN Color System collects and stores 160 hours of information. However, only 160 bars are displayed at one time. On the Page Functions Menu, select Chart Analysis then Scroll. This feature enables the keypad or the mouse to Scroll back to the beginning of the data. March 21, 2005 DTN Color System User's Manua 6-16 Chapter 6 Futures/Options and Charts Chart Parameters Option - IDC Time Increment You can now select an IDC Time Increment from 1 to 60 minutes for each chart selected. The time increment is listed on the menu to the right of each chart. The default is 1 (one) minute. To begin, use the Arrow Keys and press Enter or click the left mouse <Enter> button to select a page to modify the time increment. This can also be set as you select the commodity to display above. Bring up the Page Functions Menu, select Chart Parameter Options and then IDC Time Increment menu item. A keypad appears. Enter the desired time increment from 1 to 60. Use the Arrow Keys and press Enter for each selected digit or click on each digit with the left mouse <Enter> button. Press Enter or click with the left mouse <Enter> button to record the time increment selected. Repeat the above steps, to set the selected IDC Time Increments. The same commodity may be selected for multiple pages with a different time increment on each page. Each day on a chart is separated by a white broken vertical bar. DTN Color System User's Manua March 21, 2005 Chapter 7 Energy Programmable Quotes Introduction The Energy Programmable Quotes segment allows you to follow individually chosen contracts. These pages can be customized to follow energy and nonenergy Futures and Options contracts. You can select the specific Futures and Options contracts to be listed. The pages can be customized with headers and blank lines. Contracts can be deleted from the page after they expire. March 21, 2005 DTN Color System User's Manual 7-2 Chapter 7 Energy Programmable Quotes Programming the Quote Page To begin, from the Main Menu select the “Energy Programmable Quotes” segment. Select the page using the Arrow Keys or the mouse. Press Enter or click the left mouse <Enter> button to access the page. Either the DTN Default line of information or the last set of contracts you programmed will be displayed. Press the Alt Key, then the Menu Key or click the left mouse <Enter> button to display the Page Functions menu (Figure 7-1). 06/01/97 13:00 DTN Pg # Page Functions Program Quote Page Program Quote Header/Edit Page DTN Default Quick Quote Keyword Search Formulas User Custom Help Figure 7-1 (Page Functions) Program Contracts To program, select Program Quote Page from the Page Function Menu and then choose a line to program from Select Template Line (Figure 7-2). Use the Arrow Keys or click the left mouse <Enter> button to move the blue bar and select the line to program. 06/01/97 13:00 DTN DTN Color System User's Manua Pg # March 21, 2005 Chapter 7 Energy Programmable Quotes 7-3 Select Template Line FUTURE/OPT OPEN HIGH LOW LAST CHG VOLUME Figure 7-2 (Template Window) Next from the Select Type Menu choose what you would like to display and follow the prompts from this point to program you specific information into this line. To exit the programming mode, press the Menu key or click the right mouse <Menu> button twice. The Programmable Quote page now displays the information for the contracts you programmed. Formatting the Quote Page As you are programming, you can format the Programmable Quote page screens with headings or blank lines. This may assist you dividing the page. Expired contracts can also be deleted. Program Future/Option Header From the Page Functions Menu, select Program Quote Header/Edit Page and then choose Program Header. Use the Arrow Keys or click the left mouse button to move the blue bar and select the line for the header. Press Enter or click the left mouse <Enter> button. You then Select the Header Type from the following items in the window. The header now replaces the line on which the blue highlight bar was positioned. Continue to select the headers and blanks by moving the blue bar to another line and repeat the above steps. To exit the programming mode, press the Menu key or click the right mouse <Menu> button. Insert a Blank Line or Delete a Line March 21, 2005 DTN Color System User's Manua 7-4 Chapter 7 Energy Programmable Quotes From the Page Functions Menu, select Program Quote Header/Edit Page and then choose Insert Blank Line or Delete Line. To insert a blank line or delete a previously programmed line, move to the selected item. Press the Enter key or click the left mouse <Enter> button. Use the Arrow Keys or the left mouse button to move the blue bar and select the line. Press Enter or click the left mouse <Enter> button. You can insert or delete more than one line by continuing to press Enter or click the left mouse <Enter> button. Continue to delete the unneeded lines or expired contracts by moving the blue bar to another line and repeat the above steps. To exit the programming mode, press the Menu key or click the right mouse <Menu> button. Other Options DTN Default This section describes how to return a programmed page to the original (default) preprogrammed commodity. Select a page from the Programmable Quotes segment. Press the alt key, then the Menu Key or click the left mouse button for the Page Functions Menu. Select “DTN Default”. Answer YES to return to DTN Defaults. The original preprogrammed commodities are now displayed on the selected page. Keyword Search The search or programming function can be accessed in this menu. Choose the Keyword Search from the menu. Click the left mouse <Enter> button or press the Enter key. The Keyword Search Setup is explained in Chapter 3. Formulas This function can be accessed through this menu. The Formula function is explained in Chapter 3. To begin, from the Page Functions Menu, move to the item with the Arrow Keys and press Enter or click the left mouse <Enter> button. The High Interest Window function is explained in Chapter 3. User Custom DTN Color System User's Manua March 21, 2005 Chapter 7 Energy Programmable Quotes 7-5 The pages within the Programmable Quotes segment may be saved to the User Custom pages. To save a page, move to the item in the Page Functions Menu with the Arrow Keys and press Enter or click the left mouse <Enter> button. The function of the User Custom pages is explained in Chapter 3. Help The Help Menu can be directly accessed from the Page Functions Menu. Move to the Help item with the Arrow Keys and press Enter or click the left mouse <Enter> button. Move within the Help Menu and access the desired information. Press the Menu key or the right mouse <Menu> button twice to return to the Page Functions Menu. Refer to Chapter 5 for further information on accessing the Help Menu. March 21, 2005 DTN Color System User's Manua Chapter 8 Energy Programmable Weather Introduction The Energy Programmable Weather gives you 24 PROGRAMMABLE PAGES to establish your own personalized Weather Chapter. You can choose from many maps showing detailed regional weather information, any regional radar map available on DTN, any state or zone forecast on DTN as well as what is in the Short Range and Long Range Weather Segments. March 21, 2005 DTN Color System User's Manual Chapter 8 8-2 Energy Programmable Weather Programming the Weather Segment To begin, from the Main Menu select the “Energy Programmable Weather” segment. Select the page using the Arrow Keys or the Mouse. Press Enter or click the left mouse <Enter> button to access the page. Press <Enter> or the left mouse <Enter>button on any page of this segment. NOTE: The first and second pages of this segment are NOT programmable. Press the <Alt> <Menu> buttons or click the left mouse <Enter> button towards the top left side of the screen. The Page Functions Menu will appear. Next, move the highlighter to Program Segment and press <Enter> or the left mouse <Enter> button. Next you will need to select which page you wish to program. The next menu that will appear is the Programmable Weather Menu. Select the information you desire by moving the highlighter. Then press Enter or click the left mouse <Enter> button. Select the region of the country--US; Central; Northeast; Northwest; Southeast; or Southwest. Once you have selected, press <Enter> or click the left mouse <Enter> button. After you have selected your region, now you will be able to select the weather map of your choice. Press <Enter> or click the left mouse <Enter> button. The next message you will see is: Add page to Programmable Segment? No or Yes. Move the highlighter by pressing the Page BKWD (right) button or pressing the Page FWD (left) button. Highlight “Yes“ and press <Enter> or click the left mouse <Enter> button. Then press the <Menu> button or click the right mouse <Menu> button. This will take you back to the Page Functions Menu. Once again, you need to press the <Menu> or click the right mouse <Menu> button. This will take you back to the Energy Programmable Weather. DTN Color System User's Manua March 21, 2005 March 21, 2005 DTN Color System User's Manual Appendix A 2 TroubleShooting Guide TroubleShooting Guide Introduction There are two major categories of error messages that the system provides to assist you in resolving problems: error message boxes and blinking error messages. In addition to these, there are several physical checks you can make when your system is not working properly. You can also check status on the Statistics Page to monitor the reception of data and status of your printer. Because the physical and Statistics page checks are the easiest to perform, they are discussed first. Each error condition described below is followed by possible resolutions. If, after you have exhausted all possible remedies provided, contact DTN's Customer Service Department for assistance. Physical Signs of a Problem With Your Video Monitor/Satellite Dish Symptom Action(s) to Resolve Display on screen is fine, but no page or information updates. 1. Check the Statistics page. If the Transponder Lock and/or Data Lock oval indicators are not black, you need to re-align your satellite dish. 2. Check the Signal Level indicator on the Statistics page. If near or at a level of 10, more fine-tuning of the alignment may be needed. 3. If you are using a patio or pole type mount, your DTN Color System User's Manua March 21, 2005 Appendix A TroubleShooting Guide Symptom 3 Action(s) to Resolve dish may have moved slightly. Check its alignment. No screen is displayed or screen is garbled. 1. Check that the power cord is securely connected between the monitor and electrical outlet. 2. Check that the Power button on the video monitor is on (indicator light should be on). 3. Check that the Power light on the receiver is If not, review the receiver section below. on. 4. Check the brightness and contrast dials on the video monitor so they are not both turned down. 5. Check that there are no bent pins on the video cable and that the video cable is securely connected between the video monitor and the receiver. 6. To verify your video monitor does need to be replaced, use the monitor of your personal computer (if VGA). If the personal computer monitor works, contact DTN's Customer Service for a replacement for your Color System monitor. With Your Receiver Symptom Action(s) to Resolve Power Light is not on. 1. Check that the power cord is securely connected between the receiver and electrical outlet. 2. Verify that the outlet is working. 3. If the fan is not running, check the fuse. Replace it with 3/4 A 3SB 250v if needed. (Spare is located in the drawer by the plug connector at the rear of the receiver.) Continues paging without pressing any keys. 1. Check to see if a key is stuck. 2. Verify that mouse is set on 2, NOT 3. March 21, 2005 DTN Color System User's Manua Appendix A 4 Symptom TroubleShooting Guide Action(s) to Resolve 3. Disconnect mouse and or keyboard. Receiver is not responding to key presses. 1. If there is NOT a system message displayed (which also locks the system as it should - see Title Line - Special Codes and Messages in Chapter 3), reboot the system by unplugging the power cord for the receiver and then plugging it back in. With Your Printer Symptom Action(s) to Resolve Nothing will print. 1. Check the port being used corresponds with the entry made on the Statistics page. (Parallel/Serial) Prints garbled data 1. Check the printer driver selection on the Printer Selection page to ensure it matches your printer. 2. If serial, check for the correct baud rate setting on the Printer Communications page; see Chapter 4. With Your Mouse Symptom Action(s) to Resolve If pages are continually interrupted while being displayed. 1. Check so your mouse is in the two button mode (versus three); also check so it is not between the two modes System locks when you are paging through the system using the keys on the receiver, and have a mouse connected. 1. Check so your mouse is in the two button mode (versus three); also check so it is not between the two modes. 2. Disconnect the Mouse to see if everything else is working. DTN Color System User's Manua March 21, 2005 Appendix A TroubleShooting Guide 5 Monitoring Your Statistics Page Symptom Action(s) to Resolve CRC count continues to increase. 1. Check your satellite dish alignment. 2. Check your coax cable connections. Make sure they are secure at both ends. 3. Check the Statistics page to ensure the Connected oval indicator is black (Power is flowing from the receiver to the LNB.) If not, contact DTN's Customer Service Department. LNB Offset is +/-8 or beyond. 1. Contact DTN's Customer Service Department for a new LNB. Data Lock ovals is not black. 1. During a rain storm, reception may be poor (called rain fade). Wait until the storm passes and recheck the status. Error Messages System messages are displayed in the middle of your screen in a Message Reporting Box. Some messages are for information only; while others are reporting errors. When a system message is displayed, record the information regarding the errors and call DTN's Customer Service Department for assistance in resolving the problem. The hours are 6:00 a.m. to 7:00 p.m. Central Time, Monday through Friday: Call (800)779-5779 Blinking Error Messages The power light or turbo light on the front panel of the receiver has the capability of signaling error conditions. By using a series of blinks and pauses, error codes can be recorded and reported to DTN's Customer Service Department for March 21, 2005 DTN Color System User's Manua Appendix A 6 TroubleShooting Guide resolution. In all cases, you will need DTN's assistance to resolve problems reported with blinking error messages. Each error code is a two digit number with each digit being displayed by blinking the power light. The error codes do not have zeros in them. There is a short pause (one second) between each digit of the code, and a long pause (three seconds) between each error code. After all error code(s) have been displayed, the display sequence repeats. Two examples are shown below: BLINK - BLINK - SHORT PAUSE - BLINK - LONG PAUSE - REPEAT... This would represent the error code 21. BLINK - BLINK - SHORT PAUSE - BLINK - BLINK - BLINK - LONG PAUSE BLINK - SHORT PAUSE - BLINK - BLINK - LONG PAUSE - REPEAT... This would represent error codes 2-3 and 1-2. Remember you will need to call DTN's Customer Service Department to resolve any of the problems that are identified with a blinking error code. Note: Your receiver is not signaling an error condition if your power light blinks five times when power is first connected to the receiver. DTN Data Transmission Network Corporation DTN Customer Service 9110 West Dodge Road Omaha, NE 68114 Please give us your comments on the DTN Color System and the DTN Color System User's Manual. You may either: • Complete the following form and mail it to Data Transmission Network Corporation. DTN Color System User's Manua March 21, 2005 Appendix A TroubleShooting Guide 7 • Fax your comments to us at (402) 390-2095. • Call DTN's Customer Service Department at the toll free number. (800) 779-5779 My general comments on the DTN Color System are: I have the following comments or corrections to report regarding the DTN Color System User's Manual: March 21, 2005 DTN Color System User's Manua 8 Appendix A TroubleShooting Guide Name Company Address Phone Fax DTN Color System User's Manua March 21, 2005