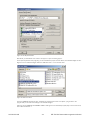
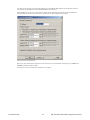
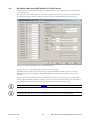
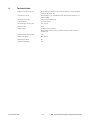
1
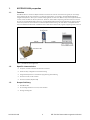
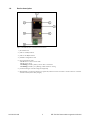
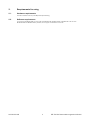
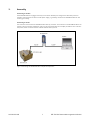
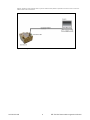
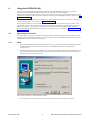
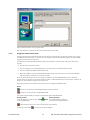
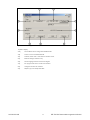
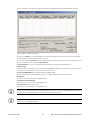
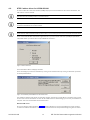
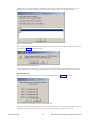
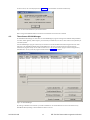
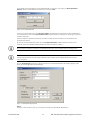
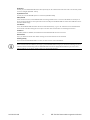
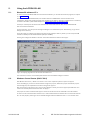
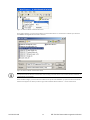
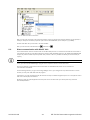
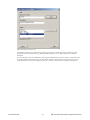
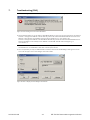
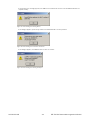
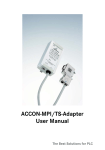
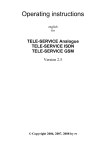
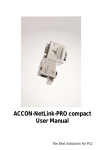
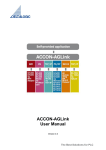
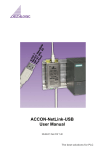
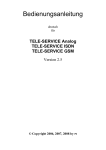
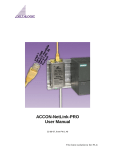
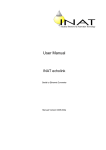
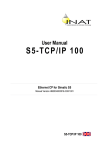
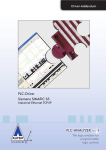
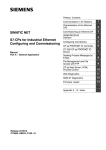
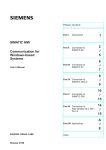
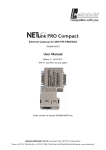
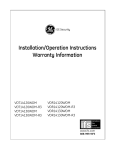
ACCON-S5-LAN
User manual
The best solutions for PLC
This manual is for project developers, users and assemblers who utilize the ACCON-S5-LAN. It shows the user the
handling of the ACCON-S5-LAN and explains the signalling functions. All necessary data for assembling should be
provided to the assembler.
© 1995 - 2009
DELTALOGIC Automatisierungstechnik GmbH
Stuttgarter Str. 3
73525 Schwaebisch Gmuend
Germany
Phone sales dep.: +49-7171-916-120
Phone support:
+49-7171-916-112
Fax sales dep.:
Fax support:
+49-7171-916-220
+49-7171-916-212
E-Mail sales dep.: [email protected]
E-Mail support:
[email protected]
Internet:
www.deltalogic.de
All rights reserved. No part of this work is allowed to be copied, reproduced, conferred, processed and stored into
electronic media or translated into any other language without a written permission of the author.
Note:
We have checked the content of this manual for conformity with the hardware and software described. Nevertheless,
because deviations cannot be ruled out, we cannot accept any liability for complete conformity. The data in this
manual have been checked regularly and any necessary corrections will be included in subsequent editions. We
always welcome suggestions for improvement.
Last update 2009-08-17. All technical changes reserved.
®
®
®
®
®
®
®
®
®
S7-200 , S7-300 , S7-400 , HMI , WinCC , WinCC flexible , ProTool , STEP and SIMATIC are registered
®
®
trademarks of Siemens AG, ACCON and DELTALOGIC are registered trademarks of DELTALOGIC
Automatisierungstechnik GmbH.
ACCON-S5-LAN
2
DELTALOGIC Automatisierungstechnik GmbH
Table of contents
1.
ACCON-S5-LAN properties ................................................................................................. 4
1.1. Function ....................................................................................................................... 4
1.2. Specific characteristics ................................................................................................ 4
1.3. Scope of delivery.......................................................................................................... 4
1.4. Device description........................................................................................................ 5
2. Requirements for using....................................................................................................... 6
2.1. Hardware requirements................................................................................................ 6
2.2. Software requirements ................................................................................................. 6
3. Assembly ............................................................................................................................ 7
4. Using the ACCON-S5-LAN................................................................................................... 9
4.1. The software PLC-VCom............................................................................................... 9
4.1.1. Setup..................................................................................................................... 9
4.1.2. Using the software PLC-VCom ............................................................................ 10
4.2. STEP 5 add-on driver for ACCON-S5-LAN ................................................................... 13
4.3. The software S5-LAN-Manager ................................................................................... 15
5. Using the ACCON-S5-LAN................................................................................................. 18
5.1. Siemens S5 software V7.x.......................................................................................... 18
5.2. Windows Control Center (WinCC V6.0)....................................................................... 18
5.3. Direct communication with WinCC V6.0..................................................................... 20
5.4. ACCON-S5-LAN and the DELTALOGIC S7/S5-OPC-Server ......................................... 24
6. Technical data................................................................................................................... 25
7. Troubleshooting (FAQ) ...................................................................................................... 26
ACCON-S5-LAN
3
DELTALOGIC Automatisierungstechnik GmbH
1.
ACCON-S5-LAN properties
1.1.
Function
ACCON-S5-LAN is a connection adaptor between a PC and a S5 controller via Ethernet using TCP/IP. The voltage
feed is effected by the PLC’s interface, so an external supply feed is not necessary. The ACCON-S5-LAN has an
integrated multiplexer to allow you to visualize and program at the same time. With the help of the supplied software,
a virtual, serial interface can be setup at the PC. Therefore, each software supporting a serial connection to the S5
PLC can use the ACCON-S5-LAN. Furthermore, the ACCON-S5-LAN supports the RFC1006 protocol (ISO on TCP) as
well as the protocol for the connection of a TCP-compliant Ethernet CP e.g. CP 1430 TCP or a compatible device.
Thus, the ACCON- S5-LAN needs no additional drivers and can be used with all programs supporting these protocols.
Figure 1: ACCON-S5-LAN configuration
1.2.
Specific characteristics
• Compact, low-cost connection of S5 PLCs to Ethernet
• Quick and easy configuration and commissioning
• Integrated multiplexer for simultaneous programming and visualizing
• Access via virtual, serial interface
• Access via S5-TCP/IP (RFC1006)
1.3.
Scope of delivery
• ACCON-S5-LAN
• CD including software for a virtual, serial interface
• Getting started guide
ACCON-S5-LAN
4
DELTALOGIC Automatisierungstechnik GmbH
1.4.
Device description
Figure 2: ACCON-S5-LAN - notifications and interfaces
1.) PU interface S5
2.) LED for 10 Mbps network
3.) LED for 100 Mbps network
4.) Hardware configuration reset
5.) S5 communication state:
LED off: device is off or in boot mode
LED on: PLC is online
LED flashing and LED 2) and 3) is off: no PLC is connected
LED flashing and LED 2) or 3) flashing: a data transfer is running
6.) 24 VDC bushing for external voltage feed (optional)
7.) RJ45 bushing to connect the device to a regular hub/switch via cross-over-cable or connect direct to a network
interface card via patch cable (straight).
ACCON-S5-LAN
5
DELTALOGIC Automatisierungstechnik GmbH
2.
Requirements for using
2.1.
Hardware requirements
A network interface card 10/100 Mbps with RJ-45 bushing.
2.2.
Software requirements
For using the ACCON-S5-LAN you need a PC with Windows NT, Windows 2000 or Windows XP. The use with
Windows 98SE and Windows Me is possible, but no support is available for these OS.
ACCON-S5-LAN
6
DELTALOGIC Automatisierungstechnik GmbH
3.
Assembly
Connecting to the PLC
The ACCON-S5-LAN will be plugged in directly on the S5 PLC. Normally the voltage feed is effected by the PLC’s
interface. If the PLC does not have a 24 VDC power supply (e.g. S5-95U), this allows the ACCON-S5-LAN to be fed
24 VDC (green clamp).
Connecting to the PC
The connection of the PC and the ACCON-S5-LAN is done by a network. The connection of the ACCON-S5-LAN to the
network is done via the built-in RJ45 jack. Plug one end of the patch cable into the RJ45 jack and the other end into a
hub/switch, which is connected to the network interface card of your PC.
Figure 3: Connecting the ACCON-S5-LAN to a PG/PC via hub/switch
ACCON-S5-LAN
7
DELTALOGIC Automatisierungstechnik GmbH
A direct operation of the network card on your PC without a hub/switch is possible. You have to use a cross-over
cable for this kind of connection.
Figure 4: Connecting the ACCON-S5-LAN to a PG/PC via cross-over-cable
ACCON-S5-LAN
8
DELTALOGIC Automatisierungstechnik GmbH
4.
Using the ACCON-S5-LAN
The setting of the ACCON-S5-LAN’s IP address is made with the »S5-LAN-Manager« program. This program is
provided on the DELTALOGIC Automatisierungstechnik-CD, under »CD drive:\S5\ACCON-S5LAN\PLCVCom\S5LanMan.exe« for direct use. If the communication is exclusively effected via RFC1006, no further
software will be necessary. Please find further information about the »S5-LAN-Manager« program in chapter 4.3 »The
software S5-LAN-Manager«.
If the ACCON-S5-LAN is to replace a serial connection, a virtual, serial interface has to be setup. This is made with
the »PLC-VCom« program, look chapter 4.1 »The software PLC-VCom«.
If the Siemens S5 software is used, an additional modulation of the Siemens S5 software has to be made in order
that the latter is able to use the virtual, serial interface of the »PLC-VCom« program. This modulation is done by the
»S5USB.exe« program. This program is provided on the DELTALOGIC Automatisierungstechnik-CD, under »CD
drive:\S5\ACCON-S5-LAN\STEP5 Patch« for direct use. For further notes, look chapter 4.2 »STEP 5 add-on driver
for ACCON-S5-LAN«.
4.1.
The software PLC-VCom
The setup program »Setup.exe« is provided on the DELTALOGIC Automatisierungstechnik-CD in the CD menu under
»S5-Hard-/Software/ACCON-S5-LAN«. Or in the explorer under »CD drive:S5\ACCON-S5-LAN\PLCVCom«. The »S5LAN-Manager« program is installed simultaneously.
4.1.1.
Setup
•
Insert now the DELTALOGIC Automatisierungstechnik-CD in your drive. Under »CD-drive:\S5-Adapter\ACCONS5-LAN\PLCVCOM« you find the setup program for the ACCON-S5-LAN driver PLC-VCOM. Start the
»Setup.exe« file.
•
After the language selection, the installation starts in the selected language and the welcome dialogue pops up.
Click »Next« to select the destination folder (look figure below). In order to change the destination folder click
»Browse«. Then confirm the »Next« button.
Figure 5: Setup PLC-VCom - choose destination location
•
ACCON-S5-LAN
In this dialogue, select the program folder for the PLC-VCom start entries. Afterwards, click »Next«.
9
DELTALOGIC Automatisierungstechnik GmbH
Figure 6: Setup PLC-VCom - select program folder
Now, the installation is started. This can take several minutes on older PCs.
4.1.2.
Using the software PLC-VCom
The »PLC-VCom« program uses automatically the next free serial interface as a virtual serial interface, this is mostly
the COM3. If another interface is to be used, you can configure it with the »SelectCOM« program. The »SelectCOM«
program is accessed via the start menu.
The assignment to which ACCON-S5-LAN the virtual serial interface is connected is be made in the »PLC-VCom«
program.
• Start PLC-VCom via the start menu.
• Click on »Configure« in the following dialogue in the state section. The assistant will be started.
• Select the required ACCON-S5-LAN and press «OK«.
• When the IP address of the selected ACCON-S5-LAN is shown in the state section in the PLC-VCom dialogue
and »connected« is indicated, the connection is made.
In the tray of the task bar (to the left of the time), the symbol for the PLC-VCOM software is shown. The setup
program enters the program in the autostart folder so that it is loaded automatically with every startup. If this will not
be the case, please start the program via the start menu.
This symbol shows the current state of the connection to the configured ACCON-S5-LAN.
States:
PLC-VCom is connected to an ACCON-S5-LAN and ready for operation.
PLC-VCom is not connected to any ACCON-S5-LAN.
The symbol changes steadily on an active communication with an ACCON-S5-LAN.
Receiving display:
If this LED lights green, data are
received from the ACCON-S5-LAN
Sending display:
If this LED lights green, data are sent
to the ACCON-S5-LAN
If these LEDs light red, an error has occurred during communication.
By clicking on this symbol
ACCON-S5-LAN
you start the PLC-VCom dialogue.
10
DELTALOGIC Automatisierungstechnik GmbH
Figure 7: PLC-VCom dialogue window
1st)Status display
2nd)
The IP address of the configured ACCON-S5-LAN
3rd)
Search or select an ACCON-S5-LAN
4th)
Software, which uses or has used this interface at last
5th)
Minimize dialogue window to tray
6th)
Switch language between German and English
7th)
Exit program and remove virtual serial interface
8th)
Configured virtual serial interface
9th)
Adapter type, here always »S5-LAN«
ACCON-S5-LAN
11
DELTALOGIC Automatisierungstechnik GmbH
Click on »Configure« in the PLC-VCom dialogue to address an ACCON-S5-LAN. The following dialogue is shown.
Figure 8: LAN - IP - VCOM - Connection
By clicking on »Search« you send a broadcast to all connected network devices in the local network. Every ACCONS5-LAN responding to this broadcast is shown in the list.
If you already know the »IP address« of your ACCON-S5-LANs, you have the possibility to input it manually. The input
box for it is activated by the checkbox »Input manually«.
If »Input manually« is active, the Drop-Down element LAN-type is activated. Select »S5-LAN« here.
Input manually
If »Input manually« is activated, you can input the boxes »IP address«, »LAN-Type« and »S5-PG-Port« yourself. If »Input
manually« is not activated, you can only select devices from the list.
Access from MSDOS-Box (only on Windows 98SE and Windows Me)
Activate this checkbox if you use software running in the MSDOS mode (Example: Siemens STEP 5).
No Network
This function is not necessary for the ACCON-S5-LAN.
Installation in Device-Manager
This function is not necessary for the ACCON-S5-LAN.
serial idle times (serielle Pausenzeiten)
This function is not necessary for the ACCON-S5-LAN.
As soon as you have pressed »OK« and an ACCON-S5-LAN has been selected, the PLC-VCOM dialogue will be refreshed
and shows the selected ACCON and the »connected« state in the »Status« section.
The virtual COM-Port is not visible, adjustable and usable before PLC-VCom is in the »connected« state, e.g. a
connection to an ACCON-S5-LAN exists.
ACCON-S5-LAN
12
DELTALOGIC Automatisierungstechnik GmbH
4.2.
STEP 5 add-on driver for ACCON-S5-LAN
In order to make the virtual serial interface (COMx) setup by PLC-VCom available for the Siemens S5 software, this
add-on driver must be installed.
PLC-VCom must be installed previous to this add-on driver!
Before you start the installation, please close the Siemens S5 software. The add-on driver can only be installed when
the Siemens S5 software has not been started.
Under Windows 98SE and Windows ME the add-on driver is not necessary as the function can be selected in PLC-VCom.
Insert now the DELTALOGIC Automatisierungstechnik-CD in your drive. Under »CD-drive:\S5-Adapter\ACCON-S5LAN\STEP5 Patch« you find the driver setup »S5USB.exe« and start it.
Figure 9: Device selection
Select »S5-LAN« as device and apply with »OK«.
In the next dialogue you start the installation by clicking on the »Install« button. By clicking on »Uninstall« you delete
an already installed driver.
Figure 10: Installation/Deinstallation of the add-on driver
The installation assistant now makes the necessary changes, whereas the process differs on the basis of the present
version of the Siemens S5 software. As soon as the »Install« button is deactivated (grey font colour) the installation is
complete. Then close the assistant with the »Exit« button.
Siemens STEP 5 V6.x
At first, the dialogue window showed in Figure 11 appears indicating the currently available drives. Select the drive
on which the Siemens S5 software is installed. As all sub-directories are always searched beginning with the stated
ACCON-S5-LAN
13
DELTALOGIC Automatisierungstechnik GmbH
starting point, it is normally adequate to name the right drive. In order to abbreviate the searching time, you can
indicate the directory where the software is saved by double-clicking on the list entry with the drive letter.
Figure 11: Choose directory
After the verification of the drive respectively directory choice by clicking the »OK« button, the search begins and the
query shown in Figure 12 appears on success.
Figure 12: Confirm the founded directory
If the indicated directory is not correct, the search will be continued with »No«. If the indicated directory is correct,
please confirm with »Yes«. The necessary changes will be made thereupon and at least the program will be closed.
Siemens STEP 5 V7.x
If an installed Siemens S5 software version 7.x is found, the dialogue shown in Figure 13 will appear.
Figure 13: Query the serial interface for Siemens S5 Software V7.x
Select here the same interface that has been setup as virtual serial interface in the »PLC-VCom« program. Then verify
with »OK« and the necessary changes will thereupon be made and at least, the program will be closed.
ACCON-S5-LAN
14
DELTALOGIC Automatisierungstechnik GmbH
In both versions, the result display shown in Figure 14 is presented after successful ended setup.
Figure 14: Successful ended setup of the add-on driver
Before using the ACCON-S5-LAN with the Siemens S5 software the PC must be restarted.
4.3.
The software S5-LAN-Manager
All ACCON-S5-LAN settings are made with the »S5-LAN-Manager« program meaning the IP address data (IP address,
net mask, default gateway, DHCP support), the used TCP port addresses, the device name and even the possibility of
a firmware update.
The »S5-LAN-Manager« program can directly be started from the DELTALOGIC Automatisierungstechnik-CD, under
»CD-drive:\S5\ACCON-S5-LAN\PLCVCom\S5LanMan.exe«. As soon as the »PLC-VCom« program has been
installed, the program startup can be made via start menu or via the »PLC-VCom« program in the »Configuration« /
»S5LAN« menu. In every case the program window shown in Figure 15 will appear.
Figure 15: S5-LAN-Manager
By clicking on »Browse local network« you send a broadcast to all connected devices in the local network. Every
ACCON-S5-LAN responding to this broadcast is shown in the list.
ACCON-S5-LAN
15
DELTALOGIC Automatisierungstechnik GmbH
If you already know the IP address of your ACCON-S5-LAN, you can enter it by clicking on »Suche bestimmte
Adresse« (Search certain address) and search it by clicking on »Find«.
Figure 16: Find ACCON-S5-LAN
In order to send a firmware file via the »Firmware senden« (Send firmware), the firmware has to be loaded before.
This is made with the help of the »Firmwaredatei laden« (Load firmware file). A dialogue for selecting the respective
firmware file appears.
Select the respective firmware file and verify with »OK«. Firmware specific information is now indicated in the
»Firmware info« section.
As soon as you have loaded the firmware file, the »Firmwaredatei laden« (Load firmware file) button will be
activated. Select the ACCON-S5-LAN and activate this button to send the firmware.
We recommend to update the firmware of the ACCON-S5-LAN only in case of problems with the existing version.
While the firmware is updated and sent to the ACCON-S5-LAN, the ACCON-S5-LAN must not be disconnected from the
network respectively from the power supply. Otherwise, there is danger that the ACCON-S5-LAN does not work
correctly anymore.
Click on »Einstellungen« (Settings) to change the features of the ACCON-S5-LAN in the following dialogue. »OK«
saves the new settings and closes the dialogue.
Figure 17: ACCON-S5-LAN properties
Device
The device name can be any text. So, you are able to identify every ACCON-S5-LAN definitely.
ACCON-S5-LAN
16
DELTALOGIC Automatisierungstechnik GmbH
S5-PD-Port
Via this port, the ACCON-S5-LAN and the PD respectively the PC communicates with each other. This normally needs
not to be changed. (Standard: 10010)
S7/S5-Server-Port
Via this port, the S5-LAN-LINK protocol is executed. (Standard: 2002)
DHCP/AutoIP
If this checkbox is active, the ACCON-S5-LAN is searching a DHCP server to receive an IP address on startup. If no
server can be found after 3 retries (can take several seconds), the ACCON-S5-LAN will search an IP address from the
»Auto-IP« address range.
auto Subnet
If set, the ACCON-S5-LAN calculates the subnet mask automatically, e.g. for 192.168.0.80 it is the 255.255.255.0.
In the subnet mask box nothing has to be input in this case. We recommend to not activating this function.
IP-Address
If »DHCP/AutoIP« is disabled, the IP address of the ACCON-S5-LAN can here be entered.
Subnet Mask
Here, you define the subnet mask. When entering 0.0.0.0 »auto Subnet« will be activated.
default gateway
If you connect the ACCON-S5-LAN to a router, so enter here the router’s IP address.
Please consider that the IP address you assign to your ACCON-S5-LAN is fitting to your network and existing only once.
Likewise, the PC communicating with the ACCON-S5-LAN must have an appropriate IP address. If you are not sure
which IP address you can assign, please contact your network administrator.
ACCON-S5-LAN
17
DELTALOGIC Automatisierungstechnik GmbH
5.
Using the ACCON-S5-LAN
5.1.
Siemens S5 software V7.x
In order to use the ACCON-S5-LAN with the Siemens S5 software, you need the »PLC-VCom« program, see chapter
4.1 »ACCON-S5-LAN«.
Under Windows 98SE and Windows Me, the checkbox »Access to MSDOS-Box« must be activated in the
configuration. Using other operating systems this checkbox is not visible. In this case, an add-on driver is necessary.
For further information, please advise chapter 4.2 »STEP 5 add-on driver for ACCON-S5-LAN«.
This step is necessary that the Siemens S5 software can communicate with the PLC via the ACCON-S5-LAN.
Start the Siemens S5 software.
Via the menu »file«, you can open the »Configure«-dialogue in the submenu »Project«. Alternatively, you get to this
dialogue via the »F4« key.
In the »PLC« flag you configure the used PLC interface (in this example: »AS511«). Below, you can setup the COM
interface created by the PLC-VCOM software (example: »COM3«).
Pressing »F3« changes the »Mode« to »Online«. The window should then show the »PLC type«.
Figure 18: Property page »PLC« of the Siemens S5 software V7.x
The connection to the PLC is successfully effected as soon as the »Mode« changes to »Online«.
5.2.
Windows Control Center (WinCC V6.0)
Start WinCC. Select »File« / »New« in the menu or click on the respective symbol to open a new project.
In the next dialogue, you have the choice between »Single-user project«, »Multi-user project« and »Client project«.
The following steps are explained on the basis of »Single-user project«.
After the selection of the project type, you arrive at a dialogue in which you enter the project path and name. You
confirm the selected path as well as the name via »Apply«.
The project will now be created and the project content will be listed on the left hand side of the main window.
In order to create a communication with the PLC, it must be defined how the software has to communicate with the
PLC. For this purpose, please right click on »Variable budget« and select »Add new driver...« in the context menu.
ACCON-S5-LAN
18
DELTALOGIC Automatisierungstechnik GmbH
Figure 19: Add new WinCC communication driver
In the »Open« dialogue, you select the respective communication driver. For the access to a S5 PLC you can select
the »SIMATIC S5 Programmers Port AS511.chn« file.
Figure 20: Select a WinCC communication driver
It is important that the selected communication driver is fitting to the PLC that is to be accessed, because otherwise, a
communication is not possible.
In the »Variable budget«, you now find a new submenu item (in this case »S5-AS511«). Open this menu and a further
submenu item appears on which you have to right click and select »New connection...« in the context menu.
ACCON-S5-LAN
19
DELTALOGIC Automatisierungstechnik GmbH
Figure 21: Add a new driver connection
Now, you can enter the name of the connection and by clicking on »Properties« a further dialogue will be opened, in
which you setup the connection properties. Just enter the used COM-Port (in this example »\\.\COM3«).
Confirm with »OK« until you are back in the main window.
Now, you can start the communication via
5.3.
and end it via
.
Direct communication with WinCC V6.0
This communication uses the H1-ISO-on TCP or also RFC1006 protocol. It is used in the Siemens S5 environment to
communicate with the CP 1430 TCP via Ethernet. Thereby, TSAP and SSAP each are to be indicated. ACCON-S5-LAN
accepts any name for TSAP respectively SSAP. This protocol is also very suitable for WinCC (use there S5 TCP/IP
Layer 4).
If you use this protocol, port 102 is to be entered in the ACCON-S5-LAN.
Firstly, you start the »S5-LAN-Manager« program via the respective shortcut in the start menu.
Click on the »Search in local network« button and mark the ACCON-S5-LAN, which is to be used for the
communication with WinCC.
Via the »Settings« button, you get in the settings dialogue. There, you configure the »S7/S5-Server-Port« to »102«.
Confirm you entry with »OK« and close the program.
Furthermore, you must configure the PD/PC interface to setup a suitable assignment point. Go to the system control
and click on »Setup PD/PC interface«.
Browse for »TCP_IP« under »Application access point«. If this one does exist you can skip this step, otherwise
select»<Add/Delete>«.
ACCON-S5-LAN
20
DELTALOGIC Automatisierungstechnik GmbH
Figure 22: Add a new access point
This dialogue provides you the opportunity to add a new access point. Please name the new access point with
»TCP_IP« and enter any description (e.g. »WinCC S5-LAN (TCP/IP«). Click on »Add« and »Close« the dialogue
afterwards.
Select the »TCP_IP« entry under »Application access point« and afterwards, select the »TCP/IP -> XXX« entry in the
list »Used interface parameterization«, whereupon »XXX« stands for the used network card. Thereupon, the entry
under »Application access point« changes into »TCP_IP --> TCP/IP -> XXX«. Save the settings by clicking »OK«.
ACCON-S5-LAN
21
DELTALOGIC Automatisierungstechnik GmbH
Figure 23: Set PG/PC interface
Afterwards, you start WinCC 6.0. Create a new project or open an existing project.
In the explorer (left half of the program), you can see different project contents. Below, the »Variable budget« as well.
Right click on the »Variable budget« and select »Add new driver...« in the context menu.
Figure 24: Add a new driver
Select the »SIMATIC S5 Ethernet Layer 4.CHN« file as communication driver. Via »Open«, you get back to the
program and you can now find a change in the »Variable budget«.
Open the new leg »SIMATIC S5 ETHERNET LAYER 4« and right click on »S5-Transport (TCP/IP)«. In the context menu,
select »New connection...«.
ACCON-S5-LAN
22
DELTALOGIC Automatisierungstechnik GmbH
You name the connection in the properties dialogue (e.g. »ACCON-S5-LAN«) and use the »Properties« button to
communicate the »IP Address« of the ACCON-S5-LAN to the connection.
In the »READ-Function« section, you activate the »Fetch Active« and assign the parameters »Local TSAP« and
»Remote TSAP« as well as in the lower section. Confirm the connection parameters via »OK«.
Figure 25: Connection parameters
Back in the main window of the application, a new connection in the »S5-Transport (TCP/IP)« leg of »SIMATIC S5
ETHERNET LAYER 4« should be visible.
The setup for a direct communication with WinCC is complete.
ACCON-S5-LAN
23
DELTALOGIC Automatisierungstechnik GmbH
5.4.
ACCON-S5-LAN and the DELTALOGIC S7/S5-OPC-Server
The DELTALOGIC S7/S5-OPC-Server provides the reading and writing access to data elements of a S7- and S5-PLC
via the OPC-interface.
Before you get access to data elements, it is necessary to parameterize the connection data. This is made with the
»S7OPCCfg.exe« program, which is included in the scope of delivery of the DELTALOGIC S7/S5-OPC-Servers.
Figure 26: The program »S7OPCCfg.exe« to configure the connection
The group »Connection parameters« contains settings to the remote station.
The address of the Ethernet-CP at the S5 controller is setup under »IP-address«. »Timeout« sets the connection
monitoring time. The value is indicated in milliseconds. When having communication problems, the value can be
increased.
The »Not use RFC 1006« checkbox should be kept deactivated. This type of communication is not recommended!
In the groups »Send TSAPs« and »Receive TSAPs«, any text can be entered in the ASCII boxes »Local« and »Remote«!
The group »Ports« contains the port numbers, if the communication is not effected via RFC 1006.
Please consider the parameters as shown in Figure 26 and use the communication via RFC 1006.
If you activate RFC 1006, you must configure the Port 102 as S7/S5-Server-Port in the ACCON-S5-LAN.
ACCON-S5-LAN
24
DELTALOGIC Automatisierungstechnik GmbH
6.
Technical data
Supported operating systems
No limitation (the driver for a virtual serial interface is only for Windows
Connection to the PC
RJ45 bushing for 10/100 Mbps Ethernet with automatic detection, no
Connection to the PLC
cable included
TTY with 15-pin SUB-D plug
Supported PLCs
S5 of the U series
Dimensions (W x H x D) in mm
42 x 15 x 65
Protection type
IP 20
Supply voltage
24 VDC from PLC interface
Not possible on some PLCs (e.g. S5-90U, S5-95U), needs a separate
voltage feed
External voltage feed possible
Yes
Power consumption
Max. 80 mA
Galvanically isolated
No
Integrated multiplexer
Yes
98SE, Me, NT, 2000, XP)
ACCON-S5-LAN
25
DELTALOGIC Automatisierungstechnik GmbH
7.
Troubleshooting (FAQ)
Q: When connecting to my ACCON-S5-LAN (via PLC-VCOM), the following error message appears.
Figure 27: Error message on an erroneous IP address
A: The IP parameterization of your PC and your ACCON-S5-LAN do not suit. There are two solutions for this problem:
Solution 1: Change the IP address of the PC that way, that the PC and the ACCON-S5-LAN have the same IP net
address. In this example, the IP address of the PC must be changed e.g. to 192.168.001.100.
Solution 2: Change the IP address of the ACCON-S5-LAN that way, that the PC and the ACCON-S5-LAN have the
same IP net address. In this example, the IP address of the ACCON-.S5-LAN must be changed e.g. to
192.168.002.111.
Q: I have connected the ACCON-S5-LAN to the COM-Port of my computer and to the interface of the PLC but the
communication is not established or abort after a certain period of time.
A: There is a possibility to verify the COM-interface. Therefore, start the PLC-VCOM dialogue and right click on the
icon in the left upper corner of the dialogue. Then select »Info«.
Figure 28: How to display the info dialogue of PLC-VCom
ACCON-S5-LAN
26
DELTALOGIC Automatisierungstechnik GmbH
Thereupon, the following dialogue appears.
Figure 29: The info dialogue of PLC-VCom
Now, right click anywhere below the text block showing the version information. Thereupon, the dialogue »Log /
Service« appears. This dialogue provides you the opportunity to access to the COM-Port.
Figure 30: The dialogue to check the connection
In the input box »Access to«, please indicate the COM-Port your ACCON-S5-LAN is connected to. In order to
access to the selected COM-Port, click on the »1x« button. If the communication aborts not until a certain period
of time, click on »CO« (Continuous operation).
Both variants return the same error messages on an erroneous communication. Those are described in the
following:
ACCON-S5-LAN
27
DELTALOGIC Automatisierungstechnik GmbH
If the following error message appears, the COM-Port is accessible but the PLC or the ACCON-S5-LAN does not
respond correctly.
Figure 31: Error message on missing device
If this dialogue appears, please verify, whether the ACCON-S5-LAN is correctly installed.
Figure 32: Error message on erroneous connection
If this dialogue appears, the COM-Port does not exist or is defect.
Figure 33: Error message on missing serial port
ACCON-S5-LAN
28
DELTALOGIC Automatisierungstechnik GmbH