1
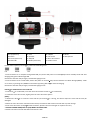
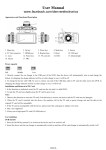
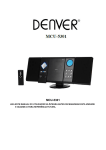
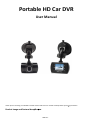
Portable HD Car DVR
User Manual
Thank you for choosing our HD720P Car DVR. Please read this user manual carefully before opera ng the device.
Product Image and Feature Iden fica on.
-ENG 01-
01. Up (Zoom in)
02. Menu
03. Down (Zoom out)
04. Mini USB
05. Lens
06. Speaker
07. REC/OK
08. Mode (video lock)
09. ON/OFF
10. LCD Screen
11. Micro SD card slot
12. Holder socket
13. Reset
14. Microphone
For the power capacity in the ba ery, refer to the following icons:
Full
Middle
Low
1. Connect device to car adaptor through Mini-USB port, device will power on automa cally & enter standby mode and start
charging with green indicator light ON.
Once device has been fully charged, red indicator light goes out.
2. Connect device to PC via USB cable, device will power on automa cally. Choose between and ‘Mass Storage (MSDC)’ mode
or ‘PC-Cam’, by pressing ‘UP’/’DOWN’ and confirm by pushing ‘OK’ bu on and start charging.
Once device has been fully charged, red indicator light goes out.
Installa on and Removal of micro SD card
1. In the direc on as indicated, insert the micro SD card into the slot un l it is held firmly.
2. To take the micro SD card out, slightly press the micro SD card to eject it.
[Note]:
1. Observe the direc on to insert the micro SD card; if the direc on is wrong, the device and/or the micro SD card may be
damaged.
2. When the micro SD card is inserted into the device, the machine will set the micro SD card as preset storage.
3. If the micro SD card is incompa ble with the device, please insert the card again or replace it for retry.
4. PLEASE USE 8GB-32GB/CLASS 10 (C10) MICRO SD CARDS ONLY.
5. Please insert the micro SD card ONLY when device is OFF.
-ENG 02-
Opera on Instruc ons
Turn ON/OFF Device
1. Press the power key for 1 second to switch ON and hold for 3 seconds to switch OFF device manually.
2. Connect the device with car charger in the car. When car engine starts up, device will be switched ON automa cally. When
car engine shuts off or car charger been disconnected, device switches OFF with 10 seconds delay (as per se ng).
How to Enter System Setup
In Video or Photo mode, press the Menu key-UP/DOWN key-REC/OK key to enter the System Setup:
- Date/Time: You may set date/ me.
- Auto Power off: off/1 minute/3 minutes. To power off DVR automa cally if DVR is not recording.
- Beep sound: on/off. To turn on/off the sound of pressing bu ons.
- Language: You may set the desired OSD language menu.
- Backlight (Power save): Off/3 min. /5 min. /10 min. To shut off the LCD screen automa cally during video recording.
- TV Mode: PAL/NTSC
- Power Frequency: 50Hz/60Hz
- Format: Format the memory card.
- Default se ngs: Cancel/OK
- Version: Firmware version number.
Take Video and Set Video Menu
1. Take video
displaying at the upper-le corner of screen. Press
A er powered ON, device enters Video Mode as default, with icon
flashes.
the ‘REC/OK’ key to start video recording a er proper Micro SD card been inserted. During recording, the red icon
[Note]
- When the device is mounted on the windshield with car charger connected, it will power ON and start recording
automa cally once car engine starts up.
- During charging with car charger connected, it supports simultaneous recording.
- During recording, press ‘MODE’ bu on to lock and protect the current video from recycling (it’s called ‘SOS’ func on).
2. Set Video Menu
Press the Menu key to enter the setup of video op ons
Default
- Resolu on:
- Loop recording: Off/1 min. /2 min. /3 min. To record, store and recycle the video file by 1/2/3 minutes per sec on.
- Exposure: -2.0 -5/3 -4/3 -1.0 -2/3 -1/3 +0.0 +1/3 +2/3 +1.0 +4/3 +5/3 +2.0
- Mo on detec on: On/Off. When car is parked and mo on detec on turned On, DVR will detect moving objects in front of car
and trigger recording automa cally, or stay at standby state if there’s no object moving.
- Record Audio: On/Off. Choose to record the video with audio, or record video without any sound.
- Date Stamp: On/Off.
- G-Sensor: Off/1G/2G. Once G-sensor turned ON to 1G or 2G and triggered, there’s an icon of ‘lock’ appearing on LCD screen
and current video file will be locked as important file. Such locked files won’t be recycled by loop recording func on.
Take Photo and Set Photo Menu
1. Take Photos
Press the power key to enter the video mode as default; press the Mode key to enter the Photo mode with icon
displaying on the upper-le corner of the screen. Then, hold the device firmly, then press REC/OK key to take photos. Photos
will be stored into memory card automa cally.
2. Set Photo Menu
During photo mode, press MENU and REC/OK key to enter photo menu se ngs.
- Capture Mode: Single/2S Timer /5S Timer /10S Timer
-ENG 03-
- Resolu on:12M(4032x3024)/10M(3648x2736)/8M(3264x2448)/5M(2592x1944)/3M(2048x1536) /2M/1.3M/VGA
- Sequence: On/Off.
- Metering: Center-weighted/Average/Spot
- Sharpness: Strong/Normal/So
- White balance: Auto/Daylight/Cloudy/Tungsten/Fluorescent
- Exposure: -2.0/-5/3/-4/3/-1.0/-2/3/-1/3/+0.0/+1/3/+2/3/+1.0/+4/3/+5/3/+2.0
- Quick Review: Off/2s/5s.
- Date stamp: Off/Date/(Date/Time)
Playback Mode
1. Browse files
A er the device powers ON and enters the VIDEO mode, press the mode key twice to enter the PLAYBACK mode, press the
UP/DOWN key to browse the video files or Photo files.
In the playback mode, press the UP/DOWN key to choose the photo or video to be previewed; the icon
appearing on the
as image files. Press the OK key to play the video.
le upper corner indicates video files while
2. Delete
In playback mode, press the Menu bu on to have the Delete/Protect/Slide Show op ons appearing. Choose Delete and press
the OK key to enter submenu ‘Delete the current’ or ‘Delete all files’ on the memory card.
[Note] The important video files that have been locked by G-sensor or Emergent key can’t be deleted.
3. Protect
In playback mode, press the Menu bu on to have the Delete/Protect/Slide Show op ons appearing. Choose Protect and press
the OK key to display Lock the current, Unlock the current, Lock all and Unlock all. The locked file cannot be deleted (except
forma ng). Note: The G-Sensor locked file may be deleted via menu unlocking.
Connec on to PC via USB Cable
1. USB Backup Mode (MSDC)
You can upload your videos and pictures to your computer by using the provided mini-USB cable. Make the connec on while
DVR is powered off and the display will show 2 op ons: MSDC / PC-CAM. MSDC = upload to computer, Highlight the MSDC by
using the UP/DOWN keys and press REC/OK key to enter your choice. Your computer should now unload all photos and videos.
[NOTE] To watch recorded videos, please transfer videos from memory card to the computer.
2. PC-CAM
Connect the device to computer while DVR is powered off and the display will show 2 op ons: MSDC / PC-CAM. PC-CAM = use
the DVR as a web camera. Highlight the PC-CAM by using the UP/DOWN keys and press REC/OK key to enter your choice. You
are now able to video chat with friends on Skype or Messenger.
Reset
Improper opera on or incorrect memory card can cause DVR to freeze. Please press the RESET hole on the bo om side of DVR
to power OFF the DVR. Power ON DVR manually and DVR will automa cally restore the factory default se ngs.
Technical Specifica ons
Screen size
1.5” TFT-LCD
Lens
92° A+ class glass lens
OSD language
Multi languages
Video resolu on
1920x1080@25fps/ Default 1280x720@30fps
Video format
AVI (MJPEG)
Photo size
12M/10M/8M/5M/3M/2M/1.3M/VGA
-ENG 04-
Photo format
JPG
Memory card
Micro-SD card, support from 8GB-32GB/C6-C10
Microphone/Speaker
Built-in
Light frequency
50Hz/60Hz
USB port
USB 2.0
Power supply
DC12V-24V adapts to 5V/500mA
Ba ery
3.7V / 200 mAh
Opera on system
Windows 2000/XP/Vista/Win 7/Win 8,MAC OSX 10.3.6 or above
Note: We do our best to reflect accurate specifica ons above, however periodic updates and changes
may occur a er this manual was printed. We reserve the right to change the parameters without prior no fica on.
Warning
• Lithium ba ry inside!
• Do not try to open the product!
• Do not expose to heat, water, moisture,
direct sunlight!
• Only charge with the original adaptor
supplied with this product!
CAUTION!
-ENG 05-
ALL RIGHTS RESERVED, COPYRIGHT DENVER ELECTRONICS A/S
Electric and electronic equipment and included batteries contains materials, components and substances that
can be hazardous to your health and the environment, if the waste material (discarded electric and electronic
equipment and batteries) is not handled correctly.
Electric and electronic equipment and batteries is marked with the crossed out trash can symbol, seen below.
This symbol signifies that electric and electronic equipment and batteries should not be disposed of with other
household waste, but should be disposed of separately.
As the end user it is important that you submit your used batteries to the approriate and designated facility. In
this manner you make sure that the batteries are recycled in accordance with legislature and will not harm the
environment.
All cities have established collection points, where electric and electronic equipment and batteries can either be
submitted free of charge at recycling stations and other collection sites, or be collected from the households.
Additional information is available at the technical department of your city.
Imported by:
DENVER ELECTRONICS A/S
Stavneagervej 22
DK-8250 Egaa
Denmark
www.facebook.com/denverelectronics
-ENG 06-