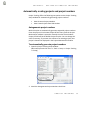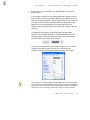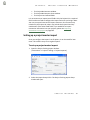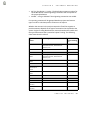
1
Project Tracking 2013 with Advanced Analytics An application for Microsoft Dynamics GP 2013 Furthering your success through innovative business solutions Copyright Manual copyright 2013 Encore Business Solutions, Inc. Printed in Canada. All rights reserved. Your right to copy this documentation is limited by copyright law and the terms of the software license agreement. As the software licensee, you may make a reasonable number of copies or printouts for your own use. Making unauthorized copies, adaptations, compilations, or derivative works for commercial distribution is prohibited and constitutes a punishable violation of the law. Trademarks Microsoft, Microsoft Excel ®, and Microsoft Dynamics GP are either registered trademarks or trademarks of Microsoft Corporation or its affiliates in the United States and/or other countries. The names of actual companies and products mentioned herein may be trademarks or registered marks - in the United States and/or other countries - of their respective owners. The names of companies, products, people and/or data used in window illustrations and sample output are fictitious and are in no way intended to represent any real individual, company, product, or event, unless otherwise noted. Warranty disclaimer Encore Business Solutions Inc. disclaims any warranty regarding the sample code contained in this documentation, including the warranties of merchantability and fitness for a particular purpose. Limitation of liability The content of this manual is furnished for informational use only, is subject to change without notice, and should not be construed as a commitment by Encore Business Solutions Inc. Encore Business Solutions Inc. assumes no responsibility or liability for any errors or inaccuracies that may appear in this manual. Neither Encore Business Solutions Inc. nor anyone else who has been involved in the creation, production, or delivery of this documentation shall be liable for any indirect, incidental, special, exemplary or consequential damages, including but not limited to any loss of anticipated profit or benefits, resulting from the use of this documentation or sample code. License agreement Use of this product is covered by a license agreement provided by Encore Business Solutions Inc. If you have any questions, please call our office at 204.989.4550 or 888.898.4330 (North America only). Publication Date January 2013 CONTENTS Contents Chapter: Introduction ............................................................................................... 8 What’s In This Manual? ............................................................................................................ 11 Symbols and conventions ........................................................................................................ 14 Additional resources ................................................................................................................. 15 Support Services ........................................................................................................................ 16 Chapter 1: Installation.......................................................................................... 20 System Requirements ............................................................................................................... 20 Upgrading from previous versions ......................................................................................... 20 Installing Project Tracking ........................................................................................................ 20 Registering Project Tracking .................................................................................................... 21 Table conversions ...................................................................................................................... 24 Chapter 2: Designing your Project Tracking system........ 26 How does Project Tracking work? .......................................................................................... 27 Understanding procedure flows ............................................................................................. 30 Understanding amount types and breakdown codes ......................................................... 31 Understanding transaction-level user-defined fields.......................................................... 32 Understanding project user-defined fields ........................................................................... 34 Blank Templates......................................................................................................................... 36 User-defined fields and user-defined field titles ................................................................. 37 Chapter 3: Setting up Project Tracking ............................................ 40 Activating Project Tracking ...................................................................................................... 40 Deactivating Project Tracking .................................................................................................. 41 Setting up user-defined fields ................................................................................................. 41 Require full or partial distribution, breakdown codes and/or descriptions ................... 46 Automatically calculating operating costs ............................................................................ 50 Automatically creating projects and project numbers ....................................................... 53 Setting the next adjustment number ..................................................................................... 55 Setting up breakdown codes ................................................................................................... 57 Setting up default amount types and default breakdowns by module ........................... 60 Assigning Breakdown Codes for a Project............................................................................. 62 Assigning Breakdown Codes for a Vendor/Vendor Class ................................................... 63 Project Tracking Dynamics GP Security ................................................................................. 64 Enhanced Project Security ....................................................................................................... 66 Activating and deactivating Enhanced Security ................................................................... 66 P ROJ E CT T RACKING iii CO N T E N TS Assigning security rights .......................................................................................................... 67 Changing your Enhanced Security password ....................................................................... 72 Project Tracking Budgeting Setup only ................................................................................. 73 Chapter 4: Setting Up Projects ................................................................... 64 Starting a project and setting up transaction user-defined field default values ........... 64 Entering a beginning balance.................................................................................................. 66 Setting project estimates......................................................................................................... 68 Maintaining project dates, numeric and check box field title information .................... 69 Entering project text field titles.............................................................................................. 71 Copying projects........................................................................................................................ 72 Chapter 5: Distributing transactions................................................... 74 Understanding system default values for project distributions ....................................... 75 Project Tracking Distribution window ................................................................................... 78 Creating project distributions ................................................................................................. 79 Posting project distributions ................................................................................................... 82 Troubleshooting posting difficulties ...................................................................................... 83 Project Tracking Distributions Inquiry window ................................................................... 86 Module-specific processing notes.......................................................................................... 87 Bank Reconciliation processing notes ................................................................................... 87 General Ledger processing notes ........................................................................................... 88 Inventory processing notes ..................................................................................................... 89 Invoicing processing notes ...................................................................................................... 90 Multi-Currency processing notes ........................................................................................... 90 Payroll processing notes .......................................................................................................... 90 Payables Management processing notes ............................................................................. 95 Purchase Order Processing processing notes ...................................................................... 95 Receivables Management processing notes ........................................................................ 97 Sales Order Processing processing notes ............................................................................. 99 Recurring transactions processing notes ............................................................................ 102 Correcting project distributions ........................................................................................... 103 Mass project adjustment ....................................................................................................... 110 Closing projects ....................................................................................................................... 114 Reopening projects ................................................................................................................. 117 Chapter 6: Reports and Inquiries ........................................................ 120 Project Inquiry ......................................................................................................................... 120 Project Inquiry Summary ....................................................................................................... 123 iv PR O JECT TRACKI N G CONTENTS Document Inquiry .................................................................................................................... 124 Budget Inquiry .......................................................................................................................... 125 Project Tracking Distributions Inquiry window .................................................................. 126 Reports ...................................................................................................................................... 128 Project Analysis Reports ......................................................................................................... 129 Project Tracking Edit List Reports ......................................................................................... 134 Budget Variance Report ......................................................................................................... 135 General Ledger Reconciliation Report ................................................................................. 141 Project Outstanding Balance Report .................................................................................... 144 Security Reports ....................................................................................................................... 146 Maintenance Reports ............................................................................................................. 147 Summary Reports .................................................................................................................... 149 Chapter 7: Project Tracking Budgeting ......................................... 154 Setting up Project Tracking Budgets .................................................................................... 154 Understanding the Project Tracking budget process ........................................................ 155 Creating new budgets ............................................................................................................. 157 Restricting budget views ........................................................................................................ 158 Adding notes to a budget ....................................................................................................... 164 Entering budget amounts when creating budgets ............................................................ 166 Shortcuts for entering budget amounts .............................................................................. 166 Copying an existing budget .................................................................................................... 168 Getting information about a budget .................................................................................... 170 Budget approval process ........................................................................................................ 170 Approving a budget ................................................................................................................. 171 Approving Budgets .................................................................................................................. 174 Reopening approved budgets ............................................................................................... 175 Revising a budget..................................................................................................................... 175 Deleting a budget .................................................................................................................... 177 Chapter 8: Project Tracking Importer............................................. 180 Importing projects (project master imports)...................................................................... 180 Setting up a project master import ...................................................................................... 181 Running a project master import ......................................................................................... 183 Importing transactions into projects ................................................................................... 184 Setting up project transaction imports................................................................................ 189 Running a project transaction import .................................................................................. 191 Chapter 9: Utilities ................................................................................................. 194 P ROJ E CT T RACKING v CO N T E N TS Purging history ........................................................................................................................ 194 Running Check Links ............................................................................................................... 195 Exporting a project file ........................................................................................................... 198 Appendix A: Advanced Reporting ................................................................................. 199 Adding Project ID to Microsoft Dynamics GP Reports ..................................................... 203 Appendix Appendix B: Data tables .............................................................................. 209 What’s New in Project Tracking 2013 ......................................................................... 213 What’s New in Project Tracking 2010 SP3 ................................................................ 213 What’s New in Project Tracking 2010 SP2 ................................................................ 213 What’s New in Project Tracking 2010 SP1 ................................................................ 214 Whats New In Project Tracking 2010 ........................................................................... 215 What’s New in Project Tracking for 10.0 SP3 .......................................................... 215 What’s New in Project Tracking for 10.0 SP2 .......................................................... 216 What’s New in Project Tracking for 10.0 SP1 .......................................................... 216 What’s New in Project Tracking for 10.0 ................................................................... 217 Known Issues............................................................................................................................. 219 About Encore Business Solutions................................................................................... 221 vi PR O JECT TRACKI N G INTRODUCTION INTRODUCTION I NTR O DU CTI O N Introduction Welcome to the Project Tracking with Advanced Analytics module. Project Tracking gives you the power to oversee your business with instant access to in-depth and accurate reporting of your company’s revenues, expenses, and profits. Project Tracking gives you the invaluable knowledge you need to analyze your business - pinpointing ways of streamlining workflow, increasing profitability, reducing wasted time and improving the way your company works. Project Tracking projects are very flexible and easy to set up. Similar to a traditional job-costing program, Project Tracking allows you to set up jobs or “projects” to track your revenues and expenses. But, Project Tracking provides much more than just a job-costing program because it is customizable to any business. There are 48 optional user-defined fields that can be used to customize Project Tracking. Using these customized fields, Project Tracking can give you a detailed view of any aspect of your operation. You can look at a portion of overall activity, a group project, a single category within a project, or you can compare and contrast the same category across a number of different projects. Project Tracking Budgeting (an additional option for Project Tracking) includes a powerful budgeting module that lets you revise and massage your budgets for projects in countless ways – invaluable when creating large, complex budgets. Project Tracking Importer (another additional option for Project Tracking) makes it easy to integrate with external systems or to import data from another job cost system. Project Tracking Lite is a scaled back version of Project Tracking w/ Advanced Analytics and is a great fit for an organization looking to track transactions entered in the Microsoft Dynamics GP Payables Transaction Entry window. Project Tracking Budgeting and Project Tracking Importer are not available with Project Tracking Lite. Some companies use Project Tracking just to track costs. Other companies use Project Tracking to track sales and cash receipts for sales analysis and 8 PR O JECT TRACKI N G INT RODUCT ION commissions reporting. Project Tracking is simple, flexible and configurable to your needs! Project Tracking provides the following benefits: • Easy installation and setup • Compare and contrast multiple aspects of your business within a single project and across multiple projects • Track revenue and costs separate from your general ledger account structure • Distribute to projects from any transaction entry screen using one distribution screen When using Project Tracking Lite you will only be able to distribute from the Payables Transaction Entry window. • Customizable to any business model • Create adjustment entries to your projects without affecting your general ledger • Process mass change adjustments • Ability to process the mass close of projects • Get a quick snapshot view of any project at any point in time using Project Tracking’s powerful reporting and inquiry features • Enhanced security—restrict access for each user on a per project basis (by project or by user) • Grant separate permission rights for editing or viewing distributions, making adjustments to projects or budgets, approving budgets, and reopening projects Project Tracking Importer provides the following benefit: P ROJ E CT T RACKING 9 I NTR O DU CTI O N • Easily import projects from another job cost system and/or import transactions into projects from external systems with or without general ledger entry using Project Tracking Importer Project Tracking Budgeting provides the following benefits: • Easily replicate budgets • Control project budgets at both the revenue and cost level maintaining multiple budget revisions with ease Project Tracking Budgeting and Project Tracking Importer are not available with Project Tracking Lite. 10 P R O JECT TRACKI N G INT RODUCT ION What’s In This Manual? This manual contains a detailed description of Project Tracking, step-bystep instructions to guide you through the installation and setup of your Project Tracking module, and instructions for how to use and tailor Project Tracking for your company. This manual assumes that you are familiar with navigation principles in Microsoft Dynamics GP and that you know how to operate the Microsoft Dynamics GP accounting system. It also assumes that Microsoft Dynamics GP2013 has been installed and configured on your computer. You will need a working knowledge of each Microsoft Dynamics GP module that you use with Project Tracking. Project Tracking Lite gives you the ablity to distribute from the Payables Management module only. Project Tracking integrates with the following Microsoft Dynamics GP modules: • General Ledger • Bank Reconciliation • Sales Order Processing • Invoicing • Receivables Management • Purchase Order Processing • Payables Management • Payroll • Inventory P ROJ E CT T RACKING 11 I NTR O DU CTI O N Project Tracking is a job-costing and accounting system designed to be used by accounting departments. Standard accounting terms are used throughout to express concepts and functionality. A knowledge of standard business accounting terms and concepts is necessary to use the information in this manual. This manual contains the following chapters: The Introduction chapter lists the benefits and features of Project Tracking and explains how the Project Tracking User Manual is organized. The Installation chapter has step-by-step instructions that guide you through the installation of your Project Tracking module. The Design chapter explains how Project Tracking can be tailored for a wide range of different businesses and provides an overview of job-costing followed by examples of how Project Tracking can be used for both traditional and non-traditional job-costing systems. It explains the specific terminology used in Project Tracking and gives hints and templates to help you configure Project Tracking to meet your specific business needs. The Setup chapter explains how to implement your design decisions and set up Project Tracking for your company. The Setting Up Projects chapter describes how to start a project, enter beginning balances, set project estimates, enter project dates, set up numeric and checkbox user-defined fields and how to copy the basic project setup from an existing project. The Distributing Transactions chapter explains how to distribute transactions, make adjustments to project distributions and how to close and reopen projects. The Inquiries chapter explains how to get information about projects and describes the reports available to you in Project Tracking. The Project Tracking Budgeting chapter describes how to maintain, approve, and delete budgets. Special registration keys are required to activate the Budgeting features. 12 P R O JECT TRACKI N G INT RODUCT I ON The Project Tracking Importer chapter describes how to bring data into Project Tracking from either parallel or legacy systems. The Project Tracking Importer requires separate registration keys. The Utilities chapter covers three file handling utilities built into Project Tracking: Purging Project History, File Maintenance, and Creating an Export. Appendix A: Advanced Reporting details how to add information from Project Tracking to existing Microsoft Dynamics GP reports and to Project Analysis reports. Appendix B: Data Tables detailed charts of sales and system data tables. What’s New in Project Tracking chapter describes all the changes made to Project tracking with this release and includes any known issues. The Known Issues section documents details of known issues. in Project Tracking. P ROJ E CT T RACKING 13 I NTR O DU CTI O N Symbols and conventions This manual uses the following symbols and conventions to make information stand out. Symbol/Convention Description The warning symbol indicates situations you should be especially aware of when completing tasks. Typically, this symbol includes cautions about performing steps in their proper order, or important reminders about how other information in Microsoft Dynamics GP may be affected. The light bulb symbol indicates helpful tips, shortcuts and suggestions. File >> Print 14 P R O JECT TRACKI N G The ( >>) symbol indicates selections to make from a menu. In this example, from the File menu, choose Print. INT RODUCT I ON Additional resources Documentation is provided in hard copy format as an Adobe Acrobat PDF file. Online help is available in this version of Project Tracking. Press F1 or click the help icon to obtain online help. P ROJ E CT T RACKING 15 I NTR O DU CTI O N Support Services To obtain product support services: Please refer to this quick reference table when you need to use Encore’s Technical Support services. Service Contact General Calls 204.989.4330 Toll Free Number (North America Only) 888.898.4330 Fax 204. 235.2331 E-mail [email protected] Web www.encorebusiness.com Before You Call Support: You should have the answers for all of the following questions to help your support specialist quickly narrow down the source of the problem you are experiencing. 16 P R O JECT TRACKI N G • What is the exact error message? • When did the error first occur? • What task were you attempting to perform at the time you received the error message? • Has the task been completed successfully in the past? • What is the name of the window you are working in? • What have you done so far to attempt to fix the problem? • Have you performed any of the table maintenance processes? • If you have performed table maintenance processes and received error messages, what were the messages? INT RODUCT I ON • Does the problem occur in another company? • Does the problem occur on another workstation? • Does the problem occur for more than one user? • Have you imported any data? • What versions of software are you using? Verify the version numbers for Microsoft Dynamics GP, your database software, Encore product and Windows. Also note service packs. To locate the version number for Project Tracking version 2013, 2010 and 10.0 go to Microsoft Dynamics GP menu >> Tools >> Setup >> System >> Encore Product Registration. The About window for Project Tracking can be located by selecting your Project Tracking product and expanding the Encore Product Registration window. The About window link is located in the bottom left hand corner of the window. To locate the version number for Project Tracking version 9.0 and 8.0 go to Tools >> Setup >> System >> Encore Product Registration. The About window for Project Tracking can be located by selecting your Project Tracking product and expanding the Encore Product Registration window. The About window link is located in the bottom left hand corner of the window. P ROJ E CT T RACKING 17 I NTR O DU CTI O N 18 P R O JECT TRACKI N G CHAPTER 1: INSTALLATION C H A P TER 1 I N STALLATI O N Chapter 1: Installation This chapter explains how to install and register Project Tracking. You will need separate registration keys to register Project Tracking, Project Tracking Budgeting, Project Tracking Importer and Project Tracking Lite. This chapter contains the following sections: • • • • • System Requirements Upgrading from previous versions Installing Project Tracking Registering Project Tracking Table conversions System Requirements The hardware necessary to run Microsoft Dynamics GP is all you need to run Project Tracking. Due to the size of some of the Project Tracking windows, we recommend a screen resolution of 1024 x 768 or greater. Upgrading from previous versions If you are upgrading from a prior version of Project Tracking, be sure to back up your data first, and then complete the installation, registration and setup procedures described in this manual. Installing Project Tracking You will use the installation program to install Project Tracking. Before you begin installing Project Tracking, do the following: 20 P R O JECT TRACKI N G • Verify that Microsoft Dynamics GP 2013 has been installed on your computer. • Create a backup copy of your important data. If you have recently upgraded Microsoft Dynamics GP, do a complete backup before installing Project Tracking. CHAP T E R 1 INST AL L AT ION • Verify that the PT12.00.01.xxx.exe file has been downloaded onto your computer. (The x’s in the file name will be replaced with numbers.) • Note the directory location of your Microsoft Dynamics GP installation - you will need to know this during the installation. • Exit all applications. To install Project Tracking: 1. Start Windows Explorer and locate the PT12.00.01.xxx.exe file. The location of this file will vary depending on how you acquired the product. (The x’s in the file name will be replaced with numbers.) 2. Launch the PT12.00.01.xxx.exe file by double-clicking it. The installation program for Project Tracking will start. (The x’s in the file name will be replaced with numbers.) 3. Follow the instructions in each window. 4. After installation is complete, start Microsoft Dynamics GP. The message “Do you wish to include new code now?” will appear. You must log in as System Administrator in order to complete the installation and do initial system setups. 5. Select Yes. Information for Project Tracking, Encore Product Registration and Encore Utilities will be copied to the Dynamics.set file. Registering Project Tracking Before you can create Project Tracking transactions in your company data, you must register your software. If you choose not to enter the registration information, you will only be able to create sample transactions using Fabrikam - the lesson company. P ROJ E CT T RACKING 21 C H A P TER 1 I N STALLATI O N To use Project Tracking Lite in the test company add the following statement to the DEX.INI file - EBS_PTLite=TRUE Note: The DEX.INI file is locted in your Microsoft Dynamics Great Plains Data folder To register Project Tracking: 1. Open the Encore Product Registration window. (Microsoft Dynamics GP menu >> Tools >> Setup >> System >> Encore Product Registration) 2. Choose the product you wish to register. • Project Tracking • Project Tracking Budgeting • Project Tracking Importer • Project Tracking Lite 3. Choose the show expansion button of the registration window. 22 P R O JECT TRACKI N G to display the detailed view CHAP T E R 1 INST AL L AT ION 4. Enter the product registration key provided by Encore Business Solutions Inc. 5. If you have purchased more than one Project Tracking product, repeat steps 2 to 4 until all your purchased products are registered. 6. Select OK to close the window. To register your product using a drop file: 1. Copy or save the drop file to the directory location for your Microsoft Dynamics GP.. For Example: C:\ Microsoft Dynamics GP\ 2. Log in to Microsoft Dynamics GP as a system administrator. 3. The system will notify you that it has found a registration file, accept the prompt. 4. The system will notify you when the product has been registered. P ROJ E CT T RACKING 23 C H A P TER 1 I N STALLATI O N 5. Open the Encore Product Registration window to ensure that it has been registered. (Microsoft Dynamics GP menu >> Tools >> Setup >> System >> Encore Product Registration) Table conversions Whether you want to demo or run the product, you must run the Table Conversion/Upgrade process to create tables—this will set up SQL components and convert any existing data. You must log in as System Administrator to initialize Project Tracking Table Conversion / Upgrade process. To create tables and run table conversions: 1. Open the Table Conversion window. (Microsoft Dynamics GP menu >> Maintenance >> Project Tracking >> Table Conversion) 2. Select Process. Tables will be created, permissions will be set, and existing data will be converted. Every time you install Project Tracking, you must run the table conversion / upgrade process for each company. 24 P R O JECT TRACKI N G CHAPTER 2: DESIGNING YOUR PROJECT TRACKING SYSTEM C H A P TER 2 DESI G N I N G YOUR P ROJ E CT T RACKING SYST E M Chapter 2: Designing your Project Tracking system Project Tracking with Advanced AnalyticsAnalysis is a very flexible, powerful program. This chapter will give you a strong conceptual overview of how Project Tracking works, and will help you decide how to best configure Project Tracking for your business. This chapter also will give you a good understanding of the various user-defined fields available to you, a description of Project Tracking’s built-in reports, some case study examples and insights into features. This chapter is divided into the following sections: • • • • • • • How does Project Tracking work? Understanding procedure flows Understanding amount types and breakdown codes Understanding transaction-level user-defined fields Understanding project user-defined fields Blank Templates User-defined fields and user-defined field titles It is important to understand the impact of each design decision you make. Before designing your Project Tracking system, please also review Chapter 6, “Reports and Inquiries”in this manual. It will help you design Project Tracking to ultimately obtain the reports you need. Because Project Tracking can be implemented in so many different ways across such a wide range of businesses, it is impossible to give step-by-step instructions for designing every system. Specific instructions for using Project Tracking’s various features are explained later in this manual. 26 P R O JECT TRACKI N G CHAPTER 2 DESI GNING YOUR P ROJ E CT T RACKING SYSTEM How does Project Tracking work? Project Tracking is essentially a job-costing system designed for businesses who want to analyze their costs, revenues, or both, for a job or a project. Because of Project Tracking’s unique design, any key business indicator you wish to analyze separately from your general ledger can be considered a project. The following table shows various examples of business indicators that could be configured as projects in the system: Type of business Example of project Housing developer Each house Tour coordinator Each regular tour Not For Profit Research Co. Each research project Industrial Equipment Repair Each type of equipment piece Mortgage broker Each mortgage Event coordinator Each event Furniture manufacturer Each type of furniture piece Project Tracking can be used for more than simply reporting the overall costs and revenues of each job or project. Project Tracking can give you specific information about revenue and costs across a wide range of projects. A housing developer may want to see not only the profitability of each house, but also how much is being spent on specific expenses, such as paint or concrete, for all houses or, for all houses within a specific development. You can easily accomplish this type of reporting using a combination of breakdown codes and transaction user-defined fields. For example, the housing developer would define a transaction user-defined fields as “DEVELOPMENT” with values such as Manhattan, Bronx, etc. and would define breakdown codes called “PAINT” and “CONCRETE”. When transactions are entered in the system, the transaction will be tagged with a development code (for example, Manhattan) and one of the breakdown codes (for example, PAINT). P ROJ E CT T RACKING 27 C H A P TER 2 DESI G N I N G YOUR P ROJ E CT T RACKING SYST E M A unique feature of Project Tracking is the ability to keep information across fiscal years. For example, a mortgage broker opened escrow on a property in December but the escrow closed in January of the following year and the broker’s fiscal year ends on December 31. Since Project Tracking is not tied to any fiscal or calendar year, the mortgage broker can close the project or the general ledger at any point in time. And yet, reporting can be specified to an exact time frame by general ledger posting date or document date range to create weekly, monthly or quarterly reports. Many other reports and configurations are possible. The level of detail you will be able to obtain from Project Tracking reports depends on how you set up your user-defined fields and breakdown codes. Not all Project Tracking user-defined fields are equal. There are seven transaction-level user-defined fields tied to each transaction distribution line that can be used for project analysis. You can pre-define a list of values for each of the transaction-level user-defined fields. For example, a housing development may have five general phases (Foundation, Framing, Mechanical, Finishing, Landscaping) and the developer may wish to track transactions by phases; the housing developer will set up a transactionlevel user-defined field for Phases and will enter the list of phases for that field. After the field is set up, the user will be able to select the appropriate phase when entering transactions. Project level user-defined fields are much more restricted in their usage. There are 41 project-level user-defined fields available which hold one value per field per project. For example, a housing developer may want to keep track of the square footage of each house (project) that is built. This value will remain constant for the entire life of the project and applies to the project not to individual transactions. Therefore, the developer will use a project-level user-defined field (numeric value) to track square footage. Project level user-defined fields can be in date, numeric, check box, or text format. 28 P R O JECT TRACKI N G CHAPTER 2 DESI GNING YOUR P ROJ E CT T RACKING SYSTEM The following table describes how the two types of user-defined fields are set up and some of the differences between them: Transaction-level user-defined fields Project-level user-defined fields 7 text fields (up to 15 characters) 7 date fields 7 numeric fields 7 check box fields 20 text fields (up to 60 characters) Use to record information that will be linked to Use to record information that is not affected transactions. by transactions. Use as a variable for project analysis when comparing and contrasting projects or specific factors within a project. Not available to compare or contrast for project analysis. Automatically included in reports. Possible to include in custom reports as an informational field. Titles will be displayed in all Project Tracking Titles will display in the Project Maintenance >> windows that reference transaction-level user- Project User-Defined Fields window only. defined fields. You may create a list of values for each field — these values will be available to all projects in Project Tracking Only one value per field per project is allowed. The values that you enter will be available only to that specific project ID. You may enter a default value for a specific project in the Project Maintenance window if applicable. Only one value per field per project is allowed. When processing transactions, you may either Not available when processing transactions accept the default value or select another value from the pre-defined list. P ROJ E CT T RACKING 29 C H A P TER 2 DESI G N I N G YOUR P ROJ E CT T RACKING SYST E M Understanding procedure flows This section describes the typical procedure flow during setup, daily and ongoing use. Setup • • • • • • • • Daily • Complete design template. Enter transaction user-defined field titles. Enter Project Text field titles. Enter Project Date, Check box and Numeric field titles. Enter breakdown codes for each amount type. Set data entry options. Activate enhanced security. Import projects from legacy system (if using Project Tracking Importer). Add Invoices, Vouchers and other transactions to the system. Use the Project Distribution window to distribute them to projects and add Breakdowns and Transaction User-Defined field values. When the transaction is saved the project distributions are saved to the Project Transaction Work file. • Prior to posting, run the Project Distribution Edit list from the Batch Entry window of each module. Correct Project distributions before posting. • Post your transactions. The Project transactions are now moved to the Project Transaction Open file. Ongoing • Add new projects to the system. • Project Tracking Budgeting Only: Create Project Budgets. • Run Project Analysis reports for Project P& L’s and cross-project cost analysis. • Run Project Variance Reports (Project Tracking Budgeting ONLY). • As projects are completed, close Projects to move the project and all of its transactions to the Project Transaction History files. • At least monthly, run check links file maintenance to verify the integrity of the project data. • Import Payroll and other data into projects. • If desired, purge old projects after several years, using Purge Projects. • Make adjustments to project revenue or expenses. 30 P R O JECT TRACKI N G CHAPTER 2 DESI GNING YOUR P ROJ E CT T RACKING SYSTEM Understanding amount types and breakdown codes Every distribution line of every transaction must be assigned an amount type. Examples of amount types are Actual Cost of Materials, Actual Cost of Labor, Sales and Freight. There are eleven amount types available for selection that come pre-defined with Project Tracking. Each amount type is designated as a revenue or an expense as shown in the following table: Revenue Amount Types Expense Amount Types Sales Estimated Cost Labor Trade Discount Estimated Cost Material Freight Actual Cost Labor Miscellaneous Charge Actual Cost Material Sales Tax Adjust Cash You will use breakdown codes to further break down the eleven amount types. Other systems often refer to these as cost or revenue codes. For instance, the housing developer may create Actual Cost of Material breakdown codes such as “PAINT”, “PLUMBING”, “CARPET”, “LUMBER”, “HARDWARE”, etc. The same housing developer may have Actual Cost of Labor breakdown codes named “ARCHITECT”, “PLUMBER”, “CARPENTER”, and so on. When you enter a transaction, you will assign the transaction to a project, an amount type, and a breakdown code. This makes it possible to see not only the total revenue or cost of each of your projects, but also how that revenue or expense is allocated into amount types and breakdowns. The amount types are pre-determined but you can define the breakdown codes based on the details you wish to see about each pre-determined amount type. When designing your breakdown codes, remember that a single transaction, even a single line item within a transaction, may be split across several Project Tracking distribution lines and may have different breakdown codes. In this way, a single invoice from a contractor may be distributed to Actual Cost of Labor and to Actual Cost of Materials. P ROJ E CT T RACKING 31 C H A P TER 2 DESI G N I N G YOUR P ROJ E CT T RACKING SYST E M Understanding transaction-level user-defined fields There are seven transaction-level user-defined fields that come with Project Tracking. Transaction user-defined fields are used when entering project tracking distributions to record additional information. Each project distribution (a single transaction may be split into several project distributions) has a Project ID, an amount type, a breakdown code, a description, an amount, and seven transaction user-defined fields. A business might designate a transaction user-defined field as Department in order to track each transaction not only to a project but also to a department. They could then run reports that tell them how each department performed within each project or how the departments performed across all or a range of projects. Another business may use one field for Department and another for Office Location. This would allow transaction-based reporting by project, by Department, by Office Location or by any combination of the three. After creating a title for each transaction user-defined field that you will use, you must enter values for each field. If you decide to use one of the fields as City, for instance, you may enter the values “LOS ANGELES”, “NEW YORK”, “CHICAGO”, etc. You must enter values in the Transaction UserDefined Maintenance window before it can be used on a distribution line. Transaction-level user-defined fields can be set to Active or Inactive. A business may want to set this field to inactive because the field is only used during one period or phase of the project. Transaction user-defined fields can be used in conjunction with amount types and breakdowns to achieve highly detailed reports. Sometimes companies would like to track the cost of items like paint and plumbing as a total cost not as separate labor and materials costs. It is possible to set up the same breakdown code for Actual Cost of Labor and Actual Cost of Materials. However, because the breakdown codes are subsidiary to amount types, you will need to modify the reports provided by the system in order to achieve the desired result. The Project Analysis reports can show distributions with all breakdowns or be limited to a single breakdown. Actual Cost of Labor Breakdown “PAINT” is considered a different Breakdown code than Actual Cost of Materials Breakdown “PAINT”. If the Project Analysis report is limited to a single breakdown code, you will see one or the other, but not both. If you print the report for 32 P R O JECT TRACKI N G CHAPTER 2 DESI GNING YOUR P ROJ E CT T RACKING SYSTEM all breakdown codes, you will see distributions with each breakdown, but even though both amount types have identical breakdown codes, they will still be reported separately under each amount type. If you have a need for this type of cross-project reporting consider using one of the transaction user- defined fields to hold the cross-project amount type value. You can set up default values for transaction user-defined fields on the Breakdown Maintenance screen. P ROJ E CT T RACKING 33 C H A P TER 2 DESI G N I N G YOUR P ROJ E CT T RACKING SYST E M Understanding project user-defined fields Project user-defined fields are used as labels for reporting purposes only. There are 41 project level user-defined fields in total: 7 date fields, 7 numeric fields, 7 check box fields, and 20 sixty-character alpha-numeric fields. You can enter values into any of these fields for each individual project. These 41 fields are distinguished from the transaction level user-defined fields in two ways: they can hold only one value per project and Project Tracking does not verify the accuracy of the information. If you want to benefit from Project Tracking’s validity checking, use a transaction userdefined field instead of a project user-defined field and mark the Constant Value field on the Project ID Maintenance window. These fields are useful for attaching additional information to projects. When used with Report Writer, they also can be used to restrict the range of projects that appear on certain reports. Date There are seven project date fields. They can be used to hold information about projects such as phase completion dates, due dates, phase start dates, etc. Each field can hold one date per project. Numeric There are seven project numeric fields. They can hold dollar amounts, percentages or any other number. Each field can hold one number per project. Check box There are seven project check box fields. Check box fields can hold an On or Off or a Yes or No value. Examples of check box fields are: INTERNAL PROJECT, OUTSIDE FUNDING, PRE-PAYMENT, etc. You would use a check box field to answer a question, such as, “Is this an internal project?” or “Does this project use outside funding?”. Each field can hold one value per project. 34 P R O JECT TRACKI N G CHAPTER 2 DESI GNING YOUR P ROJ E CT T RACKING SYSTEM Text There are 20 project text fields. Each field can hold up to 60 characters. These fields can be used for specific purposes or to hold short, miscellaneous notes about the project. P ROJ E CT T RACKING 35 C H A P TER 2 DESI G N I N G YOUR P ROJ E CT T RACKING SYST E M Blank Templates Use the following templates during your design sessions to keep track of your design decisions. Sales Actual Cost of Labor Actual Cost of Materials Cash Sales Tax Freight Trade Discount Miscellaneous Charges 36 P R O JECT TRACKI N G CHAPTER 2 DESI GNING YOUR P ROJ E CT T RACKING SYSTEM User-defined fields and user-defined field titles Adjust Estimated Cost of Labor Estimated Cost of Materials UDF #1 UDF #2 UDF #3 UDF #5 UDF #6 UDF #7 UDF #4 P ROJ E CT T RACKING 37 C H A P TER 2 Check box Fields 38 P R O JECT DESI G N I N G YOUR Date Fields TRACKI N G P ROJ E CT T RACKING Numeric Fields SYST E M Text Fields CHAPTER 3: SETTING UP PROJECT TRACKING C H A P TER 3 SETTI N G U P P ROJ E CT T RACKING Chapter 3: Setting up Project Tracking This chapter covers the company-wide initial setup necessary before you can start setting up your projects. This section includes the following topics: • • • • • • • • • • • • • • • • • Activating Project Tracking Deactivating Project Tracking Setting up user-defined fields Require full or partial distribution, breakdown codes and/or descriptions Automatically calculating operating costs Automatically creating projects and project numbers Setting the next adjustment number Setting up breakdown codes Setting up default amount types and default breakdowns by module Assigning Breakdown Codes for a Project Assigning Breakdown Codes for a Vendor/Vendor Class Project Tracking Dynamics GP Security Enhanced Project Security Activating and deactivating Enhanced Security Assigning security rights Changing your Enhanced Security password Project Tracking Budgeting Setup only Activating Project Tracking You must activate Project Tracking for each Microsoft Dynamics GP company that will use Project Tracking. To activate Project Tracking: 1. Open the Project Tracking Setup window. (Microsoft Dynamics GP menu >> Tools >> Setup >> Project Tracking >> Setup) 2. Select Enable Project Tracking. 40 P R O JECT TRACKI N G CHAPT E R 3 SE T T ING UP P ROJ E CT T RACKI NG When using Project Tracking Lite the Payables Transaction Entry module will be enabled and all other modules will be disabled. 3. Select OK to activate Project Tracking. Deactivating Project Tracking To deactivate Project Tracking: 1. Open the Project Tracking Setup window. (Microsoft Dynamics GP menu >> Tools >> Setup >> Project Tracking >> Setup) 2. De-select Enable Project Tracking 3. Select OK to deactivate Project Tracking. In order to deactivate Project Tracking all transactions must be posted that are assigned to projects. Once Project Tracking is deactivated only To activate Project Tracking: and Table conversions are available. Setting up user-defined fields If you have not already designed your Project Tracking implementation and decided how you are going to use Project Tracking’s seven transaction user-defined fields and 41 project user-defined fields, please refer to Chapter 2, “Designing your Project Tracking system” before attempting to set up these user-defined fields. This section includes the following: • • • Setting up transaction user-defined field titles Setting up project text fields Setting up user-defined project numeric, date and check box fields P ROJ E CT T RACKING 41 C H A P TER 3 SETTI N G U P P ROJ E CT T RACKING Setting up transaction user-defined field titles There are seven transaction user-defined fields. Each transaction userdefined field can hold a separate value for each project distribution. The transactions distributed to any one project may hold many different values in the transaction user-defined fields. When looking up projects throughout the system, you may sort transactions by any of the transaction user-defined fields. The titles that you enter on the setup screen will show up wherever these fields are used by the system. They are used to report on aspects of your business, such as department, territory, salesperson, both within projects and across a range of projects. Once you have determined what meaning you would like to assign to your seven transaction user-defined fields, you can assign titles on the Project Tracking Setup window. To set up transaction user-defined field titles 1. Open the Project Tracking Setup window. (Microsoft Dynamics GP menu >> Tools >> Setup >> Project Tracking >> Setup) 42 P R O JECT TRACKI N G CHAPT E R 3 SE T T ING UP P ROJ E CT T RACKI NG 2. Enter the title for each transaction user-defined field in the appropriate field on the right hand side of the window. The titles you enter will replace the User-Defined # field names on the User-Defined Tables palette and the Project Tracking windows, including Project Distribution and the Inquiry windows. If you already have one of these windows or the User-Defined Tables palette open, you will need to close and reopen it to see the titles you just entered. 3. Project Tracking Budgeting Only: If you would like to budget based on the values in any of these fields, mark the Use for Budgets check box next to that field. See the Project Tracking Budgeting Setup only on page 68 for more information. 4. To require a constant value on a per project basis for any of the transaction user-defined fields, mark the applicable Constant Value check boxes. 5. To set up actual values for the transaction user-defined fields, open the User-Defined 1 Maintenance window. (Cards >> Project Tracking >> Trx User-Defined: UDF 1) The window and menu will no longer say “User-Defined 1”. The words “UserDefined 1” will be replaced by the title you entered in step 2. 6. Enter a value and a description that is applicable to this user-defined field and choose Save. Repeat until you have entered all possible values for this field. When you are done entering values, close the window. 7. Mark the User Defined field as Active or Inactive A user defined field cannot be set to inactive if it is a default user defined field. An inactive user defined field cannot be used as a default user defined field. P ROJ E CT T RACKING 43 C H A P TER 3 SETTI N G U P P ROJ E CT T RACKING A user defined field can be set to inactive even though it is included in a Project Tracking Budget. 8. Repeat steps 4 and 5 for the other user-defined fields that you want to use. 44 P R O JECT TRACKI N G CHAPT E R 3 SE T T ING UP P ROJ E CT T RACKI NG Setting up project text fields There are twenty project text fields. They can hold any alpha-numeric value up to 60 characters. To set up project text fields: 1. Open the Project Tracking Setup window. (Microsoft Dynamics GP menu >> Tools >> Setup >> Project Tracking >> Setup) 2. To open the Project Text Field Titles window. (Select Options >> Text Field Titles). 3. Enter the text you would like to appear in the field next to the appropriate label number. The text you enter will appear on the Project Text Field window and on reports. Setting up user-defined project numeric, date and check box fields There are seven each project numeric, date and check box fields. They can hold one value each per project. P ROJ E CT T RACKING 45 C H A P TER 3 SETTI N G U P P ROJ E CT T RACKING To set up user-defined project numeric, date, and check box fields: 1. Open the Project Tracking Setup window. (Microsoft Dynamics GP menu >> Tools >> Setup >> Project Tracking >> Setup) 2. Choose the User-Defined Field Titles button to open the User-Defined Field Titles window. 3. Enter the title for each field in the appropriate field on the UserDefined Field Titles window. This is the text that will appear next to the field on the Project User-Defined fields window (accessed from the Project Maintenance window) and on reports. Require full or partial distribution, breakdown codes and/or descriptions Project Tracking gives you the option to distribute all your transactions to projects or just the transactions you choose. You can distribute all or part of a transaction. A distribution line may have values entered in all fields or just in some. To ensure data integrity, some companies want all their transactions completely booked to projects. Others may want all transactions from a certain module, such as Sales Order Processing, 46 P R O JECT TRACKI N G CHAPT E R 3 SE T T ING UP P ROJ E CT T RACKING booked to projects. Project Tracking Lite is used by companies that want to distribute only their Payables transactions. Project Tracking has been designed so that every amount distributed correlates with a general ledger distribution. This correlation allows you to: • • Reconcile amounts distributed to projects to particular balances in your general ledger Include general ledger accounts on project reports so that you can see what general ledger accounts a particular project affected. The system will always maintain a correlation—it will not allow a project distribution to be posted if the general ledger account does not match one of the accounts actually in use on the accounting transactions. The correlation between Project Tracking and the general ledger will only be a perfect one-to-one correspondence if you require full distributions for each registered and integrated Microsoft Dynamics GP module. You can require full distributions by marking the check box next to each Microsoft Dynamics GP module on the Project Tracking Setup window. If one of these check boxes is not marked, you will be able to distribute to your project an amount that is less than the amount distributed to your general ledger. It is never possible to distribute more than the general ledger amount to a project. Normally, whenever a transaction is not fully distributed to projects, Project Tracking gives the user a warning before saving the project distribution. The warning allows you to save the distribution or return to the Project Tracking Distribution window to fully distribute the transaction to projects. This is a courtesy warning for those installations not requiring full project distributions. If you do not want this warning, you can turn it off in the Project Tracking Setup window. Project Tracking also allows you to require information that would otherwise be optional. You can require breakdown codes, and descriptions (except on tax and freight). P ROJ E CT T RACKING 47 C H A P TER 3 SETTI N G U P P ROJ E CT T RACKING To require full project distributions, breakdown codes and/or descriptions: 1. Open the Project Tracking Setup window: (Microsoft Dynamics GP menu >> Tools >> Setup >> Project Tracking >> Setup) 2. Mark the windows that you want to require full project distribution. If marked, 100% of the dollar amount of each transaction must be distributed to one or more projects before the transaction can be posted in the following windows: • • • • • • • • • 48 P R O JECT TRACKI N G Payables Transaction Entry Receivables Transaction Entry Invoice Transaction Entry Sales Transaction Entry Purchase Order Processing (Purchase Order Entry, Receivings Transaction Entry, Purchasing Invoice Entry) US Payroll—Payroll Transaction Cash Receipts Entry Item Transaction Encore’s Recurring Contract Billing—Contract Maintenance CHAPT E R 3 SE T T ING UP P ROJ E CT T RACKI NG If you are using Intercompany Processing, you must turn off Require Full Project Distribution for Payables Transaction Entry in order to post Payables Management intercompany transactions. Full Project Distribution is not available for General Ledger transactions, because it would be unwise to force all lines in GL Transaction Entry to be fully distributed to projects. However, you can use the GL Transaction Entry window to create miscellaneous adjustments for projects. 3. To turn off the warnings that will occur every time a transaction is not fully distributed, mark the No Warning when Full Distribution not Required check box. If you do not turn off the warnings, Project Tracking will warn you even for windows specified as not requiring full distribution. 4. To require a breakdown code on each project distribution line in all modules, mark the Require Breakdowns check box. See Setting up breakdown codes on page 56 for more information. If you are using Project Tracking Budgeting, this option must be marked. For more information, see Project Tracking Budgeting Setup only on page 68.* 5. To require descriptions on each Project Distribution line in all modules except on tax and freight distributions, mark the Require Descriptions (except on tax and freight) option. Whenever descriptions are absent when this option is marked, error messages will be given on edit lists and you will not be able to post transactions that are missing descriptions. 6. To distribute transactions from the Payables Management module using the Quick Entry feature, mark the Enable Quick Entry check box. This feature opens a small window directly below the Payables Transaction Entry window that allows you to specify single project, breakdown, amount type, description and transaction user-defined values for each payables transaction. Please see the section Chapter , “Using the Quick Project Entry window to distribute to projects (Payables only)” for full information about this powerful feature. P ROJ E CT T RACKING 49 C H A P TER 3 SETTI N G U P P ROJ E CT T RACKING Automatically calculating operating costs Many businesses like to allocate a set percentage of material and/or labor costs for overhead or operating costs. It is also possible to have operating costs associated directly with revenue collection, such as credit card processing company charges. These costs affect project profitability. Ordinarily, these percentages are adjusted on a yearly or quarterly basis. If you desire, Project Tracking can automatically account for these operating cost percentages when reporting project profitability. You can enter the percentages of material cost, labor cost and/revenue to use for calculating operating costs on the Project Tracking Setup window. These percentages will affect project reports, however, they will not affect the Project Tracking distribution data or the General Ledger. Because these are generalized percentages, you will set these up on the company-wide Project Tracking Setup window. However, the percentages you enter here are only defaults. If you feel it is appropriate, you may override any or all of these numbers on a per project basis. The calculated operating costs are not stored, but are only calculated when the Project Inquiry Summary window is opened or when Project Analysis reports are run. They are not calculated at the time of transaction entry and are not stored with transactions. The percentages on this setup screen are the system defaults that will be used as new projects are added to the system. If you change them in the future, existing projects will retain the percentages that they already have configured. How the operating cost fields are used in reporting The following formulas show how the operating cost fields are used in reporting: Original Estimated Operating Cost (Estimated Selling Price * Revenue%) + (Estimated Material Cost * Materials%) + (Estimated Labor Cost * Labor%) =Original Estimated Operating Cost 50 P R O JECT TRACKI N G CHAPT E R 3 SE T T ING UP P ROJ E CT T RACKI NG Estimated Operating Cost after Invoicing (Actual Selling Price * Revenue%) + (Estimated Material Cost at Invoicing * Materials%) + (Estimated Labor Cost at Invoicing * Labor%) =Estimated Operating Cost after Invoicing Actual Operating Cost (Actual Selling Price * Revenue%) + (Actual Material Cost * Materials%) + (Actual Labor Cost * Labor%) =Actual Operating Cost To automatically calculate operating costs for project reports: 1. Open the Project Tracking Setup window. (Microsoft Dynamics GP menu >> Tools >> Setup >> Project Tracking >> Setup) 2. Enter the percentage of revenue you would like allocated as operating costs or overhead for each project. P ROJ E CT T RACKING 51 C H A P TER 3 SETTI N G U P P ROJ E CT T RACKING 3. Enter the percentage of labor cost you would like allocated as operating costs or overhead for each project. 4. Enter the percentage of material cost you would like allocated as operating costs or overhead for each project. 52 P R O JECT TRACKI N G CHAPT E R 3 SE T T ING UP P ROJ E CT T RACKI NG Automatically creating projects and project numbers Project Tracking offers the following two options on the Project Tracking Setup window for automatically generating project numbers: • • Auto Generate Project Numbers Auto Create Projects from SOP Number Autogenerate project numbers Mark this option to automatically generate sequential project numbers. Enter the project ID in the Next Project ID field. Every time the Project Maintenance window is opened or cleared, the value from the Next Project ID field will be the default Project ID value. You can change this value if necessary. If you enter the number of an existing project, that project’s data will be displayed in the Project Maintenance window. To automatically generate project numbers 1. Open the Project Tracking Setup window. (Microsoft Dynamics GP menu >> Tools >> Setup >> Project Tracking >> Setup) 2. Mark the Autogenerate Project Numbers check box. P ROJ E CT T RACKING 53 C H A P TER 3 SETTI N G U P P ROJ E CT T RACKING 3. Enter the initial project number from which you want to start autogenerating project numbers. The project numbers can have an alphabetic prefix, for example, PROJ00001, PROJ00002, etc. Please note that the project numbers must end with digits if you want the system to be able to automatically increment them. Also, please put a sufficient quantity of zero’s in your number to create the maximum number of projects that you need. The system cannot add digits at the beginning to increment from PROJ99 to PROJ100. You need to define the default value with leading zeros, such as PROJ0000099. Auto Create projects from Sales Order Processing number This option automatically creates a project whenever you enter the Project Tracking Distribution window from a Sales Order Processing Order document. The new project number will match the order number. The project will be assigned to the same customer as the order and the same salesperson as the customer but you can change both of these fields on the Project Maintenance window. The new project number will be used as the default project in the distributions for this document. This option is helpful to businesses who routinely start projects when they receive an order and only book expenses to the projects after the order is input into the system. 54 P R O JECT TRACKI N G CHAPT E R 3 SE T T ING UP P ROJ E CT T RACKI NG To automatically create projects from SOP Orders: 1. Open the Project Tracking Setup window. (Microsoft Dynamics GP menu >> Tools >> Setup >> Project Tracking >> Setup) 2. Mark the Auto Create Project from SOP Number check box. Setting the next adjustment number Project Tracking allows you to make adjustments in transaction amounts booked to projects. Each time you make an adjustment, the adjustment is numbered for tracking purposes. Project Tracking automatically generates a sequential number to make auditing easier. You can override the adjustment number suggested by the system when you are creating a project adjustment. You can set up a beginning adjustment number of your choice. P ROJ E CT T RACKING 55 C H A P TER 3 SETTI N G U P P ROJ E CT T RACKING To set the beginning or next adjustment number: 1. Open the Project Tracking Setup window. (Microsoft Dynamics GP menu >> Tools >> Setup >> Project Tracking >> Setup) 2. Enter the number you would like for the next Project Adjustment in the Next Adjustment Number field. The adjustment numbers can have an alphabetic prefix, for example, ADJ00001, ADJ00002, etc. Please note that the adjustment numbers must end with digits if you want the system to be able to automatically increment them. Also, please put a sufficient quantity of zero’s in your number to create the maximum number of adjustments that you need. The system cannot add digits at the beginning to increment from ADJ99 to ADJ100. You need to define the default value with leading zeros, such as ADJ0000099. 56 P R O JECT TRACKI N G CHAPT E R 3 SE T T ING UP P ROJ E CT T RACKI NG Setting up breakdown codes Project Tracking allows you to categorize all of your project distributions by both an amount type and a breakdown code. The following table shows the possible amount types and whether they are a revenue or an expense: Amount Types Revenue/Expense ADJUST Expense ACTUAL COST MATERIAL Expense ACTUAL COST LABOR Expense EST. COST MATERIAL Expense EST. COST LABOR Expense SALES Revenue SALES TAX Revenue FREIGHT Revenue TRADE DISCOUNT Revenue MISC. CHARGE Revenue CASH Revenue Each amount type can be assigned breakdown codes—such as Paint and Lumber—breaking down the amount types into specific categories. Setting up breakdown codes allows you to analyze your profitability more closely. Breakdown codes can have default values for each of the seven transaction user-defined fields. If default transaction user-defined field values are set for the breakdown codes, those values will populate the transaction user-defined fields each time the breakdown code is used. The default values will override any default values associated with the project. P ROJ E CT T RACKING 57 C H A P TER 3 SETTI N G U P P ROJ E CT T RACKING To set up breakdown codes: 1. Open the Breakdown Maintenance window. (Cards >> Project Tracking >>Breakdown) 2. Select the amount type for which you would like to define breakdown codes. 3. Enter the breakdown code you would like to define. If the breakdown code has already been defined for that amount type, the description and transaction user-defined field default values will appear in the window. These fields may be edited. 4. Select either Active or Inactive A breakdown code cannot be set to inactive if it is a default breakdown code. An inactive breakdown code cannot be used as a default breakdown code. See Understanding system default values for project distributions for more information. A breakdown code can be set to inactive even though it is included in a Project Tracking Budget. 5. Enter a description for the breakdown code. Descriptions can be up to 60 characters long. 6. If desired, enter a default value in each of the transaction user-defined fields. To override existing project values for the transaction userdefined field, select the special value <none>. 58 P R O JECT TRACKI N G CHAPT E R 3 SE T T ING UP P ROJ E CT T RACKING If you’ve also set up default values for the transaction user-defined fields on the Project Maintenance window and if the field is marked as constant value, the value associated with the project will be used. If the field is NOT marked as constant value, the value associated with the breakdown code will be used. 7. Choose Save. P ROJ E CT T RACKING 59 C H A P TER 3 SETTI N G U P P ROJ E CT T RACKING Setting up default amount types and default breakdowns by module Amount types are used throughout Project Tracking to indicate how the transaction amount should be categorized. For some modules, you can tell Project Tracking which amount type to use as the default value. In the Payables module, for example, you may specify a default value of Actual Cost of Material or Actual Cost of Labor, depending on what types of costs projects generally incur in your business. Also, for Sales modules, you can specify a separate default amount type for costs. The amount type can be changed, within limits, on each Project Distribution line. The following table shows which modules can have their default amount type set by the user and which amount types are available for that module. Microsoft Dynamics GP Module Available Amount Types General Ledger ALL Payables Management Actual Cost of Material, Actual Cost of Labor Receivables Management Sales* Invoicing Sales* Sales Order Processing Sales* Purchase Order Processing Actual Cost of Material, Actual Cost of Labor U.S. Payroll Actual Cost of Material, Actual Cost of Labor Cash Receipts Cash* Inventory Actual Cost of Material Costs in Sales modules Estimated Cost of Material, Estimated Cost of Labor, Actual Cost of Material, Actual Cost of Labor *cannot be set by user Each breakdown code is associated with a specific amount type. If you would like, you may set a default breakdown code to appear whenever its associated amount type is used in a particular module. The default breakdown code is available for all modules. 60 P R O JECT TRACKI N G CHAPT E R 3 SE T T ING UP P ROJ E CT T RACKI NG To set up default amount types and breakdown codes: 1. Open the Project Tracking Setup window. (Microsoft Dynamics GP menu >> Tools >> Setup >> Project Tracking >> Setup) 2. Choose the Options button—the Options window will open. 3. For each module, select the amount type you would like to use as the default value for transactions. 4. If you want to use default breakdown codes, enter a breakdown code for the selected amount types for each applicable module. If you haven’t set up any breakdown codes, enter the new breakdown code and the Breakdown Maintenance window will open for you to set it up. 5. Select OK. 6. Mark the checkbox for Suppress Distribution line if Cost of Sales is $0.00 to suppress Cost of Sales distributions for amounts of $0.00 in the Project Tracking Distribution window. (optional) 7. To use the Cost Entry Assist feature from the Receivables Sales Entry window, mark the Use RM Cost Entry Assists check box (optional). P ROJ E CT T RACKING 61 C H A P TER 3 SETTI N G U P P ROJ E CT T RACKING You can use Receivables Management Cost Assist Codes to specify how to split costs when entering them into the Receivables Sales Entry window allocating the Cost of Goods Sold to multiple general ledger accounts while at the same time allocating to multiple amount types in Project Tracking. 8. Select the calculation method to distribute payroll transactions to projects: Gross or Net. When you distribute payroll transactions to projects, you allocate the number of hours a staff member worked on each project. When the transaction is posted, Project Tracking will convert the hours to a dollar amount based on the amount actually paid to the staff member. The calculation may be based on Gross Pay or on Net Pay. We recommend that you use Gross Pay because that is more reflective of the actual cost incurred. Assigning Breakdown Codes for a Project The Project Breakdown Maintenance window is used to assign Breakdown Codes for a given project. You can create a restricted list of breakdown codes that will be available for selection in the Project Tracking Distribution window. To Assign Breakdown Codes to a Project 1. Open the Project Maintenance window. (Cards >> Project Tracking >> Project) 2. Enter or select the Project ID that you want to create breakdown codes for. 62 P R O JECT TRACKI N G CHAPT E R 3 SE T T ING UP P ROJ E CT T RACKI NG 3. Choose the Breakdown button. The Project Breakdown Maintenance window will open. 4. Select the Amount type. 5. Mark the Assign box beside each of the breakdown codes you want to assign to the selected project. 6. Select save. Assigning Breakdown Codes for a Vendor/Vendor Class The Vendor Breakdown Maintenance window is used to assign a restricted list of breakdown codes that will be available for selection for distributions to projects in the Project Tracking Distribution window. The breakdown codes that will be available in the Project Tracking Distribution window will be displayed as per the vendor selected for the transaction entry. P ROJ E CT T RACKING 63 C H A P TER 3 SETTI N G U P P ROJ E CT T RACKING To Assign Breakdown Codes to a Vendor or Vendor Class: 1. Open the Vendor Breakdown Maintenance window. (Cards >> Project Tracking >> Vendor Breakdown) 2. Select the Vendor Option - Vendor ID or Vendor Class. 3. Select the Vendor ID or Vendor class that you want to create breakdown codes for. 4. Select the Amount Type. 5. Mark the Assign box beside the breakdown codes you want to assign to the selected project.. 6. Select save. Project Tracking Dynamics GP Security By default every user has access to all Project Tracking windows and reports. The security tasks that affect the Project Tracking windows can be found by navigating to the Security Task Setup. 64 P R O JECT TRACKI N G CHAPT E R 3 SE T T ING UP P ROJ E CT T RACKI NG 1. Open Security Task Setup window. (Microsoft Dynamics GP>>Tools>>Setup>>System>>Security Tasks) 2. Select a Task ID. 3. Set Product to Project Tracking. 4. Set Type to Windows. 5. Set Series to 3rd Party 6. Select the appropriate Tasks to add. 7. Assign the Task to a Security Role 8. Add the Role to the User P ROJ E CT T RACKING 65 C H A P TER 3 SETTI N G U P P ROJ E CT T RACKING Enhanced Project Security The Enhanced Project Security feature is available with Project Tracking. Using Enhanced Project Security, you can control which users can view projects, edit project setups, distribute to projects, create adjustments to projects, approve and reopen budgets. Using Enhanced Security is optional. By default, Enhanced Security is not activated when you install Project Tracking. You can activate Enhanced Security on a per company basis and you can set security permissions for each user on a per project basis. It is easy to make some projects open to all users while severely limiting access to others. Enhanced Security hides projects from users without security access. If a user does not have security rights to a project, that user will not be able to access the project, and the project will not even be listed on the look-ups for the user to see, keeping the project virtually hidden from the user. Activating Enhanced Security will password protect the Project Tracking File Maintenance window. Activating and deactivating Enhanced Security By default, security is not activated when Project Tracking is installed. Once activated, you must set security permissions for all current users. If desired, you can disable security later. To activate enhanced security: 1. Open the Project Tracking Setup window. (Microsoft Dynamics GP menu >> Tools >> Setup >> Project Tracking >> Setup) 2. Choose the Security button. 66 P R O JECT TRACKI N G CHAPT E R 3 SE T T ING UP P ROJ E CT T RACKING 3. You will be asked to enter a password. If this is the first time you are activating Enhanced Security in the company, the password will be “ACCESS” (all capital letters). To change the password, see Changing your Enhanced Security password on page 67. 4. Choose OK. The Project Security window will open. 5. You will be asked if you want to activate (or reactivate) security. Choose Yes. To disable security: 1. Open the Project Tracking Setup window. (Microsoft Dynamics GP menu >> Tools >> Setup >> Project Tracking >> Setup) 2. Go to the Microsoft Dynamics GP menu bar, select Options >> Disable Project Security. 3. Enter the current password. 4. Choose OK. Assigning security rights You will use the Project Security window to assign security permissions. There are two ways to assign permissions. Both methods have shortcuts available that can reduce data entry time - the default checkboxes at the bottom of the window. • Select the Project ID security type, select a project, and assign permissions for each user who is to have access to the project. For example, for PROJ001, you can assign View permission to LESSONUSER1, LESSONUSER2, LESSONUSER4, etc. The permissions for each user do not need to be the same. • Select the User ID security type, select a user, and assign permissions for that user to each of a list of projects. For example, for LESSSONUSER1, you can assign View permission to PROJ001, PROJ002, P ROJ E CT T RACKING 67 C H A P TER 3 SETTI N G U P P ROJ E CT T RACKING PROJ004, etc. The permissions for each project do not need to be the same. You can use one method or combine the methods to use what will be most efficient for your immediate needs. For example, a company that has several data entry personnel who can distribute to projects, but only a few managers, each of whom control a different set of projects, may want to combine the two methods. In this case, the easiest way to set these permissions is as follows: 1. Using the Project ID Security type, bring up each project in the Project Security window one by one. Use the default check boxes to grant permission to all users. 2. Using the User ID security type, select the first manager’s User ID. Select each project for which the manager has control. Use the default check boxes to grant full rights to the manager for each listed project. 68 P R O JECT TRACKI N G CHAPT E R 3 SE T T ING UP P ROJ E CT T RACKI NG The following table contains the explanation of each option: Permission Allow Access To Project View Project Reports Project Inquiry windows Copy Project window Project Edit Project Maintenance window Close Project window Reopen Project window Purge History window Project Distribute Project Tracking Distribution window Project Adjust Project Adjustment window Budget View Variance Reports Budget Inquiry window Budget Edit Budget Maintenance window (for editing) Budget Approve Budget Maintenance window (for approving) Budget Reopen Reopen Budget window To assign security permissions: 1. Open the Project Tracking Setup window. (Microsoft Dynamics GP menu >> Tools >> Setup >> Project Tracking >> Setup) 2. Choose the Security button. P ROJ E CT T RACKING 69 C H A P TER 3 SETTI N G U P P ROJ E CT T RACKING 3. You will be asked to enter a password. Enter the password you entered when you activated security. If this is the first time you are opening the Project Security window, please see Activating and deactivating Enhanced Security on page 61. The Project Security window will open. 4. Select the method by which you will assign security: by Project ID or User ID. 5. If you are using Project ID as the method to assign security permissions, select a Project Status. This will limit the list of available project IDs in the lookup window. 6. Enter the Project ID or User ID for which you would like to assign security permissions. The arrows on each side of the Project ID or User ID field can be used to scroll through the available IDs. 70 P R O JECT TRACKI N G CHAPT E R 3 SE T T ING UP P ROJ E CT T RACKI NG 7. The following table explains how to grant permissions to users or projects: To grant permission to... Do the following... Some of the projects/users listed Individually mark the appropriate permissions next to those Project IDs or User IDs. All listed projects Mark the Default values for Projects check boxes next to the applicable permissions (Edit, View, Distributions, etc.) at the bottom of the window. You will be asked whether to grant this permission to All Projects, Listed Projects or New Projects, choose Listed Projects. All listed users Mark the Default values for User check box next to the applicable permissions (Edit, View, Distributions, etc.) at the bottom of the window. You will be asked whether to grant this permission to All Users, Listed Users or New Users, choose Listed Users. All projects Mark the Default values for Projects check box next to the applicable permissions (Edit, View, Distributions, etc.) at the bottom of the window. You will be asked whether to grant this permission to All Projects, Listed Projects or New Projects, choose All Projects.Permission granted to all projects will, by default, be granted to any new projects added to the system. All users Mark the Default values for User check box next to the applicable permissions (Edit, View, Distributions, etc.) at the bottom of the window. You will be asked whether to grant this permission to All Users, Listed Users or New Users, choose All Users. Permission granted to all users will, by default, be granted to any new users added to the system. 8. Choose OK or enter the ID for the next project or user for which you would like to grant permissions. P ROJ E CT T RACKING 71 C H A P TER 3 SETTI N G U P P ROJ E CT T RACKING Changing your Enhanced Security password When Project Tracking is installed it comes set up with the default password “ACCESS” (all capitals). You will need to enter this password to be able to change it. To change the Enhanced Security password: 1. Open the Project Tracking Setup window. (Microsoft Dynamics GP menu >> Tools >> Setup >> Project Tracking >> Setup) 2. Choose the Security button. 3. You will be asked to enter a password. Enter the current password. The Project Security window will open. 4. Choose the Password button. The Password window will open. 5. Enter your current password again. The Password Entry window will open. 6. Enter your new password in both fields. Passwords are case-sensitive. 72 P R O JECT TRACKI N G CHAPT E R 3 SE T T ING UP P ROJ E CT T RACKI NG 7. Select OK. Project Tracking Budgeting Setup only If you are using Project Tracking Budgeting, the following four important steps are necessary in the Project Tracking Setup window: • Ensure that Require Breakdowns is marked. When budgets are set up, each budget cell is based on a breakdown code. For accurate variance reporting, breakdown codes are required on every distribution. If you do not want a particular distribution to be assigned a breakdown code, use the pre-defined breakdown code <none>. • To include transaction user-defined fields in budgets, mark the applicable Use in Budgets fields. Project Tracking will then create a budget structure for each transaction user-defined field value. For more information about basing budgets on transaction user-defined fields, see Setting up Project Tracking Budgets on page 156. The setting for the Use in Budgets field in this window will be the default values for any new projects that you create. However, you can also change or set these fields for individual projects in the Project Maintenance window. • Choose GL or Document Date as the date for posting to budgets. Since budgets can be set up by period, you can choose to report budget P ROJ E CT T RACKING 73 C H A P TER 3 SETTI N G U P P ROJ E CT T RACKING variance based on when documents are entered (Document Date) or when they are posted to the General Ledger (GL Posting Date). If you want to reconcile general ledger accounts with the budget, GL is recommended. • To disable cross-project budget reporting on all projects, mark the Disable Cross-Project Budget Reporting check box on the Project Tracking Setup window. This setting will determine the default value of this field in the Budget Maintenance window. For Project Tracking to perform accurate cross-project variance reporting, all projects being reported must be set up with periods matching the company’s fiscal periods. However, the projects do not have to have the same duration. You can also disable cross-project budget reporting on a per-project basis in the Budget Maintenance window. For example, if you want to set up a budget for a single project according to periods other than the company’s fiscal periods, mark the Disable Cross-Project Budget Reporting check box on the Project Tracking Budget Maintenance window for that project budget. 74 P R O JECT TRACKI N G CHAPTER 4: SETTING UP PROJECTS C H A P TER 4 SETTI N G U P P ROJ E CT S Chapter 4: Setting Up Projects Setting up projects is an ongoing function of using Project Tracking. After you have finished your company-wide Project Tracking setup, you are ready to set up your first project. Projects are set up and maintained from the Project Maintenance window. Even if you automatically generate your projects from Sales Order Processing orders (see Automatically creating projects and project numbers) there are many items on a project you may want to maintain individually. This chapter will detail how to use all the features related to setting up and maintaining an individual project. This chapter does not include information about distributing transactions to projects or making adjustments to distributions to projects. Those topics are covered in Chapter 5, “Distributing transactions”. This chapter contains the following topics: • Starting a project and setting up transaction user-defined field default values • Entering a beginning balance • Setting project estimates • Maintaining project dates, numeric and check box field title information • Entering project text field titles • Copying projects Starting a project and setting up transaction user-defined field default values Starting a project in Project Tracking can be as simple as opening the Project Maintenance window, entering a Project ID, and selecting Save. That is all you need to do to start distributing transactions to that project. Of course, there are many other fields associated with a project, such as Starting Date, Selling Price, Estimated Material Cost and transaction userdefined field default values that you may want to set up with your project. These fields can be set up when you initially create your project or edit them later as required. 64 P R O JECT TRACKI N G CHAP T E R 4 SE T T ING UP P ROJ E CTS To start a project: 1. Open the Project Maintenance window. (Cards >> Project Tracking >>Project ) 2. Enter a Project ID. Once the Project ID has been entered it cannot be changed without deleting the project. If you have already distributed transactions to a project and you would like to change the Project ID, do the following: • Use the Copy Projects window. to create a new project • Use the Project Adjustment window to “move” the transactions from the existing project to the new one. • Delete the misnamed project. 3. The following fields are optional: • Description (short description of the project) • Proposal Number (quote or proposal number given to client) • Work Order Number • Status (Changing status does not affect your ability to distribute transactions to the project. Status is a filter for reports. Completed P ROJ E CT T RACKING 65 C H A P TER 4 SETTI N G U P P ROJ E CT S • • • status indicates projects that have completed work but might not have completed billing or collections.) Customer ID (Entering a Customer ID here does not prevent transactions for other customers being distributed to the project. It is mainly used for reporting purposes.) Salesperson (Will default in if one has been setup with the Customer ID.) Open, Start, and End dates 4. If you want, enter default values for the transaction user-defined fields. You can override these values at the transaction level if necessary. 5. If you want the project to always use a transaction user-defined value, mark the Constant Value check box. You can create default transaction user-defined values specific to breakdown codes using the Breakdown Maintenance window. See Setting up breakdown codes for more information. To reduce the number of budget cells you need to consider when setting up a budget, mark the Constant Value check box. When you mark the Constant Value check box for a field, budget cells will be created for the designated value only. If the box is not marked, budget cells will be created for each possible value listed in the system. 6. If you want the transaction user-defined fields to be used in budgeting, mark the Use in Budgets check box. You should decide which fields to use in budgets before starting a budget for the project. If you change your mind after you have started budgeting, you will have to delete your budget in order to change the fields used in the budget. 7. To exclude this project ID from reports, mark the Exclude from Reports check box. 8. Select Save. Entering a beginning balance If you already have existing projects when you install Project Tracking, you may want to enter beginning balances for your projects. The easiest way to 66 P R O JECT TRACKI N G CHAP T E R 4 SE T T ING UP P ROJ E CTS enter the beginning balance and other project information from an existing system is to use the Project Tracking Importer utility. This utility must be purchased separately. You also can enter beginning balance information using the Add Adjustments window. The beginning balance you enter on the Add Adjustments window is added to the Project Transaction file and combined into the Project ID summary totals together with any transactions that later occur. To enter a beginning balance: 1. Open the Adjust Project Tracking Distributions window. (Transactions >> Project Tracking >>Adjust Project Tracking Distributions) 2. Enter the Project ID for the distributions you want to edit. 3. Choose the Add Adjustment button. A message will appear asking if you are entering a Beginning Balance or an Adjustment. Choose the Begin Bal. button. The Add Adjustment window will open. 4. Enter the document number. 5. Enter the document date. P ROJ E CT T RACKING 67 C H A P TER 4 SETTI N G U P P ROJ E CT S 6. 7. 8. 9. 10. Select an amount type. Select a breakdown code if applicable. Enter the beginning balance amount. Enter the GL posting date Enter any other fields as appropriate. If you want to reconcile your project to the general ledger, we recommend that you select an account. 11. Select Save. 12. Repeat steps 4 – 11 until you have entered beginning balances for all applicable amount types. Setting project estimates There are several estimates you can set on a per project basis. You can set an estimated selling price, an estimated material cost and an estimated labor cost. You can even change the operating cost percentages for each individual project from the Project Maintenance window. (For more information about using percentages to estimate operating costs, see Automatically calculating operating costs.) The operating costs are not calculated at the time of transaction entry and these calculations are not stored with transactions. If you change the percentages on the setup screen, all transactions distributed to the project will be recalculated. Existing projects will retain the percentages that they already have configured. The Project Tracking Inquiry Summary window uses these estimates to calculate the estimated profit. If you have chosen not to use Project Tracking Budgeting, these fields are useful for basic project budgeting. For example, if you estimate operating cost at 5% of revenue. You can compare your actual costs to the estimate. To enter project estimates: 1. Open the Project Maintenance window. (Cards >> Project Tracking >>Project) 2. Enter the Project ID. 68 P R O JECT TRACKI N G CHAP T E R 4 SE T T ING UP P ROJ E CTS 3. Choose Costs. The Project Maintenance Costs window will open. 4. Enter the project’s estimated selling price (revenue) (optional). 5. Enter operating cost percentages for this project (optional). 6. Enter the project’s original estimated material costs and labor costs (optional). 7. Select OK. Maintaining project dates, numeric and check box field title information Besides the document date and the posting date associated with each transaction, there can be twelve dates associated with the project as a whole. Five of these dates are predefined: Project Open Date, Estimated Start Date, Estimated End Date, Actual Start Date, and Actual End Date. The default value for the Project Open Date field will be the Microsoft Dynamics GP user date when the project was first created. The other seven dates are user- defined. You can change any of the project date fields any time during the life of the project. There are seven numeric fields and seven check box fields for projects. If, during the setup phase, you set up the field titles, you are ready now to enter values in these fields for a particular project. P ROJ E CT T RACKING 69 C H A P TER 4 SETTI N G U P P ROJ E CT S To maintain project dates, numeric and check box field title information: 1. Open the Project Maintenance window. (Cards >> Project Tracking >>Project) 2. Choose the Project User-Defined Fields button. This will open the User-Defined Fields window. The titles you assigned to the fields during setup should appear next to the fields. See Setting up userdefined project numeric, date and check box fields for more information. 3. If you want to use any of the check box, date, or numeric fields, enter the values for the project. 4. Choose OK. 5. Select Save on the Project Maintenance window. 70 P R O JECT TRACKI N G CHAP T E R 4 SE T T ING UP P ROJ E CTS Entering project text field titles There are twenty project level text fields available for you to use. To enter project text field titles: 1. Open the Project Maintenance window. (Cards >> Project Tracking >>Project) 2. Enter the Project ID for which you want to enter information. 3. Choose the Project User-Defined Fields button—the User-Defined Fields window will open. 4. Choose the Project Text Fields button. The Project Text Field Maintenance window will open. The titles you entered during setup should appear on the window. See Setting up project text fields for more information. 5. Enter the text information. 6. Choose OK. 7. Select Save on the Project Maintenance window. P ROJ E CT T RACKING 71 C H A P TER 4 SETTI N G U P P ROJ E CT S Copying projects When you need to set up a new project that is very similar to an existing project, you may want to use the Copy Project window to copy the basic Project ID setup from one project to another. It will copy all of the information that could be entered by the user, however, it will not copy the display-only summary totals, since those are based on transactions. Project text field information will not be copied either. You can also choose to copy the budget information from the existing project to the new project. To copy a project setup: 1. Open the Copy Projects window. (Microsoft Dynamics GP menu >> Tools >> Routines >> Project Tracking >> Copy Project) 2. Enter the Project ID of the project you would like to copy. 3. Enter a new Project ID for the new project that will be created. 4. If desired, mark the Copy Budgets check box to copy the budget along with the project setup. Enter a Start Date and a Revision Number to Copy or accept the default entries. It also is possible to copy budgets from a project to another already existing project. For more information, see Chapter 7, “Project Tracking Budgeting”. 5. Select Copy. 72 P R O JECT TRACKI N G CHAPTER 5: DISTRIBUTING TRANSACTIONS C H A P TER 5 DI STRI BU TI NG T RANSACT IONS Chapter 5: Distributing transactions This chapter explains how to distribute transactions and how to adjust project distributions. As well, this chapter covers closing projects and reopening projects. The following topics are covered in this chapter: • Understanding system default values for project distributions • Project Tracking Distribution window • Creating project distributions • Posting project distributions • Troubleshooting posting difficulties • Project Tracking Distributions Inquiry window • Module-specific processing notes • Correcting project distributions • Closing projects • Reopening projects During setup of your Project Tracking module, you choose whether to use full or partial distribution on a per module basis. Transactions that require full distribution cannot be posted until they are fully distributed. See Require full or partial distribution, breakdown codes and/or descriptions for more information about requiring full or partial distribution. The steps to distribute a transaction to a project are the same regardless of your setup choices. There are three main ways to distribute transactions to projects: • Accept the system defaults for each distribution line • Use the Project Tracking Detail Entry sub-window to enter values for each distribution line • Manually set each distribution line There is a fourth method which is available for only the Payables module— the Quick Project Entry window (see Using the Quick Project Entry window to distribute to projects (Payables only)). Unit accounts are not supported in Project Tracking. The Project Tracking Distribution window functions the same way from each of the Microsoft Dynamics GP windows. The following sections 74 P R O JECT TRACKI N G CHAP T E R 5 DIST RIBUT ING T RANSACT IONS explain how to distribute transactions to projects using the Project Tracking Distribution window. Some modules have special processing features; these are discussed in the Module-specific processing notes. Understanding system default values for project distributions Creating proper system default values can make your data entry quicker and more reliable. To understand when to take advantage of the default values, it is necessary to understand where the default values originate. If you are distributing the entire transaction to a single project and you do not need to change any of the default values, you can accept the system defaults. If you need to split a transaction across more than one project or breakdown code or if you want to distribute a portion of the document amount, please see Project Tracking Distribution window. The distribution lines originate from the original transaction. For transaction windows that can contain multiple line items, for example, Sales Transaction Entry or Invoice Entry, there will be a distribution line for each line item. For transaction windows that have only one line item, such as Payables Transaction Entry, there will be one distribution for the SALES or PURCHASES amount. Project Tracking will create separate project distributions lines for any Sales Tax, Freight, Trade Discount, and Miscellaneous Charges from all windows except Purchase Order Entry. However, for Purchasing transactions, the amount type specified on the Setup Options window will be used for these lines. For Sales transactions, the amount types Sales Tax, Freight, Trade Discount, and Miscellaneous Charges are available. For Sales documents, there also will be distribution lines for costs and line item markdowns. Default Project ID values You can set up default projects for each user in order to speed up data entry. When a default project is set up, the Project Tracking Distribution window will automatically open with the user’s default project. However, a purchase order receipt will use the project ID that was assigned on the P ROJ E CT T RACKING 75 C H A P TER 5 DI STRI BU TI NG T RANSACT IONS purchase order. The purchase order invoice will use the project ID from the purchase order receipt. If you do not set up a default project ID for each user, the system uses the built-in default Project ID as the user ID for each person using the system. The system maintains dummy project IDs for each user that can be used to track line amounts that have not been properly distributed to projects. You also can use these to track administrative expenses. In cases where the amounts should have been distributed to projects, it is possible to know who entered the data. (Microsoft Dynamics GP menu >> Tools >> Setup >> Project Tracking >> Default Project ID) You can use the Default Project ID field at the bottom of the Project Tracking Distribution window to set all lines to a single Project ID. If you have already changed some of the project IDs, the system will ask whether to “roll-down” to all lines or just to lines with the “User ID” project. 76 P R O JECT TRACKI N G CHAP T E R 5 DIST RIBUT ING T RANSACT IONS Default field values on the Project Tracking Distribution window Field Transaction Type Default value Project ID Default Project ID that was set up for the user on the Default Project ID window, otherwise User ID GL Account Based on the general ledger distributions associated with the Microsoft Dynamics GP transaction Amount type / Breakdown General Ledger transactions As defined in the Setup Options window for General Ledger To see which amount types are Payables transactions available in the Setup Options window, see Setting up default amount types and default Sales (revenue) breakdowns by module. Receivables Management, Invoicing, and Sales Order Processing transactions As defined in the Setup Options window for Payables Transaction Entry (all distributions even freight, etc., go to this amount type and breakdown) Sales (costs) Receivables Management, Invoicing and Sales Order Processing transactions As defined in the Setup Options window for Cost in Sales Modules Purchase Order Processing transactions As defined in the Setup Options window for Purchase Order Processing (all distributions even freight, etc., go to this amount type and breakdown) US Payroll transactions As defined in the Setup Options window for Payroll Cash Receipt Entry window As defined in the Setup Options window for Cash Receipts—CASH is the only amount type available Inventory transactions As defined in the Setup Options window for Inventory Bank transactions For transactions: ADJUST / blank For Receipts: SALES or CASH/ blank Transaction User-Defined fields Description Proposal Number As defined in the Setup Options window—SALES is the only amount type where you can assign a default breakdown. Other AMOUNT TYPE / BREAKDOWN SALES TAX / SALES TAX FREIGHT / FREIGHT TRADE DISCOUNT / TRADE DISC MISC. CHARGE / MISC CHRGE As defined in the Breakdown Maintenance window. If not specified or if the project value is a constant, then as defined in the Project Maintenance window Inventory, Purchase Order Processing, Invoicing (Qty) + Item Description (for line items) Payroll (Hours) + Last Name, First Name, Middle Name Project Maintenance window P ROJ E CT T RACKING 77 C H A P TER 5 Field DI STRI BU TI NG T RANSACT IONS Transaction Type Work Order Number Default value Project Maintenance window Project Tracking Distribution window When you have a Microsoft Dynamics GP window (see list below) open you can access the Project Tracking Distribution window. (Additional >> Project Distribution) or by Ctrl+J The Project Tracking Distribution window is available from the following Microsoft Dynamics GP windows: • • • • • • • 78 P R O JECT TRACKI N G General Ledger Transaction Entry Bank Transaction Entry Receivables Transaction Entry Receivables Transaction Distribution Entry Invoice Entry Invoice Distribution Entry Sales Transaction Entry CHAP T E R • • • • • • • • • • • • • 5 DIST RIBUT ING T RANSACT IONS Sales Distribution Entry Cash Receipts Entry Cash Receipts Distribution Entry Payables Transaction Entry (Can also be used separately when Project Tracking Lite is activated) Payables Transaction Entry Distribution Purchase Order Entry Receivings Transaction Entry Purchasing Distribution Entry Purchasing Invoice Entry Purchasing Invoice Distribution Entry Payroll Transaction Entry Item Transaction Entry Recurring Contract Entry (Encore’s Recurring Contract Billing module) Creating project distributions The same Project Tracking Distribution window is used to create project distributions from all Microsoft Dynamics GP modules that Project Tracking integrates with. Once you know how to distribute transactions in one module, you can distribute transactions in all modules. When using Project Tracking Lite, you can distribute only payables transactions to your projects. In most modules, a single transaction can be split into as many project distribution lines as desired. There are some important processing details specific to certain modules which you should know. Please refer to Module-specific processing notes for more information. P ROJ E CT T RACKING 79 C H A P TER 5 DI STRI BU TI NG T RANSACT IONS To create project distributions: 1. Completely enter all information on the original transaction document. If you want to check or edit general ledger distributions, edit the distributions for each line item before opening the Project Tracking Distribution window. 2. Open the Project Tracking Distribution window. (Additional >> Project Distribution) or by Ctrl+J 3. Enter the Project ID or accept the default entry. To change the Project ID on all of the distribution lines in the scrolling window, enter a Project ID in the Default Project ID field at the bottom of the window. 4. Enter the general ledger account or accept the default entry. 5. Enter an amount type or accept the default entry. 6. Enter a breakdown code or accept the default entry. This field will be required if the Require Breakdowns check box on the Project Setup window is marked. 7. Enter a description or accept the default entry. 80 P R O JECT TRACKI N G CHAP T E R 5 DIST RIBUT ING T RANSACT IONS 8. Enter values in your transaction user-defined fields or accept the default values. If you change a transaction user-defined field that has been set up to have a constant value (in the Project Maintenance window) and try to save your project distributions, Project Tracking will warn you that you will not be able to post the transaction but it will allow you to save anyway. You can split distribution lines containing fields set to constant value, but those fields will have the same constant value on each line. To change the transaction user-defined fields, the Work Order Number, or the Proposal Number on all the distribution lines in the scrolling window, choose the expansion button next to the Default Project ID field at the bottom of the window. The Project Tracking Detail Entry window will open for you to make changes to all the distribution lines at once. This can be very convenient if you are distributing a document with a lot of items. Any transaction user-defined fields used for budgeting will be required fields. If a transaction user-defined field or breakdown code is required for budgeting and you don’t know which transaction-user-defined field value or breakdown code to use, you can choose the special value <none> in order to post the P ROJ E CT T RACKING 81 C H A P TER 5 DI STRI BU TI NG T RANSACT IONS transaction. However all transactions with the special value <none> will be listed on Budgeting Variance Reports until defined values are entered in the Project Adjustment window for these required fields. 9. Enter an amount or accept the default entry. 10. Enter a proposal number (optional). 11. Enter a work order number (optional). 12. Repeat steps 3 to 13 for any other distribution lines. To change the general ledger account distributions on an Invoicing, Sales Order Processing or Purchase Order Processing document, you must change the account number at the line item level before opening the Project Tracking Distribution window. Select the line item that you want to change, open the Line Item Detail Entry window, and change the account number for that line item distribution. To add new lines, scroll to the bottom of the distribution scrolling window and select the first blank line, then repeat steps 3-13. 13. Select OK. 14. Select Save or post the original transaction. Posting project distributions The system automatically posts project distributions to a project when a Microsoft Dynamics GP transaction is posted to the accounting system. Before posting, always print an edit list of the project distributions to ensure that your distributions and all the descriptive information, such as breakdown codes, descriptions and transaction user-defined values are specified correctly. The edit list also will indicate any errors that must be corrected prior to posting. The pre-posting verification will help you to ensure that all required fields are entered. Also, if you require full distribution, the system will verify that 82 P R O JECT TRACKI N G CHAP T E R 5 DIST RIBUT ING T RANSACT IONS the transaction is fully distributed. See section Project Tracking Edit List Reports for details. If the project distributions pass verification, the transaction will be posted. The project distributions will be moved from the Work file for project distributions to the Open file. If the transaction is posted from a Transaction Entry window instead of a Batch Entry window, the project distribution associated with that transaction will not get removed from the Work file until the Transaction Entry window is closed. Microsoft Dynamics GP does not complete transaction posting until that time. Therefore, we suggest that if you use this method of posting that you close your Transaction Entry window before running an inquiry or a report. If your system ever crashes before closing the transaction entry window, after you have used the Post button, it will be necessary to use the Check Links procedure for Project Tracking to remove the project entries from the Work file. See To run check links: for more information. Troubleshooting posting difficulties Editing a transaction after the fact and then forgetting to update the project distributions can cause difficulties when posting. This is especially true when the “Require Full Project Distributions” option has been selected. Often, an easy fix is simply to choose the Default button on the Project Tracking Distribution window or to manually change the project tracking amount to match the actual amount. Project distributions must correlate with general ledger distributions to be posted. Project distributions correlate with Microsoft Dynamics GP transactions as follows: • • Correlating to general ledger distributions Correlating to document line items (Invoicing, Sales Order Processing and Purchase Order Processing) P ROJ E CT T RACKING 83 C H A P TER 5 DI STRI BU TI N G T RANSACT IONS Correlating to general ledger distributions The project distributions in Project Tracking have been designed so that every amount distributed correlates with a general ledger distribution in the accounting transaction. This correlation allows you to: • Reconcile the amounts distributed to projects to particular balances in your general ledger • Include general ledger accounts on project reports so that you can see what general ledger accounts a particular project affected • Ensure accurate project distribution The system will always maintain a correlation—it will not allow a project distribution to be posted if the general ledger account does not match one of the accounts actually in use on the accounting transactions. However, the correlation will only be a perfect one-to-one relationship if you mark the Require Full Project Distributions option in the Project Tracking Setup window. If you do not mark this option, it is possible to distribute less to a project than you distributed to your general ledger. Project distributions are created using the default general ledger accounts that were set up in Microsoft Dynamics GP. If you need to change the default general ledger distributions, edit the Microsoft Dynamics GP Distributions window before accessing the Project Distributions window. The general ledger account number lookup on the Project Tracking Distribution window provides you with the general ledger account numbers associated with the Microsoft Dynamics GP transaction. This lookup is especially helpful if you have created project distributions and then later change the general ledger account number. It will allow you to change the general ledger account number, without recreating the entire project distribution. Correlating to document line items (Invoicing, Sales Order Processing and Purchase Order Processing) In addition to correlating to general ledger distribution accounts, the Project Tracking system also correlates the project distributions with the 84 P R O JECT TRACKI N G CHAP T E R 5 DIST RIBUT ING T RANSACT IONS line items on Sales Orders, Invoices and Purchase Orders. This feature is particularly helpful when you want to distribute each line to a different project and it also makes your reports more powerful. To split a line among various projects or breakdown codes, you must split the line item on the original Microsoft Dynamics GP document before opening the Project Tracking Distribution window. Project Tracking will then automatically create separate lines and you can select which Project IDs to use. The Description field will display the item and the quantity being ordered. You can override this description. In the Sales Order Processing, Invoicing, and Purchase Order Processing modules, each line item has its own general ledger account associated with it. In Purchase Order Processing, you must open the Line Item Detail window to see the line item accounts. In Sales Order Processing and Invoicing, you must choose the Distributions button on the Line Item Detail window to see the line item accounts. You must use the Line Item Detail Accounts window to override the account rather than the General Ledger Distributions Entry window. Although this isn’t required by Microsoft Dynamics GP, Project Tracking requires it to form a clear correlation between the general ledger account, the line item, and Project Distribution. If you edit accounts in the General Ledger Distributions Entry window instead of the Line Item Detail window, problems will occur. Depending on how complex your project distributions are, there are two ways to fix these problems. • Figure out what amounts or general ledger accounts are wrong and fix them directly at the line level. • Choose the Default button and then redistribute to the correct projects. If you are using many different user-defined fields and extensive descriptions that are split among several projects, the first option may be your best fit. However, if you have done a simple distribution to a single project, the second option may be easier. P ROJ E CT T RACKING 85 C H A P TER 5 DI STRI BU TI N G T RANSACT IONS For more detailed information about correcting project distributions, see Correcting project distributions. Project Tracking Distributions Inquiry window When you have a Microsoft Dynamics GP inquiry window open you can access the Project Tracking Distributions Inquiry window which will allow you to drill back to view work or posted transactions. See Project Tracking Distributions Inquiry window on page 126 for more information. 86 P R O JECT TRACKI N G CHAP T E R 5 DIST RIBUT ING T RANSACT IONS Module-specific processing notes These processing notes contain very important information. Please review the notes for each module which you use to distribute to projects. • • • • • • • • • • • Bank Reconciliation processing notes General Ledger processing notes Inventory processing notes Invoicing processing notes Multi-Currency processing notes Payroll processing notes Payables Management processing notes Purchase Order Processing processing notes Receivables Management processing notes Sales Order Processing processing notes Recurring transactions processing notes Bank Reconciliation processing notes There are two basic kinds of bank transactions: cash withdrawals and cash receipts. • For cash withdrawal transactions, Project Tracking uses the default amount type ADJUST enabling you to distribute the debit portion of the bank reconciliation transaction as an expense on a project. • For cash receipt transactions, Project Tracking uses the default amount types SALES and CASH enabling you to distribute the credit portion of the bank reconciliation transaction as a sale. Project Tracking posts the credit entries for Bank Reconciliation as a sale or as a negative expense based on the amount type used on the project distribution. Debit entries are posted as an expense or as a negative sale based on the amount type used on the project distribution. The Bank Reconciliation module is the only module that does not support batch processing. Therefore, there are additional rules to follow when distributing a bank reconciliation transaction (Transactions >> Financial >> Bank Transactions) P ROJ E CT T RACKING 87 C H A P TER 5 DI STRI BU TI NG • • • T RANSACT IONS Distribution of Bank Reconciliation transactions is optional. If you distribute a Bank Reconciliation transaction, the entire transaction must be distributed. You will not be able to split the distributions on the Project Tracking distribution window. If you want to split any amounts, do so in the Bank Transaction window prior to opening the Project Tracking Distribution window. General Ledger processing notes It is possible to distribute both credits and debits to projects from the General Ledger module. Debits will typically post as costs to projects, but could be a negative revenue value as well. Credits can post to projects as either cost or revenue depending on the amount type used on the distribution. Unlike most other modules, all amount types are available in the General Ledger module. For example, to post the credit as revenue, use the SALES amount type. To post the credit as a cost, use either the ADJUST, Actual Cost of Labor or Actual Cost of Materials amount type. Project Tracking provides the ability to add Project Tracking distributions for GL transactions such that distributions can be added for multiple lines of a journal entry at the same time. If you use Intercompany Processing, Project Tracking will allow you to distribute to the source company only. Copy General Ledger Documents When Project Tracking distributions have been attached to a General Ledger document it is possible to copy both the original document and the attached distributions automatically. To copy project distributions from a Copy Journal Entry document: 1. Open the Transaction Entry window. (Transactions >> Financial >> General) 2. Select a document with Project Tracking distributions. 88 P R O JECT TRACKI N G CHAP T E R 5 DIST RIBUT ING T RANSACT IONS 3. Select the Copy button. 4. When the Copy Journal Entry window opens, enter the required details. 5. Choose the Ok button, a message will be generated asking if you want to copy the Project Tracking distributions. Select Copy on the message. The newly created document will have the same Project Tracking distributions as the original document. To copy project distributions from a Correct Journal Entry document: 1. Open the Transaction Entry window. (Transactions >> Financial >> General) 2. Select a document with Project Tracking distributions. 3. Select the Correct button. 4. When the Correct Journal Entry window opens, enter the required details. 5. Choose the Ok button, a message will be generated asking if you want to copy the Project Tracking distributions. Select Copy on the message. The newly created document will have the same Project Tracking distributions as the original document. Inventory processing notes Inventory adjustment transactions may be distributed to projects. Inventory adjustment transactions may be positive adjustments (adjustments “into” inventory) or negative adjustments (adjustments “out of” inventory). Ordinarily, only adjustments “out of” inventory are distributed to projects. For this reason, even if the Require Full Distributions check box is marked for Allocations out of Inventory Entry on the Project Setup window, Project Tracking will only force you to distribute Inventory Adjustment Transactions “out of” inventory. You can distribute transactions “into” inventory if you wish, but Project Tracking doesn’t require you to do so. P ROJ E CT T RACKING 89 C H A P TER 5 DI STRI BU TI N G T RANSACT IONS Inventory adjustments are based on the Inventory Offset Account. Therefore, when you distribute an adjustment “out of” inventory, it is normally distributed as a cost to the project. A negative inventory adjustment is a positive Project Tracking distribution to the Actual Cost of Materials whereas a positive inventory adjustment is a negative Project Tracking distribution to the Actual Cost of Materials. You can enter an inventory adjustment with multiple line items and distribute all of them to one or many projects. It is not possible to split a single Inventory Adjustment line item between two or more projects. If you are allocating the same item to more than one project, split the item across the appropriate number of lines (one line per project) on the Inventory Adjustment window before creating project distributions. Invoicing processing notes You can enter an Invoicing document with multiple line items and distribute all of them to one or many projects. However it is not possible to split a line item on an Invoicing document between two or more projects. If you are allocating the same item to more than one project, split the item across the appropriate number of lines on the Invoice Entry window before creating project distributions. Multi-Currency processing notes Project Tracking stores all distributions and summary totals in the functional currency you have set up. Project Tracking does not allow you to switch the display to distribute transactions in their originating currencies. Payroll processing notes This section covers the following topics: • • • • 90 P R O JECT TRACKI N G Converting hours to dollars for project tracking Distributing salaried employee hours to projects Automatically distributing overtime Manually Distributing Overtime CHAP T E R 5 DIST RIBUT ING T RANSACT IONS Converting hours to dollars for project tracking When you distribute payroll transactions to projects, you allocate the number of hours a staff member worked on each project. After you print checks, the system will ask you to post. At posting, Project Tracking converts the allocated hours to dollar amounts. Depending on your setup in the Project Tracking Setup Options window, the conversion will be based on the employee’s gross or net pay. The dollar amounts will be allocated to projects in the same proportion as the hours you allocated. Distributing salaried employee hours to projects You will use the Payroll Transaction Entry window to distribute salaried employee hours to projects. You cannot distribute to projects from the Build Payroll Checks window. To distribute hours worked by salaried employees to projects: 1. Open the Payroll Transaction Entry window. (Transactions >> Payroll >>Transaction Entry) 2. Enter the Employee ID, Trx Type, and the Pay Code. The Payroll Salary Adjustment window will open. 3. Choose Reallocate Hours. This will allow you to distribute their salary even though it is an “automatic” pay type. It will not reduce or add to the total amount of their pay. In order to distribute to projects, you must choose Reallocate Hours. 4. Enter the total hours that you want to distribute for the employee on the Payroll Transaction Entry window. Normally, you will want to make sure that the number of hours entered on the Payroll Transaction Entry window is equal to the number available for the payroll period being paid. Calculate this by dividing the number of hours paid in a year by the number of payroll periods. For example, in “Fabrikam, Inc.”, BARR0001 is set up as a salaried employee working 2080 hours per year. The figure 2080 is found on his P ROJ E CT T RACKING 91 C H A P TER 5 DI STRI BU TI NG T RANSACT IONS employee record. He is paid twice a month, hence 24 times a year. 2080 divided by 24 = 86.67. To fully distribute his salary, enter a salary adjustment transaction for 86.67 hours and distribute that. (Minor rounding differences might cause the Build process to give a warning message such as “Salary reallocation or reduction exceeds salary allocation”. In that case, the report will tell you how many hours should be allocated, for example, 86.66 instead of 86.67.) Make sure to include automatic pay types when you build the batch. If you are doing a lot of repetitive distributions to the same projects for most pay periods, set up the distributions in a recurring batch. Project Tracking will use the distributions and have them available to be used the next time you post the batch. 92 P R O JECT TRACKI N G CHAP T E R 5 DIST RIBUT ING T RANSACT IONS Automatically distributing overtime All hours distributed to projects (for the employee for the period) will be converted from hours to dollars using an average wage paid for the period. The averaging method divides the total amount paid for the period by the total hours as shown in the following example: • • • • John B. works 50 hours—40 hours of regular time and 10 hours of overtime His hourly rate is $10/hour and his overtime rate is $15/hour 25 hours were distributed to project 1 and 25 hours were distributed to project 2 The system will automatically calculate that the total amount paid is ($10*40)+($15*10)=$550. Then it will calculate $550/50 hours to get an average rate per hour of $11. Then it will distribute ($11*25)=$275 to project 1 and the remaining $275 to project 2. When the automatic overtime feature in Payroll Setup is marked, you cannot use the same pay code twice when entering a payroll transaction for an employee; Project Tracking errors will prevent you from building checks. You must use a single pay code to enter all the hours including the overtime hours or use separate pay codes for the regular and overtime hours. If you want to distribute all of the overtime hours to a specific project, use the manual method for distributing overtime described in the next section. Manually Distributing Overtime The manual method is used to distribute all of the overtime hours to a specific project. In the example discussed previously, you would enter two payroll transactions: Transaction 1: Regular pay, 40 hours, 25 to project 1 and 15 to project 2 Transaction 2: Overtime pay, 10 hours to project 2 (Note that the Overtime pay should use a Pay Code that is set up with a Pay Type of Overtime or Double-time). P ROJ E CT T RACKING 93 C H A P TER 5 DI STRI BU TI NG T RANSACT IONS In this case, the system will allocate ($10*25)=$250 to project 1 and ($10*15+$15*10)=$300 to project 2. Using the Quick Project Entry window to distribute to projects (Payables only) The Quick Project Entry feature is available only in the Payables module. Though it is possible with Project Tracking to split a single transaction across several projects, many companies are careful not to combine projects on a single order. If you ordinarily distribute Accounts Payable invoices to a single project, breakdown code, and transaction user-defined field, you can take advantage of Project Tracking’s Quick Project Entry feature. If the Enable Quick Entry check box is marked on the Project Tracking Setup window, the Quick Project Entry window will open below the Payables Transaction Entry window and all values will be automatically distributed to Project Tracking. You can use this window instead of the Project Tracking Distribution window to make your edits. If, on occasion, you need to split a transaction across different projects, breakdowns or transaction user-defined field values, you can do so by choosing the Split button on the Quick Project Entry window or choosing CTRL + J. This will open the regular Project Tracking Distribution window where you can create your more complex distributions. To use the Quick Project Entry window: 1. Completely enter your Payable Transaction Entry. Make any edits to general ledger distributions before creating project distributions. 2. Enter the Project ID, Breakdown and whatever other values you would like on the Quick Project Entry window. To see the fields for the Transaction User Defined fields, choose the yellow down arrow to expand the window. 94 P R O JECT TRACKI N G CHAP T E R 5 DIST RIBUT ING T RANSACT IONS 3. Save or post the Payables Transaction Entry. Payables Management processing notes If you use Intercompany Processing, Project Tracking will allow you to distribute to the source company only. You must turn off Require Full Project Distribution in the Project Tracking Setup window for Payables Transaction Entry in order to post Payables Management intercompany transactions. Purchase Order Processing processing notes Project Tracking will automatically carry forward to Receivings all the project distributions from the original purchase order. From the Receivings Transaction Entry window, you can edit the project distributions. When the invoice is matched to the receipts, Project Tracking will only create distributions for new, undistributed amounts. Project Tracking details for items with a purchase price variance will relate to the receipt. Freight, trade discount, tax and miscellaneous charges will carry the project ID from the first project distribution line on the Receivings document. If the matching Receivings transaction was distributed to only one project, this should not present a problem. However, if your Receivings transaction is distributed to more than one project and you want to split the new amounts accordingly, you will need to manually edit the project distributions after entering the invoice. Project Tracking supports the 4 types of purchase orders: • • • Standard Drop-Ship Blanket P ROJ E CT T RACKING 95 C H A P TER 5 DI STRI BU TI NG • T RANSACT IONS Drop-Ship Blanket You can enter a purchase order with multiple line items and distribute all of them to one or many projects. You can even split a line item between two or more projects. If you partially receive a purchase order line that has been split to two or more projects, you will have to manually adjust the project tracking distributions. This is because Project Tracking will not know which projects to allocate to the partial receipt. When distributing a purchase order to projects, you usually don’t have amounts for Trade Discount, Freight, Miscellaneous and Sales Tax. Those amounts are typically added when the vendor invoice is processed. Project Tracking assigns the Project ID from the first project distribution line to one distribution line for each of these categories. If your entire purchase order is distributed to a single project, this should not present a problem. However, if your invoice is distributed to more than one project and you want to split the amounts accordingly, you must manually edit the project distributions after entering the vendor invoice. When entering a shipment/invoice receipt where the quantity shipped is greater than the quantity invoiced, Project Tracking does not correctly distribute to projects. To correctly distribute this type of transaction to projects, you will need to enter one receipt for the quantity invoiced and another receipt for the quantity shipped. For example, if you ship 10 items but only invoice 4, you will need to create one shipment/invoice receipt for the 4 shipped and invoiced items and you will need to create a separate shipment receipt for the 6 shipped but uninvoiced items. In order to close a project, all purchase orders distributed to the project must be removed. Microsoft Dynamics GP provides a routine for removing purchase orders that have been received, invoiced and/or cancelled. We recommend running this routine regularly to remove any purchase order that could block project closing. Please refer to the Microsoft Dynamics GP documentation for more details about using these routines. Purchase Order Processing Returns currently does not integrate with Project Tracking. 96 P R O JECT TRACKI N G CHAP T E R 5 DIST RIBUT ING T RANSACT IONS Receivables Management processing notes When you enter a sale in the Receivables Sales Entry window, you can enter the cost of the sale and Microsoft Dynamics GP allocates it to one Cost of Goods Sold account. Using the Receivables Management Cost Entry Assists feature, you can easily split this cost to multiple general ledger accounts each with a specific amount type in Project Tracking. This section includes the following: • • Setting up cost assist codes Entering cost assist codes Setting up cost assist codes In order to use Receivables Management Cost Assist Codes, you must turn on this option and set up cost assist codes. To set up cost assist codes: 1. Open the Project Tracking Setup window. (Microsoft Dynamics GP menu >> Tools >> Setup >> Project Tracking >> Setup) 2. Choose Options. 3. Mark the Use RM Cost Entry Assists check box. 4. Choose OK. 5. Choose OK on the Project Tracking Setup window. 6. Open the RM Cost Assist Maintenance window. (Microsoft Dynamics GP menu >> Tools >> Setup >> Project Tracking >> RM Cost Assist Codes) P ROJ E CT T RACKING 97 C H A P TER 5 DI STRI BU TI NG T RANSACT IONS 7. Enter a Cost Assist Code. Choose a name that is meaningful to your organization. 8. Enter a description of the cost assist code. 9. Select an amount type. 10. Enter an account number for this code. 11. Select Save. 12. Repeat steps 7 to 11 until you have entered all the cost assist codes that you want to use. Entering cost assist codes While entering the cost of a sale in the Receivables Sales Entry window, using the Cost Assist Expansion window, you can allocate the Cost of Goods Sold to multiple general ledger accounts each with a specific amount type in Project Tracking. Cost Assist Code functionality is not available for Credit Memo or Return document types on the Sales Entry window. You will have to manually create the General Ledger and Project Tracking distributions for those document types. 98 P R O JECT TRACKI N G CHAP T E R 5 DIST RIBUT ING T RANSACT IONS To enter cost assist codes: 1. Open the Receivables Transaction Entry window. (Transactions >> Sales >> Transaction Entry) 2. Enter the transaction. 3. Tab to the Costs field. The Cost Assist Expansion window will open. The Cost Assist Expansion window will only be available if Cost Assist Codes have been setup in the Project Tracking Setup Options window. 4. Enter cost assist codes and cost amounts making sure that the total cost has been allocated. 5. Select OK. Sales Order Processing processing notes Project Distributions can be created for any of the six types of documents that can be created in Sales Order Processing: • Quote P ROJ E CT T RACKING 99 C H A P TER 5 DI STRI BU TI N G • • • • • T RANSACT IONS Order Fulfillment Order Back Order Invoice Return You can enter a Sales Order Processing document with multiple line items and distribute all of them to one or many projects. However it is not possible to split a line item between two or more projects. If you are allocating the same item to more than one project, split the item across the appropriate number of lines (one per project) on the Sales Transaction Entry window before creating project distributions. Project distributions created from a preliminary document (quote, order, fulfillment order or back order) will follow the document when it is transferred from quote to order and from order to invoice. Ordinarily, no additional distribution steps are required. When distributing to projects from an order, fulfillment order, back order or quote, general ledger distributions are not created for: Trade Discount, Freight, Miscellaneous, Sales Tax and Amount Received because Project Tracking only distributes the line items. When the order is transferred to an invoice, Project Tracking assigns the Project ID from the first project distribution line to the distribution lines for Trade Discount, Freight, Miscellaneous and Sales Tax. To capture the Amount Received when an order is transferred make sure the Totals and Deposit option is marked. You can create a CASH distribution for each deposit/payment amount entered in the Sales Payment Entry window when an Amount Received has been entered and the Project Tracking Distribution window is opened. The Project assigned to the CASH distribution will be the first Project found on the SOP invoice. If you click the GL Account lookup button, the Project Tracking system will include all deposits entered together with the associated deposit account. If your invoice is distributed to more than one project and you want to split these amounts, you will need to manually edit the project distributions after transferring the order. Sales returns When processing a Sales return document, Microsoft Dynamics GP will not detect the original distributions automatically because there is no link to 100 P R O JECT TRACKI N G CHAP T E R 5 DIST RIBUT ING T RANSACT IONS the original invoice. You must reverse the original project distributions when you enter the return. To reverse project distributions for a Sales return document: 1. Open the Project Tracking Inquiry-Distributions by Document window. (Inquiry >> Project Tracking >> Distributions by Document) 2. Print a report of the original document distributions. The report will show you the user-defined fields, proposal number and work order number set on the original distribution. 3. Complete the Sales Order Processing return document. For more information about processing Sales Order Processing documents, see the Microsoft Dynamics GP Sales Order Processing documentation. 4. Open the Project Tracking Distribution window (CTRL +J). 5. Using the report you printed in step 2, match the project distributions on the return document to those on the original invoice. 6. Choose OK. 7. Post or save the return. Copy Sales Documents When Project Tracking distributions have been attached to a Sales document it is possible to copy both the original Sales document and the attached distributions automatically. To copy project distributions from a Sales document: 1. Open the Sales Transaction Entry window. (Transactions >> Sales >> Sales Transaction Entry) 2. Select a document with Project Tracking distributions. 3. Select copy from the Actions drop down menu. 4. When the Copy a Sales Order window opens, enter the required details. P ROJ E CT T RACKING 101 C H A P TER 5 DI STRI BU TI NG T RANSACT IONS 5. Choose the Copy button, a message will be generated asking if you want to copy the Project Tracking distributions. Select Copy on the message. The newly created document will have the same Project Tracking distributions as the original document. Recurring transactions processing notes The Payables, Receivables, General Ledger and Payroll systems allow recurring transaction batches to be created. Project Tracking does not support recurring Inventory batches. If a transaction is recurring, then the project distribution will not be deleted from the work file when the transaction is posted—it will be left there so that it may be used again the next time the batch is posted. When you post a general ledger batch with recurring postings the final transaction will not be distributed to projects. You can work around this by manually creating a Project Tracking Adjustment after the final transaction has been posted. Project Tracking can be used with Encore’s Recurring Contract Billing module. When using Project Tracking with Encore’s Recurring Contract Billing module, project distributions are entered with the contract. When an invoice is created from that contract, all the project distributions entered on the contract are recreated with the invoice. The project distributions can be edited before the invoice is posted. If the Recurring Contract Entry window is used the specific currency for document or transaction, all distribution amounts will be displayed as 0.00. The Project Tracking Distribution window will display the functional currency only. When entering project distributions for a contract, you will access the Project Tracking Distribution window from the Additional menu. Or you can use the shortcut keys, Ctrl+J. To close a project that has distributions entered in Recurring Contract Billing, you must first delete the contract or any project distributions associated with the contract. 102 P R O JECT TRACKI N G CHAP T E R 5 DIST RIBUT ING T RANSACT IONS Correcting project distributions Where you go in Project Tracking to change project distributions depends on the nature of the change. This section explains the following ways to change project distributions: • • • • • Adding a distribution to a posted transaction Editing unposted transaction distributions Editing posted transaction distributions Voiding transactions Mass project adjustment For information about project distributions for Sales Returns see Sales returns. Adding a distribution to a posted transaction When a transaction is created and posted in a supported module but has not been distributed to Project Tracking, open up the Project Tracking adjustment window to distribute it. P ROJ E CT T RACKING 103 C H A P TER 5 DI STRI BU TI NG T RANSACT IONS To add a distribution to a posted transaction 1. Open the Adjust Project Tracking Distribution window. (Transactions >> Project Tracking >> Adjust Project Tracking Distributions) 2. Select a Project ID 3. Enter the document number for the transaction that the distribution will be added to. 4. Click on Add Adjustment. 104 P R O JECT TRACKI N G CHAP T E R 5 DIST RIBUT ING T RANSACT IONS 5. Enter data. 6. Save adjustment The GL, PO, Bank Rec, and Payroll GP modules are not supported. Encore’s Recurring Contract Billing module is also unsupported. However once an invoice has been created and distributed, an adjustment can be applied . The only SOP documents that are supported are Invoices and Returns. Editing unposted transaction distributions If the project distribution you wish to change is attached to an unposted transaction, the easiest way to adjust it is to open the original transaction and use the regular Project Tracking Distribution window (Ctrl+J) to edit the project distributions. To edit unposted transaction distributions: 1. Open the original transaction. 2. Open the Project Tracking Distribution window. (CTRL + J) 3. Edit the project distributions. Whether you can change the amount type and how it can be changed depends on the module. For more information, refer to Setting up default amount types and default breakdowns by module. 4. Select Save. Editing posted transaction distributions If the transaction has already been posted, you will use the Adjust Project Tracking Distribution window to change the following fields: Project ID, Description, Breakdown, Transaction User-Defined fields, Proposal Number, or Work Order Number. P ROJ E CT T RACKING 105 C H A P TER 5 DI STRI BU TI NG T RANSACT IONS You cannot change the amount or amount type of a posted transaction. If there is an error with the amount or amount type, you can correct it by adding an additional adjustment or adjustments in the Add Adjustment window. For example, if you allocated $50.00 to a project instead of the document amount of $75.00, you would add an adjustment record for $25.00. If the wrong amount type was used, you can add an adjustment to reverse the original transaction, then add a second adjustment to create a distribution with the correct amount type. You can use the Add Adjustment window to make miscellaneous adjustments to projects, such as beginning balance entries or entries required for reconciliation to the general ledger. (Transactions >> Project Tracking >> Adjust Project Tracking Distributions >> Select Add Adjustment button) Normal distributions are entered with positive transaction amounts. Therefore, a distribution corresponding to an amount booked as a credit to a revenue account in the general ledger would be given an amount type of Sales and a positive transaction amount. A distribution corresponding to an amount booked as a debit to an expense account would be given an amount type of Actual Cost of Labor or Actual Cost of Materials and a positive transaction amount. If the distributions correspond to a reversal, for example a debit to a sales account or credit to an expense account, then the transaction amount would be entered as a negative amount. When entering a miscellaneous adjustment with the amount type of Trade Discount, think carefully about whether the transaction amount should be positive or negative. Normally, you would enter trade discount as a negative number opposite to the way the sale would be entered. But if you’re entering a trade discount for a reversed sale, you will enter it as a positive number. Based on the field or fields you wish to change, there are two procedures for correcting posted transactions: • • 106 P R O JECT TRACKI N G To correct posted transaction distributions (Project ID, Description, Breakdown, or Transaction User-Defined Field Values): To correct posted transactions (Amount or Amount Type fields): CHAP T E R 5 DIST RIBUT ING T RANSACT IONS The Master Id display’s the Vendor ID, Customer ID, Employee ID or Item ID depending on which module the transaction was created in. To correct posted transaction distributions (Project ID, Description, Breakdown, or Transaction User-Defined Field Values): 1. Open the Adjust Project Tracking Distribution window. (Transactions >> Project Tracking >> Adjust Project Tracking Distributions) 2. Enter the Project ID with the distributions you want to edit. 3. Locate the distribution line you want to edit. 4. Edit the project ID, description, breakdown code or transaction userdefined field values in the scrolling window. 5. Select OK. P ROJ E CT T RACKING 107 C H A P TER 5 DI STRI BU TI NG T RANSACT IONS To correct posted transactions (Amount or Amount Type fields): 1. Open the Adjust Project Tracking Distribution window. (Transactions >> Project Tracking >> Adjust Project Tracking Distributions) 2. Enter the Project ID for the distributions you want to edit. 3. Choose Add Adjustment. You will be asked if you are entering a Beginning Balance or an Adjustment. Choose Adjust. The Add Adjustment window will open. 108 P R O JECT TRACKI N G CHAP T E R 5 DIST RIBUT ING T RANSACT IONS 4. Enter the document number, document date, and description. 5. If you are reducing an existing distribution amount or changing the amount type, choose the amount type that matches the amount type on the existing distribution. If you are adding an adjustment to compensate for a transaction that was missed, set the amount type to an appropriate type based on the module of the transaction you are correcting. 6. Enter the amount of the adjustment. If decreasing an existing adjustment enter a negative amount for the amount of the decrease. If adding a distribution, enter a positive amount. To change the amount type, enter a negative amount for the entire amount of the original distribution, then enter a positive adjustment with the correct amount type. 7. Enter any other information applicable to the adjustment such as userdefined fields, work order number, proposal number, general ledger account, etc. 8. Select Save. P ROJ E CT T RACKING 109 C H A P TER 5 DI STRI BU TI N G T RANSACT IONS Voiding transactions From most modules, Project Tracking will automatically detect the project tracking distributions associated with a voided Microsoft Dynamics GP document and void them automatically. This applies to the following types of voids: • • • • • • Sales Voids – Invoices from Receivables, Invoicing or Sales Order Processing Cash Receipt Voids Payables Void Historical Payables Void Open Payroll Voids Bank Reconciliation Voids When a transaction is voided in Project Tracking, the transaction still appears in the Project Transaction OPEN file. However, all the transaction amounts associated with the distributions for the voided document will be set to zero. Project Summary totals and Actual amounts posted to the project tracking budgeting system are automatically decreased as well. A ‘V’ flag will show in the column after the Transaction Amount column on the Project Tracking Inquiry - Distribution by Inquiry window to indicate that the original transaction was voided. Voiding a voucher that originated in Purchase Order Processing doesn't void the inventory receipt—you must manually decrease your inventory in Microsoft Dynamics GP. To adjust the Project Tracking distributions for the inventory transaction, add an adjustment distribution to reverse the original project distribution. Mass project adjustment In addition to being able to change existing project tracking distributions one at a time, Project Tracking also allows you to make these changes to multiple distributions at the same time. This makes it easier for you to change your system setup, or to correct errors. For example, if you decide to start using a new transaction user-defined field or to make one of those fields constant, you can use the Mass 110 P R O JECT TRACKI N G CHAP T E R 5 DIST RIBUT ING T RANSACT IONS Adjustment feature to update that field on every record with just a few keystrokes. To process a mass change: 1. Open the Adjust Project Tracking Distribution window. (Transactions >> Project Tracking >> Adjust Project Tracking Distributions) 2. Enter a Project ID. 3. Choose Add Filters to filter your view. The Filter Viewing Options window will open. P ROJ E CT T RACKING 111 C H A P TER 5 DI STRI BU TI NG T RANSACT IONS 4. Enter the fields that you want to use to filter. You may filter for distributions with a specific transaction user-defined field. In this screenshot, we are filtering for only those Actual Cost Materials distributions with the Breakdown code Concrete in the city of NEW YORK (user-defined field). 5. To filter for all distributions that do not have a particular transaction user-defined field or breakdown code entered, mark the Match Blank or Unspecified check box. If you do not want to limit the view, then leave all fields blank and choose Add Filters. 6. After setting up the filter criteria, choose Add Filters and close the window. 7. Examine the Adjust Project Tracking Distribution window to verify that the distributions are filtered correctly. 8. Choose Mass Change to open the Mass Change window. 112 P R O JECT TRACKI N G CHAP T E R 5 DIST RIBUT ING T RANSACT IONS 9. Enter the values that you want to substitute in the records that are displayed in the scrolling window. Any default values from the project will automatically populate the Mass Change window. If there is a transaction user-defined value or breakdown code that you would like to set to blank for all the transactions, choose the <none> button on the lookup window. 10. Choose Preview to see a report of the records as if the changes have been applied. 11. To apply the mass change, choose Mass Change. 12. To regain a full view of your distributions without losing your filter selections, reactivate the Add Filters window and choose Full View. Choosing Clear will also give you a full view of your distributions but your filter selections will be cleared. P ROJ E CT T RACKING 113 C H A P TER 5 DI STRI BU TI NG T RANSACT IONS Closing projects When a project is Closed, all distribution records associated with the project are moved to History files. At that point, transactions can no longer be distributed to the project. Closed projects always have a status of Completed. However, open projects can have either Open or Completed status. You can optionally use the Completed status for reporting purposes to indicate projects that have completed work but might not have completed billing or collections and are still active. Do not confuse project status with the three types of project distribution files: Work, Open, and History. The following table shows how the project tables, status, and files relate to each other: Tables Status Project Distribution Files Open Open Completed Open/Work Open/Work History Completed History A project cannot be closed if it has any records in the Work file. All transactions distributed to the project must be posted. Fully received purchase orders and recurring batches will need to be removed from the system before projects attached to them can be closed. If a purchase order has been partially received, you must either remove the project distributions from the purchase order or cancel the unreceived portion and then remove the purchase order. If you should need to distribute a transaction to a project after the project has been closed, you will have to reopen the project. For more information about removing purchase orders, please refer to the Microsoft Dynamics GP Purchase Order Processing documentation. 114 P R O JECT TRACKI N G It is a good practice to regularly close all finished projects to control the size of the Open file and to maximize system performance. CHAP T E R 5 DIST RIBUT ING T RANSACT IONS To close single projects: 1. Open the Close Projects window. (Microsoft Dynamics GP menu >> Tools >> Routines >> Project Tracking >> Close Projects) 2. The close option will be defaulted to Single Project. 3. Enter or select a project close date. This will be the date that the system will use to identify the project was closed. 4. Enter or select a Project ID. 5. Select OK. To close mass projects: 1. Open the Close Projects window. (Microsoft Dynamics GP menu >> Tools >> Routines >> Project Tracking >> Close Projects) 2. Change the close option to mass close. P ROJ E CT T RACKING 115 C H A P TER 5 DI STRI BU TI N G T RANSACT IONS 3. Enter or select a project close date. 4. Choose a Close By option of Project ID or End Date. 5. Enter a range for the selected close by option. (Either Project ID or End Date) 6. Select OK. Handling transactions still in the Work file In order to close a project, there cannot be any project distributions remaining in the Project Distribution Work file. If the system claims that Work file transactions exist, there are several things you can to do identify them and delete them: To identify and delete transactions still in the Work file: 1. Open the Project Inquiry-Distributions by Project window to view the distributions associated with the project. (Inquiry >> Project Tracking >> Distributions by Project) 2. Enter the Project ID. 3. Work transactions will be identified by an ‘*’ in the column after the Transaction Amount column. Or select Work to display work transactions only. 4. If the distributions are associated with Purchase Order Processing documents, run the Microsoft Dynamics GP PO Remove Routine, cancel the purchase order, or remove the Project Tracking distributions from the purchase order. 5. For other types of documents, confirm whether the documents still exist in the system. If so, post or delete them. If no documents remain in the system, run Project Tracking checklinks to clean up the Project Tracking distributions. Note: Checklinks process must be run by the system administrator. (Microsoft Dynamics GP menu >> Maintenance >> Project Tracking >>File Maintenance) 116 P R O JECT TRACKI N G CHAP T E R 5 DIST RIBUT ING T RANSACT IONS Reopening projects In case you need to enter transactions for a project after it was closed, a window is available to reopen the project. The project records will be moved back from the History files to the Open files. The transactions may then be entered and the project can be re-closed. To reopen a project: 1. Open the Reopen Projects window. (Microsoft Dynamics GP menu >> Tools >> Routines >> Project Tracking >> Reopen Project) 2. Enter the Project ID. 3. Choose OK. P ROJ E CT T RACKING 117 C H A P TER 118 5 P R O JECT DI STRI BU TI N G TRACKI N G T RANSACT IONS CHAPTER 6: REPORTS AND INQUIRIES INTRODUCTION C H A P TER 6 REPO RTS AN D INQUIRIE S Chapter 6: Reports and Inquiries This chapter will discuss the reports and inquiries available with Project Tracking. The Project Inquiry window and the Project Analytics reports are, by far, the most commonly used of the available inquiry windows and reports. The Project Tracking Distribution Inquiry window allows you to drill back to Project Tracking while inquiring on Microsoft Dynamics GP transactions. For information about customizing existing Project Tracking reports and adding project information to Microsoft Dynamics GP reports, please refer to Appendix A: Advanced Reporting Adding Project ID to Microsoft Dynamics GP Reports. This chapter contains the following sections: • • • • • • • • • • • • • • Project Inquiry Project Inquiry Summary Document Inquiry Budget Inquiry Project Tracking Distributions Inquiry window Reports Project Analysis Reports Project Tracking Edit List Reports Budget Variance Report General Ledger Reconciliation Report Project Outstanding Balance Report Security Reports Maintenance Reports Summary Reports Project Inquiry You can use the Project Tracking Inquiry - Distributions by Project window to get a quick overview of a project and to quickly review which transactions are booked to a project. You can’t change transactions or information about a project in the Project Tracking Inquiry - Distributions by Project window but you can drill down to the original Microsoft Dynamics GP Entry or Inquiry window. 120 P R O JECT TRACKI N G CHAP T E R 6 RE P ORT S AND INQUIRI ES To view or print the Project Inquiry report: 1. Open the Project Tracking Inquiry - Distributions by Project window. (Inquiry >>Project Tracking >> Distributions by Project ) 2. Enter a Project ID. 3. Mark the project files you want to include: Work (unposted transactions), Posted, or Both. 4. To see the General Ledger posting date instead of the document date in the scrolling window, mark Display GL Posting Date. 5. To print the Project Inquiry report, choose Print. 6. To view projects that are in closed and moved in to History, select the Project Lookup. P ROJ E CT T RACKING 121 C H A P TER 6 REPO RTS AN D INQUIRIE S 7. Choose History to change the view to only projects that are closed. 8. Select a project. The lookup window will close and the project transactions will displayed. 122 P R O JECT TRACKI N G CHAP T E R 6 RE P ORT S AND INQUIRI ES Project Inquiry Summary The Project Tracking Inquiry Summary window, accessed from the Project Tracking Inquiry - Distributions by Project window, provides a snapshot of how your project is doing in broad categories, such as Actual Labor Cost and Actual Material Cost and how your project is holding up to its original estimates. To view or print the Project Inquiry Summary report: 1. Open the Project Tracking Inquiry - Distributions by Project window. (Inquiry >>Project Tracking >> Distributions by Project) 2. Enter Project ID. 3. Mark the type of records to include: Work, Posted, or Both. 4. Choose Summary. The Project Tracking Inquiry Summary window will open displaying original estimates from the Project Maintenance Costs window compared to actual revenue and costs. To view the summary information for a different project, change the Project ID on the Project Tracking Inquiry window and the project on the Project Tracking Inquiry Summary window will change too. P ROJ E CT T RACKING 123 C H A P TER 6 REPO RTS AN D INQUIRIE S 5. To print the Project Inquiry Summary report, choose the Printer icon, (CTRL + P), or File >> Print. Document Inquiry The Project Tracking Inquiry - Distributions by Document window displays project distributions organized by Microsoft Dynamics GP document number. You can see either Open or Historical transactions. Each project distribution line is listed separately so a single Microsoft Dynamics GP document may be represented by several lines on the Project Tracking Inquiry - Distributions by Document Tracking window. The window shows only a few, limited fields for each line but the report will show you more detailed information for each distribution line. You also can zoom from each line in the window to an inquiry for the original Microsoft Dynamics GP document. To view or print the Document Inquiry report: 1. Open the Project Tracking Inquiry - Distributions by Document window. (Inquiry >>Project Tracking >> Distributions by Document) The scrolling window will automatically display all Open (posted) transactions. 124 P R O JECT TRACKI N G CHAP T E R 6 RE P ORT S AND INQUIRI ES 2. To restrict the view, enter the range of document numbers that you want to view and select which project files you want to view: Open or History (closed projects). 3. Choose Redisplay to view your restricted selection. 4. To print the Document Inquiry report, choose the Printer icon. Budget Inquiry All budget information can be viewed from the Budget Inquiry window, but no changes to budgets are allowed. When Project Tracking Lite is activated you will not have access to any budget reports. You may view both working and approved budgets in the Budget Inquiry window. You can view budgets for a project along with the actual expenditures and variance. You can view this information for any version of any budget and for any or all periods. P ROJ E CT T RACKING 125 C H A P TER 6 REPO RTS AN D INQUIRIE S To view a budget in the Budget Inquiry window: 1. Open the Project Tracking Budget Inquiry window. (Inquiry >> Project Tracking >> Budget) 2. Enter a Project ID. 3. To display a different budget revision, enter the revision number that you want to view. The display on the Budget Inquiry window is controlled the same way as the display on the Budget Maintenance window. For more details, see Restricting budget views on page 158 in the Budgeting chapter. Project Tracking Distributions Inquiry window When you have a Microsoft Dynamics GP inquiry window (see list below) open you can access the Project Tracking Distributions Inquiry window which will allow you to drill back to view work or posted transactions. 126 P R O JECT TRACKI N G CHAP T E R 6 RE P ORT S AND INQUIRI ES (Additional>>Project Distribution) or by Ctrl+J The Project Tracking Distribution window is available from the following Microsoft Dynamics GP windows: • • • • • • • • • • • • • • • • • Purchasing Transaction Entry Zoom Payables Transaction Entry Zoom Receivables Transaction Inquiry Zoom Cash Receipts Inquiry Zoom Checkbook Register Inquiry (posted transactions only) Receivables Distribution Inquiry Zoom Journal Entry Inquiry (posted transactions only) Inventory Transaction Inquiry Invoice Inquiry Invoice Distribution Inquiry Receivings Transaction Inquiry Zoom Purchasing Invoice Inquiry Zoom Receivings Distribution Inquiry Zoom Purchase Order Inquiry Zoom (Purchase Orders that are ‘Open’ only) Sales Transaction Inquiry Zoom Sales Inquiry Distribution Payroll Check Inquiry P ROJ E CT T RACKING 127 C H A P TER 6 REPO RTS AN D INQUIRIE S Reports Project Tracking with Profit Analysis comes equipped with several preconfigured reports: • • • • • • • • • Project Analysis Project Tracking Edit List GL Reconciliation Outstanding Balances Project Inquiry Report Project Summary Reports Project Tracking Budgeting Only: Budget Inquiry Report Project Tracking Budgeting Only: Variance Reports Project Tracking Budgeting Only: Budget Maintenance Report Many companies like to customize the pre-configured reports to include information specific to their company, eliminate fields they are not using, add calculated fields or just rework the look of the report. Most of these customizations can be accomplished successfully using Report Writer. Project Tracking includes several pre-compiled Report Writer functions to help you customize your report. For more information about customizing existing Project Tracking reports, adding project information to Microsoft Dynamics GP reports and other reporting questions not covered in this chapter, please refer to Appendix A, “Advanced Reporting,”. 128 P R O JECT TRACKI N G CHAP T E R 6 RE P ORT S AND INQUIRI ES Project Analysis Reports The Project Analysis report is the most frequently used Project Tracking report and it is most commonly used as a project profit and loss statement. You can include all transactions booked to the project or just posted transactions. You also can use the Project Analysis report as a cost analysis report across a range of projects. The Project Analysis report always displays subtotals for each project and within each project, totals for each amount type and breakdown code. You can choose to group by Customer, Salesperson or userdefined field. If the Detail Report check box is marked, the Document Date, and Description for each transaction line also will be shown. You can obtain valuable cross-project information by grouping your report by one of the transaction user-defined fields. For example, if you choose DEPARTMENT (one of your transaction user-defined fields) as the Group By field, the report will show a sub-total for each department for each project, for each amount type and for each breakdown. The Project Analysis report also can be configured to show transactions of a specific amount type only, such as Actual Cost of Labor or Cash. If you combine restrictions on breakdown code or amount type with Grouping By DEPARTMENT, for example, you can get detailed information about how each department performs in specific cost categories. Project Tracking comes equipped with seven copies of the Project Analysis report that can be modified using Report Writer. To make your reports easier to read, you can use Report Writer to create separate layouts for different Project Analysis reports such as project profit and loss and cost code reporting. You will use the Project Analysis Report Options window to print and to configure the Project Analysis report. There are options for restricting and grouping the information that can be used to create different types of reports. Once you configure a report’s set of options, you can save it for later reuse. You can save an unlimited number of P ROJ E CT T RACKING 129 C H A P TER 6 REPO RTS AN D INQUIRIE S Project Analysis Report options making it easy to produce slight variations in reports you run frequently. To set up a Project Analysis report: 1. Open the Project Analysis Report Options window. (Reports >> Project Tracking >> Project Analysis) 2. Enter a name for this Project Analysis report. 3. If you’ve created varying layouts for this report in Report Writer, select the appropriate Report Layout. 4. Choose a Group by Field. 130 P R O JECT TRACKI N G CHAP T E R 6 RE P ORT S AND INQUIRI ES If you group by Salesperson ID or Customer ID, any records that have a blank Salesperson ID or Customer ID will be assigned the default value assigned for these fields in the Project Maintenance window for this project. There will be a sub-total for each Salesperson or Customer ID. If you group by... your report will be grouped by... Salesperson ID Salesperson ID first Project ID Amount Type Breakdown Code User-Defined Field1 User-Defined Field1 first Project ID Amount Type Breakdown Code The Grand Total at the end of the report summarizes revenue, direct cost and net profit (loss) for the projects included in the report. If you choose Detail Report, you will see transaction-level detail beneath each breakdown code. Estimated costs do not appear on the report. P ROJ E CT T RACKING 131 C H A P TER 6 REPO RTS AN D INQUIRIE S 5. Select which project files you want to include on your report: Work, Open, or History. 6. To print transaction details, mark the Detail Report check box. 7. To include all projects in this report, even those that have the Exclude from Reports option in the Project Maintenance window marked, mark the Force All Projects in Report check box. 8. To view profitability of a project based on cash received only (not including invoiced amounts), mark the Cash Received Only check box. 9. To include Trade Discount, Freight, Miscellaneous, and Sales Tax as revenue associated with Sales transactions in your report, mark these options. When associated with Payables transactions, Trade Discount, Freight, Miscellaneous, and Sales Tax will be reported as costs whether you mark these options or not. 10. Select a Project Status restriction (based on the Project Status field in the Project Maintenance window). Your report will be restricted to data from projects with the selected project status. If you’ve included the History project file, you must select the project status Completed or Both. 11. Select which amounts you want to show: All Amounts, Selected Amount Type, or Selected Breakdown. If you choose Selected Amount Type, enter the amount type that you want to report. If you choose Selected Breakdown, enter the amount type and the breakdown code that you want to report. 12. Choose a transaction type. This option allows you to limit the report to a single transaction type. For example, you may limit the report to transactions from the Payables system. 132 P R O JECT TRACKI N G CHAP T E R 6 RE P ORT S AND INQUIRI ES The Project Tracking Adjustment transaction type can be very useful. It will, in effect, provide a type of Edit List for all adjustments made to a project. 13. Enter range restrictions as follows: • • • Select the field for which you will set a range. Enter the beginning and ending values for the range. Choose Insert to insert the selected range into the Ranges scrolling window. If you choose a Project ID range from A-B and a customer range from CUST0001-CUST0005, then only data pertaining to both projects A-B and CUST0001-CUST0005 will be displayed on the variance report. You can enter only one restriction for each restriction type but you can include up to 15 different ranges in your report. If you do not select ranges for Customer ID, Salesperson ID, and Completion Date in the Project Analysis Report Options window, any default values set in the Project Maintenance window will determine the values reported. The built-in report format shows the transaction date of each transaction, rather than the GL Posting Date. If you want to display the GL Posting Date, you can modify the report using Report Writer. 14. Choose a destination for the report. If you set the report destination now, you will not be asked for the destination each time you print the report. 15. To save this report as a Report Option, select Save. 16. To print the report, select Print. P ROJ E CT T RACKING 133 C H A P TER 6 REPO RTS AN D INQUIRIE S Project Tracking Edit List Reports Project Tracking Edit List reports are designed to help you verify the accuracy of project distributions so you can correct errors before posting transactions. The Project Tracking Edit List report contains a listing of the transactions in the batch along with the details of their Project Tracking distributions. You can print Project Tracking Edit List reports from the batch entry windows for each module that integrates with Project Tracking. Project Tracking Edit List reports are available from the following windows: • • • • • • • • Batch Entry (General Ledger) Payables Batch Entry Receivables Batch Entry Invoice Batch Entry Sales Batch Entry Purchasing Batch Entry Inventory Batch Entry Payroll Batch Entry Using Report Writer, you can modify the Project Tracking Edit List report to give you the same information you would get from a regular Microsoft Dynamics GP Batch Edit List. If you don’t modify the report this way, you will need to print both the regular Batch Edit List and the Project Tracking Edit List report and reconcile the two. To print a Project Tracking Edit List: 1. Open the applicable Microsoft Dynamics GP Batch Entry window. 2. Go to Extras >> Additional >> Project Distribution Edit (or CTRL+J). Alternate Payables Batch Edit Report There is an alternate batch edit report (PM Transaction Posting Journal) for the Payables module that may eliminate the need to print two edit reports. This alternate report already contains project information. If your project distributions are limited to one per Payables transaction, you can use this alternate report instead. Only users given security approval for this report can access it. If you already have security access to the report, 134 P R O JECT TRACKI N G CHAP T E R 6 RE P ORT S AND INQUIRI ES follow the same steps you use to print the regular Payables Batch Edit report and the Project Tracking alternate will print in its place. The following procedure explains how to set up security for users that will access the alternate Payables Batch Edit report. To set up security for the alternate Payables Batch Edit report: 1. Open the Microsoft Dynamics GP Security window. (Tools >> Setup >> System >> Security) 2. Enter the User ID that you want to be able to access the alternate report. 3. Select the correct company. 4. In the Product list, select Project Tracking. 5. In the Type list, select Alternate Dynamics Reports. 6. In the Series list, select Purchasing. 7. A list of reports will appear in the scrolling window. Double-click the PM Transaction Posting Journal report and the MC PM Transaction Posting Journal. Be sure there is an asterisk beside these reports. 8. Select OK to save the user access information. Budget Variance Report A variance report allows the user to see, at any moment in time, how their actual costs and revenues compare to their budgeted costs and revenues. The difference is expressed as an actual dollar amount, as a variance amount, and as a variance percentage. A variance is calculated as the actual amounts less the budgeted amounts. A variance percentage is calculated as follows: (Actual Amounts – Budgeted Amounts)/Budgeted Amounts. If there are budgeted amounts and no actual amounts, that will be reported as a 100% variance. P ROJ E CT T RACKING 135 C H A P TER 6 REPO RTS AN D INQUIRIE S Variance reports can be run for a single project or across projects if they have fiscal budgets. When Project Tracking Lite is activated you will not have access to any budget reports. Most companies are interested in seeing Sales, Actual Cost of Materials, Actual Cost of Labor and Adjustments amounts, whether or not they’ve created a budget for these categories. The variance reports are designed to do this. For example, if a budget has been created for a project, any actual sales amounts will show up on the variance report even if sales budgets are not specified. However, other amount types available in the system will not be included on the variance report unless the budget has values set up for them. The following amount types will not be included in the variance report unless they have amounts budgeted: • • • • • • • TRADE DISCOUNT FREIGHT MISC. CHARGE SALES TAX EST. COST LABOR EST. COST MATERIAL CASH If you need to include these amount types on the variance report, you can change the budget by inputting at least one cell with a budget value (even $.01 will do). The cell can be for any budget view, for any period and for any breakdown. You will use the Variance Report Options window to print and to configure Variance Reports. There are options for restricting and grouping the information that can be used to create different types of reports. Once you configure a report’s set of options, you can save it for later reuse. You can save an unlimited number of Variance Report options making it easy to produce slight variations in reports you run frequently. 136 P R O JECT TRACKI N G CHAP T E R 6 RE P ORT S AND INQUIRI ES Using Report Writer, you can add, delete, and rearrange the fields on the reports creating 14 different physical layouts: seven versions of the detail reports and seven versions of the summary reports. To set up variance reports: 1. Open the Variance Report Options window. (Reports >> Project Tracking >> Variance Reports) 2. Enter a name for this variance report. 3. If you’ve created varying layouts for this report in Report Writer, select the appropriate Report Layout. P ROJ E CT T RACKING 137 C H A P TER 6 REPO RTS AN D INQUIRIE S 4. Choose one of the following: For more information about cross-project reporting, see Understanding the Project Tracking budget process on page 155. • Mark Cross-Project Reporting if you want to report on the performance of one key business indicator across multiple projects. This can answer questions such as, “How did the X department do across all projects?” or “How did X salesperson do across all projects?” and so on. Cross-Project Reporting also allows you to see how different projects perform together in the same time frames. All projects that will be combined into this type of report must have Project Tracking budgets based on fiscal periods. A project with a budget with a period duration of weekly or quarterly, for example, will not appear on the cross-project report. • Mark Multi-Project if you want to print many single project reports at the same time. • Mark Single Project Reporting if you want to print information about a single project. If you choose this type of report, the blank field to the right will be enabled for you to enter the Project ID. 5. Select the revision version that you want to include. You can specify to include only the latest approved budget revision, the latest revision (whether working or approved), or, if you’ve marked Single Project Reporting, a specific revision number. 6. To include transaction details, mark the Detail Report check box. 7. To include all projects, even those that have the Exclude from Reports option in the Project Maintenance window marked, mark the Force All Projects in Report check box. 8. Select which period or periods you want to report. 138 P R O JECT TRACKI N G • If you select a period range and if you are using Cross-Project reporting, enter the beginning and end dates for the range. • If you select a period range and if you are using Single or MultiProject reporting, enter the beginning and end period numbers for the range. CHAP T E R 6 RE P ORT S AND INQUIRI ES If you enter an end date that is after the last fiscal period in Microsoft Dynamics GP, Microsoft Dynamics GP will substitute the date 12/30/9999. When Period is selected as a grouping for cross-project reporting, actual transaction amounts booked to fiscal periods outside the budget range of the project will be reflected on the variance report in the actual period in which they occurred. For single and multi-project reporting, actual transaction amounts booked outside the budget range of the project will be reported on the variance report as PreProject period or Post-Project period as appropriate. The variance report contains period totals—when Project is selected as a grouping—and project-to-date totals for Actual amounts, Budgeted Amounts, Variance and % Variance. The period totals will equal the system amounts for the periods you have limited the report to, for example, current period or periods 1-3. The project-to-date totals will be based on the last period selected for the report. For example, if your report is limited to period 3 and your project has five periods, the project-to-date totals will have all pre-project amounts plus all amounts booked to periods 1, 2 and 3. If you choose to report All periods, the period totals and the project-to-date totals will always be exactly the same. To make your reports look better, you may want to create designated “All periods” report layouts for both the detailed and the summary reports and then modify the report layouts in Report Writer by removing the project-to-date totals field from the reports. 9. To restrict your report to a specific amount type, select the applicable amount type. 10. To restrict your report to a specific breakdown code, select the applicable breakdown code. 11. For cross-project or multi-project reports, select a Project Status restriction (based on the Project Status field in the Project Maintenance window). Your report will be restricted to data from projects with the selected project status. To include the History project file, you must select the project status Completed or Both. P ROJ E CT T RACKING 139 C H A P TER 6 REPO RTS AN D INQUIRIE S 12. Mark the project files you want to include in the variance report: Work, Open, or History. You must mark at least one type. 13. To determine how your report will be grouped, complete the following steps for each report grouping that you want to create. You can specify up to seven groupings for any single report option. If you want to group by Project ID only, you can omit this step and leave the scrolling window blank. • Select the category that you want to group by from the available choices in the Available Groupings scrolling window. • Choose Insert to insert the selected item into the Selected Groupings scrolling window. The order in which you select the categories is the order in which they will be sorted on the report. To remove an item from the list, choose Remove to remove one item or choose Remove All to remove all selected items. 14. Enter range restrictions as follows: • Select the field for which you will set a range. • Enter the beginning and ending values for the range. • Choose Insert to insert the selected range into the Ranges scrolling window. If you choose a Project ID range from A-B and a customer range from CUST0001-CUST0005, then only data pertaining to both projects A-B and CUST0001-CUST0005 will be displayed on the variance report. You can enter only one restriction for each restriction type. 15. Choose a destination for the report. If you set the report destination now, you will not be asked for the destination each time you print the report. 140 P R O JECT TRACKI N G CHAP T E R 6 RE P ORT S AND INQUIRI ES 16. To save this report as a Report Option, select Save. 17. To print the report, select Print. General Ledger Reconciliation Report Reconciling your project distributions with your general ledger to ensure that all applicable transactions have been distributed to projects is essential. Since you can only require full distributions on a per module basis in Project Tracking, you will need another way to confirm that a particular general ledger account was fully distributed to projects. To help you, the General Ledger Reconciliation report has two variations: • • General ledger distributions by project Project distributions by general ledger account The General Ledger distributions by project report will show each project and totals for transactions distributed to each general ledger account. Choose Complete Details and you will see a list of transactions for each general ledger account within each project. The project distributions by general ledger account report will show the total amount distributed to each general ledger account in the project system. The Partial report will show each general ledger account and under it the total distributed in each project for that general ledger account. Lastly, you can choose Complete to see the individual transactions for each of the projects booked to that general ledger account. You can tailor the general ledger reconciliation reports for your needs using the GL Account Report options window. By saving various report option configurations, you can then easily recall whichever set is appropriate each time you want to print the report. You will use the same window to print general ledger reconciliation reports. If you want to use the Project Tracking GL Reconciliation Report to reconcile project information to general ledger accounts, we suggest that you set the level of posting for general ledger accounts to Detail instead of Summary in the Account Maintenance window. If general ledger account posting is set to Summary, your trial balance will show a summary amount only; the Project P ROJ E CT T RACKING 141 C H A P TER 6 REPO RTS AN D INQUIRIE S Tracking Reconciliation Report will show detail and you will not be able to reconcile Project Tracking. To set up general ledger reconciliation reports: 1. Open the GL Reconciliation Report Options window. (Reports >> Project Tracking >> GL Reconciliation) 2. Enter a name for this General Ledger Reconciliation report. 3. If you’ve created varying layouts for this report in Report Writer, select a Report Layout. You can use Report Writer to add, delete, and rearrange the fields on any of these layouts. 4. Mark the project files you want to include in the reconciliation report: Work, Open, or History. You must mark at least one type. 5. Select a detail level for the report: 142 P R O JECT TRACKI N G • Mark Complete to print all transaction level detail • Mark Partial to print the total booked to each general ledger account for each project. This option is only available for “by account number” reports. CHAP T E R • 6 RE P ORT S AND INQUIRI ES Mark Summary to print the total booked to each general ledger account. 6. Select a Project Status restriction (based on the Project Status field in the Project Maintenance window). Your report will be restricted to data from projects with the selected project status. If you’ve included the History project file, you must select the project status Completed or Both. 7. To include all projects in this report, even those that have the Exclude from Reports option in the Project Maintenance window marked, mark the Force All Projects in Report check box. Forcing all projects in reports is helpful when running reconciliation type reports. 8. Enter range restrictions as follows: • Select the field for which you will set a range. • Enter the beginning and ending values for the range. • Choose Insert to insert the selected range into the Ranges scrolling window. If you choose a Project ID range from A-B and a customer range from CUST0001-CUST0005, then only data pertaining to both projects A-B and customers CUST0001-CUST0005 will be displayed on the variance report. You can enter only one restriction for each restriction type. 9. Choose a destination for the report. If you set the report destination now, you will not be asked for the destination each time you print the report. 10. Select Save to save the report option. 11. Select Print to print the report. P ROJ E CT T RACKING 143 C H A P TER 6 REPO RTS AN D INQUIRIE S Project Outstanding Balance Report The Project Outstanding Balance report gives you a quick snapshot of invoices vs. payments for selected projects. You will use the Project Outstanding Balance report to manage your receivables by project. You also can use this report to provide an alternate statement for customers. The amount of information on the report is kept to a minimum to make it easy to see which payments have been received and how much is still outstanding for each project. You can print the report for all projects or for a selected range of projects. You will use the Project Outstanding Balances Reports window to set up options for and to print the Project Outstanding Balances report. Once you configure each report’s set of options, you can save it for later reuse. Using Report Writer, you can add, delete, or rearrange the fields on this report to create seven different layouts for the report. To set up Project Outstanding Balance Reports: 1. Open the Project Outstanding Balances Reports window. (Reports >> Project Tracking >> Receivables Outstanding Balances) 2. Enter a name for this Outstanding Balance report. 3. If you’ve created varying layouts for this report in Report Writer, select the appropriate Report Layout. 144 P R O JECT TRACKI N G CHAP T E R 6 RE P ORT S AND INQUIRI ES 4. Choose a Group by field. The grouping you choose will show you subtotals for that group. If you group by Salesperson ID or Customer ID, any records that have a blank Salesperson ID or Customer ID will be assigned the default value assigned for these fields in the Project Maintenance window for this project. There will be a sub-total for each Salesperson or Customer ID. If you group by one of the transaction user-defined fields, projects will be grouped according to the value assigned to each transaction line. 5. Mark the project files you want to include in the Outstanding Balance report: Work, Open, or History. You must mark at least one type. 6. To include transaction details, mark the Detail Report check box. 7. To include all projects in this report, even those that have the Exclude from Reports option in the Project Maintenance window marked, mark the Force All Projects in Report check box. 8. Select a Project Status restriction (based on the Project Status field in the Project Maintenance window). Your report will be restricted to data from projects with the selected project status. If you’ve included the History project file, you must select the project status Completed or Both. 9. Enter range restrictions as follows: • Select the field for which you will set a range. • Enter the beginning and ending values for the range. • Choose Insert to insert the selected range into the Ranges scrolling window. If you choose a Project ID range from A-B and a customer range from CUST0001-CUST0005, then only data pertaining to both projects A-B and customers CUST0001-CUST0005 will be displayed on the variance report. P ROJ E CT T RACKING 145 C H A P TER 6 REPO RTS AN D INQUIRIE S You can enter only one restriction for each restriction type. 10. Choose a destination for the report. If you set the report destination now, you will not be asked for the destination each time you print the report. 11. Select Save to save the report option. 12. Select Print to print the report. Security Reports A security report will list the security rights for Projects (View, Edit, Distributions, and Adjust) and Budgets (View, Edit, Approve, Reopen). You can print this report by project to see all the users who have security rights on a project by project basis. You also can print this report by user to see all the projects that an individual user can access. The report can be limited to a single project or single user. To print a security report: 1. Open the Project Setup window. (Tools >> Setup >> Project Tracking >> Setup) 2. Choose Security. 3. You will be asked to enter a password. Enter the password you entered when you activated Security. This will open the Project Security window. 146 P R O JECT TRACKI N G CHAP T E R 6 RE P ORT S AND INQUIRI ES 4. Select a type to sort the report by: User ID or Project ID. 5. To limit the report to a single project or user, enter the project ID or user ID. 6. Choose the Print button, CTRL+P or File >> Print to print the report. Maintenance Reports You can print maintenance reports from the following Project Tracking windows: • • • • • Project Maintenance Breakdown Maintenance Each of the Transaction User-Defined Field Maintenance Project Tracking Budget Maintenance Project Tracking Budget Inquiry The Project Maintenance report prints most of the fields on the Project Maintenance window and the Project Maintenance Costs window. P ROJ E CT T RACKING 147 C H A P TER 6 REPO RTS AN D INQUIRIE S The Breakdown Maintenance report prints a listing of each amount type following by its assigned breakdown codes and descriptions. For Project Tracking Budgeting, the report also will list any transaction user-defined overrides associated with each breakdown code. The Transaction User-Defined Maintenance report prints the codes and descriptions set up on the Transaction User-Defined field maintenance window that you printed the report from. The Budget Maintenance report prints all of the fields on the Budget Maintenance window. You can print this report from the Budget Maintenance and the Budget Inquiry windows. Because of the large number of potential budget cells, Project Tracking allows you to restrict the report in various ways. When you go to print the report, the Budget Maintenance Report window will open. To print the Budget Maintenance report: 1. Open the Project Tracking Budget Maintenance or the Project Tracking Budget Inquiry window. (Cards>> Project Tracking >>Budget) OR (Inquiry>> Project Tracking >>Budget) 2. Select a Project ID. 3. Choose the printer icon button. The Budget Maintenance Report window will open. 148 P R O JECT TRACKI N G CHAP T E R 6 RE P ORT S AND INQUIRI ES 4. Select any restrictions you want to include. You can restrict the report to: • • • • • Single period Single amount type Single amount type and breakdown code A combination of user-defined fields (available only if you have default values set up for the project) Confirmed or unconfirmed cells 5. If you want to exclude all $0 cells from the report, mark this option. 6. Select Print. Summary Reports You can use the Project Tracking Report Options windows to print the following summary reports: • Margin Reports—quick look at how profitable each project was. See Margin Reports on page 149 for more information about these reports. • WIP Reports—report work in progress • Variance Reports—report differences between estimated and actual transaction amounts • Project Summary Report—report the gross profit for each project. The gross profit is calculated as the actual revenue less actual cost, operating costs and adjustments Margin Reports If you include open project files in Margin reports, these reports will be based on estimated values rather than actual values. An asterisk* next to these totals on the report indicates that this total is based on estimated revenue and costs as set up on the Project Maintenance Costs window (Cards >> Project Tracking >> Project >> Costs). When you print a Margin report using open projects, it is a “Projected” Margin report, not an actual P ROJ E CT T RACKING 149 C H A P TER 6 REPO RTS AN D INQUIRIE S Margin report. The following table shows how revenue and cost is calculated for Margin reports: When you choose... Revenue is based on Cost is based on Open project in Open file Estimated revenue Original estimated cost Completed project in Open file Actual revenue Estimated cost at invoicing time Completed project in History Actual revenue file Actual cost If the total cost has an asterisk* showing that it is based on estimates, both the Labor and Materials Cost columns are based on estimates as well. Margin Reports include the invoice numbers for any projects that have been invoiced. If there is more than one invoice on a particular project, the second and subsequent invoices will appear on a line by themselves, after the project line. No margin totals will be shown on these invoice-only lines. Each of these reports can be customized, saved and reused as needed. To set up summary reports: 1. Open the Project Tracking Report Options window. (Reports >> Project Tracking >> Summary Reports) 2. Enter a name for this Summary report. 150 P R O JECT TRACKI N G CHAP T E R 6 RE P ORT S AND INQUIRI ES 3. Select a Report Type: Margin (quick look at how profitable each project was), WIP (report work in progress), Variance (report differences between estimated and actual transaction amounts), or Project Summary (report the gross profit for each project). 4. Select a Project Status restriction (based on the Project Status field in the Project Maintenance window). Your report will be restricted to data from projects with the selected project status. If you’ve included the History project file, you must select the project status Completed or Both. 5. Select a Report Layout. Unlike the other reports, these seven layouts are not identical—each one contains a column for a different userdefined field. To choose a report layout with user-defined field 1, choose Report 1. If you wish you can define these reports more using Report Writer. 6. Select a Group by Field. The reports can be grouped by Salesperson ID, Customer ID or any of the User-defined fields. Grouping the reports this way enables you to see subtotals for each of those groups. So, for example, to report profitability of projects by Salesperson, choose the Margin Report type and group by Salesperson. To see work in progress by department, define a userdefined field called Department and then choose the Work In Progress report type and group by that user-defined field. These reports will not give you detailed breakdowns of your transaction amounts by breakdown code or user-defined fields. To get reports based on the transaction detail, see the Project Analysis Reports on page 129, or the General Ledger Reconciliation Report on page 141. If you group by a user-defined field, the reports will separate the projects based on the user-defined values associated with the project without considering any overrides you may have done at the project distribution level (on a per transaction basis). If you override these fields on the project distribution screen, the Breakdown report may be better suited for your analysis. P ROJ E CT T RACKING 151 C H A P TER 6 REPO RTS AN D INQUIRIE S 7. To include all projects in this report, even those that have the Exclude from Reports option in the Project Maintenance window marked, mark the Force All Projects in Report check box. 8. Mark the project files you want to include in the report: Work, Open or History. Work option only applies to Project Summary type of report. 9. To include Trade Discount, Freight, Miscellaneous, and Sales Tax as revenue associated with Sales transactions in your report, mark these options. When associated with Payables transactions, Trade Discount, Freight, Miscellaneous, and Sales Tax will be reported as costs whether you mark these options or not. 10. Enter range restrictions as follows: • Select the field for which you will set a range. • Enter the beginning and ending values for the range. • Choose Insert to insert the selected range into the Ranges scrolling window. If you choose a Project ID range from A-B and a customer range from CUST0001-CUST0005, then only data pertaining to both projects A-B and customers CUST0001-CUST0005will be displayed on the variance report. You can enter only one restriction for each restriction type. 11. Choose a destination for the report. If you set the report destination now, you will not be asked for the destination each time you print the report. 12. Select Save to save the report options. 13. Select Print to print the report. 152 P R O JECT TRACKI N G CHAPTER 7: PROJECT TRACKING BUDGETING INTRODUCTION C H A P TER 7 PRO JECT TRACKING BUDGE T ING Chapter 7: Project Tracking Budgeting This chapter explains how to use Project Tracking Budgeting and contains the following sections: • • • • • • • • • • • • • • Setting up Project Tracking Budgets Understanding the Project Tracking budget process Creating new budgets Restricting budget views Adding notes to a budget Entering budget amounts when creating budgets Shortcuts for entering budget amounts Copying an existing budget Getting information about a budget Budget approval process Approving a budget Reopening approved budgets Revising a budget Deleting a budget Setting up Project Tracking Budgets Before you can use Project Tracking Budgeting, there is specific setup required. Please see Project Tracking Budgeting Setup only on page 73. Project Tracking Budgeting is a very flexible and very powerful budgeting module. It is designed to allow you to budget by breakdown code. Project Tracking Budgeting gives you the flexibility to set a single budget for each breakdown code for each project or to set different budgets for each breakdown code. For even more granular budgeting, you can tie your budgets to specific combinations of transaction user-defined field values. For instance, if you have defined one of the transaction user-defined fields as DEPARTMENT, you can set up one set of budgets for the Accounting department and another set for the Human Resources department. You may combine transaction user-defined field values giving you even more control over your budgets. If you had defined another one of the 154 P R O JECT TRACKI N G CHAPT E R 7 P ROJ E CT T RACKING BUDGE T I NG transaction user-defined fields as LOCATION, you could set up budgets for the Los Angeles Accounting department, another for the New York Accounting department, one for the Los Angeles Human Resources department and another for the New York Human Resources department and so on. All of these budgets would contain a separate amount for each breakdown code for each reporting period covered by the budget. Understanding the Project Tracking budget process Every Project Tracking budget is attached to a project. A project must be open to create a budget for it. If you would like to enter a budget for a closed project for historical reporting purposes, you must reopen the project using the Reopen Project window, before creating the budget. Budget Periods Before you start a project budget, you must indicate the beginning and ending dates of your budget and the period duration. If you want to compare this project with other projects, you must accept the default period duration—fiscal period. However, you also may decide to change the period duration to daily, weekly, monthly, bi-monthly, quarterly, half-yearly and yearly periods or to a single period—one single period budget for the project, regardless of the project’s duration. To use a period duration other than fiscal period, you must mark the Disable Cross-Project Budget Reporting option in the Project Tracking Budget Maintenance window. Transaction user-defined fields in budgets You must specify which, if any, transaction user-defined fields will be used in budgets. If, for instance, you have defined one of the transaction userdefined fields as DEPARTMENT you may want to set up different budgets for each department. When you click the Start Budgeting button, one budget cell will be created for each breakdown code for each reporting period for each possible value in the DEPARTMENT field. If you have set up another transaction user-defined field as CITY and you choose to use the CITY field in budgets along with DEPARTMENT, budget cells will be created for each breakdown code for each reporting period for each possible combination of values in the DEPARTMENT and CITY field. If P ROJ E CT T RACKING 155 C H A P TER 7 PRO JECT TRACKING BUDGE T ING there are 10 departments in four cities, there are 40 possible combinations. For example, if you had a total of 25 breakdown codes across all your amount types (not an unusually high number) and you set up a fiscal period budget for12 fiscal periods, the Project Tracking Budgeting module would create 12 x 25 x 40 budget cells or 12,000 budget cells. Since there are seven transaction user-defined fields, each with an unlimited number of possible values and no limit on the number of possible breakdown codes one may create, the number of budget cells for a single budget can quickly become unwieldy. Fortunately, the Project Tracking Budgeting module provides some shortcuts to make managing your budget cells easier. Limiting and managing the number of budget cells There are a few ways to limit and manage the number of budget cells. • Use the Constant Value option on the Project Maintenance window. If this option is marked for one of the transaction userdefined fields for the project, transactions distributed to that project can have only one possible value in that field. Though there may be many possible values for the field entered in the system, all transactions distributed to that project will have the same constant value in that field. In the above example, if the constant value option was marked for the DEPARTMENT field, then there would be only four possible combinations, one department for each city. The possible combinations would be 4 x 1 or 4 instead of 40 cutting the number of budget cells from 12,000 to 1,200 (12 x 25 x 4). • Create a single period budget for your project. For each breakdown code only one cell will be created for each combination of possible transaction user-defined field values. In the above example, that would cut the number of cells to 100 (1 x 25 x 4). However, although single period budgeting is the simplest way to set up a budget, budgets set up this way cannot be included in crossproject variance reporting. To use cross-project reporting, you must budget by fiscal period. Crossproject variance reporting is one of the most powerful features of the 156 P R O JECT TRACKI N G CHAPT E R 7 P ROJ E CT T RACKING BUDGE T ING budgeting module. Using cross-project reporting, you can report on the performance of one of your key business indicators across multiple projects. This can answer questions, such as: “How did department X fare across all projects?” or “How did salesperson X do across all projects?” etc. When you choose the Start Budgeting button, Project Tracking Budgeting creates a pre-budget period and a post-budget period to account for transactions that occur outside the budget period. The pre-budget and post-budget periods will not display on the Budget Maintenance window but can be seen on the Budget Inquiry window. If you would like to base your new budget on an existing budget, see Copying an existing budget on page 168. Creating new budgets You will use the Project Tracking Budget Maintenance window to create new budgets. To create a new budget: 1. Open the Project Tracking Budget Maintenance window. (Cards >> Project Tracking >> Budget) P ROJ E CT T RACKING 157 C H A P TER 7 PRO JECT TRACKING BUDGE T ING 2. Enter a Project ID. You must have a project set up before you can create a budget because each budget is attached to a project. 3. If you are setting up the project budget by period durations other than your regular fiscal periods, mark the Disable Cross-Project Budget Reporting option. If you are matching the budget periods to your fiscal periods, be sure this option is unmarked. Once a budget has been created, the Disable Cross-Project Budget Reporting option cannot be changed. To change the option, you must delete the budget ID and recreate it. 4. Enter the Start and End Dates for your budget. If you match your budget’s periods to your company’s fiscal periods, you can obtain budget variance reports for specific breakdown codes across a range of projects. 5. If you are not matching budget periods to fiscal periods (Disable CrossProject Budgets is marked), choose a period duration from the dropdown list. 6. Choose Start Budgeting. Empty budget cells will be created for each combination of period, breakdown code and transaction user-defined field value used in your budget. 7. Enter amounts in each budget cell. See Entering budget amounts when creating budgets on page 166 for more information. The Budget Maintenance window contains some shortcuts you can use to fill in multiple cells automatically. You will need to know how to create subset budget views in the Project Tracking Budget Maintenance window if you want to use shortcuts when entering budgeted amounts. Restricting budget views It is important to understand the difference between a budget and a budget view. A budget is all the cells for all breakdown codes for all periods for all possible combinations of transaction user-defined field values. A 158 P R O JECT TRACKI N G CHAPT E R 7 P ROJ E CT T RACKING BUDGE T ING budget view is restricted to the budget cells shown in the Budget Maintenance scrolling window, generally a subset of the entire budget. This section will explain how to create different budget views using filters. When a filter is employed, only those cells that quality for the filter are displayed as part of the budget view. These filters are found at the bottom of the Project Tracking Budget Maintenance window. Budget views are based on combinations of transaction user-defined field values. If you are using two transaction user-defined fields in budgets and each has four possible values, there will be 4 x 4 or 16 basic budget views for the budget. If one of those transaction user-defined fields was, instead, held to a constant value for the project, there will be 4 x 1 or four basic budget views. Each of these budget views is independent and cells from one will never appear on another. On top of basic budget views, other filters can be added. Each of these filters is additive, that is, a cell must qualify under all filters to be part of the view. When a filter is in use, only those cells that qualify for the filter will display as part of the budget view. P ROJ E CT T RACKING 159 C H A P TER 7 PRO JECT TRACKING BUDGE T ING To restrict a budget view: 1. Open the Project Tracking Budget Maintenance window. (Cards >> Project Tracking >> Budget) 2. Select a project ID. 3. To restrict your budget view by period, select a specific period. The budget view in the scrolling window will be restricted to the period you select. Use the browse buttons to page forward or backward one period at time or to jump directly to the first or last period. You can sort the lines in the scrolling window by any of the displayed fields. To change your sorting method, click the column heading you want to sort by. Clicking the Period column heading changes the display from period numbers to period dates and vice versa. Clicking the Amount Type column heading groups the data by amount type. 4. To restrict your budget view by amount type, use the amount type filter. 160 P R O JECT TRACKI N G CHAPT E R 7 P ROJ E CT T RACKING BUDGE T ING 5. To further restrict the budget view to a specified breakdown code, select a breakdown code. You must set the amount type filter before you can set a breakdown code filter. 6. To restrict your view to cells that are confirmed, unconfirmed, or both (ALL), select the desired option at the bottom of the Budgeted Amount column. There are two sets of scrolling arrows, that is, browse buttons, on the Budget Maintenance window. You can use the browse buttons in conjunction with the window filters to create specific budget views that can then be manipulated together. The transaction user-defined browse buttons move sequentially through the basic budget views. Each possible combination of transaction user-defined field values is brought up one by one. The Auto-Fill feature, Confirm All button and Confirm None button all rely on budget views. Each of these features only affect the cells that are currently part of the budget view. When using these features, the browse buttons are very handy for quickly paging through various budget views. See the following example for more information. P ROJ E CT T RACKING 161 C H A P TER 7 PRO JECT TRACKING BUDGE T ING Example: In this example, the user wants to enter a budget for concrete for each department. The Amount Type filter is set to Actual cost of Materials and the Breakdown filter is set to CONCRETE limiting the budget view to only those cells for the breakdown code CONCRETE. Since the City and Phase fields (Transaction User-Defined Fields 2 & 3) are set to constant values, the only field with multiple possible values is DEPARTMENT (Transaction User-Defined 1). Using the browse buttons next to the Transaction User-Defined fields, the first development in the list is brought up in the window. Because the Breakdown filter is already set, only those cells for CONCRETE for the shown development are included in the budget view. The first period is used as the base period and you can use the Auto-Fill button to fill all CONCRETE cells for the first development. You can use the single down arrow to bring in the next development. Set the Auto-Fill period and amount if different and choose the Auto-Fill button again. Using the down 162 P R O JECT TRACKI N G CHAPT E R 7 P ROJ E CT T RACKING BUDGE T I NG arrows, repeat this sequence until all CONCRETE cells for all development have been entered. P ROJ E CT T RACKING 163 C H A P TER 7 PRO JECT TRACKING BUDGE T ING Adding notes to a budget The Project Tracking Budgeting Notes feature is very useful. You can add notes to a budget as a whole and to each cell. When new revisions of a budget are opened, all previous notes are carried forward along with the revision number. Additionally, if the note is attached to a budget cell, the cell amount from each revision is displayed alongside its note. You will know that a budget cell has a note if an asterisk* appears in the N column on the budget maintenance scrolling window. Notes from previous revisions may not be edited, but new notes can always be added. Notes are a powerful feature for tracking revisions and other modifications to an original budget. To add notes to an entire budget: 1. Open the Project Tracking Budget Maintenance window: (Cards >> Project Tracking >>Budget) 2. Enter the Project ID. 3. If this is a new budget, complete all steps necessary to start the budget. See Creating new budgets on page 157. 4. Choose the Note button next to the Revision Number field. If this is the first version of the budget, the Budget Revision Note window will open. 164 P R O JECT TRACKI N G CHAPT E R 7 P ROJ E CT T RACKING BUDGE T ING If this is a subsequent revision, the Revision Comment Lookup window will open. Double-click on the line next to the latest revision. The Budget Revision Note window will open. 5. Type your note in the window. 6. Choose OK. To add notes to a budget cell: 1. In the Budget Maintenance window, bring up the budget containing the cell to which you would like to add a note. 2. Click the Budgeted Amount field of the line containing the budget cell to which you wish to add a note. 3. Click the Notes button in the upper right of the scrolling window (or select Ctrl+L on the keyboard). If this is the first revision, the Budget Cell Comment window will open. If this is a subsequent revision, the Budget Cell Comment Lookup window will open. Only notes attached to the current revision may be edited. Notes from prior revisions will appear in the window, but they may not be edited. Choose Edit Latest Comment to open the Budget Cell Comment window. 4. Enter the new note in the window. P ROJ E CT T RACKING 165 C H A P TER 7 PRO JECT TRACKING BUDGE T ING 5. Select OK. Entering budget amounts when creating budgets Now that you have learned how to create different budget views and to add notes to budgets, you can enter the budgeted amounts in your budget. To enter budgeted amounts: 1. If this is a new budget, complete all steps necessary to start the budget. See Creating new budgets on page 157. 2. Choose the budget view that you want to work with. If you have many periods or breakdown codes, apply some filters to narrow the range of budget cells. See Restricting budget views on page 158 for more information. 3. Enter the Budget Amount in the desired cell or cells. To fill in multiple cells automatically, you can use the Fill Period button. See Shortcuts for entering budget amounts on page 166. An amount type will not show on the budget maintenance scrolling window unless there is at least one breakdown code configured in the system for that amount type. So, for example, to create a budget for Cash, you will need to create at least one breakdown code for the amount type Cash. Shortcuts for entering budget amounts If some of your breakdown codes have constant budget amounts across each period or if the budget amounts increase or decrease at a constant rate, you can use the Fill Period button to quickly fill multiple cells. The Fill Period process can only be used when the budget display is limited to a single amount type and breakdown code. There are three type auto-fill increments available: Entered Amount, Percentage of entered amount, and Compound percentage of entered amount. Entered Amount and Percentage of entered amount auto-fill types are similar. They both will fill budget periods starting in the base period with the base amount, and then automatically increase or decrease 166 P R O JECT TRACKI N G CHAPT E R 7 P ROJ E CT T RACKING BUDGE T ING each subsequent budget period by a set amount. The percentage amount is converted to a set amount by multiplying the percentage amount by the base amount. For example, if the base amount is $300,00, and the increment amount is $10.00, the first budget period will be filled with $300.00, the second with $310.00, the third with $320.00 and so on. Periods prior to the base period will not be affected. The Compound percentage of entered amount auto-fill type is a little different. It will fill budget periods starting with the base period with the base amount, but then it will automatically increase or decrease each subsequent budget period by a percentage of the previous budget period. For example, if the base amount is $300,00, and the increment percentage is 10.0%, the first budget period will be filled with $300.00, the second with $330.00 ($300 + $300 * 10%), the third with $363.00 ($330 + $330 * 10%) and so on. Periods prior to the base period will not be affected. To automatically fill budget cells with the same amount: 1. Open the Budget Maintenance window. (Cards >> Project Tracking >> Budget) 2. Enter the Project ID. 3. Select the auto-fill increment method Entered Amount. 4. Enter the base period - the earliest period that is to be budgeted with the base amount. 5. Enter the amount to auto-fill. 6. Choose Fill Period. All periods, starting with the base period, will be filled with the base amount. 7. If any period needs to have a different budget amount, individually edit the amount in that cell. Though the Fill Period button will only fill the budget cells for one combination of user-defined fields at a time, it is easy to quickly fill periods for other combinations using the scrolling arrows. Simply click the top arrow button next to the user-defined field to bring up the first possible combination of userdefined values. Follow the steps to auto-fill the budget cells for that P ROJ E CT T RACKING 167 C H A P TER 7 PRO JECT TRACKING BUDGE T ING combination. Use the single down arrow button to scroll to the next possible combination of user-defined values. Now just click the Fill Period button. The Breakdown, Base Period and Base Amount will remain the same. Repeat the arrow click/Fill Period sequence for each combination of user-defined values. To automatically fill budget cells with increasing or decreasing amounts: 1. Open the Budget Maintenance window. (Cards >> Project Tracking >> Budget) 2. Enter the Project ID. 3. Choose an Auto-Fill increment type: Entered Amount, Percentage of Entered Amount or Compound Percentage of Entered Amount. 4. To increase the budget cells, enter the amount or percentage. To decrease the budgeted amounts, enter a negative amount or percentage. 5. Enter the base period - the earliest period that is to be budgeted with the auto-fill amount. 6. Enter the starting budget amount in the Base Amount field. 7. Choose Fill Period. All periods, starting with the base period, will be filled with the base amount plus or minus the increase/decrease amount or percentage. 8. If any period needs to have a different budget amount, individually edit the amount in that cell. Copying an existing budget After you have created a few original budgets, you may find several of your projects have similar budgets or, budgets that share many elements in common. Using the Copy Budget feature, it is easy to copy an existing budget to a new project. This budget can then be modified before it is confirmed and approved. 168 P R O JECT TRACKI N G CHAPT E R 7 P ROJ E CT T RACKING BUDGE T ING When you copy a budget, you can choose to copy any revision of the budget. All budget cells will be copied, but the cell notes will not be copied. You also will need to enter a new start date for the copied budget. After the budget is copied, the budget is a working budget and you can modify it as desired using the Budget Maintenance window. To copy an existing budget: 1. Open the Copy Budgets window: (Microsoft Dynamics GP menu >> Tools >> Routines >> Project Tracking >> Copy Budget) 2. Select the Project ID with the budget you wish to copy. 3. Enter the Project ID to which you will copy the budget. 4. Enter a start date for the new budget. 5. Choose the revision number to copy. 6. Choose the Copy button. If the Use in Budgets options in Project Maintenance for the transaction user-defined fields do not match, you still will be allowed to copy the budget; the Use in Budgets options on the new budget will be those of the budget you are copying. However, if the constant values in Project Maintenance for the transaction user-defined fields do not match, then you will not be allowed to copy the budget. P ROJ E CT T RACKING 169 C H A P TER 7 PRO JECT TRACKING BUDGE T ING Getting information about a budget You can view budget variances in the Budget Maintenance window. The Budget Maintenance window shows variance amounts for budget cells with valid budgets only. Use the Budget Inquiry window or the Budget Variance report to see transactions posted prior to or after the project budget. For more information about these reports, see Budget Variance Report on page 135. The Budget Maintenance report prints all of the fields on the Budget Maintenance window. You can print this report from the Budget Maintenance and the Budget Inquiry windows. Because of the large number of potential budget cells, Project Tracking allows you to restrict the report in various ways. See Maintenance Reports on page 147 for more information. Budget approval process The budget approval process is an optional component of the budgeting process. If you are not using the budget approval process, you will keep your budget at Revision 1 throughout the life of the project. You can revise this budget whenever you want. Using the budget approval process adds security to your budgets. With this process in place, it is not possible for someone to go in and make an arbitrary change to a budget revision without the appropriate authority. The budget approval process works in conjunction with project security. The process works as follows: 170 P R O JECT TRACKI N G • A budget is created. • The budget cells are confirmed. • The budget as a whole is approved. Revision 1 will be your baseline budget. CHAPT E R • 7 P ROJ E CT T RACKING BUDGE T I NG There are two ways to change the budget at this point: • Create a new budget revision. This is the normal way of making changes. The system maintains a history of all revisions. When changes are complete, the budget is approved again as a whole. For more information, see Revising a budget on page 175. • Reopen the prior revision. This option is only available if you have Budget Reopen permissions set in the Project Tracking Security window. This allows you to tweak your most recent revision, even if you closed it. Unlike some other systems, the system does not force you to create a new revision unless you want to. For more information, see Reopening approved budgets on page 175. The following security checks exist in the budget revision process on a per project basis: • • • • • • Budget Edit or Budget Approval permission is required to start a new budget. Budget Edit permission is required to enter or change the amount in an individual budget cell. Budget Edit or Budget Approval permission is required to confirm individual cells in a budget. Budget Approval permission is required to approve a budget. Budget Edit or Budget Approval permission is required to start a new revision. Budget Reopen permission is required to reopen an approved budget. It takes some planning and coordination to set up this budget approval process and maintain the appropriate security settings within your system. Approving a budget Approving budgets is a two-step process: • Confirm budget cells • Approve budget P ROJ E CT T RACKING 171 C H A P TER 7 PRO JECT TRACKING BUDGE T ING All budget cells must be confirmed before a budget can be approved. Once the budget is approved, the only way to edit the budget is to reopen the latest revision, see Reopening approved budgets on page 175. The purpose of confirming cells is to ensure that the amounts contained in each cell have been reviewed and are accurate. You can confirm cells manually or automatically. The manual method is, theoretically, the “safest” way to confirm cells as it requires the user to individually mark each cell. However, since there can easily be several hundred individual budget cells, manually confirming each one can be somewhat impractical. When confirming automatically you have three choices: • • • Confirm all cells in a particular budget view Confirm all $0 cells Confirm all cells for the budget Manually Confirming Budget Cells When confirming manually, you will need to ensure that each budget view is brought to the window and that all cells in the budget have been marked as confirmed. See Restricting budget views on page 158. To manually confirm budget cells: 1. Open the Budget Maintenance window. (Cards >> Project Tracking >> Budget) 2. Enter the Project ID of the project to whose budget cells you wish to confirm. 3. Open the budget view containing the cells you wish to confirm. 4. Mark the confirm check box under the ‘C’ column heading for each cell you wish to confirm. A check mark will display in the confirm box. Repeat this step until you have confirmed all cells you wish to confirm. Confirming All Cells for a Budget View The Confirm All button at the lower right of the Budget Maintenance window will mark all cells from the current budget view, or in the scrolling window, as confirmed. Please remember that the scrolling window can extend below the visible range of the monitor. 172 P R O JECT TRACKI N G CHAPT E R 7 P ROJ E CT T RACKING BUDGE T I NG To confirm all cells in a particular budget view: 1. Open the Budget Maintenance window. (Cards >> Project Tracking >> Budget) 2. Enter the Project ID whose budget cells you wish to confirm. 3. Open the budget view containing the cells you wish to confirm. 4. Review the budget cell amounts to ensure they are correct. 5. Choose Confirm All. A check mark will display in the confirm check box beside each cell. 6. Repeat steps 3 - 5 until you have confirmed all cells you wish to confirm. Confirming $0 Cells Project Tracking Budgeting will create empty budget cells for all amount types for all breakdown codes for each possible combination of transaction user-defined fields. However, you may not want to create individual budgets for all the combinations such as Sales Tax, Miscellaneous Charges, Trade Discount. After you have entered the budget amount for all cells you want budgets for, you can use the Confirm All $0 Cells option to confirm all remaining cells. The Confirm All $0 Cells option is not dependent on the current budget view. All $0 cells will be confirmed for the entire budget regardless of which cells are currently on display. To confirm all $0 cells: 1. Open the Budget Maintenance window. (Cards >> Project Tracking >> Budget) 2. Enter the Project ID of the project whose budget cells you wish to confirm. 3. From the Options menu, choose Confirm All $0 Cells. (Options >> Confirm All $0 Cells) P ROJ E CT T RACKING 173 C H A P TER 7 PRO JECT TRACKING BUDGE T ING Confirming All Budget Cells The quickest and simplest way to confirm budget cells is the Confirm All Cells option. This option will mark all cells in the entire budget as confirmed, regardless of the current budget view. To confirm all budget cells: 1. Open the Budget Maintenance window. (Cards >> Project Tracking >> Budget) 2. Enter the Project ID of the project to whose budget cells you wish to confirm. 3. From the Options menu, choose Confirm All Cells. (Options >> Confirm All Cells) Approving Budgets Under normal circumstances, once a budget has gone through the approval process, it cannot be edited. You can create a new revision of the budget, but the approved budget will remain in the system. You will approve budgets from the Budget Maintenance window using the Options menu. Before a budget can be approved, all cells must be marked as confirmed. To approve a budget: 1. Open the Budget Maintenance window. (Cards >> Project Tracking >> Budget) 2. Enter the Project ID for the project whose budget you want to approve. 3. Choose Approve from the Options menu. Choose Approve on the message. (Options >> Approve) 4. Project Tracking will ask you to confirm your choice. Select Yes. 174 P R O JECT TRACKI N G CHAPT E R 7 P ROJ E CT T RACKING BUDGE T I NG Reopening approved budgets Approved budgets can be reopened using the Reopen Approved Budgets window. To reopen an approved budget, no current working budget for the project may exist. Only the latest revision can be reopened. If you would like to reopen an earlier revision, you will need to delete all revisions subsequent to the revision you wish to open. For more information about deleting budgets, see Deleting a budget on page 177. To use the Reopen Approved Budgets window, you must have security rights to the window. To reopen an approved budget: 1. Open the Reopen Approved Budgets window. (Microsoft Dynamics GP menu >> Tools >> Routines >> Project Tracking >> Reopen Budget) 2. Enter the Project ID whose budget you wish to reopen. 3. Select OK. Revising a budget You will use the Budget Maintenance window to revise working budgets. Until a budget has been approved, it may be changed at will. Once a budget has been approved, changes are generally made by opening a new revision. You may open previously approved budgets for revision, but there are considerations when doing so. The following sections discuss ways of revising your budget. Opening a new budget revision You only can open new revisions for budgets that have been previously approved. If a project currently has a working budget, revisions can be made directly to that working budget. P ROJ E CT T RACKING 175 C H A P TER 7 PRO JECT TRACKING BUDGE T ING To open a new budget revision: 1. Open the Budget Maintenance window. (Cards >> Project Tracking >> Budget) 2. Enter the Project ID. 3. You will be asked whether to open a new budget revision. Choose Yes. Changing budget dates You can change budget dates after a budget has been started, adding more periods to the beginning or end of a budget or starting the budget at a different time. You will use the Revise Budget Dates window to change budget dates. The only thing you may not do is shorten an existing budget. If you accidentally create a budget with more periods than you need, you will need to delete that budget and create a new one from scratch. For more information, see Deleting a budget on page 177. To change budget dates: 1. Open the Budget Maintenance window. (Cards >> Project Tracking >> Budget) 2. Enter the Project ID. 3. Select the expansion button next to the Budget Start Date field. The Revise Budget Dates window will open. 4. To change budget dates, choose Change Budget Dates in the Date Change Desired field. Enter a new budget start date in the New Start Date for Budget field. The amounts in all existing budget periods will be shifted forward or back according to the new Start Date. If you are budgeting by fiscal periods, the budget start date will automatically revert to the first date of the period that contains the date you enter. 5. To add periods to a budget, choose Add Periods to Budget in the Date Change Desired field. You can add periods to either the beginning or the end of the budget. Enter the number of periods to add. New budget periods will have $0 amounts in all cells. 6. Select Save. 176 P R O JECT TRACKI N G CHAPT E R 7 P ROJ E CT T RACKING BUDGE T I NG Deleting a budget You will use the Budget Maintenance window to delete a budget revision. Only the current working budget revision may be deleted. If you want to delete an earlier revision or approved budget, you must first delete the current working budget, re-open any subsequently approved revisions (please see Reopening approved budgets on page 175) and delete them as well. To delete the entire budget, delete all revisions, including revision 1. To delete a budget revision: 1. If your latest budget revision has already been approved, open the Reopen Approved Budget window, otherwise skip to step 4. (Microsoft Dynamics GP menu >> Tools >> Routines >> Project Tracking >> Reopen Budget) 2. Enter the Project ID of the project to whose budget you wish to delete. 3. Choose the Reopen button. 4. Open the Budget Maintenance window. (Cards >> Project Tracking >> Budget) 5. Enter the Project ID of the project to whose budget you wish to delete. 6. Select the Delete button. To delete a budget: 1. Repeat steps 1-6 above until all revisions have been deleted. P ROJ E CT T RACKING 177 C H A P TER 178 7 P R O JECT PRO JECT TRACKING TRACKI N G BUDGE T ING CHAPTER 8: PROJECT TRACKING IMPORTER INTRODUCTION C H A P TER 8 PRO JECT TRACKING IMP ORT E R Chapter 8: Project Tracking Importer Project Tracking Importer is an additional module used to bring outside information into Project Tracking. You need separate registration keys to use Project Tracking Importer. The information that you import can come from a variety of different sources. Typical uses for Project Tracking Importer are: • • • • Bringing in data from a legacy system On-going Payroll import for outsourced payroll On-going sales import from a point-of-sale system On-going import from any other tracking system to projects Project Tracking Importer is useful for companies that create their projects in an outside sales system or other system. These companies can use Project Tracking Importer regularly to transfer new projects to Project Tracking. Project Tracking Importer also can be used to update project information for existing projects. Before being brought into Project Tracking, the data is exported from the originating system to a simple text file. The text file is then brought into Project Tracking. You can import projects into Project Tracking creating project masters and you also can import transactions into projects. This chapter contains the following topics: • • • • • • Importing projects (project master imports) Setting up a project master import Running a project master import Importing transactions into projects Setting up project transaction imports Running a project transaction import Importing projects (project master imports) You will use the Project Tracking Import window to create new projects in Project Tracking. Information can be imported into the fields on the following windows: 180 P R O JECT TRACKI N G CHAP T E R • • • 8 P ROJ E CT T RACKING IMP ORT ER The Project Maintenance window The Project Maintenance Costs window The Project User-Defined Fields It is not necessary to import into all fields. Only the Project ID is a required field. You do not need to configure the import each time you bring in data. You may set up and save various import structures. One structure may include only the Project ID, others may include the Project ID and any combination of the other listed fields. If you would like to import transaction information into your projects, please see Importing transactions into projects on page 184. Setting up a project master import Once you configure the import’s set of options, it can be saved for later reuse. This makes it easy to run regular imports. To set up a project master import: 1. Open the Project Tracking Import window. (Transactions >> Project Tracking >> Project Importer) 2. Select the Import Setup ID link. The Project Tracking Import Setup window will open. P ROJ E CT T RACKING 181 C H A P TER 8 PRO JECT TRACKING IMP ORT E R 3. Enter a name for this Import Setup ID. 4. Enter a description. 5. In the File to Import Into field, choose Project Master. To import transactions into a project, please see To set up a project transaction import: on page 189. 6. Specify a file type. You can change this if necessary when you run the import. 7. Specify a complete file name and path. You can change this if necessary when you run the import. 8. Choose the Import Fields lookup. Select the field that will appear in the text file you are importing and choose the Select button. If the field is a Date or Currency field, enter the format of the field in the text file. If you choose a delimited date, the delimiter may be any character you choose, it is not limited to the </> character. (For example, if you choose the date format DD/MM/YYYY, the following date would be legal: 31.01.2002. Currency values may be blank or zero padded on the left. A minus sign indicates a negative value. If you 182 P R O JECT TRACKI N G CHAP T E R 8 P ROJ E CT T RACKING IMP ORT ER choose <no decimal>, the numbers in the import file do not have a decimal but the system will assume 2 decimal places. For example, the number 1234 will import as 12.34. If this is a Fixed Field Width text file, specify the number of characters for the field. The default number is the maximum allowable length. 9. Tab to the next line and repeat steps 8 and 9 until you have selected each field you want to import. The fields must be entered in the order they will appear in the text file. If there is a field in the import file that you don’t want to import, choose Skip Field to skip over that field. 10. To view a report of the fields that you have chosen to import, choose the Report Button on the Project Tracking Import Setup window. 11. Select Save. Running a project master import After the import’s set of options have been configured and saved for later reuse, it is easy to run regular imports. To run a project master import: 1. Open the Project Tracking Import window. (Transactions >> Project Tracking >> Project Importer) P ROJ E CT T RACKING 183 C H A P TER 8 PRO JECT TRACKING IMP ORT E R 2. Enter the Import Setup ID for the import you wish to run. 3. If necessary update the file name, path and type. 4. In the File Update Type field, indicate whether you are only adding new projects or are also updating existing projects. 5. If you would like to be notified of Project ID’s in your import file that already exist in Project Tracking, mark the Include Existing Projects as Exceptions on Report check box. 6. Choose Import. 7. The Report Destination window will open. Choose a destination for the Exceptions report. 8. Select OK. Importing transactions into projects Depending on their company’s setup, a company may choose to bring the data only into their projects, or they may want to also create entries in the general ledger. Project Tracking Importer uses two methods to bring transactions into projects: • • Project Adjustments with GL Entries Project Adjustments without GL Entries A company using Project Tracking Importer to create projects out of a Point-of-Sale program may want to create journal entries to track the original sale recorded in the outside software. They would use the Project Adjustment with GL Entries method. Another company may prefer to make large, single entries for the period in their general ledger. In that case, they would use the Project Adjustments without GL Entries method. The processes of setting up and running both types of Project Adjustment import methods are similar. Depending on which import method you 184 P R O JECT TRACKI N G CHAP T E R 8 P ROJ E CT T RACKING IMP ORT ER choose, there are a few unique fields and the required fields differ. The following table displays the differences. Project Adjustment with GL Entries Project Adjustment w/o GL Entries available fields available fields *Account Number Amount Type Breakdown Description Hours Worked Originating Master ID Project ID Proposal Number Transaction User-Defined values 1 – 7 Work Order Number *Credit Amount *Debit Amount Transaction Date Account Number *Amount Type Breakdown Description Hours Worked Originating Master ID *Project ID Proposal Number Transaction User-Defined values 1 – 7 Work Order Number *Transaction Amount *Document Date GL Posting Date Document Number * indicates required fields For Project Adjustments with GL Entries, if you don’t import the Project ID field, transactions will be written only to your general ledger and will not be associated with Project Tracking. P ROJ E CT T RACKING 185 C H A P TER 8 PRO JECT TRACKING IMP ORT E R Notes about the import file Before you import a file that contains transactions, you should be aware of the following information. Amount Type field If you are including the Project Tracking Amount Type field in your file, the integer values must correspond to the following table: Integer Amount Type 1 SALES 2 TRADE DISCOUNT 3 FREIGHT 4 MISCELLANEOUS CHARGE 5 SALES TAX 6 ESTIMATED COST OF LABOR 7 ESTIMATED COST OF MATERIALS 8 ACTUAL COST OF LABOR 9 ACTUAL COST OF MATERIALS 10 ADJUST 11 CASH If no amount type is specified, the amount type ADJUST will be used. Check box fields For any of the check box fields, a value of 1 results in the check box being checked. A value of zero or blank leaves the check box unmarked. Debit and credit amount fields When processing a Project Adjustment with GL entries, both the debit amount and credit amount fields are required as part of your file definition. If your file only contains one amount column (containing both debits and credits), you can still use Project Tracking Importer for general 186 P R O JECT TRACKI N G CHAP T E R 8 P ROJ E CT T RACKING IMP ORT ER ledger entries by creating an extra column as described in the following table: If in your existing Amounts Then... column... Rename your existing Amounts column as Credits and A positive amount (for example, $5.00) is considered a create a second column named Debits entering $0.00 for all the values in this new Debits column. debit and a negative amount (for example, -$5.00) is considered a credit, then... Rename your existing Amounts column as Debits and A positive amount (for example, $5.00) is considered a create a second column named Credits entering $0.00 credit and a negative amount for all the values in this new Credits column. (for example, -$5.00) is considered a debit This method will make it possible for you to import the file using Project Tracking Importer. If your file already contains two columns, be sure each row has an amount in only one of the columns. Project Tracking Importer will automatically combine all rows with the same transaction date into a single, balanced journal entry. GL Posting Date field If no GL Posting Date is specified in the import file, the Document Date will be used instead. Hours Worked field If Hours Worked are included on a line of the import file, the amount type for that line must be set to either 8 (ACTUAL COST OF LABOR) or 6 (ESTIMATED COST OF LABOR). Project Status field If Project Status is specified in the import file, enter a value of 1 if Open or a value of 2 if Completed. Breakdown Status Checkbox If a breakdown code is included in the file, the breakdown code must be an active breakdown. An error message will display if the breakdown code is currently set to inactive. P ROJ E CT T RACKING 187 C H A P TER 8 PRO JECT TRACKING IMP ORT E R Transaction/Document Date field The Transaction or Document Date field is required and must be specified. 188 P R O JECT TRACKI N G CHAP T E R 8 P ROJ E CT T RACKING IMP ORT ER Setting up project transaction imports Once you configure the import’s set of options, you can save it for later reuse. This makes it easy to run regular imports. To set up a project transaction import: 1. Open the Project Tracking Import window. (Transactions >> Project Tracking >> Project Importer) 2. Choose the Import Setup ID link. The Project Tracking Import Setup window will open. P ROJ E CT T RACKING 189 C H A P TER 8 PRO JECT TRACKING IMP ORT E R 3. Enter a name for this Import Setup. 4. Enter a description. 5. In the File to import into field, choose the import method that you want to use: Project Adjustment w/GL Entry, or Project Adjustment w/ o GL Entry. Please read the information about Importing transactions into projects on page 184 and the Notes about the import file on page 186 before setting up a Project Adjustment import. 6. Specify a file type. You can change this if necessary when you run the import. 7. Specify a complete file name and path. You can change this if necessary when you run the import. 8. Choose the Import Fields lookup to select the field that will appear next in the text file you are importing. If the field is a Date or Currency field, enter the format of the field in the text file. If you choose a delimited date, the delimiter may be any character you choose, it is not limited to the </> character. (For example, if you choose the date format DD/MM/YY, the following date would be legal: 31.01.2002. Currency values may be blank or zero padded on the left. A minus sign indicates a negative value. If you choose <no decimal>, you will not include a decimal in your numbers but the system will assume 2 decimal places. For example, the number 1234 will import as 12.34. If this is a Fixed Field Width text file, specify the number of characters for the field. The default number is the maximum allowable length. 9. Tab to the next line and repeat steps 8 and 9 until you have selected each field you want to import in the order they will appear in the text file. 10. Select Save. 190 P R O JECT TRACKI N G CHAP T E R 8 P ROJ E CT T RACKING IMP ORT ER Running a project transaction import After the import’s set of options have been configured and saved for later reuse, it is easy to run regular imports. To run a project transaction import: 1. Open the Project Tracking Import window. (Transactions >> Project Tracking >> Project Importer) 2. Enter the Import Setup ID for the import you wish to run. 3. If necessary update the file name, path and type. 4. If this an import without GL entries, skip to step 8. If this is an import with GL entries, enter a batch date. 5. Enter a batch number for the general ledger entries. 6. If desired, edit the source document. 7. If desired, edit the Reference field. 8. Choose Import. 9. The Report Destination window will open. Choose a destination for the Exceptions report. 10. Select OK. P ROJ E CT T RACKING 191 C H A P TER 192 8 P R O JECT PRO JECT TRACKING TRACKI N G IMP ORT E R CHAPTER 9: UTILITIES INTRODUCTION C H A P TER 9 U TI LI TI ES Chapter 9: Utilities Project Tracking comes with the following three utilities to help you maintain your Project Tracking tables. The following topics are covered in this chapter: • Purging history • Running Check Links • Exporting a project file Purging history The Purge History routines are available to help maintain the size of your database. These routines function by allowing you to delete all Project Tracking records associated with any projects that were closed before a date you specify. All records associated with the projects, both setup and transaction records, will be permanently deleted. Your regular Microsoft Dynamics GP tables will not be affected. To purge project history: 1. Open the Purge Project History window. (Microsoft Dynamics GP menu >> Tools >> Routines >> Project Tracking >> Purge History) 2. Enter the date before which you would like to remove project files. 3. Select Preview. You can review or print a report that will list all projects that were closed prior to the date specified. 194 P R O JECT TRACKI N G CHAP T E R 9 UT IL IT I ES 4. Select Purge. You will be able to review or print a report that will list the projects that will be deleted. All records associated with projects closed before the date specified will be removed. Projects closed on or after the specified date will not be affected. 5. After the projects have been purged you can print a report of the purged projects. 6. Select OK. Running Check Links You will use the file maintenance window to clean up and correct errors in your Project Tracking tables. Check Links Check Links is a very important and involved procedure. Ensure that you have a good backup of your data before running Check Links as Check Links transfers and deletes records. Check Links will take the following actions: • Checks every transaction in the Project Tracking Transaction History file to be sure there is an associated Project Maintenance record in the Project Maintenance History file. If not, checks for the maintenance record in the Project Maintenance Open file. If it is there, Check Links moves the transactions from the Transaction History file to the Transaction Open file. If no Project Maintenance record exists at all (Open or History), Check Links removes the transaction records. • Checks every transaction in the Project Tracking Transaction Open file to be sure there is an associated Project Maintenance record in the Project Maintenance Open file. If not, checks for the maintenance record in the Project Maintenance History file. If it is there, Check Links moves the transactions from the Transaction Open file to the Transaction History file. If no Project Maintenance record exists at all (Open or History), Check Links removes the transaction records. P ROJ E CT T RACKING 195 C H A P TER 9 U TI LI TI ES • Checks every transaction in the Project Tracking Transaction Work File to be sure there is an associated Project Maintenance record in the Project Maintenance Open file. If no open project is found, Check Links removes the Transaction Work Records. If open projects are found, Check Links checks if the original transaction is still in the Microsoft Dynamics GP work tables. If no original transaction exists in the work records, Check Links checks whether the original transaction is posted. If it finds a posted transaction, Check Links moves the work transactions to the Project Tracking Transaction Open file. This procedure does not currently run full validity checking on the work file transactions before posting them to the open file. Therefore it is possible it will post distributions that are not fully distributed when they should be or that are otherwise invalid. All posted distributions will be reported in the check link log and should be reviewed carefully. 196 P R O JECT TRACKI N G • For every transaction in the Project Tracking Transaction Open file, Check Links calculates the summary for that transaction type then compares all the newly calculated summaries to the ones maintained in the Project Maintenance Open file. If any don’t compare, Check Links updates Project Maintenance Open file. • For every transaction in the Project Tracking Transaction History file, Check Links calculates the summary for that transaction type then compares all the newly calculated summaries to the ones maintained in the Project Maintenance History file. If any don’t compare, Check Links updates Project Maintenance History file. • While checking transactions, Check Links may make additional corrections, as follows: • If the original transaction is a voided Sales Order Processing or Purchase Order Processing transaction, Check Links removes the project postings. • If the transaction does not originate in Payroll, General Ledger or Project Adjustment, Check Links makes sure that the Hours Worked field is 0. CHAP T E R 9 UT IL IT I ES • Check Links also recalculates the Budget actual amounts for every project in the system. • Check Links recreates a cache file that is maintained in order to support recurring Journal Entries. • Check Links verifies the key field of the Budget detail table. • Check Links verifies that projects in a closed status have been properly closed. Check Links will provide you with a complete report detailing every record that was affected along with the action taken. If, upon reviewing the report, you find an action taken by Check Links that you would like to reverse, you can restore from backup, make whatever corrections are necessary to the record, and run Check Links again. In addition to the Check Links report, a tab-delimited export file will be created in your Microsoft Dynamics GP launch directory called “pptsclnk.log”. You can export this file to a spreadsheet, sort the results by “Action Taken” and isolate any transactions that you may want to check further. If Check Links did not correct a problem, you can use the Project Adjustments window to make further corrections. Before running any file maintenance procedure, make sure you have a reliable backup of your data. To run check links: 1. Open the File Maintenance window. (Microsoft Dynamics GP menu >> Maintenance >> Project Tracking >> File Maintenance) P ROJ E CT T RACKING 197 C H A P TER 9 U TI LI TI ES You must be logged in as System Administrator to open this window. 2. Choose the checklinks checkbox to run the routine. 3. Select OK. Exporting a project file The Export Project routine dumps the records for most of the fields in either the Project Transaction Open or the Project Transaction History file into a tab-delimited text file. The resulting report can be sorted and totaled in a spreadsheet or other program to create additional reports as needed. To export a project file: 1. Open the Export Project window. (Microsoft Dynamics GP menu >> Tools >> Routines >> Project Tracking >> Export Project) 2. Choose a file to export: Project Transaction OPEN file (default) or Project Transaction HISTORY file. 3. Select OK. 198 P R O JECT TRACKI N G CHAP T E R A ADVANCE D RE P ORT ING Appendix A:Advanced Reporting All reporting originates from the transaction file (Project Transaction Open or Project Transaction Work). These are the key fields that tie the data back to the originating document: • • • Document Number — Receivables Document, Invoicing Invoice, Payables Voucher or Journal Entry Number. Document Type — for example, Invoice, Credit Memo, Debit Memo. Sequence Line — to allow multiple line distributions in Journal Entries. These are the other fields available in the transaction file: • • • • Line Item Sequence — to number all the project distribution lines associated with one document. ME_Module_LI_Index — Module Line Item Sequence to correlate to a line item sequence number in Invoicing, Sales Order Processing or Purchase Order Processing. ME_Job_ID — Project ID ME_Amount_Type The following chart displays valid amount types and their values: Amount type Internal Name Value SALES ME_AMTTYPE_SALES 1 TRADE DISCOUNT ME_AMTTYPE_TRADEDISC 2 FREIGHT ME_AMTTYPE_FREIGHT 3 MISC. CHARGE ME_AMTTYPE_MISCCHARGE 4 SALES TAX ME_AMTTYPE_SALESTAX 5 EST.COST LABOR ME_AMTTYPE_ESTCOSTLABOR 6 EST. COST MATERIAL ME_AMTTYPE_ESTCOSTMATERIAL 7 ACTUAL COST LABOR ME_AMTTYPE_ACTCOSTLABOR 8 ACTUAL COST MATERIAL ME_AMTTYPE_ACTCOSTMATERIAL 9 ADJUST ME_AMTTYPE_ADJUST 10 CASH ME_AMTTYPE_CASH 11 P ROJ E CT T RACKING 199 C H A P TER A ADVAN CED • • • • • • Internal Name Value Payables Transaction Entry ME_TRX_AP 1 Receivables Transaction Entry ME_TRX_AR 2 Invoice Entry ME_TRX_IVC 3 Journal Entry ME_TRX_OPERATING COST 4 PPT Adjustment ME_TRX_PPTS 5 Sales Order Processing Entry ME_TRX_SOP 6 Purchase Order ME_TRX_POP 7 Payroll Transaction Entry ME_TRX_PAYROLL 8 Cash Receipts Entry ME_TRX_CASH 9 Purchase Order Receivings Entry ME_TRX_POP_RECEIPT 10 Inventory Transaction Entry ME_TRX_INVENTORY 11 Bank Transaction Entry ME_TRX_BANKREC 12 Purchase Order Entry/Match Invoice Entry ME_TRX_POP_MATCH 13 (future use) ME_TRX_TIME 14 Encore’s Recurring Billing ME_TRX_CONTRACT_BILL 15 • • • • P R O JECT TRACKI N G ME_Breakdown_Code — Breakdown Code ME_User_Defined_1 through ME_User_Defined_7 — User-Defined 17 Description ME_Work_Order_Number — Work Order Number ME_Proposal_Number — Proposal Number ME_Trx_Type — Accounting Document Transaction Type The following chart displays valid transaction types: Module • • 200 RE P ORT ING Document Date Originating Master ID—Customer Number, Vendor ID, Employee Number, Item Code or GL Account Number, depending on transaction source. Transaction Amount Hours Worked — associated with Payroll transactions and certain types of adjustments. Account Index — for the GL Account Number associated with the transaction. GL Posting Date CHAP T E R • • A ADVANCE D RE P ORT I NG ME_GL_Distribution_LI_Index—The distribution sequence number for the GL distribution in the originating transaction that corresponds to this project distribution. Voided — a flag to indicate if the originating transaction was voided. For reporting, amounts will be grouped based on projects and amount types in order to calculate specific columns on the reports. Whether the amounts in the project transaction file will be negative or positive amounts depends on the type of transaction that is posted to the system. Project Tracking distributes the amounts based on the module and the type of document that is posted to Project Tracking. The following chart shows how this is done. Type of Document Posted Amount Type Distributed to Project Tracking as... Sales Invoice Sales, Freight, Miscellaneous, Sales Tax, Estimated Cost Labor, Estimated Cost Materials, Cash positive Sales Invoice Trade Discount negative Sales Return or Credit Sales, Freight, Miscellaneous, Sales Tax, Memo Estimated Cost Labor, Estimated Cost Materials, Cash negative Sales Return or Credit Trade Discount Memo positive Payables Voucher/ POP Receipt or Invoice Actual Cost Labor, Actual Cost Materials positive Payables Credit Memo Actual Cost Labor, Actual Cost Materials negative Payroll Check Actual Cost Labor positive Adjustment out of Inventory Actual Cost Materials positive Adjustment into Inventory Actual Cost Materials negative P ROJ E CT T RACKING 201 C H A P TER A ADVAN CED RE P ORT ING Type of Document Posted Amount Type Distributed to Project Tracking as... General Ledger/Bank Reconciliation Debit Sales, Freight, Miscellaneous, Sales Tax, Trade negative Discount (revenue types) General Ledger/Bank Reconciliation Debit Cash (revenue type) positive General Ledger/Bank Reconciliation Debit Estimated Cost Labor, Estimated Cost Materials, Actual Cost Labor, Actual Cost Materials, Adjust (expense types) positive General Ledger/Bank Reconciliation Credit Sales, Freight, Miscellaneous, Sales Tax, Trade positive Discount (revenue types) General Ledger/Bank Reconciliation Credit Cash (revenue type) negative General Ledger/Bank Reconciliation Credit Estimated Cost of Labor, Estimated Cost Materials, Actual Cost Labor, Actual Cost Materials, Adjust, (expense types) negative This method of storing project amounts assists in reporting. The total sales on the projects are simply the sum of all the amounts posted to the Amount Type SALES. The same is true for each of the amount types. The profitability of projects is calculated as follows: Total Sales +Total Trade Discounts + Total Freight + Total Miscellaneous + Total Sales Tax - Total Actual Cost Labor - Total Actual Cost Materials + Total Adjustments -(Total Sales * Operating Cost% of Revenue/100) - (Total Labor * Operating Cost% of Labor/100) - (Total Materials * Operating Cost% of Materials /100) 202 P R O JECT TRACKI N G CHAP T E R A ADVANCE D RE P ORT ING Adding Project ID to Microsoft Dynamics GP Reports To add the Project ID to a Microsoft Dynamics GP report, Project Tracking supplies a Report Writer function called rw_Project_Number. The parameters to the function are the Document number, Document Type and, if applicable, the Line Sequence Number from the document for which you want to print a project number. There is a limitation on the use of this function—it will only return the first project number associated with a particular transaction. So, if you have split a transaction between several projects, you will not be able to include all of the project numbers in your report using the Microsoft Report Writer and this function. Due to this limitation, do not add this function to edit lists, posting journals or the GL trial balance. Project Tracking does not support those Microsoft Dynamics GP reports. To add Project ID to Microsoft Dynamics GP reports: 1. Open the Report Writer window. (Tools >> Customize >> Report Writer) 2. When the Report Writer starts, a window will open displaying a list of products. Choose Project Tracking. Choose OK. 3. Choose the Reports menu. The Report Writer window will open displaying all the accessible reports on the left-hand column. Project ID has already been added to the following reports: • • • • • • • • • • • All of the POP Purchase order forms All of the SOP Quote, Order, Invoice, Back Order, Return, Order Fulfillment, Packing slip and Picking Ticket forms All of the Invoicing Invoice and packing slip forms RM Detail Aged Trial Balance Reports RM Statement Report RM Unapplied Documents Report RM Customer Sales Summary Invoicing Inventory Sales Register SOP Inventory Sales Register PM Detail Aged Trial Balance Reports PM Transaction Posting Journal P ROJ E CT T RACKING 203 C H A P TER A ADVAN CED RE P ORT ING 4. Choose the Report you want to modify and click Insert to Modify it. The report will be displayed in the right-hand column. 5. Choose Open or double-click the report you inserted in the right-hand column. The Report Definition window will open. 6. Choose Layout. 7. If the Toolbox is not open, select Layout >> Toolbox. 8. From the Toolbox drop down menu, select Calculated Fields and choose the New button. 9. Name the calculated field Project Number and select the Result Type String. Depending on which module you are working with, pattern your calculated field after one of the entries in the Calculated Fields Examples chart following this procedure. 10. Choose the Functions tab. 11. Choose the User-Defined radio button. 12. Select System from the Core drop-down list. 13. Select rw_Project_Number from the Function drop-down list. 14. Choose Add. 15. Choose the Fields tab. 16. Select the file you want to use from the Resources drop-down list. Refer to the chart after this procedure for a list of available files. 17. Select the field you want to use from the Fields drop-down list. Refer to the chart following this procedure for a listing of fields for the selected Resource. 204 P R O JECT TRACKI N G CHAP T E R A ADVANCE D RE P ORT I NG 18. Choose Add. Repeat steps 16 and 17 until you have selected all the fields listed for the specific resource you are adding in the chart following this procedure. 19. If there is no Line Item Sequence required for the report you are modifying, you must add a zero for the Line Item Sequence parameter as follows: • • • Click the Constants tab. Tab to the Constant field. A zero will display in the field. Click Add. A zero will be displayed in the script. 20. Make sure that your calculated expression is correct according to the Script column in the chart following this procedure. 21. Choose OK to close the Calculated Field Definition window. 22. Select the field and drag it from the Toolbox scrolling window to where you would like it displayed on your report. 23. Close the Report Layout window. Choose Save to save the report. 24. Return to Microsoft Dynamics GP. (File >> Microsoft Dynamics GP). 25. Give security access to the report to the users and companies that will be using it, as follows: 26. Choose Setup >> System >> Security from the Setup menu. 27. Select the user you want to give access. 28. Select the company you want to give access. 29. Select Product: Project Tracking. 30. Select Type: Alternate Reports. 31. Select Series: Sales or Purchasing depending on the report. P ROJ E CT T RACKING 205 C H A P TER A ADVAN CED RE P ORT ING 32. Double click the report you want to give access to. An “*” should appear to the left of all reports for which the user has access. 33. Choose Type: Alternate Dynamics GP Report. 34. Choose Series: Sales or Purchasing depending on the report. 35. Double-click the report you want to give access to. An “*” should appear to the left of all reports for which the user has access. 36. Test the report! Calculated Fields Examples Chart Module To print Purchase Order Processing Project Number in PO Purchase Order Work Header, prior to posting file (POP_PO) Purchase Order Processing Project Number in PO Line Item, prior to posting Invoicing Project Number in Invoicing Transactions Invoice Header, prior to Work file posting (IVC_HDR_WORK) Invoice Number Document Type FUNCTION_SCRIPT (rw_Project_Number IVC_HDR_WORK.Invoice Number IVC_HDR_WORK.Document Type 0) Invoicing Project Number in Invoice Line Item, prior to posting Invoice Number Document Type Line Item Sequence FUNCTION_SCRIPT (rw_Project_Number IVC_LINE_WORK.Invoice Number IVC_LINE_WORK.Document Type IVC_LINE_WORK.Line Item Sequence) 206 P R O JECT TRACKI N G Resource Fields Script PO Number PO Type FUNCTION_SCRIPT (rw_Project_Number POP_PO. PO Number POP_PO.PO Type 0) Purchase Order Line file PO Number (POP_POLine) PO Type Ord Invoicing Transactions Amounts Work file (IVC_LINE_WORK) FUNCTION_SCRIPT (rw_Project_Number POP_POLine.PO Number POP_POLine.PO Type POP_POLine.Ord) CHAP T E R A ADVANCE D RE P ORT I NG Module To print Resource Fields Script Invoicing Project Number in Invoice Header, after posting Invoicing Transactions History file (IVC_HDR_HIST) Invoice Number Document Type FUNCTION_SCRIPT (rw_Project_Number IVC_HDR_HIST.Invoice Number IVC_HDR_HIST.Document Type 0) Invoicing Project Number in Invoice Line Item, after posting Invoicing Transaction Amounts History file (IVC_LINE_HIST) Invoice Number Document Type Line Item Sequence FUNCTION_SCRIPT (rw_Project_Number IVC_LINE_HIST.Invoice Number IVC_LINE_HIST.Document Type IVC_LINE_HIST.Line Item Sequence) Sales Order Processing Project Number in any Sales Transactions Work SOP Number document Header, prior file SOP Type to posting (SOP_HDR_WORK) FUNCTION_SCRIPT (rw_Project_Number SOP_HDR_WORK.SOP Number SOP_HDR_WORK.SOP Type 0) Sales Order Processing Project Number in any document Line Item, prior to posting SOP Number SOP Type Line Item Sequence FUNCTION_SCRIPT (rw_Project_Number SOP_LINE_WORK.SOP Number SOP_LINE_WORK.SOP Type SOP_LINE_WORK.Line Item Sequence Sales Order Processing Project Number in any Sales Transactions document Header, after History file posting (SOP_HDR_HIST) SOP Number SOP Type FUNCTION_SCRIPT (rw_Project_Number SOP_HDR_HIST.SOP Number SOP_HDR_HIST.SOP Type 0) Sales Order Processing Project Number in any document Line item, after posting SOP Number SOP Type Line Item Sequence FUNCTION_SCRIPT (rw_Project_Number SOP_LINE_HIST.SOP Number SOP_LINE_HIST.SOP Type SOP_LINE_HIST.Line Item Sequence Sales Transactions Amounts (SOP_LINE_WORK) Sales Transaction Amounts History file (SOP_LINE_HIST) P ROJ E CT T RACKING 207 C H A P TER A ADVAN CED RE P ORT ING Module To print Resource Fields Receivables Management Project Number in any document RM_OPEN file (RM_OPEN) Document Number FUNCTION_SCRIPT RM Document Type-All (rw_Project_Number RM_OPEN.Document Number RM_OPEN.RM Document Type-All 0) Payables Management Project Number in any document PM_Transaction WORK Voucher Number file Document Type (PM_Transaction_ WORK) 208 P R O JECT TRACKI N G Script FUNCTION_SCRIPT (rw_Project_Number PM_Transaction_WORK. Voucher Number PM_Transaction_WORK. Document Type 0) CHAP T E R AP P E NDIX B: DAT A T ABLES Appendix B:Data tables The following charts list all related data tables created in Project Tracking and their descriptions. Financial Series Display Name Physical Name Technical Name Description ME_User_Defined_1_Maint ME97701 ME_User_Defined_1_Maint Contains user defined values and their descriptions (first) ME_User_Defined_3_Maint ME97702 ME_User_Defined_3_Maint Contains user defined values and their descriptions (third) ME_User_Defined_2_Maint ME97703 ME_User_Defined_2_Maint Contains user defined values and their descriptions (second) ME_Job_Cost_TRX_HIST ME97704 ME_Job_Cost_TRX_HIST Contains posted project distribution transactions after Project is closed ME_Job_Cost_TRX_OPEN ME97705 ME_Job_Cost_TRX_OPEN Contains posted project distribution transactions ME_Job_Cost_TRX_WORK ME97706 ME_Job_Cost_TRX_WORK Contains unposted project distribution transactions ME_Job_Cost_HIST ME97707 ME_Job_Cost_HIST Contains closed projects ME_Job_Cost_OPEN ME97708 ME_Job_Cost_OPEN Contains open projects ME_User_Defined_4_Maint ME97709 ME_User_Defined_4_Maint Contains user defined values and their descriptions (fourth) ME_Job_Cost_SETP ME97710 ME_Job_Cost_SETP Contains the setup information for Project Tracking ME_Job_Cost_Begin_Bal_ OPEN ME97711 ME_Job_Cost_Begin_Bal_OPE N Contains beginning balance record for an open Project ID ME_Job_Cost_Begin_Bal_ HIST ME97712 ME_Job_Cost_Begin_Bal_HIST Contains beginning balance record for a closed Project ID ME_Job_Cost_Code ME97713 ME_Job_Cost_Code Used for RM Default Assist ME_RM_Cost_Expansion_ WORK ME97714 ME_RM_Cost_Expansion_WOR Used for PT Distribution K ME_User_Defined_6_Maint ME97715 ME_User_Defined_6_Maint Contains user defined values and their descriptions (sixth) ME_User_Defined_7_Maint ME97716 ME_User_Defined_7_Maint Contains user defined values and their descriptions (seventh) P ROJ E CT T RACKING 209 C H A P TER APPEN DI X B: DAT A T ABL E S Display Name Physical Name Technical Name Description ME_User_Defined_5_Maint ME97717 ME_User_Defined_5_Maint Contains user defined values and their descriptions (fifth) ME_Project_Report_Options ME97718 ME_Project_Report_Options Used to set up Project Tracking reports ME_GL_TRX_Snarf ME97721 ME_GL_TRX_Snarf Used in File Maintenance ME_Distribution_Expanded ME97722 ME_Distribution_Expanded To store the setup expand for PT windows ME_Breakdown_ Maintenance ME97723 ME_Breakdown_ Maintenance To store the information about breakdown fields ME_Breakdown_Report_ Options ME97724 ME_Breakdown_Report_ Options Used to set up Breakdown Report options ME_Import_SETP ME97725 ME_Import_SETP To store the setup for import ME_Import_SETP_DTL ME97726 ME_Import_SETP_DTL Used for import ME_Error_Status ME97727 ME_Error_Status Used for import (errors for import) ME_Industry_Specific_OPEN ME97728 ME_Industry_Specific_OPEN Contains project text field values for open projects ME_Industry_Specific_HIST ME97729 ME_Industry_Specific_ HIST Contains project text field values for closed projects ME_Import_Fields ME97730 ME_Import_Fields Used for import ME_CM_Distribution_TEMP_Cop ME97732 y ME_CM_Distribution_ TEMP_Copy ME_Project_Security ME97733 ME_Project_Security Contains the PT security password for each company ME_Project_Users_Security ME97734 ME_Project_Users_ Security Tracks user level global permission information ME_Project_User_Projects ME97735 ME_Project_User_Projects Tracks which users have permission to projects, and what level of permission they have ME_User_Defaults ME97736 ME_User_Defaults Tracks the user’s default project ME_Outstanding_Balance_ Report_Options ME97737 ME_Outstanding_Balance_Rep Used to set up Outstanding ort_Options Balance report options ME_GL_Report_Options ME97738 ME_GL_Report_Options Used to set up GL Reports options ME_Budget_Maint_HDR ME97739 ME_Budget_Maint_HDR To store the header information for a budget 210 P R O JECT TRACKI N G CHAP T E R AP P E NDIX B: DAT A T ABL ES Display Name Physical Name Technical Name Description ME_Budget_Maint_DTL ME97740 ME_Budget_Maint_DTL To store the information for every period for a budget ME_Budget_Maint_DTL_ Actuals ME97741 ME_Budget_Maint_DTL_ Actuals To store the actual amount per period for a budget ME_Project_Project_Security ME97742 ME_Project_Project_Security Tracks project level global permission information ME_Budget_Periods ME97743 ME_Budget_Periods To store budget period ME_Time_Entry_WORK ME97745 ME_Time_Entry_WORK * ME_Time_Entry_OPEN ME97746 ME_Time_Entry_OPEN * ME_Employee_Rates ME97747 ME_Employee_Rates * ME_Void_Activity ME97748 ME_Void_Activity To store void activity ME_GL_TRX_HDR_WORK_ Cache ME97749 ME_GL_TRX_HDR_WORK_Cac he Temporarily stores GL transaction header information so PT can handle batch posting ME_Variance_Report_Options ME97751 ME_Variance_Report_Options Used to set up Variance Report options ME Advanced Analytics Favorites ME97752 ME_Advanced_Analytics_Favor Save favorites for Advanced ites Analytics ME Vendor Breakdown Maintenance ME97754 ME_Vendor_Breakdown_Maint Default breakdowns for each enance vendor ME Project Breakdown Maintenance ME97755 ME_Project_Breakdown_ Maintenance Default breakdowns for each project *Not used in this release (Time sheets) System Series Display Name Physical Name Technical Name Description ME_Registration ME977001 ME_Registration To store registration information ME_PPTS_ACTIVITY ME97731 ME_PPTS_ACTIVITY PT Product Version MSTR ME97753 PT_Product_Version_MSTR Stores the version number of PT thats installed P ROJ E CT T RACKING 211 C H A P TER APPEN DI X B: DAT A T ABL E S Sales Series Display Name Physical Name Technical Name Description ME_CC_Batches_For_ Request ME142701 ME_CC_Batches_For_ Request Integration with Credit Card Processing ME_Batch_Invoice_MSTR_ DTL ME50403 ME_Batch_Invoice_MSTR_DTL Integration with Contract Billing ME_Batch_Invoice_MSTR_ HDR ME50405 ME_Batch_Invoice_MSTR_HDR Integration with Contract Billing 212 P R O JECT TRACKI N G What’s New in Project Tracking 2013 Project Tracking has been upgraded to be fully compatible with Microsoft Dynamics GP 2013. The Project Tracking installer has been enhanced to include the Advanced Analytics module. What’s New in Project Tracking 2010 SP3 The following changes have been included to Project Tracking to enhance your user experience: • Added Originating Master Name Field to the Project Tracking Transaction Report Writer tables. • Added the Vendor Breakdown Maintenance window to default and assign Breakdown Codes for Vendor/Vendor Class. • Added the Project Breakdown Maintenance window to assign Breakdown Codes for a Project. • Modified the functionality of the Project Tracking Distributions window to add Project Tracking distributions for GL transactions such that distributions can be added for multiple lines of a Journal Entry at the same time. • Added an option in the Project Tracking Setup - Options window to suppress the project distribution line if ‘Cost of Sale’ is $0.00 and suppressed the addition of zero ‘Cost of Sales’ distribution line in the Project Tracking Distributions window. • Modified the functionality to add Project Tracking distributions to other source documents instead of ‘GJ’ from the GL Transaction window. What’s New in Project Tracking 2010 SP2 Project Tracking Lite is a scaled back version of Encore’s Project Tracking w/Advanced Analytics and is a great fit for an organization looking to track P ROJ E CT T RACKING 213 transactions entered in the Microsoft Dynamics GP Payables Transaction Entry window. Project Tracking Lite provides the following benefits: • Easy installation and setup • Customizable to any business module • Suitable for organizations with simple project requirements • Will provide the ability to tag project information to your payables invoices at the time of transaction entry • Distribute to projects from the Payables Transaction Entry window using the Quick Project Entry window • Track project expenses separate from your general ledger account structure • Create adjustment entries to your projects without affecting your general ledger •Get a quick snapshot view of any project at any point in time using Project Tracking Lite’s powerful reporting and inquiry features What’s New in Project Tracking 2010 SP1 The Project Tracking SP1 release includes several functionality and fixes which improves Project Tracking functionality. • • • 214 P R O JECT TRACKI N G The ability to add project distributions to posted transactions. The ability to activate or deactivate Project Tracking for individual companies within Dynamics GP. The ability to in-activate user-defined fields at the transaction level. This features allows organizations to inactivate user-defined fields as needed. • • • • The ability to give a breakdown code a status of Inactive. This new status can be used as a filter in other Project Tracking windows and reports. Lookup windows have been updated to the same look and feel as Dynamics GP lookup windows. Breakdown Description fields have been lengthened to include up to 60 characters. Multicurrency support for Journal Entries has also been added. Note that multicurrency project distributions are displayed and posted in the company's functional currency. Whats New In Project Tracking 2010 Project Tracking has been upgraded to be fully compatible with Microsoft Dynamics GP 2010 and Windows 7. What’s New in Project Tracking for 10.0 SP3 Project Tracking 10.0 SP3 release provides the ability to print a Project Summary Report showing the gross profit for each project. The gross profit is calculated as the actual revenue less actual cost, operating costs and adjustments. You can also select whether the gross profit will be based on work, open or history project files. GL series posting processing time has been improved when Project Tracking is registered and the transactions are not distributed to any one project. Note for users of Recurring Contract Billing & Project Tracking: When the Project Tracking Distributions window is opened from the Recurring Contract Entry window and the contract uses non-functional P ROJ E CT T RACKING 215 currency, all distribution amounts will be displayed as 0.00. The Project Tracking Distribution window will display the functional currency only. What’s New in Project Tracking for 10.0 SP2 Functionality has been included in Project Tracking to allow deposits made on a SOP Order to be distributed and assigned to a project. What’s New in Project Tracking for 10.0 SP1 The Project Tracking SP1 release includes a new feature for purchase order functionality and several fixes which will improve Project Tracking functionality. • • • • • • 216 P R O JECT TRACKI N G Project Tracking inquiries and reports have been enhanced so that the Project Tracking distributions related to purchase orders will reflect when a purchase order has been received, cancelled or voided. The rounding issue has been resolved that occurred when a Sales Order invoice is created using the Recurring Contract Billing invoicing process and the contract was distributed to Project Tracking. The Project Tracking issue has been resolved when saving a recurring general ledger transaction that has previously been posted. The Project Tracking posting issue has been resolved where the project transactions are posted but there is an error in Microsoft Dynamics GP that prevented the transaction from posting. The issue has been resolved where Project Tracking functionality was occurring even when a company wasn’t registered to use Project Tracking. Project Tracking is compatible with the .NET version of Recurring Contract Billing. What’s New in Project Tracking for 10.0 1. Provide the functionality in the Sales Order Processing module to copy Project Tracking distributions together with the original Sales document. 2. Provide the functionality in the General Ledger module to copy Project Tracking distributions together with the original General Ledger document. 3. An additional project ID filter of Description has been added to the Find/Sort list in the Project Lookup window. 4. The Close Project window has been enhanced to include functionality to mass close projects. 5. The Variance report now includes the breakdown description field. P ROJ E CT T RACKING 217 218 P R O JECT TRACKI N G Known Issues 1. When using the Project Tracking Importer to update existing Project Master Records, existing values will be cleared if they are not specified in the import file. WORKAROUND: Ensure that the import file specifies all values in the project master table. P ROJ E CT T RACKING 219 220 P R O JECT TRACKI N G About Encore Business Solutions Encore Business Solutions Inc. is part of a worldwide network of independent partner organizations that sell, implement, and support the award-winning products of Microsoft® Business Solutions. Encore is also an authorized Solution Developer for Microsoft Business Solutions developing and marketing industry-specific software worldwide that tightly integrates to core modules of Microsoft Dynamics GP. We are 100% dedicated to developing client-focused, reliable, industry-specific solutions and companion applications providing total end-to-end solutions that meet the operational and reporting needs of our customers. The Encore Business Solutions Inc. suite of products include: Project Tracking Solutions: • • • Project Tracking with Advanced Analytics Project Tracking with Budgeting Project Tracking Importer • Project Tracking Lite Billing Solutions: • • Recurring Contract Billing Recurring Contract Billing Importer Bank Reconciliation Solutions: • • Auto Reconciler Account Reconciler Bio-fuel Solutions: • • • • REAP REAP Auto Delivery REAP Integration REAP eConnect Additional Encore Products: • • • Advanced SmartList Investor Relationship Manager Inventory I/O Control If you have questions regarding any Encore product or service, feel free to contact us. Toll Free: Phone: Fax: E-mail: Internet: Mail: 888.898.4330 (North America only) 204.989.4330 204.235.2331 [email protected] www.encorebusiness.com 467 Provencher Blvd. Winnipeg, MB, Canada R2J 0B8 Microsoft® Gold Certified Partner 2003 - 2012 Microsoft® Business Solutions Inner Circle Member 2000, 2002 - 2005 Microsoft® Business Solutions President’s Club Member 1996 - 2010 Microsoft® Business Solutions Organizational Excellence 2002 Microsoft® Business Solutions Partners’ Choice Developer Award 1999 & 2000