1
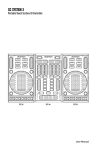
Over 100 years cumulative experience
24 hour rush turnaround / technical support service
Established in 1993
The leading independent repairer of servo motors and drives in North America.
Visit us on the web:
www.servo-repair.com
www.servorepair.ca
www.ferrocontrol.com
www.sandvikrepair.com
www.accuelectric.com
Scroll down to view your document!
For 24/7 repair services :
USA: 1 (888) 932 - 9183
Canada: 1 (905) 829 -2505
Emergency After hours: 1 (416) 624 0386
Servicing USA and Canada
6020HRJ/8030J SWITCHING SERVO
CONTROLLER
USER’S MANUAL
P/N: EDA107 (V1.1)
AEROTECH, Inc. • 101 Zeta Drive • Pittsburgh, PA. 15238-2897 • USA
Phone (412) 963-7470 • Fax (412) 963-7459
Product Service: (412) 967-6440; (412) 967-6870 (Fax)
www.aerotechinc.com
If you should have any questions about the 6020HRJ/8030J Switching Servo Controller (6020J/8030J) or comments
regarding the documentation, please refer to Aerotech online at:
http://www.aerotechinc.com.
For your convenience, a product registration form is available at our web site.
Our web site is continually updated with new product information, free downloadable software, and special pricing
on selected products.
6020HRJ/8030J is a product of Aerotech, Inc.
The 6020HRJ/8030J Switching Servo Controller Manual Revision History:
Rev 1.0
Rev 1.1
May, 1987
October 26, 2000
6020HRJ/8030J User’s Manual
Table of Contents
TABLE OF CONTENTS
CHAPTER 1:
1.1.
INTRODUCTION ............................................................................ 1-1
Description ......................................................................................... 1-1
CHAPTER 2:
2.1.
2.2.
2.3.
SPECIFICATIONS .......................................................................... 2-1
Maximum Ratings .............................................................................. 2-1
Electrical Characteristics .................................................................... 2-1
Mechanical Characteristics................................................................. 2-2
CHAPTER 3:
3.1.
3.2.
3.3.
INSTALLATION AND OPERATION ........................................... 3-1
Set-Up (Single Amplifier) .................................................................. 3-1
Selecting 6020HRJ or 8030J Operation ............................................. 3-2
Input/Output Connections................................................................... 3-2
3.3.1. AC Inputs (TB1-9, 10 TB2-13, 18, 19)................................ 3-2
3.3.2. Motor Connections (TB2-16, 17)......................................... 3-2
3.3.3. Supplies for External Use (TB2-11, 12, 14, 15, TB14, 6, TB2-13 Common) ........................................................ 3-2
3.3.4. Pre-Amplifier Inputs (TB-1, 2, 3, 5, TB1-4 Common) ........ 3-2
3.3.5. Directional Current Limits (TB1-6, 7, and 8)....................... 3-2
Adjustments........................................................................................ 3-3
3.4.1. Current Limit (R24) ............................................................. 3-3
3.4.2. Gain and Scale Factor Adjustments (R6, R9, R12,
and R22)............................................................................... 3-3
3.4.3. Balance Adjustment (R16) ................................................... 3-3
3.4.4. Overcurrent Trip Adjustment (R100)................................... 3-3
Procedure for Checking and Optimizing Performance ....................... 3-4
3.4.
3.5.
CHAPTER 4:
4.1.
4.2.
4.3.
MAINTENANCE AND REPAIR.................................................... 4-1
Maintenance ....................................................................................... 4-1
Fuse Replacement............................................................................... 4-1
Troubleshooting.................................................................................. 4-2
APPENDIX A: WARRANTY AND FIELD SERVICE POLICY ........................... A-1
INDEX
∇ ∇ ∇
Version 1.1
Aerotech, Inc.
iii
Table of Contents
iv
6020HRJ/8030J User’s Manual
Aerotech, Inc.
Version 1.1
6020HRJ/8030J User’s Manual
List of Figures and Tables
LIST OF FIGURES
Figure 3-1.
Controller Diagram ................................................................................. 3-1
LIST OF TABLES
Table 2-1.
Table 2-2.
Table 2-3.
6020HRJ/8030J Amplifier Ratings and Characteristics ..................... 2-1
6020HRJ/8030J Electrical Characteristics ......................................... 2-1
6020HRJ/8030J Mechanical Characteristics ...................................... 2-2
Table 4-1.
Troubleshooting.................................................................................. 4-2
∇ ∇ ∇
Version 1.1
Aerotech, Inc.
v
List of Figures and Tables
vi
6020HRJ/8030J User’s Manual
Aerotech, Inc.
Version 1.1
6020HRJ/8030J User’s Manual
Introduction
CHAPTER 1: INTRODUCTION
In This Section:
• Description ......................................................... 1-1
1.1.
Description
The 6020HRJ/8030J is a single amplifier designed to replace the original 6020HR/8030
amplifier. Many features were added to the design without sacrificing compatibility with
current applications.
The suffix “J” was added to the model number to indicate the JAN quality level of
components used in the power stage. The JAN (Joint ARMY/NAVY) quality level is
imposed on qualified semiconductor manufacturers by the U.S. military. Military
handbook 217-C (Reliability Prediction of Electronic Equipment) defines JAN
components to have a base failure rate five times less than commercial hermetic devices,
and ten times less than plastic devices. Experience has shown that most power amplifier
failures occur in the power stage. Since the 6020HRJ is operated under reduced stress and
fatigue conditions, higher reliability can be expected.
The following protection circuits were added to the amplifier.
1.
2.
3.
4.
Short circuit protection (output terminal to output terminal or output
terminal to ground).
Bus overvoltage
Bus undervoltage
Low level control undervoltage
All but #1 are reset automatically when the condition(s) return to normal.
The rectifier and filter are integral to the 6020HRJ/8030J, like the original 6020HR.
∇ ∇ ∇
Version 1.1
Aerotech, Inc.
1-1
Introduction
1-2
6020HRJ/8030J User’s Manual
Aerotech, Inc.
Version 1.1
6020HRJ/8030J User’s Manual
CHAPTER 2:
Specifications
SPECIFICATIONS
In This Section:
• Maximum Ratings .................................................... 2-1
• Electrical Characteristics.......................................... 2-1
• Mechanical Characteristics ...................................... 2-2
2.1.
Maximum Ratings
Table 2-1.
6020HRJ/8030J Amplifier Ratings and Characteristics
Specifications
Peak Output Current
Pulse Output Current
Continuous Output Current
Input Voltage
Operating Temperature
Storage Temperature
2.2.
Units
Amps
Amps
Amps
6020HRJ
8030J
±24
±33
±20
±30
±10
±15
80 VAC C.T. ±10%
110 VAC C.T. ±10%
0 to 50
-30 to 85
°C
°C
Electrical Characteristics
Table 2-2.
6020HRJ/8030J Electrical Characteristics
Specifications
Voltage Gain
Offset
Drift
Gain
Current Limit
Bandwidth
Power
Peak
Output:
Continuous
Switching Frequency
Form Factor
Ripple Current (amps)
Regenerative Energy
Torque Limits
Shutdown
Minimum Inductance
Input Voltage
Power
Frequency
Supply
External
±15VDC
Version 1.1
6020HRJ
8030J
Pre-Amplifier
100db (open loop)
Adjustable to 0
10mV/0c
Power Amplifier
2 a/v
3 a/v
4 to 20 amps
6 to 30 amps
DC to 1kHz
1000 watts
1500 watts
440 watts
900 watts
5 kHz
3 kHz
( )
( )
1 + 3.86
LIo
1 + 1.73
LIo
2
Ip/p = 6/L (mH)
Ip/p = 13.3/L (mH)
40 joules
20 joules
(TB1-6 to 7 or 7 to 8) Limits to 3 amps
(TB1-8 to 6) Limits to 1 amps
.75 mH
2.2 mH
80 VAC C.T.
110 VAC C.T.
50/60 Hz
30 mA (max)
Aerotech, Inc.
2-1
Specifications
6020HRJ/8030J User’s Manual
2.3.
Mechanical Characteristics
Table 2-3.
6020HRJ/8030J Mechanical Characteristics
Specifications
Weight
Dimensions
Mounting Dimensions
Mounting Screws
6020HRJ/8030J
9 lbs
6.7” W x 7.5” L x 6.5” H
5 ½” x 3 5/8”
¼ - 20, 3.8” max depth into controller base plate
∇ ∇ ∇
2-2
Aerotech, Inc.
Version 1.1
6020HRJ/8030J User’s Manual
CHAPTER 3:
Installation and Operation
INSTALLATION AND OPERATION
In This Section:
• Set-Up (Single Amplifier) ................................................ 3-1
• Selecting 6020HRJ or 8030J Operation........................... 3-2
• Input/Output Connections ................................................ 3-2
• Adjustments ..................................................................... 3-3
• Procedure for Checking and Optimizing Performance..... 3-4
3.1.
Set-Up (Single Amplifier)
Figure 3-1.
Version 1.1
Controller Diagram
Aerotech, Inc.
3-1
Installation and Operation
3.2.
6020HRJ/8030J User’s Manual
Selecting 6020HRJ or 8030J Operation
When ALL FOUR jumpers (J1-J4) are connected, the amplifier must operate as a
6020HRJ. When ALL FOUR jumpers are disconnected, the amplifier must operate as an
8030J amplifier.
3.3.
3.3.1.
Input/Output Connections
AC Inputs (TB1-9, 10 TB2-13, 18, 19)
115VAC, 50/60 Hz, 50 VA are required for the cooling fan. The connections are made at
TB1-9 and 10. Always make sure that the fan is operational before operating the
amplifier. The AC input for the power amplifier is made at terminals TB2-18 and 19 with
TB2-13 connected to the center tap of the source. The following 50/60 Hz voltages
should be used (refer to Figure 3-1).
For 6020HRJ operation, use 80 VAC center tapped (C.T.) ±10%.
For 8030J operation, use 110 VAC (C.T.) ±10%.
Use only terminal TB2-13 for the center tap connection.
3.3.2.
Motor Connections (TB2-16, 17)
The motor is connected between terminals TB2-16 and 17. Make sure the correct motor is
being applied to the amplifier. Check for shorts between motor leads and ground and
between motor leads before connecting the motor to the amplifier. A choke may have to
be inserted if motor inductance is too small. Total inductance must be greater than .75 mH
for 6020HRJ and 2.2 mH for 8030J operation.
3.3.3.
Supplies for External Use (TB2-11, 12, 14, 15, TB1-4, 6, TB213 Common)
Regulated +15 VDC, 30 mA DC maximum at terminal TB2-12 and –15VDC, 30 mA DC
maximum at terminal TB2-11 are available with respect to commons TB1-4, 6, and TB213. Unregulated bus voltage (60 VDC nominal 6020HRJ, 80 VDC nominal for 8030J) is
available at TB2-14 and TB2-15.
The current drawn from this supply + load current should not exceed the continuous
current capability of the unit. The common for this supply must be TB2-13.
3.3.4.
Pre-Amplifier Inputs (TB-1, 2, 3, 5, TB1-4 Common)
Four inputs are available for input and feedback signals. Inputs 1, 2, and 3 (TB1-1, 2, and
3 respectively) sum to the inverting input of the pre-amplifier. TB1-5 provides a noninverting signal to the pre-amplifier. In addition, TB1-1 and TB1-5 provide a differential
input for attenuating common mode from remote signal sources. All input signal
commons should be connected to TB1-4 or 6.
3.3.5.
Directional Current Limits (TB1-6, 7, and 8)
TB1-6, 7, and 8 are available to inhibit current of a specific polarity for limited travel
loads. Connecting TB1-6 to TB1-7 limits current between output terminals TB2-16 and
TB2-17 at 3 amps or less without inhibiting current between TB2-17 and 16. Likewise,
connecting TB1-7 to TB1-8 limits current between TB2-17 and TB2-16 at 3 amps or less
without inhibiting current between TB2-16 and TB2-17. Connecting TB1-6 to TB1-8
limits current in both directions at 1 amp or less.
3-2
Aerotech, Inc.
Version 1.1
6020HRJ/8030J User’s Manual
3.4.
3.4.1.
Installation and Operation
Adjustments
Current Limit (R24)
The maximum value of motor current can be set by adjusting R24 (CW rotation decreases
maximum current). The current monitor, TB2-20 (5A/volt) and common may be used to
set the desired level. To set, monitor TB2-20 with an oscilloscope (TB1-4 or 6 common)
and command the motor to step or reverse speed. Adjust R24 to obtain the desired peak
current.
3.4.2.
Gain and Scale Factor Adjustments (R6, R9, R12, and R22)
Scale factor adjustments are R6, R9, and R12 for inputs 1, 2, and 3 respectively. The
GAIN adjustment is R22. Connect the tach to input 3 and turn R12 and R22 fully CW.
The AC power can now be switched ON. If the motor “runs away”, then reverse the tach
connection to input 3. If the motor rotates slowly in either direction, adjust the balance
pot R16. Adjust R22 CCW until the motor oscillates, then adjust CW until oscillation
ceases. Continue for 1/8 to 1/16 turn further CCW. Apply velocity commands or position
error signal to input 1 or 2. Utilize the differential input TB1-2 and TB1-5 when possible.
Adjust R6 or R9 to obtain proper speed for the input being used.
Input 1 will command greater speed than input 2 because R7 is smaller than R10. If the
speed is too fast with the scale factor full CCW, increase R7 or R10. If the speed is too
slow with the scale factor full CW, R12 can be adjusted CCW. If R12 is adjusted, R22
will require readjustment.
3.4.3.
Balance Adjustment (R16)
The pre-amplifier balance (R16) should be adjusted so that the motor does not turn when
zero velocity is commanded. A high-resolution multi-turn pot is used. If it is determined
that the balance is difficult to adjust, then R18 can be increased. Increasing R18 may
decrease bandwidth and R22 may need readjustment.
3.4.4.
Overcurrent Trip Adjustment (R100)
This adjustment sets the trip level of the overcurrent circuit. This level is factory set and
should not be adjusted.
Version 1.1
Aerotech, Inc.
3-3
Installation and Operation
3.5.
6020HRJ/8030J User’s Manual
Procedure for Checking and Optimizing Performance
The pre-amplifier compensation for the 6020HRJ/8030J has been factory sealed so that a
position loop bandwidth of 10 to 20 Hz is possible when the correct motor and load are
applied. Problems in attaining a stable position loop response are usually a result of poor
velocity loop response where the latter depends predominantly on system inertia, motor
torque constant, and the setting of the GAIN pot R22 (see Section 3.4.2.).
If the required position loop response is difficult to attain after following the procedure in
Section 3.4.2., then compare actual motor load parameters against the following:
MOTOR TORQUE CONSTANT – “KT” – 28 OZ-IN/AMP
SYSTEM INERTIA (MOTOR and TABLE) – “J” - .4 OZ-IN-SEC 2
TACH VOLTAGE CONSTANT – 3V/1000 RPM
If “new” motor and load parameters vary considerably from the above values, use the
following procedure to reselect the pre-amplifier compensation elements:
C6 =
KT (new) Vtach (new) 1.79 x 10⁻³
J (new)
(R13 or R10)*
and
R20=
5.1
C6
* depending on what input is used for tach
C6 in micro farads
R13, R20 in kilo ohms
J in oz-in-sec
Vtach in volts/1000 RPM
∇ ∇ ∇
3-4
Aerotech, Inc.
Version 1.1
6020HRJ/8030J User’s Manual
CHAPTER 4:
Maintenance and Repair
MAINTENANCE AND REPAIR
In This Section:
• Maintenance ....................................................... 4-1
• Fuse Replacement .............................................. 4-1
• Troubleshooting ................................................. 4-2
4.1.
Maintenance
This solid state servo controller requires no maintenance. If it is desired, the balance can
be checked as mentioned in Section 3.4.3. at three or six month intervals. The PC card
and heat sinks can be checked for an accumulation of dirt if operated in a dirty
environment.
4.2.
Fuse Replacement
The replacement of fuses are as follows:
-
6020HRJ, F1 should be rated 10A (slow blow).
-
8030J, F1 should be rated 15A (slow blow).
-
F2 for both amplifiers should be rated 20A (slow blow).
Version 1.1
Aerotech, Inc.
4-1
Maintenance and Repair
4.3.
6020HRJ/8030J User’s Manual
Troubleshooting
Troubleshooting will be aimed at determining whether the unit is defective and needs to
be returned to the factory for repair. The symptoms will be those for a motor/tach system.
Table 4-1.
Troubleshooting
Symptom
Possible Cause
- Overcurrent trip
Amplifier shuts down
with fault indication
- Abnormal input voltage
- Low level power supply
voltage abnormal
If the fault was due to overcurrent, the amplifier must
be reset with the switch. Besides a direct output to
ground, or output to output short, overcurrents can be
caused by:
• defective motor commutator,
• commutator arching to ground at high speeds,
• an improper motor application causing control
instability.
If amplifier does not reset after pressing the reset
switch, check the AC input voltage (Section 3.3.1.).
Check the output voltage (terminal 15 (+) to 13(-)), this
voltage should be no more than 87VDC or no less than
45VDC. Check fuse F2. If external ±15VDC (terminals
11 and 12) are in use, disconnect them to verify that
there is no overload.
- Excessive load
regeneration
If the amplifier resets itself automatically following a
shutdown, check the following:
If fault is prevalent during an accelerating or
decelerating period, check AC input voltage (Section
3.3.1.). If condition seems to subside when the current
limit adjustment is increased (Section 3.4.1), the
problem may be excessive load regeneration, and the
use of a shunt regulator may be in order. If condition
subsides when the current limit level is reduced, the
problem could be poor input AC source regulation
- Open fuse F1
If F1 is open (motor fuse), first verify that the fuse and
jumpers J1-J4 were in place for amplifier operation
(6020HRJ or 8030J) – see Section 3-2. An open F1
fuse may be caused by high duty cycle operation or
excessive loading.
If fuse F2 is open, the cause is usually a fault in the
amplifier’s power stage. To verify this, check the
following with an ohmmeter before replacing F2:
Amplifier shuts down
with no fault indication
A.
- Open fuse F2
- Defective amplifier
4-2
Procedure
Place the (+) lead of the ohmmeter (x1 scale) on
terminal 15 and the (-) lead to terminal 16, then
17. Note ohm readings.
B. Place the (-) lead on terminal 13 and the (+) lead
on terminal 16, then 17. Again, note readings.
C. None of the four readings should be less than
20Kohms.
If ohmmeter polarities are not observed, low resistance
readings will be measured for a good power stage.
Aerotech, Inc.
Version 1.1
6020HRJ/8030J User’s Manual
Table 4-1.
Maintenance and Repair
Troubleshooting (Continued)
Symptom
Possible Cause
- Reverse tach connection
Reverse tach connections to amplifiers
- Open tach connection
Check for absence of tach voltage at input to amplifier
- Improper scaling
Check scaling adjustments (Section 3.4.2.). If terminals
2 or 3 are used for the tach signal, adjust R9 or R12
CW.
- Defective amplifier
The pre-amplifier may be latching up. Short terminals 6
and 8 (shutdown). If this corrects the problem, the peramplifier is defective. If the problem persists, the
power section is probably defective.
- Improper adjustments
Verify current limit adjustment (Section 3.4.1.) is set
correctly.
Re-check gain adjustment (R22) - Section 3.4.2.
- Improper set-up
Is the amplifier being used in a proper application?
Check status of jumpers J1 – J4 (Section 3.2.).
Check contact connections to terminals 6, 7, and 8
(torque limits) – see Figure 3-1. Circuits should be
totally open circuited when torque limit is not
requested.
Verify that R18 is in place.
- Improper motor
application
Make sure that the correct motor is being used with the
amplifier (Section 3.5.).
- Improper adjustments
Re-check scaling and GAIN adjustments (Section
3.4.2.). First turn the gain adjustment (R22) CW. Next,
turn the tach scaling (either R9 or R13 depending on
tach connection) CW.
- Improper motor
application
If adjustments do not resolve the oscillation, review the
motor specifications and verify that the amplifier is
being applied to the correct motor. If necessary, the
compensation components may have to be changed
(Section 3.5.).
Motor runs away
Poor servo response or
output performance
Procedure
System oscillates
∇ ∇ ∇
Version 1.1
Aerotech, Inc.
4-3
Maintenance and Repair
4-4
6020HRJ/8030J User’s Manual
Aerotech, Inc.
Version 1.1
6020HRJ/8030J User’s Manual
APPENDIX A:
Appendix A
WARRANTY AND FIELD SERVICE
In This Section:
• Laser Product Warranty
• Return Products Procedure
• Returned Product Warranty Determination
• Returned Product Non-warranty Determination
• Rush Service
• On-site Warranty Repair
• On-site Non-warranty Repair
Aerotech, Inc. warrants its products to be free from defects caused by faulty materials or
poor workmanship for a minimum period of one year from date of shipment from
Aerotech. Aerotech’s liability is limited to replacing, repairing or issuing credit, at its
option, for any products which are returned by the original purchaser during the warranty
period. Aerotech makes no warranty that its products are fit for the use or purpose to
which they may be put by the buyer, where or not such use or purpose has been disclosed
to Aerotech in specifications or drawings previously or subsequently provided, or whether
or not Aerotech’s products are specifically designed and/or manufactured for buyer’s use
or purpose. Aerotech’s liability or any claim for loss or damage arising out of the sale,
resale or use of any of its products shall in no event exceed the selling price of the unit.
Aerotech, Inc. warrants its laser products to the original purchaser for a minimum period
of one year from date of shipment. This warranty covers defects in workmanship and
material and is voided for all laser power supplies, plasma tubes and laser systems subject
to electrical or physical abuse, tampering (such as opening the housing or removal of the
serial tag) or improper operation as determined by Aerotech. This warranty is also voided
for failure to comply with Aerotech’s return procedures.
Laser Products
Claims for shipment damage (evident or concealed) must be filed with the carrier by the
buyer. Aerotech must be notified within (30) days of shipment of incorrect materials. No
product may be returned, whether in warranty or out of warranty, without first obtaining
approval from Aerotech. No credit will be given nor repairs made for products returned
without such approval. Any returned product(s) must be accompanied by a return
authorization number. The return authorization number may be obtained by calling an
Aerotech service center. Products must be returned, prepaid, to an Aerotech service
center (no C.O.D. or Collect Freight accepted). The status of any product returned later
than (30) days after the issuance of a return authorization number will be subject to
review.
Return Procedure
After Aerotech’s examination, warranty or out-of-warranty status will be determined. If
upon Aerotech’s examination a warranted defect exists, then the product(s) will be
repaired at no charge and shipped, prepaid, back to the buyer. If the buyer desires an air
freight return, the product(s) will be shipped collect. Warranty repairs do not extend the
original warranty period.
Returned Product
Warranty Determination
Version 1.1
Aerotech, Inc.
A-1
Appendix A
Returned Product Nonwarranty Determination
Rush Service
On-site Warranty Repair
6020HRJ/8030J User’s Manual
After Aerotech’s examination, the buyer shall be notified of the repair cost. At such time
the buyer must issue a valid purchase order to cover the cost of the repair and freight, or
authorize the product(s) to be shipped back as is, at the buyer’s expense. Failure to obtain
a purchase order number or approval within (30) days of notification will result in the
product(s) being returned as is, at the buyer’s expense. Repair work is warranted for (90)
days from date of shipment. Replacement components are warranted for one year from
date of shipment.
At times, the buyer may desire to expedite a repair. Regardless of warranty or out-ofwarranty status, the buyer must issue a valid purchase order to cover the added rush
service cost. Rush service is subject to Aerotech’s approval.
If an Aerotech product cannot be made functional by telephone assistance or by sending
and having the customer install replacement parts, and cannot be returned to the Aerotech
service center for repair, and if Aerotech determines the problem could be warrantyrelated, then the following policy applies:
Aerotech will provide an on-site field service representative in a reasonable amount of
time, provided that the customer issues a valid purchase order to Aerotech covering all
transportation and subsistence costs. For warranty field repairs, the customer will not be
charged for the cost of labor and material. If service is rendered at times other than
normal work periods, then special service rates apply.
If during the on-site repair it is determined the problem is not warranty related, then the
terms and conditions stated in the following "On-Site Non-Warranty Repair" section
apply.
On-site Non-warranty
Repair
If any Aerotech product cannot be made functional by telephone assistance or purchased
replacement parts, and cannot be returned to the Aerotech service center for repair, then
the following field service policy applies:
Aerotech will provide an on-site field service representative in a reasonable amount of
time, provided that the customer issues a valid purchase order to Aerotech covering all
transportation and subsistence costs and the prevailing labor cost, including travel time,
necessary to complete the repair.
Company Address
Aerotech, Inc.
101 Zeta Drive
Pittsburgh, PA 15238-2897
USA
Phone: (412) 963-7470
Fax:
(412) 963-7459
TWX: (710) 795-3125
∇ ∇ ∇
A-2
Aerotech, Inc.
Version 1.1
6020HRJ/8030J User’s Manual
Index
A
AC Inputs, 3-2
Adjustments, 3-3
Amplifier Shutdown, 4-2
B
M
Maintenance, 4-1
Maximum Rating, 2-1
Mechanical Characteristics, 2-2
Mechanical Specifications, 2-2
Motor Connections, 3-2
Motor runs away, 4-3
Balance Adjustment, 3-3
O
C
Checking Performance, 3-4
Current Limit, 3-3
Optimizing Performance, 3-4
Overcurrent Trip Adjustment, 3-3
P
D
Dimensions, 2-2
Directional Current Limits, 3-2
Poor servo response, 4-3
Power Amplifier, 2-1
Pre-Amplifier, 2-1
Pre-Amplifier Inputs, 3-2
E
Electrical Characteristics, 2-1
Electrical Specifications, 2-1
F
Field Service Information, A-1
Field Service Policy, A-1
Fuse, 4-1
S
Scale Factor Adjustment, 3-3
Selecting 6020HRJ or 8030J, 3-2
Set-Up (Single Amplifier), 3-1
Specifications, 2-1
Supplies for external use, 3-2
System oscillates, 4-3
T
G
Troubleshooting, 4-2
Gain Factor Adjustment, 3-3
W
I
Introduction, 1-1
Warranty Information, A-1
Warranty Policy, A-1
∇ ∇ ∇
Version 1.1
Aerotech, Inc.
i
Index
ii
6020HRJ/8030J User’s Manual
Aerotech, Inc.
Version 1.1
READER’S COMMENTS
AEROTECH
R
6020HRJ/8030J User’s Manual
P/N EDA107, October, 2000
Please answer the questions below and add any suggestions for improving this document. Is the
information:
Yes
No
Adequate to the subject?
____
____
Well organized?
____
____
Clearly presented?
____
____
Well illustrated?
____
____
Would you like to see more illustrations?
____
____
Would you like to see more text?
____
____
How do you use this document in your job? Does it meet your needs?
What improvements, if any, would you like to see? Please be specific or cite examples.
_____________________________________________________________________
_____________________________________________________________________
_____________________________________________________________________
_____________________________________________________________________
_____________________________________________________________________
Your name ________________
Your title ________________
Company name ________________
Address ________________
________________
Remove this page from the document and fax or mail your comments to the technical writing
department of Aerotech.
AEROTECH, INC.
Technical Writing Department
101 Zeta Drive
Pittsburgh, PA. 15238-2897 U.S.A.
Fax number (412) 967-6870