1
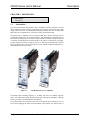
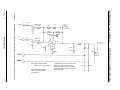
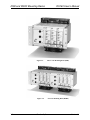
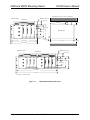
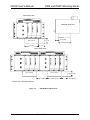
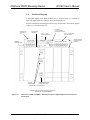
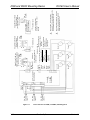
DS160 SERIES SERVO AND DSR/DSRF
RACK
USER’S MANUAL
P/N: EDA119 (V1.1)
AEROTECH, Inc. • 101 Zeta Drive • Pittsburgh, PA. 15238-2897 • USA
Phone (412) 963-7470 • Fax (412) 963-7459
Product Service: (412) 967-6440; (412) 967-6870 (Fax)
www.aerotechinc.com
If you should have any questions about the DS160 Series Servo Amplifier, the DSR/DSRF racks, or comments
regarding the documentation, please refer to Aerotech online at:
http://www.aerotechinc.com.
For your convenience, a product registration form is available at our web site.
Our web site is continually updated with new product information, free downloadable software and special pricing on
selected products.
DS160 Series Servo Amplifiers and DSR/DSRF racks are products of Aerotech, Inc.
DS160 Series Servo Amplifier Manual Revision History:
Rev 1.0
Rev 1.1
November, 1990
September 28, 2000
DS160 Series User’s Manual
Table of Contents
TABLE OF CONTENTS
CHAPTER 1:
1.1.
DESCRIPTION ................................................................................ 1-1
Introduction ........................................................................................ 1-1
CHAPTER 2:
2.1.
2.2.
2.3.
2.4.
2.5.
2.6.
2.7.
2.8.
2.9.
2.10.
2.11.
2.12.
DS160 SERVO AMPLIFIER MODULE........................................ 2-1
Introduction ........................................................................................ 2-1
Mounting Specifications..................................................................... 2-1
Power and Control Connections ......................................................... 2-2
Electrical Specifications ..................................................................... 2-4
Fault Output........................................................................................ 2-4
Personality Module............................................................................. 2-5
Control Modes.................................................................................... 2-5
Setting the Current Limit .................................................................... 2-8
Pre-Amplifier Gain Characteristics..................................................... 2-8
The Post-Amplifier ............................................................................. 2-8
Wiring DS160 into A System ............................................................. 2-8
Troubleshooting the DS160 Series ................................................... 2-13
CHAPTER 3:
3.1.
3.2.
3.3.
3.4.
3.5.
3.6.
3.7.
3.8.
3.9.
3.10.
3.11.
3.12.
DSR AND DSRF MOUNTING RACKS ........................................ 3-1
Introduction ........................................................................................ 3-1
Three-Axis Mounting Rack (DSR)..................................................... 3-1
Shunt Regulator .................................................................................. 3-1
Control & Power Connections to Mounting Racks............................. 3-1
Six-Axis Mounting Rack (DSRF)....................................................... 3-3
Mounting Specifications..................................................................... 3-3
Electrical Specifications ..................................................................... 3-6
Functional Diagram ............................................................................ 3-8
Wiring DSR/DSRF into System ....................................................... 3-11
The TV 2.5 DC Bus Power Transformer.......................................... 3-11
Troubleshooting................................................................................ 3-17
DSR & DSRF Spare Parts ................................................................ 3-18
APPENDIX A: WARRANTY AND FIELD SERVICE POLICY.......................... A-1
INDEX
∇ ∇ ∇
Version 1.1
Aerotech, Inc.
iii
Table of Contents
iv
DS160 Series User’s Manual
Aerotech, Inc.
Version 1.1
DS160 Series User’s Manual
List of Figures and Tables
LIST OF FIGURES
Figure 1-1.
The DS160 Series Servo Amplifiers................................................... 1-1
Figure 2-1.
Figure 2-2.
DS160 Series Servo Amplifier Module .............................................. 2-2
Mechanical Diagram of DS160 Series Servo Module (some
detail omitted for clarity) .................................................................... 2-2
Outline of “Quick Connect” Mating Connector for Connector
J1 of DS160 Series ............................................................................. 2-3
Simplified Block Diagram of the DS160 Series Servo
Amplifier Module ............................................................................... 2-6
Detailed Electrical Diagram of the DS160 Series PreAmplifier Circuit (actual circuit) ........................................................ 2-7
Transfer Function of Pre-Amplifier Circuit ........................................ 2-9
Outline of Personality Module RCN4 .............................................. 2-10
Detailed Electrical Diagram of DS160 Post-Amplifier Circuit ........ 2-11
Wiring Diagram for One or More DS160 Servo Modules when
not used with the Optional DSR Mounting Rack.............................. 2-12
Figure 2-3.
Figure 2-4.
Figure 2-5.
Figure 2-6.
Figure 2-7.
Figure 2-8.
Figure 2-9.
Figure 3-1.
Figure 3-2.
Figure 3-3.
Figure 3-4.
Figure 3-5.
Figure 3-6.
Figure 3-7.
Figure 3-8.
Figure 3-9.
Figure 3-10.
Figure 3-11.
Figure 3-12.
Figure 3-13.
Version 1.1
Three-Axis Mounting Rack (DSR)..................................................... 3-2
Six-Axis Mounting Rack (DSRF)....................................................... 3-2
Side View of DSR/DSRF Mounting Rack.......................................... 3-3
DSR/DSRF Mounting Dimensions..................................................... 3-4
DSR/DSRF Fan Dimensions .............................................................. 3-5
Front View of DSR (1/2 DSRF) – Showing Locations of
Input/Output Control and Power Connections.................................... 3-8
Electrical Block Diagram of DSR (1/2 DSRF) Mounting Rack ......... 3-9
Inside View of DSR Mounting Rack (DS160 Amplifiers and
Power Supply Module Removed)..................................................... 3-10
Interconnection for DSR (1/2 DSRF) Mounting Rack ..................... 3-12
Rear View of DSR (1/2 DSRF) Mounting Rack............................... 3-13
Pinout Definitions for Control Connector J13 .................................. 3-14
TV2.5 Transformer Specifications ................................................... 3-15
Typical DC Bus Voltage Characteristics of TV2.5 & DSR/F
Mounting Rack ................................................................................. 3-16
Aerotech, Inc.
v
List of Figures and Tables
DS160 Series User’s Manual
LIST OF TABLES
Table 2-1.
Table 2-2.
Table 2-3.
Table 2-4.
Table 2-5.
Table 2-6.
Table 2-7.
Table 2-8.
Table 2-9.
Table 2-10.
3U/6U Card Rack Manufacturers ....................................................... 2-1
Electrical Specifications ..................................................................... 2-4
Potentiometer Descriptions................................................................. 2-5
Personality Module RCN4 Modes.................................................... 2-10
Environmental Specifications ........................................................... 2-13
Power Stage Specifications............................................................... 2-13
Control Interface Specifications ....................................................... 2-14
Power Connection Specifications ..................................................... 2-15
Troubleshooting Guide ..................................................................... 2-15
DS160 Series Replacement Parts...................................................... 2-16
Table 3-1.
Table 3-2.
Table 3-3.
Table 3-4.
Table 3-5.
Table 3-6.
Input/Output For DS160 Series DC Bus Power Specifications .......... 3-6
Control Input Power Specifications .................................................... 3-6
Motor Output Power Specifications.................................................... 3-7
Control Interface Specifications ......................................................... 3-7
Troubleshooting................................................................................ 3-17
Replacement Parts for the DSR and DSRF....................................... 3-18
∇ ∇ ∇
vi
Aerotech, Inc.
Version 1.1
DS160 Series User’s Manual
Description
CHAPTER 1: DESCRIPTION
In This Section:
• Introduction........................................................ 1-1
1.1.
Introduction
The Aerotech DS16020 and DS16030 Servo Amplifiers (hereafter denoted as DS160
Servo Amplifiers) mark an advance in brush DC motor power control technology. High
output power, small size, and standardized mounting (standard 160 mm, 3U Euro-card)
make these Servo Amplifiers two of the most versatile on the market today.
The DS160 Series Amplifier uses a patented PWM drive scheme allowing them to
produce high output power at very high efficiency. The DS16020 has a nominal rating of
160 VDC at 20 amps peak (2 seconds), 10 amps continuous (with fan cooling) at up to 50
°C ambient. The DS16030 has a nominal rating of 160 VDC at 30 amps peak (2 seconds),
15 amp continuous (with fan cooling) at up to 50 °C ambient. The patented drive scheme
allows operation between 0 and 160 VDC bus levels without component adjustments. A
motor output load fuse is provided.
Figure 1-1.
The DS160 Series Servo Amplifiers
The PWM output switching frequency is 20 KHz, well above the audible frequency
range. The PWM output stage utilizes hermetically sealed power MOSFET switching
devices, providing very high reliability and long life.
Five potentiometers are provided at the front of the DS160 Servo Amplifier for easy
access when adjusting the input and tach feedback gain, balance, and current limit. A
Version 1.1
Aerotech, Inc.
1-1
Description
DS160 Series User’s Manual
parameter adjustment module, known as the “personality module” or RCN (ResistorCapacitor Network), provides a means of modifying all gain and current limit adjustment
parameters usually adjusted with the potentiometers. The user may set predetermined
gains and current limits, and match specific DC motors to the DS160 Series Amplifier
without adjusting the potentiometers themselves.
The DS160 Series Amplifiers are self-contained, except for the user supplied AC voltage
source needed to generate the internal DC bus voltage of 0 to 160 VDC, and ±12 VDC
control voltages. Motor load short circuit protection is provided internally. A typical
interconnection diagram for wiring two or more DS160 Series Amplifiers into a system is
shown in Figure 2-9.
Aerotech provides two types of integrated power supply mounting racks for the DS160
Series Amplifier: the DSR and the DSRF.
The three-axis mounting rack (DSR) is shown in Figure 3-1. The six-axis mounting rack
is shown in Figure 3-2. Both mounting racks have a totally integrated DC bus and control
power supplies. Shunt regulators for controlling DC bus motor regeneration are standard.
Isolation transformers to supply power to the DC bus may be supplied as an option for
both mounting racks.
Both mounting racks provide easy termination of control and power connections to the
motion controller and DC motors. These mounting racks are designed for panel mounting,
reversing the mounting flanges on the six-axis DSRF rack, will permit 19” rack mounting.
The major difference between the DSR rack and the DSRF rack is the inherent mounting
hardware. The six-axis DSRF rack is, in actuality, two three-axis racks joined together.
The six-axis DSRF rack contains two separate three-axis power supplies, each identical to
the power supply on the three-axis DSR mounting rack.
All mounting rack specifications listed in Chapter 3, except those specifying dimensional
data, are in reference to the three-axis DSR mounting rack.
∇ ∇ ∇
1-2
Aerotech, Inc.
Version 1.1
DS160 Series User’s Manual
CHAPTER 2:
DS160 Servo Amplifier Module
DS160 SERVO AMPLIFIER MODULE
In This Section:
• Introduction....................................................................2-1
• Mounting Specifications ................................................2-1
• Power and Control Connections.....................................2-2
• Electrical Specifications.................................................2-4
• Fault Output ...................................................................2-4
• Personality Module ........................................................2-5
• Control Modes ...............................................................2-5
• Setting the Current Limit................................................2-8
• Pre-Amplifier Gain Characteristics ................................2-8
• The Post-Amplifier.........................................................2-8
• Wiring DS160 into A System.........................................2-8
• Troubleshooting the DS160 Series...............................2-13
2.1.
Introduction
The DS160 Series Servo Amplifiers are shown in Figure 2-1 and Figure 2-2. Also shown
in these figures are the various locations for potentiometer adjustments, the personality
module (labeled RCN4), the motor load fuse, and the pin-out specification for the main
control and power connector J1 (located at the rear of the unit). Details of the various
items are included in this chapter.
2.2.
Mounting Specifications
The DS160 Series is designed to “slide” into any standard 3U or partitioned 6U user
supplied card rack. Integrated power supply 3U card racks for the DS160 Series can be
supplied by Aerotech (see Chapter 3 for details).
A sampling of 3U/6U card rack manufacturers are listed below in Table 2-1.
Table 2-1.
3U/6U Card Rack Manufacturers
Manufacturer
BICC-VERO
SCHROFF
KNURRAG
Version 1.1
Address
40 Lindeman Drive
Trumbull, CT
06611 (USA)
179 Commerce Drive
Warwilk, RI
02886 (USA)
(USA Representative)
Panel Components Corp.
335 Tesconi Circle
Santa Rosa, CA
95406
Aerotech, Inc.
2-1
DS160 Servo Amplifier Module
2.3.
DS160 Series User’s Manual
Power and Control Connections
A “quick-connect” mating connector is supplied with the DS160 Series Servo Amplifier
when the amplifier is supplied less the DSR mounting rack. An outline of this connector is
shown in Figure 2-3. This connector will mount in any 3U card rack section of DIN
mounting specification 41612.
Figure 2-1.
DS160 Series Servo Amplifier Module
173.8 [6.84]
40.3 [1.59]
171.1 [6.74]
Personality Module (RCN4)
Active
Gain
106.7 [4.20]
Cur. Limit
Balance
Tach
100.1 [3.94]
Input
128.4 [5.06]
O
6
|
10
|
14
|
18
|
22
|
26
|
30
|
4
|
8
|
12
|
16
|
20
|
24
|
28
|
32
|
Connector
J1
Fuse F1
Dimensions - millimeters [inches]
Front View
Side View
Back View
Figure 2-2. Mechanical Diagram of DS160 Series Servo Module (some detail omitted for clarity)
2-2
Aerotech, Inc.
Version 1.1
DS160 Series User’s Manual
DS160 Servo Amplifier Module
.25” Quick Connect
Lugs (Typical)
Mounting
Hole
4
6
8
10
12
14
16
18
20
22
24
26
28
30
32
Mounting
Hole
BACK VIEW OF CONNECTOR
Figure 2-3.
SIDE VIEW OF CONNECTOR
Outline of “Quick Connect” Mating Connector for Connector J1 of DS160 Series
If the user wants the DS160 Servo to be integrated into a user designed PC motherboard
(DIN mounting specification 41617), a different connector designed for PC board
mounting must be used. Aerotech will supply this connector as an option (P/N ECK352),
or the user may purchase this connector independently. One supplier of this mating
connector is Schroff (see Table 2-1).
Version 1.1
Aerotech, Inc.
2-3
DS160 Servo Amplifier Module
2.4.
DS160 Series User’s Manual
Electrical Specifications
Electrical specifications are listed in Table 2-2.
Table 2-2.
Electrical Specifications
Peak Current Output (2 sec)
Continuous Output Current
Units
Amps
Amps
Output Fuse, F1 (3 AG, slow blow)
Peak Output Voltage
Minimum Voltage Output
Peak Power Output
Continuous Power Output
Amps
Volts
Volts
Watts
Watts
Efficiency
Voltage Gain (max open loop)
Drift (referred to input)
Offset
Gain (continuous output)
Bandwidth
PWM Switching Frequency
Output Current Limit
Shutdown Input
Minimum Load Inductance
Operating Temperature
Storage Temperature
Weight
DS16020
±20
±10
(± 5 without fan)
10 (5 w/o fan)
160
10
2920
1530
(765 w/o fan)
%
Pre-Amplifier
dB
µV/°C
Volts
Power Amplifier
Amps/Volt
kHz
kHz
Amps (max)
mH
°C
°C
kg (lb)
DS16030
±30
±15
(± 5 without fan)
15 (5 w/o fan)
160
10
4200
2300
(765 w/o fan)
93
100
10
Adjustable to Zero
1
2
1
20
Adjustable: Zero to Peak
Tristates Motor Output
2
0 to 50
-30 to 85
0.5 (1)
A block diagram of the DS160 Series Servo Amplifier Module is shown in Figure 2-4. All
input and output power and control connections are passed through connector J1 (see
Figure 2-3, also).
Two control sections (pre-amplifier and post-amplifier, in dotted lines) are shown in
Figure 2-4. These control sections are detailed in Figure 2-5 and Figure 2-8.
2.5.
Fault Output
The DS160 Series Servo Amplifier Module, when equipped with the DS Series
motherboard, is configured with a Fault Output of active low. If the DS160 Series Servo
Amplifier is not equipped with the DS Series motherboard and the motherboard is to be
user supplied, the Servo Amplifier Module may be selectively configured for a Fault
Output of active high. This is accomplished by removing the Fault Output Select jumper
(see Figure 2-4) from JP1-1 to 2 and connecting the jumper to JP1-2 to 3 (both are P.C.B.
trace jumpers).
2-4
Aerotech, Inc.
Version 1.1
DS160 Series User’s Manual
DS160 Servo Amplifier Module
The active high Fault Output must not be used in conjunction with the DS Series
motherboard.
2.6.
Personality Module
The Personality Module pre-amplifier circuit, RCN4, (shown in Figure 2-5) is used to
interface input and tach feedback signals (if any exist). Figure 2-2 shows the location of
this module.
The user may reconfigure this module. An outline of the module is shown in Figure 2-7.
2.7.
Control Modes
The input speed command, Vcom, (see Figure 2-5) is usually connected to the output
command signal of the Motion Controller through J1, pin 16. The motor tachometer
feedback connection Vfb is then connected to J1, pin 18. The component values of RCN4
are set to those values depicted in Figure 2-5.
As previously stated, there are five potentiometers that are used to tune the amplifier to a
particular motor and load. See Table 2-3 for descriptions.
Table 2-3.
Potentiometer
Input
Tach
Balance
Current Limit
Gain
Potentiometer Descriptions
Description
Provides the means of adjusting the DC gain of the input command
present at J1-Pin16. Turning this pot CW increases gain.
Provides the means of adjusting the DC gain of the tach feedback
signal present at J1-Pin18. Turning this pot CW increases gain.
Provides the means of canceling small DC offsets that may be present
in the pre-amplifier circuit.
Provides a means of adjusting the clamp levels of the current
command signal produced by the output of the pre-amplifier. Turning
this pot CCW increases the clamp levels (increases the peak current).
Provides the means of adjusting the AC Gain of the pre-amplifier.
Turning this pot CCW increases gain.
Pots are only used in velocity mode.
For the physical position of these pots see Figure 2-2. For the circuit position and effect,
see Figure 2-5 and Figure 2-6.
Modern motion controllers often provide tach feedback internally to the control. The
result is that the output control signal from the motion controller is usually a current
command signal rather than the traditional speed command signal described above.
For this control mode, the tach connection (pin 18 of J1) remains open. The current
command signal is brought into pin 16 of J1. In this case, personality module RCN4 is
usually reconfigured for unity gain by replacing RCN4 12 to 5 and RCN4 7 to 10 with
. UHVLVWRUV7KHLQSXWWDFKDQGJDLQSRWHQWLRPHWHUSRVLWLRQVDUHVHWIXOO&&:
Version 1.1
Aerotech, Inc.
2-5
Figure 2-4.
2-6
J1
6
J1
J1
Aerotech, Inc.
–12
Heatsink
Ground
Sig Com
22
J1
4
J1
24
J1
20
J1
8
J1
Vfb
–12
HS
+12
5K Ohms
–
–
RCN4
****
Ifb
****
Icom
+
–
Fault
Logic
*
** Patent No. 4, 554, 512
on Driver/Receiver A and B.
B
A
Shut
Down
Logic
Post-Amplifier (Details
in Figure 2-8)
***
Fault
3 Output
2 Select
1 Jumper
JP1
Input/Output Transfer Convention (Open Loop)
A plus (+) voltage on either input or tach with
respect to signal common, produces a net plus
(+) voltage on motor connection 26 with
respect to motor connection 30.
Pre-Amplifier (Details in
Figures 2-5 and 2-6)
——
+12
Current
Monitor
14
I Limit –
J1
12
J1
18
I Limit +
Tach *
Input *
J1
Vcom
16
Fault / Fault 10
Shutdown
+
–
Receiver A
Isolation
**** Current Command (Icom)and current feedback
(Ifb) gains for amplifier
DS16030 – 5Amp / Volt
DS16020 – 3Amp / Volt
*** Connect JP1-1 to 2 for active low fault output.
Connect JP1-2 to 3 for active high fault output.
NOTE: Active high fault output must not be
used with the DR Series motherboard.
Current
F.B.
Amplifier
Driver B **
Driver A **
Receiver B
Power Stage
High Bus Voltage Inhibit
High Bus Current Inhibit
Floating Drivers and Receivers
Active LED
Isolation
Receiver B
Receiver A
Short
Circuit
Sensor
J1
32 –B (Return)
J1
30 – Motor
Connections
J1
26 + *
J1
28 +B (Bus)
DS160 Servo Amplifier Module
DS160 Series User’s Manual
Simplified Block Diagram of the DS160 Series Servo Amplifier Module
Version 1.1
Vcom
16
1.5K
10K
INPUT POT
CW 10K
1
.1
16
10
RCN4
CW
.1uF
150K
7
12
RCN4
10K
Gain Pot
5
RCN4
1.5K
100K
100K
11
6
13
4
RCN4 14
RCN4
RCN4 390
J1
Vfb
3
18
1.5K
+12
TACH POT
CW 39K
TACH
10K
.1
2
7
2 –
15
4
–12
9
741EN
RCN4
3
1.5K
+
10K
5
1
6
10K
–12
I LIMIT +
(See Figure
2-4)
*RCN4
6.8V
CW
J1
ICOM
8
Balance
Pot
6.8V
CW
Current
Limit Pot
12
J1
I LIMIT –
14
Note: Typical 741EN OP-AMP
Open Loop Gain Is 200 V/MV
Personality Module RCN4
Shown in the Velocity Mode
See Table 2-4.
* WARNING! Do not use a resistor value
smaller than 1.2K for RCN48-9 for the
DS16020 Amplifier. Do not use a resistor
value smaller than 2.2K for RCN48-9 for the
DS16030 Amplifier.
.01uF
. 01uF
DS160 Servo Amplifier Module
2-7
Detailed Electrical Diagram of the DS160 Series Pre-Amplifier Circuit (actual circuit)
Aerotech, Inc.
DS160 Series User’s Manual
Figure 2-5.
Version 1.1
J1
INPUT
DS160 Servo Amplifier Module
2.8.
DS160 Series User’s Manual
Setting the Current Limit
The RCN4 resistor component 8-9 is used to set the maximum current that can be
obtained by the current limit potentiometer (full CW for zero current, full CCW for
maximum current).
2.9.
Pre-Amplifier Gain Characteristics
The open loop transfer function for the input connection Vcom (pin 16, J1) and tach
feedback connection Vfb (pin 18, J1) to internal current command signal, Icom, is shown
in Figure 2-6. The gain curves shown in Figure 2-6 are in relation to the values of RCN4
shown in Figure 2-5.
2.10.
The Post-Amplifier
A detailed circuit description of the post-amplifier (shown by dotted lines in Figure 2-4)
is outlined in Figure 2-8. The circuitry shown in Figure 2-8 is for reference only and is not
intended to be altered by the user.
Figure 2-8 shows the control relationships of the internal current command, Icom, with
the internal current feedback signal, Ifb, (see also Figure 2-4 and Figure 2-5. A brief
outline of the PWM circuit, used to control the MOFSET switches of the output power
stage, is also shown in this figure.
2.11.
Wiring DS160 into A System
A typical user interconnect wiring diagram for two DS160 Servo’s operating from a
common DC bus and ± 12 VDC control supply is shown in Figure 2-9.
Exercise caution when wiring the DS160 Servo Amplifiers to the DC bus and control
power supplies.
Most important of the wiring considerations is the length of the interconnect wiring
between the DC bus power supply and connector J1, pins 28 and 32 of the DS160 Servo
Amplifier. This interconnect wiring must never exceed 18 inches between (0.45 meter)
between these two points (see Figure 2-9). Also, the interconnect wiring between the DC
bus and pins 28 and 32 must be twisted tightly together and be of no less htan #14 AWG
gauge (21x10-3 CM2).
Failure to observe the considerations listed above may result in permanent damage to
the power stage of the Servo Amplifier.
WARNING
2-8
Aerotech, Inc.
Version 1.1
DS160 Series User’s Manual
DS160 Servo Amplifier Module
Input Pot Full CCW
80
Input Pot Full CW
Gain
(dB)
60
Gain Pot Center
Gain Pot Full CW
Transfer
Function
40
20
Icom
Vcom
0
.1
1
10
100
1000
10000
100000
Frequency (Hz)
80
Tach Pot Full CCW
Gain
(dB)
Tach Pot Full CW
60
Gain Pot Center
40
Transfer
Function
Gain Pot Full CW
20
Icom
Vfb
0
.1
1
10
100
1000
10000
100000
Frequency (Hz)
Note:
Transfer functions shown above are with respect to values of
RCN4 shown in Figure 2-5.
Figure 2-6.
Version 1.1
Transfer Function of Pre-Amplifier Circuit
Aerotech, Inc.
2-9
DS160 Servo Amplifier Module
8
7
6
5
4
3
DS160 Series User’s Manual
2
1
16 Pin DIP Wafer
(snap-on cover
removed)
9
10
11
12
13
14
15
16
RCN4 1-16 (Resistor, ¼ Watt)
RCN4 2-15 (Resistor, ¼ Watt)
RCN4 3-14 (Resistor, ¼ Watt)
RCN4 4-13 (Resistor, ¼ Watt)
RCN4 5-12 (Ceramic Capacitor, 50V)
RCN4 6-11 (Resistor, ¼ Watt)
RCN4 7-10 (Resistor, ¼ Watt)
RCN4 8-9 (Resistor, ¼ Watt)
Figure 2-7. Outline of Personality Module RCN4
Table 2-4.
1-16
2-15
3-14
4-13
5-12
6-11
7-10
8-9
Personality Module RCN4 Modes
DS16020
Torque Mode
Velocity Mode
.
.
Open
.
Open
.
Open
.1uF
.
.
Open
.
.
.
DS16030
Torque Mode
Velocity Mode
.
.
Open
.
Open
.
Open
.1uF
.
.
Open
.
.
.
The surface mount version of this module has a 0 ohm resistor in series with each
component listed.
2-10
Aerotech, Inc.
Version 1.1
Figure 2-8.
Triangle
Wave
Generator
8Vout P-P
0
Triangle Wave
Reference
8 µSec Dead Time (typ.)
.001
20K
.001
20K
200K
1.5K
0
Delay
1M
Icom
A
20K
0
20K
Ifb
+
+
Op-Amp
–
Comp
Notes:
Typical Op-Amp Gain 200 V/mV
(Open Loop)
Values shown above are factory set.
0
Delay
B
2-11
DS160 Servo Amplifier Module
Detailed Electrical Diagram of DS160 Post-Amplifier Circuit
Aerotech, Inc.
+12V
DS160 Series User’s Manual
Version 1.1
50 µSec
Figure 2-9.
2-12
Aerotech, Inc.
Connect Motor
Frame to Earth
Ground.
Connect Pin 4 of J1
to Earth Ground.
DS160
4
26
30
18
14
22
12
24
20
16
28
32
J1
Axis A Speed
Command
DS160
Important: Wiring Length From Module To
Source Must Not Be More Than
18 Inches Long
Axis B
Speed
Com
0 To 115VAC
2000uF
200V per Servo
± 12 VDC Supply
(Supplied by User)
SIG. COM. Should
Be Tied To Earth
Ground
*IMPORTANT. See Note Below
Motor Wire Should Be
At Least 16 Gauge
-3
2
(14 x 10 CM )
Travel Limits
SIG COM
– 12 VDC
+12 VDC
+B
Ret
+C
+B (0 to 160VDC Bus)
+
Motor
Tach
+
*IMPORTANT!
Do not connect earth ground at this point if
115VAC off line (i.e., No Isolation Transformer)
operation is used.
18
4
26
30
14
22
12
24
20
16
28
32
J1
2uF
200V
Must Be Twisted Pair. Terminate Seperately
Both Sets To Source (DO NOT DAISY
CHAIN). Wire Gage Should Be At Least #14
Gauge (21 x 10-3 CM2)
DS160 Servo Amplifier Module
DS160 Series User’s Manual
+
Tach
Motor
+
Wiring Diagram for One or More DS160 Servo Modules when not used with the Optional
DSR Mounting Rack.
Version 1.1
DS160 Series User’s Manual
2.12.
DS160 Servo Amplifier Module
Troubleshooting the DS160 Series
A troubleshooting guide for the DS160 Series Servo Amplifier module is provided in
Table 2-9. A list of recommended spare parts for the DS160 Series Servo Amplifier
Module is shown in Table 2-10.
Table 2-5.
Environmental Specifications
Unit
Value
Comment
Operating Temp
°C
50 (max) – 0 (min)
Ambient temp of the servo module heatsink,
not the enclosure
Storage Temp
°C
+85 (max) – -30 (min)
Humidity
%
10 – 90
Table 2-6.
Shelf storage only, not stand-by use
Non-condensing
Power Stage Specifications
Unit
Value
Pin
Comment
Short Circuit Trip
Amps (min)
40
J1-26, 30
Requires power-down reset. Max
may be as high as 60 amps.
Typical input/output impedance
Ohms (max)
.3
J1-26, 28, 30, 32
From bus connection (28 or 32) to
motor connection (26 or 30)
Volts, DC
(min)
205
J1-28, 32
% (min)
93
--
DC bus high voltage trip
Typical switching efficiency
Version 1.1
Aerotech, Inc.
Requires power-down reset.
Efficiency based on switching and
resistance losses.
2-13
DS160 Servo Amplifier Module
Table 2-7.
Control Interface Specifications
Input command connection
Tach feedback connection
Shutdown connection
I Limit + connection
I limit – connection
Current monitor connection
Fault
output
(open collector)
DS160 Series User’s Manual
connection
+12VDC source connection
–12VDC source connection
Unit
Volts (max)
Value
±20
Kohms (impedance)
6
Volts (max)
Kohms (impedance)
Volts (max)
±40
6
-5 to +20
Kohms (impedance)
10
VDC
0
Kohms (impedance)
10
VDC
0
Kohms (impedance)
10
Kohms (impedance)
5
J1-8
mA (max)
-50
J1-10
VDC (max)
+30
VDC (min)
VDC (max)
mA (max loading)
VDC (min)
VDC (max)
mA (max loading)
+11
+13
50
-11
-13
50
Signal Common
2-14
Aerotech, Inc.
Pin
J1-16
J1-18
J1-6
J1-12
J1-14
J1-20
Comment
This connection is for the speed
(current command) input control to
the servo module.
This connection is for velocity
feedback to the servo module.
Provides shutdown to the power
stage of the servo module. Pulling
this input to signal common inhibits
switching at the power stage.
Provides directional current limit to
the servo module (via limit switch).
When pin J1-12 is connected
through a dry contact to signal
common, current flow from J1-30 to
J1-26 is limited to <1amp.
Provides directional current limit to
the servo module (via limit switch).
When pin J1-14 is connected
through a dry contact to signal
common, current flow from J1-26 to
J1-30 is limited to <1amp.
This connection provides a point at
which the output current level
flowing from pin 26 to 30 of J1
signal may be monitored. Scaling is
5amp/volt for DS16030 and 3
amp/volt for DS16020.
This output is used for external fault
indication. This connection is field
programmable to drive low (to
signal common) or open, if a short
circuit condition (motor load), high
DC bus voltage, or low +12VDC
input condition exists. Jumper points
1 to 2 at JP1 for active low. Jumper
points 2 to 3 at JP1 for active high.
Voltage below +11VDC will inhibit
output switching.
J1-22
J1-24
Version 1.1
DS160 Series User’s Manual
Table 2-8.
DS160 Servo Amplifier Module
Power Connection Specifications
+B, +B return connection
+, - Motor connections
Heatsink ground
Table 2-9.
Unit
VDC (max)
Value
165
Pin
J1-28 (+B)
VDC (max)
7
J1-32
(+B return)
Volts (max)
±165
J1-26 (+)
J1-30 (-)
Volts (min)
0
--
--
--
J1-4
Comment
The DC bus voltage for the power stage of
DS160 Servo is applied here. Warning Interconnect wiring between these points
must never be more than 18 inches in
length. Both wires must be twisted together.
(See Figure 2-9 for more information)
Provide “PWM” voltage, which controls
current flow to the DC motor. The output
switching frequency is 20kHz. Internal short
circuit protection is provided if these
outputs are shorted together or to earth
ground.
Earth grounding point for heatsink.
Troubleshooting Guide
Condition
Possible Cause
Active LED is de-energized, even
with ±12VDC applied to pins 20
and 22 of J1.
Shutdown input (pin 6, J1) is
pulled low.
See Figure 2-4 (see also Table 2-7).
High DC bus voltage (pins 28,
32 or J1).
+12VDC input (pin 20, J1) is
below +11VDC.
Short circuit exists at motor
connections (pin 26, 30 or J1)
See Figure 2-4, Figure 2-9.
Motor load fuse F1 is open
I limit + (pin 12, J1) and/or I
limit – (pin 14, J1) contact
closed to signal common.
No DC bus voltage on +B, +B
return (pins 28, 32 of J1)
Current limit pot turned full CW.
Tach feedback wires reversed
(pin 18, 24 of J1)
Personality module removed
Tach and or Gain pot turned too
high.
See Figure 2-2, Figure 2-4
See Figure 2-4, Figure 2-9 (see also
Table 2-7).
Active LED is energized, but no
torque is present at motor shaft
Motor accelerated to full speed
when ±12VDC power and DC bus
power was applied.
Motor has high pitch (oscillation)
sound when ±12VDC and DC bus
power is applied
Motor gets excessively hot when
running at minimum load condition
(reference current monitor, pin 8 of
J1).
Version 1.1
Ripple current (peak to peak) in
excess of 20% of continuous
return of motor, due to too high
pre-amplifier gains.
Ripple current (peak to peak) in
excess of 20% of continuous
return of motor, due to too low
motor inductance.
Aerotech, Inc.
References
See Figure 2-4, Figure 2-9 (see also
Table 2-7).
See Figure 2-4, Figure 2-9.
See Figure 2-4, Figure 2-9.
See Figure 2-2, Figure 2-4, Figure 2-5.
See Figure 2-4, Figure 2-9 (see also
Table 2-7).
See Figure 2-2, Figure 2-5.
See Figure 2-2, Figure 2-5.
See Figure 2-5.
See Figure 2-5.
2-15
DS160 Servo Amplifier Module
Table 2-10.
DS160 Series User’s Manual
DS160 Series Replacement Parts
Item
DS16020
Servo
Amplifier
Module
DS16030 Servo Amplifier
Motor load fuse, F1
Aerotech Part #
EFA465
Comment
--
EFA469
-Use any “slow blow” fuse (no
greater than 10 amp for DS16020
and 15 amp for DS16030 current
with no less than 250Volt rating).
Fuse size: 3 AG
Used for pre-selection of gain
parameters for other motor
combinations.
Mating connector for discrete
back plane termination.
Mating connector for printed
circuit motherboard termination.
Personality Module
EIK135
and
EIK162
ECK381
Quick-connect mating connector
for connector J1
Solder-type mating connector for
connector J1
ECK352
∇ ∇ ∇
2-16
Aerotech, Inc.
Version 1.1
DS160 User’s Manual
CHAPTER 3:
DSR and DSRF Mounting Racks
DSR AND DSRF MOUNTING RACKS
In This Section:
• Introduction...................................................................... 3-1
• Three-Axis Mounting Rack (DSR)................................... 3-1
• Shunt Regulator................................................................ 3-1
• Control & Power Connections to Mounting Racks .......... 3-1
• Six-Axis Mounting Rack (DSRF) .................................... 3-3
• Mounting Specifications................................................... 3-3
• Electrical Specifications................................................... 3-6
• Functional Diagram.......................................................... 3-8
• Wiring DSR/DSRF into System ..................................... 3-11
• The TV 2.5 DC Bus Power Transformer ....................... 3-11
• Troubleshooting ............................................................. 3-17
• DSR & DSRF Spare Parts.............................................. 3-18
3.1.
Introduction
Two types of mounting racks for the DS160 Series Servo Amplifier module may be
supplied as an option (see Figure 3-1 and Figure 3-2).
3.2.
Three-Axis Mounting Rack (DSR)
The three-axis mounting rack (DSR), shown in Figure 3-1, contains all necessary
functions for interfacing up to three DS160 Series Servo Modules with three DC motors.
If isolation from the AC line is required, the only additional item necessary is a
transformer for generating power for the internal DC bus power supply.
A 2.5 KVA transformer is usually all that is necessary for driving up to three DS160
Series amplifier in a typical servo application.
The control voltages (± 12 VDC supply) are derived internally from an external 115/230
VAC, 50 to 400Hz power source.
3.3.
Shunt Regulator
A DC bus shunt regulator circuit (integral to the mounting rack) is supplied to clamp an
elevated DC bus voltage caused by excess motor power regeneration during deceleration.
The shunt adjust pot (P1, see Figure 3-8) is factor set for 190 VDC. If a lower clamping
level is required, this pot may be turned CCW appropriately.
3.4.
Control & Power Connections to Mounting Racks
Control and power connections to the mounting rack are accessed via an extension board
at the rear of the mounting rack. The mounting rack base height is 3U, in accordance with
international DIN standards. The control and power extension board is less than 1U in
additional height.
Version 1.1
Aerotech, Inc.
3-1
DSR and DSRF Mounting Racks
Figure 3-1.
Figure 3-2.
3-2
DS160 User’s Manual
Three-Axis Mounting Rack (DSR)
Six-Axis Mounting Rack (DSRF)
Aerotech, Inc.
Version 1.1
DS160 User’s Manual
3.5.
DSR and DSRF Mounting Racks
Six-Axis Mounting Rack (DSRF)
The six-axis mounting rack (DSRF) is shown in Figure 3-2. This rack consists of two
three-axis racks joined together.
To simplify, this chapter provides only those specifications that are pertinent to the threeaxis rack. Specifications for the six-axis rack are provided only for those specific items
that differ from the three-axis version.
3.6.
Mounting Specifications
Mounting specifications for the DSR and DSRF mounting racks are shown in Figure 3-4
and Figure 3-5.
Adequate ventilation space must be provided above and below the mounting rack for
adequate convection cooling of the DS160 series amplifiers (see Figure 3-4 for
minimum airflow space).
WARNING
A side view of the DSR/DSRF mounting racks is shown in Figure 3-3. The sides of both
mounting racks can be reversed in the field by removing the six screws (from both sides)
as shown. This feature allows for field selectable panel mounting or rack mounting. The
DSRF (six-axis) mounting rack is the standard 19” width, allowing it to be panel or rack
mounted.
Mounting ears can be reversed for rack or
panel mounting by removing screws (both
sides).
Mounting ear in rear when panel mounted.
AC-DC
VOLTS
MODEL
SERIAL
AMPS
HERTZ
Mounting ear in
front when rack
mounted.
SERIAL TAG
MODEL TAG
VOLTS TAG
(Indicates requirement for
control input power, see
Figure 3-7 and Figure 3-9).
Figure 3-3.
Version 1.1
Side View of DSR/DSRF Mounting Rack
Aerotech, Inc.
3-3
DSR and DSRF Mounting Racks
DS160 User’s Manual
Allow Sufficient Space For Air Flow, Top And Bottom
DSR Power Supply
M5[#10] Clearance Typ.
DSR FRONT
32.0 [1.26]
50.8 [2.00]
157.5 [6.20]
22.5 [0.89]
132.8 [5.23]
101.6 [4.00]
DSR/DSRF SIDE
56.6 [2.23]
13.5 [0.53]
250.5 [9.86]
240.0 [9.45]
63.5 [2.50]
268.2 [10.56]
DSRF Power Supply
M5[#10] Clearance Typ.
DSRF FRONT
32.0 [1.26]
22.5 [0.89]
132.8 [5.23]
101.6 [4.00]
56.6 [2.23]
465.6 [18.33]
483.4 [19.03]
Dimensions - millimeters [inches]
Figure 3-4.
3-4
DSR/DSRF Mounting Dimensions
Aerotech, Inc.
Version 1.1
DS160 User’s Manual
DSR and DSRF Mounting Racks
DSR FRONT VIEW
DSR/DSRF SIDE VIEW
33.0 [1.30]
43.2 [1.70]
Blower Assembly
119.6 [4.71]
49.5 [1.95]
119.6 [4.71]
DSRF FRONT VIEW
Blower Assembly
Blower Assembly
92.7 [3.65]
119.6 [4.71]
43.2 [1.70]
50.9 [2.01]
Dimensions - millimeters [inches]
Figure 3-5.
Version 1.1
DSR/DSRF Fan Dimensions
Aerotech, Inc.
3-5
DSR and DSRF Mounting Racks
3.7.
DS160 User’s Manual
Electrical Specifications
Electrical specifications for the DSR and DSRF mounting racks are listed in the tables
below. Each specification contains reference information regarding input/output
connector pin numbers. Comments are also included for each specification.
An outline of the DSR (three-axis) mounting rack is shown in Figure 3-6. This outline
provides reference information for user terminated input and output control and power
wiring.
A rear view of the DSRF rack is shown in Figure 3-10. This outline shows the location of
jumpers A-B or B-C, which vary, depending on the type of DC bus input power (see
Figure 3-9).
Table 3-1.
Input/Output For DS160 Series DC Bus Power Specifications
Peak DC Bus Output Current
Units
Amps, DC (max)
Value
60
Pin
P1, P2, P3-28, 32
Continuous DC Bus Output Current
Amps, DC (max)
30
P1, P2, P3-28, 32
VAC (max)
115
J1-1, 2, 3, 4
VAC (min)
5
VDC (max)
190
DC Bus Input Supply AC Voltage
DC Bus Shunt Regeneration Set Point
Table 3-2.
Voltage
Control Input Power Specifications
115VAC
230VAC
Frequency
Current
3-6
--
Comment
Assume equal distribution of total current
over all 3 sets of
connections.
Max
current
per
connection is 15 amps
Max is nominal line
value. Max allowable
“high line” is 10%
(i.e., 127 VAC).
--
115VAC
230VAC
Units
VAC (max)
VAC (min)
VAC (max)
VAC (min)
Hz (min)
Hz (max)
Value
130
95
260
190
50
400
mA (max)
mA (max)
70
35
Aerotech, Inc.
Pin
J2-1, 2
J2-1, 2
J2-1, 2
Comment
240VAC
and
220VAC
(European
Service)
are
considered nominal values for
230VAC configuration.
60Hz is typically the standard
input frequency for North
American Service.
Power draw is typically less
than 5 Watts.
Version 1.1
DS160 User’s Manual
Table 3-3.
Motor Output Power Specifications
Motor Connection Output
Table 3-4.
DSR and DSRF Mounting Racks
Units
--
Value
--
Pin
J4-1, 2, 3, 4, 5, 6
Comment
See Table 2-2 through Table 28 for DS160 Series Servo
Module specifications
Control Interface Specifications
Auxiliary ±12VDC Output Connections
Motor Shutdown Connection
System Fault Output Connection
Units
mA(max)
Value
±50
Volts (max)
-5 to +20
Kohms
(impedance)
10
mA(max)
-50
VDC (max)
+30
Pin
J3-11 (+12)
J3-5 (-12)
J3-4, 10, 16
J3-20, 7
Comment
This is maximum draw for
external use.
Connection is separate for
each motor axis. Pulling this
input to signal common
inhibits
switching
of
respective Servo Amp. This
input is pulled up internally
to +12.
Open Collector output driver.
Drives low if any DS160
module is current tripped, or
if DC bus is too high (loss of
shunt regulator), or if
+12VDC supply is low.
For electrical specifications on all other connections to internal connector J3, see
Table 2-6 (Control Interface Specifications).
Version 1.1
Aerotech, Inc.
3-7
DSR and DSRF Mounting Racks
3.8.
DS160 User’s Manual
Functional Diagram
A functional diagram of the DSR mounting rack is shown in Figure 3-7. Locations of
input and output connectors J1 through J4 are shown in Figure 3-6.
Pertinent information concerning the location of key items shown in the function diagram
(Figure 3-7) is shown in Figure 3-8.
DC Bus Power
Connections
(J1)
Fault Indicator
LED (DS1)
DC BUS POWER
DANGER:
HIGH VOLTAGE
20
AC Power
(115 or 230 VAC)
for Control Power (J2)
Axis 1, 2, and 3
Control Connections
(J3)
INTERFACE
J3
AC1 AC2 CT1 CT2
1
J1
2
3
CONTROL
AC AC
HI LO
Optional Stand-off
for Plastic Guard
(typical, 4)
MOTOR1 MOTOR2 MOTOR 3
+
–
+
–
+
–
19
1
1
37
Axis 1, 2, and 3 Motor
Connections (J4)
J4
6 J5
4
J2
1
2
3
4
5
6
Input 1 Fuse
FUSE
Input 1 Fuse
FUSE
FUSE
Shunt
DC BUS
INPUT FUSES
SHUNT REGULATOR
OVERLOAD FUSE
SEE FIGURE 3-7 FOR DETAILS
* DANGER: HIGH VOLTAGE EXISTS ON CARDRACK
BACKPLANE, AS SHOWN ABOVE!
Figure 3-6.
3-8
Front View of DSR (1/2 DSRF) – Showing Locations of Input/Output Control and Power
Connections.
Aerotech, Inc.
Version 1.1
J1
Version 1.1
J12
Input
Fuse2
J10
C
A
Figure 3-7.
F1
J14
4
J13
Shunt
Resist.
Power
Module
B
Aerotech, Inc.
7
20
Open Collector
System Fault Output
32
16
14
6
24
10
26
+12VDC
Axis 1 Control
Axis 2 Control
F2
–12VDC
Axis 3 Control
+12VDC
–12VDC
Operation:
- JP1, JP3 closed
-JP2 open
-115VAC fan
230VAC 50/60Hz
Operation:
- JP1, JP3 open
-JP2 closed
-230VAC fan
* 115 VAC 50/60Hz
–12V
Isolated
15/230VAC to
12VDC Power
Supply
Control Input Power
J2
2 1
Signal Common
+12VDC
4
23
6
25
22
21
3
Signal Common
Internal
Shutdown
28
18
12
8
22
20
30
4
32
16
14
6
24
10
26
P3
4
28
18
12
8
22
20
30
P2
5 6
4
32
Axis 1 Inhibit
10
29
12
31
28
27
9
Control
Interface
28
16
14
6
24
10
26
1 2 3 4
Motor Output Power
Axis 2 Inhibit
J3
Fault
Logic
(Daisy
Chain)
Amp FLT.
IND.
+B Return (DC Bus Return)
Fault LED
Open Fuse
Fault Shutdown
18
12
8
22
20
30
P1
To DSR
Frame
JP4
J4
Reference Figures 3-9 and 3-6.
With 115VAC off line operation or with single
phase full wave operation (no centertap):
Input 1 fuse = 30ASB, Input 2 fuse = Dummy
With single phase full wave center tap operation:
Input 1 fuse = 15ASB, Input 2 fuse = 15ASB
Axis 3 Inhibit
16
35
18
37
34
33
15
AMP Heatsink
See Figure 3-10.
1
Fan *
Connection
Shunt Fuse 12? 100W
3ASB
DC Bus
Shunt
Reg.
Input
Fuse1
J16
3
J15
2000µF (3)
200VDC
2
J11
1
DC Bus Input Power
*
JP2
See
Figures:
3-3
3-8
3-9
*
JP1
JP3 *
DS160 User’s Manual
DSR and DSRF Mounting Racks
5
11
1
+B (DC Bus)
Electrical Block Diagram of DSR (1/2 DSRF) Mounting Rack
3-9
DSR and DSRF Mounting Racks
DS160 User’s Manual
P3
DS160 Series
Servo Amplifier
Modules plug in
here.
P2
Jumpers for
selecting control
power input voltage
(115 or 230 VAC)
See Figures: 3-3, 37, and 3-9.
Shunt adjust pot,
factory set to
190VDC.
P1
JP3
F2
P1
JP2
JP1
Figure 3-8.
3-10
Inside View of DSR Mounting Rack (DS160 Amplifiers and Power Supply Module Removed)
Aerotech, Inc.
Version 1.1
DS160 User’s Manual
3.9.
DSR and DSRF Mounting Racks
Wiring DSR/DSRF into System
An interconnect diagram for input power and output motor wiring is shown in Figure 3-9.
The input DC bus power wiring (J1) allows for three configurations, single-phase full
wave, single-phase center tap or 115VAC off line. The internally generated DC bus
voltage relationship to input AC voltage can be derived with the following equation (this
equation applies to both center tap and non-center tap configurations):
DC BUS (VDC) = INPUT VAC RMS x 1.414
Connections J1 pin 4 and J3 pin 7 must both be connected to earth ground (see
Figure 3-9).
An outline and pin-out specification for the control interface connector (J3) is shown in
Figure 3-11. Connector J3 accommodates a standard 37-pin “D” type male mate.
3.10.
The TV 2.5 DC Bus Power Transformer
An outline of the optional TV2.5 DC bus power supply transformer (P/N EAX159) is
shown in Figure 3-12. This transformer is supplied as an option to the DSR and DSRF
mounting racks. The transformer allows the generation of a 40 VDC bus (28 VAC taps),
60 VDC bus (43 VAC taps), 80 VDC (56 VAC taps), 100 VDC (70 VAC taps), and 160
VDC (115 VAC taps)*.
Figure 3-13 shows the typical DC bus “droop” characteristics of the TV2.5 transformer,
connected to the DC bus input power connection (J1) of the DSR rack (see Figure 3-9).
DC bus voltage level V0 of Figure 3-13 is in respect to the filter capacitors (2000µfx3)
with given value of output current I0 distributed to the three DS160 Series Amplifier
modules.
*115 VAC operation can be derived directly from the line, eliminating the need for
the TV2.5 transformer.
Version 1.1
Aerotech, Inc.
3-11
Figure 3-9.
3-12
Sig. Com.
Command
(Axis 3)
Sig. Com.
Command
(Axis 2)
Sig. Com
Command
(Axis 1)
Earth Gnd.
Aerotech, Inc.
Or Note
As required
2
3
4
5
6
J4
J1
1
2
3
4
0 – 115
VAC
See
Note
Single Phase Full Wave
DC Bus Supply
(Transformer Isolation)
Motor 2
Tach 2
Tach 3
Tach 1
Motor 1
Model/Volts tag on
side of unit
indicates set-up
(see Fig 3-3).
Earth Gnd
Earth Ground
For both arrangements
shown above:
DC BUS = VAC v2
(where VAC can be
115VAC or 230VAC, 50/60 Hz
between 0-115VAC,
115VAC Operation (DSR-A)
50/60Hz)
Motor 3
Motor
Output
1 Power
Control
Input
Power
VAC
- JP1, JP3 Closed
- JP2 Open
- 115VAC Fan
230VAC Operation (DSR-B)
- JP1, JP3 Open
- JP2 Closed
- 230VAC Fan
VAC
0 – 115 0 – 115
DC Bus
Input Power
N.C.
J2
Neutral
1
Line
2
1
2
3
4
J1
DSR (or ½ DSRF)
Mounting Rack
See Note
33 6
15 5
34
27 4
9 3
28
Control
Interface J3 J5
21 2
3 1
22
7
Single Phase Full Wave
Center Tap DC Bus Supply
(Transformer Isolation)
See
Note
1
2
3
4
See
Note
With Transformer Isolation, Jumper A
to B must be installed on the DSR
motherboard (Figure 3-10).
With 115VAC, off-line operation,
Jumper B to C must be installed on the
DSR motherboard (Figure 3-10).
For above arrangement:
DC BUS = 115VAC x v2 or
160VDC
Earth Ground
SAFETY GROUND
AC HI (LINE)
AC NEUTRAL
Single Phase Full Wave
DC Bus Supply
(No Transformer Isolation,
115VAC off line)
DSR and DSRF Mounting Racks
DS160 User’s Manual
Interconnection for DSR (1/2 DSRF) Mounting Rack
Version 1.1
DS160 User’s Manual
DSR and DSRF Mounting Racks
View is with rear cover and
shunt resistor removed.
PAD A
PAD C
PAD B
FAN
Jumper B-C with 115VAC, off-line operation
Jumper A-B with transformer isolation
See Figure 3-9.
Figure 3-10.
Version 1.1
Rear View of DSR (1/2 DSRF) Mounting Rack
Aerotech, Inc.
3-13
DSR and DSRF Mounting Racks
DS160 User’s Manual
Outline of Connector J3
20
37
1
19
1
Shield
20
System Fault
2
(N.C.)
21
Motor 1 Tach Feedback (VFB)
3
Signal Common
22
Motor 1 Input Command (Vcom)
4
Motor 1 Shutdown
23
Motor 1 Current Monitor (IFB)
5
–12VDC (for external use)
24
(N.C.)
6
Motor 1 I Limit -
25
Motor 1 I Limit +
7
Signal Common
26
(N.C.)
8
(N.C.)
27
Motor 2 Tach Feedback (VFB)
9
Signal Common
28
Motor 2 Input Command (Vcom)
10
Motor 2 Shutdown
29
Motor 2 Current Monitor (IFB)
11
+ 12VDC (for external use)
30
(N.C.)
12
Motor 2 I Limit -
31
Motor 2 I Limit +
13
(N.C.)
32
(N.C.)
14
(N.C.)
33
Motor 3 Tach Feedback (VFB)
15
Signal Common
34
Motor 3 Input Command (Vcom)
16
Motor 3 Shutdown
35
Motor 3 Current Monitor (IFB)
17
(N.C.)
36
(N.C.)
18
Motor 3 I Limit -
37
Motor 3 I Limit +
19
(N.C.)
Alternate Tachometer connections can be made at J5. See Figure 3-6 and Figure 3-9.
Figure 3-11.
3-14
Pinout Definitions for Control Connector J13
Aerotech, Inc.
Version 1.1
DS160 User’s Manual
DSR and DSRF Mounting Racks
See Section 3-10 for
DC Bus Equivalent.
PRIMARY
SECONDARY
A (0)
(104)
C
(115)
E
(0)
B
(104)
D
(115)
F
Input
Voltage
104
115
208
230
Primary
Jumper
A-B C-D
A-B E-F
C-B
B-E
115VAC
10A
70VAC
15A
56VAC
43VAC
16.5A
17A
28VAC
19A
0 Volts C.T.
0 Volts C.T.
Input
Connection
A&D
A&F
A&D
A&F
J1-1
NEUTRAL — J1-4
28VAC
19A
43VAC
56VAC
17A
16.5A
70VAC
15A
115VAC
10A
120VAC
4.0A
J1-2
J2-2
J2-1
Connections to DSR/F
Figure 3-9
MECHANICAL SPECIFICATIONS
Dimensions: Millimeters [Inches]
0
28
154.9 [6.10]
H1
42
H2
56
H3
180.3 [7.10]
148 [5.81]
70
H4
115
(Top &
Bottom)
273.1 [10.75]
140 [5.50]
Weight: 12.73 Kg (51 lbs)
Use ¼-20 Mounting Hardware
Figure 3-12.
Version 1.1
TV2.5 Transformer Specifications
Aerotech, Inc.
3-15
DSR and DSRF Mounting Racks
DS160 User’s Manual
V0
(DC)
160
150
140
130
160V
120
110
100
90
80
0
10
20
30
40
50
100V
60 I0
(DC AMPS)
Curves shown are for center-tap and full wave configurations (see
Figure 3-9).
Figure 3-13.
3-16
Typical DC Bus Voltage Characteristics of TV2.5 & DSR/F Mounting Rack
Aerotech, Inc.
Version 1.1
DS160 User’s Manual
3.11.
DSR and DSRF Mounting Racks
Troubleshooting
A troubleshooting guide for the DSR/F mounting racks appears below, in Table 3-5.
Table 3-5.
Troubleshooting
Condition
Active LED(s) on DS160
Series servo are de-energized
with 115 (230) VAC applied at
connector J2.
Possible Cause
- Shutdown inputs (pins 4, 10, 16 of
J3) are pulled to signal common.
Figure 3-7, Figure 3-11, Table 3-4.
- 115 (230) VAC control input
power below minimum level.
Figure 3-7, Figure 3-9
- Motor short circuit condition at
motor output power connections
(pin 1 through 6 on J4).
Figure 3-7, Figure 3-9
- ±12VDC power supply fuse F2
open
Active LED(s) on DS160
Series servo module(s) are
energized, but no torque is
present on motor shaft.
- Directional current limit contacts
(limit + and I limit – , pins 6, 12,
18, 25, 31, and 37 of J3) are
pulled to signal common.
- Current limit pots on DS160
Series servo module are full CW.
- No DC bus input voltage (J1) or
input DC bus fuse open.
Motor(s) accelerate to full
speed when ±12VDC power
(J2), DC bus power (J1), is
applied.
DC bus shunt regulator fuse
opens periodically.
Fault LED is energized.
Version 1.1
Reference
Tach feedback connected (pin 21,
27, and 33 of J3) are required
with respect to signal common.
Figure 3-7, Figure 3-8
If fuse is open, do not attempt repair!
Figure 3-7, Figure 3-11, Table 2-6
Figure 2-2, Figure 2-3, Figure 2-4,
Figure 2-5
Figure 3-6, Figure 3-7, Figure 3-9
Figure 3-7, Figure 3-9, Figure 3-11, Table
2-6
- Excessive motor regeneration
(due to deceleration of high
inertia load).
Figure 3-7, Table 3-1
- DC input power > 115VAC
Figure 3-7,
Figure 3-9,
Table 3-1,
Table 3-2, Table 3-3, Table 3-4
- Shunt regulator fuse is open
(shunt option).
Figure 3-6, Figure 3-7
- 1 or more DS160 Series servo(s)
have a short circuit cruuent trip
condition at motor output
connections (J4).
Figure 3-7, Figure 3-9
- DC bus voltage in excess of
195VDC.
---
Aerotech, Inc.
3-17
DSR and DSRF Mounting Racks
3.12.
DS160 User’s Manual
DSR & DSRF Spare Parts
Table 3-6.
Replacement Parts for the DSR and DSRF
Item
Aerotech Part #
DSR 3-axis mounting
rack
Comment
EFA471
--Use 15A slow-blow, 3AG, 125V fuse
with center-tap transformer
DC bus input-1 fuse,
DS16020 or DS16030
---
Use a 30A slow-blow, 3AG, 125V fuse
with non center-tap transformer or off
line. See Figure 3-7 and Figure 3-9.
Use 15A slow-blow, 3AG, 125V fuse
with center-tap transformer
DC bus input-2 fuse,
DS16020 or DS16030
---
Shunt regulator
overload fuse (F1)
---
Use dummy fuse (bus bar) with non
center-tap transformer or off line. See
Figure 3-7 and Figure 3-9.
Use 3 amp slow-blow, 3AG, 125V fuse.
Do Not Exceed 3 Amp!
∇ ∇ ∇
3-18
Aerotech, Inc.
Version 1.1
DS160 Series User’s Manual
APPENDIX A:
Appendix A
WARRANTY AND FIELD SERVICE
In This Section:
• Laser Product Warranty
• Return Products Procedure
• Returned Product Warranty Determination
• Returned Product Non-warranty Determination
• Rush Service
• On-site Warranty Repair
• On-site Non-warranty Repair
Aerotech, Inc. warrants its products to be free from defects caused by faulty materials or
poor workmanship for a minimum period of one year from date of shipment from
Aerotech. Aerotech’s liability is limited to replacing, repairing or issuing credit, at its
option, for any products which are returned by the original purchaser during the warranty
period. Aerotech makes no warranty that its products are fit for the use or purpose to
which they may be put by the buyer, where or not such use or purpose has been disclosed
to Aerotech in specifications or drawings previously or subsequently provided, or whether
or not Aerotech’s products are specifically designed and/or manufactured for buyer’s use
or purpose. Aerotech’s liability or any claim for loss or damage arising out of the sale,
resale or use of any of its products shall in no event exceed the selling price of the unit.
Aerotech, Inc. warrants its laser products to the original purchaser for a minimum period
of one year from date of shipment. This warranty covers defects in workmanship and
material and is voided for all laser power supplies, plasma tubes and laser systems subject
to electrical or physical abuse, tampering (such as opening the housing or removal of the
serial tag) or improper operation as determined by Aerotech. This warranty is also voided
for failure to comply with Aerotech’s return procedures.
Laser Products
Claims for shipment damage (evident or concealed) must be filed with the carrier by the
buyer. Aerotech must be notified within (30) days of shipment of incorrect materials. No
product may be returned, whether in warranty or out of warranty, without first obtaining
approval from Aerotech. No credit will be given nor repairs made for products returned
without such approval. Any returned product(s) must be accompanied by a return
authorization number. The return authorization number may be obtained by calling an
Aerotech service center. Products must be returned, prepaid, to an Aerotech service
center (no C.O.D. or Collect Freight accepted). The status of any product returned later
than (30) days after the issuance of a return authorization number will be subject to
review.
Return Procedure
After Aerotech’s examination, warranty or out-of-warranty status will be determined. If
upon Aerotech’s examination a warranted defect exists, then the product(s) will be
repaired at no charge and shipped, prepaid, back to the buyer. If the buyer desires an air
freight return, the product(s) will be shipped collect. Warranty repairs do not extend the
original warranty period.
Returned Product
Warranty Determination
Version 1.1
Aerotech, Inc.
A-1
Appendix A
Returned Product Nonwarranty Determination
Rush Service
On-site Warranty Repair
4020-LS User’s Manual
After Aerotech’s examination, the buyer shall be notified of the repair cost. At such time
the buyer must issue a valid purchase order to cover the cost of the repair and freight, or
authorize the product(s) to be shipped back as is, at the buyer’s expense. Failure to obtain
a purchase order number or approval within (30) days of notification will result in the
product(s) being returned as is, at the buyer’s expense. Repair work is warranted for (90)
days from date of shipment. Replacement components are warranted for one year from
date of shipment.
At times, the buyer may desire to expedite a repair. Regardless of warranty or out-ofwarranty status, the buyer must issue a valid purchase order to cover the added rush
service cost. Rush service is subject to Aerotech’s approval.
If an Aerotech product cannot be made functional by telephone assistance or by sending
and having the customer install replacement parts, and cannot be returned to the Aerotech
service center for repair, and if Aerotech determines the problem could be warrantyrelated, then the following policy applies:
Aerotech will provide an on-site field service representative in a reasonable amount of
time, provided that the customer issues a valid purchase order to Aerotech covering all
transportation and subsistence costs. For warranty field repairs, the customer will not be
charged for the cost of labor and material. If service is rendered at times other than
normal work periods, then special service rates apply.
If during the on-site repair it is determined the problem is not warranty related, then the
terms and conditions stated in the following "On-Site Non-Warranty Repair" section
apply.
On-site Non-warranty
Repair
If any Aerotech product cannot be made functional by telephone assistance or purchased
replacement parts, and cannot be returned to the Aerotech service center for repair, then
the following field service policy applies:
Aerotech will provide an on-site field service representative in a reasonable amount of
time, provided that the customer issues a valid purchase order to Aerotech covering all
transportation and subsistence costs and the prevailing labor cost, including travel time,
necessary to complete the repair.
Company Address
Aerotech, Inc.
101 Zeta Drive
Pittsburgh, PA 15238-2897
USA
Phone: (412) 963-7470
Fax:
(412) 963-7459
TWX: (710) 795-3125
∇ ∇ ∇
A-2
Aerotech, Inc.
Version 1.1
DS160 Series User’s Manual
Index
Environmental specifications for DS16020/16030, 213
C
Control and power connections
DS160, 2-2
DSR/F, 3-1
Control input power specifications for DSR/F, 3-6
Control interface specifications
DS160, 2-14
DSR/F, 3-7
Control modes of DS160 Series, 2-5
Current limit, 2-4, 2-5, 2-8, 3-17
F
Fault output, 2-4
Field Service Information, A-1
Field Service Policy, A-1
I
Introduction, 1-1
D
Description
DS160 series, 2-1
DSR, 3-1
DSRF, 3-3
DS16020, DS16030
Control interface specifications, 2-14
Control modes, 2-5
Electrical specifications, 2-4
Environmental specifications, 2-13
Fault output, 2-4
Mounting specifications, 2-1
Personality module, 2-5
Pictures of, 1-1, 2-2
Post-amplifier specifications, 2-8, 2-11
Power and control connections, 2-2
Power connection specifications, 2-15
Power stage specifications, 2-13
Pre-amplifier
Specifications, 2-4
Spare parts, 2-16
Troubleshooting guide, 2-15
DSR/DSRF
Control and power connections, 3-1
Control input power specifications, 3-6
Control interface specifications, 3-7
Electrical specifications, 3-6
Functional diagram, 3-8
Interconnection, 3-12
Introduction, 3-1
Motor output specifications, 3-7
Mounting specifications, 3-3, 3-4, 3-5
Shunt regulator option, 3-1
Spare Parts, 3-18
Troubleshooting, 3-17
Wiring into a system, 3-11
J
J13 pinouts, 3-14
L
Load connections, 3-3, 3-12
M
Motor output specifications for DSR/F, 3-7
Mounting specifications for the DSR/F, 3-3
Mounting the DS160 series, 2-1
P
Parts
DS160 series, 2-16
DSR/F, 3-18
Personality module, 2-5, 2-10, 2-16
Pinouts for J13, 3-14
Post-amplifier specifications for DS16020/16030, 2-8
Potentiometer
Description, 2-5
Overview, 1-1
Power connection specifications, 2-15
Pre-amplifier
Gain characteristics, 2-8, 2-9
PWM, 1-1
Output stage, 1-1
Output switching frequency, 1-1
R
Replacement parts for the DSR/F, 3-18
S
E
Electrical specifications
DS16020/16030, 2-4
DSR/F, 3-6
Version 1.1
Shunt regulator option, 3-1
Six-axis mounting rack (DSRF), 3-2, 3-3
Specifications, 2-1
Aerotech, Inc.
i
Index
DS160 Series User’s Manual
T
Three-axis mounting rack (DSR), 3-1, 3-2
Transformer, TV2.5, 3-11
Specifications, 3-15
Troubleshooting
DS160 series, 2-13, 2-15
DSR/F, 3-17
TV2.5 transformer, 3-11
W
Warranty Information, A-1
Warranty Policy, A-1
Wiring into a system
DS160, 2-8
DSR/F, 3-11
∇ ∇ ∇
ii
Aerotech, Inc.
Version 1.1
READER’S COMMENTS
AEROTECH
R
DS160 Series Servo Amplifier User’s Manual
P/N EDA119, September, 2000
Please answer the questions below and add any suggestions for improving this document. Is the
information:
Yes
No
Adequate to the subject?
____
____
Well organized?
____
____
Clearly presented?
____
____
Well illustrated?
____
____
Would you like to see more illustrations?
____
____
Would you like to see more text?
____
____
How do you use this document in your job? Does it meet your needs?
What improvements, if any, would you like to see? Please be specific or cite examples.
_____________________________________________________________________
_____________________________________________________________________
_____________________________________________________________________
_____________________________________________________________________
_____________________________________________________________________
Your name ________________
Your title ________________
Company name ________________
Address ________________
________________
Remove this page from the document and fax or mail your comments to the technical writing
department of Aerotech.
AEROTECH, INC.
Technical Writing Department
101 Zeta Drive
Pittsburgh, PA. 15238-2897 U.S.A.
Fax number (412) 963-7009