1
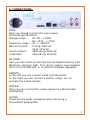
DSR-X20
DSR-X20
User Manual
DISCO
Discosmash
Vroegeinde 14, 2243 Pulle, Belgium
Phone: +32 (0)3 4640909 - Fax: +32 (0)3 4640139
[email protected] - www.discosmash.com
Please read this manual carefully and keep it for future
reference.
This manual was printed at 11/10/2006.
New software can require a new manual.
You always can find the latest version at our website:
http://www.discosmash.com
or ask us to send you a copy.
In case you have any technical problems, or have any other
questions, you can contact discosmash at:
phone:
+32 (0)34640909
internet:
http://www.discosmash.com
E-mail:
[email protected]
Address:
Discosmash b.v.b.a.
Vroegeinde 14
2243 Pulle
Belgium
Discosmash is not responsible for data loss, or for
the copyrights that may protect the sounds that you
will record with this device
CONTENT:
1.
2.
3.
4.
5.
6.
7.
8.
Introduction
Connections
Daily Usage
3.1 Playing samples
3.2 Adjusting volume
3.3 Using the menu
Adding new samples
4.1 Recording
4.2 Copying
Editing samples
5.1 Cutting
5.2 Deleting
5.3 Copying
5.4 Setting tone offset
5.5 Setting volume offset
5.6 Setting iterruptability
5.7 Bind to preset button
Timers
6.1 Adding a new timer
6.2 Deleting a timer
6.3 Starting a timer
6.4 Stopping a timer
Options
7.1 Configure remote
7.2 Language select
7.3 Set master tone control
Remote
8.1 1-button remote
8.2 Full-control remote
1. INTRODUCTION:
To start first a few thing will be explained which are
important to understand the rest of the manual.
The DSR-X20 can store an unlimited amount of samples
(i.e. soundeffects, text messages, etc.) on it’s internal
memory. 20 of these files can be mapped to the 20 preset
buttons for quick access.
The rest of the files can be used in timers or for the
1-button remote. The files that you aren’t using can be
changed easily to replace the 20 sounds that you mapped
the the preset buttons.
Sounds on the external memory cannot be used from there.
Before you can use them, they have to be copied to the
internal memory (how to do this will be explained later).
2. CONNECTIONS:
220V:
Here you should connect the main power.
Technical specifications:
Voltage range:
AC: 90 --> 264V
DC: 127V --> 370V
Frequency range: 47 --> 440 HZ
Max AC Current: 0.7A @ 230V AC
1A @ 115V AC
Inrush Current:
40A max @ 230V AC
(cold start)
20A max @ 115V AC
SD CARD:
Here you can insert an external Secure Digital memory card.
Maximum capacity: 1GB. This can be used to copy samples
from or to the DSR-X20, or to perform software upgrades.
REMOTE:
on the left you can connect extra controll panels
on the right you can connect a button, relays, etc. to
activate the 1-wire remote
AMP-DS:
Here you can connect the audio signals to a Discosmash
preamplifier
OUT/IN:
These are the audio in/outputs when not using a
Discosmash preamplifier
3. DAILY USAGE
3.1 Playing samples
When everything is configured correctly (how to do all this
will be explained later) you just need to push 1 of the 20
preset buttons to activate a sound.
While this sound is playing, the corresponding button will
blink and a progress bar will see how much has been played
already.
While playing the “stop” button will be illuminated,
indicating that you can use it to stop the sound. Depeding
of how the “interruptable” setting of the playing sound is
(see later), the sound can be interrupted by playing another
or you have to wait untill it stopped playing before you can
start another sound.
The “stop” button can stop any sounds, interruptable or
not!
3.2 Adjusting the volume
From any menu, the volume buttons (+ and -) will always be
available to adjust the volume. A volume bar at the right of
the display will show you the current volume.
Warning:
The volume will be saved at the same time as the tone
control (see section 7.3).
3.4 Using the menu
To open the menu: press the “E” (enter) button.
In each menu, the buttons that can be used at that place
will be illuminated, others not.
To go trough the menus you can use the navigation buttons
(up and down), to enter a menu you can use “E”. In some
menus, to enter another menu, you can just push on the
button with the number that is written next to the menu
item that you want instead of using the navigation keys.
For going back, always number 0 (= stop button) is used.
4. ADDING NEW SAMPLES
If you want new sounds, you can choose to record them by
yourself (i.e. from your microphone, cd-player,...) or copy
them from the external memory. you can put sounds on
this external memorycard using your PC, copy from another
DSR-X20, buy cards from Discosmash with spoken texts or
sound effects,...).
4.1 Recording
To record your own samples, do the following:
• Open the main menu by pushing “E”.
• Go to “Samples” (1).
• Open “New sample” (1).
• Choose “Record new sample” (2).
Now you have to choose if you want to record from:
• the input (connections marked with IN) (1).
• a Discosmash preamplifier (PA) (2).
After choosing this you can enter a name for your new
sound using the up, down, left and right buttons (up/down
to choose another letter, left right to go to the next or
previous letter of the name).
• When the name is complete, push “E”.
• To start the recording, push “E” again. A counter will show
you how much time has been recorded already.
• You can stop the recording with pushing “STOP”. The
recorded sample will now be saved
• After this is complete, you can push “E” to continue and
you will get back in the “New sample” menu.
• Before you can use this new sample it has to be mapped
to 1 of the 20 preset buttons. You can read how to do this in
chapter 5.5.
HINT:
You can adjust the beginning and end-points later, so make
sure you start recording on time, and don’t stop too early.
You can still cut the sound later to make it perfectly like you
wanted.
4.2 Copying
To copy a sample from the externam memory:
• Open the main menu by pushing “E”.
• Go to “Samples” (1).
• Open “New sample” (1).
• Choose “Copy from SD-card” (1).
• Now a list will be shown with the samples that are on the
external card.
• Choose the sound that you want (go up or down with the
navigation buttons). You can listen to it by pushing the right
arrow button.
• Push “E” when you found the right sound.
• Now you can change the name if you want it to have
another name on the internal memory.
• When the name is complete, push “E” and the copying will
start.
• When the copying is finished, push “E” to continue and
you will get back to the “New sample” menu.
Technical explanation:
The sounds on the external card should be in the “root”
directory (not in any maps). They should be in Wave format
(with .wav extention) and should be 44KHz, 16 bit PCM
stereo or mono (not compressed). It is also possible to play
8 bit files, but due to the much worse sound quality, we do
not recommend this.
Playing of MP3 files is currently not supported. (may be
implemented in future software versions)
The external card can have a maximum size of 1GB.
5. EDITING SAMPLES
For all the editing functions, you need to go to the edit
sample menu:
• Open the main menu by pushing “E”.
• Go to “Samples” (1).
• Choose “Edit sample” (2).
• Choose the sound that you want to edit from the list. You
can listen by pusing the right arrow button.
• Push“E” when you found the sound that you want to edit.
Now you will see all the edit functions, which will be
explained here.
5.1 Cut
As explained before, sound files can be “cut” (adjusting of
beginning and end point).
Choose “Cut” (1) from the “Edit sample” menu.
Automatically the “begin” bar will be selected and you will
hear the beginning of the sound in a loop.
By moving the bar more left or right (using the navigation)
you can adjust the beginning point.
A counter will show how many seconds you are cutting.
When you finished with the beginning point, select the
“end” bar (using the down navigation button). Adjust this
also with the left and right buttons.
When you finished, save your settings with pushing “E”.
If you don’t want to save your changes, just push “STOP” to
go back.
Technical explanation:
The “cut” function will only adjust the point where the file
will start and stop playing. It will not delete this part from
the memory, so you can change it again later. If you want
to cut the file exactly like you want and delete the rest from
the memory, we advise that you use sound editing software
on your PC or laptop to make the sound perfect like you
want and then copy it using the external memory.
5.2 Delete
If you want to delete a file completely from the internal
memory you can select “Delete” (2). You will be asked to
comfirm this action with choosing “Yes” or “No” (using the
left and right navigation buttons and then pushing “E”).
When deleting is finished you can push “E” to continue, and
you will get back to the “Samples” menu.
5.3 Copy to ext. SD-card
If you want to copy a sound to the external memory (for
editing on a PC, copying to another DSR-X20, making a
backup copy, etc.) choose “Copy to ext. SD-Card” (3) from
the “Edit sample” menu.
You can change the name that the sound will get on the
external memorycard by using the navigation. After
changing this push on “E” and the copying will start.
When it’s done, you can push “E” to continue and you will
get back to the “Edit sample” menu.
5.4 Tone offset
Using the “Tone offset” function, you can adjust the tone
settings of a file. This way you can make all your samples
sound the same. Open the “Tone offset” (4) function. Here
you will see 3 bars (bass, medium and treble). If you never
changed them, they will all be in the middle. Using the
navigation keys you can adjust these settings. When the
bars are in the middle the tone will not be adjusted, when
they are moved to the left the bass, medium or treble will
be lower (each step is around 1db). If they are moved to
the right, it will be increased.
To save your settings push “E”, to go back without saving
push “STOP”.
Technical explanation:
These settings will be saved in a seperate file on the
internal memory and will not be copied when you copy the
sound file to external memory.
This special file will be created the first time you change
the tone offset, volume offset or interruptable setting for a
sample.
10
5.5 Volume offset
Using the Volume offset function, you can adjust the volume
settings of a file. This way you can make all your samples
equally loud. Open the “Volume offset” (5) function. Here
you will see a volume bar. If you never changed it, it will be
in the middle. It can be adjusted by using the navigation
keys. When the bar is in the middle the volume will not be
changed, when it is moved to the left it will be less loud, to
the right more loud.
To save your settings push “E”, to go back without saving
push “STOP”.
Technical information:
see “Tone offset”, section 5.5.
5.6 Interruptable
There are different priority levels for the playing of each
sound:
- highest priority: 1-button remote
- lower priority:
manually started sounds
- lowest priority: sounds started by timers
This means that a timer can’t interrupt anything else.
Manually started sounds can interrupt only timer sounds.
The remote sound can interrupt anything.
If a sound is started while another sound with the same
priority is playing, the “interruptable” setting will decide if it
will continue playing, or it will be interrupted.
To change this for a sound, open the “interruptable” (6)
setting. Choose yes or no (yes = interruptable, no = not
interruptable) and push “E”.
Technical information:
see “Tone offset”, section 5.5.
11
5.5 Bind to preset
To put this sound on 1 of the 20 preset buttons, open the
“Bind to preset” (7) option. Now you can choose the preset
button that you want this sound to be on. Push “STOP”
to go back without changing anything, or push the correct
preset button. This will give you a comfirmation message
and you can push “E” to continue.
12
6. TIMERS
Timers are sequences of sounds that can be played
automatically. After each time a sound will be played there
will be pause for a specified time and then the next sound
will play. This is often used for commercial messages,
security announcements, etc.
They can be compared with “playlists”, with the difference
that the time between each sound is adjustable.
All the timer settings will begin from the “Timer” menu. To
get here go to the main menu (push “E”) and then choose
“Timers” (2).
6.1 New timer
To create a new timer, choose “New timer” (1).
Now you can enter a name for your new timer by using the
navigation keys (up and down to choose another letter, left
and right to go to the next or previous letter of the name).
After typing the name, push Enter (“E”).
Now you will get a list of all the files on the internal memory.
Choose the first sound that has to be played and push
enter (“E”). Now you can choose the time to wait after
playing this sound. Use the buttons 0 --> 9 to enter a time
in seconds (always push 3 numbers, for example to wait
12 seconds push 0 1 2). You can also use the up and down
navigation keys to adjust the time.
After choose the correct time to wait, push “E”.
Now you can choose if you want to add another sample to
your timer. If you choose “Yes”, you can choose the next
sound and time to wait. You can repeat this as many times
as you want.
If you choose “No” the timer will be saved and you will go
back to the “Timers” menu.
6.2 Delete timer
To delete a timer, choose the “Delete Timer” (2) option.
Then choose the timer that you want to delete, push “E”,
and comfirm your action with “Yes” or “No”.
13
6.3 Start Timer
To start a timer, choose “Start timer” (3). After this you
will get a list of all the timers that are available. Select the
timer that you wish to start and push “E”. This will give you
a confirmation message that the timer has been started,
and you can push “E” to continue.
Warning:
If a timer is already running, and you start another timer,
the one that already was running will be stopped.
6.4 Stop Timer
To stop a timer, choose “Stop timer” (4). This will give you
a comfirmation that the timer has been stopped. Push “E”
to continue.
14
7. OPTIONS
The options menu contains all the general options.
To get here, go to the main menu (push “E”) and then go to
“Options” (3).
7.1 Configure remote
If you want to use the 1-button remote, you should choose
which sample will be played when activating it. To choose
this open the “Configure remote” option. You will see a
list of all files that are on the internal memory. Select the
sound that you want to be activated with the remote and
push “E”. You will automatically get back to the “Options”
menu.
For more information about the remote, see section 8.1.
7.2 Select language
If you would like the menu to be in another language, you
can open the “Select language” (2) menu. Choose your
language (currently English, French, German or Dutch).
The language off the menu will now be changed and you
can go back using the “STOP” button (0).
7.3 Master tone control
Here you can choose the main tone settings. Open the
“Master tone control” (3) menu. Move the bass medium
and treble bars to the positions that you want. Now save
your settings with “E”, or go back without saving with
“STOP”.
When these settings are saved, also the master volume
setting will be saved so that the next time you switch on
your DSR-X20, the volume will be at the same level as when
you saved these settings.
15
8. REMOTE
8.1 1-button remote
1 sound can be activated using a button, microswitch,
relays contact,... To use this feature, connect a NO (normal
open) switch to the “Remote” connector (you can contact
Discosmash if you need a connector that fits here). When
the 2 contacts of this connector are closed, the sound will
be activated.
For maximum safety, this connector is completely isolated
from the other electronics of the DSR-X20. However this
still does not mean that you can’t break it. Be carefull when
connecting this, and do not apply any voltage to these
contacts, only a free switch!
8.2 Full remote control
Other control panels (currently limited to 14) can be
connected. This way you will have full control over your
DSR-X20 from multiple places (2 cash boxes, etc.).
Control panels can be 100’s of meters away from eachother.
Different control panels will be available later (compact,
without display only for playing sounds, wireless, ...).
Many things are possible using this extention (i.e. make
your ride to activate sounds automatically,...).
If you have any special needs, please contact Discosmash
to discuss the possibilities.
16
Thank you for your confidence!
If you have any further problems or questions, do not
hesitate to contact us.
Discosmash
Vroegeinde 14
2243 Pulle
Belgium
Phone: +32 (0)3 4640909
Website: http://www.discosmash.com
E-mail: [email protected]
17