1
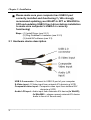
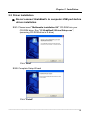
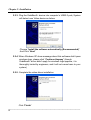
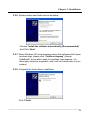
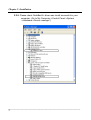
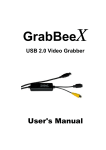
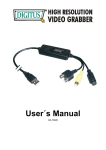
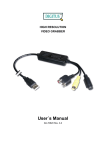
GrabBeeX+
USB 2.0 AV Grabber
User's Manual
________________________________________________________________________________
FEDERAL COMMUNICATIONS COMMISSION
This device complies with Part 15 of the FCC Rules Operation is subject to
the following two conditions: this device may not cause harmful interference,
and (2) this device must accept any interference received, including
interference that may cause undesired operation.
This equipment has been tested and found to comply with the limits for a
Class B Digital Device, pursuant to part 15 of the FCC Rules. These limits
are designed to provide reasonable protection against harmful interference in
a residential installation. This equipment generates, uses and can radiated
radio frequency energy and, if not installed and used in accordance with the
instruction, may cause harmful interference to radio communication.
However, there is no grantee that interference will not occur in a particular
installation. If this equipment does cause harmful interference to radio or
television reception, which can be determined by tuning the equipment off
and on, the user is encouraged to try to correct the interference by one or
more of the following measures:
-Reorient or relocate the receiving antenna.
-Increase the separation between the equipment and receiver.
-Connect the equipment into an outlet on a circuit different from that to
which the receiver is connected.
-Consult the dealer or an experienced radio/TV technician for help.
Notice: Changes or modifications not expressly approved by the party
responsible for compliance could void the user’s authority to operate the
equipment.
CE DECLARATION
This device complies with CE . These limits are designed to provide
reasonable protection against harmful interface in a residential installation.
Printed in TAIWAN R.O.C No.0272304
All contents are subject to change without notice.
All trademarks are the property of their respective owner
I
Table of Contents
Chapter 1. Overview ---------------------------------------------------------1.1
1.2
1.3
1.4
1.5
1
Introduction ----------------------------------------------------------------Features --------------------------------------------------------------------Specifications --------------------------------------------------------------Package Contents --------------------------------------------------------Minimal System Requirements -----------------------------------------
1
1
2
2
2
Chapter 2. Installation -------------------------------------------------------
3
2.1
2.2
2.3
Hardware device description ------------------------------------------Driver Installation ---------------------------------------------------------Application Software(Video Jukebox) Installation -----------------
3
4
8
Chapter 3. Basic Function Operating -------------------------------
9
Chapter 4. Trouble Shooting ----------------------------------------------- 14
_______________________________________________________________________________
II
Chapter 1. Overview
1.1 Introduction
Congratulations on your purchase of “GrabBeeX+”. The “GrabBeeX+”New Generation USB2.0 Audio/Video grabber is the best ideal companion for
your portable audio/video application. Real-time MPEG 1/2/4 recording make
you have powerful video application on hand
GrabBeeX+ is the bridge between your computer and analog camera, VCR,
camcorder or other video source.
GrabBeeX+ is small enough to fit in the palm of your hand and is ideal for
both notebook and desktop computers.
1.2 Features
Small Wonder--Dimensions are (L)81mm x (W)30mm x (H)15mm
Audio and video go though USB 2.0 bus (WinXP) to make best
performance
High speed USB 2.0 data transfer rate for best audio/video recording
Encoding MPEG 1 / MPEG 2 / MPEG 4 format directly, Ideal formats for
video application
Up to 25 fps motion capture capability at 720x576(PAL) & 30 fps at
720x480(NTSC)
SnapShot function support
Composite, S-Video analog input, NTSC, PAL and SECAM multi
system support
Recording period setup
Support Brightness, Contrast, Hue, Saturation, Sharpness control
Powerful video editing function include Motion Video Special Effects/
Title Effects/ Picture-in-Picture Effects/ Slow & Fast Motion Video
Effects/ background music/ color background/ Transitional Effects
Plug & Play
Low power consumption. Ideal for portable computer too
No Battery---No need to install batteries or run off the wall adapter
_____________________________________________________________
1
Chapter 1. Overview
1.3 Specifications
Video input : One RCA composite, One S-Video.
Video system : NTSC, PAL and SECAM multi system support
Audio input : in WinXP, go through USB; in Win2000, go through
sound card
Motion capture : MPG /AVI format up tp 720x480@NTSC, and
720x576@PAL resolution
MPEG 4 format 320x240@NTSC and
352x288@PALresolution
Still image capture : BMP/JPG/TIF/PCX/TGA file format
Performance : Up to 25 fps at 720x576 for PAL,
30fps at 720x480 for NTSC
Power Source : 5VDC,300mA(max) through USB port
1.4 Minimum System Requirements
USB 2.0 equipped computer
Pentium 4 1G or above
128MB of RAM
Windows 2000/XP
Sound card
1.5 Package Contents
GrabBeeX+ USB 2.0 Audio/Video Grabber
Video Jukebox software CD
Ulead VideoStudio editing software
User’s manual
_____________________________________________________________
2
Chapter 2. Installation
※ Please make sure your computer has USB2.0 port
correctly installed and functioning !! ( We strongly
recommend updating your WinXP to SP1 or Win2000 to
SP4 and updating USB2.0 host driver before installation
to make sure computer’s USB2.0 is correctly
functioning)
Steps : (1) Install Driver (see 2.2.1)
(2) Plug GrabBeeX+ hardware (see 2.2.3)
(3) Install AP software (see 2.3)
2.1 Hardware device description
USB 2.0 connector : Connect to USB 2.0 port of your computer
S-Video input : S-Video input from external A/V device(e.g.VCR)
Composite video input : Composite video input from external A/V
device(e.g.VCR)
Audio L/R input : Audio input from externam A/V device (In WinXP);
(In Win2000 – please connect external A/V device
audio to line-in of Sound card)
_____________________________________________________________
3
Chapter 2. Installation
2.2 Driver Installation
※ Do not connect GrabBeeX+ to computer USB port before
driver installation
2.2.1. Please insert "Multimedia Installation Kit" CD-ROM into your
CD-ROM drive; Run " E:\GrabBeeX+\Driver\Setup.exe ";
(assuming CD-ROM drive in E drive)
Click "Next"
2.2.2. Complete Setup Wizard
Click "Finish"
_____________________________________________________________
4
Chapter 2. Installation
2.2.3. Plug the GrabBeeX+ device into computer’s USB2.0 port; System
will detect new Video device as below.
Choose “Install the software automatically (Recommended)”
And Click “Next”
2.2.4. When Windows XP show message about this software didn’t pass
windows logo, please click “Continue Anyway” (though
GrabBeeX+ driver didn’t apply for windows logo approve, it is
thoroughly tested by engineers, and it will not cause harm to your
system)
2.2.5. Complete the video driver installation
Click “Finish”
_____________________________________________________________
5
Chapter 2. Installation
2.2.6. System detect new Audio device as below.
Choose “Install the software automatically (Recommended)”
And Click “Next”
2.2.7. When Windows XP show message about this software didn’t pass
windows logo, please click “Continue Anyway” (though
GrabBeeX+ driver didn’t apply for windows logo approve, it is
thoroughly tested by engineers, and it will not cause harm to your
system)
2.2.8. Complete the Audio driver installation
Click “Finish”
_____________________________________________________________
6
Chapter 2. Installation
2.2.9. Please check GrabBeeX+ driver was install successful in your
computer; (Go to My Computer->Control Panel->System
->Hardware->Device manager”)
_____________________________________________________________
7
Chapter 2. Installation
2.3 Application Software (Video Jukebox) Installation
2.3.1. Please insert "Multimedia Installation Kit" CD-ROM into your
CD-ROM drive; Run " E:\GrabBeeX+\AP software\Setup.exe ";
(assuming CD-ROM drive in E drive)
2.3.2. Welcome to the InstallShield wizard;
Click "Next"
2.3.3. Choose destination location;
Click “Next”
2.3.4.Select Program Folder;
Click “Next”
2.3.5. Finished Jukebox software installation;
Click “Finish”
2.3.6. Install Windows Media Format 9 Series Runtime Setup;
Click “Yes”
2.3.7. License agreement
Click “Yes”
2.3.8. Finished Windows Media Format 9 Series Runtime installtion;
Click “Ok”
2.3.9. Driver install;
Click “No”
Completer AP software installation!
_____________________________________________________________
8
Chapter 3. Basic Function Operating
3.1. Starting : Please click the “Video Jukebox” icon
After starting application, you can see control panel as below
also one preview window as below
3.2. Preview : Please move mouse cursor into Preview window and right click,
function menu will appear as below
_____________________________________________________________
9
Chapter 3. Basic Function Operating
Resolution : There are 4 resolution video preview you can select
NTSC mode : 352x240, 640x480, 720x480, Full screen
PAL mode : 352x288, 640x480, 720x576, Full screen
3.3. Close : Exit Video Jukebox program
3.4. Record : When you click “Record”, it will start to record video,
the recording video resolution depend on preview resolution,
but MPEG4 file(ASF) resolution is 320x240 in NTSC and
352x288 in PAL.
※ In order to make smooth recording, we recommend you
do not move mouse during recording
3.5. Stop : Stop recording; After you click “Stop“, a table will be shown
you can select a file and select “Delete” or “Save” function.
3.6. Play : Play the recorded file
3.7. Pause : Pause the playback file
3.8. Svideo input / Composite Video input : Click to select which input
video you want display
3.9. Color Control : Brightness/Contrast/Hue/Saturation/Sharpness
adjustment
_____________________________________________________________
10
Chapter 3. Basic Function Operating
3.10.Still Image Capture : the resolution depend on Preview mode
resolution
3.11. Setting : After you click “Setting”, a screen appear as below
3.11.1. Tuner : Setting input video system and then click “OK”
3.11.2. Devices : Please choose Audio input driver and then click “OK”
※ Under WinXP, audio go through USB, please choose
“USB EMP Audio Device”
※ Under Win2000, audio go through Sound card, please choose
your computer’s own audio device
_____________________________________________________________
11
Chapter 3. Basic Function Operating
3.11.3. Capture : Setup capture function
3.11.3.1. Time limit : Setup recording period
3.11.3.2. Saving video recording files / Saving snapshot photos
You can change any location as you want
3.11.3.3. Video format : Choose which format you will record
※ The recording performance depend on your
computer system speed
3.11.3.4. Video view : Enable/Disable video window display during
recording
3.11.3.5. Settings : Setup recoding format compression rate
_____________________________________________________________
12
Chapter 3. Basic Function Operating
3.11.3.6. System : Show your computer information
3.12. Mute : Volume On/Off
3.13. Full Screen mode : You can Double left click inside video window to
switch between full screen and previous screen
size
※ In full screen mode, if you didn’t move mouse, then mouse will
disappear until you move mouse again.
_____________________________________________________________
13
Chapter 4. Trouble Shooting
Q1 : Why My system can not detect GrabBeeX+
A1 : (a) Make sure you enable USB2.0 in motherboard BIOS setup
(b) Please make sure that your system has the latest USB2.0 host driver.
For Win XP, please upgrade to Service Pack 1.
For Win2000, please upgrade to Service Pack 4.
Q2 : Why can not see video display
A2 : (a) Maybe your video system setup is incorrect, please check your
hardware connection (see page 3; 2.1 Hardware device
description) and choose the correct video system (see page 11;
3.11.1. Tuner)
(b) Please make sure your system got latest USB2.0 host driver.
For Win XP, please upgrade to Service Pack 1.
For Win2000, please upgrade to Service Pack 4
Q3 : Why is the resolution always 320x240 in preview mode
A3 : Because you plug GrabBeeX+ in USB1.1 port, or though your USB port
is 2.0, but didn’t upgrade USB2.0 driver, please make sure USB port is
USB2.0 and upgrade the USB2.0 host driver from Microsoft Website
Q4 : Why does the system show “High Speed device plug into Full speed
USB port…”
A4 : (a) Please make sure your system support USB2.0 hardware port.
(b) Please make sure that your system install USB2.0 Host driver already
Q5 : Why do I get unstable video during preview and recording ?
A5 : If you are using Ultra DMA hard disk, please updated latest driver of IDE
ATA/ATAPI controller.
Some motherboard bundled driver is not latest version, we suggest that
you use XP system bundled driver.
Q6 : Why can not hear anything during preview mode?
A6: In WinXP, Audio go through GabBeeX+, and choose correct Audio device
(please see 3.11.2.)
In Win2000, the audio go through sound card Line-in, please check your
sound card function.
_____________________________________________________________
14
Chapter 4. Trouble Shooting
Q7 : How can I get minimum number of dropped frames during video
capture ?
A7 : The best recording performance depends on your computer system
performance, but you can also take some steps as below to improve
performance
(a) Try lowering the resolution format you record.
(b) Enable hard disk drive DMA ; Go to My Computer->Control Panel
->System->Hardware->Device Manager->Disk drives to setup
(c) Keep Hardisk free space larger.
(d) Use speed more than 7200 rotation hardisk drive
(e) Disable Power Management in BIOS
(f) Disable Power Saving mode of monitor
(g) Close some resident programs of your system
(h) Defrag your hardisk
(i) Do not run other program during recording
Q8 : I can preview video but when recording, the system crashed/hanged
A8 : (a) Please install DirectX 9.0 or above from driver CD.
(b) Maybe your VGA card driver is not compatible with direct draw very
well, please update new VGA driver
(c) Your system resident too many programs which occupies the memory,
please close unnecessary programs
(d) Please lower the hardware accelerator, you can go to
My Computer->Control Panel->Display->Settings->Advanced->
Performance to adjust it.
_____________________________________________________________
15