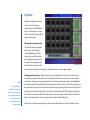
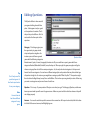
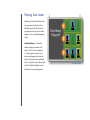
1
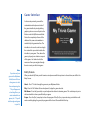
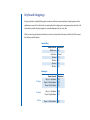
Your Trivia. Your Way.
User Manual
Version 1.0
MyTrivia was created and developed by Steuber Studios. For more information, visit us online at www.steuberstudios.com.
© 2006. All rights reserved.
Table of Contents
User Manual
1
History of MyTrivia
3
File Structure
4
Game Interface
8
Keyboard Mappings
9
Creating a Game
10
Preferences
11
Options
12
Editing Questions
13
Question Editor Features
15
Playing Your Game
17
History of MyTrivia
Several years ago, my brother and I built a custom trivia game based on our childhood memories. We finished
it in time for the holidays and shared it with our rather large family, nine kids in all. Our experience has become
your opportunity. We had such a great time playing the game that we decided to create a brand new type of
trivia game where anyone could add their own content to create a much more personal and enjoyable game
experience. The result of several years of effort has resulted in MyTrivia™, a trivia game where you supply your
own questions, graphics and even sound effects. We hope that you enjoy playing MyTrivia as much as we have
enjoyed creating it. The rest of this manual is devoted to helping you get the most out of the game with tips
and ideas on how you can get your very own trivia game up and running.
File Structure
Because we wanted MyTrivia to be completely customizeable, most of the game elements are stored outside
of the main program. There are various folders that contain content that you can change but be careful and
be sure to make back-ups. This manual will take you on a tour of this content and describe how you can build
your own game.
All of the files and folders of MyTrivia are located within the MyTrivia folder which you should place in the C:
drive on a Windows PC (C:\MyTrivia) or the Applications folder on a Macintosh. Open that folder and let’s look
at the folders contained within.
MyBackgrounds
Tip:
When creating a
background image,
darker images with
lesser contrast usually
work best. If there is
too much contrast,
your game might look
cluttered.
MyBackgrounds:
Background images are
1024 x 768 pixels,
72 dpi,
.jpg
This folder contains graphics used
in the background of the game.
MyTrivia comes pre-loaded with
four backgrounds (Blue, Green,
Grey and Red). Any graphic or
picture you place in this folder will
be available on the Options screen
next time you launch MyTrivia.
Graphics or pictures should be
JPG’s with a resolution of 1024 x
768. Any other file type or size may
produce undesired results. Use
family photos, desktop wallpapers
or any other cool graphics you’ve
collected over the years. It’s your
game, do as you wish.
MyBooths
This folder contains the player booths used during game play. MyTrivia
comes with a small collection of booths of different colors. These are highly
specialized graphics, we do not recommend that you attempt to change
these graphics or add your own. You can order new sets of booths off of the
MyTrivia Web site at www.mytriviagame.com.
MyGames
This folder contains the individual game folders which contain a question
file (MyQuestions.txt) , a specific game options file (MyOptions.txt), and a
default question and answer audio file (Q0.mp3, A0.mp3) for your game.
The MyOptions.txt file is edited only through the user interface accessed within the MyTrivia game. DO NOT
attempt to edit this file outside of the interface. The question and answer audio files are created outside the
application using your favorite voice recording software. Please note that the names of the folders within the
MyGames folder are the actual names of your games. You can create as many games as you wish, you can even
share them with your friends! See the section “Creating a Game” later in this manual.
Tip:
You may purchase
more booths from the
MyTrivia Web site at
www.mytriviagame.
com
Exporting Questions
When you want to share your questions with another MyTrivia player, you can use the “export” feature on the
Question Editor Screen. When you export a question set, MyTrivia will write a file to the MyTrivia folder, it will
be named: [name of the game] Questions.txt. Pass this along to a friend and they can quickly import your whole
question set.
Importing Questions
If you wish to quickly add a batch of questions to your game, the best way is to import a tab-delimited file. Be
sure that the file is correctly formatted, you should start with a file that was exported from MyTrivia. When you
click the “import” button, you will be warned, if you click “yes”, MyTrivia will import the file named “Questions.
txt” located in the MyTrivia folder. WARNING: This will overwrite your current question set! If you already have
questions written, be sure to export your set and back it up in a safe place.
MyPics
Tip:
MyPics contribute to
the mood and design
of your game. Try to
associate these images
with your theme.
MyPics:
MyPics images are
640 x 480 pixels,
72 dpi,
.jpg
MyPlayers:
MyPlayers images are
150 x 150 pixels,
72 dpi,
.jpg
This folder contains the pictures or graphics used for the question interlude. The question interlude displays
an image and plays a sound clip between each question. You control which graphic is displayed with the
associated game question 1 through 20. The default graphics are already loaded with the game, but you can
create your own by simply adding pictures or graphics to this folder, just be sure that they are JPGs, sized to
640 x 480 pixels at 72 dpi. Once you’ve added the graphics to the MyPics folder, the names of those files will
appear in the list on the Options screen.
MyPlayers
This folder contains your player headshots. Three are provided with MyTrivia but you can add more. These
graphics or pictures must be sized to 150 x 150 at 72 dpi. in JPG format. The name of the graphic file will be
the name of the player in the game. For example, if the graphic you put in this folder was named “Bill.jpg” then
“Bill” would be the player name used in the game. Once you’ve added the graphics to the MyPlayers folder,
these players will be available to select from at the beginning of the game.
MyPresets
This folder contains two subfolders; SoundEffects and Timers which contain game sound effects and game
timers. You can replace any file in the SoundEffects folder with a recording of your own, even your own voice.
The file must retain the same file name and must be in mp3 format. Sound effects include game background
music, emcee comments and miscellaneous game sound effects. Feel free to experiment but make sure the
name of the file remains exactly the same and, as always, be sure to backup your files before making changes.
Timers
DO NOT edit the files in the Timers folder. These files control the timing of events in the game.
MyTunes
The files in this folder work in conjunction with the files in the “MyPics” folder. During the question interlude,
the appropriate graphic in the “MyPics” folder will be displayed and the sound byte from the “MyTunes” folder
will be played. Again, you can use any .mp3 sound file you want including voice recordings or song clips. Be
careful to keep these short as the game will not continue until the complete clip is finished playing.
Miscellaneous Files
Under the parent directory “MyTrivia” there are several system files that should not be manipulated. The
MyPreferences.txt file is a general game preference file that is updated through the game interface. The
“MyTrivia.exe” file (PC) or MyTrivia (MAC) is the compiled program that you run by double-clicking it or
doublle-clicking a shortcut that is linked to it.
Final Thoughts on Files and Folders
Tip:
When creating .mp3
files for the MyTunes
folder, be sure to
keep them short and
sweet. Otherwise, your
audience may loose
interest.
We have given you extensive file information because we want you to be aware of the options you have in
your game. Because we had the desire to create a very customizable trivia game, it was necessary to allow you
to have free access to many files normally inaccessable to a user. This gives you a great deal of control over
your game which also increases the risk of causing undesireable results. If you follow the instructions above
and stick to changing only the files we’ve outlined, you won’t have any trouble.
Game Interface
As discussed previously, some of the
customization takes place outside of
the game interface by simply adding
graphics, pictures or sound bytes to the
folders under the MyTrivia main folder.
Due to the complexity of some of the
database files, some customization is
controlled by the game interface. The
interface is also used to select and apply
the custom files you added outside the
interface to your game. Then, when the
game is played, your selections are part
of the game. Let’s take a look at the
menus and how you navigate through
them to create your first trivia game.
Note:
If you have only one
game in the MyGames
folder, there will be no
other games to select
from and pressing the
“1” key will appear to
do nothing. Once you
create and add more
games, the “1” key will
tab through each game
in your list.
Entry Screen
Entry Screen
When you launch MyTrivia you will come to a simple menu with four options to choose from, we call this the
Entry Screen.
Select - Press “1” to tab through the games in your MyGames folder.
Play - Press the “Go” button (Enter on keyboard ) to play the game selected.
Edit Games - Press the [space bar] on your keyboard to edit and customize games. This selection puts you in
edit mode which is where you will build your game.
Escape - Press the [Esc] escape key to close the program. If the [Esc] key is pressed at any point while in edit
mode or while playing the game, the program will be closed. Be careful with this key.
Keyboard Mappings
If you purchased a custom MyTrivia game console you will not need your keyboard to play a game once the
application is opened. You will need to use your keyboard to edit games or make game option selections. We
have made it possible to play the game on a standard keyboard, it’s just not as fun.
When you are using a keyboard, note that you need to use keys rather than mouse-clicks for all of the screens
that display number buttons.
General Play
Game Console
Quit Button
Go Button
1 Button
2 Button
3 Button
4 Button
Keyboard
[E]
[ Enter ]
[1]
[2]
[3]
[4]
3 Players:
Game Console
Player 1: Left Buzzer
Player 2: Middle Buzzer
Player 3: Right Buzzer
Keyboard
[Q]
[B]
[P]
2 Players:
Player 1: Left Buzzer
Player 2: Right Buzzer
[Q]
[P]
1 Player:
Player 1: Middle Buzzer
[B]
Buzzing In
Creating a Game
MyTrivia comes with a default game
named “My Trivia Game” which you can
play but it is really just meant to get you
started. The real fun is when you create
your own game. You can choose to add
to this game, re-name it or just start a
new game. We will get back to play after
we’ve set up a game.
Creating a Brand New Game
To create a new game, first you need
to copy the “My New Game” folder
(found inside the MyTrivia folder) to the
Main Menu
“MyGames” folder. Be sure to duplicate
the folder, don’t just move it, you need to keep the original for creating more games later. The next time you launch
MyTrivia, “My New Game” will show up in your list of games and you can change the name of the game.
Changing the Game Name – To change the name of the game, click the small “Edit” button in the top right
corner of the menu screen. Type in the name you want and click “Save” or click “Cancel” to return to the
previous name. This operation simply changes the name of the folder under your MyGames folder. This
operation MUST be done through the interface to avoid potential problems. Do not change the folder names
outside of the application.
Note:
When playing with two
players, Player 2 buzzes
in with Buzzer 3 or
keyboard key [ P ].
Customizing Your Game – From the Main Menu press the [spacebar] to edit and customize a game. This will
take you to the Main Edit Menu. On this menu you will see a scrollable game list window with a list of your
games. Above the game list window is the name of the current loaded game. To the right of the game list
window are four buttons – Play, Editor, Options and Preferences. Play will take you back to the opening screen.
Preferences
Let’s set the global preferences by clicking on the
“Preferences” button. These preferences apply to all
games.
Number of questions in the game - Set the
number of questions you would like to have in
your game. You can have up to twenty standard
questions in a game.
Number of questions in the bonus round - This
sets the number of questions in the Bonus Lightning
Round. There is no limit as long as you have enough
questions loaded in your game to cover your standard questions and your bonus questions.
Preferences
Point value for each question in the game - You can set the point value for the questions based on the first,
second and third attempts. You can make each attempt worth the same amount or you can reduce the value.
These values are also used in the Bonus Lightning Round.
Tip:
It’s a good idea to
reduce the amount of
points for each attempt,
this encourages players
to buzz in early and
keeps the pace of the
game moving.
Skip question transitions? – As mentioned before, there is a transition or interlude between questions during
the game. If you would like to skip these, click the Yes button. Skipping the transitions will make for a faster
paced game.
Fast forward/rewind in question editor - As your games get bigger you may find it useful to browse through
your questions to get to a particular spot quicker. This option lets you specify the rate at which you skip from
question to question.
After you have made your selections click “Save & Exit”.
Options
Now that your global preferences
are set, let’s select the gamespecific options. Click the “Options”
button. This takes you to a screen
with 20 slides and several scrollable
windows on the right.
Changing the game background
The scroll window on the bottom
right contains a list of the files
in your “MyBackgrounds” folder.
Simply select one of the files and
the background for you game will
be changed. The background you
select will remain associated with
the game you’re editing until you change it. All selections on this screen are game specific.
Tip:
It’s a good idea to
reduce the amount of
points for each attempt,
this encourages players
to buzz in early and
keeps the pace of the
game moving.
Options Screen
Changing question pictures – Before each question in the game there is a transition. You can have up to
20 questions in a game, therefore, there are 20 possible transition pictures and tunes to associate with the
20 questions. To change an association simply click on the slide you want to change. The slide will highlight,
then select a picture from the Pictures file list and a tune from the Tunes file list. These selections will replace
the previous one on the slide. You can preview the selected tune by clicking the “musical note” button on the
bottom of the screen. Notice that the files in the Pictures list come from your “MyPics” folder and the files in
the Tunes list come from your “MyTunes” folder. When you’ve made all your selections click the “Save & Exit”
button on the bottom of the screen. Once again you’re back to the Main Edit Screen.
Now it’s time to build the questions for your game. From the Main Edit screen, click on the “Editor” button.
Editing Questions
The Questin Editor is where most of
your game building time will take
place. A trivia game is only as good
as the questions it contains. That’s
why we let you build them. First let
me describe the three parts to the
questions.
Tip:
Don’t limit yourself to
specific categories. It’s
fine if each question has
it’s very own category.
Note:
You must have at
least three different
categories for any
game.
Category – The Category gives you
the opportunity to group similar
or topical questions together. For
instance you could have a general
Question Editor
game with the following categories:
Entertainment, Sports, Science, Geography, Literature etc. Or you could have a sports game with these
categories: Baseball, Basketball, Football, Soccer, Hockey etc. When you play the game, one player will get to
choose a category from a list of three unique categories. So, the only rule about categories is that you must
have at least three categories. You can have a different category for each question that may hint at what type
of question it might be. For instance, you might have a category called “What’s Up Doc?”. The question might
then be related to Bugs Bunny, Looney Tunes or Mel Blanc. This is where you can get really creative. Either way,
you must use categories and you must have at least three.
Question – This is easy. It’s your question. What you see is what you get. The Category, Question, and Answer
boxes represent what you will see on the game screen. Make sure your text fits inside these boxes or they will
not display properly.
Answers – You need to enter four possible answers in the answer box. After you’ve done that, click the button
to the left of the correct answer, it will highlight green.
Okay, let’s edit your first question.
To get started, let’s first edit the
sample question supplied with the
game. Click the “Edit” button.
Edit – When you click the “Edit”
button the fields are opened and
you can type in your category,
question and answer fields. Use
the “Tab” key to move to the
different fields. Click the button
next to the correct answer and
then click the “Save” button. If you
edit a question and wish to abort
the changes you made, click the
“Revert” button and all values will
be restored.
Tip:
Don’t limit yourself to
specific categories. It’s
fine if each question has
it’s very own category.
Add – To add questions click the
“Add” button and you will get a
new set of blank entry fields. Type
Edit Button on the Question Editor Screen
in your question. If you don’t
like what you’ve entered you can
click the “Clear” button to clear all the fields. If you want to keep your question click “Save”. That question will
be saved and another blank entry will be presented. When you’re done entering questions click the “Done”
button to return to the Question Editor Main Menu.
That’s all there is to entering your questions. Let’s look at some more features of the Question Editor.
Question Editor Features
Question Browsing – You can browse through your questions
using the arrow buttons at the bottom of the question screen.
Scroll one at a time, several at a time (based on the value you set
under the Preferences screen), or scroll to the end or beginning of your question set. If you see a question you
want to change or remove, simply click the “Edit” button and make your changes. Note that you cannot delete
a question but you can overwrite one.
Audio Preview – If the speaker icon in the lower right-hand portion of the screen
displays waves coming from it, then an audio file has been recorded for the question.
You can preview the audio by clicking the icon. Click it again to stop the audio.
Note:
The number of the
question is not the
order that they appear
when playing the game.
Questions are drawn
from the list at random.
Question Search – To
search for a question
with a specific word
in it, type the word in
the lower left hand
text box and then
click the magnifying
glass button. You
will get a list of all
questions that contain
the search word. To
get a list of all your
questions, leave the
text box blank and
click the magnifying
glass.
Search Results
From the search results window you have several options. You can scroll through your results list, you can do
another search by following the same directions, you can go directly to a specific question or you can create
an html file of your list. To go directly to a specific question, enter the question number you want in the field
to the left of the “Go” button and then click “Go”. To create a report click the “Generate html” button which will
create a html page. A dialog box will tell you that the file has been saved in your MyTrivia folder. Finally, you
can click “Cancel” to exit the search results window. Then click “Exit” to exit the Question Editor and return to
the Main Edit Menu.
Recording Your Questions – You have the option to record yourself or someone else reading your questions
and answers in the game. You will need to make two recordings for each question. One recording for the
question and one for the answers. If you don’t have an audio file for your question or answer, the question and
answers will be displayed but only background music will play.
Tip:
The generated html file
is very convenient for
recording the questions
and answers.
Tip:
It might be more
efficient for you to
record the question and
answers together, then
split it into two pieces
with your recording
software.
Your question and answer files need to be stored in the appropriate game folder found in the MyGames folder.
The format should be MP3 and the file name should be “Q”, plus the number of the question it is associated
with. So, if you are recording question 114 in your question set, then you should save your recorded files as
Q114.mp3 for the question and A114.mp3 for the answers. That’s it. You’re ready to play.
Make sure that you have created enough questions to go with the preferences you set in the Preferences
screen. If you chose a 21 question game with 7 bonus lightning questions then you need to have 28 questions
prepared to play. Questions will not repeat within a game.
So, let’s play.
Playing Your Game
Now that you’ve put all that hard work
into your game, let’s play. From the
Main Menu, press the “Go” button on
your game console. (if you do not have
a game console, see keyboard mappings
on p. 9)
How Many Players? – Choose the
number of players you want in the
game (1, 2, or 3). If you are playing a
1 or 2 player game, make sure your
buzzers are plugged into the correct
jacks. For 1 player, use the middle jack
only. For 2 players, use the left and right
jacks. The “How Many Players” screen
illustrates the correct configuration.
How Many Players?
Player and Booth Selection – On
these screens participants will select
booths and players. The booths come
from the MyBooth folder and the player
icons come from the MyPlayers folder.
Buttons “1” and “2” change your booth
and buttons “3” and “4” change your
player. Press “Go” after you’ve made
your selections. Obviously, Player One
selects first, then Player Two then Player
Three.
Player and Booth Selection
Tip:
Player icons are
the quickest way to
customize your game,
all you need is a digital
hedshot of each player.
Category Screen – Remember the
“Category” field in the Question Editor?
Players are given a selection of 3 categories
to choose from. The program does not allow
duplicate categories in this screen. You
will always get 3 distinct choices. Listen to
the audio, it will tell you which player gets
to choose the category. The player who
answered the previous question correctly
gets to choose the category. Press button “1”,
“2”, or “3”.
Question Transition – After the category
is selected there is a question transition
screen. This is where the slide selections you
made on the “Options Screen” come in to
play. You can elect to skip these transition
Category Screen
screens on the “Preferences” screen. These
transitions give a break to the players and you can get creative with your content here. Once the audio has
completely played another screen will pop-up.
Tip:
Player icons are
the quickest way to
customize your game,
all you need is a digital
hedshot of each player.
Question Screen – This is the
screen where the question is
read and players can buzz in. The
answers appear after the question
is read. The first player to buzz
in gets to make an attempt at
choosing the correct answer. The
light above the player who buzzed
in first will turn bright green, that’s
your cue to pick an answer.
The player who buzzed in first
chooses an answer using the
buttons 1-4. If they are correct,
their booth and the answer are
outlined with a bright green light.
If they are wrong, it’s a bright red
Question Screen
light and the other players get a
chance to answer at the “Second try” point value. Any player who answers incorrectly on a question will not
have an opportunity to answer again during that question. After the question is answered correctly or all
players have tried and failed to answer the question or nobody buzzes in, play continues to the next question.
Note:
Once you buzz in, you
have a limited time in
which to answer the
question so be ready.
Lightning Bonus Round – After the last standard question has been displayed, the Lightning round will begin.
In this section of the game, a question is displayed and one by one, the possible answers are displayed on the
screen. The player who buzzes in first when the correct answer appears gets the points. In this round, you can
buzz in as much as you want. Points are not added to your score until after the round is over.
Point Tally – After the lightning round, points are tallied and a winner is declared!
Quit – During the game, if
someone pushes the quit
button a screen will come up
asking if you really want to
quit. If so, push “Quit” again.
If not, push “Go”. This is not a
pause, the game may continue.
Esc – Once you’re back at the
Main Menu, you can press “Esc”
on your keyboard to exit the
application. Be careful with
this key, this will automatically
quit the application.
Quit Screen