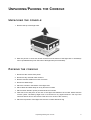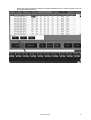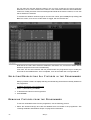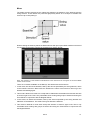
1
Maxxyz
user manual
All measurements are expressed in centimeters.
28 40
104
61
88
111
© 2003 Martin Professional A/S, Denmark. All rights reserved. No part of this manual may be reproduced, in any form or by any
means, without permission in writing from Martin Professional A/S, Denmark. Printed in Denmark.
P/N 35000115 Rev. A. November 2003
Table of contents
INTRODUCTION ....................................................................................................................... 8
MAXXYZ SAFETY INFORMATION ........................................................................................................................... 8
INCLUDED ITEMS ................................................................................................................................................ 8
UNPACKING/PACKING THE CONSOLE ...................................................................................... 9
UNPACKING THE CONSOLE .................................................................................................................................. 9
PACKING THE CONSOLE ...................................................................................................................................... 9
SETTING UP THE CONSOLE................................................................................................... 10
CONNECTING DMX DEVICES ............................................................................................................................ 10
CONNECTING THE DMX LINK .................................................................................................................. 11
AC POWER ...................................................................................................................................................... 11
POWER SUPPLY ..................................................................................................................................... 11
POWER CONNECTION ............................................................................................................................. 11
MAXXYZ LAYOUT AND DESCRIPTION ..................................................................................... 12
TYPES OF CONTROLS ....................................................................................................................................... 13
THE PLAYBACK CONTROLS ..................................................................................................................... 14
THE PROGRAMMER CONTROLS .............................................................................................................. 15
TRACKBALL CONTROL ............................................................................................................................ 16
SLIDER POTENTIOMETER (FADER) .......................................................................................................... 17
OPERATOR AUDIO .................................................................................................................................. 17
DISPLAY SCREENS ........................................................................................................................................... 17
DEFAULT PLAYBACK SCREENS ............................................................................................................... 18
DEFAULT PROGRAMMER SCREENS ......................................................................................................... 18
EDITING DISPLAY SCREENS .................................................................................................................... 19
STARTING THE MAXXYZ ........................................................................................................ 20
PATCHING FIXTURES ............................................................................................................ 21
ADDING FIXTURES TO THE PATCH ..................................................................................................................... 21
PATCH SHORTCUT ........................................................................................................................................... 29
DELETING FIXTURES FROM PATCH ................................................................................................................... 31
DELETING A FIXTURE FROM PATCH ......................................................................................................... 31
LOADING THE MAXXYZ VISUALIZER ....................................................................................... 32
SELECTING FIXTURES .......................................................................................................... 34
SELECTING FIXTURES USING THE MAIN KEYPAD ............................................................................................... 34
SELECTING FIXTURES AND SPECIFYING AN INTENSITY ............................................................................. 34
USING THE SELECTED FIXTURES SCREEN ......................................................................................................... 35
FIXTURE SELECTION ORDER .................................................................................................................. 36
SELECTED/DESELECTED AND ACTIVE/INACTIVE ................................................................................................. 36
DESELECTING FIXTURES ................................................................................................................................... 36
CLEARING SELECTED FIXTURES ........................................................................................................................ 37
MANIPULATING SELECTED FIXTURES .................................................................................... 38
3D VISUALIZER .......................................................................................................................................... 38
PROGRAMMER CONTROL .................................................................................................................................. 39
THE PROGRAMMER TOUCH SCREEN ................................................................................................................. 40
DISPLAY SELECTION .............................................................................................................................. 40
ATTRIBUTE CONTROL ............................................................................................................................. 41
ATTRIBUTE POP-UP WINDOW ....................................................................................................... 42
EFFECTS CONTROL ................................................................................................................................ 42
MISCELLANEOUS CONTROLS .................................................................................................................. 42
COMMAND LINE ................................................................................................................................................ 43
THE
CONFIGURING YOUR SHOW .................................................................................................. 45
GROUPS .......................................................................................................................................................... 45
RECORDING GROUPS ............................................................................................................................. 45
MOVING AND COPYING GROUPS ................................................................................................... 47
EDITING GROUPS ................................................................................................................................... 48
TO ADD FIXTURES TO AN EXISTING GROUP .................................................................................. 48
TO REPLACE THE FIXTURES IN AN EXISTING GROUP ..................................................................... 48
DELETING A GROUP ..................................................................................................................... 49
SELECTING GROUPS ............................................................................................................................... 49
GROUP PAGES ...................................................................................................................................... 49
PRESETS ......................................................................................................................................................... 49
THE PRESET SCREEN ............................................................................................................................ 50
RECORDING PRESETS ............................................................................................................................ 50
MOVING AND COPYING PRESETS .................................................................................................. 51
EDITING PRESETS .................................................................................................................................. 51
TO ADD FIXTURES TO A PRESET .................................................................................................. 51
TO REPLACE THE FIXTURES IN AN EXISTING PRESET .................................................................... 52
DELETING A PRESET .................................................................................................................... 52
SUBMASTERS ................................................................................................................................................... 52
THE PROGRAMMER WINDOW ................................................................................................ 54
THE PROGRAMMER DISPLAY ........................................................................................................................... 54
LOADING FIXTURES INTO THE PROGRAMMER ..................................................................................................... 55
LOADING THE PROGRAMMER USING FIXTURE SELECTION ........................................................................ 55
LOADING THE PROGRAMMER USING EDIT ............................................................................................... 57
LOADING THE PROGRAMMER USING LOAD ............................................................................................... 57
LOADING GROUPS ....................................................................................................................... 57
LOADING THE ENTIRE CONTENTS OF THE PROGRAMMER ............................................................... 58
LOADING ATTRIBUTE GROUPS AND INDIVIDUAL ATTRIBUTES .......................................................... 58
USING EDIT AND LOAD TOGETHER ......................................................................................................... 60
SELECTING/DESELECTING ALL FIXTURES IN THE PROGRAMMER ............................................................... 62
REMOVING FIXTURES FROM THE PROGRAMMER ...................................................................................... 62
SAVING CHANGES MADE IN THE PROGRAMMER ................................................................................................. 63
RECORDING CUES ................................................................................................................................. 63
UPDATE ................................................................................................................................................. 63
CLEAR AND THE PROGRAMMER ........................................................................................................................ 64
CLEARING AND DESELECTING ................................................................................................................. 64
CLEARING ATTRIBUTES AND ATTRIBUTE GROUPS .................................................................................... 64
PLAYBACK COMMAND ....................................................................................................................................... 66
DISPLAYS WHEN CUELIST TYPE IS “NONE” ............................................................................................. 67
LCD KEY DEFINITIONS ................................................................................................................. 67
DISPLAYS WHEN CUELIST TYPE IS “CUELIST” ......................................................................................... 67
LCD KEY DEFINITIONS ................................................................................................................. 68
DISPLAYS WHEN CUELIST TYPE IS “CHASE” ............................................................................................ 68
LCD KEY DEFINITIONS ................................................................................................................. 68
DISPLAYS WHEN CUELIST TYPE IS “OVERRIDE” ...................................................................................... 69
RECORD CUE OPTIONS ........................................................................................................ 70
THE RECORD OPTIONS WINDOW ...................................................................................................................... 70
............................................................................................................................................................. 70
RECORD OPTIONS CATEGORY ................................................................................................................ 71
SOURCE OPTIONS CATEGORY ................................................................................................................ 71
EXTRA FILTERING CATEGORY ................................................................................................................. 71
EXTRA OPTIONS CATEGORY ................................................................................................................... 71
FILTER CATEGORY ................................................................................................................................. 72
WORKING WITH CUES .......................................................................................................... 73
PLAYBACK CONTROLS ...................................................................................................................................... 73
THE “MAIN GO” BUTTONS ................................................................................................................................ 74
4
Maxxyz
TO OVERRIDE CUE TIMING ..................................................................................................................... 74
PLAYBACK PAGES (BANKS) .............................................................................................................................. 74
LABELING A BANK .................................................................................................................................. 75
SELECTING A CUELIST ...................................................................................................................................... 75
CREATING AND WORKING WITH CUELISTS ......................................................................................................... 75
CUELIST SCREEN BUTTONS .................................................................................................................... 76
CUELIST COLUMN HEADERS ................................................................................................................... 77
SETTING CUE TIMING ....................................................................................................................................... 78
SETTING A CUE’S BASE FADE TIME ........................................................................................................ 78
SETTING A CUE’S BASE DELAY TIME ...................................................................................................... 79
SETTING AN ATTRIBUTE FADE TIME ........................................................................................................ 79
SETTING THE FADE TIME FOR AN ATTRIBUTE GROUP .................................................................... 80
SETTING AN ATTRIBUTE DELAY TIME ...................................................................................................... 81
SETTING A STAGGERED DELAY TIME (FANNING) ..................................................................................... 82
FANNING FROM MULTIPLE POINTS ................................................................................................ 83
SETTING CUE TRIGGERS ........................................................................................................................ 84
SETTING A WAIT TRIGGER ........................................................................................................... 84
SETTING A FOLLOW TRIGGER ....................................................................................................... 84
CUELIST OPTIONS ............................................................................................................................................ 85
CHANGING THE CUELIST TYPE AND OPTIONS .......................................................................................... 85
CHASE .................................................................................................................................................. 89
OVERRIDE ............................................................................................................................................. 90
USING MACROS ............................................................................................................................................... 91
CREATING A MACRO .............................................................................................................................. 91
DELETING OR EDITING A MACRO ............................................................................................................ 91
RELEASING A CUELIST ...................................................................................................................................... 92
RELEASING AN INDIVIDUAL CUELIST ........................................................................................................ 92
RELEASING ALL CUELISTS ...................................................................................................................... 92
REL/SNAP ................................................................................................................................... 92
SNAP/REL ................................................................................................................................... 92
MOVING, COPYING, AND DELETING CUELISTS ON PLAYBACK FADERS ................................................................ 93
MOVING CUELISTS ON PLAYBACK FADERS .............................................................................................. 93
COPYING CUELISTS ON PLAYBACK FADERS ............................................................................................ 93
DELETING CUELISTS ON PLAYBACK FADERS ........................................................................................... 93
OTHER CUELIST LOCATIONS ................................................................................................. 94
VIRTUAL CUELIST ............................................................................................................................................. 94
VIRTUAL CUELIST DISPLAY ..................................................................................................................... 95
MOVING AND COPYING FROM THE VIRTUAL CUELIST ............................................................................... 95
TO COPY FROM VIRTUAL CUELIST TO PLAYBACK FADER ................................................................ 96
TO COPY FROM VIRTUAL CUELIST TO PLAYBACK BUTTON .............................................................. 96
MOVING AND COPYING WITHIN THE VIRTUAL CUELIST ............................................................................. 96
TO COPY FROM ONE VIRTUAL CUELIST BUTTON TO ANOTHER VIRTUAL CUELIST BUTTON ................ 96
TO MOVE FROM ONE VIRTUAL CUELIST BUTTON TO ANOTHER VIRTUAL CUELIST BUTTON ................ 96
DELETING A VIRTUAL CUELIST ................................................................................................................ 97
TO DELETE A VIRTUAL CUELIST .................................................................................................... 97
PLAYBACK BUTTON PAGE ................................................................................................................................. 97
PLAYBACK BUTTON DISPLAY .................................................................................................................. 98
MOVING AND COPYING CUELISTS WITH THE PLAYBACK BUTTON DISPLAY ................................................ 98
DELETING CUELISTS IN THE PLAYBACK BUTTON DISPLAY ........................................................................ 99
TO DELETE A PLAYBACK BUTTON CUELIST ................................................................................... 99
ACTIVE CUELIST VIEW ............................................................................................................................ 99
THE 2D STAGE LAYOUT ..................................................................................................... 100
2D LAYOUT OVERVIEW ................................................................................................................................... 100
GENERIC FUNCTIONS ..................................................................................................................................... 102
SELECTING/MOVING ELEMENTS ............................................................................................................ 102
TO SELECT/MOVE AN ELEMENT ................................................................................................. 102
CHANGE MENU ..................................................................................................................................... 102
TO CHANGE THE COLOR OF AN ‘ELEMENT .................................................................................. 102
5
TO CHANGE THE ROTATION OF AN ELEMENT .............................................................................. 103
TO COPY AND PASTE AN ELEMENT ............................................................................................. 103
WORKING WITH FIXTURES IN 2D LAYOUT ........................................................................................................ 103
ADDING FIXTURES TO THE 2D LAYOUT .................................................................................................. 104
TO ADD FIXTURES TO THE 2D LAYOUT ....................................................................................... 104
DELETING FIXTURES ............................................................................................................................ 104
TO DELETE A FIXTURE ............................................................................................................... 105
CHANGE THE FIXTURE ICON ................................................................................................................. 105
TO CHANGE THE FIXTURE ICON .................................................................................................. 105
LOADING FIXTURE INTO THE PROGRAMMER WITH 2D LAYOUT ............................................................... 105
TO LOAD A FIXTURE INTO THE PROGRAMMER ............................................................................. 105
WORKING WITH OTHER ELEMENTS ................................................................................................................. 106
TRUSS ................................................................................................................................................. 106
TO ADD TRUSS .......................................................................................................................... 106
TO DELETE TRUSS .................................................................................................................... 106
TEXT ................................................................................................................................................... 106
TO ADD TEXT ............................................................................................................................ 106
TO DELETE TEXT ....................................................................................................................... 107
BITMAPS .............................................................................................................................................. 107
TO ADD A BITMAP ...................................................................................................................... 107
TO DELETE A BITMAP ................................................................................................................ 108
EFFECTS ............................................................................................................................ 109
EFFECTS CONTROLS ...................................................................................................................................... 109
REGULAR EFFECT ................................................................................................................................ 109
BASELINE - A QUICK CONCEPT .................................................................................................. 110
SWING ...................................................................................................................................... 110
SPEED ...................................................................................................................................... 110
MODE ....................................................................................................................................... 111
REGULAR EFFECTS EXAMPLES ................................................................................................... 112
TIME EFFECTS ..................................................................................................................................... 113
DELAY/WAVE ............................................................................................................................. 113
SHIFT/STEP ............................................................................................................................... 114
PAN/TILT AND “P/T COMB” ................................................................................................................... 114
WORKING WITH EFFECTS ..................................................................................................................... 114
“SPEED” AS IT’S OWN CUELIST .................................................................................................... 114
SPEED IN THE SAME CUELIST ...................................................................................................... 115
SHOW FILE MANAGEMENT .................................................................................................. 116
IMPORTANT NOTICE! ....................................................................................................................................... 116
BACKING UP YOUR SHOWFILE DATA .................................................................................................... 116
BACKING UP YOUR VISUALIZATION FILE ................................................................................................ 116
SAVE A SHOW ................................................................................................................................................ 117
LOAD A SHOW ................................................................................................................................................ 117
DOWNLOADING AND UPLOADING FILES ............................................................................................................ 117
RECOMMENDED FILE LOCATION ...................................................................................................................... 117
SERVICE ............................................................................................................................ 118
LOADING MAXXYZ SOFTWARE UPGRADES ....................................................................................................... 118
CLEANING ...................................................................................................................................................... 118
TECHNICAL SUPPORT ..................................................................................................................................... 118
MAXXYZ SPECIFICATIONS ................................................................................................... 119
PHYSICAL .................................................................................................................................. 119
AC SUPPLY ............................................................................................................................... 119
HARDWARE ............................................................................................................................... 119
CONTROL & PROGRAMMING ....................................................................................................... 120
PLAYBACK FACILITIES ................................................................................................................ 120
SOFTWARE ................................................................................................................................ 120
6
Maxxyz
ORDERING INFORMATION ........................................................................................................... 120
INDEX................................................................................................................................. 121
7
INTRODUCTION
Thank you for selecting the Martin Maxxyz controller.
The Maxxyz controller is a stable hardware platform combined with leading edge software that is
constantly being developed and refined. This manual matches the functionality provided in
Version 1.0 of the Maxxyz software. For the latest firmware updates, documentation, and other
information about this and all Martin Professional products, please visit the Martin web site at
http://www.martin.com
M AXXYZ S AFETY I NFORMATION
This product presents risks of lethal or severe injury due to electric shock. Read this manual
before powering or installing the console, follow the safety precautions listed below and observe
all warnings in this manual and printed on the console. If you have questions about how to
operate the console safely, please contact your Martin dealer or call the Martin 24-hour service
hot line at +45 70 200 201 or +1 954 858 1800.
• Always ground (earth) the console electrically.
• Use only a source of AC power that complies with local building and electrical codes and has
both overload and ground-fault protection.
• Do not expose the console to rain or moisture.
• Refer any service operation not described in this manual to a qualified technician.
• Do not modify the console or install other than genuine Martin parts.
• Do not lift or carry the console alone.
I NCLUDED I TEMS
The Maxxyz is shipped in a flight case that contains the following items:
• Maxxyz console
• Power cable
• 3 desk lamps
• 1 dust cover
• 2 sets removable roadcase wheels
• 2 monitor stands
• 1 set spare fuses (found under console)
• 4 3-pin to 5-pin XLR adaptors
8
Maxxyz
UNPACKING/P ACKING
THE
CONSOLE
U NPACKING THE CONSOLE
1 Remove the top of the flight case.
2 With one person on each side, lift the console out of the bottom of the flight case or the Maxxyz
can be operated directly from the base of the flightcase (recommended).
P ACKING THE CONSOLE
1 Disconnect the console from power.
2 Disconnect any external video monitors
3 Remove monitor stands from back of console
4 Disconnect desk lamps
5 Place the console in the bottom of the flight case.
6 Place cables and desk lamps in cavity at back of console
7 Place monitor stands in space provided at back of console
8 Fold dust cover and place in the rear of the flight case between the monitor stands and the
console. (Note: The Maxxyz flight case is constructed to very tight tolerances. The top of the
roadcase will not fit over the console if the dust cover is left on the console.)
9 Place the top section of the flight case over the console without forcing
Unpacking/Packing the Console
9
SETTING UP
THE
CONSOLE
1 Remove 3 desk lamps, AC power cord and detachable monitor stands.
2 Connect AC power cord to inlet found at the lower right corner of the console (as viewed from
behind).
3 If using external monitors, install the left and right monitor brackets as shown below:
Be certain that the bracket is fitted snugly and pressed into the slots provided before tightening
wing bolts. Note: The maximum allowed weight is 5kg (11 lbs) per monitor.
4 Connect external monitors to SVGA ports found one on the left and one on the right of the back
of the console.
5 Connect desk lamps to connections on the console.
6 Connect DMX devices following the procedure and notes below (Connecting DMX Devices).
7 Connect console to mains power. Please see “AC power” on page 11 for warnings and details on
AC connections.
C ONNECTING DMX D EVICES
The Maxxyz has 5-pin XLR sockets for DMX input and output. The pin-out on all sockets is pin 1
to shield, pin 2 to data compliment (-), and pin 3 to data true (+).
• Use shielded twisted-pair cable designed specifically for DMX devices: standard microphone
cable cannot transmit control data reliably. 24 AWG cable is suitable for runs up to 300 meters
(1000 ft). Heavier gauge cable and/or an amplifier is recommended for longer runs.
• To split the DMX link into multiple branches use a splitter such as the Martin 4-Channel
Opto-Isolated RS-485 Splitter/Amplifier. Never use a “Y” cable.
• Do not overload the link. Up to 31 additional devices may be connected on any given DMX link.
• Terminate the link by installing a termination plug in the output socket of the last fixture. The
termination plug, which is a male XLR plug with a 120 ohm, 0.25 watt resistor soldered between
pins 2 and 3, “soaks up” the control signal so it does not reflect and cause interference. If a
splitter is used, terminate each branch of the link. Please note that some fixtures and dimmers
provide on board termination and do not require an external terminator. Consult user manual of
DMX device for details.
10
Maxxyz
• Martin fixtures introduced before 1997 have reversed polarity data sockets (pin 2 + and pin 3 -).
The socket polarity is labelled. Use a phase-reversing cable between the Maxxyz and any device
with reversed polarity.
CONNECTING
THE
DMX
LINK
1 Using the proper cable, connect the DMX device to the Maxxyz’s 5-pin output (female)
connector.
2 Insert a male 120 Ω XLR termination plug in the 3-pin or 5-pin output of the last device on the link
if required.
AC POWER
WARNING! For protection from electric shock, the console must be grounded (earthed). The
AC mains supply shall be fitted with a fuse or circuit breaker and ground-fault
protection.
POWER
SUPPLY
The Maxxyz comes with an auto-sensing, auto-ranging switch-mode power supply. Manual
adjustments to the mains voltage and frequency are not necessary as the Maxxyz automatically
adapts.
POWER
CONNECTION
Important! Connect the Maxxyz directly to AC power. Do not connect it to a dimmer system;
doing so may damage the console.
You may need to install a cord cap that fits your supply on the power cable. A 3-prong
grounding-type plug must be installed following the manufacturer’s instructions. The table below
shows some possible pin identification schemes; if the pins are not clearly identified, or if you
have any doubts about proper installation, consult a qualified electrician.
To apply power, set the power switch on the rear of the console to the “I” position.
Wire Color
Pin
Symbol
Screw (US)
brown
live
L
yellow or brass
blue
neutral
N
silver
yellow/green
ground
Setting Up the Console
green
11
MAXXYZ LAYOUT
D ESCRIPTION
AND
The Maxxyz console can be divided into a number of sub-controls. Those sub-controls are
A B
D
J
C
E
F
O
P
G
H
I
K
L
M
N
Q
A
Playback View Buttons
B
Playback Screen Control
C
Playback Touch Screen
D
Main Go
E
Playback Control
F
Playback Command
G
Screen Swap
H
Master Control
I
Keypad Entry
J
Programmer View Buttons
K
Programmer Screen Control
L
Programmer Touch Screen
M
Programmer Control
N
Trackball Control
O
Alphanumeric Keyboard
P
Removable Media Data Drives
Q
Operator Audio
Please note that the Maxxyz console is a very flexible console and therefore the labels
“Playback” and “Programmer” are not absolute. That is to say that there may be times when you
are using the playback side for programming and vice versa depending on the functions you are
performing.
12
Maxxyz
T YPES OF C ONTROLS
The Maxxyz console uses several different types of controllers to manipulate the data for your
show. Among them are:
Hard Keys (buttons)
These are the traditional buttons found on the console.
Soft Keys
These are keys that appear on the video displays are
activated by touching them on the touch screens, clicking on
them using the trackball controls on the external monitors, or,
in the case of selecting displays for the touch screens (as an
example), by pressing the associated view key directly above
or below the softkey.
LCD Keys
These are hard keys with the ability to change their color and
legend.
Slider Potentiometer
(fader)
There are 14 faders on the Maxxyz; all located in the Playback
Controls and Master Controls sections. These are used for
controlling the intensities of any fixtures associated with them.
The 10 directly below the Playback Touch Screen are
motorized and will vary in position dependent upon the
playback page selected and the level assigned to the fader.
Track Belt
There are 11 track belts on the Maxxyz. The two located next
to the touch screens (Screen Controls) are used to scroll
through the touch screen displays. The 8 in the Programmer
Controls are used to change the values of selected fixtures.
The remaining track belt, in Playback Control, is used to
change cue timings.
Jog Dial
There are four silver jog dials (three horizontal and one
vertical). The three horizontal jog dials are used to change the
displays on their associated LCD Keys. The vertical jog dial is
used to change playback pages/banks in the playback touch
screen.
Trackball
The blue track ball is located on the right side of the console
and is used to move the cursor across the touch screens and
external monitors. By pressing the associated “P/T” key, the
trackball can be used to control the pan and tilt of selected
fixtures.
Maxxyz Layout and Description
13
>
< >
>
>
>
THE PLAYBACK CONTROLS
MACRO PREVIEW
GM
1
2
3
4
5
6
7
8
9
FM
A
MENU
B
10
SNAP REL
II / BACK
GO >>
The left hand side of the desk is designed primarily for playback use. However, the 5 LCD keys
and track belt on the right side of the Playback Controls are used for setting and recording
timings into cues, changing the playback banks and other functions.
14
Maxxyz
THE PROGRAMMER CONTROLS
X
Y
Z
EDIT
UNDO
CLEAR
COPY
MOVE
DELETE
RECORD
/
-
+
7
8
9
THRU
UPDATE
4
5
6
FULL
LOAD
1
2
3
@
GROUP
0
.
ENTER
CUE
The right hand side of the desk is designed primarily for selecting and manipulating fixtures and
cues. When a fixture is selected, it’s attributes will be loaded into the programmer controls.
Maxxyz Layout and Description
15
TRACKBALL CONTROL
The Trackball Controls, found on the right side of the console, are used for moving the cursor
between the touch screens and external monitors and manipulating the menus on those screens.
It can also be used to control the pan/tilt attributes of selected fixtures. There are five hard keys
associated with the trackball; four across the top and one on the left. The mode of the Trackball
Controls determines the function of the keys and the trackball.
By pressing and holding the “P/T” key and any other trackball key you will toggle the functionality
of the trackball controls between:
Normal Mode (default)
When in this mode, the trackball is continuously lit and it controls
the cursor. The bottom left key is associated with the left mouse
button while the top left and right keys are assigned “next” and
“last” fixture selection functions.
Mouse Mode
The trackball will be dark in this mode and will control the cursor.
The bottom left button is assigned “left mouse click” while the top
right button is designated as “right mouse click.”
The other buttons are disabled. Pressing the “P/T” key alone (regardless of whether you are in
Normal or Mouse mode) will toggle you into:
P/T Mode
In this mode, the “P/T” key will be lit and the trackball will pulse
slowly and control the pan/tilt attributes of any selected fixtures.
The “previous” and “next” keys remain unchanged, but the
bottom left button now toggles between “X lock,” “Y lock,” and
“No lock.”
To escape P/T mode and return to the previous mode, press the
“P/T” key.
Note that in all modes, the “Highlight” button, when engaged, will cause any selected fixtures to
go to full intensity, force their shutter to “open” and change their color to “Open White” or “No
Color” for rapid identification.
The function of the “next/last” keys is dependant on whether or not there are fixtures selected in
the programmer. If no fixtures are selected, the “next/last” buttons will cycle through all fixtures,
beginning with the lowest fixture number and working up. If there are fixtures selected in the
programmer, the “next/last” buttons will cycle through those fixtures based on the order in which
they were entered into the programmer. When you are finished with the “next/last” function, you
may press the “Revert to selection” button to re-select the fixtures in the programmer.
16
Maxxyz
SLIDER POTENTIOMETER (FADER)
The Maxxyz uses 14 faders, 10 of which are motorized and the function of which is covered later
in this manual. Here we will concern ourselves only with the four non-motorized faders and their
associated bump buttons.
Grand Master
The Grand Master is located at the top center of the console. It is
consistent with the function of the Grand Master found on most other
boards in that it masters the intensity output channels of all other control
devices on the console including the programmer. However, please note
that while the programmer output is limited by the GM, the values in the
programmer remain unaffected. Therefore, if you were to record a cue
with the GM down, the intensity values in the programmer would still be
recorded into the cue, although their output would not be visible on
stage. The GM can be overridden by the GM hardy directly above the
fader. The GM hardy acts as a “flash” and pressing and holding the key
has the same effect as if the GM fader were at full.
Flash Master
The Flash Master is not currently implemented.
A/B Submaster
The A & B Submasters are similar in function to the Grand Master
except they can be programmed to only master fixtures you specify. See
“Submasters” on page 52 for further information.
OPERATOR AUDIO
Located on the front of the console on the right hand side you will find the controls for operator
audio. These include>
• Speaker Volume
• (Head)Phones Volume
• Intercom
• Mic Volume
• Mic In
• Speech On/Off.
With the initial release of Maxxyz, only “Speaker Volume” and “Phones Volume” are used.
“Speaker Volume” controls the level of the built-in speaker system when playing CDs or DVDs
while “Phones Volume” controls the output to the headset jacks.
D ISPLAY S CREENS
The Maxxyz console uses a variety of different displays to convey information to the user. These
displays can be selected using the 8 view keys (two sets of four) found above each of the touch
screens. These view keys will change the displays on both the built-in touch screens and the
external monitors. The Programmer and the Playback have a discrete set of default displays.
Details for each of these screens can be found later in the manual.
Maxxyz Layout and Description
17
DEFAULT PLAYBACK SCREENS
The Maxxyz has the following default playback screens:
Prog/Output
This view key will display programmer values in the touch screen and the
live output values on the external monitor.
Presets
This view key will display presets used for playback in the touch screen
and the programmer on the external monitor.
Groups/Fixture
This view key will display group selection and fixture selection in the touch
screen and the 2D stage layout on the external monitor.
2D Stage
This view key will display the 2D stage layout in the touch screen and the
fixture list on the external monitor.
Cuelist
This view key will display the cuelist view in the touch screen and the
programmer and cuelist values on the external monitor.
Patch
This view key will display the patch screen in the touch screen and the 2D
stage layout on the external monitor.
PlaybButtons
This view key will display cue playback button page in the touch screen
and the selected cuelist view and cuelist values touch screen on the
external monitor.
Virtual Cuelist
This view key will display the virtual cue playback button page in the touch
screen and the programmer screen on the external monitor.
DEFAULT PROGRAMMER SCREENS
The Maxxyz has the following default programmer screens:
18
Groups/3Dview
This view key will display the channels view (used in manipulating
fixtures) and group selection on the touch screen and the Martin Show
Designer view on the external monitor.
Groups/Select
This view key will display the channels view and group selection on the
touch screen and the fixture selection view on the external monitor
Channels
This view key will display the channels view only on the touch screen
and the fixture selection view on the external monitor
Groups
This view key will display a greatly expanded group selection and
reduced channels view on the touch screen and the Martin Show
Designer view on the external monitor
Fixture filter
This view key will primarily display the fixture selection view with a small
fixtures list on the touch screen and the group selection view on the
external monitor
Presets
This view key will primarily display the preset selection view with a small
channels view on the touch screen and Martin Show Designer on the
external monitor
Groups/fixture
This view key splits the touch screen between the group and fixture list
and places Martin Show Designer on the external monitor
Groups/presets
This view key displays the preset selection and group selection views
on the touch screen and Martin Show Designer on the external monitor
Maxxyz
EDITING DISPLAY SCREENS
It is possible to customize the views shown on the Playback screens of the Maxxyz console to
suit your needs. Once a view is recorded, be aware that the view is recorded to the console, not
the specific show. To record a new view:
1 Using the trackball, close all open windows in the target screen by clicking on the small “x” found
in the upper right hand corner of each of the windows.1
2 Press the “Menu” hard key found near the top and center of the console.
3 From the pop up screen that appears, select the desired screen.
4 Using the trackball, position and resize the screen as desired.
5 Add any additional screens required
6 Press “Record” and the desired view screen hard key.
7 In the pop up window, enter the name of the new view and then press “ok.”
Also note that temporary changes can be made to the screens by adding and/or resizing views
without recording them. When the appropriate view key is pressed again, the view will return to
the earlier saved view.
1.Note: the one exception to this is the “channels” window. The channels window can not be closed.
Maxxyz Layout and Description
19
STARTING
THE
M AXXYZ
Once your console is set up and the cables are connected, start the Maxxyz by turning on the
power. The switch is located at the back on the left hand side as your facing the front of the
console. The processors will then boot and load the operating software. The first screen you see
that requires your input is the “Welcome Screen” located on the Playback Touch Screen.
At this point, you are presented with three options. They are
Create new show
This option allows you to start a new show from the beginning
with no existing show information.
Load a show...
This option will take you to a traditional Windows interface
where you can select any show stored on the console.
Continue with current
show
The third option loads the last show that you were working on.
Please note that no cues will be active if you select this
option.
In the lower left hand corner of the “Welcome Screen” you’ll notice a check box labeled “Start
automatically.” By default, this box is unchecked and you will be required to make one of the
selections above. However, if you check this box, the console will automatically select “Continue
with current show” after displaying the “Welcome Screen” for ~10 seconds. This setting is stored
in the console and will take effect the next time the console if started.
Note:
The Maxxyz console automatically and continually saves the current show as you
are working on it. Therefore, if you select “Load a show...” please be aware that
you will be recording over your existing show. Further, if you have not previously
saved your showfile (see “Save a Show” on page 117), that data will be
permanently lost.
For now, press “Create new show.”
20
Maxxyz
PATCHING F IXTURES
A DDING F IXTURES TO THE P ATCH
When starting a new show, the default screen will appear in the Playback Touch Screen and the
operator touch screen. To patch, we’ll only be using the Programmer Touch Screen. To access
the patch, you will need to press the View key located directly above the “Patch” label on the
Programmer Touch Screen.
Patching Fixtures
21
This will bring you to the main patch screen. From here, select the “Fixtures” softkey using either
the trackball or pressing the touch screen.
22
Maxxyz
This will bring you to the patch spreadsheet screen. At this point, select the “Add” softkey, again
using either the trackball or pressing the touch screen.
Patching Fixtures
23
This will bring up the fixture library. The fixture library is sorted by manufacturer. Select the
“Martin” library and you will be presented with the following screen:
24
Maxxyz
Start by patching MAC 500 (E) fixtures. Selecting this softkey will generate the following screen:
From this screen, you can select the Mode, Lens, and other Options for your fixtures. Use the
selections highlighted above. Press “OK” and you will be sent to a new screen where you will be
Patching Fixtures
25
prompted to set the number of fixtures to be added to the show. Set the number of fixtures to 12
and press “OK” to return to the patch spreadsheet.
As you can see, 12 MAC 500s have been added to the show, but they have not yet been
patched. Before patching the MAC 500s, add 12 MAC 600 (E) NT Mode 2. To do that, press the
“Add” softkey and repeat the process used in adding the MAC 500s.
26
Maxxyz
Now that the fixtures have been added to the patch spreadsheet, they need to be patched to their
appropriate DMX addresses.
Patching Fixtures
27
Highlight the “Universe” field next to Fixture #1 and then press the “Edit” softkey. This will bring
up the DMX Universe pop-up screen:
Here you can choose which DMX universe (1-64) to patch the specified fixture. You can enter the
DMX universe number with the numeric keypad in the Keypad Entry section or you can scroll up
and down using the scroll arrows to the right of the universe number. Set the universe number to
“1” and then press “OK.”
28
Maxxyz
You can also “range select” a number of fixtures by either dragging your finger down the
appropriate column of the desired fixtures or by using the trackball and “click-dragging” as
pictured below:
Select the remaining MAC 500s and set their universe to “1.” You will note that the individual
fixture DMX addresses all default to “1.” Range select the addresses of all the MAC 500s and
press the “Edit” key. The Maxxyz console will automatically address the selected fixtures based
on the required number of DMX channels. You may set the address of the first unit to any number
between 1 and 512. (Note: an error will occur and you will be asked to enter a new value if the
number of DMX channels required by the selected fixtures exceeds 512.) Set the address to “1”
and press “OK.” All the MAC 500s are now addressed with the proper offsets.
Using the range selection technique described above, now select the universe for all the MAC
600s and set them to universe 2. Then select the addresses for the MAC 600s and range edit
those fixtures with the first unit set to address 1.
You can also range edit a number of other fixture attributes including fixture number (PatchNr),
pan invert (panInv), tilt invert (tiltInv), and pan/tilt swap (PTswap). At this point, range select the
fixture numbers for the MAC 600s and set them to start at 21.
P ATCH S HORTCUT
The Maxxyz console also allows you a very rapid means of patching called “Auto-Addressing.
When using “Auto-Addressing,” the Maxxyz console will automatically assign individual DMX
addresses to the selected fixture s with in t he DMX un iv erse sele cted. To access
“Auto-Addressing,” select a fixture or fixtures to be patched. When you arrive at the screen where
Patching Fixtures
29
you enter the quantity of fixtures to be added, press the “Auto-Addressing” softkey and you will
be presented with the following screen:
In the example above, the 12 fixtures that are to be added will be placed in DMX universe 2 with
a start address of 1. Each fixture will be automatically offset to the next available address. In the
event that the specified DMX address is already used by another fixture, the Maxxyz console will
select the next available address in the next available universe. Similarly, if the number of fixtures
being added exceeds 512 DMX addresses, the Maxxyz console will continue on into the next
available universe.
Once this is done, your patch spreadsheet should look as follows:
Important Note! Changes to the patch do not take affect until the “Apply” softkey is selected!
Press the “Apply” softkey to save your changes.
30
Maxxyz
Note:
You must close the patch spreadsheet to insure proper operation of the console.
To do so, press the “Fixture” softkey (see page 22). Failure to do this can result
in erratic behavior!
D ELETING F IXTURES F ROM P ATCH
Important Notice! When you delete a fixture from the patch, you are removing all references to
that fixture from the console. All preset, group and cue information will be updated and any
references to the deleted fixture will be removed. Patching a new fixture to the same address will
not restore the information. The only way to retrieve the fixture information is from a previously
stored showfile. For this reason, if you need to temporarily disable a fixture, it is recommended
that you patch the fixture to a “phantom” DMX universe. That is to say that you patch the fixture
to a DMX universe that you are not using.
DELETING
A
FIXTURE
FROM
PATCH
1 Open the Patch window.
2 Press the “Fixtures” button to open the spreadsheet.
3 Select the fixtures) you wish to delete.
4 Press “Delete.”
5 Press “Apply.”
Patching Fixtures
31
LOADING
THE
M AXXYZ VISUALIZER
The Maxxyz console uses files created with Martin Show Designer (MSD) to provide a visual
representation of the console output. Version 1.0 of the Maxxyz console does not support the
editing of MSD files on the console. The visualization is always displayed on the programmer
external monitor. While the visualization component of the Maxxyz console is not required for
creating and running shows, it is a very valuable tool when pre-programming or learning the
console, particularly if you are not connected to “physical” fixtures.
When you first start the Maxxyz console, the visualizer will display it’s default MSD scene file
which will look similar to the screen below:
Maxxyz software includes a MSD file titled “Tutorial 1.0” that incorporates the patch entered
earlier. To access this file click on the “Open File” icon.
32
Maxxyz
You can then select the “Tutorial 1.0.scn” file from the menu and the visualizer will display the
following:
If you wish to create your own scene file using MSD, it is recommended that the file be loaded to
the following path: My Computer\Shared Documents\MSD4\Scenes 1 . In order for the
visualization to be accurate, the fixture type (including mode), the fixture number, DMX universe
number and DMX address must be exactly the same in both the Maxxyz patch and the MSD
scene file. For more information please see “Show File Management” on page 116.
Note:
Maxxyz does not provide for an association between the scene file and the
console showfile. By default, the Maxxyz console will open the “Maxxyz.scn” file.
If you are working with another file, you will be required to open the appropriate
scene file whenever you start the console. However, you may use the “Save as...”
function under the file menu to set the current scene as the default. To do this,
save the file to the following location: My Documents\MSD4\MAXXYX.scn.
1.For a manual on using the Martin Show Designer, please visit www.Martin.com.
Loading the Maxxyz Visualizer
33
SELECTING FIXTURES
There are two primary methods of selecting fixtures on the Maxxyz console: using the main
keypad, or clicking on fixture icons in the 2D Stage View. In this section, we will look at using the
main keypad. For information on the using the 2D Stage View, please see “The 2D Stage Layout”
on page 100.
S ELECTING F IXTURES U SING T HE M AIN K EYPAD
If you know the number of the fixture(s) you wish to select, you can use the 0-9 keys to specify
the fixture numbers and the “+” (and), “-” (except) and “Thru” (through) keys to modify your
selection. Maxxyz allows simple as well as complex fixture selection. Some possible examples
are:
1 Enter
This will select fixture 1.
1 + 2 Enter
This will select fixture 1 and 2.
1 Thru 5 Enter
This will select fixture 1 through 5.
1 Thru 5 + 21 Thru 25 Enter
This will select fixtures 1 through 5 and 21 through 25.
1 Thru 5 - 4 Enter
This select fixtures 1, 2, 3 and 5.
SELECTING FIXTURES
AND
SPECIFYING
AN
INTENSITY
Using the above keys in conjunction with the “@” (at) or Full keys allows you to set specified
fixtures to specified intensity values.
1 Full
This will bring the intensity of fixture one to 100%
1 + 2 Full
This will bring the intensity of fixtures 1 and 2 to 100%.
1 Thru 5 @ 50 Enter
This will bring the intensity of fixtures 1 through 5 to
50%.
Note that when bringing fixtures to Full you are not required to use the “@” or “Enter” keys. When
entering any other value, these keys are required. Also note that pressing 1 Thru 5 @ 5 Enter
will also bring the fixtures to 50% while pressing 1 Thru 5 @ 05 Enter will bring the fixtures to
5%.
34
1 Thru 5 + 21 Thru 25 @ 75 Enter
This will bring the intensity of fixtures 1 through 5
and 21 through 25 to 75 percent.
1 Thru 5 - 4 @ 95 Enter
This will bring the intensity of fixtures 1, 2, 3 and
5 to 95%
Maxxyz
Intensity Fanning - The Maxxyz console allows you to rapidly assign a range of intensities to a
range of fixtures. Use the following procedure to implement Intensity Fanning:
1 Thru 5 @ 10 Thru 50 Enter
This will bring the intensity of fixture 1 to 10%, fixture 2 to
20%, fixture 3 to 30%, etc. Conversely, you could enter 1
Thru 5 @ 50 Thru 10 Enter. This would put fixture 1 at
50% and each of the following fixtures 10% lower.
U SING THE S ELECTED F IXTURES S CREEN
The Maxxyz console also make use of a “Selected Fixtures Screen.” You can find this screen by
selecting the “Groups/Select” view key over the Programmer Controls touch screen. An
abbreviated version of this screen can also be found in the touch screen on the Playback
controls by pressing the “Groups/Fixture” view key.
This screen is automatically populated with fixtures as you select them; either by the means
described above, or by selecting Groups (see “Groups” on page 45). In this screen you are
provided with the fixture number and model. Using the checkboxes at the left side of the screen,
you can select or deselect additional fixtures. The “Flip” button on the right side of the screen is
not currently implemented.
Selecting Fixtures
35
FIXTURE SELECTION ORDER
The Maxxyz console goes beyond recalling simply what fixtures have been selected, it also
recalls the order in which they were selected. This is particularly useful in the creation of
“fanning” effects (see “Setting a Staggered Delay Time (Fanning)” on page 82) or when stepping
through the fixtures using the “Next/Last” buttons in the Trackball Controls. In other words, the
Maxxyz console goes beyond listing the fixtures from highest to lowest based only on their fixture
number.
Once fixtures have been selected, they can also be reordered rather than re-entering the
selection. This is accomplished in the Selected Fixture Screen. To reorder the fixtures:
1 Select the fixture to be moved by pressing in the “Model” field. It will be highlighted in red.
2 Use the up or down arrows on the right of the screen to move the fixture through the list.
S ELECTED /D ESELECTED AND A CTIVE /I NACTIVE
The Maxxyz console allows you to control fixtures and their individual channel attributes based
on whether they are selected or deselected for fixtures and active or inactive for channel
attributes. The following definitions will be helpful to remember while working with the console:
Selected Fixture
A selected fixture is one that is currently editable using the
programmer’s trackbelts.
Deselected Fixture
A deselected fixture is a fixture that while in the programmer, will not
be affected by changes made in the programmer. That is to say that
changes made using the trackbelts that control fixtures will have no
effect on deselected fixtures. For more information, please see
“Loading the Programmer Using Fixture Selection” on page 55.
Active Channel
An active channel is a channel in the programmer that, by default,
will be recorded into a group, cue or preset. An active channel can
also be thought of as a channel whose values will be changed using
the programmer keys. These channel values are displayed in white.
Inactive Channel
An inactive channel is a channel in the programmer that will not
normally be recorded into the specified group, cue or preset unless
specifically commanded to do so. Inactive channels will not be
affected by the programmer keys. These channel values are
displayed in black.
Null Channel
A null channel is one that is not in the programmer. It may still have a
value, but, as it is not in the programmer, it is not considered either
active or inactive and is therefore “null.”
D ESELECTING F IXTURES
Once you have finished adjusting the desired attributes of the selected fixtures, you can deselect
those fixtures in a number of different ways. Note that deselected fixtures and their attribute
values remain in the programmer until otherwise cleared.
• To deselect a specific fixture or fixtures, press the - (minus) key and enter the desired fixtures.
36
Maxxyz
• To deselect all fixtures, press the “Deselect All” button found in the Fixture List window or press 0
(zero) Enter.
• Entering a new fixture selection will deselect all previously selected fixtures.
• Selecting fixtures using the Selected Fixtures screen will deselect all previously selected fixtures.
C LEARING S ELECTED F IXTURES
To completely clear the programmer of all fixtures, you will need to press the Clear button twice.
• The first time you press Clear, all channels will become inactive.
• The second time you press Clear, all fixtures will be cleared.
At that point, the programmer screen1 will be emptied and the visualizer will return to it’s previous
state.
1.For more details, please see “The Programmer Window” on page 54.
Selecting Fixtures
37
MANIPULATING S ELECTED FIXTURES
When you select a fixture or a number of fixtures you will notice several changes on the console.
These changes are primarily found on the programmer touch screen and programmer controls,
but a number of the screens that are displayed on the playback touch screen and external
monitor are also affected. We’ll start by selecting fixtures 1 through 5 and viewing some of the
affected screens.
THE
3 D VISUALIZER
When you select fixtures, those fixtures that are under active control of the programmer will be
highlighted in green or red. While both the red and green fixtures are selected, it is useful to note
that only the attributes of the red fixture (the last fixture number of the selected range) are
displayed in the Programmer Control. Any fixtures that are highlighted will be under the control of
the keys and track belts on the Programmer Control. Once you have adjusted one or more of the
attributes of the selected fixture(s) and then select another fixture or fixture(s), the first fixture will
return to its deselected (grey) color and the new selection will be highlighted in green. Changes
made to the first selected fixture will remain visible on the screen until the programmer screen is
cleared or the changes are recorded.
38
Maxxyz
P ROGRAMMER C ONTROL
The programmer controls, located directly below the programmer touch screen, determine what
attributes are displayed in the touch screen and provide a way to control those attributes.
The left four track belts, jog dial and LCD keys are used to control fixture attributes while those
on the right are primarily used to program effects (and will not be discussed here). Again using
fixture 1, a MAC 500, we can see that attribute groups have loaded into the left LCD keys1. From
top to bottom, the attribute groups are:
Dim/Focus
This contains the dimmer, shutter and focus attributes.
Pan/Tilt
This contains the pan, tilt, and pan/tilt speed attributes.
Color
This contains the color 1 and color 2 attributes.
Gobo
This contains the gobo, gobo 1R, and fixed gobos attributes.
Zoom/Prism
This contains the iris and prism attributes.
Turning the jog wheel directly below the LCD keys will load the next page of attribute groups, if
any exist. For the MAC 500, turning the job wheel will load the Speed/Effects attribute group.
Turning to the first page of attributes and press the “Dim Focus” LCD key and you will notice that
it turns red. This indicates that the Dim/Focus attributes have been loaded on the corresponding
track belts. The color coding for the LCD keys is as follows:
Red
The currently selected attribute group. Attributes belonging to this group will be
active on the corresponding track belts.
Orange
An attribute group that has previously been selected and where changes, visible
in the programmer screen, have been made.
Green
An attribute group that is available but is not selected and no changes have been
made.
1.Different fixture types will result in different attribute groups being loaded into the LCD keys. Only those attribute groups appropriate to the fixture will be loaded. If differing fixture types are selected in the programmer
simultaneously, the attributes of the last fixture selected will be displayed.
Manipulating Selected Fixtures
39
T HE P ROGRAMMER T OUCH S CREEN
When a fixture or fixtures are selected, the programmer touch screen is loaded with information
concerning the selected fixture. The information that is loaded into the programmer touch screen
is dependant on the attributes of the selected fixtures. When multiple fixture types are selected,
all the various attributes will be displayed in the programmer. In the view below we have selected
fixture 1, a MAC 500 and are displaying the Dim/Focus information (see “Command Line” on
page 43 for information on changing the data displayed in the programmer touch screen).
There’s a lot of information on this screen so we’ll look at it in smaller sections.
DISPLAY SELECTION
There is a row of labels across the top of the Programmer Touch Screen that correspond to the
Programmer View Buttons found directly about the touch screen. These labels are used to
change the layout of the Programmer Touch Screen.
Pressing the view keys (two sets of four keys found directly above the Programmer Touch
Screen) will change the display of both the touch screen and the associated external monitor. For
more information, please refer to “Display Screens” on page 17.
40
Maxxyz
ATTRIBUTE CONTROL
The left side of the programmer touch screen contains information regarding the specified
attributes of the selected fixture(s) and a means to control them.
Four columns are displayed for any attribute group selected (such as “Dim/Focus” displayed
above). Each column pertains to a specific attribute from the selected group and displays the
current settings of that attribute.1 The attribute assigned to each column is identified by a dark
blue label near the bottom of the screen; in this case “Dimmer,” “Shutter,” and “Focus.” The
values of these attributes can be changed in two different ways: you can touch or click on the
touch screen to select the desired setting or you can use the track belt below each column to
scroll through the values. There is also a light blue label at the bottom of each column that
identifies whether the values will fade smoothly or snap to specific values as well as the specific
numeric value for the attribute.
1.Note that if multiple fixtures of different types with varying settings for the same attribute are selected, the value of the last fixture selected is displayed.
Manipulating Selected Fixtures
41
ATTRIBUTE POP-UP WINDOW
Below each attribute column is an associated hard key (directly above the track belt). By double
clicking on this hard key, or pressing the blue box with the attribute name found on the touch
screen, you can bring up a pop-up window that contains all the preset values for that attribute.
Below is the pop up screen for “Gobo 1” selected from the Gobo attribute group of a Martin MAC
500.
With the pop-up window open, you can rapidly select the desired value by touching it and then
closing the window.
EFFECTS CONTROL
The right side of the programmer touch screen contains information regarding the creation of
effects on the Maxxyz console. Effects creation will be covered later in the manual (see“Effects”
on page 109).
MISCELLANEOUS CONTROLS
Located at the bottom center of the programmer touch screen are four miscellaneous controls.
42
Functions
The Functions menu is not currently implemented and will be
discussed in a later version of this manual. Please note:
should you open this window and then attempt to close it using
the trackball, the console will give the appearance of having
“frozen.” This is not the case. Simply press the “x” in the upper
right hand corner of the window using the touch screen and
the window will close.
Control resolution
Located directly below the Functions menu is the control
resolution box. Pressing or clinking on this box will cycle the
setting between 16 and 8 bits in one step increments with 16
bit providing the highest degree of resolution and 8 bit
providing coarser, but faster control of selected attributes.
Maxxyz
Functions
The Functions menu is not currently implemented and will be
discussed in a later version of this manual. Please note:
should you open this window and then attempt to close it using
the trackball, the console will give the appearance of having
“frozen.” This is not the case. Simply press the “x” in the upper
right hand corner of the window using the touch screen and
the window will close.
Relative/Absolute toggle
This toggle determines how fixtures with different values for
the same attribute will react with each other. If, for example,
we select fixtures 1 thru 5 and 1,2,4, and 5 are set at an
intensity of 10% and fixture 3 is set at an intensity of 50%,
when “relative” is selected, rolling up the intensity trackbelt will
increase the intensity of the selected fixtures relative to one
another. If the toggle is set to “absolute” then all fixtures will
jump to the level of the highest numbered fixture when the
trackbelt is moved. This feature is particularly useful with the
pan/tilt attributes however, please note that while it works well
with the trackbelts, it does not function with the trackball.
PT Comb
This is an abbreviation for “Pan/Tilt Combine” and will be
discussed later in the Effects section of the manual
(page 109).
C OMMAND L INE
The Maxxyz console uses a command line display that displays the keys pressed to construct a
command. At any point during the construction of the command, you may press the back arrow
key found on the Keypad Entry to backspace over commands and edit them. Once the command
has been constructed and executed, it can no longer be edited but it remains on the command
line in a “grayed out” state until the next command is started.
The command line (highlighted in red below) appears at the bottom of several of the playback
screens including Cuelist, Playback, Presets, Programmer, and Groups.
At the far right hand side of the command line are two buttons labeled “Assist” and “Esc”
(escape). Pressing the escape key will clear the entire command line. Pressing assist creates
two pull down menus on the left hand side of the command line. These pull down menus will
automatically fill with the appropriate text as keys are pressed or you can use them to select the
desired commands. While this is not the fastest way to program, it can be very helpful as the pull
downs are context sensitive. In other words, you would not be able to select “Move” and then
Manipulating Selected Fixtures
43
“Programmer” as that is not a supported command. Below are the complete contents of both pull
down menus.
44
Maxxyz
CONFIGURING Y OUR SHOW
Before you begin recording cues, you may wish to take advantage of some of the fixture
management functions the Maxxyz console provides. These functions can save immense
amounts of time when the time comes to cue your show.
G ROUPS
The Groups function and displays allow you to select ranges of fixtures with a single button or
mouse click. The fixtures needn’t be of the same type or within any specific numeric range.
RECORDING GROUPS
To record a group, bring up the “Fixture/Groups” screen on the Playback Touch Screen by
pressing the view button directly above the “Fixture/Groups” label.
You can then select fixtures as described earlier. Once the fixtures are selected, press Record
and then press or click on the desired group button and the group will be recorded. Should you
wish to label the group, select the desired fixtures, press record and the desired group button
and then use the keyboard to enter the desired text and press Enter.1 You can also label a group
Configuring Your Show
45
after it’s been created by simply pressing the desired group and then entering the text with the
keyboard.
Record the following groups using the fixtures from the tutorial1:
Group #
Keystrokes
Instructions
1
1 Thru 12 Enter
Record Group1 (then type on the keyboard) All
500 (then press) Enter
2
1 + 3 + 5 + 7 + 9 + 11
Enter
Record Group2 (then type) Odd 500 (then press)
Enter
3
2 + 4 + 6 + 8 + 10 + 12
Enter
Record Group3 (then type) Even 500 (then
press) Enter
4
21 Thru 32 Enter
Record Group4 (then type) All 600 (then press)
Enter
5
21 + 23 + 25 + 27 + 29 +
31 Enter
Record Group5 (then type) Odd 600 (then press)
Enter
6
22 + 24 + 26 + 28 + 30 +
32 Enter
Record Group6 (then type) Even 600 (then
press) Enter
7
1 Thru 32 Enter
Record Group7 (then type) All (then press) Enter
When you have finished this, your Fixture/Group screen will look like this:
1.Note that you needn’t be in a group screen to record a group. Instead of using the touchscreens, you can enter
the group number directly using the main keypad.
1.Note that the examples given assume the use of the touch screen to select the group number. If you prefer to
use the keypad for group number selection, you will need to press Enter after entering the desired group number.
46
Maxxyz
Note that when you create groups in the playback touch screen, they were also created in the
programmer touch screen.
In fact, you can create, edit and move groups from either screen and the changes will be
reflected in the other.
MOVING AND COPYING GROUPS
Should you wish to move a group from one location to the another, you can use the “Move” key
found in the keypad entry and the following command line syntax:
• Move Groupxx @ Groupyy
Or you can press the Move key, then press the desired group on the touch screen and then press
it’s new location. This allows you to arrange the groups in a manner that is logical.
Similarly, if you wish to copy a group, use the “Copy” key and the following command line syntax:
• Copy Groupxx @ Groupyy
Or you can press the Copy key, then press the desired group on the touch screen and then press
the location for the copy. By default, the copy will have the same name as the original but will be
Configuring Your Show
47
appended with a number in parenthesis (ex: Even 600 (1)). The number in parenthesis will
increment if additional copies are made.
EDITING GROUPS
Once a group has been recorded, it can be easily edited. Maxxyz provides two different ways of
editing an existing group. The first is to add or merge fixtures into an existing group and the
second is to replace the fixtures in the existing group with the currently selected fixtures.
TO ADD FIXTURES TO AN EXISTING GROUP
1 Select the desired fixture(s)
2 Press “Record” and the button of the group to which you wish to add the fixture(s).
The following pop-up window will appear:
3 Select “MERGE with current selection.”
The selected fixtures will be added to the fixtures that were previously in the group.
TO REPLACE THE FIXTURES IN AN EXISTING GROUP
1 Select the desired fixture(s)
2 Press “Record” and the button of the group you wish to replace.
The following pop-up window will appear:
3 Select “REPLACE with current selection.”
The fixtures that were previously in the group will be replaced by the selected fixtures.
The “CANCEL current command” button will abort the command and clear the command line.
The “EDIT current command” button will abort the command but will leave the command line
active so that you can edit it and then record.
48
Maxxyz
DELETING A GROUP
To delete a group, press the “Delete” hardy, the desired group, and then Enter.
SELECTING
GROUPS
When a group is selected, it is highlighted in red in the group screen(s). Further, any group that is
a subset of that group is also highlighted in red. For example, if you were to select the group “All
500,” the groups “Odd 500” and “Even 500” would also be highlighted.
The selection of groups is a toggle based process. That is to say that if a group is not selected,
pressing it’s button will select it but if it is already selected, pressing the button will deselect it.
Again, if you were to press “All 500,” the “Even 500” and “Odd 500” buttons would highlight. If
you were to then press “Odd 500,” both the “Odd 500” and “All 500” buttons would no longer be
highlighted (but the “Even 500” button would naturally remain highlighted.)
GROUP PAGES
The Maxxyz console is capable of managing thousands of groups. Naturally, these can not all be
displayed on a single screen. However, you can arrange your groups on various pages. The
number of groups per page is dependant on the size of the group window with the default view
set at 60. Therefore, the first group of the second page is 61. If you were to resize the window to
display 100 groups, the first group of the second page will be 101. To change the Group page,
use the “Page Up” and “Page Down” buttons found to the right of the group screen.
P RESETS
Where the Groups function allows you to rapidly select fixtures, The Presets function and display
provide a method for rapidly recall fixture channel attribute settings. Presets are also building
blocks for cues. If a preset is recorded into a cue or several cues and the preset is later edited, all
cues using that preset will be updated with the new preset information.
It is important to note that if a fixture is not recorded into a preset, it will not be affected by
that preset. If, for example, you create color preset 1 using fixtures 1-11, only fixtures 1-11
would be modified by that preset. The color of any other fixtures would remain
unchanged.
Configuring Your Show
49
THE PRESET SCREEN
Activate the preset screen by pressing the view button directly over the “Preset” label on the
playback touch screen. Within the preset screen are several buttons labeled with different
attribute groups. These attribute groups will record specific information from the programmer
screen. The information recorded depends upon which attribute group is selected.The groups
and their specific attributes are:
Dim Focus
This group contains attributes such as Intensity, Shutter, Focus, etc.
Pan Tilt
This group contains attributes such as pan, tilt, pan/tilt speed, etc.
Color
This group contains attributes such as color wheels, CMY and color
correction.
Gobo
This group contains attributes such as Gobo wheels, rotation and
indexing.
Zoom Prism
This group contains attributes such as iris and prism.
Speed Effect
This group contains attributes such as speed attributes.
Framing
This group contains attributes such as framing shutter information.
To the right of the attribute groups is the “Auto select” button. When highlighted (red), the
auto-select will automatically set the preset attribute page to match the active attribute group in
the programmer LCD keys. If you wish to record a different attribute group, press the attribute
group button on the playback touch screen and the appropriate display will appear.
RECORDING PRESETS
Recording presets is done in much the same way as recording groups. For example, select
fixture 1, a MAC 500 from the tutorial, and focus it on the red cylinder. Repeat this process with
the other MAC 500s, fixtures 2 through 12. With fixtures 1 through 12 on the cylinder, selected in
the programmer and “Pan Tilt” as the selected attribute group in the preset window press
“Record” and the desired preset number. As with groups, if you wish to label the preset, press
record, then the desired group button and then enter text using the keyboard and press “Enter”.
You can also label a preset after it’s been created by simply pressing the desired preset and then
entering the text with the keyboard.
If you now select the “Color” attribute group on the Programmer Touch Screen, you will note that
the preset page changes and your previously recorded “Pan Tilt” preset is no longer visible. By
default, recording a preset on this page will only capture the color attributes that are in the
programmer. (Again, if you didn’t change the color when you were focusing the MAC 500s, the
color attribute will not be loaded into the programmer and nothing will be recorded into the
preset.)
50
Maxxyz
Note: Only those attributes appropriate to the preset that are currently displayed in the
programmer screen can be recorded.
It should be noted that while by default only those attributes specific to the selected attribute
group will be recorded in a preset, it is possible to override those defaults using the “Record Cue
Options” pop-up window. That is to say that you could, as an example, have a preset on the
Color page that contains only pan/tilt values. For more information, please see “Record Cue
Options” on page 70.
Select the “Pan Tilt” attribute group again and record presets for the pyramid and the sphere.
When you’re done, the “Pan Tilt” page should look something like this:
Note: If “Auto select” was highlighted while you were focusing your fixtures, the preset
page would automatically change to the “Pan Tilt” page.
MOVING AND COPYING PRESETS
Should you wish to move a preset from one location to the another, you can use the “Move” key
found in the keypad entry and the following command line syntax:
• Move Presetxx @ Presetyy
Or you can press the Move key, then press the desired preset on the touch screen and then
press it’s new location. You can move presets between pages if you wish.
Similarly, if you wish to copy a preset, use the “Copy” key and the following command line syntax:
• Copy Presetxx @ Presetyy
Or you can press the Copy key, then press the desired preset on the touch screen and then
press the location for the copy. By default, the copy will be named “Copy of (original preset
name).” You can copy presets from on page to a different page should you desire.
EDITING PRESETS
As with editing groups, Maxxyz provides two ways to edit a group: merging and replacing.
TO ADD FIXTURES TO A PRESET
1 Select and focus the desired fixtures.
2 Press “Record” and the button of the preset to which you wish to add fixtures.
Configuring Your Show
51
The following pop-up menu will appear:
3 Select “Merge current data” and the appropriate fixture attributes will be added to the preset.
TO REPLACE THE FIXTURES IN AN EXISTING PRESET
1 Select and focus the desired fixtures.
2 Press “Record” and the button of the preset you wish to replace.
The following pop-up menu will appear:
3 Select “REPLACE with current data” and the appropriate fixture attributes will be recorded in the
preset.
The “CANCEL current command” button will abort the command and clear the command line.
The “EDIT current command” button will abort the command but will leave the command line
active so that you can edit it and then record.
DELETING A PRESET
To delete a preset, press the “Delete” hardy, the desired preset, and then Enter.
S UBMASTERS
Maxxyz utilizes two submasters, labeled “A” and “B.” These can be programmed to master the
intensity of any individual or group of fixtures. Please note that just as with the Grand Master, the
A and B submasters can not be used to raise the levels of fixtures, but can only be used to limit
their intensity. To program the submasters:
1 Select the fixtures that you wish to have controlled by the submaster.
2 Set the fixtures to any level other than zero.
3 Press Record Group x and record the fixtures into a new group.
52
Maxxyz
4 Do not clear the programmer!
5 Press Record and the flash button above the target submaster.
6 Select the group you recorded in step 3.
7 Select Merge or Replace in the Group Record pop up window.
Once you’ve chosen merge or replace, the group label will change to either “Submaster A” or
“Submaster B” and the appropriate fader will now master the selected fixtures.
Configuring Your Show
53
THE PROGRAMMER WINDOW
The programmer window displays information on the fixtures that are currently under your direct
control. That is to say, it displays those fixtures that have been selected and manipulated, but not
yet recorded into a group, preset or cue and then cleared. When a fixture is selected, it is
automatically loaded into the programmer. It is also possible to load portions of or entire cues,
groups, and presets into the programmer for editing. It is important to note that any attribute of
any fixture loaded into the programmer will have the highest priority. Nothing, with the
exception of the Grand Master, will override the output of any fixture loaded into the programmer.
Also, when you record or update a cue, group or preset, only that information contained in the
programmer will be recorded or updated.
T HE P ROGRAMMER D ISPLAY
Activate the programmer display by pressing the view button directly over the “Prog/Output” label
on the playback touch screen.
Across the top of the programmer display there are 5 soft keys. The two left-most soft keys are
toggles while the 3 right-most soft keys are either active (red) or inactive (blue).
The first two buttons determine how data is displayed:
Percentage Toggle
This button will toggle the values displayed between a decimal
percentage (0-100%) and digital values (0-255 for 8-bit attributes and
0-32767 for 16-bit attributes). The default is Percentage.
Preset Name Toggle
This button will toggle between “Preset Name,” where the label taken
from a preset is displayed; “Preset Number,” where the page and
number of the preset are displayed; and “Preset Value” where the
numeric value of the preset is displayed. The numeric value will be
either percentage or decimal as determined by the Percentage
Toggle. If the selected fixtures are at a value that is not determined by
a preset, the Preset Name Toggle will have no effect.
The next 3 buttons determine what data is displayed:
54
Show Base
This key is permanently on and can not be deselected. This key
displays the base attribute information in the programmer.
Show FX
When active, this key allows for the display of effects channel
information such as “Swing Value,” “Mode,” and “Figure.” Deselecting
this key will hide those values resulting in a less “busy” screen.
Show Timing
When active, this key allows for the display of Fade and Delay values
entered for any of the attributes using the “Timing” Programmer LCD
key.
Maxxyz
The screen shot below shows all of these features in use.
You can see at a glance that fixture 9, a MAC 500, is selected and changes have been made to
it’s color and gobo attributes. You can also see that the pan/tilt of all the odd 500’s are set to the
Preset “500 cylinder” and the intensities are varying. A fade time of 5 seconds is also indicated
for the 500’s. Looking down at the 600’s we can see that the color and intensity of the fixtures
has been changed and that there are effects controlling the Cyan and Yellow attributes.
L OADING F IXTURES INTO THE P ROGRAMMER
There are three ways to load information into the programmer:
1 Selecting a fixture or fixtures
2 Using the “Edit” key from the keypad to edit presets, groups or cues
3 Using the “Load” key from the keypad to load groups, presets, attribute groups or individual
attributes.
LOADING
THE
PROGRAMMER USING FIXTURE SELECTION
As noted earlier, this is an automatic function of the Maxxyz console. Whenever you select a
fixture and adjust one or more of it’s attributes, it is loaded into the programmer. Please note that
only those attributes that are adjusted are loaded.
The Programmer Window
55
For example, using the tutorial 1.0 scene file and the patch we created earlier, if you were to
select fixtures 1-12, bring them to full and then focus them on the cylinder, the programmer would
look similar to this:
You’ll note that while the fixture’s intensity and pan/tilt information is in the programmer, other
information such as color, gobo, zoom, etc. is not included. This means that when you record this
information into a cue, the other attributes will not be affected. If they were at a level before this
cue, they will remain there; if they weren’t at a level, they won’t be given one.
You’ll also note that the number field for fixtures 1-11 are green while it is red for fixture 12. The
number field is color coded as follows:
Blue
Fixture is in programmer, but is not currently selected and will be
unaffected by changes made by the programmer keys.
Red
Fixture is selected, will be affected by changes made using the
programmer keys, and is the specific fixture displayed in the programmer
controls.
Green
Fixture is selected as part of a range of fixtures (i.e. “Fixture 1 Thru 12”)
and will be affected by changes made using the programmer keys, but is
not the specific fixture displayed in the programmer controls.
Dark Green
A fixture on a dark green field is one that has been selected, but has been
overridden through the use of the “next/last” commands. Pressing “revert to
selected” in the Fixture Groups window will return the selection to a green
field.
Below is a screen shot using several of the fixture selection color identifiers:
You can see that fixture 3 is the currently selected fixture, that fixtures 4 through 8 are dark green
and can therefore be selected by using the next/last functions and that all other fixtures are
currently deselected.
56
Maxxyz
LOADING
THE
PROGRAMMER USING EDIT
Once a group, preset or cue has been created, it can be loaded into the programmer for editing.
To edit a group or preset, press the “Edit” key on the keypad and the appropriate preset or edit
softkey. (Alternatively with groups, you can press the “Group” key on the keypad and then the
number of the group and “Enter.”)
Editing a cue is similar, but has some differences. You must first make a cue list “active” (please
see “Playback Controls” on page 73 for information on activating cue lists). You can then press
“Edit,” “Cue,” and a cue number from the active cuelist and then “Enter.” For example:
Edit Cue 1 Enter loads cue 1 of the selected cue list into the programmer.
Note that directly to the right of the “Preset Name” toggle, we can see information telling us that
this is Cue 1 from Cuelist 5. By examining the information inside the window, we can see that
fixtures 1 through 12, MAC 500s, are taken to a level of 100% by this cue.
We can now select any or all of these fixtures and make the desired changes. We can also add
fixtures to the programmer using either conventional fixture selection methods or by using the
“Load” function described below.
Once you have made your changes, you can press Update Enter to update the cue the original
information was taken from. For more information on the Update function, please see “Update”
on page 63.
LOADING
THE
PROGRAMMER
USING
LOAD
The “Load” command can be used to load complete groups and cues or attribute groups or
individual attributes of selected fixtures. “Load” differs from “Edit” in that where “Edit” will read
information on attributes that have been recorded with values in them, “Load” reads all of the
specified attributes, whether they are at a value or not. If one or more of the attributes that is read
by a “Load” function is at a level (for example the attribute is in an active cue), then that value will
be loaded into the programmer as well.
LOADING GROUPS
To load a group into the programmer, press the “Load” key followed by the softkey on the Group
touch screen.1
1.Alternatively, you can press the following keys on the keypad: Load Group xx Enter.
The Programmer Window
57
All attributes of the selected Group will be loaded into the programmer. If any of those attributes
are driven to a level by a cue, that level information will be loaded into the programmer as well.
Note that it is quite possible that more than one cue may be affecting different attributes of an
individual fixture. If this is the case, then the level information from all the different cues will be
loaded into the programmer. You can then make changes if desired and save them as a new
group, cue or preset or merge them into an existing group, cue or preset.
LOADING THE ENTIRE CONTENTS OF THE PROGRAMMER
The Load function also provides a very rapid means of capturing all information for any selected
fixtures in the programmer. After selecting the desired fixtures via main keypad or groups
pressing Load Load will load all attribute information for the selected fixtures into the
programmer.
LOADING ATTRIBUTE GROUPS AND INDIVIDUAL ATTRIBUTES
Loading attributes and attribute groups is quite similar to loading presets or groups. The
difference is that instead of selecting all attributes of selected fixtures, you are loading a subset
of the selected fixtures.
The following screen shot is of an active cue as displayed in the Cue Visualizer window.:
We can see that all the MAC 600s from the tutorial are active in this cue. To adjust the color on
the odd MAC 600s only, we would use the following procedure:
1 Select the group “Odd 600” from one of the Group touch screens.
2 Press and hold the Load key on the keypad
3 Press the “Color” LCD key in the programmer key section
4 Release the Load and Color keys
58
Maxxyz
The programmer screen will then look like this:
You can see that all the color attributes for the odd MAC 600s have been selected and will be
controlled by the programmer keys.
Loading individual attributes is accomplished in much the same manner except, instead of
pressing the attribute group LED key to load the group, press the hard key in the programmer
that is directly below the desired attribute displayed in the programmer touch screen.
For example, using the same cue, we can load all the MAC 600 intensity values by using the
following procedure:
1 Select the group “All 600” from one of the Group touch screens.
2 Press and hold the Load key on the keypad
3 Press the “Dim Focus” LCD key in the programmer key section (if not already selected)
4 Press the hard key directly below the “Intensity” label on the touch screen
5 Release the Load and hard keys
The programmer screen will then look like this:
As you can see, only the single attribute of intensity has been loaded into the programmer.
The Programmer Window
59
USING EDIT
AND
LOAD TOGETHER
The following is an example of one of many ways that Edit and Load can be used together to
create new looks. We’ll begin by looking at the two cues to be Edited together:
We can see that the first cue contains all the MAC 600s while the second cue contains only the
odd MAC 500s. To put both of these cues into the programmer, use the following procedure:
1 Select Cuelist 1 by pressing the appropriate cuelist LCD key
2 Press Edit Cue 1 Enter
3 Select Cuelist 2 by pressing the appropriate LCD key
4 Press Edit Cue 1 Enter
60
Maxxyz
Once completed, the programmer screen will look like this:
Examining this screen, we can see a number of things. Of particular note are the turquoise
rectangles next to the fixture numbers pointed out by the arrow. These turquoise rectangles
indicate that there are timing values associated with those fixtures. However, since the “Show
Timings” toggle is set to off to conserve screen space, they are not visible. (To confirm this,
examine the screen shot directly above this one.) If there were turquoise boxes next to any of the
attributes, it would indicate that there were hidden effects values.
The Programmer Window
61
We can also see that the attribute values in the cue from cuelist two are active while the
attributes in the cue from cuelist one are inactive. This is because cuelist two was loaded after
cuelist one. Finally, because of the blue background behind all the fixture numbers, we can see
that no fixtures are selected.
To activate the attribute values brought in from the first cuelist, press Load (Group softkey) All
600. The screen, once we turn off the Show FX toggle, will now look like this:
Note that as we used Load to select the attributes in the bottom cue, we now have hidden effects
attributes (turquoise boxes next to all attributes).
From here, we can select fixtures and use presets and/or the programmer keys to modify the
look until we are satisfied with it. Once completed, it can be recorded new or merged with an
SELECTING/DESELECTING ALL FIXTURES
IN THE
PROGRAMMER
Maxxyz provides a means of rapidly selecting and deselecting all the fixtures already loaded into
the programmer.
To Select All Fixtures in the Programmer
1 Press “.” (decimal key) and Enter.
2 To Deselect All Fixtures in the Programmer
3 Press 0 Enter.
REMOVING FIXTURES
FROM THE
PROGRAMMER
To remove unwanted fixtures from the programmer, use the following process:
1 Select the desired fixture(s) and clear all attributes that are loaded in the programmer. See
“Clearing Attributes and Attribute Groups” on page 64 for information.
62
Maxxyz
2 Press - (minus key) (fixture number) Enter.
S AVING C HANGES M ADE IN THE P ROGRAMMER
Once you have made your changes to the values in the programmer, you will need to save them.
Saving changes to presets or groups is covered in those specific sections in the manual so we
will discuss saving changes as cues here.
RECORDING CUES
There are two primary ways of recording the changes in the programmer into a cue. The first is to
press “Record” and then the LCD key of the desired Cuelist below the playbacks. When you do
this, the cue will be added to the end of the list. If you select an empty playback, the information
in the programmer will be saved as cue 1.
The second way to save the information as a cue is to specify the cue number. The information
will then be saved as the specified cue number in the active programmer. For example:
• Record Cue 21 Enter
will save the information as cue 21 in the selected cuelist.
Note:
When you press Record, the Cue Options window will pop-up (see screen shot
below). For basic recording operations, simply press “record” and use the
defaults in the Cue Options Window. For more information, please see “Record
Cue Options” on page 70.
Also please note that when you record a cue, group or preset, fixtures in the programmer
become deselected and a single press of the clear button will remove them from the
programmer. For more information please see the following section “Clearing and the
Programmer.”
UPDATE
When using the Edit function with a cue, the Update key’s LED will begin to flash. Once you have
made your changes in the programmer, you can simply press Update Enter and the cue that
was being edited in the programmer will be updated with any new values.:
Similarly, when you use the Edit function with a group, pressing Update Enter will update any
attribute values that have changed into the target group.
NOTE!
If two or more groups or cues are loaded into the programmer using the Edit
function, Update will only update the attributes of the last loaded cue or group.
All other changes will be lost!
For this reason, when working with multiple cues and or groups in the programmer, it is strongly
recommended to use the Record function and either record a new cue, group or preset or merge
into an existing cue, group or preset.
The Programmer Window
63
C LEAR AND THE P ROGRAMMER
Fixture and attribute information entered into the programmer will remain there until it is cleared.
The “Clear” button on the keypad serves three different functions within the programmer: it can
be used to deselect active fixtures; it can be used to clear the programmer entirely; or it can be
used to clear specific attributes or attribute groups.
At this point, it is worth repeating a few definitions found earlier in the manual:
Selected Fixture
A selected fixture is one that is currently editable using the
programmer’s trackbelts.
Deselected Fixture
A deselected fixture is a fixture that while in the programmer, will not be
affected by changes made in the programmer. That is to say that
changes made using the trackbelts that control fixtures will have no
effect on deselected fixtures. For more information, please see
“Loading the Programmer Using Fixture Selection” on page 55.
Active Channel
An active channel is a channel in the programmer that, by default, will
be recorded into a group, cue or preset. An active channel can also be
thought of as a channel whose values will be changed using the
programmer keys. These channel values are displayed in white.
Inactive Channel
An inactive channel is a channel in the programmer that will not
normally be recorded into the specified group, cue or preset unless
specifically commanded to do so. Inactive channels will not be affected
by the programmer keys. These channel values are displayed in black.
Null Channel
A null channel is one that is not in the programmer. It may still have a
value, but, as it is not in the programmer, it is not considered either
active or inactive and is therefore “null.”
CLEARING
AND
DESELECTING
The first time the “Clear” button is pressed, all attributes in the programmer will become inactive,
but selected fixtures will remain selected. The second time the “Clear” button is pressed, all
fixtures and attributes will be removed from the programmer.
For information on deselecting fixtures, please see “Deselecting Fixtures” on page 36.
CLEARING ATTRIBUTES
AND
ATTRIBUTE GROUPS
In much the same way that you can load attributes and attribute groups using the “Load” key, you
can remove them using the “Clear” key. Please refer to the screen below:
64
Maxxyz
To clear the “Cyan” attribute from only the odd numbered MAC 600s, we would use the following
keystrokes:
1 Select the group “Odd 600” from one of the Group touch screens.
2 Select the “Color” LED key on the programmer,
3 Press and hold the “Clear” key on the keypad
4 Press the hard key in the programmer that is directly below the “Cyan” label in the Programmer
Touch Screen.
5 Release both keys
The programmer screen will then look like this:
To clear an entire attribute group, press the appropriate LCD key in the programmer rather than
the hard key for the specific attribute. For example, to clear all color attributes from the odd
numbered MAC 600s, use the following keystrokes:
1 Select the group “Odd 600” from one of the Group touch screens.
2 Select the “Color” LCD key on the programmer,
3 Press and hold the “Clear” key on the keypad
4 Press the “Color” LCD key.
5 Release both keys
The Programmer Window
65
When this is done, the programmer will have the following display:
P LAYBACK C OMMAND
Located to the right of the playback faders and the left of the main keypad is the playback
command. The playback command consists of 5 LCD keys, one jog wheel, and one track belt.
The playback command is used for manipulating cuelist information. The information and type of
control exerted by the playback command is dependent upon the active cue type. The possible
cue types that determine the information displayed are: 1) None, 2) Cuelist, 3) Chase, and 4)
Override. (For information on cue types, please see “Working With Cues” on page 73.)
66
Maxxyz
DISPLAYS WHEN CUELIST TYPE
IS
“NONE”
When no cuelist is selected, the playback command LCD keys contain the following information:
LCD Key
Legend Page 1
LCD Key 1
Next Bank
LCD Key 2
Prev Bank
LCD Key 3
Bank...
LCD Key 4
Delay
LCD Key 5
Fade
LCD KEY DEFINITIONS
Next Bank
Pressing this key will advance the playback fader bank by one.
Previous Bank
Pressing this key will decrement the playback fader bank by one.
Bank...
By pressing this key and a number between 1 and 100, you will jump to
that bank.
Delay
This button is used in the setting of delay offsets for “fanning” the timing
of selected attributes.
Fade
This button is used to set the “Fade In” time of a specified attribute.
DISPLAYS WHEN CUELIST TYPE
IS
“CUELIST”
When you have selected a cuelist of the type “Cuelist,” he playback command LCD keys
contains the following information1:
LCD Key
Legend
Page 1
(default)
Legend
Page 2
Legend
Page 3
LCD Key
1
Next Bank
Release
---
LCD Key
2
Prev Bank
As Main
Fade In
LCD Key
3
Bank...
Mode
Time
LCD Key
4
Delay
Pause
Back
---
LCD Key
5
Fade
Go
---
1.The jog dial found at the bottom of the LCD keys is used to change the pages of the LCD keys.
The Programmer Window
67
LCD KEY DEFINITIONS
Note that definitions given earlier are not repeated here.
Release
Pressing release will cause the selected playback fader to release control of
all associated fixtures.
As Main
When a playback fader is selected and “As Main” is pressed, the selected
cuelist will become the “main” cuelist and that cuelist will be assigned to the
main “Go” and “Pause/Back” keys on the left side of the console.
Mode
Pressing this button toggles the mode of a cue trigger between “Go,” “Wait,”
and “Follow.”
Pause Back
When this key is pressed once, the selected cuelist will stop it’s fade.
Pressing it a second time will cause the previous cue to be activated.
Go
Pressing this button will cause the next cue in the selected cuelist to
execute.
Fade In
This button has no current functionary.
Time
This button has no current functionary
DISPLAYS WHEN CUELIST TYPE
IS
“CHASE”
When you have selected a cuelist of the type “Chase,” he playback command LCD keys contain
the following information:
LCD Key
Legend
Page
1(default)
Legend
Page 2
Legend
Page 3
LCD Key
1
Next Bank
Release
---
LCD Key
2
Prev Bank
Rate BPM
As Main
LCD Key
3
Bank...
XFade%
---
LCD Key
4
Delay
Pause
Back
---
LCD Key
5
Fade
Go
---
LCD KEY DEFINITIONS
Note that definitions given earlier are not repeated here.
68
Rate BPM
Pressing this key activates the track belt and allows you to dynamically
change the rate, measured in beats-per-minute, of the selected chase
cuelist.
XFade %
Pressing this key activates the track belt and allows you to dynamically
change the proportion of the crossfade between cues that will be used when
moving from one cue in a chase to the next of the selected cuelist.
Maxxyz
DISPLAYS WHEN CUELIST TYPE
IS
“OVERRIDE”
When you have selected a cuelist of the type “Override,” he playback command LCD keys
contain the following information:
LCD Key
Legend
Page
1(default)
Legend
Page 2
Legend
Page 3
LCD Key
1
Next Bank
Release
---
LCD Key
2
Prev Bank
As Main
---
LCD Key
3
Bank...
---
---
LCD Key
4
Delay
Back
---
LCD Key
5
Fade
Go
---
The Programmer Window
69
RECORD CUE OPTIONS
The Record Cue Options window is a powerful tool in the creation of groups or presets, but is
especially well suited to manipulating cue data. The Record Cue Options window (or Options
window) can be used to filter exactly which attributes from the programmer are recorded into a
cue, group or preset and, in the case of cues, where it is recorded. This window pops up
whenever the “Record” key is pressed.
T HE R ECORD O PTIONS W INDOW
The Options window contains several buttons that are broken down into five categories:
70
Record Options
These functions are used primarily with cues, but can be useful in
presets and groups as well.
Source Options
Used in determining exactly what attributes will be recorded, these
buttons are of interest whenever you are recording.
Extra Filtering
Whenever recording after using a “Load” function, these buttons will be
quite useful.
Extra Options
Consisting of one button, “Cue Only” this is only of use when recording
cues.
Filter
Used to determine which attribute groups will be recorded, this is useful
in all recordings.
Maxxyz
RECORD OPTIONS CATEGORY
There are four buttons in this group, many of which can be found in other pop-up windows, but
here they are collected in one place.
Merge
When selected, the merge command will add all selected attributes to the
specified cue, group or preset. Attributes that were previously in the cue,
group or preset will not be affected unless they are carried in the
information to be added.
Replace
Where Merge adds information, the Replace function will overwrite all
existing attributes. Any previously existing attribute values will be erased
and the specified contents of the programmer will be put in their place. This
can be used with cues, groups and presets.
Insert Before
Used exclusively with cues, this command will insert the specified
programmer data as a “point cue” immediately before the specified cue.
Insert After
Same as “Insert Before” except information is added after the specified
cue.
SOURCE OPTIONS CATEGORY
This category contains two buttons that toggle between each other and deal with active vs.
inactive attributes. For a definition of active/inactive attributes, see “Selected/Deselected and
Active/Inactive” on page 36.
Active Only
This is the only default filter used in the Options window. When selected,
only those attributes that are active in the programmer will be recorded.
Active & Inactive
When selected, both active and inactive attributes will be recorded.
EXTRA FILTERING CATEGORY
These two filter buttons determine which attribute groups will be loaded.
Base Channels
When selected the “Base Channels,” those defined in the Dim/Focus,
Pan/Tilt, Color, Gobo, Zoom/Prism, Speed/Effect, and Framing attribute
groups found on the programmer LCD keys will not be recorded.
Effect Channels
When selected, the “Effects Channels,” those defined in the Regular
Effect and Time Effect attribute groups found on the programmer LCD
keys will not be recorded.
EXTRA OPTIONS CATEGORY
This button breaks the normal recording method of the Maxxyz console. The Maxxyz is a
tracking console. That is to say that when a change is made, it tracks that information forward
though the cuelist. However, there are occasions when you may wish to record information into
only one specific cue without it tracking. The “Cue Only” button will allow that. When selected,
information that is recorded into that cue will not track forward. It will be contained only within that
cue. The one exception to this is when “Cue Only” is selected and you record a new cue at the
end of a cuelist. In that eventuality, the information will be tracked forward.
Record Cue Options
71
FILTER CATEGORY
In many ways, this category is akin to the Preset page filters. Using these filters, you can
determine which attribute groups will be recorded into a cue, group or preset.
Intensity Focus
Only those attributes which would be found in the Dim/Focus attribute
group will be recorded when this is selected.
P/T
Only those attributes which would be found in the Pan Tilt attribute group
will be recorded when this is selected.
Color
Only those attributes which would be found in the Color attribute group
will be recorded when this is selected.
Gobo
Only those attributes which would be found in the Gobo attribute group
will be recorded when this is selected.
Zoom/Prism
Only those attributes which would be found in the Zoom/Prism attribute
group will be recorded when this is selected.
Effects Speed
Only those attributes which would be found in the Effects/Speed attribute
group will be recorded when this is selected.
Framing
Only those attributes which would be found in the Framing attribute group
will be recorded when this is selected.
Defilter
Pressing this button will clear all selected filters from the Filter Category
Filters can be combined so that, for example, you merge only active effects channels for gobo
and color into one cue without tracking as shown below.
72
Maxxyz
WORKING WITH C UES
The primary method of playing back looks on the Maxxyz console is by the use of cues. Cues are
recorded into cuelists which are then assigned to playback faders. The Maxxyz console uses a
Last Takes Precedence (LTP) methodology of determining the values for the various fixture
attributes. In an LTP console, a distinction is made between “zero” and “no value” or “null.” Stated
simply, an LTP console will not change an attribute unless specifically instructed to. If a cue
specifically states that fixture 1 has an intensity of zero, then that value will be generated by the
console and sent to the fixture over the DMX cable. If however a cue is executed that contains
color information but no specific intensity information, then that fixtures color will change, but the
intensity will continue at whatever previous level it was at and will remain at that level indefinitely
until it receives a specific command to change. Maxxyz also makes no differentiation as to where
the information comes from1. It can come from any cue on any cuelist in any playback fader. Last
Takes Precedence.
P LAYBACK C ONTROLS
There are 10 sets of LED Keys, Hard keys and motorized faders in the Playback Controls. Each
of these controls pertains to an individual cuelist.
The LCD Key at the bottom is color coded and contains the cuelist text or label. The colors found
on the LCD Key are as follows:
• Not lit - No cue list is loaded into the Playback Control
• Green - Cuelist is loaded and available, but is not selected.
• Orange - Cuelist is loaded, available and is the selected cuelist/Playback Control
Directly above the LCD Key is the fader. The fader controls the intensity values of the fixtures in
the assigned cuelist. The fader will automatically return to it’s last position when changing
between playback pages.
1.The one exception to this is the programmer which always takes precedence over any other control with the
exception of the Grand Master.
Working With Cues
73
The top button on the Playback Control (with the blue LED) is the Go button for that specific
cuelist. The button directly below the Go button can be programmed to be either the Pause/Back
button or a Flash button.
• Pause/Back: When pressed once, the cuelist will stop any fade in progress. When pressed
subsequent to that, the cues will be executed in reverse order.
• Flash: When configured as a Flash button, pressing this button will drive the current cue in the
associated cuelist to 100% of it’s recorded value, regardless of the position of the fader.
This button is configured in the Cuelist Options screen. For more information, please see
“Changing the Cuelist Type and Options” on page 85.
T HE “M AIN G O ” B UTTONS
Aside from the individual playback faders, Maxxyz provides a location for controlling a “main”
cuelist.
When a cuelist is set “as Main” the Go and Pause/Back buttons in the Main Go area will execute
cues in that cuelist. Also in this area are the Release key and the Snap key. The Snap key can be
used to override the cue timings in a cuelist and force the cue to execute in a time of zero.
TO OVERRIDE CUE TIMING
1 Press and hold Snap
2 Press either the Go or Pause/Back key of the playback fader controlling the desired cuelist.
P LAYBACK P AGES (B ANKS )
Maxxyz supports 100 Playback pages called “Banks”. Each bank contains 10 cuelists that
correspond to the 10 Playback Controls. The bank list is found at the bottom of the programmer
touch screen. To change banks, use the vertical jog wheel found to the left of the Playback
Control LCD keys or the Playback Command LCD. The active bank is highlighted in bold print
and displayed at the bottom of the Playback Touch Screen.
74
Maxxyz
In the previous screen shot, we can see that the console is currently in Bank 5. The bank display
also provides color coded information about the playback faders associated with that particular
bank.
• Dark Red: A standard cuelist is loaded in this playback
• Light Blue: A chase is loaded in this playback
• Bright Red: An override is loaded in this playback.
• Dark Blue: No cuelist is loaded in this playback.
For more information on cuelist types, please see “Changing the Cuelist Type and Options” on
page 85.
LABELING
A
BANK
It is possible to change the default label (Bank x) by using the following procedure:
1 Go to the bank whose label you wish to change.
2 Press Edit
3 Press Bank... on the Playback Command LCD.
4 Enter the text you wish using the keyboard.
5 Press Enter.
S ELECTING A C UELIST
Only a cuelist that is selected can be modified or viewed on in the Cuelist display and only one
cuelist may be selected at any given time. Note that a cuelist needn’t be selected in order to
playback the cuelist. To select a cuelist, press the LCD button at the bottom of the desired
Playback Control. The LCD will turn orange to indicate that it is currently selected.1
C REATING AND W ORKING WITH C UELISTS
The Cuelist window is the primary tool used by Maxxyz for manipulating cue data. You can
access the Cuelist window by pressing the associated view key over the playback touch screen.
In order to properly examine the Cuelist window, first create a cuelist in playback one with 5 cues
using the following directions:
1 Select a group or groups of fixtures and focus them.
1.When recording the first cue into a new cuelist, that cuelist is automatically selected.
Working With Cues
75
2 Press the “Record” key on the keypad.
3 The “Record Cue Options” window will open. Ignore this for now. It will be discussed later in
“Using Macros” on page 91.
4 Press the LCD key under playback fader 1 (the furthest left fader). Playback fader 1 will
automatically become the selected cuelist. The motorized fader will raise to full, the LCD key will
light in amber, and cue 1 will be recorded into the playback.
5 Change the attributes on the selected fixtures and repeat steps 1-3 until you have a total of 5
cues.
When finished, the Cuelist window will look like this:
CUELIST SCREEN BUTTONS
In the upper left hand corner of the Cuelist screen are three buttons. The first one, “Options,” will
be discussed in detail below (see “Changing the Cuelist Type and Options” on page 85). The
next three buttons determine how the cuelist is displayed.
Follow Values
When this button is highlighted (red), the carat, the “>>” next to Cue 1
that indicates the current cue will advance as each cue is executed,
but the cue list will not automatically scroll down following the carat.
The highlight bar (the bright blue bar shown over Cue 1) will remain on
the last selected cue.
Follow Grid
Again, the carat will advance as cues are executed and the highlight
bar remains at the last selected cue, but when Follow Grid is selected,
the cue list will automatically scroll down following the carat.
Follow Cue
With only Follow Cue selected, the carat and the highlight bar advance
together as cues are executed, but the screen will not automatically
scroll if the cuelist is longer than the number of cues that can be
displayed on the screen (a maximum of 14 cues).
The default setting is for all 3 “Follow” keys to be selected.
To the right of the “Follow” keys is the “Add Macro” button. This will be discussed later in the
manual. Please see “Using Macros” on page 91.
Next in line is the “Unblock Cuelist” button. As mentioned earlier, the Maxxyz is a LTP console. It
is expected that an attributes value will track from cue to cue until it is specifically given a new
value. However, it is possible to inadvertently “block” that tracking action. For example, if in cue 1
you have fixture 1 at full and you then copy a cue from a different cuelist that also has fixture 1 at
full and you then record that as cue 2, fixture 1 will have a “hard” (non-tracked) value of full in
both cue 1 and 2. This means that a change to the intensity of fixture 1 in cue 1 would not track
through cue 2. Pressing the “Unblock Cuelist” button removes those blocks.
Next you will find text that tells you the cue type (Cuelist, Chase, or Override) and the cuelist
number (in this case Cuelist 24).
76
Maxxyz
Directly below this is the Cuelist Label. By default, the Cuelist Label is the same as the cuelist
number. To edit this label:
1 Select the text by touching or clicking on the text “Cuelist 24” on the touch screen.
2 The text will highlight in red.
3 Using the keyboard, enter the desired text.
4 Press Enter and the cuelist will be relabeled.
Note that the new label is also displayed in the appropriate playback LCD key and that the cuelist
number, found above the label on the touchscreen remains unchanged.
Finally, to the far right is the “Edit Mode” button. This button locks access the Trigger, Delay,
Fade, and Fade Mode cue modifiers thereby preventing accidental changes to the cue. By
default, the button is locked (light blue). To unlock the cue modifiers, simply press the “Edit
Mode” button (it will turn ochre to indicate that access is allowed). Please note that “Edit Mode”
does not prevent the recording, deselecting or editing of cue contents. It pertains only to Trigger,
Delay, Fade, and Fade Mode. Also, the “Edit Mode” button will maintain it’s state (locked or
unlocked) regardless of the cuelist or view displayed.
CUELIST COLUMN HEADERS
Just below the Cuelist Screen Buttons are six columns, each of which provide specific
information about the cue.
• No: This is the cue number. The cue number can range from.0001 to 99999.9999
• Name: The default cue name is the same as the cue number. The process to change the cue
name is similar to changing the Cuelist name:
1 Select the text by touching or clicking on the text “Cuelist 24” on the touch screen.
2 The text will highlight in red.
3 Using the keyboard, enter the desired text.
4 Press Enter and the cuelist will be relabeled.
Trigger
The three trigger types (Go, Wait, Follow) and any associated timings are
listed here. Information on triggers can be found in “Setting Cue Triggers”
on page 84.
Delay
Any delay time is displayed here. For further information, see “Setting Cue
Timing” below.
Fade
The fade time of the cue is displayed here. For further information, see
“Setting Cue Timing” below.
Fade Mode:
There are 3 modes available. Each of them deals with how the snap or fade
of attributes is processed. (See “Attribute Control” on page 41 for more
information on snap and fade.)
Working With Cues
77
Default Fading
The cue will use snap or fade as denoted in the
programmer touch screen.
Snap All Channels
When this option is selected, any attributes set as
fade attributes will be overridden and will execute in
a snap (zero) count. Note that currently, this
function is not implemented.
Fade All Channels
When this option is selected, any attributes set as
snap attributes will be overridden and will fade
according to the cue or attribute timing.
S ETTING C UE T IMING
The Maxxyz console allows for very flexible timing parameters. These can be set by the
individual or group of cues or by the individual or group of fixture attributes.
SETTING
A
CUE’S BASE FADE TIME
The Maxxyz console allows the use of “base” times for it’s cues. This is the default time for that
specific cue. It is the time that all attributes will use unless overridden and provided with a
different time. (See setting attribute time below.) The default base time is 3 seconds. Unless
otherwise specified, all attributes will fade in 3 seconds. This 3 second default can be changed in
the Cue Options page (page 85). Using cuelist 24 as the example, we’ll change the base cue
time on cue 2 to 5 second using the following steps:
1 Confirm that Edit Mode is unlocked (ochre).
2 Press or click on the cell that contains the Fade time for Cue 2. The cell will highlight in red.
3 On the main keypad, type 5 Enter. The cell will now show a time of 5 seconds and revert to a
highlighted blue state.
You can also select a range of cues in the same manner you select a range of cells in Patch. Use
the trackball to click-and-drag or you can touch-and-drag using your finger. To change the base
time to 5 seconds for all cues:
Select the Fade time for all the cues by touch-dragging or click-dragging on them.
4 Press 5 Enter.
78
Maxxyz
You’ll note that all of the Fade times have changed to 5 seconds.
SETTING
A
CUE’S BASE DELAY TIME
This feature is not currently implemented.
SETTING
AN
ATTRIBUTE FADE TIME
Aside from setting a base time for a cue, you can set specific times for any attribute or attribute
group of any fixture or group of fixtures. The range for these times is between 0 seconds and
over 3 hours. These times override the base cue timing and are set through the programmer
controls. For our example, we’ll use cue 1 with a base time of 5 seconds but we’re gong to
change the intensity timing to zero using the following procedure:
1 Select the desired cuelist.
2 Highlight the cue to be changed in the Cuelist view window.
Note that following steps 1 & 2 above will result in changes to the timing for all fixtures in the cue.
For a method of changing the timing on some of the fixtures in a cue, see the example in “Setting
the Fade Time for an Attribute Group” on page 80.
3 Select the attribute group with the desired attribute in the programmer controls LCD buttons. Use
“Dim/Focus” for this example.
4 Press the “Fade” LCD key in the Playback Command
5 Press the hard key directly below the desired attribute label in the touchscreen. For this example,
use “intensity.”
6 Press “0” on the keypad.
Once you have done this, you will see the following in the contents of the command line:.
This indicates that the selected fixtures will be set to an intensity fade time of zero.
7 Press Enter to record the change into the programmer.
Working With Cues
79
We can now see that the intensity fade time is set to “0” by referring to the programmer window:
Here we can clearly see that fixtures 1-12 have fade times of zero seconds (0 s) associated with
them. By following the column of zeros up, we can see that they are in the Intensity column. So,
all the fixtures will now “snap” on. To finish the process:
8 Press Record Enter
Cue 1 has now been updated with the new cue times as is reflected in the cuelist view:
Looking at cue 1, you can see that under the header “Override” a value of “0s>>0s” is displayed.
This indicates that at least one attribute on at least one fixture has overridden the default fade
time and that it/they have a time range of 0 to 0 seconds. Had we programmed it so that half of
the fixtures faded-in in time zero while the other half faded-in in 10 seconds, the display would
read “0s>>10s.”
SETTING THE FADE TIME FOR AN ATTRIBUTE GROUP
In the example above, we examined how to set a fade time for an individual attribute (intensity).
However, it is possible to set the fade time for and entire attribute group, such as color. To do so:
1 Select the desired cuelist and press Edit Cue 1 Enter.
2 Press the “All 600” group button to select the fixtures.
80
Maxxyz
Note that following steps 1 & 2 above will allow changes to the timing of some of the fixtures in
the cue. For a method of changing the timing on all of the fixtures in a cue, see the example in
“Setting an Attribute Fade Time” on page 79.
3 Press the “Fade” LCD key in the Playback Command.
4 Press the “Color” LCD in the programmer command.
5 Press 5 Enter on the keypad.
We can see that all the color attributes have been set to a fade time of 5 seconds by looking at
the programmer window:
SETTING
AN
ATTRIBUTE DELAY TIME
An attribute’s delay time is the amount of time between when the cue starts, and when the
attribute begins it’s fade. The attribute delay time is set in much the same way as the attribute
fade time. For this example, we will again work with cue 1 from our previous cuelist. We will
program the cue such that the odd numbered MAC 500 will come to full and move 2.5 seconds
after the even MAC 500s by using the following procedure:
1 Select the desired cuelist and press Edit Cue 1 Enter
2 Press the “Odd 500” group button to select the fixtures
3 Press the “Dim/Focus” programmer controls LCD button.
4 Press the Delay LCD key in the Playback Command
5 Press the hard key directly below the “Intensity” label in the touchscreen
6 Press 2.5 Enter to set the intensity delay to 2.5 seconds
7 Press the “Pan/Tilt” programmer controls LCD button.
8 Press the Delay LCD key in the Playback Command.
9 Press 2.5 Enter to set the pan and tilt delay to 2.5 seconds
Working With Cues
81
10 Press the hard key directly below the “Pan” label in the touchscreen (if not already selected)
We can now see that the Pan, Tilt, and Intensity attributes of the odd MAC 500s all have a delay
time of 2.5 seconds.
To complete this process:
11 Press Update Enter.
SETTING
A
STAGGERED DELAY TIME (FANNING)
The Maxxyz console makes it very quick and simple to fan the attributes of a group of fixtures.
Fanning can be defined as taking a delay time range (such as 0 to 11 seconds) and applying that
delay evenly across a group of fixtures. For example, if you did specify a delay of 0 to 11 seconds
and then applied that delay evenly across 12 fixtures, fixture one would begin it’s move as soon
as the cue began, fixture 2 would delay one second, fixture 3 would delay 2 seconds, etc.
To examine how this works, create a new cuelist using the tutorial.scn file.
1 Select group “All 600” @ Full
2 Press Record and a blank Playback LCD to create cue 1 in a new cuelist.
3 Press the “Pan/Tilt” programmer controls LCD button.
4 Using the trackbelt below the “Tilt” legend in the programmer touch screen, focus the MAC 600s
downstage.
5 Press the Delay LCD key in the Playback Command.
6 Press the Pan/Tilt LCD key in the programmer controls.
7 On the main keypad, press 0 Thru 10.
82
Maxxyz
At this point if you look at the command line, you’ll see the following:
8 Press Enter.
By looking at the programmer, you can see that the delay time of zero to 10 seconds has been
evenly distributed across the 12 fixtures.
To complete this operation,
9 Press Record and the Playback LCD used to create cue 1
10 Press Clear to clear the programmer.
FANNING FROM MULTIPLE POINTS
In much the same way that a standard fan is created, you can use change the delay time so that
the fade will begin at multiple points throughout the selected fixtures. For example:
1 Press Edit Cue 2 Enter
2 Select group “All 600” @ Full
3 Press the Delay LCD key in the Playback Command.
4 Press the Pan/Tilt LCD key in the programmer controls.
5 On the main keypad, press 0 Thru 10 Thru 0 Enter.
6 Press Update Enter.
Now, when cue 2 is executed, you will see that the fan begins from the beginning and end of the
selected fixtures and works it’s way towards the middle. Conversely, had we wished to start in the
middle and work out, we would set the delay time to 10 Thru 0 Thru 10. It is possible to use
multiple “Thru” commands to construct your fan effect.
Working With Cues
83
SETTING CUE TRIGGERS
The trigger for a cue determines what event is required for that trigger to execute. The most
basic is the “Go” trigger which merely requires pressing the appropriate “Go” button. Maxxyz
supports two other trigger types, “Wait” and “Follow” both of which will automatically advance
cues down the cuelist.
SETTING A WAIT TRIGGER
A cue with a wait time will automatically execute x seconds after the previous cue is executed.
That is to say that if a cue is created with a wait time of 7 seconds, it will automatically begin 7
seconds after the previous cue starts.
To set a Wait trigger, use the following procedure:
1 Confirm that Edit Mode is unlocked (ochre).
2 Select the desired cuelist by pressing the appropriate LCD playback button.
3 Press the current trigger value of (for example) cue 2.
At the top of the cuelist screen you will see the three trigger values and a button for “Trigger
Time.” Setting the wait time will be covered below.
4 Press the Wait button.
5 The cuelist will display “Wait 0 s” in the Trigger cell of cue 2.
6 To change the Wait Time, press the trigger value again.
7 This time, select Trigger Time.
8 The cuelist will revert to it’s normal state, but the command line will read: Set Cue2 Triggertime.
9 Using the keypad, enter the desired time (in seconds) and press Enter.
10 Select another cue and repeat if desired.
SETTING A FOLLOW TRIGGER
A cue with a follow time will automatically execute x seconds after the previous cue is complete.
That is to say that if a cue is created with a follow time of 7 seconds, it will automatically begin 7
seconds after the previous cue finishes.
To set a Follow trigger, use the following procedure:
1 Select the desired cuelist by pressing the appropriate LCD playback button.
2 Confirm that Edit Mode is unlocked (ochre).
3 Press the current trigger value of (for example) cue 3.
4 Press the Follow button.
84
Maxxyz
5 The cuelist will display “Follow 0 s” in the Trigger cell of cue 3.
6 To change the Wait Time, press the trigger value again.
7 This time, select Trigger Time.
8 The cuelist will revert to it’s normal state, but the command line will read: Set Cue2 Triggertime.
9 Using the keypad, enter the desired time (in seconds) and press Enter.
10 Select another cue and repeat if desired.
When the Wait and Follow times have been set for cues 2 and 3, the cuelist screen will display
this information:
C UELIST O PTIONS
CHANGING
THE
CUELIST TYPE
AND
OPTIONS
As mentioned earlier, Maxxyz supports 3 different cue types. “Cuelist,” the default, we have been
working with. We’ll now look at the other two cue types “Chase” and “Override” and how they can
be configured.
Working With Cues
85
To change the cuelist type, press the “Options” button in the upper left hand corner of the Cuelist
view and the Cuelist Options window will open.
The three cue types are listed across the top of the screen. We can see that the selected type (in
red) is “Cuelist.”
Below the three cue types are several other setting that may be applied to the cue. Many of these
features are not yet functional, and are denoted by “(N/A).” However, those that are implemented
are quite useful and are described below.
Normal Priority
86
The “Normal Priority” button isn’t truly implemented, yet as it is
the only priority available, it is worth mentioning that this is the
lowest of the 3 possible priorities for a cuelist. A “Normal Priority”
cuelist will give up it’s attributes to any other cuelist using those
same attributes in a cue. When the ‘High” and “Higher” priorities
become functional, this will become quite useful and important.
For now, if you were to deselect “Normal Priority” it would
automatically reselect when you close the cue options window.
Maxxyz
Autorelease
By default, Autorelease is on. Autorelease determines the
actions of attributes that are taken from the cuelist that you are
modifying by another cuelist. An example is the best way to
describe the function of Autorelease:
Example with Autorelease ON
1 Cuelist A controls attributes x, y, and z.
2 Cuelist B controls attributes x, y, z, and any other attributes.
3 In Cuelist A, Autorelease is ON (highlighted in red.)
4 Cuelist A is running. When cuelist B starts, cuelist B takes
control of attributes x, y, and z.
5 Cuelist A releases it’s cuelist automatically (blue LED in
playback go button goes out).
6 When cuelist B is released, attributes x, y, and z go to zero.
Example with Autorelease OFF
1 Cuelist A controls attributes x, y, and z.
2 Cuelist B controls attributes x, y, z, and any other attributes.
3 In Cuelist A, Autorelease is Off (not highlighted in red.)
4 Cuelist A is running. When cuelist B starts, cuelist B takes
control of attributes x, y, and z.
5 Cuelist A does not release it’s cuelist (blue LED in playback
go button remains lit) although cuelist B is controlling
attributes x, y, and z.
6 When cuelist B is released, attributes x, y, and z return to the
control of cuelist A.
Please note that in order for Autorelease to function in the
manner described above, cuelist B must contain all the attributes
of cuelist A. Otherwise, when cuelist B is released, those
attributes taken from A will be sent to zero.
Release when Restart
By default, Release when Restart is on. This function deals with
the state of attributes when they finish the last cue in a cuelist
and return to the first cue in the cuelist. By default, any changes
made to any of the attributes will not be tracked back through
cue one when the cuelist restarts. For example:
With Release when Restart ON
The first cue in the cuelist has all fixtures in open white
The last cue in the cuelist has all fixtures in red.
When the cuelist cycles back to the top, all fixtures will be
returned to open white.
With Release when Restart OFF
The first cue in the cuelist has all fixtures in open white
The last cue in the cuelist has all fixtures in red.
When the cuelist cycles back to the top, all fixtures will remain
red.
Default Release Time
Using the “+” and “-” keys, you can change the release time from
it’s default of 3 seconds.
Working With Cues
87
Release Dimmers First
By default, this setting is off. When enabled, intensity values will
fade out in the specified default time first, and then all other
attributes will follow once the intensity has reached zero, again in
the specified default time.
Default Button Behavior
This selection area allows for the toggling of two different
settings, “Pause/Back” and “Flash.” This setting pertains to the
behavior of the button located directly below the playback “Go”
button.
Pause/Back:
When pressed once, the cuelist will stop
any fade in progress. When pressed
subsequent to that, the cues will be
executed in reverse order.
Flash:
When configured as a Flash button,
pressing this button will drive the current
cue in the associated cuelist to full,
regardless of the position of the fader.
The “Default Fader Behavior” and “Action of GO When Running”
are fairly self-explanatory and, as only the default settings are
allowed at this time, there will be no further discussion of them in
this version of the manual.
88
Maxxyz
CHASE
A chase cuelist is one that when executed will automatically go from the first cue to the last cue
and then loop to the start and continue again until the cuelist is released. Any cuelist can be used
as a chase. When a cuelist is set as a chase, each individual cue becomes one “step” in the
cuelist. To set a cuelist to chase, select the cuelist and press the “Options” button in the upper-left
hand corner of the cuelist screen. When the Cuelist Options window opens, press the “Chase”
button found in the top middle of the screen.
When the Chase mode is selected a new box “Chase Options” is opened in the lower right hand
corner of the options screen. From here you can set the beats-per-minute rate of cue execution
and the fade percentage.
Beats Per Minute (BPM)
This setting determines the length of time between the execution
of each step of a chase. The default is 30 bpm or 1 step every
two seconds. You can increment or decrement the bpm by using
the “+” and “-” soft keys to the right of the bpm display.
Fade%
This is the amount of time that each step will actually move. For
example, if you set the bpm to 15, or 4 seconds per step, and
then set the Fade% to 25, each step would execute/move in 1
second (25% of 4 seconds) and then be idle for 3 seconds
before executing the next step. You can increment or decrement
the Fade% by using the “+” and “-” soft keys to the right of the
Fade% display. You can also use the Playback Command
trackbelt to alter this value.
FWD, BWD, BNC, RND
These buttons refer to chase styles but are currently not
implemented. All chases will move forward (lowest cue number
to highest and then looping back to the start).
While these settings can be changed “live” while the chase is running (see“Displays When
Cuelist Type is “Chase”” on page 68), in the case of the Fade% is strongly recommended the
setting be changed in the Cue Options window as it is much more accurate than the trackbelt.
You can now run the chase by closing the “Cue Options” pop-up and pressing the go button on
the appropriate playback fader.
Working With Cues
89
OVERRIDE
An Override cue breaks the convention of an LTP console. (See “Working With Cues” on
page 73 for more information on LTP.) A cue set as a type Override will maintain control of it’s
associated channels regardless of any other control with the exception of the programmer and
the grand master. Do note however that one Override cue can be overridden by another Override
cue in what might be described as Last Override Takes Precedence.
To create an override cue using the tutorial, perform the following steps:
1 Clear the programmer if necessary.
2 Select all fixtures and set to full intensity.
3 Load the Pan/Tilt attribute group into the programmer.
Your programmer should look something like this:
4 Record the contents of the programmer to an available playback.
5 Clear the programmer.
6 In the Cuelist View, open the “Options” screen and set the cue type to “Override.”
You have now created your override cue. To view the effects of the override, perform the
following steps:
7 Start the chase created earlier (or any other cue) by pressing the appropriate go key1.
8 Play the override cue by pressing the appropriate go key.
You’ll note that the Override cue has taken control of the pan, tilt and intensity attributes of all
other fixtures. Other attributes such as color, gobo, iris, etc. are unaffected. Note that you can
master the amount of control the override exerts by raising and lowering the corresponding
playback fader.
9 Release the override cue.
The attributes that were controlled by the override cue are returned to the control of their
previous playbacks.
1.For the best effect, use a cuelist that does not have fixtures at 100% intensity and 50/50 pan/tilt.
90
Maxxyz
U SING M ACROS
The Maxxyz console allows you to automatically affect a cuelist from any cue in any cuelist. This
is done via Macros. Macros give you the ability to trigger, release or pause any existing cuelist.
CREATING
A
MACRO
To use a macro in a cuelist, follow this procedure:
1 Select the desired cuelist and view it in the Cuelist window.
2 Highlight the cue that you wish to have trigger the macro. Note that the macro will execute as
soon as the cue starts.
3 Select “Add Macro” at the top to the cuelist. The macro will be added directly below the selected
cue.
4 To determine the effect of the macro, touch “Undefined Macro”
When selected, the Macro Editing screen will appear at the top of the cuelist:
5 From the left pull down menu, select Trigger, Release, or Pause.
6 From the right pull down menu select any cue.
Note that this cue needn’t necessarily be loaded into a playback fader. A macro can be used to
trigger a cue in the Virtual Cuelist (see “Virtual Cuelist” on page 94 for more information).
7 Select “Apply” to save your changes.
DELETING
OR
EDITING
A
MACRO
Once inserted into a cuelist, a macro can later be edited or deleted. Use the following procedure:
Working With Cues
91
1 Select the desired cuelist and view it in the Cuelist window.
2 Press the macro action (the cell that contains the word Trigger, Release, or Pause followed by
the cuelist number).
3 To edit the macro, enter any changes in the trigger or cuelist selection then press apply.
4 To delete the macro, press “Delete Macro.”
5 The edits to the macro will be applied.
R ELEASING A C UELIST
Releasing (or clearing) a cuelist will cause the selected Playback Control to cease outputting
instructions to it’s associated fixtures and cancels any cues, chases, or overrides. You can
release a specific cuelist or you can release all cuelists.
RELEASING
AN
INDIVIDUAL CUELIST
To release an individual cuelist use the “Rel” button in the Main Go area:
1 Press and hold the “Rel” button
2 Press the “Go” button of the desired Playback Control
3 Release both buttons
RELEASING ALL CUELISTS
There are two ways to release all cuelists
REL/SNAP
1 Press and hold the “Rel” and then the “Snap” button in the Main Go area
All attributes in all faders on all banks will return to their “home” position in the default fade time.
2 Release both buttons
SNAP/REL
1 Press and hold the “Snap” and then the “Rel” button in the Main Go area
All intensity values of all fixtures on all pages will fade to zero and then all other attributes in all
faders on all banks will return to their “home” position.
2 Release both buttons
92
Maxxyz
M OVING , C OPYING , AND D ELETING C UELISTS ON
P LAYBACK F ADERS
Accomplishing the above mentioned tasks on the Maxxyz console is extremely simple and
intuitive.
MOVING CUELISTS
ON
PLAYBACK FADERS
To move a cue from one playback fader to another, use the following procedure:
1 Press the Move key found in the main key area.
2 Press the LCD Playback key of the cuelist you wish to move.
3 Press the target LCD Playback key (where you wish to move the cuelist).
Note that it is possible to move a cuelist from one bank to another by selecting the desired bank
after selecting the cuelist to be moved.
You can not move a cuelist from a playback to a playback that is already using another cuelist.
COPYING CUELISTS
ON
PLAYBACK FADERS
Copying a cue from one playback fader to another is quite similar to moving a cue.
1 Press the Copy key found in the main key area.
2 Press the LCD Playback key of the cuelist you wish to copy.
3 Press the target LCD Playback key (where you wish to copy the cuelist).
Just as you can move cuelists across banks, you can copy across banks as well. And you are
also prohibited from copying to a playback that already has a cuelist.
There is however, one very important thing to note: when you copy a cuelist from one playback
fader to another, you are not creating a copy per se, as much as you are creating a clone. That is
to say that any changes made in one cuelist, be it the original or the copy, will be reflected in the
other. It is essentially the same cuelist, but in two locations.
DELETING CUELISTS
ON
PLAYBACK FADERS
1 To delete a cue from a playback fader:
2 Press the Delete key found in the main key area.
3 Press the LCD Playback key of the cuelist you wish to delete.
4 Press Enter1
The selected cuelist has been deleted from the playback. Accidentally delete a cuelist? Don’t
worry. See “Virtual Cuelist” on page 94.
1.Note that you can also press and hold the “Delete” key and then press and LCD playback button. When “Delete” is then released, the specified cuelist will be removed from the fader.
Working With Cues
93
OTHER C UELIST LOCATIONS
Aside from the playback faders, cuelists exist in two other locations: The Virtual Cuelist and
Playback Buttons.
V IRTUAL C UELIST
Throughout the manual, we have spoken of cuelists on playback faders. And while it is likely that
that is where you will most often manipulate cuelist information, it is important to note that
playback faders are not where the cuelist information is actually stored. Whenever you record a
cue, you’re not actually recording it into the playback fader, you’re recording it into the Virtual
Cuelist. It may help you in your understanding of the Virtual Cuelist if you think of it as the
“Master Cuelist.” In order to view the Virtual Cuelist, it may be necessary to create a custom view.
(See “Editing Display Screens” on page 19 for information.)
One way to think of the Virtual Cuelist is to compare it to Microsoft Windows: In Windows, you
have a folder that contains a file. This is the same as the Virtual Cuelist. On your desktop you
have shortcuts to the original file. This is the equivalent of the other cuelist locations (playback
faders, play back button page).
94
Maxxyz
VIRTUAL CUELIST DISPLAY
Looking a little closer at the individual cue lists we can see which ones are active and what type
they are.
We can see that this is cuelist 8. The CL in the upper left-hand corner denotes that it is a cuelist.
It has been labeled songlist A and the black arrowhead indicates that it is active.
Here we see that cuelist 31, labeled “chase” is active. The circular icon in the lower left hand
corner denotes it is active and the “CH” in the upper right hand corner identifies it as a chase.
And lastly, we see cuelist 31, an override is also active.1
MOVING
AND
COPYING
FROM THE
VIRTUAL CUELIST
In the case of the Virtual Cuelist, moving and copying to playback faders or playback buttons
(see “Playback Button Page” on page 97) are identical functions.
1.Note that the label “override all” is inaccurate. If it were truly overriding all, the other cuelists would not be
active.
Other Cuelist Locations
95
TO COPY FROM VIRTUAL CUELIST TO PLAYBACK FADER
1 Press Copy
2 Select the virtual cuelist you desire from the touchscreen
3 Press the target LCD Playback key (where you wish to copy the cuelist).
You can copy the same cuelist to as many different playback faders on as many banks as you
wish. However, as with copying a cuelist from one playback fader to another, any changes made
in one cuelist, will be reflected in all others. Also, changes made to a cuelist on a playback fader
will affect the same cuelist if it’s found on a a playback button page as well.
TO COPY FROM VIRTUAL CUELIST TO PLAYBACK BUTTON
1 Press Copy
2 Select the virtual cuelist you desire from the touchscreen
3 Press the Playbbutton view hard key to bring up the Playback button window.
4 Press the target playback button (where you wish to copy the cuelist).
Again, you can make as many copies as you wish, but they are all still the same cuelist so
changes made in any one, will affect all copies. This includes copies found on playback faders.
Moving a cuelist from the Virtual Cuelist to a playback fader or playback button is exactly the
same as copying it. The same rules apply.
MOVING
AND
COPYING WITHIN
THE
VIRTUAL CUELIST
Moving or copying a cuelist from one location in the Virtual Cuelist to another is simple to do, but
it is important to understand what is happening.
TO COPY FROM ONE VIRTUAL CUELIST BUTTON TO ANOTHER VIRTUAL CUELIST
BUTTON
1 Press Copy
2 Select the virtual cuelist you desire from the touchscreen.
3 Press the target Virtual Cuelist button on the touch screen (where you wish to copy the cuelist).
When you perform this function, you have made an actual copy. There is no relationship between
the two cuelists with the one exception that the copy will retain the same name. The reason for
this is that when you select the original cuelist, it is assigned a number (such as cuelist 8); when
you copy it to a new location, that location has it’s own cuelist number. Therefore, by copying
cuelist 8 and “pasting” it into a new cuelist button, you have in effect created a new cuelist.
TO MOVE FROM ONE VIRTUAL CUELIST BUTTON TO ANOTHER VIRTUAL CUELIST
BUTTON
1 Press Move
2 Select the virtual cuelist you desire from the touchscreen.
3 Press the target Virtual Cuelist button on the touch screen (where you wish to move the cuelist).
When you move a Virtual Cuelist from one location to another, you are destroying the old cuelist
and creating a new one. If you move from cuelist 8 to cuelist 12, cuelist 8 no longer exists.
However, the Maxxyz console will automatically update all playback faders and playback buttons
with the new location of the cuelist.
96
Maxxyz
DELETING
A
VIRTUAL CUELIST
Warning! When you delete a Virtual Cuelist all references to it (i.e. copies on playback
faders and playback buttons) are removed as well! A deleted Virtual Cuelist is
completely and irrevocably removed from the show file. Once deleted, you only
recourse in retrieving it is to load a previously saved showfile.
TO DELETE A VIRTUAL CUELIST
1 Press Delete
2 Select the cuelist you wish to delete on the touch screen
3 Press Enter
P LAYBACK B UTTON P AGE
The Playback Button Page presents an alternative way of displaying information to be used
instead of or in conjunction with the playback faders. While the detailed level of information that
is readily accessible in a playback fader is missing, the rapid access to a large number of cuelists
presents you with the ability to make very quick changes. There are 26 pages of buttons, each
(by default) containing 100 buttons in a 10 by 10 arrangement.
To access the playback button page, press the view hard key found directly over the label
“PlaybButtons” on the playback touch screen.
Other Cuelist Locations
97
PLAYBACK BUTTON DISPLAY
At the top of the screen you can see the controls for the playback buttons. The “Page Up” and
“Page Down” increment and decrement through the 26 available Playback Button pages. The
“Go,” “Pause,” and “Select” buttons have the same function as described earlier in this manual.
However, whereas in a playback fader you select the cuelist and then the function, in the
Playback Button page, you select the function and then the cuelist. That is to say that in order to
execute a cue, you press (and therefore highlight and make active) the “Go” button and then
select which cuelist you wish. The three other buttons in this list are described below.
Select
Select is used to load a cuelist into the Selected Cuelist View and Cuelist
Values windows. “Select” also allows you to access all functions that you
would normally have access to with a selected cuelist in a playback fader.
Mark as Main
When selecting this button and then selecting a cuelist from one of the
playback buttons, that cuelist will be controlled by the Main Go buttons. To
unload the cuelist from the Main Go buttons, either select the same cuelist
again or select any other cuelist twice.a
Optimize All
When selected, the Optimize all button will remove unused effect
parameters in the Playback Button cuelists and improve their performance.
A reboot of the console is required after optimizing for the changes to take
effect.
a. This has the effect of loading and then unloading the second cuelist from the Main Go buttons.
MOVING
AND
COPYING CUELISTS
WITH THE
PLAYBACK BUTTON
DISPLAY
Moving and copying cues in the Playback Button Display is somewhat limited. You are not
allowed to move or copy cuelists from the Playback Button display to anywhere other than
98
Maxxyz
another Playback Button on any bank. Nor can you copy or move cuelists from the playback
faders to the Playback Buttons. You are allowed only to move or copy cuelists from the Virtual
Cuelist to the Playback Button Display. Be aware that the same rules apply when copying a
cuelist: you’re not creating a new cuelist, merely copying one. What’s done in or to the copy will
be done in and to the original.
DELETING CUELISTS
IN THE
PLAYBACK BUTTON DISPLAY
TO DELETE A PLAYBACK BUTTON CUELIST
1 Press Delete
2 Select the cuelist you wish to delete on the touch screen
3 Press Enter
ACTIVE CUELIST VIEW
To the right of the playback button display is the Active Cuelist View. In the screen shot on
page 98, you can see that the cuelist number and label are displayed, in this case cuelist 4 with a
label of “set break.” Pressing a cuelist in this view has the effect of selecting it and making it the
active cuelist.
Other Cuelist Locations
99
THE 2D STAGE LAYOUT
The 2D Stage Layout provides 26 gridded pages (labeled A through Z) with gridlines drawn in 1
meter squares. Each page is 52m by 30m. On these pages you can add the fixtures from your
patch as well as truss, text and bitmaps.
The 2D layout allows a quick 2-dimensional graphic representation of the stage. The 2D view
also allows for a moderate degree of interaction with the controller side of the console.
Specifically, it allows for fixture selection through the graphical interface.
2D L AYOUT O VERVIEW
Below is an image of the unpopulated 2D Stage Layout1.
You can clearly see the gridded blank space for adding elements of the design and little
explanation is required there. However, we will discuss the series of buttons along the top of the
page.
Zoom
There are four levels of zoom in the 2D layout. Pressing the “+”
magnifying glass will zoom in while the “-” magnifying glass will zoom out.
Page
Directly below zoom are the Page functions. Pressing the document icon
on the right will increment the page while the icon on the left will
decrement the page. Next to the word “Page” you can see the letter “A.”
This indicates that we are viewing page A.
1.Note this screen shot is cropped.
100
Maxxyz
View
The two view keys, “Patch Numbers” and “Clear View” pertain exclusively
to fixtures. Either one of these views, but not both can be selected. They
determine whether a fixture number will be visible or not on the drawing.
When “Patch Numbers” is selected
(highlighted in red), the fixture icon will display
like this:
When “Clear View is highlighted, the fixture
icon will display like this:
Setup
When highlighted, this button “un-hides” the additional buttons to the
right. NOTE: When the Setup button is highlighted and the setup options
are visible, you can not select fixtures to load them into the programmer.
Edit Buttons
Fixture
When selected, this button allows you to
manipulate the fixtures in the drawing.
Truss
When selected, this button allows you to add,
delete and otherwise manipulate trusses in the
drawing.
Text
When selected, this button allows you to add and
edit text.
Note:
To ensure smooth operation, it is recommended that only one element
(fixture, truss, or text) be highlighted at any given time.
Add
This button opens either a pop-up window or dialog box to add either
truss or text. Adding fixtures is handled separately (see “Adding fixtures
to the 2D Layout” on page 104)
Change
The “Change”
button opens a new
window:
Color
Clicking on this button brings up a pull down menu
with a choice of colors. The selected element will
be changed to the selected color.
Icon
Clicking on this button will bring up a list of
alternative views (i.e. side, top, front) for the
selected fixture to be shown in. Please note that
only fixtures can use this feature.
Patch
This feature is not yet implemented.
Number
The feature is not yet implemented.
Rotation
This button, when selected will bring up a window
with two icons. One is used to rotate elements in
increments of 22.5 degrees to the left, the other in
increments of 22.5 degrees to the right.
Lock
When selected, all elements on the page will be locked and will not be
able to be repositioned.
Back
This button will close this window.
The 2D Stage Layout
101
Copy
This is used to copy an element.
Paste
This is used to paste an element that has been copied.
Delete
This is used to delete elements.
Import Bitmap
This is used to import a graphic into the 2D view. See below for more
information.
Deselect All
When pressed, any selected elements will be come deselected.
G ENERIC F UNCTIONS
Some of the functions listed above are independent of element type. They will behave the same
whether you are working with a fixture, text or truss. In the examples below, we will be working
with a piece of truss.
SELECTING/MOVING ELEMENTS
Once an element has been added to the 2D layout, you must select it in order to perform any
other functions on it. Selecting elements in the 2D layout is closely tied with moving them and is
accomplished with 3 mouse clicks.
TO SELECT/MOVE AN ELEMENT
1 Click the mouse on the desired element. It will highlight in green.
2 If you wish to perform some modifying action on it (copy, change, delete, etc.) you would select
the desired action now.
3 If you wish to move the object rather than modify it, click again. If the cursor has moved away
from the object, it will return to the center of the object with this click.
4 You can now use the trackball to position the element. To place the element (and deselect it) click
again.
CHANGE MENU
The Change Menu allows for a number of modifications to be performed on the various
elements, however only the “Color” and “Rotation” functions can be applied to all elements.
TO CHANGE THE COLOR OF AN ‘ELEMENT
1 Select the desired element (one click only).
2 Move the cursor to the “Change” button and press it.
102
Maxxyz
3 Press the “Color” button. When you do, the following window will open:
4 Scroll down the list until you find the desired color and click on it.
5 Click on “Ok.”
6 Click on “Back”
7 Click on “Deselect All.” The color change will have been applied.
TO CHANGE THE ROTATION OF AN ELEMENT
1 Select the desired element
2 Move the cursor to the “Change” button and press it.
3 Press the “Rotation” button. When you do, the following window will open:
4 Press the right icon to rotate the element 22.5 degrees clockwise and the left to rotate 22.5
degrees counter clockwise.
5 Click on “Back”.
6 Click on “Back” again.
7 Click on “Deselect All.”
TO COPY AND PASTE AN ELEMENT
1 Select the element to be copied.
2 Click on “Copy.”
3 Click on “Deselect All.”
4 Move your cursor to the location where the new element is to be added.
5 Click on “Paste.”
6 Press “Deselect All.”
Please note that with all the above commands, you can right click and draw a “selection box”
around the desired elements to select more than one element at once. You can not however,
click on two different objects to select them as the second click will be interpreted as a “Move”
command.
W ORKING WITH F IXTURES IN 2D L AYOUT
Adding and then adjusting fixtures in the 2D layout can provide you with a quick, at-a-glance
representation of your rig. With the 2D layout, finding the fixture you want is quick and simple and
doesn’t require you to remember the fixture number.
The 2D Stage Layout
103
ADDING
FIXTURES TO THE
2D LAYOUT
Adding fixtures is accomplished via the “Patch” menu.
TO ADD FIXTURES TO THE 2D LAYOUT
1 Select the Patch menu.
2 Press the “Fixtures” button to access the spreadsheet view.
To the far right of the spreadsheet, you will see a column labeled “Page.”
3 In the “Page” column, highlight the cell(s) of the fixture(s) you would like to add to the 2D layout.
4 Press the “Edit” key.
After pressing the “Edit” key, a new window will open in the Patch screen:
5 Select the page you wish to put the fixtures on by scrolling through the list (A through Z) and
press “Ok.”
6 The fixtures will be added to the 2D view immediately but before leaving this screen press
“Apply” and exit the spreadsheet view.
With the fixtures added to the 2D layout, you may now modify them as desired.
DELETING FIXTURES
Deleting fixtures from the 2D layout does not unpatch them or remove them from the show. It
merely removes them from the 2D view.
104
Maxxyz
TO DELETE A FIXTURE
1 Select fixture(s) to be deleted.
2 Press delete.
CHANGE
THE
FIXTURE ICON
The default viewpoint for fixtures is looking at them from above. The 2D layout allows you to
change the viewing orientation of the fixtures for a more accurate stage picture.
TO CHANGE THE FIXTURE ICON
1 Select the fixture(s) that you would like to modify.
2 Press the “Change” button.
3 Press the “Icon” button.
A pop up window will appear in the touch screen window:
This window shows the fixture type and the available views.
4 Select the desired view and press “Ok.”
5 The fixture(s) will immediately assume the new position.
6 Press “Back.”
7 Press “Back” again.
8 Press “Deselect All.”
LOADING FIXTURE INTO
THE
PROGRAMMER
WITH
2D LAYOUT
Fixtures in the 2D Layout can be selected and loaded into the programmer and then focused just
as if you had used traditional fixture selection means.
TO LOAD A FIXTURE INTO THE PROGRAMMER
1 Confirm that the “Set Up” button is deselected and that the buttons used for modifying elements
are no longer visible.
2 Click on individual fixture. Selecting multiple fixtures simultaneously is not possible.
3 To remove fixture from the programmer, click on the fixture again.
The 2D Stage Layout
105
W ORKING WITH O THER E LEMENTS
While similar in many ways, modification to other elements are somewhat different that
modifications to fixtures.
TRUSS
TO ADD TRUSS
1 Select “Truss” from the “Edit” box.
2 Select “Add.”
A pop-up menu will appear:
Scroll down the list to find the length or type of truss desired. Note that truss is generic and
lengths are given in centimeters.
3 Click on the desired truss and click on “Ok.”
4 Move the cursor to the layout area and click to insert the truss.
5 To add additional pieces of the same truss, click again.
6 When finished placing truss, select “Add.”
7 Click “Cancel” in the pop-up menu.
TO DELETE TRUSS
1 Select truss piece to be deleted.
2 Click on “Delete.”
Note: If truss does not immediately disappear from screen, you may need to refresh the display.
To do this, press “Set Up” to close the editing window and then press “Set Up” again to re-open it.
TEXT
TO ADD TEXT
1 Select “Text” from the “Edit” box.
2 Click on “Add.”
A pop-up window will appear with a list of font sizes.
3 Select the desired font size and press “Ok.”
A pop-up window will appear in the playback touch screen.
4
Enter your text using the keyboard and press “Ok” on the pop-up window.
5 Move the cursor to the layout area and click to insert the truss.
106
Maxxyz
TO DELETE TEXT
1 Select text to be deleted.
2 Click on “Delete.”
Note: If text does not immediately disappear from screen, you may need to refresh the display.
To do this, press “Set Up” to close the editing window and then press “Set Up” again to re-open it.
BITMAPS
You can import a bitmap into the 2D layout to add textures, scenic designs or other elements to
your representation. As noted earlier, the layout area is grided in 1 meter squares. Conveniently,
each meter corresponds to 100 pixels. Therefore, calculating the required size of your bitmap is
quite easy.
TO ADD A BITMAP
1 Select “Import Bitmap.”
A pop-up screen will appear in the playback touch screen.
2 Select the drive that has the bitmap.
3 Select the Directory and File.
4 Select the page you wish to add the bitmap to.
5 Press “Import.”
6 Press “Done.”
The 2D Stage Layout
107
The bitmap will be imported, anchored to the upper left corner of the 2D layout. It is not possible
to move the bitmap.
TO DELETE A BITMAP
1 Select “Import Bitmap.”
2 In the pop-up window select the page that has the bitmap you wish to delete.
3 Press “Delete.”
4 Press “Done.”
The bitmap will be deleted.
108
Maxxyz
EFFECTS
The Maxxyz console utilizes a very powerful effects package. With Maxxyz effects you can use
either pre-programmed shapes or work on an attribute-by-attribute level to design your own.
Effects are created using the programmer keys on the right of the console. While going through
this section of the manual, it will be quite useful to be at the console. Some terms and concepts
that might not be familiar to you will be much easier to grasp if you can follow along with your
console.
Please note: Maxxyz handles all attributes the same with the exception of pan and tilt. Pan and
tilt receive a special treatment when the “PT Comb” (pan/tilt combine) button in the programmer
touch screen is selected. This manual will cover “PT Comb” at the end of this section. Please
confirm that “PT Comb” is not highlighted for the first part of this section.
E FFECTS C ONTROLS
The effects controls are limited to the 4 right trackbelts and 2 of the 5 right LCD keys in the
programmer controls. The two LCD keys are:
REGULAR EFFECT
This loads the control elements for the motion of the attribute being controlled by the effect. The
elements are: Swing, Speed, and Mode.
Note that the attribute that will be affected by the Regular Effect control elements is intensity. This
is determined by the attribute selection using the right 5 LCD keys in the programmer control. By
selecting the “Dim Focus” LCD and then pressing the hard key directly below the intensity
column in the touchscreen, intensity is selected as the attribute to be affected by the Regular
Effect elements. Note that the active attribute hard key has a blue LED. That LED will be lit on the
active attribute.
Effects
109
BASELINE - A QUICK CONCEPT
All regular effects elements in the Maxxyz console work off the premise of the baseline of the
selected attribute. The baseline can be described as the level of the attribute before the effect
element is applied. So for intensity, the base line can be anywhere between zero and full. When
we apply an effect element to the intensity, it varies the intensity in relation to the base line.
Therefore, if we use an effect that takes the selected attribute from it’s baseline to 100% but that
attribute’s baseline is already 100%, the effect element won’t have any affect on the attribute.
To put it another way, if fixture one is at full and we apply an effect element that goes from zero to
100% and back to zero, we won’t see any change in the fixtures intensity. If however, the fixture
were at zero, we would see the intensity rise and fall with the effect.
SWING
Swing can be described as the amount of the effect to be applied to the attribute. In audio terms,
it would be described as the amplitude. As stated earlier, it affects the selected attribute based on
that attributes baseline value. Swing has a nominal value range of 0-170. Note however that all
fixture attributes except for pan and tilt have a nominal range of 0-128 (pan and tilt have a
nominal range of 0 - 64). In other words, a fixture at 50% would have a baseline of 64 (50% of
128). The swing range between an attributes maximum of 128 and the swing maximum of 170
can be used to “overdrive” the attribute. This doesn’t mean that you’ll be able to get more than
100% intensity from your fixture, but the fixture will “sit” at the top of it’s range (128) until the
swing value drops below 128.
Don’t Panic! Don’t be intimidated or frustrated if this doesn’t make sense yet. There are some
examples at the end of this section that should help clear this all up. But first, let’s examine the
other two Regular Effect Elements.
SPEED
Speed determines how fast the selected attribute will execute it’s swing value. Again, in audio
terms, it would be best described as frequency. While the baseline of an attribute does not have
a great impact on how speed affects the attribute, physics and the mechanics of the fixture
certainly do. If you set a moving head to execute 540 degrees of rotation in 1/4 of a second, it’s
not going to happen. Instead, the fixture will move back and forth off it’s baseline position a very
small amount as the swing value cycles back and forth past it faster than the servos can move.
The Speed element has a completely arbitrary range of 0-1000.
110
Maxxyz
MODE
The Mode element determines the relationship between the baseline of the attribute and the
swing element. These Modes are presented graphically. Below is an example of a Mode with
notes to help in interpreting it.
Double clicking the hard key below the Mode element will open up the Mode window so that all of
it’s contents can be easily viewed.It is presented in a graphic format:
Note: The numbers 1-8 were added for identification in this manual and do not appear in the actual Mode
screen on the console.
There are 12 modes available on the Maxxyz. We will discuss the first 8 here.
1 In this mode, we start at the baseline, fade up the amount specified by the swing element, return
to the baseline and then fade below the baseline the same amount before returning to the
baseline and starting again.
2 This mode is identical to mode one except that we fade below the baseline first and the direction
of travel is right to left. This is only noticeable when working with groups of fixtures and using the
Time Effects in conjunction with the Regular Effects.
3 In this mode, we start at the baseline, fade up the amount specified by the swing element and
fade back to the baseline. This mode never goes below the baseline.
4 This mode is identical to mode three except the direction of travel is right to left. This is only
noticeable when working with groups of fixtures and using the Time Effects in conjunction with
the Regular Effects.
Effects
111
5 In this mode, we start at the baseline, fade down the amount specified by the swing element and
fade back to the baseline. This mode never goes above the baseline.
6 This mode is identical to mode five except the direction of travel is right to left. This is only
noticeable when working with groups of fixtures and using the Time Effects in conjunction with
the Regular Effects.
7 In this mode, we start at the baseline, snap (time zero) up the amount specified by the swing
element, and then snap below the baseline the same amount before snapping above the
baseline again.
8 This mode is identical to mode seven except that we snap below the baseline first and the
direction of travel is right to left. This is only noticeable when working with groups of fixtures and
using the Time Effects in conjunction with the Regular Effects.
REGULAR EFFECTS EXAMPLES
Example #1
1 Using the tutorial.scn file, select fixture 8 and bring it to 50%
2 Making sure that “intensity” is the selected attribute (the blue LED on the associated hard key is
lit), roll the Swing element to 64.
3 Now, set the speed to 200.
You’ll note that the fixture is now fading from zero to full. We set intensity attribute to 50% or a
baseline of 64. (Remember that single attributes have a range of 0 to 128 on the Maxxyz
console.) We’re in mode 1 which swings above and below the baseline. Since our baseline is 64
and our swing is 64, when the intensity attribute is at the top of the wave, were at full intensity
(baseline 64 + swing value 64 = 128 = full). When we reach the bottom of the wave, we’re at zero
(baseline 64 - swing value 64 = 0).
Example #2
4 Continuing with where we were, double click the hard key below the mode label to open the
mode window.
5 Select mode #3 from the drawing above and close the mode window.
You can now see that our fixture is cycling between 50 - 100%
6 Take the intensity on fixture 8 to full.
While it appears the effect has stopped running, it hasn’t. Mode #3 never goes below the
baseline and our baseline is now 128 (full), so there’s no effect on the intensity attribute.
7 Open the mode window and select mode #5.
Predictably, the fixture is now cycling between 50 - 100% again.
8 Change the swing value to 128.
And again, the fixture is moving between zero and full.
Example #3
1 Clear the programmer.
2 Bring fixture 8 to full and focus it approximately half way between the sphere and the pyramid.
3 Select the “Tilt” attribute. (Press the Pan/Tilt LCD key and the hard key below the “Tilt” label in
the touch screen.) Directly above the “Swing” label, it should say “Effects on Tilt.”
4 Set Swing to 11 and Speed to 200.
The fixture should now be swinging somewhere between the end of the stage and the backdrop.
5 When the fixture next reaches it’s most upstage point, rapidly change the speed to zero.
112
Maxxyz
You’ll note that the fixture has stopped, but it’s not at it’s baseline (between the sphere and the
pyramid). The effect is still “running” but it has, in a manner of speaking, “frozen in time.”
6 Return the speed to 200.
At this point you may wish to move the pan/tilt attributes and move the baseline around.
Of course on the Maxxyz console you can have different attributes on the same fixture running
different effects at different speeds. All attributes of every fixture can run an effect.
TIME EFFECTS
Where Regular Effects can be used with a single fixture and deal with movement, Time Effects
address groups of fixtures and the execution of the regular effects. While it is, of course possible
to assign Time Effects to individual fixtures, there would be no discernible behavior in the fixture.
Time Effects consist of Delay (or Wave), Shift (or Step), and Wait. Wait is not fully implemented at
this time and will be addressed in a later revision of this manual.
DELAY/WAVE
The Delay element creates the image of a wave of effects. With the same regular effect running
on a group of fixtures, utilizing Delay will cause the fixtures to be at a different points in that
effect. The number of points along the duration of the effect that the group of fixtures is divided
into is set using Delay. While Delay can be set using the trackbelt, it is highly recommended that
you use the touch screen; either the pop-up window or by touching the values listed in the Delay
column.
The Delay pop-up window will automatically populate with x number of “Wave per x” selections
where “x” is the number of fixtures selected. With 12 fixtures selected, the box above will be
available. The first selection, “Wave per 1” is essentially no wave. “Wave per 1” puts all 12
fixtures at the same point on the wave. “Wave per 2” creates two points for the fixtures to be at in
the effect. The even fixtures will be 180 degrees off of where the odd fixtures are. This increases,
in this example to “Wave per 12” where each fixture has it’s own, evenly distributed point along
the curve of the effect. To examine how Delay works, do the following:
1 Using the tutorial.scn, select all the MAC 600s and bring them to full.
2 Select the Tilt attribute hard key.
3 In Regular Effects, set Swing to 18, Speed to 250 and use Mode #3 as described earlier.
The fixtures should be tilting from their “home” position to somewhere near the downstage edge
of the stage.
4 Select the “Time Effect” LCD key.
5 Double click the hard key below the “Delay” label to open the pop-up window shown above.
Effects
113
6 Select “Wave per 12.”
You can set the fixtures to the other “Wave per x” settings to see how they work, then return to
“Wave per 12.”
7 Confirm that Tilt is the selected attribute and then press the “Regular Effect” LCD.
8 Select Mode #4 as described above.
You can now see the difference between a “forward” mode and a “reverse” mode.
SHIFT/STEP
Shift is similar to delay except where delay divides the effect and distributes the fixtures evenly
along it’s curve, Shift divides the number of fixtures evenly and distributes the effect to them. The
pop-up window for Shift is essentially identical to the wave pop-up with the exception that “step”
is used instead of “wave.” To view the effects of step:
1 Using the tutorial.scn, select all the MAC 600s and bring them to full.
2 Select the Tilt attribute hard key.
3 In Regular Effects, set Swing to 18, Speed to 250 and use Mode #3 as described earlier.
The fixtures should be tilting from their “home” position to somewhere near the downstage edge
of the stage.
4 Select the “Time Effect” LCD key.
5 Double click the hard key below the “Shift” label to open the pop-up window.
6 Select “Shift per 12.”
Set the fixtures to the other “Step per x” settings to see how they work.
PAN/TILT
AND
“P/T COMB”
By selecting the “P/T Comb” button, a new option for the regular effects is available. As is
apparent from the name, this option is only available to the pan and tilt attributes. To use the “P/T
Comb” feature:
1 Select a group of fixtures and bring them to full.
2 With the Pan/Tilt attribute group selected, press “Regular Effects” (if necessary).
3 Select “P/T Comb.” It will be red when selected.
You’ll see that the effects window now has four panes: Swing Pan, Swing Tilt, Speed, and Figure.
The first 3 panes have been described above. The new window, “Figures” contains a variety of
geometric shapes that the fixtures can be programmed to approximate. Altering the swings and
speed as well as the baseline will determine the actual movement of the fixture(s).
WORKING
WITH
EFFECTS
It is important to realize that while effects attributes do not pertain to an actual physical device
(such as an iris or pan/tilt motor), the Maxxyz console treats it the same as any other attribute.
This is particularly apparent and useful when discussing LTP. We can examine some of the
advantageous of this using the tutorial.scn file and the “Speed” attribute.
“SPEED” AS IT’S OWN CUELIST
1 Select Fixture 1 and bring it to full.
114
Maxxyz
2
Select the “Tilt” attribute.
3 In Regular Effects, set the Swing to 45. Do Not Change The Seed. Leave Speed at zero.
4 Record this as cue 1 in a new cuelist.
As might be expected, when this cue is activated, the fixture comes to full, but it doesn’t move.
5 Clear the programmer.
6 Select Fixture 1 again.
7 Select the “Tilt” attribute.
8 In Regular Effects, set the Speed to 300. Do Not Change The Swing.
9 Select a new cuelist and record this as cue 1.
10 Open the cuelist options for this cuelist and set to type “Override.”
11 Execute both cuelists.
You can now see fixture 1 tilting up and down stage. But, if you pull down the Override cuelist
fader, you will notice that you now have manual control over the speed of the effect. What’s
more, the other fader will control the intensity of the fixture giving you full control of the look on
stage1.
SPEED IN THE SAME CUELIST
1 Select all the MAC 500s and bring them to full.
2 Using the Swing and Speed attributes in Regular Effect, set them to tilt up and downstage at a
speed of 200.
3 Record as cue 1 in a new cuelist (do not clear the programmer).
4 Increase the speed to 400.
5 Record as cue 2 in the same cuelist and clear the programmer.
When we play these cues, we can see that the speed increases when cue 2 is executed.
However, if we wish to make changes in cue 1, we’ll see those changes track through and again,
all cue 2 will do is increase the speed.
6 Release the cuelist (if it’s running).
7 Press Edit Cue 1 Enter
8 Press the Tilt attribute hard key
9 Select the “Time Effects” LCD key and set to “Wave per 12.”
10 Press Update Enter and clear the programmer.
Again, as we execute the cuelist, we’ll see the fixtures moving, but this time in a wave. As we
execute cue 2, the wave will track through, but it will be moving at twice the earlier speed.
1.Note that had a speed been entered in the first cue created, the override cue would have taken control of the
fixture. Once the override cue had been released, the fixture would have returned to the original speed.
Effects
115
SHOW FILE M ANAGEMENT
The Maxxyz console utilizes two processors in normal operation. Broadly speaking, the left hand
processor stores and manipulates the show file data while the right hand processor stores and
handles visualization data. As noted earlier, there is no automatic “connection” between these
two files. You must select them individually (see “Loading the Maxxyz Visualizer” on page 32).
This being the case, any show using visualization will consist of two separate files: one with a
“.scn” file name (the MSD file) and one with a “.maxxyz” file extension (the show data).
I MPORTANT N OTICE !
As with any computer, it is strongly recommended that you periodically back up your show files.
Martin recommends this be accomplished through the use of a USB storage device such as a
removable hard drive or “Thumbdrive1.” These are inexpensive devices readily available at most
consumer electronics stores. Please note that some software upgrades to the Maxxyz will
overwrite the hard drives and erase any existing show information. For that reason, please back
up any critical show files before performing an upgrade.
BACKING UP YOUR SHOWFILE DATA
To back up showfile data:
1 Connect the USB storage device to either of the USB ports found on the back of the console.
2 Press the Menu hardkey at the top of the console.
3 Select “Save Current Show...”
4 The default directory will be listed.
5 Open the “Save In” pull down menu and select “Removable Disk [E:].”
BACKING UP YOUR VISUALIZATION FILE
To back up MSD files:
1 Connect the USB storage device to the USB port on the front of the console near the audio
connections.
2 In the visualizer window, select “File” and “Save As...”
3 The default directory will be listed.
4 Open the “Save In” pull down menu and select “Removable Disk [E:].”
1.A “Thumbdrive” is a small removable USB hard drive.
116
Maxxyz
S AVE A S HOW
As the only information that can be manipulated with the Maxxyz console is showfile data, that is
the only information that will be saved. To save a show
1 Press the “Menu” key in the Master Control section
2 When the pop-up window appears on the Playback Touch Screen, select “Save show as...”
3 Using the attached keyboard, enter a name for the file and press “Enter” in the pop-up window
(or on the keyboard).
4 The showfile is stored on the “C” drive of the left processor.
L OAD A S HOW
To load a visualization file, please see “Loading the Maxxyz Visualizer” on page 32. Loading a
showfile can only be accomplished during the boot up cycle of the Maxxyz console. To load a
showfile
1 Turn on the console.
2 When the “welcome screen” appears (“Starting the Maxxyz” on page 20), select “Load a Show.”
3 A pop-up window will appear.
4 Select the desired show and press “Enter.”
D OWNLOADING AND U PLOADING F ILES
Exchanging files between the Maxxyz console and other computers requires removable media.
Martin recommends a USB “thumb drive.” To copy the visualization file, plug the thumb drive into
the USB port found on the front of the Maxxyz, near the Operator Audio. You can then copy a file
to or from the thumb drive. To copy the show file, plug the thumb drive into either of the USB
ports found on the rear of the console.
R ECOMMENDED F ILE L OCATION
The recommended (default) file location for the “.scn” file is: “My Computer\Shared
Documents\MSD4\Scenes”.
The recommended (default) file location for the “.maxxyz” file is: “My Documents”.
Show File Management
117
SERVICE
The Maxxyz console is designed as a rugged, road worthy console. However, some general
maintenance is required. For any service related concerns not addressed below, please contact
your Martin dealer or go to www.Martin.com.
L OADING M AXXYZ S OFTWARE U PGRADES
Maxxyz software upgrades are available at http://www.Martin.com . Once downloaded to your
PC, the zipped file can be extracted to either a CD or a USB storage device such as a removable
hard drive or thumbdrive. If extracted to a CD, simply insert the CD and the software upgrade will
automatically be installed. (Note that during installation of the software, normal console operation
will be stopped and a restart of the console may be required.) If using a thumbdrive to transfer
the files, you will need to click on the “Installx.x.x” icon to start the upgrade. Also, please refer to
any specific upgrade instructions found with the upgrade.
C LEANING
The Maxxyz requires periodic cleaning, as does any computer. The schedule depends heavily on
the operating environment; please consult a Martin service technician for recommendations if
needed.
As with any computer, never spray the cleaner directly onto the Maxxyz, always spray into a lint
free cloth and wipe clean. The touchscreens should only be cleaned with cleaners or wipes
specifically designed for cleaning computer screens.
Refer any other service not described here to a qualified Martin technician.
Important! Excessive dust, smoke fluid, and particulate buildup degrades performance and
causes overheating and damage to the console that is not covered by the
warranty.
T ECHNICAL S UPPORT
For a complete list of Technical Support phone numbers, please visit our web site at
http://www.martin.com/service/hotline.asp
118
Maxxyz
MAXXYZ SPECIFICATIONS
PHYSICAL
Dimensions (L x W x H) . . . . . . . . . . . . . . . . . . . . . . . . . . . . . . . . . .1034 x 613 x 287 mm (41 x 24 x 11 in.)
Weight: . . . . . . . . . . . . . . . . . . . . . . . . . . . . . . . . . . . 48 Kg (106 lbs), including flight case 66 kg (145.5 lbs)
AC SUPPLY
Power supply. . . . . . . . . . . . . . . . . . . . . . . . . . . . . . . . . . . . . . . . . . . . . . . . . . . . . . . . . 100-240 V, 50-60 Hz
Power consumption. . . . . . . . . . . . . . . . . . . . . . . . . . . . . . . . . . . . . . . . . . . . . . . . . . 0.75 A, 160 W @ 230 V
HARDWARE
8 5-pin DMX universe outputs
DMX/Ethernet connector (for addition of up to 24 extra DMX universes)
10 motorized playback faders, each with one dynamically-labeled-LCD-button (to identify/activate the
playback), and two function-assignable buttons
8 digital fader belts for fixture control
Digital LCD buttons (dynamically labeled)
Grandmaster fader
Built-in stereo loudspeakers
Headphone mini-jack connector
Speaker and headphone volume controls
3 USB connectors for peripheral device connection
2 VGA connectors for external monitors
2 12.1” SVGA TFT industrial color touch screens
2 industrial motherboards with Pentium III processors (1.3 GHz) with failure redundancy system
2 built-in hard drives with failure redundancy system
DVD/CD combo-drive
3.5” floppy disk drive
Built-in US keyboard
Trackball (with pan/tilt control switch)
3 desk light XLR connectors
Maxxyz Specifications
119
CONTROL & PROGRAMMING
DMX-512 standard
8 DMX universes (expandable to 32)
4096 channels (expandable to 16384)
No per fixture channel limit
100 playback banks, each containing 10 playbacks
Unlimited cue stacks on virtual cue lists
2-D plan view
3-D offline visualizer
Import Martin Show Designer data
Extensive fixture library
Unlimited presets for each group of functions: P/T, color, gobo, effect
Effect generator for automated programming of more complex effects (with 16 bit)
High light function to identify individual fixtures
Pan and tilt . . . . . . . . . . . . . . . . . . . . . . . . . . . . . . . . . . . . . . . . . . . . . . . . . relative or absolute programming
Fan function for all channels including timing parameters
PLAYBACK FACILITIES
10 motorized playback faders, each with one dynamically-labeled-LCD-button (to identify/activate the
playback), and two function-assignable buttons
Place a cue, cue list (sequence), virtual cue list, or effect, on any playback fader
100 banks, each of 10 playbacks, selectable with a scroll wheel on the desk
Full 16-bit fading for high-resolution fixtures
Individual fade in/fade out times for all playbacks
Manual override available at all times
Cue memory with individual delay-in, fade-in, fade-out and delay-out timing on all fixtures and their
parameters
Freeze times and playbacks
Live override of the global cue timings from 0-100%
Go-function (supporting multiple cues simultaneously)
Cue lists have tracking
Show data is mirrored on secondary hard drive to protect against failures
Motherboards are designed with redundancy in mind to enable the running of a show in the event of a
failure
SOFTWARE
Embedded OS WinXPe user interface
Real-world paradigm - pictures, dynamic text labels, and actuals are used instead of channel numbers,
values and percentages - wherever possible
Show backup on hard drive, floppy disk, or USB storage device (not included)
Compatible with Martin Show Designer
ORDERING INFORMATION
Maxxyz Controller, 90-230V . . . . . . . . . . . . . . . . . . . . . . . . . . . . . . . . . . . . . . . . . . . . . . . . . . . P/N 90732000
120
Maxxyz
INDEX
selecting 75
type 85
G
Numerics
chase 89
override 90
virtual 94
Grand Master 17
Group
pages 49
Groups
add fixtures to 48
copying 47
deleting 49
editing 48
labeling 45
moving 47
recording 45
replace fixtures in
selecting 49
2D Stage Layout
bitmap 107
fixtures 103
loading programmer with 105
text 106
truss 106
8 bit to 16 bit resolution 42
8bit/16-bit control resolution 42
A
Absolute Fixture Control
Active/Inactive 36
Attribute Controls 41
Audio
speaker volume 17
Auto Select 50
Auto-Addressing 29
Autorelease 87
43
B
Beats Per Minute 89
BPM (Beats Per Minute)
89
C
Channel Attribute
active vs. inactive 36
Chase
beats per minute (BPM) 89
Clear 37
Command Line 43
assist 43
clearing 43
escape 43
Control Resolution 42
Copy
group 47
preset 51
Cue Only recording 71
Cuelist
"Playback Button" page 97
clear 92
copying 93
deleting 93
moving 93
options 85
release 92
screen 76
Cuelist Options Window
Cues
chase 89
creating 75
editing 57
follow 84
recording 63
timing 78
update 63
wait 84
85
D
H
Default Button Behavior 88
Delay Time
attribute 81
cue 79
fanning 82
Deselecting Fixtures 36
Display Screens
editing 19
list of 17
Playback 18
Programmer 18
Highlight button
48
16
I
Intensity Fanning 35
J
Jog Dial
13
L
E
Edit Cue 57
Effects
baseline 110
delay/wave 113
examples 112
mode 111
regular 109
shift/step 114
speed 110
swing 110
F
Fade Mode 77
Fade Time
attribute 79
attribute group 80
cue 78
Fixture
color code 56
relative/absolute toggle 43
selected vs. deselected 36
selection order 36
Flash Button 74, 88
Functions Soft Key 42
Index
Labeling
cuelist 77
groups 45
presets 50
Last Takes Precedence (LTP)
LCD Keys 13, 39
Load a Show 117
Load Load command 58
Loading Cue Contents 57
73
M
Macro
creating 91
deleting 91
editing 91
Martin Show Designer (MSD)
Move
group 47
preset 51
32
N
Next/Last keys 16
Normal Priority 86
121
O
Operator Audio
17
P
Patch
adding fixtures 23
apply softkey 30
Auto-Addressing 29
deleting fixtures 31
edit range of fixtures 29
edit single fixture 28
spreadsheet 22
Pause/Back
fader 74, 88
Playback Button Page 97
Playback Command
LCD button displays 67
Playback Controls
graphic of 14
LCD key color code 73
pages/banks 74
Presets
add fixtures to 51
attribute group contents 50
copying 51
deleting 52
labeling 50
moving 51
recording 50
replace fixtures with 52
Programmer
fixture color codes 56
Programmer Controls
description 39
graphic of 15
Programmer Touch Screen
attribute pop-up window 42
controlling attributes 41
displays 40
Programmer Window
clearing all 64
clearing attributes 64
deselecting fixtures 64
display options 54
loading attributes 58
loading fixtures 55
using edit 57
using fixture selection
55
using load 57
saving changes 63
R
deselecting 36
deselecting all 62
selecting all 62
with main keypad 34
Snap key 74
T
the 50
Time 87
Track Belt 13
Trackball
sensitivity 43
Trackball Control
graphic of 16
next/last selection 16
U
Unblock Cuelist 76
USB Ports 117
Record Options Window 70
cue only 71
filters 71
Relative Fixture Control 43
Release Dimmers First 88
Release when Restart 87
S
Save a Show 117
Selected Fixtures Screen
Selected/Deselected 36
Selecting Fixtures
Index
V
Virtual Cuelist 94
copying 95
deleting 97
moving 95
Visualizer
default file location 33
opening a MSD file 32
35
122