1
User’s Manual
TextGrid-Tools
Version 2009-10-25
Work Package AP 2
Responsible Partners: TU Darmstadt, Saphor GmbH
TextGrid
Modular Platform for Collaborative Text Editing A Community Grid for the Humanities
Projekt: TextGrid
Part of D-Grid and the German e-Science Initiative
Funded by the German Federal Ministry of Education and Research (BMBF)
by Agreement 07TG01A-H
Project Duration: February 2006 - January 2009
Document status: abgeschlossen
Distribution: internal
Authors:
Wolfgang Pempe, Saphor
Thorsten Vitt, TU Darmstadt
Mirjam Blümm, Uni Würzburg
Jens Mittelbach, SUB Göttingen
Martin Haase, DAASI
Oliver Schmidt, Uni Trier
Thomas Stadtlander, Uni Würzburg
Andrea Zielinski, Christian Simon, IDS Mannheim
Table of Contents
Table of Contents ....................................................................................................................... 3
Introduction ................................................................................................................................ 6
1
2
The TextGridLab ................................................................................................................ 6
1.1
Download and Installation ........................................................................................... 6
1.2
Your TextGrid account ................................................................................................ 6
1.3
User Interface Basics.................................................................................................... 7
1.3.1
Managing User Interface Components ............................................................... 7
1.3.2
Perspectives and Editors ..................................................................................... 9
1.3.3
Selection and the Context Menu ......................................................................... 9
Tools ................................................................................................................................. 10
2.1
XML Editor ................................................................................................................ 10
2.1.1
How to Open the XML Editor .......................................................................... 10
2.1.2
Editing XML Files ............................................................................................ 10
2.1.3
Editor Views ..................................................................................................... 12
2.1.4
Design View ..................................................................................................... 12
2.1.5
Source View...................................................................................................... 13
2.1.6
WYSIWYM View ............................................................................................ 15
2.1.7
Associating an XML Schema and Validating XML Files ................................ 17
2.1.8
Text Link Editor ............................................................................................... 19
2.2
Management/Administration ..................................................................................... 22
2.2.1
Navigator .......................................................................................................... 22
2.2.2
Project and User Management .......................................................................... 24
2.2.3
Metadata Editor ................................................................................................ 31
2.3
Workflow Component................................................................................................ 35
2.3.1
Overview........................................................................................................... 35
2.3.2
Workflow Editor Graphical User Interface ...................................................... 36
2.3.3
Background Information ................................................................................... 40
2.4
Image Link Editor ...................................................................................................... 44
2.4.1
Functionality ..................................................................................................... 44
2.4.2
Application and handling.................................................................................. 44
2.4.3
Components of the perspective ......................................................................... 44
2.4.4
Functions .......................................................................................................... 45
2.4.5
Example of use: ................................................................................................ 47
2.4.6
Status bar: ......................................................................................................... 48
3
2.4.7
2.5
Search – Searching for Documents in TextGridRep .................................................. 49
2.5.2
How to Open the Research Perspective ............................................................ 49
2.5.3
What Can Be Searched for? .............................................................................. 49
2.5.4
How to search? ................................................................................................. 52
2.5.5
The Research Results View .............................................................................. 52
2.5.6
Search Hints (FAQ) .......................................................................................... 53
2.6
Dictionary Search ....................................................................................................... 54
2.6.1
Which Dictionaries Can Be Searched? ............................................................. 54
2.6.2
How to Open the Dictionary Search ................................................................. 55
2.6.3
The Dictionary Search Mask ............................................................................ 56
2.6.4
The Dictionary Search Results View ................................................................ 57
2.6.5
The Dictionary Browser View .......................................................................... 58
2.6.6
How to Combine Text Searches with Dictionary Search ................................. 59
2.7
Web Publisher ............................................................................................................ 60
2.7.1
How to open the Web Publisher ....................................................................... 60
2.7.2
How to create a publication .............................................................................. 60
2.8
Lemmatizer ................................................................................................................ 62
2.8.1
Morphisto Lemmatizer Module: Functions ...................................................... 62
2.8.2
How to open the Lemmatizer Module Morphisto ............................................ 62
2.8.3
The Morphisto User Interface ........................................................................... 63
2.8.4
The Morphisto Configuration Mask ................................................................. 63
2.8.5
Presentation of the Morphisto Results .............................................................. 64
2.8.6
How to access Morphisto from an Editor ......................................................... 66
2.8.7
FAQ: Hints for Using the Lemmatizer Module Morphisto .............................. 67
2.9
CollateX ..................................................................................................................... 68
2.9.1
State of development ........................................................................................ 68
2.9.2
The Web based test GUI ................................................................................... 68
2.10
3
4
Interaction with other components ................................................................... 48
Streaming Tools (i.e. non-interactive tools) .......................................................... 70
2.10.1
Sort.................................................................................................................... 70
2.10.2
Streaming Editors ............................................................................................. 70
2.10.3
Tokenizer .......................................................................................................... 75
Tools not developed in TextGrid ..................................................................................... 78
3.1
Bibliography Tool ...................................................................................................... 78
3.2
OCR ........................................................................................................................... 78
3.3
Print Publisher ............................................................................................................ 78
3.4
4
Registry ...................................................................................................................... 78
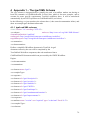
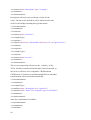
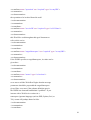
Appendix 1 – The tgwf XML Schema ............................................................................. 79
4.1.1
tgwf.xsd XML schema...................................................................................... 79
4.1.2
Example tgwf document ................................................................................... 86
5
Introduction
This user manual documents the different tools, services and applications of TextGrid from a
user’s perspective.
TextGrid focuses mainly on two components: TextGridLab (short for laboratory) as a single
point of entry to the virtual research environment, provides integrated access to specialized
tools, services and content, while TextGrid Rep (short for repository), a long-term archive for
research data in the humanities, embedded in a grid infrastructure, will ensure availability and
access to its research data as well as interoperability.
This report will be concerned with the former component.
The contents of this report is or will also be available in the TextGridLab’s online help
system.
1 The TextGridLab
TextGridLab is TextGrid’s client application. It offers services and tools for specialists in the
arts and humanities in a grid environment.
1.1 Download and Installation
The current beta version of the TextGridLab is available as a free download from
www.textgrid.de/beta.html for various operating systems. Before you can use the software,
you must install a Sun Java Runtime Environment (JRE, at least version 5)1. Aside from that,
TextGridLab does not require installation: simply download and unpack the archive file and
run the textgridlab application.
1.2 Your TextGrid account
A lot of functionality including read-only access to published information and working with
local files is available without logging in. To be able to store your own data in the repository,
however, you need to identify yourself and login. If your institution participates in the DFN
Shibboleth federation, you may simply use your institutional login to do so, in any case you
can
request
a
specific
TextGrid
account
from
our
web
site
at
www.textgrid.de/beta/installation.html.
1
Either your operating system provides means for installing a JRE, or you can download an appropriate
version from http://java.com/download
6
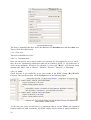
1.3 User Interface Basics
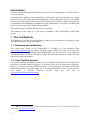
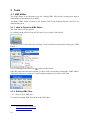
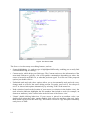
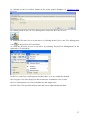
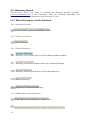
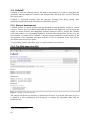
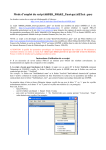
Figure 1: TextGridLab displaying the Welcome Screen.
Figure 1 shows what you see when you start the TextGridLab:
The main part of the application window is filled with the Welcome Screen, which provides
links to the most important tools of the TextGridLab. You can login here (see p. 24, this part
of the screen shows your user ID if you already have logged in), access the tool to search
through TextGrid, switch to the XML editor or call the online help.
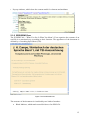
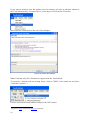
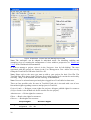
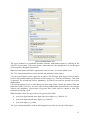
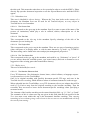
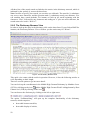
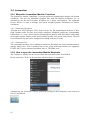
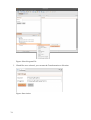
1.3.1 Managing User Interface Components
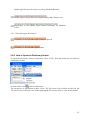
Figure 2 shows what you see when you click on the Project & User Management link on the
welcome screen (this tool is described in detail in the section Project and User Management
on p. 24 ff).2
The menu bar at the top of the screen offers hierarchical access to most of TextGridLab’s
functionality. The toolbar below offers quick access to the most used tools and components
plus additionally some tool-specific functions.
Use the perspective bar below to switch between tools you already used in this session – the
concept of perspectives is explained in more detail below.
The TextGridLab’s user interface builds on the principle of re-use of components: There are
rather small components with a specific functionality that are re-used in various tools.
2
TextGridLab’s UI is based on the principles of the Eclipse integrated development environment, if you are
already familiar with Eclipse you may just flip through this section.
7
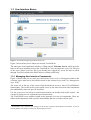
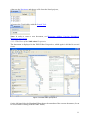
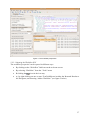
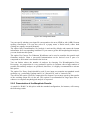
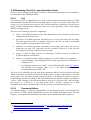
Figure 2: TextGridLab's user interface components exemplified by the project administration tool.
For example, there is the Navigator (described in section Navigator on p. 22) that can be used
to browse through projects and objects therein. This component is displayed in (e.g.) the
project and rights management tool (as on the left side in Figure 2), the workflow editor and
the text-image link editor. Building blocks like this are called views. The other views in
Figure 2 are labeled User Management and Role Help.
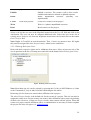
The application screen is mainly an arrangement of these views, plus fixed components like
menu, toolbar and status line. Each view has a title bar. You can move a view to another
region of the screen by dragging its title bar with the mouse. Resize views by dragging the
border between screen components, or temporarily maximize or minimize a view by clicking
on the or icons, respectively. Use the icon to remove a view from your screen – you
can bring it up again using the respective menu item from the Tools menu.
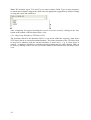
Multiple views can be stacked on top of each other. If you do that, only the topmost one of
these views is visible. Click on a background view’s title bar to make it visible.
8
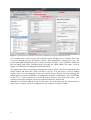
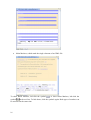
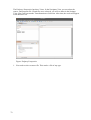
Figure 3: Navigator and Metadata Editor stacked.
1.3.2 Perspectives and Editors
A specific arrangement of user interface components can be saved as a perspective.
TextGridLab uses perspectives for the various tools: E.g., there is a project management
perspective that displays the navigator, the user management view and the role help (cf.
Figure 2); and there is a link editor perspective (cf. section Image Link Editor on p. 44 ff.)
that combines the navigator with views for image and text.
If you open an object in the XML editor, the user interface part that displays the XML content
is an editor. Editors are close relatives to views, with (from a user’s perspective) just a few
differences: Unless re-arranged, all editors open in a central area typically in the middle of the
screen as tabs on top of each other. While you typically have one view of a kind whose
contents depends on the selected object, you’ll open a separate editor for each object you want
to edit. The editor will stay open until you explicitly close it or the software.
Editors can contain unsaved content, in this case their title is marked with an asterisk (*).
1.3.3 Selection and the Context Menu
Large parts of user interface’s contents and functionality depend on the current selection. To
select something in a list or tree, single-click it, to select multiple objects, control-click them
(command-click on a Mac) or use shift-click to select a range of objects. You can also
combine the control and shift keys with the cursor and space keys to select without using the
mouse. In a text editor, you can select by simply dragging the mouse or using shift and the
cursor keys.
E.g., the User Management view always shows the context information about the currently
selected project, if you select another project, the view updates its contents.
9
2 Tools
2.1 XML Editor
The XML Editor is an interactive tool for viewing XML files and for creating new data or
annotating text retrospectively in XML.
TextGrid’s XML editor is based on the Eclipse Web Tools Platform Project3 and Vex4 by
John Krasnay et al.
2.1.1 How to Open the XML Editor
The XML Editor can be opened
by clicking on the XML icon in the Welcome Screen of the TextGridLab;
or directly in the TextGridLab by selecting “Tools” from the menu bar and clicking on “XML
Editor”;
rsp. by clicking on the XML icon
in the tool bar below;
Once the perspective has been opened, it can be easily accessed by clicking the “XML Editor”
tab in the perspective switch bar, even if another perspective is active at the time.
2.1.2 Editing XML Files
2.1.2.1 How to open XML files
To open an existing XML document in the XML editor
3
4
10
http://www.eclipse.org/webtools
http://vex.sourceforge.net/
either use the Navigator and choose a file from the listed projects,
or browse the TextGridRep with the Search Tool.
Note: In order to create a new document, see Managing (Adding, Copying, Publishing)
Resources in a Project.
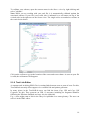
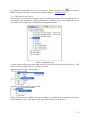
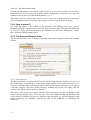
2.1.2.2 The Views of the XML editor Perspective
The document is displayed in the XML-Editor Perspective, which again is divided in several
views.
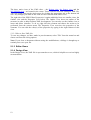
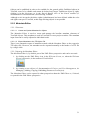
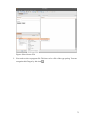
Figure: The XML Editor perspective
On the left hand side, the Metadata Editor shows the metadata of the current document. (It can
be closed while working with the XML Editor)
11
The three main views of the XML editor - the Design view, the Source view and the
WYSIWYM view - are located in the centre. These views are used for editing an XML-file.
You can switch between the single pages by clicking the appropriate tab on the bottom left
side. Any changes you make in one view are also reflected in the other views.
The right side of the XML-Editor Perspective is again subdivided in to two smaller views, the
Outline view and the Properties View below. The Outline View shows an outline of the
structure in order to help facilitate XML development. You can also use the Outline view to
insert and delete elements. To do so, right click the element and choose the action to be
performed from the context menu. The Properties View overviews the properties of the
elements. You can edit the value(s) of the properties by typing in the right column of this
view.
2.1.2.3 How to Save XML files
To save any changes you have made in your document, select "File" from the menu bar and
choose one from the saving options.
Note: If you close a document without saving the modifications, a dialoge is brought up to
remind you to save your file.
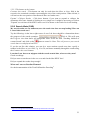
2.1.3 Editor Views
2.1.4 Design View
In the Design View, the XML file is represented as a tree, which is helpful to overview highly
structured data.
12
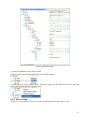
Figure: The Design View
Content and attribute values can be edited
directly in the corresponding table cells of the right column,
or with the help of the context menu. Therefore right-click the item you wish to alter and
choose the appropriate task from the menu.
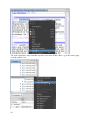
2.1.5 Source View
The Source view enables you to view and work directly with a file's source code.
13
Figure: The Source View
The Source view has many text editing features, such as:
Syntax highlighting, i.e. each tag type is highlighted differently, enabling you to easily find
a certain kind of tag for editing.
Content assist, which helps you finish tags. The Content assist uses the information of the
associated Schema to provide a list of acceptable continuations depending on where the
cursor is located in an XML file, or what has just been typed. To select one of the proposed
options just double-click it.
Unlimited undo and redo, these options allow you to incrementally undo and redo every
change made to a file for the entire editing session. For undo, press ctrl+Z, for redo press
ctrl+Y or choose both options alternatively by selecting "Edit" in the menu bar.
Node selection, based on the location of your cursor (or selection in the Outline view), the
node selection indicator highlights the line numbers that include a node (for example, an
element or attribute), in the vertical ruler in the left area of the Source view.
"Smart" double-clicking behaviour. If your cursor is placed in an attribute value, one
double-click selects that value, another double click selects the attribute-value pair, and a
third double-click selects the entire tag. This makes it easier to copy and paste commonly
used pieces of XML.
14
Pop-up windows, which show the content model for elements and attributes
2.1.6 WYSIWYM View
The WYSIWYM (= "What You See Is What You Mean") View organises the contents of an
xml-file in a structured way, according to their function. The appearance of the document is
defined by a Cascading Style Sheet (CSS).
Figure: The WYSIWYM View
The structure of the document is visualised by two kinds of markers:
Block Markers, which mark nested divisions of an XML-file.
15
Inline Markers, which mark the single elements of an XML-file.
To show Block Markers, left-click the symbol
, to show Inline Markers, left-click the
symbol
in the tool bar. To hide them, click the symbols again. Both types of markers can
be activated at the same time.
16
Elements can be inserted by
left-clicking "XML" in the menu bar and selecting "Insert Element",
or by right-clicking and selecting "Insert Element" in the context menu.
You can undo and redo every change made to a file for the entire editing session. For undo,
press ctrl+Z, for redo press ctrl+Y or choose both options alternatively by selecting "Edit" in
the menu bar or in the context menu.
2.1.7 Associating an XML Schema and Validating XML Files
A new object can be associated with a schema while it is being created. Therefor, select one
of the Schemas of the TextGrid Repository or one of the build-in XML catalog.
Figure: Select a Schema for a new TextGrid object
17
If you want to associate your file against your own schema, you have to add your schema to
the TextGrid Repository. In order to do so, select Import Files from the File menu,
then follow the instructions of the select files dialogue.
Figure: the select files dialogue
Note: Currently only W3C Schemas are supported in the TextGridLab5
To associate a Schema with an existing object, click on "XML" in the menu bar and select
"Associate a schema ..."
Choose one from the listed schemas and press the "OK" button.
5
Support for DTDs and possibly Relax NG is planned.
18
To validate your schema, open the context menu in the Source view by right-clicking and
select "validate".
Note: While you are working with your xml file, it is automatically validated against the
associated schema. If your file is not valid, this is indicated by a red button on top of the
vertical ruler in the right area of the Source view. The single errors are marked as red bars in
the vertical ruler below.
Click on the red bars to get to the location of the errors and correct them. As soon as your file
is valid, the red button will disappear.
2.1.8 Text Link Editor
A common task in editing XML files is creating links between texts or parts of texts. For this,
TextGridLab currently offers support via a versatile link and pointer generator.
In many places in the TextGridLab users can find the items Copy URI and Copy URI
Fragment for this. They generate an URI, if necessary including an fragment identifier
following the XPointer standard, and copy it to the clipboard.
E.g., a user might want to link to the entry for Aphrodite in a name glossary. The user can
select it in the XML editor:
19
The same operation is also available anywhere else in the XML editor, e.g, in the source page
or in the outline view:
20
The user can now insert the URI at the position where he wants to link to Aphrodite. The
following line would be inserted in this specific case:
textgrid:Goethe-Testprojekt:Namensglossar%3A+Der+junge+Goethe+in+seiner+Zeit:20091023T174552:text%2Fxml:1#xpointer(id('JG79610')/name[1])
The URI consists of two parts: the document URI (before the #) is TextGrid’s unique
persistent identifier for the document in the editor, the fragment (after the #) indicates the
position in the document.
The fragment’s syntax follows the XPointer standard6. The fragment is generated for
robustness:
(1) If the element to address has an XML ID, the fragment is simply #id
(2) Otherwise, it is an XPath from the nearest ancestor that has an ID.
2.1.8.1 Copy URI fragment: Internal Links
The Copy URI menu item is accompanied by the Copy URI Fragment command that is useful
for internal links inside a document: It copies only the fragment part starting with the # sign to
the clipboard. This is useful for internal links in a document that should not contain the
document’s URI.
2.1.8.2 Links outside the XML editor
The functionality of the link editor is not limited to the XML editor. It is available everywhere
where there are TextGrid objects: e.g., in the navigator or the search results view. Applied on
whole TextGridObjects, e.g., in the Navigator, users can copy the document’s URI. In the
search tool’s KWIC view, the fragment pointing to the search result’s section will be included
with the URI.
6
http://www.w3.org/TR/xptr-xpointer/
21
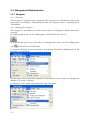
2.2 Management/Administration
2.2.1 Navigator
2.2.1.1 Functions
The Navigator is a project browser giving the users easy access to all materials related to the
project they are working at. Being always present, the Navigator can be a starting point in
TextGridLab.
2.2.1.2 Opening the Navigator
The navigator is, by default, part of the Project and User Management Module and can be
accessed:
by clicking on the Project & User Management icon in the Welcome Screen:
or, when the Welcome Screen is not active, by clicking on the Project and User Management
icon
in the tool bar of TextGridLab.
or, when the Welcome Screen is not active, by selecting "Project/User Management" in the
menu bar of TextGridLab:
.
The Navigator can be opened in perspectives other than the Project and User Management
Module or, if closed, re-opened:
by selecting “Tools” in the menu bar and selecting “Navigator”:
22
by clicking, when the Welcome Screen is not active, on the Navigator icon
in the tool bar.
Note: Using the Navigator view requires authentication (cf. Authentication).
2.2.1.3 Browsing Your Projects
The navigator is used for browsing the objects of the projects that a user has rights to access.
Browsing is easy and intuitive. All projects the user is entitled to access are displayed in a tree
view that can be expanded or collapsed by clicking on the nodes.
.
Figure: The Navigator view
Context menus will pop up when right-clicking a project or an object in the object tree. This
allows a user to manage objects or create new ones:
manage objects via the context menu:
create a new object via the context menu:
Note: If someone else modifies repository contents, you might need to refresh the Navigator
view manually. Click on "Refresh" at the top of the Navigator view to do so.
23
2.2.2 Project and User Management
2.2.2.1 Functions
2.2.2.1.1 Authenticate
TextGrid uses Shibboleth for authentication purposes. The Shibboleth authentication and
authorization architecture allows for cross-domain single sign-on and removes the need for
content or service providers to maintain user names and passwords. Users are authenticated
via identity information stored with their home IdP (identity provider).
2.2.2.1.2 Create and Manage Projects
Projects in TextGrid are used to manage access to objects (e.g. TEI/XML texts, XSLT
adaptors, images). Any TextGrid object belongs to a project. TextGrid users can start a new
project in order to create or copy objects. Objects belonging to a project are listed in the
Navigator View. Currently projects, once created, cannot be deleted.
2.2.2.1.3 Add Users to Projects and Assign Roles
The creator of a project can select other TextGrid users, associate them with the project and
assign specific roles to them. Users to be selected must previously have logged in to
TextGridLab at least once.
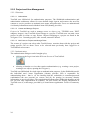
2.2.2.2 Authentication
The authentication dialogue can be brought up by:
clicking on the Login icon in the Welcome Screen of TextGridLab:
selecting a function or view that requires authentication (e.g. creating a new project,
creating a new object, opening the Navigator),
TextGrid uses Shibboleth for single sign-on authentication purposes. In the Shibboleth model,
the individual user’s home organisation (identity provider, IdP) is responsible for
authenticating them – that is, (a) for checking that the credentials (a username/password
combination) the user presents are correct, and (b) for passing on necessary identity
information to service providers. The organisational infrastructure Shibboleth depends on has
not yet been fully implemented in Germany. For this reason, the identity information of
TextGrid users is, at this stage, provided by a virtual home organisation TextGrid Community
IdP.
24
Figure: Authentication dialogue
Users who have a TextGrid account with TextGrid Community IdP can authenticate using
their individual username/password combination. You can obtain a TextGrid account using a
web form at www.textgrid.de/beta/installation or sending an email with your contact details to
[email protected].
Users who do not have a TextGrid account and want to authenticate via their home
organisation should click on the button Log in via DFN-AAI. They can then select their
identity provider and log in to TextGridLab using the credentials of their home organisation.
When a user has successfully logged in, their login status and TextGridLab User ID are
displayed on the Welcome Screen.
Users who have directly registered with TextGrid and are not authenticated via another IdP
can change the password for their TextGrid account and update their email address. Select
“Help” in the menu bar and left-click “Authentication”. An authentication information
dialogue is shown that displays the user’s User ID. Click on the Change Password button. For
safety reasons, a dialogue appears that requires you to re-authenticate. Type in your username
and current password and click on Login. You can now update your email address and choose
a new password.
In some cases it may be necessary to start a new session in TextGridLab. This can be achieved
by re-authentication. Select “Help” in the menubar and leftclick “Authentication” for the
authentication information dialogue to appear. Clicking on the Re-Authenticate button brings
up the authentication dialogue. You can now select your identity provider “TextGrid
Community IdP” in the dropdown menu. Refresh your authentication by clicking on the
Select button.
25
To log out, just quit or restart the TextGridLab application or use the corresponding button in
the dialog at Help / Authentication.
Note: The authentication procedure can only be executed properly if the web browser
TextGridLab uses for displaying HTML content is set to accept cookies. Under Microsoft
Windows, TextGridLab uses the rendering engine of Internet Explorer regardless of which
application is the system’s standard web browser. Adjust your settings using the Windows
Control Panel. Select “Internet Options” and set the privacy level to “Medium” or “Medium
High”.
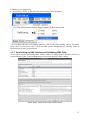
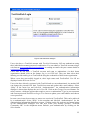
2.2.2.3 Creating a New Project
Users can create new projects at any time in TextGridLab by selecting “File” in the menu bar
and left-clicking “New Project ...”.
Figure: Creating a new project
A dialogue is opened. Enter a project name and a description and click on the Create button.
If you have not logged in yet, you will now be required to authenticate (cf. Authentication).
The creator is assigned the role of Project Leader for the new project by default (cf. Adding
Users and Assigning Roles).
Figure: Create project dialogue
2.2.2.4 Adding Users and Assigning Roles
When a new project has been created, project users can be added and roles can be assigned to
them.
The User and Project Management module can be accessed:
26
by clicking on the Users/Roles button in the create project dialogue (cf. Creating a New
Project):
by clicking on the Project & User Management icon in the Welcome Screen:
or, when the Welcome Screen is not active, by clicking on the Project and User Management
icon
in the tool bar of TextGridLab: .
or, when the Welcome Screen is not active, by selecting "Project/User Management" in the
menu bar of TextGridLab:
.
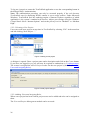
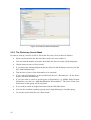
In the User and Project Management module, three views are enabled by default:
the Navigator view lists all projects the current user is entitled to view or edit,
the User Management view lets you add users and assign roles,
the Role Help view provides help on roles and access rights attached to them.
27
Figure: TextGridLab - Project and User Management module
Note: The workspace can be adapted to individual needs. For disabling, enabling and
arranging views or resetting the arrangement of views within a perspective see Editors and
Views in the Workbench documentation.
In order to manage a project, select it in the Navigator view by left-clicking. The users
associated with this project are shown in the User Management view. Add a new user by
filling the TextGrid User ID in the field User ID.
Note: Please refer to the users you want to add to your project for their User IDs. The
TextGrid User ID is shown in the Welcome Screen after logging in. It can also be retrieved by
selecting “Help” in the menubar and left-clicking “Authentication”.
Note: Users to be selected must previously have logged in to TextGridLab at least once.
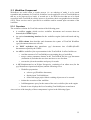
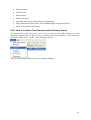
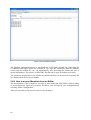
There are four possible roles for users in TextGrid. Each role is invested with a set of nonhierarchical rights regarding resources and projects in TextGrid:
Project Leader → Delegate, create rights for projects; delegate, publish rights for resources
(Project Leader is the default role for the creator of a new project).
Administrator → Delete rights for resources.
Editor → Read, write rights for resources.
Observer → Read rights for resources.
Project Rights
the
Delegate Edit
assignment
28
Resource Rights
user/role Modify rights for the resource.
for the
project.
Publish
Publish a resource. The resource will be then worldreadable and cannot be deleted or updated anymore.
Delete
Delete unpublished
implemented).
Create
Create new projects.
resources
(currently
not
Create new resources in the project.
Write
Write (i.e. update) unpublished resources.
Read
Read resources in the project.
Diagram: Rights in TextGrid
Select a role for the new user in the dropdown menu below the User ID field and click on the
Add button. The user can now be assigned additional roles. Select the user in the list of
existing users, choose a role from the dropdown menu below the list and click on the button
Give User(s) a Role.
Note: Rights in TextGrid are non-hierarchical. Thus, if users are meant to have full rights
they must be assigned the roles Project Leader, Administrator and Editor.
2.2.2.5 Deleting Roles from Users
Roles with their respective rights can be withdrawn from users. Select at least one role of the
user in question in the list of existing users and click on the button Delete Role(s) from Users.
Figure: Deleting roles from users
Note: More than one role can be selected by pressing the Ctrl key in MS Windows or Linux
or the Command (⌘) key in Mac OS while leftclicking the list entries.
Removing all roles from users cancels their affiliation with a project.
The role of Project Leader is the default role for the creator of a project. This role can also be
assigned to other users. Project creators can remove their affiliation with a project by deleting
all their roles. However, at least one Project Leader must remain with the project. When the
creator of a project cancels affiliation with it, re-authentication is necessary in order to update
the project list in the Navigator (cf. Authentication).
29
2.2.2.6 Managing (Adding, Copying, Publishing) Resources in a Project
When the new project has been created, TextGrid objects (e.g. TEI/XML texts, XSLT
adaptors, images) can be added or an existing object belonging to another project can be
copied into the new project.
Create a new object either by selecting “File” in the menu bar and left-clicking “New
Object ...” or by right-clicking anywhere in the Navigator window and selecting “New
Object ...” from the context menu.
Note: If you want to create a new object using the menu bar and have not logged in yet, you
will now be required to authenticate (cf. Authentication). Also make sure that you have
appropriate rights for creating objects (cf. Adding Users and Assigning Roles).
A dialog opens:
Figure: Create object wizard
If the project that is to contain the new object is not pre-selected in the create object dialogue,
left-click it now. Select the object type in the dropdown menu Type and click on the button
Next for assinging metadata (cf. Creating Metadata) and a schema (cf. Associating an XML
Schema and Validating XML Files) to the new object.
Note: Metadata and a schema can be added later. You can click on the button Finish at any
time.
After finishing the Create Object wizard, click on the button Finish. A new perspective is
opened showing the Metadata Editor and the XML Editor. Now you can start editing the
object (cf. documentation of Metadata Editor and XML Editor).
Copying an object from another project is to be a standard function of TextGridLab. At this
stage, however, it has not yet been implemented.
30
Objects can be published in order to be readable for the general public. Published objects in
TextGrid cease to be editable and cannot be deleted any longer. Publish an object by rightclicking it in the Navigator or in the Search Results view of the Search module (cf.
documentation of Search module) and selecting “Publish”.
Although a role invested with delete rights (Administrator) has been defined within the roles
and rights concept of TextGrid, at this stage deleting objects is not possible.
2.2.3 Metadata Editor
2.2.3.1 Functions
2.2.3.1.1 Create and Update Metadata for Objects
The Metadata Editor is used to create and manage the baseline metadata elements of
TextGrid objects. This metadata is used in TextGrid for cross-project searches. The metadata
input form can be easily adjusted to individual needs.
2.2.3.1.2 Export Metadata to the TEI Object File
There is no automatic export of metadata created with the Metadata Editor to the respective
TEI object file. However, the metadata can be exported manually to the header of a TEI file
by a single click.
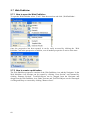
2.2.3.2 Opening the Metadata Editor
The Metadata Editor is, by default, part of the XML Editor perspective and can be accessed:
1. by clicking on the XML Editor icon in the Welcome Screen, or, when the Welcome
Screen is not active, in the toolbar of TextGridLab:
2. by creating a new object (cf. documentation of Project and User Management, ch.
Managing (Adding, Copying, Publishing) Resources in a Project).
The Metadata Editor can be opened in other perspectives than the XML Editor or, if closed,
re-opened in the XML Editor perspective:
31
1. by selecting “Tools” in the menu bar and selecting “Metatdata Editor”:
2. by clicking, when the Welcome Screen is not active, on the Metadata Editor icon in
the tool bar:
Note: In order to load object metadata into the Metadata Editor you must authenticate and
select a TextGrid object for editing (cf. Authentication).
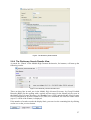
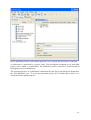
2.2.3.3 Creating Metadata
In the Metadata Editor view, the following baseline metadata can be attached with TextGrid
objects:
1. names of agents and their roles (author, contributor, editor, illustrator, translator,
providing institution, other) (repeatable element),
2. object title,
3. date or date range of object,
4. text type of object.
32
Figure: Metadata Editor view
The Agent element is a repeatable metadata element. Add further agents by clicking on the
Add New Agent button. Type in the agent’s name and select the appropriate role for the agent
in the respective dropdown menu Role.
Note: Personal names should be typed in the form surname, first name middle name.
The Title element should be used for the title and subtitle(s) of the object.
You can specify dates or date ranges for an object. The first date field Approx Date in can be
used for non-standard date specifications or text strings (e.g. “The Ides of March”). This field
is optional. The second date field is mandatory. At least a year must be specified as a fourdigit number.
Click on the button Switch to Date Range for date range fields. Again, the optional first and
third date fields (Not before, Not After) are for non-standard date specifications or text strings
whereas the mandatory Approximate Gregorian Date fields need to contain at least four
numerals specifying a year.
Note: Possible values for Approximate Gregorian Date fields:
year (four digits)-month (two digits)-day (two digits), e.g. 2009-01-21;
year (four digits)-month (two digits), e.g. 2009-01;
year (four digits), e.g. 2009.
The Type element should be used for indicating the text class or text type of the object.
33
Note: The elements Agent, Title and Type are auto-complete fields. Type in some characters
to obtain auto-complete suggestions, then select an appropriate suggestion by double-clicking
or using the cursor and return keys
After completing all required metadata the record set can be saved by clicking on the Save
button at the bottom of the Metadata Editor view.
2.2.3.4 Exporting Metadata to TEI Object Files
The metadata edited in the Metadata Editor is not stored within the respective data object
(TEI object) but in an external metadata database. The header metadata of the TEI object may
or may not be identical with the external metadata. In some cases – e.g. if a new object is
created – it might be desirable to copy the external metadata into the object header. This can
be done by clicking on the Generate TEI Header button at the bottom of the Metadata Editor
view.
34
2.3 Workflow Component
Workflows are useful when a certain process (i.e. an ordering of tasks) is to be made
repeatable and permanent. In TextGrid, workflows can be applied to a list of TextGridObjects
that are to be processed in a batch. A second use is for Web Services that are to be made
accessible in the TextGridLab, which, however, do not have their own graphical user interface
(GUI). These services can be specified in a workflow and be enacted upon execution of the
workflow.
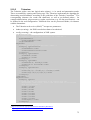
2.3.1 Overview
The workflow solution for TextGrid consists of the following parts:
A workflow engine which receives workflow documents and executes them on
demand (the GWES Engine)
An optional monitoring interface for the workflow engine (both web-based and log
files)
An XSD schema that describes and documents the syntax of TextGrid Workflow
(tgwf) documents that users will edit
An XSLT stylesheet that transforms tgwf documents into GridWorkflowDL
documents accepted by the GWES
An API for workflow jobs representations in the TextGridLab. It offers facilities to
o read the contents of a TextGridObject representing the tgwf workflow
o merge various parameters known in the TextGridLab into the tgwf document
(instantiate it) such that the user does not have to care for them
o execute the job at the machine and query for results
A GUI implemented as an Eclipse Perspective, consisting of an editor area (for the
tgwf document or input/result objects) and the following views:
o Workflow preparation:
select a tgwf Workflow document,
display input TexGridObjects,
choose the target project where resulting objects are to be created
o initiate the execution of the workflow
o Job Management: query for the status of the user's wokflow jobs at the engine
o Result viewer: displays the list of resulting TextGridObjects created anew
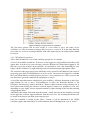
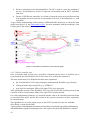
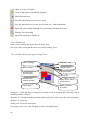
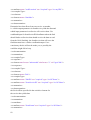
An overview of the interplay of these components is given in the following figure.
35
Figure 1: architecture of the workflow component
Please
see
also
some
slides
http://sugi.dgrid.de/fileadmin/user_upload/sugi_storage//0000/309/07_Haase.pdf
and
a
video
http://sugi.d-grid.de/fileadmin/user_upload/sugi_storage//0000/309/07_haase.html
(22
minutes) of a presentation of this system (in German).
2.3.2 Workflow Editor Graphical User Interface
The Workflow GUI is implemented as an Eclipse perspective, consisting of an editor area
(for editing the tgwf workflow document or input/result objects) and the following views:
Workflow preparation: here you can select a tgwf Workflow document, display input
TexGridObjects, choose the target project where resulting objects are to be created, and
initiate the execution of the workflow
Job Management: query for the status of the user's wokflow jobs at the engine
Result viewer: display the list of resulting TextGridObjects created anew
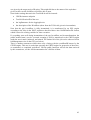
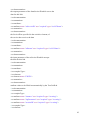
The following figure shows the interface; more details on how to use the GUI will be
explained below.
36
figure 4: The workflow perspective
2.3.2.1 Opening the Workflow GUI
The workflow perspective can be opened in different ways:
By clicking on the “Workflow” link/icon on the welcome screen
By selecting “Workflow” from the “Tools” menu
B clicking the
icon in the icon tray
or, by right-clicking on one or more TextGridObjects in either the Research Results or
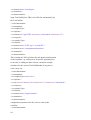
the Navigator, and choosing “Add to Workflow” (see figure 5 below)
37
Figure 5: Adding input documents to a workflow
The first three options will be more useful if a user wants to query the status of her
workflows, or if she just wants to jump to this perspective, or reset it. If on the other hand the
user wants to execute an existing workflow with some input objects, the fourth option should
be chosen.
2.3.2.2 Workflow Preparation
This is the left-hand side view of the workflow perspective. It contains:
A list of all available workflows. If the user is not logged in, only published workflows will
appear here. In order to see your own ones, press the “Refresh list” button after logging in. Do
this also if you just created a new workflow. It is possible to view, and, depending on your
rights, edit the workflows by right-clicking in this list and choosing an appropriate editor.
The selection of the target project into which the newly created TextGridObjects (the result of
processing your input TextGridObjects) are to be saved. You need to be logged in, such that
the TextGridLab knows in which projects you have create permission (i.e. where you own the
role Bearbeiter given the standard role assignment is active).
A list of the input documents scheduled for your workflow. Add new documents to the list by
right-clicking on one or more TextGridObjects in either the Research Results or the
Navigator, and choosing “Add to Workflow”. Remove them from the list by selecting one or
more entries and clicking the “Remove selected input(s)” button. It is possible to view, and,
depending on your rights, edit the input documents by right-clicking in this list and choosing
an appropriate editor.
And finally, the button “Run with input document”, which will execute the workflow selected
in the upper list, with the input documents from the lower list. The resulting documents will
be stored in the project specified as the target project.
Once the workflow is started by the “Run...” button, it will be submitted to the GWES
workflow engine and started there. It will be added to the Job Management view as “active”.
38
2.3.2.3 Job Management
All jobs owned by the current user will be displayed in this list. If you expect to see some jobs
here, check to see if you are not logged in yet. Every job is listed by its name, its time of
submission, and its status. The status of the job can be one of:
initiated – the workflow has just been submitted but not started yet
running – state when the workflow has been started
active – if there are active transitions working
suspended – if a user (perhaps via the monitoring tool) paused the workflow
completed – if the workflow ended successful
terminated – if there was an error during execution
There are two buttons below the list: The “Refresh job list” button queries for the current
status of the user's workflows at the workflow engine. The “See results” button has two
meanings:
either, if the status of the selected job is completed, it will display the result documents of this
job in the Workflow Results window.
or, if the status of the selected job is terminated, it will show an error message to the user and
write the engine's error or warning output into the TextGridLab's error log file.
2.3.2.4 Workflow Results
This list is for the user's convenience. Instead of having to locate the resulting documents in
the Navigator, or searching for them, all resulting TextGridObjects created as the output of
the respective Workflow will be displayed here. It is possible to view, and edit these
documents by right-clicking in this list and choosing an appropriate editor. Currently the user
still has to select the workflow in the Job Management view and click “See results” first
before they are displayed.
2.3.2.5 Writing a new Workflow from Scratch
A new TextGrid workflow is created similarly to any other TextGridObject: Choose “New
Object...” from the File menu, then pick the project to save this workflow in, and select
“TextGrid Workflow Document” as type of the new object. Th next step is to enter the
metadata of the workflow, which is not different compared to other TextGridObjects –
however, it is better to accept the pre-set type “workflow” here in order to search more easily
later on.
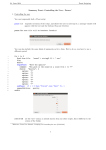
After clicking on “Finish”, the TextGrid XML Editor will be opened with a template of an
incomplete workflow. Use either the “Design” or the “Source” view. The editor knows the
tgwf schema behind the workflow and will assist you with typing in. You may want to adapt
contents of already existing workflows to your needs. If you are unsure about editing the tgwf
XML or the XSL stylesheet contained therein (the rules for creating the new metadata of the
resulting objects), please feel free to ask for support from the TextGrid community.
39
2.3.3 Background Information
2.3.3.1 GWES Workflow Engine7
We use the Grid Workflow Execution Service by Fraunhofer FIRST as the enactment engine
in TextGrid. It is a webapp to be installed in a Servlet Conatiner such as Apache Tomcat. It
accepts GridWorkflowDL documents that contain all information the engine needs, i.e. input
data is also contained in a GridWorkflowDL document. The abstract formalism of
GridWorkflowDL is High-Level Petri Nets, which is Turing-complete. Data is represented as
structured tokens, and flows from places to transitions and from transitions to places. While a
workflow is being executed, the GridWorkflowDL document is in permanent change, with
data moving from one place over the transitions (which may be Web or Grid Services) to
another. The workflow halts if there are no more enabled transitions, i.e. no transition that has
all incoming places filled with at least one data token.
The engine can be configured to hold workflows in memory for a certain amount of time, e.g.
one day. Further persistence is facilitated by storing the workflows in a database afterwards.
Natively the GWES works with XML databases such as eXist.
Installation and configuration of the GWES is straightforward: download the gwes.war from
FIRST (and optionally exist.war from its download site), move it into the webapp/ folder of a
running Tomcat and let Tomcat unpack it. Afterwards, edit webapps/gwes/WEBINF/classes/gwes.properties, mainly for timeout configuration, and conf/tomcat-users.xml to
specify the user(s) that are allowed to login to the monitoring site.
2.3.3.2 Monitoring Interface
As soon as the GWES is installed, it is possible to query a number of things using its web
interface. However, it must be made sure to protect these pages from unauthorized use, e.g. by
setting a user/password combination in tomcat-users.xml, or by other means. Then it is
possible to find the interface at http://host:port/gwes/servlet/GWESOverviewServlet. Here
you can
upload new workflow documents (in GridWorkflowDL format);
get a list of all workflows currently in memory or database;
see the details of a specific workflow with statistical and status information (warnings
and errors that led to unsuccessful termination of the workflow will appear here);
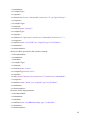
see a graph of the workflow, even animated when it is executing (c.f. figure 2 below)
test if the GWES is alive and
get documentation.
Furthermore, there are the Tomcat logs where GWES will log its messages, too. Depending
on the settings in webapps/gwes/WEB-INF/classes/log4j.properties (e.g. set
log4j.logger.net.kwfgrid.gwes.wsactivity to DEBUG for debug logging of Web Service jobs)
one can find useful debugging information when something did not work as expected. See the
file logs/catalina.out in Tomcat's installation folder.
7
http://www.gridworkflow.org/kwfgrid/gwes/docs/, see also Andreas Hoheisel: Grid Workflow
Execution Service – Dynamic and Interactive Execution and Visualization of Distributed Workflows. In
Proceedings
of
the
Cracow
Grid
Workshop
2006,
Cracow,
2007,
http://www.first.fraunhofer.de/owx_medien/pdf/3462_hohe2007.pdf
40
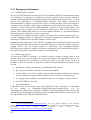
Figure 2: graph of the workflow displayed by GWES' web interface
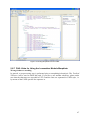
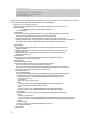
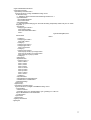
2.3.3.3 tgwf XML schema
See Appendix 1.
2.3.3.4 tgwf2GridWorkflowDL stylesheet
We do not list the stylesheet verbatim here, however, the interested reader can find it in the
TextGrid source code repository. Instead, we give a short summary of what the stylesheet
does.
Insert the header and footer a correct GridWorkflowDL document needs
Format a place called “batchinput” with as many tokens as URIs were given in the
tgwf document
For each entry in the <inputconstants> section, format a place holding a single token
with its contents. The place will be a read-only place, i.e. its tokens will not be
consumed
Format a number of default places every workflow has, e.g. for the CRUD's SessionID
and LogParameter, input places for the StreamingEditor, and result places
Format the places between the services proper, e.g. for each <link>
Format a CRUDread transition: this will consume the URI and return data (to be
handed over to the services proper) and metadata (to be given to the StreamingEditor).
Format a transition for every service given under <activities>
41
Format a transition for the StreamingEditor. The SE is used to create the metadata of
the new TextGridObjects. It takes as input the old metadata and an XSLT stylesheet
with rules.
Format a CRUDcreate transition. It will take as input the processed (text) data and the
new metadata and will return the real metadata of the new TextGridObjects (i.e. with
real URIs).
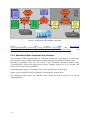
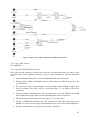
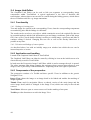
To get a better understanding of the resulting GridWorkflowDL document, we show the same
graph from figure 2 in the Monitoring section , but now annotated with the meanings of the
various places and control flow in figure 3 below.
Figure 3: visualization of data flow in the workflow graph
2.3.3.5 API for workflow jobs
Here we describe what is done once a workflow is submitted by the users. A workflow job is
represented by the class WorkflowJob. It does most of its work in the constructor:
The main constructor for a WorkflowJob takes three arguments:
the TextGridObject (TGO) representing the uninstantiated Workflow (tgwf format)
a String with the target project ID (e.g. TGPR123)
an ArrayList containg the URIs of the input TGOs to be processed
After reading the contents of the Workflow TGO, any stale TGO URIs possibly present in the
workflow will be cleared and the URIs of the input TGOs will be inserted.
For each configuration parameter, it is checked whether it has to be encoded in Base64 format
(as specified in the tgwf), and the full content of the respective parameter will be replaced by
its encoded string.
The algorithm tries to set the target project in the XSLT stylesheet for the new metadata.
Specifically, it looks for the Path
“tgwf:tgwf/tgwf:metadatatransformation/xsl:transform/xsl:template/tgc:tgObjectMetadata/tg
md:administrative/tgmd:client/tgmd:project" and replaces the projectId found there with the
42
one given by the target project ID string. This might fail due to the nature of the stylesheet
given. In this case the workflow will not be able to start.
Now further settings known in the TextGridLab will be inserted:
CRUDs instance endpoint
TextGrid SessionID of the user
the logParameter for the loggingService
the description of the Workflow (taken from the TGO's title given in its metadata).
Now that the tgwf workflow is fully instantiated, it is transformed by an XSL engine
according to the rules in the XSLT stylesheet described above into GridWorkflowDL format,
which is stored in a String variable for later execution.
If everything went well during instantiation of the tgwf workflow and its transformation, the
public method start() can be executed, meaning it will be transferred to the GWES engine
under the user's name (initiated), and started. The further life of the job can be observed in the
JobManagement view in the GUI (see below).
There is another constructor which takes only a String with the workflowID known by the
GWES engine. This one is used when querying the GWES engine for properties of the active,
or terminated, or completed workflows. Various public functions will use the data retrieved
by this constructor, see the API documentation for a full list of them.
43
2.4 Image Link Editor
The Graphical Link Editor can be used to link text segments to corresponding image
components within TextGridLab. A typical application is the link of facsimile and
transcription, whereas these texts can also be created during the linking process, which allows
the use of further tools like e.g. image annotations.
2.4.1 Functionality
2.4.1.1 Linkage of existing texts
Text and image are opened in the corresponding Views, then the corresponding components
are marked by pairs and the linkage is confirmed.
The results can be saved as a new object, which contains the text of the original file (but not
its potential markup) and the link information (text and image coordinates, path of the image
file). Once a file is saved double clicking it suffices to reload image, copied text and links to
continue editing if desired. Changing this new file as well as the already linked text is
possible at any time.
2.4.1.2 Creation and linkage of transcriptions
As described above, but with an initially empty text window into which the text can be
inserted stepwise or at once.
2.4.2 Application and handling
Launch of the Graphical Link Editor in TextGridLab
The Graphical Link Editor can either be started by clicking its icon on the initial screen or be
chosen directly as tool in TextGridLab.
In both cases the Perspective Image Link Editor which is used to manage the tool is opened.
The editor amongst other things contains the navigator whose context menu allows to open
images, texts or previously created annotations - depending on the user rights in particular.
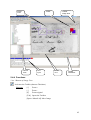
2.4.3 Components of the perspective
The perspective consists of a Toolkit and three specific Views in addition to the generic
Navigator View:
Image View: shows the image or an image detail to be linked and enables the marking of
image segments
Thumb View: used for navigation. Shows a reduced version of the entire image and the
active image detail (which is enlarged in the Image View) which can easily be moved and
zoomed
Text Editor: allows to open or create texts as well as the marking of text parts
Toolkit: provides functions to work in the Image View
44
Image
View
Toolkit
Thumb
View
Text
Input
Toolbar
Image View
Status
Line
Toolbar
Text Editor
2.4.4 Functions
2.4.4.1 Buttons of Image View:
- Activates the Toolkit (shortcut: Tabulator)
Shortcuts
[+]
Zoom +
[-]
Zoom –
[0]
Zoom original
[Tab] Opens the Toolbox
[Space+MouseLeft] Move Image
45
2.4.4.2 Buttons of the Text Editor
- Create a link between the marked segments
- Delete the entire text
- Save the annotated text in the active object
- Save the annotated text in a new object (plain text + link information)
- Delete the selected link (Marking in text and image including reference)
- Dialogue for font editing
- Show/hide marking of linked text
2.4.4.3 Thumb View:
Slide control to adjust the zoom factor in Image View
Selection frame to navigate the active text detail in Image View
2.4.4.4 Toolkit (all functions apply to Image View):
Select: rectangle
Magnifier1: temp
Select: polygon
Magni2: Zoom +
Choose colour:
active selection
Magnifi3: Zoom Sliding tool
Choose colour:
inactive selection
Reset colour
Swap colour: change
active/inactive
Raster: activates
line raster
Magnifier1: Click and drag to enlarge the selected screen area temporarily (the range can be
modified with the Ctrl key)
Magnifier2: Clicking the desktop zooms in and centres the work space at the selected position
Magnifier3: zooms out
Sliding tool: moves the work space
Rectangular selection: Click and drag to select a rectangular area
46
Polygonal selection: Click and drag to create the edge of a polygon which can be completed
by double clicking
In both modes existing markings can be edited (see below)
Raster: activates a line raster to facilitate the alignment of the marking
Choose colour: modifies foreground (= selected, active marking) or background (= inactive
marking) colour, both can be modified by clicking the coloured square
Swap colours: interchanges fore- and background colour
Reset colour: resets fore- and background colour to default colours black and white
2.4.5 Example of use:
Open an image:
Double clicking an image file in the navigator opens the image
Open a text:
Right clicking a text file in the navigator and choosing the menu item "Edit with
Image Link Editor" opens the text, potentially existing markup will not be adopted
Selection of work space:
The displayed detail can be selected with the selection rectangle in the Thumb View
and the scrollbars, the zoom factor can be changed using the slide control in the
Thumb View or the magnifier tools
Creation of links:
The selection in the image can be effected in rectangular (default) or polygonal mode.
In rectangular mode clicking the image at one corner of the area to select suffices to
draw the rectangular selection keeping the left button pressed. In polygonal mode an
edge can be drawn by clicking and dragging, releasing the left button determines the
next corner of the polygon which can be completed by double clicking. A marking
which is not yet linked to a text is displayed with a dashed border.
Text can be selected by clicking and dragging or by double clicking (single word)
respectively triple clicking (whole line).
The creation of a link can be effected using the
symbol.
The marking in text and image does not have to be effected alternating. It is also
possible to mark a larger quantity of image segments and link them successively.
Correction/deletion of links:
Existing links can be displayed in the text field by clicking the
button.
The selection of a link can be effected by double clicking both in the graphic and in
the text field.
Selected links or markings are labelled red, inactive are labelled blue. (in the Image
View they are displayed in the potentially modified fore- and background colour)
Selected links (i.e. markings in text and image and their link) can be deleted by right
clicking using the context menu or by clicking the
button.
47
Markings in the Image View can be edited subsequently. When moving over an active
marking the cursor and its icon change: In the centre it becomes a sliding tool (four
way arrow), which allows to change the position of the marking by clicking and
dragging. Close to the boundaries it allows to reposition the edges (two-way arrow) or
the corners (diagonal two-way arrow) in a similar way. For polygons changes can be
realized analogically with the exception that single edges of polygons can not be
moved.
Linked text cannot be edited, if the cursor is inside a selected area and the selection is
not active (= red) as a whole. Linked text can not be deleted completely.
2.4.6 Status bar:
-* Symbol in tab of the Text- or Image View: Changes are not saved yet.
- Annotated object: Shows the name of the edited object.
-Warning sign: The image area contains unlinked markings
2.4.7 Interaction with other components
As described above, texts, images and linking objects are opened in the navigator which is
explained in an independent documentation.
48
2.5 Search – Searching for Documents in TextGridRep
The Search Module allows for searching across the contents (e.g. TEI-encoded documents)
and the object metadata in the TextGrid Repository. It serves as a front-end to Tg-Search,
TextGrid's search service.
The Research perspective is the default perspective when the TextGridLab starts and the
Welcome Screen is closed. It consists of two sub-windows, or views: Research and Research
Results.
2.5.1.1 Research
Specify here what you are looking for:
Text contained in the document, and whether this text should be presented as KWIC
format in the Research Results, i.e. as Key Word In Context.
Metadata describing the document, e.g. title, author, genre.
Refine your search to certain tags of the TextGrid baseline encoding (see below) and
specify whether you want all results at once or in successive portions.
2.5.1.2 Research Results
This view initially shows the titles (as in the document's metadata). However, if you would
like to see more information, you might want to
flip open (a single document), or
push the Expand button (for all documents). This can be repeated until all levels of the
tree are shown, including the KWICs.
2.5.2 How to Open the Research Perspective
The Research perspective is the default perspective when the TextGridLab starts. However, it
may be hidden by the Welcome Screen, and, sometimes, by the Authentication Dialogue.
Once these elements are closed, the Research View will be visible.
During work in the TextGridLab, there are three ways to open the Research perspective:
a) Select “Tools” from the menu bar and click on “Research”
b) Push the small
button in the menu bar.
c) Click on the button labelled "Research" in the perspective switch bar (i.e. in the same
row where the small button is located) once the Research perspective had been
opened before, but was covered by another perspective in the meantime. N. b.: this
allows you to switch between the perspecives that have been opened by now.
2.5.3 What Can Be Searched for?
The Research view is shown in the following picture, together with some example values
filled in the form.
49
Figure: Research view
The form is separated into three areas: the text area, the metadata area and the refine area.
These will be described in turn.
2.5.3.1 Text Area
This area is labelled Search for...
2.5.3.1.1 Text input field
Here you can specify one or more words to be searched for. If searching for several words ,
they are to be separated by blank space and will be joined by AND, i.e. all words have to
occur in the document. Wildcards are allowed, e.g. the term "Mess*" will find all words
starting with "Mess" such as "Messer", "Messers", "messen", "Messias", or "Messung".
2.5.3.1.2 KWIC
Check this box if you would like to see your results in the KWIC format (Key Word In
Context). The search term then will be highlighted as in the following figure.
Figure: KWIC search results
As the term can occur several times in a document and in several XPaths (the structural
location within an XML document), the KWIC entries will be shown as indirect children of
50
the title node. This means the nodes have to be expanded in order to reveal the KWICs. Either
directly flip open the document in question or use the Expand Button twice until the KWICs
appear.
2.5.3.2 Metadata Area
This area is labelled In objects having... Whereas the Text Area looks at the contents of a
document, the Metadata Area can be used for all TextGrid objects, as every object in
TextGrid has its set of metadata.
2.5.3.2.1 The Person field
This corresponds to the agent tag in the metadata. Specify a name or part of the name of the
persons (or institutions) which play a role in creation, edition, transcription etc. of the
document.
2.5.3.2.2 The Title field
This corresponds to the title tag in the metadata. Specify substrings of the title of the
documents you are looking for.
2.5.3.2.3 The Project field
This corresponds to the project tag in the metadata. There are two ways of naming a project:
either with parts of its display name, or with its name known by Tg-Auth*, e.g. TGPR123.
The latter string can be found in the users and project management perspective.
2.5.3.2.4 The Text Genre field
This corresponds to the type tag in the metadata, and could be e.g. "dictionary" or "prose". If
you are unsure about the available genres, type some letter(s) and wait a moment to see a
suggestion of the existing genres that contain these letter(s).
2.5.3.3 Refine Area
This area is labeled Refine search...
2.5.3.3.1 The Baseline Elements field
Every TEI document - like dictionaries, drama, letters, critical editions, or language corpora is represented twice in the TextGridRep:
Once in its original encoding with possibly document-specific TEI tags, and once in the
TextGrid baseline encoding, which defines a subset of common elements for each text type.
When uploaded into the TextGridRep, every TEI document refers to an adapter that will be
used by Tg-Crud to map from the original encoding to the baseline encoding. Thus the
researcher does not need to know about document-specific encodings when specifying a
structural search.
The elements of the baseline encoding can be entered into this field, e.g. "p", "div", or "head".
The semantics of this is: when some tag was given in this field, then the text specified in the
Text Area must occur within this tag in the document's baseline encoding. Thus entering
something in here without giving a search term in the text area is not intended and will keep
the search from starting.
51
2.5.3.3.2 The Show At Once field
You can specify whether you want all results at once or in successive portions of a fixed size.
In the first case, use the string "all" as in the default configuration. In the latter case, type in a
number to specify the size of the desired portion, e.g. 10.
This field is there for performance reasons: If you expect your search result to be numerous,
the TextGridLab tends to slow down. Specifying a portion of e.g. 50 will remedy this.
2.5.4 How to search?
Just click the button at the bottom of the Research view labelled "Start new search".
Remember that this can take some time if the search result is large. The specified fields will
be joined by AND, which means that every condition (e.g. text, title, AND genre, if those
three fields are filled in) must be met.
2.5.5 The Research Results View
The Research Results view is shown in the following picture, together with some example
content.
Figure: Research Results view
2.5.5.1 The results list
The documents that are returned by TG-search will be displayed here. Initially you can see a
list of their titles, prepended by a count of how many matches of the search term there were.
However, clicking on the small symbol at the left of each document will cause it to expand to
a tree-like structure with more details showing, including the project, the author, and the
context if the KWIC options had been checked.
The items in the list can be clicked. Double-click opens them (at least on Windows and
Linux) with the default editor. This may take some time. Right-clicking (on Windows and
Linux) allows for further actions to be applied to the document, e.g. selecting another Open
action, displaying the metadata, copying the URI to the clipboard, or publishing the
document.
52
2.5.5.2 The buttons at the bottom
Continue this search - This button can only be used when the Show at Once field in the
research view contained a number representing the size of the result portions. When clicked, it
will retrieve the next portion of documents if there are further ones.
Expand / Collapse Results - Click these buttons if you want to expand or collapse the
documents all at once instead of clicking at every single one. It might be necessary to click on
"Expand" several times if the KWIC entries are to be shown or the whole list is still loading.
2.5.6 Search Hints (FAQ)
My search results are too numerous, now the result view does not stop loading! How can
I cancel this search run?
Try the following: At the lower right corner of your Lab, there should be a button that shows
the progress of the search operation:
Click it. This will open
the Progress view that shows all background tasks. Select the item "Fetching children of
current Search" and click on the
button to cancel it. Note: This will preserve your search
results that were displayed until now.
If you do not like this solution, you can do a more cautious search next time: specify a
number in the Show at once field, e.g. 10 or 50, and iterate manually through the results using
the Continue this search button.
Last time I saw these text snippets with the search term in blue, where are they now?
Check two things:
Did you enter a search term in the text area and checked the KWIC box?
Did you expand the results deep enough?
What can I enter as Baseline Elements?
See the documentation of the TextGrid Baseline Encoding8
8
http://www.textgrid.de/fileadmin/TextGrid/reports/baseline-all-en.pdf
53
2.6 Dictionary Search
The Dictionary Search Tool allows for searching the dictionary network “LexWeb”
(www.woerterbuchnetz.de) at the Competence Centre for Electronic Publishing and
Information Retrieval in the Humanities of the University of Trier.
2.6.1 Which Dictionaries Can Be Searched?
2.6.1.1 General dictionaries
German Dictionary by Jacob and Wilhelm Grimm
2.6.1.2 Author’s dictionaries
Goethe Dictionary
2.6.1.3 Dialect dictionaries
Dictionary of the Alsatian Dialect by Ernst Martin and Hans Lienhart
Dictionary of German-Lorrainese Dialects by Ferdinand Follmann
Dictionary of the Palatine Dialect by Ernst Christmann et al.
Rhenish Dictionary
Supplement to the Rhenish Dictionary
2.6.1.4 Middle High German dictionaries
Middle High German Dictionary by Matthias Lexer
54
Middle High German Dictionary by Georg Friedrich Benecke
Middle High German Word List Supplement by Kurt Gärtner et al.
Supplement to the Middle High German Dictionary by Matthias
Lexer
2.6.1.5 Luxembourgian dictionaries
Dictionary of the Luxembourgian colloquial speech
Dictionary of the Luxembourgian dialect
2.6.2 How to Open the Dictionary Search
To open the Dictionary Search perspective select “Tools” from the menu bar and click on
“Dictionary Search”
or click on the icon
in the tool bar below.
The perspective is subdivided in three views. The Dictionary Search Mask on the left, the
Dictionary Search Results view on the right and the Dictionary Browser view at the bottom.
55
Figure: The Dictionary Search Perspective
2.6.3 The Dictionary Search Mask
In order to look up a word in LexWeb, fill out the Dictionary Search Mask as follows:
Insert your keyword in the first slot (the search is not case sensitive).
You can limit the number of results. By default, the first 10 results will be displayed.
Choose between exact or fuzzy search.
If you want only lemmas displayed that are linked in the dictionary network, tick the
box “linked lemmas only”.
Tick the box or boxes of the dictionaries to be searched:
If you want all dictionaries to be searched tick the box “Dictionaries”, all the boxes
will be activated automatically.
If you just want to search a special group of dictionaries, e.g. Middle High German
dictionaries, tick the box “Mittelhochdeutsche Wörterbücher”. The boxes of the four
dictionaries of this group will be activated.
If you want to search in single dictionaries tick the individual boxes.
You can also combine searching a group and a single dictionary of another group.
To start the search click the icon “Start search”.
56
Figure: The Dictionary Search Mask
2.6.4 The Dictionary Search Results View
A search for “Wurm” in the Middle High German dictionaries, for instance, will turn up the
following results:
Figure: The Dictionary Search Results View
There are three hits in total, one in the Middle High German Dictionary by Georg Friedrich
Benecke (BMZ) for the spelling with a capital, and two more for the lemma in lower case in
the Middle High German Dictionary by Matthias Lexer (LEX) and the Middle High German
Word ListSupplement by Kurt Gärtner et al. (FiB). For orientation, the first line of the article
(up to 13 words of the lemma) is displayed.
If the number of results exceeds the display limit, you can view the remaining hits by clicking
on the next or the previous button.
57
All three hits of the actual search are linked to the entries in the dictionary network, which is
indicated by the symbol @, next to the short form.
Note: In order to specify your search, you can also use wildcards. The asterisk (*) substitutes
any zero or more characters, and the question mark (?) substitutes exactly one character. You
can combine these search methods. For instance to look up all words beginning with the
characters “Wur”, followed by any characters and ending on “e” plus one more character, the
search term to be used is “Wur*e?”.
2.6.5 The Dictionary Browser View
In order to look up the entry in the dictionary click on the short form. If you click on BMZ for
instance, the Dictionary Browser View will show you the entire entry for “Wurm”.
Figure: The Dictionary Browser View
This quick view starts with the article in question. However, it lists the following articles as
well, depending on their length.
There are several options to go into more detail:
You can look up the searchlemma in the Middle High German Dictionary by Matthias Lexer
(LEX) by clicking on the icon
and the Middle High German Word ListSupplement by Kurt
Gärtner et al. (FiB) by clicking on the icon
.
You can browse the dictionary by clicking on the left or right arrow.
The option “Volldarstellung” will open up the complete functionality of the dictionary
network, which comprises:
browsable lemma search list,
browsable display of articles,
58
full-text search,
lemma search,
linked entries,
citable references,
structured entry-views (depending on the dictionary),
links within the dictionary entry (in the Middle High German dictionaries),
maps (in the Dialect dictionaries).
2.6.6 How to Combine Text Searches with Dictionary Search
The functionality of the Dictionary Search Tool can also be used while working on a text
document. Open the Search Result view by clicking on the item “Window” in the menu bar,
and select “Show View”, “Other” and “Dictionary Search”.
You can look up any word of your text by double clicking it.
59
2.7 Web Publisher
2.7.1 How to open the Web Publisher
To open the Web Publisher select „Tools” from the menu bar and click „Web Publisher“.
Once the perspective has been opened, it can be easily accessed by clicking the “Web
Publisher” tab in the perspective switch bar, even if another perspective is active at the time.
2.7.2 How to create a publication
The Web Publisher perspective consists of the Web Publisher view and the Navigator. In the
Web Publisher view Sections can be created by clicking “New Section” and renamed by
clicking “Rename Section”. TextGrid-Objects can be dragged from the Navigator and
dropped on the Web Publisher view. Both, Sections and TextGrid-Objects can be rearranged
via Drag and Drop or removed by clicking “Remove Item”.
60
Before publishing at least a title and an agent have to be entered, the description is optional.
A publication is associated to a project. Only TextGrid-Objects belonging to its associated
project can be added to a publication. The publication itself is stored as a TextGrid-Object
belonging to its associated project.
The associated project of a publication is determined by the first TextGrid-Object dropped on
the Web Publisher view. To reset the associated project all TextGrid-Objects have to be
removed from the publication tree.
61
2.8 Lemmatizer
2.8.1 Morphisto Lemmatizer Module: Functions
The Lemmatizer module “Morphisto” is used to perform a morphological analysis on German
wordforms. The user can lemmatize complete files with the function Lemmatize file, or
interactively use the tool Lemmatize Wordform for a single word analysis. The command
Search Historic is used to manage and search morpho-syntactic information of historic
wordforms.
2.8.1.1 Lemmatize Wordform
TextGrid uses SFST (Stuttgart Finite State Library) for the morphological analysis of New
High German words. For any given single wordform, Morphisto returns the corresponding
lemma form, or, even a more complex morphological analysis with information concerning
the morpho-syntatic features of the word (number, gender, case, mode, and person). The tool
is used interactively and can be configured according to the user's needs.
2.8.1.2 Lemmatize File
The command Lemmatize File is similar to Lemmatize Wordform but is used in batch mode to
manage whole files. UTF-8 encoded files in one of the following formats are supported:
PLAIN ASCCI texts, tokenized wordform lists, or, TEI/XML texts.
2.8.2 How to open the Lemmatizer Module Morphisto
The Lemmatizer Module can be accessed from the tools menu of the TextGridLab.
Please select first “Tools” in the menu bar and then choose “Lemmatizer”:
Alternatively, the Lemmatizer can be opened by clicking on the Lemmatizer icon in the tool
bar of TextGridLab:
62
You can look up any word from within an editor by marking the word, right-clicking it, and
selecting a lemmatizer function from the pop-up menu that appears:
2.8.3 The Morphisto User Interface
2.8.3.1 Lemmatize Wordform:
To lemmatize a single German wordform with the command Lemmatize Wordform, please
type in a word in the field German Wordform. Choose your favorite configuration option and
click on the icon Start Lemmatizer. The result is presented in the text window below.
2.8.3.2 Lemmatize file:
The command Lemmatize file is used in batch mode for UTF-8 encoded files. Please first
choose between the modes plain text, TEI/XML-encoded file and German Wordfom List. The
last option is for files which are already tokenized. The result is presented in the window
below.
2.8.3.3 Search Historic:
The command Search Historic is used to manage and search morpho-syntactic information of
historic wordforms. Please type in a historic wordform in the field Search Term and click on
the icon Search Item to find the corresponding lemma. The result is presented in the text
window Found Lemmas. If you would like to see all wordforms pertaining to the selected
lemma, you can double-click on the respective lemma. The results are shown in the text
window Included Wordforms.
2.8.4 The Morphisto Configuration Mask
If you click on Make Configuration, a dialogue field pops up where you can specify your
desired configuration for lemmatizing with Morphisto.
63
Figure: The Configuration Mask
You can specify whether your input file corresponds to the new (NDR) or old (ADR) German
spelling conventions. You can also select in a popup menu a liberal mode, where both
writings are equally accepted (Neutral).
The option Only Lemmatization, No Analysis is activated by default, and returns the lemma
information for a corresponding wordform. If you want to get the full morphological analysis,
you can deactivate this option.
The option Use Guesser For Unknown Wordforms can be used to consider also partial word
formation analysis. Often a successful lemmatization can be derived even if part of a
compound or derivation is not listed in the lexicon.
You can further reduce the number of analyses by choosing Use Disambiguation PostProcessing . As composition is a very productive process in German, often a large number of
possible but unlikely analyses are produced; therefore, it is highly recommended to activate
this option.
The option Use Fuzzy Search should be used if your input text contains non-standard words
spellings (e.g., particularly Umlaute and 'ß, 'ue’ instead of 'ü’ and 'ss’ instead of 'ß’).
You can use the option UseZLib Compression For Output if you want to speed up the transfer
of the resulting output file via the net. This option is recommended for large input files or
whenever a complete morphological analysis is requested.
2.8.5 Presentation of the Morphisto Results
A search for “Kohle” in Morphisto with the standard configuration, for instance, will turn up
the following results:
64
Figure: The Lemmatizer Results
There are two interpretations, the first one is the plural form of Kohl, and the second one is
the singular form of the lemma Kohle. When the field Full Analysis is activated, the morphosyntactic features are displayed as well.
65
Figure: The Lemmatizer Results
The linguistic annotation can also be integrated into a TEI/XML-encoded file. If the input file
is tokenized and single tokens are enclosed in <w> tags, the lemmatizer adds the attributes
lemma and ana within the <w> tag automatically, thus providing the lemma and part of
speech information. The result is a valid XML file that can be used for further processing.
The results are displayed in a text window by default, but they can be stored in a separate file
by clicking on the Store Results button.
2.8.6 How to access Morphisto from an Editor
The functionality of the Lemmatizer can also be used within the XML-Editor while working
on a text document. Open the Lemmatize Wordform view and specify your configuration by
selecting “Make Configuration”.
Then you can look up any word of your text by clicking it.
66
Figure: Accessing Morphisto from an Editor
2.8.7 FAQ: Hints for Using the Lemmatizer Module Morphisto
Wrong format or encoding
In general, a pre-processing step is performed prior to morphological analysis. The TextGrid
Tokenizer can be used to fulfill this task. If you like to use another tokenizer, please make
sure that the characters are encoded in UFT-8 and the lines are separated in UNIX style, i.e.
by means of the UNIX-specific line operator \n.
67
2.9 CollateX
CollateX is a tool for collating sources: fed with several witnesses it is able to align them and
optionally annotate additions, deletions and transpositions that may have occurred between
the various texts.
CollateX is developed together with the Huygens Instituut, Den Haag, among other
institutions coordinated by the Interedition collaboration project9.
2.9.1 State of development
CollateX consists of various modules that are designed for interoperability and use in various
contexts: There is the core collation algorithm that performs the alignment, code for input and
output of various formats, interchangeable distance functions, code to analyze the collation
result and produce a set of potential additions, deletions and transpositions for the text, and
user interface to control all of CollateX. Currently, the development focused mainly on the
development of the algorithm and input formats, a GUI for inclusion in the Lab will be
developed in the next project phase.
To experiment with the algorithm, there is a web based test user interface.
2.9.2 The Web based test GUI
Figure 4: CollateX’ web based test GUI.
The current web based user interface is illustrated in Figure 4. It is not the final state yet, for it
is intended to allow philologists and developers to evaluate the algorithm rather than for
production use.
9
http://www.interedition.eu/
68
The user interface consists of several pages. On the first page, users can enter their test texts
and push the collate button to perform a collation with the current algorithm. The other pages
contain standard test cases.
A user interface for productive use will be developed in the next project phase.
69
2.10 Streaming Tools (i.e. non-interactive tools)
There are some streaming tools that do not have a dedicated user interface but are intended to
be controlled via the Workflow Editor.
2.10.1
Sort
The Sorting Service is optimized for use with a fully functional streaming editor for XML
transformations like the XSLT based streaming editor (see the next section). If the units to be
sorted (sort units) and the sort key have not yet been marked up consistently, the user has to
supply suitable markup before calling the sort service (and, optionally, remove that markup
after the sorting process).
The sort service basically expects five arguments:
xmltree: The XML document to sort. This document must be well-formed, will not be
validated by the tool, however.
unitXPath: An XPath expression (encoded as an xs:string) that selects the sort units.
The path expression will be evaluated relatively to the root of xmltree and should
return a nodeset of elements that will be sorted.
keyXPath: An XPath expression (encoded as an xs:string) that selects the sort key
within the sort unit. The expression will be evaluated relatively to each sort unit
selected by the unitXPath and must return a string.
nsmap: A map of XML prefixes to namespaces. Prefixes used in unitXPath or
keyXPath must be declared here.
collator: A description of the collation sequence to be used. There are two options:
o a locale identifier. Specifying this will select the sort sequence for the locale as
defined in ICU10
o the collation sequence as a string11. If you follow the link to the ICU explorer
you will find, as an example, “&ae << æ <<< Æ”. These collation sequences
are primarily based on ISO 14651.
The sort service identifies the sort units in the document and the sort keys therein using the
XPath expressions unitXPath and keyXPath. XML prefixes in these expressions are resolved
using nsmap. The sort units are then ordered in such a way that their respective sort keys
monotonically increase according to the order defined by the collation sequence specified as
collator. XML elements in the document that are not part of a sort unit aren’t moved during
this process, i.e. if there are n sort units before such a “neutral” element and m units
afterwards in the source document, this will also be the case in the result document.
2.10.2
Streaming Editors
As streaming editors, i.e. general programmable text transformation tools, TextGrid provides
two services: A XSLT based transformation service for working with XML source files and
FnQuery, a prolog based transformation tool that can also handle non-XML input data.
10
11
Cf. http://www.icu-project.org/userguide/locale.html and http://demo.icu-project.org/icu-bin/locexp
Cf. http://www.icu-project.org/userguide/Collate_Intro.html and especially http://www.icuproject.org/userguide/Collate_Customization.html
70
2.10.2.1 XSLT
The XSLT transformation service is a simple web service wrapper (REST and SOAP)12
around the Saxon B-(9.0.x) XSLT processor13. Besides the optional SessionID and log string
(see above), the transformation service accepts three parameters:
input (xs:anyType) – the XML data to be transformed
stylesheet (xs:anyType) – the XSLT stylesheet
params (xs:string) – key-value pairs defining XSLT parameters:
key1:value1|key2:value2| ...
2.10.2.2 FNQuery
The FnQuery Module can be accessed from the tools menue of the TextGridLab.
1. Please select first “Tools” in the menu bar and then choose “FnQuery”:
Figure: Accessing FnQuery
2. Alternatively, FnQuery can be opened by clicking on the FnQuery icon in the tool bar
of TextGridLab :
12
13
EPR: http://ingrid.sub.uni-goettingen.de:8081/axis2/services/StreamingEditorXSLT
http://saxon.sourceforge.net
71
The FnQuery-Perspective has three Views. In the Navigator-View you can select the
source- and program file. If both files were selected, you will see them in the SettingsView. Now you can start the Transformation or Selection. After that, the result will appear
in the Result-View.
Figure: FnQuery Perspective
1. You need to select a source file. This can be a file of any type.
72
Figure: Select Source-File
2. You need to select a program file. This have to be a file of the type prolog. You can
recognize this filetype by this icon .
73
Figure: Select Program-File
3. If both files were selected, you can start the Transformation or Selection.
Figure: Start Action
74
2.10.3
Tokenizer
The Tokenizer splits a text into logical units (tokens), i.e. in words and punctuation marks.
These are marked by opening and closing tags. The Tokenizer implements the algorithm for
determining word boundaries according to the guidelines of the Unicode Consortium14. The
corresponding elements (for words and characters) as well as pre-defined tokens - for
example abbreviations, proper nouns or regular expressions (e.g. for date specification) - can
be defined in the tool-configuration. Tokenized texts can be processed further, for instance
with the lemmatizer.
The Tokenizer web service (SOAP)15 accepts two parameters:
indata (xs:string) – the XML encoded text data to be tokenized
config (xs:string) – the configuration, in XML syntax:
<TokenizerConfig>
<!—elements whose content should not be tokenized-->
<IgnoreElements>
<item>teiHeader</item>
</IgnoreElements>
<MyTokens>
<!—typed lists(s) of pre-defined tokens-->
<category type="winter">
<item>Advent</item>
<item>Schneeflöcklein</item>
</category>
<category type="abbr">
<item>Abk.</item>
<item>e.g.</item>
</category>
<category type="NE">
<item>Rufus T. Firefly</item>
<item>Otis B. Driftwood</item>
</category>
<category type="date">
<!--you can also use regular expressions-->
<item>\d{1,2}\.\s?\d{1,2}\.\s?\d{4}</item>
<item>\d{4}-\d{1,2}-\d{1,2}</item>
</category>
</MyTokens>
<MyCharacters>
<category type="">
<!—typed lists(s) of characters to be tagged with the
charelement (see below), note: some chars need to be escaped
with the backslash-->
<item>\.</item>
<item>;</item>
<item>,</item>
<item>!</item>
<item>\?</item>
<item>\(</item>
<item>\)</item>
<item>\:</item>
<item>"</item>
</category>
14
15
http://www.unicode.org/reports/tr29/tr29-9.html#Word_Boundaries
http://ingrid.sub.uni-goettingen.de/Tokenizer.wsdl
75
</MyCharacters>
<!--elements to be used for tagging tokens/words and characters-->
<tokenelement>w</tokenelement>
<charelement>c</charelement>
</TokenizerConfig>
Since there is no UI component, the tokenizer can only be used via the workflow tools. Here
is an example workflow that calls tokenizer and lemmatizer:
<?xml version="1.0" encoding="UTF-8"?>
<tgwf:tgwf xmlns:tgwf="http://textgrid.info/namespaces/middleware/workflow" version="0.4">
<tgwf:description>
Lemmatizer Workflow with prepended Tokenizer (v0.4)
</tgwf:description>
<tgwf:activities>
<tgwf:service description="TextGrid Tokenizer" name="Tokenizer" operation="Tokenizer64"
serviceID="tok" targetNamespace="http://namespaces.textgrid.de/"
wsdlLocation="http://ingrid.sub.uni-goettingen.de/Tokenizer.wsdl"/>
<tgwf:service operation="LemmatizerTEIBatch64" wsdlLocation="http://ingrid.sub.unigoettingen.de/lemmatizer_doc.wsdl" name="Lemmatizer" description="The TextGrid New German
Lemmatizer" serviceID="lem" targetNamespace="http://namespaces.textgrid.de/"/>
</tgwf:activities>
<tgwf:datalinks>
<tgwf:link linkID="read" fromServiceID="crud" fromParam="batchinput" toServiceID="tok"
toParam="indata"/>
<tgwf:link toServiceID="lem" fromParam="outdata" toParam="infile" fromServiceID="tok"
linkID="Tok2Lem"/>
<tgwf:link linkID="write" fromServiceID="lem" fromParam="outfile" toServiceID="crud"
toParam="batchoutput"/>
</tgwf:datalinks>
<tgwf:CRUD instance="inserted automatically" sessionID="inserted automatically"
logParameter="inserted automatically"/>
<tgwf:batchinput/>
<tgwf:metadatatransformation>
<xsl:transform xmlns:xsl="http://www.w3.org/1999/XSL/Transform"
xmlns:xsi="http://www.w3.org/2001/XMLSchema-instance"
xmlns:ns1="http://textgrid.info/namespaces/middleware/tgcrud/services/TGCrudService"
xmlns:tgomd="http://textgrid.info/namespaces/metadata/core/2008-07-24" version="1.0">
<xsl:output method="xml" encoding="UTF-8" indent="no"/>
<xsl:template match="/">
<ns1:tgObjectMetadata
xmlns:ns1="http://textgrid.info/namespaces/middleware/tgcrud/services/TGCrudService">
<descriptive xmlns="http://textgrid.info/namespaces/metadata/core/2008-07-24">
<xsl:for-each select="/ns1:tgObjectMetadata/tgomd:descriptive/tgomd:agent">
<xsl:copy-of select="."/>
</xsl:for-each>
<agent role="other">empty</agent>
<title>
<xsl:value-of select="/ns1:tgObjectMetadata/tgomd:descriptive/tgomd:title"/>
<xsl:text> (tokenized and lemmatized)</xsl:text>
</title>
<xsl:copy-of select="/ns1:tgObjectMetadata/tgomd:descriptive/tgomd:date"/>
<xsl:copy-of select="/ns1:tgObjectMetadata/tgomd:descriptive/tgomd:type"/>
</descriptive>
<administrative xmlns="http://textgrid.info/namespaces/metadata/core/2008-07-24">
<client>
<project id="TGPRXXX"/>
<xsl:copy-of select="/ns1:tgObjectMetadata/tgomd:administrative/tgomd:client/tgomd:format"/>
<xsl:copy-of select="/ns1:tgObjectMetadata/tgomd:administrative/tgomd:client/tgomd:partNo"/>
</client>
</administrative>
<xsl:copy-of select="/ns1:tgObjectMetadata/tgomd:custom"/>
</ns1:tgObjectMetadata>
</xsl:template>
</xsl:transform>
76
</tgwf:metadatatransformation>
<tgwf:inputconstants>
<tgwf:activity serviceID="tok">
<tgwf:const name="config" needsB64encoding="true">
<TokenizerConfig>
<!-- Elemente, deren Inhalt nicht beruecksichtigt werden soll -->
<IgnoreElements>
<item>teiHeader</item>
<item>vers2</item>
</IgnoreElements>
<!-- Hier angegebene Strings (jew. eine Zeile als String interpretiert) werden als jew. ein Token
umgesetzt -->
<MyTokens>
<category type="winter">
<item>Advent</item>
<item>Schneeflöcklein</item>
<item>
Irgendein!StringMit;Trennzeichen:darin
</item>
</category>
<category type="abbr">
<item>Abk.</item>
</category>
<category type="leer"/>
<category type="NE">
<item>Loriot</item>
</category>
<category type="Date">
<item>\d{1,2}\.\s?\d{1,2}\.\s?\d{4}</item>
<item>\d{1,2}\.\s?\d{1,2}\.\s?\d{2}</item>
<item>\d{4}-\d{1,2}-\d{1,2}</item>
</category>
</MyTokens>
<MyCharacters>
<category type="">
<item>\.</item>
<item>;</item>
<item>,</item>
<item>!</item>
<item>\?</item>
<item>\(</item>
<item>\)</item>
<item>\:</item>
<item>"</item>
</category>
</MyCharacters>
<tokenelement>w</tokenelement>
<charelement>c</charelement>
</TokenizerConfig>
</tgwf:const>
</tgwf:activity>
<tgwf:activity serviceID="lem">
<tgwf:const name="configfile" needsB64encoding="true">
<configuration>
<token>w</token>
<lemmatize fuzzy="no" disambiguation="yes" guessing="no" zlib="no"
output="MORPHISTO">ntl</lemmatize>
</configuration>
</tgwf:const>
</tgwf:activity>
</tgwf:inputconstants>
</tgwf:tgwf>
77
3 Tools not developed in TextGrid
Some tools originally planned for TextGrid have not yet been implemented:
3.1 Bibliography Tool
The Bibliography Tool has not been developed within the first project phase of TextGrid, as a
similar functionality will be provided by a service in eSciDoc. After integrating this service in
TextGrid, it will be made accessible via a user interface in TextGridLab.
3.2 OCR
The development of an OCR module for Gothic print involved a far greater effort than
expected. An implementation as TextGrid service is projected for the second phase of
TextGrid. The University of Kaiserslautern as new TextGrid partner will be responsible for
developing an OCR service for identification of Gothic type letters, integrating it in TextGrid
and appropriating tools for working with OCR results.
3.3 Print Publisher
The Print Publisher has been outsourced for a similar reason: During the requirements
engineering phase it turned out that developing a really useful and usable print publisher
would involve far more resources than available for a TextGrid sub-module, thus it should be
developed in an independent project. An accordant proposal was submitted at the Deutsche
Forschungsgemeinschaft (German Research Foundation). It was granted in October 2009.
TextGrid will cooperate with this project.
3.4 Registry
One of TextGrid’s project partners, FH Worms, has developed the service registry Isidorus
that is mainly targeted at the eGovernment community. It is currently on the way of being
adopted in a way usable for TextGrid16, and will finally be integrated with TextGrid in the
second project phase.
16
78
Lukas Gießmann, Implementation of a Web 2.0 Interface and an RDF-Im/Exporter for the Topic Maps
Engine “Isidorus”. Bachelor Thesis, Worms 2009
4 Appendix 1 – The tgwf XML Schema
The tgwf schema is designed both to simplify the task of workflow authors not having to
know the semantics of GridWorkflowDL or Petri Nets, which is far more complex, and to
account for some specific requirements TextGrid workflows have. It will be transferred
automatically by an XSLT stylesheet to GridWorkflowDL (see below).
In the following, we just reproduce the schema here (it has some documentation inline), and
show an example tgwf document afterwards.
4.1.1 tgwf.xsd XML schema
<?xml version="1.0" encoding="UTF-8"?>
<xs:schema
xmlns:xs="http://www.w3.org/2001/XMLSchema"
elementFormDefault="qualified"
xmlns:tgwf="http://textgrid.info/namespaces/middleware/workflow"
targetNamespace="http://textgrid.info/namespaces/middleware/workflow">
<xs:annotation>
<xs:documentation>
Defines a simplified Workflow document in TextGrid. A tgwf
document written by the user will be completed by the
TextGridLab Workflow component, then xsl-transformed into a
GridWorkflowDL document which can processed by the GWES Workflow
Engine.
</xs:documentation>
</xs:annotation>
<xs:element name="tgwf">
<xs:complexType>
<xs:sequence>
<xs:element ref="tgwf:description"/>
<xs:element ref="tgwf:activities"/>
<xs:element ref="tgwf:datalinks"/>
<xs:element ref="tgwf:CRUD"/>
<xs:element ref="tgwf:batchinput"/>
<xs:element ref="tgwf:metadatatransformation"/>
<xs:element ref="tgwf:inputconstants"/>
</xs:sequence>
<xs:attribute name="version" use="required" type="xs:decimal" fixed="0.5"/>
</xs:complexType>
</xs:element>
79
<xs:element name="description" type="xs:string">
<xs:annotation>
<xs:documentation>
Description will not be processed and is solely for the
writer. The title of the workflow will be taken from the title
of the TextGridObject holding this tgwf document.
</xs:documentation>
</xs:annotation>
</xs:element>
<xs:element name="activities">
<xs:complexType>
<xs:sequence>
<xs:element maxOccurs="unbounded" minOccurs="0" ref="tgwf:service">
</xs:element>
</xs:sequence>
</xs:complexType>
</xs:element>
<xs:element name="service">
<xs:annotation>
<xs:documentation>
The services proper that will process the _contents_ of the
TGOs. All data is transferred SOAP-inline, base64-encoded, so
the services will have to be compatible. CRUDread and
CRUDcreate for Grid access and StreamingEditor for metadata
transformation will be inserted automatically.
</xs:documentation>
</xs:annotation>
<xs:complexType>
<xs:attribute name="description" use="required"/>
<xs:attribute name="name" use="required" type="xs:NCName">
<xs:annotation>
<xs:documentation>
name for visualisation of workflow
</xs:documentation>
</xs:annotation>
</xs:attribute>
80
<xs:attribute name="operation" use="required" type="xs:anyURI">
<xs:annotation>
<xs:documentation>
the operation to be invoked from this wsdl
</xs:documentation>
</xs:annotation>
</xs:attribute>
<xs:attribute name="serviceID" use="required" type="xs:NCName">
<xs:annotation>
<xs:documentation>
this ID will be used throughout this tgwf document to
refer to this service
</xs:documentation>
</xs:annotation>
</xs:attribute>
<xs:attribute name="targetNamespace" use="required" type="xs:anyURI">
<xs:annotation>
<xs:documentation>
If the WSDL specifies a targetNamespace, its value can be
given here.
</xs:documentation>
</xs:annotation>
</xs:attribute>
<xs:attribute name="usetns" type="xs:boolean">
<xs:annotation>
<xs:documentation>
set to true to tell the Workflow Engine that the message
parameters should be prepended the targetNamespace
given. Hint: set to true if the schema definition part in
the WSDL has elementFormDefault="qualified". If you
interact with a Web Service written in a
namespace-ignorant language (such as PHP, Python, Perl, or
Tcl), usetns will perhaps better be false.
</xs:documentation>
</xs:annotation>
</xs:attribute>
81
<xs:attribute name="wsdlLocation" use="required" type="xs:anyURI"/>
</xs:complexType>
</xs:element>
<xs:element name="datalinks">
<xs:annotation>
<xs:documentation>
Determine how data flows from one service to another,
i.e. which output parameter in fromService yields the data and
which input parameter in toService will receive them. Use
crud/batchinput for fromServiceID/fromParam when the link
should lead to toServices that should receive the data as read
from the Grid. Similarly, the fromService that will serve the
final data must have a link to crud/batchoutput. Cave:
consistency checks will not be made yet, so possibly the
workflow might fail or loop.
</xs:documentation>
</xs:annotation>
<xs:complexType>
<xs:sequence>
<xs:element maxOccurs="unbounded" minOccurs="1" ref="tgwf:link"/>
</xs:sequence>
</xs:complexType>
</xs:element>
<xs:element name="link">
<xs:complexType>
<xs:attribute name="linkID" use="required" type="xs:NCName"/>
<xs:attribute name="fromServiceID" use="required" type="xs:NCName">
<xs:annotation>
<xs:documentation>
the ServiceID as specified in the activities element for
the service that yields data
</xs:documentation>
</xs:annotation>
</xs:attribute>
<xs:attribute name="fromParam" use="required" type="xs:NCName">
<xs:annotation>
82
<xs:documentation>
the output parameter of the fromServiceID which serves the
data for this link
</xs:documentation>
</xs:annotation>
</xs:attribute>
<xs:attribute name="toServiceID" use="required" type="xs:NCName">
<xs:annotation>
<xs:documentation>
the ServiceID as specified in the activities element, of
the service that receives the data
</xs:documentation>
</xs:annotation>
</xs:attribute>
<xs:attribute name="toParam" use="required" type="xs:NCName">
<xs:annotation>
<xs:documentation>
the input parameter of the toServiceID which accepts
the data for this link
</xs:documentation>
</xs:annotation>
</xs:attribute>
</xs:complexType>
</xs:element>
<xs:element name="CRUD">
<xs:annotation>
<xs:documentation>
attribute values to be filled in automatically by the TextGridLab
</xs:documentation>
</xs:annotation>
<xs:complexType>
<xs:attribute name="instance" use="required" type="xs:string"/>
<xs:attribute name="logParameter" use="required" type="xs:string"/>
<xs:attribute name="sessionID" use="required" type="xs:string"/>
</xs:complexType>
</xs:element>
83
<xs:element name="batchinput">
<xs:annotation>
<xs:documentation>
input TextGridObject's URIs, to be filled in automatically by
the TextGridLab
</xs:documentation>
</xs:annotation>
<xs:complexType>
<xs:sequence>
<xs:element ref="tgwf:URI" maxOccurs="unbounded" minOccurs="0"/>
</xs:sequence>
</xs:complexType>
</xs:element>
<xs:element name="URI" type="xs:anyURI"/>
<xs:element name="metadatatransformation">
<xs:annotation>
<xs:documentation>
This contains the XSL stylesheet for rule-based transformation
of the metadata, e.g. setting a new ProjectID, appending text
to the title, or adding an editor. Please consult an example
stylesheet for the current TextGridMetadata if you plan to
write a new one.
</xs:documentation>
</xs:annotation>
<xs:complexType mixed="true">
<xs:sequence>
<xs:any processContents="lax" minOccurs="0" maxOccurs="unbounded"/>
</xs:sequence>
</xs:complexType>
</xs:element>
<xs:element name="inputconstants">
<xs:annotation>
<xs:documentation>
configuration parameters for the services used in this
workflow
</xs:documentation>
84
</xs:annotation>
<xs:complexType>
<xs:sequence>
<xs:element maxOccurs="unbounded" minOccurs="0" ref="tgwf:activity"/>
</xs:sequence>
</xs:complexType>
</xs:element>
<xs:element name="activity">
<xs:complexType>
<xs:sequence>
<xs:element ref="tgwf:const" maxOccurs="unbounded" minOccurs="1" />
</xs:sequence>
<xs:attribute name="serviceID" use="required" type="xs:NCName">
<xs:annotation>
<xs:documentation>
the ServiceID as specified in the activities element
</xs:documentation>
</xs:annotation>
</xs:attribute>
</xs:complexType>
</xs:element>
<xs:element name="const">
<xs:complexType mixed="true">
<xs:sequence>
<xs:any processContents="lax" minOccurs="0" maxOccurs="unbounded"/>
</xs:sequence>
<xs:attribute name="name" use="required" type="xs:NCName">
<xs:annotation>
<xs:documentation>
the name of this input parameter
</xs:documentation>
</xs:annotation>
</xs:attribute>
<xs:attribute name="needsB64encoding" type="xs:boolean">
<xs:annotation>
<xs:documentation>
85
set to true if this parameter, as the content data, has
to be encoded in Base64 for the service
</xs:documentation>
</xs:annotation>
</xs:attribute>
</xs:complexType>
</xs:element>
</xs:schema>
4.1.2 Example tgwf document
This document defines a two-service pipe: TextGridObjects are being sent to the TextGrid
Tokenizer, then to the Lemmatizer, then resulting TextGridObjects are being created. See
figure XXX for a graphical representation of this workflow in GridWorkflowDL.
<?xml version="1.0" encoding="UTF-8"?>
<tgwf:tgwf
version="0.5">
xmlns:tgwf="http://textgrid.info/namespaces/middleware/workflow"
<tgwf:description>
Lemmatizer Workflow with prepended Tokenizer
</tgwf:description>
<tgwf:activities>
<tgwf:service description="TextGrid Tokenizer"
name="Tokenizer"
operation="Tokenizer64"
serviceID="tok"
targetNamespace="http://namespaces.textgrid.de/"
wsdlLocation="http://ingrid.sub.uni-goettingen.de/Tokenizer.wsdl"/>
<tgwf:service operation="LemmatizerTEIBatch64"
wsdlLocation="http://ingrid.sub.uni-goettingen.de/lemmatizer_doc.wsdl"
name="Lemmatizer"
description="The TextGrid New German Lemmatizer"
serviceID="lem"
86
targetNamespace="http://namespaces.textgrid.de/"/>
</tgwf:activities>
<tgwf:datalinks>
<tgwf:link linkID="read" fromServiceID="crud" fromParam="batchinput"
toServiceID="tok" toParam="indata"/>
<tgwf:link linkID="Tok2Lem" fromServiceID="tok" fromParam="outdata"
toServiceID="lem" toParam="infile" />
<tgwf:link linkID="write" fromServiceID="lem" fromParam="outfile"
toServiceID="crud" toParam="batchoutput"/>
</tgwf:datalinks>
<tgwf:CRUD instance="inserted automatically"
sessionID="inserted automatically"
logParameter="inserted automatically"/>
<tgwf:batchinput/>
<tgwf:metadatatransformation>
<xsl:transform> ... </xsl:transform>
</tgwf:metadatatransformation>
<tgwf:inputconstants>
<tgwf:activity serviceID="tok">
<tgwf:const name="config" needsB64encoding="true">
<TokenizerConfig>...</TokenizerConfig>
</tgwf:const>
</tgwf:activity>
<tgwf:activity serviceID="lem">...</tgwf:activity>
</tgwf:inputconstants>
</tgwf:tgwf>
87
88