1
Genealogy Pro User Manual
Genealogy Pro for MacOS X - User Manual
Introduction
Getting Started
The Genealogy Pro Database
Database Fields
Individuals’ Browser
Family Browser
Adding and Removing People
Genealogy Pro Files
Files
Using GEDCOM files
Merging Files
The Genealogy Pro Editor
Name Editor
Date Editor
Place Editor
Text Editor
Document Editor
Scrap Book Editor
Combined Field Editor
Formatting using the Editor
Charts
Creating a chart
Ancestor Charts
Descendant Charts
Altering the fields in a chart
Altering the chart style
The Chart List Panel
Chart Links
Reports
Family Report
Ahnentafel Report
-1-
Genealogy Pro User Manual
Publishing on the Internet
Web Page Set Up
Creating Web Pages
Web Preferences
Privacy
Searching the database
Sources
Notes
Appendix 1: Quick Start Tutorial
Appendix 2: Shortcuts
Appendix 3: Data storage format
-2-
Genealogy Pro User Manual
Introduction
Genealogy Pro© for MacOS X 2.0 is a Genealogy data management and charting program, and web
publishing software for the MacOS X operating system.
Genealogy Pro 2.0 is integrated with an inexpensive web publishing site, the Genealogy Pro internet site
that features a web solution for publishing your family tree.
It is designed specifically for storing family tree data and drawing family tree charts. It stores familial data
such as family names, relationships, important dates and events such as birth and death dates, and uses this
information to create genealogical charts.
Charts currently support are vertical and horizontal pedigree (ancestor) and vertical and horizontal family
(descendant) charts.
Data can be imported using the standard GEDCOM (genealogical data communication) format, and data
can be export to GEDCOM format. The native database is a relational database table based upon the
database capability of the underlying OS X.
System Requirements:
Power Macintosh G3 (minimum, recommended G4 processor or higher) running MacOS system version
10.2 or higher.
-3-
Genealogy Pro User Manual
Getting Started
The best way to get to know how to use Genealogy Pro is to start using it. The tutorial in the appendix to
this manual describes how to create a new document, add individuals and families, manage external files
such as images, and create charts.
If you have already created your family tree using other genealogical software, please read the chapter on
importing GEDCOM files to learn how to import your family tree data.
The chapter on web publishingdescribes the steps to format and put your family tree onto the internet.
-4-
Genealogy Pro User Manual
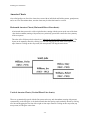
Genealogy Pro Data Management
Data Management
Genealogy Pro stores all information pertaining to people, families, sources, and notes in a database.
Information in the database is accessed and changed through one of the types of windows - the
’Individuals browser’, the ’Family browser’ or a Chart. Adding or removing people and changing family
information such as birth dates etc. can be altered in any of these views. However, it is usual to alter any
data with one of the browsers, and create charts for publishing after the data has been entered.
For those experienced with the use of the relational database, each person in a chart may be thought of as
analogous to a record of the databse. The fields such as birth dates, birth places, etc. may be thought of
(indeed are) as fields of the databse table.
A Real Life Model
The Genealogy Pro database is modelled on real life. Children can only be added to an existing individual
(or to be more correct, to the individual’s family). If the "New Son" or "New Daughter" function is
selected for a person not associated with a family, a new family (with spouse) will automatically be
created prior to adding the children to the family.
Similarly, parents can only be added to an existing individual.
There is no need to know any details of a "tag" for an indivudal or family. There is no need to manually
place individuals into a family or to manually assign parents to an individual.
Conversely, deleting a person or family from the database will also delete all children from that persons
families, and from the childrens families, etc. It makes sense - if the person does not exist, then that
persons ancestors do not exist - they will all be deleted.
Building the Database
The database is built by selecting an individual and consecutively adding children (Family->New Son or
Family->New Daughter), a spouse (Family->New Spouse), or adding parents (Family->New Parents).
The quickstart tutorial in Appendix 1 of this manual gives an example of building up a database.
The tutorial is a good place to start if you are a new Genealogy Pro user.
Whether you use the Individuals browser or the Family browser to navigate and build up the database is a
matter of pesonal preference. In version 2.0 the Family browser features an "ancestor tree" like view of all
individuals in the database, allowing a continual overview of where any family being viewed is located in
the database.
Database Storage
-5-
Genealogy Pro User Manual
A significant change starting in version 2.0 of Genealogy Pro is the use of the SQLITE engine to store the
genealogical data. While this does provide some noticable improvements for end users (such as quicker
sorting and updating in the Individuals browser), it also provides advanced users the opportunity to use the
sqlite database tool to browse the database. It also allows potential developers to provide third party
Genealogy Pro add-ons, including web based solutions. An overview of the Genealogy Pro 2.0 file format
is provided in Appendix 3.
-6-
Genealogy Pro User Manual
Database Fields
An Introduction to Fields
Creating Custom Fields
Changing the Field Order
An Introduction to Fields
Each person or family has a number of fields associated with them. Examples of field are: a person’s birth
date, place of birth, death date, place of death, marriage date, etc. Even the name of a person is a field.
There are a number of built in fields that Genealogy Pro supports - these are the birth date and place, death
date and place, name of person, Picture, Photo Album, Occupation, Family Images, marriage date and
place, and divorce date and place.
Fields in Genealogy Pro are not limited to the built in fields. In fact, most users will at some time want to
create new fields to suit their own purposes.
Creating Custom Fields
There are serveral types of fields that can be created. These are:
Name - store names (first, middle, last)
Date - store dates
Place - store places and addresses
Text - stores test
Document - store one image or other type of file, or a url (web address)
Scap Book - stores a collection of images or other type of file, or a url (web address), and
Combined fields - a reference to two or more existing fields.
note: The ’Document’ field is identical to the ’Image’ field in Genealogy Pro 1.0. It has been expanded to
manage other types of documents and URL’s. lSimilarly, the ’Scrap Book’ is identical to the ’Photo
Album’ custom field in Genealogy Pro 1.0, it being expanded to manage other types of documents and
URL’s. These names of fields may be used interchangeably in some place in this manual
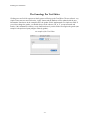
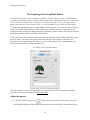
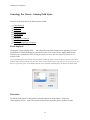
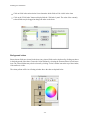
To create a custom field choose the "Database⇒Define New Field ..." menu item. The window depicted
below will appear that offers option for the new field.
-7-
Genealogy Pro User Manual
The "Field Association" option determines whether it is a Field of a Person (an example is a birth date) or
a Field of a Family (an example is a wedding date).
The "Field Type" determines the type of field (eg name, date, place, etc). The "Field Name" is the name of
the field, as displayed in the column header of the Individuals’ browser, or the row of the Family browser.
The "Field Type" determines the type of field (eg name, date, place, etc). The "Field Name" is the name of
the field, as displayed in the column header of the Individuals’ browser, or the row of the Family browser.
All fields in the database, both custom and inbuilt fields, are listed in the "Fields in Database" table. The
fields that cannot be deleted cannot be selected. All custom fields, and some of the builtin fields can be
selected by clicking on the name in the table and choosing the "Delete" button.
Fields defined by the GEDCOM standard can be created by choosing the "Gedcom Events ..." button. As a
GEDCOM event has a date and a place associated with it, choosing an item from the list of GEDCOM
events may result in multiple custom fields created.
-8-
Genealogy Pro User Manual
After creation, the custom fields are altered in the same way as an inbuilt field using the Genealogy Pro
Editor.
Changing the Field Order
The order of fields may be changed in two ways.
In the individualss browser, click and hold the mouse on the name of the field and drag the column to
the left or to the right as desired.
In the Family browser, click and hold the mouse on the name of the field and drag the row up or
downas desired.
note: Changing the order of fields in the Family browser will automatically change the order of fields in the Individuals’
browser, and vice versa.
A Word about Combined Fields
Combined fields are different from the other types of fields. Combined fields do not store any data per se.
Instead, they store a reference to two or more fields. The purpose of combined fields is to display multiple
facts about a person in one line of information.
For example, the name birth and death for John Smith, born January 5th 1728 and died June 9th 1772 may
be represented on one line as "John Smith (1728 - 1772)". Genealogy Pro can display this information
through a combined field of a name (John Smith), birth date (1728) and death date (1772). Instead of
displaying the name, birth date, and death date in separate lines in a chart, the combined field may be used
in lieu.
note: Combined fields are not displayed in the Individuals’ browser or Family browser. They are only available for display in
Charts.
-9-
Genealogy Pro User Manual
The Individuals’ Browser
Overview
As depicted below, the Individuals’ browser lists all individuals in the database.
Fields are listed in columns.
Each row equates to one individual in the database.
note: The row numbers do not equate to Gedcom identification numbers.
Opening the Individuals’ Browser
If the Individuals’ browser is closed, it may be opened by:
a. Clicking on the "Individuals" toolbar icon at the top right hand of the Family browser; or
b. Choosing the the menu Database⇒File Name⇒Individuals to view this window.
- 10 -
Genealogy Pro User Manual
The columns may be moved by clicking on column names and dragging the column.
Sorting in the Individuals’ Browser
The table may be sorted by any field. Click in the column header to sort the list of individuals. The list
will sort by the Date, Place, Name or Text.
Sorting may be undertaken by:
the current formatting (eg if the date format is day:month:year then the sort will occur by day
before month then year); or
Natural sorting by field type. For the name field, sorting is by surname, first Name, then middle
names, regardless of the display. For the date field it is sorted by year, month then day.
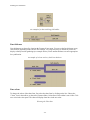
Enabling and disabling of sorting, and selecting the method of sorting is through the Genealogy Pro
preferences menu, as depicted below.
- 11 -
Genealogy Pro User Manual
Editing in the Individuals’ Browser
To activate the Genealogy Pro editor in this browser, click on a cell in the table and choose the "Editor"
icon in the tool bar.
note: The editor is also activated by double clicking in a cell.
- 12 -
Genealogy Pro User Manual
The Family Browser
The Genealogy Pro version 3.0 the family browser features a split view - a table and a tree.
The upper view depicts exactly one family or individual in a table. The lower view depicts all families in
the database in a tree. All families at the top level of the tree are families in which the parents of that
family themselves have no parents, that is, they are the deepest level of ancestor in that line.
Components of the Family Browser
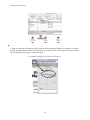
The image below shows a Family browser of the file named ’McLaughlins.gpro’. This window features a
focal person of the browser. The focal person has his or her name in large bold letters at the top left side
of the window. It is "Margaret McLaughlin" in the example below.
The lower view show the focal person in a tree.
The toolbar has four pop-up menu items that forms the Navigation menus. You can choose to navigate to
either parent, any spouse, sibling or child by choosing the menu item for that person. That person will then
become the new focal person of the browser. The new person will automatically be selected in the tree.
You can also select a new focal person by clicking on any individual in the tree.
The toolbar also displays access items to access the Field Editor, the Source Editor, and the Note
Editor.
The "Parents" tab displays data for the individuals, such as name, date of birth. The "Family" tab lists
all data for the family, such as date or place of marriage.
Components of the Family Browser
- 13 -
Genealogy Pro User Manual
There are three columns in the ’Parents’ tab. The first (left most) column are all the fields that are present
in this database. Most documents will have a ’Name’, ’Date of Birth’, Date of Death’, ’Gender’.
Additional name, place, date, text, image or photo album fields may be created using the
"Document->Define new field" menu. The second column comprises rows for field data for the focal
person of the window. The third column comprises rows of data for the spouse of the focal person in the
currently selected family.
If there is greater than one spouse for the focal person, a menu at the top of this third column will allow
toggling between spouses.
note: Functions that apply to individuals (eg adding a new spouse) will always apply to the focal person.
Navigating in the Family Window
There are two basic ways to navigate through the genealogy database.
1. Navigating using the Navigation menus in the toolbar
Use one of the the four Navigation menu’s in the toolbar to navigate to either one of the current focal
persons parents, a spouse, a sibling, or a child. When one of these retlations is chosen, this relation now
becomes the focal person.
Choosing an item from the navigation bar will cause the selected person to become the focal person of the
window. In the example below the chile "Adelaide" has been selected, and the window will now have
"Adelaide" as the focal person. Note that the Tree view in the lower half of the window automatically
updates to select Adelaide.
An example selecting a person in a Navigation menu
The selected person is now the focal person of the window
- 14 -
Genealogy Pro User Manual
2. Navigating using the Tree view
Move to a different family or person in the lower "Tree" view, by clicking on a family or person with the
mouse or using the arrow key to move up or down. The upper table is filled with the new family and/or
person. The selected person or one of the persons from the selected family will now become the new focal
person.
For example, clicking the mouse onto Adelaide in the Tree view would have produced an identical result,
making Adelaide the focal person as above.
Some tips for Navigating in the Tree View
Simple mouse click without any control keys pressed will make the selected person or family the new
focal person and family.
Double clicking on the person or family in the Tree View will also make the selected person or
family the new focal person, and will additionally open the field editor (if it is not already open) and
make the field editor the active window.
Pressing the Command key while clicking on a family will make the spouse of the family the focal
person of the window. If the spouses parent family also exists in the database, tthis family will exist
in two locations in the Tree View (as a family "child" each parents family). This family is displayed
under the spouses parents family will be selected.
Pressing the Shift click on a family will select the "Parents" table (if not already selected) and goes to
the name field.
Pressing the Shift + Command click on a family selects the parent tab (if not already selected) and
goes to the spouse person.
Pressing the Option key while clicking on a family will make the family tab the active tab.
- 15 -
Genealogy Pro User Manual
Changing the order of children in a Family
To change the order of children for a family, click the mouse on a person or family in the Tree View. Hold
hold the mouse down and drag the child in the view to the new desired position within the family and
release the mouse. The child is updated in the database to the new position within the family.
Changing the order of spouse in a Family
To change the order of a spouse of a person, press the Command key while clicking and holding the
mouse down on a person where greater than one spouse exists for that person. Drag the family with the
spouse to the new desired position for that spouse. The order of the spouse is updated in the database
Searching in a Family
Use the "Find" menu to go to an individual with a specified value in a field. The first item found will be
selected in the Tree View and the person become the focal person. Using "Find next" will sequentially
traverse the Tree View for the next person matching the search.
- 16 -
Genealogy Pro User Manual
Adding and Removing People
Adding a Person
Deleting a Person
Setting the Spouse
Adding a Person
People are added to the Genealogy Pro database using the "Family" menu.
Firstly, select a person by clicking in a row of that person. It doesnt matter whether the view is the Family
browser or the Individuals’ browser or even a Chart window. People are added to the Genealogy Pro
database using the "Family" menu. The family menu is shown below.
For example, when "Family⇒New Son" menu item was clicked and David Mitford was the currently
selected person in the Individuals browser. The image below shows that a new person has been created.
The surname for the new person has been copied from the selected parent. The first name is by defaul
"Son of ..." where ... is the name of the selected parent (in this case, David). There is no special linking of
the name of the new person with the parent name. It is simply initialised by default to the name of the
parent and can be changed at any time using the name editor.
- 17 -
Genealogy Pro User Manual
When a new person is created, the first and/or surname is usually altered to the desired name using the
Genealogy Pro Editor.
Deleting a Person
People are deleted from the database the selecting the person and then choosing the "Delete" item from the
"Family" menu.
In any genealogy database, all individuals are usually related somehow. Deleting individuals will
therefore often leave a gap. In Genealogy Pro 1.0 this was prevented by only allowing deletion of
lineages, that is, deletion of the person required deletion of all descendants. In the production version of
Genealogy Pro 2.0, you are allowed to delete any individual. However, you should do so sparingly to
avoid ’gaps’ in the databae. A general rule of thumb for deleting individuals is:
Where a person has no descendants, a simple deletion is the default behaviour.
Where a person has one or more descendants, you have the choice, in a dialog window, to choose
whether to delete the individual or all descendants. The usual choice will be to delete all descendants.
Where a person has one or more descendants, but has no parents, you are give the choice to delete the
individual or all descendants. Often the desired result in this case is to delete the individual and not
the descendants.
You should not delete a spouse from a family because the name of the spouse is unknown. If the person is
unknown, you should set the name to a blank space, or any other desired name (eg a ’?’ character).
Deleting the spouse may produce unanticipated behaviour (eg. the ’add spouse’ function will simply add
the spouse back to the family, it does not create a new family with a new spouse)
- 18 -
Genealogy Pro User Manual
If you choose to delete descendants,the offspring and all descendants of the offspring will also be deleted.
Genealogy Pro will giving a warning prior to any deletion occurring, including an estimated count of the
number of descendats that will be deleted.
Setting the Spouse
The "Family⇒Set Spouse" function enables you to designate a person who currently exists in the database
as a spouseto the selected person. This function should be used rarely, if at all.
The only time in which this function should be used is when
Cousins marry - in which case the cousins already created and put into the database in their
respective families, require the "Set Spouse" function to tell Genealogy Pro that the cousins are
spouses of each other or
There are a number of genealogical lines in the database and the lines overlap at more than one point
(eg two brothers of one line married to two sisters of another family).
- 19 -
Genealogy Pro User Manual
Genealogy Pro Files
1. Genealogy Pro can read files of type:
"gpro" - native Genealogy Pro format
"ged", "Gedcom" - GEDCOM format
2. Genealogy Pro can write to files of type:
"gpro" - native Genealogy Pro format
"ged", "Gedcom" - GEDCOM format
"sql", "SQL" - Structured Query Languange - the genealogy pro database is listed as a sequence of
insert statements in the sql database language
"tiff", "TIFF image" - (charts only) - chart in tiff format
"text", "Plain text" - (reports only) - report saved as plain text
"rtf", "RFT" - (reports only) - report saved as rich text format
"rtfd", "RFTD" - (reports only) - report saved as rich text format with embedded images
- 20 -
Genealogy Pro User Manual
The native Genealogy Pro File Format
Genealogy Pro will require that you save a new document upon creation of the document. Data is
regularly updated into the database, when changes are made after editing the document. There is no
requirement to save a document at the end of a session (this does not apply to charts).
The document will normally close after the last window for the document is closed. You can also close the
document by choosing the File⇒Close Database menu item.
The Genealogy Pro native document is saved with suffix of "gpro".
Version 2.0 and greater of Genealogy Pro has all data stored in an SQL database format. The Genealogy
Pro file is actually a Directory, and the SQL database in stored inside this directory.
- 21 -
Genealogy Pro User Manual
Reading and Writing to GEDCOM Format
Reading Gedcom Files
Writing To Gedcom Format
Gedcom Preferences
Genealogy Pro can read and write data in the GEDCOM (Genealogical Data Communication) format.
GEDCOM is a standard devised by the Church of Jesus Christ of Latter Day Saints and many genealogy
software programs support this format.
Importing Gedcom Documents
To read in a GEDCOM file select the ’File⇒Open ...’ menu item. Select a file in the GEDCOM format.
The GEDCOM file should have a .ged or .GED suffix. After this you will be prompted for a name of the
file to store the converted file. Genealogy Pro will then convert the file into Genealogy Pro format.
Exporting Gedcom Documents
To write data in GEDCOM format to a file, choose the ’File⇒Save To ...’ menu item. Prior to saving data
to GEDCOM format for the first time, you will need to set the Submitter option. The ’Submitter’ is
information stored at the beginning of the GEDCOM document, such as (your) name and address.
Custom Name Fields
Genealogy programs that are compliant with GEDCOM version 5.5 can read and write multiple names,
the standard name types being ’aka’ (also known as) ’birth’ (name given on birth certificate) ’immigrant’
(name assumed at the time of immigration) ’maiden’ (maiden name, name before first marriage) ’married’
(name was persons previous married name) and ’other’. Genealogy Pro will export custom name fields in
accordance with this format. However, when you create the custom name field, you must ensure that the
name of the field at the time of creation is one of the above names in order to be recognised by other
- 22 -
Genealogy Pro User Manual
genealogy programs. One the field has been created, you can change the display name at any time, and it
will still be recognised by other genealogy programs. This is because the custom field is assigned a unique
identifier at the time of creation, which is usually the same as the display name. The unique identifier
doesn’t change when you subsequently change the display name.
- 23 -
Genealogy Pro User Manual
Genealogy Pro for MacOS X: Merging Files
How to Merge Files
Starting with version 2.0, Genealogy Pro includes a merge file facility. This function allows you to
communicate with and import data obtained from other historians.
The merge file function merges two files together into one file. The two files to be merged must be in
native Genealogy Pro Format.
To use the merge facility,
Open one file. This file will be the file that will contain the merged data ("The Merge File")
Choose the ’File⇒merge’ menu item.
You need to identify a common individual in both files. Genealogy Pro will open a window that contains
two tables:
The table location at the left of the window contains a list of all individuals from the file you are
obtaining information from ("The Source File")
The table located at the right of the window contains a list of all individuals from the ’Merged File’
If the common individual has a family in both files, you will be prompted to indentify that family. You
can choose to:
Have the family of the person being merged added to the ’Merged File’ as an additional family (ie
second marriage) or
Identify the family and have Genealogy Pro merge the family data.
How Genealogy Pro Merges files
Genealogy Pro merges file by:
Checking whether the ’Merge File’ has familial information (parents, children), and if NO familial
information exists;
Replaces the familial information in the ’Merge File’ with data from the ’Source File’
Merging files can be tricky, it is recommended that you always make a copy of the file you are merging
into, and work on the copy until you are satisfied that the merged file contains data with the outcome you
are after.
Note that data of all individuals and families, including dates, places, names, text, documents and images,
notes and sources will be copies over from the ’Merge Files’,
except for the common individual(s) and family(s) identified above. Data in the existing file is not
overwriten for these individual(s) and family(s). If there is aditional information needed for the
- 24 -
Genealogy Pro User Manual
individual(s) in the ’Merge File’ it will need to be entered manually.
- 25 -
Genealogy Pro User Manual
The Genealogy Pro Editor
The Genealogy Pro Editor is a floating window that is convenient for editing the data field of the
individuals and families. Access the field editor using the menu (choosing Format-Field Editor) or by
clicking on the Field Editor item in the Family Window or Individuals Window or Chart Window.
The field editor can be used in multiple window types, include the Family Window, Individual Window,
and all types of Chart Window.
To launch the editor:
Click on the name, date, place, image or documents of a person or family in any of the windows then
choose the Format⇒Field Editor menu item; or
Click on the name, date, place, image or documents of a person or family in any of the windows then
click on the editor icon (
) in the tool bar; or
Simply double click on the name, date, place, image or documents of a person or family in any of the
windows; or
The editor has two components - the "Data" tab (left most tab, the name of the data tab will be the name of
the field type eg "Name" or "Place" etc), and the "Formatting" tab. The data tab is for entering information
into the database. The Formatting tab is for setting how the information is displayed in the window.
When entering information into the document, it is convenient to leave the Editor window open. When
you click on a different person or family, or click on a different field, the editor automatically updates
itself ready for you to enter information.
There are a number of different editor views, depending on the type of field you click. These are:
Name Editor - used to change a name
Date Editor - used to change a date
Place Editor - used to change a place
Image/Document Editor - used to change a link to an image or other type of document
Photo Album/Scrapbook Editor - used to manage a collection of image files, video, audio or other
types of documents
Additonally, the Combined Field Editor is available for charts, which have the capability of
displaying "Combination Fields", which are two or more fields that are displayed as one (eg one built
in combination field is th e"Birth - Death" field that combines birth and death on one line ie "(1927 1952)")
- 26 -
Genealogy Pro User Manual
The current data of the field editor is dependant on the field that was last clicked. In some instances
formatting (not data entry) can be applied to multiple selections.
- 27 -
Genealogy Pro User Manual
The Genealogy Pro Name Editor
Name Editor
Double clicking on the name of a person will bring up the Name Editor. Genealogy Pro recognises four
components of a name - the title, first name, middle names, and surname. All of these are editable using
the name editor. Simple type in the names in the editor and these will be updated in the database.
An example of the Name Editor used in a Family Browser
- 28 -
Genealogy Pro User Manual
The Genealogy Pro Date Editor
Double clicking on the date of a person will bring up the Date Editor. Genealogy Pro recognises four
components of a date - the modifier, day, month and year. All of these are editable using the date editor.
The modifier is used to qualifier the information about the date, because it is often difficult to obtain exact
information about a date.
To set the modifier or month, choose from the list of options in the menu. To set a day or year, simply
type in the day or year and the date will be updated in the database.
An example of the Date Editor
- 29 -
Genealogy Pro User Manual
The Genealogy Pro Place Editor
Double clicking on any place type field for a person or family will bring up the Place Editor. Genealogy
Pro recognises three components of a place - the city, state, and country. All of these are editable using the
place editor. Simply enter the information into the editor and the database will update with the new
information.
Users of Genealogy Pro version 1 should note that the ’town’ field is no longer used. All information from
the town field is transferred to or prepended to the city field on upgrade to version 2.
An example of the Place Editor
- 30 -
Genealogy Pro User Manual
The Genealogy Pro Text Editor
Clicking on a text field for a person or family person will bring up the Text Editor. The text editor is very
simple. Enter some text and click on the ’Apply’ button and the database will be updated with the new
information. Note that as in the example below, the gender field is implemented as a simple text field. If
you wish to change the gender, you should always set the values to ’M’ or ’F’ to represent male and
female, if this information is known, so any functions that rely on this field will recognise the gender (one
example is the option to layout pedigree charts by gender).
An example of the Text Editor
- 31 -
Genealogy Pro User Manual
The Genealogy Pro Document Editor
Users of Genealogy Pro version 1.0 should note that the ’Document Editor’ and the ’Scrapbook Editor’
are simply an expanded version of the Image Editor and the Photo Album Editor. However, in Genealogy
Pro 2.0 documents manged by these editors are not restricted to images. They can be images, audio,
audio-visual, uniform resource locators (URL’s, ie web page address) or any other type of document.
Double clicking on a ’Document’ field (formerly known as an ’Image’ field in Genealogy Pro 1.0) for a
person or a family will bring up the Document Editor (formally known as the Image editor). A
’Document’ can be any file stored on your local computer,including images, audio-visual, audio, web
page addresses, or any other type of document or a web page address.
The image in the editor is that of the currently selected image or document. For documents that are simple
images, the image is a preview of the image file. For other types of documents, the editor shows the finder
icon for that document type.
An example of the Document Editor
Adding Documents
There are a number of ways to add documents to a Document field.
1. Click the ’Add document’ icon (
). This will result in a panel to choose a file.
2. Drag a file from the Finder directly onto the Document Editor.
3. Drag a file directly onto the ’Document’ column for a person in the Individuals’ Browser, or
directly on the ’Document’ row for the Family Browser (see depiction below). When adding multiple
images or documents, this is probably the best way to associate a document with a person.
An example of dragging a document directly to the Individuals’ Browser.
- 32 -
Genealogy Pro User Manual
4. Drag a url from the web browser directly onto one of the Genealogy Pro Browser windows, or directly
onto the Document Editor similar to that described in (2) and (3) above. The image below depicts adding
the Genealogy Pro home page to a document field.
An example of dragging a url from a web browser.
- 33 -
Genealogy Pro User Manual
Removing Documents
To remove documents:
1. Click the ’Remove document’ icon (
). This will remove the document associated with the
currently selected person or family.
2. Click on the document in the Individuals’ Browser or Family Browser, and press the delete key on
your keyboard.
Viewing Documents
To view documents:
1. Click the ’View document’ icon (
). For images, the image will be viewed in a Genealogy Pro
utility window. For other types of documents, the document will be opened in the default application
for that document type. Web site addresses will be opened in the default web browser (eg Safari).
2. Click on the image or document icon in the window and drag it onto a application. The application
will open the document.
3. Hold the option key while double clicking on the document in the Individuals’ browser or in the
Family browser. In this case, the Document Editor will be bypassed and the image or document
opened directly.
- 34 -
Genealogy Pro User Manual
The Genealogy Pro Scrap Book Editor
Users of Genealogy Pro version 1.0 should note that the ’Document Editor’ and the ’Scrapbook Editor’
are simply an expanded version of the Image Editor and the Photo Album Editor. However, in Genealogy
Pro 2.0 documents manged by these editors are not restricted to images. They can be images, audio,
audio-visual, uniform resource locators (URL’s, ie web page address) or any other type of document.
A ’Scrap Book’ (formally known as a ’Photo Album’ in Genealogy Pro 1.0) is simple a collection of one
or more documents, including images, audio-visual, audio, web page addresses, or any other type of
document. Double clicking on a image/document type field for a person or family will bring up the Scrap
Book Editor (formally known as the Photo Album editor).
A menu at the top of the Scrap Book editor lists all current documents in this Scrap Book for the current
person or family. The image in the editor is that of the currently selected image or document. For
documents that are simple images, the image is a preview of the image file. For other documents, the
editor shows the finder icon for that document type.
An example of the Scrap Book Editor
There are a number of ways to add documents to a Scrap Book field. These are analogous to adding,
removing, and viewing documents in the Document editor.
Adding Documents
1. Click the ’Add document’ icon (
). This will result in a panel to choose one or more files.
The chosen document(s) will be added to the person or family for this field. This menu that lists or
- 35 -
Genealogy Pro User Manual
the documents will be updated with the chosen files.
2. Drag one or more files from the Finder directly onto the Document Editor.
3. Drag one or more files directly onto the ’Document’ column for a person in the Individuals’
Browser, or directly on the ’Document’ row for the Family Browser (see depiction below). When adding
multiple images or documents, this is probably the best way to associate a document with a person or
family.
An example of dragging a document directly to the Individuals’ Browser.
4. Drag a url from the web browser directly onto one of the Genealogy Pro Browser windows or directly
onto the Scrap Book Editor similar to (2) and (3) above. See the Document editor page for an example of
dragging a url.
Removing Documents
To remove documents:
1. Click the ’Remove document’ icon (
). This will remove ONE of the documents in the
scrapbook. It will remove the currently selected document.
2. Click on the document in the Individuals’ Browser or Family Browser, and press the delete key on
your keyboard. This will remove ALL documents associated with the selected person or family for
this field.
- 36 -
Genealogy Pro User Manual
Viewing Documents
To view documents:
1. Click the ’View document’ icon (
). For images, the image will be viewed in a Genealogy Pro
utility window. For other types of documents, the document will be opened in the default application
for that document type. Web site addresses will be opened in the default web browser (eg Safari).
2. Click on the image or document icon in the window and drag it onto a application. The application
will open the document.
3. Hold the option key while double clicking on the document in the Individuals’ browser or in the
Family browser. In this case, the Document Editor will be bypassed and the image or document
opened directly.
- 37 -
Genealogy Pro User Manual
Combined Field and the Combined Field Editor
Chart windows (and only chart windows) also have the additional capability of displaying "Combination
Fields", which are two or more fields that are displayed as one (eg one built in combination field is th
"Birth - Death" field that combines birth and death on one line ie "(1927 - 1952)").
Combined fields are not like other fields. They do not store data, rather they format data from other field
type. You can have up to four (4) fields as part of a combined field.
- 38 -
Genealogy Pro User Manual
The Genealogy Pro Editor - Formatting
The Genealogy Pro Editor has two tabs - a data tab and a format tab. The format tab simply depicts how
the data is displyed in a window. The formatters associated with each type of field are very similar. They
include options for exclusion or inclusion of any part of the field for display (eg you may wish to exclude
the middle name for display in a name). They also include options for abbreviations (eg first middle initial
in a name formatter), and the addition of text before or after any field element. The text may be
conditional upon the existence of the field element (eg middle name) for a person or family.
The format does not alter any data in the genealogy database.
Clicking on the format tab of the Genealogy Pro Editor will show a view similar that shown below for the
formatter associated with the Name Editor.
An example of a formatter - the Name Formatter
Smart Formatting
Formatting allows "Smart" formatting. Sometimes data is not known for individuals - a date of birth or
date of death is missing. A middle name is not known. Formatting can be made conditional on the
presence or absence of one or more fields for an individual.
As an example using the name formatter, use the following procedure:
1. Choose the components of the name, and the order they will occur, starting from top to bottom.
For the name formatter, there are four menus. Each menu may have a name component, such as a title,
first name, surname, etc.
- 39 -
Genealogy Pro User Manual
2. Insert any "extra text" that is requied with the name. This may include a comma, space, inverted quotes,
brackets, etc. For the name formatter, there are eight locations where extra text may be inserted, before
and after each name component.
3. Choose the required "conditions" for the extra text. It may be conditional on the presence of one or
more name components,. For example, a ", " between the first and surname would not be suitable if the
first name or surname is unknown. Therefor the ", " should be set to be conditional on a valid first name
and surname.
as an example, to format a name to "Smith, John L."
a. select Surname in the top menu, First Name in the second menu, and First Middle Initial in the third
menu, Unused in the fourth menu.
b. Enter a comma followed by a space prior to first name, select "requires first name and requires middle
name". For conditional context, select "requires one selected item only". this means that the comma and
space is present when middle name OR last name is present. If there is no first or middle name on the
database the comma will not be displayed.
c. enter a full point after first middle name. select "Requires middle name". The full point will be
displayed only where there is a middle name.
Other Formatters
Formatters are available for data, place and text fields. The operation of these formatters is analogous to
the Name Formatter.
Including spouse Numbers (Charts only)
For family charts, the format can include the spouse number of an individual, where there is more than
one spouse for a person in a family chart. You include the spouse number by adding the "#" symbol as
extra text in any of the text boxes (see depiction below).
The example below has the letter ’m’ followed by ’#’, folow by ’. This results in the chart as shown
below, where John Smith was married twice.
- 40 -
Genealogy Pro User Manual
Selecting all of one type of field in a chart
Your can also format for fields of any one type in a chart at the same time. Select the relevant field in one
individual (eg select the name), then choosethe menu Edit⇒Select All "Field Name" (where ’Field Name’
is the name of the field). Formatting is then applied to the entire selection
- 41 -
Genealogy Pro User Manual
Introduction to Charts
Genealogy Pro curently supports two basic chart types. These are
1. Descendant Charts (Family charts).
These start with a family and link the children, and their children’s children and so on. The chart may
be in a left right direction as for a horizontal descendant chart, or in the top to bottom direction as for
a vertical descendant chart.
2. Ancestor Charts (Direct Line Charts or Pedigree Charts).
These start with an individual and link the parents, grandparents, and so on. The chart may be in a
left right direction as for a horizontal ancestor chart, or in the top to bottom direction as for a vertical
ancestor chart.
- 42 -
Genealogy Pro User Manual
Creating a Chart
Each chart has a ’focal’ or ’root’ person, that is the person which forms the base of the ancestor or
descendant chart. For a ancestor chart this will be the first generation of the chart. For the descendant chart
this will be the person that is the highest generation.
There are a number of ways to select a focal person, depending which window is the front window
The current person in a family window will become the focal person of a new chart
The selected person of a table of individuals will become the focal person
The currently selected person of a chart will become the focus person of any new chart
To create a chart,
Select a focus person in one of the ways described above
Choose the menu Chart-> New Chart->(selected chart type)
- 43 -
Genealogy Pro User Manual
Ancestor Charts
Also called pedigree or direct line charts, these start with an individual and link the parents, grandparents,
and so on. Like descendant charts, ancestor charts may be either horizontal or vertical.
Horizontal Ancestor Charts (Horizontal Direct Line charts).
A horizontal chart proceeds in a left to right direction, starting with the person at the root of the chart
, then the descendants (starting with parents) are symetrically spaced above and below the symmetry
of the root person.
The order of the field may also be altered (see "Altering the type and order of fields in a chart"). The
layout can be manually altered by clicking on a line and dragging the line from left to right or from
top to bottom. Clicking on the root person (left most person) will drag the entire chart.
Vertical Ancestor Charts (Vertical Direct Line charts).
These are symmetrically spaced with the first person at the top, and descendants (starting with parents)
symmetrically to the left/right. As for the horizontal chart the spacing can be manually altered by clicking
on a line and dragging the line from left to right or from top to bottom. Clicking on the root person (top
most person) will drag the entire chart.
- 44 -
Genealogy Pro User Manual
- 45 -
Genealogy Pro User Manual
Descendant Charts
Descendant charts start with a family and link the children, and their children’s children and so on.
Descendant charts may be either horizontal or vertical.
1. Horizontal Descendant Charts (Horizontal Family charts).
A horizontal chart proceeds in a left to right direction. The chart is joined by lines through the centre
of a family, joined at the right end to the childrens’ families.
Normally, one parent is located above the centre line, and the second parent is located below the
centre line (refer to diagram below). The fields of the chart (eg name, dates, etc) that are visible can
be altered. The order of the field may also be altered (see "Altering the type and order of fields in a
chart").
An example of a horizontal Descendant Chart (Family Chart)
By default, a new chart is symmetrically spaced with the first person/family at the left, and children
above/below. The spacing can be manually altered by clicking on a line and dragging the line from
left to right or from top to bottom. When dragging occurs a transparent image of the section of the
chart being dragged becomes visible, as depicted in the following figure.
- 46 -
Genealogy Pro User Manual
An example of a dragging a section of the chart.
2. Vertical Descendant Charts (Vertical Family charts).
Vertical charts are created symmetrically spaced with the first person or family at the top of the chart, and
children symmetrically to the left to right underneath. Similar to the horizontal chart, the spacing can be
manually altered by clicking on a line and dragging the linieage from left to right or from top to bottom.
An example of a vertical Descendant Chart (Family Chart)
- 47 -
Genealogy Pro User Manual
- 48 -
Genealogy Pro User Manual
Altering the fields of a chart
To alter the field of a chart, make sure that the chart is the front window. Choose the Chart⇒Display
Fields ... menu. The window depicted below describes options for the new chart.
Click on fields in the main window list to determine which fields will be visible in the chart
Click on the "Field Order" button to display/hide the "field order" panel. The order of the currently
selected fields may be dragged to change the order on the chart.
Entering data for fields
To enter data for fields, use the Field Editor by clicking the "Field Editor" icon in the toolbar. Double
clicking on a field (eg a name) for a person will also bring up the editor.
When there is no data for a field, it will not be displayed in a chart. For example, if the birth date for a
person is not known then it will not be displayed. To put in data for an empty field not currently visible in
the chart, press the Command key while clicking on a person. It should be noted that only fields that
would normally be visible in the chart, set through the ’visible fields’ options, can be edited in this way.
- 49 -
Genealogy Pro User Manual
Searching
Use the Find menu to go to an individual with a specified value in a field.
- 50 -
Genealogy Pro User Manual
Genealogy Pro Charts - Altering Field Styles
The style of the chart that can be altered to taste include:
Fields displayed
Field order
Field width
Background colour
Line thickness
Line colour
Font type, size and style
Font colour
Optional hiding/display of lineages
Fields displayed
Clicking the "Chart⇒display fields ..." menu item will result in the window below appearing. A list of
fields that are available for display are presented in a list. Click on any field to display that field only.
Hold down the command key while clicking on a field to select or deselect that field from the list of
multiple fields.
note: Combined fields are also available in the list of fields available for display. This means that it is unusual to have all the
fields available selected for display in the one chart. This is because data may appear more than once. As an example, the birth
data for a person may appear as the birth data field, the birth - death date combined field, or the name(b-d) combined field.
Field order
To alter the field order of a chart, make sure that the chart is the front window. Choose the
Chart⇒Display Fields ... menu. The window depicted below describes options for the new chart.
- 51 -
Genealogy Pro User Manual
Click on fields in the main window list to determine which fields will be visible in the chart
Click on the "Field Order" button to display/hide the "field order" panel. The order of the currently
selected fields may be dragged to change the order on the chart.
Background colour
Ensure that no fields are selected in the chart. Any selected fields can be deselected by clicking anywhere
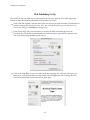
in the background of the chart. Choose the Colour Pallette by selecting the Format⇒Show Colours menu
item. The Colour Pallette may also be selected by clicking "Colors" toolbar item at the top of the window,
if the toolbar is visible.
The colour pallette will be in a floating window above the chart as depicted below
- 52 -
Genealogy Pro User Manual
ss
Clicking the colour pallette will result in a new background colour. As the chart is updated "live", every
click in the palette will result in instantaneous updating of the background colour as depicted below.
Chart Field widths
The field width is the horizontal length of each field (eg a name) in the chart. To change the field widths,
choose the Chart⇒Field Width ... menu to change the field width to set the width to an absolute
value
press command choose the command + ’]’ key to increment the field width (by value set in the chart
preferences)
press command choose the command + ’[’ key to decrement the field width (by value set in the chart
preferences)
An example of a chart with short field widths.
- 53 -
Genealogy Pro User Manual
An example of a chart with long field widths.
Line thickness
Line thicknesses are altered by choosing the Format⇒Lines menu. You can set the line thickness to any
value desired, depending on the end use. For example, very large lines may be desired for posters for
display at family reunion gatherings (see example below), where smaller thickness are more appropriate
for a publication.
An example of a chart with very thick line thickness.
Line colour
To change the colour of the chart lines, first select the chart lines by clicking on the line. Choose the
’Colors’ icon in the toolbar, or choose the Format⇒Show Colors menu if the toolbar is not visible. Click
on a color in the color panel. The chart will display chart lines in the new color.
Selecting the Chart Line
- 54 -
Genealogy Pro User Manual
New Line Colour
Font type, size and style
To change the font for any field, first select a field by clicking on one of the fields (eg click on the name
of a person to select the ’name’ field for that person). You may extend the select to all fields in the chart
of that type (eg all ’name’ fields) by choosing the Edit⇒FieldName Select All menu (where the
’FieldName’ is the name of the field). Choose the ’Fonts’ icon in the toolbar, or choose the Format⇒Font
menu if the toolbar is not visible. Click on a font in the font panel. The chart will display the field in the
new font.
Font colour
To change the font colour for any field, first select a field by clicking on one of the fields (eg click on the
name of a person to select the ’name’ field for that person). You may extend the select to all fields in the
chart of that type (eg all ’name’ fields) by choosing the Edit⇒FieldName Select All menu (where the
’FieldName’ is the name of the field). Choose the ’Colors’ icon in the toolbar, or choose the
Format⇒Show Colors menu if the toolbar is not visible. Click on a color in the color panel. The chart will
display chart field in the new color.
An example of a chart with custom font and colour for the name field
- 55 -
Genealogy Pro User Manual
Optional hiding/display of lineages
Genealogy Pro automatically configures charts with all individuals and families for the number of
generations chosen when the chart was created. You may optionally choose to hide selected lineages by
clicking on a person and choosing the chart⇒Hide Offspring or Chart⇒Hide Person menu. If a lineage is
hidden, you can show it again using the Chart⇒Show Offspring (for pedigree charts, the menu items will
be altered to Chart⇒Show Parents).
- 56 -
Genealogy Pro User Manual
This page is under construction
The Chart List
The chart list is simply a window that lists all currently saved charts associated with the database. The
chart list provides:
A convenient way to view all saved charts
An alternative way to open charts - double click on any chart in the list to open it
An alternative way to create chart links - drag a chart from the list to any person on a chart to create a
chart link
A method for setting the default chart for your web page - drag the name from the chart list to the
web page set up window.
- 57 -
Genealogy Pro User Manual
This page is under construction
Chart Links
Chart links provide a way to navigate between charts using a html-like linking facility. It provides a ways
to link between charts for web publishing. A link is simply a reference from one person in one chart, to the
same person in another chart. When you add a chart link to a person in any chart, a revers link is
automatically created in the linked chart.
You can create chart links in three ways.
Open the Chart List, and drag the name of a chart onto any person in a window of a currently open
chart. The link will be automatically linked to that person in the dragged chart. If the person does not
exist in the dragged chart, a link will not be created.
Click on a person in an open chart window, and choose the ’Chart⇒InsertChart Link’ menu. Choose
the chart from the dialog box.
Click on a person in an existing chart window, and create a new chart. Check the "create chart
hyperlink" in the chart options when creating the chart. A link will be created in the new chart and
the old chart.
note: in Genealogy Pro 2.0 there is a restriction on the type of chart hyperlinks. You can only create
hyperlinks for the same type of chart (eg horizontal family chart must have hyperlinks to a horizontal
family chart)
- 58 -
Genealogy Pro User Manual
Genealogy Pro Reports
Reports contain generally non-graphical information about a family (or an individual if the individual is
not married) in a fashion which is visually pleasing and print ready.
Unlike Charts, reports are not live linked to the database, that is if you change any information in the
database, such as a persons name, the family report will not be automatically updated. If you find that an
open Family Report window needs updating, you can do so by choosing the Window⇒Refresh Display
menu item. Alternatively, you can close and reopen the window, or If you click on any link any
information will be updated in the window.
Family Report - this encapsulates all inormation about a family (or an individual)
Ahnentafel Report - produces a numbered list of all ancestors of an individual
Reports can be saved as:
Plain Text format
Rich Text format, without embedded images (rtf)
Rich Text format, with embedded images (rtfd)
To save a report, choose one of the File⇒save, File⇒Save as ..., or File⇒Save to ... menus. There is no
’memory’ of the saved file. Each time you choose one of the save commands, you will be prompted for a
file name.
Current reports generated by Genealogy Pro are:
The purpose of saving a saving in either of these formats is usually to format your data in a external editor
of word processor. Genealogy Pro can not open a report file.
- 59 -
Genealogy Pro User Manual
Genealogy Pro - The Family Report
The Family Report compiles information about a family (or an individual if the individual is not married)
in a fashion which is visually pleasing and print ready.
To create a family report, select a person in either the Individuals Browser or the Family Browser. Choose
the Reports⇒Family Report menu. The report will appear in a new window
You can change the column alignment selecting the entire window (choose menu Edit⇒Select All) and
dragging the tabs in the ruler
Fonts, font colours and background colour can be altered by selecting the font icon or colour icon from the
toolbar. The background colour is changed when there is no selected text
You can choose to optionally display images or hyperlinks in the Family Report by choosing the Report
tab in the Preferences panel (choose the Genealogy Pro⇒Preferences ... menu item to open the
Preferences panel. Clicking on a link will result in a new report being generated for the person that you
clicked.
You can also choose which fields to display in the family report. Currently this is done through the Web
Page Set Up menu. The fields to display are identical to those displayed in the Web Page Family View.
It may seem odd that the web page set up is used for the Family Report. This is simply indicative of the
current direction of Genealogy Pro development, where the web publishing is developing in parallel with
the application development. The family report may be thought as analogous to the web based family
view, as seen in this example.
- 60 -
Genealogy Pro User Manual
Genealogy Pro - The Ahnentafel Report
The Ahnentafel report is a simple, non-graphical way of presenting your family tree to view your
ancestors.
In the Ahnentafel report, each person is assigned a number. By looking at a number you can determine the
relationship of any person in the report. You are always 1, your father 2, your mother 3, paternal
grandfather 4, paternal grandmother 5, maternal grandfather 6, maternal grandmother 7, patrilineal great
grandfather 8, and so on.
Each new generation has double the number of ancestors of the previous generation. Thus you have four
grandparents, eight great-grandparents, 16 great-great-grandparents and so on.
To paraphrase an interesting article about Ahnentafel reports, knowing the numbers allows you to use
maths to properly identify any individual. Even numbers are males and odd numbers are females, except
for the first person who is always 1 whether male or female. Individual 33 is the wife of 32, or to put it in
English your great-great-great grandparents, or to put it in ahnentafel language your father’s father’s
father’s father’s father and your father’s father’s father’s father’s mother. Half 32 and get 16 who is your
great-great grandfather. Add one and get 17 who is your great-great-grandmother; half 16 to 8 and you
have your great-grandfather, and add one to get 9 who is your great-grandmother.
You can choose to optionally display hyperlinks in the Family Report by choosing the Report tab in the
Preferences panel (choose the Genealogy Pro⇒Preferences ... menu item to open the Preferences panel.
Clicking on a link will result in the person being displayed in the Family Browser.
- 61 -
Genealogy Pro User Manual
Web Publishing with Genealogy Pro
Genealogy Pro 2.0 includes facilities that, in conjunction with the internet service provided by Genealogy
Pro Software Services, allows you to share your family tree with friends and relatives on the internet.
Experience in writing web pages is NOT required to publish your family tree using Genealogy Pro 2.0.
The tutorial in the appendix to this manual describes how to create a simple genealogy database using
Genealogy Pro. The result of this example tutorial, is availble as an example internet site.
This section describes how to format your Genealogy Pro file ready for internet publishing. The Web
Publishing Manual describes how to set up an internet account and upload files to your account using the
Genealogy Pro Upload Manager.
.
You only need to follow these simple steps to format your genealogy files ready to publish on the internet.
Set your internet site name, home page, default chart, default family in the Web Page Set Up window
(this is required only once for each Genealogy Pro file);
Optionally, set your preferences for the format of image, chart files and the type of files that will be
generated; and
Save the web files
- 62 -
Genealogy Pro User Manual
Web Publishing Set Up
Prior to first saving your family tree in web format for the first time, open the ’File⇒Web page setup ...’
menu item. Enter the following information in the window (see below).
Under ’Web Site Location’ enter the name of the web site that you registered when you subscribed to
use the Genealogy Pro Network Services. Note: this is the name that you type into the browser to
access your web page at myname.genealogypro.net.
Under ’Home Page Title’ enter a short line of text that you want your home page title to be.
Genealogy Pro will use this in generating the title of the windows in your web file, and also in the
links to your home page throughout your web site.
Click on the ’Page Body’ icon to view and set text that Genealogy Pro will insert at the top of you
home page. You can format this text using custom fonts and alignments, and Genealogy Pro will
convert it to html format for insertion into you home page.
- 63 -
Genealogy Pro User Manual
Click on the ’Charts’ icon to view a list of all currently saved charts in your Genealogy Pro database.
Click on a chart and drag it into the window to set the default first chart for your web page (see depiction
below). Your home page will refer to this default chart as a recommended place to start viewing your web
page, for the chart view. By default, the first page that appears when a user types your web site name (ie
yourname.genealogypro.net ) into their web browserCheck is your home page. Check the ’Make this
chart the first page of the web site’ button, to make this chart the first page when a user types your web
site name into their web browser.
Drag the name of the chart onto the window to make it the default chart to recommend to users
Drag the name of a person or family from either the Individuals’ Browser or the [IMAGE] onto the
window, to set the default person or family for your web site. This person or family is identified on your
home page as one of your eldest ancestors and a recommended way to start viewing your genealogy.
Check the ’Make this family view the first page of the web site’ button, to make this person or family the
first page when a user types your web site name into their web browser.
Drag the name of a family from the Family Browser to make it the default family to recommend to users as the place to
start browsing your web site
Click the ’Web Preferences ..’ button to customise the way Genealogy Pro will save your web pages.
- 64 -
Genealogy Pro User Manual
Genealogy Pro - Creating Web Pages
Create a web page in Genealogy Pro is easy. First, create your family tree in Genealogy Pro. If you
are new to Genealogy Pro, you may wish to view the tutorial on creating a new Genealogy Pro file
and building up the family tree database. You can build up your family data using Genealogy Pro, or if
you have your family tree in an existing genealogy program, you can import it into Genealogy Pro from
the GEDCOM format.
Prior generating a web page for the first time, you will need to set your web page settings, using the
’File⇒Web page set up ...’ menu.
Creating web files is as simple as choosing the ’File⇒Save as web page ...’ menu. You will be
prompted for a directory into which to save the web files. All web files are saved into a new directory
called name_web, where "name" is the name of your Genealogy Pro network account (previously set
in the File⇒Web page set up ...’ menu). For example, in the image here, the GenealogyPro.net
account is "mitford". Genealogy Pro will save all the web files in a directory called "mitford_web".
The web files created and placed into the "mitfords_web" directory are
charts - a directory of all chart pictures to be uploaded (chart pictures will only exist if inclusion
of chart images option is chosen in the preferences)
database.sql.z - a compressed file of the database in structured query language (SQL) format.
home.php - your home page file
documents - a directory of all images and other documents to be uploaded
Upload Files.gpupload - this is a Genealogy Pro Upload Manager file, that is used to upload the
file to your web site.
Ensure that you are connected to the internet and that you have download the Genealogy Pro Upload
Manager. Upload the web files to your web page by double clicking on the ’Upload Files.gpload’.
The Genealogy Pro Upload Manager will launch. Enter your use name and password and click
’Upload’. The files will be uploaded to your web site. Your genealogy is now available for public
browsering. Refer to the Genealogy Pro Upload Manager documentation for more information about
uploading your files.
created in step 3 above. Double click on the file named "Upload Files.gpload".
- 65 -
Genealogy Pro User Manual
Web Publishing Preferences
You can customise what types of files Genealogy Pro will format when saving a web page using the
Genealogy Pro⇒Preferences ... menu. When your collection of family data grows into a very large
file, with many images and charts, you may wish to bypass uneccessary processing when creating web
pages. For example, if you have not created or modified any new charts since you last saved your data in
web format, you can set Genealogy Pro to bypass the processing of charts.
The Preferences Menu
To save web space and improve the speed of your web site, it is desirable to make images as small as
possible while maintaining a reasonable resolution. The Genealogy Pro preferences allows you to
customise the resolution and scale of images and charts when saving for web publication.
When Genealogy Pro creates your web page, it places a number of files into a directory, the local
web files directory, titled myname_web, where ’myname’ is the name of your web site. The files and
directories created and placed into this folder mirror the directory in your web site account, as described in
the Genealogy Pro Web Publishing Manual.
Check/uncheck the Create Home Page button to enable/disable the generation of a home page
(myname_web/home.php)
Check/uncheck the Create Web Database button to enable/disable the generation of a database
file (myname_web/database.sql.gz)
Check/uncheck the Copy Images button to enable/disable the copying of images to your local
web directory (myname_web/documents/ ... ). Note that when images are copied for web
publication, the name is different from the original file name. The name of the file is prefixed by
a number followed by a ’_’ symbol.
You can choose the image format that Genealogy Pro saves the files by selecting the ’image
format’ popup button. The default ’jpg’ format is recommended for most purpose as it allows
images to be compressed into small format.
- 66 -
Genealogy Pro User Manual
You can optionally choose to scale image sizes to a maximum size, and Genealogy Pro will
scale any image that exceeds these dimensions.
Check/uncheck the ’Copy other documents’ button to enable/disable the copying of any other
documents such as audio, audio-visual, and other types of files. Similar to images, these document files
are prefixed with a number followed by a ’_’ symbol.
Check/uncheck the Create Chart Images button to enable/disable the copying of charts to your
local web directory (myname_web/charts/ ... ).
Set the Image Resolution for charts and all other images using the ’Image Resolution’ popup
button. High resolution results in good quality images, but larger file sizes and slower speeds for viewing
your web pages. Low resolution results in lower quality images but smaller file sizes and faster speeds for
viewing your web pages. This option applies to both charts and general images.
Set the ’Create low resolution alternate images’ button to create low resolution images that the
web browser should display while waiting to load larger images. This option applies to both charts and
general images.
The Web Preferences Window
note: Advanced users and programmers should note that the numbers which prefix the image and other document files is
the primary key of the ’documents’ table in the database.
note2: Safari 2.0 appears to ignore the ’lowsrc’ tag in the html tag. This makes the low resolution alternate images
redundant for this browser.
- 67 -
Genealogy Pro User Manual
Genealogy Pro - Protecting Privacy
Marking Individuals as Private
Genealogy Pro includes an option to mark any individual as ’Private’. When an individual is marked
as private, the text "private" is displayed for the name, birth date, and any other piece of information about
that person.
Privacy applies to Charts and Web Pages. It does not affect the display of any individuals’ data in
the Family Browser or the Individuals’ Browser on your local computer.
For privacy setting for any individual to apply you must ensure that:
The individual is marked as private; and
The "Enforce Privacy Options" are set in the Privacy Preferences. Choose the ’Genealogy
Pro⇒Preferences’ menu, and navigate to the Privacy view to set the Privacy Preferences.
To mark an individual as private, select that person and choose the ’Database⇒Mark as Private’
menu. If the person is already marked as private, choose the ’Database⇒Remove Privacy’ menu.
You can set all individuals that are born after a certain date to be marked as private. Choose the
’Database⇒Privacy’ panel. Enter the year into the window below, and click the ’Apply’ button.
The Privacy Panel
Marking a lineage as Private
You can set all descendants of an individual as private by choosing the
’Database⇒Mark descendants private’ menu. You can remove privacy restrictions for all descendants
of an individual by selecting that person and choosing the ’Database⇒Remove descendants privacy’
menu. You will be given the option, in a new window to restrict the number of generations in the
persons descendants to remove the privacy
You usually have an idea of which generation are still living. You can set all descendants for a
person as marked private, then lift the privacy for the number of generations you are confident are
not living. That way you can confidently set privacy, even if you haven’t recorded the birth date for
an individual.
- 68 -
Genealogy Pro User Manual
How Privacy Works
Genealogy Pro implements privacy by setting privacy text into a field, by default named ’Publishing
Restriction’ (the name of this field can be changed as for any other field). if you mark a person as Private,
Genealogy pro will set the privacy text to "Privacy_user", recognising that it was set by you, the user. If
you set the privacy as a batch using the privacy panel, the privacy string is marked simply to "Private".
This is so Genealogy Pro can differentiate between privacy set automatically and privacy set manually.
When you remove privacy, you can choose to remove all privacy for all individuals, or just for the
individuals that have been set in batch mode using the privacy panel. This way, privacy set manually will
not be lost.
Note: Genealogy Pro only checks the first character when determing privacy. If the first character is ’p’, ’P’, ’c’, ’C’, it
will treat the individual as private. The ’c’ is for GEDCOM compatibility, where privacy can be marked as ’Private’ or
’Confidential’.
The family table also includes a privacy field. This is unused in Genealogy Pro 2.0.
- 69 -
Genealogy Pro User Manual
Searching the Database
Individuals in the database may be accessed by searching by any name, date, place or text field.
To use the search tool, open a Family Window or Individuals Window. Choose the menu
(Document->Find).
Enter the Field that is to be used for the search. In the example below, the "Name" field has been
chosen, with a criterion of the first name starting with "Rose".
Choose OK.
In a Family Browser , the focal person will become the next person that matches this criteria. Choose
the menu (Document->Find Again) to bring up the next match.
In the Individuals Browser, the row of the next person that matches the criteria is selected. Choose
the menu (Document->Find Again) to go to the row of the next match.
An example of using the search facility.
- 70 -
Genealogy Pro User Manual
Genealogy Pro Sources
Genealogy Pro includes a document management system that allows you to record where you
obtained information about an individual or a family. Each piece of information is stored in a Genealogy
Pro ’Source’. You can record any information you want in a source, and store images, files and internet
url’s that can be launched by a click of the mouse.
To view, edit or add sources to a person or family, select a person or family (eg by clicking on a row
in the Individuals Browser, or opening the family browser) and choose the Sources icon (
)
from the Toolbar.
The Source Panel
To add a new source to the document, click on the new source icon (
), add choose the type
of source from the list (see below).
The List of Source Types for a New Source
To remove a source from the current person or family, click on the remove source icon (
).
Note: Removing a source from a person or family will not necessarily delete the source from the Genealogy Pro
database. Sources can be assigned to multipe people and families. The source will automatically be deleted when it
is no longer assigned to any person or family.
- 71 -
Genealogy Pro User Manual
You can assign an existing source to a person a family. Click on the book shelf (
) icon.
This will open a new panel with a list of all sources in the database. To assign an existing source to the
person or family, drag the source from the panel onto the sources window.
The "Relevance" text is a short description of how the source is relevant to this person. You can,
if you choose, have multiple sources that refer to the same publication. It may be that a different chapter
of a book is relevant to one person, and a completely separate chapter of the same book is relevant to
another person. You can create completely different sources that both refer to the same book. In this case
you can use the ’Relevance’ text to describe how the book is applicable to the person or family
Most of the information about a sources is described in the ’Detail’ secion. Click on the ’Detail’
icon (
). A text panel will appear as a drawer. Enter your detailed description of the source
in this text panel.
Click on the ’Facts’ icon (
) to set the factual information for a source. For a publication,
this is the publication name, publisher, published date, etc.
For publications only, you can assign an existing publication to the source. Click on the
publications (
) icon. This will open a new panel with a list of all publications in the
database. To assign an existing publication to the person or family, drag the publication from the panel
onto the sources window.
You can assign the source to the selected persons ancestors or descendants by cicking the
’context’ (
) icon.
Click the ’Repository’ (
) icon to set the information about where the source is stored, for
example a library address.
Click the ’Documents’ (
) icon to add images or other documents or web url associated with
this source. The panel drawer associated with this icon is analagous to and works similar to the
Scrap Book Editor.
Importing Gedcom Sources
When Genealogy Pro imports a GEDCOM file, it assumes that the sources are of type ’Publication’.
You can change this setting in the by choosing the Genealogy Pro⇒Preferences menu, and going to
the Gedcom view. In place of making each source a publication, you can choose to have Genealogy
Pro prompt you for the source type while importing the file.
- 72 -
Genealogy Pro User Manual
Notes
Any person or family can have notes associated with them. Notes are simply text that describes the
authors opinion about anything to do with the information about the person or family. To set the notes for
a person, click on the row of a person in the Individuals’ browser, or click the Persons tab in the
) icon from the toolbar. Enter the notes text into the
Family Browser, and choose the notes (
window. To set the notes for a family, click the Family tab in the Family browser and open the Notes
window.
Notes and sources are usually closely interlinked. As depicted below, the Notes window lists all
current sources for the person or family at the bottom of the window. You can double click on any source
as a shortcut to open that source in the sources window.
The Notes Panel
- 73 -
Genealogy Pro User Manual
Quick Start Tutiorial
In this tutorial you will learn how to create and add to a family tree using Genealogy Pro. You will
also learn how to attach images to any individual or a family.
The images used in this tutorial and a GEDCOM file of the ’Mitfords’ can be downloaded here .
In the final section of this tutorial we will publish the newly created family tree on the internet, using
Genealogy Pro’s in-built web publishing features. The web ready family tree will be uploaded to the
GenealogyPro.net web site, with a domain name of ’mitford5’, that is, the internet location will be located
at http://www.mitford.genealogypro.net. You can visit there at any time to view this site.
1. Open Genealogy Pro, then create a new document by choosing the menu, File-New (as shown
below). (If you are using the file Mitfords.ged, skip to step 11).
2. You will be prompted to save the new untitled file. Save the file under the name "Mitfords.gpro".
A new window will appear as below. The individuals created in the chart are all stored inthe
"Mitfords.gpro" database. This window displays all individuals in the database.
By default, a new file will create three individuals in a new database. These individuals are "John
Smith", "Spouse of John Smith" and "son of John Smith".
- 74 -
Genealogy Pro User Manual
- 75 -
Genealogy Pro User Manual
Quick Start Tutiorial 2 - Family Browser
3. To view any family in the database, click on a name and choose the "Family" toolbar item. The
) toolbar item is located at the top of the window. The Family browser will appear
"Family" (
as shown below.
tip: double clicking the row number will also bring up the Family browser for the person in that row.
3. Change the name of the selected person to the name of a person in your family’s genealogy.
It doesnt matter whether you are working in the Family browser or the Individuals browser. Click on
the name "Smith, John" in the window, then select "Editor" (
) from the tool bar. The Editing
window will appear, allowing the editing of the name. Change the name from John Smith to "David
Mitford" as shown below.
tip: double clicking the name of the person will also bring up the Editor for the clicked name.
- 76 -
Genealogy Pro User Manual
4. Repeat this process for the spouse and son. Click on the spouse and change the name to "Sydney
Bowles", click on the name of the son and change the name to "Thomas Mitford".
- 77 -
Genealogy Pro User Manual
Quick Start Tutiorial 3 - charts
5. Create a new horizontal family chart by selecting the menu Chart->New Chart->Horizontal Family
as shown below.
6. A dialog will appear for chart options (shown below). by default the ’Name’ and ’Birth - Death’
fields are selected. Command click on ’Birth - Death’ to deselect this field. Select ’OK’.
6. A new chart window will appear with David Mitford as the focal person of the chart, as depicted
below.
- 78 -
Genealogy Pro User Manual
7. Click on "Mitford, David", and select the New Daughter from the Family Menu (shown below)
8. A new daughter for David Mitford will appear on the chart as shown below.
- 79 -
Genealogy Pro User Manual
Quick Start Tutiorial 4 - Editor
9. Change the name of the new daughter to "Nancy". To do this bring up the Field Editor by selected
the menu Edit->Field Editor. The editor will appear as below. change the name accordingly.
10. Repeat this process for additional daughters for David Mitford. Names of daughters are "Pamela",
"Diana", Unity", "Jessica" and "Debo". Select "Mitford, Pamela" by clicking on it, and choose the menu
item New Spouse to create a spouse. Change the spouse name to "Derek Jackson". Similarly create two
spouses "Bryan Guiness" and "Oswald Mosely" for Diana, and "Esmond Romilly for Jessica, and
"Andrew Cavendish" for Debo. The chart should now appear as below.
- 80 -
Genealogy Pro User Manual
11. The individuals created in the chart are all stored inthe "Mitfords.gpro" database. To view all the
individuals in the database choose the menu item Database->Individuals (if you have more than one
database open, choose the submenu "mitfords.gpro"). The Individuals List window will appear as shown
below.
12. Click and select the "Picture of persons" column and drag the column to the left of the window
(this is for convenience only).
- 81 -
Genealogy Pro User Manual
13. Again select the Field Editor, and click in the Picture column for David Mitford. The field editor
will show an image tab. There is no picture visible in the editor, as no picture has been selected for this
individual.
14. Click the "Choose" button. A dialog will propt you to select an image file. Choose the File
"David M". The following will appear.
15. Click on the picture column for the other individuals, and repeat this process.
tip: files may also be added to the document by dragging the file from the finder onto the Picture column in the row of a
person. This may be more convenient where many images need to be added to the document at one time.
- 82 -
Genealogy Pro User Manual
- 83 -
Genealogy Pro User Manual
Quick Start Tutiorial 5 - a finished chart
16. Go to the Chart Window (It is listed in "Windows" Menu).
17. The "Picture of Persons" field is not currently available to the chart. To make this field available
to the chart select the menu "Chart->Display Fields", and select the fields "Name" and "Picture of Person".
The chart will be reformatted with both the "Name" field and the "Picture of Person" field as below.
note: The chart format has been altered by changing the background colour, line colour, line thickness, and font as
described in Changing the way charts are displayed.
- 84 -
Genealogy Pro User Manual
- 85 -
Genealogy Pro User Manual
Shortcuts
Keyboard shortcuts often make the user experience more productive for a software application. This
page lists some of the shortcuts that may be used in Genealogy Pro 2.0.
General Shortcuts
Hold down the sift key while double clicking on an image/document in the Family Browser and
Individual Browser will automatically lauch the image/document in a new window or external
application, bypassing the Editor.
Shortcuts in the Family Browser
Simple mouse click without any control keys pressed will make the selected person or family
the new focal person and family.
Double clicking on the person or family in the Tree View will also make the selected person or
family the new focal person, and will additionally open the field editor (if it is not already open)
and make the field editor the active window.
Pressing the Command key while clicking on a family will make the spouse of the family the
focal person of the window. If the spouses parent family also exists in the database, tthis family
will exist in two locations in the Tree View (as a family "child" each parents family). This
family is displayed under the spouses parents family will be selected.
Pressing the Shift click on a family will select the "Parents" table (if not already selected) and
goes to the name field.
Pressing the Shift + Command click on a family selects the parent tab (if not already selected)
and goes to the spouse person.
Pressing the Option key while clicking on a family will make the family tab the active tab.
- 86 -
Genealogy Pro User Manual
Appendix 3: Genealogy Pro Data Storage Format
This appendix is designed for users with a programming background.
This chapter assumes that you have a basic understanding of the Unix Shell and a moderate
understanding of Structured Query Language (SQL).
This section makes use of the Sqlite3 executable that is packaged with MacOS X starting with
MacOS X system 10.4. If you are running MacOS X with a system prior to system 10.4 it is available as a
free download.
File Wrapper Structure
Genealogy Pro documents are File Wrappers - that is, they are directories that are flagged by MacOS
X to be presented to the user as a file. The listing in the image below shows the contents of the directory.
All data is stored in the .Contents/Resources/ directory and comprises:
’charts’ directory - this is where charts are stored.
’document preferences’ - this is a property list file of preferences that apply to the document
’genealogy.database’ - this is an SQLite 3 database file that contains all genealogy data
Database Tables
The image below shows the list of tables in the database when querying the database with the sqlite3
executable.
- 87 -
Genealogy Pro User Manual
The persons and families Table
The tables that store family information are the ’persons’ and the ’families’ table.
The image below shows a listing of the persons table. The columns in the table are:
persons - an unique integer that identifies this person. (This value is used as the GEDCOM id
when exporting to GEDCOM, except it is prefixed with an ’I’).
note: This is a convention in the genealogy.database tables. The first column is the same name as the database and
is the primary key identifier for a row in the table.
par_family - this identifies the family in the ’families’ tables
sp_families - this is a bracketed list of identifiers of family in the ’families’ table.
name - integer that identifies the name in the ’names’ table
gender - text that identifies the gender
birthdate - integer that identifies the birth date in the ’dates’ table
birthplace - integer that identifies the birth place in the ’places’ table
deathdate - integer that identifies the death date in the ’dates’ table
deathplace - integer that identifies the death place in the ’places’ table
personimage - integer that identifies an image in the ’images’ table
personImageArray - this is a bracketed list of identifiers of images in the ’images’ table
OCCU - text that identifies the occupation
sources - integer that identifies the source of the persons data in the ’sources’ table
note - integer that identifies the notes for the person in the ’notes’ table
When fields are defined using the ’Database⇒Define New Field ...’ function, and the Field
Association option chosen is "Individual Field", the new field (except for combined fields) will
appear as a column in the ’persons’ table. Where the field type is :
Name field, it will be an integer that identifies a name in the ’names’ table
Date field, it will be an integer that identifies a name in the ’dates’ table
Place field, it will be an integer that identifies a name in the ’places’ table,
Image field, it will be an integer that identifies a image in the ’places’ table,
Photo Album field, it will be a bracketed list of integers that identifies a images in the ’images’
table and
Text field, it will be simple textual information stored in the ’persons’ table
- 88 -
Genealogy Pro User Manual
The image below shows a listing of the families table. The columns in the table are:
families - an unique integer that identifies this family. (This value is used as the GEDCOM id of
the family when exporting to GEDCOM, except it is prefixed with an ’F’).
parent1 - integer that identifies the first of the two parents in the ’persons’ table
parent2 - integer that identifies the second of the two parents in the ’persons’ table<
offspring - this is a bracketed list of integers that identify the offsprint in the ’persons’ table
marrdate - integer that identifies the marriage date in the ’dates’ table
marrplace - integer that identifies the marriage place in the ’places’ table
familyImageArray - this is a bracketed list of identifiers of images in the ’images’ table
sources - integer that identifies the source of the family data in the ’sources’ table
note - integer that identifies the notes for the family in the ’notes’ table
As for ’persons’, when fields are defined using the ’Database⇒Define New Field ...’ function, and
the Field Association option chosen is "Family Field", the new field (except for combined fields) will
appear as a column in the ’families’ table. Where the field type is :
Name field, it will be an integer that identifies a name in the ’names’ table
Date field, it will be an integer that identifies a name in the ’dates’ table
Place field, it will be an integer that identifies a name in the ’places’ table,
Image field, it will be an integer that identifies a image in the ’places’ table,
Photo Album field, it will be a bracketed list of integers that identifies a images in the ’images’
table and
Text field, it will be simple textual information stored in the ’families’ table
- 89 -
Genealogy Pro User Manual
The names, firstnames and surnames Table
The names table has the following columns:
names - a unique integer that identifies this name.
title - an integer that identifies a title in the ’titles’ table
firstName - an integer that identifies a title in the ’firstnames’ table
firstMiddleName - an integer that identifies a name in the ’firstnames’ table
otherMiddleNames - a bracketed list of integers that identifies names in the ’firstnames’ table
surname - an integer that identifies a surnames in the ’surnames’ table
The surnames table has the following columns:
surnames - a unique integer that identifies this surnames
names - text of the surname
count - number of times that this row is referenced by other tables
- 90 -
Genealogy Pro User Manual
Genalogy Pro keeps a running tab of how many times the row is referenced by other tables in the
’count’ column. For example, if the user change the surname ’Jackson’ to ’Smith’, Genealogy Pro will
decrement the count to zero. When the count reaches zero the row is flagged for deletion from the table.
The name of a person can be accessed by using the SQL join statement, such as the following:
select p.persons as "Genealogy Pro ID" , s.names as "Last Name" , f.names as "First Name" from persons p left outer
join names n on p.name = n.names left outer join surnames s on n.surname = s.surnames left outer join firstnames f on
n.firstName = f.firstnames order by s.names, f.names ;
The output from this statement is depicted below.
- 91 -
Genealogy Pro User Manual
The dates Table
The dates table has the following columns:
dates - a unique integer that identifies the date
day - integer representing the day of month. A value of ’-1’ means no day is known.
month - integer representing the month of year. A value of ’-1’ means no month is known.
year - number of times that this row is referenced by other tables. A value of ’-1’ means no year
is known.
modifier type - (optional) identifies the type of date. This description is similar to the GEDCOM
modifier. eg BEF = before
The date field of a person can be accessed by using the SQL join statement, such as the following:
select p.persons as "id" , s.names as "last name" , f.names as "first name", d.day as "birth day", d.month as "birth
month", d.year as "birth year" from persons p left outer join names n on p.name = n.names left outer join surnames s on
n.surname = s.surnames left outer join firstnames f on n.firstName = f.firstnames left outer join dates d on p.birthdate =
d.dates order by d.year asc, d.month asc, d.day asc;
The output from this statement is depicted below (now using a genealogy pro file, generated from
importing the example GEDCOM file).
The table_descriptions Table
This table is used by Genealogy Pro to gather information about the tables. It stores information
about the order of the fields (for displaying in the Individuals’ browser or Family browser) and the
display name of the fields (as displayed in the browsers).
- 92 -