1
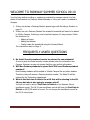
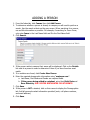
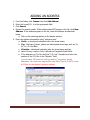
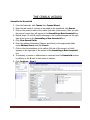
SUMMER SCHOOL
INFINITE CAMPUS USER’S MANUAL
Infinite Campus Summer School Manual 09-10
Revised: 4/03/2009
Page 1 TABLE OF CONTENTS
Welcome and FAQ ........................................................................ 3
Adding a Person ........................................................................... 4
Adding an Address ........................................................................ 5
The Census Wizard (creating a household) ..................................... 6
Adding a Non-Household Relationship ............................................ 9
Adding a Secondary Household ...................................................... 9
Adding a Person to an Existing Household ...................................... 10
Changing Demographic Information for a Person............................. 10
Changing an Address for a Household ............................................ 10
Enrolling a Student ....................................................................... 11
DESE Parkway State School Numbers ............................................. 13
Registering a Student for a Course ................................................. 14
Dropping/ Changing a Student’s Course .......................................... 15
Withdrawing a Student .................................................................. 15
Absence Reason Codes ................................................................. 16
Daily Attendance .......................................................................... 17
Classroom Monitor ........................................................................ 18
Attendance Wizard ........................................................................ 19
How to print a Roster for a Course ................................................. 22
How to print an Alpha Listing of Student with Courses ..................... 23
Printing Batch Schedules ............................................................... 24
Creating Mailing Labels ................................................................. 25
Grades (High School ONLY) ........................................................... 26
Missing Grades Report .................................................................. 27
Infinite Campus Summer School Manual 09-10
Revised: 4/03/2009
Page 2 WELCOME TO PARKWAY SUMMER SCHOOL 09-10
Your first step before enrolling or registering a student for summer school is to first
decide if that student is a Parkway student already or if they will need to be added to
Campus.
1. If they are already a Parkway Student please begin with Enrolling a Student on
page 11.
2. If they are not a Parkway Student the student’s household will need to be added
to Infinite Campus. Entering a new household requires a 3 step process. Follow
the directions for :
o Adding a Person
o Adding an Address
o Finally create the household using the Census Wizard.
The instructions start on Page 4.
FREQUENTLY ASKED QUESTIONS
1. Do Social Security numbers have to be entered for new students?
If we are given the social security number please enter the information into
Campus. However we can not require that they give us this information.
2. Will Non-Parkway students be given State ID#’s and Parkway student
numbers?
Non-Parkway students will be added to Infinite Campus like any other student.
Therefore, they will receive a Parkway student number. The State ID will be
entered by the Technology department.
3. What is the first date in district for a KG that will be starting in the 0910 year but who is also going to summer school?
You will not need to enter a First Date in District on the Summer School
enrollment record. The 09-10 year enrollment record will have the First Date in
District as 08/17/09 which is correct. Do not change the enrollment record for
the 09-10 school year.
Infinite Campus Summer School Manual 09-10
Revised: 4/03/2009
Page 3 ADDING A PERSON
1. From the Index tab, click Census then click Add Person.
2. To determine whether a person is already in campus you will need to perform a
search. Use the search criteria on the grey screen. When searching for a person,
use as little information as possible. For example, if searching for Jason Jones,
only enter Jones in the Last Name field and J in the First Name field.
3. Click Search.
4. If the person exists in campus their name will be displayed. Click on the Details
link next to a person’s name to determine if there if you have found an exact
match.
5. If no matches are found, click Create New Person.
6. Enter the required demographic information using “sentence case”.
a. Last Name, First Name and Gender are required fields.
b. If the person being added is a student, enter their Birth Date and
Race Ethnicity. ONLY ENTER BIRTHDATES FOR STUDENTS.
7. Click Save.
8. If the person is NOT a student, click on their name to display the Demographics
tab. Add all personal contact information provided (work, cell phone numbers,
and email address).
9. Click Save.
Infinite Campus Summer School Manual 09-10
Revised: 4/03/2009
Page 4 ADDING AN ADDRESS
1.
2.
3.
4.
From the Index, click Census then click Add Address.
Enter the house/P.O. # in the appropriate field.
Click Search.
Review the search results. If the address does NOT appear in the list, click New
Address. If the address appears in the list, check the address as described
below.
a. Click on the matching address in the display window.
5. Enter the address information using “sentence case”.
a. Prefix – a directional indication before the street name.
b. Tag – the type of street, please use abbreviated street tags, such as, Dr.,
St., Ln., Ct. and Blvd.
c. Direction – directional indication after the street name and tag.
d. Leave County, Location Code, Latitude and Longitude fields blank.
e. If the address is a P.O. Box click the “P.O. box” checkbox and enter the
number of the P.O. Box in the “Number” field.
In most cases, PO boxes can only be used for “secondary” parent
addresses. You must have approval through Mary Theriot (5-5062) to use
a PO Box for the student’s primary address.
Infinite Campus Summer School Manual 09-10
Revised: 4/03/2009
Page 5 THE CENSUS WIZARD
Assemble the Household
1. From the Index tab, click Census then Census Wizard.
2. Enter the last name of a person to be added to the household, click Search.
3. Click on the person’s name in the outline (left side of the screen). After you click
the person’s name they will appear in the Assembling a New Household box.
4. Repeat steps 2-3 until all people belonging to the household appear on the right
side of the screen in the Assembling a New Household box.
5. Click Clear Search Fields.
6. Enter the address information (Number and Street) in the appropriate fields
under Address Search and click Search.
7. Click on the correct address in the outline (left side of the screen) so that it
appears on the right side of the screen in the Assembling a New Household
box.
8. If necessary, a person or address can be removed from the Household window
by clicking on the X next to their name or address.
9. Click Continue – Step 2
Infinite Campus Summer School Manual 09-10
Revised: 4/03/2009
Page 6 Household Membership and Mailing
1. Enter the Household Name (the most common surname in the household) in
the appropriate field.
2. Enter a phone number in the Household Phone Number field. This number
should be the primary phone number used for that household.
3. Enter a Start Date next to the address. This start date WILL always be the
date the household is created in Infinite Campus.
4. Click the Mailing checkbox next to the address.
5. Check the Census Verification form to see if a household’s address is Private. If
it is, check the Private checkbox next to the address.
6. Enter Start Dates for all people in the household. This start date WILL always
be the date the household is created in Infinite Campus. .
7. Click Save & Continue – Step 3.
Infinite Campus Summer School Manual 09-10
Revised: 4/03/2009
Page 7 Define Relationships within the Household
1. You only need to work with the STUDENT records in this section. Ignore the
parents!!!
2. From the drop down menu, choose the appropriate relationship, for example,
father/student or mother/student.
3. Mark the appropriate checkboxes for each relationship.
a. Guardian – the person is the student’s legal guardian
b. Mailing – this person is allowed to receive mail for this student
c. Portal – Do not check this box.
d. Messenger – Do not check this box.
e. Private – Do not check this box.
4. Parent relationships to each other SHOULD be left BLANK. Example: husbandwife, boyfriend-girlfriend, etc.
5. Click Save & Done. This will save the date but will only refresh the screen.
Infinite Campus Summer School Manual 09-10
Revised: 4/03/2009
Page 8 ADDING A NON-HOUSEHOLD RELATIONSHIPS
1. To add non-household relationships such as emergency contacts, click on the
student’s name in the search results (on the left side of the screen).
2. Click on the Relationships tab.
3. Click New Non-Household Relationship.
4. Search for the person.
a. If the person is not already in Campus, click Create New Person and
follow the ADDING A PERSON instructions on page 4.
b. If the correct person shows up in the search results, click the name. Close
the box by clicking the red X in the top, right corner. Before clicking, make
sure your cursor looks like a little hand and NOT a four-point arrow.
5. Choose the best relationship from the drop down menu.
6. Enter a Start Date for the relationship. This start date WILL always be the date
the household is created in Infinite Campus.
7. Click the appropriate check boxes for this contact. In most cases, NONE of the
boxes should be marked.
8. Repeat steps 4-7 for additional non-household relationships.
9. Click Save.
NOTE: Secondary Parents should be in a “Secondary” household. They
should NOT be listed as a “Non-Household Relationship”.
ADDING A SECONDARY HOUSEHOLD
If you have to add a secondary household for a student whether it is for a NonParkway student or for a current Parkway student you will need to follow steps
the steps for adding a new household:
o Adding a Person
o Adding an Address
o Finally create the household using the Census Wizard.
The instructions start on Page 4.
Please NOTE that you on the second part of the Census Wizard, Household
Membership and Mailing, you will need to click the check boxes for
Secondary.
Infinite Campus Summer School Manual 09-10
Revised: 4/03/2009
Page 9 ADDING A PERSON TO AN EXISTING HOUSEHOLD
1. Add the new person to Infinite Campus following the instructions on page 4.
2. Click on the person’s name to bring up their information.
3. Click on the Households tab, and then click New Household Membership.
4. Search for the household in which you want to place the person. Click on the
correct household in the list.
5. Enter a start date for the household membership.
6. Click Save.
CHANGING DEMOGRAPHIC INFORMATION FOR A
PERSON
1. Click on the Search tab.
2. Change the “Search for a:” drop down to say All People.
3. Type the last name, first initial in the box. Ex: Jones, J
4. Click Go
5. Find your person listed below and click on their name.
6. On the Demographics tab for that person you will be able to change their
personal contact information.
CHANGING AN ADDRESS FOR A HOUSHOLD
1. On the Search tab on the left side of the screen, type the Household name OR
the name (last, first) of one member of the household in the box and search
Households.
2. Scroll through the list of names and click on the correct household.
3. On the right side of the screen, click on the Addresses tab.
4. Click on the old address.
a. Enter an End Date.
b. Uncheck all of the boxes.
5. Click Find New Address.
6. Search for the new address by street number only.
a. If the correct address appears in the list, click it.
b. If the address does not appear in the list, click New Address then enter
the address information.
c. Click Save.
7. Enter a start date for the new address. (This is first day that the family will
start living at that location.)
8. Check the appropriate boxes.
9. Click Save.
Infinite Campus Summer School Manual 09-10
Revised: 4/03/2009
Page 10 ENROLLING A STUDENT
NON-PARKWAY STUDENT
Do the following steps on the Enrollments tab for students new to the district or
returning to the district:
1. Create a new enrollment record by clicking on New on the Enrollments tab.
Make sure you are in the 09-10 Year. Make sure you have the correct school
selected in the drop down menu for school. Make sure you have the summer
school calendar selected in the drop down.
2. Select a Grade Level for the student by making a selection from the drop down
box (this will be the grade level they will be in for the 09-10 year).
3. Enter the Start Date of the new enrollment status record – this is the first date
of summer school.
4. Enter a Start Status code by making a selection from the drop down box. FOR
SUMMER SCHOOL the Start Status will be Remained Advanced for all
students.
5. Select the NH: Not Homeless option in the Homeless field.
6. Select the MN: Not Migrant option in the Migrant Indicator field.
7. In the State Reporting area select the Residing District (Parkway C-2
096095) and enter your DESE state school number in the Residing School field
– refer to the DESE State School Numbers on Page 13.
If the student is a VST Student then the Residing District will be St. Louis City
(115115) and the DESE code will be 6280.
8. Select the appropriate Residing County of St. Louis County (96) for ALL
SUMMER SCHOOL students.
9. In the State Reporting area select the Attending District (Parkway C-2
096095) and enter your DESE state school number in the Attending School
field – refer to the DESE State School Numbers on Page 13.
If the student is a VST Student then the Attending District will be Parkway
(096095) and the DESE code will be your DESE code.
10. Enter the appropriate State Aid Resident Status code for the student .
Parkway Resident = R1: Resident-1, VST = DI: Desegregated In.
11. Select the appropriate Primary Language spoken in the home if applicable.
12. Select the NLP: Not LEP option in the LEP field.
13. Click Save.
Infinite Campus Summer School Manual 09-10
Revised: 4/03/2009
Page 11 STUDENT ALREADY IN PARKWAY (CAMPUS)
1. Make sure you are in the 09-10 Year. Make sure you have the correct school
selected in the drop down menu for school. Make sure you have the summer
school calendar selected in the drop down.
2.
3.
4.
5.
6.
7.
Locate the student by searching under All People under Census.
Click on Student Name.
Click on the Enrollments tab.
Click on New.
Select Grade Level (the grade level they will be in for the 09-10 year).
Enter the Start Date of the new enrollment status record – this is the first date
of summer school.
8. Enter a Start Status code by making a selection from the drop down box. FOR
SUMMER SCHOOL the Start Status will be Remained Advanced for all
students.
9. Enter a Start Comment - for example: Attending Summer School from SWM.
10. In the State Reporting area select the Residing District (Parkway C-2
096095) and enter your DESE state school number in the Residing School field
– refer to the DESE State School Numbers on Page 13.
If the student is a VST Student then the Residing District will be St. Louis City
(115115) and the DESE code will be 6280.
11. Select the appropriate Residing County of St. Louis County (96) for ALL
SUMMER SCHOOL students.
12. In the State Reporting area select the Attending District (Parkway C-2
096095) and enter your DESE state school number in the Attending School
field – refer to the DESE State School Numbers on Page 13.
If the student is a VST Student then the Attending District will be Parkway
(096095) and the DESE code will be your DESE code.
13. Click Save.
Infinite Campus Summer School Manual 09-10
Revised: 4/03/2009
Page 12 Parkway School District DESE State School Numbers DESE School No. 4020 4030 4035 4040 4060 4100 4110 4120 4130 4160 4180 4190 4200 4210 4220 4235 4245 4260 3020 3040 3060 3000 3080 1050 1085 1075 1090 1080 Parkway School Name Barretts Elem. Bellerive Elem. Carman Trails Elem. Claymont Elem. Craig Elem. Green Trails Elem. Hanna Woods Elem. Henry Elem. Highcroft Ridge Elem. Mason Ridge Elem. McKelvey Elem. Oak Brook Elem. Pierremont Elem. River Bend Elem. Ross Elem. Sorrento Springs Elem. Shenandoah Valley Elem. Wren Hollow Elem. Central Middle Northeast Middle South Middle Southwest Middle West Middle Central High Fern Ridge High North High South High West High Infinite Campus Summer School Manual 09-10
Revised: 4/03/2009
Page 13 REGISTERING A STUDENT FOR COURSES
1. Click on the Search tab.
2. In the Search for a: field you want to change the drop down to All People.
3. Type in the last name of the student, comma, and then the first name in the
search box. (ex: Moore, Mariah)
4. Click on Index
5. Expand the list under Student Information by clicking on the plus to the left of
it.
6. Click on General.
7. Click on the student’s Schedule tab on the right.
8. Click on Walk-in Scheduler (on the far right of the screen).
9. Click Search (approximately in the middle of the screen).
10. In the Section Search box type in the Start Date of 06/08/09 (first date
of summer school) and type in the course number.
11. Click Search.
12. This will bring up all sections available with that course number.
13. Click on the Section for which you want to register the student.
14. The information listed beside the course/section is (Course number, Section
number, (number of students registered/ max students), Term name, Period,
and IEP’s (for IEP we do not currently use this in Parkway and will not be for
summer school).
15. Click on the option that you want. Once you click on your selection it is
loaded into the student’s schedule on the left.
Infinite Campus Summer School Manual 09-10
Revised: 4/03/2009
Page 14 DROPPING/CHANGING A STUDENT’S COURSE
1. Click on Search
2. Click on Student for “Search for a:” and type the student you are looking for,
last name then first name.
3. Click on the Schedule tab.
4. Click on the course on the students schedule that you want to drop/ change for
the student.
To get to the student’s schedule. Click on Index > Student Information >
General > then click on the Student’s schedule tab.
5. A box will pop up and you can put in an End Date.
6. Click Save.
7. If you are adding another course in it’s place you can repeat steps 8-14 under
Registering a Student for Courses on Page 8.
WITHDRAWING A STUDENT FROM SUMMER
SCHOOL
If you need to withdraw a student before Summer School is over:
1. Click on the Enrollments tab for the student.
2. Click on the Summer School Enrollment which should be bold because it is the
active enrollment.
3. Change the End Date to the actual date you are withdrawing the student.
4. Enter any End Comments.
5. Click Save.
Infinite Campus Summer School Manual 09-10
Revised: 4/03/2009
Page 15 Absence Reason Codes Reason Code AE AT AU BR BS DE DO FT FV GS HB IL IS LB MB NB NIC OS RH SUA SUP SV TDE TDU TR Description Absent Excused Athletic Event Absent Unexcused Bereavement Bus Suspension Dentist Appointment Doctor Appointment Field Trip Family Vacation Gold Star Home Bound Illness In School Suspension Late Bus Missed Bus No Bus Not in Class Overslept Religious Holiday Suspended Absent Suspended Present School Visit Tardy Excused Tardy Unexcused Truant Infinite Campus Summer School Manual 09-10
Status Absent Absent Absent Absent Absent Absent Absent Present Absent Absent Absent Absent Present Absent Absent Absent Present Absent Absent Absent Present Absent Tardy Tardy Absent Excuse Excused Exempt Unexcused Excused Excused Excused Excused Exempt Excused Excused Excused Excused Excused Excused Unexcused Excused Excused Unexcused Excused Excused Excused Excused Excused Unexcused Unexcused Revised: 4/03/2009
Page 16 DAILY ATTENDANCE
To Edit Student Attendance:
1. Go to Index > Attendance > Daily Attendance
2. Infinite Campus will automatically load the current day’s attendance. If you
want a previous date, type it in the box or use the calendar to select it and
click Refresh.
3. Events that have been created or updated using Attendance Wizard or the
student’s attendance tab (Student Information > General) will show the code
and a color coded status. (A legend for the color coding appears at the top.)
4. Any absence (A) or tardy (T) entered by a teacher that has not been
processed by the attendance office will show with a yellow (unknown reason)
background.
5. Select the event that needs to be edited by clicking on the attendance code.
This will take you to a new screen with just that student’s name and a drop
down next to every period meeting.
6. In the drop-down menu, select the correct attendance code for that period.
Select the blank option at the top of the menu will mark the student Present.
7. Enter any new comments in the Comments field.
8. If the change should be applied to all subsequent periods, click Fill Down.
9. If a student has absences and should be marked present for the entire day,
click the Clear button.
10. Click Save.
To View Student’s Attendance History:
1. Go to Index > Attendance > Daily Attendance
2. Click on the student’s name in the table. Their attendance history for the
school year (at your school only) will display.
3. You can make changes to a student’s attendance information from this screen
by following instructions 3-10 above.
4. Click on the Daily Attendance tab at the top of the screen to return to Daily
Attendance.
Infinite Campus Summer School Manual 09-10
Revised: 4/03/2009
Page 17 CLASSROOM MONITOR
To get to the Classroom Monitor: Click on Index > Attendance > Classroom Monitor
This is used by the registrar or attendance secretary to determine which teachers have
taken attendance for the day or for a specific period.
NOTES about Classroom Monitor:
• Classroom Monitor shows the attendance from the point of view of the courses.
• Any section highlighted in greed indicated that attendance has been taken for that
section. Any section highlighted in pink has not had attendance taken.
• When looking at the Classroom Monitor grid, you’ll see the course/section number
followed by a number in parentheses. This shows present vs. scheduled
students.
(xx/xx) equals (“number of students present”/”number of students scheduled”)
• Click on the course/section number (highlighted in green or pink) to bring up the
attendance for that particular course/section.
• The email address and phone number for a teacher (as entered in Census >
Person > Demographics Tab) will display by hovering over the icons in the
Contact column.
Viewing Attendance for a Particular Course:
1. From your Index, click on Attendance.
2. Click Classroom Monitor. The Classroom Monitor will open for the current
date based on the server clock.
3. To change the date, enter the desired date or select the date from the calendar
icon. Click the Refresh button to open the monitor for the new date.
4. Click on a course/section number to pull up the roster for that class. Each
student defaults to (P) present. The teacher can then choose (A) absent or (T)
Tardy, but cannot enter a reason code.
5. Any change that YOU make to the attendance will lock out the teacher from
that particular section, meaning he/she will not be able to take attendance for
that hour. If the course/section is pink and you open it up, DO NOT SAVE if you
want the teacher to be able to take his/her own attendance.
Taking Attendance for a Substitute Teacher:
If a class has a substitute teacher, he or she should be provided with a roster or
seating chart in order to take attendance. When the form is returned to the office, the
attendance secretary can enter the attendance using Classroom Monitor. Follow the
instruction 1-4 above. Mark students absent or tardy as necessary and click Save.
Infinite Campus Summer School Manual 09-10
Revised: 4/03/2009
Page 18 ATTENDANCE WIZARD
The Attendance Wizard is found under Attendance on the Index. The date box will
default to the current date; however, you can enter a different date if necessary. Click
the button next to one of the following modes (under Attendance Date) to use the
mode. The Overwrite Existing Data box will erase any existing attendance data for
that date and/or period and replace it with the code and comments entered in the
Attendance Wizard.
Mode: Daily
1. Search for the students whose attendance needs to be processed.
2. Search results will appear in the “B. Select students to add to edit list” box.
Click on the student name(s) you need to edit. This moves their name to the “C.
Click on a student to remove from list” box. (As implied, if you mistakenly
added a student to the list, click on their name in box C to remove it.)
3. Next to “4. Daily” select the correct Attendance Code from the drop-down
menu.
4. Enter any additional information in the Comments field.
5. Select the appropriate Comment Option from the drop-down menu.
a.
Overwrite Existing Comments will replace any previous comments.
b. Append Comments will place the new comments after any previous
comments.
c.
Leave Existing Comments Unchanged
6. Click Save Attendance
Mode: Period
1. Search for the students whose attendance needs to be processed.
2. Search results will appear in the “B. Select students to add to edit list” box.
Click on the student name(s) you need to edit. This moves their name to the “C.
Click on a student to remove from list” box.
3. Next to “4. Period” select the correct Current Period and Attendance Code
from the drop-down menus.
4. Enter any additional information in the Comments field and select Comment
Option.
5. Click Save Attendance
Infinite Campus Summer School Manual 09-10
Revised: 4/03/2009
Page 19 Mode: Batch
1. Search for the students whose attendance needs to be processed. You can
search by any single field. Search results will appear in the “B. Select students
to add to edit list” box. Click on the student name(s) you need to edit. This
moves their name to the “C. Click on a student to remove from list” box.
2. Next to “4. Batch” select the correct Attendance Code.
3. Enter the date (and time, if needed) to begin applying the absence code in the
From: area.
4. Enter the last date (and time, if needed) for the code in the To: section.
5. Enter any additional information in the Comments field.
6. Select the appropriate Comment Option from the drop-down menu.
7. Click Save Attendance
Mode: Edit
1. Select the date that needs edited, then select Edit mode.
2. Students who have an attendance event for that day will appear in column B.
3. Click on a student name in column B to display their attendance reason codes
below.
4. Make a reason code change using the drop-down menu under Code. Change
the number of Present Minutes. Enter any necessary Comments. If the
change should be applied to all subsequent periods, click Fill Down.
5. Click Save Attendance.
Mode: Batch Edit
1. Search for the students whose attendance needs to be processed. This method
is most useful for multiple students who will have the same attendance reason
code over the same date range, such as for a field trip.
2. Search results will appear in the “B. Select students to add to edit list” box.
Click on the student name(s) you need to edit. This moves their name to the “C.
Click on a student to remove from list” box.
3. Under “4. Batch Edit,” enter the date range for the attendance event. Start and
End dates can be the same.
4. Select the correct reason code for the event from the drop-down menu under
Code.
5. Present minutes will default to zero (0) if an absence reason code is entered,
change if necessary. Add any additional information in Comments.
6. Click Save Attendance.
Infinite Campus Summer School Manual 09-10
Revised: 4/03/2009
Page 20 Mode: Check In
1. Search for the students whose attendance needs to be processed.
2. Search results will appear in the “B. Select students to add to edit list” box.
Click on the student name(s) you need to edit.
3. Enter the Attendance Code to update the absences recorded up to the Check
In time.
4. Enter any Comments as needed.
5. Click Save Attendance.
Mode: Check Out
1. Search for the students whose attendance needs to be processed.
2. Search results will appear in the “B. Select students to add to edit list” box.
Click on the student name(s) you need to edit.
3. Enter the Attendance Code.
4. Enter a time in the Current Time (this is the time for which you want the
attendance event to begin) and any Comments.
5. Click Save Attendance.
Infinite Campus Summer School Manual 09-10
Revised: 4/03/2009
Page 21 HOW TO PRINT A ROSTER FOR A COURSE
1. Click on Search
2. Choose Course/Section from the drop down for “Search for a:”
3. You can enter the course # you are looking for or you can leave the field blank
(leaving the field blank will give you all course numbers for that school year).
4. Once you have found your course, click on the course itself.
5. Click on the plus beside the course to see the sections for that course.
6. Click on the section you want to print a roster for.
7. Click on the Roster tab
8. In the top right corner click the Print icon to print the roster.
OR
1.
2.
3.
4.
5.
6.
Click on Index
Click on Scheduling
Click on Reports
Click on Section Rosters
Click on SS for Term
Click on which Period (or you can choose both by holding down CTRL + and
clicking on both periods)
7. You can choose to exclude the address and phone number if you wish.
8. You can choose to add page break after each section or not by checking the box.
9. Enter the Effective Date as the first date of summer school.
10. Choose which Teacher you want from the list.
11. Click Generate Report.
Infinite Campus Summer School Manual 09-10
Revised: 4/03/2009
Page 22 HOW TO PRINT AN ALPHA LISTING OF
STUDENTS WITH COURSES
1.
2.
3.
4.
Click on Index
Click on Ad Hoc Reporting
Click on Data Export
Under your Saved Filters click on “SS Alpha List of Students with Course”
This filter was created and added to your login. If you do not have it please
contact Amanda Moore in Technology.
5. Click on PDF Report under Pick an Export Format.
6. Click Export.
Infinite Campus Summer School Manual 09-10
Revised: 4/03/2009
Page 23 PRINTING BATCH SCHEDULES
1.
2.
3.
4.
5.
6.
Click on Index
Click on Scheduling
Click on Reports
Click on Schedule Batch
For Report Options leave it to Use the Default Format
Pick the Grade that you want to see in your report or just leave it marked as
All Students.
7. Enrollment Effective Date is the first day of Summer School.
8. Click on Print one copy per student (if not and a student has a secondary
home then will two will print out for that student).
9. Leave Alpha checked for How would you like your report sorted?
10. Click Generate Report.
OR
As we talked about in training - If you wish to have your schedule generated
into a letter for each student please send the letter you want typed to
Amanda Moore so she can create it in Campus for you and then follow the
directions below:
1.
2.
3.
4.
5.
6.
7.
8.
Click on Index
Click on Ad Hoc Reporting
Click on Report Builder
Click on the Saved Filter “Summer School Students” (this filter was
created by Technology. If you do not have it in your saved filters please
contact Amanda Moore in Technology).
Click on the Saved Reports “Schedule Letter” (this filter was created by
Technology. If you do not have it in your saved filters please contact Amanda
Moore in Technology).
Set Operation should be selected as Union.
Sort Options should be Alpha.
Click Build Report
Infinite Campus Summer School Manual 09-10
Revised: 4/03/2009
Page 24 CREATING MAILING LABELS
1.
2.
3.
4.
5.
6.
7.
8.
Click on Index
Click on Census
Click on Reports
Click on Mailing Labels
Leave the Grade/Adhoc button selected.
Choose which Grade you want labels for or leave All Students selected.
For Enrollment Effective Date enter the first date of summer school.
For Choose Print Options: decide if you want to Include Guardian’s Name
OR you want it to say To Parent/Guardian of:
9. Leave Student selected for Print the labels for
10. Leave Name selected for How would you like the report sorted?
11. Click Generate Report.
12. The labels will open up in a PDF. When you choose to print please change
the Page Scaling to None or the labels will not print correctly.
Infinite Campus Summer School Manual 09-10
Revised: 4/03/2009
Page 25 GRADES (for High School ONLY)
Teacher Grading Instructions
1. Posting Grades
a. Go to Instruction > Gradebook
b. From the “Section” drop-down menu, select the class you want to submit
c. From the “Select a Task” drop-down menu, select the appropriate term.
d. The yellow area in the gradebook shows the cumulative grade. The green
area shows the grade that will be submitted during grade posting.
e. In one of the green columns, right click on any student grade.
f. Select “Post grades to other task” and select the Summer School grading task.
g. Click Save.
h. Important – Any change you make in your gradebook will NOT change the
posted grade unless you repeat steps (e) through (g.)
2. Change or Override a Posted Grade
a. Go to the green area and click on the student’s posted grade you want to
change.
b. Click on the arrow that appears and select the correct grade from the drop-down
menu.
c. Click Save.
d. Repost your grade book using steps (e) through (g) above. Grade changes can
be made as often as necessary while the grading window is open.
Infinite Campus Summer School Manual 09-10
Revised: 4/03/2009
Page 26 Missing Grades Report (for High School ONLY)
On your Index, click: Grading & Standards > Reports > Grades Report
This will open the “Grades Batch Report.” Here, you can create a variety of grade
reports, including a “Missing Grades Report”.
1. Select the Grade button and choose All Students.
2. You may leave the Enrollment Effective Date as the default, which is the date
you run the report.
3. Under Select Grading Tasks hold your Ctrl key and click the correct grading
task.
4. Select the correct grading term.
5. In the window next to Select Teachers, click All.
6. Click the Teachers button next to Group by.
7. Click the Show available grading scores link next to the Generate Report
button.
8. You will see that all of the boxes are checked. Click on the All box to remove all
of the checkmarks. Now, click on the Missing box.
9. Click the Generate Report button.
A pop-up window will open with your PDF report. It is organized alphabetically by
teacher and then numerically by course and section.
You can save, print or email this report. If you choose to email, you can only send
the entire report.
Infinite Campus Summer School Manual 09-10
Revised: 4/03/2009
Page 27