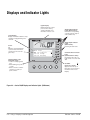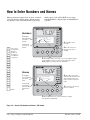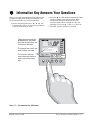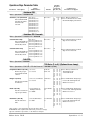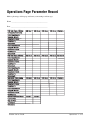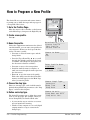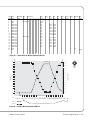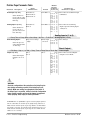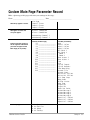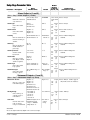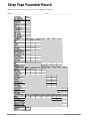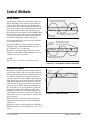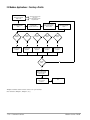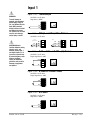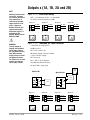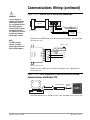
1
Series F4S/D
User’s Manual
96mm x 96mm Ramping Controller (1/4 DIN)
with Guided Setup and Programming
1241 Bundy Boulevard, Winona, Minnesota USA
Phone: +1 (507) 454-5300, Fax: +1 (507) 452-4507 http://www.watlow.com
Registered Company
Winona, Minnesota USA
0600-0032-0000 Rev H
*0600-0032-0000*
August 2011
About Watlow Winona
Watlow Winona is a division of Watlow Electric Mfg. Co., St. Louis, Missouri, a manufacturer of industrial
electric heating products since 1922. Watlow begins with a full set of specifications and completes an industrial product that is manufactured in-house, in the U.S.A. Watlow products include electric heaters, sensors,
controllers and switching devices. The Winona operation has been designing solid-state electronic control
devices since 1962, and has earned the reputation as an excellent supplier to original equipment manufacturers. These OEMs and end users depend upon Watlow Winona to provide compatibly engineered controls
that they can incorporate into their products with confidence. Watlow Winona resides in a 100,000-squarefoot marketing, engineering and manufacturing facility in Winona, Minnesota.
About This Manual
The Series F4 User’s Manual covers hardware and software in both the SingleChannel and Dual-Channel controllers. Instructions and illustrations pertain
to both unless otherwise specified. If a given feature or parameter operates on
only the Single or the Dual Channel controller, it will be identified by an icon in
the margin or nearby.
1
2
Single
Channel
F4S
Dual
Channel
F4D
Your Comments
Your comments or suggestions on this manual are welcome. Please send them to the Technical Literature ,
Watlow Winona, 1241 Bundy Boulevard, P.O. Box 5580, Winona, Minnesota, 55987-5580 U.S.; Telephone:
+1 (507) 454-5300; fax: +1 (507) 452-4507.
Copyright July 2002 by Watlow, Inc., with all rights reserved. (2249)
T
Series F4S/D: Table of Contents
Introduction
Installation and Wiring
Chapter 1: Introduction . . . . . . . . . . . . . . . . . 1.1
Chapter 11: Installation . . . . . . . . . . . . . . . . .11.1
Chapter 2: Keys, Displays and Navigation . . .2.1
Chapter 12: Wiring . . . . . . . . . . . . . . . . . . . .12.1
Operations
Appendix
Chapter 3: Operations . . . . . . . . . . . . . . . . . .3.1
Glossary . . . . . . . . . . . . . . . . . . . . . . . . . .A.2
CE Declaration of Conformity . . . . . . . . . .A.5
Profiles
Chapter 4: Profile Programming . . . . . . . . . . .4.1
Product Specifications . . . . . . . . . . . . . . .A.6
Ordering Information . . . . . . . . . . . . . . . . .A.7
Index . . . . . . . . . . . . . . . . . . . . . . . . . . . . .A.8
Setup
Chapter 5: Setup . . . . . . . . . . . . . . . . . . . . . .5.1
List of Figures . . . . . . . . . . . . . . . . . . . . . .A.13
Software Map . . . . . . . . . . . . . . . . . . . . . .A.16
Chapter 6: Features . . . . . . . . . . . . . . . . . . . .6.1
Chapter 7: Communications . . . . . . . . . . . . . .7.1
Factory
Chapter 8: Security and Locks . . . . . . . . . . . .8.1
Chapter 9: Calibration . . . . . . . . . . . . . . . . . . .9.1
Chapter 10: Diagnostics . . . . . . . . . . . . . . . .10.1
A downloadable electronic copy of this user manual is available free of charge through Watlow's web site:
http://www.watlow.com/prodtechinfo. Search on Series F4.
Watlow Series F4S/D
Table of Contents ■ i
ç
Safety Alert
CAUTION or
WARNING
∫
Electrical Shock
Hazard
CAUTION or
WARNING
Safety Information in this Manual
Note, caution and warning symbols appear throughout this book to draw your attention to
important operational and safety information.
A “NOTE” marks a short message to alert you to an important detail.
A “CAUTION” safety alert appears with information that is important for protecting your
equipment and performance.
A “WARNING” safety alert appears with information that is important for protecting you,
others and equipment from damage. Pay very close attention to all warnings that apply to
your application.
The ç symbol (an exclamation point in a triangle) precedes a general CAUTION or
WARNING statement.
The Ó symbol (a lightning bolt in a lightning bolt in a triangle) precedes an electric shock
hazard CAUTION or WARNING safety statement.
Technical Assistance
If you encounter a problem with your Watlow controller, review all configuration
information to verify that your selections are consistent with your application: inputs;
outputs; alarms; limits; etc. If the problem persists after checking the above, you can get
technical assistance by calling your local Watlow representative (see back cover of this
manual), or in the U.S., dial +1 (507) 494-5656. For technical support, ask for an
Applications Engineer.
Please have the following information available when you call:
• Complete model number
• All configuration information
• User’s Manual
• Diagnostic menu readings
Warranty
The Watlow Series F4 is warranted to be free of defects in material and workmanship for
36 months after delivery to the first purchaser for use, providing that the units have not
been misapplied. Since Watlow has no control over their use, and sometimes misuse, we
cannot guarantee against failure. Watlow's obligations hereunder, at Watlow's option, are
limited to replacement, repair or refund of purchase price, and parts which upon
examination prove to be defective within the warranty period specified. This warranty
does not apply to damage resulting from transportation, alteration, misuse or abuse.
Returns
•
Call or fax your distributor or the nearest W atlow sales office for best information
about returns. (See outside back cover.)
•
To return directly to Watlow Winona in the U.S., first call or fax Customer Service for
a Return Material Authorization (RMA) number (telephone: +1 (507) 454-5300; fax: +1
(507) 452-4507).
•
Put the RMA number on the shipping label, along with on a written description of the
problem.
•
A restocking charge of 20% of the net price is charged for all standard units returned
to stock. Returned units must be in like new condition and must be returned within
120 days of initial receipt of the product.
ii ■ Table of Contents
Watlow Series F4S/D
1
Chapter One: Introduction
Overview
Watlow’s Series F4 1/4 DIN industrial ramping
controllers are easy to set up, program and operate
in the most demanding ramp-and-soak-processing
applications. The F4 includes:
• four-line, high resolution LCD display
• guided setup and programming software
• 16-bit microprocessor
• 256 possible ramp steps in as many as 40 variable-length, nameable profiles
• six step types
• eight programmable event outputs, compressor
control, boost heat/boost cool, power-out selections and a real-time clock.
• Note: the F4S has two less analog inputs and
two less control outputs than the F4D.
Inputs and Outputs
1 Universal
Analog Input
(2 optional)
1
Single
Channel
F4S
4 Digital Inputs
F4
1A
2 Control Outputs
1B
…Alarm1 Lo Deviation
–1 F
Adjusts Value
Back
Next
2 Alarm Outputs
1
2
2 Retransmit Outputs
(optional)
1 Communication I/O
8 Digital Outputs
i
Figure 1.1a — Single-Channel Series F4 (F4S_ - _ _ _ _ - _ _ _ _ ) Inputs and Outputs.
F4
2
1A
3 Universal
Analog Inputs
Dual
Channel
F4D
4 Digital Inputs
1B
2A
4 Control Outputs
2B
…Alarm2 Low SP_______
32 F
Adjusts Value
Back
Next
1
2 Alarm Outputs
2
2 Retransmit Outputs
(optional)
1 Communication I/O
i
8 Digital Outputs
Figure 1.1b — Dual-Channel Series F4 (F4D_ - _ _ _ _ - _ _ _ _ ) Inputs and Outputs.
Watlow Series F4S/D
Introduction ■ 1.1
Sample Application: Environmental Testing
with a Dual Channel F4 Using Multiple Inputs and Outputs
Overview
Andy, an engineer with the Ajax
Testing Company, is running temperature and humidity tests on navigational equipment. He wants to be able to
control temperature and humidity in
the environmental chamber, and monitor the temperature of the equipment
itself. With the Watlow Series F4 ramping controller, he can:
• program the test as a ramping profile
and control it remotely;
• use boost heat and cool to maintain
precise temperatures;
• record the equipment temperature on
a chart recorder;
• notify the operator with a bell if process temperatures do not follow the
profile;
• pause the profile if someone opens the
chamber door during the test;
• set up communications with a PC
later.
1. Wire
Following diagrams in the user manual, Andy
connected the analog input terminals to temperature and humidity sensors, channel 1 output
terminals to the heater and cooler, channel 2
outputs to the humidifier/dehumidifier, alarm
output 1 to an alarm bell and retransmit output
1 to a chart recorder to track the equipment
temperature. Digital output 6 and 7 controlled
the boost heater and cooler, and 8 controlled the
mechanical refrigeration compressor.
See the Wiring Chapter.
F4
1A
1B
5. Run the Profile
2A
2B
Main Page___________
Go to Profiles
Go to Setup
Go to Factory
i
1
2
Andy pressed the Profile Key and
selected the test profile. He monitored
the progress of the test on the display
and the equipment temperature on the
chart recorder.
See the Operations Chapter.
Figure 1.2 — Sample Application 1: Series F4 Dual Channel Using Multiple Inputs and Outputs.
1.2 ■ Introduction
Watlow Series F4S/D
Main Page___________
Go to Profiles
Go to Setup
Go to Factory
Choose to Setup:____
Digital Output8
Communications
Custom Main Page
3. Customize and Name
2. Set up the F4
After checking the navigation instructions
in the user manual, Andy went to the
Setup Page of the software to configure the
controller for the equipment and the ramping profiles. He named the alarm to make
it easier to identify an alarm condition. The
alarm message will appear on the Lower
Display, which also informs about the
progress of the test.
See the Keys, Displays and Navigation Chapter.
See the Setup Chapter.
Andy customized the Main Page so he could
tell the status of the digital outputs by glancing at the controller's Lower Display (Setup
Page > Custom Main Page Menu).
He also named one of the Alarms "TEMP
DEV", which will make it easy to identify the
alarm condition (Setup Page > Alarm Output
1 Menu). Three digital inputs, two alarms
and eight digital outputs can be given 10character names.
See the Setup Chapter.
4. Program the Profile
F4
1A
1B
2A
2B
Main Page___________
Go to Profiles
Go to Setup
Go to Factory
1
2
Step
Step
Step
Step
1:
2:
3:
4:
Ramp Time
Ramp Time
Soak
Jump
Andy programmed the test as a ramping profile of 21 steps. To make sure the equipment
is at the ambient chamber temperature, he
put a Wait condition on Step 2. Step 20 is a
Jump step that puts the equipment through
the same heat and humidity cycle 21 times.
i
See the Profile Programming Chapter.
✔ NOTE:
The profile in this sample application is embedded
in the Series F4 software for use as a teaching tool
or a template. It is the first profile, MILSTD810D,
located in the Profiles Page > Edit Profile Menu.
You can change or delete this profile and later
recall it through factory defaults. If you have a
single-channel controller, you will see only the temperature on Channel 1. This is not the true
Military Standard Test 810D.
This sample application is continued in the Operations, Profile Programming and Setup Chapters.
Watlow Series F4S/D
Introduction ■ 1.3
Setup Steps
• If the Series F4 is an independent unit, start
with Step 1 below.
• If the Series F4 is already installed in and set
up for a piece of equipment, proceed to Steps 4,
5, 6 and 7 below.
• If the Series F4 is already installed in a piece
of equipment and the setup and profile programming functions are locked, proceed directly to Step 5 or 7.
What to do
How to do it
1
Install the controller.
See Chapter 11, Installation. (This step will not
be necessary if the Series F4 is already installed
in equipment.)
Wire the controller.
See Chapter 12, Wiring. (This step will not be
necessary if the Series F4 is already installed in
equipment.)
Set up the controller to suit your basic
application.
Learn to navigate the software in Chapter 2,
Keys, Displays and Navigation, and then go to
Chapter 5, Setup. For background, you may also
want to refer to Chapter 6, Features. (This step
may not be necessary if the Series F4 is already
installed in the equipment.)
Tune the system and set alarm set points.
See Chapter 3, Operations.
Set up serial communications.
See Chapter 7, Communications.
Program a profile.
See Chapter 4, Profile Programming.
Run the profile (or establish a set point
for static set point control).
See Chapter 3, Operations.
2
3
4
5
6
7
The ˆ Key
During all these steps, the Information Key
will summon helpful definitions and setup tips.
Just position the cursor next to the item you
want to know more about, then press the key.
Press it again to return to your task.
1.4 ■ Introduction
Watlow Series F4S/D
2
Chapter Two: Keys, Displays &
Navigation
Displays and Indicator Lights . . . . . . . . . . . . . . . . .2.2
Custom Main Page . . . . . . . . . . . . . . . . . . . . . . . . .2.3
Keys and Navigation . . . . . . . . . . . . . . . . . . . . . . . .2.4
Guided Setup . . . . . . . . . . . . . . . . . . . . . . . . . . . . . .2.5
How to Enter Numbers and Names . . . . . . . . . . . .2.6
ˆ Information Key Answers Your Questions . . . . .2.7
Main Page Parameter Table . . . . . . . . . . . . . . . . . .2.8
Overview
This chapter introduces the user interface of the
Series F4S/D controller — the displays, keys and
indicator lights, and the principles of navigating
the software to program profiles and change setup
settings. The Series F4 is designed with user friendly features to facilitate setup, programming
and operation of the Series F4.
The four-line LCD display facilitates setup and
programming, and presents informative messages
about status, error and alarm conditions.
The Information Key summons information about
the pages, menus, parameters and values, as well
as error and alarm conditions if they occur.
The software is organized into five pages of menus.
The Main Page gives access to the other four —
Operations, Profiles, Setup and Factory. The Main
Page can be customized to display user -chosen
information.
Digital inputs, digital outputs, profiles and alarms
can be named for easy reference.
Watlow Series F4S/D
Keys, Displays and Navigation ■ 2.1
Displays and Indicator Lights
Upper Display
Displays Channel 1 actual
process values during
operation. Displays error
information if errors occur.
Active Output Indicator
Lights (Output status):
Lit when the corresponding
controller channel output is
active. (F4D shown)
Lower Display
Displays information about the setup,
operation and programming of the
controller.
F4
1A
1B
Cursor
(>):
Indicates selected parameter
or present value in F4 memory. Moves via the four navigation keys.
Profile Indicator Light
(Run/Hold status):
• Lit when a ramping profile
runs.
• When blinking, the profile is
on hold.
• When not lit, the controller
operates as a static set
point controller.
2A
Alarm Output Indicator
Lights
(Alarm status):
Lit during an alarm state.
2B
Main Page___________
Go to Profiles
Go to Setup
Go to Factory
i
1
2
Communications Indicator
Light
(Communication status):
Lit (pulsates) when the controller sends or receives valid
data.
Scroll Bar
(Scroll up or down):
Appears when the Up or
Down Keys can reveal more
information in the Lower
Display.
Figure 2.2 — Series F4S/D Displays and Indicator Lights. (F4D shown)
2.2 ■ Keys, Displays and Navigation
Watlow Series F4S/D
Custom Main Page
The first and central page on the Lower Display is
the Main Page, which shows error messages, input,
output and profile status, and allows access to controller software (Go to Operations, Profiles, Setup
and Factory).
The Main Page can be customized to display cho-
Will always appear
if active:
The following parameters will appear by default on
the Main Page, unless the Main Page has been customized.
Main Page_____
Input 1 Error
Input 2 Error
Input 3 Error
Will appear if active
and if set up to appear:
Alarm 1 Condition
Alarm 2 Condition
Will appear if active and
selected to appear:
Autotuning Ch 1
Autotuning Ch 2
Will appear by default:
(Profile information will
appear by default if a
profile is running.)
Current File
Current Step
Input2
Set Point 1
Set Point 2
Step Type
Target SP1
Target SP2
Wait for Status
Time Remaining
Digital Ins
Digital Outs
% Power1
% Power2
Date
Time
Will always appear
unless customized:
sen information. (To do so, go to the Setup Page,
Custom Main Page Menu. See Chapter 5, Setup,
for instructions.)
>Go
Go
Go
Go
to
to
to
to
Operations
Profiles
Setup
Factory
Press < to scroll
down the list.
Read-only information
Static set point control
Read-only information
Access to software
2
Figure 2.3 — Default Main Page Parameters.
Watlow Series F4S/D
Dual
Channel
F4D
Keys, Displays and Navigation ■ 2.3
Keys and Navigation
Setup Page
Think of this display as a window
into the software table. You move
around in the software using the
following navigation keys:
Main>Setup
Choose to Setup
System
Analog Input 1
F4
1A
1B
,
>
. <
Move Up/Increase
2A
Move Down/Decrease
Back Next
2B
Main Page___________
Go to Profiles
Go to Setup
Go to Factory
1
2
Profile Key
(Profile Run/Hold):
Summons a menu that allows
you to start, hold, resume or
terminate a profile.
i
Information Key
(Toggle for more
information):
Provides information in the
Lower Display about the
cursor-selected parameter.
Another press toggles the
display back to the parameter.
4-20mA
0-20mA
0-10V
0-5V
1-5V
0-50mV
Choose Units
Temperatur
%rh
PSI
units
Choose Decimal
0
0.0
0.00
0.000
Up and Down Keys
(Move Up/Increase and Move
Down/Decrease):
Move the cursor (>) position in the
Lower Display through the
software in the direction of the key
arrow. Increase or decrease a
value, or change a letter in a usernameable field, such as alarms,
events and profile names.
Left and Right Keys
(Back Out and Next):
Move right to select the choice to
the right of the cursor and proceed
to the next screen. Move left to exit.
2500 ft
Figure 2.4 — Series F4 Keys and Navigation.
2.4 ■ Keys, Displays and Navigation
Watlow Series F4S/D
Guided Setup
In most F4 menus, setup and programming tasks
are guided. For example, once you select Analog
Input 1 on the Setup Page, all parameters necessary to configure that input are linked:
1. Use > < to move the cursor to select an
item in a list.
2. Press the Right Key
..
Main Page___________
Go to Operations
Go to Profiles
>Go to Setup
Choose to Setup:____
>Control Output 1A▲
Control Output 1B■
Control Output 2A▼
3. Enter the value and make a choice.
4. Press
. again.
5. Repeat until you return to the original list.
Choose Function:____
>Heat
Cool
.
.
.
. saves the value and proceeds to the next
parameter in the series.
, saves the value and backs out of the series, and
returns to the Main Page.
For initial setup and programming, we recommend
that you answer all the questions in the series,
entering values for all linked parameters and
pressing . until you return to your starting
point.
To edit a parameter, proceed through the series
without changing values until you find the parameter you want to change. After making the change,
you may back out or proceed to the end of the
series.
✔ NOTE:
The Edit PID Menu (Operations Page) presents lists of
parameters that can be entered and edited individually.
Press either . or , to enter the value and return to
the list.
✔ NOTE:
Make sure your setup is complete before entering profiles.
Certain analog input setup changes will delete profiles.
Watlow Series F4S/D
Choose Cycle Time:__
>Variable Burst
Fixed Time
■
▼
Enter Hi Power Limit
100%
▲▼ Adjusts Value
< Back
> Next
Enter Lo Power Limit
0%
▲▼ Adjusts Value
< Back
> Next
Choose to Setup:____
>Control Output 1A▲
Control Output 1B■
Control Output 2A▼
.
.
.
,
Save setup changes
or restore values?
▼ Restore ▲ Save
Keys, Displays and Navigation ■ 2.5
How to Enter Numbers and Names
Many parameters require users to enter a numerical value. Alarms, digital inputs, digital outputs
and profiles can be customized with easily recog-
nized names, such as TOO HOT for an alarm,
DOOR OPEN for a digital input and GLAZE 6 for
a profile.
F4
1A
1B
Numbers
1. Navigate
to the parameter
you want to
change.
Z
Y
X
W
…
If the cursor
is at Z, press
< to go
down to A,
then from 9
to 0. Blank is
on the end.
2A
2B
Alarm Hysteresis:___
36 °F
Adjusts Value
Save Changes
1
2
4. Press . to enter
the value.
You'll change
the value on
this line.
3. Scroll to increase or
decrease the value of
the digit.
i
2. Move right or left, if necessary, to choose the digit to change.
C
(Some numbers increase or decrease as single units; others
digit by digit.) The active position is underlined.
B
A
9
F4
8
1A
7
1B
Names
6
2A
2B
5
1. Navigate
4
to the parameter
you want to
name.
3
Enter Alarm Name:___
ALARM1
Adjusts Char
Back
Next
1
2
2
1
Ø
Blank
You'll change
each letter on
this nameable
10-character
line.
4. Press . to move to the
end of the 10-character name
space and proceed to the
next screen. This enters the
name.
3. Scroll to choose the new
letter or a number.
i
2. Move right or left to choose the character to change.
(The position is underlined.)
Figure 2.6 — How to Enter Numbers and Names. (F4D shown)
2.6 ■ Keys, Displays and Navigation
Watlow Series F4S/D
ˆ
Information Key Answers Your Questions
There’s a wealth of information about features and
parameters right in the Series F4 controller. Use
the Information Key to get this information.
2. Press the ˆ key. The displayed information will
assist you during setup and operation. When
information takes more than four lines, the
scroll bar will be filled or weighted at the end,
directing you to press < or > to see the rest.
1. Use the four navigation keys ( < > , . )
to position the cursor (>) next to the parameter
you want to know more about.
3. Press ˆ again to return to your task.
Toggle the Information Key
ˆ between the parameter
you need to know about and
its functional definition.
F4
1A
1B
2A
2B
The second press takes you
back to where you were.
The scroll bar indicates
more information above or
below; use the > and <
keys.
Choose to Setup:____
System
Analog Input 1
Analog Input 2
1
2
i
i
Figure 2.7 — The Information Key. (F4D shown)
Watlow Series F4S/D
Keys, Displays and Navigation ■ 2.7
Main Page Parameter Table
Parameter
Description
Range
(Modbus Value)
Default
Modbus
Register
read/write
[I/O, Set, Ch]
Conditions for
Parameters to Appear
Main Page
Main > Setup > Main Page
Input x (1 to 3) Error
Alarm x (1 to 2) Condition
Autotuning Channel x (1 or 2)
Parameter x (1 to 16)
View customized
parameter list.
None
Input 1 Value
Input 2 Value
Input 3 Value
Set Point 1
Set Point 2
% Power 1
% Power 2
Tune status 1
Tune status 2
Time
Date
Digital Ins
Digital Outs
Time Remaining
Current File
Current Step
Active Ch1 PID Set
Active Ch2 PID Set
Last Jump Step
Jump Count
WaitFor Status
Step Type
Target SP1
Target SP2
Inner Set Point
Custom Message 1
Custom Message 2
Custom Message 3
Custom Message 4
Input 1 Cal. Offset
Input 2 Cal. Offset
Input 3 Cal. Offset
Current File
Current Step
Input 2 value
Set Point 1
Set Point 2
Step Type
Target SP1
Target SP2
Wait for
Status
Time
Remaining
Digital Ins
Digital Outs*
% Power 1
% Power 2
Date
Time
*Digital outputs configured as
events can be turned on/off in the
static set point mode or when a
running profile is on hold. The
event output status will remain as
set until reset by the profile or by
the operator.
Go to Operations
Auto-tune PID sets,
edit PID parameters
and select alarm set
points.
Go to Profiles
Create, edit, delete
and rename profiles.
Go to Setup
Set up inputs and
outputs, configure
the system and
design the Main
Page.
Go to Factory
Set security settings,
and calibrate and restore factory settings.
2.8 ■ Keys, Displays and Navigation
Watlow Series F4S/D
3
Chapter Three: Operations
Static Set Point Control . . . . . . . . . . . . . . . . . . . . . .3.1
Profile Control . . . . . . . . . . . . . . . . . . . . . . . . . . . . .3.2
Alarm Set Points . . . . . . . . . . . . . . . . . . . . . . . . . . .3.4
Clearing Alarms and Errors . . . . . . . . . . . . . . . . . . .3.4
Auto-tune PID . . . . . . . . . . . . . . . . . . . . . . . . . . . . .3.4
Edit PID . . . . . . . . . . . . . . . . . . . . . . . . . . . . . . . . . .3.4
Multiple PID Sets . . . . . . . . . . . . . . . . . . . . . . . . . . .3.5
Cascade . . . . . . . . . . . . . . . . . . . . . . . . . . . . . . . . . .3.6
Sample Application . . . . . . . . . . . . . . . . . . . . . . . . .3.7
Troubleshooting Alarms and Errors . . . . . . . . . . . . .3.8
Operations Page Map . . . . . . . . . . . . . . . . . . . . . . .3.10
Operations Page Parameter Table . . . . . . . . . . . . .3.11
Operations Page Parameter Record . . . . . . . . . . . .3.15
Series F4S/D Operation
The Series F4S/D controller can function as either
a static set point controller or as a profile controller. The information shown on the Lower Display during operation (the Main Page) is programmable and can be customized to support both
modes of operation. (See Setup Page.)
In either the static set point mode or the profile
mode, the Series F4 can only be operated in a
closed-loop configuration. Manual operation (openloop) mode is not allowed.
Static Set Point Control
The Series F4 is in static mode when it is not controlling a ramping profile. When in static mode:
• The Profile Indicator Light is off.
• The Upper Display shows the actual process
temperature of input 1, 2 or 3 depending upon
Setup Page configuration.
✔ NOTE:
All control activity stops when you enter the Setup Page,
Analog Input, Digital Input, Control Output, Alarm Output, Retransmit, and Digital Output menus.
Watlow Series F4S/D
• The Lower Display shows the default or user configured information set. See the Setup
Chapter for instructions in programming the
Main Page to display the information you want.
To operate the Series F4 as a static set point controller, use the navigation keys ( > < , . ) to
select the preferred channel and adjust the set
point.
Static Set Point1___
___ °F
▲▼ Adjusts Value
< Back
> Next
Limits may be placed on the set point in the Set
Point Low Limit and Set Point High Limit parameters (Setup Page > Analog Inputx).
Setting the set point to Set Point Low Limit minus
1 (-1) will turn control Output 1 off and display the
set point as off.
Static Set Point1___
OFF
▲▼ Adjusts Value
< Back
> Next
Operations ■ 3.1
Profile Control π
The main purpose of the Series F4 is to control profiles for ramp-and-soak-processing applications.
The instructions below explain how to use an existing profile. To program a profile, see Chapter 4,
Profile Programming.
To Start/Run a Profile
To initiate the profile mode, press the Profile Key
π and answer the questions that follow.
While running a profile, the Profile Status message
on the lower display will keep you informed about
the progress of the profile. For example, it could
read like the screen at right:
✔ NOTE:
As a protective measure, all stored profiles will be cleared
if you enter the Setup Page and change values in the
Analog Input 1, 2, 3 menus —specifically, the Sensor,
Sensor Type, Decimal, Scale (for process inputs), and Set
Point High and Low Limits. Pop-up messages will warn
that the profiles will be erased from the controller’s memory.
✔ NOTE:
You must configure the software for your inputs and outputs before programming a profile. See the Setup Chapter.
✔ NOTE:
You must program a profile or use the pre-programmed
MILSTD810D profile before running it. See the Profile
Programming Chapter.
■
■
▼ No
▲ Yes
■
■■■■■■■■■■■■■■■■
Start a Profile?
Start Profile:_______
MILSTD810D..........
ALUMINUM
>Glaze 8
Start:_______________
Step 1 Autostart
>Step 2 Ramp Time
Step 3 Ramp Time
>
.
.
Glaze 8 Running.
Step
2
Remain
00:10:30
✔ NOTE:
While a profile is running, the controller will not recognize digital inputs that are programmed to start a profile.
Such digital inputs will be recognized only while the controller is in the static set point mode.
✔ NOTE:
While a profile is running, profiles can be either created
or renamed only while a profile is running. All other
pages and menus can be entered only during Static Set
Point Control mode.
ç WARNING
Check the configuration of the controller on the Setup
Page before starting and running a profile (if the Setup
Page is not locked). Make sure the settings are appropriate to the profile: input sensor ranges and limits, digital
inputs and outputs as events, guaranteed soak band, response to power out and Celsius or Fahrenheit scales. If
the Setup Page is accessible, failure to check the configuration before running a profile could result in damage to
equipment and/or property, and/or injury or death to personnel.
3.2 ■ Operations
Watlow Series F4S/D
To Hold a Running Profile
1. Press the Profile Key π while running a profile. The Profile Action Menu appears.
2. Choose to Don’t Hold, Hold or Terminate
the profile. (Default is to Don’t Hold.) If you
choose to hold the profile, the Main Page reappears, and the Profile Status message reads
“Profile X holding.” The Profile Indicator Light is
off.
If you do not make a choice when the Profile Action
Menu appears, the profile continues running and
the profile indicator light stays on.
To Resume a Profile on Hold
1. Press the Profile Key π while a profile is
holding. The Resume Profile Menu appears.
2. Choose to Continue Holding, Resume or
Terminate the profile.
If you do not make a choice, the profile continues
holding and the Profile Indicator Light stays off.
To Terminate a Running/Holding Profile
1. Press the Profile Key π while a profile is
running. The Profile Action Menu appears.
2. Choose to Continue, Hold or Terminate the
profile. (Default is to Continue.) If you choose to
terminate, the profile ends with all outputs off.
The set point on the Main Page reads off.
If you do not make a choice when the Profile Action
Menu appears, the profile continues as it was —
running or holding.
Hold Profile:_______
Don’t Hold
>Hold
Terminate
✔ NOTE:
While profiles are on hold, the step set point value can be
adjusted using the Static Set Point parameter on the
Main Page.
Resume Profile:_____
>Continue Holding
Resume
Terminate
✔ NOTE:
When a profile is resumed during a Ramp step, the controller uses the Static Set Point from the Main Page to
calculate the rate of change needed to get to the set point
at the end of the step. When a profile is resumed in a
soak step, the new set point value will be used as the soak
value for the time remaining in the step.
Hold Profile:_______
Don’t Hold
Hold
>Terminate
✔ NOTE:
The Profile Status message takes precedence over all other information except errors, alarm messages and input
status. Errors and alarm messages always take precedence over Profile Status.
π The Profile Key:
• initiates the ramping profile mode;
• initiates the Hold-profile state;
• initiates the Resume-profile command;
The Profile Key functions only from the Main
Page. It will not function from any of the other
pages — Operations, Profile, Setup or Factory.
• initiates the Terminate-profile command.
Watlow Series F4S/D
Operations ■ 3.3
Alarm Set Points
✔ NOTE:
PID Set 1 for Channel 1 and PID Set 6 for Channel 2
are used in the Static Set Point mode.
The Series F4 includes two alarm outputs, which
can be programmed as process or deviation alarms.
Autotuning Procedure
Process alarms notify the operator when process
values exceed or fall below Alarm Low and Alarm
High Set Points. Deviation alarms notify the operator when the process has deviated from the set
point beyond the deviation limits. For more information, see the Features Chapter. To set up the
alarms, see the Setup Chapter.
Alarm set points are the points at which alarms
switch on or off, depending on the alarm setting.
Alarm set points can be viewed or changed in the
Alarm Set Point Menus (Operations Page).
The Alarm High Set Point defines the high temperature that, if exceeded, will trigger an alarm.
This temperature must be higher than the alarm
low set point and lower than the high limit of the
sensor range.
The Alarm Low Set Point defines the low temperature that, if exceeded, will trigger an alarm.
This temperature must be lower than the alarm
high set point and higher than the low limit of the
sensor range.
✔ TIP:
You may want to set up the alarms with names that will
identify the alarm conditions. See the Setup Page.
To Clear an Alarm or Error
In an alarm condition, an alarm message will appear on the Main Page (if this option has been selected on the Setup Page). To silence it, move the
cursor to the alarm message and press the Right
Key . . A pop-up message will confirm the silencing of the alarm, and the indicator light will go off.
When the condition causing the error or alarm is
corrected, return to the error or alarm message on
the Main Page, and press the Right Key again. A
pop-up message confirms the alarm is unlatched.
Auto-tune PID
In autotuning, the controller automatically selects
the PID parameters for optimal control, based on
the thermal response of the system. In the Series
F4, five sets of PID values are available for each
channel of the controller: sets 1 to 5 for channel 1,
and sets 6 to 10 for channel 2. Default PID values
exist for all PID sets, although these values typically do not provide optimal control. PID values
can be auto-tuned or adjusted manually. When autotuning is complete, the PID values will be stored
in the Edit PID Menu.
3.4 ■ Operations
Autotuning cannot be initiated while a profile is
running. It can only be initiated in the static set
point control mode.
1. Before initiating auto-tune, go to the System
Menu (Setup Page), and set the Channel 1 or 2
Autotune Set Point to the percentage of set point
you choose to begin with. This percentage is
based on your knowledge of the system and how
much overshoot or undershoot there is likely to
be in on-off control.
In the Custom Main Page, select to display Tune
Status 1 and Tune Status 2. This displays Tune
Status in the Main Page.
2. Go to the Main Page and set the static set point.
3. Go to the Autotune PID Menu (Operations Page)
and choose the channel to auto-tune and the PID
set in which to store the settings. A message will
be displayed on the Main Page during the autotuning process. (Auto-tune cannot be initiated
when a profile is running. It can only be initiated
in the static set point mode.)
4. When autotuning is complete, the controller will
store the values for optimum control in the PID
set specified.
✔ NOTE:
While the controller is autotuning, profiles cannot be run
and only the Profiles Page and Operation Page of the
software can be entered.
ç
CAUTION: Choose an auto-tune set point value that will
protect your product from possible damage from overshoot
or undershoot during the autotuning oscillations. If the
product is sensitive, select the auto-tune set point very
carefully to prevent product damage.
For additional information about autotuning and proportional, integral and derivative control, see the Features Chapter.
Edit PID
Edit PID is useful when Auto-tune PID does not
provide adequate control. Each of the PID parameters can be adjusted manually:
Proportional Band: Define a band for PID control, entered in degrees or units. Lower values increase gain, which reduces droop but can cause oscillation. Increase the proportional band to eliminate oscillation.
Watlow Series F4S/D
Integral (Reset): Define the integral time in minutes per repeat; define reset in repeats per minute.
Set repeats per minute if units are U.S.; minutes
per repeat if units are SI.
Derivative (Rate): Define the derivative (rate)
time in minutes. Large values prevent overshoot
but can cause sluggishness. Decrease if necessary.
Dead Band: Define the dead band in degrees or
units. Heating dead band shifts the set point down.
Cooling dead band shifts the set point up. For more
information, see the Features Chapter.
Manual Tuning Procedure
1. Apply power to the Series F4 and enter a set
point. Go to the Operations Page, Edit PID Menu
and begin with Proportional Band set to 5; Integral (Reset) set to 0; Derivative (Rate) set to 0;
and Autotune set to Tune Off.
2. Start manual tuning by entering the desired set
point and let the system stabilize. Once the system stabilizes, observe the value of Input 1 on
the Main Page. If the Input 1 value fluctuates,
increase the proportional band setting until it
stabilizes. Adjust the proportional band in 5º to
10º increments, allowing time between adjustments for the system to stabilize.
3. Once Input 1 has stabilized, observe the percent
power on the Main Page. It should be stable,
±2%. At this point, the process temperature
should also be stable, but it will exhibit droop
(stabilized below set point). The droop can be
eliminated with reset or integral.
4. Start with a reset setting of 0.01, and allow 10
minutes for the process temperature to come up
to set point. If it has not, increase the setting to
0.05 and wait another 10 minutes. After this,
double the reset setting and wait another 10
minutes until the process value equals the set
point. If the process becomes unstable, the reset
value is too large. Decrease the setting until the
process stabilizes.
5. Increase Derivative/Rate to 0.10 minute. Then
raise the set point by 20° to 30°F, or 11° to 17°C.
Observe the system's approach to the set point. If
the load process value overshoots the set point,
increase Derivative/Rate to 0.50 minute.
new set point without overshooting or approaching the set point too slowly.
For additional information about manual tuning
and proportional, integral and derivative control,
see the Features Chapter.
Multiple PID Sets
Environmental chambers, ovens and furnaces typically have different thermal requirements when
they operate at high and low temperatures or pressures. To accommodate varying thermal requirements, the F4 is capable of storing five different
PID sets for each channel. One set for each channel
can be chosen in each profile step.
For example, a controller in an environmental
chamber with PID settings optimized for control at
subzero temperatures may not control well when
the set point is set to temperatures above the boiling point of water. With the F4, one PID set could
be used for subzero operation and another set for
temperatures above boiling.
Multiple Tuning Procedure
1. To auto-tune a single PID set, begin by setting
the static set point on the Main Page.
2. Go to the Autotune PID Menu (Operations Page),
and choose a channel and a set. Autotuning begins when you select the set. The Main Page displays information about the autotuning process
when Tune Status is selected in the Custom
Main Page.
3. When autotuning is finished, proceed with
another PID set.
In the example above, the user would first autotune a PID set for subzero operation, and then another for operation at boiling temperatures. When
programming a profile, the user could then select a
different PID set for each step, depending on the
thermal requirements.
✔ NOTE:
Autotuning cannot be done while running a profile. It can
only be initiated when the controller is in the Static Set
Point Control mode.
Raise the set point by 20° to 30°F, or 11° to 17°C
and watch the approach to the new set point. If
you increase Derivative/Rate too much, the approach to the set point will be very sluggish. Repeat as necessary until the system rises to the
Watlow Series F4S/D
Operations ■ 3.5
Cascade
Cascade control is available on the Series F4 controllers. For background information about cascade
control, see the Features Chapter.
Select cascade control through the Analog Input 3
Menu (Setup Page) and choose Process Cascade or
Deviation Cascade. To set the range for the Process
Cascade Inner Loop set point, use Low and High
Range settings. These are independent of the Channel 1 set point. Deviation Cascade uses Deviation
Low and High settings that are referenced to the
Channel 1 set point.
Deviation Cascade is used in applications with large
set point ranges or where limiting heating or cooling
equipment temperatures is required.
When tuning a cascade system, the inner loop must
be tuned first. The inner loop comprises outputs 1A
and 1B and the Analog Input 1 sensor, which usually
measures the energy source temperature. The output
device controls a power switching device, which in
turn switches the heating and cooling. The set point
for the inner loop is generated by the outer loop. For
Process Cascade, this will have a range between the
Cascade Low Range and Cascade High Range.
Cascade Setup Procedure
1. First, configure Analog Input 3, Cascade Low
Range and Cascade High Range.
Go to the Analog Input 3 Menu (Setup Page).
Choose Process or Deviation Cascade. Deviation
Cascade references Channel 1 set point allowing a
range above and below the current control set
point. For Process Cascade control of a heat/cool or
cool only system, set the Cascade Low Range to a
value slightly lower than the lowest temperature
desired in the chamber. For heat-only systems, set
the Cascade Low Range to a value slightly lower
than the ambient temperature; otherwise the heat
output will never turn fully off.
For heat/cool or heat only systems , set the Cascade High Range to a value slightly higher than
the highest temperature desired in the chamber.
For cool-only systems, set the Cascade High Range
to a value slightly higher than the ambient temperature; otherwise the cooling will never fully
turn off.
2. Next, configure the controller to tune and display
data for the outer loop. To view Inner Loop Set
Point in the upper display, go to the Setup Page,
Custom Main Page Menu, select the Inner Set
point as one of the parameters, P1 to P16, to be
displayed in the Main Page.
To also view Analog Input 3 in the upper display,
go to the Setup Page, Process Display Menu, and
choose Alternating. Under Set Display Time,
choose a duration for the display of the Input 1 and
Input 3 variables.
3.6 ■ Operations
Cascade Autotuning Procedure
1. Go to Setup Page, Custom Main Page Menu.
Choose Tune Status 1 and Tune Status 2 to appear as 2 of the 16 parameters that can be displayed on the Main Page. The Main Page will now
display the status of the autotuning process.
2. Autotune the inner loop. Go to the Autotune PID
Menu (Operations Page), and select Cascade Inner-loop. Choose Cascade Inner Loop PID Set 1 to
5, where PID values will be stored after autotuning. Autotuning begins when you choose the PID
set. While autotuning, the F4 controller will control the energy source in an on-off mode to a temperature equal to the Cascade High Range setting
x Channel 1 Autotune Set Point. For best results,
use proportional control only on the inner loop.
3. Next, autotune the outer loop. Go to the Autotune PID Menu (Operations Page). Choose
Cascade Outer Loop, then choose Outer Loop PID
set 1 to 5, where PID values will be stored after
autotuning. Autotuning begins when you choose
the PID set. While autotuning, the outer loop will
be controlled in an on-off mode at a set point
equal to static set point x Ch 1 Autotune Set
Point. In most cases, the autotuning feature will
tune for acceptable control. If not, manually tune
the outer loop (step 4 below). Before manually
tuning, record the values generated by the autotuning feature.
4. To manually tune the outer loop, go to the Edit
PID Menu (Operations Page). Choose Cascade
Outer Loop, then choose Outer Loop PID set 1 to
5. Begin manual tuning by setting the Proportional Band to 5, Integral (Reset) to 0, and Rate
to 0. Establish the desired set point and let the
system stabilize. When the system stabilizes,
watch the Inner Loop Set Point on the Main
Page. If this value fluctuates, increase the proportional band until it stabilizes. Adjust the proportional band in 3° to 5° increments, allowing
time for the system to stabilize between adjustments.
5. When Input 1 has stabilized, watch the percent
power on the Main Page. It should be stable,
±2%. At this point, the process temperature
should also be stable, but it will exhibit droop
(stabilized below set point). The droop can be
eliminated with Integral (reset).
6. Start with an integral setting of 99.9 minutes,
and allow 10 minutes for the process temperature to come up to set point. If it has not,
decrease the setting by half and wait another 10
minutes. Then halve the setting again and wait
another 10 minutes until the process value
equals the set point. If the process becomes
unstable, the integral value is too small. Increase
it until the process stabilizes.
Watlow Series F4S/D
Sample Application:
Environmental Testing, Running a Profile
RUN
F4
1A
1B
2A
2B
Main Page___________
Go to Profiles
Go to Setup
Go to Factory
1
2
i
Andy presses the Profile Key π , moves the cursor
to "MILSTD810D" on the Run Profile Menu, then
presses the Right Key .. He wants to begin at
Step 1, so he presses . to select that step. The
Profile Status Message (on the Lower Display)
now says: "MILSTD810D Running. Step 1 Remains: XX:XX."
π
Andy, an engineer with the Ajax Testing Company,
is running temperature and humidity tests on
navigational equipment. He runs the test profile,
Military Standard Test 810D, having already set
up the controller and programmed the profile.
In Step 4, the temperature in the chamber exceeded the Alarm 1 setting. This triggered the alarm,
causing the indicator light on the front panel (next
to the bell-shaped icon) to light up and a message
to appear on the lower display: "TEMP DEV
High."
Because Alarm 1 was set up as a latching alarm
(Setup Page), Andy had to clear it manually. First
he corrected the alarm condition by widening the
gap between low and high deviation alarm settings on the Operations Page. He then unlatched
the alarm by returning to the Main Page alarm
line and pressing the Right Key . again.
If your Series F4 is a single-channel controller,
you will see only the temperature on Channel 1.
This is not the true Military Standard Test 810D.
✔ NOTE:
This profile is embedded in the Series F4 as a teaching
tool and a template. Go to the Edit Profile Menu (Profiles Page) and look for MILSTD810D.
Watlow Series F4S/D
Start Profile:_______
>MILSTD810D..........
ALUMINUM
Glaze 8
HOLD
When the alarm occurred, Andy put the profile on
hold while he corrected the Alarm Set Points.
π
Hold Profile:_______
Don’t Hold
>Hold
Terminate
MILSTD810D Holding.
Step 1
Remains
00:01:40
.
RESUME
After clearing the alarm, Andy entered the command to resume the profile.
π
Resume Profile:______
Continue Holding
>Resume
Terminate
Operations ■ 3.7
Troubleshooting Alarms and Errors
Indication
Power
• Displays are dead.
Communications
• Unit will not
communicate.
Alarms
• Alarm won’t occur.
• Alarm won’t clear.
(To clear the alarm, correct the alarm condition. If the alarm is
latched, press . with
the cursor at the alarm
message on the Main
Page.)
3.8 ■ Operations
Probable Cause(s)
•
•
•
•
Power to unit may be off.
Fuse may be blown.
Breaker may be tripped.
Safety Interlock door switch, etc., may be
activated.
• Separate system limit control may be
latched.
• Wiring may be open.
• Input power may be incorrect.
Corrective Action
• Check switches, fuses, breakers, interlocks,
limits, connectors, etc. for energized conditions and proper connection.
• Measure power upstream for required level.
Check part number for input power required.
• Check wire size.
• Check for bad connections.
• Address parameter may be incorrectly set.
• Check Communications Setup Menu and set
to correct address.
• Baud rate parameter may be incorrectly
• Check Communications Setup Menu and set
set.
to correct baud rate.
• Unit-to-unit daisy chain may be disconnect- • Look for a break in the daisy chain.
ed.
•Communications wiring may be reversed,
• Verify correct connections and test wiring
short or open.
paths.
• EIA-485 converter box may be incorrectly
• Check converter box wiring and its documenwired.
tation.
• Computer communications port may be in- • Reconfigure computer’s communications port
correctly set up.
setup and verify that communications are
okay.
• Communications software setup or address • Check the communication card documentation
may be incorrect.
for setable variables and operational testing.
• Protocol or parity may be wrong, should be • Restart communications software and check
8, n, 1.
for settings agreement. Verify the communica• Application software not working properly.
tions bus is active.
• May need termination and pull-up and pull- • Verify operation with Watlow communications
down resistors.
tool.
• Alarm output may be off.
• Alarm set points may be incorrect.
• Alarm sides may be incorrect.
• Controller may be in diagnostics mode.
•
•
•
•
Configure output as an alarm.
Check alarm set points.
Check the alarm sides setting.
Check the alarm type setting.
• Alarm may be latched. Move cursor to
alarm message. Press ..
• Alarm set points may be incorrect.
• Alarm hysteresis may be incorrect.
• Input may be in error condition.
• Check the alarm logic for compatibility with
system peripherals and annunciators.
• Check the power limit setting.
• Check the operation mode.
• Check the alarm output function.
• Check the °C and °F setting.
• Check the calibration offset value. Set it to a
lower level.
Watlow Series F4S/D
Indication
Probable Cause(s)
Input Errors
(Upper Display shows error code • Input is in error condition.
for input 1 only. Lower Display
shows error message. Alarm
Output Indicator is lit.)
Corrective Action
• Check sensor connections.
Upper [A-dLO]
Lower !Input x (1 to 3) AtoD -
• Check sensor connections and sensor
wiring.
• Check sensor connections and sensor
wiring.
Upper [A-dhi]
Lower !Input x (1 to 3) AtoD+
• Input type may be set to wrong sensor
or may not be calibrated.
• Check the Sensor parameter to match the
sensor hardware.
• Measure power upstream for required
level. Check part number for power requirements.
Upper [SEnhi]
• The open loop detect feature shows a
• Check sensor function. The Open Loop
Lower !Input x (1 to 3) Sensor+
Detect parameter indicates it may be
broken sensor.
broken.
Upper [Atod`]
• The Calibration Offset parameter is set • Check the Calibration Offset parameter
Lower !Timeout
much too high or low.
value. Set it to a lower level.
Upper [SEnLo]
Lower !Input x (1 to 3) Sensor-
System Errors
(Upper Display shows error
numbers. Lower Display messages indicate cause and action to take.)
•Input 1 Module Error! Only
single-channel modules
supported.
• Input 1 Module Error! Only
dual-channel modules
supported.
• Retransmit 1 Module Error!
Only process modules
supported.
• Retransmit 2 Module Error!
Only process modules
supported.
• Cannot identify: Modify: Replace module.
• Module change. Defaults will
occur. Accept with any key.
• First power-up. Parameters
are initializing.
• Firmware change. Parameters
are initializing.
Fatal Errors (Controller shuts
down.)
• Checksum Error!, Parameter
memory.
• Checksum Error!, Unit config
memory.
• Checksum Error!, Profile memory.
• RAM Test Failed! Return controller to the Factory.
• Flash Memory Failed. Return
controller to the Factory.
Watlow Series F4S/D
• Power may be incorrect.
• Input is in error condition.
• Check sensor connections.
• Input 2-3 module in input 1 slot.
• Move module to correct input slot.
• Input 1 module in input 2-3 slot.
• Move module to correct input slot.
• Wrong module in retransmit 1 slot.
• Replace incorrect module with retransmit
module.
• Wrong module in retransmit 2 slot.
• Replace incorrect module with retransmit
module.
• Component failure.
• Firmware upgrade.
• Remove the module just installed and
replace with a new module.
• Press any key. All parameters will
default.
• Wait until initialization is done.
• Firmware upgrade.
• Wait until initialization is done.
• Loss of power during memory setup.
• Turn the controller off, then on again.
• Loss of power during memory setup.
• Turn the controller off, then on again.
• Loss of power during memory setup.
• Turn the controller off, then on again.
• Component failure.
• Call your Watlow distributor or representative.
• Call your Watlow distributor or representative.
• Module changed.
• Component failure, loss of power
during download.
Operations ■ 3.9
Operations Page Map
Autotune PID
Channel 1 Autotune
Tune Off
PID Set 1
PID Set 2
PID Set 3
PID Set 4
PID Set 5
Channel 2 Autotune
Tune Off
PID Set 6
PID Set 7
PID Set 8
PID Set 9
PID Set 10
Channel 1 Outer Loop Autotune
PID Set C1
PID Set C2
PID Set C3
PID Set C4
PID Set C5
Edit PID
PID Set Channel 1
PID Set 1-5
Proportional Band A
IntegralA / ResetA
DerivativeA / RateA
Dead Band A
Hysteresis A
Proportional Band B
IntegralB / ResetB
DerivativeB / RateB
Dead Band B
Hysteresis B
PID Set Channel 2
PID Set 6-10
Proportional Band A
IntegralA / ResetA
DerivativeA / RateA
Dead Band A
Hysteresis A
Proportional Band B
IntegralB / ResetB
DerivativeB / RateB
Dead Band B
Hysteresis B
Cascade PID Set
Cascade Set 1-5
Proportional Band A
IntegralA / ResetA
DerivativeA / RateA
Dead Band A
Hysteresis A
Proportional Band B
IntegralB / ResetB
DerivativeB / RateB
Dead Band B
Hysteresis B
Alarm Set Points
Alarm1 Low SP
Alarm1 High SP
Alarm1 Lo Deviation
Alarm1 Hi Deviation
Alarm2 Low SP
Alarm2 High SP
Alarm2 Lo Deviation
Alarm2 Hi Deviation
✔ NOTE:
Some parameters may not appear, depending on the model and configuration of the controller.
3.10 ■ Operations
Watlow Series F4S/D
Operations Page Parameter Table
Parameter
Range
(Modbus Value)
Description
Default
Modbus
Register
read/write
[I/O, Set, Ch]
Conditions for
Parameters to Appear
Autotune PID
Main > Operations > Autotune PID
Channel x (1 to 2) Autotune
Select whether PID
parameters will be
automatically
selected.
Tune Off (0)
Ch1 PID Set 1 (1)
Ch1 PID Set 2 (2)
Ch1 PID Set 3 (3)
Ch1 PID Set 4 (4)
Ch1 PID Set 5 (5)
Ch2 PID Set 6 (1)
Ch2 PID Set 7 (2)
Ch2 PID Set 8 (3)
Ch2 PID Set 9 (4)
Ch2 PID Set 10 (5)
Tune Off (0)
305
324
r/w
Channel
[1]
[2]
Active: Always (Channel 1).
Active if controller is set to Dual
Channel Ramping (Channel 2).
Autotune PID Cascade
Main > Operations > Autotune PID > Cascade
Tune Off (0)
Inner Loop PID Set 1 (1)
Select which PID pa- Inner Loop PID Set 2 (2)
rameters will be au- Inner Loop PID Set 3 (3)
tomatically tuned.
Inner Loop PID Set 4 (4)
Inner Loop PID Set 5 (5)
Tune Off (0)
305
r/w
Active if Analog Input 3 Control
Type is set to Cascade.
Tune Off (0)
Outer Loop PID Set 1 (1)
Select which PID pa- Outer Loop PID Set 2 (2)
rameters will be au- Outer Loop PID Set 3 (3)
tomatically tuned.
Outer Loop PID Set 4 (4)
Outer Loop PID Set 5 (5)
Tune Off (0)
343
r/w
Active if Analog Input 3 Control
Type is set to Cascade.
Cascade Inner Loop
Cascade Outer Loop
Edit PID
Main > Operations > Edit PID
PID Set x (1 to 5)* (Optional Inner Loop)
Main > Operations > Edit PID > PID Set Channel 1 > PID Set x (1 to 5)
25°F (25)
14°C (14)
1A
500
510
520
530
540
r/w
1B
550
560
570
580
590
Set
[1]
[2]
[3]
[4]
[5]
Active: Always (Channel 1).
°F Default for US
°C Default for SI
0.00 to 300.00 minutes
Set the integral time (0 to 30000)
in minutes.
0 minutes
(0)
1A
501
511
521
531
541
r/w
1B
551
561
571
581
591
Set
[1]
[2]
[3]
[4]
[5]
Active if PID Units (Setup Page)
is set to SI and Proportional
Band is not set to 0.
0.00 per minute to
99.99 per minute
Set the reset time in
(0
to 9999)
repeats per minute.
0 per minute
(0)
1A
502
512
522
532
542
r/w
1B
552
562
572
582
592
Set
[1]
[2]
[3]
[4]
[5]
Active if PID Units (Setup Page)
is set to U.S. and Proportional
Band is not set to 0.
0.00 minutes
(0)
1A
503
513
523
533
543
r/w
1B
553
563
573
583
593
Set
[1]
[2]
[3]
[4]
[5]
Active if PID Units (Setup Page)
is set to SI and Proportional
Band is not set to 0.
Proportional Band x (A or B) 0 to 30000
(0 to 30000)
Define the proportional band for PID
control.
Integral x (A or B)
Reset x (A or B)
Derivative x (A or B)
Set the derivative
time.
0.00 to 9.99 minutes
(0 to 999)
*This section is also applicable for Cascade Inner Loop.
✔ NOTE: For more information about how parameter settings
affect the controller’s operation, see the Features Chapter.
Watlow Series F4S/D
Operations ■ 3.11
Operations Page Parameter Table
Parameter
Description
Rate x (A or B)
Set the rate time.
Dead Band x (A or B)
Define the effective
shift in the heating
and cooling set
points to prevent
conflict.
Hysteresis x (A or B)
Define the process
variable change from
the set point required to re-energize
the output (in on-off
mode).
Range
(Modbus Value)
Default
Modbus
Register
read/write
[I/O, Set, Ch]
Conditions for
Parameters to Appear
0.00 to 9.99 minutes
(0 to 999)
0.00 minutes
(0)
1A
504
514
524
534
544
r/w
1B
554
564
574
584
594
Set
[1]
[2]
[3]
[4]
[5]
Active if PID Units (Setup Page)
is set to U.S. and Proportional
Band is not set to 0.
0 to 30000
(0 to 30000)
0
(0)
1A
505
515
525
535
545
r/w
1B
555
565
575
585
595
Set
[1]
[2]
[3]
[4]
[5]
Active if Proportional Band is not
set to 0 and one output is set to
heat and the other to cool
(Setup Page).
1 to 30000
(1 to 30000)
3 (3)
1A
507
517
527
537
547
r/w
1B
557
567
577
587
597
Set
[1]
[2]
[3]
[4]
[5]
Active if Proportional Band is set
to 0 and one channel is set to
heat and the other to cool
(Setup Page).
PID Set x (6 to 10)
Main > Operations > Edit PID > PID Set Channel 2 > PID Set x (6 to 10)
Proportional Band x (A or B) 0 to 30000
Set the proportional (1 to 30000)
25°F (25)
14°C (14)
2A
2500
2510
2520
2530
2540
r/w
2B
2550
2560
2570
2580
2590
Set
[6]
[7]
[8]
[9]
[10]
Active: Always (Channel 1).
0.00 to 99.99 minutes
Set the integral time (0 to 9999)
in minutes.
0 minutes
(0)
2A
2501
2511
2521
2531
2541
r/w
2B
2551
2561
2571
2581
2591
Set
[6]
[7]
[8]
[9]
[10]
Active if PID Units (Setup Page)
is set to SI and Proportional
Band is not set to 0.
0.00 per minute to
99.99 per minute
Set the reset time in
repeats per minute. (0 to 9999)
0 per minute
(0)
2A
2502
2512
2522
2532
2542
r/w
2B
2552
2562
2572
2582
2592
Set
[6]
[7]
[8]
[9]
[10]
Active if PID Units (Setup Page)
is set to U.S. and Proportional
Band is not set to 0.
0.00 to 9.99 minutes
(0 to 999)
0.00 minutes
(0)
2A
2503
2513
2523
2533
2543
r/w
2B
2553
2563
2573
2583
2593
Set
[6]
[7]
[8]
[9]
[10]
Active if PID Units (Setup Page)
is set to SI and Proportional
Band is not set to 0.
0.00 to 9.99 minutes
(0 to 999)
0.00 minutes
(0)
2A
2504
2514
2524
2534
2544
r/w
2B
2554
2564
2574
2584
2594
Set
[6]
[7]
[8]
[9]
[10]
Active if PID Units (Setup Page)
is set to U.S. and Proportional
Band is not set to 0.
band.
Integral x (A or B)
Reset x (A or B)
Derivative x (A or B)
Set the derivative
time.
Rate x (A or B)
Set the rate time.
✔ NOTE: Press the Information Key ˆ
3.12 ■ Operations
for more task-related tips.
Watlow Series F4S/D
Operations Page Parameter Table
Parameter
Description
Dead Band x (A or B)
Define the effective
shift in the heating
and cooling set
points to prevent
conflict.
Hysteresis x (A or B)
Define the process
variable change from
the set point required to re-energize
the output (in on-off
mode).
Range
(Modbus Value)
Default
Modbus
Register
read/write
[I/O, Set, Ch]
Conditions for
Parameters to Appear
0 to 30000
(1 to 30000)
0 (0)
2A
2505
2515
2525
2535
2545
r/w
2B
2555
2565
2575
2585
2595
Set
[6]
[7]
[8]
[9]
[10]
Active if Proportional Band is not
set to 0 and one output is set to
heat and the other to cool
(Setup Page).
1 to 30000
(1 to 30000)
3 (3)
2A
2507
2517
2527
2537
2547
r/w
2B
2557
2567
2577
2587
2597
Set
[6]
[7]
[8]
[9]
[10]
Active if Proportional Band is set
to 0 and one channel is set to
heat and the other to cool
(Setup Page).
Cascade Outer Loop PID Set x (1 to 5)
Main > Operations > Edit PID > Cascade Outer Loop PID Set X (1 to 5)
25°F (25)
14°C (14)
1A
2600
2610
2620
2630
2640
r/w
1B
2650
2660
2670
2680
2690
Set
[1]
[2]
[3]
[4]
[5]
Active: Always (Channel 1).
°F Default for US
°C Default for SI
0.00 to 99.99 minutes
Set the integral time (0 to 9999)
in minutes.
0 minutes
(0)
1A
2601
2611
2621
2631
2641
r/w
1B
2651
2661
2671
2681
2691
Set
[1]
[2]
[3]
[4]
[5]
Active if PID Units (Setup Page)
is set to SI and Proportional
Band is not set to 0.
0.00 per minute to
99.99 per minute
Set the reset time in
(0
to 9999)
repeats per minute.
0 per minute
(0)
1A
2602
2612
2622
2632
2642
r/w
1B
2652
2662
2672
2682
2692
Set
[1]
[2]
[3]
[4]
[5]
Active if PID Units (Setup Page)
is set to U.S. and Proportional
Band is not set to 0.
0.00 to 9.99 minutes
(0 to 999)
0.00 minutes
(0)
1A
2603
2613
2623
2633
2643
r/w
1B
2653
2663
2673
2683
2693
Set
[1]
[2]
[3]
[4]
[5]
Active if PID Units (Setup Page)
is set to SI and Proportional
Band is not set to 0.
0.00 to 9.99 minutes
(0 to 999)
0.00 minutes
(0)
1A
2604
2614
2624
2634
2644
r/w
1B
2654
2664
2674
2684
2694
Set
[1]
[2]
[3]
[4]
[5]
Active if PID Units (Setup Page)
is set to U.S. and Proportional
Band is not set to 0.
0 to 30000
(0 to 30000)
0
(0)
1A
2605
2615
2625
2635
2645
r/w
1B
2655
2665
2675
2685
2695
Set
[1]
[2]
[3]
[4]
[5]
Active if Proportional Band is not
set to 0 and one output is set to
heat and the other to cool
(Setup Page).
Proportional Band x (A or B) 0 to 30000
(0 to 30000)
Define the proportional band for PID
control.
Integral x (A or B)
Reset x (A or B)
Derivative x (A or B)
Set the derivative
time.
Rate x (A or B)
Set the rate time.
Dead Band x (A or B)
Define the effective
shift in the heating
and cooling set
points to prevent
conflict.
✔ NOTE: For more information about how parameter settings
affect the controller’s operation, see the Features Chapter.
Watlow Series F4S/D
Operations ■ 3.13
Operations Page Parameter Table
Parameter
Description
Hysteresis x (A or B)
Define the process
variable change from
the set point required to re-energize
the output (in on-off
mode).
Range
(Modbus Value)
1 to 30000
(1 to 30000)
Default
3 (3)
Modbus
Register
read/write
[I/O, Set, Ch]
1A
2607
2617
2627
2637
2647
r/w
1B
2657
2667
2677
2687
2697
Set
[1]
[2]
[3]
[4]
[5]
Conditions for
Parameters to Appear
Active if Proportional Band is set
to 0 and one channel is set to
heat and the other to cool
(Setup Page).
Alarm Set Points
Main > Operations > Alarm Set Points
Alarm 1 Low SP
Set low value at
which alarm is triggered.
Alarm 1 High SP
Set high value at
which alarm is triggered.
Alarm 1 Low Deviation
Set the deviation
below set point 1
that will trigger an
alarm.
Alarm 1 High Deviation
Set the deviation
above set point 1
that will trigger an
alarm.
Alarm 2 Low SP
Set low value at
which alarm is triggered.
Alarm 2 High SP
Set high value at
which alarm is triggered.
Alarm 2 Low Deviation
Set the deviation
below set point 2
that will trigger an
alarm.
Alarm 2 High Deviation
Set the deviation
above set point 2
that will trigger an
alarm.
3.14 ■ Operations
<per sensor> to Alarm
1 High Set Point
<per sensor> 302
r/w
Active if Alarm 1 Type (Setup
Page) is set to Process.
<per sensor> to Alarm
1 Low Set Point
<per sensor> 303
r/w
Active if Alarm 1 Type (Setup
Page) is set to Process.
-19999 to -1
(-1 to 19999)
-999 (-999)
Active if Alarm 1 Type (Setup
Page) is set to Deviation.
-.1 to -1999.9
(-1 to 19999)
-99.9 (999)
1 to 30000
(1 to 30000)
999 (999)
.1 to 3000.0
(1 to 30000)
99.9 (999)
Active if decimal is set to 0.0
<per sensor> to Alarm
2 High Set Point
<per sensor> 321
r/w
Active if Alarm 2 Type (Setup
Page) is set to Process.
<per sensor> to Alarm
2 Low Set Point
<per sensor> 322
r/w
Active if Alarm 2 Type (Setup
Page) is set to Process.
-19999 to -1
(-1 to -19999)
-999 (-999)
Active if Alarm 2 Type (Setup
Page) is set to Deviation.
-.1 to -1999.9
(-1 to -19999)
-99.9 (-999)
0 to 30000
(0 to 30000)
999 (999)
302
r/w
Active if decimal is set to 0.0.
303
r/w
321
r/w
Active if Alarm 1 Type (Setup
Page) is set to Deviation.
Active if decimal is set to 0.0
322
r/w
Active if Alarm 2 Type (Setup
Page) is set to Deviation.
Watlow Series F4S/D
Operations Page Parameter Record
Make a photocopy of this page and enter your settings on that copy .
Name _________________________________________________
Date
__________________________________________________
Operations
Page
PID Set Chan 1 Menu
PID Set 1
PID Set 2
PID Set 3
PID Set 4
PID Set 5
PID Set 6
PID Set 7
PID Set 8
PID Set 9
PID Set 10
PID Set 1
PID Set 2
PID Set 3
PID Set 4
PID Set 5
Alarm 1
Alarm 2
or Cascade Inner Loop
Proportional Band A
IntegralA / ResetA
DerivativeA / RateA
Dead Band A
Hysteresis A
Proportional Band B
IntegralB / ResetB
DerivativeB / RateB
Dead Band B
Hysteresis B
PID Set Chan 2 Menu
Proportional Band A
IntegralA / ResetA
DerivativeA / RateA
Dead Band A
Hysteresis A
Proportional Band B
IntegralB / ResetB
DerivativeB / RateB
Dead Band B
Hysteresis B
Cascade Outer Loop
Proportional Band A
IntegralA / ResetA
DerivativeA / RateA
Dead Band A
Proportional Band B
IntegralB / ResetB
DerivativeB / RateB
Dead Band B
Alarm Set Point Menu
Low Set Point
High Set Point
Lo Deviation
Hi Deviation
Watlow Series F4S/D
Operations ■ 3.15
Notes
3.16 ■ Operations
Watlow Series F4S/D
4
Chapter Four: Profile Programming
What is a Ramping Profile? . . . . . . . . . . . . . . . . . .4.2
Step Types . . . . . . . . . . . . . . . . . . . . . . . . . . . . . . .4.2
Profile Plan Checklist . . . . . . . . . . . . . . . . . . . . . . .4.3
How to Program a New Profile . . . . . . . . . . . . . . .4.4
How to Edit a Profile . . . . . . . . . . . . . . . . . . . . . . .4.6
User Profile Record . . . . . . . . . . . . . . . . . . . . . . . .4.7
A Sample Application . . . . . . . . . . . . . . . . . . . . . . .4.8
Frequently Asked Questions . . . . . . . . . . . . . . . . .4.10
Profiles Page Map . . . . . . . . . . . . . . . . . . . . . . . . .4.11
Profiles Page Parameter Table . . . . . . . . . . . . . . .4.12
Overview
This chapter explains how to program a ramp-andsoak profile so that it will be stored in the Series
F4 memory.
• The first section explains profiles, steps and
step types.
• The second section explains how to name and
program a ramping profile. The Series F4 presents a sequence of questions that prompt you
to define the steps and the step properties.
While reading this section, refer to the profile
already embedded in the Series F4 software.
You can use this profile, Military Standard Test
810 (MILSTD 810D), as a template and learning tool.
• The third section explains how to edit and
delete an existing profile. In the Series F4, you
✔ NOTE:
For more information about how parameter settings affect
the controller’s operation, see the Features Chapter.
choose from a list of the steps and their parameters, much like in previous controllers.
• You will also find a User Profile Record to use
to record the steps and parameters for your
profiles.
If you receive this controller as a separate unit, you
will have to install, wire and configure the Series
F4 before you set up a ramping profile.
If you receive this controller already installed in an
environmental chamber, furnace or other equipment, continue with this chapter. You will not have
to configure the controller if the manufacturer has
done this for you. You should check the Setup Page
in the controller software for settings of relevant
inputs and outputs.
✔ NOTE:
Make sure your controller inputs are properly
configured before entering profiles. Analog Input
setup changes may delete profiles.
✔ NOTE:
If your Series F4 is a single-channel controller, you will
see only the temperature on Channel 1 of the embedded
profile. This is not the true Military Standard Test 810D.
Watlow Series F4S/D
Profile Programming ■ 4.1
What Is a Ramping Profile?
A profile is a set of instructions programmed as a
sequence of steps. The controller handles the profile steps automatically, in sequence. As many as 40
different profiles and a total of 256 steps can be
stored in the Series F4’s non-volatile memory.
The 256 steps are grouped by profile. So, one profile could have 256 steps; or 39 profiles could have
6 steps and one could have 22; or 32 profiles could
have eight steps each. The maximum number of
steps is 256, and the maximum number of profiles
is 40.
Temperature
A ramp is a programmed change from one set
point to another. A soak maintains the set point
over a period of time.
Time
Figure 4.2 — An eight-step profile, as it might be logged
on a chart recorder.
Step Types — Building Blocks of Profiles
Six types of steps are available in the Series F4.
They are the building blocks of ramping profiles.
2. Event outputs to turn on or off (if digital outputs are set up as events in the Setup Page);
Use the six step types to create simple or complex
profiles involving all inputs and outputs. The Series F4 prompts you to define each step’ s properties, listed below.
3. Time (in hours, minutes and seconds);
•
•
•
•
•
•
Autostart
Ramp Time
Ramp Rate
Soak
Jump
End
Autostart
Autostart pauses a profile until the specified date
or day, and time (of a 24-hour-clock). Define the Autostart by choosing:
1. Day (of the week) or Date,
2. Time
4. Channel 1 Set Point;
5. Channel 2 Set Point (if dual channel);
6. PID set (one of five sets of heat/cool PID parameters per channel, pre-defined in the Operations Page);
7. Guaranteed Soak (requires the actual process
value to stay within the Soak Band as set in
the System Menu).
F4S
1
Single
Channel
Ramp Rate
Ramp Rate (for single channel only) changes the
set point to a new value at a chosen rate. Define
the Ramp Rate step by choosing:
1. Wait for an event or process value;
(Wait for Events are set up in the Setup Page.)
Note: To invoke an Autostart step in a profile, you
must activate the profile via the Profile Key and select the Autostart step.
2. Event outputs to turn on or off (if digital outputs are set up as events in the Setup Page);
Ramp Time
4. Channel 1 Set Point;
Ramp Time changes the set point to a new value in
a chosen period of time. Ramp T ime is the same for
both channels of a dual-channel controller. Define
the Ramp Time step by choosing:
5. PID set (one of five sets of heat/cool PID parameters, pre-defined in the Operations Page);
1. Wait for an event or process value;
3. Rate (units per minute);
6. Guaranteed Soak (requires the actual process
value to stay within the Soak Band as set in
the System Menu).
(Wait for Events are set up in the Setup Page.)
4.2 ■ Profile Programming
Watlow Series F4S/D
Soak
Soak maintains the set point from the previous
step for a chosen time in hours, minutes and seconds. Define the Soak step by choosing:
1. Wait for an event or process value;
(Wait for Events are set up in the Setup Page.)
2. Event outputs to turn on or off (if digital outputs are set up as events in the Setup Page);
process value must arrive at or cross the specified
value before the step proceeds.
Digital inputs must first be configured in the Setup
Page as Wait for Events, with the condition to be
met also specified. Then, to wait for this digital
input, you must specify On, meaning the condition
as configured in the Setup Page, or Off, meaning
the opposite of that condition.
3. Time;
4. PID set (one of five sets of heat/cool PID parameters per channel, pre-defined in the Operations Page); or
5. Guaranteed Soak (requires the actual process
value to stay within the Soak Band as set in
the System Menu).
Jump
Jump initiates another step or profile. Define the
Jump step by choosing:
1. Profile to jump to;
2. Step to jump to; and
3. Number of Repeats.
✔ NOTE:
If a power out condition occurs during a profile and
more than 20 jump steps are stored in the F4’s Profile
Program memory, the controller will terminate the profile
and turn off all outputs if Continue, Hold or Terminate
was selected as the Power Out action. If Profile Reset or
Go to Idle Set Point was selected, the controller will take
those actions. A pop-up message will warn of this when
the 21st jump step is programmed
End
End terminates the profile in a chosen state. All
profiles must have an End step. It cannot be deleted or changed to another step type. Define the End
by choosing:
• End with Hold, Control Off, All Off or Idle end
state.
Another Option: Wait For
Wait For is not a step type, but Ramp T ime, Ramp
Rate and Soak steps can be programmed to wait for
events and processes. This means the wait conditions must be satisfied before the time clock and
the step activity proceeds.
Profile Plan Checklist
1. Configure the controller (Setup Page) to
provide the right foundation for the profile:
❏ Set the appropriate input sensor ranges
and limits (Input Menus).
❏ Establish digital inputs and outputs as
events if required (Digital Input and
Output Menus).
❏ Set the guaranteed soak band (System
Menu).
❏ Decide the controller response to a
power-out situation (System Menu).
❏ Choose Celsius or Fahrenheit (System
Menu) scale.
❏ If Setup Page values have not been
recorded, note them on the Setup Page
Parameter Record in the Setup Chapter.
2. Check the Operations Page:
❏ If defaults are not acceptable, establish
PID values (through the Autotune or
Edit PID Menu).
❏ Set the alarm set points (Alarm Set
Points Menu).
3. Plan the profile on paper. The User Profile Record (later in this chapter) will give
you a framework for your plan.
4. Program the profile. Make sure the User
Profile Record is an accurate record of the
program.
5. Store the Setup Page Parameter
Record along with the User Profile Record
to document your programmed settings.
If the step is to wait for an analog input, the actual
Watlow Series F4S/D
Profile Programming ■ 4.3
How to Program a New Profile
F4
The Series F4 uses a question-and-answer format
to prompt you to define the steps and step types of
a new profile. Here’s how:
1.Go to the Profiles Page.
Move the cursor to Go to Profiles (at the bottom
of the Main Page), then press the Right Key . .
2.Create a new profile.
Press . .
3.Name the profile.
Unless the equipment manufacturer has locked
out this function, you can name your profiles for
easy reference. (Names can have up to 10 characters.) To name a profile,
• Press . to enter the name space and the
first position.
• Press the Up or Down Key > < to scroll
through the alphabet and choose the letter
or number. (See Chapter 2, Navigation, for
the character selections available.)
• Press . to move to the next position.
• Continue until the name is complete, or
until you move through the name space into
the next screen.
1A
1B
2A
2B
Main Page___________
Go to Profiles
Go to Setup
Go to Factory
1
2
i
Press .
to enter
Main>Profile________
>Create Profile
Edit Profile
Delete Profile
Choose to Name:_____
No
>Yes
Enter Profile Name:_
ALUMINUM8
▲ ▼ Adjusts Char
< Back
> Next
• Enter . to save the name of the profile.
This name will be stored in the Series F4’ s
memory and will appear on the Main Page
when you run the profile.
4.Choose the step type.
There are six step types, each of which must be
defined through different parameters. (See “Step
Types,” earlier in this chapter.)
5.Define each step type.
The Series F4 prompts you to define the parameters of each step type. For example, when you
choose Ramp Time, the Profile Guide asks:
Choose Step1 Type:__
Autostart
>Ramp Ti me
■
Ramp Rate
▼
Choose to wait:_____
>Step does not wait
Step waits for…
• if you want the step to wait for an event or
process input before starting;
• whether events outputs are on or off (digital
outputs must be set up as events in the
Setup Page);
4.4 ■ Profile Programming
Watlow Series F4S/D
• how much time it will take to reach set
point;
• what the set point is;
• which PID set to activate; and
• whether you want a guaranteed soak.
Continue defining step types until your profile is complete. The last step must be an End
step.
Enter Ramp Time:____
00:00:01 (H:M:S)
▼ ▲ Adjusts Digit
< >
Save Changes
6.Choose the end-state.
All profiles end with an End step, which is preprogrammed into the new profile. Choose:
• Hold set point and event outputs;
• Control off, set point off, event output status maintained;
• All Off (control outputs and event outputs)
or
• Idle, with each channel at user-specified set
points. Event output status maintained.
7.Save your settings.
When exiting the Profiles Page, choose whether
to save profile data > or restore values < .
Save profile data
■
or restore values? ■
▼ Restore ▲ Save
■
■■■■■■■■■■■■■■■■
✔ NOTE:
The final step of every profile is End. You cannot delete an
End step or change it to another type, but you can insert
new steps before it.
Get Information from the ˆ Key
If you do not know a term, press the ˆ Key
when the cursor points to the word in the display text. Or check the glossary in the Appendix of this user manual.
Watlow Series F4S/D
i Ramp Time: A step
type that changes
the set point to a ■
new value in a
▼
user-chosen period
of time.
Profile Programming ■ 4.5
How to Edit a Profile
To change one or more parameters in any step of a
profile, choose Edit Profile on the Profiles Page.
1. Go to the Profiles Page.
Move the cursor to Go to Profile (at the bottom
of the Main Page), then press . .
2.Choose to edit a profile.
Press . .
3.Choose the profile you want to edit.
Press . .
4.Choose how you change the profile.
.
Main>Profile________
Create Profile
>Edit Profile
Delete Profile
…Edit Profile_______
>Glaze 42
▲
Glaze 43
■
Glaze 56
▼
Choose whether you want to insert a new step,
edit a specific step or delete a step.
To edit a step:
• Select the number of the step you wish to edit
from a list of steps and step types.
.
Choose to:__________
Insert Step
>Edit Step
Delete Step
• The next screen presents a list of all possible
step types. The cursor will be positioned on
the current step type. To keep it, press . and
make your changes to the properties listed on
succeeding screens.
• If you choose to change a Step T ype, the Series F4 will prompt you to program all necessary parameters.
To insert a step:
.
Edit Step:__________
>Step 1 Autostart
Step 2 Ramp Time
■
Step 3 Soak
▼
.
Move the cursor to the number of the step that
the new step will precede. Press . . The Series
F4 will prompt you to program all necessary parameters of the new step. Inserting a step
changes the numbers of all steps that follow.
To delete a step:
Move the cursor to the number of the step to be
deleted. Press . . Deleting a step changes the
numbers of all steps that follow.
A Jump Step that jumps to an End Step cannot
be deleted.
✔ NOTE:
Inserting a step changes the numbers of all steps that
follow.
4.6 ■ Profile Programming
Watlow Series F4S/D
User Profile Record
Copy this record and use it to plan profiles. Keep it
with a Setup Page Parameter Record to document
the controller’s programmed settings.
Profile Name:__________________________________
Date Programmed: ____________________________
Programmed by: ______________________________
Controller checked by:__________________________
Step
Nmbr
Step
Type
Date/Day,
Time
Wait
for
Watlow Series F4S/D
Set Events
1 2 3 4 5 6 7 8
Time
HMS
Rate
Set
Pt 1
Set
Pt 2
PID
Set
Guar.
Soak
Jump to
Profile
Step
Repeats End
Step
Profile Programming ■ 4.7
A Sample Application: Environmental Testing
Programming a Profile
To test its customers’ navigational equipment,
F4
1A
1B
2A
2B
Main Page___________
Go to Profiles
Go to Setup
Go to Factory
1
2
i
Ajax Testing Co. selected a version of Military Standard
Test 810D, which is often used to test navigational or
other military equipment under hot, humid conditions.
The full test requires a two-channel controller to manipulate both temperature and humidity in an environmental
chamber.
Andy planned his profile on the User Profile
Record,
This profile is embedded in the Series F4
software for use as a teaching tool and as
a template. To see how it is programmed
in steps, and how each step is defined, go
to the Profiles Page, choose Edit Profile
and open MILSTD 810D.
after checking the Setup Page to make sure the controller’s inputs, outputs, limits and ranges were configured properly. Andy then programmed the profile into the
Series F4.
If your Series F4 is a single-channel controller, you will see only the temperature
on Channel 1. This is NOT the true Military Standard Test 810D.
Military Standard 810D
Step 1:
Step 2:
Ramp Time
Soak
Step 3:
Soak
Steps 4 to 11:
Ramp Time
Step 12:
Soak
Steps 13 to 19: Ramp Time
Step 20:
Step 21:
Jump
End
4.8 ■ Profile Programming
Initialize the set point for channels 1 and 2.
Wait for channels 1 and 2 process values to reach their set points before the test
proceeds.
To ensure that the equipment temperature has stabilized, expose the equipment
in the chamber to a temperature of 88°F and an RH of 88% for five hours.
The test calls for a programmed increase in temperature and decrease in relative
humidity over a period of eight hours.
Expose the equipment in the chamber to a temperature of 105°F and an RH of
59% for three hours.
The test calls for a programmed decrease in temperature and increase in relative
humidity over a period of seven hours.
Jump to step 3 and repeat steps 3 to 20 twenty times.
End the profile and turn off all outputs.
Watlow Series F4S/D
Step
Nmbr
1
2
3
4
5
6
7
8
9
10
11
12
13
14
15
16
17
18
19
20
21
Step
Type
Ramp
Soak
Soak
Ramp
Ramp
Ramp
Ramp
Ramp
Ramp
Ramp
Ramp
Soak
Ramp
Ramp
Ramp
Ramp
Ramp
Ramp
Ramp
Jump
End
Date/Day, Wait
Time
for
Set Events
1 2 3 4 5 6 7 8
Time
Process1&2
Time
Time
Time
Time
Time
Time
Time
Time
Process1&2
Time
Time
Time
Time
Time
Time
Time
Time
HMS
1 sec.
1 sec.
5 hrs.
1 hr.
1 hr.
1 hr.
1 hr.
1 hr.
1 hr.
1 hr.
1 hr.
3 hrs.
1 hr.
1 hr.
1 hr.
1 hr.
1 hr.
1 hr.
1 hr.
Rate
Set
Pt 1
88°F
Set
Pt 2
88%
90°F
93°F
96°F
98°F
100°F
102°F
104°F
105°F
85%
80%
76%
73%
69%
65%
62%
59%
102°F
99°F
97°F
94°F
91°F
90°F
89°F
65%
69%
73%
79%
85%
85%
88%
PID
Set
Guar.
Soak
Jump to
Profile
Step
Repeats End
Step
3
20
All Off
Figure 9a — Profile Chart for Military Standard 810D Test.
106
Temperature ( F)
2
88
86
Relative Humidity
104
Dual
Channel
F4D
84
82
102
80
78
76
98
74
72
96
70
94
% Relative Humidity
Temperature ( F)
100
68
66
92
64
90
62
88
58
60
Test Period in Hours
Step
0
1 2
1
3
Channel 1
Channel 2
2
3
4
5
6
4
5
7
6
8
7
9
8
10 11 12 13 14 15 16 17 18 19 20 21 22 23
9 10 11 12
13 14 15 16 17 18 19
Steps
20
21
End of test
Step 20 jumps to Step 3 and repeats 20 times.
Figure 9b — Graph of Military Standard 810D Test.
Watlow Series F4S/D
Profile Programming ■ 4.9
Frequently Asked Questions About Profiles
1. Why should I check the Setup Page before
programming a profile?
Complex, sophisticated profile control is possible
with the Series F4’s two or three analog inputs,
four digital inputs, four control outputs (two for a
single-channel controller), two alarm outputs, two
retransmit outputs and eight digital outputs, but
they must be configured correctly. Don’t assume
that the controller has been set up correctly for the
profile you want to program and run. Checking the
Setup Page first will save time.
2. Why can’t I program a Ramp Rate step on
Channel 2?
Ramp Rate is available only on single-channel controllers.
3. Why can’t I set the Channel 2 parameters?
Channel 2 parameters do not appear in singlechannel controllers, or Input 2 is Off in a dualchannel controller.
4. Why can’t I adjust the set point to get the
value I want?
Check the configuration of the inputs (Setup Page)
and the set point limits (Setup Page).
7. Why can’t I delete the End step?
Because every profile must have an End step, and
this End step is programmed into the profile. If you
wish to add a step before the end, use the Insert
Step command under the Edit Profiles Menu.
8. How do I start or run a profile?
You must be on the the Main Page to run a profile.
Press the Profile Key, select the profile you want to
run and choose the step you want to start on.
9. I just programmed the profile, but when I
press the Profile Key nothing happens. What’s
wrong?
You must return to the Main Page before running a
profile. The Profile Key does not function from any
other page but the Main Page.
10. How do I know which profile is running?
When a profile is running, the profile name and
current step number is displayed on the Main
Page. You may have to scroll up or down to find
this information.
11. Why can’t I access certain pages, menus or
parameters?
5. Why don’t the digital inputs appear as Wait
for conditions?
The parameters you are looking for may not be
available in your model of controller.
They must first be configured as events in the
Setup Page.
The OEM that installed the F4 may have locked
users out of certain pages and menus.
6. Why can’t I delete a particular step of my
profile?
You cannot delete a step that another step jumps
to, or a step that is an End step.
4.10 ■ Profile Programming
The F4’s software may have been locked by a supervisor or someone else at your facility.
If a profile is running, you can enter only the Profiles Page.
Watlow Series F4S/D
Profiles Page Map
Create Profile
Name Profile
Step x (1 to 256) Type
Autostart
Date
Day
Time
Ramp Time
Wait For
Event Output (1 to 8)
Time
Ch1 SP
Ch2 SP
Ch1 PID Set x (1 to 5)
Ch2 PID Set x (6 to 10)
Guar. Soak1
Guar. Soak2
Ramp Rate
Wait For
Event Output (1 to 8)
Rate
Ch1 SP
Ch1 PID Set x (1 to 5)
Guar. Soak1
Soak
Wait For
Event Output (1 to 8)
Time
Ch1 PID Set x (1 to 5)
Ch2 PID Set x (6 to 10)
Guar. Soak1
Guar. Soak2
Jump
Jump to Profile x (1 to 40)
Jump to Step x
Number of Repeats
End
Hold
Control Off
All Off
Idle
Ch1 Idle Set Point
Ch2 Idle Set Point
✔ NOTE:
Some parameters may not appear, depending on the
model and configuration of the controller.
Watlow Series F4S/D
Edit Profile
Profile x (1 to 40)
Insert Step
Insert Before Step x
Step x (1 to 256) Type (see below)
Edit Step
Step x (1 to 256) Type
Autostart
Date
Day
Ramp Time
Wait For
Event Output (1 to 8)
Time
Ch1 SP
Ch2 SP
Ch1 PID Set x (1 to 5)
Ch2 PID Set x (6 to 10)
Guarantee Soak1
Guarantee Soak2
Ramp Rate
Wait For
Event Output (1 to 8)
Rate
Ch1 SP
Ch1 PID Set x (1 to 5)
Guarantee Soak1
Soak
Wait For
Event Output (1 to 8)
Time
Ch1 PID Set x (1 to 5)
Ch2 PID Set x (6 to 10)
Guarantee Soak1
Guarantee Soak2
Jump
Jump to Profile x (1 to 40)
Jump to Step x
Number of Repeats
End
Hold
Control Off
All Off
Idle
Ch1 Idle Set Point
Ch2 Idle Set Point
Delete Step
Done
Delete Profile
Profile x (1 to 40)
Re-Name Profile
Profile x (1 to 40)
Profile Programming ■ 4.11
Profiles Page Parameter Table
Parameter
Range
(Modbus Value)
Description
Default
Modbus
Register
read/write
[I/O, Set, Ch]
Conditions for
Parameters to Appear
Autostart
…>Edit Profile > Profile x (1 to 40) > Edit Step > Step x (1 to 256) > Autostart Step
M/D/Y
Date
Set date to
autostart.
Day
Set day of the week
to autostart.
Time
Set time to
autostart.
today’s date
[Date] (0)
[Day] (1)
[mo] (1 to 12)
[day] (1 to 31)
[yr] (1998 to 2035)
4004 [Date] Active: Always.
or [Day]
4005 [mo]
4006 [day]
4007 [yr]
r/w
Every Day (0)
Sunday (1)
Monday (2)
Tuesday (3)
Wednesday (4)
Thursday (5)
Friday (6)
Saturday (7)
00:00:00 to 23:59:59
Every Day (0) 4008 r/w
Active: Always.
00:00:00
Active: Always.
[h] (0 to 23)
[m] (0 to 59)
[s] (0 to 59)
[h] (0)
[m] (0)
[s] (0)
4009
4010
4011
r/w
Ramp Time or Ramp Rate or Soak Step
…>Edit Profile > Profile x (1 to 40) > Edit Step > Step x (1 to 256) > Ramp Time or Ramp Rate or Soak Step
Wait for
Wait for an event or
process value. (Digital inputs must be
configured in the
Setup Page before
they can be used
here.) The F4 can be
programmed to wait
for up to 4 event inputs and 3 analog inputs.
Step does not wait (0)
Step waits for…(1)
Step does not 4012 r/w
wait (0)
4103 r
Digital Outputs 1 to 8
Off (0)
Turn an event output on or off. (Digital On (1)
outputs must be configured in the Setup
Page before they can
be used here. Verify
that the setup
matches events.)
Event Output
4030
4111
4031
4112
4032
4113
4033
4114
4034
4115
4035
4116
4036
4117
4037
4118
r/w
r
r/w
r
r/w
r
r/w
r
r/w
r
r/w
r
r/w
r
r/w
r
Active if digital inputs are configured as wait for events.
Dig
Out
[1]
[1]
[2]
[2]
[3])
[3])
[4]
[4]
[5]
[5]
[6]
[6]
[7]
[7]
[8]
[8]
Active if digital outputs are configured as events.
✔ NOTE: To edit profiles through serial communications, see p. 7.17,
✔ NOTE: Two sets of Modbus registers contain profile information:
In edit mode, the number of the profile being edited is at 4000, and
the number of the step being edited is at 4001. When the profile is
running, the number of the profile being run is at 4100, and the
number of the step being run is at 4101. All run addresses are read
only.
4.12 ■ Profile Programming
Watlow Series F4S/D
Profiles Page Parameter Table
Parameter
Description
Time
Set the time in
hours, minutes and
seconds.
Rate
Select the rate of
change by entering
degrees per minute.
Set Point Channel 1
Set the target for the
Channel 1 process
value (temperature,
etc.) at the end of
this step.
Set Point Channel 2
Set the target for the
Channel 2 process
value (temperature,
etc.) at the end of
this step.
PID Set
Select the PID set
for each channel.
Guarantee Soak
Select this feature.
Range
(Modbus Value)
Default
Modbus
Register
read/write
[I/O, Set, Ch]
Conditions for
Parameters to Appear
00:00:01 to 99:59:59
[h] (0 to 99)
[m] (0 to 59)
[s] (0 to 59)
00:00:01
(0)
(0)
(1)
Ch
4009 r/w [h]
4119 r
[h]
4010 r/w [m]
4120 r [m]
4011 r/w [s]
4121 r
[s]
Active if Step is set to Ramp
Time or Soak.
.1 to 3,000.0 degrees
per minute
(1 to 30000)
.1
4043 r/w
Active if Step is set to Rate and
controller is not Dual Channel.
Set point low limit to
set point high limit
75 (75)
4044 r/w
4122 r
Active if Step is set to T ime or
Rate.
Set point low limit to
set point high limit
75 (75)
4045 r/w
4123 r
Active if Step is set to T ime and
controller is Dual Channel.
Channel 1 PID 1 to 5
Channel 2 PID 6 to 10
[1] (0 to 4)
[2] (0 to 4)
[1] (0)
[2] (0)
No (0)
Yes (1)
No (0)
4046 r/w
4124 r
4047 r/w
4125 r
Ch
[1]
[1]
[2]
[2]
Active: Always.
4048 r/w
4049 r/w
Ch
[1]
[2]
Active: Always.
Wait for:
… > Profile (1 to 40) > Edit Step > Step x (1 to 256) > Ramp Time or Ramp Rate or Soak Step > Wait for:
Step Does/Does Not Wait
Do not wait for any
condition.
Step Wait For…
Wait for the chosen
condition.
Does not wait (0)
Wait for (1)
—
Event Input x (1 to 4)
Analog Input x (1 to 3)
4012 r/w
—
4012 r/w
Active: Always.
✔ NOTE: Two sets of Modbus registers contain profile information: In edit mode, the number of the profile being edited is at
4000, and the number of the step being edited is at 4001. When
the profile is running, the number of the profile being run is at
4100, and the number of the step being run is at 4101. All run
addresses are read only.
✔ NOTE: For more information about how parameter settings
affect the controller’s operation, see the Features Chapter.
Watlow Series F4S/D
Profile Programming ■ 4.13
Profiles Page Parameter Table
Parameter
Range
(Modbus Value)
Description
Don’t Wait (0)
Wait for Off (1)
Select whether or
not to wait for a dig- Wait for On (2)
ital signal to initiate
this step.
Event Input x (1 to 4)
Analog Input x (1 to 3)
Select whether or
not to wait for a
process value to initiate this step.
Don’t Wait (0)
Wait (1)
Default
Don’t Wait (0)
Don’t Wait (0)
Modbus
Register
read/write
[I/O, Set, Ch]
4013
4104
4014
4105
4015
4106
4016
4107
r/w
r
r/w
r
r/w
r
r/w
rw
4021 r/w
4108 r
4023 r/w
4109 r
4025 r/w
4110 r
Input
[1]
[1]
[2]
[2]
[3]
[3]
[4]
[4]
[1]
[1]
[2]
[2]
[3]
[3]
Conditions for
Parameters to Appear
Active if the selected Event Input
is Enabled.
Active if the selected Analog
Input is present (Analog Input
1 always is).
Analog Input x (1 to 3)
… > Ramp Time or Ramp Rate or Soak Step > Wait for: > To Wait for > Analog Input x (1 to 3)
Enter Analog Input x
Select the process
value that will initiate this step.
Range Low to Range
High
Follow input
selected
4022 r/w
4024 r/w
4026 r/w
Input
[1]
[2]
[3]
Active: Always.
Event Output
… > Edit Step > Step x (1 to 256) > Ramp Time or Ramp Rate or Soak Step > Event Output
Output x (1 to 8)
Select this Digital
Output to be on or
off.
Off (0)
On (1)
Off (0)
4030
4111
4031
4112
4032
4113
4033
4114
4034
4115
4035
4116
4036
4117
4037
4118
Output
r/w [1]
r
[1]
r/w [2]
r
[2]
r/w [3]
r
[3]
r/w [4]
r
[4]
r/w [5]
r
[5]
r/w [6]
r
[6]
r/w [7]
r
[7]
r/w [8]
r
[8]
Active if the associated Digital
Output is set to Event.
ç
WARNING:
Check the configuration of the controller on the Setup Page before starting and running a profile (if the Setup Page is not
locked). Make sure settings are appropriate to the profile. If
the Setup Page is accessible, failure to check the configuration
before running a profile could result in damage to equipment
and/or property, and/or injury or death to personnel.
✔ NOTE: Two sets of Modbus registers contain profile information: In edit mode, the number of the profile being edited is at
4000, and the number of the step being edited is at 4001. When
the profile is running, the number of the profile being run is at
4100, and the number of the step being run is at 4101. All run
addresses are read only.
4.14 ■ Profile Programming
Watlow Series F4S/D
Profiles Page Parameter Table
Parameter
Description
Range
(Modbus Value)
Default
Modbus
Register
read/write
[I/O, Set, Ch]
Conditions for
Parameters to Appear
PID Set
… > Profile x (1 to 40) > Edit Step > Step x (1 to 256) > Ramp Time or Ramp Rate or Soak Step > PID Set
Channel 1
Select a PID set for
channel 1.
Channel 2
Select a PID set for
channel 2.
PID Set 1 (0)
PID Set 2 (1)
PID Set 3 (2)
PID Set 4 (3)
PID Set 5 (4)
PID Set 1 (0) 4046 r/w
4124 r
Active: Always.
PID Set 6 (5)
PID Set 7 (6)
PID Set 8 (7)
PID Set 9 (8)
PID Set 10 (9)
PID Set 6 (0) 4047 r/w
4125 r
Active if controller is Dual
Channel.
Jump
\Main > Profiles > Edit Profile > Profile x (1 to 40) > Edit Step > Step x (1 to 256) > Jump Step
Jump To Profile
Select name or number of profile to jump
to.
Step x (1 to 256)
Select number of
steps to jump to.
Number of Repeats*
Set number of times
to repeat the chosen
Jump.
1 to 40 or name
(1 to 40)
—
4050 r/w
—
1 to 256
(1 to 256)
1 (1)
4051 r/w
Active: Always.
1 to 999
(1 to 999)
1 (1)
4052 r/w
Active: Always.
End
Main > Profiles > Edit Profile > Profile x (1 to 40) > Edit Step > Step x (1 to 256) > End
Action
Hold (0)
Control Off (1)
Select what state
the controller will be All Off (2)
in at the end of the Idle (3)
profile.
All Off (2)
4060 r/w
Active: Always.
*✔ NOTE:
If a power out condition occurs during a profile and more than 20 jump steps are stored in the F4’s Profile Program
memory, the controller will terminate the profile and turn off all outputs if Continue, Hold or Terminate was selected as
the Power Out action. If Profile Reset or Go to Idle Set Point was selected, the controller will take those actions. A popup message will warn of this when the 21st jump step is programmed
✔ NOTE: Two sets of Modbus registers contain profile information: In edit mode, the number of the profile being edited is at 4000, and the number of the step being edited is at 4001. When the profile is running, the number of the profile being run is at 4100, and the number of the step being run is at 4101. All run addresses are read only.
✔ NOTE: For more information about how parameter settings affect the controller’s operation, see the Features Chapter.
Watlow Series F4S/D
Profile Programming ■ 4.15
Profiles Page Parameter Table
Parameter
Range
(Modbus Value)
Description
Default
Modbus
Register
read/write
[I/O, Set, Ch]
Conditions for
Parameters to Appear
Idle
Main > Profiles > Edit Profile > Profile x (1 to 40) > Edit Step / Step x (1 to 256) > Step > End > Idle
Enter Channel 1 Idle Set
Point
Select the channel 1
set point to be maintained after the profile ends.
Enter Channel 2 Idle Set
Point
Select the channel 2
set point to be maintained after the profile ends.
Set Point 1 Low Limit
to Set Point 1 High
Limit
75 (75)
4061 r/w
Active: Always (Channel 1).
Set Point 2 Low Limit
to Set Point 2 High
Limit
75 (75)
4062 r/w
Active if controller is set to Dual
Channel Ramping (Channel 2).
✔ NOTE: Two sets of Modbus registers contain profile information: In edit mode, the number of the profile being edited is at
4000, and the number of the step being edited is at 4001. When
the profile is running, the number of the profile being run is at
4100, and the number of the step being run is at 4101. All run
addresses are read only.
✔ NOTE: Press the Information Key ˆ for task-related tips.
4.16 ■ Profile Programming
Watlow Series F4S/D
5
Chapter Five: Setup
Setup Guidelines . . . . . . . . . . . . . . . . . . . . . . . . . . .5.1
Parameter Setup Order . . . . . . . . . . . . . . . . . . . . . .5.1
Customizing the Main Page . . . . . . . . . . . . . . . . . .5.2
Custom Main Page Parameter Record . . . . . . . . . .5.3
Sample Application . . . . . . . . . . . . . . . . . . . . . . . . .5.4
Setup Page Map . . . . . . . . . . . . . . . . . . . . . . . . . . .5.6
Setup Page Parameter Table . . . . . . . . . . . . . . . . .5.7
Setup Page Parameter Record . . . . . . . . . . . . . . . .5.16
Overview
This chapter presents information about configuring the controller software through the Setup Page.
This is where you:
• indicate what hardware the input and output
pins will be connected to;
• indicate how the inputs and outputs will function (Some of the inputs, outputs and functions
may not be visible, depending on the model
number of your controller);
• choose Celsius or Fahrenheit scales;
• make other choices about the display of information on the Main Page and in the Upper
(LED) Display; and
• set up computer communications with the controller.
Many control features are explained in greater
depth in the Features Chapter.
To reach the Setup Page from the Main Page, move
the cursor to Go to Setup, then press the Right .
Key.
✔ NOTE:
If the Series F4 is already installed in an environmental
chamber, oven, furnace or other equipment, most parameters will already be configured and access to the Setup
Page may be limited (locked).
Watlow Series F4S/D
Setup Guidelines
Setup Page parameters affect many areas of the
controller’s function:
• which parameters and functions are visible in
other pages;
• the way the controller responds to your application; and
• the way information is displayed on the Main
Page.
Setting up the controller properly will provide a
sound foundation for settings in other pages.
Parameter Setup Order
Initial configuration of the Series F4 is best done in
the following order:
1. Go to the System Menu (Setup Page). Here you
will indicate:
• the current time and date;
• preference of PID units — U.S. (Reset,
Rate) or SI (Integral, Derivative);
• preference of Celsius or Fahrenheit scales;
• whether or not to display these units in the
controller’s Upper Display,
✔ NOTE:
To see how all the pages, menus and parameters are
grouped, see the software map on the inside back cover of
this manual.
✔ NOTE:
For more information about how parameter settings affect
the controller’s operation, see the Features Chapter.
Setup ■ 5.1
• the guaranteed soak band for each channel;
• open-loop detection warnings on or off; and
• profile-power outage actions.
2. Go the Setup Page and define all inputs, outputs and alarms:
• Analog Input x (1 to 3);
• Digital Input x (1 to 4);
• Control Output x (1A, 1B, 2A or 2B);
• Alarm Output x (1 or 2);
• Retransmit Output x (1 or 2);
• Digital Output x (1 to 8); and
• Communications
3. Go to the Operations Page and tune or set the
PID sets.
4. Go to the Operations Page and set the alarm
set points.
5. Go to the Profiles Page to program the profiles.
Customizing the Main Page
Up to 16 lines can be added to the Main Page to
display status and information from the controller.
Go to the Setup Main Page menu on the Setup
Page. The first screen will prompt you to choose
one of the 16 lines to customize. "P1 Parameter" is
the first line; "P16 Parameter" is the 16th. After
choosing this line by pressing . , select a parameter to monitor. Your choices are:
•
•
•
•
•
•
•
•
•
•
•
•
•
•
•
•
•
None
Input 1 Value
Input 2 Value
Input 3 Value
Set Point 1
Set Point 2
% Power 1
% Power 2
Tune Status 1
Tune Status 2
Time
Date
Digital Ins*
Digital Outs*
Time Remaining
Current File
Current Step
• Active Ch1 PID Set
• Active Ch2 PID Set
• Last Jump Step
• Jump Count
• WaitFor Status
• Step Type
• Target SP1
• Target SP2
• Inner Set Point
• Custom Message 1
• Custom Message 2
• Custom Message 3
• Custom Message 4
• Input 1 Cal. Offset
• Input 2 Cal. Offset
• Input 3 Cal. Offset
* When a digital input or output is active, its number will
appear in the Main Page display; when it is inactive, its
position will be underlined.
When a Wait for condition is still pending, its number
will appear in the Main Page display; when it is no
longer being awaited, it will be underlined.
5.2 ■ Setup
After the initial configuration of the controller, the
most frequent changes will be to profiles, alarm set
points and PID sets. The Setup Page is likely to be
the least frequently accessed for changes. Some
manufacturers may prefer to lock out this page to
prevent user access.
Changing parameters may change other parameters. For example, changing the type of units (temperature, relative humidity, etc.) will affect settings
that assume either Reset or Rate and Integral or
Derivative. Changing from the Celsius to the
Fahrenheit scale will affect every parameter with a
numerical value in one or the other scale. In some
cases, a change in one parameter will affect the defaults of others.
✔ NOTE:
Changes to some parameters will affect other parameters.
Choose P:1 Display__
>None
Input 1 Value 30°C ■
Input 2 Value 76% ▼
SP
TargetSP1
SP2
TargetSP2
26°C
30°C
10%
100%
Input1
26°C
Input2
4%
Input3
20°C
PROFILE_2
Waiting
Step 2
Ramp Time
Wait
A_2_4 D1_34
Remain
00:00:00
Jump Step
0_0
Jump Count
0
Ch1 PID Set
1
Ch2 PID Set
3
Power1
0%
Power2
55%
Digital In
_234
Digital Out _2_4_678
Time
14:15:30
Date
10/7/99
Figure 2 — Example Parameters on the Custom Main
Page.
✔ NOTE:
For defaults, see the Keys, Displays and Navigation
Chapter.
Watlow Series F4S/D
Custom Main Page Parameter Record
Make a photocopy of this page and enter your settings on that copy .
Name ___________________________________________ Date ______________________________
Will always appear if active:
Will appear if active and
set up to appear:
Main Page
Input 1 Error
Input 2 Error
Input 3 Error
Alarm 1 Condition
Alarm 2 Condition
Autotuning Channel 1
Autotuning Channel 2
(Position on Main Page)
P1
P2
P3
P4
P5
P6
P7
P8
P9
P10
P11
P12
P13
P14
P15
P16
Choose from the column at
the far right the information
you want to appear on the
Main Page (in any order):
Will always appear:
Watlow Series F4S/D
Go
Go
Go
Go
to
to
to
to
____________________
____________________
____________________
____________________
____________________
____________________
____________________
____________________
____________________
____________________
____________________
____________________
____________________
____________________
____________________
____________________
(Possible parameters)
None
Input 1 Value
Input 2 Value
Input 3 Value
Set Point 1
Set Point 2
% Power 1
% Power 2
Tune status 1
Tune status 2
Time
Date
Digital Inputs
Digital Outputs
Time Remaining
Current File
Current Step
Active Ch1 PID Set
Active Ch2 PID Set
Last Jump Step
Jump Count
WaitFor Status
Step Type
Target SP1
Target SP2
Inner Set Point
Custom Message 1
Custom Message 2
Custom Message 3
Custom Message 4
Input1 Cal. Offset
Input2 Cal. Offset
Input3 Cal. Offset
Operations
Profiles
Setup
Factory
Setup ■ 5.3
Sample Application:
Setup for Environmental Testing
F4
1A
1B
2A
2B
Main Page___________
Go to Profiles
Go to Setup
Go to Factory
1
2
Analog Input 1
i
For greatest accuracy in measuring the chamber temperature, a resistance temperature detection (RTD) sensor has been wired to analog input 1. Andy wanted to measure tenths of degrees Fahrenheit,
with an alarm that would clear by itself if the temperature exceeded or fell below the active alarm set point band. Alarm set points
are determined in the Operations Page.
Sensor: RTD
Type: DIN
Decimal Point: 0.0
Set Point Low: 32.0°F
Retransmit Output 1
Before programming the profile
to run the temperature and humidity tests in the environmental chamber, Andy had to configure the controller to suit the
equipment and the test.
He went to the Setup Page,
System Menu, and established
the global system parameters,
including the real-time clock,
the date and the PID units.
Then he continued through the
list of inputs and outputs, configuring each and keeping
notes about his settings on the
User Setup Chart.
To enter, press the Right
Key. .
To exit, press the Left Key
repeatedly. ,
To track the temperature of the
equipment inside the chamber,
Andy configured a retransmit output to match input 3. He scrolled
down the list of inputs and outputs
on the Setup Page and found Retransmit Output. He chose 50ºF
and 150ºF, respectively, for the
Scale Low and Scale High; the
smaller the range, the higher the
resolution on the chart.
Source: Input 3
Current: 4-20mA
Scale Low: 50°F
Scale High: 150°F
Scale Offset: 0°F
Set Point High: 450.0°F
No Calibration Offset
0-second Filter
Self-Clearing Error
Control Output x
(1A, 1B, 2A, 2B)
Next, he scrolled back up to
set the control outputs controlling heat and humidity.
For the fastest possible
switching rate, tighter control
and longer heater life, he selected Burst Fire control for
each of them, designating 1A
and 1B as heat/cool outputs,
and 2A and 2B as
humidify/de-humidify outputs.
Digital Output 7
Digital output 7 was wired to an SSR (solid-state relay) that switched a solenoid valve controlling the flow of liquid nitrogen used for
cooling.
Name: Default
Function: Boost cool
Boost Power Level: -90%
Boost Delay: 20 seconds
Use a copy of the chart at
the end of this chapter to
record your settings.
5.4 ■ Setup
Watlow Series F4S/D
Analog Input 2
Analog Input 3
The humidity sensor on analog input 2 was a process sensor using a 4 to
20 mA signal, so Andy set the high end of the scale (20mA) for 100% and
the low (4mA) for 0% relative humidity (rh). Knowing that process sensor
displays are sometimes jumpy, he put a 1-second filter on it to stabilize it.
A thermocouple (type J) sensor
was adequate to measure the
temperature of the equipment
itself (analog input 3). The other
settings remained the same as
analog input 1.
Sensor: Process
Type: Vaisala
Units: % RH
Scale Low: 0%
Scale High: 100%
Set Point Low: 10%
Set Point High: 90%
No Calibration Offset
1-second Filter
Self-clearing Error
Sensor: Thermocouple
Type: J
Decimal Point: Whole numbers
only
Alarms
Digital Inputs
Digital Output 6
He assigned an alarm output
to indicate a temperature deviation on input 1, which
would monitor chamber temperature, and gave it a name
that would state the problem.
Then he set up the digital inputs for
remote functions. Digital input 1
would be wired to a key-lock switch
that requires the operator to have a
key to operate the controller and
chamber. Digital input 2 would be
wired to a door switch to stop the profile if the chamber door opens.
For heating and cooling capacity
and to accommodate the compressor, Andy assigned these
functions to Digital outputs 6, 7
and 8.
Name: TEMP DEV
Type: Deviation
Source: Input 1
Latch: Yes
Silencing: Self-clear
Alarm Hysteresis: 1, 1.0
Sides: Both
Condition: Close on alarm
Show: Yes
Digital Input 1
Name: KEYLOCK
Function: Panel lock
Condition: Start on high
Digital output 6, wired to a big
auxiliary heater, was set up to
kick in only when the main
heater worked at greater than
90% power (boost power level)
for more than 20 seconds (boost
delay).
Name: BOOST HEAT
Function: Boost heat
Boost Power Level: 90%
Boost Delay: 20 seconds
Digital Input 2
Name: Default
Function: Pause
Condition: High
Digital Output 8
Andy set the compressor control parameter to have the
compressor run only when cooling is needed.
% on Power: 0%
% off Power: 9%
Off Delay: 30 seconds
On Delay: 60 seconds
There was no computer connection, so Andy skipped
Communications.
Then he left the Setup Page and went to the Factory
Page where he put a password lock on the Setup Page,
Profile Page and Factory Page.
Finally, he went to the Operations Page and set the active alarm band:
-20°F
+20°F
Watlow Series F4S/D
Setup ■ 5.5
Setup Page Map
System
Guar. Soak Band1
Guar. Soak Band2
Current Time
Current Date
PID Units
°F or °C
Show °F or °C
Ch1 Autotune SP
Ch2 Autotune SP
Input 1 Fail
Input 2 Fail
Open Loop Ch1
Open Loop Ch2
Power-Out Time
Power-Out Action
Analog Input x (1 to 3)
Sensor
Type
Units
Decimal
Scale Low
Scale High
Choose Scaling
Ch2 Output Disable?
Enter In1 Temp Low
Enter In1 Temp High
SP Low Limit
SP High Limit
Calibration Offset
Filter Time
Error Latch
Cascade
Digital Input x (1 to 4)
Name
Function
Condition
Control Output x (1A, 1B, 2A or
2B)
Function
Cycle Time
Process
Hi Power Limit
Lo Power Limit
5.6 ■ Setup
Alarm Output x (1 and 2)
Name
Alarm Type
Alarm Source
Latching
Silencing
Alarm Hysteresis
Alarm Sides
Alarm Logic
Alarm Messages
Retransmit Output x (1 and 2)
Retransmit Source
Analog Range
Low Scale
High Scale
Scale Offset
Digital Output x (1 to 8)
Name
Function
Off
Event Output
Complementary Output
(Output 5 only)
Control Output
Boost Heat (Output 6 only)
Boost %Power
Boost Delay Time
Boost Cool (Output 7 only)
Boost %Power
Boost Delay Time
Compressor (Output 8 only)
Compressor On %Power
Compressor Off %Power
Compressor On Delay
Compressor Off Delay
Communications
Baud Rate
Address
Custom Main Page
Px (Parameter 1 to 16)
Process Display
Input 1 only
Alternating Display
IN1 Display Time
IN2 Display Time
IN3 Display Time
Static Message
Message 1 to 4
Watlow Series F4S/D
Setup Page Parameter Table
Parameter
Description
Range
(Modbus Value)
Default
Modbus
Register
read/write
(I/O, Set, Ch)
Conditions for
Parameters to Appear
System
Main > Setup > System
Guarantee Soak Band
x (1 or 2)
Select value above
and below set point
to define the soak
band.
Current Time
Enter actual time.
(24-hour-clock)
Current Date
Enter actual date.
Decimal choice
dependent:
1 to 30000, or
.1 to 3000.0, or
.01 to 300.0, or
.001 to 30.0
(1 to 30000)
1
hh:mm:ss
00:00:00 to 23:59:59
[hh] (0 to 23)
[mm] (0 to 59)
[ss] (0 to 59)
current time
Time
1916 [hh]
1917 [mm]
1918 [ss]
r/w
Active: Always.
M/D/Y
01/01/1998 to
12/31/2035
[mm] (1 to 12)
[dd] (1 to 31)
[yy] (1998 to 2035)
current date
Time
1919 [mm]
1920 [dd]
1921 [yy]
r/w
Active: Always.
900 r/w
Active: Always.
U S (Reset/Rate) (0)
U S (Reset/
Rate) (0)
Choose units for PID SI (Integral/Derivative)
(1)
control.
PID Units
°F or °C
Choose temperature
scale.
Show °F or °C
Choose whether to
display or hide °C or
°F in top display.
Channel x Autotune Set
Point (1 or 2)
Enter percent of
power supplied to
the output if analog
input sensor fails.
Band
[1]
[2]
Active: Always (1).
Active if controller is Dual Channel (2).
°F (0)
°C (1)
°F (0)
901 r/w
Active: Always.
No, Upper Display (0)
Yes, Upper Display (1)
Yes, Upper
Display (1)
1923 r/w
Active: Always.
50 to 150% (50 to 150)
90% (90)
0 to 100% Heat only
0 to 100% Cool only
-100% to +100%
Cool/Heat or
Heat/Cool
0% (0)
Set percent of set
point to auto-tune to.
Input x Fail (1 or 2)
1205
1212
r/w
Open Loop Channel x (1 or 2) Off (0)
On (1)
Select whether to
turn off outputs and
display an error
message.
Power-Out Time
0 to 30000 seconds
(0 to 30000)
Define a power out-
Off (0)
304
323
r/w
903
906
r/w
904
907
r/w
Point
[1]
[2]
Fail
[1]
[2]
Active: Always (1).
Active if controller is Dual
Channel (2).
Active: Always (1).
Active if controller is Dual
Channel (2).
Channel –
[1]
[2]
10 seconds
(10)
1213 r/w
–
Continue (0)
1206 r/w
Active: Always.
age in seconds.
Continue (0)
Choose controller re- Hold (1)
Terminate (2)
sponse to power outReset (3)
age while running a Idle Set Point 1 (4)
profile.
Idle Set Point 2 (5)
Power-Out Action
✔ NOTE:
For more information about how parameter settings affect the controller’s operation, see the Features Chapter.
Watlow Series F4S/D
Setup ■ 5.7
Setup Page Parameter Table
Parameter
Description
Range
(Modbus Value)
Default
Modbus
Register
read/write
(I/O,
[I/O, Set, Ch)
Ch]
Conditions for
Parameters to Appear
Analog Input x (1 to 3)
Main > Setup > Analog Input x (1 to 3)
Sensor
Select the sensor.
Type
Select the linearization table to apply
to the sensor.
Thermocouple (0)
RTD (1)
Process (2)
Wet Bulb-Dry Bulb* (3)
Off (4)
Thermocouple (0)
If Sensor is set to
thermocouple:
J (0)
K (1)
T (2)
E (3)
N (4)
C (5)
D (6)
PT2 (7)
R (8)
S (9)
B (10)
If Sensor is set to RTD
or Wet/Dry Bulb:
100Ω DIN (11)
100Ω JIS (12)
500Ω DIN (23
500Ω JIS (24))
1kΩ DIN (25)
1kΩ JIS (26)
If Sensor is set to
Process:
4 to 20mA (13)
0 to 20mA (14)
0 to 5V (15)
1 to 5V (16)
0 to 10V (17)
0 to 50mV (18)
If Analog Input 2 Sensor is set to Process
and Analog Input 2 is
selected:
•Vaisala 0 to 5V** (19)
•Vaisala 0 to 10V (20)
•Vaisala 0 to 20mA**
(21)
•Rotronics 0 to 5V***
(22)
J (0)
601
611
621
r/w
Input
[1]
[2]
[3]
Active: Always.
Input
[1]
[2]
[3]
Active: Always.
ç
CAUTION: Changes to
Sensor, Type, Units,
Decimals, Scales and Set
Point Limits will delete all
profiles stored in the F4’s
memory.
100Ω DIN
(11) for
100Ω RTD
models
500Ω DIN
(23) for
500Ω or
1kΩ models
The tenth character of your
model number determines
your RTD base resistance.
F4_ _-_ _ _ _-_ (1 to 4) R G
for 100Ω
F4_ _-_ _ _ _-_ (5 to 8) R G
for 500Ω and 1kΩ
4 to 20mA
(13)
* A wet bulb at input 2 uses the input 1 value to calculate the relative humidity on channel 2. The humidify and dehumidify outputs (2A and 2B) are disabled when the input 1 temperature is too
low (32°F [0°C]) or too high (212°F [100°C]). The relative humidity display in the Main Page will display “RH Disabled” for a low
temperature error and “RH Disabled” for a high temperature error.
** The Series F4 provides temperature compensation for the
Vaisala HMM-30C Solid-state Humidity Sensor to calculate relative humidity on channel 2. The humidify and dehumidify outputs (2A and 2B) are disabled when the input 1 temperature is
too low (-40°F [-40°C]) or too high (320°F [160°C]). The relative
5.8 ■ Setup
600
610
620
r/w
humidity display in the Main Page will display “RH Disabled”
for a low temperature error and “RH Disabled” for a high temperature error.
*** The Series F4 provides temperature compensation for the
Rotronics Model H260 Capacitive Relative Humidity Sensor to
calculate relative humidity on channel 2. The humidify and dehumidify outputs (2A and 2B) are disabled when the input 1
temperature is too low (-5°F [-20°C]) or too high (320°F [160°C]).
The relative humidity display in the Main Page will display “RH
Disabled” for a low temperature error and “RH Disabled” for a
high temperature error.
Watlow Series F4S/D
Setup Page Parameter Table
Parameter
Description
Altitude
Select an elevation
to compensate for
wet bulb evaporation rates.
Units
Select the units of
measure for the
input.
Decimal
Set the decimal
point for input.
Range
(Modbus Value)
Default
0 to 2499 ft (0)
2500 to 4999 ft (1)
5000 ft and above (2)
0 to 2499 ft
(0)
Temperature (0)
%rh (1)
psi (2)
units (3)
Temperature
(0)
0 (0)
0.0 (1)
0.00 process (2)
0.000 process (3)
0 (0)
Depends on sensor and —
decimal point selecSet unit value for
tion.
low end of current or
voltage range.
Scale Low
Scale High
Set unit value for
high end of current
or voltage range.
Choose Scaling
Select normal or inverse scaling.
Depends on sensor and —
decimal point selection.
Normal Scaling (0)
Normal (0)
Scale Inversion (1)
(Scale High corresponds to the lowest
process value, and
Scale Low corresponds to the highest
process value.)
No (0)
Disables Channel 2 Yes (1)
outside the range
defined by Enter In1
Temp Low and
Enter In1 Temp
High.
Choose the lowest
temperature at
which the channel 2
output is active.
Enter In1 Temp High
Choose the highest
temperature at
which the channel 2
output is active.
Set Point Low Limit
1902 r/w
608
618
628
r/w
606
616
626
r/w
680
682
684
r/w
681
683
685
r/w
693
694
695
r/w
Conditions for
Parameters to Appear
Active if Analog Input 2 Type is
Wet Bulb-Dry Bulb.
Input
[1]
[2]
[3]
Active if Sensor Type is set to
Process.
Input
[1]
[2]
[3]
Active if Sensor Type is set to
Process.
Input
[1]
[2]
[3]
Active if Sensor Type is set to
Process.
Input
[1]
[2]
[3]
Active if Sensor Type is set to
Process.
Input
[1]
[2]
[3]
Active if Sensor Type is set to
Process.
No (0)
696 r/w
Active if Analog Input 2, Sensor
is set to Process and Units is
set to %rh and Analog Input 1,
Units is set to Temperature.
Sensor range low to
In1 Temp High - 1
—
697 r/w
Active if Ch2 Output Disable is
set to Yes.
Sensor range high to
In1 Temp Low + 1
—
698 r/w
Active if Ch2 Output Disable is
set to Yes.
Depends on sensor.
—
Ch2 Output Disable?
Enter In1 Temp Low
Modbus
Register
read/write
(I/O, Set, Ch)
Set limit for minimum set point.
602
612
622
r/w
Input
[1]
[2]
[3]
Active: Always, except when Cascade is set to Process Cascade
or Deviation Cascade this is
masked for Analog Input 1.
✔ NOTE:
For more information about how parameter settings affect the controller’s operation, see the Features Chapter.
Watlow Series F4S/D
Setup ■ 5.9
Setup Page Parameter Table
Parameter
Description
Set Point High Limit
Range
(Modbus Value)
Default
Depends on sensor.
—
-19999 to 30000
0
-60.0 to 60.0
(-600 to 600)
0.0 (0)
1.0 if Decimal
is set to 0.0
and Sensor
Type is set
to Thermocouple or
RTD. (10)
Set limit for maximum set point.
Calibration Offset
Compensate for sensor errors or other
factors.
Filter Time
Set the filter time
for input in seconds.
Self Clear (0)
Select whether error Latch (1)
clear is automatic or
manual.
Cascade
No Cascade (0)
Process Cascade (1)
Select whether to
Deviation Cascade (2)
use the cascade
Error Latch
Self Clear (0)
No Cascade
(0)
Modbus
Register
read/write
(I/O,
[I/O, Set, Ch)
Ch]
603
613
623
r/w
605
615
625
r/w
604
614
624
r/w
607
617
627
r/w
Conditions for
Parameters to Appear
Input
[1]
[2]
[3]
Active: Always, except when Cascade is set to Process Cascade
or Deviation Cascade this is
masked for Analog Input 1.
Input
[1]
[2]
[3]
Active: Always.
Input
[1]
[2]
[3]
Active: Always.
Input
[1]
[2]
[3]
Active: Always.
1925 r/w
Active if Analog Input 3 is not set
to Off (variable selection only).
algorithm.
Cascade Low Range,
Process
Depends on sensor and —
decimal point selection.
1926 r/w
Active if Input 3 is not set to off
and Process Cascade is selected.
Cascade High Range,
Process
Depends on sensor and —
decimal point selection.
1927 r/w
Active if Input 3 is not set to off
and Process Cascade is selected.
Cascade Low Range,
Deviation
Depends on sensor and —
decimal point selection.
1926 r/w
Active if Input 3 is not set to off
and Deviation Cascade is
selected.
Cascade High Range,
Deviation
Depends on sensor and —
decimal point selection.
1927 r/w
Active if Input 3 is not set to off
and Deviation Cascade is
selected.
3000-3009
3010-3019
3020-3029
3030-3039
r/w
Active: Always.
Digital Input x (1 to 4)
Main > Setup > Digital Input x (1 to 4)
Name
Name the input for
easy reference.
<selected by user>
(ASCII Values)
DIGIT IN1
✔ NOTE:
Press the Information Key ˆ for more task-related tips.
5.10 ■ Setup
Watlow Series F4S/D
Setup Page Parameter Table
Parameter
Range
(Modbus Value)
Description
Function
Select the digital
input function.
Condition
Select the condition
to trigger digital
input.
Default
Off (0)
Off (0)
Panel Lock (1)
Reset Alarm (2)
Control Outputs Off (3)
All Outputs Off (4)
Digital Outputs Off (5)
Start Profile (6)*
Pause Profile (7)
Resume Profile (8)
Terminate Profile (9)
Wait for Event (10)
Low (0)
High (1)
Low (0)
Modbus
Register
read/write
(I/O, Set, Ch)
1060
1062
1064
1066
r/w
Input
[1]
[2]
[3]
[4]
Conditions for
Parameters to Appear
Active: Always.
While a profile is running, the
controller will not recognize
digital inputs that are programmed to start a profile.
Only one profile can be run at a
time.
* This prompt only appears if the
F4 memory contains a profile.
1061
1063
1065
1067
r/w
Input
[1]
[2]
[3]
[4]
Active: Always.
Digital inputs are edge triggered and require a transition
from high to low or low to high.
Control Output x (1A,1B, 2A and 2B)
Main > Setup > Control Output x (1A,1B, 2A and 2B)
Function
Select type of function for output.
Off (0)
Heat (1)
Cool (2)
Heat (1A and
Output
700
[1A]
2A) (1)
717
[1B]
Off (1B, 2B)
734
[2A]
(0)
751
r/w
Choose Cycle Time
Enter the value of
the variable burst
cycle time.
Enter Cycle Time
Select the duration
of cycle.
Process
Set process output
type.
High Power Limit
Set high limit control (PID mode only)
output power level.
Variable Burst (0)
Fixed Time (1)
.1 to 60
(1 to 600)
Fixed Time
1.0 sec. (10)
4
0
0
1
0
4 to 20mA (0)
to 20mA (0)
to 20mA (1)
to 5V (2)
to 5V (3)
to 10V (4)
Low Limit +1 to 100%
(Low Limit +1 to 100)
0% to High Limit -1
Set low limit control (0 to High Limit -1)
(PID mode only)
output power level.
Low Power Limit
509
559
2509
2559
r/w
100% (100)
0% (0)
506
556
2506
2556
r/w
701
718
735
752
r/w
714
731
748
765
r/w
715
732
749
766
r/w
Active if Analog Inputs 1 and 2
are enabled.
[2B]
Output
[1A]
[1B]
[2A]
[2B]
Active always.
Output
[1A]
[1B]
[2A]
[2B]
Active if the selected output is
not Process and Burst is set to
No.
Output
[1A]
[1B]
[2A]
[2B]
Active if the selected output is
set to a process output.
Output
[1A]
[1B]
[2A]
[2B]
Active: Always.
Output
[1A]
[1B]
[2A]
[2B]
Active: Always.
✔ NOTE:
For more information about how parameter settings affect the controller’s operation, see the Features Chapter.
Watlow Series F4S/D
Setup ■ 5.11
Setup Page Parameter Table
Parameter
Range
(Modbus Value)
Description
Default
Modbus
Register
read/write
(I/O,
[I/O, Set, Ch)
Ch]
Conditions for
Parameters to Appear
Alarm Output x (1 and 2)
Main > Setup > Alarm Output x (1 and 2)
Name
Name the alarm for
easy reference.
Alarm Type
Select the alarm
type.
Alarm Source
Select the alarm
source.
Latching
Choose automatic or
manual clearing of
alarms.
Silencing
Choose whether to
mask alarms on
power-up.
Alarm Hysteresis
Set the alarm
hysteresis.
Alarm Sides
Choose to enable
Low, High or both
alarm set points.
Alarm Logic
Select the alarm
logic option.
Alarm Messages
Select the alarm
message option.
<selected by user>
(ASCII Values)
ALARMX
Off (0)
Process (1)
Deviation (2)
Off (0)
Input 1 (0)
Input 2 (1)
Input 3 (2)
Off (0)
Alarm Self-Clears (0)
Alarm Latches (1)
Alarm SelfClears (0)
No (0)
Yes (1)
No (0)
1 to 30000
(1 to 30000)
3 (3)
Both (0)
Low (1)
High (2)
Both (0)
Open on Alarm (0)
Close on Alarm (1)
Open on
Alarm (0)
Yes on Main Page (0)
No (1)
Yes on Main
Page (0)
3200-3209
3210-3219
r/w
Active always.
Output
[1]
[2]
Active always.
Output
[1]
[2]
Active if the source is
enabled.
Output
[1]
[2]
Active if Alarm Output is
enabled.
Output
[1]
[2]
Active if Alarm Output is
enabled.
Output
[1]
[2]
Active if Alarm Output is
enabled.
Output
[1]
[2]
Active if Alarm Output is
enabled.
Output
[1]
[2]
Active if Alarm Output is
enabled.
Output
[1]
[2]
Active if Alarm Output is enabled.
702
719
r/w
716
733
r/w
704
721
r/w
705
722
r/w
703
720
r/w
706
723
r/w
707
724
708
725
r/w
Retransmit Output x (1 and 2)
Main > Setup > Retransmit Output x (1 and 2)
Retransmit Source
Choose a source for
retransmit signal.
Analog Range
Select voltage or
current range to
retransmit.
Input 1 (0)
Input 2 (1)
Input 3 (2)
Set Point 1 (3)
Set Point 2 (4)
Channel 1 Power (5)
Channel 2 Power (6)
Input 1 (0)
4
0
0
1
0
4 to 20mA (0)
to 20mA (0)
to 20mA (1)
to 5V (2)
to 5V (3)
to 10V (4)
-19999 to high scale -1
(minimum sensor
Set low end of currange) (-19999 to
rent or voltage
High Scale -1)
range to retransmit.
Low Scale
Low end of
sensor
range
709
726
r/w
836
837
r/w
710
727
r/w
Output Active: Always. (Values appear
[1]
only if the source is enabled.)
[2]
Output Active: Always.
[1]
[2]
Output Active: Always.
[1]
[2]
✔ NOTE:
Press the Information Key ˆ for more task-related tips.
5.12 ■ Setup
Watlow Series F4S/D
Setup Page Parameter Table
Parameter
Description
Range
(Modbus Value)
Low Scale +1 to 30000
Set high end of cur- (maximum sensor
range) (Low Scale +1
rent or voltage
to 30000)
range to retransmit.
Scale Offset
-19999 to 30000
Range Low to Range
Shift the scale up
High
(+) or down (-) to
(-19999 to 30000)
agree with source
signal.
High Scale
Default
High end of
sensor
range
0 (0)
Modbus
Register
read/write
(I/O, Set, Ch)
711
728
r/w
712
729
r/w
Output
[1]
[2]
Conditions for
Parameters to Appear
Active: Always.
Output Active: Always.
[1]
[2]
Digital Output x (1 to 8)
Main > Setup > Digital Output x (1 to 8)
Name
Name the digital
output for easy reference.
<selected by user>
(ASCII Values)
DIGIT OUTX 3100-3109
3110-3119
3120-3129
3130-3139
3140-3149
3150-3159
3160-3169
3170-3179
r/w
Off (0)
Off (0)
Event Output (1)
Choose a function
Complementary Output
for each digital out- (Digital 5) (2)
put.
*Control Output 1A
*Control Output 1B
*Control Output 2A
*Control Output 2B
**Boost Heat (Digital 6)
(3)
**Boost Cool (Digital 7)
(4)
**Compressor (Digital
8) (5)
Boost Percent Power
0% to 100% for Heat
Heat 100%
(100)
Enable boost above -100% to 0% for Cool
Cool -100% (chosen power level.
100)
Function
Boost Time Delay
Set time to delay
boost.
0 to 9999 seconds
(0 to 9999)
30 seconds
(30)
2001
2011
2021
2031
2041
2051
2061
2071
r/w
2052
2062
r/w
2054
2064
r/w
[1]
[2]
[3]
[4]
[5]
[6]
[7]
[8]
Active: Always.
Active: Always.
*Active if the selected output is not
Process.
**Operates based on Channel 1
power requirements.
Output
[6]
[7]
Active if Digital 6 or 7 Function
is set to Boost Heat or Boost
Cool.
Output
[6]
[7]
Active if Digital 6 or 7 Function
is set to Boost Heat or Boost
Cool.
ç
WARNING: Provide a labeled switch or circuit breaker near peripheral equipment permanently connected to the Series F4 digital outputs as the means of disconnection for
servicing. Failure to do so could result in damage to equipment and/or property,
and/or injury or death to personnel.
✔ NOTE:
For more information about how parameter settings affect the controller’s operation, see the Features Chapter.
Watlow Series F4S/D
Setup ■ 5.13
Setup Page Parameter Table
Parameter
Description
Range
(Modbus Value)
-100% to 100%
(-100 to 100)
The compressor will
be on below this
chosen power level.
Compressor Off % Power
Compressor on %
power to 100%
The compressor will
be off above this
chosen power level.
Compressor Off Delay
0 to 9999 seconds
(0 to 9999)
Set time to delay
compressor turn-off.
Compressor On % Power
Compressor On Delay
Set time to delay
compressor turn-on.
1 to 9999 seconds
(1 to 9999)
Default
0% (0)
Modbus
Register
read/write
(I/O, Set, Ch)
Conditions for
Parameters to Appear
2072 r/w
Active if Digital 8 Function is
Compressor.
Compressor
2073 r/w
on % power
Active if Digital 8 Function is
Compressor.
10 seconds
(10)
2075 r/w
Active if Digital 8 Function is
Compressor.
30 seconds
(30)
2074 r/w
Active if Digital 8 Function is
Compressor.
ç
WARNING: Provide a labeled switch or circuit breaker near peripheral equipment permanently connected to the Series F4 digital outputs as the means of disconnection for
servicing. Failure to do so could result in damage to equipment and/or property,
and/or injury or death to personnel.
Communications
Main > Setup > Communications
Baud Rate
Select transmission
speed.
Address
19200 (0)
9600 (1)
19200
Not
available
Active: Always.
1 to 247 (1 to 247)
1
Not
available
Active: Always.
Select address for
controller.
✔ NOTE:
Press the Information Key ˆ for more task-related tips.
5.14 ■ Setup
Watlow Series F4S/D
Setup Page Parameter Table
Parameter
Description
Range
(Modbus Value)
Default
Modbus
Register
read/write
(I/O, Set, Ch)
Conditions for
Parameters to Appear
Custom Main Page
Main > Setup > Custom Main Page
P x (1 to 16)
Choose parameters
to appear on Main
Page.
None (0)
Input 1 Value (1)
Input 2 Value (2)
Input 3 Value (3)
Set Point 1 (4)
Set Point 2 (5)
% Power 1 (6)
% Power 2 (7)
Tune status 1 (8)
Tune status 2 (9)
Time (10)
Date (11)
Digital Inputs (12)
Digital Outputs (13)
Time Remaining (14)
Current File (15)
Current Step (16)
Active Ch1 PID Set(17)
Active Ch2 PID Set(18)
Last Jump Step (19)
Jump Count (20)
WaitFor Status (21)
Step Type (22)
Target SP1 (23)
Target SP2 (24)
Inner Set Point (25)
Custom Message 1 (26)
Custom Message 2 (27)
Custom Message 3 (28)
Custom Message 4 (29)
Input1 Cal. Offset (30)
Input2 Cal. Offset (31)
Input3 Cal. Offset (32)
[1] Current
File (15)
[2] Current
Step (16)
[3] Input 2
Value (2)
[4] Set Point 1
(4)
[5] Set Point 2
(5)
[6] Step Type
(22)
[7] Target SP1
(23)
[8] Target SP2
(24)
[9] WaitFor
Status (21)
[10] Time Remaining (14)
[11] Digital Inputs (12)
[12] Digital
Outputs (13)
[13] % Power 1
(6)
[14] % Power 2
(7)
[15] Date (11)
[16] Time (10)
1400
1401
1402
1403
1404
1405
1406
1407
1408
1409
1410
1411
1412
1413
1414
1415
r/w
Par.
[1]
[2]
[3]
[4]
[5]
[6]
[7]
[8]
[9]
[10]
[11]
[12]
[13]
[14]
[15]
[16]
Active: Always.
Process Display
Main > Setup > Process Display
Input 1 Only
Input 1 (0)
Alternating (1)
Alternating Display
Input 1 Display Time (0
to 999)
Input 2 Display Time (0
to 999)
Input 3 Display Time (0
to 999)
Input 1 (0)
Active: Always.
5500
5501
5502
5503
[1]
[2]
[3]
Active if Inputs 2 and/or 3 are
active.
Static Message
Main > Setup > Static Message
Message 1 to 4
<selected by user>
(ASCII Values)
Message X
4501-4518[1] Active: Always.
4521-4538[2]
4541-4558[3]
4561-4578[4]
✔ NOTE:
For more information about how parameter settings affect the controller’s operation, see the Features Chapter.
Watlow Series F4S/D
Setup ■ 5.15
Setup Page Parameter Record
Make a photocopy of this page and enter your settings on that copy .
Setup Page
Name ___________________________________________
Date ______________________________
System Menu
Setting
Guar. Soak Band 1
Guar. Soak Band 2
Current Time
Current Date
PID Units
F or C
Show F or C
Ch1 Autotune SP
Ch2 Autotune SP
Input 1 Fail
Input 2 Fail
Open Loop Ch1
Open Loop Ch2
Power-Out Time
Power-Out Action
Input Menu
Analog In 1 Analog In 2 Analog In 3
Digital In 1
Digital In 2
Digital In 3
Digital In 4
Output 1A
Output 1B
Output 2A
Output 2B
Alarm 1
Alarm 2
Retrans 1
Retrans 2
Digit Out 1
Digit Out 2
Digit Out 3
Digit Out 4
Digit Out 5
Digit Out 6
Digit Out 7
Digit Out 8
Sensor
Type
Decimal
Altitude
Units
Scale Low
Scale High
Choose Scaling
Ch2 Output Disable?
Enter In1 Temp Low
Enter In1 Temp High
SP Low Limit
SP High Limit
Calibration Offset
Filter Time
Error Latch
Cascade
Name
Function
Condition
Control Output Menu
Function
Cycle Time
Process Type
Hi Power Limit
Lo Power Limit
Alarm Name
Alarm Type
Alarm Source
Latching
Silencing
Alarm Hysteresis
Alarm Sides
Alarm Logic
Alarm Messages
Retransmit Source
Analog Range
Low Scale
High Scale
Scale Offset
Digital Output Menu
Name
Function
Boost % Power
Boost Delay
Compressor On % Power
ower
Compressor Of
Off
f % Power
ower
Compressor On Delay
Compressor Off Delay
Communications Menu
Setting
Baud Rate
Address
5.16 ■ Setup
Watlow Series F4S/D
6
Chapter Six: Features
Inputs
Calibration Offset . . . . . . . . . . . . . . . . . . . . . . .6.2
Filter Time Constant . . . . . . . . . . . . . . . . . . . . .6.2
Set Point Low Limit and High Limit . . . . . . . . . .6.3
High Scale and Low Scale . . . . . . . . . . . . . . . .6.3
Event . . . . . . . . . . . . . . . . . . . . . . . . . . . . . . . . .6.3
Retransmit . . . . . . . . . . . . . . . . . . . . . . . . . . . . .6.3
Control Methods
On-Off Control . . . . . . . . . . . . . . . . . . . . . . . . . .6.4
Proportional Control . . . . . . . . . . . . . . . . . . . . .6.4
PI Control . . . . . . . . . . . . . . . . . . . . . . . . . . . . .6.5
PID Control . . . . . . . . . . . . . . . . . . . . . . . . . . . .6.5
Dead Band . . . . . . . . . . . . . . . . . . . . . . . . . . . .6.5
Multiple PID Sets . . . . . . . . . . . . . . . . . . . . . . .6.6
Burst Fire . . . . . . . . . . . . . . . . . . . . . . . . . . . . . .6.6
Other Features
Autotuning . . . . . . . . . . . . . . . . . . . . . . . . . . . . .6.7
Power-Out Time/Action . . . . . . . . . . . . . . . . . . .6.7
Alarms
Alarm Set Points . . . . . . . . . . . . . . . . . . . . . . . .6.8
Alarm Hysteresis . . . . . . . . . . . . . . . . . . . . . . . .6.8
Process or Deviation Alarms . . . . . . . . . . . . . . .6.8
Alarm Latching . . . . . . . . . . . . . . . . . . . . . . . . .6.9
Alarm Silencing . . . . . . . . . . . . . . . . . . . . . . . . .6.9
Alarm Sides . . . . . . . . . . . . . . . . . . . . . . . . . . . .6.9
Advanced Features
Boost Heat and Boost Cool . . . . . . . . . . . . . . .6.10
Compressor Control . . . . . . . . . . . . . . . . . . . . .6.10
Cascade . . . . . . . . . . . . . . . . . . . . . . . . . . . . . .6.11
Watlow Series F4S/D
Features ■ 6.1
Inputs/Outputs
Calibration Offset
You can view or change the offset value of inputs 1,
2 or 3 with the Calibration Offset parameter.
Temperature
Calibration offset allows a device to compensate for
an inaccurate sensor, lead resistance or other factors that affect the input value. A positive offset increases the input value, and a negative offset decreases the input value.
The negative calibration offset will
compensate for the difference
between the sensor reading and
the actual temperature.
Temperature Reading
from Sensor
Actual Process Temperature
Location in software: Setup Page > Analog Input x
(1 to 3).
Time
Figure 6.2a — Calibration Offset.
Filter Time Constant
Unfiltered Input Signal
Temperature
A time filter smooths an input signal by applying a
first-order filter time constant to the signal. Either
the displayed value or both the displayed and control values can be filtered. Filtering the displayed
value makes it easier to monitor. Filtering the signal may improve the performance of PID control in
a noisy or very dynamic system.
A positive value affects only the viewed values. A
negative value affects both the viewed and control
values.
Filtered Input Signal
Temperature
Location in software: Setup Page > Analog Inputs x
(1 to 3).
Time
Time
Figure 6.2b — Filtered and Unfiltered Input Signals.
Open Loop Detect
Open loop checks the integrity of the control loop, consisting of the controller output, power control, heater
and sensor.
If the output power is at its maximum for a period of time equal to the reset time and the input has not
changed at least ± 5°F, the controller will switch to Manual Mode at 0% output power . The upper screen will
display [oPLP`] and the lower screen will display “Open Loop.”
To clear an open loop error, after correcting the problem that caused it, turn the controller off then back on.
Location in software: Setup Page > System.
6.2 ■ Features
Watlow Series F4S/D
Set Point Low Limit and High Limit
You can view or change the input low limit (SP Low
Limit) and the input high limit (SP High Limit) for
analog inputs 1, 2 or 3.
Location in software: Setup Page > Analog Input x
(1 to 3).
High Limit of selected Sensor Range
SP High Limit Range (between High Limit of Sensor and SP Low Limit)
SP High Limit
Temperature
The controller constrains the set point to a value
between a low limit and a high limit. The high limit cannot be set higher than the sensor high limit
or lower than the low limit. The low limit cannot be
set lower than the sensor low limit or higher than
the high limit.
Set Point Range (must be between SP Low Limit and SP High Limit)
SP Low Limit
SP Low Limit Range (between Low Limit of Sensor and SP High Limit)
Low Limit of selected Sensor Range
Figure 6.3a — Sensor Ranges.
High Scale and Low Scale
When an analog input is selected as a process input, you must choose a value to represent the low
and high ends of the current or voltage range. For
example, if an analog input with a process sensor
type 4 to 20mA is selected and the units are % Relative Humidity, then 0% could represent 4mA and
100% could represent 20mA. The set point will be
limited to the range between scale low and scale
high.
Location in software: Setup Page > Retransmit
Output x (1 or 2).
Event
With an event input an operator can perform certain operations on a system by opening or closing a
switch or applying a dc logic signal to the controller. This feature can add convenience, safety or
security to a system.
In the Series F4, digital inputs 1 to 4 can be assigned as wait for events, as well as other process
control features.
Location in software: Setup Page > Digital Input x
(1 to 4) Condition.
Retransmit
Retransmit outputs 1 and 2 can retransmit an analog signal to serve as an input variable for another
device. The signal may serve as a remote set point
for another controller or as input for a chart
recorder to document system performance over
time.
Location in software: Setup Page.
Watlow Series F4S/D
Features ■ 6.3
Control Methods
On-Off Control
The heating action switches off when the process
temperature rises above the set point.
Temperature
On-off control switches the output either full on or
full off, depending on the input, set point and hysteresis values. The hysteresis value indicates the
amount the process value must deviate from the set
point to turn on the output. Increasing the value decreases the number of times the output will cycle.
Decreasing hysteresis improves controllability. With
hysteresis set to 0 the process value would stay closer to the set point, but the output would switch on
and off more frequently, causing “chattering.”
The heating action
switches on at startup.
The heating action switches on when the process temperature
drops below the set point minus the hysteresis.
Time
The cooling action
switches
on at startup.
Temperature
Hysteresis x (A or B) location in software: Operations Page > Edit PID > PID Set Channel x (1 or 2)
> PID Set x (1 to 5) or (6 or 10).
Hysteresis
Process Temperature
Set the proportional band to 0 to set the controller
to on-off control mode.
Proportional Band x (A or B) location in software:
Operations Page > Edit PID > PID Channel x (1 or
2) > PID Set x (1 to 5) or (6 or 10).
Set Point
Process Temperature
The cooling action switches on when
the process temperature rises above
the set point plus the hysteresis.
Hysteresis
Set Point
The cooling action switches off when the process
temperature drops below the set point.
✔ NOTE:
Fail power does not function in on/off control mode.
Time
Figure 6.4a — On-off Control for Heating and Cooling.
Proportional Control
Set Point
Overshoot
Droop
Proportional Band
Temperature
Some processes need to maintain a temperature or
process value closer to the set point than on-off control can provide. Proportional control provides closer control by adjusting the output when the temperature or process value is within a proportional
band. When the value is in the band, the controller
adjusts the output based on how close the process
value is to the set point; the closer to set point the
lower the output. This is similar to backing off on
the gas pedal of a car as you approach a stop sign.
It keeps the temperature or process value from
swinging as widely as it would with simple on-off
control. However, when a system settles down, the
temperature or process value tends to “droop” short
of the set point.
Time
Figure 6.4b — Proportional Control.
With proportional control the output power level
equals (set point minus process value) divided by
propband.
Location in software: Operations Page > Edit PID >
PID Set Channel x (1 or 2) > PID Set x (1 to 5) or (6
to 10).
6.4 ■ Features
Watlow Series F4S/D
Proportional plus Integral (PI) Control
Set Point
Droop
Proportional Band
Droop corrected
Temperature
The droop caused by proportional control (reset)
can be corrected by adding integral control. When
the system settles down the integral value is tuned
to bring the temperature or process value closer to
the set point. Integral determines the speed of the
correction, but this may increase the overshoot at
startup or when the set point is changed. T oo much
integral action will make the system unstable. Integral is cleared when the process value is outside of
the proportional band.
Integral (if units are set to SI) is measured in minutes per repeat. A low integral value causes a fast
integrating action.
Time
Figure 6.5a — Proportional Plus Integral Control.
Reset rate (if units are set to U.S.) is measured in
repeats per minute. A high reset value causes a fast
integrating action.
Location in software: Operations Page > Edit PID >
PID Set Channel x (1 or 2) > PID Set x (1 to 5) or
(6 to 10).
Proportional Integral Derivative (PID)
Control
Proportional Band
Proportional Band x 2
Temperature
Use derivative rate control to minimize overshoot
in a PI-controlled system. Derivative adjusts the
output based on the rate of change in the temperature or process value. Too much derivative will
make the system sluggish.
Reduced Overshoot
Set Point
Heating slows
Location in software: Operations Page > Edit PID >
PID Set Channel x (1 or 2) > PID Set x (1 to 5) or (6
to 10).
Time
Figure 6.5b — PID Control.
Dead Band
Proportional action ceases when the process value
is within the dead band. Integral action continues
to bring the process temperature to the set point.
When the dead band value is zero, the heating element activates when the temperature drops below
the set point, and the cooling element switches on
when the temperature exceeds the set point.
Cooling Set Point
Heating Set Point
Temperature
In a multiple PID application the dead bands above
and below the set point can save an application's
energy and wear by maintaining process temperature within acceptable ranges. Shifting the effective
cooling set point and heating set point keeps the
two systems from fighting each other.
Cooling Proportional Band
Cooling Dead Band
Heating Proportional Band
Time
Figure 6.5c — Cooling Dead Band.
Location in software: Operations Page > Edit PID
>PID Set Channel x (1 or 2) > PID Set x (1 to 5) or
6 to 10).
Watlow Series F4S/D
Features ■ 6.5
Multiple PID Sets
The Series F4 has five PID sets available for each
channel, sets 1 to 5 for Channel 1 and sets 6 to 10
for Channel 2, allowing optimal performance under
different conditions, loads and temperatures. In the
Static Set Point mode, PID Set 1 is used for Channel 1 and PID Set 6 is used for Channel 2 control.
When programming a profile, you can assign different sets to each Ramp step and Soak step.
A PID set includes proportional, integral and
derivative settings for outputs A and B. It also includes dead band, as long as the proportional band
is not set to 0.
Channel 1 (Heat/Cool)
Output 1A Heat
Output 1B Cool
PID Sets 1 to 5
PropBand A
Integral A
Derivative A
Dead Band A
PropBand B
Integral B
Derivative B
Dead Band B
Location in software: Operations Page > Edit PID >
PID Set Channel x (1 or 2) > PID Set x (1 to 5) or
(6 to 10).
Channel 2 (Relative
Humidity)
Output 2A Humidify
Output 2B Dehumidify
PID Sets 6 to 10
PropBand A
Integral A
Derivative A
Dead Band A
PropBand B
Integral B
Derivative B
Dead Band B
Burst Fire
Burst firing provides even output power with the
lowest level of noise generation (RFI). Burst fire is
the preferred method for controlling a resistive
load, providing a very short time base for longer
heater life.
100% output
10 ON, 0 OFF
The controller determines when the ac sine wave
will cross the 0-volts point, then switches the load
on or off only at this point, minimizing RFI.
Location in software: Setup Page > Control Output
x (1 to 3).
50% output
1 ON, 1 OFF
66% output
2 ON, 1 OFF
Figure 6.6 — Burst Fire.
6.6 ■ Features
Watlow Series F4S/D
Other Features
Auto-tune begins
(on-off control).
Autotuning
Auto-tune is complete
(PID control).
Auto-tune Set Point
(Default is 90% of process set point.)
Temperature
The autotuning feature allows the controller to
measure the system response to determine effective
settings for PID control. When autotuning is initiated the controller reverts to on-off control. The
temperature must cross the auto-tune set point
four times to complete the autotuning process.
Once complete, the controller controls at the normal set point, using the new parameters. The F4
stores the value in the PID set specified.
Process Set Point
Location in software: Operations Page > Autotune
PID > Channel 1 Autotune > PID Set x (1 to 5) or
Channel 2 Autotune > PID Set x (6 to 10).
Time
ç
CAUTION: Choose an auto-tune set point value that will
protect your product from possible damage from overshoot
or undershoot during the autotuning oscillations. If the
product is sensitive, carefully select the auto-tune set
point to prevent product damage.
Figure 6.7 — Autotuning.
✔ NOTE:
For manual tuning, see the Operations Chapter.
Power-Out Time/Power-Out Action
The Power-Out Time and Power-Out Action parameters direct the F4’s response to the interruption of
electrical power while running a profile. The F4’ s
battery-powered real-time clock tracks the amount
of time the power is out. When power is restored,
the controller compares this amount of time to the
Power-Out Time setting and takes whatever action
is selected in the Power-Out Action setting.
First, determine how long the power can be interrupted without adversely affecting results. Set the
Power-Out Time to this time. If power is returned
in less time than this setting, the profile will resume running. (The profile run time stops while
the power is off.) If power is returned after a time
longer than this setting, the F4 will take action
based on the user-configured Power-Out Action parameter: Continue (resume the profile at the point
that power was interrupted); Hold (hold the profile
at the point that power was interrupted); Terminate (stop the profile using the End step conditions); Reset (restart the profile from Step 1); Idle
(stop the profile and transfer to an idle setpoint).
Location in software: Setup Page > System > Power-Out Time > Power-Out Action.
Watlow Series F4S/D
✔ NOTE:
The Power Out Action occurs only if a profile was running when the power went out. If a profile was on hold, it
will return to its Hold status when the power returns.
Features ■ 6.7
Alarms
Alarms are activated when the process value or
temperature leaves a defined range. A user can
configure how and when an alarm is triggered,
what action it takes and whether it turns off automatically when the alarm condition is over.
Configure alarm outputs in the Setup Page before
setting alarm set points.
Alarm Set Points
The alarm high set point defines the process value
or temperature that will trigger a high side alarm.
It must be higher than the alarm low set point and
lower than the high limit of the sensor range.
The alarm low set point defines the temperature
that will trigger a low side alarm. It must be lower
than the alarm high set point and higher than the
low limit of the sensor range.
Location in software: Operations Page > Alarm Set
Point > Alarm x (1 or 2).
Alarm Hysteresis
Alarm hysteresis is a zone inside each alarm set
point. This zone is defined by adding the hysteresis
value to the alarm low set point or subtracting the
hysteresis value from the alarm high set point.
Location in software: Setup Page > Alarm Output x
(1 or 2).
High Side Alarm Range
Alarm High Set Point
Alarm Hysteresis
Temperature
An alarm state is triggered when the process value
reaches the alarm high or alarm low set point.
Alarm hysteresis defines how far the process must
return into the normal operating range before the
alarm can be cleared.
Normal Operating Range
Alarm Hysteresis
Alarm Low Set Point
Low Side Alarm Range
Time
Figure 6.8 — Alarm Settings.
Process or Deviation Alarms
A process alarm uses one or two absolute set points
to define an alarm condition. A deviation alarm uses one or two set points that are defined relative to
the control set point. High and low alarm set points
are calculated by adding and/or subtracting offset
values from the control set point. If the set point
changes, the window defined by the alarm set
points automatically changes with it.
In the Series F4 you must configure each alarm
output as either a process or deviation alarm.
Location in software: Setup Page > Alarm Output x
(1 or 2).
6.8 ■ Features
Watlow Series F4S/D
Alarm Latching
The alarm state begins when the temperature
reaches the alarm high set point.
A latched alarm will remain active after the alarm
condition has passed. It can only be deactivated by
the user. An alarm that is not latched (self-clearing) will deactivate automatically when the alarm
condition has passed.
Alarm Hysteresis
Temperature
Location in software: Setup Page > Alarm x (1 or 2).
Alarm High
Set Point
Normal Operating Range
Process
Temperature
The alarm state continues until the
temperature drops to the alarm high
set point minus the hysteresis. A
latching alarm could be turned off by
the operator at this point. A nonlatching alarm would turn off
automatically.
Alarm Low
Set Point
Time
Figure 6.9a — Alarm Latching.
Alarm Silencing
Alarm silencing has two uses:
2. Alarm silencing also allows the operator to disable the alarm output while the controller is in
an alarm state. The process temperature has to
enter the normal operating range beyond the
hysteresis zone to activate the alarm output
function.
Alarm High
Set Point
Hysteresis
Temperature
1. It is often used to allow a system to warm up
after it has been started up. W ith alarm silencing on, an alarm is not triggered when the process temperature is initially lower than the
alarm low set point. The process temperature
has to enter the normal operating range beyond
the hysteresis zone to activate the alarm function.
Process
Temperature
Normal Operating Range
Alarm is
enabled
here.
Hysteresis
Startup,
alarm is
disabled.
Alarm
is triggered
here.
Alarm Low
Set Point
Time
Figure 6.9b — Alarm Silencing.
If the Series F4 has an output that is functioning
as a deviation alarm, the alarm is silenced when
the set point is changed, until the process value reenters the normal operating range.
Location in software: Setup Page > Alarm x (1 or 2).
Alarm Sides
Alarms can be configured to trigger when the process exceeds the High Alarm Set Point, the Low
Alarm Set Point or both.
Location in software: Setup Page > Alarm x (1 or 2).
(Alarm set points are established in the Operations
Page.)
Watlow Series F4S/D
Features ■ 6.9
Advanced Features
Boost Heat and Boost Cool
The boost heat feature uses a digital output to turn
on an additional heater to speed up the heating. As
the process temperature approaches the set point,
the boost heat output switches off so that the process temperature doesn’t overshoot the set point.
100%
85%
Boost Percent
Power = 85%
Heat
% Power
Boost cool uses a digital output to speed up the
cooling process, typically by activating a solenoid
valve that releases liquid nitrogen.
For either boost heat or boost cool, set Boost % Power to define the power level that must be exceeded
before the boost output is activated. Use a positive
value for heating, a negative value for cooling.
To prevent the output from cycling and to extend
hardware life, define Boost Time Delay in seconds
to set the minimum period of time that the output
will remain off after an on cycle.
0%
On
Boost Heat
Off
Boost On Delay
= 30 Seconds
Time In Seconds
Time In Seconds
0%
Cool
% Power
The Series F4 uses digital output 6 for boost heat
and digital output 7 for boost cool. Hysteresis for
boost heat and cool is fixed at 5%.
Boost Percent
Power = 85%
-85%
-100%
Location in software: Setup > Digital Output x (6 or 7).
Boost Delay Time = 30 Seconds
On
Boost Cool
Off
Figure 6.10a — Boost Heat and Boost Cool.
Compressor Control
The compressor control can save wear on a compressor and prevent it from locking up from short
cycling. A bypass valve operated by a control output
regulates how the process is cooled, while a digital
output switches the compressor on and off.
The Series F4 uses digital output 8 for compressor
control. Compressor On % Power sets the power
level that will switch the compressor on. Compressor Off % Power sets the power level that will
switch the compressor off.
The compressor will not turn on until the output
power exceeds the Compressor On % Power for a
time longer than the Compressor On Delay. The
compressor will not turn off until the output power
exceeds the Compressor Off % Power for a time
longer than the Compressor Off Delay.
Heat
% Power
100%
2% Compressor
Off Power
2%
0%
0% Compressor
On Power
Cool
-100%
Time In Seconds
Compressor
Compressor On Delay = 45 Seconds
On
Off
Compressor Off Delay = 20 Seconds
Figure 6.10b — Compressor Power.
Location in software: Setup Page > Digital Output 8.
6.10 ■ Features
Watlow Series F4S/D
Cascade
This graph illustrates a thermal system with a long
lag time. Curve A represents a single-loop control
system with PID parameters that allow a maximum
heat-up rate. Too much energy is introduced and the
set point is overshot. In most systems with long lag
time, the process value may never settle out to an
acceptable error. Curve C represents a single-control
system tuned to minimize overshoot. This results in
unacceptable heat-up rates, taking hours to reach
the final value. Curve B shows a cascade system
that limits the energy introduced into the system,
allowing an optimal heat-up rate with minimal overshoot.
Cascade control uses two control loops (outer and inner) to control the process. The outer loop (analog
input 3) monitors the process or part temperature,
which is then compared to the set point. The result
of the comparison, the error signal, is acted on by
the settings in a Cascade Outer Loop PID set (1 to
5), which then generates a power level for the outer
loop. The set point for the inner loop is determined
by the outer-loop power level and the Cascade Low
Range/Deviation and the Cascade High Range/Deviation settings for analog input 3.
The inner loop (analog input 1) monitors the energy
source (heating and cooling), which is compared to
the inner loop set point generated by the outer loop.
The result of the comparison, the error signal, is acted on by the settings in a Cascade Inner Loop PID
set (1 to 5), which generates an output power level
between -100% to +100%. If the power level is positive the heat will be on; if the power level is negative the cool will come on.
In Series F4 controllers, cascade control is available
on channel 1. Analog input 3 is used to measure the
outer-loop process while analog input 1, the inner
loop, is used to measure the energy source. Power
from the energy sources are supplied by outputs 1A
and 1B.
Curve A (PID)
Set
Point
Curve B (Cascade)
Temperature
Cascade control is a control strategy in which one
control loop provides the set point for another loop.
It allows the process or part temperature to be
reached quickly while minimizing overshoot. Cascade is used to optimize the performance of thermal
systems with long lag times.
Curve C (Single-control)
Time
Figure 6.11a — Control Lag Times.
Outer Loop
Set Point
(Process Part)
+
Control Outer Loop
PID Set 1-5
ES/PB x 100 = % Out
Error Signal
-
Input 3
Outer Loop
(Process Part)
Percent Power
0% to 100%
Inner Loop
0% = Cascade Low Range/Deviation
100% = Cascade High Range/Deviation
+
Input 1
Inner Loop
(Energy Source)
-
Cascade Inner Loop
PID Set 1-5
Error Signal ES/PB x 100 = % Out
(Heat)
0 to 100%
(Cool)
0 to -100%
✔ NOTE: Cascade Low Range and Cascade High Range Set
Points for Input 1 (as shown above) are setup under Analog Input 3. Refer to Setup Chapter.
Figure 6.11b — Cascade Control.
outer-loop
thermocouple
F4
input 3
1A
1B
oil in
output 1
oil out
1
input 1
2
/M
A
limit
heater
inner-loop
thermocouple
limit sensor
Lube O il Ta nk
Figure 6.11 — Cascade Example
To set up and tune a system for cascade control, see
the Operations Chapter.
Location in software: Setup Page and Operations
Page.
Watlow Series F4S/D
Features ■ 6.11
Notes
6.12 ■ Features
Watlow Series F4S/D
7
Chapter Seven: Communications
Exception Responses . . . . . . . . . . . . . . . . . . . . . . .7.2
Modbus Registers (Alphabetical Order) . . . . . . . . .7.2
Profiling Registers . . . . . . . . . . . . . . . . . . . . . . . . . .7.10
Modbus Registers (Numerical Order) . . . . . . . . . . .7.13
Communications Page Parameter Table . . . . . . . . .7.16
Profiling Flow Charts . . . . . . . . . . . . . . . . . . . . . . . .7.17
Overview
The Series F4 uses Modbus as its communications
protocol. Modbus is a standard protocol developed
by A.E.G. Schneider. Modbus RTU enables a computer or PLC to read and write directly to registers
containing the controller’s parameters. With it you
can read all of the controller ’s parameters with a
few read commands.
Dependencies between parameters do exist. For
best results, program the parameters in the order
in which they appear in the Software Map (inside
back cover).
To program a profile using Modbus, refer to the
Profiling Flow Charts in this chapter.
For basic information about writing an application
using Modbus protocol, you may want to download
the electronic Watlow Controls Data Communications Guide from the Watlow web site:
http://www.watlow.com/prodtechinfo
Search on data communications reference.
If you already have a software application that uses Modbus, the Modbus Registers Table in this
chapter will provide the register number and values (sometimes called enumerated types) for each
parameter.
Exception Responses
When a controller cannot process a command it returns an exception response and sets
the high bit (0x80) of the command.
0x01 illegal command
0x02 illegal data address
0x03 illegal data value
Packet returned by controller:| nn |
∆
nn | nn | nn nn |
∆
∆
∆
|
∆
controller address (one byte)
command + 0x80
exception code (0x01 or 0x02 or 0x03)
CRC low byte
CRC high byte
✔ NOTE:
For ranges, conditions and other information, look up parameter names in
the Index, which will direct you to earlier chapters in this book.
Watlow Series F4S/D
Communications ■ 7.1
Series F4 Modbus Registers
Parameters Sorted Alphabetically
Register numbers listed are relative values. To convert to absolute values, add 40001. Registers for
profiling parameters are in a separate section at the end of this list, followed by a list of all Modbus registers in numerical order. For more information about parameters, see the Index.
103
r
107
r
111
r
115
r
102
r
106
r
303
r/w
322
r/w
303
r/w
322
r/w
703
r/w
720
r/w
704
r/w
721
r/w
707
r/w
724
r/w
302
r/w
321
r/w
302
r/w
321
r/w
708
r/w
725
r/w
1308
r/w
706
r/w
723
r/w
705
r/w
% Power Output 1A, Status
0 to 100 (expressed in %)
% Power Output 1B, Status
0 to 100 (expressed in %)
% Power Output 2A, Status
0 to 100 (expressed in %)
% Power Output 2B, Status
0 to 100 (expressed in %)
Alarm 1, Status
Alarm 2, Status
Alarm High Deviation, Alarm 1, Value
1 to 30000
Alarm High Deviation, Alarm 2, Value
1 to 30000
Alarm High Set Point, Alarm 1, Value
<per sensor> to Alarm 1 Low Set Point
Alarm High Set Point, Alarm 2, Value
<per sensor> to Alarm 2 Low Set Point
Alarm Hysteresis, Alarm Output 1
1 to 30000
Alarm Hysteresis, Alarm Output 2
1 to 30000
Alarm Latching, Alarm Output 1
0 Alarm Self-clears
1 Alarm Latches
Alarm Latching, Alarm Output 2
0 Alarm Self-clears
1 Alarm Latches
Alarm Logic, Alarm Output 1
0 Open on Alarm
1 Close on Alarm
Alarm Logic, Alarm Output 2
0 Open on Alarm
1 Close on Alarm
Alarm Low Deviation, Alarm 1, Value
-19999 to -1
Alarm Low Deviation, Alarm 2, Value
-19999 to -1
Alarm Low Set Point, Alarm 1, Value
<per sensor> to Alarm 1 High Set Point
Alarm Low Set Point, Alarm 2, Value
<per sensor> to Alarm 2 High Set Point
Alarm Messages, Alarm Output 1
0 Yes on Main Page
1 No
Alarm Messages, Alarm Output 2
0 Yes on Main Page
1 No
Alarm Set Point, Lockout
0 Full Access
1 Read Only
2 Password
3 Hidden
Alarm Sides, Alarm Output 1
0 Both
1 Low
2 High
Alarm Sides, Alarm Output 2
0 Both
1 Low
2 High
Alarm Silencing, Alarm Output 1
0 No
1 Yes
7.2 ■ Communications
722
r/w
716
r/w
733
r/w
702
r/w
719
r/w
1902
r/w
606
r/w
616
r/w
626
r/w
836
r/w
837
r/w
305
r/w
324
r/w
343
r/w
Alarm Silencing, Alarm Output 2
0 No
1 Yes
Alarm Source, Alarm Output 1
0 Input 1
1 Input 2
2 Input 3
Alarm Source, Alarm Output 2
0 Input 1
1 Input 2
2 Input 3
Alarm Type, Alarm Output 1
0 Off
1 Process
2 Deviation
Alarm Type, Alarm Output 2
0 Off
1 Process
2 Deviation
Altitude, Analog Input 2
0 0 to 2499 ft
1 2500 to 4999 ft
2 5000 ft and above
Analog Input 1 Decimal Point
0 0
1 00
2 000
3 0000
Analog Input 2 Decimal Point
0 0
1 00
2 000
3 0000
Analog Input 3 Decimal Point
0 0
1 00
2 000
3 0000
Analog Range, Retransmit Output 1
0 4 to 20mA
1 0 to 20mA
2 0 to 5V
3 1 to 5V
4 1 to 10V
Analog Range, Retransmit Output 2
0 4 to 20mA
1 0 to 20mA
2 0 to 5V
3 1 to 5V
4 1 to 10V
Autotune Channel 1
0 Tune Off
1 PID Set 1
2 PID Set 2
3 PID Set 3
4 PID Set 4
5 PID Set 5
Autotune Channel 2
0 Tune Off
1 PID Set 6
2 PID Set 7
3 PID Set 8
4 PID Set 9
5 PID Set 10
Autotune Cascade
0 Tune Off
1 PID Set 1
2 PID Set 2
3 PID Set 3
4 PID Set 4
5 PID Set 5
Watlow Series F4S/D
1306
r/w
304
r/w
323
r/w
2062
r/w
2064
r/w
2062
r/w
2064
r/w
2052
r/w
2054
r/w
2052
r/w
2054
r/w
605
r/w
615
r/w
625
r/w
1922
r
1925
r/w
Autotune PID, Lockout
0 Full Access
1 Read Only
2 Password
3 Hidden
Autotune Set Point, Channel 1, Value
50 to 150 (expressed in %)
Autotune Set Point, Channel 2, Value
50 to 150 (expressed in %)
Boost Cool % Power, Digital Output 7
-100 to 0 for Cool (expressed in %)
Boost Cool Delay On Time, Digital Output 7
0 to 9999 seconds
Boost Cool Power
Value
Boost Cool Time
Value
Boost Heat % Power, Digital Output 6
0 to 0 for Heat (expressed in %)
Boost Heat Delay On Time, Digital Output 6
0 to 9999 seconds
Boost Heat Power
Value in %
Boost Heat Time
Value in seconds
Calibration Offset, Analog Input 1
-19999 to 30000
Calibration Offset, Analog Input 2
-19999 to 30000
Calibration Offset, Analog Input 3
-19999 to 30000
Cascade Inner Set Point
Cascade Type
0 No Cascade
1 Process Cascade
2 Deviation Cascade
1926
Cascade, Range Low
r/w
Depends on Sensor
1927
Cascade, Range High
r/w
Depends on Sensor
1330-33 Change Password
r/w
ASCII codes 0-9, A-Z
1501
CJC1 AtoD, Diagnostics
r
HHHH see In 1 AD
1500
CJC1 Temp, Diagnostics
r
value
1532
CJC2 AtoD, Diagnostics
r
HHHH
1531
CJC2 Temp, Diagnostics
r
value
312
Clear Alarm 1, Key Press Simulation
w
write any value
331
Clear Alarm 2, Key Press Simulation
w
write any value
311
Clear Error 1, Key Press Simulation
w
write any value
330
Clear Error 2, Key Press Simulation
w
write any value
349
Clear Error 3, Key Press Simulation
w
write any value
1315
Clear Locks
0 yes
2046
Complementary Output, Digital Output 5
0 1A
1 1B
2 2A
3 2B
2073
Compressor Off % Power, Digital Output 8
r/w
Compressor On % Power to 100%
2075
Compressor Off Delay, Digital Output 8
r/w
0 to 9999 seconds
2072
Compressor On % Power, Digital Output 8
r/w
-100 to 100 (expressed in percent)
2074
Compressor On Delay, Digital Output 8
r/w
1 to 9999 seconds
Control Output Calibration — see Process Output Calibration
700
Control Output 1A Function
r/w
1 Heat
2 Cool
Watlow Series F4S/D
717
r/w
Control Output 1B Function
0 Off
1 Heat
2 Cool
734
Control Output 2A Function
✔ NOTE:
r/w
1 Heat
2 Cool
For more information about
751
Control Output 2B Function
parameters, see the Index.
r/w
0 Off
1 Heat
2 Cool
1920
Current Date, Day
r/w
1 to 31
1919
Current Date, Month
r/w
1 to 12
1921
Current Date, Year
r/w
1998 to 2035
1916
Current Time, Hour
r/w
0 o 23
1917
Current Time, Minutes
r/w
0 to 59
1918
Current Time, Seconds
r/w
0 to 59
1400-15 Custom Main Page Parameters (P1 to P16)
r/w
0 None
1 Input I Value
2 Input 2 Value
3 Input 2 Value
4 Set Point 1
5 Set Point 2
6 % Power 1
7 % Power 2
8 Tune Status 1
9 Tune Status 2
10 Time
11 Date
12 Digital Inputs
13 Digital Outputs
14 Time Remaining
15 Current File
16 Current Step
17 Active Ch1 PID Set
18 Active Ch2 PID Set
19 Last Jump Step
20 Jump Count
21 Wait For Status
22 Step Type
23 Target Set Point 1
24 Target Set Point 2
25 Internal Cascade Set Point
26 Custom Message 1
27 Custom Message 2
28 Custom Message 3
29 Custom Message 4
30 Input1 Cal. Offset
31 Input2 Cal. Offset
32 Input3 Cal. Offset
4501-18 Custom Message 1
r/w
4521-38 Custom Message 2
r/w
4541-58 Custom Message 3
r/w
4561-78 Custom Message 4
r/w
509
Cycle Time (type), Control Output 1A
r/w
0 Variable Burst
1 Fixed Time
506
Cycle Time Value, Control Output 1A
r/w
number
559
Cycle Time (type), Control Output 1B
r/w
0 Variable Burst
1 Fixed Time
556
Cycle Time Value, Control Output 1B
r/w
number
2509
Cycle Time (type), Control Output 2A
r/w
0 Variable Burst
1 Fixed Time
2506
Cycle Time Value, Control Output 2A,
r/w
number
2559
Cycle Time (type), Control Output 2B
0 Variable Burst
1 Fixed Time
Communications ■ 7.3
2556
r/w
2605
r/w
2615
r/w
2625
r/w
2635
r/w
2645
r/w
505
r/w
515
r/w
525
r/w
535
r/w
545
r/w
2655
r/w
2665
r/w
2675
r/w
2685
r/w
2695
r/w
555
r/w
565
r/w
575
r/w
585
r/w
595
r/w
2505
r/w
2515
r/w
2525
r/w
2535
r/w
2545
r/w
2555
r/w
2565
r/w
2575
r/w
2585
r/w
2595
r/w
2603
r/w
2613
r/w
2623
r/w
2633
r/w
2643
r/w
503
r/w
513
r/w
523
r/w
533
r/w
Cycle Time Value, Control Output 2B
number
Dead Band 1A, Cascade PID Set 1, Channel 1
0 to 30000
Dead Band 1A, Cascade PID Set 2, Channel 1
0 to 30000
Dead Band 1A, Cascade PID Set 3, Channel 1
0 to 30000
Dead Band 1A, Cascade PID Set 4, Channel 1
0 to 30000
Dead Band 1A, Cascade PID Set 5, Channel 1
0 to 30000
Dead Band 1A, PID Set 1, Channel 1
0 to 30000
Dead Band 1A, PID Set 2, Channel 1
0 to 30000
Dead Band 1A, PID Set 3, Channel 1
0 to 30000
Dead Band 1A, PID Set 4, Channel 1
0 to 30000
Dead Band 1A, PID Set 5, Channel 1
0 to 30000
Dead Band 1B, Cascade PID Set 1, Channel 1
0 to 30000
Dead Band 1B, Cascade PID Set 2, Channel 1
0 to 30000
Dead Band 1B, Cascade PID Set 3, Channel 1
0 to 30000
Dead Band 1B, Cascade PID Set 4, Channel 1
0 to 30000
Dead Band 1B, Cascade PID Set 5, Channel 1
0 to 30000
Dead Band 1B, PID Set 1, Channel 1
0 to 30000
Dead Band 1B, PID Set 2, Channel 1
0 to 30000
Dead Band 1B, PID Set 3, Channel 1
0 to 30000
Dead Band 1B, PID Set 4, Channel 1
0 to 30000
Dead Band 1B, PID Set 5, Channel 1
0 to 30000
Dead Band 2A, PID Set 6, Channel 2
1 to 30000
Dead Band 2A, PID Set 7, Channel 2
1 to 30000
Dead Band 2A, PID Set 8, Channel 2
1 to 30000
Dead Band 2A, PID Set 9, Channel 2
1 to 30000
Dead Band 2A, PID Set 10, Channel 2
1 to 30000
Dead Band 2B, PID Set 6, Channel 2
1 to 30000
Dead Band 2B, PID Set 7, Channel 2
1 to 30000
Dead Band 2B, PID Set 8, Channel 2
1 to 30000
Dead Band 2B, PID Set 9, Channel 2
1 to 30000
Dead Band 2B, PID Set 10, Channel 2
1 to 30000
Derivative 1A, Cascade PID Set 1, Channel 1
000 to 999 (expressed in hundredths of minutes)
Derivative 1A, Cascade PID Set 2, Channel 1
000 to 999 (expressed in hundredths of minutes)
Derivative 1A, Cascade PID Set 3, Channel 1
000 to 999 (expressed in hundredths of minutes)
Derivative 1A, Cascade PID Set 4, Channel 1
000 to 999 (expressed in hundredths of minutes)
Derivative 1A, Cascade PID Set 5, Channel 1
000 to 999 (expressed in hundredths of minutes)
Derivative 1A, PID Set 1, Channel 1
000 to 999 (expressed in hundredths of minutes)
Derivative 1A, PID Set 2, Channel 1
000 to 999 (expressed in hundredths of minutes)
Derivative 1A, PID Set 3, Channel 1
000 to 999 (expressed in hundredths of minutes)
Derivative 1A, PID Set 4, Channel 1
000 to 999 (expressed in hundredths of minutes)
7.4 ■ Communications
543
r/w
2653
r/w
2663
r/w
2673
r/w
2683
r/w
2693
r/w
553
r/w
563
r/w
573
r/w
583
r/w
593
r/w
2503
r/w
2513
r/w
2523
r/w
2533
r/w
2543
r/w
2553
r/w
2563
r/w
2573
r/w
2583
r/w
2593
r/w
201
1061
r/w
1060
r/w
1075
r/w
1076
r/w
213
1063
r/w
1062
r/w
Derivative 1A, PID Set 5, Channel 1
000 to 999 (expressed in hundredths of minutes)
Derivative 1B, Cascade PID Set 1, Channel 1
000 to 999 (expressed in hundredths of minutes)
Derivative 1B, Cascade PID Set 2, Channel 1
000 to 999 (expressed in hundredths of minutes)
Derivative 1B, Cascade PID Set 3, Channel 1
000 to 999 (expressed in hundredths of minutes)
Derivative 1B, Cascade PID Set 4, Channel 1
000 to 999 (expressed in hundredths of minutes)
Derivative 1B, Cascade PID Set 5, Channel 1
000 to 999 (expressed in hundredths of minutes)
Derivative 1B, PID Set 1, Channel 1
000 to 999 (expressed in hundredths of minutes)
Derivative 1B, PID Set 2, Channel 1
000 to 999 (expressed in hundredths of minutes)
Derivative 1B, PID Set 3, Channel 1
000 to 999 (expressed in hundredths of minutes)
Derivative 1B, PID Set 4, Channel 1
000 to 999 (expressed in hundredths of minutes)
Derivative 1B, PID Set 5, Channel 1
000 to 999 (expressed in hundredths of minutes)
Derivative 2A, PID Set 6, Channel 2
000 to 999 (expressed in hundredths of minutes)
Derivative 2A, PID Set 7, Channel 2
000 to 999 (expressed in hundredths of minutes)
Derivative 2A, PID Set 8, Channel 2
000 to 999 (expressed in hundredths of minutes)
Derivative 2A, PID Set 9, Channel 2
000 to 999 (expressed in hundredths of minutes)
Derivative 2A, PID Set 10, Channel 2
000 to 999 (expressed in hundredths of minutes)
Derivative 2B, PID Set 6, Channel 2
000 to 999 (expressed in hundredths of minutes)
Derivative 2B, PID Set 7, Channel 2
000 to 999 (expressed in hundredths of minutes)
Derivative 2B, PID Set 8, Channel 2
000 to 999 (expressed in hundredths of minutes)
Derivative 2B, PID Set 9, Channel 2
000 to 999 (expressed in hundredths of minutes)
Derivative 2B, PID Set 10, Channel 2
000 to 999 (expressed in hundredths of minutes)
Digital Input 1, Status
0 Low
1 High
Digital Input 1 Condition
0 Low
1 High
Digital Input 1 Function
0 Off
1 Panel Lock
2 Reset Alarm
3 Control Outputs Off
4 All Outputs Off
5 Digital Outputs Off
6 Start Profile
7 Pause Profile
8 Resume Profile
9 Terminate Profile
10 Wait For Event
Digital Input 1, Start Profile
1 to 40
Digital Input 1, Start Step
1 to 256
Digital Input 2, Status
0 Low
1 High
Digital Input 2 Condition
0 Low
1 High
Digital Input 2 Function
0 Off
1 Panel Lock
2 Reset Alarm
3 Control Outputs Off
4 All Outputs Off
5 Digital Outputs Off
6 Start Profile
7 Pause Profile
8 Resume Profile
9 Terminate Profile
10 Wait For Event
Watlow Series F4S/D
1077
r/w
1078
r/w
225
1065
r/w
1064
r/w
1079
r/w
1080
r/w
237
1067
r/w
1066
r/w
1081
r/w
1082
r/w
2000
r/w
2001
r/w
2010
r/w
2011
r/w
2020
r/w
2021
r/w
2030
r/w
2031
r/w
2040
r/w
2041
r/w
Digital Input 2, Start Profile
1 to 40
Digital Input 2, Start Step
1 to 256
Digital Input 3, Status
0 Low
1 High
Digital Input 3 Condition
0 Low
1 High
Digital Input 3 Function
0 Off
1 Panel Lock
2 Reset Alarm
3 Control Outputs Off
4 All Outputs Off
5 Digital Outputs Off
6 Start Profile
7 Pause Profile
8 Resume Profile
9 Terminate Profile
10 Wait For Event
Digital Input 3, Start Profile
1 to 40
Digital Input 3, Start Step
1 to 256
Digital Input 4, Status
0 Low
1 High
Digital Input 4 Condition
0 Low
1 High
Digital Input 4 Function
0 Off
1 Panel Lock
2 Reset Alarm
3 Control Outputs Off
4 All Outputs Off
5 Digital Outputs Off
6 Start Profile
7 Pause Profile
8 Resume Profile
9 Terminate Profile
10 Wait For Event
Digital Input 4, Start Profile
1 to 40
Digital Input 4, Start Step
1 to 256
Digital Output 1, Condition
0 Off
1 On
Digital Output 1 Function
0 Off
1 Event Output
Digital Output 2, Condition
0 Off
1 On
Digital Output 2 Function
0 Off
1 Event Output
Digital Output 3, Condition
0 Off
1 On
Digital Output 3 Function
0 Off
1 Event Output
Digital Output 4, Condition
0 Off
1 On
Digital Output 4 Function
0 Off
1 Event Output
Digital Output 5, Condition
0 Off
1 On
Digital Output 5 Function
0 Off
1 Event Output
2 Complementary Output
Watlow Series F4S/D
2946
r/w
2050
r/w
2051
r/w
2060
r/w
2061
r/w
2070
r/w
2071
r/w
2072
r/w
2073
r/w
2074
r/w
2055
r/w
1513
w
1307
r/w
607
r/w
617
r/w
627
r/w
1303
r/w
604
r/w
614
r/w
624
r/w
1602
1205
r/w
1212
r/w
1220
r/w
1221
r/w
714
r/w
731
r/w
Control Output
0 1A
1 1B
2 2A
3 2B
Digital Output 6, Condition
0 Off
1 On
Digital Output 6 Function
0 Off
1 Event Output
3 Boost Heat
Digital Output 7, Condition
0 Off
1 On
✔ NOTE:
Digital Output 7 Function
0 Off
For more information
1 Event Output
about parameters, see
4 Boost Cool
Digital Output 8, Condition
the Index.
0 Off
1 On
Digital Output 8 Function
0 Off
1 Event Output
5 Compressor
Power On
Value
Power Off
Value
Delay On
Value
Delay Off
Value
Display Test, Test
0 Off
1 On
Edit PID, Lockout
0 Full Access
1 Read Only
2 Password
3 Hidden
Error Latching, Analog Input 1
0 Self Clear
1 Latch
Error Latching, Analog Input 2
0 Self Clear
1 Latch
Error Latching, Analog Input 3
0 Self Clear
1 Latch
Factory Page, Lockout
0 Full Access
1 Read Only
2 Password
Filter Time, Analog Input 1
-600 to 600 (expressed in tenths of seconds)
Filter Time, Analog Input 2
-600 to 600 (expressed in tenths of seconds)
Filter Time, Analog Input 3
-600 to 600 (expressed in tenths of seconds)
Full Defaults
800 yes
Guaranteed Soak Band, Channel 1
1 to 9999
Guaranteed Soak Band, Channel 2
1 to 9999
Guaranteed Soak Band 1 Source
0 Input 1
1 Input 2
2 Input 3
Guaranteed Soak Band 2 Source
0 Input 1
1 Input 2
2 Input 3
High Power Limit, Control Output 1A
Low Limit+1 to 100 (expressed in %)
High Power Limit, Control Output 1B
Low Limit+1 to 100 (expressed in %)
Communications ■ 7.5
748
r/w
765
r/w
711
r/w
728
r/w
2607
r/w
2617
r/w
2627
r/w
2637
r/w
2647
r/w
507
r/w
517
r/w
527
r/w
537
r/w
547
r/w
2657
r/w
2667
r/w
2677
r/w
2687
r/w
2697
r/w
557
r/w
567
r/w
577
r/w
587
r/w
597
r/w
2507
r/w
2517
r/w
2527
r/w
2537
r/w
2547
r/w
2557
r/w
2567
r/w
2577
r/w
2587
r/w
2597
r/w
308
r/w
327
r/w
1504
r
101
903
r/w
210
High Power Limit, Control Output 2A
Low Limit+1 to 100 (expressed in %)
High Power Limit, Control Output 2B
Low Limit+1 to 100 (expressed in %)
High Scale, Retransmit Output 1
Low Scale +1 to 30000 (maximum sensor range)
High Scale, Retransmit Output 2
Low Scale +1 to 30000 (maximum sensor range)
Hysteresis 1A, Cascade PID Set 1, Channel 1
1 to 30000 (dependent on decimal setting)
Hysteresis 1A, Cascade PID Set 2, Channel 1
1 to 30000 (dependent on decimal setting)
Hysteresis 1A, Cascade PID Set 3, Channel 1
1 to 30000 (dependent on decimal setting)
Hysteresis 1A, Cascade PID Set 4, Channel 1
1 to 30000 (dependent on decimal setting)
Hysteresis 1A, Cascade PID Set 5, Channel 1
1 to 30000 (dependent on decimal setting)
Hysteresis 1A, PID Set 1, Channel 1
1 to 30000 (dependent on decimal setting)
Hysteresis 1A, PID Set 2, Channel 1
1 to 30000 (dependent on decimal setting)
Hysteresis 1A, PID Set 3, Channel 1
1 to 30000 (dependent on decimal setting)
Hysteresis 1A, PID Set 4, Channel 1
1 to 30000 (dependent on decimal setting)
Hysteresis 1A, PID Set 5, Channel 1
1 to 30000 (dependent on decimal setting)
Hysteresis 1B, Cascade PID Set 1, Channel 1
1 to 30000 (dependent on decimal setting)
Hysteresis 1B, Cascade PID Set 2, Channel 1
1 to 30000 (dependent on decimal setting)
Hysteresis 1B, Cascade PID Set 3, Channel 1
1 to 30000 (dependent on decimal setting)
Hysteresis 1B, Cascade PID Set 4, Channel 1
1 to 30000 (dependent on decimal setting)
Hysteresis 1B, Cascade PID Set 5, Channel 1
1 to 30000 (dependent on decimal setting)
Hysteresis 1B, PID Set 1, Channel 1
1 to 30000 (dependent on decimal setting))
Hysteresis 1B, PID Set 2, Channel 1
1 to 30000 (dependent on decimal setting)
Hysteresis 1B, PID Set 3, Channel 1
1 to 30000 (dependent on decimal setting)
Hysteresis 1B, PID Set 4, Channel 1
1 to 30000 (dependent on decimal setting)
Hysteresis 1B, PID Set 5, Channel 1
1 to 30000 (dependent on decimal setting)
Hysteresis 2A, PID Set 6, Channel 2
1 to 30000 (dependent on decimal setting)
Hysteresis 2A, PID Set 7, Channel 2
1 to 30000 (dependent on decimal setting)
Hysteresis 2A, PID Set 8, Channel 2
1 to 30000 (dependent on decimal setting)
Hysteresis 2A, PID Set 9, Channel 2
1 to 30000 (dependent on decimal setting)
Hysteresis 2A, PID Set 10, Channel 2
1 to 30000 (dependent on decimal setting)
Hysteresis 2B, PID Set 6, Channel 2
1 to 30000 (dependent on decimal setting)
Hysteresis 2B, PID Set 7, Channel 2
1 to 30000 (dependent on decimal setting)
Hysteresis 2B, PID Set 8, Channel 2
1 to 30000 (dependent on decimal setting)
Hysteresis 2B, PID Set 9, Channel 2
1 to 30000 (dependent on decimal setting)
Hysteresis 2B, PID Set 10, Channel 2
1 to 30000 (dependent on decimal setting)
Idle Set Point, Channel 1, Power Out Action
number
Idle Set Point, Channel 2, Power Out Action
number
Input 1 AtoD, Diagnostics
HHHH
Input 1 Error, Status
Input 1 Fail % Power, System
-100 to 100 (expressed in %)
Input 1 Open Loop, Status
7.6 ■ Communications
8
r
100
r
1603
1505
r
105
906
r/w
222
9
r
104
r
1608
1506
r
109
10
r
108
r
1613
2601
r/w
2611
r/w
2621
r/w
2631
r/w
2641
r/w
501
r/w
511
r/w
521
r/w
531
r/w
541
r/w
Input 1 Type, Diagnostics
Univ
Input 1 Value, Status
value
Input 1, Calibrate
1 0 mV Thermocouple
2 50 mV Thermocouple
3 32° Type J
4 Ground
5 Lead
6 15.0 ohms
7 380.0 ohms
8 0.000 V
9 10.000 V
10 4.000 mA
11 20.000 mA
Input 2 AtoD, Diagnostics
HHHH
Input 2 Error, Status
Input 2 Fail % Power, System
-100 to 100 (expressed in %)
Input 2 Open Loop, Status
Input 2 Type, Diagnostics
Univ
None
Input 2 Value, Status
value
Input 2, Calibrate
1 0 mV Thermocouple
2 50 mV Thermocouple
3 32° Type J
4 Ground
5 Lead
6 15.0 ohms
7 380.0 ohms
8 0.000 V
9 10.000 V
10 4.000 mA
11 20.000 mA
Input 3 AtoD, Diagnostics
HHHH
Input 3 Error, Status
Input 3 Type, Diagnostics
Univ
None
Input 3 Value, Status
value
Input 3, Calibrate
1 0 mV Thermocouple
2 50 mV Thermocouple
3 32° Type J
4 Ground
5 Lead
6 15.0 ohms
7 380.0 ohms
8 0.000 V
9 10.000 V
10 4.000 mA
11 20.000 mA
Integral 1A , Cascade PID Set 1, Channel 1
000 to 9999 (expressed in hundredths of minutes)
Integral 1A , Cascade PID Set 2, Channel 1
000 to 9999 (expressed in hundredths of minutes)
Integral 1A , Cascade PID Set 3, Channel 1
000 to 9999 (expressed in hundredths of minutes)
Integral 1A , Cascade PID Set 4, Channel 1
000 to 9999 (expressed in hundredths of minutes)
Integral 1A , Cascade PID Set 5, Channel 1
000 to 9999 (expressed in hundredths of minutes)
Integral 1A , PID Set 1, Channel 1
000 to 9999 (expressed in hundredths of minutes)
Integral 1A , PID Set 2, Channel 1
000 to 9999 (expressed in hundredths of minutes)
Integral 1A , PID Set 3, Channel 1
000 to 9999 (expressed in hundredths of minutes)
Integral 1A , PID Set 4, Channel 1
000 to 9999 (expressed in hundredths of minutes)
Integral 1A , PID Set 5, Channel 1
000 to 9999 (expressed in hundredths of minutes)
Watlow Series F4S/D
2651
r/w
2661
r/w
2671
r/w
2681
r/w
2691
r/w
551
r/w
561
r/w
571
r/w
581
r/w
591
r/w
2501
r/w
2511
r/w
2521
r/w
2531
r/w
2541
r/w
2551
r/w
2561
r/w
2571
r/w
2581
r/w
2591
r/w
1515
r
715
r/w
732
r/w
749
r/w
766
r/w
710
r/w
727
r/w
5
r
0
r
3200-09
r/w
3210-19
r/w
3000-06
r/w
3010-16
r/w
3020-26
r/w
3030-36
r/w
3100-09
r/w
3110-19
r/w
Integral 1B , Cascade PID Set 1, Channel 1
000 to 9999 (expressed in hundredths of minutes)
Integral 1B , Cascade PID Set 2, Channel 1
000 to 9999 (expressed in hundredths of minutes)
Integral 1B , Cascade PID Set 3, Channel 1
000 to 9999 (expressed in hundredths of minutes)
Integral 1B , Cascade PID Set 4, Channel 1
000 to 9999 (expressed in hundredths of minutes)
Integral 1B , Cascade PID Set 5, Channel 1
000 to 9999 (expressed in hundredths of minutes)
Integral 1B, PID Set 1, Channel 1
000 to 9999 (expressed in hundredths of minutes)
Integral 1B, PID Set 2, Channel 1
000 to 9999 (expressed in hundredths of minutes)
Integral 1B, PID Set 3, Channel 1
000 to 9999 (expressed in hundredths of minutes)
Integral 1B, PID Set 4, Channel 1
000 to 9999 (expressed in hundredths of minutes)
Integral 1B, PID Set 5, Channel 1
000 to 9999 (expressed in hundredths of minutes)
Integral 2A, PID Set 6, Channel 2
000 to 9999 (expressed in hundredths of minutes)
Integral 2A, PID Set 7, Channel 2
000 to 9999 (expressed in hundredths of minutes)
Integral 2A, PID Set 8, Channel 2
000 to 9999 (expressed in hundredths of minutes)
Integral 2A, PID Set 9, Channel 2
000 to 9999 (expressed in hundredths of minutes)
Integral 2A, PID Set 10, Channel 2
000 to 9999 (expressed in hundredths of minutes)
Integral 2B, PID Set 6, Channel 2
000 to 9999 (expressed in hundredths of minutes)
Integral 2B, PID Set 7, Channel 2
000 to 9999 (expressed in hundredths of minutes)
Integral 2B, PID Set 8, Channel 2
000 to 9999 (expressed in hundredths of minutes)
Integral 2B, PID Set 9, Channel 2
000 to 9999 (expressed in hundredths of minutes)
Integral 2B, PID Set 10, Channel 2
000 to 9999 (expressed in hundredths of minutes)
Line Frequency, Diagnostics
xx
Low Power Limit, Control Output 1A
0 to High Limit-1000 to 9999 (expressed in %)
Low Power Limit, Control Output 1B
0 to High Limit-1 (expressed in %)
Low Power Limit, Control Output 2A
0 to High Limit-1 (expressed in %)
Low Power Limit, Control Output 2B
0 to High Limit-1 (expressed in %)
Low Scale, Retransmit Output 1
-19999 to Scale High-1 (minimum sensor range)
Low Scale, Retransmit Output 2
-19999 to Scale High-2 (minimum sensor range)
Mfg. Date, Diagnostics
xxxx
Model, Diagnostics
F4
Name, Alarm 1 (10 characters)
ASCII equivalent decimal code — see Modbus Naming Flowchart
Name, Alarm 2 (10 characters)
ASCII equivalent decimal code — see Modbus Naming Flowchart
Name, Digital Input 1 (7 characters)
ASCII equivalent decimal code — see Modbus Naming Flowchart
Name, Digital Input 2 (7 characters)
ASCII equivalent decimal code — see Modbus Naming Flowchart
Name, Digital Input 3 (7 characters)
ASCII equivalent decimal code — see Modbus Naming Flowchart
Name, Digital Input 4 (7 characters)
ASCII equivalent decimal code — see Modbus Naming Flowchart
Name, Digital Output 1 (10 characters)
ASCII equivalent decimal code — see Modbus Naming Flowchart
Name, Digital Output 2 (10 characters)
ASCII equivalent decimal code — see Modbus Naming Flowchart
Watlow Series F4S/D
3120-29 Name, Digital Output 3 (10 characters)
r/w
ASCII equivalent decimal code — see Modbus Naming Flowchart
3130-39
r/w
3140-49
r/w
3150-59
r/w
3160-69
r/w
3170-79
r/w
904
r/w
907
r/w
200
r
16
r
17
r
18
r
19
r
900
r/w
1206
r/w
1213
r/w
5500
r/w
5501
r/w
5502
r/w
5503
r/w
1606
w
1607
w
1605
w
1604
w
1611
w
1612
w
1610
w
Name, Digital Output 4 (10 characters)
ASCII equivalent decimal code — see Modbus Naming Flowchart
Name, Digital Output 5 (10 characters)
ASCII equivalent decimal code — see Modbus Naming Flowchart
Name, Digital Output 6 (10 characters)
ASCII equivalent decimal code — see Modbus Naming Flowchart
Name, Digital Output 7 (10 characters)
ASCII equivalent decimal code — see Modbus Naming Flowchart
Name, Digital Output 8 (10 characters)
ASCII equivalent decimal code — see Modbus Naming Flowchart
Open Loop Channel 1
0 Off
1 On
✔ NOTE:
Open Loop Channel 2
0 Off
For more information
1 On
about parameters, see
Operation Mode, Status
0 Terminate Profile
the Index.
1 Pre-run Profile
2 Running Profile
3 Holding Profile
Output 1A Type, Diagnostics
1 DC
2 SSR
3 Process
Output 1B Type, Diagnostics
0 None
1 DC
2 SSR
3 Process
Output 2A Type, Diagnostics
0 None
1 DC
2 SSR
3 Process
Output 2B Type, Diagnostics
0 None
1 DC
2 SSR
3 Process
PID Units, System
0 US (Reset/Rate)
1 SI (Integral/Derivative)
Power-Out Action
0 Continue
1 Hold
2 Terminate
3 Reset
4 Idle Set Point 1
5 Idle Set Point 2
Power-Out Time
0 to 9999 seconds
Process Display
0 Input 1 only
1 Alternating
Process Display, Input 1 Time
0 to 999
Process Display, Input 2 Time
0 to 999
Process Display, Input 3 Time
0 to 999
Process Output 1A, 1.000V, Calibrate
0000 to 3000 (expressed in thousandths volts)
Process Output 1A, 10.000V, Calibrate
0000 to 12000 (expressed in thousandths volts)
Process Output 1A, 20.000mA, Calibrate
0000 to 24000 (expressed in microamps)
Process Output 1A, 4.000mA, Calibrate
0000 to 6000 (expressed in microamps)
Process Output 1B, 1.000V, Calibrate
0000 to 3000 (expressed in thousandths volts)
Process Output 1B, 10.000V, Calibrate
0000 to 12000 (expressed in thousandths volts)
Process Output 1B, 20.000mA, Calibrate
0000 to 24000 (expressed in microamps)
Communications ■ 7.7
1609
w
1616
w
1617
w
1615
w
1614
w
1621
w
1622
w
1620
w
1619
w
608
r/w
618
r/w
628
r/w
701
r/w
718
r/w
735
r/w
752
r/w
1309
r/w
2600
r/w
2610
r/w
2620
r/w
2630
r/w
2640
r/w
500
r/w
510
r/w
520
r/w
530
r/w
Process Output 1B, 4.000mA, Calibrate
0000 to 6000 (expressed in microamps)
Process Output 2A, 1.000V, Calibrate
0000 to 3000 (expressed in thousandths volts)
Process Output 2A, 10.000V, Calibrate
0000 to 12000 (expressed in thousandths volts)
Process Output 2A, 20.000mA, Calibrate
0000 to 24000 (expressed in microamps)
Process Output 2A, 4.000mA, Calibrate
0000 to 6000 (expressed in microamps)
Process Output 2B, 1.000V, Calibrate
0000 to 3000 (expressed in thousandths volts)
Process Output 2B, 10.000V, Calibrate
0000 to 12000 (expressed in thousandths volts)
Process Output 2B, 20.000mA, Calibrate
0000 to 24000 (expressed in microamps)
Process Output 2B, 4.000mA, Calibrate
0000 to 6000 (expressed in microamps)
Process Units, Analog Input
0 Temperature
1 %rh
2 psi
3 units
Process Units, Analog Input 2
0 Temperature
1 %rh
2 psi
3 units
Process Units, Analog Input 3
0 Temperature
1 %rh
2 psi
3 units
Process, Control Output 1A
0 4 to 20mA
1 0 to 20mA
2 0 to 10V
3 0 to 5V
4 1 to 5V
Process, Control Output 1B
0 4 to 20mA
1 0 to 20mA
2 0 to 10V
3 0 to 5V
4 1 to 5V
Process, Control Output 2A
0 4 to 20mA
1 0 to 20mA
2 0 to 10V
3 0 to 5V
4 1 to 5V
Process, Control Output 2B
0 4 to 20mA
1 0 to 20mA
2 0 to 10V
3 0 to 5V
4 1 to 5V
Profiles, Lockout
0 Full Access
1 Read Only
2 Password
3 Hidden
Proportional Band 1A, Cascade PID Set 1, Channel 1
0 to 30000
Proportional Band 1A, Cascade PID Set 2, Channel 1
0 to 30000
Proportional Band 1A, Cascade PID Set 3, Channel 1
0 to 30000
Proportional Band 1A, Cascade PID Set 4, Channel 1
0 to 30000
Proportional Band 1A, Cascade PID Set 5, Channel 1
0 to 30000
Proportional Band 1A, PID Set 1, Channel 1
0 to 30000
Proportional Band 1A, PID Set 2, Channel 1
0 to 30000
Proportional Band 1A, PID Set 3, Channel 1
0 to 30000
Proportional Band 1A, PID Set 4, Channel 1
0 to 30000
7.8 ■ Communications
540
r/w
2650
r/w
Proportional Band 1A, PID Set 5, Channel 1
0 to 30000
Proportional Band 1B, Cascade PID Set 1, Channel 1
0 to 30000
2660
r/w
2670
r/w
2680
r/w
2690
r/w
550
r/w
560
r/w
570
r/w
580
r/w
590
r/w
2500
r/w
2510
r/w
2520
r/w
2530
r/w
2540
r/w
2550
r/w
2560
r/w
2570
r/w
2580
r/w
2590
r/w
2604
r/w
2614
r/w
2624
r/w
2634
r/w
2644
r/w
504
r/w
514
r/w
524
r/w
534
r/w
544
r/w
2654
r/w
2664
r/w
2674
r/w
2684
r/w
2694
r/w
554
r/w
564
r/w
Proportional Band 1B, Cascade PID Set 2, Channel 1
0 to 30000
Proportional Band 1B, Cascade PID Set 3, Channel 1
0 to 30000
Proportional Band 1B, Cascade PID Set 4, Channel 1
0 to 30000
Proportional Band 1B, Cascade PID Set 5, Channel 1
0 to 30000
Proportional Band 1B, PID Set 1, Channel 1
0 to 30000
Proportional Band 1B, PID Set 2, Channel 1
0 to 30000
Proportional Band 1B, PID Set 3, Channel 1
0 to 30000
Proportional Band 1B, PID Set 4, Channel 1
0 to 30000
Proportional Band 1B, PID Set 5, Channel 1
0 to 30000
Proportional Band 2A, PID Set 6, Channel 2
0 to 30000
Proportional Band 2A, PID Set 7, Channel 2
0 to 30000
Proportional Band 2A, PID Set 8, Channel 2
0 to 30000
Proportional Band 2A, PID Set 9, Channel 2
0 to 30000
Proportional Band 2A, PID Set 10, Channel 2
0 to 30000
Proportional Band 2B, PID Set 6, Channel 2
0 to 30000
Proportional Band 2B, PID Set 7, Channel 2
0 to 30000
Proportional Band 2B, PID Set 8, Channel 2
0 to 30000
Proportional Band 2B, PID Set 9, Channel 2
0 to 30000
Proportional Band 2B, PID Set 10, Channel 2
0 to 30000
Rate 1A, Cascade PID Set 1, Channel 1
000 to 999 (expressed in hundredths of minutes)
Rate 1A, Cascade PID Set 2, Channel 1
000 to 999 (expressed in hundredths of minutes)
Rate 1A, Cascade PID Set 3, Channel 1
000 to 999 (expressed in hundredths of minutes)
Rate 1A, Cascade PID Set 4, Channel 1
000 to 999 (expressed in hundredths of minutes)
Rate 1A, Cascade PID Set 5, Channel 1
000 to 999 (expressed in hundredths of minutes)
Rate 1A, PID Set 1, Channel 1
000 to 999 (expressed in hundredths of minutes)
Rate 1A, PID Set 2, Channel 1
000 to 999 (expressed in hundredths of minutes)
Rate 1A, PID Set 3, Channel 1
000 to 999 (expressed in hundredths of minutes)
Rate 1A, PID Set 4, Channel 1
000 to 999 (expressed in hundredths of minutes)
Rate 1A, PID Set 5, Channel 1
000 to 999 (expressed in hundredths of minutes)
Rate 1B, Cascade PID Set 1, Channel 1
000 to 999 (expressed in hundredths of minutes)
Rate 1B, Cascade PID Set 2, Channel 1
000 to 999 (expressed in hundredths of minutes)
Rate 1B, Cascade PID Set 3, Channel 1
000 to 999 (expressed in hundredths of minutes)
Rate 1B, Cascade PID Set 4, Channel 1
000 to 999 (expressed in hundredths of minutes)
Rate 1B, Cascade PID Set 5, Channel 1
000 to 999 (expressed in hundredths of minutes)
Rate 1B, PID Set 1, Channel 1
000 to 999 (expressed in hundredths of minutes)
Rate 1B, PID Set 2, Channel 1
000 to 999 (expressed in hundredths of minutes)
Watlow Series F4S/D
574
r/w
584
r/w
594
r/w
2504
r/w
2514
r/w
2524
r/w
2534
r/w
2544
r/w
2554
r/w
2564
r/w
2574
r/w
2584
r/w
2594
r/w
2602
r/w
2612
r/w
2622
r/w
2632
r/w
2642
r/w
502
r/w
512
r/w
522
r/w
532
r/w
542
r/w
2652
r/w
2662
r/w
2672
r/w
2682
r/w
2692
r/w
552
r/w
562
r/w
572
r/w
582
r/w
592
r/w
2502
r/w
2512
r/w
2522
r/w
2532
r/w
2542
r/w
2552
r/w
Rate 1B, PID Set 3, Channel 1
000 to 999 (expressed in hundredths of minutes)
Rate 1B, PID Set 4, Channel 1
000 to 999 (expressed in hundredths of minutes)s
Rate 1B, PID Set 5, Channel 1
000 to 999 (expressed in hundredths of minutes)
Rate 2A, PID Set 6, Channel 2
000 to 999 (expressed in hundredths of minutes)
Rate 2A, PID Set 7, Channel 2
000 to 999 (expressed in hundredths of minutes)
Rate 2A, PID Set 8, Channel 2
000 to 999 (expressed in hundredths of minutes)
Rate 2A, PID Set 9, Channel 2
000 to 999 (expressed in hundredths of minutes)
Rate 2A, PID Set 10, Channel 2
000 to 999 (expressed in hundredths of minutes)
Rate 2B, PID Set 6, Channel 2
000 to 999 (expressed in hundredths of minutes)
Rate 2B, PID Set 7, Channel 2
000 to 999 (expressed in hundredths of minutes)
Rate 2B, PID Set 8, Channel 2
000 to 999 (expressed in hundredths of minutes)
Rate 2B, PID Set 9, Channel 2
000 to 999 (expressed in hundredths of minutes)
Rate 2B, PID Set 10, Channel 2
000 to 999 (expressed in hundredths of minutes)
Reset 1A, Cascade PID Set 1, Channel 1
000 to 999 (expressed in hundredths of minutes)
Reset 1A, Cascade PID Set 2, Channel 1
000 to 999 (expressed in hundredths of minutes)
Reset 1A, Cascade PID Set 3, Channel 1
000 to 999 (expressed in hundredths of minutes)
Reset 1A, Cascade PID Set 4, Channel 1
000 to 999 (expressed in hundredths of minutes)
Reset 1A, Cascade PID Set 5, Channel 1
000 to 999 (expressed in hundredths of minutes)
Reset 1A, PID Set 1, Channel 1
000 to 999 (expressed in hundredths of minutes)
Reset 1A, PID Set 2, Channel 1
000 to 999 (expressed in hundredths of minutes)
Reset 1A, PID Set 3, Channel 1
000 to 999 (expressed in hundredths of minutes)
Reset 1A, PID Set 4, Channel 1
000 to 999 (expressed in hundredths of minutes)
Reset 1A, PID Set 5, Channel 1
000 to 999 (expressed in hundredths of minutes)
Reset 1B, Cascade PID Set 1, Channel 1
000 to 999 (expressed in hundredths of minutes)
Reset 1B, Cascade PID Set 2, Channel 1
000 to 999 (expressed in hundredths of minutes)
Reset 1B, Cascade PID Set 3, Channel 1
000 to 999 (expressed in hundredths of minutes)
Reset 1B, Cascade PID Set 4, Channel 1
000 to 999 (expressed in hundredths of minutes)
Reset 1B, Cascade PID Set 5, Channel 1
000 to 999 (expressed in hundredths of minutes)
Reset 1B, PID Set 1, Channel 1
000 to 999 (expressed in hundredths of minutes)
Reset 1B, PID Set 2, Channel 1
000 to 999 (expressed in hundredths of minutes)
Reset 1B, PID Set 3, Channel 1
000 to 999 (expressed in hundredths of minutes)
Reset 1B, PID Set 4, Channel 1
000 to 999 (expressed in hundredths of minutes)
Reset 1B, PID Set 5, Channel 1
000 to 999 (expressed in hundredths of minutes)
Reset 2A, PID Set 6, Channel 2
000 to 999 (expressed in hundredths of minutes)
Reset 2A, PID Set 7, Channel 2
000 to 999 (expressed in hundredths of minutes)
Reset 2A, PID Set 8, Channel 2
000 to 999 (expressed in hundredths of minutes)
Reset 2A, PID Set 9, Channel 2
000 to 999 (expressed in hundredths of minutes)
Reset 2A, PID Set 10, Channel 2
000 to 999 (expressed in hundredths of minutes)
Reset 2B, PID Set 6, Channel 2
000 to 999 (expressed in hundredths per minutes)
Watlow Series F4S/D
2562
r/w
2572
r/w
2582
r/w
2592
r/w
1601
20
r
21
r
1626
r/w
1627
r/w
1625
r/w
1624
r/w
1631
r/w
1632
r/w
1630
r/w
1629
r/w
709
r/w
726
r/w
25
681
r/w
683
r/w
685
r/w
680
r/w
682
r/w
684
r/w
712
r/w
729
r/w
601
r/w
Reset 2B, PID Set 7, Channel 2
000 to 999 (expressed in hundredths of minutes)
Reset 2B, PID Set 8, Channel 2
000 to 999 (expressed in hundredths of minutes)
Reset 2B, PID Set 9, Channel 2
000 to 999 (expressed in hundredths of minutes)
Reset 2B, PID Set 10, Channel 2
000 to 999 (expressed in hundredths of minutes)
Restore Factory Calibration
0 Input 1
✔ NOTE:
1 Input 2
2 Input 3
For more information
Retransmit 1 Type, Diagnostics
about parameters, see
0 None
1 Process
the Index.
Retransmit 2 Type, Diagnostics
0 None
1 Process
Retransmit Output 1, 1.000V, Calibrate
0000 to 3000 (expressed in thousandths volts)
Retransmit Output 1, 10.000V, Calibrate
0000 to 12000 (expressed in thousandths volts)
Retransmit Output 1, 20.000mA, Calibrate
0000 to 24000 (expressed in microamps)
Retransmit Output 1, 4.000mA, Calibrate
0000 to 6000 (expressed in microamps)
Retransmit Output 2, 1.000V, Calibrate
0000 to 3000 (expressed in thousandths volts)
Retransmit Output 2, 10.000V, Calibrate
0000 to 12000 (expressed in thousandths volts)
Retransmit Output 2, 20.000mA, Calibrate
0000 to 24000 (expressed in microamps)
Retransmit Output 2, 4.000mA
0000 to 6000 (expressed in microamps)
Retransmit Source, Retransmit Output 1
0 Input 1
1 Input 2
2 Input 3
3 Set Point 1
4 Set Point 2
5 Channel 1 Power
6 Channel 2 Power
Retransmit Source, Retransmit Output 2
0 Input 1
1 Input 2
2 Input 3
3 Set Point 1
4 Set Point 2
5 Channel 1 Power
6 Channel 2 Power
Save Changes to EE
0 Save
Scale High, Analog Input 1
Depends on sensor and decimal point selection.
Scale High, Analog Input 2
Depends on sensor and decimal point selection.
Scale High, Analog Input 3
Depends on sensor and decimal point selection.
Scale Low, Analog Input 1
Depends on sensor and decimal point selection.
Scale Low, Analog Input 2
Depends on sensor and decimal point selection.
Scale Low, Analog Input 3
Depends on sensor and decimal point selection.
Scale Offset, Retransmit Output 1
-19999 to 30000
Range Low to Range High
Scale Offset, Retransmit Output 2
-19999 to 30000
Range Low to Range High
Sensor Type, Analog Input 1
0 J
1 K
2 T
3 E
4 N
5 C
6 D
7 PT2
8 R
9 S
10 B
Communications ■ 7.9
611
r/w
621
r/w
600
r/w
610
r/w
620
r/w
1
r
11 100Ω DIN RTD
12 100Ω JIS RTD
13 4 to 20 mA
14 0 to 20 mA
15 0 to 5V
16 1 to 5V
17 0 to 10V
18 0 to 50mV
23 500Ω DIN RTD
24 500Ω JIS RTD
25 1kΩ DIN RTD
26 1kΩ JIS RTD
Sensor Type, Analog Input 2
0 J
1 K
2 T
3 E
4 N
5 C
6 D
7 PT2
8 R
9 S
10 B
11 100Ω DIN RTD
12 100Ω JIS RTD
13 4 to 20 mA
14 0 to 20 mA
15 0 to 5V
16 1 to 5V
17 0 to 10V
18 0 to 50mV
19 Vaisala 0 to 5V
20 Vaisala 0 to 10V
21 Vaisala 0 to 20mA
22 Rotronics 0 to 5V
23 500Ω DIN RTD
24 500Ω JIS RTD
25 1kΩ DIN RTD
26 1kΩ JIS RTD
Sensor Type, Analog Input 3
0 J
1 K
2 T
3 E
4 N
5 C
6 D
7 PT2
8 R
9 S
10 B
11 100Ω DIN RTD
12 100Ω JIS RTD
13 4 to 20 mA
14 0 to 20 mA
15 0 to 5V
16 1 to 5V
17 0 to 10V
18 0 to 50mV
23 500Ω DIN RTD
24 500Ω JIS RTD
25 1kΩ DIN RTD
26 1kΩ JIS RTD
Sensor, Analog Input 1
0 Thermocouple
1 RTD
2 Process
4 Off
Sensor, Analog Input 2
0 Thermocouple
1 RTD
2 Process
3 Wet Bulb-Dry Bulb
4 Off
Sensor, Analog Input 3
0 Thermocouple
1 RTD
2 Process
4 Off
Serial Number, First Part, Diagnostics
0 to 999999
7.10 ■ Communications
2
r
Serial Number, Second Part, Diagnostics
0 to 999999
Set Locks — see individual items to lock
1330-33 Set Password
r/w
ASCII codes 0-9, A-Z
300
Set Point 1, Value
r/w
Range Low 1 to Range High 1
319
Set Point 2, Value
r/w
Range Low 2 to Range High 2
603
Set Point High Limit, Analog Input 1
r/w
Depends on Sensor
613
Set Point High Limit, Analog Input 2
r/w
Depends on Sensor
623
Set Point High Limit, Analog Input 3
r/w
Depends on Sensor
602
Set Point Low Limit, Analog Input 1
r/w
Depends on Sensor
612
Set Point Low Limit, Analog Input 2
r/w
Depends on Sensor
622
Set Point Low Limit, Analog Input 3
r/w
Depends on Sensor
1300
Set Point, Lockout
r/w
0 Full Access
1 Read Only
1302
Setup Page, Lockout
r/w
0 Full Access
1 Read Only
2 Password
3 Hidden
1923
r/w
313
w
332
w
4
2
3
r
1514
901
r/w
Show °F or °C
0 No, Upper Display
1 Yes, Upper Display
Silence Alarm 1, Key Press Simulation
Write any value
Silence Alarm 2, Key Press Simulation
Write any value
✔ NOTE:
Software Revision, Diagnostics
000 to 999
For more information
Software Number, Diagnostics
about parameters, see the
0 to 99
Index.
Test Outputs, Test
0 All Off
1 Output 1A
2 Output 1B
3 Output 2A
4 Output 2B
5 Retransmit 1
6 Retransmit 2
7 Alarm 1
8 Alarm 2
9 Digital Out 1)
10 Digital Out 2
11 Digital Out 3
12 Digital Out 4
13 Digital Out 5
14 Digital Out 6
15 Digital Out 7
16 Digital Out 8
17 All On
18 Communications
°F or °C, System
0 °F
1 °C
Profile Parameters
4004
r/w
4009
r/w
4010
r/w
4011
r/w
Autostart Profile Date or Day
0 Date
1 Day
Autostart Time (hours)
0 to 99
Autostart Time (minutes)
0 to 59
Autostart Time (seconds)
0 to 59
Watlow Series F4S/D
4006
r/w
4005
r/w
4007
r/w
4008
r/w
4046
r/w
4124
r
4047
r/w
4125
r
4111
r
4112
r
4113
r
4114
r
4115
r
4116
r
4117
r
4118
r
4002
4060
r/w
4061
r/w
4062
r/w
4129
r
4130
r
Autostart, Date (day)
1 to 31
Autostart, Date (month)
0 to 12
Autostart, Date (year)
1998 to 2035
Autostart, Day (of week)
0 Every Day
1 Sunday
2 Monday
3 Tuesday
4 Wednesday
5 Thursday
6 Friday
7 Saturday
Channel 1 PID Set, Ramp Rate or Ramp Time or Soak Steps
0 Channel 1 PID
1 Channel 2 PID
Channel 1 PID, Ramp Rate, Ramp Time or Soak Step, Current Profile Status
0 Channel 1 PID
1 Channel 2 PID
Channel 2 PID Set, Ramp Rate or Ramp Time or Soak Steps
0 Channel 1 PID
1 Channel 2 PID
Channel 2 PID Set, Ramp Rate, Ramp Time or Soak Step, Current Profile Status
0 Channel 1 PID
1 Channel 2 PID
Create Profile — see Edit Profile Action
Delete Profile or Step — see Edit Profile Action
Digital Output 1, Monitor Current Status (Profile)
0 Off
1 On
Digital Output 2, Monitor Current Status (Profile)
0 Off
1 On
Digital Output 3, Monitor Current Status (Profile)
0 Off
1 On
Digital Output 4, Monitor Current Status (Profile)
0 Off
1 On
Digital Output 5, Monitor Current Status (Profile)
0 Off
1 On
Digital Output 6, Monitor Current Status (Profile)
0 Off
1 On
Digital Output 7, Monitor Current Status (Profile)
0 Off
1 On
Digital Output 8, Monitor Current Status (Profile)
0 Off
1 On
Edit Profile Action
1 Create
2 Insert Step
3 Delete Current Profile
4 Delete Step
5 Start Profile
255 Delete All Profiles
End Action, End Step
0 Hold
1 Control Off
2 All Off
3 Idle
End Idle Setpoint Channel 1, End Step
Set Point 1 Low Limit to Set Point 1 High Limit
End Idle Setpoint Channel 2, End Step
Set Point 2 Low Limit to Set Point 2 High Limit
End Set Point Channel 1, Current Profile Status
Range Low 1 to Range High 1
End Set Point Channel 2, Current Profile Status
Range Low 2 to Range High 2
Watlow Series F4S/D
4030
r/w
4031
r/w
4032
r/w
4033
r/w
4034
r/w
4035
r/w
4036
r/w
4037
r/w
4048
r/w
4049
r/w
1210
w
4119
r
4126
r
4127
r
4052
r/w
4128
r
4050
r/w
4051
r/w
4120
r
3500-09
r/w
3510-19
r/w
3520-29
r/w
3530-39
r/w
3540-49
r/w
3550-59
3560-69
3570-79
3580-89
3590-99
3600-09
3610-19
3620-29
3630-39
3640-49
3650-59
3660-69
3670-79
3680-89
3690-99
Event Output 1, Ramp Rate or Ramp Time or Soak Steps
0 Off
1 On
Event Output 2, Ramp Rate or Ramp Time or Soak Steps
0 Off
1 On
Event Output 3, Ramp Rate or Ramp Time or Soak Steps
0 Off
1 On
Event Output 4, Ramp Rate or Ramp Time or Soak Steps
0 Off
1 On
Event Output 5, Ramp Rate or Ramp Time or Soak Steps
0 Off
1 On
Event Output 6, Ramp Rate or Ramp Time or Soak Steps
0 Off
1 On
Event Output 7, Ramp Rate or Ramp Time or Soak Steps
0 Off
1 On
Event Output 8, Ramp Rate or Ramp Time or Soak Steps
0 Off
1 On
Guaranteed Soak Channel 1, Ramp Rate or Ramp Time or Soak Steps
0 No
1 Yes
Guaranteed Soak Channel 2, Ramp Rate or Ramp Time or Soak Steps
0 No
1 Yes
Hold a Profile, Key Press Simulation
1 Hold
Hours Remaining, Ramp Time or Soak Step, Current Profile Status
0 to 23
Insert Step — see Edit Profile Action
Jump Count, Current Profile Status
1 to 999
Jump Profile, Current Profile Status
0 to 40
Jump Repeats, Jump Step
1 to 999
Jump Step, Current Profile Status
1-256
Jump to Profile, Jump Step
1 to 40
Jump to Step, Jump Step
1 to 256
Minutes Remaining, Ramp Time or Soak Step, Current Profile Status
0 to 59
Name, Profile 1 (10 characters)
ASCII equivalent decimal code — see Modbus Naming Flowchart
Name, Profile 2 (10 characters)
ASCII equivalent decimal code — see Modbus Naming Flowchart
Name, Profile 3 (10 characters)
ASCII equivalent decimal code — see Modbus Naming Flowchart
Name, Profile 4 (10 characters)
ASCII equivalent decimal code — see Modbus Naming Flowchart
Name, Profile 5 (10 characters)
ASCII equivalent decimal code — see Modbus Naming Flowchart
Name, Profile 6 (10 characters)
Name, Profile 7 (10 characters)
Name, Profile 8 (10 characters)
Name, Profile 9 (10 characters)
Name, Profile 10 (10 characters)
Name, Profile 11 (10 characters)
Name, Profile 12 (10 characters)
Name, Profile 13 (10 characters)
Name, Profile 14 (10 characters)
Name, Profile 15 (10 characters)
Name, Profile 16 (10 characters)
Name, Profile 17 (10 characters)
Name, Profile 18 (10 characters)
Name, Profile 19 (10 characters)
Name, Profile 20 (10 characters)
Communications ■ 7.11
3700-09
3710-19
3720-29
3730-39
3740-49
3750-59
3760-69
3770-79
3780-89
3790-99
3800-09
3810-19
3820-29
3830-39
3840-49
3850-59
3860-69
3870-79
3880-89
3890-99
4000
4100
4103
1218
r
4001
4101
1219
r
4003
r/w
4102
r
4108
r
4109
r
4110
r
4104
r
4105
r
4106
r
4107
r/w
4044
r/w
4045
r/w
4009
r/w
4010
r/w
Name, Profile 21 (10 characters)
Name, Profile 22 (10 characters)
Name, Profile 23 (10 characters)
Name, Profile 24 (10 characters)
Name, Profile 25 (10 characters)
Name, Profile 26 (10 characters)
Name, Profile 27 (10 characters)
Name, Profile 28 (10 characters)
Name, Profile 29 (10 characters)
Name, Profile 30 (10 characters)
Name, Profile 31 (10 characters)
Name, Profile 32 (10 characters)
Name, Profile 33 (10 characters)
Name, Profile 34 (10 characters)
Name, Profile 35 (10 characters)
Name, Profile 36 (10 characters)
Name, Profile 37 (10 characters)
Name, Profile 38 (10 characters)
Name, Profile 39 (10 characters)
Name, Profile 40 (10 characters)
Profile Edit Action — see Edit Profile Action
Profile Number
Profile Number, Current Status
Profile Ramp Waiting, Current Status
Profiles Remaining
0-40
Profile Step Number
Profile Step Number, Current Status
Profile Steps Remaining
0-256
Profile Step Type
1 Ramp Time
2 Ramp Rate
3 Soak
4 Jump
5 End (read only)
Profile Step Type, Current Status
1 Ramp Time
2 Ramp Rate
3 Soak
4 Jump
5 End
Profile Waiting for Analog Input 1, Current Status
0 Don’t Wait
1 Wait
Profile Waiting for Analog Input 2, Current Status
0 Don’t Wait
1 Wait
Profile Waiting for Analog Input 3, Current Status
0 Don’t Wait
1 Wait
Profile Waiting for Event 1, Current Status
0 Don’t Wait
1 Wait for Off
2 Wait for On
Profile Waiting for Event 2, Current Status
0 Don’t Wait
1 Wait for Off
2 Wait for On
Profile Waiting for Event 3, Current Status
0 Don’t Wait
1 Wait for Off
2 Wait for On
Profile Waiting for Event 4, Current Status
0 Don’t Wait
1 Wait for Off
2 Wait for On
Ramp Set Point Channel 1, Ramp Rate or Ramp Time Step
Range low to range high
Ramp Set Point Channel 2, Ramp Time Step
Range low to range high
Ramp Time (hours)
0 to 99
Ramp Time (minutes)
0 o 59
7.12 ■ Communications
4011
r/w
4043
r/w
1209
w
25
w
4119
r
4120
r
4121
r
4122
r
4123
r
4009
r/w
4010
r/w
4011
r/w
1217
w
4021
r/w
4022
r/w
4023
r/w
4024
r/w
4026
r/w
4025
r/w
4013
r/w
4014
r/w
4015
r/w
4016
r/w
4012
r/w
Ramp Time (seconds)
0 to 59
Rate, Ramp Rate Step
1 to 3000 units per minute
ReName Profile — see Name, Profile x
Resume a Profile, Key Press Simulation
1 Resume
Save Changes to EE
0
Hours Remaining, Ramp Time or Soak Step, Current Profile Status
0 to 99
Minutes Remaining, Ramp Time or Soak Step, Current Profile Status
0 to 59
Seconds Remaining, Ramp Time or Soak Step, Current Profile Status
0 to 59
Set Point Ch. 1, Ramp Rate, Ramp Time or Soak Step, Current Profile Status
Range low to range high
Set Point Ch. 2, Ramp Rate, Ramp Time or Soak Step, Current Profile Status
Range low to range high
Soak Step Time (hours)
0 to 99
Soak Step Time (minutes)
0 o 59
Soak Step Time (seconds)
0 o 59
Terminate a Profile, Key Press Simulation
1 Terminate
Wait For Analog 1, Ramp Rate or Ramp Time or Soak Steps
0 Don’t Wait
1 Wait
Wait For Analog 1, Value, Ramp Rate or Ramp Time or Soak Steps
Range Low to Range High
Wait For Analog 2, Ramp Rate or Ramp Time or Soak Steps
0 Don’t Wait
1 Wait
Wait For Analog 2, Value, Ramp Rate or Ramp Time or Soak Steps
Range Low to Range High
Wait For Analog 3 Value, Ramp Rate or Ramp Time or Soak Steps
Range Low to Range High
Wait For Analog 3, Ramp Rate or Ramp Time or Soak Steps
0 Don’t Wait
1 Wait
Wait For Event 1, Ramp Rate or Ramp Time or Soak Steps
0 Don’t Wait
1 Wait for Off
2 Wait for On
Wait For Event 2, Ramp Rate or Ramp Time or Soak Steps
0 Don’t Wait
1 Wait for Off
2 Wait for On
Wait For Event 3, Ramp Rate or Ramp Time or Soak Steps
0 Don’t Wait
1 Wait for Off
2 Wait for On
Wait For Event 4, Ramp Rate or Ramp Time or Soak Steps
0 Don’t Wait
1 Wait for Off
2 Wait for On
Wait/Don’t Wait, Ramp Rate or Ramp Time or Soak Steps
0 Don’t Wait
1 Wait for
Watlow Series F4S/D
Parameters Sorted by Modbus Register
0
1
2
3
4
5
8
9
10
16
17
18
19
20
21
25
100
101
102
103
104
105
106
107
108
109
111
115
200
201
210
213
222
225
237
300
302
303
304
305
308
311
312
313
319
321
322
323
324
327
330
331
332
343
349
500
501
502
503
504
505
506
507
509
510
511
512
513
514
515
Model, Diagnostics
Serial Number, First Part, Diagnostics
Serial Number, Second Part, Diagnostics
Software Number, Diagnostics
Software Revision, Diagnostics
Mfg. Date, Diagnostics
Input 1 Type, Diagnostics
Input 2 Type, Diagnostics
Input 3 Type, Diagnostics
Output 1A Type, Diagnostics
Output 1B Type, Diagnostics
Output 2A Type, Diagnostics
Output 2B Type, Diagnostics
Retransmit 1 Type, Diagnostics
Retransmit 2 Type, Diagnostics
Save Changes to EE
Input 1 Value, Status
Input 1 Error, Status
Alarm 1, Status
% Power Output 1A, Status
Input 2 Value, Status
Input 2 Error, Status
Alarm 2 , Status
% Power Output 1B, Status
Input 3 Value, Status
Input 3 Error, Status
% Power Output 2A, Status
% Power Output 2B, Status
Operation Mode, Status
Digital Input 1, Status
Input 1 Open Loop, Status
Digital Input 2, Status
Input 2 Open Loop, Status
Digital Input 3, Status
Digital Input 4, Status
Set Point 1, value
Alarm Low Set Point and Deviation, Alarm
1, value
Alarm High Set Point and Deviation, Alarm
1, value
Autotune Set Point, Channel 1, value
Autotune Channel 1
Idle Set Point, Channel 1, Power Out Action
Clear Error 1, Key Press Simulation
Clear Alarm 1, Key Press Simulation
Silence Alarm 1, Key Press Simulation
Set Point 2, value
Alarm Low Set Point and Deviation, Alarm
2, value
Alarm High Set Point and Deviation, Alarm
2, value
Autotune Set Point, Channel 2, value
Autotune Channel 2
Idle Set Point, Channel 2, Power Out Action
Clear Error 2, Key Press Simulation
Clear Alarm 2, Key Press Simulation
Silence Alarm 2, Key Press Simulation
Autotune Cascade
Clear Error 3, Key Press Simulation
Proportional Band 1A, PID Set 1, Channel 1
Integral 1A , PID Set 1, Channel 1
Reset 1A, PID Set 1, Channel 1
Derivative 1A, PID Set 1, Channel 1
Rate 1A, PID Set 1, Channel 1
Dead Band 1A, PID Set 1, Channel 1
Cycle Time value, Control Output 1A
Hysteresis 1A, PID Set 1, Channel 1
Cycle Time Type, Control Output 1A
Proportional Band 1A, PID Set 2, Channel 1
Integral 1A , PID Set 2, Channel 1
Reset 1A, PID Set 2, Channel 1
Derivative 1A, PID Set 2, Channel 1
Rate 1A, PID Set 2, Channel 1
Dead Band 1A, PID Set 2, Channel 1
Watlow Series F4S/D
517
520
521
522
523
524
525
527
530
531
532
533
534
535
537
540
541
542
543
544
545
547
550
551
552
553
554
555
556
557
559
560
561
562
563
564
565
567
570
571
572
573
574
575
577
580
581
582
583
584
585
587
590
591
592
593
594
595
597
600
601
602
603
604
605
606
607
608
610
611
612
613
614
615
Hysteresis 1A, PID Set 2, Channel 1
Proportional Band 1A, PID Set 3, Channel 1
Integral 1A , PID Set 3, Channel 1
Reset 1A, PID Set 3, Channel 1
Derivative 1A, PID Set 3, Channel 1
Rate 1A, PID Set 3, Channel 1
Dead Band 1A, PID Set 3, Channel 1
Hysteresis 1A, PID Set 3, Channel 1
Proportional Band 1A, PID Set 4, Channel 1
Integral 1A , PID Set 4, Channel 1
Reset 1A, PID Set 4, Channel 1
Derivative 1A, PID Set 4, Channel 1
Rate 1A, PID Set 4, Channel 1
Dead Band 1A, PID Set 4, Channel 1
Hysteresis 1A, PID Set 4, Channel 1
Proportional Band 1A, PID Set 5, Channel 1
Integral 1A , PID Set 5, Channel 1
Reset 1A, PID Set 5, Channel 1
Derivative 1A, PID Set 5, Channel 1
Rate 1A, PID Set 5, Channel 1
Dead Band 1A, PID Set 5, Channel 1
Hysteresis 1A, PID Set 5, Channel 1
Proportional Band 1B, PID Set 1, Channel 1
Integral 1B, PID Set 1, Channel 1
Reset 1B, PID Set 1, Channel 1
Derivative 1B, PID Set 1, Channel 1
Rate 1B, PID Set 1, Channel 1
Dead Band 1B, PID Set 1, Channel 1
Cycle Time value, Control Output 1B
Hysteresis 1B, PID Set 1, Channel 1
Cycle Time Type, Control Output 1B
Proportional Band 1B, PID Set 2, Channel 1
Integral 1B, PID Set 2, Channel 1
Reset 1B, PID Set 2, Channel 1
Derivative 1B, PID Set 2, Channel 1
Rate 1B, PID Set 2, Channel 1
Dead Band 1B, PID Set 2, Channel 1
Hysteresis 1B, PID Set 2, Channel 1
Proportional Band 1B, PID Set 3, Channel 1
Integral 1B, PID Set 3, Channel 1
Reset 1B, PID Set 3, Channel 1
Derivative 1B, PID Set 3, Channel 1
Rate 1B, PID Set 3, Channel 1
Dead Band 1B, PID Set 3, Channel 1
Hysteresis 1B, PID Set 3, Channel 1
Proportional Band 1B, PID Set 4, Channel 1
Integral 1B, PID Set 4, Channel 1
Reset 1B, PID Set 4, Channel 1
Derivative 1B, PID Set 4, Channel 1
Rate 1B, PID Set 4, Channel 1
Dead Band 1B, PID Set 4, Channel 1
Hysteresis 1B, PID Set 4, Channel 1
Proportional Band 1B, PID Set 5, Channel 1
Integral 1B, PID Set 5, Channel 1
Reset 1B, PID Set 5, Channel 1
Derivative 1B, PID Set 5, Channel 1
Rate 1B, PID Set 5, Channel 1
Dead Band 1B, PID Set 5, Channel 1
Hysteresis 1B, PID Set 5, Channel 1
Sensor, Analog Input 1
Sensor Type, Analog Input 1
Set Point Low Limit, Analog Input 1
Set Point High Limit, Analog Input 1
Filter Time, Analog Input 1
Calibration Offset, Analog Input 1
Decimal Point, Analog Input 1
Error Latching, Analog Input 1
Process Units, Analog Input 1
Sensor, Analog Input 2
Sensor Type, Analog Input 2
Set Point Low Limit, Analog Input 2
Set Point High Limit, Analog Input 2
Filter Time, Analog Input 2
Calibration Offset, Analog Input 2
616
617
618
620
621
622
623
624
625
626
627
628
680
681
682
683
684
685
700
701
702
703
704
705
706
707
708
709
710
711
712
714
715
716
717
718
719
720
721
722
723
724
725
726
727
728
729
731
732
733
734
735
748
749
751
752
765
766
836
837
900
901
903
904
906
907
1060
1061
1062
1063
1064
1065
1066
1067
Decimal Point, Analog Input 2
Error Latching, Analog Input 2
Process Units, Analog Input 2
Sensor, Analog Input 3
Sensor Type, Analog Input 3
Set Point Low Limit, Analog Input 3
Set Point High Limit, Analog Input 3
Filter Time, Analog Input 3
Calibration Offset, Analog Input 3
Decimal Point, Analog Input 3
Error Latching, Analog Input 3
Process Units, Analog Input 3
Scale Low, Analog Input 1
Scale High, Analog Input 1
Scale Low, Analog Input 2
Scale High, Analog Input 2
Scale Low, Analog Input 3
Scale High, Analog Input 3
Function, Control Output 1A
Process, Control Output 1A
Alarm Type, Alarm Output 1
Alarm Hysteresis, Alarm Output 1
Alarm Latching, Alarm Output 1
Alarm Silencing, Alarm Output 1
Alarm Sides, Alarm Output 1
Alarm Logic, Alarm Output 1
Alarm Messages, Alarm Output 1
Retransmit Source, Retransmit Output 1
Low Scale, Retransmit Output 1
High Scale, Retransmit Output 1
Scale Offset, Retransmit Output 1
High Power Limit, Control Output 1A
Low Power Limit, Control Output 1A
Alarm Source, Alarm Output 1
Function, Control Output 1B
Process, Control Output 1B
Alarm Type, Alarm Output 2
Alarm Hysteresis, Alarm Output 2
Alarm Latching, Alarm Output 2
Alarm Silencing, Alarm Output 2
Alarm Sides, Alarm Output 2
Alarm Logic, Alarm Output 2
Alarm Messages, Alarm Output 2
Retransmit Source, Retransmit Output 2
Low Scale, Retransmit Output 2
High Scale, Retransmit Output 2
Scale Offset, Retransmit Output 2
High Power Limit, Control Output 1B
Low Power Limit, Control Output 1B
Alarm Source, Alarm Output 2
Function, Control Output 2A
Process, Control Output 2A
High Power Limit, Control Output 2A
Low Power Limit, Control Output 2A
Function, Control Output 2B
Process, Control Output 2B
High Power Limit, Control Output 2B
Low Power Limit, Control Output 2B
Analog Range, Retransmit Output 1
Analog Range, Retransmit Output 2
PID Units, System
°F or °C, System
Input 1 Fail % Power, System
Open Loop Channel 1
Input 2 Fail % Power, System
Open Loop Channel 2
Function, Digital Input 1
Condition, Digital Input 1
Function, Digital Input 2
Condition, Digital Input 2
Function, Digital Input 3
Condition, Digital Input 3
Function, Digital Input 4
Condition, Digital Input 4
Communications ■ 7.13
1075
1076
1077
1078
1079
1080
1081
1082
1205
1206
1209
1210
1212
1213
1217
1218
1219
1220
1221
1300
1302
1303
1306
1307
1308
1309
1315
1330-33
1400-15
1500
1501
1504
1505
1506
1513
1514
1515
1531
1532
1601
1602
1603
1604
1605
1606
1607
1608
1609
1610
1611
1612
1613
1614
1615
1616
1617
1619
1620
1621
1622
1624
1625
1626
1627
1629
1630
1631
1632
1902
1915
1916
1917
1918
1919
1920
1921
1922
1923
Digital Input 1, Start Profile
Digital Input 1, Start Step
Digital Input 2, Start Profile
Digital Input 2, Start Step
Digital Input 3, Start Profile
Digital Input 3, Start Step
Digital Input 4, Start Profile
Digital Input 4, Start Step
Guaranteed Soak Band, Channel 1
Power-Out Action
Resume a Profile, Key Press Simulation
Hold a Profile, Key Press Simulation
Guaranteed Soak Band, Channel 2
Power-Out Time
Terminate a Profile, Key Press Simulation
Profiles Remaining
Profile Steps Remaining
Guaranteed Soak Band 1 Source
Guaranteed Soak Band 2 Source
Set Point, Lockout
Setup Page, Lockout
Factory Page, Lockout
Autotune PID, Lockout
Edit PID, Lockout
Alarm Set Point, Lockout
Profiles, Lockout
Clear Locks
Set Password
Custom Main Page Parameters (P1 to P16)
CJC1 Temp, Diagnostics
CJC1 AtoD, Diagnostics
Input 1 AtoD, Diagnostics
Input 2 AtoD, Diagnostics
Input 3 AtoD, Diagnostics
Display Test, Test
Test Outputs, Test
Line Frequency, Diagnostics
CJC2 Temp, Diagnostics
CJC2 AtoD, Diagnostics
Restore Factory Calibration
Full Defaults
Input 1, Calibrate
Process Output 1A, 4.000mA, Calibrate
Process Output 1A, 20.000mA, Calibrate
Process Output 1A, 1.000V, Calibrate
Process Output 1A, 10.000V, Calibrate
Input 2, Calibrate
Process Output 1B, 4.000mA, Calibrate
Process Output 1B, 20.000mA, Calibrate
Process Output 1B, 1.000V, Calibrate
Process Output 1B, 10.000V, Calibrate
Input 3, Calibrate
Process Output 2A, 4.000mA, Calibrate
Process Output 2A, 20.000mA, Calibrate
Process Output 2A, 1.000V, Calibrate
Process Output 2A, 10.000V, Calibrate
Process Output 2B, 4.000mA, Calibrate
Process Output 2B, 20.000mA, Calibrate
Process Output 2B, 1.000V, Calibrate
Process Output 2B, 10.000V, Calibrate
Retransmit Output 1, 4.000mA, Calibrate
Retransmit Output 1, 20.000mA, Calibrate
Retransmit Output 1, 1.000V, Calibrate
Retransmit Output 1, 10.000V, Calibrate
Retransmit Output 2, 4.000mA, Calibrate
Retransmit Output 2, 20.000mA, Calibrate
Retransmit Output 2, 1.000V, Calibrate
Retransmit Output 2, 10.000V, Calibrate
Altitude, Analog Input 2
Cascade, Analog Input 3
Current Time, Hour
Current Time, Minutes
Current Time, Seconds
Current Date, Month
Current Date, Day
Current Date, Year
Cascade Inner Set Point
Show °F or °C
7.14 ■ Communications
1925
1926
1927
2000
2001
2010
2011
2020
2021
2030
2031
2040
2041
2046
2050
2051
2052
2054
2060
2061
2062
2064
2070
2071
2072
2073
2074
2075
2500
2501
2502
2503
2504
2505
2506
2507
2509
2510
2511
2512
2513
2514
2515
2517
2520
2521
2522
2523
2524
2525
2527
2530
2531
2532
2533
2534
2535
2537
2540
2541
2542
2543
2544
2545
2547
2550
2551
2552
2553
2554
2555
2556
2557
2559
2560
2561
2562
2563
Cascade Type
Cascade, Range Low
Cascade, Range High
Digital Output 1, Condition
Function, Digital Output 1
Digital Output 2, Condition
Function, Digital Output 2
Digital Output 3, Condition
Function, Digital Output 3
Digital Output 4, Condition
Function, Digital Output 4
Digital Output 5, Condition
Function, Digital Output 5
Complementary Output, Digital Output 5
Digital Output 6, Condition
Function, Digital Output 6
Boost Heat % Power, Digital Output 6
Boost Heat Delay On Time, Digital Output 6
Digital Output 7, Condition
Function, Digital Output 7
Boost Cool % Power, Digital Output 7
Boost Cool Delay On Time, Digital Output 7
Digital Output 8, Condition
Function, Digital Output 8
Compressor On % Power, Digital Output 8
Compressor Off % Power, Digital Output 8
Compressor On Delay, Digital Output 8
Compressor Off Delay, Digital Output 8
Proportional Band 2A, PID Set 6, Channel 2
Integral 2A, PID Set 6, Channel 2
Reset 2A, PID Set 6, Channel 2
Derivative 2A, PID Set 6, Channel 2
Rate 2A, PID Set 6, Channel 2
Dead Band 2A, PID Set 6, Channel 2
Cycle Time Value, Control Output 2A
Hysteresis 2A, PID Set 6, Channel 2
Cycle Time (type), Control Output 2A
Proportional Band 2A, PID Set 7, Channel 2
Integral 2A, PID Set 7, Channel 2
Reset 2A, PID Set 7, Channel 2
Derivative 2A, PID Set 7, Channel 2
Rate 2A, PID Set 7, Channel 2
Dead Band 2A, PID Set 7, Channel 2
Hysteresis 2A, PID Set 7, Channel 2
Proportional Band 2A, PID Set 8, Channel 2
Integral 2A, PID Set 8, Channel 2
Reset 2A, PID Set 8, Channel 2
Derivative 2A, PID Set 8, Channel 2
Rate 2A, PID Set 8, Channel 2
Dead Band 2A, PID Set 8, Channel 2
Hysteresis 2A, PID Set 8, Channel 2
Proportional Band 2A, PID Set 9, Channel 2
Integral 2A, PID Set 9, Channel 2
Reset 2A, PID Set 9, Channel 2
Derivative 2A, PID Set 9, Channel 2
Rate 2A, PID Set 9, Channel 2
Dead Band 2A, PID Set 9, Channel 2
Hysteresis 2A, PID Set 9, Channel 2
Proportional Band 2A, PID Set 10, Channel 2
Integral 2A, PID Set 10, Channel 2
Reset 2A, PID Set 10, Channel 2
Derivative 2A, PID Set 10, Channel 2
Rate 2A, PID Set 10, Channel 2
Dead Band 2A, PID Set 10, Channel 2
Hysteresis 2A, PID Set 10, Channel 2
Proportional Band 2B, PID Set 6, Channel 2
Integral 2B, PID Set 6, Channel 2
Reset 2B, PID Set 6, Channel 2
Derivative 2B, PID Set 6, Channel 2
Rate 2B, PID Set 6, Channel 2
Dead Band 2B, PID Set 6, Channel 2
Cycle Time Value, Control Output 2B
Hysteresis 2B, PID Set 6, Channel 2
Cycle Time (type), Control Output 2B
Proportional Band 2B, PID Set 7, Channel 2
Integral 2B, PID Set 7, Channel 2
Reset 2B, PID Set 7, Channel 2
Derivative 2B, PID Set 7, Channel 2
2564
2565
2567
2570
2571
2572
2573
2574
2575
2577
2580
2581
2582
2583
2584
2585
2587
2590
2591
2592
2593
2594
2595
2597
2600
2601
2603
2604
2605
2607
2610
2611
2612
2613
2614
2615
2617
2620
2621
2622
2623
2624
2625
2627
2630
2631
2632
2633
2634
2635
2637
2640
2641
2642
2643
2644
2645
2647
2650
2651
2652
2653
2654
2655
2657
2660
2661
2662
2663
2664
Rate 2B, PID Set 7, Channel 2
Dead Band 2B, PID Set 7, Channel 2
Hysteresis 2B, PID Set 7, Channel 2
Proportional Band 2B, PID Set 8, Channel 2
Integral 2B, PID Set 8, Channel 2
Reset 2B, PID Set 8, Channel 2
Derivative 2B, PID Set 8, Channel 2
Rate 2B, PID Set 8, Channel 2
Dead Band 2B, PID Set 8, Channel 2
Hysteresis 2B, PID Set 8, Channel 2
Proportional Band 2B, PID Set 9, Channel 2
Integral 2B, PID Set 9, Channel 2
Reset 2B, PID Set 9, Channel 2
Derivative 2B, PID Set 9, Channel 2
Rate 2B, PID Set 9, Channel 2
Dead Band 2B, PID Set 9, Channel 2
Hysteresis 2B, PID Set 9, Channel 2
Proportional Band 2B, PID Set 10, Channel 2
Integral 2B, PID Set 10, Channel 2
Reset 2B, PID Set 10, Channel 2
Derivative 2B, PID Set 10, Channel 2
Rate 2B, PID Set 10, Channel 2
Dead Band 2B, PID Set 10, Channel 2
Hysteresis 2B, PID Set 10, Channel 2
Proportional Band 1A, Cascade PID Set 1,
Channel 1
Integral 1A , Cascade PID Set 1, Channel 1
2602Reset 1A, Cascade PID Set 1, Channel 1
Derivative 1A, Cascade PID Set 1, Channel 1
Rate 1A, Cascade PID Set 1, Channel 1
Dead Band 1A, Cascade PID Set 1, Channel 1
Hysteresis 1A, Cascade PID Set 1, Channel 1
Proportional Band 1A, Cascade PID Set 2,
Channel 1
Integral 1A , Cascade PID Set 2, Channel 1
Reset 1A, Cascade PID Set 2, Channel 1
Derivative 1A, Cascade PID Set 2, Channel 1
Rate 1A, Cascade PID Set 2, Channel 1
Dead Band 1A, Cascade PID Set 2, Channel 1
Hysteresis 1A, Cascade PID Set 2, Channel 1
Proportional Band 1A, Cascade PID Set 3,
Channel 1
Integral 1A , Cascade PID Set 3, Channel 1
Reset 1A, Cascade PID Set 3, Channel 1
Derivative 1A, Cascade PID Set 3, Channel 1
Rate 1A, Cascade PID Set 3, Channel 1
Dead Band 1A, Cascade PID Set 3, Channel 1
Hysteresis 1A, Cascade PID Set 3, Channel 1
Proportional Band 1A, Cascade PID Set 4,
Channel 1
Integral 1A , Cascade PID Set 4, Channel 1
Reset 1A, Cascade PID Set 4, Channel 1
Derivative 1A, Cascade PID Set 4, Channel 1
Rate 1A, Cascade PID Set 4, Channel 1
Dead Band 1A, Cascade PID Set 4, Channel 1
Hysteresis 1A, Cascade PID Set 4, Channel 1
Proportional Band 1A, Cascade PID Set 5,
Channel 1
Integral 1A , Cascade PID Set 5, Channel 1
Reset 1A, Cascade PID Set 5, Channel 1
Derivative 1A, Cascade PID Set 5, Channel 1
Rate 1A, Cascade PID Set 5, Channel 1
Dead Band 1A, Cascade PID Set 5, Channel 1
Hysteresis 1A, Cascade PID Set 5, Channel 1
Proportional Band 1B, Cascade PID Set 1,
Channel 1
Integral 1B , Cascade PID Set 1, Channel 1
Reset 1B, Cascade PID Set 1, Channel 1
Derivative 1B, Cascade PID Set 1, Channel 1
Rate 1B, Cascade PID Set 1, Channel 1
Dead Band 1B, Cascade PID Set 1, Channel 1
Hysteresis 1B, Cascade PID Set 1, Channel 1
Proportional Band 1B, Cascade PID Set 2,
Channel 1
Integral 1B , Cascade PID Set 2, Channel 1
Reset 1B, Cascade PID Set 2, Channel 1
Derivative 1B, Cascade PID Set 2, Channel 1
Rate 1B, Cascade PID Set 2, Channel 1
Watlow Series F4S/D
2665
2667
2670
2671
2672
2673
2674
2675
2677
2680
2681
2682
2683
2684
2685
2687
2690
2691
2692
2693
2694
2695
2697
3000-06
3010-16
3020-26
3030-36
3100-09
3110-19
3120-29
3130-39
3140-49
3150-59
3160-69
3170-79
3200-09
3210-19
3500-09
3510-19
3520-29
3530-39
3540-49
3550-59
3560-69
3570-79
3580-89
3590-99
3600-09
3610-19
3620-29
3630-39
3640-49
3650-59
3660-69
3670-79
3680-89
3690-99
3700-09
3710-19
3720-29
3730-39
3740-49
3750-59
3760-69
Dead Band 1B, Cascade PID Set 2, Channel
1
Hysteresis 1B, Cascade PID Set 2, Channel
1
Proportional Band 1B, Cascade PID Set 3,
Channel 1
Integral 1B , Cascade PID Set 3, Channel 1
Reset 1B, Cascade PID Set 3, Channel 1
Derivative 1B, Cascade PID Set 3, Channel
1
Rate 1B, Cascade PID Set 3, Channel 1
Dead Band 1B, Cascade PID Set 3, Channel
1
Hysteresis 1B, Cascade PID Set 3, Channel
1
Proportional Band 1B, Cascade PID Set 4,
Channel 1
Integral 1B , Cascade PID Set 4, Channel 1
Reset 1B, Cascade PID Set 4, Channel 1
Derivative 1B, Cascade PID Set 4, Channel
1
Rate 1B, Cascade PID Set 4, Channel 1
Dead Band 1B, Cascade PID Set 4, Channel
1
Hysteresis 1B, Cascade PID Set 4, Channel
1
Proportional Band 1B, Cascade PID Set 5,
Channel 1
Integral 1B , Cascade PID Set 5, Channel 1
Reset 1B, Cascade PID Set 5, Channel 1
Derivative 1B, Cascade PID Set 5, Channel
1
Rate 1B, Cascade PID Set 5, Channel 1
Dead Band 1B, Cascade PID Set 5, Channel
1
Hysteresis 1B, Cascade PID Set 5, Channel
1
Name, Digital Input 1 (7 characters)
Name, Digital Input 2 (7 characters)
Name, Digital Input 3 (7 characters)
Name, Digital Input 4 (7 characters)
Name, Digital Output 1 (10 characters)
Name, Digital Output 2 (10 characters)
Name, Digital Output 3 (10 characters)
Name, Digital Output 4 (10 characters)
Name, Digital Output 5 (10 characters)
Name, Digital Output 6 (10 characters)
Name, Digital Output 7 (10 characters)
Name, Digital Output 8 (10 characters)
Name, Alarm 1 (10 characters)
Name, Alarm 2 (10 characters)
Name, Profile 1 (10 characters)
Name, Profile 2 (10 characters)
Name, Profile 3 (10 characters)
Name, Profile 4 (10 characters)
Name, Profile 5 (10 characters)
Name, Profile 6 (10 characters)
Name, Profile 7 (10 characters)
Name, Profile 8 (10 characters)
Name, Profile 9 (10 characters)
Name, Profile 10 (10 characters)
Name, Profile 11 (10 characters)
Name, Profile 12 (10 characters)
Name, Profile 13 (10 characters)
Name, Profile 14 (10 characters)
Name, Profile 15 (10 characters)
Name, Profile 16 (10 characters)
Name, Profile 17 (10 characters)
Name, Profile 18 (10 characters)
Name, Profile 19 (10 characters)
Name, Profile 20 (10 characters)
Name, Profile 21 (10 characters)
Name, Profile 22 (10 characters)
Name, Profile 23 (10 characters)
Name, Profile 24 (10 characters)
Name, Profile 25 (10 characters)
Name, Profile 26 (10 characters)
Name, Profile 27 (10 characters)
Watlow Series F4S/D
3770-79
3780-89
3790-99
3800-09
3810-19
3820-29
3830-39
3840-49
3850-59
3860-69
3870-79
3880-89
3890-99
4000
4001
4002
4003
4004
4005
4006
4007
4008
4009
4010
4011
4009
4010
4011
4009
4010
4011
4012
4013
4014
4015
4016
4021
4022
4023
4024
4025
4026
4030
4031
4032
4033
4034
4035
4036
4037
4043
4044
4045
4046
4047
4048
Name, Profile 28 (10 characters)
Name, Profile 29 (10 characters)
Name, Profile 30 (10 characters)
Name, Profile 31 (10 characters)
Name, Profile 32 (10 characters)
Name, Profile 33 (10 characters)
Name, Profile 34 (10 characters)
Name, Profile 35 (10 characters)
Name, Profile 36 (10 characters)
Name, Profile 37 (10 characters)
Name, Profile 38 (10 characters)
Name, Profile 39 (10 characters)
Name, Profile 40 (10 characters)
Profile Number
Profile Step Number
Profile Edit Action
Profile Step Type
Autostart Profile Date or Day
Autostart, Date (month)
Autostart, Date (day)
Autostart, Date (year)
Autostart, Day (of week)
Autostart Time (hours)
Autostart Time (minutes)
Autostart Time (seconds)
Ramp Time (hours)
Ramp Time (minutes)
Ramp Time (seconds)
Soak Step Time (hours)
Soak Step Time (minutes)
Soak Step Time (seconds)
Wait/Don’t Wait, Ramp Rate or Ramp Time
or Soak Steps
Wait For Event 1, Ramp Rate or Ramp Time
or Soak Steps
Wait For Event 2, Ramp Rate or Ramp Time
or Soak Steps
Wait For Event 3, Ramp Rate or Ramp Time
or Soak Steps
Wait For Event 4, Ramp Rate or Ramp Time
or Soak Steps
Wait For Analog 1, Ramp Rate or Ramp
Time or Soak Steps
Wait For Analog 1, Value, Ramp Rate or
Ramp Time or Soak Steps
Wait For Analog 2, Ramp Rate or Ramp
Time or Soak Steps
Wait For Analog 2, Value, Ramp Rate or
Ramp Time or Soak Steps
Wait For Analog 3, Ramp Rate or Ramp
Time or Soak Steps
Wait For Analog 3 Value, Ramp Rate or
Ramp Time or Soak Steps
Event Output 1, Ramp Rate or Ramp Time
or Soak Steps
Event Output 2, Ramp Rate or Ramp Time
or Soak Steps
Event Output 3, Ramp Rate or Ramp Time
or Soak Steps
Event Output 4, Ramp Rate or Ramp Time
or Soak Steps
Event Output 5, Ramp Rate or Ramp Time
or Soak Steps
Event Output 6, Ramp Rate or Ramp Time
or Soak Steps
Event Output 7, Ramp Rate or Ramp Time
or Soak Steps
Event Output 8, Ramp Rate or Ramp Time
or Soak Steps
Rate, Ramp Rate Step
Ramp Setpoint Channel 1, Ramp Rate or
Ramp Time Step
Ramp Setpoint Channel 2, Ramp Time Step
Channel 1 PID Set, Ramp Rate or Ramp
Time or Soak Steps
Channel 2 PID Set, Ramp Rate or Ramp
Time or Soak Steps
Guaranteed Soak Channel 1, Ramp Rate or
4049
4050
4051
4052
4060
4061
4062
4100
4101
4102
4103
4104
4105
4106
4107
4108
4109
4110
4111
4112
4113
4114
4115
4116
4117
4118
4119
4120
4121
4122
4123
4124
4125
4126
4127
4128
4129
4130
4501-18
4521-38
4541-58
4561-78
5500
5501
5502
5503
Ramp Time or Soak Steps
Guaranteed Soak Channel 2, Ramp Rate or
Ramp Time or Soak Steps
Jump to Profile, Jump Step
Jump to Step, Jump Step
Jump Repeats, Jump Step
End Action, End Step
End Idle Setpoint Channel 1, End Step
End Idle Setpoint Channel 2, End Step
Profile Number, Current Status
Profile Step Number, Current Status
Profile Step Type, Current Status
Profile Ramp Waiting, Current Status
Profile Waiting for Event 1, Current Status
Profile Waiting for Event 2, Current Status
Profile Waiting for Event 3, Current Status
Profile Waiting for Event 4, Current Status
Profile Waiting for Analog Input 1, Current
Status
Profile Waiting for Analog Input 2, Current
Status
Profile Waiting for Analog Input 3, Current
Status
Digital Output 1, Current Status
Digital Output 2, Current Status
Digital Output 3, Current Status
Digital Output 4, Current Status
Digital Output 5, Current Status
Digital Output 6, Current Status
Digital Output 7, Current Status
Digital Output 8, Current Status
Hours Remaining, Ramp Time or Soak
Step, Current Profile Status
Minutes Remaining, Ramp Time or Soak
Step, Current Profile Status
Seconds Remaining, Ramp Time or Soak
Step, Current Profile Status
Set Point Channel 1, Ramp Rate, Ramp Time
or Soak Step, Current Profile Status
Set Point Channel 2, Ramp Rate, Ramp Time
or Soak Step, Current Profile Status
Channel 1 PID, Ramp Rate, Ramp Time or
Soak Step, Current Profile Status
Channel 2 PID Set, Ramp Rate, Ramp Time or
Soak Step, Current Profile Status
Jump Count, Current Profile Status
Jump Profile, Current Profile Status
Jump Step, Current Profile Status
End Set Point Channel 1, Current Profile
Status
End Set Point Channel 2, Current Profile
Status
Custom Message 1
Custom Message 2
Custom Message 3
Custom Message 4
Process Display
Process Display Input 1, Time
Process Display Input 2, Time
Process Display Input 3, Time
✔ NOTE:
For more information about
parameters, see the Index.
Communications ■ 7.15
Communications Page Parameter Table
Parameter
Range
(Modbus Value)
Description
Default
Modbus
Register
read/write
[I/O, Set, Ch]
Conditions for
Parameters to Appear
Communications
Main > Setup > Communications
Baud Rate
Set the transmission
speed in bits/seconds.
Address
19200
9600
19200
No Modbus
address.
Active: Always.
1 to 247
1
No Modbus
address.
Active: Always.
Set the controller’s address between 1 and
247.
NOTE: For more information about how parameter settings
affect the controller’s operation, see the Features Chapter.
7.16 ■ Communications
Watlow Series F4S/D
F4 Modbus Applications:
Profile Programming Procedures
F4 Modbus Applications: Profile Overview
A maximum of 40 files may be created, with a total of 256 steps. Each time a new file is created, the file is placed after the previously created file. As files are deleted, newly created files
are placed into these locations. Modbus Register 4000 returns the file number of the newly
created file.
*Profiles without custom-written names are referred to
by their numbers (Profile 1, Profile 2, etc.),
Watlow Series F4S/D
Communications ■ 7.17
F4 Modbus Applications: Creating a Profile
Set File Number
Write Modbus Register
4000=1 to 40
Assumes file does not exist
Use 1 to 40
File will be placed at lowest
empty file location.
-OptionalRename Profile*
Registers 3500 thru 3899
Create Profile
Write Modbus Register
4002=1
Step Type
"Autostart"?
Step Type
"Time"?
No
No
Set Current Step Number
Write Modbus Register
4001=1 to 256
Step Type
"Rate"?
Step Type
"Soak"?
No
No
Insert Step
Write Modbus Register
4002=2
Step Type
"Jump"?
Yes
Yes
Yes
Yes
Yes
See "Autostart"
Step Type sheet
for options
See "Time"
Step Type sheet
for options
See "Rate"
Step Type sheet
for options
See "Soak"
Step Type sheet
for options
See "Jump"
Step Type sheet
for options
Done with
profile?
No
Yes
Set Step Number to where
the "End" step is located
Write Modbus Register
4001=1 to 255
See "End"
Step Type sheet
for options
Done
*Profiles without custom-written names are referred to by
their numbers (Profile 1, Profile 2, etc.),
7.18 ■ Communications
Watlow Series F4S/D
F4 Modbus Applications: Autostart Step
Set Step Type to
"Autostart"
Write Modbus Register
4003=0
Start on a
Date or
Day?
Day
Set "Day" Flag
Write Modbus Register
4004=1
Enter Day of week
Write Modbus Register
4008=0 to 7
Date
Set "Date" Flag
Write Modbus Register
4004=0
Enter Hour
Write Modbus Register
4009=0 to 23
1=
Enter Month to Start Profile
Write Modbus Register
4005=1 to 12
12 =
Enter Day to Start Profile
Write Modbus Register
4006=1 to 31
Enter Year to Start Profile
Write Modbus Register
4007=1998 to 2035
Jan
.
.
.
Dec
0=
1=
2=
3=
4=
5=
6=
7=
Every Day
Sunday
Monday
Tuesday
Wednesday
Thursday
Friday
Saturday
24 Hour
Clock
Format
Enter Minute
Write Modbus Register
4010=0 to 59
Enter Second
Write Modbus Register
4011=0 to 59
Save Changes
Write Modbus Register
25=0
Done
Autostart pauses a profile until the specified date or day , and time (of a 24-hourclock).
Watlow Series F4S/D
Communications ■ 7.19
F4 Modbus Applications: Ramp Time, Ramp Rate, Soak Steps (page 1 of 3)
Digital inputs must be configured as Events before profiling: “Digital Input 1 to 4 Function =
Wait for Event” and “Digital Input 1 to 4 Condition = Low or High.” Modbus Registers 1060
through 1067. See Setup Page Map.
7.20 ■ Communications
Watlow Series F4S/D
F4 Modbus Applications: Ramp Time, Ramp Rate, Soak Steps (page 2 of 3)
Analog inputs and digital outputs must be configured before programming a profile. See Setup
Page Map.
Watlow Series F4S/D
Communications ■ 7.21
F4 Modbus Applications: Ramp Time, Ramp Rate, Soak Steps (page 3 of 3)
7.22 ■ Communications
Watlow Series F4S/D
F4 Modbus Applications:
F4 Modbus Applications:
Jump Step
End Step
Jump initiates another step or profile. File
must exist at location specified.
Watlow Series F4S/D
Communications ■ 7.23
F4 Modbus Applications: Editing, Deleting, Starting a Profile
7.24 ■ Communications
Watlow Series F4S/D
F4 Modbus Applications: Naming a Profile
Profiles without custom-written names are referred to by their numbers (Profile 1, Profile 2,
etc.). Follow this procedure to customize the profile name, using ASCII-equivalent decimal
codes (in the column labeled “Dec” in the chart below).
Renaming a Profile - F4
via Modbus Communication
Determine file number to
Name - See list on right
Write to Modbus Register
xxxx=File Name Character
using decimal equivalent
Next
Char
Have 10
characters
been
written?
No
Yes
Next Modbus Register
Save Changes
Write Modbus Register
25=0
Done
Watlow Series F4S/D
File Name
Character
blank
0
1
2
3
4
5
6
7
8
9
A
B
C
D
E
F
G
H
I
J
K
L
M
N
O
P
Q
R
S
T
U
V
W
X
Y
Z
Dec
32
48
49
50
51
52
53
54
55
56
57
65
66
67
68
69
70
71
72
73
74
75
76
77
78
79
80
81
82
83
84
85
86
87
88
89
90
Modbus
Register
File #
xxxx=
3500 - 3509
1
3510 - 3519
2
3520 - 3529
3
3530 - 3539
4
3540 - 3549
5
3550 - 3559
6
3560 - 3569
7
3570 - 3579
8
3580 - 3589
9
3590 - 3599
10
3600 - 3609
11
3610 - 3619
12
3620 - 3629
13
3630 - 3639
14
3640 - 3649
15
3650 - 3659
16
3660 - 3669
17
3670 - 3679
18
3680 - 3689
19
3690 - 3699
20
3700 - 3709
21
3710 - 3719
22
3720 - 3729
23
3730 - 3739
24
3740 - 3749
25
3750 - 3759
26
3760 - 3769
27
3770 - 3779
28
3780 - 3789
29
3790 - 3799
30
3800 - 3809
31
3810 - 3819
32
3820 - 3829
33
3830 - 3839
34
3840 - 3849
35
3850 - 3859
36
3860 - 3869
37
3870 - 3879
38
3880 - 3889
39
3890 - 3899
40
Note: There are ten
Modbus Registers for
each profile name.
Communications ■ 7.25
F4 Modbus Applications: Monitor Current Step
Assumes controller is configured
for functions read - you can’t read
a digital output if it doesn’t exist.
7.26 ■ Communications
Watlow Series F4S/D
8
Chapter Eight: Security and Locks
Overview
The Series F4 allows users to set separate security
levels for the Static Set Point prompt on the Main
Page, for all menus on the Operations Page, as well
as for the Profiles Page, Setup Page and Factory
Page. Four levels of security are available:
• Full Access (operators can enter and change
settings);
• Read Only (operators can read but not change
settings);
• Password (operators can enter and change
settings after entering a password); and
• Hidden (operators cannot see the menu or
page — it is not displayed). Set Point settings
cannot be Hidden.
Full Access is the default for all menus. Unless you
change the level of access, operators will be able to
read and change every setting in every menu in the
Series F4 software.
Set Lock Levels
To set levels of security, go to “Set Lockout,” on the
Factory Page. Press the Right Key .. This menu
lists the menus for which access can be limited:
• Set Point on Main Page
• Operations Page Autotune PID
• Operations Page Edit PID
• Operations Page Alarm Set Point
• Profiles Page
• Setup Page
• Factory Page
After choosing the item to lock out, press . and
choose the level of access: Full, Read Only,
Password or Hidden. If you choose Password, you
must set the password — see below.
Main>Factory________
>Set Lockout
Diagnostic
Test
.
…Factory>Set Lock___
Set Point
>Oper. Autotune PID ■
Oper. Edit PID
▼
.
…Lock>Autotune PID___
Full Access
Read Only
>Password
✔ NOTE:
Full Access is the default for all menus. Unless you
change the level of access, operators will be able to read
and change every setting in every menu in the Series F4
software.
✔ NOTE:
For more information about how parameter settings affect
the controller’s operation, see the Features Chapter.
Watlow Series F4S/D
Security and Locks ■ 8.1
Enter a Password
If you try to set password security before any
password has been established, a pop-up message
will give you the opportunity to enter one. Use the
. , > < keys to enter a four-character
password, which can consist of letters, numbers or
both. After entering and confirming the password,
re-enter the chosen menu or page and select
Password Security. Record your password and keep
it secure.
Must have password
before choosing the
password lock!
■■■■■■■■■■■■■■
>
Must reset lock
after setting the
password
■ ■ ■ Press any key!■ ■ ■
▲
▼
Enter New Password:
_ _ _ _
▲▼ Adjusts Char
Save Changes
▲
▼
Confirm Password:
_ _ _ _
▲▼ Adjusts Char
Save Changes
To enter a password-protected area, users must
enter the password. If an incorrect password is
entered, a pop-up message will tell you it is invalid
and you may try again. When the password is
correct, choose again to enter the menu or page of
your choice.
Change a Password
▲▼ Adjusts Char
Save Changes
…Factory>Set Lock___
Setup
▲
Factory
■
>Change Password
▼
.
Enter Password:
_ _ _ _
▲▼ Adjusts Char
Save Changes
▲
▼
The Change Password parameter is near the end of
the list under Set Lockout on the Factory Page. T o
change a password, you must first enter the old
password for confirmation.
Invalid, Re-Enter:____
▲
▼
Use a Password
Set Lockout Menu Map
Set Point
Oper. Autotune PID
Oper Edit PID
Oper. Alarm SP
Profile
Setup
Factory
Change Password
Clear Locks
8.2 ■ Security and Locks
Watlow Series F4S/D
Set Lockout Menu Parameter Table
Parameter
Description
Range
(Modbus Value)
Default
Modbus
Register
read/write
[I/O, Set, Ch]
Conditions for
Parameters to Appear
Set Lockout
Main > Factory > Set Lock
Set Point
Set the set point
access level.
Operations, Autotune PID
Limit access to this
menu.
Operations, Edit PID
Limit access to this
menu.
Operations, Alarm Set Point
Limit access to this
menu.
Profile Page
Limit access to this
page.
Setup Page
Limit access to this
page.
Factory Page
Limit access to this
page.
Set/Change Password
Reset or change
password. Choose
Yes to change the
password.
Clear Locks
Full Access (0)
Read Only (1)
Full Access
1300 r/w
Active: Always.
Full Access (0)
Read Only (1)
Password (2)
Hidden (3)
Full Access
1306 r/w
Active: Always.
Full Access (0)
Read Only (1)
Password (2)
Hidden (3)
Full Access
1307 r/w
Active: Always.
Full Access (0)
Read Only (1)
Password (2)
Hidden (3)
Full Access
1308 r/w
Active: Always.
Full Access (0)
Read Only (1)
Password (2)
Hidden (3)
Full Access
1309 r/w
Active: Always.
Full Access (0)
Read Only (1)
Password (2)
Hidden (3)
Full Access
1302 r/w
Active: Always.
Full Access (0)
Read Only (1)
Password (2)
Full Access
1303 r/w
Active: Always.
Yes (0)
No (1)
1314 r/w
Active: Always.
Yes (0)
1315 w
Unlock set point
and all pages and
menus.
NOTE: For more information about how parameter settings
affect the controller’s operation, see the Features Chapter.
Watlow Series F4S/D
Security and Locks ■ 8.3
Notes
8.4 ■ Security and Locks
Watlow Series F4S/D
9
Chapter Nine: Calibration
Thermocouple Input Procedure . . . . . . . . . . . . . . . .9.2
RTD Input Procedure . . . . . . . . . . . . . . . . . . . . . . . .9.2
Voltage Process Input Procedure . . . . . . . . . . . . . .9.3
Current Process Input Procedure . . . . . . . . . . . . . .9.3
Process Output Procedure . . . . . . . . . . . . . . . . . . .9.4
Retransmit Output Procedure . . . . . . . . . . . . . . . . .9.5
Calibration Menu Map . . . . . . . . . . . . . . . . . . . . . . .9.6
Factory Page Parameter Table . . . . . . . . . . . . . . . .9.7
Overview
The Calibration Menu on the Factory Page allows
calibration of inputs and outputs. Calibration procedures should be done only by qualified technical
personnel with access to the equipment listed in
each section.
Before beginning calibration procedures, warm up
the controller for at least 20 minutes.
Restore Factory Values
Each controller is calibrated before leaving
the factory. If at any time you want to restore the
factory calibration values, use the last parameters
in the menu: Restore In x (1 to 3) Cal. Press . .
No special equipment is necessary.
✔ NOTE:
To see how all the pages, menus and parameters are
grouped, refer to the inside back cover of this manual.
✔ NOTE:
For more information about how parameter settings affect
the controller’s operation, see the Features Chapter.
Watlow Series F4
Calibration ■ 9.1
Calibrating the Series F4
Thermocouple Input Procedure
RTD Input Procedure
Equipment
Equipment
•
Type J reference compensator with reference
junction at 32°F (0°C), or type J thermocouple
calibrator to 32°F (0°C).
•
•
Precision millivolt source, 0 to 50mV minimum
range, 0.002mV resolution.
1. Connect the correct power supply to terminals
1, 2 and 3 (see the W iring Chapter and the
Appendix).
Input x (1 to 3) Setup and Calibration
1. Connect the correct power supply to terminals
1, 2 and 3 (see the W iring Chapter and the
Appendix).
2. Connect the millivolt source to Input 1 terminals 62 (-) and 61 (+), Input 2 terminals 58 (-)
and 57 (+), or Input 3 terminals 56 (-) and 55
(+), with copper wire.
3. Enter 50.000mV from the millivolt source. Allow at least 10 seconds to stabilize. Press the
Right Key . once at the Calibrate Input x (1
to 3) prompt (Factory Page). At the 50.00mV
prompt press . once and to store 50.00mV
press the Up Key > once.
1kΩ decade box with 0.01Ω resolution.
Input x (1 to 3) Setup and Calibration
2. Short Input 1 terminals 60, 61 and 62; Input 2
terminals 54, 57 and 58; or Input 3 terminals
52, 55 and 56 together with less than 0.1 Ω.
Press the Right Key . once at the Calibrate
Input x (1 to 3) prompt. At the Ground prompt
press . once and to store ground input press
the Up Key > once.
3. Short Input 1 terminals 60 and 61; Input 2 terminals 54 and 57; or Input 3 terminals 52 and
55 together with less than 0.5 Ω. Press . once
at the Calibrate Input x (1 to 3) prompt. At the
Lead prompt press . once and to store lead
resistance press > once.
4. Enter 0.000mV from the millivolt source. Allow
at least 10 seconds to stabilize. At the 0.00mV
prompt press . once and to store 0.00mV
press > once.
4. Connect the decade box to Input 1 terminals 60
(S2), 61 (S1) and 62 (S3); Input 2 terminals 54
(S2), 57 (S1) and 58 (S3); or Input 3 terminals
52 (S2), 55 (S1) and 56 (S3), with 20- to 24gauge wire.
5. Disconnect the millivolt source and connect the
reference compensator or thermocouple calibrator to Input 1 terminals 62 (-) and 61 (+) or Input 2 or 3 terminals 58 (-) and 57 (+). W ith type
J thermocouple wire, if using a compensator,
turn it on and short the input wires. When using a type J calibrator, set it to simulate 32°F
(0°C). Allow 10 seconds for the controller to stabilize. Press . once at the Calibrate Input x (1
or 2) prompt (Factory Page). At the 32°F Type J
prompt press . once and to store type J thermocouple calibration press > once.
5. For 100Ω RTD, enter 15.00Ω. For 500Ω or 1kΩ
RTD, enter 240.00Ω. Allow at least 10 seconds
to stabilize. Press . once at the Calibrate Input x (1 to 3) prompt (Factory Page). At the
15.00Ω or 240.00Ω* prompt press . once and
to store the 15.00Ω or 240.00Ω input press > once.
6. For 100Ω RTD, enter 380.00Ω. For 500Ω or 1kΩ
RTD, enter 6080.00Ω. Allow at least 10 seconds
to stabilize. Press . once at the Calibrate Input x (1 to 3) prompt. At the 380.0Ω or
6080.00Ω* prompt press . once and to store
the 380.00Ω or 6080.00Ω input press > once.
6. Rewire for operation and verify calibration.
7. Rewire for operation and verify calibration.
✔ NOTE:
You need the equipment listed and technical skills. Controllers come calibrated from the factory. Recalibrate only
for other agency requirements or if temperatures aren’t accurate as verified by another calibrated instrument.
*The tenth character of your model number determines
what prompts appear and what input resistance values to
use for the RTD calibration.
F4_ _-_ _ _ _-_(1 to 4)RG: 15.00 and 380.00Ω
F4_ _-_ _ _ _-_(5 to 8)RG: 240.00 and 6080.00Ω
9.2 ■ Calibration
Watlow Series F4S/D
Press . once at the Calibrate Input 3 prompt
(Factory Page). At the 10.000V prompt press .
once and to store the 10.000V input press >
once.
Voltage Process Input Procedure
Equipment
•
Precision voltage source, 0 to 10V minimum
range, with 0.001V resolution.
Input x (1 to 3) Setup and Calibration
1. Connect the correct power supply to terminals
1, 2 and 3 (see the W iring Chapter and the
Appendix).
Input 1
2. Connect the voltage source to terminals 59 (+)
and 62 (-) of the controller.
3. Enter 0.000V from the voltage source to the
controller. Allow at least 10 seconds to stabilize.
Press the Right Key . once at the Calibrate
Input 1 prompt. At the 0.000V prompt press .
once and to store the 0.000V input press the Up
Key > once.
4. Enter 10.000V from the voltage source to the
controller. Allow at least 10 seconds to stabilize.
Press . once at the Calibrate Input 1 prompt.
At the 10.000V prompt press . once and to
store the 10.000V input press > once.
Input 2
5. Connect the voltage source to terminals 53 (+)
and 58 (-) of the controller.
6. Enter 0.000V from the voltage source to the
controller. Allow at least 10 seconds to stabilize.
Press . once at the Calibrate Input 2 prompt.
At the 0.000V prompt press . once and to
store the 0.000V input press > once.
7. Enter 10.000V from the voltage source to the
controller. Allow at least 10 seconds to stabilize.
Press . once at the Calibrate Input 2 prompt
(Factory Page). At the 10.000V prompt press .
once and to store the 10.000V input press >
once.
Input 3
8. Connect the voltage source to terminals 51 (+)
and 56 (-) of the controller.
9. Enter 0.000V from the voltage source to the
controller. Allow at least 10 seconds to stabilize.
Press . once at the Calibrate Input 3 prompt.
At the 0.000V prompt press . once and to
store the 0.000V input press > once.
10. Enter 10.000V from the voltage source to the
controller. Allow at least 10 seconds to stabilize.
Watlow Series F4S/D
11. Rewire for operation and verify calibration.
Current Process Input Procedure
Equipment
•
Precision current source, 0 to 20mA range, with
0.01mA resolution.
Input x (1 to 3) Setup and Calibration
1. Connect the correct power supply to terminals
1, 2 and 3 (see the W iring Chapter and the
Appendix).
Input 1
2. Connect the current source to terminals 60 (+)
and 62 (-).
3. Enter 4.000mA from the current source to the
controller. Allow at least 10 seconds to stabilize.
Press the Right Key . once at the Calibrate
Input 1 prompt. At the 4.000mA prompt press
. once and to store 4.000mA press the Up Key
> once.
4. Enter 20.000mA from the current source to the
controller. Allow at least 10 seconds to stabilize.
Press . once at the Calibrate Input 1 prompt.
At the 20.000mA prompt press . once and to
store 20.000mA press > once.
Input 2
5. Connect the current source to terminals 54 (+)
and 58 (-).
6. Enter 4.00mA from the current source to the
controller. Allow at least 10 seconds to stabilize.
Press . once at the Calibrate Input 2 prompt.
At the 4.000mA prompt press . once and to
store 4.000mA press > once.
7. Enter 20.00mA from the current source to the
controller. Allow at least 10 seconds to stabilize.
Press . once at the Calibrate Input 2 prompt.
At the 20.000mA prompt press . once and to
store 20.000mA press > once.
Input 3
8. Connect the voltage source to terminals 52 (+)
and 56 (-) of the controller.
9. Enter 4.000mA from the current source to the
controller. Allow at least 10 seconds to stabilize.
Calibration ■ 9.3
Press . once at the Calibrate Input 3 prompt.
At the 4.000mA prompt press . once and to
store the 4.000mA input press > once.
10. Enter 20.000mA from the current source to the
controller. Allow at least 10 seconds to stabilize.
Press . once at the Calibrate Input 3 prompt
(Factory Page). At the 20.000mA prompt press
. once and to store the 20.000mA input press
> once.
7. Press the Right Key . at the Calibrate Output 1A prompt. At the 10.000V prompt press .
once. Use the Up Key > or the Down Key <
to adjust the display to the reading on the
volt/ammeter. The controller should stabilize
within one second. Repeat until the volt/ammeter reads 10.000V. Press . to store the value.
8. Rewire for operation and verify calibration.
11. Rewire for operation and verify calibration.
Output 1B Setup and Calibration
Process Output Procedure
1. Connect the correct power supply to terminals
1, 2 and 3 (see the W iring Chapter and the
Appendix).
Equipment
•
Precision volt/ammeter with 3.5-digit resolution.
Output 1A Setup and Calibration
1. Connect the correct power supply to terminals
1, 2 and 3 (see the W iring Chapter and the
Appendix).
Milliamperes
2. Connect the volt/ammeter to terminals 42 (+)
and 43 (-).
3. Press the Right Key . at the Calibrate Output 1A prompt. At the 4.000mA prompt press .
once. Use the Up Key > or the Down Key <
to adjust the display to the reading on the
volt/ammeter. The controller should stabilize
within one second. Repeat until the volt/ammeter reads 4.000mA. Press . to store the value.
4. Press the Right Key . at the Calibrate Output 1A prompt. At the 20.000mA prompt press
. once. Use the Up Key > or the Down Key
< to adjust the display to the reading on the
volt/ammeter. The controller should stabilize
within one second. Repeat until the volt/ammeter reads 20.000mA. Press . to store the value.
Volts
5. Connect the volt/ammeter to terminals 44 (+)
and 43 (-).
6. Press the Right Key . at the Calibrate Output 1A prompt. At the 1.000V prompt press .
once. Use the Up Key > or the Down Key <
to adjust the display to the reading on the
volt/ammeter. The controller should stabilize
within one second. Repeat until the volt/ammeter reads 1.000V. Press . to store the value.
9.4 ■ Calibration
Milliamperes
2. Connect the volt/ammeter to terminals 39 (+)
and 40 (-).
3. Press the Right Key . at the Calibrate Output 1B prompt. At the 4.000mA prompt press .
once. Use the Up Key > or the Down Key <
to adjust the display to the reading on the
volt/ammeter. The controller should stabilize
within one second. Repeat until the volt/ammeter reads 4.000mA. Press . to store the value.
4. Press the Right Key . at the Calibrate Output 1B prompt. At the 20.000mA prompt press
. once. Use the Up Key > or the Down Key
< to adjust the display to the reading on the
volt/ammeter. The controller should stabilize
within one second. Repeat until the volt/ammeter reads 20.000mA. Press . to store the value.
Volts
5. Connect the volt/ammeter to terminals 41 (+)
and 40 (-).
6. Press the Right Key . at the Calibrate Output 1B prompt. At the 1.000V prompt press .
once. Use the Up Key > or the Down Key <
to adjust the display to the reading on the
volt/ammeter. The controller should stabilize
within one second. Repeat until the volt/ammeter reads 1.000V. Press . to store the value.
7. Press the Right Key . at the Calibrate Output 1B prompt. At the 10.000V prompt press .
once. Use the Up Key > or the Down Key <
to adjust the display to the reading on the
volt/ammeter. The controller should stabilize
within one second. Repeat until the volt/ammeter reads 10.000V. Press . to store the value.
8. Rewire for operation and verify calibration.
Watlow Series F4S/D
put 2B prompt. At the 4.000mA prompt press .
once. Use the Up Key > or the Down Key <
to adjust the display to the reading on the
volt/ammeter. The controller should stabilize
within one second. Repeat until the volt/ammeter reads 4.000mA. Press . to store the value.
Output 2A Setup and Calibration
1. Connect the correct power supply to terminals
1, 2 and 3 (see the W iring Chapter and the
Appendix).
Milliamperes
2. Connect the volt/ammeter to terminals 36 (+)
and 37 (-).
3. Press the Right Key . at the Calibrate Output 2A prompt. At the 4.000mA prompt press .
once. Use the Up Key > or the Down Key <
to adjust the display to the reading on the
volt/ammeter. The controller should stabilize
within one second. Repeat until the volt/ammeter reads 4.000mA. Press . to store the value.
4. Press the Right Key . at the Calibrate Output 2A prompt. At the 20.000mA prompt press
. once. Use the Up Key > or the Down Key
< to adjust the display to the reading on the
volt/ammeter. The controller should stabilize
within one second. Repeat until the volt/ammeter reads 20.000mA. Press . to store the value.
Volts
5. Connect the volt/ammeter to terminals 38 (+)
and 37 (-).
6. Press the Right Key . at the Calibrate Output 2A prompt. At the 1.000V prompt press .
once. Use the Up Key > or the Down Key <
to adjust the display to the reading on the
volt/ammeter. The controller should stabilize
within one second. Repeat until the volt/ammeter reads 1.000V. Press . to store the value.
7. Press the Right Key . at the Calibrate Output 2A prompt. At the 10.000V prompt press .
once. Use the Up Key > or the Down Key <
to adjust the display to the reading on the
volt/ammeter. The controller should stabilize
within one second. Repeat until the volt/ammeter reads 10.000V. Press . to store the value.
4. Press the Right Key . at the Calibrate Output 2B prompt. At the 20.000mA prompt press
. once. Use the Up Key > or the Down Key
< to adjust the display to the reading on the
volt/ammeter. The controller should stabilize
within one second. Repeat until the volt/ammeter reads 20.000mA. Press . to store the value.
Volts
5. Connect the volt/ammeter to terminals 35 (+)
and 34 (-).
6. Press the Right Key . at the Calibrate Output 2B prompt. At the 1.000V prompt press .
once. Use the Up Key > or the Down Key <
to adjust the display to the reading on the
volt/ammeter. The controller should stabilize
within one second. Repeat until the volt/ammeter reads 1.000V. Press . to store the value.
7. Press the Right Key . at the Calibrate Output 2B prompt. At the 10.000V prompt press .
once. Use the Up Key > or the Down Key <
to adjust the display to the reading on the
volt/ammeter. The controller should stabilize
within one second. Repeat until the volt/ammeter reads 10.000V. Press . to store the value.
8. Rewire for operation and verify calibration.
Retransmit Output Procedure
Equipment
•
Precision volt/ammeter with 3.5-digit resolution.
8. Rewire for operation and verify calibration.
Retransmit 1 Setup and Calibration
Output 2B Setup and Calibration
1. Connect the correct power supply to terminals
1, 2 and 3 (see the W iring Chapter and the
Appendix).
1. Connect the correct power supply to terminals
1, 2 and 3 (see the W iring Chapter and the
Appendix).
Milliamperes
2. Connect the volt/ammeter to terminals 33 (+)
and 34 (-).
3. Press the Right Key . at the Calibrate Out-
Watlow Series F4S/D
Milliamperes
2. Connect the volt/ammeter to terminals 50 (+)
and 49 (-).
3. Press the Right Key . at the Calibrate
Rexmit 1 prompt. At the 4.000mA prompt press
. once. Use the Up Key > or the Down Key
Calibration ■ 9.5
< to adjust the display to the reading on the
volt/ammeter. The controller should stabilize
within one second. Repeat until the volt/ammeter reads 4.000mA. Press . to store the value.
4. Press the Right Key . at the Calibrate
Rexmit 1 prompt. At the 20.000mA prompt
press . once. Use the Up Key > or the Down
Key < to adjust the display to the reading on
the volt/ammeter. The controller should stabilize within one second. Repeat until the
volt/ammeter reads 20.000mA. Press . to
store the value.
Volts
5. Connect the volt/ammeter to terminals 48 (+)
and 49 (-).
6. Press the Right Key . at the Calibrate
Rexmit 1 prompt. At the 1.000V prompt press
. once. Use the Up Key > or the Down Key
< to adjust the display to the reading on the
volt/ammeter. The controller should stabilize
within one second. Repeat until the volt/ammeter reads 1.000V. Press . to store the value.
7. Press the Right Key . at the Calibrate
Rexmit 1 prompt. At the 10.000V prompt press
. once. Use the Up Key > or the Down Key
< to adjust the display to the reading on the
volt/ammeter. The controller should stabilize
within one second. Repeat until the volt/ammeter reads 10.000V. Press . to store the value.
8. Rewire for operation and verify calibration.
Retransmit 2 Setup and Calibration
1. Connect the correct power supply to terminals
1, 2 and 3 (see the W iring Chapter and the
Appendix).
Milliamperes
2. Connect the volt/ammeter to terminals 47 (+)
and 46 (-).
3. Press the Right Key . at the Calibrate
Rexmit 2 prompt. At the 4.000mA prompt press
. once. Use the Up Key > or the Down Key
< to adjust the display to the reading on the
volt/ammeter. The controller should stabilize
within one second. Repeat until the volt/ammeter reads 4.000mA. Press . to store the value.
4. Press the Right Key . at the Calibrate
Rexmit 2 prompt. At the 20.000mA prompt
press . once. Use the Up Key > or the Down
Key < to adjust the display to the reading on
the volt/ammeter. The controller should stabilize within one second. Repeat until the
volt/ammeter reads 20.000mA. Press . to
store the value.
Volts
5. Connect the volt/ammeter to terminals 45 (+)
and 46 (-).
6. Press the Right Key . at the Calibrate
Rexmit 2 prompt. At the 1.000V prompt press
. once. Use the Up Key > or the Down Key
< to adjust the display to the reading on the
volt/ammeter. The controller should stabilize
within one second. Repeat until the volt/ammeter reads 1.000V. Press . to store the value.
7. Press the Right Key . at the Calibrate
Rexmit 2 prompt. At the 10.000V prompt press
. once. Use the Up Key > or the Down Key
Calibration Menu Map
Calibrate Input 1
Calibrate Input 2
Calibrate Input 3
Calibrate Output 1A
Calibrate Output 1B
Calibrate Output 2A
Calibrate Output 2B
Calibrate Rexmit 1
Calibrate Rexmit 2
Restore In1 Cal
Restore In2 Cal
Restore In3 Cal
9.6 ■ Calibration
Watlow Series F4S/D
Factory Page Parameter Table
Parameter
Description
Range
(Modbus Value)
Default
Modbus
Register
read/write
[I/O, Set, Ch]
Conditions for
Parameters to Appear
Calibrate Input x (1 to 3)
Main Page > Factory > Calibration > Calibrate Input x (1 to 3)
0.00mV Thermocouple
Yes (1)
Store 0.000mV calibration for the thermocouple input.
50.00mV Thermocouple
Yes (2)
Store 50.000mV calibration for the thermocouple input.
32°F Type J
Yes (3)
Store 32°F type J
calibration.
Yes (4)
Ground
Store calibration for
ground at gains of 1
and 32.
Yes (5)
Lead
Store calibration for
lead resistance.
15.0 Ohms*
Yes (6)
Store 15.00Ω calibration for the 100Ω
RTD input.
240.0 Ohms*
Yes (6)
Store 240.00Ω calibration for the 500Ω
or 1kΩ RTD input.
380.0 Ohms*
Yes (7)
Store 380.00Ω calibration for the 100Ω
RTD input.
6080.0 Ohms*
Yes (7)
Store 6080.00Ω calibration for the 500Ω
or 1kΩ RTD input.
Yes (8)
0.000V
Store 0.000V calibration for the process
input.
Yes (9)
10.000V
Store 10.000V calibration for the process input.
*The tenth character of your model number determines
what prompts appear and what input resistance values to
use for the RTD calibration.
F4_ _-_ _ _ _-_(1 to 4)RG: 15.00 and 380.00Ω
Watlow Series F4S/D
1603
1608
1613
w
1603
1608
1613
w
1603
1608
1613
w
1603
1608
1613
w
1603
1608
1613
w
1603
1608
1613
w
1603
1608
1613
w
1603
1608
1613
w
1603
1608
1613
w
1603
1608
1613
w
1603
1608
1613
w
Input
[1]
[2]
[3]
Active: Always.
Input
[1]
[2]
[3]
Active: Always.
Input
[1]
[2]
[3]
Active: Always.
Input
[1]
[2]
[3]
Active: Always.
Input
[1]
[2]
[3]
Active: Always.
Input
[1]
[2]
[3]
Active: Always.
Input
[1]
[2]
[3]
Active: Always.
Input
[1]
[2]
[3]
Active: Always.
Input
[1]
[2]
[3]
Active: Always.
Input
[1]
[2]
[3]
Active: Always.
Input
[1]
[2]
[3]
Active: Always.
F4_ _-_ _ _ _-_(5 to 8)RG: 240.00 and 6080.00Ω
✔ NOTE:
For more information about how parameter settings affect
the controller’s operation, see Features Chapter.
Calibration ■ 9.7
Factory Page Parameter Table
Parameter
Description
Range
(Modbus Value)
Default
Modbus
Register
read/write
[I/O, Set, Ch]
Conditions for
Parameters to Appear
Calibrate Input x (1 to 3)
Main Page > Factory > Calibration > Calibrate Input x (1 to 3)
Yes (10)
4.000mA
1603
1608
1613
w
Store 4mA calibration for the process
input.
20.000mA
Yes (11)
1603
1608
1613
w
Store 20mA calibration for the process
input.
Input
[1]
[2]
[3]
Active: Always.
Input
[1]
[2]
[3]
Active: Always.
Calibrate Output x (1A, 1B, 2A, 2B ) and Retransmit x (1 and 2)
Main > Factory > Calibration / Calibrate Output x (1A, 1B, 2A, 2B) and Retransmit x (1 and 2)
4.000mA
Store 4mA calibration for the process
output.
20.000mA
Store 20mA calibration for the process
output.
1.000V
Store 1.000V calibration for the process output.
10.000V
Store 10.000V calibration for the process output.
0.000mA to 6.000mA
(0 to 6000)
4.000mA
(4000)
0.000 to 24.000mA
(0 to 24000)
20.000mA
(20000)
0.000 to 3.000V
(0 to 3000)
1.000V
(1000)
0.000 to 12.000V
(0 to 12000)
10.000V
(10000)
Output
[1A]
[1B]
[2A]
[2B]
Rexmit
1624
[1]
1629
[2]
w
Active: Always.
Output
[1A]
[1B]
[2A]
[2B]
Rexmit
1625
[1]
1630
[2]
w
Active: Always.
Output
[1A]
[1B]
[2A]
[2B]
Rexmit
1626
[1]
1631
[2]
w
Active: Always.
Output
[1A]
[1B]
[2A]
[2B]
Rexmit
1627
[1]
1632
[2]
w
Active: Always.
1604
1609
1614
1619
1605
1610
1615
1620
1606
1611
1616
1621
1607
1612
1617
1622
Restore Input x (1 to 3) Calibration
Main > Factory > Calibration / Restore Input x (1 to 3) Calibration
Restore Input x (1 to 3)
Calibration
Restores original
factory calibration
values.
Modbus:
Input 1 (0)
Input 2 (1)
Input 3 (2)
1601 w
✔ NOTE:
Press the Information Key ˆ for more task-related tips.
9.8 ■ Calibration
Watlow Series F4S/D
10
Chapter Ten: Diagnostics
Overview
Diagnostic Menu parameters (on the Factory Page)
provide information about the controller unit that
is useful in troubleshooting. For example, the Model parameter will identify the 12-digit Series F4
part number. The Out1A parameter will identify
what type of output has been selected for Output
1A.
Select the parameter by pressing the Right Key ..
The information will appear on the Lower Display.
Some of the parameters in the Diagnostic Menu
provide information for factory use only.
To reset all parameters to their original factory
values, use the Full Defaults parameter under the
Test Menu.
Diagnostic Menu Map
Test Menu Map
Model
Mfg Date
Serial #
Software #
Revision
In1
In2
In3
Out1A
Out1B
Out2A
Out2B
Retrans1
Retrans2
In1 AtoD
In2 AtoD
In3 AtoD
CJC1 AtoD
CJC2 AtoD
CJC1 Temp
CJC2 Temp
Line Freq
Test Outputs
Display Test
Full Defaults
✔ NOTE:
To see how all the pages, menus and parameters are
grouped, refer to the inside back cover of this manual.
Watlow Series F4S/D
✔ NOTE:
For more information about how parameter settings affect
the controller’s operation, see the Features Chapter.
Diagnostics ■ 10.1
Diagnostic Menu Parameter Table (Factory Page)
Parameter
Range
(Modbus Value)
Description
Default
Modbus
Register
read/write
[I/O, Set, Ch]
Conditions for
Parameters to Appear
Diagnostic
Main > Factory > Diagnostic
Model
F4xx-xxxx-xxxx
F4xx-xxxxxxxx
0r
Active: Always.
xxxx
0198
5r
Active: Always.
0 to 999999
0
1r
2r
Active: Always.
00 to 99
(0 to 99)
1
3r
Active: Always.
0.00 to 9.99
(0 to 990)
2.01 (201)
4r
Active: Always.
8r
Active: Always.
Identifies the 12digit Series F4 part
number.
Mfg Date
Identifies the manufacture date.
Serial Number
Identifies the individual controller.
Software Number
Identifies the software ID number.
Software Revision
Identifies the software revision.
Univ. Single (7)
In1
Displays the input 1
type.
In2
Univ. Dual (8)
Displays the input 2 None (0)
type.
9r
Active: Always.
In3
Univ. Dual (8)
Displays the input 3 None (0)
type.
10 r
Active: Always.
DC (3)
SSR (2)
Process (4)
16 r
Active: Always.
DC (3)
SSR (2)
Process (4)
None (0)
17 r
Active: Always.
Displays the output
1B type.
DC (3)
SSR (2)
Process (4)
None (0)
18 r
Active: Always.
Displays the output
2A type.
DC (3)
SSR (2)
Process (4)
None (0)
19 r
Active: Always.
Displays the output
2B type.
Out1A
Displays the output
1A type.
Out1B
Out2A
Out2B
✔ NOTE: Press the Information Key ˆ for more task-related tips.
10.2 ■ Diagnostics
Watlow Series F4S/D
Diagnostic Menu Parameter Table (Factory Page)
Parameter
Description
Range
(Modbus Value)
Default
Modbus
Register
read/write
[I/O, Set, Ch]
Conditions for
Parameters to Appear
Process (4)
Displays the retrans- None (0)
mit 1 option.
20 r
Active: Always.
Process (4)
Displays the retrans- None (0)
mit 2 option.
21 r
Active: Always.
HHHH
1504 r
Active: Always.
HHHH
1505 r
Active: Always.
HHHH
1506 r
Active: Always.
HHHH
1501 r
Active: Always.
HHHH
1532 r
Active: Always.
xx.x (xxx)
1500 r
Active: Always.
xx.x (xxx)
1531 r
Active: Always.
xx (xx)
1515 r
Active: Always.
Retrans1
Retrans2
In1 AtoD
Factory use only.
In2 AtoD
Factory use only.
In3 AtoD
Factory use only.
CJC1 AtoD
Factory use only.
CJC2 AtoD
Factory use only.
CJC1 Temp
Cold junction compensation for analog
input 1. Reads the
ambient temperature
of the controller.
CJC2 Temp
Cold junction compensation for analog
input 2. Reads the
ambient temperature
of the controller.
Line Freq
Display the ac line
frequency in hertz.
✔ NOTE: For more information about how parameter settings
affect the controller’s operation, see the Features Chapter.
Watlow Series F4S/D
Diagnostics ■ 10.3
Diagnostic Menu Parameter Table (Factory Page)
Parameter
Range
(Modbus Value)
Description
Default
Modbus
Register
read/write
[I/O, Set, Ch]
Conditions for
Parameters to Appear
Test
Main > Factory > Test
Test Outputs
Choose output to
test.
Display Test
All Off
Output 1A
Output 1B
Output 2A
Output 2B
Retransmit 1
Retransmit 2
Alarm 1
Alarm 2
Digital Out 1
Digital Out 2
Digital Out 3
Digital Out 4
Digital Out 5
Digital Out 6
Digital Out 7
Digital Out 8
All On
Communications
(0)
(1)
(2)
(3)
(4)
(5)
(6)
(7)
(8)
(9)
(10)
(11)
(12)
(13)
(14)
(15)
(16)
(17)
(18)
1514 w
Active: Always.
✔NOTE: Must be in the Calibration or Test Menu at the display
for this prompt to work via communications.
Yes (1)
1513 w
Active: Always.
Default all values?
Yes (800)
1602 w
Active: Always.
Checks LED display
segments by turning
them on and off.
Full Defaults
Causes all parameters and profile values to revert to
their factory default
settings.
✔ NOTE: For more information about how parameter settings
affect the controller’s operation, see the Features Chapter.
10.4 ■ Diagnostics
Watlow Series F4S/D
11
Chapter Eleven: Installation
Dimensions
0.020 in. (0.5 mm) maximum gap between
controller front panel and mouning panel
3.930 in.
(99.8 mm)
4.284 in.
(108.8 mm)
3.930 in.
(99.8 mm)
Figure 11.1a — Front View Dimensions and Gasket Gap Dimension.
4.189 in.
(106.4 mm)
3.850 in.
(97.8 mm)
4.264 in.
(108.3 mm)
0.339 in.
(8.6 mm)
Figure 11.1b — Side and Top View and Dimensions.
Watlow Series F4S/D
Installation ■ 11.1
Panel Dimensions
3.930 in.
(99.8 mm)
3.62 to 3.65 in.
(92 to 93 mm)
F4
1A
1B
Panel Cutout
2A
2B
Main Page___________
Go to Profiles
Go to Setup
Go to Factory
1
2
3.930 in.
(99.8 mm)
Panel
Thickness
3.62 to 3.651 in.
(92 to 93 mm)
0.375 in. maximum
(9.5 mm)
i
0.675 in.
(17.6 mm)
minimum
0.625 in.
(16 mm)
minimum
Figure 11.2a — Multiple Panel Cutout Dimensions.
Installing the Series F4 Controller
Installing and mounting requires access to the back
of the panel.
Tools required: one #2 Phillips screwdriver.
1. Make the panel cutout using the mounting
template dimensions in this chapter.
2. Insert the controller into the panel cutout.
Check that the rubber gasket lies in its slot at
the back of the bezel. Slide the retention collar
over the case, with open holes facing the back of
the case.
Figure 11.2b — Gasket Seated on the Bezel.
3. Align the mounting bracket with the screws tips
pointed toward the panel. Squeezing the bowed
sides of the bracket, push it gently but firmly
over the case until the hooks snap into the slots
at the front of the case.
11.2 ■ Installation
Watlow Series F4S/D
4. If the installation does not require a NEMA 4X
seal, tighten the four screws with the Phillips
screwdriver just enough to eliminate the
spacing between the rubber gasket and the
mounting panel.
For a NEMA 4X seal, tighten the four screws
until the gap between the bezel and panel
surface is .020 in. maximum. (See figure 1 1.1b).
Make sure that you cannot move the controller
back and forth in the cutout. If you can, you do
not have a proper seal. Do not over tighten.
Over tightening could damage the the
mounting bracket.
Figure 11.3a — Retention Collar and Mounting Bracket.
Removing the Series F4 Controller
The controller can be removed most easily by
disengaging the mounting bracket hooks and
pushing the controller forward through the panel.
Be ready to support it as it slides forward through
the panel.
Tools required: one #2 Phillips screwdriver, one flathead screwdriver and some means of supporting
the controller as it slides out the front of the panel.
1. Remove all the wiring connectors from the back
of the controller. Using the Phillips screwdriver,
unscrew the four screws on the mounting
bracket (two on top, two on bottom) until the
tips are completely retracted into the shafts.
Figure 11.3b — Tightening the Screws.
2. Slide the tip of a flat screwdriver between the
case and the center top side of the mounting
bracket. Rotate the screwdriver 90 degrees,
stretching the bracket away from the case so
the hooks on the bracket disengage from the
slots on the case. Hold the bracket and press
the controller forward slightly to prevent the
disengaged hooks from snapping back into the
slots.
3. Repeat this operation to disengage the hooks on
the bottom side of the mounting bracket.
4. Press with one or two fingers on the lower half
of the back of the unit so that the controller
slides forward through the panel. Hold the
bracket steady; do not pull back. Be ready to
support the controller as it comes through the
front panel. Remove the mounting brackets and
retention collar from the back side of the panel.
Watlow Series F4S/D
Figure 11.3c — Disengaging the Mounting Bracket.
Installation ■ 11.3
Notes
11.4 ■ Installation
Watlow Series F4S/D
12
Chapter Twelve: Wiring
Input-to-Output Isolation . . . . . . . . . . . . . . . . . . . .12.1
Power Wiring . . . . . . . . . . . . . . . . . . . . . . . . . . . . .12.2
Sensor Installation Guidelines . . . . . . . . . . . . . . . .12.2
Input 1 . . . . . . . . . . . . . . . . . . . . . . . . . . . . . . . . . .12.3
Inputs x (2 and 3) . . . . . . . . . . . . . . . . . . . . . . . . .12.4
Digital Inputs x (1 to 4) . . . . . . . . . . . . . . . . . . . . .12.6
Outputs x (1A, 1B, 2A and 2B) . . . . . . . . . . . . . . .12.7
Retransmit and Alarm Output . . . . . . . . . . . . . . . .12.8
Digital Outputs x (1 to 8) . . . . . . . . . . . . . . . . . . . .12.9
Communications Wiring . . . . . . . . . . . . . . . . . . . . .12.10
Wiring Example . . . . . . . . . . . . . . . . . . . . . . . . . . .12.12
Wiring Notes . . . . . . . . . . . . . . . . . . . . . . . . . . . . .12.13
Wiring the Series F4
Wiring options depend on the model number, which
is printed on the label on the back of the controller .
The model number codes are explained in the
Appendix.
The labels on the sides and back of the controller
contain some basic wiring information.
Input-to-Output Isolation
The Series F4 uses optical and transformer
isolation to provide a barrier to prevent ground
loops when using grounded sensors and/or
peripheral equipment.
Here is a breakdown of the isolation barriers:
•
Analog input 1 and all the digital inputs
and outputs are grouped together.
•
Analog inputs 2 and 3 are grouped together.
•
All the control outputs and retransmit
outputs are grouped together.
•
Both alarm outputs are grouped together.
•
Communications is isolated from the other
inputs and outputs.
Isolation Blocks
There are no electrical connections between these blocks.
Analog Input 1
Digital Inputs
Digital Outputs
Analog Input 2 and 3
Control Outputs
Retransmit Outputs
Communications
Alarm Outputs
Figure 12.1 — Isolation Blocks.
Watlow Series F4S/D
Wiring ■ 12.1
ç
Power Wiring
WARNING:
Use only number 14, AWG copper conductor rated for at least 60°C.
Provide a labeled switch
or circuit breaker
connected to the Series
F4 power wiring as the
means of disconnection
for servicing. Failure to
do so could result in
damage to equipment
and/or property, and/or
injury or death to
personnel.
100 to 240V‡ (ac/dc), nominal (85 to 264 actual) F4 _ H - _ _ _ _ - _ _ _ _
The Series F4 has a non-operator-replaceable fuse Type T (time-lag)
rated at 2.0 or 5.0A @ 250V.
ç∫
WARNING:
To avoid damage to
property and equipment,
and/or injury of loss of
life, use National Electric
Code (NEC) standard
wiring practices to install
and operate the Series
F4. Failure to do so could
result in such damage,
and/or injury or death.
ç
CAUTION:
Maintain isolation
between analog inputs 2
and 3, and between
analog input 1 and digital
inputs 1 to 4 to prevent a
ground loop. A ground
loop may cause incorrect
readings. Failure to
follow this guideline
could result in damage to
equipment and product.
12.2 ■ Wiring
Figure 12.2 — Power wiring.
Sensor Installation Guidelines
Thermocouple inputs: Extension wire for thermocouples must be of
the same alloy as the thermocouple to limit errors.
If a grounded thermocouple is required for input 2, the signal to input 3
must be isolated to prevent possible ground loops.
RTD input: Each 1 of lead wire resistance can cause a +2°F error when
using a two-wire RTD. A three-wire RTD sensor overcomes this problem.
All three wires must have the same electrical resistance (i.e., same
gauge, same length, multi-stranded or solid, same metal).
Process input: Isolation must be maintained between input 2 and
input 3. If both input 2 and input 3 are process signals, a separate power
supply and transmitter must be used for each input. These inputs must
be electrically isolated from one another to prevent ground loops.
Watlow Series F4S/D
Input 1
ç
WARNING:
17 18 19
3
42 43 44
2
39 40 41
1
36 37 38
33 34 35
20
4
21 22 23 24
5
6
7
8
25 26
10
51 52
9
59 60
27 28 29 30
61 62
31 32
53 54 55 56 57 58
15 16
48 49 50
45 46 47
11 12 13 14
Figure 12.3b — RTD (2- or 3-Wire) 100Ω Platinum
Available on all units
17 18 19
3
42 43 44
2
39 40 41
1
20
4
21 22 23 24
5
6
7
8
25 26
10
51 52
9
27 28 29 30
61 62
31 32
48 49 50
59 60
53 54 55 56 57 58
15 16
45 46 47
11 12 13 14
60
61
62
61 62
S1
S3
36 37 38
S2
59 60
60
61
62
61 62
S1
S3
3-wire
33 34 35
2-wire
jumper 60 to 62
59 60
Figure 12.3c — 0-5VÎ, 1-5VÎ or 0-10VÎ (dc) Process
Available on all units.
Input impedance: 20kΩ
17 18 19
3
42 43 44
2
39 40 41
1
36 37 38
20
4
21 22 23 24
5
6
7
8
25 26
10
51 52
9
59 60
27 28 29 30
61 62
31 32
53 54 55 56 57 58
15 16
48 49 50
45 46 47
11 12 13 14
61 62
-62
33 34 35
+59
59 60
CAUTION:Maintain
isolation between analog
inputs 2 and 3, and
between analog input 1
and digital inputs 1 to 4
to prevent a ground loop.
A ground loop may cause
incorrect readings.
Failure to follow this
guideline could result in
damage to equipment
and product.
+61
-62
61 62
ç
Available on all units
Impedance: 20MΩ
59 60
To avoid damage to
property and equipment,
and/or injury of loss of
life, use National Electric
Code (NEC) standard
wiring practices to install
and operate the Series
F4. Failure to do so could
result in such damage,
and/or injury or death.
Figure 12.3a — Thermocouple
Figure 12.3d — 0-20mA or 4-20mA Process
Available on all units.
Input impedance: 100Ω
17 18 19
3
42 43 44
2
39 40 41
1
36 37 38
33 34 35
20
4
21 22 23 24
5
6
7
8
25 26
10
51 52
9
27 28 29 30
59 60
53 54 55 56 57 58
31 32
61 62
15 16
48 49 50
45 46 47
11 12 13 14
61 62
-62
59 60
+60
Figure 12.3e — 0 to 50mV
Available on all units
Impedance: 20MΩ
42 43 44
3
17 18 19
2
39 40 41
1
36 37 38
20
4
21 22 23 24
5
6
7
8
53 54 55 56 57 58
59 60
27 28 29 30
61 62
31 32
15 16
48 49 50
45 46 47
11 12 13 14
51 52
10
25 26
9
61 62
Watlow Series F4S/D
33 34 35
59 60
+61
-62
Wiring ■ 12.3
Inputs x (2 and 3)
ç
Figure 12.4a — Thermocouple
17 18 19
42 43 44
3
39 40 41
2
20
4
21 22 23 24
5
6
7
8
25 26
10
51 52
9
51 52
59 60
27 28 29 30
61 62
31 32
53 54 55 56 57 58
48 49 50
15 16
45 46 47
11 12 13 14
53 54 55 56 57 58
F4S _ - _ _ _ 6 - _ _ _ _ or F4D _ - _ _ _ _ - _ _ _ _
17 18 19
3
42 43 44
2
39 40 41
1
20
4
21 22 23 24
5
6
7
8
25 26
10
51 52
9
59 60
27 28 29 30
61 62
31 32
53 54 55 56 57 58
48 49 50
15 16
45 46 47
11 12 13 14
S1
S3
36 37 38
55
56
jumper 52 to 56
33 34 35
57
58
52
53 54 55 56 57 58
S1
S3
53 54 55 56 57 58
54
jumper 54 to 58
Input 3
51 52
Input 2
Figure 12.4c — RTD (3-wire) 100Ω Platinum
F4S _ - _ _ _ 6 - _ _ _ _ or F4D _ - _ _ _ _ - _ _ _ _
42 43 44
3
17 18 19
2
39 40 41
1
36 37 38
20
4
21 22 23 24
5
6
7
8
53 54 55 56 57 58
59 60
27 28 29 30
61 62
31 32
15 16
48 49 50
45 46 47
11 12 13 14
51 52
10
25 26
9
S1
S3
33 34 35
55
56
53 54 55 56 57 58
57
58
Input 3
S2
52
51 52
S1
S3
54
53 54 55 56 57 58
S2
51 52
Input 2
12.4 ■ Wiring
+55
-56
Figure 12.4b — RTD (2-wire) 100Ω Platinum
51 52
Maintain isolation
between analog inputs 2
and 3, and between
analog input 1 and digital
inputs 1 to 4 to prevent a
ground loop. A ground
loop may cause incorrect
readings. Failure to
follow this guideline
could result in damage to
equipment and product.
+57
-58
Input 3
53 54 55 56 57 58
CAUTION:
51 52
ç
Input 2
1
Impedance: 20MΩ
36 37 38
F4S _ - _ _ _ 6 - _ _ _ _ or F4D _ - _ _ _ _ - _ _ _ _
To avoid damage to
property and equipment,
and/or injury of loss of
life, use National Electric
Code (NEC) standard
wiring practices to install
and operate the Series
F4. Failure to do so could
result in such damage,
and/or injury or death.
33 34 35
WARNING:
Watlow Series F4S/D
Inputs x (2 and 3) (continued)
ç
Figure 12.5a — 0 to 5VÎ, 1 to 5VÎ or 0 to 10VÎ (dc) Process
17 18 19
42 43 44
39 40 41
36 37 38
3
20
4
21 22 23 24
5
6
7
8
25 26
10
51 52
9
59 60
27 28 29 30
61 62
31 32
53 54 55 56 57 58
48 49 50
15 16
45 46 47
11 12 13 14
-56
2
-58
+51
1
+53
53 54 55 56 57 58
CAUTION:
51 52
ç
Input 3
Input 2
33 34 35
Input impedance: 20kΩ
53 54 55 56 57 58
F4S _ - _ _ _ 6 - _ _ _ _ or F4D _ - _ _ _ _ - _ _ _ _
To avoid damage to
property and equipment,
and/or injury of loss of
life, use National Electric
Code (NEC) standard
wiring practices to install
and operate the Series
F4. Failure to do so could
result in such damage,
and/or injury or death.
51 52
WARNING:
Figure 12.5b — 0 to 20mA or 4 to 20mA Process
F4S _ - _ _ _ 6 - _ _ _ _ or F4D _ - _ _ _ _ - _ _ _ _
Input impedance: 100Ω
42 43 44
17 18 19
39 40 41
3
36 37 38
2
20
4
21 22 23 24
5
6
7
8
53 54 55 56 57 58
59 60
27 28 29 30
61 62
31 32
48 49 50
15 16
45 46 47
11 12 13 14
51 52
10
25 26
9
-56
53 54 55 56 57 58
-58
1
+52
53 54 55 56 57 58
+54
33 34 35
Input 3
51 52
Input 2
51 52
Maintain isolation
between analog inputs 2
and 3, and between
analog input 1 and digital
inputs 1 to 4 to prevent a
ground loop. A ground
loop may cause incorrect
readings. Failure to
follow this guideline
could result in damage to
equipment and product.
Figure 12.5c — 0 to 50mV
F4S _ - _ _ _ 6 - _ _ _ _ or F4D _ - _ _ _ _ - _ _ _ _
Impedance: 20MΩ
17 18 19
3
42 43 44
2
39 40 41
1
33 34 35
36 37 38
20
4
21 22 23 24
5
6
7
8
25 26
59 60
27 28 29 30
61 62
31 32
15 16
48 49 50
45 46 47
11 12 13 14
53 54 55 56 57 58
10
51 52
9
+55
-56
53 54 55 56 57 58
Watlow Series F4S/D
53 54 55 56 57 58
+57
-58
Input 3
51 52
51 52
Input 2
Wiring ■ 12.5
Digital Inputs x (1 to 4)
ç
Figure 12.6 — Digital Inputs x (1 to 4)
Voltage input
WARNING:
0 to 2VÎ (dc) Event Input Low State
To avoid damage to
property and equipment,
and/or injury of loss of
life, use National Electric
Code (NEC) standard
wiring practices to install
and operate the Series
F4. Failure to do so could
result in such damage,
and/or injury or death.
3 to 36VÎ (dc) Event Input High State
Contact closure
0 to 2kΩ Event Input Low State
> 23kΩ Event Input High State
17 18 19
3
42 43 44
2
39 40 41
1
20
4
21 22 23 24
5
6
7
8
25 26
10
51 52
9
27 28 29 30
61 62
31 32
48 49 50
59 60
53 54 55 56 57 58
15 16
45 46 47
11 12 13 14
Digital Input Common
Digital Input 1
Digital 2
10kΩ Digital 3
-27
28
29
30
31 32
Digital 4 31
27 28 29 30
31 32
Digital 4 +31
27 28 29 30
-27
+28
+29
+30
36 37 38
25 26
25 26
- Digital Input Common
+ Digital Input 1
Digital 2
Digital 3
33 34 35
21 22 23 24
21 22 23 24
CAUTION:
20
20
ç
Maintain isolation
between analog inputs 2
and 3, and between
analog input 1 and digital
inputs 1 to 4 to prevent a
ground loop. A ground
loop may cause incorrect
readings. Failure to
follow this guideline
could result in damage to
equipment and product.
Contact Closure
(add a 10kΩ
pull-up resistor
for each active
input)
17 18 19
17 18 19
Voltage Input
Digital Input Common (27)
Digital Input 1 (28)
Digital Input 2 (29)
Digital Input 3 (30)
Digital Input 4 (31)
Internal Circuitry
12.6 ■ Wiring
Watlow Series F4S/D
Outputs x (1A, 1B, 2A and 2B)
NOTE:
Output 1A
Output 1B
Output 2A
key pin
F4 _ _ - _ K _ _ - _ _ _ _
36 N.O.
37 COM.
key pin
F4D _ - _ _ K _ - _ _ _ _
33 N.O.
34 COM.
33 34 35
key pin
Output 2B
36 37 38
39 N.O.
40 COM.
39 40 41
42 N.O.
43 COM.
F4 _ _ - K _ _ _ - _ _ _ _
key pin
F4D _ - _ _ _ K - _ _ _ _
11 12 13 14
15 16
17 18 19
9
42 43 44
5
3
39 40 41
4
2
1
33 34 35
36 37 38
31 32
20
21 22 23 24
6
7
8
25 26
51 52
10
59 60
27 28 29 30
61 62
31 32
48 49 50
53 54 55 56 57 58
45 46 47
61 62
48 49 50
59 60
53 54 55 56 57 58
45 46 47
27 28 29 30
51 52
10
25 26
8
21 22 23 24
15 16
7
20
11 12 13 14
6
17 18 19
9
42 43 44
5
3
39 40 41
4
2
1
36 37 38
33 34 35
31 32
61 62
48 49 50
59 60
53 54 55 56 57 58
45 46 47
27 28 29 30
51 52
10
25 26
8
21 22 23 24
15 16
7
20
11 12 13 14
6
17 18 19
9
42 43 44
5
3
39 40 41
4
2
61 62
48 49 50
59 60
53 54 55 56 57 58
15 16
45 46 47
11 12 13 14
1
36 37 38
33 34 35
10
51 52
9
31 32
8
27 28 29 30
7
25 26
6
21 22 23 24
5
20
4
17 18 19
3
42 43 44
2
39 40 41
1
WARNING:
0.5 amps, off-state impedance 31MΩ
36 37 38
ç
24VÅ (ac) minimum, 253VÅ (ac) maximum
33 34 35
Watlow carries the R.C.
suppressor Quencharc
brand name, which is a
trademark of ITW
Paktron. Watlow Part No.
0804-0147-0000.
Figure 12.7a — Solid-state Relay
42 43 44
Switching inductive loads
(relay coils, solenoids,
etc.) with the mechanical
relay, switched dc or
solid-state relay output
options requires use of
an R.C. suppressor.
Figure 12.7b — Switched DC, Open Collector
• Switched dc configuration
To avoid damage to
property and equipment,
and/or injury of loss of
life, use National Electric
Code (NEC) standard
wiring practices to install
and operate the Series
F4. Failure to do so could
result in such damage,
and/or injury or death.
COM not used
DC+ = 22 to 28VÎ (dc)
Maximum supply current is 30mA
• Open collector output
DC+ not used
DC- = 42VÎ (dc) maximum
Off: 10mA maximum leakage
On: 0.2V @ 0.5 amps sink
Switched DC
Open Collector
External
Power
Supply
+
+
42VÎ (dc) max
-
dc-
dcSSR
COM.
COM.
+
dc+
dc+
Internal Circuitry
Output 1A
Output 2A
F4 _ _ - _ C _ _ - _ _ _ _
38 dc+
F4D _ - _ _ C _ - _ _ _ _
33 dc34 COM.
33 34 35
41 dc+
Output 2B
36 dc37 COM.
36 37 38
39 dc40 COM.
39 40 41
42 43 44
44 dc+
F4 _ _ - C _ _ _ - _ _ _ _
35 dc+
F4D _ - _ _ _ C - _ _ _ _
6
21 22 23 24
15 16
20
11 12 13 14
17 18 19
9
42 43 44
5
3
39 40 41
4
2
1
36 37 38
33 34 35
7
8
25 26
51 52
10
27 28 29 30
61 62
31 32
48 49 50
59 60
53 54 55 56 57 58
45 46 47
61 62
31 32
48 49 50
59 60
53 54 55 56 57 58
45 46 47
27 28 29 30
51 52
10
25 26
8
21 22 23 24
15 16
7
20
11 12 13 14
6
17 18 19
9
42 43 44
5
3
39 40 41
4
2
1
36 37 38
33 34 35
61 62
31 32
48 49 50
59 60
53 54 55 56 57 58
45 46 47
27 28 29 30
51 52
10
25 26
8
21 22 23 24
15 16
7
20
11 12 13 14
6
17 18 19
9
42 43 44
5
3
39 40 41
4
2
61 62
48 49 50
59 60
53 54 55 56 57 58
15 16
45 46 47
11 12 13 14
1
36 37 38
33 34 35
10
51 52
9
31 32
8
27 28 29 30
7
25 26
6
21 22 23 24
5
20
4
17 18 19
3
42 43 44
2
39 40 41
1
36 37 38
33 34 35
Watlow Series F4S/D
Internal Circuitry
Output 1B
42 dc43 COM.
Load
-
Wiring ■ 12.7
Figure 12.8a — 0 to 20mA, 4 to 20mA, 0 to 5VÎ, 1 to 5VÎ and 0 to
NOTE:
Output 1B
F4 _ _ - _ F _ _ - _ _ _ _
33 amps+
34 COM.-
33 34 35
F4 _ _ - F _ _ _ - _ _ _ _
41 volts+
Output 2B
36 amps+
37 COM.-
36 37 38
44 volts+
Output 2A
39 amps+
40 COM.-
39 40 41
42 amps+
43 COM.-
38 volts+
F4D _ - _ _ F _ - _ _ _ _
35 volts+
F4D _ - _ _ _ F - _ _ _ _
17 18 19
42 43 44
3
39 40 41
2
36 37 38
1
33 34 35
17 18 19
3
42 43 44
2
39 40 41
1
36 37 38
33 34 35
17 18 19
20
4
20
4
20
6
7
7
8
8
8
21 22 23 24
5
6
7
21 22 23 24
5
6
21 22 23 24
25 26
51 52
59 60
27 28 29 30
61 62
31 32
48 49 50
45 46 47
15 16
53 54 55 56 57 58
11 12 13 14
61 62
31 32
10
59 60
27 28 29 30
9
25 26
15 16
48 49 50
45 46 47
31 32
11 12 13 14
27 28 29 30
61 62
53 54 55 56 57 58
10
59 60
48 49 50
53 54 55 56 57 58
45 46 47
51 52
25 26
10
51 52
9
15 16
42 43 44
11 12 13 14
39 40 41
9
36 37 38
5
3
61 62
4
2
59 60
53 54 55 56 57 58
15 16
48 49 50
45 46 47
11 12 13 14
1
33 34 35
10
51 52
9
31 32
8
27 28 29 30
7
25 26
6
21 22 23 24
5
20
4
17 18 19
3
42 43 44
2
39 40 41
1
36 37 38
33 34 35
Watlow carries the R.C.
suppressor Quencharc
brand name, which is a
trademark of ITW
Paktron. Watlow Part No.
0804-0147-0000.
Output 1A
42 43 44
Switching inductive loads
(relay coils, solenoids,
etc.) with the mechanical
relay, switched dc or
solid-state relay output
options requires use of
an R.C. suppressor.
10VÎ (dc) Process
Retransmit and Alarm Output
ç
Figure 12.8b — Retransmit Outputs x (1 and 2)
WARNING:
mA maximum load impedance: 800Ω
To avoid damage to
property and equipment,
and/or injury of loss of
life, use National Electric
Code (NEC) standard
wiring practices to install
and operate the Series
F4. Failure to do so could
result in such damage,
and/or injury or death.
volts (dc) minimum load impedance: 1k Ω
Output 1
Output 2
F4 _ _ - _ _ _ _ - 1 _ _ _
or F4 _ _ - _ _ _ _ - 2 _ _ _
45 46 47
volts 45
COM. 46
amps 47
48 49 50
volts 48
COM. 49
amps 50
F4 _ _ - _ _ _ _ - 2 _ _ _
6
21 22 23 24
15 16
20
11 12 13 14
17 18 19
9
42 43 44
5
3
39 40 41
4
2
7
8
25 26
51 52
10
27 28 29 30
61 62
31 32
48 49 50
59 60
53 54 55 56 57 58
45 46 47
61 62
48 49 50
59 60
53 54 55 56 57 58
15 16
45 46 47
11 12 13 14
1
36 37 38
33 34 35
10
51 52
9
31 32
8
27 28 29 30
7
25 26
6
21 22 23 24
5
20
4
17 18 19
3
42 43 44
2
39 40 41
1
36 37 38
33 34 35
Figure 12.8c — Alarm Outputs x (1 and 2)
42 43 44
3
17 18 19
2
39 40 41
1
36 37 38
33 34 35
Alarm Output 2
4
20
1
1
Alarm Output 1
21 22 23 24
5
6
7
8
53 54 55 56 57 58
59 60
27 28 29 30
61 62
31 32
15 16
48 49 50
45 46 47
11 12 13 14
51 52
10
3
3
4
4
5
5
6
6
4
5
6
25 26
9
2
2
N.O.
COM.
N.C.
9
9
8
9
N.C.
7
8
7
8
7
N.O.
COM.
10
10
11 12 13 14
11 12 13 14
15 16
15 16
Electromechanical relay without contact suppression
Form C, 2 amp, off-state impedance: 31M Ω
12.8 ■ Wiring
Watlow Series F4S/D
Digital Outputs x (1 to 8)
ç
Figure 12.9a — Digital Outputs x (1 to 8)
WARNING:
Digital output supply: +5VÎ (dc) ±5%
To avoid damage to
property and equipment,
and/or injury of loss of
life, use National Electric
Code (NEC) standard
wiring practices to install
and operate the Series
F4. Failure to do so could
result in such damage,
and/or injury or death.
Maximum source current: 80mA (total for all 8 switch dc)
Open collector:
Off (open): 42VÎ (dc) maximum @ 10µA
On (closed): 0.2VÎ (dc) maximum @ 50mA sink
17 18 19
3
42 43 44
2
39 40 41
1
36 37 38
33 34 35
20
4
21 22 23 24
5
6
7
8
25 26
59 60
27 28 29 30
61 62
31 32
15 16
48 49 50
45 46 47
11 12 13 14
53 54 55 56 57 58
10
51 52
9
Digital Output Common -26
+5
Digital Output 1
25 26
Digital 8 -25
21 22 23 24
-20
-21
-22
-23
-24
20
Digital 3
Digital 4
Digital 5
Digital 6
Digital 7
17 18 19
+
Digital Output 1 -18
Digital 2 -19
27 28 29 30
Digital Output 8
31 32
Digital Output Ground
Internal Circuitry
Figure 12.9b — Open Collector Example
External Supply
+
18
Digital Output 1
-
+
50mA
max load
26
Digital Ground
Figure 12.9c — Switched DC Example
17 18
Watlow Series F4S/D
+
External
-
Load
Wiring ■ 12.9
Communications Wiring
ç
3
17 18 19
2
42 43 44
1
39 40 41
36 37 38
33 34 35
EIA/TIA 232
4
20
1
EIA/TIA 485
1
21 22 23 24
5
6
WARNING:
Figure 12.10a — EIA/TIA 485 and EIA/TIA 232 Communications
7
8
59 60
27 28 29 30
61 62
31 32
15 16
48 49 50
45 46 47
5
5
6
6
7
7
8
8
9
9
10
10
15 16
15 16
Transmit 14
Receive 15
COM.
16
11 12 13 14
11 12 13 14
16
11 12 13 14
4
4
COM.
53 54 55 56 57 58
3
3
5V+ termination bias 11
T+/R+
12
T-/R13
25 26
10
51 52
9
2
2
To avoid damage to
property and equipment,
and/or injury of loss of
life, use National Electric
Code (NEC) standard
wiring practices to install
and operate the Series
F4. Failure to do so could
result in such damage,
and/or injury or death.
Figure 12.10b — Termination for EIA-232 to EIA-485 Converter
42 43 44
3
39 40 41
2
17 18 19
1
36 37 38
33 34 35
1
20
4
21 22 23 24
5
6
7
2
8
10
51 52
25 26
9
59 60
27 28 29 30
53 54 55 56 57 58
61 62
31 32
15 16
48 49 50
4
45 46 47
11 12 13 14
3
5
6
8
9
10
+5V
1KΩ T+/R+
120Ω T-/R1KΩ
11 12 13 14
Com
15 16
B
A
GND
7
Converter box
termination
with pull-up
and pull-down
resistors.
If the system does not work properly, it may need termination resistors at each
end of the network. A typical installation would require a 120-ohm resistor
across the transmit/receive terminals (12 and 13) of the last controller in the
network and the converter box or serial card. Pull-up and pull-down 1k resistors
may be needed on the first unit to maintain the correct voltage during the idle
state.
Figure 12.10c — EIA/TIA-232 Connections
14 16 15
14 16 15
¥¥¥¥¥¥¥¥¥¥¥¥¥
1 2 3 4 5 6 7 8 9 10 11 12 13
14 15 16 17 18 19 20 21 22 23 24 25
¥¥¥¥¥¥¥¥¥¥¥¥
Wire
Color
12.10 ■ Wiring
F4
232
¥1 ¥2 ¥3 ¥4 ¥5
6
7
8
9
¥¥¥¥
DB 9
Connector
DB25
Connector
White
TX Pin 14
RX Pin 2
RX Pin 3
Red
RX Pin 15
TX Pin 3
TX Pin 2
Black
GND Pin 16
Gnd Pin 5
GND Pin 7
Green
GND Pin 24
N/U Pin 9
N/U Pin 22
Shield
N/C
Gnd Pin 5
Gnd Pin 7
Watlow Series F4S/D
Communications Wiring (continued)
ç
Figure 12.11a — EIA/TIA 232 to EIA/TIA 485 Conversion
WARNING:
NOTE:
485SD9TB
T-/RT+/R+
COM.
TD (A)
TD (B)
DB9 Connector (9 pin)
+12VÎ(dc)
GND
EIA-485
+
– Power Supply
AD-1210
13
12
16
120V~ (ac)
B&B Converter (B&B Electronics Manufacturing Company, (815) 433-5100,
www.bb-elec.com)
The CMC converter
requires an external
power supply when used
with a laptop computer.
EIA-485
ADA485L
EIA-232
120V
G
9V
G
B
A
B
A
9V
DI/O DI/O
To avoid damage to
property and equipment,
and/or injury of loss of
life, use National Electric
Code (NEC) standard
wiring practices to install
and operate the Series
F4. Failure to do so could
result in such damage,
and/or injury or death.
(ac)
(dc) (see note)
COM.
T+/R+
T-/R-
16
12
13
DB25 Connector (25 pin)
CMC Converter (CMC Connecticut Micro-Computer, Inc., 800-426-2872,
www.2cmc.com)
Figure 12.11b — GPIB Conversion to EIA/TIA 232 or EIA/TIA 485
Communications with Modbus RTU
ICS Model 4899
EIA-232 or
EIA-485
GPIB
ICS GPIB Bus Interface (ICS Electronics, (925) 416-1000, www .icselect.com)
Watlow Series F4S/D
Wiring ■ 12.11
Wiring Example
ç
L1
L2
hightemperature
light
WARNING:
fuse
high-limit
mechanical
contactor
coil
42 (dc-)
1
(-)
6
17 18 19
3
42 43 44
2
39 40 41
1
2
36 37 38
1
16
44 (dc+)
Series F4
F4 _ H - CA _ _ - O1RG
rear view
33 34 35
(+)
1
2
DIN-A-MITE
DA10-24C0-0000
3
optional
normally open
momentary switch
5
3
4
20
4
Heater
21 22 23 24
5
6
7
8
59 60
27 28 29 30
61 62
31 32
15 16
25 26
11 12 13 14
53 54 55 56 57 58
10
51 52
9
To avoid damage to
property and equipment,
and/or injury of loss of
life, use National Electric
Code (NEC) standard
wiring practices to install
and operate the Series
F4. Failure to do so could
result in such damage,
and/or injury or death.
14
15
8
15
8
2
9
3
10
9
11
4
16
17
18
12
5
6
7 (+)
19
7
20
21
97A1-DDAA-00RR
Limit Controller
process sensor
limit sensor
62 (-)
WARNING:
Install high- or lowtemperature-limit control
protection in systems
where an overtemperature fault
condition could present a
fire hazard or other
hazard. Failure to install
temperature limit control
protection where a
potential hazard exists
could result in damage to
equipment, property and
injury to personnel.
17
6 (-)
61 (+)
ç
14
13
1
L2
1
1
1
2
3
2
4 (+)
2
5
3
Series F4
F4_H - CA_ _ - 01RG
Temperature Controller
61
(-)
62
44
4
5
1 CR-1
1
1
9
8
42
6 (+)
7 (-)
5
6
2
2
DIN-A-MITE
DA10-24C0-0000
Heater
10
7
1
9
12
1
(+)
15
7
(-)
16
9
10
11
12
14
11
8
2
Series 97
97A1-DDAA-00RR
3
Limit Controller
13
14
8
13
4
3
6
6
15
17
14
1
18
1
19
1CR
2
17
15
18
20
R
2
high-temperature light
Figure 12.12 — System Wiring Example.
12.12 ■ Wiring
Watlow Series F4S/D
A
Appendix
Glossary . . . . . . . . . . . . . . . . . . . . . . . . . . . . . . . . .A.2
Declaration of Conformity . . . . . . . . . . . . . . . . . . .A.5
Specifications (Single and Dual Channel) . . . . . . . A.6
Ordering Information (Single and Dual) . . . . . . . . A.7
Index . . . . . . . . . . . . . . . . . . . . . . . . . . . . . . . . . . . A.8
List of Figures . . . . . . . . . . . . . . . . . . . . . . . . . . . . .A.13
Software Map . . . . . . . . . . . . . . . . . . . . . . . . . . . . .A.16
Watlow Series F4S/D
Appendix ■ A.1
Glossary
cold junction.
ı) — Both direct and alternating current.
ac/dc (ı
control mode — The type of action that a controller uses. For example, on/off, time proportioning, PID, automatic or manual, and combinations of
these.
alternating current — An electric current that
reverses at regular intervals, and alternates positive and negative values.
cycle time — The time required for a controller to
complete one on-off-on cycle. It is usually expressed
in seconds.
American Wire Gauge (AWG) — A standard of
the dimensional characteristics of wire used to conduct electrical current or signals. AWG is identical
to the Brown and Sharpe (B & S) wire gauge.
deadband — The range through which a variation
of the input produces no noticeable change in the
output. In the dead band, specific conditions can be
placed on control output actions. Operators select
the deadband value.
Å) — See alternating current.
ac (Å
auto-tune — A feature that automatically sets
temperature control PID values to match a particular thermal system.
battery — BR1225, retains volatile memory. Sevenyear shelf life, indefinite life with power applied to unit.
baud rate — The rate of information transfer in
serial communications, measured in bits per second.
burst fire — A power control method that repeatedly turns on and off full ac cycles. Also called zerocross fire, it switches close to the zero-voltage point
of the ac sine wave. Variable-time-base burst fire
selectively holds or transits ac cycles to achieve the
desired power level. See zero cross.
calibration accuracy — Closeness between the
value indicated by a measuring instrument and a
physical constant or known standard.
calibration offset — An adjustment to eliminate
the difference between the indicated value and the
actual process value.
cascade — Control algorithm in which the output
of one control loop provides the set point for another loop. The second loop, in turn, determines the
control action.
CE — A manufacturer’s mark that demonstrates
compliance with European Union (EU) laws governing products sold in Europe.
chatter — The rapid on-off cycling of an electromechanical relay or mercury displacement relay due
to insufficient controller bandwidth. It is commonly
caused by excessive gain, little hysteresis and short
cycle time.
CJC — See cold junction compensation.
closed loop — A control system that uses a sensor
to measure a process variable and makes decisions
based on that feedback.
cold junction — See junction, cold.
cold junction compensation — Electronic means
to compensate for the effective temperature at the
A.2 ■ Appendix
default parameters — The programmed instructions that are permanently stored in the microprocessor software.
derivative — The rate of change in a process variable. Also known as rate. See PID.
derivative control (D) — The last term in the
PID control algorithm. Action that anticipates the
rate of change of the process, and compensates to
minimize overshoot and undershoot. Derivative
control is an instantaneous change of the control
output in the same direction as the proportional error. This is caused by a change in the process variable (PV) that decreases over the time of the
derivative (TD). The TD is in units of seconds.
Deutsche Industrial Norm (DIN) — A set of
technical, scientific and dimensional standards developed in Germany. Many DIN standards have
worldwide recognition.
droop — In proportional controllers, the difference
between set point and actual value after the system
stabilizes.
duty cycle — The percentage of a cycle time in
which the output is on.
EIA — See Electronics Industries of America.
EIA/TIA -232, -422, -423 and -485 — Data communications standards set by the Electronic Industries of America and Telecommunications Industry
Association. Formerly referred to as RS- (Recognized Standard).
Electronics Industries of America (EIA) — An
association in the US that establishes standards for
electronics and data communications.
external transmitter power supply — A dc voltage source that powers external devices.
filter, digital — A means to slow the response of a
system when inputs change unrealistically or too
fast. Equivalent to a standard resistor-capacitor
(RC) filter.
Watlow Series F4S/D
form A — A single-pole, single-throw relay that uses only the normally open (NO) and common contacts. These contacts close when the relay coil is energized. They open when power is removed from
the coil.
form B — A single-pole, single-throw relay that uses only the normally closed (NC) and common contacts. These contacts open when the relay coil is energized. They close when power is removed from
the coil.
form C — A single-pole, double-throw relay that
uses the normally open (NO), normally closed (NC)
and common contacts. The operator can choose to
wire for a form A or form B contact.
Hertz (Hz) — Frequency, measured in cycles per
second.
hysteresis — A change in the process variable required to re-energize the control or alarm output.
Sometimes called switching differential.
integral — Control action that automatically eliminates offset, or droop, between set point and actual
process temperature.
integral control (I) — A form of temperature control. The I of PID. See integral.
isolation — Electrical separation of sensor from
high voltage circuitry. Allows use of grounded or
ungrounded sensing element.
JIS — See Joint Industrial Standards.
Joint Industrial Standards (JIS) — A Japanese
agency that establishes and maintains standards
for equipment and components. Also known as
JISC (Japanese Industrial Standards Committee),
its function is similar to Germany’s Deutsche Industrial Norm (DIN).
junction, cold — Connection point between thermocouple metals and the electronic instrument. See
junction, reference.
junction, reference — The junction in a thermocouple circuit held at a stable, known temperature
(cold junction). Standard reference temperature is
32°F (0°C).
LCD — See liquid crystal display.
LED — See light emitting diode.
light emitting diode (LED) — A solid state electronic device that glows when electric current passes through it.
liquid crystal display (LCD) — A type of digital
display made of a material that changes reflectance
or transmittance when an electrical field is applied
to it.
Watlow Series F4S/D
limit or limit controller — A highly reliable, discrete safety device (redundant to the primary controller) that monitors and limits the temperature of
the process, or a point in the process. When temperature exceeds or falls below the limit set point,
the limit controller interrupts power through the
load circuit. A limit controller can protect equipment and people when it is correctly installed with
its own power supply, power lines, switch and sensor.
manual mode — A selectable mode that has no
automatic control aspects. The operator sets output
levels.
Modbus™ — A digital communications protocol
owned by AEG Schneider Automation for industrial
computer networks.
Modbus™ RTU — Remote Terminal Unit, an individual Modbus™-capable device on a network.
NEMA 4X — A NEMA (National Electrical Manufacturer’s Association) specification for determining
resistance to moisture infiltration. This rating certifies the controller as washable and corrosion resistant.
on/off controller — A temperature controller that
operates in either full on or full off modes.
open loop — A control system with no sensory
feedback.
output — Control signal action in response to the
difference between set point and process variable.
overshoot — The amount by which a process variable exceeds the set point before it stabilizes.
page — A fixed length block of data that can be
stored as a complete unit in the computer memory.
P control — Proportioning control.
PD control — Proportioning control with derivative (rate) action.
PDR control — Proportional derivative control
with manual reset, used in fast responding systems
where the reset causes instabilities. With PDR control, an operator can enter a manual reset value
that eliminates droop in the system.
PI control — Proportioning control with integral
(auto-reset) action.
PID — Proportional, integral, derivative. A control
mode with three functions: proportional action
dampens the system response, integral corrects for
droop, and derivative prevents overshoot and undershoot.
process variable — The parameter that is controlled or measured. Typical examples are temperature, relative humidity, pressure, flow, fluid level,
Appendix ■ A.3
events, etc. The high process variable is the highest
value of the process range, expressed in engineering units. The low process variable is the lowest
value of the process range.
proportional — Output effort proportional to the
error from set point. For example, if the proportional band is 20° and the process is 10° below set
point, the heat proportioned effort is 50 percent.
The lower the PB value, the higher the gain.
proportional band (PB) — A range in which the
proportioning function of the control is active. Expressed in units, degrees or percent of span. See
PID.
proportional control — A control using only the
P (proportional) value of PID control.
radio frequency interference (RFI) — Electromagnetic waves between the frequencies of 10 KHz
and 300 GHz that can affect susceptible systems by
conduction through sensor or power input lines,
and by radiation through space.
ramp — A programmed increase in the temperature of a set point system.
range — The area between two limits in which a
quantity or value is measured. It is usually described in terms of lower and upper limits.
rate — Anticipatory action that is based on the
rate of temperature change, and compensates to
minimize overshoot and undershoot. See derivative.
rate band — A range in which the rate function of
a controller is active. Expressed in multiples of the
proportional band. See PID.
reference junction — see junction, reference.
reset — Control action that automatically eliminates offset, or droop, between set point and actual
process temperature. Also see integral.
automatic reset — The integral function of a PI
or PID temperature controller that adjusts the process temperature to the set point after the system
stabilizes. The inverse of integral.
automatic power reset — A feature in latching
limit controls that does not recognize power outage
as a limit condition. When power is restored, the
output is re-energized automatically, as long as the
temperature is within limits.
manual reset — 1) A feature on a limit control that
requires human intervention to return the limit to normal operation after a limit condition has occurred. 2)
The adjustment of a proportional control to raise the
proportional band to compensate for droop.
resistance temperature detector (RTD) — A
sensor that uses the resistance temperature charac-
A.4 ■ Appendix
teristic to measure temperature. There are two basic types of RTDs: the wire RTD, which is usually
made of platinum, and the thermistor, which is
made of a semiconductor material. The wire RTD is
a positive temperature coefficient sensor only, while
the thermistor can have either a negative or positive temperature coefficient.
RFI — See radio frequency interference.
RTD — See resistance temperature detector.
serial communications — A method of transmitting information between devices by sending all
bits serially over a single communication channel.
set point — The desired value programmed into a
controller. For example, the temperature at which a
system is to be maintained.
SI (Systeme Internationale) — The system of
standard metric units.
switching differential — See hysteresis.
thermal system — A regulated environment that
consists of a heat source, heat transfer medium or
load, sensing device and a control instrument.
thermocouple (t/c) — A temperature sensing device made by joining two dissimilar metals. This
junction produces an electrical voltage in proportion to the difference in temperature between the
hot junction (sensing junction) and the lead wire
connection to the instrument (cold junction).
thermocouple break protection — The ability of
a control to detect a break in the thermocouple circuit and take a predetermined action.
time proportioning control — A method of controlling power by varying the on/off duty cycle of an
output. This variance is proportional to the difference between the set point and the actual process
temperature.
transmitter — A device that transmits temperature data from either a thermocouple or a resistance temperature detector (RTD) by way of a twowire loop. The loop has an external power supply.
The transmitter acts as a variable resistor with respect to its input signal. Transmitters are desirable
when long lead or extension wires produce unacceptable signal degradation.
WatView — A Windows-based software application
for communicating with and configuring Watlow
controllers.
zero cross — Action that provides output switching only at or near the zero-voltage crossing points
of the ac sine wave. See burst fire.
zero switching — See zero cross.
Watlow Series F4S/D
Declaration of Conformity
Series F4
Watlow
an ISO
9001 approved facility since 1996.
1241 Bundy Blvd.
Winona, MN 55987 USA
Declares that the following product:
Designation:
Series F4
Model Numbers: F4 (S, D or P) (H or L) – (C, E, F or K) (A, C, E, F or K) (A, C, F or K) (A, C, F, K, 0 or
6) – (0, 1 or 2) (Any three numbers of letters)
Classification:
Temperature control, Installation Category II, Pollution degree 2 continuous
unmonitored operation, IP65 Front panel
Rated Voltage:
100 to 240 V~ (ac) or 24 to 28 V (ac or dc), 50/60 Hz
Rated Power:
39 VA maximum
Meets the essential requirements of the following European Union Directives by using the relevant
standards show below to indicate compliance.
2004/108/EC Electromagnetic Compatibility Directive
EN 61326-1
2005
Electrical equipment for measurement, control and
laboratory use – EMC requirements (Industrial Immunity,
Class A* Emissions).
EN 61000-4-2
1996 + A1,A2
Electrostatic Discharge Immunity
EN 61000-4-3
2006
Radiated Field Immunity
EN 61000-4-4
2004
Electrical Fast-Transient / Burst Immunity
EN 61000-4-5
2006
Surge Immunity
EN 61000-4-6
1996 + A1,A2,A3 Conducted Immunity
EN 61000-4-11
2004
Voltage Dips, Short Interruptions and Voltage Variations
Immunity
EN 61000-3-2
2006
Harmonic Current Emissions
EN 61000-3-3
2005
Voltage Fluctuations and Flicker
SEMI F47
2000
Specification for Semiconductor Sag Immunity Figure R1-1
*NOTE: Not appropriate for use in commercial or residential applications without additional filtering.
EN 61010-1
2001
2006/95/EC Low-Voltage Directive
Safety Requirements of electrical equipment for measurement, control and laboratory use. Part 1: General
requirements
Per 2002/96/EC WEEE Directive
Please Recycle Properly
These devices contain lead solder and are not RoHS compliant.
They are a Control Devices and fall outside the scope of 2002/95/EC Directive.
Raymond D. Feller III
Name of Authorized Representative
Winona, Minnesota, USA
Place of Issue
General Manager
Title of Authorized Representative
February 2009
Date of Issue
Signature of Authorized Representative
Watlow Series F4S/D
Appendix ■ A.5
Specifications
Universal Analog Inputs 1 (2 and 3 optional)
• Update rates, In1: 20Hz; In2 and In3: 10Hz
Thermocouple
• Type J, K, T, N, C (W5), E, PTII, D (W3), B, R, S
RTD
• 2- or 3-wire platinum, 100
• JIS or DIN curves, 1.0 or 0.1 indication
Process
• Input resolution 50,000 bits at full scale
• Range selectable: 0 to 10VÎ (dc), 0 to 5VÎ (dc), 1 to
5VÎ (dc), 0 to 50mV, 0 to 20 mA, 4 to 20 mA
• Voltage input impedance 20 k
• Current input impedance 100
Digital Inputs (4)
• Update rate: 10 Hz
• Contact or dc voltage (36 VÎ (dc) maximum)
• 10 k input impedance
Control Outputs (1A, 1B, 2A, 2B)
• Update rate: 20 Hz
Open Collector/Switched DC
• Internal load switching (nominal):
Switched dc, 22 to 28VÎ (dc), limited @ 30 mA
• External load switching (maximum):
Open collector 42VÎ (dc) @ 0.5 A
Solid-state Relay
• Zero switched, optically coupled, 0.5 A @
24VÅ (ac) minimum, 253VÅ (ac) maximum
Process Outputs (Optional Retransmit)
• Update rate: 1 Hz
• User-selectable 0 to 10VÎ (dc), 0 to 5VÎ (dc),
1 to 5VÎ (dc) @1 k min., 0 to 20 mA, 4 to 20 mA @
800 max.
• Resolution:
dc ranges: 2.5mV nominal
mA ranges: 5 µA nominal
• Calibration accuracy:
dc ranges: ±15 mV
mA ranges: ±30 µA
• Temperature stability 100ppm/°C
Alarm Outputs
• Output update rate1 Hz
• Electromechanical relay, Form C, 2 A @
30VÎ (dc) or 240VÅ (ac) maximum
Digital Outputs (8)
•
•
•
•
•
Update rate: 10 Hz
Open collector output
Off: 42VÎ (dc) max @ 10 µA
On: 0.2VÎ (dc) max @ 50 mA sink
Internal supply: 5VÎ (dc), @ 80 mA
Communications
EIA-232 and EIA-485 serial communications
with Modbus™ RTU protocol
Safety and Agency Approvals
• UL®/C-UL 916-listed, File # E185611
Process Control Equipment
• CE EMC to EN 61326
• CE Safety to EN 61010
• IP65 and NEMA 4X
Terminals
Power
• 100 to 240VÅ (ac), -15%, +10%; 50/60Hz, ±5%
• 39VA maximum power consumption
• Data retention upon power failure via nonvolatile
memory (seven years for battery-backed RAM).
Sensor input isolation from input to input to output to
communication circuitry is 500VÅ (ac).
Operating Environment
• 32 to 130°F (0 to 55°C)
• 0 to 90% RH, non-condensing
• Storage temperature: -40 to 158°F (-40 to 70°C)
Accuracy
• Calibration accuracy and sensor conformity: ±0.1% of
span ±1°C @ 77°F ±5°F (25°C ±3°C) ambient, and
rated line voltage ±10% with the following exceptions:
Type T, 0.12% of span for -200°C to -50°C
Types R and S, 0.15% of span for 0°C to 100°C
Type B, 0.24% of span for 870°C to 1700°C
• Accuracy span: Less than or equal to operating ranges,
1000°F (540°C) minimum
• Temperature stability: ±0.1°F/°F (±0.1°C/°C) rise in
ambient for thermocouples
• ±0.05°F/°F (±0.05°C/°C) rise in ambient for RTD sensors
Displays
• Update rate: 2 Hz
• Process: 5, seven-segment LED red
• Control interface display: high-definition LCD green
Sensor Operating Ranges:
Type J:
32
Type K:
-328
Type T:
-328
Type N:
32
Type E:
-328
Type C:
32
Type D:
32
Type PTII: 32
Type R:
32
Type S:
32
Type B:
32
RTD (DIN): -328
RTD (JIS): -328
Process:
19999
to 1500°F
to 2500°F
to
750°F
to 2372°F
to 1470°F
to 4200°F
to 4352°F
to 2543°F
to 3200°F
to 3200°F
to 3300°F
to 1472°F
to 1166°F
to 30000 units
or
or
or
or
or
or
or
or
or
or
or
or
or
0
-200
-200
0
-200
0
0
0
0
0
0
-200
-200
to
to
to
to
to
to
to
to
to
to
to
to
to
815°C
1370°C
400°C
1300°C
800°C
2315°C
2400°C
1395°C
1760°C
1760°C
1816°C
800°C
800°C
or
or
or
or
or
or
or
or
or
or
or
or
or
0
-200
-200
0
-200
0
0
0
0
0
870
-200
-200
to
to
to
to
to
to
to
to
to
to
to
to
to
750°C
1250°C
350°C
1250°C
800°C
2315°C
2400°C
1393°C
1450°C
1450°C
1700°C
800°C
630°C
Sensor Accuracy Ranges:
Input ranges
Type J:
32 to 1382°F
Type K:
-328 to 2282°F
Type T:
-328 to
662°F
Type N:
32 to 2282°F
Type E:
-328 to 1470°F
Type C(W5) 32 to 4200°F
Type D(W3) 32 to 4352°F
Type PTII: 32 to 2540°F
Type R:
32 to 2642°F
Type S:
32 to 2642°F
Type B:
1598 to 3092°F
RTD (DIN): -328 to 1472°F
RTD (JIS): -328 to 1166°F
Process: -19999 to 30000 units
• Touch-safe, removable terminal blocks, accepts 12- to
22-gauge wire
A.6 ■ Appendix
Watlow Series F4S/D
Ordering Information
Ordering Information
1/4 DIN Single-Channel Ramping Controller
1/4 DIN Dual-Channel Ramping Controller
Series F4
1
⁄4 DIN, Single-Channel
Ramping Controller
F4 S
-
A
-
Series F4
1
⁄4 DIN, Dual-Channel
Ramping Controller
F4 D
-
-
Single-Channel
Ramping Controller
1 universal analog input, 4 digital
inputs, 8 digital outputs, 2 alarms,
EIA-232/485 communications
Power Supply
H = 100 to 240Vı (ac/dc)
Dual-Channel
Ramping Controller
3 universal analog inputs, 4 digital
inputs, 8 digital outputs, 2 alarms,
EIA-232/485 comms
Power Supply
H = 100 to 240Vı (ac/dc)
Output 1A
C = Open collector/switched dc
F = Process, 0 to 5, 1 to 5, 0 to 10VÎ (dc),
0 to 20 mA, 4 to 20 mA
K = Solid-state Form A 0.5-amp relay
Output 1B
A = None
C = Open collector/switched dc
F = Process, 0 to 5, 1 to 5, 0 to 10VÎ (dc),
0 to 20 mA, 4 to 20 mA
K = Solid-state Form A 0.5-amp relay
Auxiliary Input Module
0 = None
6 = Dual universal inputs
Auxiliary Retransmit Module
0 = None
1 = Single retransmit output 0 to 5, 1 to 5,
0 to 10VÎ (dc), 0 to 20 mA, 4 to 20 mA
2 = Dual retransmit outputs 0 to 5, 1 to 5,
0 to 10VÎ (dc), 0 to 20 mA, 4 to 20 mA
Language and RTD Options
1 = English with 100 W RTD
2 = German with 100 W RTD
3 = French with 100 W RTD
4 = Spanish with 100 W RTD
5 = English with 500 and 1 kW RTD
6 = German with 500 and 1 kW RTD
7 = French with 500 and 1 kW RTD
8 = Spanish with 500 and 1 kW RTD
Display and Custom Options
RG = Standard Display (Red/Green display only)
XX = Custom options: software, setting parameters, overlay
Output 1A
C = Open collector/switched dc
F = Process, 0 to 5, 1 to 5, 0 to 10VÎ (dc),
0 to 20 mA, 4 to 20 mA
K = Solid-state Form A 0.5-amp relay
Output 1B
A = None
C = Open collector/switched dc
F = Process, 0 to 5, 1 to 5, 0 to 10VÎ (dc),
0 to 20 mA, 4 to 20 mA
K = Solid-state Form A 0.5-amp relay
Output 2 A
C = Open collector/switched dc
F = Process, 0 to 5, 1 to 5, 0 to 10VÎ (dc),
0 to 20 mA, 4 to 20 mA
K = Solid-state Form A 0.5-amp relay
Output 2 B
A = None
C = Open collector/switched dc
F = Process, 0 to 5, 1 to 5, 0 to 10VÎ (dc),
0 to 20 mA, 4 to 20 mA
K = Solid-state Form A 0.5-amp relay
Auxiliary Retransmit Module
0 = None
1 = Single retransmit output 0 to 5, 1 to 5,
0 to 10VÎ (dc), 0 to 20 mA, 4 to 20 mA
2 = Dual retransmit outputs 0 to 5, 1 to 5,
0 to 10VÎ (dc), 0 to 20 mA, 4 to 20 mA
Language and RTD Options
1 = English with 100 W RTD
2 = German with 100 W RTD
3 = French with 100 W RTD
4 = Spanish with 100 W RTD
5 = English with 500 and 1 kW RTD
6 = German with 500 and 1 kW RTD
7 = French with 500 and 1 kW RTD
8 = Spanish with 500 and 1 kW RTD
Display and Custom Options
RG = Standard Display, (Red/Green display only)
XX = Custom options: software, setting parameters, overlay
Watlow Series F4S/D
Appendix ■ A.7
Index
°F or °C 5.7
A
A to D 10.3
accuracy A.6
Action, End 4.15
active output indicator lights 2.2
add step 4.6
Address 5.14, 7.16
agency approvals A.6
Alarm 1 High Deviation 3.14
Alarm 1 High SP 3.14
Alarm 1 Low Deviation 3.14
Alarm 1 Low SP 3.14
Alarm 2 High Deviation 3.14
Alarm 2 High SP 3.14
Alarm 2 Low Deviation 3.14
Alarm 2 Low SP 3.14
alarm band example 5.5
alarm clearing 3.4
Alarm High Set Point 3.4
Alarm Hysteresis 5.12, 6.8
Alarm Latching 5.12, 6.9
Alarm Logic 5.12
Alarm Low Set Point 3.4
alarm messages 3.8
Alarm Messages 5.12
Alarm Name 5.12
alarm output indicator lights 2.2
Alarm Output x Menu 5.12
Alarm Set Point Menu 3.14
alarm set points 3.4, 3.14, 6.8, 8.3
Alarm Sides 5.12, 6.9, 7.2
Alarm Silencing 5.12, 6.9
Alarm Source 5.12
alarm status, indicator lights 2.2
Alarm Type 5.12
alarms
deviation 3.4, 6.8
features 6.8–6.9
operation 3.4
process 3.4, 6.8
self-clearing 6.9
troubleshooting 3.8
Altitude 5.9
Alternating Display 5.15
ambient temperature A.6
Analog Input x
A To D, Diagnostics 10.3
Calibration Offset 5.10
A.8 ■ Appendix
Decimal 5.9, 7.2
Deviation Cascade High Range
5.10
Deviation Cascade Low Range 5.10
Error Latch 5.10
Filter Time 5.10
Open Loop 5.7
Process Cascade High Range 5.10
Process Cascade Low Range 5.10
Sensor 5.8
Type 5.8
Units 5.9
Wait for 4.14
Analog Input x Menu 5.8
Analog Range, Retransmit Output
5.12
Automatic Operation 3.1
automatic tuning 3.5, 3.6
Autostart Menu 4.2, 4.12
Date 4.12
Day 4.12
Time 4.12
Autostart Profile Date Or Day 4.12
autostart step application 7.19
Autotune, selecting set points 3.4
Autotune PID Cascade Menu 3.11
Autotune PID Menu 3.4–3.5, 3.11
autotuning 3.4–3.5, 6.7
cascade 3.6
lockout 8.3
operation 3.4, 3.11, 6.7
PID Autotune 3.4, 3.11, 6.7
Autotuning Channel x 2.8, 3.4, 5.7
B
B&B Converter 12.11
Battery A.2
Baud Rate 5.14, 7.16
Boost Cool, Digital Output Function
6.10
Boost Heat, Digital Output Function
6.10
Boost Percent Power 5.13, 6.10
Boost Time Delay 5.13, 6.10
burst fire 6.6
heater life 6.6
noise generation (RFI) 6.6
sine wave 6.6
C
Calibration, overview 9.1
inputs 9.2–9.4
outputs 9.4–9.6
Calibration Offset 5.10, 6.2
Cascade 6.11, 7.3
Analog Input 3 5.10
Autotuning 3.6
cascade system 3.6, 6.11
cascade system, tuning 3.6
control, selecting 3.6
inner loop 3.6, 6.11
internal set point 6.11
long lag times 6.11
outer loop 3.6, 6.11
overshoot 3.6, 6.11
parameters 3.13–3.14
PID 6.11
setup 3.6
Cascade High Range
Deviation 5.10
Process 5.10
Cascade Inner Loop 3.11
Cascade Low Range
Deviation 5.10
Process 5.10
Cascade Outer Loop 3.11
CE Declaration of Conformity A.5
Ch2 Output Disable? 5.9
changing and setting password 8.2
Channel 1, PID Set 4.15
Channel 2, PID Set 4.15
Channel x Autotune 3.11
Channel x Autotune Set Point 5.7
charts
Custom Main Page 5.3
Operations Page Record 3.15
Setup Page Record 5.16
User Profile Record 4.7
Choose Cycle Time, Control Output x
5.11
Choose Scaling 5.9
CJCx A to D, Diagnostics 10.3
CJCx Temp, Diagnostics 10.3
clear alarm, key press simulation
3.4, 7.3
clear error, key press simulation 3.4,
7.3
Clear Locks, Set Lockout 8.3
closed-loop configuration 3.1
closed-loop control, see automatic
operation
CMC converter 12.11
communications 5.14, 7.1, 7.16
communications indicator light 2.2
Communications Menu 5.14, 7.16
communications wiring
Watlow Series F4S/D
B&B converter 12.11
CMC converter 12.11
EIA-232 to EIA-485 conversion
12.11
EIA/TIA 485 12.10
EIA/TIA 232 12.10
termination for EIA-232 to EIA-485
converter 12.10
Complementary Output, Digital Output 5, Function 5.13
Compressor Control 6.10
Compressor Off % Power 5.14, 6.10
Compressor Off Delay 5.14, 6.10
Compressor On % Power 5.14, 6.10
Compressor On Delay 5.14, 6.10
Condition, Digital Input x 5.11
conformity A.5
continue profile 3.3
Control Output Function 5.10, 12.7
Control Output x Menu 3.5, 5.11
controller, overview 1.1
cooling compressor 6.10
creating a profile application 7.18
Current Date 5.7
Current Process Input, Calibration
9.3
Current Time 5.7
cursor 2.2
Custom Main Page Menu 5.15
Custom Main Page Record 5.3
Custom Message 1 to 4 7.3
customizing the Main Page 5.2
Cycle Time 5.11
cycle time adjustment 3.5
D
Dead Band 3.5, 3.12, 3.13, 6.5
Cascade Inner Loop 3.12
Cascade Outer Loop 3.13
integral action 6.5
PID set 3.13, 6.4–6.5
PID Set 1 to 5 3.12
PID Set 6 to 10 3.13
proportional action 6.5
Decimal 5.9
Declaration of Conformity A.5
default Main Page parameters 2.3,
2.8
Delete Profile 4.6
Delete Step 4.6
Derivative 3.11, 3.12, 3.13
derivative rate adjustment 3.5
Watlow Series F4S/D
deviation alarm 3.4
diagnostics
overview 10.1
menu map 10.1
Digital Inputs x 5.10–5.11, 6.3
Condition 2.3, 2.8, 5.10, 5.11
Function 5.11
Name 5.10
number of 1.1
see, event input
specifications A.6
status 2.3, 2.8
wiring 12.6
Digital Outputs x
condition 2.3, 2.8
Function 5.13
Name 5.13
number of 1.1
see, event output
specifications A.6
wiring 12.9
dimensions 11.1–11.2
Display Test 10.4
displays 2.2–2.4
cursor 2.2
front panel 2.2
Lower Display 2.2
scroll bar 2.2
Upper Display 2.2
displays, overview 2.1
dry bulb 5.8
dual channel 1.1
dwell — see soak, soak step
E
edit PID 3.4, 3.11
Edit PID Menu 2.5, 3.4–3.5,
3.11–3.12
edit profile 4.6
End step 4.3, 4.15
action, end step 4.6
Idle Set Point, Channel x 4.16
Enter Cycle Time 5.11
Enter In1 Temp High 5.9
Enter In1 Temp Low 5.9
enter key 2.6
environmental testing 1.2–1.3
Error Latch, Analog Input x 5.10
errors
fatal errors 3.8–3.9
input errors 3.8–3.9
operation 3.8–3.9
system errors 3.8–3.9
troubleshooting 3.8–3.9
event input 4.13, 6.3
see, Digital Input x
event output, ramp rate or ramp time
or soak steps 4.12
see, Digital Output x
F
Factory Page 2.1, 8.1, 9.1, 10.1
lockout 8.3
parameter table 9.7
Fahrenheit scale 5.1
Filter Time 5.10, 6.2
filter time constant 6.2
Frequently Asked Questions 4.10
Full Access 8.1, 8.3
Full Default 10.1, 10.4
Function
Control Output x 5.11
Digital Input x 5.11
Digital Output x 5.13
G
global system parameters 5.4
Guarantee Soak 4.3
Guarantee Soak Band x 5.7
Guarantee Soak, ramp rate or ramp
time or soak steps 4.13
guided setup and programming 2.5
H
High Power Limit 5.6, 5.11
High Scale 5.13, 6.3
Hold 3.3, 4.5
hold profile 3.3
holdback, see guaranteed soak
hours remaining, ramp time or soak
step, current profile status
4.13
Hysteresis 6.4
boost heat & cool 6.10
Cascade Inner Loop 3.12
Cascade Outer Loop 3.14
PID Set 1 to 5 3.12
PID Set 6 to 10 3.13
I
“i” key 1.4, 2.4, 2.7
Idle 4.5
Idle Set Point 4.5, 4.16
Idle Set Point, Channel x, power out
Appendix ■ A.9
action 5.7
indicator lights 2.2
Information Key 1.4, 2.4, 2.7
Input 1 Only, Process Display 5.15
Input 1 wiring 12.3
Input 2 wiring 12.4–12.5
Input 3 wiring 12.4–12.5
input calibration 9.2–9.4
input errors 3.9
input status 2.8
input wiring 12.3–12.5
Input x Error 2.8
Input x Failure 5.7
input-to-output isolation 12.1
inputs and outputs 1.1
calibration 9.2–9.6
dual-channel Series F4 1.1
single-channel Series F4 1.1
wiring, overview 12.1–12.2
insert step 4.6
installation
dimensions 11.1
installing 11.2
overview 11.2–11.3
tools required 11.2
Integral Reset Adjustment 3.5
Integral x
Cascade Inner Loop 3.11
Cascade Outer Loop 3.13
PID Set 1 to 5 3.11
PID Set 6 to 10 3.12
Internal Cascade SP 6.11
isolation barriers 12.1
J
Jump
Count 4.15
Profile 4.15
Repeats 4.15
Step 4.13, 4.15
K
keys
Information Key 1.4, 2.4, 2.7
Left and Right Keys 2.4, A.17
Profile Key 2.4, A.17
Up and Down Keys 2.4, A.17
keys, displays and navigation,
overview 2.1, A.17
L
Latching, Alarm Output x 5.12
A.10 ■ Appendix
Line Frequency 10.3
linearization table 5.8
lockout 8.1–8.3
locks 8.3
Clear Locks 8.3
levels 8.1
Set Lock 8.3
Low Power Limit 5.11
Low Scale 5.12, 6.3
Lower Display 2.2
M
Main Page 2.3, 2.8
Alarm x Condition 2.8
Autotuning Channel x 2.8
Custom Main Page 2.3, 5.2, 5.3
default Main Page 2.3
error messages on 2.3
parameter table 2.8
manual operation, not allowed, 3.1
manual tuning 3.5–3.6
Manufacture Date 10.2
map, software A.16–A.17
menu and page maps
all A.16–A.17
Calibration Menu 9.6
Communications Menu 5.14, 7.16
Diagnostics Menu 10.1
Operations Page 3.10
Profiles Page 4.11
Set Lockout Menu 8.2
Setup Page 5.6
Message 1 to 4, Static Message 5.15
Military Standard Test 810D 3.7,
4.8–4.9
Modbus registers
alphabetical listing 7.2–7.10
numerical listing 7.13–7.15
profile parameters 7.10–7.12
Modbus Remote Terminal Unit (RTU)
7.1
Modbus RTU protocol 7.1
Model Number 12.1, A.7
Model, Diagnostic 10.2
multiple PID sets 3.5, 6.6
multiple tuning procedure 3.5
N
Name
Alarm Output x 5.12
Digital Input x 5.10
Digital Output x 5.13
names, how to enter 2.6
naming
alarm output 2.6, 5.13
digital input 2.6, 5.10
digital output 2.6, 5.12
profiles 2.6, 4.4
navigation 2.4
navigation keys 2.4
noise filter 6.2
non-volatile memory 4.2
numbers, how to enter 2.6
O
On-Off control 6.4
chattering 6.4
Hysteresis x (A or B) 6.4
Proportional Band x (A or B) 6.4
Open Loop Channel x, enable 5.7
Open Loop Detect 6.2
operations
overview 3.1
profile control 3.2
sample application 3.7
Operations Page
map 3.10
Parameter Record 3.15
parameter table 3.11
operator’s display, see lower display
ordering information A.7
Output Calibration 9.4–9.6
output condition, indicators 2.2
Outputs, Event, number of 1.1
outputs x (1A, 1B, 2A and 2B)
type 10.2
wiring 12.7–12.8
P
P (Parameter) x, Custom Main Page
5.15
page and menu maps
all A.16–A.17
Calibration Menu 9.6
Communications Menu 5.14, 7.16
Diagnostics Menu 10.1
Operations Page 3.10
Profiles Page 4.11
Set Lockout Menu 8.2
Setup Page 5.6
pages, software 2.1, A.16–A.17
Panel Lock 5.5
parameter record
Custom Main Page 5.3
Watlow Series F4S/D
Operations Page 3.15
Profile 4.7
Setup Page 5.16
parameter setup order 5.1–5.2
parameter tables
Calibration Menu 9.7–9.8
Communications Menu 5.14, 7.16
Diagnostic Menu 10.2–10.3
Main Page 2.8
Operations Page 3.11–3.14
Profiles Page 4.12–4.16
Set Lockout Menu 8.3
Setup Page 5.7–5.15
Test Menu 10.4
password lock 8.1
password, setting or changing 8.2
pattern — see profile
pause (Hold) profile 4.3
Percent Power Output, status 7.2
PI control 6.5
droop 6.5
Integral 6.5
overshoot 6.5
reset 6.5
PID block, see PID set
PID control 6.5
autotuning 6.8
derivative 6.5
PID parameters, adjusting manually
3.5
PID sets 6.6
PID Units 5.1, 5.7
PID values, defaults 3.4
Power Out Condition 4.3
power wiring 12.2
Power-Out Action 5.7
Power-Out Time 5.7
Process Display 5.15
process input range limits
process input, wiring 12.2
process or deviation alarms 3.4, 6.8
Process Output, Calibration 7.7, 9.4
Output 1 Calibration 7.7, 9.4
Output 2 Calibration 7.7, 9.4
Process, Control Output x 5.11
Profile Action Menu 3.3
profile control 3.2, 5.10
profile indicator light 2.2
Profile Key 2.4, 3.2, 3.3
hold a profile 3.3
resume a profile 3.3
run a profile 3.2
start a profile 3.2
Watlow Series F4S/D
terminate a profile 3.3
profile lockout 7.8, 8.1
profile mode 3.2
profile number 7.12
profile plan checklist 4.3
profile programming
editing a profile 4.6
frequently asked questions 4.10
Modbus flowcharts 7.17–7.26
new profile 4.4
overview 4.1
procedures 7.17–7.26
Profiles Page parameters
4.12–4.16
sample profile 4.8–4.9
step types 4.2–4.3, 4.12, 4.16
User Profile Record 4.7
profile Modbus registers 7.10–7.12
Profile Status message 3.2
profile wait for, analog input x or
event x 4.13
profile, defined 4.2
Profiles Page 4.4
create profile 4.4
edit profile 4.6
map 4.11
programming new profile 4.4–4.5
Proportional Band x 6.4
adjustment 3.5
Cascade Inner Loop 3.11
Cascade Outer Loop 3.13
PID Set 1 to 5 3.11
PID Set 6 to 10 3.12
proportional control 6.4
droop 6.4
proportional plus integral (PI) control
6.5
droop 6.5
integral 6.5
overshoot 6.5
reset 6.5
proportional plus integral plus
derivative (PID) control 6.5
derivative 6.5
PV bias, see calibration offset
Q
questions 4.10
R
Ramp Rate 4.2, 4.12–4.13
Ramp Set Point Channel x 4.13
ramp steps, number of 1.1
Ramp Time 4.12–4.13
ramping mode 3.2
ramping profile 4.2
range high 6.3
range low 6.3
Rate 6.5
Cascade Inner Loop 3.12
Cascade Outer Loop 3.13
PID Set 1 to 5 3.1 1
PID Set 6 to 10 3.12
read only 8.1
real-time clock 1.1
recipe —see file or profile
Records
Custom Main Page 5.3
Operations Page Record 3.15
Profile Page Record 4.7
Setup Page Record 5.15
reference compensator 9.2
registers
Modbus 7.2–7.15
profile 7.10–7.12
relative humidity (RH) 5.5
removing the controller 11.3
renaming profiles, see naming,
profiles
Reset 6.5
Cascade Inner Loop 3.11
Cascade Outer Loop 3.13
PID Set 1 to 5 3.11
PID Set 6 to 10 3.12
resistance temperature detector
(RTD) 5.4
restore factory calibration values 9.1
Resume Profile 3.3
retransmit outputs
calibration 9.5–9.6
diagnostics 10.3
wiring 12.8
Retransmit Source 5.12
retransmitting 6.3
chart recorder 6.3
outputs 1 and 2 6.3
remote set point 6.3
Rotronics 5.8
RTD 5.4, A.6
input, calibration 9.2
inputs, wiring 12.3–12.4
S
safety info ii
sample application, enviroonmental
Appendix ■ A.11
testing 1.2–1.3, 3.7, 4.8–4.9,
5.4–5.5
Scale High 5.9, 6.3
Scale Low 5.9, 6.3
Scale Offset 5.13
scroll bar 2.2
security and locks, overview 8.1
full access 8.1
hidden 8.1
password 8.1
read-only 8.1
security levels 8.1
segment —see step
self-clearing alarm 6.9
self tune —see autotune
sensor installation guidelines 12.2
accuracy ranges A.6
process input wiring 12.3–12.5
RTD input wiring 12.3–12.5
thermocouple input wiring
12.3–12.5
Sensor, Analog Input x 5.8
serial number, diagnostics 10.2
Set Lockout Menu map 8.2
Set Point
Channel x, ramp or soak 4.13
High Limit 5.10, 6.3
Lockout 8.1
Low Limit 5.9, 6.3
set point, autotuning 3.4
set point, beginning percentage 3.4
set points, cooling dead band 3.5
set points, heating dead band 3.5
set variable, see setpoint
setting and changing password 8.2
setting lock levels 8.1
Clear Locks 8.3
Factory Page 8.1
Operations 8.1
Password 8.2, 8.3
Profile Page 8.1
Set Point 8.1
Setup Page 8.1
settings 2.5
change 2.5
program 2.5
set up 2.5
setup steps 1.4
Setup, overview 5.1
customizing the Main Page 5.2
parameter record 5.16
parameter setup order 5.1
parameter table 5.7–5.15
A.12 ■ Appendix
sample application 5.4–5.5
setup guidelines 5.1
Setup Page Map 5.6
Show °F or °C 5.7
silence, alarm 5.12, 6.9
Silencing, Alarm Output x 5.12
single channel 1.1
Soak Step 4.3
Soak Step Time 4.13
software map A.16–A.17
Software Number 10.2
software, page and menu maps
Calibration Menu 9.6
Diagnostics Menu 10.2
Operations Page 3.10
Profiles Page 4.11
Set Lockout Menu 8.2
Setup Page 5.6
solenoid valve 5.4
solid-state relay 5.4, 12.7
SP High Limit 5.10, 6.3
SP Low Limit 5.9, 6.3
specifications A.6
Static Message 5.15
static set point 3.1
step types 4.2–4.3
Autostart 4.2
End 4.3
Jump 4.3
Ramp Rate 4.2
Ramp Time 4.2
Soak 4.3
stop bit 3.9
system errors 3.9
System Menu 3.4, 5.7
Systeme Internationale (SI) 5.1
U
U.S. units 5.1, 5.7
Units
Analog Input 5.9
input measurement 5.9
PID 5.7
SI, U.S. 5.1, 5.7
upper display 2.2
use password 8.2
user ramp chart 4.7
V
Vaisala 5.5, 5.8
values, enter 2.5
Variable Burst, Cycle Time 5.10
voltage process input, calibration 9.3
W
wait for event 4.3
warranty ii
wet bulb 5.8
wiring example 12.12
wiring, overview 12.1
X, Y, Z
zero-cross switching 6.6
heater life 6.6
noise generation (RFI) 6.6
sine wave 6.6
T
technical assistance ii
temperature scale (°F or °C) 5.1, 5.7
terminals A.6
terminate profile 3.3
test menu map 10.1
Test Outputs 10.1, 10.4
thermocouple 5.8, A.6
thermocouple compensator 9.2
thermocouple input
calibration 9.2
wiring 12.2–12.4
Time 4.13
time, setting current 5.1
transformer isolation 12.1
Watlow Series F4S/D
F4
1A
1B
2A
2B
…Alarm2 Low SP_______
32 F
Adjusts Value
Back
Next
i
1
2
List of Figures
Chapter 1
Chapter 11
Single-Channel Series F4 Inputs/Outputs . . . . . . .1.1a
Dual-Channel Series F4 Inputs/Outputs . . . . . . . . .1.1b
Sample Application: Environmental Testing . . . . . .1.2–1.3
Front View Dimensions and Gap Dimension . . . .11.1a
Side and Top View and Dimensions . . . . . . . . . . .11.1b
Multiple Panel Cutout Dimensions . . . . . . . . . . . .11.2a
Gasket Seated on the Bezel . . . . . . . . . . . . . . . . .11.2b
Retention Collar and Mounting Bracket . . . . . . . .11.3a
Tightening the Screws . . . . . . . . . . . . . . . . . . . . .11.3b
Disengaging the Mounting Bracket . . . . . . . . . . . .11.3c
Chapter 2
Series F4 Displays and Indicator Lights . . . . . . . . .2.2
Default Main Page Parameters . . . . . . . . . . . . . . .2.3
Series F4 Keys and Navigation . . . . . . . . . . . . . . .2.4
How to Enter Numbers and Names . . . . . . . . . . . .2.6
The Information Key . . . . . . . . . . . . . . . . . . . . . . . .2.7
Chapter 3
Sample Application: Running a Profile . . . . . . . . . .3.7
Chapter 4
Eight-Step Profile . . . . . . . . . . . . . . . . . . . . . . . . . .4.2
Sample Application: Programming a Profile . . . . . .4.8
Profile Chart for Military Standard 810D Test . . . . .4.9a
Graph of Military Standard 810D Test . . . . . . . . . .4.9b
Chapter 5
Parameters on the Custom Main Page . . . . . . . . .5.2
Sample Application: Setup . . . . . . . . . . . . . . . . . .5.4–5.5
Chapter 6
Calibration Offset . . . . . . . . . . . . . . . . . . . . . . . . . .6.2a
Filtered and Unfiltered Input Signals . . . . . . . . . . .6.2b
Sensor Ranges . . . . . . . . . . . . . . . . . . . . . . . . . . . .6.3a
On-off Control for Heating and Cooling . . . . . . . . .6.4a
Proportional Control . . . . . . . . . . . . . . . . . . . . . . . .6.4b
Proportional Plus Integral Control . . . . . . . . . . . . .6.5a
PID Control . . . . . . . . . . . . . . . . . . . . . . . . . . . . . . .6.5b
Cooling Dead Band . . . . . . . . . . . . . . . . . . . . . . . .6.5c
Burst Fire . . . . . . . . . . . . . . . . . . . . . . . . . . . . . . . .6.6
Autotuning . . . . . . . . . . . . . . . . . . . . . . . . . . . . . . .6.7
Alarm Settings . . . . . . . . . . . . . . . . . . . . . . . . . . . .6.8
Alarm Latching . . . . . . . . . . . . . . . . . . . . . . . . . . . .6.9a
Alarm Silencing . . . . . . . . . . . . . . . . . . . . . . . . . . . .6.9b
Boost Heat and Boost Cool . . . . . . . . . . . . . . . . . .6.10a
Compressor Power . . . . . . . . . . . . . . . . . . . . . . . . .6.10b
Control Lag Times . . . . . . . . . . . . . . . . . . . . . . . . .6.11a
Cascade Control . . . . . . . . . . . . . . . . . . . . . . . . . . .6.11b
Cascade Example . . . . . . . . . . . . . . . . . . . . . . . . .6.11c
Watlow Series F4S/F
Chapter 12
Isolation Blocks . . . . . . . . . . . . . . . . . . . . . . . . . . .12.1
Power Wiring . . . . . . . . . . . . . . . . . . . . . . . . . . . .12.2
Input 1, Thermocouple . . . . . . . . . . . . . . . . . . . . .12.3a
Input 1, RTD (2- or 3-Wire) 100 Ω Platinum . . . .12.3b
Input 1, 0 to 5VÎ, 1 to 5VÎ or 0 to 10VÎ Process12.3c
Input 1, 0 to 20 mA or 4 to 20 mA Process . . . . .12.3d
Input 1, 0 to 50mV . . . . . . . . . . . . . . . . . . . . . . . .12.3e
Input 2 & 3, Thermocouple . . . . . . . . . . . . . . . . . .12.4a
Input 2 & 3, RTD (2-wire) 100Ω Platinum . . . . . .12.4b
Input 2 & 3, RTD (3-wire) 100Ω Platinum . . . . . .12.4c
In. 2 & 3, 0 to 5VÎ, 1 to 5VÎ or 0 to 10VÎ Process12.5a
Input 2 and 3, 0 to 20 mA or 4 to 20 mA Process 12.5b
Input 2 & 3, 0 to 50mV . . . . . . . . . . . . . . . . . . . . .12.5c
Digital Inputs 1 to 4 . . . . . . . . . . . . . . . . . . . . . . .12.6
Output x, Solid-state Relay . . . . . . . . . . . . . . . . . .12.7a
Output x, Switched DC, Open Collector . . . . . . . .12.7b
Output x, 0 to 20 mA, 4 to 20 mA, 0 to 5VÎ, 1 to 5VÎ
and 0 to 10VÎ (dc) Process . . . . . . . . . . . . . .12.8a
Retransmit Outputs 1 and 2 . . . . . . . . . . . . . . . . .12.8b
Alarm Outputs 1 and 2 . . . . . . . . . . . . . . . . . . . . .12.8c
Digital Outputs 1 to 8 . . . . . . . . . . . . . . . . . . . . . .12.9a
Digital Output, Open Collector Example . . . . . . .12.9b
Digital Output, Switched DC Example . . . . . . . . .12.9c
EIA/TIA 485 and 232 Communications . . . . . . . .12.10a
Termination for EIA-232 to -485 Converter . . . . .12.10b
EIA/TIA-232 Connections . . . . . . . . . . . . . . . . . . .12.10c
EIA-232 to EIA-485 Conversion . . . . . . . . . . . . . .12.11a
GPIB Conversion to EIA-232 or EIA-485 . . . . . . .12.11b
System Wiring Example . . . . . . . . . . . . . . . . . . . .12.12
Appendix ■ A.13
A.14 ■ Appendix
Watlow Series F4S/D
Watlow Series F4S/D
Appendix ■ A.15
Series F4 Software Map
For ranges, defaults, Modbus numbers and other information about the parameters, refer to the
Parameter Tables in the chapters noted below.
Main Page see Chapter 2
Input x (1 to 3) Error
Alarm x (1 to 2) Condition
Autotuning Ch x (1 to 2)
Parameter x (1 to 16)
Current File
Current Step
Input 2 Value
Set Point 1
Set Point 2
Step Type
Target SP1
Target SP2
Wait for Status
Time Remaining
Digital Ins
Digital Outs
% Power 1
% Power 2
Date
Time
Go to Operations
Go to Profiles
Go to Setup
Go to Factory
Operations Page
see Chapter 3
Autotune PID
Channel 1 Autotune
Tune Off
PID Set x (1 to 5)
Channel 2 Autotune
Tune Off
PID Set x (6 to 10)
Edit PID
PID Set Channel 1
PID Set x (1 to 5)
PID Set Channel 2
PID Set x (6 to 10)
Proportional BandA
Integral A / ResetA
Derivative A / RateA
Dead Band A
Hysteresis A
Proportional Band B
Integral B / ResetB
Derivative B / RateB
Dead Band B
Hysteresis B
Alarm Set Points
Alarm1
Alarm1 Lo Deviation
Alarm1 Hi Deviation
Alarm2 Low SP
Alarm2 Low SP
Alarm2 High SP
A.16 ■ Appendix
Profiles Page
see Chapter 4
Create Profile
Name Profile
Step x (1 to 256) Type
Autostart
Date
Day
Ramp Time
Wait For
Event Output
Time
Ch1 SP
Ch2 SP
Ch1 PID Set x (1 to 5)
Ch2 PID Set x (6 to 10)
Guarantee Soak1
Guarantee Soak2
Ramp Rate
Wait For
Event Output
Rate
Ch1 SP
Ch2 SP
Ch1 PID Set x (1 to 5)
Guarantee Soak1
Ch2 PID Set x (6 to 10)
Guarantee Soak2
Soak
Wait For
Event Output
Time
Ch1 PID Set x (1 to 5)
Guarantee Soak1
Ch2 PID Set x (6 to 10)
Guarantee Soak2
Jump
Jump to Profile x (1
to 40)
Jump to Step x
Number Of Repeats
End
Hold
Control Off
All Off
Idle
Edit Profile
Profile x (1 to 40)
Insert Step x (1 to 256)
Insert Before Step x
Step x Type (see below)
Edit Step
Step x Type
Autostart
Date
Day
Ramp Time
Wait For
Event Output
Time
Ch1 SP
Ch2 SP
Ch1 PID Set x
(1 to 5)
Guarantee Soak1
Ch2 PID Set x
(6 to 10)
Guarantee Soak2
Ramp Rate
Wait For
Event Output
Rate
Ch1 SP
Ch2 SP
Ch1 PID Set x
(1 to 5)
Guarantee Soak1
Ch2 PID Set x
(6 to 10)
Guarantee Soak2
Soak
Wait For
Event Output
Time
Ch1 PID Set x
(1 to 5)
Guarantee Soak1
Ch2 PID Set x
(6 to 10)
Guarantee Soak2
Jump
Jump to Profile
x (1 to 40)
Jump to Step x
Number Of Repeats
End
Hold
Control Off
All Off
Idle
Delete Step
Done
Delete Profile x (1 to 40)
Re-Name Profile x (1 to 40)
Watlow Series F4
Upper Display
process information
Lower Display
alarm, error, status information
and access to software
Factory Page
see Chapters 8, 9, 10
F4
1A
Output status
1B
2A
Cursor
Alarm status
2B
1
2
Profile Light
run/hold
status
Communications
status
Scroll up or down
Move up,
increase
i
Profile Key
run, hold,
resume,
terminate
profiles
Move down,
decrease
Information Key
Back
toggles to tips and
definitions about the
chosen parameter
Setup Page see Chapter 5
System
Guar. Soak Band1
Guar. Soak Band2
Current Time
Current Date
PID Units
°F or °C
Show °F or °C
Ch1 Autotune SP
Ch2 Autotune SP
Input 1 Fail
Input 2 Fail
Open Loop Ch1
Open Loop Ch2
Power-Out Time
Power-Out Action
Analog Input x (1 to 3)
Sensor
Type
Decimal
Altitude
Units
Scale Low
Scale High
Choose Scaling
Ch2 Output Disable?
Enter In1 Temp Low
Enter In1 Temp High
SP Low Limit
SP High Limit
Calibration Offset
Filter Time
Error Latch
Cascade
Digital Input x (1 to 4)
Name
Function
Condition
Control Output x (1A, 1B,
2A, or 2B)
Function
Watlow Series F4
Next
Cycle Time
Process
Hi Power Limit
Lo Power Limit
Alarm Output x (1 and 2)
Name
Alarm Type
Alarm Source
Latching
Silencing
Alarm Hysteresis
Alarm Sides
Alarm Logic
Alarm Messages
Retransmit Output x (1 and 2)
Retransmit Source
Analog Range
Low Scale
High Scale
Scale Offset
Digital Output x (1 to 8)
Name
Function
Off
Event Output
Boost Heat
Boost %Power
Boost Delay Time
Boost Cool
Boost %Power
Boost Delay Time
Compressor
Compressor On %Power
Compressor Off %Power
Compressor On Delay
Compressor Off Delay
Communications (see Chapter 7)
Baud Rate
Address
Custom Main Page P x
(Parameter 1 to 16)
Set Lockout
Set Point
Oper.Autotune PID
Oper. Edit PID
Oper. Alarm SP
Profile
Setup
Factory
Change Password
Clear Locks
Diagnostic
Model
Mfg Date
Serial #
Software #
Revision
Inx (1 to 3)
Out x (1A, 1B, 2A, or 2B)
Retrans x (1 or 2)
In x (1 to 3) AtoD
CJC x (1 or 2) AtoD
CJC x (1 or 2) Temp
Line Freq
Test
Test Outputs
Display Test
Full Defaults
Calibration
Calibrate Input x (1 to 3)
Calibrate Output x (1A,
1B, 2A, or 2B)
Calibrate Rexmit x (1 or
2)
Restore In x (1 to 3) Cal
✔ NOTE:
Some parameters may not appear,
depending on the controller model
and how it is configured. Some
menus may not appear if the
controller has already been installed
in equipment and the manufacturer
has locked out portions of the
software.
Appendix ■ A.17
How to Reach Us
Corporate Headquarters
Europe
Watlow Electric Manufacturing Company
12001 Lackland Road
St. Louis, MO 63146
Sales: 1-800-WATLOW2
Manufacturing Support: 1-800-4WATLOW
Email: [email protected]
Website: www.watlow.com
From outside the USA and Canada:
Tel: +1 (314) 878-4600
Fax: +1 (314) 878-6814
Watlow France
Tour d'Asnières.
4 Avenue Laurent Cély
92600 Asnières sur Seine
France
Tél: + 33 (0)1 41 32 79 70
Télécopie: + 33(0)1 47 33 36 57
Email: [email protected]
Website: www.watlow.fr
Latin America
Watlow de México S.A. de C.V.
Av. Fundición No. 5
Col. Parques Industriales
Querétaro, Qro. CP-76130
Mexico
Tel: +52 442 217-6235
Fax: +52 442 217-6403
Watlow GmbH
Postfach 11 65, Lauchwasenstr. 1
D-76709 Kronau
Germany
Tel: +49 (0) 7253 9400-0
Fax: +49 (0) 7253 9400-900
Email: [email protected]
Website: www.watlow.de
Watlow Italy S.r.l.
Viale Italia 52/54
20094 Corsico MI
Italy
Tel: +39 024588841
Fax: +39 0245869954
Email: [email protected]
Website: www.watlow.it
Asia and Pacific
Watlow Singapore Pte Ltd.
16 Ayer Rajah Crescent,
#06-03/04,
Singapore 139965
Tel: +65 6773 9488
Fax: +65 6778
0323
Email: [email protected]
Website: www.watlow.com.sg
Watlow Australia Pty., Ltd.
4/57 Sharps Road
Tullamarine, VIC 3043
Australia
Tel: +61 3 9335 6449
Fax: +61 3 9330 3566
Website: www.watlow.com
Watlow Electric Manufacturing Company
(Shanghai) Co. Ltd.
Room 501, Building 10, KIC Plaza
290 Songhu Road, Yangpu District
Shanghai, China 200433
China
Phone:
Local: 4006 Watlow (4006 928569)
International: +86 21 3381 0188
Fax: +86 21 6106 1423
Email: [email protected]
Website: www.watlow.cn
ワトロー・ジャパン株式会社
〒101-0047 東京都千代田区内神田1-14-4
四国ビル別館9階
Tel: 03-3518-6630
Fax: 03-35186632
Email: [email protected] Website:
www.watlow.co.jp
Watlow Japan Ltd.
1-14-4 Uchikanda, Chiyoda-Ku
Tokyo 101-0047
Japan
Tel: +81-3-3518-6630
Fax: +81-33518-6632
Email: [email protected] Website:
www.watlow.co.jp
Watlow Ibérica, S.L.U.
C/Marte 12, Posterior, Local 9
E-28850 Torrejón de Ardoz
Madrid - Spain
T. +34 91 675 12 92
F. +34 91 648 73 80
Email: [email protected]
Website: www.watlow.es
Watlow UK Ltd.
Linby Industrial Estate
Linby, Nottingham, NG15 8AA
United Kingdom
Telephone: (0) 115 964 0777
Fax: (0) 115 964 0071
Email: [email protected]
Website: www.watlow.co.uk
From outside The United Kingdom:
Tel: +44 115 964 0777
Fax: +44 115 964 0071
Website: www.watlow.com
瓦特龍電機股份有限公司
80143 高雄市前金區七賢二路189號 10樓
之一
電話: 07-2885168 傳真: 07-2885568
Watlow Electric Taiwan Corporation
10F-1 No.189 Chi-Shen 2nd Road
Kaohsiung 80143
Taiwan
Tel: +886-7-2885168
Fax: +886-72885568
Your Authorized Watlow Distributor
Watlow Korea Co., Ltd.
#1406, E&C Dream Tower, 46,
Yangpyeongdong-3ga
Yeongdeungpo-gu, Seoul 150-103
Republic of Korea
Tel: +82 (2) 2628-5770
Fax: +82 (2)
2628-5771
Website: www.watlow.co.kr
Watlow Malaysia Sdn Bhd
1F-17, IOI Business Park
No.1, Persiaran Puchong Jaya Selatan
Bandar Puchong Jaya
47100 Puchong, Selangor D.E.
Malaysia
Tel: +60 3 8076 8745
Fax: +60 3
8076 7186
Email: [email protected]