1
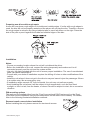
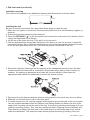
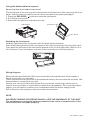
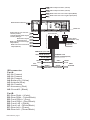
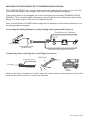
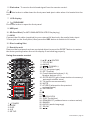
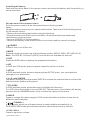
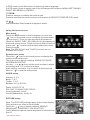
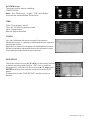
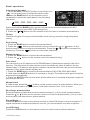
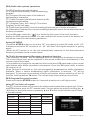
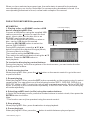
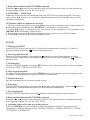
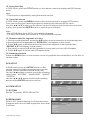
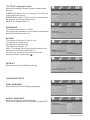
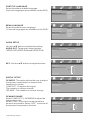
SD430
3
Using the touch screen
RDS (Radio data system) operations
DVD/VCD/CD/MP3/MPEG4 operations
DVD setup
User’s Manual - page 1
Safety information
CAUTION:
This mobile DVD player is a Class 1 laser product. However, this mobile DVD player uses a
visible/invisible laser beam which could cause hazardous radiation exposure if directed. Be sure
to operate the mobile DVD player correctly as described in this manual.
Use of controls or adjustments or performance of procedures other than those specified may
result in hazardous radiation exposure.
Do not open covers and do not attempt to repair this product yourself. Refer servicing to
qualified personnel.
WARNING:
- To reduce the risk of fire or electric shock, do not expose this equipment to rain or moisture.
- To reduce the risk of fire or electric shock, and annoying interference, use only the
recommended accessories.
- This device is intended for continuous operation.
This product incorporates copyright protection technology that is protected by method claims of
certain U.S. patents and other intellectual property rights owned by Macrovision Corporation and
other rights owners. Use of this copyright protection technology must be authorized by
Macrovision Corporation, and is intended for home and other limited viewing uses only unless
otherwise authorized by Macrovision Corporation. Reverse engineering or disassembly is
prohibited.
Region Management Information
This mobile DVD Player is designed and manufactured to respond to the Region Management
Information that is recorded on a DVD disc. If the Region number described on the DVD disc
does not correspond to the Region number of this Mobile DVD Player, this Mobile DVD Player
cannot play this disc.
DISC NOTES
You can playback the following discs:
DVD VIDEO/DVD AUDIO
VIDEO CD/AUDIO CD
MP3/WMA/JPEG/MPEG4
Handling and Cleaning
- Dirt, dust, scratches and warped discs will prevent proper operation.
- Do not place stickers or make scratches on discs.
- Do not bend discs.
- A disc should always be kept in its case when not in use to prevent damage.
- Do not place discs in the following places:
1. Direct sunlight.
2. Dirty, dusty and damp areas.
3. Near car heaters.
4.On the seats or dashboard.
Disc Cleaning
Use a dry soft cloth to wipe the surface. If the disc is quite dirty, use a soft cloth slightly
moistened with isopropyl (rubbing) alcohol. Never use solvents such as benzene, thinner or
conventional record cleaners as they may mar the surface of the disc.
User’s Manual - page 2
Preparing new discs with rough spots
A new disc may have rough edges on its inside and outside edges. If a disc with rough edges is
used, the disc will not be properly seated and the player will not play the disc. Therefore, remove
the rough edges in advance by using a ballpoint pen or pencil as shown on the right. Press the
side of the pen or pencil against the inside and outside edges of the disc.
Installation
Notes:
- Choose a mounting location where the unit will not distract the driver.
- Before the installation of the unit, connect the wiring temporarily and make sure it is all
connected properly and the unit and the system works.
- Use only the parts included with the unit to ensure proper installation. The use of unauthorized
parts can cause malfunctions.
- Consult with your dealer if installation requires the drilling of holes or other modifications of the
vehicle.
- Install the unit where it does not get in the driver’s way and cannot injure the passenger if there
is a sudden stop, like an emergency stop.
- If installation angle exceeds 30° from horizontal, the unit may not perform properly.
- Avoid installing the unit where it will be subject to high temperature, such as from direct
sunlight, or from hot air, from the heater, or where it would be subject to dust, dirt or excessive
vibration.
DIN mounting options
This unit can be installed either from the ‘Front’ (conventional DIN Front-mount) or the ‘Rear’
(DIN Rear-mount installation using the threaded holes on the sides of the chassis). For details,
refer to the following illustrated installation methods.
Remove transit screws before installation
Before installing the unit, please remove the two transit screws.
User’s Manual - page 3
1. DIN front-mount (method A)
Installation opening
This unit can be installed in any dashboard opening with dimensions as shown below:
2 / 32”
(53 mm)
3
7 3/16 ”
(182 mm)
Installing the unit
Be sure to test all connections first, then follow these steps to install the unit.
1. Make sure the ignition is turned off. Disconnect the cable from the vehicle battery negative (-)
terminal.
2. Disconnect the wire harness and the antenna.
3. Press the RELEASE ( ) on the front panel and remove the control panel (for details, refer to
‘Using the Detachable Front Panel’).
4. Lift the top of the outer trim ring. Then pull it out to remove it.
5. The two supplied keys release tabs inside the unit’s sleeve so you can remove it. Insert the
keys as far as they will go (with the notches facing up) into the appropriate slots at the center
of the left and right sides of the unit. Then slide the sleeve off the back of the unit.
Notch
6. Mount the sleeve by inserting it into the opening of the dashboard and bend open the tabs
located around the sleeve with a screwdriver. Not all tabs will be able to make contact, so
examine the opening to determine which tabs will be most effective. Bend open the
appropriate tabs behind the dashboard to secure the sleeve in place.
7. Reconnect the wire harness and the antenna, being careful not to pinch any wires or cables.
8. Slide the unit into the sleeve until it locks into place.
9. To further secure the unit, use the supplied metal strap to secure the back of the unit in place.
Use the supplied hardware (Hex Nut (M5mm) and Spring Washer) to attach one end of the
strap to the mounting bolt on the back of the unit. If necessary, bend the metal strap to fit your
vehicle’s mounting surface. Then use the supplied hardware (Tapping Screw (5x25mm) and
Plain Washer) to attach the other end of the metal strap to a solid metal part of the vehicle
under the dashboard. This strap also helps ensure proper electrical grounding of the unit.
User’s Manual - page 4
10. Reconnect the cable to the vehicle battery’s negative (-) terminal. Then replace the outer
trim ring and install the unit’s front panel (see the steps of ‘to install the front panel’).
Removing the unit
1. Make sure the ignition is turned off, and then disconnect the cable from the vehicle battery
negative (-) terminal.
2. Remove the metal strap attached to the back of the unit (if present).
3. Press the release button to remove the front panel.
4. Lift the top of the outer trim ring then pull it out to remove it.
5. Insert both of the supplied keys into the slots at the middle left and right sides of the unit then
pull the unit out of the dashboard.
2. DIN rear-mount (method B)
If your vehicle is a Nissan or Toyota, follow these mounting instructions: Use the screw holes
marked T (Toyota) or N (Nissan) located on both sides of the unit to fasten the unit to the factory
radio mounting brackets supplied with your car.
T
N
T
N
5mm MAX
Left hand side
T
N
T
N/T
5mm MAX
Right hand side
Fasten the unit to the factory radio mounting brackets. Align the screw holes on the bracket with
the screw holes on the unit, and then tighten the screws (5x5mm) on each side.
Note: The outer trim ring, sleeve and the metal strap are not used for method B installation.
User’s Manual - page 5
Using the detachable front panel
Removing the detachable front panel
The front panel of the unit may be removed as a theft deterrent. After removing the front
panel, use the case provided to prevent the front panel from getting damaged.
1. Press the RELEASE ( ) button to open the front panel.
2. Pull off the front panel.
3. Store the front panel in its protective case.
REL button
protective case
front panel
Attaching the front panel
Hold the right side of the front panel with the plate facing forwards.
First attach the right side of the front panel to the unit by inserting it into the right notch.
Then push the left side of the front panel inwards to fix it in the right place. Be sure it is
fully inserted. If not, the display or some of the keys may not function properly.
Wiring diagram
Many vehicles are fitted with ISO connectors behind the dashboard, which makes it
easier to connect your car radio.
These connections can be found in the dashboard where the car radio will be fitted. Use
these cables to connect the car radio.
Should your car not be fitted with these ISO connectors, we strongly advise you to
consult your car dealer or a specialist to obtain the right adaptor. Once you have these
cables, you will need to connect your loudspeakers and the power supply to the
ISO connector, following the connection instructions below.
NOTE:
INCORRECT WIRING OR OPERATION WILL VOID THE WARRANTY OF THIS UNIT.
The manufacturer cannot be held responsible in the event of a malfunction if the
connections are not made properly.
User’s Manual - page 6
Video output socket 1 (Yellow)
Video output socket 2 (Yellow)
RCA connector to rear left output (White)
RCA connector to rear right output (Red)
Radio Antenna Socket
FUSE 15A
15
Video input To car rear view
camera (Yellow)
ISO CONNECTOR
Coaxial digital audio output
Socket (Orange)
Subwoofer output
Socket (Green)
RCA connector to front right
output (Red)
REVERSING CAMERA
ACTIVAION WIRE B+ (PINK)
PARKING BRAKE WIRE B ( PINK/BLACK )
RCA connector to front left
output (White)
MEMORY B+ (YELLOW)
GROUND B- (BLACK)
ACC B+ (RED)
FRONT
4 ohm
LEFT
SPEAKER
REAR
4 ohm
ISO connector:
Part A:
A1: No Connect
A2: No Connect
A3: No Connect
A4: Battery B+ (Yellow)
A5: Antenna (Blue)
A6: No Connect
A7: Accessory (Red)
A8: Ground B- (Black)
Part B:
B1: Rear Right + (Violet)
B2: Rear Right - (Violet/Black)
B3: Front Right + ( Grey)
B4: Front Right - (Grey/Black)
B5: Front Left + (White)
B6: Front Left - (White/Black)
B7: Rear Left + (Green)
B8: Rear Left - (Green/Black)
User’s Manual - page 7
POWER B+ FOR
RADIO ANTENNA ( BLUE )
WHITE
GREY
WHITE / BLACK
GREY / BLACK
GREEN
GREEN / BLACK
VIOLET
VIOLET / BLACK
FRONT
4 ohm
RIGHT
SPEAKER
REAR
4 ohm
WATCHING THE VIDEO MONITOR IS FORBIDDEN WHILE DRIVING:
The “PARKING BRAKE” wire must be connected to the parking brake system of your car. The
LCD screen will display video images ONLY when the parking brake is engaged.
If the parking brake is not engaged, the screen will display the message “DISABLED WHILE
DRIVING”. This is a safety feature designed to prevent the driver from watching a video while
driving. The video output of this unit is not affected by this.
Note: In Radio Mode or CD/MP3 Mode images will be displayed on the monitor whether or not
the parking brake is engaged.
Connecting the Parking Brake line to the parking brake system built in the car
Parking Brake line (Pink/Black)
Parking brake
indicator Light
Parking Brake
Car Battery
Parking Brake switch
(Inside the car)
To metallic body or chassis of your car
Connecting the reversing line to taillight on the car
To reversing line
Taillight line
To taillight
To Car Battery
Taillight
After connecting, at power on state, when you start up the reverse gear, the unit will
receive the picture from car rear view camera.
User’s Manual - page 8
Operations
Features and controls
Front panel
3
7
8
5
9
SD430
6
4
1
Car radio
after sliding down the front panel
11
after removing the front panel
12
2 13
10
1.
Turning the unit on/off
- Turn the unit on by pressing any button except the (Release) button.
When the unit is switched on, press and hold down the button to go to standby mode.
- Mute on/off: Press the
( MUTE ) button to shut off the sound output.
Press it again to resume previous sound level.
2 . ANTI-THEFT LED indicator
Flashes when the front panel is removed.
3. Select source
Press the SRC button to display the main menu (or root
menu). Then you can access all the features (Such as
RADIO, DISC, SD, USB, AV IN.) by tapping on the touch
screen icons. Touch an icon to select a source.
Touch the icon “ X ” icon to exit the menu and return to
the previous mode. Note : The GPS,BT, AV2 and TV
(MTV) function are not available for this unit.
4. Sound adjustment
Adjust the volume by pressing the VOL + /VOL - button.
User’s Manual - page 9
5. IR window : To receive the infrared signal from the remote control.
6.
Press this button to slide down the front panel and eject a disc when it is loaded into the
unit.
7. LCD display
8. [ ] RELEASE
Press this button to open the front panel.
9. USB port
10. SD Card Slot (For MP3/WMA/MPEG4/JPEG file playing)
11. AV IN
Connect the AV cable (supplied) to your external AV device by the audio/video input
3.5mm jack on the front panel, then press the SRC button to switch to AV mode.
12. Disc Loading Slot
13. Reset the unit
Remove the front panel and use a pointed object to press the RESET button to restore
the factory settings when the unit or display is not working properly.
Using the remote control
1
19
4
26
27
16
3
2
23
12
8
6
10
5
18
9
28
21
20
7
14
22
13
24
25
15
17
1. POWER
2. MODE
3. DISP
4. A-B
5. SETUP
11
6.▲/▼/◄/►/ENTER
7. TITLE/PBC
8. ANGLE
9. / (-TUNING+)
10. VOL-/VOL+
11. PTY (program type)
12. RPT (repeat)
13. Preset stations buttons (1-6),
Number buttons (0-9)
14. GOTO/AS/PS (go to/scan stations to memory/
automatic station store)
15. TA (traffic announcement)
16. MUTE
17. AF/REG (alternative frequencies/
regional mode)
18. DVD MENU
19.
20.■
21.
22. PROG/LO/DX
23. SUB-T(subtitles)
24. RDM/MO/ST (random/mono or stereo select)
25. BAND/ 0
26. AUDIO (audio language)
27. ZOOM
28. /
User’s Manual - page 10
Installing the battery
Open the tray at the back of the remote control and insert the battery with the polarity (+)
on top as shown.
2
1
Use and care of the remote control
Point the remote control at the infrared window on the front panel.
Notes:
Using the battery incorrectly can cause malfunctions. Take note of the following points
for the remote control:
* Remove the insulating tape before using the first time.
* Keep the battery out of the reach of children. Should the battery be swallowed,
immediately consult a doctor.
* Use one CR2025 (3V) lithium battery.
* Remove the battery if the remote control is not to be used for a month or longer.
1 POWER
Press to turn on or off the unit.
2 MODE
Press this button to select one of the following modes: RADIO, DISC, SD, USB, AV IN.
Note : The GPS,BT, AV2 and TV(MTV) function are not available for this unit.
3 DISP
Press the DISP button to display the playback information.
4 A/B
In DVD and VCD mode, press to repeat a specific section on a disc.
5 SETUP
In DVD playback mode, press to display system SETUP menu, you can adjust the
settings to your preference.
6 [▲/▼/◄/►] ENTER
[up/down/ left/right] and then press ENTER to access the selected item or confirm the
selection in the system setting menu.
7 TITLE/PBC
In DVD playback mode, press the button to display the title menu.
For VCD, press this button to turn on PBC ON. The disc menu (if available) will display
and then use the NUMBER button (0-9) to select the options in the menu.
8 ANGLE
Press to change the camera angle in DVD mode (Available only when it was shot at
different camera angles).
9 / (-TUNING+)
In radio mode, press one of these buttons to seek a station automatically. In
DVD/USB/CARD mode press these buttons to select the previous or next file.
10 VOL-/VOL+
Press to adjust the volume.
User’s Manual - page 11
11 PTY
In radio mode, press to turn the PTY function on/off.
12 RPT
In DVD/USB/CARD mode, press repeatedly to select repeat playback mode.
13 Preset stations buttons (1-6), Number buttons ( 0-9 )
In radio mode, press and hold this button to store a preset station, press this button
briefly to recall a preset station. Press to select track, chapter or preset stations.
14 GOTO/AS/PS (go to/scan stations to memory/automatic station store)
In DVD mode, press the GOTO button and the cursors / to highlight one of the following
options: TT (title), CH (chapter), TRACK or a specific time (clock icon). Use the number
buttons to input a desired item and then press the ENTER button to confirm.
In VCD/CD/MP3 mode, press the GOTO button and the cursors to select one of the
following options: TRACK or a specific time (clock icon).
Note: GOTO function may not work for some discs such as MP3 discs, which have
different burning conditions.
15 TA
In radio mode, press to turn the TA function on/off .
16 MUTE
Press to shut off the sound output. Press it again to resume previous sound level.
17 AF/REG
In radio mode, press to turn the AF function on/off. Hold down the button to turn the REG
(regional) function on/off.
18 MENU
In DVD mode, press the MENU button on the remote control to access DVD’s menu.
19
Press to slide down the front panel and eject a disc when it is loaded into the unit.
20 ■
Press to stop the playback.
21
Press to start, pause or resume playback.
22 PROG/LO/DX
In radio mode, press briefly to select “LOC” - local stations or long distance stations. In
DVDVCD/CD mode, press this button to set program playback.
23 SUB-T (subtitles)
In DVD playback mode, press this button to change the subtitle language.
24 RDM/MO/ST
In DVD/VCD/CD mode, press this button to play the tracks/chapters in random order. In
radio mode, press this button to select STEREO or MONO reception.
25 BAND
In radio mode, press the button to select bands.
26 AUDIO (audio language)
User’s Manual - page 12
In DVD mode, press this button to select the audio language.
In VCD mode, press to select one of the following audio outputs: MONO LEFT, MONO
RIGHT, MIX MONO or STEREO.
27 ZOOM
Press to enlarge or reduce the picture size.
Press to return to the previous menu in the menu (AUDIO/PICTURE/SETUP) mode.
28 /
Fast backward/ Fast forward in playback mode.
Using the touch screen
Main menu
Touch the SRC button on the front panel or t ouch the
“ ” icon on the touch screen to display the main menu
(or root menu). Then you can access all the features
(Such as RADIO, DISC, SD, USB, AV IN.) by tapping on
the touch screen icons. Touch an icon to select a source
or the icon “ X ” icon to exit the menu and return to the
Previous mode.
Note: The GPS,BT, AV2 and TV(MTV) function are not
available for this unit.
System tools setup
Touch the “ ” icon on the touch screen to display the
system tools setup menu.
Touch an icon to adjust a setting: AUDIO/ PICTURE/
SYSTEM/DVD SETUP.
Use the - , + or / icons on the touch screen to adjust
the setting and “I, II” to access a page.
After setting, touch the icon to return to the previous
Menu or “ X ” to exit the setup menu.
AUDIO setup
Volume: 0 - 63
Bass: -7-0-7
Treble: -7-0-7
Balance: L15-L-R-R15
Fader: R15-R-F-F15
EQ: FLAT, CLASSIC,POP, ROCK.
Loud (loudness): on/off
Sub.W(Subwoofer): 0(off)-12
PICTURE setup
Note: The PICTURE settings apply to the video display
Only and have no effect in tuner mode.
Touch the , icon to select a setting: BRIGHT
(Brightness), CONTRAST, COLOR or TINT.
These different options can be adjusted on a scale from
0 to 63.
User’s Manual - page 13
SYSTEM setup
Touch an icon to select a setting:
TIME/TOUCH.
Note : The “Dual zone”, “Light”, “SW” and “Other”
function are not available for this unit.
TIME
Time: Time display on/off
Time.M: 12/24 hour display mode
Hour: Adjust hours
Minute: Adjust minutes
TOUCH
You can calibrate the touch screen if necessary.
When the target “+” moves to another position, tap and
hold at the center.
Repeat four times to complete the calibration process.
When completed, tap anywhere on the screen to save
The setting and go back to menu screen.
DVD SETUP
Touch the cursor icons (▲/▼/◄/►) on the touch screen
to select a setting and use the “OK” icon to confirm.
Alternatively, you can use the cursors (▲/▼/◄/►) and
ENTER button on the remote control to set the DVD
setup.
Please refer to the “DVD SETUP” section for more
details.
User’s Manual - page 14
Radio operations
Listening to the radio
1. Touch the SRC (SOURCE) button o r touch the icon
“
” on the main menu to select the radio mode.
2. Press the BAND button on the remote control
repeatedly to select the radio band in the following
sequence:
FM1--FM2--FM3--AM1--AM2
Press and hold the BAND button on the remote control to switch between EUR01
(Europe frequency) and USA2 (USA frequency).
3. Press the [ / ] buttons on the remote control to tune in a station automatically.
Tuning
There are 3 types of tuning mode available, seek tuning, manual tuning and preset
tuning.
Seek tuning
1. Press the BAND button to select the desired band.
2. Press the
/
button on the remote control or touch the
touch screen to tune in a station automatically. Press the
/
frequency. Press the
/
button to reduce the frequency.
or
button on the
button to increase the
Manual tuning
1. Press the BAND button to select the desired band.
2. Press the / button on the remote control to manual tuning.
Auto store
You can store up to 30 stations on the FM/AM band (6 stations per band) in the unit's
memory. The auto store function allows you to automatically store 6 stations for the
chosen band. If 6 stations with good reception cannot be received, the previous stored
stations (if they exist) remain as they are.
1. Press the BAND button to select the desired band (FM1-FM2-FM3-AM1-AM2).
2. Hold down the AS/PS button for 2 seconds or longer. The stations with good reception
are stored automatically.
3. Press the AS/PS button to scan each preset station for 5 seconds and press it again to
stop the preset scan.
Manual store
In radio mode, press the / buttons on the remote control to scan stations. When you
have found the station of your choice, hold down a button from 1 to 6 to store.
Recalling a preset station
Select a frequency band and use the number buttons (1 to 6) to recall a preset station.
Press the
or
button on the remote control or touch the preset staion (1 to 6) on the
touch screen can also select a preset station.
Stereo/Mono
Press the MO/ST button on the remote control to select FM stereo or mono reception. If
signal reception is weak and distortion occurs, you should switch to mono reception.
Local/Distant
Press the LO/DX button on the remote control to select local or distant stations.
User’s Manual - page 15
RDS (Radio data system) operations
The RDS functions are the following:
PI: (Program identification) Code for identifying
program.
PS: (Program Service) name of the station in
alphanumeric characters.
TP: (Traffic Program) identification data for traffic
information broadcasting.
PTY (Program Type): See “Using PTY to select
Program” on the next page.
TA (Traffic Announcement): function enabling the broadcast of traffic information.
AF (Alternative Frequencies): function enabling automatic search for the best alternative
frequency available.
In tuner FM mode, touch the “
” icon on the top left corner of the touch screen to
display the RDS operation buttons. You can use the touch screen icons or the buttons on
the remote control for the following operations.
Setting AF MODE
*Press the AF/REG button (or touch the “AF” icon) briefly to switch AF mode on/off. “AF”
is displayed when the AF function is on. “AF” will flash if the signal reception is getting
worse.
*When the AF function is on, the unit automatically searches for the best alternative
frequency available for the current station.
TA (Traffic Announcement)/Emergency broadcast function
*The message “ALARM” will be displayed when an emergency broadcast is received.
The sound output level will be adjusted to the preset output level automatically if the
volume control is set lower.
*It is possible to program the car radio so that it exits disc/USB/card mode or the current
radio station when traffic information is broadcast. Press the TA button briefly to switch
TA mode on or off.
When TA mode is switched on, the unit automatically broadcasts the traffic information
available. When a station broadcasting traffic information is received, “TP” will be
displayed. To interrupt the broadcast of traffic information without switching off the TA
function, briefly press the TA button. The unit will then return to the previous mode.
REG (Regional Program) function
Press and hold the AF/REG button for 2 seconds to switch on or off region mode.
Using PTY to Select a Program
The PTY function allows you to search for stations with a particular program type. Press
the PTY button to enter the PTY search mode. You can select the type by touching the ▲
/ ▼ button on the touch screen or pressing ▲ and ▼ button on the remote control. Refer
to the table below:
NEWS
POP M
SOCIAL
FOLK M
AFFAIRS
ROCK M
RELIGION
DOCUMENT
INFO
EASY M
PHONE IN
TEST
SPORT
LIGHT M
TRAVEL
ALARM !
EDUCATE
CLASSICS
LEISURE
DRAMA
OTHER M
JAZZ
CULTURE
WEATHER
COUNTRY
SCIENCE
FINANCE
NATIONAL M
VARIED
CHILDREN
OLDIES
User’s Manual - page 16
When you have selected a program type, the radio starts to search for broadcasts
corresponding to your choice, and stops if a corresponding broadcast is found. If no
corresponding broadcast is found, normal radio reception is resumed.
DVD/VCD/CD/MP3/MPEG4 operations
MP3/MPEG4
1. Playing a disc, an SD/MMC card or a USB
device containing MP3 files
Connect a USB device using the supplied USB
cable or press the
button to open the front
panel, insert a disc into the disc slot or an
SD/MMC card into the card slot.
The unit will automatically switch on when a
disc, card or USB device is inserted.
Press the SRC / MODE button to select the
source: DISC/USB/SD.
During MP3 playback, press the ▲/▼/◄/►
buttons to select the required file type (Music ,
Picture or Movie) or folder.
Then confirm using the ENTER button.
Then select the next track desired using the ▲/▼
Buttons. Press the ENTER button to
start playback.
Information display
Files list
Files type
Folders list
To invoke the disc playing control buttons
During disc playing, touch the anywhere of the touch screen, you can invake the disc
Playing control buttons.
2. Quick track selection
When playing MP3 files, press the
or previous track.
/
button on the remote control to go to the next
3. Repeat playing
When playing MP3 files, press the RPT button repeatedly on the remote control to select
repeat mode. You can select one of the following modes: REP 1, REP DIR, REP ALL or
REP OFF. While in REP 1 mode, the unit will play one track repeatedly. While in REP DIR
mode, it will play in the current folder repeatedly. In REPEAT ALL mode, the unit will play
all tracks repeatedly.
4. Selecting an MP3 track (or file) using the number buttons
In folder/file list display mode, press the number buttons to select a track, then press the
ENTER button to confirm.
Note:
* This function can only be operated using the remote control.
5. Stop playing
When playing MP3 files, press the ■ button to stop playback.
6. Pause playback
When playing MP3 files, press the
User’s Manual - page 17
button to switch between play and pause.
7. Skip backward/forward/F.F/F.REW playback
Press the
or
button on the remote control to perform fast rewind or fast forward at
the following speeds: 2X, 4X, 8X, 20X, PLAY.
8. [PICTURE] --- JPEG Files
Press the button to start a slideshow from the JPEG file currently selected. Then you
can use the ◄/► buttons to rotate the displayed pictures and the ▲/▼ buttons to flip
up/down or left/right.
10. Repeat a specific segment on a disc
1. During normal playback, press the A-B button once to determine the starting point of
the segment to be repeated and “ REPEAT A- " will appear on the screen.
2. Press A-B again to determine the end point of the segment to be repeated and
“ REPEAT A-B ” will display on the screen.
3. Set point A to set point B will be repeated in a loop until you turn off A-B repeat.
4. Press A-B again to cancel the A-B repeat mode.
VCD/CD
1. Playing a VCD/CD
Insert a VCD/CD disc into the slot. The unit will automatically switch on. If a disc is
already loaded, press the
button to start playback.
2. Quick track selection
During VCD/CD playback, first press the
button to return to the beginning of the
current track. Press this button again to play the previous track. Press the
button to
play the next.
3. Repeat play
During VCD/CD playback, press the RPT button on the remote control to select a repeat
mode from: REP 1, REP ALL or REP OFF.
4. Play track at random
During VCD/CD playback, press the RDM button on the remote control to play any track
at random. Press this button again to return to normal play.
5. Number buttons
Use the number button to select a track to play.
6. Stop play
During VCD/CD playback, first press the ■ button to stop playback. Press the
resume play. Press the ■ button twice to stop playback completely.
7. Pause playback
During VCD/CD playback, press the
button to
button to switch between play and pause.
8. Skip backward/forward/F.F/F.REW playback
Press the
or
button on the remote control to perform fast rewind or fast forward at
the following speeds: 2X, 4X, 8X, 20X, PLAY.
9. Increase or decrease the size of the picture
Press the ZOOM button to increase or decrease the picture size. Press the button
repeatedly to change the zoom size. ZOOM 2, ZOOM 3, ZOOM 4, ZOOM 1/2, ZOOM
1/3, ZOOM 1/4, ZOOM OFF
User’s Manual - page 18
10. On screen display
In CD mode, press the DISP button (in VCD
mode, press and hold down the SUB-T button) to
display the following information:
DVD
"Disc Type, Track * / * (the playing track / total tracks), Mute, PBC (VCD only),
Repeat Mode, Elapsed Time of the Playing Track
11. Selecting an audio mode
In VCD/CD mode, press the AUDIO button on the remote control repeatedly to select an
audio mode in the following order: MONO L - MONO R - MIX MONO - STEREO.
12. PBC
In VCD mode, press the PBC button. PBC playback starts and the menu of the entire
disc appears on the screen. Then you can select the desired track by using number
buttons. To cancel the PBC function, press the PBC button again.
Note: * PBC playback is only compatible with discs which are version 2.0 or above.
13. Programmed playback
In VCD/CD mode, press the PROG button and the program menu will be displayed.
Press the number buttons to select the track number. Use the direction buttons to move
the cursor to PLAY and press ENTER to start programmed playback.
Move the cursor to CLEAR and press ENTER to clear the program. To delete the
programmed playback menu and return directly to the previous mode, use the ■ button.
14. Repeat a specific segment on a disc
1. During normal playback, press the A-B button once to determine to the starting point
of the segment to be repeated and “ REPEAT A- " will appear on the screen.
2. Press A-B again to determine the end point of the segment to be repeated and
“ REPEAT A-B ” will display on the screen.
3. Set point A to set point B will be repeated in a loop until you turn off A-B repeat.
4. Press A-B again to cancel the A-B repeat mode.
DVD
1. Playing a DVD
Insert a DVD into the slot. The unit will automatically switch on. If a disc is already
loaded, press the MODE button on the remote control to switch to DVD mode.
2. Quick chapter selection
During playback, press the
button again to play the previous chapter. Press the
button to play the next chapter.
3. Stop play
During DVD playback, first press the ■ button to stop playback. Press the
resume play. Press the ■ button twice to stop playback completely.
Note:
* This function can only be operated by using the remote control.
4. Pause playback
During DVD playback, press the
button to
button to switch between play and pause.
5. Skip backward/forward/F.F/F.REW playback
Press the
or
button on the remote control to perform fast rewind or fast forward at
the following speeds: 2X, 4X, 8X, 20X, PLAY.
User’s Manual - page 19
6. Repeat play
During DVD playback, press the RPT button on the remote control to select a repeat
mode from: REP CHAPTER, REP TITLE, REP ALL or REP OFF.
7. Increase or decrease the size of the picture
Press the ZOOM button to increase or decrease the picture size. Press the button
repeatedly to change the zoom size. ZOOM 2, ZOOM 3, ZOOM 4, ZOOM 1/2, ZOOM
1/3, ZOOM 1/4, ZOOM OFF
8. On screen display
In DVD mode, press and hold the SUB-T button on the remote control and the display
shows: "Disc Type, Title * / * (the playing title / total titles), Chapter * / * (the playing
chapter/ total chapters), Elapsed Time of the Disc".
Press and hold the button again to show the following information:
Language */* (the number of playing language/the amount of optional languages)
or “Off”, Language Type, Audio Type, Subtitle * / * (the serial number of playing subtitle
/the amount of optional subtitles) or “Off”, Angle * / * (the number of playing angle / the
amount of optional angles) or “Off".
Press and hold the button repeatedly to display the following information: Chapter
remaining time, Title elapsed time and remaining time. Press and hold the button a sixth
time to turn off the display menu.
9. Changing the viewing angle (Multi-angle)
With DVDs featuring multi-angle (scenes shot from multiple angles) recordings, press
the ANGLE button to switch between viewing angles during playback. The viewing angle
changes in the following order:
[1/3],
[2/3],
[3/3].
Note:
* This function is operated by using the remote control.
* This function is only available with DVDs featuring multi-angle recordings.
* The
symbol on a DVD packaging indicates that it features multi-angle scenes. The
number in the
symbol indicates the number of angles from which scenes were shot.
* The ANGLE button does not function during fast forward/fast rewind or pause.
10. Changing audio language (multi-audio)
DVDs can provide audio playback with different languages. With DVDs featuring multiaudio recordings, you can press the AUDIO button to switch between language and
audio systems during playback.
Note:
* For some DVDs, you need to change the language in the menu).
* This function is only available with DVDs featuring multi-audio recordings.
* The number in the
symbol on a DVD packaging indicates the number of recorded
languages/audio systems.
11. Changing the subtitle language (multi-subtitle)
With DVDs featuring several subtitle languages, press the SUB-T button to switch
between subtitle languages during playback.
Note:
* This function can only be operated by using the remote control (for some DVDs, you
need to change the language in the menu).
* This function is only available with DVDs featuring several subtitle languages.
* The number in the 2 symbol on a DVD packaging indicates the number of recorded
subtitle languages.
User’s Manual - page 20
12. Using the titles
In DVD mode, press the TITLE button on the remote control to display the DVD player
menu.
Note:
* This function is operated by using the remote control.
13. Using the menus
In DVD mode, press the MENU button on the remote control to access DVD’s menu.
Then you can find your favorite program by entering the relevant DVD’s menu.
Use the ◄/►/▲/▼ buttons on the remote control to select a item on the menu you wish
to play, then press the ENTER button to confirm your selection.
Note:
* Not all DVD discs have DVD’s menu playing features.
* For some DVD discs, the content of TITLE and MENU is same.
13. Repeat a specific segment on a disc
1. During normal playback, press the A-B button once to determine to the starting point
of the segment to be repeated and “ REPEAT A- " will appear on the screen.
2. Press A-B again to determine the end point of the segment to be repeated and
“ REPEAT A-B ” will display on the screen.
3. Set point A to set point B will be repeated in a loop until you turn off A-B repeat.
4. Press A-B again to cancel the A-B repeat mode.
14. Random playback
Press the RDM button on the remote control to playback the tracks(files) on the disc in
random order.
DVD SETUP
In DVD mode, press the SETUP button on the
remote control to display the setup menu on the
screen. (A disc must be inserted in the unit).
Use the ◄/►buttons to select one of the following
setup items: “SYSTEM”, “LANGUAGE” , “AUDIO”,
“DIGITAL”.
Use the ◄/►/▲/▼ buttons to select the setting
and press the ENTER button to confirm.
SYSTEM SETUP
SYSTEM SETUP
TV SYSTEM
SCREEN SAVER
TV TYPE
PASSWORD
RATING
DEFAULT
TV SYSTEM
SCREEN SAVER
TV TYPE
PASSWORD
RATING
DEFAULT
EXIT SETUP
SYSTEM SETUP
TV SYSTEM
Set the TV system: NTSC/PAL/AUTO.
AUTO
PAL
NTSC
EXIT SETUP
SCREENSAVER
Select “ON” (default setting) for the screensaver
to appear when the unit has stopped for more than
3 minutes.
SYSTEM SETUP
TV SYSTEM
SCREEN SAVER
TV TYPE
PASSWORD
RATING
DEFAULT
EXIT SETUP
User’s Manual - page 21
ON
OFF
“TV TYPE” (display format)
Select the display format to watch widescreen
Movies.
4:3 PS (Pan Scan): For 4:3 screens, the left and
right edges will be cut.
4:3 LB (Letter Box): For 4:3 screens, black bars
will appear at the top and bottom.
16:9 : For a widescreen TV.
PASSWORD
The default password is “0000”.
To change the password, enter the old password,
and then enter the new one.
SYSTEM SETUP
TV SYSTEM
SCREEN SAVER
TV TYPE
PASSWORD
RATING
DEFAULT
4:3PS
4:3LB
16:9
EXIT SETUP
SYSTEM SETUP
TV SYSTEM
SCREEN SAVER
TV TYPE
PASSWORD
RATING
DEFAULT
----
EXIT SETUP
RATING
The rating of the disc is from 1 to 8:
(1): Minimum rating level.
(8): Maximum rating level.
The default setting is “8”.
Note: The rating can only be selected when the
password lock is not switched on.
Conversely, the limit only works when the
Password lock is activated ( ).
SYSTEM SETUP
TV SYSTEM
SCREEN SAVER
TV TYPE
PASSWORD
RATING
DEFAULT
EXIT
SETUP
1
2
3
4
5
6
7
8
KID SAFE
G
PG
PG 13
PG-R
R
NC-17
ADULT
SYSTEM SETUP
DEFAULT
Restore the factory default settings.
TV SYSTEM
SCREEN SAVER
TV TYPE
PASSWORD
RATING
DEFAULT
RESTORE
EXIT SETUP
LANGUAGE SETUP
LANGUAGE SETUP
OSD LANGUAGE
Select the On Screen Display language.
OSD LANGUAGE
AUDIO LANG
SUBTITLE LANG
MENU LANG
EXIT SETUP
AUDIO LANGUAGE
Select the default audio language.
(If several languages are available on the DVD).
ENGLISH
GERMAN
SPANISH
FRENCH
PORTUGUESE
ITALIAN
RUSSIAN
POLISH
LANGUAGE SETUP
OSD LANGUAGE
AUDIO LANG
SUBTITLE LANG
MENU LANG
EXIT SETUP
ENGLISH
GERMAN
SPANISH
FRENCH
PORTUGUESE
ITALIAN
RUSSIAN
POLISH
User’s Manual - page 22
SUBTITLE LANGUAGE
Select the default subtitle language.
(If several languages are available on the DVD).
LANGUAGE SETUP
OSD LANGUAGE
AUDIO LANG
SUBTITLE LANG
MENU LANG
EXIT SETUP
MENU LANGUAGE
Select the default menu language.
(if several languages are available on the DVD).
ENGLISH
GERMAN
SPANISH
FRENCH
PORTUGUESE
ITALIAN
RUSSIAN
POLISH
LANGUAGE SETUP
OSD LANGUAGE
AUDIO LANG
SUBTITLE LANG
MENU LANG
EXIT SETUP
ENGLISH
GERMAN
SPANISH
FRENCH
PORTUGUESE
ITALIAN
RUSSIAN
POLISH
AUDIO SETUP
Use the ▲/▼ buttons to adjust the setting.
AUDIO OUT : Three audio output modes
-SPDIF/OFF,SPDIF/RAW and SPDIF/PCM.
AUDIO SETUP
AUDIO OUT
KEY
SPDIF / OFF
SPDIF / RAW
SPDIF / PCM
EXIT SETUP
KEY : Use the ▲/▼ buttons to adjust the tone.
AUDIO SETUP
AUDIO OUT
KEY
-
#
+4
+2
0
-2
-4
b
EXIT SETUP
DIGITAL SETUP
OP MODE : This option allows the user to adjust
the dynamic compression in order to limit
variations in volume.
“LINE OUT”: Compress the signal.
The variation in volume is small.
“RF MOD”: The variation in volume is large.
DYNAMIC RANGE
Select “LINE OUT” in OP MODE to adjust the
compression rate.
Select “FULL” to limit the volume variations
as much as possible. Select “OFF”, to switch off
the dynamic compression function.
DIGITAL SETUP
OP MODE
DYNAMIC RANGE
DUAL MONO
EXIT SETUP
DIGITAL SETUP
OP MODE
DYNAMIC RANGE
DUAL MONO
EXIT SETUP
User’s Manual - page 23
LINE OUT
RF REMOD
FULL
- 6/8
- 4/8
- 2/8
OFF
DUAL MONO
Select the audio channel:
STEREO, MONO L, MONO R or MIX MONO.
DIGITAL SETUP
OP MODE
DYNAMIC RANGE
DUAL MONO
STEREO
MONO L
MONO R
MIX MONO
EXIT SETUP
USB playback
Using the USB stick:
This disc player features a front panel USB interface. A USB device can be connected to
this port. When you insert a USB stick through the port, the DVD player will search for the
MP3/WMA files and start to play them automatically.
If you insert a SD/MMC card into the SD/MMC card slot or a disc into the disc slot while
reading the USB stick, the unit will play the disc. You can press MODE button to switch to
USB playback mode.
Note:
- Use the USB adaptor cable, if necessary.
- The operations of playing MP3/WMA files in the USB is the same as the MP3/WMA
operation described in the CD/MP3/WMA disc operations.
- When reading the USB stick, please don't touch or remove it.
- If following the instruction above, the unit can't read the file in the USB stick, please
check if the device is in good condition, or take it out then insert it into the USB port
once more.
- The main unit can only support the standard USB-memory device.
- USB MP3 player is not a standard which means different brand name or different
models have their own standard. So this product cannot support all MP3 players.
- When connecting an MP3 player and there is a normal battery in the player (non
rechargeable battery), you should remove the battery from the MP3 player and then
connect it to the USB port. Otherwise, it may cause battery burst.
- When reading a USB device, be sure not to remove it from the USB port (change mode
beforehand).
Memory Card playback
Using the SD/MMC card:
This disc player features a SD/MMC memory card slot. When you insert a SD/MMC card
into the memory card slot, the DVD player will read the SD/MMC card automatically.
If you insert a USB stick into the USB port or a disc into the disc slot while reading the
SD/MMC card, the unit will play the file in the USB or track on the disc. When you press
the MODE button to switch back to SD/MMC reading mode.
The operations of the SD/MMC memory card playback is the same with the CD / MP3 /
WMA disc operations described above.
Note:
- When reading the memory card, please don't touch or take out the card.
- If following the instruction above, the unit can't read the card, please check if the card
is in good condition, or take out the card and then insert it into the card slot once more.
User’s Manual - page 24
A/V IN Operations
This car DVD player is equipped with an Audio / Video Auxiliary input jack on the front
panel, so you can connect a video game, digital camera/camcorder or other device you
wish to use in this car DVD payer.
To connect a video device to the auxiliary A/V input jack, first connect it with the cable
provided, Then Touch the SRC button on the front panel or press the MODE on the
remote control to switch AV IN mode.
Specifications
GENERAL
Power Supply Requirements: DC 12 Volts, Negative Ground
Chassis Dimensions: 7”W X 6.3”D X 2”H
Maximum Output Power: 80W X 4CH
M aximum current consumption : 15A
Current Consumption: 15 Ampere (max.)
DVD PLAYER
Signal to Noise Ratio: more than 50 dB (1KHz)
Distortion: less than 0.2%
Channel Separation: more than 40 dB
Frequency Response: 20Hz - 20 KHz
Disc played: DVD,VCD,SVCD,CD-DA,CD-R/RW /JPEG/ MPEG4/MP3/WMA
SCREEN
Size/type: 4.3 inch TFT LCD (16:9)
Resolution : 432 RGB X 240
Brightness(cd/ m² ): 300 cd/ /m²
Contrast: 500:1
View angle V: 160°
View angle H: 160°
RADIO
FM TUNER
Frequency range: 87.5 -107.9 MHz (USA.)
87.5 - 108 MHz (EUR.)
IF:
10.7 MHz
Signal to Noise ratio: 55 dB (mono)
Stereo Separation: >25dB
AM(MW) TUNER
Frequency range: 530 - 1710 KHz (USA.)
522 - 1620 KHz (EUR.)
IF:
450 KHz
USB/SD(card)
USB port type: 2.0
USB port maximum capacity: 32
4 GB
Card type: SD/MMC
Card maximum capacity: 32
4 GB
User’s Manual - page 25
Troubleshooting
If it appears that your DVD unit is faulty, please first consult this checklist. It may be that
something simple has been overlooked.
Under no circumstances should you try to repair the player yourself, as this will void the
warranty. Only qualified service personnel may remove the cover or service this player.
No Power
♦ If the power supply is connected to the car accessory circuits, but the engine is not
turned on, switch the ignition key to “ACC.”
♦ Check if the fuse is blown. Replace with a new fuse if necessary.
♦ Check if the POWER button on the front of the player is set to ON.
No Picture
♦ Check if the monitor or TV is switched ON.
♦ Check if select proper mode has been selected (such as Disc Play mode or AV mode).
♦ Check the video connections.
Distorted Picture
♦ Check the disc for fingerprints and clean it with soft cloth, wiping from center to the
edge.
♦ Sometimes a small amount of picture distortion may be present. This is not a
malfunction.
Completely Distorted Picture
♦ The disc format is not the same as the TV-set used (PAL/NTSC). Select the proper
setting in the TV SYSTEM menu.
No Color in Picture
♦ The disc format is not the same as the TV-set used (PAL/NTSC). Select the proper
setting in the TV SYSTEM menu.
Disc Does Not Play
♦ Be sure that the disc label faces up.
♦ Clean the disc.
♦ Check if the disc is defective by trying another disc.
No Sound
♦ Check the audio connections.
The Player Does Not Respond to the Remote Control
♦ Aim the remote control directly at the sensor on the front of the player.
♦ Remove any obstacles which may interfere with the signal path.
♦ Inspect or replace the remote control battery.
Picture is distorted or Only Black and White
♦ The disc format is not according to the TV-set used (PAL/NTSC). Select the proper
setting in the TV SYSTEM menu.
No Audio at Digital Output
♦ Check the digital connections.
♦ Check the Digital Audio menu to make sure that the digital output is correctly set.
♦ Check if the audio format of the selected audio language matches your receiver’s
capabilities.
Buttons Do Not Work
♦ Press Reset button on the front panel of the DVD unit.
User’s Manual - page 26