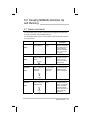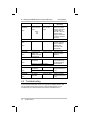
1
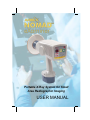
Portable X-Ray System for Small
Area Radiographic Imaging
USER MANUAL
NOMAD, NOMAD eXaminer, ARIBEX, the ARIBEX logo, and the stylized A are
trademarks of ARIBEX, Inc. within the United States and other countries. United
States and international patents pending.
All other brand and product names are trademarks or registered trademarks of
their respective companies.
A Radiation Safety Abbreviated Report has been submitted in order to register
NOMAD eXaminer in accordance with DHHS Manufacturer Reporting
Requirements, 21 CFR 1002.12. See accompanying Certificate of Conformance.
Disclaimer: NOMAD eXaminer is sold with the understanding that the user
assumes sole responsibility for radiation safety (as well as any state, provincial, or
local regulatory compliance) and that ARIBEX, Inc., its agents or representatives,
do not accept responsibility for:
a) injury or danger to personnel from x-ray exposure,
b) image overexposure due to poor operating techniques or procedures,
c) equipment not properly serviced or maintained in accordance with
instructions contained in this publication, and
d) equipment which has been modified or tampered with in any way.
© ARIBEX, Inc. 2005
All Rights Reserved
Printed in the U.S.A
MP-0025, Rev. B
ARIBEX, Inc. • 754 South 400 East • Orem, Utah 84097 U.S.A
Phone: +801-226-5522 • Fax: +801-434-7233 • www.aribex.com
USER MANUAL
Table of Contents
1.0
Getting Started ..........................................................................................
1.1
Intended Use .................................................................................
1.2
Unpacking and Registering NOMAD eXaminer .............................
1.3
Charging the Battery ......................................................................
1
1
2
2
2.0
Important Safety Precautions ....................................................................
2.1
Cleaning .........................................................................................
2.2
Usage ............................................................................................
2.3
Storage and Transportation ...........................................................
3
3
3
4
3.0
Setup and Power Check ............................................................................
3.1
Attaching the Backscatter Shield ...................................................
3.2
Attaching a Charged Battery ..........................................................
3.3
Checking for Power .......................................................................
5
5
5
6
4.0
Operation ...................................................................................................
4.1
Powering Up ..................................................................................
4.2
Ensuring Battery Charge Is Adequate ...........................................
4.3
Ensuring the Right Exposure Time Is Set ......................................
4.4
Situating Object and Enabling the Device ......................................
4.5
Initiating and Completing a X-Ray Exposure .................................
4.6
Powering Down ..............................................................................
7
7
7
7
8
8
8
5.0
Battery Replacement ................................................................................. 9
6.0
Keeping NOMAD eXaminer Up and Running ..........................................
6.1
Alarms and Alerts ........................................................................
6.2
Troubleshooting ...........................................................................
6.3
Repair and Maintenance by an Authorized Distributor ................
7.0
Basic Technical Specifications ................................................................ 15
Limited Warranty
10
10
11
13
1.0 Getting Started
We value your business. For feedback or suggestions, please send e-mail to
[email protected] – we like to hear from our customers. Thank you
very much for choosing ARIBEX, Inc. as your x-ray vendor!
Introducing X-Portability from ARIBEX
True Portability – optimal cordless use for confined spaces or remote locations.
Other NOMAD™ eXaminer Features
Charged for Performance – battery power source delivers dependable high
voltage (60kV, true DC) and direct current (2.3mA).
Constant Emission Radiation – high-frequency, constant-potential x-ray
generator provides high quality images, with a relatively lower radiation dosage
than other AC x-ray systems.
Radiation Protection – operator shielded from source and backscatter radiation.
Simple Operation – exposure time is the only setting requiring operator input,
digitally displayed on the user-friendly control panel along with indicators for
machine and battery status.
Lightweight and Ergonomic – design provides complete flexibility and
convenience.
Engineered for Compatibility – works with both film and digital imaging systems.
Authorized Service – complete support and maintenance from an authorized
distributor and ARIBEX.
1.1 Intended Use
NOMAD™ eXaminer is intended for general, non-medical use – materials imaging,
industrial inspection, pathology/forensics, and veterinary care that requires smallarea radiographic imaging. The use of NOMAD eXaminer on live humans is
expressly prohibited by regulation.
This publication, applicable to NOMAD eXaminer and NOMAD CE eXaminer,
covers instructions for a cordless, handheld x-ray system. Symbols used in this
publication and used to mark the equipment have the following meanings:
Ionizing Radiation
Double Insulation
Warning or Danger
Electrical Shock Hazard
Type BF Equipment (providing a degree of protection against electric
shock, pertaining particularly to allowable leakage currents)
1
Intended Use
User Manual
1.0 Getting Started
1.2 Unpacking and Registering NOMAD
eXaminer
Unwrap individual components from the protective plastic and double-check for
any noticeable signs of damage. The battery charger should be appropriate for
local AC line voltage. The standard package system includes the following items.
NOMAD Device (AP-0001)
Backscatter Shield (AP-0012)
[2] Retainer O-Ring (CP-0046)
User Manuals
Warranty/Reg Card
Certificate of Conformance
[2] Battery (CP-0001)
Battery Charger
110V AC (CP-0002)
or
220V AC (CP-0045)
Compare the serial number of NOMAD eXaminer (see underside) with the
number affixed to the registration card (MP-0008) to ensure they are the same.
Complete this product registration card and mail it with proper postage to
ARIBEX today. Registration fills a condition of warranty coverage (see last page
for warranty info) and enables you to receive valuable product news and updates.
1.3 Charging the Battery
Unwrap the power cord of the battery charger and connect it to an AC electrical
outlet (110V or 220V, dictated by the locale). A plug adapter may be used as
needed; use only the supplied battery charger (for manufacturer and model info,
see section 6.3, Repair and Maintenance by an Authorized Distributor).
Invert one of the batteries and plug it into the charger. The red indicator light on
the top of the charger will flash at a steady rate while the battery is charging. The
required charge time varies (as much as 30 to 45 minutes). Battery and charger
may become warm to the touch while charging, which is a normal condition.
When the battery is fully charged and ready to use, the indicator light will stop
flashing and remain on continuously (for more info, see section 5.0, Battery
Replacement, or the battery charger user manual).
Charging the Battery
2
2.0 Important Safety Precautions
Do not pull apart the apparatus housing (enclosure). Do not undertake
disassembly of the main apparatus, or the warranty shall be invalidated.
Repairs can only be undertaken by trained service personnel at an authorized
distributor. Direct all questions to an authorized distributor.
2.1 Cleaning
Ensure the battery charger is unplugged before attempting to clean. To make sure
that power is off for NOMAD eXaminer while cleaning, detach the battery. Use a
non-alcohol based disinfectant only – wipes, or a cloth dampened with liquid or
spray.
NOMAD eXaminer and the accompanying battery charger are not designed to be
subjected to any kind of sterilization procedure. NOMAD eXaminer is not designed
to be used to sterilize anything else.
2.2 Usage
NOMAD eXaminer should not be used in environments where flammable
cleaning agents are present.
NOMAD eXaminer is rated for IP0; do not operate it or battery charger if
either was immersed in liquid or subjected to an undue amount of moisture.
As a safety feature, NOMAD eXaminer cannot be enabled for exposure with
insufficient voltage (low battery). The proper voltage rating for NOMAD eXaminer
batteries is 14.4V.
NOMAD eXaminer is also designed to avoid damage from overheating. The
maximum duty cycle rating (the relationship between duration and frequency of
exposures) is 1:60. Examples of optimal use:
Duration
Cycle
0.25 sec
every 15 sec
0.46 sec
every 28 sec
0.50 sec
Every 30 sec
0.99 sec
every 60 sec
NOMAD eXaminer may generate and radiate radio frequency energy that causes
interference to other devices in the vicinity, if not used in accordance with the instructions (though there is no guarantee that interference will not occur in a particular instance). If interference occurs, the user is encouraged to try the following
corrective measures: reorient or relocate the receiving device; increase the
separation between the equipment; consult the device manufacturer or field
service technician for help.
This x-ray unit may be dangerous to operator and bystander unless safe
exposure factors and operating instructions are observed.
3
Usage
User Manual
2.0 Important Safety Precautions
Follow all guidelines dictated by the radiation protection program of your
organization in regard to operators who are pregnant or expect to become
pregnant. In implementing a radiation protection program, please consult any
state, provincial, and local regulations governing radiation protection and the use
of x-ray equipment. Ensure proper registration and compliance with any such
regulation.
Standard exposure procedure consists of three basic steps, regardless of whether
film or a digital imaging sensor is used:
Determining proper time setting
Enabling the x-ray device (which ensures a state of readiness)
Starting the timed exposure
Do not enable NOMAD eXaminer until relevant materials and personnel are
positioned and ready for the exposure, diminishing the likelihood of interruption
and preventing inadvertent exposure of anyone to x-rays. Do not attempt an
exposure if anyone else is positioned immediately behind the object or material
being examined (in line with the direction of x-ray emission).
An exposure can be prematurely terminated for any reason by abruptly releasing
the depressed trigger (for more info, see section 4.0, Operation).
2.3 Storage and Transportation
Make sure NOMAD eXaminer will not be knocked to the ground when not in use.
Lay it on its side if necessary. Power should automatically shut off.
Some charge is lost during extended inactivity (leading to fewer exposures
between battery chargings). For long-term storage, please detach the battery.
Under conditions that are cool and dry, away from direct sunlight, battery and
charger can actually be stored for up to five years. Do not store or carry batteries
so that metal objects can contact exposed battery terminals.
NOMAD eXaminer, battery charger, and batteries should not be subjected during
storage or transportation to extreme conditions that are below –40°C (–40°F) or
above +60°C (+140°F), or beyond 10% and 100% relative humidity (noncondensing).
Storage and Transportation
4
3.0 Setup and Power Check
Please follow these additional pre-operational steps.
3.1 Attaching the Backscatter Shield
In addition to the lead-lined cone, the backscatter shield provides additional
protection to you, the operator, and features an adjustable position to permit
exposures made at various angles.
First locate the rubber, retainer o-ring in the groove around the end of the
collimator cone. Roll it out of the groove. Remove it and set aside.
Hold the backscatter
shield perpendicular to
the collimator cone and
align the end of the
tube-shaped cone with
the hole in the center of
the shield.
Attach it by pressing
firmly on the shield,
guiding it past the
groove on the end. The
inner o-ring of the shield
allows it to slide along
the collimator cone for
adjustment as needed.
In order to keep the shield on the cone, the retainer o-ring must now be placed
back into the groove on the cone end. Make sure it is seated all the way around.
3.2 Attaching a Charged Battery
Once the red indicator light of the battery charger has changed from steady
flashing to continuous (which could be up to 30 or 45 minutes), the battery is fully
charged and can be removed from the charger.
Properly orient and insert the newly charged battery into the base of the
NOMAD eXaminer handle with a firm push.
5
Attaching a Charged Battery
User Manual
3.0 Setup and Power Check
The clicking sound
ensures the snaps on
both sides of the handle
bottom are fastened.
Make sure the battery
is secure by giving it a
tug.
That’s all it takes!
NOMAD eXaminer can
be immediately placed
into service, pending the
following check for
power.
3.3 Checking for Power
The control panel
provides interaction
and functionality
necessary for operating
NOMAD eXaminer.
Press/release
POWER. A single, long
audible signal and the
illuminated numeric
(LED) display for
exposure time are
evidence of proper
battery operation.
For either scenario
below, see section 5.0,
Battery Replacement,
for more info.
If for some reason the battery is too low, the yellow indicator at the lower right of
the control panel will flash (accompanied by an intermittent audible signal).
The second battery should be charged in advance of the need to replace the
battery currently in use. So, start charging it now.
Checking for Power
6
4.0 Operation
Follow these steps for powering NOMAD eXaminer on/off and producing basic
exposures.
For an explanation of the relationship between duration and frequency of
exposures (duty cycle), see section 2.2, Usage.
4.1 Powering Up
After about two and a half minutes of inactivity, NOMAD
eXaminer shuts off automatically. Press/release POWER
to turn NOMAD eXaminer on, if needed.
A single, long audible signal and an illuminated numeric
(LED) display for exposure time confirm that the control
panel has power.
example
4.2 Ensuring Battery Charge Is Adequate
If the Low Battery indicator slowly flashes,
accompanied by an intermittent audible signal, see
section 5.0, Battery Replacement or section 6.2,
Troubleshooting.
For other error conditions, please see section 6.1,
Alarms and Alerts.
4.3 Ensuring the Right Exposure Time Is Set
increase
decrease
7
When power is turned off, the most recent setting for
exposure time is stored in memory and redisplays when
power is turned back on (unless the battery was replaced, in which case it is reset to the default value of
00, meaning 0.00 seconds).
If needed, press the Up and Down arrow buttons to
change time (by tenths / hundredths of a second). A
single, short audible signal confirms input when a panel
button is pressed/released. (For example, 08 LED
setting = 0.08 seconds; 35 LED setting = 0.35
seconds.)
Ensuring the Right Exposure Time Is Set
example
User Manual
4.0 Operation
4.4 Situating Object and Enabling the Device
Properly position the material or object to be examined
before enabling NOMAD eXaminer (to prevent
accidental exposure). Make sure the object remains
stationary during the exposure.
Press/release ENABLE to ready the device; be sure to
re-enable NOMAD eXaminer if any subsequent
changes are made to the time setting prior to exposure.
The slowly flashing, green Enabled indicator and
audible signal (intermittent, double beep) confirm that
NOMAD eXaminer is enabled. This continues for 30
seconds or until an exposure is initiated.
4.5 Initiating and Completing a X-Ray
Exposure
Note: An exposure can be prematurely terminated for
any reason by abruptly releasing the depressed trigger.
See section 6.1, Alarms and Alerts.
To begin the exposure, squeeze the handle trigger (or
press/release START). The Enabled indicator stops
flashing, and the green Start and yellow X-Rays On
indicators illuminate.
To ensure complete exposure, keep the trigger
depressed until the audible, continuous-tone signal
ends and both indicators extinguish.
4.6 Powering Down
Press/release POWER to turn NOMAD eXaminer off, if
needed.
As previously noted, NOMAD eXaminer automatically
shuts off after about three minutes of inactivity.
Powering Down
8
5.0 Battery Replacement
Having at least two batteries makes it possible to charge one while another is still
in use. The red indicator light on the battery charger may stay on momentarily after
a battery is removed from the charger. Always wait for the indicator light to
extinguish before inserting another battery.
A flashing, yellow Low Battery indicator (control panel) and intermittent audible
signal indicate the need for a freshly charged battery. NOMAD eXaminer cannot
be enabled for an exposure with a low, depleted battery (insufficient voltage).
Follow these steps to clear the Low Battery alert.
Press/release POWER
on the control panel in
order to turn NOMAD
eXaminer off.
Grasp the depleted
battery and depress the
buttons on both sides to
unsnap it from the
handle. You may have
to put pressure at the
very top of the buttons
(nearest the handle).
Then pull the battery
away from the handle.
Insert a newly charged battery into the base of the NOMAD eXaminer handle
with a firm push. A clicking sound ensures that the snaps on both sides of the
handle bottom are fastened. Make sure the battery is secure by giving it a tug.
Note: When a battery is detached, any stored exposure time is erased from
memory and has to be reset when the unit is turned on again.
Each battery can go through the discharge/charge cycle approximately 100 times.
When the battery charger senses a bad battery, it is spent and must be taken out
of service. Do not attempt to charge damaged batteries. An authorized distributor,
ARIBEX, and your local recycling center will accept spent or damaged batteries.
Order new 14.4V batteries from ARIBEX or your authorized distributor. Do not use
18V (or other incorrect voltage) batteries from other sources, which invalidates the
warranty.
Risk of Shock - There is 120V AC present at the battery charger terminals.
Do not probe with fingers or conductive objects.
Always unplug the charger from the power supply when it is not in service.
For additional information, specifically about the charger, please see the
accompanying user manual for the battery charger.
9
Battery Replacement
6.0 Keeping NOMAD eXaminer Up
and Running
6.1 Alarms and Alerts
The visual/audible alarm signals a programmed action designed to prevent harm
to operator, bystanders, and/or NOMAD eXaminer.
The visual/audible alerts confirm normal conditions or draw the operator’s attention
to a required action.
Condition
Overheating
Alarm
Low Battery
Alert
X-Ray
Exposure
Alert
Incomplete
Exposure
Alert
Visual Indicator
Audible Signal
Function /
Resolution
operation suspends if
the device overheats;
after cooling down, it
must be manually
powered off/on (duty
cycle – see section
2.2, Usage)
LED display
begins flashing
series of long
beeps
yellow Low Battery
indicator flashes
slowly
slow series of
short beeps
replace the battery
and reset exposure
time (for info see
section 5.0, Battery
Replacement)
green Start and
yellow X-Rays On
indicators
illuminate
continuous tone
(for the duration
of the timed
exposure)
at the end of the
successful exposure,
audible signal and
indicators extinguish
green Start and
yellow X-Rays On
indicators flash
series of long
beeps
activates if trigger is
released before the
timed x-ray exposure
actually completes;
ends automatically
after 15 seconds or if
power is manually
turned off/on
Alarms and Alerts
10
6.0 Keeping NOMAD eXaminer Up and Running
Condition
System
Readiness
Alert
Invalid Input
Error
Visual Indicator
Audible Signal
Alert
System Alert
Alert
Power OFF
Alert
Power ON
Alert
Function /
Resolution
activates when
ENABLE is pressed/
released; ends automatically after 30
seconds or when an
exposure starts
(trigger is depressed
or START is pressed/
released)
green Enabled
indicator flashes
slowly
slow series of
short, double
beeps
N/A
two short beeps
invalid input (for
example, triggering
prior to enabling)
activates alert,
which then ends
automatically
for numeric LED
display, time
setting increments
or decrements
single short beep
valid when panel
button is pressed/
released
LED display
extinguishes
two short beeps
followed by a system shutdown
battery is not low and
x-ray emissions are
not detected during
timed exposure
LED display
two short beeps
extinguishes
followed by a system shutdown
POWER is pressed/
released (while power
is on)
LED display
illuminates
POWER is pressed/
released (while power
is off)
Alert
Valid Input
User Manual
single long beep
6.2 Troubleshooting
If you encounter results and/or errors in the operation of NOMAD eXaminer that
are not explained in the previous sections, check the following table on user
troubleshooting in an effort to determine the need for authorized service.
11
Troubleshooting
User Manual
6.0 Keeping NOMAD eXaminer Up and Running
Device Symptom
Potential Problem
Corrective Action
6.2.1 Image from x-ray
exposure does not
have sufficient contrast
Underexposure (too light).
Increase the exposure time
setting; or see Incomplete
Exposure below.
Decrease the exposure
time setting.
Ensure chemical freshness
and proper temperature.
Overexposure (too dark).
Chemical developer (for
film-based imaging).
6.2.2 Image from x-ray
exposure is blurred
Combined movements of
operator and object during
exposure produced too
much distortion.
Double-check the
exposure time setting and
re-enable when operator
and object are again
properly situated.
6.2.3 Green Enabled
indicator stops flashing
(and corresponding,
short double beeps
end) before an
exposure is started
NOMAD eXaminer is no
longer enabled. If an x-ray
exposure is not initiated
within 30 seconds of
enabling, the System
Ready condition will
terminate.
Double-check the
exposure time setting and
re-enable when operator
and object are again
properly situated.
6.2.4 Green Start and
yellow X-Rays On
indicators flash (with
corresponding series of
long beeps)
Incomplete exposure – the
depressed trigger was
released before the timed
exposure was able to
complete.
This condition is cleared
automatically within 15
seconds or by manually
turning NOMAD eXaminer
off and back on. The
exposure will probably
have to be repeated.
6.2.5 Yellow
X-Rays On indicator
does not illuminate
No exposure – a
subsequent Low Battery
alert will signal whether a
low battery is the source of
the problem.
If within a few seconds,
two short beeps are
emitted and the system
automatically shuts down,
a different problem exists
(see section 6.1, Alarms
and Alerts).
Follow proper procedures
for replacing the battery;
see section 5.0, Battery
Replacement.
NOMAD eXaminer will
require authorized service;
see section 6.3, Repair
and Maintenance by an
Authorized Distributor.
Troubleshooting
12
6.0 Keeping NOMAD eXaminer Up and Running
User Manual
Device Symptom
Potential Problem
Corrective Action
6.2.6 NOMAD
eXaminer automatically
shuts down
After about three minutes
of inactivity, NOMAD
eXaminer emits two short
beeps and shuts off
automatically – the system
has timed out.
However, if while
attempting a x-ray
exposure two short beeps
were emitted and
shutdown occurred, a
different problem exists
(see section 6.1, Alarms
and Alerts).
Manually turn on NOMAD
eXaminer when you are
ready to use the device.
6.2.7 There is no
power to the NOMAD
eXaminer control panel
If pressing POWER several
times does not cause the
numeric (LED) display to
illuminate, the attached
battery is the likely
problem.
However, if while attempting an x-ray exposure two
short beeps were emitted
and shutdown occurred, a
different problem exists
(see section 6.1, Alarms
and Alerts).
If this condition persists,
NOMAD eXaminer will
require authorized service;
see section 6.3, Repair
and Maintenance by an
Authorized Distributor.
Ensure battery is securely
attached.
Replace with a newly
charged battery before
continuing. Use the battery
charger to determine if the
first battery is spent and
must be taken out of
service, or if it can be
recharged.
NOMAD eXaminer will
require authorized service;
see section 6.3, Repair
and Maintenance by an
Authorized Distributor.
6.3 Repair and Maintenance by an Authorized
Distributor
NOMAD eXaminer is a maintenance-free product, except for routine cleaning. To
make sure the power is off while cleaning, detach the battery. It is unnecessary to
detach anything else in order to clean the unit. Use a non-alcohol based
disinfectant only – wipes, or a cloth dampened with liquid or spray.
The battery charger and NOMAD eXaminer are not designed to be user serviceable.
Do not pull apart the apparatus housing (enclosure). Do not undertake
disassembly of the main apparatus, or the warranty shall be invalidated.
13
Repair and Maintenance by an Authorized Distributor
User Manual
6.0 Keeping NOMAD eXaminer Up and Running
Repairs can only be undertaken by trained service personnel at an authorized
distributor. Direct all questions to an authorized distributor.
The following are factory serviceable parts and components:
NOMAD eXaminer, main apparatus assembly – part AP-0001
Retainer o-rings – part CP-0046
Backscatter shield / inner o-ring assembly – part AP-0012
Batteries – part CP-0001
110V AC battery charger w/ manual (DeWalt, model DW9116) – part CP-0002
220V AC battery charger w/ manual (DeWalt, model DE9107) – part CP-0045
Plastic carrying case (accessory) – part MP-0018
Damaged or suspect NOMAD eXaminer materials and components must be
returned to an authorized distributor or ARIBEX, Inc. Please protect the
environment, and do not throw away or improperly dispose of any part of the
system or the battery charger.
If product return is required, contact ARIBEX for a Return Authorization number
and shipping instructions to return the product to the proper facility. If the product
is under warranty, you will be required to provide the serial number from the label
affixed on the underside of the main apparatus.
Please be sure to include the Return Authorization number on the package you
are returning. Products without a Return Authorization number cannot be repaired
or given credit consideration.
Freight costs for product returns to the company are the responsibility of the
customer. Though ARIBEX will not assume responsibility for shipping damages, it
will help you file a claim with the freight carrier. Please see warranty information at
the end of this manual.
Repair and Maintenance by an Authorized Distributor
14
7.0 Basic Technical Specifications
Maximum deviation from fixed factors
Total weight
Environmental
Operation
Temperature
Relative humidity
Storage and transportation
Temperature
Temperature w/ plastic carrying case
Relative humidity
Classification
Electrical specification
IPX specification
Mode of operation
±5% (unless otherwise noted)
4kg
+4.5°C (+40 °F) to +40.5°C (+105°F)
10 to 90%, non-condensing
–40°C (–40°F) to +60°C (+140°F)
–20°C (–4°F) to +60°C (+140°F)
10 to 100%, non-condensing
Double insulation
Class II, Type BF
IP0; do not operate under wet conditions
Intermittent operation
For use in environments where no flammable anesthetics and/or flammable
cleaning agents are present; non-alcohol based disinfectant only – wipes or cloth
dampened with liquid / spray.
Electrical
Rechargeable NiCd battery
Minimum battery charge
Battery current at 2.3mA, 60kVp output
14.4V, 2 Ahr
11.6V
16A
X-Ray Controls and Generator
Exposure time range
Maximum duty cycle
Minimum inherent filtration
Maximum output power
Generator rating
Leakage technique factors
0.01–0.99 sec.
1:60 (one 0.25 sec. exposure / 15 sec.)
1.5mm Al
140W nominal at 60kV, 2.3mA
2.3mA at 60 kVp ±5%
60kV, 2.3mA, 0.99 sec.
Collimator Cone
Nominal dose output at cone tip (20cm)
X-ray field size and configuration
Sh ielding
600mR / sec.
6cm diameter circle
Lead-lin ed
Tube Assembly
Maximum peak tube potential
Anode voltage
Anode current
60kV ±5%
60kV, DC
2.3mA
15
Basic Technical Specifications
ARIBEX, Inc. makes no other warranty, either express or implied, with respect to any equipment purchased from ARIBEX,
including without limitation any implied warranties of merchantability or fitness for a particular purpose, whether or not
ARIBEX may have been informed of the actual uses to which any of such equipment may be put. ARIBEX, Inc. shall not under
any circumstance be liable for incidental, indirect, consequential, punitive or exemplary damages, including without limitation
damages for delay or lost profits, and in no event shall liability of ARIBEX arising from the purchase, sale or use of the
equipment, or breach of any warranty made above, exceed in the aggregate the purchase price paid therefore.
This warranty does not apply to equipment that is or has been abused, misused, or altered (including opening enclosure or
tampering), improperly maintained, subjected to use beyond rated conditions, or damaged as a result of any carelessness or
accidents. This warranty does not cover ordinary wear and tear or maintenance.
The liability of ARIBEX, Inc. is limited to repair or replacement of any parts that ARIBEX or its authorized resellers determine
to be defective. Parts proving defective will be repaired or replaced free of charge, F.O.B. Orem, Utah, U.S.A. (or the location of
the authorized reseller), if defective equipment is returned to such location for inspection, freight charges prepaid. All warranty
claims must be made not later than ten (10) business days following the expiration of the applicable warranty period. Equipment
repaired or replaced under warranty will continue to be warranted for the balance of the original warranty term.
ARIBEX, Inc. warrants its x-ray equipment to be free from any defects in material or workmanship for a period of one (1) year
from the date of purchase. ARIBEX, Inc. also warrants carrying case, and any accessories purchased from ARIBEX, to be free
from any defects in material or workmanship for the period of one (1) year from the date of purchase.
ARIBEX, Inc.
X-Ray Products Limited Warranty
© ARIBEX, Inc. 2005
All Rights Reserved
Printed in the U.S.A
MP-0025, Rev. B
ARIBEX, Inc. • 754 South 400 East • Orem, Utah 84097 U.S.A
Phone: +801-226-5522 • Fax: +801-434-7233 • www.aribex.com