1
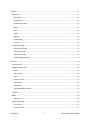
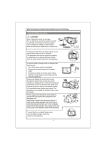
CERN – EN/ICE/MTA
TBTS and CALIFES Displays
User manual
Martin Nybø
Two GUI applications have been developed for monitoring and controlling parts of TBTS and
CALIFES. The applications each has a main panel, from which several sub - panels with different
functionality can be opened. Some of those sub panels have common functionality for both
applications, and will be explained in the “common” section of this manual.
Table of Contents
TBTS ........................................................................................................................................................ 5
Main page ........................................................................................................................................... 5
Quit ................................................................................................................................................. 5
Menu ............................................................................................................................................... 5
Status .............................................................................................................................................. 5
Performance .................................................................................................................................... 5
Show errors ..................................................................................................................................... 5
Breakdown ...................................................................................................................................... 6
Log .................................................................................................................................................. 6
Communication ............................................................................................................................... 6
Configuration page .............................................................................................................................. 6
TBTS_Config..................................................................................................................................... 6
TBTS_MagnetsConfig ....................................................................................................................... 6
TBTS_RfConfig ................................................................................................................................. 6
TBTS_BpmConfig ............................................................................................................................. 6
BPM Signals Page................................................................................................................................. 7
Selecting signals............................................................................................................................... 7
Freeze button .................................................................................................................................. 7
Dump to file button ......................................................................................................................... 7
Init colors......................................................................................................................................... 7
BPM Waterfall page............................................................................................................................. 8
Beam ............................................................................................................................................... 8
View ................................................................................................................................................ 8
History ............................................................................................................................................. 8
Change palette file ........................................................................................................................... 8
TBTS Home page.................................................................................................................................. 9
BPMs ............................................................................................................................................... 9
MTVs ............................................................................................................................................... 9
Valves ............................................................................................................................................ 10
Magnets ........................................................................................................................................ 10
Couplers ........................................................................................................................................ 10
31.08.2010
2
Martin Nybø – EN/ICE/MTA
CALIFES ................................................................................................................................................. 11
Main panel ........................................................................................................................................ 11
Quit button .................................................................................................................................... 11
Config button................................................................................................................................. 11
Performance button ...................................................................................................................... 11
BPMs ............................................................................................................................................. 11
MTVs ............................................................................................................................................. 12
Valves ............................................................................................................................................ 12
Magnets ........................................................................................................................................ 12
Phase shifters ................................................................................................................................ 12
Klystron ......................................................................................................................................... 12
Configuration page ............................................................................................................................ 13
CALIFES_BpmConfig ....................................................................................................................... 13
CALIFES_RfConfig........................................................................................................................... 13
CALIFES_IctConfig .......................................................................................................................... 13
CALIFES_MagnetsConfig ................................................................................................................ 13
Common ............................................................................................................................................... 14
Control panels ................................................................................................................................... 14
Magnet control panel ........................................................................................................................ 14
Name............................................................................................................................................. 14
Actual value ................................................................................................................................... 14
Slider ............................................................................................................................................. 14
Numeric control ............................................................................................................................. 15
Store button .................................................................................................................................. 15
Send button ................................................................................................................................... 15
Run/Stop/Stb/Rst buttons ............................................................................................................. 15
Couplers ............................................................................................................................................ 16
BPMs ................................................................................................................................................. 16
The graph ...................................................................................................................................... 16
Configuration page ............................................................................................................................ 17
Files list box ................................................................................................................................... 17
Sections list box ............................................................................................................................. 17
31.08.2010
3
Martin Nybø – EN/ICE/MTA
Keys list box ................................................................................................................................... 17
Save button ................................................................................................................................... 17
Performance panel ............................................................................................................................ 17
31.08.2010
4
Martin Nybø – EN/ICE/MTA
TBTS
Main page
The main TBTS page is controlling the whole TBTS display application, and all its panels.
When a new panel is opened, it will be incorporated into the main panel, except from the TBTS home
panel, and its sub-panels which will be opened as separate windows.
Figure 1: TBTS Main panel with configuration page displayed.
Controls on the Main panel:
Quit - Will close the application together with all sub-panels. This is the same as clicking the X-button
in the upper right corner.
Menu - A list of available pages. Once selected, the page will be inserted into the main panel. On
start up, the configuration page is shown.
Status - Gives the status for Vacuum, Drive beam, and Probe beam; green – OK, red – Not OK.
Performance - See common section – “Performance panel”
Show errors - Opens a window showing any errors (Mainly for debugging purposes).
31.08.2010
5
Martin Nybø – EN/ICE/MTA
Breakdown - Not yet implemented (Does nothing).
Log - The window in the lower left corner shows information about which window is loaded and so
on.
Communication - Available protocols used for subscription. The options are RDA and JAPC. By
default RDA is selected. This control cannot be set during run time.
Configuration page
See Common section -” Configuration page”.
Available configuration files for TBTS:
TBTS_Config - Contains one section; Thresholds, which contains the keys and values used for setting
the status of Vacuum, Drive beam, and Probe beam in the status window on the main panel.
TBTS_MagnetsConfig - The sections in this file has the same names as the magnets, one section
represents one magnet. This file is mainly used for the magnet controls.
Available keys are; “current”, “tolerance” and “slider increment”. Current is a stored reference
current for the magnet. Tolerance is a threshold value (Ampere); if the difference between the set
current and the readout current exceeds this value an alarm will be given. Slider increment defines
the increment/decrement of the slider on the magnet controls. The value is a percentage of the
range of the magnet.
TBTS_RfConfig - Contains all information used for subscribing to the RF equipment. One section in
the file corresponds to one RF device. The key “fesaDevice” is the name used to retrieve the data
from the front end, which is not always exactly the same as name of equipment.
TBTS_BpmConfig - Has only two sections at the moment; “IntensityScaleCA” and
“IntensityScaleCM” Those defines the range of the BPM intensity sliders on the home page.
31.08.2010
6
Martin Nybø – EN/ICE/MTA
BPM Signals Page
The BPM signals page contains four graphs, one for Horizontal (H) signals, one for vertical (V), one for
intensity (I), and one for the RF signals.
Figure 2: Main panel with BPM signals page displayed (Simulated signals).
Selecting signals - To the left of the graphs, there is a list of all available signals. At the top there is
the BPM section, towards the bottom, the RF section. Each signal name is displayed on a colored
background; this color is the color the corresponding signal will have on the graph. Next to the BPM
signal name, there are three checkboxes, one for Horizontal, one for vertical, and one for intensity.
The RF signals only have one. By clicking one of these boxes, that signal will become visible on the
corresponding graph, and an “X” will become visible in the checkbox. There are also six checkboxes
on top of the BPM section for selecting all CM signals, and all CA signals (HVI) at once. For RF there is
a checkbox for selecting all RF signals at once.
Freeze button - The freeze button simply freezes all graphs from the moment it is depressed. This
can be useful when wanting to look closer at a signal. There are Zoom menus at the bottom of each
graph, which can be used when the graph is frozen.
Dump to file button - Will dump the selected signals to a text file. Each signal appears in the file
with the signal name first, followed by values separated by spaces. Each signal is separated by end of
line characters. The files are stored in the Data folder (/TBTS_Display/Data).
Init colors - If changing any colors for the graphs, this button will reinitialize the colors to the
default ones.
31.08.2010
7
Martin Nybø – EN/ICE/MTA
BPM Waterfall page
This page shows waterfall or color-fall graphs for the BPMs and for Beam loss and energy. The graphs
are separated into 6 columns, one for each BPM and one for beam loss and energy. There are three
rows of graphs; the upper one is for Horizontal signals, the middle one for Vertical, and the lower one
for intensity.
Figure 3: Main panel with BPM Waterfall page displayed (Simulated signals only).
Beam - Two radio buttons for selecting whether to display Probe or drive beam.
View - Radio buttons for selecting color-fall or waterfall.
History - this knob is for selecting how much history should be displayed on the graph. The default
for waterfall is 5, and 40 for color-fall. Increasing the history also increases the CPU and memory
consumption.
Change palette file - Opens a dialog box for browsing to another palette file.
31.08.2010
8
Martin Nybø – EN/ICE/MTA
TBTS Home page
The TBTS Home page is opened as a stand alone panel on startup of the application. It consists of a
layout drawing of the TBTS, together with ten graphs, each representing a beam position monitor. The
home page is operated by right clicking on the symbols on the layout drawing. For most of the symbols,
a right click will result in a drop-down menu with possible options for the device the symbol is
representing.
Figure 4: TBTS Home page. One of the graphs is displayed in red as its value is outside the limits (Simulated signals).
BPMs - See common section – “BPMs”
MTVs - The MTV symbols on the layout drawing are only indicators, they contain no right click menu.
They will indicate the state following this pattern (Orange if unknown state):
MTV
CM.MTV0590
CMS.MTV0630
CA.MTV0790
CAS.MTV0830
31.08.2010
Screen out
Green
N.A
Green
N.A
Screen 1
Red
N.A
Red
N.A
9
Screen 2
N.A
N.A
N.A
N.A
Martin Nybø – EN/ICE/MTA
Valves - As for the MTVs, the valves are only indicators; no right click menu is available. These are
the states:
Open
Green
Closed
Red
Unknown
Orange
Magnets - The magnet symbols all have right click menus. The options are “Show current” and
“open control panel”. If the magnet has a vertical and a horizontal part, there will be options for both
parts in the menu.
- Show current – Will show/hide the current next to the symbol on the layout drawing.
- Open control panel – Will open a control panel for the magnet. See “Magnet control panel”.
Couplers - See common section – “Couplers”
The home panel can be closed by either using the red “Quit” button in the upper left corner of the
panel, or by using the X button. When closed, all its sub-panels will also be closed. When the main panel
is closed, the home panel and all of its belonging sub panels are also closed.
31.08.2010
10
Martin Nybø – EN/ICE/MTA
CALIFES
The monitoring and control application for CALIFES has a main panel similar to the Home page of TBTS,
with a layout drawing of the machine together with 6 BPM graphs. As for the TBTS home page, new
panels are opened by right clicking symbols on the layout drawing and selecting from a drop-down
menu, or by clicking any of the buttons on the uppermost line of the panel.
Figure 5: CALIFES Main panel.
Main panel
Quit button - Closes the CALIFES application and all its sub panels, this is the same as clicking Xbutton in upper right corner.
Config button - Opens the configuration page for CALIFES.
Performance button - See Common section- “Performance panel”.
BPMs - See common section – “BPMs”
31.08.2010
11
Martin Nybø – EN/ICE/MTA
MTVs - As for TBTS, the MTVs does not have right click menus, they are only indicators. The status is
indicated according to this pattern (Orange if unknown):
MTV
CA.MTV0215
CA.MTV0390
CA.MTV0420
Screen out
Green
Green
Flashing red
Screen 1
Red
Red
Red
Screen 2
N.A
Red
N.A
Screen 3
N.A
Flashing red
N.A
Valves - The valves are also only indicators, displayed according to this pattern;
Open
Green
Closed
Red
Unknown
Orange
Magnets - By right-clicking a magnet symbol and selecting “Show current” the readout current will
be displayed next to the symbol. A magnet control panel
can also be opened. See Common section - “Magnet
control panel”.
Phase shifters - The phase shifters have their own
panels for readout and setting. This panel is similar to
the magnet control panel, but without the “reset”,
“standby”,” run”, and “stop” buttons.
Figure 6: CALIFES
Phase shifter
control.
Klystron - The klystron symbol is indicating the actual state, if the klystron
is switched off, the symbol is depicted in red, if on but not pulsing, the
symbol will be switching between red and orange. The Klystron also has its
own panel for readout and setting. This panel displays the actual state
together with the readout voltage. All states are settable, as well as the
voltage. Readout and setting is in Kilovolts.
31.08.2010
12
Figure 7: CALIFES
Klystron control
Martin Nybø – EN/ICE/MTA
Configuration page - See Common section-“Configuration page”.
Available configuration files for CALIFES;
CALIFES_BpmConfig
Contains offset and calibration values for all BPMs in addition to range for the BPM intensity slider.
CALIFES_RfConfig
Contains parameters for phase shifters and klystron; stored reference value, tolerance (allowed
discrepancy between set and readout values) and increment for the slider.
CALIFES_IctConfig
Contains parameters used to retrieve data from the front end, together with calibration values.
CALIFES_MagnetsConfig
The sections in this file has the same names as the magnets, one section represents one magnet. This
file is mainly used for the magnet controls.
Available keys are; “current”, “tolerance” and “slider increment”. Current is a stored reference
current for the magnet. Tolerance is a threshold value (Ampere); if the difference between the set
current and the readout current exceeds this value an alarm will be given. Slider increment defines
the increment/decrement of the slider on the magnet controls. The value is a percentage of the
range of the magnet.
Figure 8: CALIFES Configuration page.
31.08.2010
13
Martin Nybø – EN/ICE/MTA
Common
Control panels
All control panels that can be opened from the symbols on the home pages has a common behavior. If a
control is open, and the mouse pointer is moved across its symbol on the home panel, the control will
change color to dark gray; this can be used for finding a particular control if many are open. If a control
that is already open is tried opened again, the already opened one will get highlighted and brought to
front. This can be used for finding panels that are hidden behind other ones.
Note – On startup the control will try getting the range for setting from the front-end; if this fails the
control will close. If the control does not receive data from the front end, setting will not be allowed; the
controls will be disabled and grayed out. If this occurs, try closing and opening the panel again.
Magnet control panel
A magnet control panel is available for all magnet symbols on the Home pages. For the magnets that has
a horizontal and vertical part, a panel is available for each of those. A magnet control panel is opened
from the right click menu on a magnet symbol.
Name – The number of the magnet will be displayed at the upper part of the control, together with
CM or CA, and eventually H/V for horizontal or vertical.
Actual value – The actual value is displayed in the upper numeric indicator of the panel, just below
the name. This value is read from the front end. If no data is received from the front end, this
indicator will become yellow, and the setting controls will be disabled and grayed out. If this occurs,
try closing the panel and reopen.
Slider – A new value can be set by moving the blue slider up or down. The value of the slider is
reflected in the numeric control below the slider.
On startup the slider will be positioned at the first actual value received. The slider will change the
value with a predefined increment/decrement value. This value is taken from a configuration file,
and can be changed. The value in the configuration file is a percentage of the range of the magnet,
and should therefore be a number between 1 and 100. The predefined value is 1%.
The arrow buttons of the slider can also be used to change the magnet current. One click on one of
the buttons will directly increase/decrease the magnet current by the defined increment/decrement
value.
Note – Avoid dragging the slider outside of the slider boundaries before releasing the mouse button,
as this will result in no value being set, but the slider to be stuck in the upper/lower position. If this
happens, move the slider back to desired value and set.
31.08.2010
14
Martin Nybø – EN/ICE/MTA
Numeric control – The numeric control below the slider can also be used for setting. The value can
be directly typed into the numeric control, this value will be set without any confirmation, when
enter is pressed, or mouse button is clicked outside of the control. The value can also be changed by
using the up or down arrow keys on the keyboard when the cursor is placed in the numeric control.
Note that the increment of this control will change according to where the cursor is placed! If the
cursor is placed at the right hand side of the first decimal place, the increment will typically be one
tenth (0.1). If it is placed at the right hand side of the decade, the increment will be ten. The numeric
control will be displayed in red if there is a discrepancy of the actual and the set value of more than
the tolerance specified in the configuration file.
Store button – The store button stores the value from the current control in a configuration file.
This stored value can be retrieved and set using the “send” button.
Send button – Sets the previously stored value, displays a confirmation box for safety.
Run/Stop/Stb/Rst buttons – These buttons will display the current status of the magnet. The
button with the current state will be displayed in color, while the others will be gray. If for example
the magnet is in run state, the run button is green and the others gray. The magnet can be set to a
different state by clicking any of the buttons. All buttons will display confirmation boxes when
clicked. If all these buttons are grayed out, it means a value of zero is received. A value of 0 is
defined as “Nothing”.
Figure 9: Magnet
control panel
31.08.2010
15
Martin Nybø – EN/ICE/MTA
Couplers
By right clicking a coupler symbol and selecting a signal, a coupler display containing a graph will pop up.
The selected signal will be displayed on this graph. More signals can be selected by either using the radio
buttons on the display, or right clicking another coupler symbol, and selecting again. Colors of the plots
can be changed by using the buttons to the right of the radio buttons. The coupler display can be closed
by clicking the X-button in the upper right corner.
Figure 10: CALIFES Coupler display
BPMs
When moving cursor over the BPM symbol on the layout drawing, the corresponding graph will be
highlighted. By right clicking the BPM symbol you can show or hide the graph for that BPM.
The graph
The white area of the graph shows the beam position. The mean value of the horizontal position is on
the X- axis, and mean of vertical position is on the Y-axis. If the value is grater than 10, or less then -10 in
any direction, the white area of the graph becomes red.
At the right side of the graph there is a slider that shows the beam intensity.
In the upper left corner of the Home page, there is a button called “HOLD”, by switching this button on,
The BPM graphs will store the last positions, and make a “trace” on the graph.
The CALIFES BPM graphs show only the intensity.
31.08.2010
16
Martin Nybø – EN/ICE/MTA
Configuration page
The configuration page is used for viewing or changing entries in the configuration files. The
configuration page for CALIFES and TBTS looks slightly different, but has the same functionality;
Files list box - The files list box displays the names of configuration files for TBTS. By clicking one of
the filenames in the list box, the “Sections” list box will be filled with the section names for that file.
Sections list box - By clicking a section name, the key names for that section will be displayed in the
Keys list box.
Keys list box – By clicking the name of a key, the value for that key will be displayed in the key
indicator.
Save button – When a value is displayed in the key indicator, that value can be modified by typing in
the desired value and clicking the save button. The save button will start blinking as soon as the value
in the key indicator is modified.
Performance panel
Is a panel with two graphs, one showing percentage of Memory, the other, percentage of CPU used by
the application. This panel is mainly for debugging purposes. (Shows the total used by the LabVIEW
session, so if other programs are opened from the same session, they will be included).
Figure 11: Performance panel
31.08.2010
17
Martin Nybø – EN/ICE/MTA