1
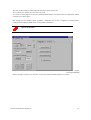
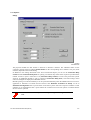
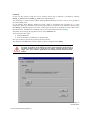
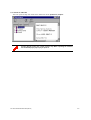
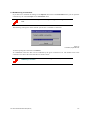
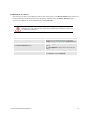
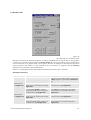
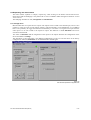
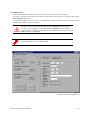
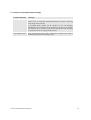
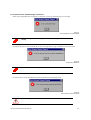
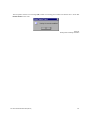
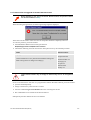
DOC-3047-2
User’s Manual
DOC-3047-2
Title:
HERMES REMOTE CONTROL – User’s Manual
ID-no.:
DOC-3047-2
Date:
2003-10
Software:
Hermes Remote-Control Release 1.2
main issue
chapter 1
new
chapter 2
new
chapter 3
new
chapter 4
new
chapter 5
new
chapter 6
new
chapter 7
new
update
new:
The corresponding chapters are new or completely revised.
corr.:
Passages of the corresponding chapter were corrected; see modification bars.
add.:
Passages of the corresponding chapter were added; see modification bars.
Document History
Modifications which result in a new version are indicated by a vertical bar.
Keep this sheet!
Trademarks
Brand and product names mentioned in this manual may be trademarks, registered trademarks or copyrights
of their respective holders. All brand and product names mentioned in this manual serve as comments or
examples and are not to be understood as advertising for the products or their manufacturers.
Copyright © 2000-2003 by Barco Control Rooms GmbH
Die Weitergabe sowie die Vervielfältigung aller Unterlagen, die von uns überlassen werden, deren
Verwertung und Mitteilung ihres Inhaltes an Dritte ist nicht gestattet, soweit dies nicht ausdrücklich
zugestanden ist. Urheberrechte, insbesondere auch solche an Software, werden nur insoweit übertragen, als
es für die Erreichung des speziellen Vertragszwecks erforderlich ist. Zuwiderhandlungen können zu
Schadensersatz verpflichten. Alle Rechte aus der Erteilung eines Patents oder der Eintragung eines
Gebrauchsmusters verbleiben bei uns.
Copyright © 2000-2003 by Barco Control Rooms GmbH
All rights reserved. No part of this document may be copied, reproduced or translated. It shall not otherwise
be recorded, transmitted or stored in a retrieval system without the prior written consent of Barco Control
Rooms GmbH.
Guarantee and Compensation
Barco Control Rooms GmbH provides a guarantee relating to perfect manufacturing as part of the legally
stipulated terms of guarantee. On receipt, the purchaser must immediately inspect all delivered goods for
damage incurred during transport, as well as for material and manufacturing faults. Barco Control Rooms
GmbH must be informed immediately in writing of any complaints.
The period of guarantee begins on the date of transfer of risks, in the case of special systems and software on
the date of commissioning, at the latest 30 days after the transfer of risks. In the event of justified notice of
complaint, Barco Control Rooms GmbH can repair the fault or provide a replacement at its own discretion
within an appropriate period. If this measure proves to be impossible or unsuccessful, the purchaser can
demand a reduction in the purchase price or cancellation of the contract. All other claims, in particular those
relating to compensation for direct or indirect damage, and also damage attributed to the operation of
software as well as to other services provided by Barco Control Rooms GmbH, being a component of the
system or independent services, will be deemed invalid provided the damage is not proven to be attributed to
the absence of properties guaranteed in writing or due to the intent or gross negligence on the part of Barco
Control Rooms GmbH
If the purchaser or a third party carries out modifications or repairs on good delivered by Barco Control
Rooms GmbH, or if the goods are handled incorrectly, in particular if the systems are commissioned or
operated incorrectly or if, after the transfer of risks, the goods are subject to influences not agreed upon in the
contract, all guarantee claims of the purchaser will be rendered invalid. Not included in the guarantee
coverage are system failures which are attributed to programs or special electronic circuitry provided by the
purchaser, e. g. interfaces. Normal wear as well as normal maintenance are not subject to the guarantee
provided by Barco Control Rooms GmbH either.
The environmental conditions as well as the servicing and maintenance regulations specified in this manual
must be complied with by the customer.
Revision sheet
To:
Barco Control Rooms GmbH
An der Rossweid 5 • D-76229 Karlsruhe • Germany
Phone (49) (721) 6201-0 • Fax (49) (721) 6201-298
E-mail [email protected], Web www.barcocontrolrooms.de
BARCO N.V. Projection Systems
Noordlaan 5 • B-8520 Kuurne • Belgium
Phone (32) (56) 36-8211 • Fax (32) (56) 36-8251
E-mail [email protected]• Web www.barcocontrolrooms.com
From:
Date:
Please correct the following points in this documentation (Doc-3047-2):
page
wrong
correct
Contents
1 Introduction .................................................................................................................. 1-1
1.1 How this manual is organized .............................................................................. 1-2
1.2 Styles And Symbols ............................................................................................. 1-3
2 Summary...................................................................................................................... 2-1
2.1 The Hermes Remote-Control software ................................................................ 2-2
3 Installation .................................................................................................................... 3-1
3.1 System Requirements.......................................................................................... 3-2
3.2 Setup.................................................................................................................... 3-2
3.3 Automatically starting Hermes Remote-Control ................................................... 3-3
3.4 Starting the Software manually ............................................................................ 3-3
3.5 Settings of the Hermes Remote Control Software ............................................... 3-4
3.5.1 Restoring original settings............................................................................ 3-4
4 Getting started..............................................................................................................4-1
4.1 The user interface ................................................................................................ 4-2
4.2 File Menu ............................................................................................................. 4-4
4.3 Connection Menu ................................................................................................. 4-5
4.3.1 Options......................................................................................................... 4-6
4.3.2 Open ............................................................................................................ 4-8
4.4 Help Menu............................................................................................................ 4-8
4.4.1 Contents and Index...................................................................................... 4-9
4.4.2 About.......................................................................................................... 4-10
5 Operating ..................................................................................................................... 5-1
5.1 Establishing a connection .................................................................................... 5-2
5.2 Selection of a device ............................................................................................ 5-3
5.3 Hermes D2D, Digital Switchbox, AVC-Box as Multiplexer ................................... 5-4
5.4 Hermes DXD........................................................................................................ 5-5
5.5 AVC-Box as Analog Controller............................................................................. 5-7
5.6 Hermes V2A......................................................................................................... 5-9
5.7 Hermes VXA ...................................................................................................... 5-11
5.8 Expanding the main window .............................................................................. 5-13
5.8.1 Configuration.............................................................................................. 5-13
Save User Settings ........................................................................................ 5-14
Restore User Settings.................................................................................... 5-14
Restore Default Settings ................................................................................ 5-14
Enable Autoswitch ......................................................................................... 5-14
5.8.2 Identification............................................................................................... 5-15
6 Troubleshooting ........................................................................................................... 6-1
6.1 Troubles caused by hardware settings ................................................................ 6-2
6.2 Troubles when estabilishing a connection ........................................................... 6-3
6.3 Troubles after an upgrade of Hermes Remote-Control ........................................ 6-5
6.4 Error message when starting a second instance of Hermes Remote-Control ..... 6-7
7 Hotline .......................................................................................................................... 7-1
7.1 Addresses ............................................................................................................ 7-2
1 Intro duction
Hermes Remote-Control is a Windows NT/2000/XP software for the convenient use of the Remote-Control
for HERMES VXA, HERMES DXD, HERMES V2A, HERMES D2D, AVC-BOX and DIGITAL SWITCHBOX. This
manual describes installation, menus and commands of this software.
Doc-3047-2 Hermes Remote-Control (2003-10)
1-1
1.1 How th is manual is organized
This manual is divided into seven chapters:
Introduction
explains the structure of the manual itself and the used typographic styles and symbols.
Summary
provides an overview of the features of HERMES REMOTE-CONTROL Software
Installation
lists the system requirements and explains how to install the software
Getting Started
explains the user interface of HERMES REMOTE-CONTROL
Operating
Describes operating of all the devices which can be controlled via HERMES REMOTE-CONTROL
Troubleshooting
gives some hints which troubles might occur and how to solve them
Hotline
lists the addresses to contact if any problems occur.
Numbering
Chapters, pages, figures and tables are numbered separately. Chapters are indicated by a »point syntax«, e. g.
4.2.3, pages by a »dash syntax«, e. g. 2-1, as figures and tables are, e. g. Figure 5-4.
Doc-3047-2 Hermes Remote-Control (2003-10)
1-2
1.2 Styles And Symbols
The typographic styles and the symbols used in this document have the following meaning:
Arial bold
Labels, menus and buttons are printed in the Arial bold font.
Condensed
Links to both other chapters of this manual and to sites in the Internet are printed condensed. In the on-line
version of this manual all hyperlinks appear teal.
Courier
Names of files and parts from programs are printed in the Courier font.
Courier bold
Inputs you are supposed to do from the keyboard are printed in Courier bold font.
This arrow marks tips and notes.
If you do not heed instructions indicated by this symbol there is a risk of damage to
the equipment!
If you do not heed instructions indicated by this symbol there is a risk of electrical
shock and danger to personal health!
Doc-3047-2 Hermes Remote-Control (2003-10)
1-3
2 Summ ary
This chapter introduces the HERMES REMOTE-CONTROL software.
Doc-3047-2 Hermes Remote-Control (2003-10)
2-1
2.1 The He rmes Remote-Control software
HERMES VXA, HERMES DXD, HERMES V2A, HERMES D2D, AVC-BOX and DIGITAL SWITCHBOX can be
controlled by Remote-Control as described in chapter Remote-Control of the respective user's manuals.
Besides sending the commands via the open protocol as described in the manual mentioned above a
Windows NT/2000/XP software is available which enables you to enter the commands via an intuitive
graphical user interface.
Doc-3047-2 Hermes Remote-Control (2003-10)
2-2
3 Insta llation
This chapter explains the installation of the HERMES REMOTE-CONTROL software and applies for all devices.
Doc-3047-2 Hermes Remote-Control (2003-10)
3-1
3.1 System Requirements
Windows NT 4.0 ServicePack 6
Internet Explorer 6.0 or higher
Or
Windows 2000 Service Pack 2
Internet Explorer 6.0 or higher
Or
Windows XP Service Pack 1a
Internet Explorer 6.0 or higher
3.2 Setup
To install the software it is recommended to log in with administrative rights.
Before installing a new version of Hermes Remote-Control, the previous version
has to be de-installed.
Select Start|Settings|Control Panel|Add/Remove Programms.
Select Hermes Remote-Control
Click on the Change/Remove button and confirm the file deletion.
The CD ROM of HERMES REMOTE-CONTROL Software comes with an autorun.
Just insert the CD into the CD-Drive of your computer to start the setup of HERMES REMOTE-CONTROL.
OR
In case autorun is switched off, you can setup.exe also start manually.
Start Windows Explorer
Browse to the CD Drive
Double click on setup.exe.
Or
Select Start|Run and enter the respective drive and the file name.
Figure 1
installing the software
Please follow the instructions on your display.
Doc-3047-2 Hermes Remote-Control (2003-10)
3-2
3.3 Autom atically starting Hermes Remote-Control
To start Hermes Remote-Control each time Windows starts
Click Start, and then point to Settings
Click Taskbar, and then click the Start Menu Programs tab
Click Add, and then click Browse.
Locate avctool.exe , and then double-click it
Click Next, and then double-click the StartUp folder
Type the name you want to see on the StartUp menu, and then click Finish
To define the status in which the program starts navigate to Start Menu | Programs | Startup and right-click
on the shortcut to open the context menu. In the context menu select Properties and then the tab shortcut.
Use the listbox Run to select the desired status (normal window, minimized, maximized)
3.4 Startin g the Software manually
Hermes Remote-Control software can be started by double click on AVCTool.exe in the explorer window or
with the shortcut Start | Programs | Barco Hermes Remote Control
Figure 2
starting the software
Doc-3047-2 Hermes Remote-Control (2003-10)
3-3
3.5 Setting s of the Hermes Remote Control Software
The settings of HERMES REMOTE CONTROL software are stored in the registry.
The registry entries for HERMES REMOTE-CONTROL are not made during installation,
but during operating HERMES REMOTE-CONTROL. If you encounter strange effects
with regards to window position or window size with HERMES REMOTE-CONTROL,
just delete the registry entries!
3.5.1 Restori ng original settings
If size and position of the windows of HERMES REMOTE-CONTROL cannot be adjusted as desired, restoring
the original settings requires deleting the entries of the registry.
To delete the registry entries, proceed as follows:
Start the registry editor using the the shortcut Start|Run and enter regedit
Figure 3
starting the registry editor
In the registry editor, go to HKEY_CURRENT\Software\VB and VBA Program Settings\Barco Hermes
Remote-Control. Delete all the keys and subkeys referring to Barco HERMES REMOTE-CONTROL.
Doc-3047-2 Hermes Remote-Control (2003-10)
3-4
4 Getti ng started
Doc-3047-2 Hermes Remote-Control (2003-10)
4-1
4.1 The us er interface
When the software is launched, the About window will be visible for a few moments.
Figure 4
the About window as shown when starting the software
Then the main window for operating the device is shown. As long as no connection had been opened this
window looks the same for all devices to be controlled by HERMES REMOTE-CONTROL software.
Figure 5
main view of the Remote-Control software AVCTool
Doc-3047-2 Hermes Remote-Control (2003-10)
4-2
The main window offers all commands and controls to operate the devices.
If no connection is opened, the connection icon is red.
As soon as a remote-control connection is established the number of connected devices is displayed, and the
connection icon shows green.
This dialog can be expanded. When expanded, a multipage with 2 tabs is displayed to manage device
configurations of HERMES DXD and to see the product information..
These tabs refer to Hermes DXD only. In case other devices are addressed, all the
controls are disabled.
Figure 6
main window expanded
Before opening a connection we will have a look at the menus of HERMES REMOTE-CONTROL.
Doc-3047-2 Hermes Remote-Control (2003-10)
4-3
4.2 File Me nu
Figure 7
the File menu
In the File menu there is the Exit command to close HERMES REMOTE-CONTROL software.
Doc-3047-2 Hermes Remote-Control (2003-10)
4-4
4.3 Conne ction Menu
Figure 8
the Connection menu
The Connection menu includes the command Open to open the connection to the devices as well as the menu
item Options. This menu item gives access to set the connection settings which then are applied when
selecting Open. Since these settings are independent of the device to be controlled (HERMES DXD, HERMES
VXA, HERMES V2A, HERMES D2D, AVC-BOX, DIGITAL SWITCHBOX) we will have a look on settings before
opening a connection. The Options menu item includes two tabs: Settings and Preferences.
Doc-3047-2 Hermes Remote-Control (2003-10)
4-5
4.3.1 Options
Settings
Figure 9
Connection tab
The physical medium for data transfer is based on a RS-232-C interface. The indicated values are the
connection settings listed in chapter Remote-Control of the corresponding user's manuals. The port (serial
interface) depends on the actual cabling.
In addition to the settings described in the above mentioned chapter you can set the Connection Retry
Counter and the Connection Delay Time for opening a connection. By means of the respective spin button the
number of trials to open a connection is set (Connection Retry Counter) as well as the period the systems
waits for an additional attempt to open a connection (Connection Delay Time). The fixed settings which
cannot be changed are displayed via disabled controls.
Besides opening a connection manually it can be opened automatically when the HERMES REMOTE-CONTROL
application is launched. To benefit from this feature click Automatic connection on startup. To do an
Automatic Reconfiguration after a power failure of the device please select the respective checkbox. If this
checkbox is not checked then after a power failure the connection icon will turn yellow to indicate that the
devices can't be operated.
A connection can also be opened/closed by clicking on the red/green connection
icon.
Doc-3047-2 Hermes Remote-Control (2003-10)
4-6
Preferences
On this tab the respective help file can be selected. Online help in German is provided by selecting
hermes_rc_d.chm whereas hermes_rc_e.chm is the English help file.
The online help is context sensitive. When operating HERMES REMOTE-CONTROL, click on F1 to get help to
the corresponding topic.
On the Display Wall, HERMES REMOTE-CONTROL might be minimized and overlayed by e.g. video
applications. Then the command to activate the program has to be entered via the keyboard. After pressing
this hotkey, the HERMES REMOTE CONTROL window pops up and can be operated by mouse clicks on the
desired functions. In addition the commands can be sent via the shortcuts listed in Operating.
The hotkey for activating the program can be set on the Preference tab.
To do this follow these steps:
click the Set button
press the desired key combination on the keyboard
Now you are able to activate the program by pressing this key.
The label below the Set button informs which key has been assigned as the hotkey.
Make sure that you don't assign a key combination which is used by other
programs. The hotkey will de-activate any other shortcut with the identical keys of
any other program. If you e.g. select Ctrl.-S as hotkey, pressing these keys will no
longer save your windows applications but always activate Hermes RemoteControl.
Figure 10
Preferences tab
Doc-3047-2 Hermes Remote-Control (2003-10)
4-7
4.3.2 Open
Selecting this item results in opening the connection according to the chosen parameters in the Options
submenu (Connection Retry Counter, Connection Delay Time).
4.4 Help M enu
The Help menu gives via Contents and Index access to the online help. In addition information about the
software and driver version is given when selecting the About menu item.
Figure 11
Help Menu
Doc-3047-2 Hermes Remote-Control (2003-10)
4-8
4.4.1 Conten ts and Index
This item opens the help file which has be defined on the tab preferences | Help file
Hermes Remote-Control has context senstive help. When operating the software,
the related Help topic pops up if you press F1.
Doc-3047-2 Hermes Remote-Control (2003-10)
4-9
4.4.2 About
The About menu item shows the information about the version of Hermes Remote-Control software. As
stated above, this window is also displayed for a few moments when starting the software
Figure 12
the About window
If you encounter any problems with Hermes Remote-Control, please make a screen
shot of the About Window and include this screen shot in the error report!
To copy an active window into the clipboard, press Alt+Print on your keyboard.
To copy the entire desktop into the clipboard, press Strg+Print on your keyboard.
Afterwards the contents of the clipboard can be inserted into the error report via the
Paste command or via Strg+V.
Doc-3047-2 Hermes Remote-Control (2003-10)
4-10
5 Oper ating
The commands available are depending on the device. All devices in common have two inputs which can
alternatively be activated. With HERMES VXA, HERMES V2A and AVC-BOX as Analog Controller also the
analog input can be operated.
The software recognizes the connected device and the views and commands available are adapted.
Doc-3047-2 Hermes Remote-Control (2003-10)
5-1
5.1 Establi shing a connection
If you have set or checked the settings on the Options menu item of the Connection menu you can open the
connection by the command Open on the Connection menu.
A connection can also be opened/closed by clicking on the red/green connection
icon.
The following message box shows that the system tries to establish a connection.
Figure 13
connection progression bar
To abort opening the connection click Cancel.
An established connection then will be indicated by the green connection icon. The number next to the
connection icon shows the total of the devices under control.
If you encounter problems when establishing a connection, cf. Troubles when
estabilishing a connection
Doc-3047-2 Hermes Remote-Control (2003-10)
5-2
5.2 Selecti on of a device
The selection of a device in the Remote-Control chain can be done via the Device Selection spin button or via
the keyboard. The commands will be sent to the device indicated next to the Device Selection button.
If you want to address all device simultaneously, check Select All.
Select All can even be selected in case of a mixed system, e.g. HERMES D2D and
HERMES V2A. The software only sends those commands to each device which can
be handled by that device.
Menu
Shortcut
If necessary, activate the program by pressing the
hotkey assigned in chapter Options (Preferences tab)
Select a device be means of the respective spin button
in the Device Selection frame.
Press Ctrl-PgUp to increase the value of the spin
button
Press Ctrl-PgDown to decrease the value of the spin
button
Click Select All to control all devices simultaneously.
Press Ctrl-A to check Select All
Press Ctrl-S to uncheck Select All
Doc-3047-2 Hermes Remote-Control (2003-10)
5-3
5.3 Herme s D2D, Digital Switchbox, AVC-Box as Multiplexer
Figure 14
the selected device is a Hermes D2D, a Digital Switchbox or AVC-Box as Multiplexer
HERMES D2D, DIGITAL SWITCHBOX and AVC-BOX as Multiplexer connect one digital projection unit
alternatively to two graphical controllers. By means of Remote-Control the active input can be selected. The
respective data then is displayed on the projection cube.
Activating the desired input
Action
User interface
Shortcut
If necessary, activate the program by pressing the
hotkey assigned in chapter Options (Preference
tab)
Input Selection
for Digital Out 1
Click the button Digital 1 to select the first
digital input to be switched to the Output
Press Ctrl-1 to select the first digital input Digital 1
to be switched to the Output Digital Out 1
Digital Out 1
Input Selection
for Digital Out 2
Click the button Digital 2 to select the
second digital input to be switched to the
Output Digital Out 1
Press Ctrl-2 to select the second digital input Digital
2 to be switched to the Output Digital Out 1
Not available
Not available
If no signal is applied to the selected input the command won’t have any effects,
the other input will remain the active one.
Expanding the window to display the multipage will show disabled controls only. As mentioned above, the
multipage is only functional in case of a HERMES DXD.
Doc-3047-2 Hermes Remote-Control (2003-10)
5-4
5.4 Herme s DXD
Figure 15
the selected device is a Hermes DXD
HERMES DXD has two digital inputs and two digital outputs. By means of Remote-Control the active input
can be selected for every output. The respective data then is displayed on the respective projection cube
connected to this output. It is also possible to have one signal (e.g. the signal of the input Digital 1) displayed
on two projection cubes simultaneously.
If there is no signal applied to the selected input, automatically the other input is activated, provided Auto
Switch had not been disabled, cf. Enable Autoswitch
Doc-3047-2 Hermes Remote-Control (2003-10)
5-5
Activating the desired input
Action
User interface
Shortcut
If necessary, activate the program by pressing the
hotkey assigned in chapter Options (Preference
tab)
Input Selection
for Digital Out 1
Click the button Digital 1 to select the first
digital input to be switched to the Output
Press Ctrl-1 to select the first digital input Digital
1to be switched to the Output Digital Out 1
Digital Out 1
Input Selection
for Digital Out 2
Click the button Digital 2 to select the
second digital input to be to be switched to
the Output Digital Out 1
Press Ctrl-2 to select the second digital input
Digital 2 to be switched to the Output Digital Out
Click the button Digital 1 to select the first
digital input to be switched to the Output
Press Ctrl-o to select the first digital input Digital
1 to be switched to the Output Digital Out 2
1
Digital Out 2
Click the button Digital 2 to select the
second digital input to be switched to the
Output Digital Out 2
Press Ctrl-t to select the second digital input
Digital 2 to be switched to the Output Digital Out
2
If no signal is applied to the selected input the command won’t have any effects,
the other input will remain the active one, provided Auto Switch had not been
disabled, cf. Enable Autoswitch
The functionalites provided on the multipage which is displayed when expanding the main window will be
discussed later.
Doc-3047-2 Hermes Remote-Control (2003-10)
5-6
5.5 AVC-B ox as Analog Controller
Figure 16
the selected device is a AVC-Box as Analog Controller
The AVC-Box as Analog Controller allows the alternatively display of analog video/RGB sources and the
data of the graphical controller on a projection cube. By means of Remote-Control the active input (analog
input or digital input) can be selected.
Activating the desired input
Action
User interface
Shortcut
If necessary, activate the program by pressing the
hotkey assigned in chapter Options (Preference
tab)
Input Selection
for Digital Out 1
Input Selection
for Digital Out 2
Click the Digital button to activate the
digital input LVDS In
Press Ctrl-1 to select the digital input to be the
active one
Click the Analog button to activate the
analog input (VGA IN, Y/C IN, CVBS)
Press Ctrl-2 to select the analog input to be the
active one
Not available
Not available
If no signal is applied to the selected input the command won’t have any effects, the
other input will remain the active one.
Doc-3047-2 Hermes Remote-Control (2003-10)
5-7
Operating the analog input
When the analog input is selected to be the active one the parameters of the applied signal can be adjusted as
described in chapter 5.4.Operating the analog input of the user's manual (Doc-2783)
The following table lists the menu controls and their corresponding keys when controlling by means of the
keyboard:
Menu
shortcut
description
Ctrl-<up>
navigating in main menu and submenu
Ctrl-<down>
navigating in main menu and submenu
Ctrl-<left>
selecting a value
Ctrl-< right>
selecting a value
Ctrl-M
opening main menu
selecting a submenu with Ctrl-<up>and Ctrl-<down>
(white on blue background: selection)
Ctrl-Enter
switching between VGA In, Y/C In and CVBS
opening submenu
selecting a menu item with Ctrl-<up> and Ctrl-<down>
selecting a value with Ctrl-<left> and Ctrl-< right>
(white on red background: settings are not applied unless confirmed with
Ctrl-Enter)
twice: returning to and leaving main menu
Expanding the window to display the multipage will show disabled controls only. As mentioned above, the
multipage is only functional in case of a HERMES DXD.
Doc-3047-2 Hermes Remote-Control (2003-10)
5-8
5.6 Herme s V2A
Figure 17
the selected device is a Hermes V2A
HERMES V2A allows the alternatively display of analog video/RGB sources and the data of the graphical
controller on a projection cube. By means of Remote-Control the active input (analog input or digital input)
can be selected.
Activating the desired input
Action
User interface
Shortcut
If necessary, activate the program by
pressing the hotkey assigned in
chapter Options (Preference tab)
Input Selection
for Digital Out 1
Input Selection
for Digital Out 2
Click the Digital button to activate the
digital input Digital In
Press Ctrl-1 to select the digital input to
be the active one
Click the Analog button to activate the
analog Input (PC/RGB1, VIDEO1,
VIDEO2, SVHS)
Press Ctrl-2 to select the analog input
to be the active one
Not available
Not available
If no signal is applied to the selected input the command won’t have any effects, the
other input will remain the active one.
Doc-3047-2 Hermes Remote-Control (2003-10)
5-9
Operating the analog input
When the analog input is selected to be the active one the parameters of the applied signal can be adjusted as
described in chapter 3.4 Operating the analog input of the user's manual (Doc-3023).
The following table lists the menu controls and their corresponding shortcuts when controlling by means of
the keyboard:
Menu Control
shortcut
description
Ctrl-<up>
navigating in main menu or submenu
Ctrl-<down>
navigating in main menu or submenu
Ctrl-<left>
leaving a submenu or the main menu
Ctrl-<right>
entering a submenu
Ctrl-+
increasing a value
Ctrl--
decreasing a value
Ctrl-M
opening main menu or leaving main menu
Ctrl-Enter
selecting a menu item
saving a value (confirmation when leaving the corresponding submenu)
Expanding the window to display the multipage will show disabled controls only. As mentioned above, the
multipage is only functional in case of a HERMES DXD.
Doc-3047-2 Hermes Remote-Control (2003-10)
5-10
5.7 Herme s VXA
Figure 18
the selected device is a Hermes VXA
HERMES VXA allows the alternatively display of analog video/RGB sources and the data of the graphical
controller on a projection cube. By means of Remote-Control the active input (analog input or digital input)
can be selected for every digital output. The respective data then is displayed on the respective projection
cube connected to this output. It is also possible to have one signal (e.g. applied to the input Analog)
displayed on two projection cubes simultaneously.
If there is no signal applied to the selected input, automatically the other input is activated.
Activating the desired input
Action
User interface
Shortcut
If necessary, activate the program by pressing the
hotkey assigned in chapter Options (Preference
tab)
Input Selection
for Digital Out 1
Click the button Digital to select the
digital input to be switched to the Output
Press Ctrl-1 to select the digital input to be
switched to the Output Digital Out 1
Digital Out 1
Input Selection
for Digital Out 2
Click the button Analog to select the
analog input (RGB, Video, SVHS) to be
switched to the Output Digital Out 1
Press Ctrl-2 to select the analog input (RGB,
Video, SVHS) to be switched to the Output
Click the button Digital to select the
digital input to be switched to the Output
Press Ctrl-o to select the digital input to be
switched to the Output Digital Out 2
Digital Out 1
Digital Out 2
Click the button Analog to select the
analog input (RGB, Video, SVHS) to be
switched to the Output Digital Out 2
Doc-3047-2 Hermes Remote-Control (2003-10)
Press Ctrl-t to select the analog input (RGB,
Video, SVHS) to be switched to the Output
Digital Out 2
5-11
If no signal is applied to the selected input the command won’t have any effects, the
other input will remain the active one.
Operating the analog input
When the analog input is selected to be the active one, the parameters of the applied signal can be adjusted as
described in chapter 3.4 Operating the analog input of the user's manual (Doc-3199).
The following table lists the menu controls and their corresponding shortcuts when controlling by means of
the keyboard:
Menu Control
shortcut
description
Ctrl-<up>
navigating in main menu or submenu
Ctrl-<down>
navigating in main menu or submenu
Ctrl-<left>
leaving a submenu or the main menu
Ctrl-<right>
entering a submenu
Ctrl-+
increasing a value
Ctrl--
decreasing a value
Ctrl-M
opening main menu or leaving main menu
Ctrl-Enter
selecting a menu item
saving a value (confirmation when leaving the corresponding submenu)
Expanding the window to display the multipage will show disabled controls only. As mentioned above, the
multipage is only functional in case of a HERMES DXD.
Doc-3047-2 Hermes Remote-Control (2003-10)
5-12
5.8 Expand ing the main window
The main window expands or collapse, respectively, when clicking on the button with the black arrow.
Please mind, that the multipage is only functional in case of a HERMES DXD starting from firmware version
AVC-3187-1x.
The multipage includes two tabs, Configuration and Identification.
5.8.1 Configu ration
HERMES DXD has two inputs and two outputs. The outputs can be routed to the desired input, and it is also
possible to route one input to both outputs (splitter). This functionality can be deliberately set. In addition
there is the possibility to trigger this behavior automatically in case there is no signal on an input: then the
other input is on its own routed to the respective output. This behavior is called Autoswitch and can be
activated or deactivated.
The status of Autoswitch and the assignment of the inputs to the outputs describe the configuration of the
device and define its settings.
This tab allows to save and restore a user defined configuration as well as to reset the device to the factory
configuration. If desired, Autoswitch can be disabled and/or enabled again.
Figure 19
main window expanded: configuration tab
Doc-3047-2 Hermes Remote-Control (2003-10)
5-13
Save User Settings
Clicking this buttons saves the current configuration as user settings.
These are the features to be saved:
connection of Digital Output 1 (either to Digital Input 1 or Digital Input 2)
connection of Digital Output 2 (either to Digital Input 1 or Digital Input 2)
status of Autoswitch (enabled or disabled)
Restore User Settings
Clicking this buttons re-applies the configuration which has been saved as user settings (and thus discards
previously made modifications)
These are the features to be restored:
connection of Digital Output 1 (either to Digital Input 1 or Digital Input 2)
connection of Digital Output 2 (either to Digital Input 1 or Digital Input 2)
status of Autoswitch (enabled or disabled)
Restore Default Settings
Clicking this button applies the factory configuration of the device:
Digital Output 1 is connected to Digital Input 1
Digital Output 2 is connected to Digital Input 2
Autoswitch is enabled.
Enable Autoswitch
The autoswitch functionality allows the device to automatically connect an output to the other input if there is
no longer a sync signal on the input previously connected to this output. This functionality provides
redundancy (inspite of a crash, there will be a signal displayed on the projection modules), but sometimes it
might be useful to disable this behavior (e.g. to enforce the selection of one input, even for the case that no
valid signal is present to be notified about the crash).
As default, every device leaves production with the autoswitch functionality enabled.
Clear the checkbox Enable Autoswitch to disable the autoswitch functionality and to prevent the device from
automatically switching to another input in case of a missing signal.
With Autoswitch enabled and case there is no signal present on an input, the other
input is switched to the corresponding output. As soon as a signal can be found,
the device readjusts to the desired settings.
Doc-3047-2 Hermes Remote-Control (2003-10)
5-14
5.8.2 Identific ation
On this tab the product information about the device can be found. The entries are read only.
The values are updated (read) each time this tab is activated and if another device is selected by means of the
Device Selection spin button.
In case HERMES DXD requires servicing, it is recommended to make a screen shot of this tab and to send the
information to the Barco service technician.
To copy an active window into the clipboard, press Alt+Print on your keyboard.
To copy the entire desktop into the clipboard, press Strg+Print on your keyboard.
Afterwards the contents of the clipboard can be inserted into the error report via the
Paste command or via Strg+V.
The information about the firmware is correctly indicated for all devices, even for
devices which are not of type HERMES DXD.
Figure 20
main window expanded: identifcation tab
Doc-3047-2 Hermes Remote-Control (2003-10)
5-15
6 Troub leshooting
Doc-3047-2 Hermes Remote-Control (2003-10)
6-1
6.1 Troubl es caused by hardware settings
Troubles caused by
cause/step
IR Interface
If the laptop has an enabled IR interface, data transfer via the serial
interface may be disturbed and HERMES REMOTE-CONTROL will hang
when closing the connection.
In the BIOS Setup, disable the IR interface. If you run Windows
2000/Windows XP, check the device manager if the device has actually
been removed. If not, reboot the system and check again. After rebooting
the system the device no longer should be listed.
Power Management
Please switch off all settings with regards to Power Management, both in
the BIOS setup and in the operating system
Doc-3047-2 Hermes Remote-Control (2003-10)
6-2
6.2 Troubl es when estabilishing a connection
If the system repeatedly fails in opening a connection you will get the following error message:
Figure 21
error message on connection failure
When receiving this error message, check the port settings and the remote-control
cabling!
In case the devices are still switched off, the error message when trying to establish a connection reads
Figure 22
devices are switched off
Switch on the devices and repeat connection.
In case the device is not operabel due to destroyed firmware, the message reads
Figure 23
warning about an unknown device
Call Barco Support Center!
Doc-3047-2 Hermes Remote-Control (2003-10)
6-3
The acceptance of these error message (OK) results in a warning just to make sure that the user is aware that
Remote-Control won't work:
Figure 24
warning about a missing connection
Doc-3047-2 Hermes Remote-Control (2003-10)
6-4
6.3 Troubl es after an upgrade of Hermes Remote-Control
Before installing a new version of Hermes Remote Control, the previous version
has to be de-installed, cf. Setup.
When launching the application, the following message might be displayed:
That's due to the fact that in some cases not all components had been completely removed.
To solve the problem, proceed as follows:
Uninstall Hermes Remote-Control using the shortcut
Start|Settings|Control Panel|Add/remove software
Check if the following ActiveX controls have been passed over by the uninstall procedure:
Folder
ActiveX controls
c:\program files\common files\barco\shared
axavc.ocx
axidpromdoc.dll
(If the installation was not performed with default settings the
folder settings must be changed accordingly.)
axidpromeditor.ocx
axisiaprg.ocx
axrcpm.ocx
hflw32vb.dll
hotkey.ocx
These ActiveX controls may not simply be deleted! They have to be unregistered
first!
If one or all of these files: still exist in c:\program files\common files\barco\shared, proceed as follows:
open the command prompt
change to the directory where the file is located
enter the command regsvr32 /u filename.ocx. This will unregister the file.
this command has to be entered for all files listed above
Subsequently the files themselves have to be deleted.
Doc-3047-2 Hermes Remote-Control (2003-10)
6-5
Check if the following ActiveX controls have been passed over by the uninstall procedure:
Folder
ActiveX controls
c:\program files\common files\barco\shared
iapsrv.exe
ispsrv.exe
(If the installation was not performed with default settings the
folder settings must be changed accordingly.)
These ActiveX controls may not simply be deleted! They have to be unregistered
first!
If one or all of these files still exist in c:\program files\common files\barco\shared, proceed as follows:
open the command prompt
change to the directory where the file is located
enter the command iapsrv.exe /UnRegServer. This will unregister the file.
enter the command ispsrv.exe /UnRegServer. This will unregister the file.
Subsequently the files themselves have to be deleted.
Check if the following ActiveX controls have been passed over by the uninstall procedure:
If one or all of the files rcpwin32.dll, hflwin32.dll, ispwin32.dll still exist in c:\WINNT\system32, delete
them.
Folder
ActiveX controls
c:\WINNT\System32
rcpwin32.dll
hflwin32.dll
ispwin32.dll
If one or all of these files still exist in c:\WINNT\System32, proceed as follows:
Delete them
Since now the uninstall procedure is complete, the software can be installed again.
Doc-3047-2 Hermes Remote-Control (2003-10)
6-6
6.4 Error m essage when starting a second instance of Hermes Remote-Control
If a second instance of Hermes Remote-Control is startet, the following error message pops up:
This message is due to the fact that a hotkey can only registered once, and if the second instance of HERMES
REMOTE-CONTROL is launched with the identical hotkey definition specified on the preferences tab, the
registration of this hotkey cannot be made a second time.
Doc-3047-2 Hermes Remote-Control (2003-10)
6-7
7 Hotli ne
Doc-3047-2 Hermes Remote-Control (2003-10)
7-1
7.1 Addres ses
Please feel free to contact us if you encounter any problems.
Barco Control Rooms GmbH
An der Rossweid 5, D-76229 Karlsruhe
Phone: +49-721-6201-0, Fax: +49-721-6201-298
E-mail: [email protected],Web: www.barcocontrolrooms.de
BARCO N.V. Projection Systems
Nordlaan 5, B-8520 Kuurne
Phone: +32-56-368-211, Fax: +32-56-368-251
E-mail: [email protected], Web: www.barcocontrolrooms.com
Doc-3047-2 Hermes Remote-Control (2003-10)
7-2


![Overview cPR67 and cPR84 [v00]](http://vs1.manualzilla.com/store/data/005648847_1-d158a5d3d4b92d14c7a3179652b88ffd-150x150.png)

![OverView Control Manager user`s manual - operator [v04]](http://vs1.manualzilla.com/store/data/005659468_1-4c522981c7089838b286d7fbb1120c24-150x150.png)

![Octopus` installation and user`s manual [v00]](http://vs1.manualzilla.com/store/data/005962625_1-a588a4c5f54c9235be7780e6e118b681-150x150.png)