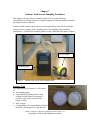
1
Industrial Hygiene Sampling Manual NEVADA MINING ASSOCIATION INDUSTRIAL HYGIENE SUB-COMMITTEE Notice Copyright © 2008 Nevada Mining Association All Rights Reserved (other than the License set forth below) License You may copy this NvMA Industrial Hygiene Sampling Manual and distribute such copies to others, provided that you do so on a non-commercial basis and do not charge for such copies or this manual other than a reasonable fee to cover your copying and distribution expenses. Each such copy must be a complete copy of this Manual (including this Notice, License and Disclaimer) and must include the attributions that are set forth in this Manual. You have no license or right to modify this manual or to create any derivative work based on this Manual. NvMA or its successor in interest to the copyright to this Manual may terminate this license at any time. Disclaimer This Manual is provided for general information purposes only and is provided “as is” without warranty or any kind. Any use, copying, and distribution of and reliance on this Manual or its content is at the sole risk of the user or person doing so, not NvMA or any of the authors of this Manual. Nothing herein is intended to constitute legal, accounting or professional advice and should not be taken as such. Chapter 1 Introduction Page 1 of 4 Copyright © 2008 Nevada Mining Association Chapter 1 Introduction Preface We, the Nevada Mining Association (NvMA) are pleased to bring you this NvMA Industrial Hygiene Sampling Manual. Our intention for this manual is to serve as an aid to individuals who are just starting in industrial hygiene. For example, if an equipment operator or millwright is now charged with doing dust sampling, the dust sampling chapter can serve as an aid in performing the sampling. The manual was created through the work of several different mining companies working through the NvMA. The NvMA extends its sincere appreciation to those individuals who contributed to the production of the manual. Shane Owen, CSP, CMSP Chairman, NvMA Industrial Hygiene Subcommittee • • • • • • Kelly Hess, CMSP, Barrick Goldstrike Mines Inc. Steve Lambert, CMSP, Barrick Goldstrike Mines Inc. Mark Langston, Marigold Shane Owen, CSP, CMSP, Barrick Goldstrike Mines Inc. Diane Shelly, Cortez Gold Jim Vath, Robinson Mining Chapter 1 Introduction Page 2 of 4 Copyright © 2008 Nevada Mining Association Introduction This book is intended as a guide for personnel just beginning Industrial Hygiene in the mining industry. It contains step-by-step instructions on basic industrial hygiene sampling techniques. However it is not meant as a technical manual for IH. Updates will be periodically added to the manual. The complete updated manual can be downloaded from the Nevada Mining Association (NvMA) website at http://www.nevadamining.org/. This book is intended to be distributed free of charge. The manual and information within is not intended to be sold for profit by anybody. What Is Industrial Hygiene? Industrial hygiene is the science of keeping people safe and healthy at work and in their communities. Industrial hygienists (IHs) are professionals dedicated to the health and well-being of workers. Originally industrial hygienists worked primarily in factories and other industrial settings but as our society has changed, so has the definition of industrial hygiene. Today, IHs can be found in almost every type of work setting. Industrial hygienists also use the term OEHS or occupational and environmental health and safety to refer to the work that they do. What Does an Industrial Hygienist Do? IHs still work to prevent illness or injury from hazards in industrial settings. They may also be found working to prevent ergonomic injuries in the office; measuring noise levels at an airport; supervising the safe removal of lead, mold or asbestos; and in thousands of other settings. Industrial hygienists may sample air, soil or water to determine if there are harmful substances present. They may fit test a respirator to ensure that a worker is breathing cleaner air. Industrial hygiene saves lives, improves quality of life, and increases productivity. Safe, healthy workers are more efficient. Injuries can mean many days or weeks out of work, or even permanent disability, causing serious economic hardship to a worker and his or her family. You should contact IH Accredited Lab for more information, http://www.aiha.org use this link for the list of accredited labs. This link will provide you with labarotory programs, education knowledge, experts in industrial hygiene. Chapter 1 Introduction Page 3 of 4 Copyright © 2008 Nevada Mining Association What Is NIOSH Manual of Analytical Methods (NMAM)? NMAM is a collection of methods for sampling and analysis of contaminants in workplace air, and in the blood and urine of workers who are occupationally exposed. These methods have been developed or adapted by NIOSH or its partners and have been evaluated according to established experimental protocols – (http://www.cdc.gov/niosh/nmam/protocols.html) and performance criteria. NMAM also includes chapters on quality assurance, sampling, portable instrumentation, etc. NIOSH recommends that the best method available be used for making each measurement. Methods published by others, such as OSHA, MSHA, EPA, ASTM, ISO or commercial suppliers of sampling and analytical equipment, may have advantages over NIOSH methods for a given sampling situation. (An Industrial Hygienist should determine the sampling protocol, considering analytical accuracy, cost, and optimum sample number.) Every method should undergo an initial evaluation to demonstrate performance. When a method is used in a laboratory that did not perform the initial evaluation, that laboratory should verify that comparable results can be obtained. NIOSH methods may need to be modified, and if modified, should be re-evaluated. Various OSHA regulations (e.g. benzene) mention performance criteria for evaluating whatever method is used. NIOSH has published methods developed in cooperating laboratories. These method performance have been evaluated using established experimental protocols. These methods were selected based upon priorities established in a joint NIOSH/AIHA survey of participating laboratories. http://www.cdc.gov/niosh/nmam/ use this link to access NIOSH Analytical Methods & how to use them Chapter 1 Introduction Page 4 of 4 Copyright © 2008 Nevada Mining Association Chapter 2 Definitions This chapter will define some of the terms commonly used in industrial hygiene. Industrial Hygiene: According to the American Industrial Hygiene Association (AIHA), industrial Hygiene is “that science and art devoted to the anticipation, recognition, evaluation, and control of those environmental factors or stresses arising in or from the workplace and homeplace which may cause sickness, impaired health and well-being, or significant discomfort among workers or among the citizens of the community.” NIOSH Manual of Analytical Methods (NMAM) NMAM is a collection of methods for sampling and analysis of contaminants in workplace air, and in the blood and urine of workers who are occupationally exposed. These methods have been developed or adapted by NIOSH or its partners and have been evaluated according to established experimental protocols. The NMAM can be found at NIOSH’s website at http://www.cdc.gov/niosh/nmam. NMAM also includes chapters on quality assurance, sampling, portable instrumentation, etc. Threshold Limit Value (TLV): The American Conference for Governmental Industrial Hygienists (ACGIH) has established guidelines for exposure to airborne contaminates. These guidelines are widely accepted and updated annually. The TLV of an airborne chemical represents the concentration of that chemical below which there is thought to be no significant adverse effect on most workers. In developing TLV’s it should be assumed that workers may be repeatedly exposed, day after day, to the chemical. Not every chemical will have a TLV. For more information on TLV’s, refer to your ACGIH Threshold Limit Values for Chemical Substances and Physical Agents and Biological Exposure Indices booklet. (2002 NSC Fundaments of IH workbook) Permissible Exposure Limit (PEL): PEL’s are promulgated & enforced by OSHA. However, MSHA has used the term PEL in recent rule making, such as Part 62 (noise exposure) and at times refers to PEL’s in the DPM regulations. In most part, the term PEL has the same meaning as TLV, however refers to an enforcing agency (OSHA or MSHA). Recommended Exposure Limit (REL): This limit is developed by the National Institute of Occupational Safety & Health. Often the REL is a time-weighted average for a 10-hour work day during a 40-hour work week. Chapter 2 Definitions Page 1 of 3 Copyright © 2008 Nevada Mining Association Action Level (AL): This is a level at which action is required. OSHA & MSHA requires an action level for some specific substances as well as for noise exposure. Many industrial hygiene professionals use the action level to evaluate workplace exposure: It is usually identified as half the PEL or TLV. Categories of Exposure Limits There are three important categories of exposure limits that apply to TLVs, PELs, and RELs: time-weighted average, short-term exposure limit, and ceiling. Time-Weighted Average This is the average concentration for an 8-hour workday or 40-hour workweek, to which nearly all workers may be repeatedly exposed, day after day, without adverse effect. Short-Term Exposure Limit (STEL) This is a short-term TWA exposure to which workers can be continuously exposed for up to 15 minutes without suffering from irritation, chronic or irreversible tissue damage, or narcosis of sufficient degree to increase the likelihood of accident or injury. Ceiling (C) This is the concentration that should not be exceeded during any part of the work day. Skin Designation In looking up exposure limits, you may see a skin designation. This alerts you that there is a potential for significant exposure due to skin absorption. This designation is an alert that air sampling alone is insufficient to quantify exposure. Chemical agents - crystalline silica, coal dust, diesel particulate matter (DPM), welding fumes, solvent vapors, oxides of nitrogen, etc. Physical agents –noise, heat, and cold. Chapter 2 Definitions Page 2 of 3 Copyright © 2008 Nevada Mining Association Shift Weighted Average (SWA): Shift Weighted Average is a term used solely by MSHA. TLVs & PELs are intended for 8-hour work days, however many miners work more than 8-hours per day. Therefore MSHA uses Shift Weighted Averages to compare full shift sampling on miners working greater than 8-hours per day to the 8-hour TLV or PEL. For example, if MSHA sampled a miner working a 12-hour shift for mercury exposure, MSHA would sample the entire 12-hour shift, then shift-weight the result to compare to the 8-hour TLV. The formula below shows how to shift weight a result from a Time Weighted Average (TWA). TWA = 0.05 mg/m3 SWA = TWA x SWA = 0.05 mg/m3 x ( ( Sample Time (minutes) 480 Minutes 720 (minutes) 480 Minutes ) ) SWA = 0.075 mg/m3 Chapter 2 Definitions Page 3 of 3 Copyright © 2008 Nevada Mining Association Chapter 3 Pump Calibration These pump calibration procedures are for all personal sampling pumps. Although flow required flow rates may vary, the calibration procedures are still the same. Below are typical flow rates in liters per minute (lpm) for various contaminate sampling: • Respirable dust....................1.700 lpm • Lead.....................................1.700 lpm – 2.000 lpm • Arsenic ................................1.700 lpm – 2.000 lpm • Mercury (sorbent tube) .......0.200 lpm • Welding Fumes ...................1.700 lpm – 2.000 lpm Respirable dust requires the use of a 10 millimeter cyclone with a flow rate of 1.700 lpm. A 1.700 lpm flow rate is required for the cyclone to work correctly. Other particulate sampling such as lead, arsenic & welding fumes require a flow that will achieve a sufficient loading on the sampling cassette. If higher concentrations are suspected, lower flow rates can be used. If low concentrations are suspected, higher flow rates can be used in order to accumulate more particulates on the sample cassettes. (If there is an insufficient amount of particulates on the sample cassette, the lab may not be able to analyze it.) If sampling for mercury vapor with sorbent tubes, flow rates should be set at 0.020 lpm. This usually requires a low-flow pump or low-flow adapter equipment that works in conjunction with you personal sampling pump. Calibration Procedures: • • Pumps should be fully charged prior to calibrating. Turn pumps on and let run for 10 – 15 minutes before calibrating. Batteries will have a ‘peak’ charge when removed from the charging unit. This may cause the pump to run slightly faster until the peak charge is gone. Once pumps have run 10 – 15 minutes the peak should be gone and pumps will run at normal speeds. Some brands of pumps may have a ‘peak’ indicator that will let you know if the peak exists or not. There are two different types of primary calibrators; dry & wet. Use the Gillibrator Bubble Generator calibration method below if you are using a bubble generator calibrator. Use the Dry Cal method if you are using a dry calibrator. Gillibrator Bubble Generator: A Gillibrator uses a mild soap solution to create a bubble inside an internal chamber. The bubble is pulled from the bottom of the chamber to the top by the air-flow created by the sampling pump. The bubble is timed by the Gillibrator and a flow rate is calculated by the amount of time it takes the bubble to travel from the bottom of the chamber to the top. Chapter 3 Pump Calibration Page 1 of 3 Copyright © 2008 Nevada Mining Association To use the Gillibrator, make sure there is enough mild soap solution in the bottom of the Gillibrator cylinder to sufficiently cover the bottom. Tube Connection Connect the sample train as seen in Picture 1. 1. Connect one end of the Tygon tubing to the intake of your sampling pump. 2. Connect the other end Cylinder Plunger of the Tygon tubing to the lid of the calibration jar (make sure it is the Picture 1 – calibration sample train using Gillian Bubble Generator primary port connected to the calibrator. top of the cyclone). 3. Connect another Tygon tubing to the suction side of the calibration jar lid 4. The other end of this tubing must be connected to the ‘out’ (top) nipple of the Gillibrator cylinder. Turn the Gillibrator on (your pump should already be running). Depress the cylinder plunger at the bottom of the cylinder to allow a soap bubble to be picked up inside the cylinder. Release the plunger to allow the bubble to travel to the top of the cylinder. The flow rate will display on the screen. Repeat this total of 10 times. Some models will display the average flow rate on the display. On other models, you will have to press the average button to see the average. Adjust your pump to get your flow rate as close to the desired flow rate (+/- 0.02 lpm) as possible. Repeat the calibration process each time you adjust the pump. Chapter 3 Pump Calibration Page 2 of 3 Copyright © 2008 Nevada Mining Association Dry Cal Primary Calibrator Dry primary calibrators do not require any liquids or soap solutions. Assemble the sampling train as shown in Picture 2. The sample train is identical to the Gillibrator Bubble Generator. The Tygon tubing must be connected to the ‘out’ nipple of the DryCal. 1. Press the sample button & release to Personal Sampling Calibration Jar Cyclone DryCal begin the sample. Pump The internal cylinder will actuate Picture 2 – Calibration equipment for calibrating for respirable dust and the flow rate samples using a DryCal primary calibrator. will be displayed on the display screen. Most models will also display the average flow rate up to 10 samples. (If the sample button is pressed & held for approximately 3 seconds, the DryCal will continue to sample until the stop button is pressed. This is faster than pressing the sample button each time). 2. If after 10 samples your flow rate is not at the desired flow rate (+/- 0.02 lpm), adjust the pump and recheck the calibration. Post Calibration Procedures 1. Perform calibration procedures as explained above, however do not adjust the pump calibration. Record the each flow rate and get an average after 10-cycles. Use this average for the post-calibration average. Average the pre & post calibration rates to get your final flow rate. Please note: If your post calibration varies by more than 5% of the pre calibration, the sample must be void. Refer to the pumps user manual for instructions on how to adjust the flow. All primary calibrators must be sent to the manufacture annually for calibration. Chapter 3 Pump Calibration Page 3 of 3 Copyright © 2008 Nevada Mining Association Chapter 4 Respirable Dust Sampling Procedures This chapter will demonstrate how to measure respirable dust exposures. Respirable dust is dust that is smaller than 10-microns in size. Respirable dust is sampled using a Dorr-Oliver 10-millimeter nylon cyclone. Picture 1 shows the sampling train needed to sample respirable dust. Since free crystalline silica is the most abundant element in the earth’s crust, exposures to silica dust are quite prevalent in mining operations. Respirable silica dust is typically produced when drilling, blasting, or cutting silica-containing rock. When crystalline silica enters the lung, fibrotic nodules and scarring can occur around the trapped silica particles. This fibrotic condition of the lung is called silicosis. If the nodules grow too large, breathing becomes difficult and death may result. Silicosis victims are also at high risk of developing active tuberculosis. Pre-weighed PVC Cassette Cyclone Tygon Tubing Air Sampling Pump Picture 1 – sample train for respirable dust sampling. Train consists of air pump pre-calibrated to 1.7 LPM, Tygon tubing, 10-mm nylon cyclone & pre-weighed PVC cassette. The sampling train will consist of: • Personal sampling pump – There are several different brands of personal sampling pumps available. The sample pump must be calibrated to 1.7 liters per minute (LPM) in order for the 10-mm cyclone to work properly. Chapter 4 Respirable Dust Sampling Procedures Page 1 of 4 Copyright © 2008 Nevada Mining Association • • • Tygon tubing – the Tygon tubing connects the personal sampling Outlet Inlet pump to the 10-mm nylon cyclone. The tubing must be long enough that the pump can be worn on the employee’s waist and the cyclone can be mounted on the employee’s collar. 10-mm nylon cyclone – There are several different brands of cyclones available. Two most common are MSA & Sensidyne Gillian. (Sensidyne Gillian is shown in picture 1 above). PVC preweighed cassette – Preweighed PVC cassettes can be obtained from the lab used to analyze samples. Please note that the cassette outlet says outlet on it. It also has a ‘wagon wheel’ looking air-channel to distribute the air across the filter evenly. This end of the cassette must be connected to the Tygon tubing so air flows into the cassette through the inlet side only. Calibration Procedures: • Calibrate the air sampling pump following the “Respirable Dust” calibration procedures in the “Pump Calibrations Procedures” chapter. Sampling Procedures: • • Select employee(s) to be sampled. Explain that the purpose of the sampling is to monitor the employee’s exposure to dust over his shift. Explain to the employee how the cyclone works and not to tip the Cyclone & sampling cyclone upside cassette in breathing zone down while sampling. (The cyclone works by separating out large particles from the sample stream. The large particles fall to the grit pot at the Sampling Pump bottom of the cyclone, and the small particles travel up to the Chapter 4 Respirable Dust Sampling Procedures Page 2 of 4 Copyright © 2008 Nevada Mining Association • • • • • cassette where they are captured. Tipping the cyclone upside down may cause the large particles to fall to the cassette, contaminating the sample). Instruct the employee to wear the sample the entire shift. Attached the pump to the employee. This can be done several ways: o Attach the pump to the employee’s belt o Use the carrying case & straps that usually come with a sampling pump o Use a vest, such as a fishing vest to carry the pump. Attach the cyclone/cassette assembly to the employee’s collar. This should be within the employee’s breathing zone (within 12-inches around the employee’s head). Explain to the employee that the sample inlet must face away from clothing, etc. at all times. Do not cover the sample with coat, coveralls, etc. Check on the sample every couple of hours to ensure: o Pump is still running o Sample is still in correct position o Employee is still performing same task o Etc. Collect Samples When Sampling is Complete: • Collect sample train • Record sample run time in minutes • Perform post calibration as described in the Pump Calibration Procedures chapter • Shut off pump • Remove cassette from cyclone and insert plugs into inlet & outlet • Charge pump for next sampling • Clean cyclones using soap and water and allow to thoroughly dry • Send samples to IH-Accredited lab for analysis. Request NIOSH 0600 for respirable dust and NIOSH 7500 for silica analysis. Both analysis will be required to compare to MSHA’s TLV. Calculating TLV & Interpreting Results: • Two results will be received from the lab for each sample: o Respirable Dust will be expressed usually in milligrams per sample (mg/sample). This is the total weight of the dust collected on the sample cassette. o Silica Weight will be expressed usually in milligrams per sample also. This result expresses the amount of silica contained in the respirable dust. The percent silica must be calculated in order to use MSHA’s calculation for determining the TLV for respirable dust containing silica. To calculate the percent silica, divide the weight of the silica by the weight of the respirable dust. 10 • Calculate TLV by using formula (%silica + 2) • Calculate employee exposure o Calculate cubic meters of air ran through the sample (average liters per minute (lpm) ran during sampling multiplied by number of minutes the sample ran. For example, if the average of the pre & post calibrations was Chapter 4 Respirable Dust Sampling Procedures Page 3 of 4 Copyright © 2008 Nevada Mining Association 1.705 lpm and the sample time was 480 minutes, then use 1.705 lpm *480 minutes* .001= 0.818 m3. Please note that if a personal sample is conducted on an employee that works more than an eight-hour shift, then the sample must be shift-weighted (called a Shift-Weighted Average (SWA)) in order to compare the exposure to MSHA’s TLV. To shift-weight an exposure, 480 minutes must be used no matter what the sample time was (as long as the sample was more than eight hours). For example, if a fullshift sample was conducted on an employee working a 12-hour shift, then the formula used to calculate the cubic meters would be 1.700 * 480 * .001. Please notice that 480 minutes is used in the SWA, not 720 minutes. o Calculate exposure: Divide the mg/sample received from the lab by the cubic meters calculated above. Example, Employee Sampled for Full 12-Hour Shift: • Respirable dust = ...................................................... 0.24 mg/sample • Silica =....................................................................... 0.08 mg/sample • Pre Cal ....................................................................... 1.700 LPM • Post Cal...................................................................... 1.715 LPM • Shift Duration (12-Hours) ......................................... 720 Minutes Calculate Silica Percentage • % silica = (0.08/0.24) = ............................................ 33% silica • TLV = 10/(33+2) = 10/35 = ..................................... 0.286 mg/m3 Calculate Air Volume • Average Liters per Minute = (1.700+1.715)/2 = ...... 1.708 LPM • Total Liters (1.708 LPM * 480) = ............................ 820 Liters Please note that 480 minutes is used to Shift Weight the result although the sample time was actually 720 minutes. • Total cubic meters (m3) 820 liters * .001= ................ 0.82m3 Calculate Exposure: • Divide respirable dust by total cubic meters o 0.24 mg per sample / 0.82m3 = .............. 0.29 mg/ m3 • Exposure compare to TLV • 0.29 mg/ m3 / 0.286 mg/m3 = ............................ 101% - Over-exposure In the above example, the employee’s exposure was over MSHA’s calculated TLV. Chapter 4 Respirable Dust Sampling Procedures Page 4 of 4 Copyright © 2008 Nevada Mining Association Chapter 5 Noise Exposure Sampling Procedures This chapter will demonstrate how to measure noise exposures using a dosimeter. MSHA requires two different levels be monitored in 30 CFR Part 62. Employees must be monitored to: 1) see if they must be enrolled in a Hearing Conservation Program (HCP) and 2) ensure their exposure does not exceed the Permissible Exposure Limit (PEL). Both the Action Level & PEL are summarized below; however it is important that all of MSHA’s Part 62 are understood & followed. For example, if the person exceeds the Action Level described below, then a HCP must be developed in accordance to Part 62 & the employee must be enrolled. Sampling procedures: Sampling must consist of full-shift sampling. Employees must be sampled for MSHA’s Action Level and PEL criteria (explained in more detail below). Using noise dosimeters that record sound pressure using at least 2 different sampling criteria makes the sampling much easier. The picture at the right shows a Quest noise dosimeter that will record the same noise exposure using both criteria. If your noise dosimeter will only record one set of criteria at a time, then two dosimeters may have to be used, or the sampling will have to be done twice. Noise exposures can be measured using a Sound Level Meter, however since Sound Level Meters do not record sound levels it will be very time consuming. Noise dosimeters must be set to record at the criteria set by MSHA. The criteria is listed below. MSHA requires that employees be notified before the sampling occurs and that certain notifications occur after the sampling. Be sure to read & be familiar with all requirements of Part 62. Criteria Definitions: Response: Noise typically is not constant. If you were to try and read noise levels without a response time, it would be very difficult to read the meter due to the very fast fluctuations. Setting the response time to slow uses a constant of 1 second. Thus it slows the meter down so it can be read more easily. Exchange Rate (Doubling Rate): Refers to how the sound energy is averaged over time. Using the decibel scales, every time the sound energy doubles, the measured level increases by 5. Thus when the sound level increases from 80 – 85 decibels, the sound energy has doubled. MSHA uses a 5 decibel exchange rate (or doubling rate). Criterion Level: The criterion level is used in the Dose calculation. If the dosimeter is exposed to a decibel level equal to the criterion level for 8 hours the result will be 100% dose. The criterion level for MSHA’s Action Level and PEL is 90 decibels. Please remember that although Chapter 5 Noise Exposure Sampling Procedures Page 1 of 15 Copyright © 2008 Nevada Mining Association the criterion for the Action Level & PEL are the same, the thresholds are different. Thus 100% dose for the action level equals 85 decibels and 100% dose for the PEL equals 90 decibels. Example: MSHA mandates the criterion level (maximum allowable accumulated noise exposure) to be 90dB for 8 hours. For an 8 hour sample, an average level (LAVG) of 90dB will result in 100% dose. Threshold: The threshold affects the LAVG, TWA, and DOSE measurements. All sound below the Threshold is considered non-existing noise for the averaging and integrating functions. MSHA uses two different thresholds. The threshold for the Action Level is 80 dB and the threshold for the PEL is 90 dB. Therefore all sound levels above 80 dB are integrated into the Action Level dose and all sound levels above 90 dB are integrated into the PEL dose. Any sound levels below the threshold are not used. Example #1: With a 80dB threshold, suppose you placed a 79dB calibrator on the unit for a period of time. Because all of the noise is below the threshold, there would be no average (you can think of it as an average of 0dB). If the calibrator were 80dB instead, then the average would be 80dB. On histogram printouts, typically 1-minute (or other specified increment) averages are printed. Because real noise fluctuates, it is quite possible to have an average level below the threshold. This also applies for the overall LAVG. Example #2: The chart below shows how sound levels accumulate towards the Action Level dose using a threshold of 80 decibels. Although the dosimeter records all sound levels, levels below 80 dB are not integrated in dose. The same principal applies to the PEL, however the threshold is 90 dB, not 80 dB. Therefore the sound levels below 90 dB are not integrated into the PEL dose. Only sound levels above 90 are integrated into the PEL dose. Only sound levels above 80 dB are integrated into AL dose Sound levels below 80 dB are not integrated into AL dose. Chapter 5 Noise Exposure Sampling Procedures Page 2 of 15 Copyright © 2008 Nevada Mining Association Action Level: This is the level MSHA has set that if exceeded, the employee must be enrolled in a Hearing Conservation Program. MSHA defines AL as “An 8-hour time-weighted average sound level (TWA8) of 85 dBA, or equivalently a dose of 50%, integrating all sound levels from 80 dBA to at least 130 dBA.” Permissible Exposure Level (PEL): The level MSHA has set that employees TWA must not exceed for a full-shift sample. MSHA defines PEL as “A TWA8 of 90 dBA or equivalently a dose of 100% of that permitted by the standard, integrating all sound levels from 90 dBA to at least 140 dBA.” Dual Hearing Protection Level: The level MSHA has set that employees must wear dual hearing protection if exceeded. MSHA defines Dual Hearing Protection Level as “A TWA8 of 105 dBA, or equivalently, a dose of 800% of that permitted by the standard, integrating all sound levels from 90 dBA to at least 140 dBA.” Noise measurements using a Noise Dosimeter 1. Pre - calibrate the noise dosimeter according to manufactures directions. 2. Set both dosimeters to the criteria listed in table 1. 3. Once you are ready to begin sampling, turn the dosimeter on & make sure it is in run mode. 4. Clip the microphone on the employee’s collar where it will not be obstructed with other clothing, jackets, Parameter Action Level PEL etc. If the employee is Slow Slow Response wearing a radio, place 5 dB 5 dB Exchange Rate the microphone on the 90 dB* 90 dB Criterion Level opposite side, away from the radio speaker. 80 dB 90 dB Threshold 5. Place the dosimeter on A RMS Weighting A the employee’s belt or Table 1 *MSHA sets criterion for the Action Level to 90 dB, thus a in a pocket. dose of 50% equals the action level of 85 dB. 6. Explain to the employee that the microphone must not be covered up & to perform his/her duties as normal. 7. At the end of the shift, take the dosimeter out of run mode. 8. Post calibrate the dosimeter according to manufactures instructions. 9. If your dosimeter can be downloaded to the computer, download & get information from computer. If not, follow manufactures instructions to get needed information. 10. Record the Time Weighted Average (TWA) and the Dose. Most dosimeters will give you much more information than just the TWA & Dose and can get quite confusing. The TWA & Dose will allow you to compare to MSHA’s limits. 11. If the dose for the Action Level criteria is over 50%, then refer to 30 CFR Part 62.120 to determine if employee must be enrolled in your Hearing Conservation Program (HCP). Chapter 5 Noise Exposure Sampling Procedures Page 3 of 15 Copyright © 2008 Nevada Mining Association 12. If the dose for the PEL criteria is over 100%, then the employee’s exposure has exceeded MSHA’s PEL. Refer to 30 CFR Part 62.130 for control information. The table below indicates the length of time an employee can be in an area at a certain decibel level without exceeding the PEL. For example, if the sound level in an area is 95 dBA, then the employee can be in the area for 4-hours until the PEL is reached. He or she would then have to avoid noise exposure for the rest of the shift. -----------------------------------------------------------------------dBA T (hours) -----------------------------------------------------------------------80........................................................ 32.0 85........................................................ 16.0 86........................................................ 13.9 87........................................................ 12.1 88........................................................ 10.6 89........................................................ 9.2 90........................................................ 8.0 91........................................................ 7.0 92........................................................ 6.1 93........................................................ 5.3 94........................................................ 4.6 95........................................................ 4.0 96........................................................ 3.5 97........................................................ 3.0 98........................................................ 2.6 99........................................................ 2.3 100....................................................... 2.0 101....................................................... 1.7 102....................................................... 1.5 103....................................................... 1.3 104....................................................... 1.1 105....................................................... 1.0 106....................................................... 0.87 107....................................................... 0.76 108....................................................... 0.66 109....................................................... 0.57 110....................................................... 0.50 111....................................................... 0.44 112....................................................... 0.38 113....................................................... 0.33 114....................................................... 0.29 115....................................................... 0.25 -----------------------------------------------------------------------Table 1 – Allowable time limits for sound levels Chapter 5 Noise Exposure Sampling Procedures Page 4 of 15 Copyright © 2008 Nevada Mining Association Hearing Conservation Program Chapter 5 Noise Exposure Sampling Procedures Page 5 of 15 Copyright © 2008 Nevada Mining Association Hearing Conservation Program Pages 7 – 15 contain a draft Hearing Conservation Program and are intended to be an aid in creating a written HCP. Please use it as only that, an aid. A HCP must be specific to your site, thus this draft should be customized to your specific issues. Chapter 5 Noise Exposure Sampling Procedures Page 6 of 15 Copyright © 2008 Nevada Mining Association HEARING CONSERVATION PROGRAM CONTENTS Section 1. Monitoring 1 2. Hearing Conservation Program 2 3. Hearing Protection 3 4. Training 4 5. Recordkeeping 5 6. Transfer/Termination of a Miner 6 7. Audiograms 7 Chapter 5 Noise Exposure Sampling Procedures Page 7 of 15 Copyright © 2008 Nevada Mining Association In accordance with Federal regulations 30 CFR Part 62 the following program standards have been developed and will be followed at “SITE” “DATE” 1. Monitoring (62.110a,b) Site wide Noise survey will continue to be conducted annually each November, utilizing the current dosimeter technology available on the mine site, to determine if there are any gross variances from previous readings. Any readings over 85 decibels on the A weighted scale (dBA) will indicate a need for further evaluation of the work area or any personal exposures in that area. Any miner exposed to a TWA of 85 dBA or greater will be enrolled in “SITES” Hearing Conservation Program (HCP). (62.130) TWA readings over 90 dBA will indicate a need for evaluation of the source in order to determine if there are any further feasible engineering controls or administrative controls that can be administered to reduce the exposure. (62.150) Any TWA exposure over 105 dBA will require the use of dual hearing protection in addition to the above actions. Dual hearing protection is defined as “…the concurrent use of both an ear plug and an ear muff type hearing protector.” (62.110d130) The results of the survey and notification of any engineering or administrative controls put in place will be posted on the area bulletin boards for the miners review. (62.110/120) Operators who work in an area with the potential for a noise exposure over 85 dBA will be monitored for a shift using a dosimeter set to the following criteria as outlined in 30 CFR Part 62.110: a) 90 dB criteria level and a 5 dB exchange rate b) use the A weighting scale and slow response instruments settings c) be monitored for their entire shift but use the time weighted average of 8 hours (TWA8) to determine compliance d) test for noise exposure between 90 and 140 dBA e) no adjustment will be made for hearing protection values Chapter 5 Noise Exposure Sampling Procedures Page 8 of 15 Copyright © 2008 Nevada Mining Association (62.110c) Any miner may chose to observe the monitoring as it takes place. Dates and times of monitoring will be announced either verbally or in writing no later than the start of the shift that the miner will be sampled on. This will allow an opportunity for miners or their representatives to observe the monitoring conducted. Miners are advised that under part 62 the operator is not required to pay the miner observing the personal sampling being conducted if it is not part of the miner’s regular duties. (62.110d)Written and verbal notification of the results of the personal sampling will be distributed to the miner within 15 calendar days of the personal sampling being conducted and will include: a) written determination of exposure b) corrective actions being taken c) signatures of the tester and person being tested The original will be sent to the employee’s occupational health file and a copy given to the employee. 2. Hearing Conservation Program (62.120/130) Any miner found to be exposed to noise levels of 85 dBA or greater will enrolled in the Hearing Conservation Program (HCP). If a miner is found to be exposed to noise in the excess of the permissible exposure limits (PEL) as defined in the table 62-1 at any time during his/her shift, the following will apply: a) The department manager will be notified and the source reviewed to determine if all feasible engineering and administrative controls are in place to ensure the least amount of exposure possible for the miners. b) The miner will be notified and enrolled in a HCP program. (62.130b) If the miner’s exposure continues to exceed PEL’s despite the use of feasible engineering and administrative controls, “SITE” will continue to evaluate for possible solutions to reduce the miners exposure to a level as low as possible. Chapter 5 Noise Exposure Sampling Procedures Page 9 of 15 Copyright © 2008 Nevada Mining Association (62.150) The hearing conservation program (HCP) will consist of the following elements: a) b) c) d) e) 3. Monitoring Provision and use of hearing protectors Audiometric testing Training Recordkeeping Hearing Protection (62.150/160a2) “SITE” will supply 2 types of ear plugs and 2 types of ear muffs for their employees to choose from on site. In the event dual hearing protection is required the miner will be allowed to choose one plug and one muff type. Additional hearing protection, pre approved by the Safety Department and management, may be supplied on an individual or departmental basis. (62.160a5) In the event that the miner is unable to utilize the hearing protection required due to a medical pathology of the ear, the miner will be allowed to choose from suitable hearing protection. (62.160a4) All hearing protection will be provided by “SITE” at no cost to the miner. (62.140) Dual hearing protection (Plugs and Muffs) will be required and provided by the company when noise exposure exceeds a TWA of 105 dBA. (62.160bc1,2) “SITE” will ensure that hearing protection is worn when exposure exceeds the action level of a TWA 85 dBA or permissible exposure level and prior to the implementation of any engineering or administrative controls. (62.160a3) “SITE” will ensure that hearing protection is maintained in good condition and in accordance with manufacturer’s instructions during the annual audiogram and retraining and through periodic inspections conducted by supervisors in their work areas. 4. Training (62.160al/180) Initial training will be conducted within 30 days of a miner’s enrollment in an HCP program as outlined below: Chapter 5 Noise Exposure Sampling Procedures Page 10 of 15 Copyright © 2008 Nevada Mining Association a) The general requirements of 30 CFR Part 62 b) The purpose and value of audiometric testing and a summary of the procedures c) Discussion of their audiometric baseline results or if a pre existing baseline is available a comparison of the results and discussion of the miners on and off the job hearing practices. d) The effects of noise on hearing e) The purpose and value of wearing hearing protection f) Examples of the various hearing protectors offered by “SITE” – a minimum of 2 plug types and 2 muff types will be made available to the miner. g) Advantages and disadvantages of the hearing protectors offered h) Care, fitting, maintenance and use of each hearing protector offered i) Understand the hearing protection and replacements will be provided at no cost to the miner j) The miner will be allowed to select the one plug and one muff style of hearing protection they prefer from a minimum of 2 plug types and 2 muff types k) “SITE”s and the miners responsibilities in maintaining noise controls l) Written certification of the baseline or retest results, training conducted and date training as outlined above was completed. 5. Recordkeeping (62.180b) Records will be maintained for as long as the employee is enrolled in the HCP and at least for 6 months after termination (OSHA requires retention for a minimum of 30 years post employment). The original copy of the employee’s written certification will be filed in the employees occupational health file, a copy sent to safety for filing in their training file and a copy given to the employee as proof of training. (62.190b) A single initial copy of all required records pertaining to the HCP will be provided to the miner or former miner at no cost within 15 days of a written request for such records. Additional copies may be requested at an additional cost. Chapter 5 Noise Exposure Sampling Procedures Page 11 of 15 Copyright © 2008 Nevada Mining Association (62.175b) Records pertaining to the HCP are considered to be confidential medical records of the miner and therefore will be distributed only with the miner’s written consent. (62.190a) Records must be made available to Federal representatives as required by 30 CFR Part 62.190a. 6. Transfer/Termination of a Miner (62.190c1,2) Transfer of an employee’s HCP records shall be made to a successor mine only with the written approval of the individual miner. (62.190c1,2) In the event an experienced miner is hired at “SITE”, a request for a transfer of existing occupational health records from the previous mine will be made be the miner to ensure his/her health on the mine site. The baselines received from the previous employer will be utilized if they are in compliance with 30 CFR Part 62. A current audiogram will be conducted upon employment and compared to previous baseline to assure the integrity of audiograms. 7. Audiograms (62.170a2) A quiet period of a minimum of 14 hours is required prior to conducting any audiograms. The quiet period is defined as an exposure to no more then 80 dBA with or without hearing protection. Ideally, it is best to test the employee after their days off and having educated them in what is necessary to ensure an accurate baseline audiogram (see appendix A). (62.170b) Annual audiogram must be conducted every 12 months after the baseline to determine if a threshold shift has occurred. If a threshold shift of 10 dBA or more has occurred, “SITE” shall re-educate the employee in the use of hearing protection and retest the employees hearing after their days off in accordance with the initial baseline audiogram procedure to limit the statistical possibilities of error. (62.172) The second test will determine whether the shift was temporary in nature or a standard threshold shift. The retest must be conducted within 15 days of the original. Chapter 5 Noise Exposure Sampling Procedures Page 12 of 15 Copyright © 2008 Nevada Mining Association If the retest still shows a shift of 10 dBA or more at 2000, 3000 or 4000 Hz in either ear, it shall be considered a Standard Threshold Shift (STS). If there is no shift, it is considered a temporary threshold shift (TTS). Retraining will be conducted in accordance with the training section of this plan with an emphasis on the need to wear hearing protection both on and off the job in either case. If the STS exceeds 25 dB at 2000, 3000 or 4000 Hz in either ear relative to the baseline audiogram, the STS is considered to be reportable hearing loss and shall be reported according to 30 CFR Part 50 and state statutes. (62.170c) Revision of the baseline audiogram may be made by a physician or audiologist under the following circumstances: a) A standard threshold shift is thought to be permanent, or b) The hearing threshold shown on the annual audiogram indicates a significant improvement over the previous baseline audiogram. (62.171) Audiometric Test Procedures shall be conducted in accordance with CAOHC accepted standards. a) Begin the test by following CAOHC procedures b) Complete the test and print out results c) The audiometric record will include the following: Date, name and job classification of the subject Test results Comments on any unusual characteristics of the test Results of personal surveys conducted d) Review the results with the employee, sign the results, have the subject sign results, retain appropriate paperwork for records in a confidential manner as outlined in the record keeping section. e) Train the employee in accordance with section 62.160al/180 with the HCP’s training requirements. (62.170b,c 1,2/172) Audiograms must be conducted and evaluated by a physician, audiologist or the CAOHC technician under the direction of a physician or audiologist at no cost to the miner. Baseline audiograms will be obtained on all “SITE” employees no later than April 2001 or within the first week of employment at “SITE”. All testing will be conducted under the following criteria: Chapter 5 Noise Exposure Sampling Procedures Page 13 of 15 Copyright © 2008 Nevada Mining Association a) Determine if the audiogram is valid using standard CAOHC practices. b) Determine if a temporary or standard threshold shift or reportable hearing loss has occurred. c) Any information unrelated to the miners hearing loss due to occupational noise or the wearing of hearing protectors shall not be revealed to the mine operator. d) The audiogram must be interpreted and the results received within 15 days of the initial audiogram. In determining whether an STS has occurred, allowance of aging may be made utilizing MSHA Table 62.3 and 62.4. To determine if an STS or reportable hearing loss has occurred, the baseline audiogram and current audiogram must be compared as follows: a) Determine age correction factors from tables 62.3 or 62.4 1) Find the age at which the baseline audiogram was taken and record the corresponding values for are correcting at 2,000, 3,000 and 4,000 Hz 2) Find the age at which most recent annual test was conducted and record the corresponding values for age correction at 2,000, 3,000 and 4,000 Hz; and 3) Subtract the values as appropriate – The difference is the corrected values for aging. 4) Subtract the current adjusted audiogram results from the baseline to determine if a TTS(10dB), STS(10dB) or Reportable hearing loss (25dB) has occurred. (62.173) If the CAOHC technician suspects that the audiogram is invalid for any reason then the employee will be referred to the overseeing physician or audiologist for further evaluation at no cost to the employee. Only occupational related issues will be revealed to the operator by the physician or audiologist. If it is believed that there is a medical pathology of the ear caused by wearing hearing protection, aggravated by the employees exposure to occupational noise, or that it may limit the employees ability to use hearing protection provided by the company, then the employee must be referred for a clinical-audiological examination or an otological examination, as appropriate, at no cost to the employee. Chapter 5 Noise Exposure Sampling Procedures Page 14 of 15 Copyright © 2008 Nevada Mining Association If the pathology is determined not to be work related the employees will be billed for any treatment post diagnosis. If a threshold shift of 10 dB or greater has occurred in the miners hearing the miner will be retested within 10 days after counseling in the definition of the quiet period and returning from their days off to minimize noise exposure. (62.174a) If a Standard Threshold Shift of 10-25 dB has occurred the miner will be retrained in the use of hearing protection and provided with the opportunity to reselect adequate hearing protection for his/her work area. (62.174b,c) A re-evaluation of the miners work environment by personal monitoring will also be conducted to assure the noise exposure is in the prescribed ranges that will include a review of the engineering and administrative controls for effectiveness. Chapter 5 Noise Exposure Sampling Procedures Page 15 of 15 Copyright © 2008 Nevada Mining Association Chapter 6 Diesel Particulate Matter (DPM) Sampling Procedures This chapter will demonstrate how to measure Diesel Particulate Matter (DPM). DPM is a product of the exhaust from a diesel engine. Although the exhaust will contain many different elements, such as gasses and vapors, only the particulate that is emitted will be sampled. The use of diesel engines can produce a mixture of gases, vapors, and particulates. Hazardous gases in diesel exhaust include carbon monoxide, nitrogen dioxide, and sulfur dioxide, while the vapors include volatile organic compounds, aldehydes, and Polycyclic Aromatic Hydrocarbons (PAHs). DPM is considered a probable human carcinogen by the International Agency for Research on Cancer (IARC). Based upon the best available scientific evidence, MSHA has determined that DPM puts miners at excess risk for diseases of the heart and lung, including lung cancer. Picture 1 – sample train for DPM. Train consists of air pump pre-calibrated to 1.7 LPM, Tygon tubing, SKC Diesel Particulate Matter Cassettes with Integral Precision-Jeweled Impactors, and a 10-mm nylon Dore-Oliver cyclone. The sampling train consists of: • Personal sampling pump – There are several different brands of personal sampling pumps available. The sample pump must be calibrated to 1.7 liters per minute (LPM) in order for the 10-mm cyclone to work properly. Chapter 6 Diesel Particulate Matter (DPM) Sampling Procedures Page 1 of 4 Copyright © 2008 Nevada Mining Association • • • Tygon tubing – the Tygon tubing connects the personal sampling pump to the 10mm nylon cyclone. The tubing must be long enough that the pump can be worn on the employee’s waist and the cyclone can be mounted on the employee’s collar. 10-mm nylon cyclone – There are several different brands of cyclones available. Two most common are MSA & Sensidyne Gillian. (MSA is shown in picture 1 above). Although a cyclone is not required when using the SKC Impactor Cassettes, it is a ‘best-practice’. Large amounts of larger particles could plug-up the impactor inside the cassette, causing erroneously low results, or cause channeling on the quartz-fiber filter which will also cause erroneous results. The cyclone will ‘pre-screen’ the larger particles to eliminate these interferences. (Please note: DPM is smaller than one micron. The cyclones will not separate out submicron particles, thus will not interfere with the DPM loading on the cassette). SKC Diesel Particulate Matter Cassettes with Integral Precision-Jeweled Impactors. Please note that other 37-mm cassettes with Quartz-Filter fiber may be used instead of the SKC cassette. However, several substances can interfere with the results, such as carbonatious ore, oil mist, etc. The impactor in the SKC cassette is very successful at removing these interferants before they contaminate the sample. Calibration Procedures: • Calibrate the air sampling pump to 1.7 LPM following the “DPM” calibration procedures in the “Pump Calibrations Procedures” chapter. Sampling Procedures: • • • • Select employee(s) to be sampled. Explain that the purpose of the sampling is to monitor the employee’s exposure to DPM over his shift. Explain to the employee how the cyclone works and not to tip the cyclone upside down while sampling. (The cyclone works by Cyclone & sampling separating out large particles cassette in breathing zone from the sample stream. The large particles fall to the grit pot at the bottom of the cyclone, and the small particles travel up to the cassette where they are captured. Tipping the cyclone upside down may cause the large particles to fall to the cassette, contaminating the sample). Sampling Pump Instruct the employee to wear the sample the entire shift. Attached the pump to the employee. This can be done several ways: Chapter 6 Diesel Particulate Matter (DPM) Sampling Procedures Page 2 of 4 Copyright © 2008 Nevada Mining Association • • • o Attach the pump to the employee’s belt o Use the carrying case & straps that usually come with a sampling pump o Use a vest, such as a fishing vest to carry the pump. Attach the cyclone/cassette assembly to the employee’s collar. This should be within the employee’s breathing zone (within 12-inches around the employee’s head). Explain to the employee that the sample inlet must face away from clothing, etc. at all times. Do not cover the sample with coat, coveralls, etc. Check on the sample every couple of hours to ensure: o Pump is still running o Sample is still in correct position o Employee is still performing same task o Etc. Collect Samples When Sampling is Complete: • Collect sample train • Record sample run time in minutes • Perform post calibration as described in the Pump Calibration Procedures chapter • Shut off pump • Remove cassette from cyclone and insert plugs into inlet & outlet • Charge pump for next sampling • Clean cyclones using soap and water and allow to thoroughly dry • Send samples to IH-Accredited lab for analysis. Request NIOSH 5040 method for Elemental and Organic Carbon Analysis. Interpreting Results: • Two results will be received from the lab: Elemental Carbon & Organic Carbon. The total carbon (elemental + organic) is used as a surrogate to determine DPM. • Results will be given in micrograms per sample (ug/sample). This will need to be converted to micrograms per cubic meter (ug/m3) by using the following: o Multiply the average liters per minute (LPM) by the amount of minutes the pump ran when sampling. This will give you the total liters ran through the sample cassette. o Multiply the total liters (from above) by .001 to convert to cubic meters (m3). o Divide the ug/sample (received from lab) by the cubic meters (calculated above) to get ug/m3. o Do this for both the organic & elemental results. Once both are calculated, add them both together to get the total carbon amount. MSHA’s Permissible Exposure Limit (PEL) is based on the total carbon amount. • Compare to MSHA’s current (PEL) to determine whether the exposure was over or under the PEL. o From 2007 through May 19, 2008, the PEL is 350tc ug/m3 of total carbon. If the total carbon (elemental + organic) is over 350tc ug/m3, then multiply the elemental carbon (ug/m3) by 1.3. If that total is also over 350tc ug/m3, then an over-exposure has occurred. Chapter 6 Diesel Particulate Matter (DPM) Sampling Procedures Page 3 of 4 Copyright © 2008 Nevada Mining Association o Beginning May 20, 2008, the PEL is reduced to 160tc ug/m3. However, at the time of the printing of this manual, MSHA has not determined a final multiplier for elemental carbon (such as the 1.3 multiplier used in 2007). Example utilizing the 2007 PEL: Employee sampled for full 12-hour shift: Average air flow ...................................................................1.72 LPM Shift duration (sampling time) ...............................................720 minutes Organic carbon amount (received from lab)..........................25 ug/sample Elemental carbon amount (received from lab).......................52 ug/sample Calculate Air Volume • Average Liters per Minute = (1.72+1.72)/2 = .......1.72 LPM • Total Liters (1.72 LPM * 480) = ............................826 Liters Please note that 480 minutes is used to Shift Weight the result although the sample time was actually 720 minutes. • Total cubic meters (m3) 826 liters * .001= .............0.826m3 Calculate Exposure: • Step 1: o Organic Carbon: 25 ug/sample/0.826 m3 = 177oc ug/m3 o Elemental Carbon: 52 ug/sample/0.826 m3 = 185ec ug/m3 Add both together: • 177oc ug/m3 + 185ec ug/m3 = 362 ug/m3 Since the total of organic + elemental carbon is over 350tc ug/m3, you must now multiply the elemental carbon by 1.3 to determine if an over-exposure has occurred. If this amount had been under 350tc ug/m3, an over-exposure would not have occurred and you would not have to go any farther. • Step 2: o Multiply elemental carbon amount by 1.3 185ec ug/m3 * 1.3 = 241tc ug/m3 Since the product of the elemental carbon times 1.3 is under the PEL of 350tc ug/m3, no over-exposure has occurred. Chapter 6 Diesel Particulate Matter (DPM) Sampling Procedures Page 4 of 4 Copyright © 2008 Nevada Mining Association Chapter 7 Airborne Lead/Arsenic Sampling Procedures This chapter will discuss how to sample airborne lead or arsenic dust/fume concentrations. Lead and Arsenic are sampled using nearly identical methods; therefore the chapters will be combined. Airborne lead & arsenic requires the use of a mixed-cellulose ester (MCE with 0.084 micron pore size) cassette with a sampling pump. The sampling pump should be calibrated to 1-4 LPM before sampling (please see the Calibration Procedures Chapter). MCE Cassette Sampling pump Picture 1 – airborne lead dust & fume sampling train Sampling Train The sampling train (see picture 1) will consist of: • Air sampling pump, • Tygon tubing, the tubing must be long enough to reach from the air pump (at person’s waist) to the cassette (at the person’s collar) • MCE cassette. • Cassette holder, the cassette holder will hold the MCE cassette and have a clip that will Outlet Chapter 7 Airborne Lead/Arsenic Sampling Procedures Page 1 of 3 Copyright © 2008 Nevada Mining Association Inlet clip to the person’s collar. Please note that the cassette outlet says outlet on it. It also has a ‘wagon wheel’ looking air-channel to distribute the air across the filter evenly. This end of the cassette must be connected to the Tygon tubing so air flows into the cassette through the inlet side only. Sampling Procedures • Select employees to be sampled. Explain that the purpose of the sampling is to monitor the employee’s exposure to lead or arsenic dust and/or fume over his shift. • Instruct the employee to wear the sample the entire shift. • Attach the pump to the employee. This can be done several ways: o Attach the pump to the employee’s belt o Use the carrying case & straps that usually come with a sampling pump o Use a vest, such as a fishing vest to carry the pump. • Attach the cassette assembly to the employee’s collar. This should be within the employee’s breathing zone (within 12-inches around the employee’s head). • Explain to the employee that the sample inlet must face downwards at all times. (If the inlet faces up, dust can fall into the cassette, giving an erroneously elevated result). Do not cover the sample with coat, coveralls, etc. • Check on the sample every couple of hours to ensure: o Pump is still running o Sample is still in correct position o Employee is still performing same task o Etc. • A task log could be given to the person to fill out every half-hour. This helps in identifying tasks that may have contributed to elevated exposures. Collect Samples When Sampling is Complete: • Collect sample train • Record sample run time in minutes • Perform post calibration as described in the Pump Calibration Procedures chapter • Remove cassette from cyclone and insert plugs into inlet & outlet • Charge pump for next sampling • Send samples to IH-Accredited lab for analysis. Request NIOSH 7082 for lead analysis or NIOSH 7900 for Arsenic analysis. (NIOSH 7300 can be used if sampling for both lead & arsenic with same cassette). Calculating TLV & Interpreting Results: • Results usually are received in milligrams (mg) per sample. If results are reported in micrograms (ug) multiply the result in micrograms by .001 to move the decimal point 3 places to the left. For example 125ug x .001 = .125mg. o Calculate cubic meters of air ran through the sample (average liters per minute (lpm) ran during sampling multiplied by number of minutes the sample ran. For example, if the average of the pre & post calibrations was 1.705 lpm and the sample time was 480 minutes, then use 1.705 lpm *480 minutes* .001= 0.818 m3. Chapter 7 Airborne Lead/Arsenic Sampling Procedures Page 2 of 3 Copyright © 2008 Nevada Mining Association Please note that if a personal sample is conducted on an employee that works more than an eight-hour shift, then the sample must be shift-weighted (called a Shift-Weighted Average (SWA)) in order to compare the exposure to MSHA’s TLV. To shift-weight an exposure, 480 minutes must be used no matter what the sample time was (as long as the sample was more than eight hours). For example, if a full-shift sample was conducted on an employee working a 12-hour shift, then the formula used to calculate the cubic meters would be 1.700 * 480 * .001. Please notice that 480 minutes is used in the SWA, not 720 minutes. o Calculate exposure: Divide the mg/sample received from the lab by the cubic meters calculated above. Example (using lead): Employee sampled for full 12-hour shift • • • • Results received from lab in micrograms (ug)...........44 Pre Cal.....................................................................1.700 LPM Post Cal ...................................................................1.715 LPM Shift Duration (12-Hours).......................................720 Minutes • Change 44 micrograms to milligrams.....................44ug x .001 = .044mg Calculate Air Volume • Average Liters per Minute = (1.700+1.715)/2 = ...1.708 LPM • Total Liters (1.708 LPM * 480) = ..........................820 Liters Please note that 480 minutes is used to Shift Weight the result although the sample time was actually 720 minutes. • Total cubic meters (m3) 820 liters * .001= .............0.82m3 Calculate Exposure Divide lead(mg) by cubic meters o .044mg / 0.82m3 = 0.054mg/m3 In this example, the employee was over the current American Conference of Governmental Industrial Hygienist’s (ACGIH) TLV of 0.05mg/m3. Please note that MSHA’s TLV from 1973 is three times higher at 0.15mg/m3. Chapter 7 Airborne Lead/Arsenic Sampling Procedures Page 3 of 3 Copyright © 2008 Nevada Mining Association Chapter 8 Sampling for Mercury Vapors Overview The purpose of personal air monitoring is to determine an individual’s exposure to airborne metallic mercury vapor. A sampling device is placed on the employee within his/her breathing zone, which usually involves clipping the monitor to the shirt collar. The sampling time is dependent on the objectives of the survey. The sampling results are compared to either predetermined values established by the company or to regulatory standards to ascertain whether corrective action is needed to ensure the health of the employee. MSHA’s full-shift exposure limit is 0.050 mg/m3. Exceeding this limit requires corrective action. Personal Air Monitoring There are two sampling methods that can be used to obtain an individual’s exposure to airborne mercury vapor: 1. Passive diffusion monitors can be used to collect full-shift samples. The primary benefit of using this sampling protocol is the ease of use. 2. The other method is active-integrated sampling, which entails using a calibrated sampling pump and a sorbent tube. The pump draws air, at a predetermined flow rate, through a sorbent tube where the contaminant is captured. The sorbent tube is sent to a laboratory to determine the amount of the contaminant collected on the sampling media. The results for both air monitoring methods are presented in either µg/m3 or mg/m3 of mercury. Passive Diffusion Monitoring Sampling using a passive diffusion monitor is very easy. You should identify the employee that you would like to sample and meet with them to explain the sampling goals and procedures. Chose your sampler (either the gold film or Sorbent Capsule) and clip the monitor in their breathing area, most likely on the lapel or shirt pocket. Open the cover and start monitoring. An activity log should be kept by the employee during the test to help identify problematic areas or activities in the event the sample exceeds the allowable limits (MSHA’s full-shift exposure limit is 0.050 mg/m3, the ACGIH TLV is 0.025 mg/m3). Direct the employee that is being sampled not to cover or handle the passive diffusion monitor. The monitor should be worn throughout the entire shift. You should check on the monitoring every few hours to verify that it is being worn correctly and not being tampered with. At the end of the sample period, remove the sample and follow the manufacturer’s recommendation for processing the sample. Sorbent capsule typically will require removing the sorbent capsule and cleaning the holder. Gold film badges typically require removing a perforated cloth that is used to keep particulate out of the monitor. Seal the sample and send it to the lab for analysis. During sampling it is Chapter 8 Sampling for Mercury Vapors Page 1 of 4 Copyright © 2008 Nevada Mining Association important to log the serial number of the passive monitor, the date and time the sample started and ended in addition to maintaining a complete record of chain of custody. The SKC Sorbent Capsule Passive Monitor The CHEMDISK II Gold Film Badge Passive Monitor Active-Integrated Sampling Active Integrated Sampling for mercury utilizes a sampling pump, Tygon tubing, an adjustable low flow tube holder and the sorbent tube. The sampling pump should be calibrated to .2 LPM before sampling (please see the Calibration Procedures Chapter). (Use NIOSH Manual of Analytical Methods 6009) Sampling Train The sampling train (see picture 1) will consist of: • Air sampling pump • Tygon tubing, the tubing must be long enough to reach from the air pump (at person’s waist) to the cassette (at the person’s collar) • Adjustable Low Flow Holder. The tube holder will hold the sorbent tube and have a clip that will clip to the person’s collar. • • • • Sampling Procedures Select employees to be sampled. Explain that the purpose of the sampling is to monitor the employee’s exposure to lead or arsenic dust and/or fume over his shift. Instruct the employee to wear the sample the entire shift. Attach the pump to the employee. This can be done several ways: o Attach the pump to the employee’s belt o Use the carrying case & straps that usually come with a sampling pump o Use a vest, such as a fishing vest to carry the pump. Attach the tube assembly to the employee’s collar. This should be within the employee’s breathing zone (within 12-inches around the employee’s head). Chapter 8 Sampling for Mercury Vapors Page 2 of 4 Copyright © 2008 Nevada Mining Association • • Check on the sample every couple of hours to ensure: o Pump is still running o Sample is still in correct position o Employee is still performing same task o Etc. A task log could be given to the person to fill out every halfhour. This helps in identifying tasks that may have contributed to elevated exposures. Collect Samples When Sampling is Complete: • Collect sample train • Record sample run time in minutes • Perform post calibration as described in the Pump Calibration Procedures chapter • Remove sorbent tube and insert plugs into inlet & outlet • Charge pump for next sampling • Send samples to IH-Accredited lab for analysis. Area Airborne Monitoring The purpose of obtaining area airborne samples is to determine specific sources of mercury vapor within the plant and to ascertain the effectiveness of clean-up and equipment decontamination procedures. Area samples should not be used as a substitute for personal exposure sampling. This type of monitoring should be used only to approximate employees’ personal exposures to mercury vapor or to determine contamination of an area or objects. Area airborne monitoring can be done using the same sampling techniques described above for personal exposure monitoring. In addition, there are two types of hand-held instruments that can be used to obtain instantaneous airborne concentrations of metallic mercury vapor: 1. Bacharach Instrument Company makes a mercury vapor analyzer that is based on ultra-violet (UV) absorption principle. It has a sensitivity of 0.01 mg/m3 and is accurate within +/- 5 percent. Since the mercury vapor detector depends on the absorption of UV radiation by the sample, it will be affected to some extent by any substances that have a greater absorption of UV light than does normal air. Commonly encountered substances are vapors of various hydrocarbons, water vapor, sulfur compounds, and particulate, such as smoke. The advantage of the UV instrument is that it can be used continuously in relatively high concentrations of mercury vapor (less than 1.0 mg/m3) whereas the gold film instrument requires periodic regeneration of the gold film. The disadvantages of the UV instrument are that the instrument must be zeroed between samples and its sensitivity. 2. Arizona Instruments Inc. makes a gold film mercury vapor monitor that is based on mercury’s ability to alter the resistance of a gold film. The instrument’s Chapter 8 Sampling for Mercury Vapors Page 3 of 4 Copyright © 2008 Nevada Mining Association sensitivity is 0.003 mg/m3 and the accuracy is +/- 5 percent at 0.100 mg/m3. Ammonia and acid gases are the principle chemicals that interfere with the operation of the instrument. Filters can be purchased from AZI in ammonia & acid environments to eliminate the interference. The instrument is also temperature sensitive. The advantage of the gold film instrument is its sensitivity and its ability to automatically zero itself between each sample. To perform area sampling, conduct a walkthrough of potential expose area and identify thermal areas. Potential sources would include carbon kilns, strip solution storage tanks, retorts, refineries, electro-winning cells and melting furnaces. Take area readings in these locations and document the results. If the readings are well below the exposure limits, no addition action is necessary. If readings are near or above the exposure limits, the source of the mercury vapor should be identified and either engineering or administrative controls should be put in place to control the exposure to the employees. Readings should be taken periodically to establish trends and identify exposure levels above the TLV. Monitoring would be more frequent if higher exposures are encountered. Appropriate PPE such as respiratory protection may be necessary if exposure levels can not be lowered. Surface Sampling Wipe samples are used to determine the effectiveness of equipment decontamination procedures and clean-up protocols used for the hygiene facility and lunch room. This type of sampling involves swiping a 100cm2 area with moist filter paper. The wipe sample is placed in a plastic bag and submitted to a laboratory for analysis. The results are presented in either micrograms or milligrams of mercury. These results should be used only to determine the presence or absence of mercury. A control sample should be taken in an area where mercury should not be present (such as a desk in an administrative area that is not located in a mercury area). This control sample can be used as an ‘acceptable’ amount of mercury. Contact your preferred analytical lab and ask for a Ghost Wipe sample kit. The test kits typically come with a template for the wipe area, directions and the required materials. Make sure your hands are free of any mercury before you perform the wipe test. Also, there are commercially available surface test kits for evaluating surface contamination. They can be used as indicators of the presence or absence of mercury on various surfaces. A Mercury Test Kit is available from SKC to indicate the presence of mercury*. *Please note that this is not an endorsement for SKC. Chapter 8 Sampling for Mercury Vapors Page 4 of 4 Copyright © 2008 Nevada Mining Association Chapter 9 Airborne Silver Dust/Fume Sampling Procedures This chapter will discuss how to sample airborne Silver dust/fume concentrations. Airborne Silver requires the use of a mixed-cellulose ester (MCE) cassette with a sampling pump. The sampling pump should be calibrated to 1 - 4 LPM before sampling (please see the Calibration Procedures Chapter). (Use NIOSH Manual of Analytical Method 7300) MCE Cassette Sampling pump Picture 1 – airborne Silver dust & fume sampling train Sampling Train The sampling train (see picture 1) will consist of: • Air sampling pump, • Tygon tubing, the tubing must be long enough to reach from the air pump (at person’s waist) to the cassette (at the person’s collar) • MCE cassette. • Cassette holder, the cassette holder will hold the MCE cassette and have a clip that will clip to the person’s collar. Please note that the cassette outlet says outlet on it. It also has a ‘wagon wheel’ looking air-channel to distribute the air Outlet Chapter 9 Airborne Silver Dust/Fume Sampling Procedures Page 1 of 3 Copyright © 2008 Nevada Mining Association Inlet • across the filter evenly. This end of the cassette must be connected to the Tygon tubing so air flows into the cassette through the inlet side only. A Cyclone is not used for this procedure. Sampling Procedures • Select employees to be sampled. Explain that the purpose of the sampling is to monitor the employee’s exposure to silver dust or fume over his shift. • Instruct the employee to wear the sample the entire shift. • Attach the pump to the employee. This can be done several ways: o Attach the pump to the employee’s belt o Use the carrying case & straps that usually come with a sampling pump o Use a vest, such as a fishing vest to carry the pump. • Attach the cassette assembly to the employee’s collar. This should be within the employee’s breathing zone (within 12-inches around the employee’s head). • Check on the sample every couple of hours to ensure: o Pump is still running o Sample is still in correct position o Employee is still performing same task o Etc. • A task log could be given to the person to fill out every half-hour. This helps in identifying tasks that may have contributed to elevated exposures. Collect Samples When Sampling is Complete: • Collect sample train • Record sample run time in minutes • Perform post calibration as described in the Pump Calibration Procedures chapter • Remove cassette and insert plugs into inlet & outlet • Charge pump for next sampling • Send samples to IH-Accredited lab for analysis. Request analysis for NIOSH Analytical Method 7300 for Silver. Calculating TLV & Interpreting Results: • Silver fume concentrations are determined as Shift Weighted Average (SWA). The formula for calculating the SWA is: SWA = Weight of Contaminant (mg) (Flow Rate (Lpm) x Time x 0.001 m3 ÷ L) As per Metal Nonmetal Safety and Health’s sampling protocol, a 480minute time is used to calculate the SWA. The PEL for silver fumes and dust, from the 1973 TLV list, is 0.01 mg/m3 or 10ug/m3. • Results usually are received in milligrams (mg) per sample. If results are reported in micrograms (ug) multiply the result in micrograms by .001 to move the decimal point 3 places to the left. For example 8 ug x .001 = .008mg. Chapter 9 Airborne Silver Dust/Fume Sampling Procedures Page 2 of 3 Copyright © 2008 Nevada Mining Association o Calculate cubic meters of air ran through the sample (average liters per minute (lpm) ran during sampling multiplied by number of minutes the sample ran. For example, if the average of the pre & post calibrations was 1.705 lpm and the sample time was 480 minutes, then use 1.705 lpm *480 minutes* .001= 0.818 m3. Please note that if a personal sample is conducted on an employee that works more than an eight-hour shift, then the sample must be shift-weighted (called a Shift-Weighted Average (SWA)) in order to compare the exposure to MSHA’s TLV. To shift-weight an exposure, 480 minutes must be used no matter what the sample time was (as long as the sample was more than eight hours). For example, if a full-shift sample was conducted on an employee working a 12hour shift, then the formula used to calculate the cubic meters would be 1.700 * 480 * .001. Please notice that 480 minutes is used in the SWA, not 720 minutes. o Calculate exposure: Divide the mg/sample received from the lab by the cubic meters calculated above. Example: Employee sampled for full 12-hour shift • • • • Results received from lab in micrograms (ug)...........0.8 Pre Cal.....................................................................1.700 LPM Post Cal ...................................................................1.715 LPM Shift Duration (12-Hours).......................................720 Minutes • Change 0.8 micrograms to milligrams....................0.8ug x .001 = .0008mg Calculate Air Volume • Average Liters per Minute = (1.700+1.715)/2 = ...1.708 LPM • Total Liters (1.708 LPM * 480) = ..........................820 Liters Please note that 480 minutes is used to Shift Weight the result although the sample time was actually 720 minutes. • Total cubic meters (m3) 820 liters * .001= .............0.82m3 Calculate Exposure Divide Silver (mg) by cubic meters o .0008mg / 0.82m3 = 0.001mg/m3 In this example, the employee was below the current MSHA, NIOSH and OSHA PEL of 0.010 mg/m3. Chapter 9 Airborne Silver Dust/Fume Sampling Procedures Page 3 of 3 Copyright © 2008 Nevada Mining Association Rev 1 Chapter 10 Thermal Stress Heat stress Working in hot conditions puts stress on our body's cooling system. When the heat is combined with other stresses such as physical labor, loss of fluids, fatigue or preexisting medical conditions, it may lead to heat-related illness, disability and even death. This can happen to anybody--even the physically fit. The body is always generating heat and passing it to the environment. The harder the body is working, the more heat it has to lose. When the environment is hot or humid, is near a source of radiant heat (for example, a furnace or the sun), the body must work harder to get rid of its heat. If the air is moving (for example, from fans) and is cooler than the body, it is easier for the body to pass heat to the environment. Workers over 40 should be more careful because of a reduced ability to sweat. Hot work environments can be managed with an effective program including but not limited to; • Industrial hygiene monitoring program • Work/rest regiments • Ventilation • Fluids for worker hydration • Employees trained in the signs and symptoms of heat stress • Use of appropriate clothing and PPE The American Conference of Industrial Hygienist (ACGIH) TLV booklet is a good source to acquire better understanding of thermal stress and was used as a reference for this chapter. It also contains more information on heat stress factors such as metabolic rates that can assist in heat stress monitoring. Acclimatization If an employee is not used to working in the heat, it can take a week or two to get acclimatized or used to the heat. If they were ill or away from work for a week or so they can lose their acclimatization. Chapter 10 Thermal Stress Page 1 of 8 Copyright © 2008 Nevada Mining Association Rev 1 Signs, Symptoms, Prevention and Treatment Signs & Cause Symptoms Treatment Symptoms Hot humid environment; plugged sweat glands. Too much exposure to the sun. Red bumpy rash with severe itching. Heat Cramps Heavy sweating drains a person's body of salt, which cannot be replaced just by drinking water. Painful cramps in arms, legs or stomach which occur suddenly at work or later at home. Cramps are serious because they can be a warning of other more dangerous heatinduced illnesses. Move to a cool area; loosen clothing and drink cool salted water ( 1 tsp. salt per gallon of water) or commercial fluid replacement beverage. If the cramps are severe or don't go away, seek medical aid. Fainting Not enough blood flowing to the head, causing loss of consciousness. Sudden fainting after at least two hours of work; cool moist skin; weak pulse. Reduce activity levels and/or heat exposure. Drink fluids regularly. Workers should check on each other to help spot the symptoms which often precede heat stroke. Heat Exhaustion Inadequate salt and water intake causes a person's body's cooling system to start to break down. Heavy sweating; cool moist skin; body temperature over 38oC; weak pulse; normal or low blood pressure; person is tired, weak, clumsy, upset or confused; is very thirsty; or is panting or breathing rapidly, vision may be blurred. Fainting may be due to a heart attack or other illness. GET MEDICAL ATTENTION. Assess need for CPR. Move to a cool area; loosen clothing; make person lie down; and if the person is conscious, offer sips of cool water. GET MEDICAL AID. This condition can lead to heat stroke, which can kill. Move the person to a cool shaded area; loosen or remove excess clothing; provide cool water to drink (salted if possible); fan and spray with cool water. Heat Stroke If a person's body has used up all its water and salt, it will stop sweating. This can cause body temperature to rise. High body temperature (over 41oC) and any one of the following: the person is weak, confused, upset or acting strangely; has hot, dry, red skin; a fast pulse; a headache or dizziness. In later stages, a person may pass out and have convulsions. CALL AMBULANCE. This condition can kill a person quickly. Remove excess clothing; fan and spray the person with cool water; offer sips of cool water if the person is conscious. Reduce activity levels and/or heat exposure. Drink fluids regularly. Workers should check on each other to help spot the symptoms which often precede heat stroke. Heat Rash Sunburn Red, painful, or blistering and peeling skin. Change into dry clothes and avoid hot environments. Rinse skin with cool water. If the skin blisters, seek medical aid. Use skin lotions (avoid topical anesthetics) and work in the shade. Prevention Chapter 10 Thermal Stress Page 2 of 8 Copyright © 2008 Nevada Mining Association Wash regularly to keep skin clean and dry. Work in the shade: cover skin with clothing; wear suntan lotions with a sun protection factor of at least 15. People with fair skin should be especially cautious. When working in the heat, workers should put salt on their food (if on a low-salt diet, this should be discussed with a doctor). This will give the body all the salt it needs; don't take salt tablets. Reduce activity levels and/or heat exposure. Drink fluids regularly. Workers should check on each other to help spot the symptoms which often precede heat stroke. Rev 1 Effective engineering controls that reduce heat exposure to employees are the first line of defense when protecting workers. Below is s list of engineering, administrative, and personal protective clothing controls. Engineering Controls • • • • • Control the heat at source through the use of insulating and reflective barriers (insulate furnace walls). Exhaust hot air and steam produced by specific operations. Reduce the temperature and humidity through air cooling. Provide air-conditioned rest areas. Reduce physical demands of work task through mechanical assistance (hoists, lifttables, etc.). Administrative Controls • • • • • • • Schedule hot jobs to cooler times of the day. Work/rest regiment. Make available cool drinking water or other fluids for workers and remind them to drink a cup every 20 minutes. Assign additional workers or slow down work pace. Make sure everyone is properly acclimatized. Train workers to recognize the signs and symptoms of heat stress. Pregnant workers and workers with a medical condition should discuss working in the heat with their doctor. Clothing & PPE • • • • • Light clothing should be worn to allow free air movement and sweat evaporation. Outside, wear light-colored clothing. In a high radiant heat situation, reflective clothing may help. For very hot environments, air, water or ice-cooled insulated clothing should be considered. Vapor barrier clothing, such as acid suits, greatly increases the amount of heat stress on the body, and extra caution is necessary. Monitoring Equipment Two commonly used monitoring tools are the Wet Bulb, Globe Temperature (WBGT) device and the personal heat stress monitor. The WBGT offers a useful index of environmental contribution to heat stress. It is influenced by air temperature, radiant heat and humidity. It can be used to determine heat stress exposure before it occurs. Personal heat stress monitors indicate body core temperature. The heat stress monitor in the example below uses an ear lug device to calculate body core temperature. The heat stress monitor gives a reading of heat stress exposure during or after the exposure has occurred. Chapter 10 Thermal Stress Page 3 of 8 Copyright © 2008 Nevada Mining Association Rev 1 Personal Heat Stress Monitor Wet Bulb, Globe Temperature Monitor Wet Bulb, Globe Temperature (WBGT) The WBGT uses three sensors (sensor array) to take measurements which compute the WBGT index; wet bulb thermometer, globe temperature, and dry bulb thermometer. The WBGT index is an excepted method of determining the heat stress level imposed on an individual in a given environment. Although the formulas for the WBGT index are included in this chapter, the WBGT monitor will give an index reading temperature that can be useful in determining the potential for heat stress exposure. The ACGIH screening criteria for heat stress exposure table is included as well. The values from the WBGT can be compared to this table to determine an appropriate work/rest regiment. The WET BULB THERMOMETER gives an indication of the effects of humidity on an individual. Relative humidity and wind speed are taken into account by measuring the amount of evaporative cooling taking place at a thermometer covered with a moistened wick. The GLOBE THERMOMETER gives an indication of radiant heat exposure to an individual due to either direct light or hot objects in the environment. This is accomplished by placing a temperature sensor inside a blackened copper sphere and measuring the temperature rise. The DRY BULB THERMOMETER measures the ambient air temperature. This measurement is used in the outdoor WBGT calculation when a high solar radiant heat load may be present. The WBGT uses the wet bulb and globe temperatures readings to monitor the indoor environment. Outdoor measurements include the dry bulb temperature reading where a high solar radiant heat load may be present. The WBGT index is a weighted average of these measurements according to these formulas: WBGT indoor = 0.7 wet bulb + 0.3 globe WBGT Outdoor = 0.7 wet bulb + 0.2 globe + 0.1 dry bulb Chapter 10 Thermal Stress Page 4 of 8 Copyright © 2008 Nevada Mining Association Rev 1 Monitoring with a Wet Bulb, Globe Temperature (WBGT) Some WBGT units are available with more than one sensor array. These can be used to monitor more than one area at a time or used together at ankle, abdomen, and head height when the temperature in an area is variable (see illustration). When used in a temperature variable environment the WBGT can weight or average the readings. Most WBGT units can be set to automatically weight the readings together using formula below. WBGT= (WBGT head + (2 x WBGT abdomen) + WBGT feet) 4 Basic Operating Instructions: • Depending on the memory capabilities, you may need to clear the WBGT data from previous monitoring. The unit may append the data or start a new session. • Place the WBGT at a height of 3.5 ft. for standing individuals or 2.0 ft. for sitting individuals. Tripod mounting is recommended to get unit away from anything that may block radiant heat or airflow. • Fill the wet bulb reservoir with distilled water. After adding water or moving the unit to a new location, allow 10 minutes for the globe and wet bulb readings to stabilize. • Set the instrument to WBGT-in for indoor application or WBGT-out for outdoor use. • Start the unit’s data recording for the monitoring session. See the instruction book for the WBGT you are using for details on data logging, programming start and stop times, alarm options, data out-put, printing options, etc. Because the WBGT is only an index of environment, the screening criteria are adjusted for the contributions of the work demands and clothing as well as state of acclimation. The following tables are used in conjunction with WBGT measurements to assess the work environment. Table 1 provides WBGT criteria suitable for screening purposes, table 2 provides additions to measured WBGT values for some clothing ensembles, and table 3 provides examples of activity levels. These values are based on preventing fit, acclimatized workers' core temperatures from rising above 38o C (100o F). Chapter 10 Thermal Stress Page 5 of 8 Copyright © 2008 Nevada Mining Association Rev 1 Table 1. Screening Criteria. All values in oC Acclimated Work Demands Un-acclimated Light Moderate Heavy 100% Work 29.5 27.5 75% Work; 25% Rest 50% Work; 50% Rest 25% Work; 75% Rest 30.5 Very Heavy Very Heavy Light Moderate Heavy 26 27.5 25 22.5 28.5 27.5 29 26.5 24.5 31.5 29.5 28.5 27.5 30 28 26.5 25 32.5 31 30 29.5 31 29 28 26.5 TABLE 2. Additions to measured WBGT values for some clothing. All values in oC Clothing Type WBGT Addition Summer work uniform Cloth (woven material) overalls Double-cloth overalls 0o +3.5o +5o Table 3. Examples of Activity Categories Categories Example Activity Resting Sitting quietly Sitting with moderate arm movements Sitting with moderate arm and leg movements Standing with light work with machine or bench while using mostly arms Using table saw Standing with light or moderate work at machine or bench and some walking about Scrubbing in standing position Walking about with moderate lifting or pushing Walking on level at 6 Km/hr while carrying 3 Kg weight load Carpenter sawing by hand Shoveling dry dirt Heavy assembly work on a noncontinuous basis Intermittent heavy lifting with pushing or pulling (e.g., pick-and-shovel work) Shoveling wet sand Light Moderate Heavy Very Heavy Personal Heat Stress Monitor The personal heat stress monitor described in this chapter uses an ear sensor to monitor body temperature. It is intended to alert the user that their body temperature has risen above the “safe” level and action should be taken to allow the body to cool. It does not replace the individuals own feelings and judgment. Chapter 10 Thermal Stress Page 6 of 8 Copyright © 2008 Nevada Mining Association Rev 1 The hypothalamus is located at the base of the brain. It is the body’s temperature controller. The ear canal borders the hypothalamus and will track its temperature changes once the ear canal is isolated from the outside environment. The personal heat stress monitor’s sensor is placed in a special ear plug to achieve the required isolation and monitor change in the body’s temperature. It will set off an audible alarm in the ear when body temperature levels reach a preset limit. The recommended limit is 38o C by the World Health Organization (WHO). This limit has been accepted by the ACGIH. Closely monitored acclimated individuals may have a higher tolerance. If the alarm activates, take appropriate measures to allow the body to cool. Rest, lowering the work load, moving to a cooler environment, and drinking cool liquids are all methods to help cool the body and avoid heat related injuries. Basic Operating Instructions: • Explain the purposes of the personal heat stress monitor to the worker and that an audible alarm sounding indicates their body needs a cooling period. • Turn on the monitor and check battery strength and clear old data if required. • Calibrate the monitor by taking the worker’s oral temperature and entering this “offset” temperature into the monitor. • Place the sensor in a new ear plug and have the worker use slight pressure to roll the ear plug and insert it into the ear canal. Allow 5 minutes for temperature to stabilize. Only ear plugs designed for the sensor should be used. • Place the personal heat stress monitor on the worker’s belt or other location so the cord to the ear piece will not interfere with the work being performed. After use, many personal heat stress monitors allow for the data to be printed out or down loaded to analyze the worker’s heat exposure. See the instruction book for the personal heat stress monitor you are using for details on data logging, programming start and stop times, alarm options, data out-put, printing options, etc. Cold stress Cold Stress limits are intended to prevent workers from the most severe effects of hypothermia and cold injury. The objective of these limits is to keep the body core temperature from falling below 36o C. It is important to also protect extremities from frost bite. The wind chill factor is a combination of air temperature and wind speed that affects the freezing rate of exposed skin. Wind chill should be considered when assessing the work environment. See table 4 for the ACGIH cooling power of wind chart. Frostbite is a medical condition that can happen to anyone. In the most basic terms frostbite is when the skin and/or the tissue under the skin freezes and causes cell damage. This is caused by exposure to cold, either through the air or through a chemical exposure, like to dry ice or highly compressed gas. Under extreme conditions frostbite can occur in one second. The elderly, young children, people with circulatory disorders, and people from warmer climates have a higher risk factor of getting frostbite. People who have had previous cold injuries are also more at risk of getting frostbite again in the same places. Chapter 10 Thermal Stress Page 7 of 8 Copyright © 2008 Nevada Mining Association Rev 1 Frostbite is a preventable outdoor-related injury. Preparation and understanding is all it takes to prevent serious injury while working outdoors. Below is a list of some steps that can be taken to prevent cold stress. • • • • • • • Estimated wind speed in MPH Use a work/warm regiment. Use a buddy system to watch for symptoms. Avoid sweating that can result in wet clothing. Understand the prevailing weather conditions and wind chill. Wear layers of clothing and protect exposed skin from the elements. Wear a hat that will cover your ears. In extreme conditions use a facemask and or goggles. Allow workers to acclimate to cold conditions. Table 4. Cooling power of wind on exposed flesh. Actual Temperature Reading (oF) 50 40 30 20 10 0 -10 -20 -30 -40 -50 -60 -40 -47 -70 -85 -96 -104 -109 -113 -116 -50 -57 -83 -99 -110 -118 -125 -129 -132 -60 -68 -95 -112 -121 -133 -140 -145 -148 Equivalent Chill Temperatures Calm 5 10 15 20 25 30 35 40 50 48 40 36 32 30 28 27 26 40 37 28 22 18 16 13 11 10 30 27 16 9 4 0 -2 -4 -6 20 16 4 -5 -10 -15 -18 -20 -21 10 6 -9 -18 -25 -29 -33 -35 -37 0 -5 -24 -32 -39 -44 -48 -51 -53 -10 -15 -33 -45 -53 -59 -63 -67 -69 -20 -26 -46 -58 -67 -74 -79 -82 -85 -30 -36 -58 -72 -82 -88 -94 -98 -100 LITTLE DANGER INCREASED DANGER GREAT DANGER (wind speeds greater In < hr with dry skin. Danger from freezing of exposed skin Flesh may freeze in 30 Maximum danger of false sense within one minute. seconds. than 40 mph have little additional effect) of security. Trench foot and emersion foot may occur at any point on this chart The ACGIH TLV book is an excellent source to learn more about thermal stress and the prevention of related injury and illness. With a comprehensive industrial hygiene program that includes IH monitoring, observation, engineering and administrative controls, and appropriate PPE adverse effects from thermal stress can be prevented. Chapter 10 Thermal Stress Page 8 of 8 Copyright © 2008 Nevada Mining Association Chapter 11 Metal Fumes – Welding/Cutting 1.1 Purpose/Scope 1.2 Definition 1.3 To measure airborne concentrations of particulates generated from welding and cutting operations. A fume is an airborne particle formed when a metal, which is solid at room temperature, is melted, vaporizes into the atmosphere, and then condenses to a solid again. Evaluating the Hazard A) Breathing Zone Samples All personal samples shall be taken in the worker’s breathing zone. The breathing zone of a welder wearing a welding hood is considered to be under the hood when the face shield is in the down position. B) Short-Term Samples When welding work is done for less than a full shift, short term sampling is appropriate. Short-term samples are also taken when high exposures to ceiling limit contaminants (i.e. manganese and cadmium) are anticipated. All short-term sampling should be taken for at least 15 minutes to allow enough contaminant to be collected for analysis. (Consult the certified lab used, for analysis requirements.) Collect at least one short-term sample during a period of suspected peak exposure. C) Full-Shift Samples Full-shift sampling should be used when employees will be welding or exposed to fume sources for all or most of their work shift. If full shift sampling is interrupted to take short-term sampling, the contaminant amounts determined by analysis of the full-shift and each short-term sample must be added to obtain the full-shift exposure for each contaminant. Chapter 11 Metal Fumes – Welding/Cutting Page 1 of 4 Copyright © 2008 Nevada Mining Association MCE Cassette Sampling pump Picture 1 – airborne metal fume sampling train 1.4 Sampling Equipment A) Battery operated vacuum pumps B) Two-piece filter cassette, 37mm diameter Metal Scan: Mixed cellulose ester (MCE) membrane filter with 0.8 micron pore size for monitoring for individual metals; analysis by inductively coupled argon plasma spectroscopy. Hexavalent Chromium (Chromium VI) Metal Fumes: Untared PVC filter with 5.0 micron pore size for monitoring only hexavalent chromium (does not include other forms of chromium nor can other metals be determined on the same filter); analysis by colorimetry. C) Standard Flow Meter Calibrator D) Sampling Hose 1.5 Sampling Procedures Chapter 11 Metal Fumes – Welding/Cutting Page 2 of 4 Copyright © 2008 Nevada Mining Association A) Prepare and Calibrate Pump - Refer to Calibration Procedures Chapter a. Assemble the sampling train consisting of the sampling hose and pump. b. Use a filter cassette of the same type used for sampling and attach to sampling train and calibrator. c. Calibrate per manufacture recommendations for a flow rate of 2.0 L/min. Document starting calibration flow rate. B) Select Worker a. Select a worker to be sampled and inform the worker what you are doing, what the sampling device does, and the reason for the sampling. b. Instruct the worker not to remove the sampler for any reason and not to cover the filter cassette with a coat or other garment. c. Emphasize the need for the worker to continue to work in a routine manner, and to inform you of any unusual occurrences during the sampling period. d. Inform the worker when and where the sampler will be removed. C) Attach Sampling Train to Worker a. Attach the pump to the worker’s belt b. Position the pump so it does not interfere with the worker’s activities. c. Attach the sampling head assembly to the clothing or the welder’s hood. 1. Ensure that the inlet of the filter cassette is facing down and next to the cheek. 2. Check to make sure there is enough slack in the sampling hose and that the cassette will be under the hood when the hood is in the down position. (This is the welder’s actual breathing zone and will give a true representative sample of the worker’s exposure.) Chapter 11 Metal Fumes – Welding/Cutting Page 3 of 4 Copyright © 2008 Nevada Mining Association D) Collect Sample a. Remove the plug from the cassette inlet. b. Start the pump and record the start time. c. Check the pump and sampling train as frequently as practical. Record all pertinent information in your field notes. d. Record activity of the worker and equipment operating in the area. Note controls in use and potential sources of exposure. E) Remove Sampling Train from Worker a. Be at the location specified at the start of the sampling period for the collection of the sampling train. b. Turn the pump off and record the end time. c. Remove the filter cassette from the sampling train and replace the plugs in the inlet and outlet openings of the cassette. Handle the cassette carefully to avoid losing sample and make sure cassette is properly labeled. F) Post-Sampling a. Make sure filter cassette is properly labeled and can be cross referenced to your field notes. b. Complete a post-calibration per manufacture recommendations with a representative filter in line to verify that the flow has not changed plus or minus 5%. Document the post-calibration flow rate. Use the average of the initial and final flow rate to calculate total volume sample. c. Along with the sample filter cassette, submit a blank from the same lot number as the sample filter cassette. This is done so that any contamination from handling samples will be accounted for in the final analysis. d. Fill out the required lab form and pack the sample filter, the blank, and all pertinent sampling information securely for shipment to a certified lab for analysis. Chapter 11 Metal Fumes – Welding/Cutting Page 4 of 4 Copyright © 2008 Nevada Mining Association Chapter 12 Industrial Ventilation Introduction Industrial Ventilation is an important method for reducing employee exposures to airborne contaminants. Ventilation is used to reduce or remove contaminates from employees. There are two major (2) types of industrial ventilation: 1. Dilution systems: reduce the concentrations of contaminants released in a work room by mixing with air flowing through the room. Natural or Mechanical induced air movement can be used to dilute contaminants. 2. Local exhaust ventilation (LEV): systems capture or contain contaminates at their source before they escape into the workplace environment. The main advantage of these systems is that they remove contaminates in place of diluted them depending upon 100% collection efficiency. Natural ventilation: is air movement within a work area due to wind, temperature differences between the exterior and interior of a building. Even moderate winds can move large volumes of air through open doors and windows. For example, a 15 mph wind blowing directly through a window of an open area of 36 ft² can move 25,000 ft³ min or more through the building if the air can escape through a doorway or other large opening. Mechanical ventilation: systems that range from simple wall-mounted propeller fans or roofmounted mechanical ventilators to complex engineered designs. They are efficient air movers only as long as there is an adequate amount of make-up air supply. Makeup Air: is air that enters the workroom to replace air exhausted through the ventilation system. A ventilation system will not work properly if there is not enough air in the room to exhaust. Makeup Air key notes: The supply rate should exceed the exhaust rate by 10%. The air should flow from cleaner areas of the workplace or plant. Makeup air should provide some cooling in the summer or in hot process areas. Makeup air should be provided 8-10 ft from the floor. Air should be heated to a temperature of 65F during winter months. Makeup air should not be contaminated by other exhaust sources. Fans Fans generate the airflow needed to provide industrial ventilation. There are two (2) major classes of fans, centrifugal and axial flow fans. Chapter 12 Industrial Ventilation Page 1 of 6 Copyright © 2008 Nevada Mining Association Centrifugal fans move air by blades on rotating fan wheel throwing air outward from the center inlet at a higher velocity or pressure than air entering the fan. Axial fans the air travels to the fan shaft and leaves the fan in the same direction as it entered propeller. In Local Exhaust Ventilation systems, centrifugal fans are more widely used than axial fans because they are quieter, less expensive to install and operate and generate higher pressures than axial fans of the same airflow capacity. Air-Cleaning Devices The ideal air cleaner would have these features; low initial and operating costs, high efficiency, no decline in operating efficiency or any service interruptions between cleaning and maintenance cycles and without hazardous employee exposures. Filters: trap particulates as the exhaust the flows through a porous medium. These filters may be made of woven or felted (pressed) fabric, paper or woven metal, depending upon the application. They can be disposable and/or reusable and configured to be mats, cartridges, bags and envelopes. Electrostatic precipitators: charge the particles by means of an electric field that is strong enough to produce ions that adhere to the particles. The charged particles are then collected by weaker field that causes the particle to migrate toward and adhere to the electrode with the opposite charge. Precipitators are greatest in systems where gas volume is large and high collection efficiency for small particles is needed. Cyclones: use a circular motion to the exhaust gas and causes particulates to move to the outer part of the air stream where they impact the cyclone walls. Air velocity is lower at the wall and the particulates drop down the wall into a collection hopper at the bottom. Wet scrubbers: water and/or other liquids collect the particles in water droplets, to collect extremely fine particles it is necessary to generate small water droplets moving at a high rate of speed. Wet scrubbers can remove particles as small as 0.2 μm. Any smaller particles there must be an increase in the amount of energy used to create contact with the smaller water droplets. Scrubbers that use absorption and/or chemical reaction are widely used for gas and vapor removal. “Baghouse”: is a typical example of an air cleaner, it is a configuration of tubular fabric filters arranged in a housing along with cleaning mechanism which can be automated or manual operated by shacking device and a means of blowing air back through the bags from the clean side. Another method used is the dislodging of accumulated dust cake. Chunks of cake that dislodged from the cleaning cycle should be large enough so that they are not re-entrained in the exhaust gas stream, or the section being cleaned should be isolated from the remainder of the baghouse. Baghouses can collect practically used on all particles greater than 1 μm. Gas and vapor removal: removal techniques for gases and vapors are absorption, adsorption and oxidation. Absorption: is a diffusion process where molecules are transferred from the exhaust gas to a liquid. Mass transfer occurs at the interface between the gas or vapor molecule and the liquid. A spray Chapter 12 Industrial Ventilation Page 2 of 6 Copyright © 2008 Nevada Mining Association chamber or another simple device may work for materials with low solubility or where a chemical reaction occurs between the contaminant and liquid prior to absorption a packed bed is often used to maximize contact. Adsorption: is the process where a gas or vapor adheres to the surface of a porous solid material. The contaminant condenses into very small liquid droplets at ambient temperature higher than its boiling point. This principal is well known to industrial hygienists through the use of carbon sampling devices. The contaminant can be recovered from the adsorbent by heating, steam flushing, air stripping vacuum treating or any other method that vaporizes the condensed material. Oxidation or combustion: devices are used when the air contaminants are combustible. They oxidize (burn) the contaminants under a variety of operating conditions. These systems are not very cost effective and do not work well when the airstream contains particulates. Testing Equipment Smoke tube test: smoke tubes are glass tubes containing a chemical that produces a chemical fume (smoke) as room air is blown through the tube with a hand-operated bulb. They are useful in evaluating: the capture range of hoods. identifying draft and other factors that can interfere with hood performance. demonstrating the capture distance of hoods to workers so they can position the hood or work item properly. Manometer: a instrument for measuring pressure: essentially a U-tube partially filled with a liquid (usually water), mercury or light oil and constructed in such a way that the amount of displacement of the liquid indicates the pressure being exerted on the instrument. Velometer: contains a vane or paddle that moves according to velocity of the air passing through the instrument. The paddle is connected mechanically to a meter that displays the velocity. Aerometer: has a propeller-like velocity sensor connected either a mechanical or electronic readout unit. This device comes in a variety of sizes the smaller ones have a thin probe while larger ones have a propeller that is several inches in diameter. Pitot-tube devices: these instruments determine the velocity pressure inside a duct and are connected to liquid manometer or pressure senor that displays output in either inches of water velocity pressure or directly in velocity. A pitot tube is special probelike device that accurately measures static and total pressures inside a duct. Taking Ventilation Measurements: Ducts: To measure the amount of air movement through a round duct, pitot tube & manometer can be used (see picture 1). Insert the pitot tube into a small hole in the side of the duct. The open end of Chapter 12 Industrial Ventilation Page 3 of 6 Copyright © 2008 Nevada Mining Association a the pitot tube must face into the air flow, so air blows into the tube. The pitot tube must be connected to a manometer. The manometer will show you the difference between static pressure & total pressure. This difference is called the velocity pressure. Thus, if the manometer reads 1” of water column, then the velocity pressure equals 1. Use the formula V 4005 VP Where: V=Velocity VP=Velocity Pressure Once you have the velocity, calculate the CFM by using the formula Q AV Where: Q=CFM A=Area – Calculate using A r 2 Where A=Area pie r2=radius (half the diameter in feet) squared (multiplied times itself). Example, to calculate the area of a 6 inch diameter duct, the formula would be: A .5 2 .785CFM Don’t forget to change from inches to feet. This is a common mistake. Underground: Underground ventilation readings are fairly simple to take with an anemometer. There are many anemometers available. The picture at the right has a couple of anemometers. Davis Ball Bearing Anemometer Taking underground ventilation readings will take several steps. Take each step on at a time & record each result. The steps are pretty easy! Alnor ® Rotating-Head Vane Anemometer 1. Using your anemometer (usually connected to a pole so you can reach the top of the drift) measure the velocity. Do this by starting at the top of the drift & move your anemometer from side to side, bringing it down about a foot each time. The intension is to cover all areas of the width & height of the drift. Do this for exactly one minute. At the end of the minute, you should have covered nearly every square foot of the drift Direction of anemometer (from bottom to top, side to side, in a straight line (see Picture 2). After one minute, read the 4Ft Vent line anemometer to get the velocity (Feet Per Minute)(FPM). This can be repeated 2 or 3 times to get a consistent average. Write down the velocity in FPM. 13 Ft 2. Measure the drift. Picture 3 shows a theoretic drawing with dimensions of an underground 8 Ft drift. Most drifts will have an arched top for 8 Ft ground stability. This causes us to do an extra step to figure out the area. a. Measure the width of the drift & the height of the sill (the distance from the Picture 2 – Move anemometer to cover drift area Chapter 12 Industrial Ventilation Page 4 of 6 Copyright © 2008 Nevada Mining Association floor along the side to the point where the arch begins). When measuring, keep the units in feet, not inches (example 8.25 ft). Multiply the width times the height to get the area up to the sill. Write the area down. b. Measure the distance in feet from the sill to the top of the arch (sometimes referred to as the back). This can also be done by measuring from the floor to the back, then subtracting the distance measured in the previous step from the floor to the sill. r 2 . Where: Calculate the area by using the formula A 2 i. A=Area ii. pie iii. r2 = radius squared (times itself) Write the number down. c. In this figure, a 4-foot vent line is against the back. The vent line takes away from the area of the drift. Calculate the 4ft area of the vent line using the same formula as 5 ft 2 above A r . d. Now, add the area from step a & b, & subtract the area of the vent line in step c. Sill Example from Picture 4: 8 ft 1. Calculate area from floor to sill (shaded in grey) a. Area from floor to sill = 8 foot b. Area from rib to rib = 8 foot i. 8 x 8 = 64 square feet 2. Calculate area at back (arch) Picture 4 2 r a. Use area of a circle formula A . (Since we are only calculating half of the 2 circle, we are dividing the answer by 2). r 2 5 2 i. A = 39.27 square feet 2 2 3. Calculate the area of the vent line – Please note that if there is no vent line, this step can be skipped. a. Use the same formula as above, but do not divide the answer by 2 i. A r 2 2 2 = 12.6 square feet. 4. Calculate the final area by adding the square feet from sill to floor to the area of the arch. Then subtract the area of the vent line: a. 64.0 +39.27 -12.6 90.67 sqft 5. Now, multiply the final area (90.67 sqft) to the velocity (measured with the anemometer in Feet Per Minute (FPM)). a. 90.67 SQFT x 350.0 FPM 31,734 CFM (Cubic Feet Per Minute) Chapter 12 Industrial Ventilation Page 5 of 6 Copyright © 2008 Nevada Mining Association Vent Hoods: Measure the ventilation in a vent hood exactly the same way you would an underground drift. However, it is much easier! 1. Measure velocity with anemometer. Cover face of hood with a sweeping motion for 1 minute, similar to underground above. 2. Measure height & width of face in feet. 3. Multiply height times width times velocity (FPM). a. W x H x FPM = CFM 4. Example: a. W x H x FPM 5ft 4ft Picture 4 – Lab vent hood (used for splitting samples) Measured 35 FPM when checked with anemometer 5 x 4 x 35 = 700 CFM Chapter 12 Industrial Ventilation Page 6 of 6 Copyright © 2008 Nevada Mining Association DATE:____________ SHIFT:_________________ DIVISION:____________________ SAMPLER:______________________ AGENT SAMPLED:_________________________________ NAME/AREA ASSIGNED DUTIES 1.) 2.) 3.) 4.) 5.) 6.) 7.) 8.) 9.) 10.) 11.) 12.) OTHER REMARKS/OBSERVATIONS PUMP # DOSI # SAMPLE NUMBER PRE POST CAL CAL TIME ON TIME OFF TOTAL FINAL MINUTES FLOW VOLUME