1
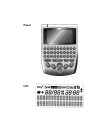
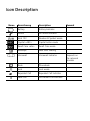
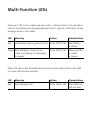
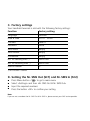
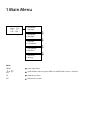
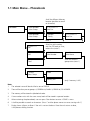
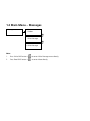
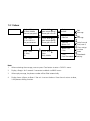
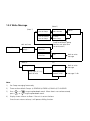
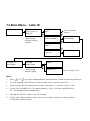
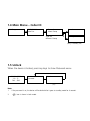
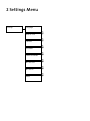
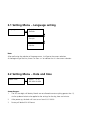
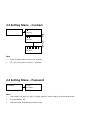
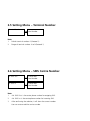
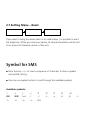
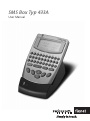
SMS Box Typ 433A
User Manual
Introduction
This product is a Portable SMS Device, which can able to send
or receive SMS from anywhere at home by using fixed line network. The transmission of messages of up to 160 characters is
guaranteed and text messages can be sent and received on any
mobile network across BT lines. The 433A Portable SMS Device,
which is a true innovative way to participate in the increasing
trend of text messaging, will revolutionize home communications boasting SMS text Messaging capability. It is designed to
give user a new concept and mobility of SMS communication
for domestic usage with an elegant design and user-friendly
interface. This product is comprised of two parts: the handheld
portable keypad and the cradle. The keypad is the part that the
users type and read text message on the LCD display whereas
the cradle is connected to the fixed line socket and telephone
through RJ11 plug, it is used to receive and store incoming
SMS in base temporary by a EEPROM when portable unit is
removed from base.
Feature List for
433A Portable SMS Device
SMS
ó
ó
ó
ó
ó
ó
ó
ó
ó
ó
ó
ó
ó
ó
LCD display: 4 lines. One line icons, one line date / time
and 2 lines text with 16 characters
Multi-language display
Can send SMS to SMS terminal, mobile
Number of Messages: Max – 63 SMS; Min – 20 SMS
(incoming + outgoing)*
Compatible to ETSI ES 201 912 protocol 1
Handheld portable
Security mode with password protected
Receive and store incoming SMS in base temporary when
portable unit is removed from base
Phonebook memory for names and numbers: 99
Clock feature: time display
Battery: 3 x AAA for portable SMS keypad; 3 x AAA for cradle
Battery life: 2 months for Carbon Zinc battery;
4.5 months for Alkaline battery
Indication for «new SMS» via LED & Audible Alert
Non-volatile memory for SMS, Phonebook and Caller ID backup
CALLER-ID / CLIP
ó
ó
ó
ó
ó
ó
ó
Caller-ID standard: Dual Mode DTMF / FSK
Display of Number and / or name of each incoming call
before lifting the handset
The phone numbers and the names of the 40 last incoming
calls are automatically stored with indication of data and time
Name tagging to the incoming phone number
Message waiting: display indication of new message in mailbox**
Display of new calls with indication of repeat calls
Display of new calls with counter of repeat calls
** The maximum and minimum number of messages depending on the contents of
messages stored. 64 KB Memory: Minimum 20 messages for 160 characters / SMS
or maximum 63 messages for 42 characters / SMS.
** If this service is supported by your telephone provider.
List of Menu Functions
Phonebook
ó
ó
View Number
View Group
Message
ó
ó
ó
Inbox
Outbox
Write Message
CID Memory
Add Entry
Settings
ó
ó
ó
ó
ó
ó
ó
ó
Language
Date & Time
Contrast
Password
Terminal Number
Nr. SMS Out
Nr. SMS In
Reset
Panel
LCD
Buttons
Input
Normal Output
A
A, a
Output ( + Shift «
»)
Output ( + «Num»)
Ç
B
B, b
º
/
C
C, c
Æ
_
D
D, d
É, é
E
E, e
#
F
F, f
ì
G
G, g
?
H
H, h
Ñ, ñ
3
I
I, i
*
J
J, j
Ò
8
K
K, k
‚
L
L, l
Ü, ü
;
M
M, m
Ö, ö
>
N
N, n
£
<
O
O, o
(
9
:
P
P, p
)
0
Q
Q, q
!
1
R
R, r
$
4
S
S, s
è
T
T, t
%
U
U, u
&
7
V
V, v
?
=
W
W, w
@
2
X
X, x
‘
-
5
Input
Normal Output
Y
Y, y
Output ( + Shift «
?
6
Z
Z, z
Å, å
+
Num
CAP
»)
Output ( + «Num»)
À
Note 1
Ù
.
.
Ä, ä
¨
Note 2
,
Note 3
Make one space
:-)
Note 4
Go to MENU
Go to Phonebook
Go to WRITE
Go to READ
Scroll Up
Scroll Down
ESC
Escape / Exit
OK
Confirm / OK
Remarks:
1) Press «CAP» button to changes the Caps.
2)
If «¨» button is pressed for 1 second in input mode, the whole screen will be cleared.
3)
Pressing different button while hold with «
», it gives a specific symbol corresponding
»).
to the button you press. Refer to the third column of the table Output (+ SHIFT «
4)
Please see 3. Symbol for SMS, which is at the end of this menu.
Icon Description
Name
Bezeichnung
Description
Battery
Battery Indicator
Phone
Off-Hook Indicator
Lock 123
Number & Symbol mode
Capital «ABC»
Capital Letter mode
Small Case «abc»
Small Case mode
Envelope
New SMS Waiting
Voicemail
Voicemail Indicator
Book
Phonebook
Lock
Lock mode
Repeated Call
Repeated Call Indicator
New Call
Unchecked Call Indicator
Remark
Depends on
the network
provider
Multi-Function LEDs
There are 1 LED on the cradle with two colors – Red and Green. The red LED is
used for low battery warning whereas green LED is used for notification of new
message stored in the cradle.
LED
Meaning
Action
Cleared when
Red
Low Battery Warning (below 2.5V)
32ms ON / 3s OFF
New Battery
is refilled
32ms ON / 3s OFF
Memory buffer
in cradle
is cleared
Green New Message is stored in the
cradle and waiting for uploading
to keypad
When the LED on the handheld device shows red this means that a new SMS
or a new call has been received.
LED
Meaning
Action
Cleared when
Red
New Message / Call
32ms ON / 3s OFF
New SMS and
CID are read
Getting Started
A. Installation
ó
ó
ó
ó
ó
Put batteries in the battery compartment to activate the display.
Open the battery compartment at the bottom of the device and the cradle.
Insert 3 x AAA batteries each.
Close the battery compartment.
Connect the line cord to the telephone line wall socket and to one of the
RJ11 socket at the back of cradle.
Note:
1)
User can also put the SMS device and telephone in series to one wall socket by connecting another
RJ11 socket at the back of cradle to telephone.
2)
Your SMS device is intended for a serial connection to an analog telephone. Whilst you may connect
the SMS box to an analogue telephone using a parallel connection there is no guarantee that it will
work flawlessly.
B. Pairing/ Synchronization for both Keypad and Cradle
ó
ó
ó
ó
Press Menu button «
» to go to main menu.
Select «Settings» and then «Reset».
Press the button «OK» to confirm your setting and then display shows
«Return To Base» if the Keypad is not on the base. Once the keypad is
placed properly, the pairing process will start.
Display shows «OK» if successes; «Fail».
Note:
If there is no response after the keypad is placed in the cradle, please pick up the keypad and put it back
on the cradle again. This error is often caused by the improper placing between keypad and cradle.
C. Factory settings
Your handheld terminal is sold with the following factory settings:
Function
Factory setting
Language
German
Date & time
01/ 01 00:00
Contrast
Level 4
Password
None
SMS inbox
empty
SMS outbox
empty
Phonebook
empty
No. for sending SMS *)
06221000
No. for receiving SMS *)
06221000
Device number
0
*) For Swisscom Customers
D. Setting the Nr. SMS Out (SC1) and Nr. SMS In (SC2)
ó
ó
ó
ó
Press Menu button «
» to go to main menu
Select «Settings» and then «Nr. SMS Out & Nr. SMS Out»
Input the required numbers
Press the button «OK» to confirm your setting
Note:
If you are not sure about the Nr. SMS Out & Nr. SMS In, please contact your SMS service provider.
1 Main Menu
28 / 04 7:30
-10- -5Calls SMS
> Phonebook
Messages
> Phonebook
> Messages
> Messages
> CID Memory
> CID Memory
> Add Entry
> Add Entry
> Settings
Note:
MENU
or
enter Main Menu
scroll different menu or press MENU to scroll different menu in forward
OK
towards next level
ESC
backwards last level
1.1 Main Menu – Phonebook
Scroll for different Memory
location (possible to search
on character)
Phonebook
> View Number
View Group
01 0313421111
Peter Pan
> View Number
> View Group
> General
Family
01 0313421111
Peter Pan
Note 2
0313421111
Dial?
0313421111
Edit?
Seize line, dial number,
wait for Off-hook or 8 sec,
release line (note 7)
00313421111
Enter Number
Scroll for different
group name (note 1)
0313421111
Clear?
> Friend
Select Group
Peter Pan
Enter Name
Saved
Memory Full
(only if memory is full)
Note:
1.
The selected name will be classified as one of GROUP.
2.
There will be four pre-set groups: a) GENERAL b) FAMILY c) FRIEND d) CO-WORKER
3.
The memory will be stored in alphabetical order.
4.
If two numbers exist with the same name, both will be stored in separate location.
5.
When reviewing the phone book, user can press Clear button to enter «CLEAR?» menu.
6.
It shall be possible to search on characters. (Press C and the phone moves to names starting with C)
7.
Display shows «Return to Base» if the unit is not on the base. Once the unit returns to base,
it will process dialling function.
1.2 Main Menu – Messages
Messages
> Inbox
Outbox
> Outbox
Write Message
> Outbox
> Write Message
Note:
1.
Press Write SMS button «
» to enter Write Message menu directly.
2.
» to enter Inbox directly.
Press Read SMS button «
1.2.1 Inbox
Inbox
13 / 4 9:50
04 Ricky Mobile
How are you going?
13 / 4 9:50
How are you going?
Please give me a call.
13 / 4 9:45
03 0313421111
See you tomorrow…
13 / 4 9:50
How are you going?
Please give me a call.
13 / 4 9:45
01 Mary
OK
13 / 4 9:50
From:
Ricky Mobile
> Reply
Forward
Edit
Message
> Reply
> Forward
Edit
Message
> Forward
> Return Call
Seize line and
Dial (note 4)
> Return Call
> Clear
Clear and go
to inbox
index
> Clear
> Save Phonebook
Phonebook
editing
Note:
1.
When reviewing the message, user can press Clear button to enter «CLEAR?» menu.
2.
Display «Empty» for 2 seconds if no content and back to INBOX menu.
3.
When reply message, the phone number will be filled automatically.
4.
Display shows «Return to Base» if the unit is not on the base. Once the unit returns to base,
it will process dialling function.
1.2.2 Write Message
(Note 3)
(Note 1)
> Sent to Number
Sent to Group
0313421111
Phone Number
> Sent to Number
> Sent to Group
> Friends
Select Group
Scroll for different group
location and select one
to send (note 2)
edit text here
Write Message
How are you
going?…
Send?
> Send SMS
Save Text
> Send SMS
> Save Text
(Note 4)
OK!
back to write
message
(2 s)
Sending …
Send again (if «Y»)
back to write
OK!
Error!
Resend (Y/N)?
back to write
message
message if «N»
Note:
1)
For Group messaging feature only.
2)
There are four default Groups: a) GENERAL b) FRIEND c) FAMILY d) CO-WORKER
3)
Press «
press «
4)
Displays shows «Return to Base» if the unit is not on the base.
Once the unit returns to base, it will process dialling function.
»+«
» or «
» to go to phonebook search. When there is no number entered,
» to go to phonebook search.
1.2.3 Outbox
Outbox
04 Ricky Mobile
How are you going?
Please give me a call.
How are you going?
Please give me a call.
03 Mary
See you
tomorrow…
01
OK! I will aten …
How are you going?
Please give me a call.
> Edit?
Forward
Edit
Message
> Edit?
> Forward
Send menu
> Forward
> Clear
Clear
and go
outbox index
Fax to:
Ricky Mobile
Anmerkungen:
1.
When reviewing the message, user can press Clear button «¨» to enter «CLEAR?» menu.
2.
Display «Empty» for 2 seconds if no content and back to OUTBOX menu.
3.
Use new icon «
» to indicate the SMS that was not sent.
1.3 Main Menu – Caller ID
CID Memory
28 / 04 7:30
24 0313421111
Peter Pan
Scroll through
different memory
location
24 0313421111
Dial?
Dial the number
(note 6)
24 0313421111
Save Phonebook?
0313421111
Enter Number
24 0313421111
Clear?
24 0313421111
Clear all?
0313421111
Enter Name
> Friends
Select Group
Scroll through
different group
Notes:
1.
Press «
2.
» or «
Confirm?
Saved
Memory Full
(only if memory is full)
» key will go through different memory location, started with the most recent one.
The time displayed will be the time at which the calls come in, not the current time.
3.
When reviewing the CID memory, user can press Clear button «¨» to enter «Clear?» menu.
4.
During «SAVE PHONEBOOK», if all memory location is fill up, it will show «MEMORY FULL»
for 3 sec and goes back to standby mode.
5.
Message LED will blink if there is new CID message.
6.
Display shows «Return to Base» if the unit is not on the base. Once the unit returns to base,
it will process sending function.
1.4 Main Menu – Caller ID
Add Entry
0313421111
Peter Pan
> General
Select Group
Scroll for
different Group
Saved
Memory Full
(only if memory full)
1.5 Unlock
When the device is locked, press any keys to show Password menu.
28 / 04 7:30
-10- -5Calls SMS
*****
Password
Error!
(2 s)
Note:
1.
If the password is set, the device will be locked after it goes to standby mode for 8 seconds.
2.
«
» icon is shown in Lock mode.
2 Settings Menu
Settings
Language
Date & Time
Contrast
Password
Terminal Number
Nr. SMS Out
Nr. SMS In
Reset
2.1 Setting Menu – Language setting
Language
> English
> Deutsch
> Deutsch
> Français
> Français
> Italiano
Note:
After confirming the selection of language menu, it will go to the current selection.
At the beginning of the line, there is an icon «>» to indicate that it is the current selection.
2.2 Setting Menu – Date and time
Date & Time
29 / 03 13:15
DD / MM HH:MM
Anmerkungen:
1.
The first two digits will be day. Month are not allowed to enter anything greater than 12,
similar up-bound criteria also applied to the settings for the day, hour and minute.
2.
After power up, the clock will start to run from 01/ 01 00:00.
3.
Factory will default 24 HR format
2.3 Setting Menu – Contrast
Contrast
–
Contrast
+
–
Contrast
+
–
Contrast
+
Note:
1.
There are eight levels of contrast for selection.
2.
LCD will use the contrast when it is selected.
2.4 Setting Menu – Password
Password
12345
Password
Note:
1.
If password is set, press any key in standby mode will show a display for entering password.
2.
Password default: No
3.
Clear passwords to disable password function.
2.5 Setting Menu – Terminal Number
Terminal Number
0
Enter Number
Note:
1.
Default terminal number: 0 (Protocol 1)
2.
Range of terminal number: 0 to 9 (Protocol 1)
2.6 Setting Menu – SMS Centre Number
Nr. SMS Out
1234567890
Enter Number
Nr. SMS In
1234567890
Enter Number
Note:
1.
«Nr. SMS Out» is the centre phone number for outgoing SMS.
2.
«Nr. SMS In» is the centre phone number for incoming SMS.
3.
After confirming the selection, it will show the current number.
User can enter or edit he service number.
2.7 Setting Menu – Reset
Reset
Confirm
OK!
Vx.xx
If you want to bring the device back to its initial status, it is possible to reset
the telephone. When you reset your device, all stored information will be lost.
Vx.xx shows the firmware version of the unit.
Symbol for SMS
ó
Press the key « :-) » to insert a sequence of characters to form a symbol
during SMS writing.
ó
User can use symbol button to scroll through the available symbols.
Available symbols:
:)
:-)
;)
;-)
:P
:-P
;P
:D
:-D
@@
!@@!
!><!
:(
:-(
:>
:<
:b
;b
:-v
:-o
:-))
:->
8-0
-!-
Erase Password
If user forgets the password, it can be erased by the following procedures.
1. Remove the battery.
2. Press and hold the « » + «¨» key and then re-install the batteries.
3. Hold the keys for more than 4 seconds.
Note:
All the contents of the unit will be erased as well.
Warranty/Repairs
Maintenance/Certification
Warranty
This SMS terminal is guaranteed for a period of 2 years commencing on date of purchase. Should any repairs be necessary during the warranty period please enclose the completed
guarantee certificate or the purchase receipt when returning
the device.
The warranty does not cover damage caused by improper
handling (breakages, water ingress etc.), damage due to fair
wear and tear or technical manipulations by unauthorised
third parties and any damage caused by general carelessness.
The batteries are not covered by the warranty.
Repairs/Maintenance
Repairs will be undertaken free of charge in accordance with
the provisions on the guarantee certificate. Should a repair be
necessary, the terminal must be returned to the place of
purchase.
Should the batteries have to be replaced they will be charged for.
If you have any general questions about products or services,
please contact the information service in your Swisscom shop
or call freephone 0800 800 800.
Certification
This device may be operated on the Swiss analog network.
Country-specific requirements have been taken into account.
Should you have any queries about the differences in the
public telephone networks please contact your specialist or
network operator. The device complies with the principle
requirements of the European R & TTE Directive as certified
by the CE logo.
Declaration of conformity:
«The above mentioned product has been manufactured
according to ANNEX V of the R & TTE-Directive 99/5/EC.
The presumption of conformity with the essential requirements regarding Council Directive 99/5/EC is ensured.»
CE
The declaration of conformity can be viewed on the Internet
site by visiting:
www.swisscom.com, and then going to «Online-Shop»,
«Phones», «All declarations of conformity», or it may be
ordered from the following address:
Swisscom Fixnet AG
Retail Business
Customer Premises Equipment (CPE)
3050 Berne