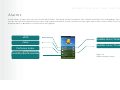
1
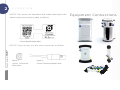
CONTENTS
1
2
3
4
03 INTRODUCTION
Symbols
04 Introduction
05 Intellectual Property
5
06 OVERVIEW
Intended Use
07 Operating Priciples
08 Commercial Presentation
10 Compatible Sensors
12 Equipment Connections
15 EQUIPMENT OPERATION
Installing the Oximeter
16 Equipment Controls
17 Light Indicators
18
19
20
21
23
25
26
27
MONITORING THE PATIENT
Main Menu
Buttons and Widgets
Security Locks
Alarms
Patient Data
Settings
Internet
Batteries
Trends
6
28 GENERAL GUIDELINES
Biocompatibility
Essential Care
29 Battery care
30 Packaging, Transportation
and Storage
Electrostatic Discharge
32 Precautions
33 Restrictions
35 Warnings
38 MAINTENANCE
Cleaning and Disinfection
41 Preventive Maintenance
Corrective Maintenance
42 Problems and Solutions
Supply of Sensors and
Accessories
43 Oximeter Manual Test
44 Test Method for Accuracy
Verification
45 Fuse Substitution
7
8
46 TECHNICAL SPECIFICATIONS
Equipment Classification
47 Equipment Accuracy, Calibration
and Resolution
49 Power Supply
External Power Supply
Batteries
Conectivity
50 Electromagnetic
Compatibility
56 WARRANTY
57 Certifications of the Company
and Product
INDEX
INSTALLING THE EQUIPMENT
BATTERY
SCREEN / INTERFACE
MAINTENANCE
Device and accessories ............... 08
How to charge batteries ............. 27
Touchscreen .................................... 16
Preventive and corrective .......... 41
Compatible Sensors ..................... 10
Charge level..................................... 27
Screen of monitoring of
How to verif y equipment
accuracy ............................................44
Equipment connections ............. 12
Taking care of battery .................. 29
patient's vital signal ..................... 19
How to replace fuses ................... 45
Menu Screen ................................... 19
PROBLEMS AND SOLUTIONS
Installation steps ........................... 15
Equipment Buttons ....................... 16
Battery type ..................................... 49
VITAL SIGNALS
Security and Lock screen ........... 21
MONITORING THE PATIENT
ALARMS AND SOUNDS
Device sounds
when turn on .................................. 18
Basic monitoring
functions .......................................... 18
Basic Information
about vital signals ......................... 19
Alarms Screen ................................. 23
How to clean ................................... 40
Patient data screen ....................... 25
Settings Screen .............................. 26
How to discard
parts of equipment ...................... 37
Internet Screen ............................... 27
How to perform oximeter
manual test ...................................... 43
Alarms screen ................................. 23
How to register
Frequent problems
and solutions .................................. 42
Turning off the alarms .................. 24
patient's data .................................. 25
Understanding the priority
How to analyze
ICONS, BUTTONS
WARRANTY.........................................56
of alarms ........................................... 24
trends charts ................................... 27
AND WIDGETS ....................................20
CONSUMER SERVICE .........................58
1
INTRODUCTION
INT
S y m b ol s
Symbol
Fragile, han
handle
with care
Protect of humidity
Direct current (DC)
This side u
up
Handle with care
Equipment class II
Temperatu
Temperature limits
Indicates th
the temperature
range for transportation
t
and
storage
Alternating current (AC)
Equipment with applied
part type BF, protected against defibrillator
discharge
Maximum stacking, where
the numbe
number “n” (in the
central squ
square) indicates
the maximum
maxim
quantity of
boxes that can be stacked
Consult accompanying
information about
necessary information
Electrostatic discharge
sensibility
Non-ionizing radiation
3
1
I N T R O D U C T I O N
Milli pulse oximeter is an electro medical device manufactured by HI Technologies Brazil that indirectly monitors the oxygen functional
saturation of patient's blood and cardiac frequency in patients who are in medical and hospital environment.
Pulse
u Oximeter
Oximet
m er
milli®
m
With a completely new design, this device has unique characteristics:
4
•
•
•
•
•
•
It can be used as a table oximeter when connected to the docking station,
on, or as a hand
oximeter when separated of the base.
It has its own operating system created by the company that permits thee installation of
medical applications, increasing the unit features.
It can transmit patient's vital signals via Internet or through a wireless connection.
onnection.
It offers Internet and Intranet access with a browser like a computer.
It has an integrated video camera.
It allows that approved accessories are installed via USB or wireless connection
tion (Bluetooth).
I N T R O D U C T I O N
I n tel l ec ttu a l Proper t y (IP)
The information contained
c
in this manual is exclusive property of HI Technologies, and may not be copied (in part or whole) without
the prior written permission of the company.
The company doesn’t
doe
measure efforts to maintain the information provided in this manual free of errors. In order to update the information provided and correct some mistakes, HI Technologies reserves the right to alter any portion of this document without prior notice.
Circuit diagrams, component lists, descriptions and other information are available by signing in a confidentiality agreement (NDA)
with the company.
compan
5
2 OVERVIEW
I n te n d ed Us e
This device is indicated to monitor the oxygen functional saturation of patient's blood and cardiac frequency in patients
tients who are in
medical and hospital environment.
This equipment should not be used during Magnetic Resonance Exam (MRI) due to severe burns hazard.
This equipment should not be used to continuous monitoring if the audible alarms are permanently disabled..
Pulse Oximeter
milli®
The validity period of this equipment is UNDETERMINED, but its lifetime is 3 year average, since the manufacture
cture date, and it
may vary with the adequate use and preventive maintenance.
6
O V E R V I E W
Op era tin
ti n g Pr inciples
Pulse oximetry is based on two main principles:
Spectrophotometry:
Spectrophot
The red and infrared light absorption is different between oxyhemoglobin and deoxyhemoglobin;
Plethysmography: The arterial blood volume in tissues varies with cardiac pulse, resulting in a variation of light absorption.
Plethysmogr
Based on mentio
mentioned principles, the pulse oximeter determines functional oxygen saturation in blood (SpO2) with a sensor with two
light emitting diodes
dio
(LEDs) red and infrared, and a photodiode light receptor. This sensor is placed in a pulsating arterial vascular
bed (e.g.: fingers and toes, ears and nose).
The LEDs emit in
infrared light (wavelength 905nm), and red light (wavelength 660nm) through a patient’s arterial vascular bed. The
light is converted in electronic signals by the photodiode. These signals are used to calculate the vital signals.
7
2
O V E R V I E W
The calculus of functional saturation of blood oxygen (SpO2) is obtained using the equation figure 1,
where A and B are calibration values, and R is obtained by the equation figure 2, where AC V and DC V are the
AC and DC components of red light and AC IV and DC IV are the components AC and DC of infrared light. It is very
important to remark that the equipment is enabled to measure the functional saturation, which means, the
percentage of oxygenated hemoglobin related to total hemoglobin able to carry oxygen.
It is also important to report that comparing the calculated saturation (obtained with pulse oximeter)
with the measured saturation (obtained with a gas sample of arterial blood), it may be different. These
discrepancies are due to the calculated saturation is not properly corrected with some variables as: pH,
carbon dioxide partial pressure, temperature and fetal hemoglobin. Moreover, a comparison can only be
done in situations where the calculated saturation is stable for the duration of collecting blood for testing.
SpO2=A−B*R
pO2=A−B*R
Figuree 1
R=
AC
CV
DC
CV
AC
CIV
DC
CIV
Figuree 2
Pulse Oximeter
milli®
Co mm erc i a l
Pre senta ti o n
8
This product consists of the following devices
and accessories.
NOTICE: All parts, accessories and sensors are
for EXCLUSIVE USE of Milli Pulse Oximeter.
Code
Name
Quantity
FOCA-DM-001
Pulse Oximeter
1
FOCA-BA-001
Docking station
1
See sensors table
Oximetry Sensor
1
FOCA-CA-001
Power Cord
1
FOCA-MU-001
User Manual
1
Table 1
O V E R V I E W
FFigure
Figur
Fig
igure 4.
4.
Milli Pulse Oximeter
Mi
(horizontal position).
Figure 3.
Milli Pulse Oximete
Oximeter
er
(vertical position).
Figure 5.
Milli Pulsee Oxi
Oximet
Oximeter
meter
ter
(detached from docking station).
9
2
O V E R V I E W
Compatible Sensors
Table 2 shows the sensors compatible with the equipment.
Pulse Oximeter
milli®
Code
10
Use
Type
FOCA-SP-001
Pediatric
Soft
FOCA-SA-001
Adult
Soft
FOCA-CM-001
Adult
Clip
FOCA-CP-001
Pediatric
Clip
FOCA-JA-001
Adult
Clip
FOCA-LC-001
Adult
LED
FOCA-IN-001
Pediatric
Intermediate
Image
Table 2
NOTICE: The manufacturer recommends its disposal and replacement every 12 months.
O V E R V I E W
Compatible Sensors
Compat
Table 3 shows th
the sensors compatible with the equipment.
Code
Use
Type
FOCA-PB-001
Pediatric
Clip
FOCA-AB-001
Adult
Clip
FOCA-PG-001
Pediatric
Soft Biogenesis
FOCA-AG-001
Adult
Soft Biogenesis
FOCA-MS-001
Neonatal
Multisite
FOCA-DP-001
Pediatric
Disposable
FOCA-DA-001
Adult
Disposable
Image
Table 3
11
2
O V E R V I E W
NOTICE: The sensors are identified with a label that holds information about lot and expiry date, as follows:
Equipment Connec tions
ns
10
9
12
11
Figure 6.
Sensor identification label.
NOTICE: Ever y sensors use the same connec tor, as follows:
Pulse Oximeter
milli®
13
12
14
15
5
Figure 7.
Sensor Connector
(front view).
Figure 8.
Sensor Connector (lateral view).
O V E R V I E W
9
Connection pins
Con
10
External batteries input
It should be used only to connect
external batteries. Just certified
batteries, tested and approved
by the company can be used (IEC
60601).
11
Conne
Connection
pins used to connect the
docking station with handheld.
dockin
USB input
This port should be used only to
connect accessories approved by
the company.
No oth
other equipment should be connected he
here.
13
2
O V E R V I E W
12
Power Supply
14
Power supply, it supplies electrical
energy to the equipment (110V~ to
220V~).
13
It should be used only
nly to connect accessories approved
proved by the
company.
Connection pins
Pulse Oximeter
milli®
15
14
Connection pins
Sensor input
The oximetry sensorr should be connected in this port.
t. Only certified
sensors, tested and approved by the
company should be connected in
this entry (IEC60601).).
Connections pins used to connect the handheld to
docking station.
No other equipment should be connected here.
3
EQUIPMENT OPERATION
EQU
I n st
sta l l i ng t he O xime ter
1
Connect the power cord to docking station.
2
Connect the handheld to docking station. The
connection is electromagnetic, mechanical fittings are
not needed.
3
Connect the sensor to the handheld.
4
To turn on the equipment press the MENU button
by 3 seconds. The same procedure will be done
to turn it off.
5
After turning on, register the patient (according to
“Patient” section) then accompany the monitoring.
NOTICE:
OTICE: When the equipment is turned on, it emits a
sound that indicates whether the speaker is operating
properly and whether the alarm will sound normally.
15
3
E Q U I P M E N T
O P E R A T I O N
Equipment Controls
Milli pulse oximeter can be controlled by two ways:
1. Touch buttons: buttons are lit when the device is on, but they are turned off momentarily during
touch to indicate they are being activated;
2. Touch screen: press the buttons on the screen to activate functions.
Symbol
Name
Pulse Oximeter
milli®
Menu / Turn on /Turn Off
16
Return
Silence Audible Alarms
Function
• Keep pressed to turn on/off the device.
als
• Touching quickly activate the menu if the equipment is in vital signals
monitoring screen.
• Returns to the previous screen.
• Turn off the audible alarms by 25 seconds.
• Turn on the audible alarms if they are temporarily disabled
m
• If one alarm (SpO2 or Pulse) is permanently disabled, it displays alarm
settings screen.
Table
able 4
E Q U I P M E N T
O P E R A T I O N
L i g h t I n d i c ators
Docking station has blue light indicators. When lit, this indicates some states of the equipment:
Symbol
Name
Meaning
(when lit)
Meaning
(when off)
Handheld connection
Handheld is connected to
docking station.
Handheld is not connected to
docking station.
Power grid connection
Docking station is connected
to the power grid.
Docking station is not connected
to the power grid.
Table 5
17
4
MONITORING THE PATIENT
Milli pulse oximeter starts with the patient’s monitoring screen. The user has access to:
1. Patient's name;
2. Functional oxygen saturation in blood (SpO2) measured
in %;
3. Heartbeat, measured in beats per minute;
5. Plethysmographic curve proportional to
o the patient’s
heartbeat;
6. Heartbeats indicator. The quality of heartbeats
artbeats signals
can be verified by the size of the circumference.
ference. Bigger
is better signal quality (S Q).
4. Perfusion Index (IP) and Perfusion Variability (IVP) measured in %;
Pulse Oximeter
er
milli®
mi
i®
If user presses the MENU button, the MENU screen will be displayed.
18
If SILENCE ALARMS button is pressed, the alarms will be temporarily disabled by 25 seconds. If the button is pressed again during
this period, the alarms will be enabled. But in case of alarms being
permanently disabled, the SILENCE ALARMS button displays the
alarm settings.
*To access to Alarm settings, the device requestt for a password.
See page 21 Security Locks for more information.
n.
Alarms can be disabled with a quick tap on the screen.
M O N I T O R I N G
T H E
P A T I E N T
Patient's name
Pulse
SPO2
Plethysmographic curve
IP (IVP)
(IV
P: Heartbeats
Figure 16.
Patient’s vital signals monitoring.
M ai n M eenu
Touch the menu button in the monitoring screen to access to MENU screen. Many functions of the oximeter are available in this screen
by touching the icons (shortcuts) on screen surface (touch screen).
Patient W
Widget
Status Bar
Applications (icons)
Alarm/ Monitoring
Figure 17.
Main menu.
19
4
M O N I T O R I N G
T H E
P A T I E N T
B uttons a n d Widge t s
Applications
Access the applications.
Open Folder
ons organization.
Helps in applications
Hints
Shows safety hints and use hints the first
time the device is turned on.
Shortcuts
on of shortcuts
Allows the creation
for applications.
Settings
Access to personal settings.
Add widgets
Helps in widget settings.
Pulse Oximeter
milli®
Internet
Internet access.
20
Remove widgets
Helps in widgets settings.
Trends
Access to monitoring trends charts.
CONNECTIVITY SYMBOL
Organizational folder
Helps in applications organization.
Patient
Register and access to patient's
information.
Alarm
Alarm information.
Patient's Avatarr
ent, if not yet been
Identifies the patient,
set, whether malee or female.
Edit
Edit patient data.
Bluetooth activated.
ted.
vity.
Bluetooth in activity.
n activated.
Wi-Fi connection
Release
Delete the patient.
M O N I T O R I N G
OTHERS BUTTONS
Zoom in
increases sscreen details.
T H E
P A T I E N T
S e c u r i t y Lo c k s
LOCK OF MEDICAL FUNCTIONS
To lock the access to all the medical functions of the device:
Zoom out
Decreases screen details.
Enable au
audible alarms
VITAL SIGNALS SY
SYMBOLS
IP
Perfusion index.
IVP
Variabillity perfusion
index.
SPO2
Functiona
Functional saturation of
oxygen.
PULSE
Patient’s ccardiac
frequency
frequency.
1
Go to MENU screen.
2
Click the Application shortcut
3
Click the Security and Lock
shortcut.
4
Maintain the red button pressed
to lock medical functions of the
equipment. The
appears
in Status Bar while the device is
in this state.
Note: Functions may be temporarily unlocked with individual
password while equipment is locked.
21
4
M O N I T O R I N G
T H E
P A T I E N T
Pulse Oximeter
milli®
S e c u r i t y Lo c k s
22
UNLOCK OF MEDICAL FUNCTIONS
TECHNICAL FUNCTIONS
To unlock proceed as follows:
Technical functions of device (e.g.
g. settings applications) are protected by the password:
ssword: KIRK.
1
To unlock temporarily individual functions,
or general lock, enter the password : AMOR.
2
Select a letter by dragging the
column up or down until to reach to
the correct letter.
3
If the password is correct, the red button
“cancel” becomes green “proceed”.
Clicking on it, unlocking is done
and
disappear of Status Bar.
M O N I T O R I N G
T H E
P A T I E N T
A lar
la r ms
ms
In the alarms screen,
scre
the user can set the alarm limits. Touching the desired alarm, the window with the limits will appear. The sounds
can be turned of
off permanently for each vital signal with alarm sounds controls on the right side of the screen. When SpO2 or pulse
audible alarm is disabled,
d
a visual notice will appear.
SSPO2
Audible Alarm “Enabled”
P
Pulse
Audible Alarm “Disabled"
Perfusion Index
Perfus
Variabilityofperfusionindex
Figure 18.
Alarms settings screen.
23
4
M O N I T O R I N G
T H E
P A T I E N T
Alarms are categorized into high, medium and low priority. Each priority has a different visual identification:
HIGH
•
•
MEDIUM
LOW
Letter “x” indicates that any audible alarm (SpO2 or pulse) is permanently disabled.
The clock indicates that the audible alarms are disabled by 25 seconds.
Table 6. Description of the alarm sounds.
Pulse Oximeter
milli®
Description
24
Priority
Sound Sequence
Sensor disconnected of the equipment
Medium
C4 C4 C4
Finger disconnected of the sensor
Medium
C4 C4 C4
Low
E4 C4
Weak signal
Errors in the oximetry module
Medium
C4 C4 C4
Sensor failure
Medium
C4 C4 C4
SpO2 out of limits
High
C5 B4 A4 - G4 F4
Pulse out of limits
High
C4 E4 G4 - G4 C5
Perfusion Index out of limits
High
C5 B4 A4 - G4 F4
Variation of perfusion out of limits
High
C5 B4 A4 - G4 F4
M O N I T O R I N G
T H E
P A T I E N T
alarms values..
Table 7. Range of al
Alarm
Min value
Max value
Factory enabled
Factory minimum value
Factory maximum value
SpO2
0
100
Yes
85
100
Pulse
30
235
Yes
40
100
Perfusion index
inde
0,02
20
No
5
15
Variability of perfusio
perfusion index
0
100
No
40
100
Pa ti ent Da ta
Pati
Patient’s data may
m be registered using the Patient’s application, in the
menu screen. If n
no patients are registered, a form will appear automatically.
Touching in any field
f
enables a virtual keyboard. The keyboard can be used
by touching the ttouchscreen. When the patient is registered, the user may
choose to “Releas
“Release” (remove all patient data, including trend charts) or “Edit”
(allows data editi
editing).
Figure 19.
Patient data Editing.
Figure 20.
Display of Patient data.
25
4
M O N I T O R I N G
T H E
Settings
The user can set up the oximeter in the
“Settings” screen of the main menu, following the next steps:
P A T I E N T
BACKGROUND:
1
Choose one of preinstalled languages:
anguages: Portuguese, English and Spanish.
2
Define it as background.
WIRELESS NETWORKS AND OTHERS:
THERS:
*Password of Settings Screen: KIRK.
1
2
Pulse Oximeter
milli®
3
26
SELECT LANGUAGE:
Select your preferred
image.
1
Enable or disable the
he desired
connections.
2
Do necessary adjustments
stments
Go to “Menu” screen.
Click on “Settings”
shortcut.
Choose one of the options
to set.
DATE AND TIME:
1
Define desired date and time,
do necessary adjustments.
OPENVIDA NETWORK:
Milli pulse oximeter may be used
ed in telemedicine
applications using OpenVida Network. For more
information, acquire OpenVida Central Monitoring.
APPLICATIONS.
Applications installed in the
e device can be
removed. To do this, select onee application and
check available options.
M O N I T O R I N G
T H E
P A T I E N T
I nter
n ter net
n et
Bat te r ie s
Tre nds
The user may bro
browse in Internet using the
“Internet” application,
applic
from main menu
screen. It is neces
necessary to setup and enable
a Wi-Fi connection
connecti
before browsing. The
steps are:
This icons sequence shows the batter y
charge. When the charge level decreases,
the blue color becomes yellow, followed by
red, when the charge is finishing. When the
battery is empty, the icon is black. While
the battery is charging, icon color goes
from red to blue, passing through yellow.
To charge the handheld battery is necessary to connect it to docking station, and
connect this to power grid. The average
battery charge time is 10 hours.
The patient's vital signals are stored in
pulse oximeter and can be seen as trend
charts. The access to this screen is trough
the “Trend” shortcut in the main menu.
1
Go to “Men
“Menu” screen
screen.
2
Click on “Applications” shortcut.
Cli
4
Click on “Internet” option.
Clic
5
Browse in Internet.
In
Figure 21.
Sequence of battery charge.
1
Go to “Menu” screen.
2
Click on “Applications”
shortcut.
3
Click on “Trends” shortcut.
4
Analyze the charts.
Figure 22.
Trends charts.
27
5
GENERAL GUIDELINESS
B i o c om p a tibilit y
All parts of the equipment that remains in contact with
the patient (sensors) are produced with biocompatible
materials. The manufacturer has the documents that certify
the sensors biocompatibility and it should be delivered
signing a confidentiality agreement.
Essential Care
Maintain the equipment in a dry environment,
nment, protected
of direct solar rays.
Avoid places where liquid spillage may occur.
ccur.
Do not use the equipment if it is wet or with
h humidity excess.
According to the kind of contact with patient (ISO 10993-1)
it is classified as external communication equipment.
Pulse Oximeter
milli®
According to the duration of contact with the patient (ISO
10993-1) it is classified as limited or prolonged exposure
equipment.
28
Do not use if it shows external damage or in case of suspected fall.
Install the equipment always in places where
ere the electrical
installation corresponds to the conditions
ns established on
the equipment (voltage, current, power).
G E N E R A L
Essential
Essen
tia Care
Never sterilize
steri
or immerse it in liquids.
Do not apply
app mechanical stress to the cables.
Do not expose
exp
the device to temperatures upper 131F (55°C)
or lower 14F
14 (-10°C).
Do not op
operate the device in temperatures upper 104F
(40°C) or lo
lower 32F (0°C).
Calibration is not required.
Functional measurers may not be used to determine the
accuracy of
o the oximetry sensor.
G U I D E L I N E S
Batter y Care
Batteries may have longer lifetime if kept, whenever possible, its maximum load. Constant discharges decrease their
lifetime. It must also be considered that elderly batteries
have lower operating time.
The equipment's batteries (docking station and handheld)
should not be changed and do not require maintenance.
In case of problems, send the equipment to an Authorized
Technical Support.
Batteries charging temperature varies between 32F (0°C)
and 117F (47°C), and batteries discharging temperature is
estimated between -4F (-20°C) and 149F (65°C). There is a
protection circuitry that disables it partially in temperatures
out of limits. During device operation, batteries may have
temperatures varying between -4F (20°C) and 167F (75°C).
29
5
G E N E R A L
G U I D E L I N E S
Pa c k a gi n g, Trans por t at ion
a n d Stor a ge.
The equipment is packaged in a Kraft box reinforced with
internal polyurethane protector.
During transportation, handle with care to avoid damage.
Pulse Oximeter
milli®
During transportation or storage, the equipment should be
maintained in temperatures between -40F (-40°C) and 158F
(70°C), protected against liquid spillage, with relative air
humidity between 10% and 90%, and atmospheric pressure
between 500hPa and 1060hPa (375mmHg and 795mmHg).
30
El e c tro stati c D i schargee
Electrostatic discharge (ESD) may cause damage
amage to the Milli
pulse oximeter if it happens inside of it.. Because of the
accumulation of electrons on the material
al surface, it may
occur in many ways. For example after dragging feet on
carpet floor (what causes electrons accumulation
mulation on your
body), you may feel an electric shock while
hile touching the
metallic knob door. This shock is due to thee static electricity
accumulated on your body is discharged to
o ground through
knob door. Eventually, the discharge mayy occur touching
the car bodywork after it was driven for some time. Even
these shocks are nothing more than a nuisance
sance to people it
may damage electronics circuits as Milli's circuits. Therefore
it is important to take certain precautions
ns to avoid these
episodes:
G E N E R A L
G U I D E L I N E S
Ele c tros
trosta ti c Dis charge
All professional
profess
who use Milli pulse oximeter should know
the explanations
explan
contained in this manual about electrostatic discharge
discha
protection, so that:
•
•
They can recognize the warning symbol ESD.
They are trained in procedures to prevent
electrostatic discharge.
elec
Connectio pins identified with the ESD warning should
Connection
not be tou
touched.
To connect these pins it is necessary to follow procedures
against ESD
ESD.
Follow these precaution procedures:
•
•
•
Connect to a grounding point to take the
equipment.
Increase the air relative humidity.
Install specific protection items against ESD, as
floors, bracelets and antistatic heel straps.
Avoid conditions that promote the accumulation of static
electricity in the environment:
•
•
•
Low relative humidity.
Materials that accumulate static charge, e.g.
synthetic materials accumulate more static
energy than natural fiber as cotton.
Touch or connect the equipment quickly.
31
5
G E N E R A L
G U I D E L I N E S
Pre c a u ti on s
The equipment should be used by trained professionals.
The operator should know the information contained in this
user manual before proceeding to use it with the patient.
The results obtained with this device are a complement of
the evaluation patient/client and should
d be used with a
clinical evaluation of a qualified professional.
onal.
The operation of this equipment may be affected by presence of strong magnetic fields as electro surgery devices,
computed tomography, magnetic resonance images (MRI)
and others.
Hi Technologies’s sensors do not contain latex
atex in its composition, protecting patient and operator off possible allergic
tissue reactions due to toxicity.
Pulse Oximeter
milli®
Always disconnect the equipment of power supply and
remove the accessories before cleaning and disinfecting
to avoid damaging and ensure the biosafety guidelines.
32
Always use sensors approved by the company. The use of
other sensors can generate inaccurate measures or damage
the equipment.
Do not use the sensor in temperatures above
bove 106F (41ºC)
in children under one year.
This equipment requires special precautions
utions related to
electromagnetic compatibility, for that itt must be installed and operated in accordance with the electromagnetic
compatibility information available in thiss manual.
Mobile and portable radio frequency devices
evices may affect
this equipment.
G E N E R A L
G U I D E L I N E S
Restrictions
Any condition
condit
that restricts the peripheral blood flow (as
non invasive
invasiv pressure cuffs) may prevent accurate measurement of vital signals.
Significant rates of dysfunctional hemoglobin, as carboxyhemoglobin, may affect the accuracy of SpO2 measure.
HYPOPERFUSION
HYPOPE
Genetic diseases, like falciform anemia, in acute conditions (lower than 5mg/dl) may have the value decreased.
The result o
of readings for low values may be altered due to
the difficulty
difficu of the peripheral circulation.
VENOUS CONGESTION
Increased b
blood volume may produce capillaries pulses and
promote re
reading errors in some equipment.
MOVEMENTS
MOVEME
The locati
location for sensor placement should be analyzed
according to patient's mobility to avoid compromising
their anatomophysiology
anato
and reliability of sensor readings.
ANOMALOUS HEMOGLOBIN
INTOXICATIONS
(e.g. carbon dioxide) may alter the values.
SKIN PIGMENTATION
Darker skins may interfere in the readings.
LIGHT INTERFERENCE
When two or more sensors are placed near, mistakes may
happen due to the exchange of light among them. Cover
each of the sensors with opaque material to prevent light
leakage.
33
5
G E N E R A L
G U I D E L I N E S
Restrictions
ARTIFACTS
EPITHELIAL LESIONS
For example cell phones, may interfere in the correct operation of some electronic equipment causing reading mistakes.
Skin problems (e.g. dermatitis, lesions, onicomycosis
nicomycosis and
necroses) may block the light input in thee sensor, altering
the reading result.
AMBIENT LIGHT
Intense solar light, xenon light, fluorescent and infrared
light may decrease the presented values.
BAD POSITIONING OF THE SENSOR:
May have unrealistic values regarding the patient's general
condition.
Pulse Oximeter
milli®
Obstructions or dirt on the LEDs or photodiode may cause
sensor failures. Always verify if the sensor is free and clean.
34
EXCESSIVE SECRETIONS
Interfere in the sensor reading allowing the reading of a
lower value than reality. The problem is solved by cleaning
the verification area (mechanical removal) or by changing
the sensor position.
NAIL POLISH
May prevent the propagation of light sensor,
nsor, altering the
reading (mainly dark colors). It is not significant,
gnificant, but for
complementary observation it is preferablee to remove using
nail polish remover.
FALSE NAILS
May interfere in the propagation of lightt sensor, altering
the reading. It is preferable to remove them to perform
complementary examination.
G E N E R A L
G U I D E L I N E S
Warr ni
Wa
n i ng
ngs
Never use tthis device in presence of flammable anesthetic
because of the risk of ignition that may result in an explosion.
Never use tthis device in the presence o Magnetic Resonance
devices (MRI).
(M
MRI scanners can generate induced currents
in the sensor,
sens resulting in injuries and severe burns in the
patient.
The autocla
autoclave use, ethylene oxide sterilization or immersion
of the sensors
sen
in liquids may cause incorrect readings or
irreversible damage to the equipment.
When connecting the equipment in any instrument, verify
proper operation before clinical use. See instrument manual
for complete information. Accessories connected to the
interface of the monitor should be certified in accordance
with the respective standards.
Any connection of additional equipment in the input or
output of signal will be classified as a medical system, so it
should be in accordance with applicable technical standards.
Sensors used incorrectly may cause inaccurate readings. See
manual for instructions about proper application.
The prolon
prolonged use of the sensor may cause blisters, skin
deterioration and discomfort. It is recommended to change
deterioratio
the location of the sensor every 4 hours or as patient's needs.
35
5
G E N E R A L
G U I D E L I N E S
Pulse Oximeter
milli®
War n i n g s
36
Damaged cables and sensors may cause incorrect readings,
with possible injury or death of patient. Inspect each sensor
and each cable and immediately discard if damaged. It is
recommended to use another cable or sensor and contact
the Technical Support for assistance.
Do not insert any object into the docking
g station's power
input connector.
Chemical products: petroleum based substances or substances used for disinfection (e.g. alcohol), for removing skin
glue (e.g. benzine), removers (e.g. thinner) and other, may
damage the material protection of the sensor, altering the
reading results.
The equipment may generate imprecise results
esults if operated
out of amplitudes specified in this manual.
al.
Do not connect USB devices not approved by the company
because the use of other devices may cause irreparable
damage to the equipment.
Connectors identified with warning ESD
D symbol should
not may not be touched directly neither with manual tools.
The use of accessories, transducers or cables not specified, approved and recommended by the
he manufacturer
may adversely affect equipment operation,
on, increasing the
electromagnetic emissions or decreasing the electromagnetic immunity of the equipment.
G E N E R A L
G U I D E L I N E S
The device may not be used near or stacked over other
equipments.
equipment
This equip
equipment is susceptible to other equipments, even
being in co
conformity with CISPR emission prescription.
All discarded
discarde parts such as sensors, batteries, etc., should be
sent to the manufacturer or delivered to one of the Technical
Support Network,
Ne
duly sterilized for proper disposal.
The equip
equipment should be sent to the manufacturer or
delivered tto one of the Technical Support Network, duly
sterilized fo
for proper disposal.
37
6
MAINTENANCE
Cle a n i n g a nd Dis infe c t ion
The instructions for cleaning and disinfection of the equipment
and accessories should be strictly followed, as follows:
Pulse Oximeter
milli®
•
38
•
•
•
Do not drop liquids onto the equipment, mainly in
ventilation areas to prevent it from entering in the
electronic components.
If it happens, disconnect the equipment and call the
Technical Support.
Never immerse the equipment in any liquid.
Do not sterilize with autoclave or any disinfectant immersion technique.
•
•
•
•
Turn it off and disconnect from the power
wer grid before
start cleaning.
Clean the external part with a smooth lint-free cloth,
moistened with mild soap and water.
Do not use chemical petroleum based
ed products as
thinner, benzine and other derivatives
es to clean the
accessories and modules.
Never wet connectors.
M A I N T E N A N C E
•
LCD Touch Screen:
S
In case of sp
splashing or spilling liquids directly over LCD
screen, clean immediately with a dry cloth and proceed
to disinfectio
disinfection. Remember, any more fluid substance may
enter in scre
screen edges and damage the internal circuits.
Never use cleaning products with acid or alkaline base
(use products with neutral pH).
When using the cleaner, avoid the contact with the
edges of the film or glass and flexible parts.
Use a lint-free
lint-fr cloth.
The cloth sh
should be used dry or moistened with a mild
cleanser. Make
Ma sure the cloth is slightly damp, not wet.
Never apply the cleaner directly on the surface of the
panel. If the cleaner is spilled on the touch panel, dry
immediately with an absorbent cloth
Wipe the surface gently, if it has directional texture,
wipe in the direction of texture.
Never use chemical organic products as thinner, acetone,
propyl or isopropyl alcohol, toluene, xylene or kerosene.
Appropriate cleaning products are commercially
available.
39
6
M A I N T E N A N C E
Cle a n i n g a nd Dis infe c t ion
•
LCD Touch Screen:
The wrong way to clean or use of not recommended
products result in optical deterioration of the panel or
functionality damage.
It is recommended:
Use a moistened cloth (not wet). In case the display has
grease stains, use three drops of neutral soap.
Gently wipe the screen without pressing.
ng.
Pulse Oximeter
milli®
Immediately dry with a dry cloth.
40
NOTE: the majority of products have 1-3% of isopropyl alcohol per volume, which is in the
acceptable limits for cleaning resistive touch screens.
CAUTION: many products contain ammonia, phosphates and or ethylene glycol and
they are NOT RECOMMENDED. Carefully verify the content of the product in the label.
M A I N T E N A N C E
Pre ve
vent
n t i ve
M a i n ten
tena n c e
Co r re c ti ve
M ai nte nance
Every three mon
months, the operator should check all equipment
if there is no bre
breaks in cables, drying of connections and metal
parts oxidation.
Milli Pulse Oximeter corrective maintenance requires specific
technical knowledge and software that only authorized people
have. There are no internal parts that can be repaired by users.
Therefore, if any repairs to the equipment are required, only
Authorized Technical Support can do it.
Oximetry sensor should be inspected monthly for life, because
handling may damage
dam
the LEDs and the internal wires of the cable.
To ensure the proper
pro
operation of the oximeter is recommended to
send the equipm
equipment to an Authorized Technical Support annually.
In case on doubts about the equipment and its operation contact
the manufacturer. The validity of the warranty and veracity of
monitoring is only guaranteed when the corrective maintenance
is performed in an Authorized Technical Support.
41
6
M A I N T E N A N C E
Pro b l e m s a n d S o l u t i o n s
This section shows possible solutions for some problems that may occur and can be solved by the operator. If the problem persists
echnical Support
and the system does not work properly after the indicated verification, contact Hi Technologies or an Authorized Technical
to solve the problem as soon as possible.
Pulse Oximeter
milli®
Problems
42
Possible Causes
Solution
The equipment does not turn on
1. Lack of energy.
2. Energy cable broken.
3.Battery discharged.
1. Verify the energy cable.
2. Change the energy cable.
3. Connect the equipment in the power grid.
Signals does not appear on screen
1. Sensor disconnected from the equipment.
2. Sensor disconnected from the patient.
3. Patient with very low perfusion.
4. Faulty sensor.
ment.
1. Connect the sensor to the equipment.
2. Place the sensor in the patient.
3. Change sensor position.
4. Substitute the sensor.
S u p p l y o f S e n s o r s a n d Ac c e s s o r i e s
The company provides sensors and accessories that can be connected to the Milli pulse oximeter. If necessary,
the sensors for replacement may be purchased directly from Hi Technologies.
M A I N T E N A N C E
Oxi mete
meter M anual Te s t
1. Connect oximeter
oxim
to the power grid.
9. Thescreenwouldrotateautomaticallyafter
a few seconds.
2. Connect sensor
se
in the oximeter.
equipment on.
3. Turn the eq
a) Ifscreendoesnotrotate,tapitandwait
5 seconds until the rotation.
14. Check if the alarm is triggered.
15. TurntheSpO2alarmoffandcheckifthealarm
is triggered.
16. Repeat steps 11 to 15 for:
4. Wait the start
sta up.
5. Theequipmen
equipmentshouldplayanalarmduring
start up.
6. Usethecapacitive
capacitiv buttonsandtouchscreento
browse in m
menus.
10. Connectthesensorinapatientorsimulator
andcheckifthevitalsignalsareonscreen.
11. Browsetoalarmsettingsscreenandsetupthe
upperSpO2limittoavaluelowerthancurrent
vital signal.
12. Check if the alarm is triggered.
7. Check if buttons
butto and screen respond to
commands.
commands
8. Turntheoxime
oximeterinthe4possiblepositions
to check sc
screen rotation.
a) Cardiac frequency;
b) Perfusion index;
c) Perfusion variability.
17. Returntotheinitialsettingsforalarmlimits.
13. Browsetoalarmsettingsscreenandsetupthe
lowerSpO2limittoavalueupperthancurrent
vital signal.
43
6
M A I N T E N A N C E
Te s t M ethod for Accurac y Ve r i fi cati o n
Some models of functional testers or patient simulators (available
on the market) may be used to check the functionality of the
oximeter, cables and sensors. Read the specific operation manual
of these equipments to perform the tests.
Even being useful for checking the oximeter, cables and sensors,
these testers ARE NOT CAPABLE of evaluate the accuracy of
oximeter measurements.
Pulse Oximeter
milli®
The full evaluation of the accuracy of Milli pulse oximeter requires
at least a full reproduction of the optical interaction between the
sensor and the patient. This level of technology is beyond the
ability of the testers and simulators on the market, even those
that say they have those resources.
44
Therefore, the Milli pulse oximeter accuracy may be evaluated with
in vivo experiments through direct comparison
n with the values
simultaneously measured with a lab co-oximeter.
er.
The accuracy limits of the oximeter were established
tablished with a
clinical study realized with healthy adult volunteers
teers (SpO2 scale
between 70% and 100%). The measured SpO2 values
alues were statistically compared with the simultaneous results obtained with a
certified and calibrated lab co-oximeter. Pulse measurements
easurements were
statistically compared with simultaneous resultss obtained with a
certified and calibrated cardiac monitor.
Validation of accuracy of measured values is thee sole responsibility of the manufacturer and may only be guaranteed
anteed when the
equipment is used according to the instructionss in this manual.
M A I N T E N A N C E
Fusee Su b sti t ut ion
Fus
The docking stat
station has 2 fuses that can be located in the Figure 23, which shows radial fuse 3.15A/250VAC (retarded) on the power
circuit board. The fuse 1 (blue one) is visible without removing the cover of power supply. To see fuse 2 (yellow one) cover removal
is necessary.
Figure 23.
Fuse localization inside the power supply of the Milli docking station.
45
7
TECHNICAL SPECIFICATIONS
Equipment Classification
ANVISA hazard class of the device
III
Protection against harmful water penetration
IPXO - COMMON EQUIPMENT (closed equipment
without protection against water penetration)
Equipment operation mode
CONTINUOUS OPERATION
Pulse Oximeter
milli®
CLASS II
46
Protection degree against electric shock
Internally powered
rge
With BF applied part protected against defibrillator discharge
Equipment NOT SUITABLE for use in the presence of anesthetic flammable mixture with air, oxygen or nitrous oxide.
T E C H N I C A L
S P E C I F I C A T I O N S
Equipment Accurac y, Calibration and Resolution
Equipme
Milli pulse oxime
oximeter is calibrated after the end of fabrication process. Therefore a new calibration is not necessary during oximeter
lifetime. It was calibrated
c
between 70 and 100%, being that for lower values is not possible to ensure the calibration accuracy. In
the range of 70 to
t 100% there is an error of ±2% and during movement ±3%. The measurements done by the equipment, related to
patient's pulse have
ha an error of ±2 bpm between 20 and 100 beats per minute and 2% between 101 and 250 beats per minute.
Table 8. Oxime
Oximeter accuracy.
SpO2 (70-100%)
± 2%
SpO2 (70-100%) (in movement)
± 3%
SpO2 (<70%)
Undefined
Table 9. Pulse aaccuracy.
Pulse frequency (20-100 bpm)
± 2 bpm
Pulse frequency (101-250 bpm)
± 2%
47
7
T E C H N I C A L
S P E C I F I C A T I O N S
Table 9. Equipment resolution.
SpO2
1,00%
Pulse frequency
1 bpm
< 10 seconds
Conditions: Oximeter powered, looking for the pulse
and with the clip adult sensor.
Pulse Oximeter
milli®
Reading update time
48
< 2 seconds
Conditions: Oximeter powered, pulse detected and with the clip adult sensor.
T E C H N I C A L
Power SSu pp ly
Electric grid: 110 to 220 V~ (AC)
Frequency: 60 Hz / 50 Hz
S P E C I F I C A T I O N S
E x te r nal Powe r
Supply
Co nne c ti vi t y
Connected to the docking station: 12
to 15Vcc (CC)
Operating frequency: 2.4 – 2.4835 GHz
Connector: 2 Pins
Bluetooth:
Power: < 1.1 mW
Current: 3.5A
Power: 44 VA
Fuses: 2 units typ
type of Radial T3.15A/250V~
(retarded)
Bat te r ie s
Modulation: Frequency Hopping Spread
Spectrum (FHSS)
IEEE 802.11 b/g:
Docking station batter y: 2 x Li-Polymer
2000mAh, 3.7V
Handheld battery: 2 x Li-Polymer 2000mAh,
3.7V.
Operating frequency: 2.4 – 2.4835 GHz
Power: 500 mW
Modulation: Orthogonal Frequency Division
Multiplexing (OFDM)
49
7
T E C H N I C A L
S P E C I F I C A T I O N S
Ele c troma gnet ic Compat ibili t y
Table 10. Electromagnetic emissions.
Guidelines and manufacturer declarations – Electromagnetic emissions
Pulse Oximeter
milli®
Milli pulse oximeter is intended for use in the electromagnetic environment specified in this table.
It is recommended the user or consumer to ensure that the equipment is used in such an environment.
50
Test
Conformity
Electromagnetic environment - Guidelines
RF emissions ABNT NBR IEC CISPR 11
Group 1
Milli pulse oximeter uses RF energy only for internal functions. Its RF emissions are veryy low and it is not probable to cause any interference in near electronic equipments.
RF emissions ABNT NBR IEC CISPR 11
Class A
Limits for harmonics emissions IEC 61000-3-2
Not applicable
an be used in homes
Milli pulse oximeter is suitable for use in all establishments other than domestic, and can
and establishments connected to the public power grid (low voltage) for domestic use whenever it has
the following warning:
Warning:Thisdevice/systemisintendedforuseonlybyhealthprofessionals.Thisdevice/system
/systemmaycauseradio
nproceduressuchasreointerferenceordisruptoperationsofnearbyequipment.Itmaybenecessarytoadoptcertain
Voltage fluctuations and flicker in public
low-voltage supply systems IEC 61000-3-3
Not applicable
o reduce the effects.
rientation and repositioning of the Milli pulse oximeter or local shielding to
T E C H N I C A L
S P E C I F I C A T I O N S
Table 11. Electroma
Electromagnetic immunity (general).
Guidelines and man
manufacturer declarations – Electromagnetic immunity
Milli pulse oximeter is intended for use in the electromagnetic environment specified in this table.
It is recommended th
the user or consumer to ensure that the equipment is used in such an environment.
Immunity test
Test level ABNT NBR IEC 60601
Conformity level
Electromagnetic environment - Guidelines
Electrostatic discharg
discharge (ESD)
IEC 61000-4-2
± 6 kV by contact
± 8 kV by air
± 6 kV by contact
± 8 kV by air
Floors should be of wood, concrete or ceramic. If floors
are covered with synthetic material, the relative humidity
should be at least 30%.
Testing and measurem
measurement techniques
- Electrical fast transient/burst
transie
immunity test. IEC 61000-4
61000-4-4
± 2 kV in power supply lines
± 1 kV in input/output lines
± 2 kV in power supply lines
Not applicable
The quality of power supply should be that of a typical commercial or hospital environment.
Testing and measurement
measurem techniques
- Surge immunity test.
te
IEC 61000-4-5
± 1 kV line(s) to line(s)
± 2 kV line(s) to ground
± 1 kV line(s) to line(s)
Not applicable
The quality of power supply should be that of a typical commercial or hospital environment.
51
7
T E C H N I C A L
S P E C I F I C A T I O N S
Table 11. Electromagnetic immunity (general).
Immunity test
Pulse Oximeter
milli®
Testing and measurement techniques - Voltage dips, short
interruptions and voltage variations
immunity tests. IEC 61000-4-11
52
Testing and measurement techniques - Power frequency magnetic
field immunity test 50/60Hz. IEC
61000-4-8
Test level ABNT NBR IEC 60601
< 5% UT
(> 95% voltage drop in UT) for 0,5
cycle 40% UT
(60% voltage drop in UT) for 5 cycles
70% UT)
(30% voltage drop in UT for 25 cycles
< 5% UT
(> 95% voltage drop in UT) for 5
seconds.
3 A/m
Note: UT is the c.a. voltage before the application of test level.
Conformity level
Electromagnetic environment - Guidelines
Not applicable
ted
Milli pulse oximeter is always operated
ust
with a backup battery. The user must
ensure that the equipment battery is
fully charged.
3 A/m
d near a Magnetic
Milli pulse oximeter cannot be used
Resonance Unit (MRI).
T E C H N I C A L
S P E C I F I C A T I O N S
Table 12. Electroma
Electromagnetic immunity (equipment that is not for life support).
Guidelines and man
manufacturer declarations – Electromagnetic immunity – Equipment that is not for life support.
Milli pulse oximeter is intended for use in the electromagnetic environment specified in this table.
It is recommended th
the user or consumer must ensure that the equipment is used in such an environment.
Immunity test
Testing and measurement
measure
techniques - Immunity to conducted
disturbances, induce
induced by radio-frequency fields. IEC 610
61000-4-6
Test level ABNT NBR IEC 60601
3Vrms
150 kHz until 80 MHz
Conformity level
Electromagnetic environment - Guidelines
3V
RF communication equipment, portable or not, should not
be used near any part of the Milli Pulse Oximeter, including
cables, with a separation distance less than recommended.
This distance is calculated from the equation applicable to the
transmitter frequency.
Recommended separation distance
d=1.17√P
d=1.17 from √P 80 MHz até 800 MHz
d=2.33 from √P 800 MHz até 2.5 GHz
53
7
T E C H N I C A L
S P E C I F I C A T I O N S
Table 13. Electromagnetic immunity (equipment that is not for life support).
Immunity test
Pulse Oximeter
milli®
Testing and measurement techniques - Radiated, radio-frequency,
electromagnetic field immunity test.
IEC 61000-4-3
54
Test level
ABNT NBR IEC 60601
3V/m
80 MHz until 2.5 GHz
Conformity level
3V/m
Electromagnetic environment - Guidelines
he transmitter in
Where P is the maximum nominal output power of the
Watts (W) according to the transmitter manufacturer,, and d the separation distance in meters (m). It is recommended that the field strength
th determined
established by the RF transmitter and the field strength
through an electromagnetic inspection in the place*,, is less than the
ence may occur
compliance level in each frequency range. ** Interference
around the equipment with the following symbol:
NOTE 1: In 80 MHz and 800 MHz apply a higher frequency range.
NOTE 2: These guidelines may be not applicable in every situation.
Electromagnetic propagation is affected by absorption and reflection of structures, objects and people.
o AM and FM and
* Field intensity established by fixed transmitters as radio base stations, telephone (cell and wireless) and land mobile radios, amateurs, transmission radio
nded an electroTV transmission theoretically cannot be predicted accurately. To evaluate the electromagnetic environment due to fixed RF transmitters, it is recommended
ve, it should be
magnetic inspection of the place. If the measurement of the field strength where Milli pulse oximeter is used exceeds the level of conformity cited above,
observed to verify if the equipment is in normal operation. If it is observed an abnormal operation, some additional procedures such as reorientation orr repositioning of the
Milli pulse oximeter may be necessaries.
**Above frequency range of 150KHz until 80MHz, field strength should be lesser than 3V/m.
T E C H N I C A L
S P E C I F I C A T I O N S
Table 14. Separatio
Separation distances.
Recommended sep
separation distances between RF communication portable and mobile equipment and Milli Pulse Oximeter
Milli pulse oximeter is intended for use in the electromagnetic environment where radiated RF disturbances are controlled. The customer or user of the oximeter can help
prevent electromagnetic
electromagn
interference by maintaining a minimum distance between portable and mobile RF communication devices (transmitters) and the oximeter, as
recommended in thi
this table, according to the maximum power output of communication equipment.
Separation distance according to transmitter frequency m
Nominal maximum power
output of the transm
transmitter W
From 150 kHz to 80 MHz
d=1.17√P
From 80 MHz to 800 MHz
d=1.17√P
From 800 MHz to 2,5 GHz
d=2.33√P
0.01
0.12
0.12
0.23
0.1
0.37
0.37
0.74
1
1.2
1.2
2.3
10
3.7
3.7
7.4
100
12
12
23
For transmitters with a nominal maximum output power not listed in this table, recommended separation distance d in meters (m) may be determined by the equation
applicable to the fre
frequency of the transmitter where P is the maximum power output of the transmitter in Watts (W) according to the transmitter's manufacturer.
NOTE 1: In 80 MHz and
an 800 MHz, separation distance for the higher frequency range is applied.
NOTE 2: These guide
guidelines may not be applicable in all situations. Electromagnetic propagation is affected by absorption and reflection from structures, objects and people.
55
8 WARRANTY
HIT Tecnologia em Saúde LTDA, within the limits specified in this
certificate assures the consumer/purchaser of this product warranty against manufacturing defects (materials) if presented within
one year for the equipment, and 90 (ninety) days on accessories
(cables and sensors), counting from the date of invoice issuance
of the product.
Pulse Oximeter
milli®
The responsibility of HIT Tecnologia em Saúde LTDA is limited to
repair, replace defective parts, or at the discretion of the company,
replace the products/equipments, since technical department
or authorized representative check failures during normal use.
56
This warranty will be null and void if the product is damaged by
accidents, natural agents, if it is operated in disagreement with
the Operation Manual, use of accessories not approved by HIT
Tecnologia em Saúde LTDA, not suitable electrical installations or
excessive fluctuations of electricity supply, and if shows signs of
having been violated, adjusted or repaired by people not authorized by HIT Tecnologia em Saúde LTDA.
Potential losses and damages of the buyer by the malfunctioning
or standstill of product under any circumstances will not be
manufacturer’s liability.
HIT Tecnologia em saúde LTDA undertakes to provide
vide both free and
paid services only in localities which maintain itss own workshops
or authorized representatives.
Freight expenses, transportation, lodging and
d packaging are
responsibility of the consumer/purchaser, exceptt in cases covered
by the warranty.
If the property of product is transferred during thee warranty period,
this will be transferred with all rights and will continue in force
until the end of the period counting from the date of purchase
by the first consumer/purchaser.
This warranty certificate is the only responsibility
ity statement for
HIT Tecnologia em Saúde LTDA, no representative
tive is authorized
to open exceptions on their behalf.
Claims for damage during transportation must
st be registered
immediately with the carrier company. All correspondence
pondence relating
to the product must specif y product name, model and serial
number, as described in the equipment.
W A R R A N T Y
Ce r tifi
ti f i ca
c a ti ons of t he Company and Pro du c t
Good manufacturing practice (GMP)
Go
NBR IEC 60601-1: 1994 + Amendment:1997
Issued: 07/13/2010
Renewed every 2 years
Health License
Electro medical equipment
Part 1 – General safety requirements.
Issued 03/10/2011
Validity: 03/10/2016.
Certificado em: 04/19/2011
Renewed annually
NBR IEC 60601-1-2: 2006
INMETRO Certification
Issued: 03/10/2011.
Validity: 03/10/2016 .
NBR IEC 60601-1-4: 2004
Electro medical equipment
Pa
Parts 1-4 – General safety requirements
Collateral Standard: Programmable
electro medical systems.
Issued 10/03/2011
Validity: 10/03/16.
Electro medical equipment
Parts 1-2 – General safety requirements
Collateral Standard: Electromagnetic
Compatibility - Requirements and testing
Issued 03/10/2011
Validity: 03/10/2016.
NBR ISO 9919: 1997
Pulse oximeter for medical use
Prescriptions
Issued 03/10/2011
Validity: 03/10/2016.
57
7
8
W A R R A N T Y
Manufacturer Data
Register in ANVISA / MINISTRY OF HEALTH - Brazil:
80583710002
Product manufactured by
HIT Tecnologia em Saúde Ltda
Rua Prof. Algacyr Munhoz Mader, 3775, CIC
CEP: 81350-010 Curitiba – PR – Brazil
Phone number: (55-41)3022-3291 / Fax: (55-41)3022-3271
CNPJ (National Register of Legal Entities): 07.111.023/0001-12
Business license: U776MM9X03XM
Pulse Oximeter
milli®
CTO:
Eng. Sérgio Renato Rogal Jr (CREA-PR 83470/D)
58
Legal Person
Eng. Marcus Vinícius Mazega Figueredo (CREA-PR 83468/D)
Manual translated by Eng. Viviana Raquel Zurro MSc
Consumer Assistance
Technical Support: 55 41 3022 3195 | SAC: 55 41 3022 3461
E-mail: [email protected]
Website: www.hitechnologies.com.br
A n nota ti ons
__________________________________________________________________________________________________
__________________________________________________________________________________________________
__________________________________________________________________________________________________
__________________________________________________________________________________________________
__________________________________________________________________________________________________
__________________________________________________________________________________________________
__________________________________________________________________________________________________
__________________________________________________________________________________________________
__________________________________________________________________________________________________
__________________________________________________________________________________________________
__________________________________________________________________________________________________
__________________________________________________________________________________________________