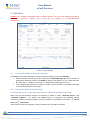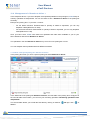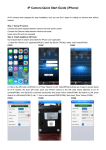
1
Simplify your EDI User Manual 6, passage Abel LEBLANC 75012 PARIS - FRANCE Tel : +33 1 55 78 22 62 Fax : +33 1 55 78 85 75 SIRET : 34502166100037 RCS Paris APE : 741G TVA : FR 14 345 021 661 http://www.tenorconseil.fr 2014 User Manual eCar® Services Summary 1. Getting started ................................................................................................... 7 1.1. Set Internet Explorer ....................................................................................... 7 1.2. Connect to eCar® ............................................................................................ 7 1.3. Use eCar®....................................................................................................... 7 2. Home ................................................................................................................... 8 2.1. Select a partner .............................................................................................. 8 2.2. Take note of the number of messages received ............................................. 8 2.3. Get information on the account: credit level .................................................... 8 2.4. Get information on the application .................................................................. 8 2.5. Display a form................................................................................................. 8 2.6. Change the language ..................................................................................... 8 2.7. Exit eCar® ....................................................................................................... 8 3. General rules of use........................................................................................... 9 3.1. Run through eCar® ........................................................................................ 9 3.2. Display online help ......................................................................................... 9 3.3. Printout a document........................................................................................ 9 3.4. Download a message ..................................................................................... 9 4. Repository ........................................................................................................ 10 4.1. 4.2. 4.3. User...............................................................................................................10 4.1.1. Authorize a new user ...................................................................................... 10 4.1.2. Update an user’s rights ................................................................................... 10 Organization ..................................................................................................11 4.2.1. Consult information about an organization ..................................................... 11 4.2.2. Create a new organization .............................................................................. 11 4.2.3. Cancel an organisation ................................................................................... 11 4.2.4. Update information about an organization ...................................................... 11 Article ............................................................................................................12 4.3.1. Consult more detail information of an article .................................................. 12 4.3.2. Create a new article ........................................................................................ 12 4.3.3. Modify an article .............................................................................................. 12 4.3.4. Modify an EAN article ..................................................................................... 15 4.3.5. Remove an article ........................................................................................... 15 User manua l eCar ® Servic e s Confidential document, property of TENOR, 2012 eCar 1.9 Tenor 13/05/2013 Page 2 of 52 User Manual eCar® Services 4.4. 4.5. Packaging......................................................................................................16 4.4.1. Create a Packaging Type ............................................................................... 16 4.4.2. Modify a Packaging Type ............................................................................... 16 4.4.3. Remove a Packaging Type............................................................................. 16 4.4.4. Create, modify, remove a HU Type ................................................................ 16 4.4.5. Create, modify, remove an EAN LU/DU Type ................................................ 16 ETI9 setup .....................................................................................................17 4.5.1. ETI9 setup....................................................................................................... 17 4.5.2. ETI1 setup....................................................................................................... 18 4.5.3. EAN label setup .............................................................................................. 18 5. Messages summary ......................................................................................... 19 5.1. Know the messages status and their features ...............................................19 5.2. Display Acknowledgment of messages sent ..................................................20 5.3. Consult the message content ........................................................................20 5.4. Put a message in the Trash bin .....................................................................20 5.5. Restore a message from the Trash................................................................21 5.6. Consult a message in the Trash ....................................................................21 6. EAN Order ......................................................................................................... 22 6.1. Consult the header of an Order message ......................................................22 6.2. Consult the detail of an article line .................................................................22 7. Delivery instruction and Call off delivery....................................................... 23 7.1. Consult the header of a requirement message ..............................................23 7.2. Consult the detail of an article line .................................................................23 8. The collection request ..................................................................................... 24 8.1. Consult the list of collection requests .............................................................24 8.2. Consult the detail of a collection request........................................................25 8.3. Choose another collection request.................................................................25 8.4. Create a line in Detail ....................................................................................26 8.5. Send a collection request ..............................................................................26 9. Making of a delivery ......................................................................................... 27 9.1. First method: use of the Picking List ..............................................................27 9.2. Second method: use of the despatch advice form .........................................27 User manua l eCar ® Servic e s Confidential document, property of TENOR, 2012 eCar 1.9 Tenor 13/05/2013 Page 3 of 52 User Manual eCar® Services 9.3. Ideal delivery .................................................................................................28 10. Picking lists ...................................................................................................... 30 10.1. Consult the Summary of the Picking Lists ......................................................30 10.2. Consult the Detail of a Picking List.................................................................31 10.3. Merge the Picking Lists..................................................................................31 10.4. Generate the corresponding Despatch Advice from the Picking List ..............31 10.5. Choose another Picking List ..........................................................................31 10.6. Management of « Remains to deliver » .........................................................32 11. Despatch advice ............................................................................................... 35 11.1. Consult a Despatch Advice previously sent or billed ......................................35 11.2. Validate a Despatch Advice prepared from a Picking List ..............................35 11.3. Create an exceptional Despatch advice .........................................................35 11.4. Create an Article line in Detail page ...............................................................36 11.5. Printout PU, HU and SHU labels....................................................................37 11.6. Printout LU and DU EAN label .......................................................................38 11.7. Editing functions of the Dispatch Set Up list ...................................................39 11.8. Editing of a Delivery Note (DN) ......................................................................39 11.9. Fill up the Delivery Note .................................................................................39 11.10. Send the Despatch advice ...........................................................................39 12. Invoice............................................................................................................... 40 12.1. Introduction to the invoices ............................................................................40 12.2. Charge a delivery ..........................................................................................40 12.3. Consult an invoice .........................................................................................40 12.4. Create or consult invoice detail ......................................................................40 12.5. Sending an invoice ........................................................................................40 12.6. Find an invoice with a DN number .................................................................40 13. Dematerialization ............................................................................................. 41 13.1. Dematerialised Invoices .................................................................................41 13.1.1. Search for a dematerialised invoice from a number ..................................... 41 13.1.2. Search for a dematerialised invoice from an amount ................................... 41 13.1.3. Search for a dematerialised invoice from a date .......................................... 41 13.1.4. Reset the research fields .............................................................................. 41 User manua l eCar ® Servic e s Confidential document, property of TENOR, 2012 eCar 1.9 Tenor 13/05/2013 Page 4 of 52 User Manual eCar® Services 13.2. 13.1.5. Consult a dematerialised invoice .................................................................. 41 13.1.6. Print the displayed list of dematerialised invoice .......................................... 42 Partners of dematerializing ............................................................................42 13.2.1. View the list of Dematerialised partners ....................................................... 42 13.2.2. Know the history of changes of the Seller (liable entity) ............................... 42 13.2.3. Know the history of modifications of a partner.............................................. 42 13.2.4. Search for a dematerialised partner to a given date .................................... 42 13.2.5. Print the list of the displayed dematerialised partners .................................. 42 14. Your account .................................................................................................... 43 14.1. Know the level of units available ....................................................................43 14.2. Know the number of message exchanged with a partner ...............................43 14.3. View the statistics of a selected month ..........................................................43 14.4. Download the statistics of my account ...........................................................43 15. Tools ................................................................................................................. 44 15.1. Upload a despatch advice .............................................................................44 15.2. Upload an invoice ..........................................................................................44 15.3. Upload files at a time .....................................................................................44 16. Preferences ...................................................................................................... 45 16.1. Select default language .................................................................................45 16.2. Select time section ........................................................................................45 16.3. Select display format and date format ............................................................45 16.4. Put the messages into the trash ....................................................................46 16.5. Make manage DN, PU and Invoice number by the application ......................46 16.6. Select file download mode .............................................................................46 16.7. Validate settings specified in preference form ................................................46 16.8. Cancel settings specified in preference form .................................................46 17. eCar® feedback ................................................................................................ 47 Appendix: Making an expedition with the Web EDI eCar® ................................. 48 Lexicon .................................................................................................................... 49 Pictures list ............................................................................................................. 52 User manua l eCar ® Servic e s Confidential document, property of TENOR, 2012 eCar 1.9 Tenor 13/05/2013 Page 5 of 52 User Manual eCar® Services User manua l eCar ® Servic e s Confidential document, property of TENOR, 2012 eCar 1.9 Tenor 13/05/2013 Page 6 of 52 User Manual eCar® Services 1. Getting started 1.1. Set Internet Explorer To connect to eCar eCar®, you should use the browser Internet Explorer version 8 or 9 only. If your current version is inferior to version 8, download and install according to Windows: Windows XP http://www.microsoft.com/downloads/InternetExplorer/XP Windows Vista http://www.microsoft.com/downloads/InternetExplorer/Vista Windows Seven http://www.microsoft.com/downloads/InternetExplorer/Seven Configure Internet Explorer as follows: Log on to https://services-edi.net/v2 Click on Tools, then Internet Options o In General tab: o In Advanced tab: 1.2. 1.3. In History, then Settings, check the first choice, then click Ok ; In History, click on Delete, select « Internet temporary files » and « History », then click on Delete. Uncheck boxes "Use HTTP 1.1" and "Use HTTP 1.1 through proxy connections" Once the operation is completed, click on Ok, then close all windows and run Internet Explorer again. Connect to eCar® Start Internet Explorer (version 8 at least, to know about your version, click on Help then « About Internet Explorer ») ; Enter in the address area of Internet Explorer : https://services-edi.net/v2. Select the desired language ; Enter the user name and password given by email ; Click on Connection. Use eCar® In order to ensure a problem-free use of eCar®, be sure to follow these recommendations: Use version 8 or 9 of Internet Explorer ; Do not use Previous (Back) and Next (Forward) buttons of the browser. Use the functions of eCar® application in order to point from one page to another ; Pages must be entirely loaded before clicking on a link or on a button ; Use the menu button Exit to quit the application ; Acrobat Reader must be previously installed on your PC for printing ( http://www.adobe.com/fr/). You can get help at any time regarding your current action through the button Help menu of the application. User manua l eCar ® Servic e s Confidential document, property of TENOR, 2012 eCar 1.9 Tenor 13/05/2013 Page 7 of 52 User Manual eCar® Services 2. Home Home page allows you to select the Partner whith whom you want to work, and consult informations such as what is new in the application, number of new messages received or even the number of available credit units on your account. 2.1. Select a partner Select your partner using the Partner dropdown list on the right side of the screen. 2.2. Take note of the number of messages received When you receive a message from a Partner, an email alert is sent to you – to email address previously informed in Repository>User. The right side of the screen displays the number and type of message received that have not been read yet. 2.3. Get information on the account: credit level The remaining units available are always displayed on home page. However you can also see those in Administration>Your account to know the scratch-date. An alert message showing the level of remaining units available is displayed on home page when your account is close to be unitless, or if your subscription validity period comes to scratch-date. Then consider renewing your subscription of use. 2.4. Get information on the application New features of the application are described as they are set up in front of the News, on the left side of the home page screen. 2.5. Display a form Once you have selected your Partner, the entire menu is displayed. Then you can click on the choosen wording in the menu to access the different screens. 2.6. Change the language You can change the language from the menu Administration>Language and choose among options: French, English, German, Spanish, Italian, Russian and Romanian. Caution: when you change the language during a data entry, be carefull to save your work before. Otherwise your data will be lost. 2.7. Exit eCar® Remark: click on Exit to quit the application. If you quit the application by closing your browser, your session will not be closed and eCar® will display this message at the reconnection attempt « You are already connected to the application. Do you want to disconnect your previous session? ». User manua l eCar ® Servic e s Confidential document, property of TENOR, 2012 eCar 1.9 Tenor 13/05/2013 Page 8 of 52 User Manual eCar® Services 3. General rules of use 3.1. Run through eCar® Move from one page to another The main menu allows you to view a selected page and move from one function to another. The same function can have multiple pages. In this case, browsing is done by clicking on proposed titles and buttons available thanks to the tab, for ex: Access the Detail from the Header page, Access the Header from the Detail page. Move from one table to another Click on the buttons: Next Item 3.2. Previous Item Display online help Recommendation: use online help to get familiar with the application. Each page/form has a specific online help page that gives you all the explanations to know the use and information required in the exact page where you are. 3.3. Click on Help in the menu. Printout a document To print a document – Delivery Schedule, Call off Delivery, Despatch Advice, Invoice, Labels, Picking List: 3.4. Click on the Printout button; The document is downloaded by the automatic execution of Acrobat Readerc, to be preinstalled on your PC; The document is displayed. To print click in the menu File>Printout. You can also save the document in a Directory of your PC. Download a message To download informations in a message: Click on the button Download; The document is downloaded; The file is displayed. You can also save the document in a Directory of your PC. User manua l eCar ® Servic e s Confidential document, property of TENOR, 2012 eCar 1.9 Tenor 13/05/2013 Page 9 of 52 User Manual eCar® Services 4. Repository The Repository is the representation of the database that stores all the information to be managed. Necessary for the proper use of the application. Remark: the Repository>Article is updated automatically from all information contained in Delivery Instruction, sent by your partner. It is useless to set the Repository>Article with new article code but it’s better to wait until they are implemented automatically. 4.1. User Definition: eCar® can assign different rights on the use of the application to users based on their responsibilities. For example, you can authorize an user only to consult the Delivery Instruction sent by your Partner, and another user only to create and send a Despatch Advice. You have unlimited number of creation of user login. However, you cannot be connected with over 4 users login simultaneously. When creating your eCar account, you will receive by email the Administrator Login and Password. An Administrator Login has all the rights. Meaning that you can update and modify information content of the Repository. At least one administrator login per eCar account is needed. 4.1.1. Authorize a new user Through dropdown Users list, select New; Enter the Login name; Enter corresponding Email address, up to 3 per user login. An email alert will be sent to these address at each Inbound message of your Partner; By check box, the Administrator gives Rights on the application to this user login; For example, if you want to allow a user login to create a Despatch Advice, check the box of the line Dispatch Advice/column Create; You can also assign Rights over a fixed period by informing dates in Valid from and to using format YYYY/MM/DD. If these dates are not filled out, the Rights will have permanent validity; Click on Validate. Picture 1. Repository user 4.1.2. Update an user’s rights Through dropdown Users list, select the concerned user Login; Update the information; Click on Validate. User manua l eCar ® Servic e s Confidential document, property of TENOR, 2012 eCar 1.9 Tenor 13/05/2013 Page 10 of 52 User Manual eCar® Services 4.2. Organization Definition: an organization is a structure or a company with a role in business transaction managed by eCar®: Seller, Consignor, Buyer, Consignee, Beneficiary, Invoicee, Carrier, etc. Remark: the information regarding your customer (Buyer, Consignee site, Invoicee) and those of your company (Seller or Consignor) are preset by TENOR in eCar® in order to avoid you a collect of information and guarantee you a high quality of these informations. Usually you cannot change those information details, if you need an update, contact TENOR. The Repository>Organization lists all entity that may be involved in transactions managed by eCar®. To get more information, click on the line for the organization to consult. 4.2.1. Consult information about an organization Click on Repository>Organization. The list of organization is displayed: Click on the line for the organization to consult; A window displays corresponding detailed information. Consult the place of discharge of a Consignee site Click on Place of discharge in the Consignee form. 4.2.2. Create a new organization Remark: you can only create a new organization if the button New (available right on the organization) is displayed for this type of organization. Click on New; The entry screen is displayed; Enter or select through dropdown list the information in the appropriate fields. The nature and the format required are in the online help; Click on Validate. 4.2.3. Cancel an organisation Remark: you cannot cancel the informations of your Buyer, Consignee site, Invoicee. Click on the line for the organization to cancel; The window form with the informations of the organization is displayed; Click on Cancel. 4.2.4. Update information about an organization Caution: some information from certain organization cannot be updated. If you still want to do, contact TENOR. Click on the line for the organization to update; Update the informations. The nature and the format of the informations are in the online help; Click on Validate. User manua l eCar ® Servic e s Confidential document, property of TENOR, 2012 eCar 1.9 Tenor 13/05/2013 Page 11 of 52 User Manual eCar® Services 4.3. Article Remark: the Repository>Article is updated automatically from all the informations contained in the Delivery Schedule and Call off Delivery, sent by your partner. Only certain infiormations are not contained in the messages and must be entered or updated in the Repository>Article. For example, the Gross Weight, needed to print labels and the unit price, necessary for the calculation of the bill, must be entered by you. To research an article through the Article List, inform the input area Search Buyer’s Nr or Search description then click on . Caution: an article is always defined by its reference and (not et) its Order Number. 4.3.1. Consult more detail information of an article In the menu, click on Repository>Article. The Article list is displayed. Remark: you can sort the Article list according to the criterias Buyer’s Nr., Description, Supplier’s Nr. or Order Nr. Remark for EAN users: you can sort the Article list according to the criterias GTIN Article, Article Description or Type Logistics. In Article list, click on the line for the article you want to consult detailed information. The form with detailed information is displayed. 4.3.2. Create a new article In Article list, click on New Article. The entry screen to create a new article is displayed. You will find the nature and the format of the informations in the online help. 4.3.3. Modify an article Caution: although most information is updated automatically when receiving messages from your partner, you must complete this information. Click anywhere on the article line The entry screen of detailed information of the article selected is displayed. The Article form consists of 4 areas: Article : Buyer’s ref, Order Nr, Order date, Number (Supplier’s ref.), Description; Price : Unit price, Currency, VAT/Country applicable, Unit Price Basis (hundredth, number of decimal); Packaging: Pack Type, Qty/Package; Misc : Net weight, Gross weight, Weight Unit, Country of Origin, Engineering change number and Modification date. Update the Order Nr To allocate an order number to an article (considering that Order Nr is normally mentionned in message received, consequently automatically updated in same manner upon receipt of messages). Select Order Nr through drop-down list Order Nr; Click on Validate. User manua l eCar ® Servic e s Confidential document, property of TENOR, 2012 eCar 1.9 Tenor 13/05/2013 Page 12 of 52 User Manual eCar® Services Create a new Order Nr Click on Order; Select New in the drop-down list Order Number; Inform the number and order date for this article; Click on Validate. Update the price Caution: it is mandatory to inform the price of an article before issuing an invoice. The price must corresponds to the article price of the order number entered in the field Order Nr. Enter the price of the article in the field Unit Price; Select the currency using the drop-down list Currency; Select the VAT rate using the drop-down list VAT / Country; Enter the unit price basis (hundredth) in the field Unit Price Basis; Select the measure unit of the unit price basis using the drop-down list Measure Unit; Click on Validate. Create, update or delete a VAT rate Click on the button VAT rate. Update a packaging Caution the Pack Type appears in the Call off Delivery messages. You need to use the Pack Type priority requested. To create, update or delete a Pack Type, use the form Repository>Packaging. Allocate a Pack Type to an article Remark: multiple Pack Type can be allocated to an article. With drop-down list Pack Type, select the corresponding Pack Type. If Pack Type is not listed, select Add Link. Packaging window is displayed ; Select with the drop-down list Packaging List the Pack Type you want to allocate to an article; Check the Main box, if the Pack Type is the one that is mentionned by the logistic protocol or if you inform just single Pack Type; Enter the quantity per package in the field Qty/Package; Click on Validate. Delete a Pack Type of an article Select with the drop-down list Pack Type the one you want to delete for this article; Click on Delete the Pack Type. Remark: an article cannot be deleted while being currently in delivery process or invoicing process. Allocate the C40 Label to an article Check the box C40 Label, this function being valid only if labels are already set in ETI9 format in the Repository>ETI9 setup for this partner; Click on Validate. User manua l eCar ® Servic e s Confidential document, property of TENOR, 2012 eCar 1.9 Tenor 13/05/2013 Page 13 of 52 User Manual eCar® Services Remark: at the time of dispatch of this article, C40 Label will be automatically ganerated in the PU Label pdf file, except if other articles of the delivery do not have this specificity. If so, check the box C40 label in the Detail page of your Despatch Advice. Update the weight Caution: it is mandatory to inform the Gross Weight of an article to be able to print corresponding labels. Enter the Net weight in the Net weight field [weight of one article] and the Gross weight in the Gross weight field, the calculation rule being [Net weight + (weight of the empty packaging : Qty per package)] = Gross weight; Select the weight unit using the drop-down list Weight Unit; Click on Validate. Add a symbol on the labels Caution: when you set a symbol, the chosen symbol also updates the article for all other Order Nr related with this article number. Different symbols may be added on the labels: Symbol « AQP »: Quality Control; Symbol « S »: Security part; Symbol « R »: Regulated part. To the buyer’s demand, a symbol for Security part or Reserve parts can be added in the form of graphic printed symbol. Picture 2. Symbol for Security parts Check the box S in Logos; Click on Validate. Picture 3. Symbol for Regulated parts Check the box R in Logos; Click on Validate. It belongs to the supplier to create labels complying to its specifications. There is monitoring equipment allowing to comply thanks to the symbol « AQP ». Picture 4. Symbol for Quality Control insurance Check the box Quality control; Click on Validate. Caution: the acronym AQP can not be added to the ETI9 format labels. Available on ETI1 format only. User manua l eCar ® Servic e s Confidential document, property of TENOR, 2012 eCar 1.9 Tenor 13/05/2013 Page 14 of 52 User Manual eCar® Services 4.3.4. Modify an EAN article Caution: this paragraph concerns the users of retail industry. Although the major part of the information is updated automatically by the message received from your partner, updates may be necessary. Click anywhere on the article line The entry screen of detailed information of the article selected is displayed. The Article form consists of 6 areas: Article: Article GTIN, Description, Pack (packaging); Anonymous Packaging type: Packaging Type, Qantity, Unit; Price: Order Nr, Unit price, Currency, Unit Price Basis, Measure Unit, VAT rate applicable/Country; Packaging (Sons): Article GTIN, Qantity, unit; Despatch Logistics (Fathers): GTIN, Quantity, unit; Misc : Net weight, Gross weight, Weight Unit, Country of Origin. To update the Packaging To allocate a Pack Type to an article (the Pack Type appears normally in the content of the message received from your partner and is automatically updated when receiving messages). Click on the Pack. button ; Select the Pack Type using the drop-down list Packaging Type; Click on Validate. To create a new Packaging Type Caution: the LU type appears in Order messages. You need to use the LU type priority requested. To create, update or print a LU type, use the form Repository>LU Type. To change the Anonymous Packaging type, Packaging (Sons), Despatch Logistics (Fathers) Click on Add; Fill out the displayed fields; Click on Validate; If needed, click on Delete at the end of (the) line to delete. To update the price, weight or to create, update or delete a VAT rate Report to previous informations in 4.3.3. Modify an article. 4.3.5. Remove an article Click on the article line to remove; The form with detailed information of the article is displayed; Click on Delete. User manua l eCar ® Servic e s Confidential document, property of TENOR, 2012 eCar 1.9 Tenor 13/05/2013 Page 15 of 52 User Manual eCar® Services 4.4. Packaging A pack unit (PU) can be a single unit (cardboard waisted pack) or a standard reusable box (container, metal or plastic folding packaging). Picture 5. Repository/Packaging 4.4.1. 4.4.2. 4.4.3. Create a Packaging Type Click on New in the drop-down list Packaging List; The entry screen is displayed; Enter or select with drop-down lists the informations in appropriate fields: Pack_Id, Description, Dimensions and Weight; Click on Validate. Modify a Packaging Type Select a Packaging in the drop-down list Packaging List; The entry screen displayed the informations of the Packaging; Modify the appropriate fields; Click on Validate. Remove a Packaging Type Select a Packaging in the drop-down list Packaging List; The entry screen displayed the informations of the Packaging; Click on Delete. 4.4.4. Create, modify, remove a HU Type A HU Type (Hand Unit) is a pallet load delivered by the supplier to the carrier and shipped to the customer. Caution: the Repository>HU Type is not always available. This depends on the partner’s profil selected on the Home page. The creation, modification and deletion of a HU Type follows the same process as the PU Type. 4.4.5. Create, modify, remove an EAN LU/DU Type This part concerns the users of the retail industry. A LU Type (Logistic Unit) could be a unitary packaging or a standard reusable packaging. A DU Type (Despatch Unit) is a pallet load delivered by the supplier to the carrier and shipped to the customer. Caution: The Repository>DU Type is not always available. This depends on the partner’s profil selected on the Home page. The creation, modification, deletion of LU and DU Types follows the same process as the PU/HU Types. User manua l eCar ® Servic e s Confidential document, property of TENOR, 2012 eCar 1.9 Tenor 13/05/2013 Page 16 of 52 User Manual eCar® Services 4.5. ETI9 setup Definition: eCar integrates the identification of the articles according to GALIA Odette standards, thanks to logistic labels ETI1 and ETI9. Consequently, all references delivered to the customers will be identified by the PU and HU with the help of a printed label following one of those standards. Picture 6. Repository: ETI9 setup Caution: the ETI1 and ETI9 labels must be used according to the customer’s specifications. However, Besides, other label formats exist (NISSAN, VDA,...) that are not available on eCar®. The configuration of the labels must be set up for each partner if you use ETI9. As default, the labels will be available in ETI1 for all your partners. 4.5.1. ETI9 setup To configurate ETI9 format for PU, HU, SHU labels, check the box above corresponding column. All Consignee sites will consequently be selected for this partner. Then click on Validate. Picture 7. ETI9 (210 x 74 mm) Remark: you have the possibility to print C40 label when you are in Detail page of your Despatch Advice. Just check the box C40 Label to generate the ETI9 format dedicated to box C40. Picture 8. Complement to ETI9 for box C40 (210 x 40 mm). User manua l eCar ® Servic e s Confidential document, property of TENOR, 2012 eCar 1.9 Tenor 13/05/2013 Page 17 of 52 User Manual eCar® Services 4.5.2. ETI1 setup As default, ETI1 label is generated. To check this configuration, go in Repository>ETI9 setup and check that all boxes are unchecked. Then click on Validate. Picture 9. ETI1 (210 x 148 mm) Remark: the Place of Discharge (mandatory data) is at the top right corner of the « Consignee » area. The Place of Destination (facultative data, except if it is informed in the delivery instruction) is in the « Place of Destination » area. Here, the Place of Discharge is « 891A5S » and the Place of Destination is « 2Z205514 ». 4.5.3. EAN label setup This configuration is not required to generate EAN label. The system generates automatically EAN labels if your partner is in EAN mode. Those labels have been validated by the standards organization GS1. Picture 10. GS1 label (125 mm x 150 mm) When your partner has the EAN mode, the menu Repository>ETI9 setup is not taken in account.These are the EAN labels that will always be generated. User manua l eCar ® Servic e s Confidential document, property of TENOR, 2012 eCar 1.9 Tenor 13/05/2013 Page 18 of 52 User Manual eCar® Services 5. Messages summary Message summary allows to view the list of inbound and outbound messages. Choose with drop-down list the selection criterias, then click on at the end of the titles line. Picture 11. Summary of messages The list is displayed as a table. The absence of table displayed means that there is no message in the application regarding the selected criterias. 5.1. Know the messages status and their features Various icons may appear in the Summary or in the forms. Some are related to the status of the messages, some others correspond to different available features. The status of the messages are represented by: Received: message received, not yet read; Read: message read, already consulted; In process: message on which you are working on, and that is not yet sent (a message that is In process status can be changed before being sent); Sent: message sent to your partner, can not be modified; Invoiced: Despatch Advice message which has been invoiced. User manua l eCar ® Servic e s Confidential document, property of TENOR, 2012 eCar 1.9 Tenor 13/05/2013 Page 19 of 52 User Manual eCar® Services The features available are represented by: Printout: generating of a pdf file of the corresponding message; Download: export of an XML file or other type of specific file (consult TENOR to download a specific file); Delete: put in the trash the corresponding message. Those three features may be applicated on several messages at a time by checking the corresponding boxes at the end of the message line, then click on proposed functions at bottom right of the page. In general, a zip file which you can download is generated. 5.2. Display Acknowledgment of messages sent You can view the Acknowledgment of your messages sent to your partner. To use this function, if it is available: Click on See acknowledgments. The status change from to become . Remark: the Acknowledgments are currently available only with some partners. 5.3. Consult the message content Click anywhere on the line corresponding to the message you want to view. eCar® displays the corresponding form containing message information. Remark: when you consult a message received on your account, the date displayed in the Summary corresponds to the date which is configurated in Administration>Preferences>Miscalaneous (reception date or display message date, status). For message sent, the date is always the sending date. 5.4. Put a message in the Trash bin eCar® keeps in its database all your messages at least for 6 months. In order to avoid displaying many messages in the Summary list, you can put your messages in the trash. Messages will not be destroyed but remain available if you want to consult and edit later on. Click on the button Delete corresponding to the line of the message to put into the trash bin. Remark: you can put in the trash bin the messages that you no longer want. These are stored into the trash bin. Caution: as default, messages are put in the trash passed 50 days. If needed, you can change this period value in the form Administration>Preferences and indicate by indicating in appropriate boxes the number of days from which you want your messages to be in the trash bin. You can use the box « All check/uncheck » in top right for your selection. User manua l eCar ® Servic e s Confidential document, property of TENOR, 2012 eCar 1.9 Tenor 13/05/2013 Page 20 of 52 User Manual eCar® Services 5.5. Restore a message from the Trash To restore a message from the trash, click on previous picture). Trash bottom left of the Summary page. (See Picture 12. Trash Click on the line of the message to restore. It is restored in the Summary list. This function may be applied on several messages at a time by checking corresponding boxes at the end of the line. To go back to the Summary of messages, click on bottom left of the page. 5.6. Consult a message in the Trash To consult a message in the trash, you need to restore the message first, as described above. Then, click on the corresponding message in the Summary. Once in the trash, the message stays there up to 200 days. Passed the period of 200 days, the message is definitely archived. User manua l eCar ® Servic e s Confidential document, property of TENOR, 2012 eCar 1.9 Tenor 13/05/2013 Page 21 of 52 User Manual eCar® Services 6. EAN Order Caution: this message is dedicated mainly to Retail industries. The order type (indicated top right of the form) is generally « original », but it could also be « replace » ou « modification/order cancellation ». Picture 13. Order (Header) 6.1. Consult the header of an Order message Consultation of an Order message is done by number of program or from the Summary. 6.2. Select a number with the help of the drop-down list Status/Message Nr. The list of Order is classified by oldness increasing. The Status of Order is managed by eCar®, it takes the value R = Received ; L = Read (Lu in french) ; T = Downloaded (Téléchargé in french) ; eCar® displays the article lines of Order in a table. Use the elevator on right side of the table to consult all article lines of the Order. Consult the detail of an article line This form allows you to view the detail of the article line selected in the header of the Order, Other price list and despatch logistics are displays by tables in areas « Alternate prices » and « Despatch logistics ». For Orders, two additional types of information are available: general information (header) and articles (detail). Those information are accessible from buttons Desc and General Article Desc. If the number of line is too important, use the elevator in the right side of the table. User manua l eCar ® Servic e s Confidential document, property of TENOR, 2012 eCar 1.9 Tenor 13/05/2013 Page 22 of 52 User Manual eCar® Services 7. Delivery instruction and Call off delivery Caution: these requirements are mainly dedicated to the Automotive industry. According to the logistic profil of your partner, this one express the requirement with the help of one message of delivery forecast mixed, or with the help of two separated messages, delivery forecast and call of delivery. In second case, eCar® application proposes different forms for the program and for the call of delivery. The handling is similar. 7.1. Consult the header of a requirement message The consultation of a requirement message is done by the menu Purchases and selecting of the program number or from the Summary. 7.2. Select a number using the drop-down menu Status/Msg Nr. The list is classified by chronology. The Status is managed by eCar®, it takes the values R = Received ; L = Read ; T = Downloaded ; eCar® displays the article lines in a table. Use the elevator in right side of the table to consult the entire program. Consult the detail of an article line The Detail form allows you to view the detail of each line selected in the Header form of a program or a call of delivery. The detail per line is presented in the form of a table calling Scheduling details. For the programs, the type of additional information depends on your partner. Those informations are displayed in the area Additional Informations. Picture 14. Delivery forecast >Detail If the number of lines is too important, use the elevator on the right side of the table. User manua l eCar ® Servic e s Confidential document, property of TENOR, 2012 eCar 1.9 Tenor 13/05/2013 Page 23 of 52 User Manual eCar® Services 8. The collection request Recommendation: the collection requests are to enter and send before 1pm, the day before the collection. The collection request includes the delivery to make for one consignee plant, to a place of discharge at a given date. The carrier that is indicated in the message, comes on the date and time to take the goods and make the shipment from the consignor site to the consignee site. 8.1. Consult the list of collection requests This form allows you to view the summary of collection requests. The collection requests are displayed in a table. The absence of table means that the OEM (Original Equipment Manufacturer) has not sent firm requirements. In this case, there is no collection request to generate regarding the partner selected. You can use the selection criterias « Show » (according to the status) / « Period » to refine the search of a list. The status of the collection requests are represented by: To process: the collection request is to process ; the collection request hasn’t been generated; Processed: the collection request is processed ; the corresponding collection request has been sent. The corresponding DN number is displayed in the next column. Caution: the nature of the instruction may take values such as « From » (departure), « To » (arrival) or « Imp. » (imperative, in case of emergency). In this latter case, the goods are imperative to be shipped at date and time indicated in Schedule. Picture 15. List of collection requests (Summary) User manua l eCar ® Servic e s Confidential document, property of TENOR, 2012 eCar 1.9 Tenor 13/05/2013 Page 24 of 52 User Manual eCar® Services 8.2. Consult the detail of a collection request Click on any field of the line of a collection request you want to consult. The detail of the list displays. You must, all the time, be able to serve what is required in the collection request. 8.3. Choose another collection request With the summary of collection requests, you can choose another number of collection request by clicking on the corresponding line. The detail of the collection request selected displays automatically. To switch of the list, come-back to the summary of collection requests with the button Summary. Caution: as long as the message of collection request is not sent, the status of the collection request remain To process. Picture 16. Collection request (Detail) Information Consignor and Carrier are prefilled automatically (according to the parameters set in Repository>Organization). The first from the list is set as default. If you have set multiple Consignor sites on your account, make sure to select the right Consignor before sending your message. Caution: if the Consignor sites wanted is missing from the list, get in contact with your customer (OEM) in order to set the parameter needed. Remark: it is mandatory that the collection date be superior or equal to the current day date. It is recommended to inform the DN number, this allows the carrier to identify the corresponding shipment to this collection request. Total weight of each line do not includs the weight of the pallet. It corresponds to the gross weight unit of the article (related to the order number) multiplied by the quantity to deliver. The gross weight must be set in Repository>Article. Instructions in bottom of the page gives more information regarding the delivery terms. This blank field is for free information, but it is not mandatory. User manua l eCar ® Servic e s Confidential document, property of TENOR, 2012 eCar 1.9 Tenor 13/05/2013 Page 25 of 52 User Manual eCar® Services 8.4. Create a line in Detail In the area at the bottom of the page: Select an Article Nr in the drop-down list or use the drop-down list below displaying the list of your articles with Order number and description Article Nr – Suppl. Art. Nr – Order Nr – Description; Fill up the line with useful information. eCar® displays all the information available corresponding to the article previously selected; Enter or modify the data required by your partner. Use the online Help button for additional information on meaning and the format of entering data. Create a new line Click on New line: the description is bottom of the table of the article line; Repeat the first two points for the new article line of your delivery. Delete a line Click on Delete from the line to delete. Modify a line Click on the line to modify; Enter your modifications in the entry fields in bottom of the form. Duplicate a line 8.5. Click on Duplicate: the description displays in bottom of the table of the article line. Send a collection request Click on Send the collection request. User manua l eCar ® Servic e s Confidential document, property of TENOR, 2012 eCar 1.9 Tenor 13/05/2013 Page 26 of 52 User Manual eCar® Services 9. Making of a delivery Recommendation: The List of collection requests are to process and send before 1pm the day before the collection day. In order to best respond to various logistic organizations of your partners, eCar® proposes several possibilities of making of a delivery. A resume of the steps is in appendix at the end: « Making an expedition with Web EDI eCar » page 44. 9.1. First method: use of the Picking List For an easy preparation of shipments, you should use the Picking List. The Picking List are generated by the firm information received by your customer, containing firm quantity differrent from 0, and includes those firm requirements you should deliver. eCar® pre-filled automatically the Despatch Advice depending on the chosen Picking List. All information contained in your buyer’s message will be recovered. This method guarantees the full conformity of your shipment with your customer’s requirement. Once the Despatch Advice is generated you always keep the possibility to change it before sending. To create a despatch advice according to this first method, click on Despatch>Picking list from the menu. Picture 17. Method 1: Use of the Picking List (Header) 9.2. Second method: use of the despatch advice form We recommend using this method only in case of exceptional shipment, or in case you need to close a Picking List that you have treated partially. User manua l eCar ® Servic e s Confidential document, property of TENOR, 2012 eCar 1.9 Tenor 13/05/2013 Page 27 of 52 User Manual eCar® Services Picture 18. Method 2: Create a despatch advice manually (Header) 9.3. Ideal delivery This paragraph presents the method of use to prepare the « ideal » delivery that must guarantee you the consistence between the physical flow and information flow – Despatch Advice message, labels and Delivery note, and so complying to service level requirements of your partners. How to prepare your delivery? Generate the despatch advice from the Picking List; In the « Despatch advice - Header » form, if you ship a RENAULT Group’s plant, check for the Transport Identifier (if there is not, follow the recommendations of RENAULT); Print the labels from the « Despatch advice - Détail » form in bottom of the page; Put the despatch advice In process: click on Dispatch Set Up list . Print and validate the dispatch set up list, that is the Delivery note to give to the truck driver or the person in charge if you ship by railway; air, sea, etc. Prepare the delivery – palletizing and labeling of packages; Once the palletizing is completed, return into the despatch advice in status In process (in the Summary), complete with missing information as the Equipment Id. (licence plate of the trailer truck or container), check, then click on DN ; Print the DN, after entering the Equipment Id., that is the Delivery Note to give to the truck driver, or the person in charge if you ship by railway; air, sea, etc. Once the truck left your plant, send your EDI message by pressing . For example, the despatch advice n°456814 was put « In process ». You can print labels from the Detail page. Here, one label SHU in ETI1 format is downloadable in pdf format. User manua l eCar ® Servic e s Confidential document, property of TENOR, 2012 eCar 1.9 Tenor 13/05/2013 Page 28 of 52 User Manual eCar® Services Picture 19. Ideal delivery: prepare a despatch advice (Detail) Caution: do not print labels as the DN is not at least put In process. Because if automatic managing number of PU is set and meanwhile you send another DN, PU number may consequently be different. The message sent by EDI must be strictly in accordance with the printed labels. User manua l eCar ® Servic e s Confidential document, property of TENOR, 2012 eCar 1.9 Tenor 13/05/2013 Page 29 of 52 User Manual eCar® Services 10. Picking lists Recommendation: we recommend to use the picking list to prepare a delivery, subject to one or more Call off delivery message. The picking list is a facility offered by eCar® to help you to generate your Despatch Advice in conformity with your customer’s requirement. The Picking List are calculated by eCar® from the firm requirement received from your partner. A picking list includes the delivery to make for the same consignee plant, in a place of discharge for a given date and time period. A resume of this step is in the appendix at the end: « Making an expedition with Web EDI eCar » page 48. 10.1. Consult the Summary of the Picking Lists This form allows you to view the Summary ot the Picking Lists. The picking lists displays in a table. The absence of table means that there is no delivery to make regarding the partner selected. You can use the selection criterias « Show » / « Period » to refine your search of a list. The status of the Picking List are represented by: To process: the picking list is to be processed, the requirement is not honored yet; Partially processed: the picking list is partially processed ; the requirement is not fully honored. To deliver later the rest of the goods, you should use directly the « Despatch advice » form; Processed: the picking list is processed ; the corresponding despatch advice has been sent. The corresponding DN number appears in the column next. Remark: in case you need to use several time the same picking list, even partially processed, get in contact with TENOR support team. Caution: the nature of the instruction may take values such as « From » (departure), « To » (arrival) or « Imp. » (imperative, in case of emergency). In this latter case, the goods are imperative to be shipped at date and time indicated in Schedule. Picture 20. Picking lists (Summary) User manua l eCar ® Servic e s Confidential document, property of TENOR, 2012 eCar 1.9 Tenor 13/05/2013 Page 30 of 52 User Manual eCar® Services 10.2. Consult the Detail of a Picking List Click on any field of the line of the picking list you want to consult. The details of the picking list displays. You must permanently be able to serve what is requested. 10.3. Merge the Picking Lists In case you have the possibility to make a single delivery for several picking lists, you can merge several picking lists. Check the boxes at the end Merge checked picking lists. of the corresponding lines to merge, then click on Remark: Picking Lists « In process » status only can be merged. Moreover, the picking lists that have not the same Consignee plant and same Place of discharge cannot be merged. Caution: once the PL are merged, you cannot go back. 10.4. Generate the corresponding Despatch Advice from the Picking List Click on Generate the despatch advice in the Detail form of the Picking List selected; The pre-filled form « Despatch advice - Header » displays. 10.5. Choose another Picking List Through the Summary of the Picking List, choose another Picking List number by clicking on the corresponding line. The Detail of the picking list selected displays automatically. To switch to another list, go back to the Summary by the button Summary. Caution: as long as the Despatch Advice message is not sent, the status of the Picking List stays « To process ». Picture 21. Picking Lists (Detail) User manua l eCar ® Servic e s Confidential document, property of TENOR, 2012 eCar 1.9 Tenor 13/05/2013 Page 31 of 52 User Manual eCar® Services 10.6. Management of « Remains to deliver » In the despatch advice, if you don’t despatch all requested quantities in the picking list, eCar® keep in memory quantities not despatched. You can see them as line : Remains to deliver in the picking list Summary. Example of a picking list « To process » in which : - For the article reference E1062011232C a quantity of 20000 is requested, you can only despatch 19000 (difference of 1000) For the article reference EUR373790F a quantity of 2500 is requested, you can only despatch 2400 (difference of 100) Once your DN is sent, eCar® save these two quantities and make them available to you for your future deliveries with the line Remains to deliver. The quantities in the line Remains to deliver may come from one picking list or more. You can despatch these quantities with two different methods. 1st method : with special picking list “Remains to deliver” In the picking list screen you have a special picking list called Remains to deliver In the Detail tab of the picking list Remains to deliver, the first table of the picking list is empty but in the second table at the bottom, you can see your remaining quantities “Remaining quantities to be despatched”. The second table allows you to fulfill the first table by clicking on buttons « down ». User manua l eCar ® Servic e s Confidential document, property of TENOR, 2012 eCar 1.9 Tenor Go up » and « 13/05/2013 Go Page 32 of 52 User Manual eCar® Services Once you have rised some lines, you can generate a despatch advice by clicking on Generate the despatch advice and follow usual steps. This despatch advice will be considered as a “manual” despatch advice because it will not attached to a picking list. 2nd method: with a picking list “To process” You can also find again your non despatched quantities by clicking on a picking list “To process” with the same consignee and the same place of discharge. Then, in the tab Detail, you will be able to see the table “Remaining quantities to be despatched” wich allows you to add lines in the first table by clicking on « User manua l eCar ® Servic e s Confidential document, property of TENOR, 2012 eCar Go up » and « 1.9 Tenor Go down ». 13/05/2013 Page 33 of 52 User Manual eCar® Services Then you can generate the despatch advice as usual. Caution: quantities « Remains to deliver » are only calculated when you send a despatch advice, not when you save it in despatch set up list. Caution: if you despatch a requirement id number partially, it will not be saved. Only requirement id number not despatched will be saved. Remark: if you don’t want to despatch a « Remaining quantities to be despatched », you can just click on the button « Delete » at the bottom of the table to delete it permanently. User manua l eCar ® Servic e s Confidential document, property of TENOR, 2012 eCar 1.9 Tenor 13/05/2013 Page 34 of 52 User Manual eCar® Services 11. Despatch advice Caution : the Despatch Advice can be generated automatically using the « Picking List », or manually from the form « Despatch Advice ». If you used the Picking lists to generate the Despatch Advice, it is pre-filled automatically. Some information must be validated or add according to the partner you deliver. A summary of the steps is in appendix: « Making an expedition with Web EDI eCar » page 48. 11.1. Consult a Despatch Advice previously sent or billed Select your partner and from the main menu click on Despatch>Despatch advice, with the dropdown list Status/DN Nr, choose the DN Nr (delivery note) to consult. The DN classification is made chronologically. The DN displays preceded by a letter corresponding to the status of the message. The different status are P: In process, E: Sent, F: Invoiced. 11.2. Validate a Despatch Advice prepared from a Picking List After generating a Despatch Advice from the Picking List, the form « Despatch advice – Header » displays. Validate the information contained in the form « Despatch advice - Header ». If you deliver a plant from the RENAULT Group, ensure the presence of the Identifier number, otherwise you should connect to RENAULT website, in ELTA (Espace Logistique Transport Approvisionnement) to consult the Identifier that was missing in the message Call off delivery. Enter this information in the form « Despatch advice - Header ». Then click on Detail; Validate the information in the form « Despatch advice - Detail ». If you prepare and validate your palletizing in several steps, click on Dispatch Set Up list or: Print the labels for PU, SHU and/or HU Labels; Click on DN , the form « Delivery note » displays. Fill up and validate the DN. If you deliver a plant from the RENAULT Group, enter the licence plate of the truck trailer (registration number), then print your DN; Click on Send to send the EDI message. 11.3. Create an exceptional Despatch advice In the menu, click on Despatch>Despatch advice. The form "Despatch advice" displays. In the drop-down list Status/DN Nr, click on New; Enter or select the data required by your partner; Click on Detail to display the form « Despatch advice – Detail ». Management principles of the form "Despatch advice - Detail" The form consists of three zones. The first zone, in top of the form, contains the Header information of the despatch advice; The second zone, middle of the form, represents information of the shipping lines; The third blue zone, in bottom of the form is the input zone, containing the input field of the shipping lines's informations. User manua l eCar ® Servic e s Confidential document, property of TENOR, 2012 eCar 1.9 Tenor 13/05/2013 Page 35 of 52 User Manual eCar® Services Picture 22. Despatch advice (Detail) 11.4. Create an Article line in Detail page In the blue input zone: Select an Article Number from the drop-down list or from the drop-down list below Your article number - Order - Description, listing your Article references, the corresponding Order Nr and article description; Fill up the line and eCar® displays all the informations corresponding to the selected; Enter or modify all data required by your partner. You can consult the meaning and the input format in the online Help. Create a new line Click on New line: descriptions are available in bottom of the table; Repeat the first two steps for the new line of your delivery. Delete a line Click on Delete from the line to delete. Modify a line Click on the line to modify; Enter your modifications in the blue input field. Duplicate a line Click on table. Duplicate from the line to duplicate: the description is available in bottom of the Remark: you can set up automatic numbering of PU and HU from Administration>Preferences. Or, while you enter a HU number on the first line, this number will apply on the following lines, until you enter another HU number. If there is no other HU numbers on following lines, then HU number will be the same for all Detail lines. It is the same for the UMS selection. For example, if your DN n°123456 contains two HU, and you haven't setted the automatic managing numbering, you can number your HU such as: "DN Nr+01" (from 01 to 99), either for the first HU "12345601" and for the second HU "12345602". In this way, the numbering of HU is unique. User manua l eCar ® Servic e s Confidential document, property of TENOR, 2012 eCar 1.9 Tenor 13/05/2013 Page 36 of 52 User Manual eCar® Services 11.5. Printout PU, HU and SHU labels Remark: labels may be generated from the Detail page of the Despatch advice and printed while the Despatch advice is « In process » Here are the various logistics units: PU: Packing Unit, corresponding to the smaller physical unit to handle ; HU: Handling Unit, corresponding to the palletized loading ; SHU: Single Hand Unit, corresponding to PU = HU. A delivery PU and HU Caution: if you specify the PU and HU number in the Detail of the DN, you should print the PU labels for each box and the HU labels for each pallet. It says a homogeneous HU when it is loaded with multiple PU containing only items with the same reference. Picture 23. HU homogeneous (M) It says heterogeneous HU or mixed when it is loaded with various PU containing items with different references. Picture 24. HU heterogeneous or mixed (G) Click on PU button to generate the PU labels. Click on HU button to generate the HU labels. A delivery UMS Caution: if you check the box SHU at the end of the line, you only need to print the SHU labels where the package is the pallet. Picture 25. SHU (S) Click on SHU button to generate the SHU labels. When eCar® application says « No label to print », the logistic unit selected is not suitable to what has been entered in Detail lines of your delivery. Remark: to change the labels format, go in the menu Repository>ETI9 set up. To print multiple labels on a A4 sheet, get in contact with TENOR. Before printing your labels, please inform the Net Weight and the Gross Weight in the Repository>Article for each article. User manua l eCar ® Servic e s Confidential document, property of TENOR, 2012 eCar 1.9 Tenor 13/05/2013 Page 37 of 52 User Manual eCar® Services 11.6. Printout LU and DU EAN label Caution: this part concerns the Retail industry users. Remark: labels may be generated from the Detail page of the Despatch advice and printed while the Despatch advice is « In process ». Here are the various logistics units: LU: Logistic Unit, corresponding to the smaller physical unit to handle; DU: Despatch Unit, corresponding to the palletized loading. Qualification: a standard despatch unit is a fixed combination of identical logistical base units, (generaly consumer units) all the products have the same GTIN (Global Trade Item Number), made up of a regular frequency basis, not on the basis of a specific order. A standard homogeneous delivery The standard Logistic Unit homogeneous contains articles with the same GTIN, the same DC (Deadline Consumption), the same DFOU (Deadline For Optimal Use) and the same batch number. Picture 26. Homogeneous DU A standard heterogeneous delivery Delivery unit containing several different reference of goods or several types of logistic units. This is a mixed standard pacakges (several different items) or a complex logistic units (several LU). Picture 27. Heterogeneous DU Qualification: non-standard despatch unit is created for the needs of a particular order. Such unit is not listed in the catalog of the supplier. It is recognizable by a SSCC (Serial Shipping Container Code). A non-standard homogeneous delivery The non-standard homogeneous despatch unit contains articles with the same GTIN, the same DC (Deadline Consumption), the same DFOU (Deadline For Optimal Use) and the same batch number but with a definite quantity at the time of a particular order. A non-standard heterogeneous delivery It is a retail package or a regrouping of a non-standard LU. To generate LU labels, click on LU. To generate DU labels, click on DU. Remark: to print several labels per A4 sheet, get in contact with TENOR. User manua l eCar ® Servic e s Confidential document, property of TENOR, 2012 eCar 1.9 Tenor 13/05/2013 Page 38 of 52 User Manual eCar® Services 11.7. Editing functions of the Dispatch Set Up list If you use the Dispatch Set Up list, you can fill data in or modify the Despatch Advice, print and save it. Then, when the delivery is ready, you must go back to the Despatch Advice to modify it if needed, print the Delivery Note and send the Despatch Advice. Click on Despatch Set Up list The Despatch advice form displays. You can print it using Printout; Dispatch Set Up list is a consultation form. To modify it you should go back to the Header page or Detail page; Click on Validate to save it. ; 11.8. Editing of a Delivery Note (DN) Click on DN The form displays. You can fill data in and print. This form allows you to send and print. Picture 28. Despatch advice (DN) 11.9. Fill up the Delivery Note Fill in, modify or choose the informations. Caution: some of your customers requires that you enter the number of the license plate of the trailer used for delivery. 11.10. Send the Despatch advice Caution: don’t forget to click on the button not sent. Cliqk on Send when the truck left. Otherwise your message is Send. User manua l eCar ® Servic e s Confidential document, property of TENOR, 2012 eCar 1.9 Tenor 13/05/2013 Page 39 of 52 User Manual eCar® Services 12. Invoice 12.1. Introduction to the invoices Caution: to generate an invoice, you must update information of price and VAT applicable of your Repository>Article. Otherwise eCar® will not calculate your invoice. You must generate one invoice per delivery or per delivery note. Picture 29. Invoice (Header) 12.2. Charge a delivery With the drop-down list Status/Invoice’s Nr, select « New ». Depending on the choice previously made in Preferences, eCar® displays an invoice number, otherwise enter your invoice number; With the drop-down list, select le DN Nr to invoice. The DN Nr are classified by decreasing seniority; eCar® displays all the information corresponding to the selected delivery note. Fill up, modify or select the needed informations in the field. 12.3. Consult an invoice Select the Invoice’s Nr with the drop-down list Status/Invoice’s Nr. The DN Nr are classified by decreasing seniority. 12.4. Create or consult invoice detail From the Header of the invoice form, click on Detail . eCar® calculates the amount of the invoice and displays all the informations corresponding to the DL selected in the Header. 12.5. Sending an invoice Click on Send. 12.6. Find an invoice with a DN number Go in the Header page of your DN (satus F), then access to the invoice by clicking on See Invoice from the DN form of the Despatch advice. User manua l eCar ® Servic e s Confidential document, property of TENOR, 2012 eCar 1.9 Tenor 13/05/2013 Page 40 of 52 User Manual eCar® Services 13. Dematerialization 13.1. Dematerialised Invoices The dematerialised invoice in tax system term is an invoice exchange between two commercial partners in electronic format without being sent as hard copy. Remark: the number of result in searching is limited to 500 lines (500 invoices). 13.1.1. Search for a dematerialised invoice from a number Enter a number (integer number) in the dedicated zone Number, « 10 to 20 » ; Click on to the right of the selection research fields. 13.1.2. Search for a dematerialised invoice from an amount Enter an amount using the format 99,99 in the dedicated zone Amount ET (excluding tax) or Amount IT (including tax) « 600,00 to 699,99 » (the separator is the coma) ; Click on to the right of the selection research fields. 13.1.3. Search for a dematerialised invoice from a date Enter a debut date (and an end date if necessary) to the required format in the dedicated zone Date « DD/MM/YYYY à DD/MM/YYYY » ; Click on to the right of the selection research fields. 13.1.4. Reset the research fields Click on to the right of the selection research fields. The fields becomes empty (default value). Remark: the research criterias can be combined. Search for a dematerialised invoice from a number and a date for example. 13.1.5. Consult a dematerialised invoice In the invoice summary list from de dematerialised invoice, click on the button the line concerned. Print at the end of The features available are represented by: Print: generating a pdf file of the corresponding invoice; Download: download the EDI file stored in the safe-box. Picture 30. Summary list of the dematerialised invoice User manua l eCar ® Servic e s Confidential document, property of TENOR, 2012 eCar 1.9 Tenor 13/05/2013 Page 41 of 52 User Manual eCar® Services 13.1.6. Print the displayed list of dematerialised invoice Click on the button Print down the page. 13.2. Partners of dematerializing The dematerializing if effective is following of a series of validated test by the partner. The dematerializing may be active for a corporate brand name and not a particular plant of the brand name. 13.2.1. View the list of Dematerialised partners Click on to the right of the selection research fields Date (without filling). The list of all your dematerialised partners are displayed. 13.2.2. Know the history of changes of the Seller (liable entity) Click on History to the right of the information related to the liable. 13.2.3. Know the history of modifications of a partner Click on an information of the line related to the partner. 13.2.4. Search for a dematerialised partner to a given date Fill up a debut date (and an end date if necessary) at the Date format « DD/MM/YYYY to DD/MM/YYYY » ; Click on The list of dematerialised partners at this selected period displays. 13.2.5. Print the list of the displayed dematerialised partners Click on the button Print down the page. Picture 31. Dematerialised partner User manua l eCar ® Servic e s Confidential document, property of TENOR, 2012 eCar 1.9 Tenor 13/05/2013 Page 42 of 52 User Manual eCar® Services 14. Your account This form allows you to consult the situation of your account such as available credit units, scratch date of your subscription and traffic exchange statistics. Picture 32. Your account Caution: the statistics mentionned in the table shows the number of message received and sent, not the corresponding units consumption. 14.1. Know the level of units available Remaining units available Administration>Account. are displayed in the field Your credit from the menu Caution: to avoid any interruption of services, think of renewing your units subscription of use before the level of available units reachs 0. A message alert sent by eCar will warn you with an anticipating period of 3 weeks before the end (early end or scratch date). 14.2. Know the number of message exchanged with a partner Statistics are displayed by a table, allowing you to view the total number of message received or sent with all your partners. Use the elevator on the right side of the table to consult all the lines for each partner, and the total in bottom of the table. 14.3. View the statistics of a selected month Statistics of the traffic message exchanged are displayed by a table for the current month (not the corresponding consumed units). To load the statistics of a selected month: Click on Load above the selected month; The statistic’s column corresponding to the month displays. Remark: the statistics for a previous period of 6 months are accessible. 14.4. Download the statistics of my account You can download the statistics of your account in different formats: export to Excel, Word, XML or print in pdf. The informations displayed are those that will be uploaded. To generate a file, click on upper right corner of the table. User manua l eCar ® Servic e s Confidential document, property of TENOR, 2012 eCar 1.9 Tenor 13/05/2013 in the Page 43 of 52 User Manual eCar® Services 15. Tools This form allows you to import the files in the data base of eCar®. You can benefit of this feature if you have requested its use and accepted the corresponding commercial proposal made by TENOR. Picture 33. Tools 15.1. Upload a despatch advice Select Despatch Advice Upload from the drop-down list, select the file type to send; Click on Send. 15.2. Upload an invoice Select Invoice Upload from the drop-down list, select the file type to send; Click on Send. 15.3. Upload files at a time Caution: the importation of files is restricted to 10 files at a time. Remark: the files submitted at a time must have the same type of message. It is impossible to submit a Despatch advice and an Invoice at the same time. Click on Run…; Select your file to import; Click on Open; If you have other files to import, repeat the first 3 points on next line; Click on Upload file. Caution: the files are processed one by one. If a file has an error, the other messages contained are not imported. However the following files are analyzed and processed unless they contain errors. User manua l eCar ® Servic e s Confidential document, property of TENOR, 2012 eCar 1.9 Tenor 13/05/2013 Page 44 of 52 User Manual eCar® Services 16. Preferences This form allows you to personalize the use of your application. You can set some parametters of the application for your easy use. Picture 34. Preferences 16.1. Select default language With the drop-down list Default language, choose a language. All the forms will display in this language to each of your connection to the application. 16.2. Select time section Time zone allows you to specify the time difference of the place of use of the application compared to the GMT hour (Greenwich Mean Time). The date and time attributed to different status of the messages, take account of the specified time difference. Using the drop-down list Time zone, choose the GMT hour. 16.3. Select display format and date format Remark: the data entry format is independent from the format to use to exchange information with your partner. The application manages itself the necessary transformations. The Date Format field allows to select the format to enter the dates in all forms of the application. This format is the same used by the application to display the dates in consultation. With the drop-down list Date Format, choose the date format. User manua l eCar ® Servic e s Confidential document, property of TENOR, 2012 eCar 1.9 Tenor 13/05/2013 Page 45 of 52 User Manual eCar® Services 16.4. Put the messages into the trash You have the possibility to put the messages you no longer wish to see to the trash automatically. Enter the number of days after which messages should be in the trash automatically. Picture 35. Preferences: put the messages into the trash 16.5. Make manage DN, PU and Invoice number by the application You can choose the using mode of the application so that eCar® numbered automatically or not some numbers. Just check the box to apply automatic numbering. For example: for the application manage the Delivery note number, check the DN box. In this case when creating a new DN, eCar® displays a DN number automatically. Picture 36. Preferences: managing of the automatic numbering 16.6. Select file download mode Caution: as défault, the format of the files that you are able to download is XML. Zipped file: using the checkboxes, specify if you wish to download zipped file. If so, you need a decompression zip software ; download times are significantly shorter; Long name: at the moment of downloading a file, the application names the file as default. Using the checkboxes, specify if your operating system authorizes the use of long name for those files (longer than 8 lettering). If so, the application names the files precisely, for example: Invoice 000123 as of 10 07 2011.doc. 16.7. Validate settings specified in preference form Click on Confirm. 16.8. Cancel settings specified in preference form Click on Cancel. User manua l eCar ® Servic e s Confidential document, property of TENOR, 2012 eCar 1.9 Tenor 13/05/2013 Page 46 of 52 User Manual eCar® Services 17. eCar® feedback Feedback allows you to contact the eCar support team. To express a technical problem, asking a question or make a suggestion regarding eCar, you can send a message by following these steps: Select the type of message out of: suggestion, problem or question; If it is about a problem, select the type of problem from the drop-down list: technical issue, data error, other problems; Specify the Nr of the relevant message in Your message; Click on Send. Picture 37. Feedback Remark: the fields Login and Email address are automatically filled in using the information of your current connection to your account. Caution: for any support request by email ([email protected]), without using the menu Administration>Feedback of your eCar application, please provide us with your login information and clear associated information (Picking List Nr, DN Nr, Invoice Nr…) and short description of the problem or question faced, to handle your request as soon as possible. User manua l eCar ® Servic e s Confidential document, property of TENOR, 2012 eCar 1.9 Tenor 13/05/2013 Page 47 of 52 User Manual eCar® Services Appendix: Making an expedition with the Web EDI eCar® Start Response to a need Specifications 1. 2. Delivery with DI? NO 4. From the menu, click on « Despatch advice » 3. 4. YES 1. From the menu, click on « Picking List » 5. 2. Select the « Picking List » 11. With the Despatch Set Up list, put labels on packaging 8. 9. 10. 3. Click on « Generate the Despatch advice » Transport Id. pre-filled? NO NO Gap between physical and labels? 5. Consult the ELTA portal to recover the Transport Identifier 12. Make changes in the quantities shipped 6. Click on « Detail » 13. Click on « DN » NO 7. Modify lthe quantity of the references concerned 14. Enter the licence plate of trailer or container YES 13. Print the DN 8. Enter the number of HU labels or check SHU box 9. Print the labels HU, PU and/or SHU 10. Click on « Dispatch Set up list » 11. 12. YES YES Delivery identical to the DI? 6. 7. 16. Click on « Send » to send the message End Expedition completed 13. 14. 15. 16. To prepare your delivery, from the menu click on «Picking List». Always use the Picking List to prepare a delivery preceded by a DI (Delivery Instruction). Select the list «To process» by clicking on any field of the line. The Detail of the list to process displays. In the form «Picking List-Detail» click on «Generate the Despatch advice» in bottom of the form. The form «Despatch advice-Header» displays. If you haven’t received a Delivery Instruction previously, then use the form Despatch advice. Click on «Despatch advice» in the menu. If the Transport Identifier is not pre-filled in the «Despatch advice-Header», you should consult the ELTA supplier portal on RENAULT web site to recover and inform it in the form. The Transport Identifier in the DESADV is mandatory for monitoring the transport. Click on «Detail» in botton of the form. The form «Despatch advice–Detail» displays. If your delivery is different from the DI, different from what it is displayed, modify the concerned data from the blue data entry area in bottom of the page. Enter the HU label number or check SHU box depending on the case. Print the different labels PU and HU or SHU. Click on «Dispatch Set Up list» in bottom right of the form to save your delivery note, the detail of the list displays, print the list and click on «Validation». With the help of your dispatch set up list and the labels go prepare your delivery in compliance palletizing rules. Then reconnect to your eCar application. Click on «Summary» from the menu. Your delivery is in status «In process». Click on any field of the line. The form «Despatch advice-Header» displays. Click on «Detail» in bottom of the form. If you see a difference between the physical delivery and your dispatch set up list or the labels, make the necessary changes to your delivery. Click on «DN» in bottom of the Detail form. The DN displays. Enter the licence plate of the trailer truck or container in the field «Equipment Id.». Print the DN with the button «Print». Give the DN to the truck driver/person in charge of the delivery. Click on «SEND» to send your DESADV message to RENAULT. Notes 2. A Picking List includes references that you must ship to a CONSIGNEE plant, in a PLACE OF DISCHARGE, for an hour or given period. 3. All the Transport information (Carrier, Transport Mode, Transport Identifier,..) must be informed. 4. If a delivery do not strictly comply to a DI, you must pay particular attention to the RAN Nr field that must be entered manually (please double check). 8. If it is not a SHU (Pack Unit=Handling Unit), then the HU label number must be different from the PU label number. 9. Printing the HU and SHU labels requires that you previously informed the Gross weight and Net weight in the Repository>Article. 11. This step is a way to control the gap between the Dispatch Set Up list and physical delivery. 16. Sending the message must be done at the DEPARTURE of the truck. Picture 38. Making an expedition with the Web EDI eCar® User manua l eCar ® Servic e s Confidential document, property of TENOR, 2012 eCar 1.9 Tenor 13/05/2013 Page 48 of 52 User Manual eCar® Services Lexicon Call off Delivery (DELJIT for « Delivery just in time » or CALDEL for « Call off delivery »): includes only firm requirements. Despatch Advice (DESADV for « Despatch advice » or AVIEXP for « Avis d’Expédition »): describes the physical delivery of the goods, the detail of that the shipment contains. The EDI message must be strictly reliable with the load, the labels and the delivery note. DN: Delivery Note, hard paper document (copy of the Despatch Advice) including the information regarding the goods. This DN could be sent back, annotated to the sender. It includes commercial and logistic’s data needed for the reception of the goods at the consignee plant. This DN is the reflect of the load supported by the carrier. One DN per delivery must be made, consequently per place of discharge (no DN regrouping several deliveries). Routing Code: free code containing specific information to each partner and necessary for the proper delivery of the goods. It is built and structured by the partner. PSA use it in its Call off delivery on maximum up to 12 lettering. It is presented by this form: « YYMMDD HHMM » or « CCYYMMDDHHMM ». It is a timestamp allowing the physical storage of pallets in line for a crossdock through the identification of the time slot. With Renault, it is presented by 14 lettering that may include space, dot and slash: « ZZ 31/12 23.59 », 2 letters for the distribution zone and the timestamped period. For example « SE 22/05 14.00 ». Order (ORDERS or ORDERR): Message sent by the buyer for a direct delivery to the final customer or its representative, identified by the place of delivery. This message contains firm requirement. Seller Code (supplier code, also called COFOR by Renault and PSA): Identifier containing alphanumeric lettering allocated by the partner initiating the exchanges. With Renault, it corresponds to 8 lettering « 00999999 ». With PSA, it corresponds to 6 alphanumeric lettering: « 99999Z ». There may be a sub-code with 2 lettering « 99 ». Cross-dock: reception storage area, between suppliers and supermarket (consignee). Collection Date: « First » or « Last », date on which the goods must leave the warehouse (supplier plant). Delivery Date: « First » ou « Last », date which the goods must be delivered to the customer (consignee plant). DC: Deadline Consumption, is mandatory notification on most of the fresh products. DFOU: Deadline For Optimal Use, used for non-perishable foods but whose taste and appearance is likely to be altered by the time. EAN: European Article Number, it is the European codification system of products that is used in bar codes. EDI: Electronic Data Interchange or Échange de Données Informatisées, is a device allowing two companies to exchange electronic messsages corresponding to business transactions for implementing in their information system. ELTA: Espace Logistique Transport Approvisionnement, portal on internet Renault website allows you (not allowing) to manage, in one tool, various functions regarding the transport. It is used by Renault. User manua l eCar ® Servic e s Confidential document, property of TENOR, 2012 eCar 1.9 Tenor 13/05/2013 Page 49 of 52 User Manual eCar® Services Batch number: allows you to identify the manufacture sequence. Delivery Forecast: (DELFOR for « Delivery forecast » or DELINS for « Delivery instruction ») contains the requirements of your customer. Those may be previsionnal and firm if you do not receive the DELJIT message. Otherwise, those requirements are only previsionnal. Delivery Label: standard format label defined by the standards organization GALIA (for automotive industry in France), ODETTE (for automotive industry in Europe), GS1 for the EAN…). This label may be sticked to logistics unit and shall include codified information in barcode. DU: Despatch Unit, unit made of various composition, dedicated to the transport and/or the storage, that may be managed along the delivery chain. In automotive industry flow, the DU corresponds to the HU. Engineering change number: Changing of the characteristics of one piece, of a set, of an organ, or a vehicle or its conception (size of the manufacturing diameter, for example). This Engineering change number is not always used by the OEM. GTIN: Global Trade Item Number, code in 14 lettering, right justified and supplemented with zeros in case so, allowing the identification of an article. This number consider various structures of EAN numbering that is used to identify in unique way a product in the world. EAN product’s identification numbers allows a unique GTIN identification code to be researched and found. HU: Handling Unit, pallet load delivered by the supplier to the carrier and delivered to the customer. Invoice (INVOIC for « Invoice »): Valuing of the ASN (despatch advice). Any invoice that follows to an electronic sending must contain the words « SEND ELECTRONICALY». LU: Logistic Unit, conditioning unit consisting of articles intended for sale to the customer in retail store. Some LU (boxes, pallets, box-pallets, trays, etc.) are called « standard » when regrouping a fix number of articles. In automotive industry flow, the LU corresponds to the PU. Non-manufacturing product: Invoice of Non-Manufacturing Product, is used in some particular context. OEM : entity (individual or corporate) who orders to subcontractors performing work according to specifications document. Order Nr: reference allowing you to do shipments of goods through a contractual number. This number is informed by the customer according to the open order (contract). Picking List: Calculated by eCar® from the informations contained in firm requirements received from your partner. A Picking List includes the delivery to make for a same consignee plant, in a place of discharge, at a given time or time slot. Place of destination: also called « point of consumption », final destination place of the articles at the consignee site, after unloading of the goods (when the goods are in the store, the supermarket, or for assembly, for example). Place of discharge: also called « gare routière » or « station », exact physical place at the consignee plant where the goods must be unloaded from the truck. PU: Packing Unit, corresponds to the smaller physical unit to handle, may be a single unit package (cardboard waisted pack) or a standard reusable box (contener, metal or plastic folding packaging). User manua l eCar ® Servic e s Confidential document, property of TENOR, 2012 eCar 1.9 Tenor 13/05/2013 Page 50 of 52 User Manual eCar® Services RAN: Release Authorization Number, delivery identification regarding firm need of Renault plants. It identify specificaly a firm requirement for an article, a quantity at a given date/time. Already also used by Nissan. This identifier create a new rupture element (on the DN for example). If there is no RAN, the delivery canot be satisfied. It is on 8 lettering and may be on the form « LR999999 » if need is zero on at least one of the time slot associated to this identifier transport, or the RAN may be « ZZZZZZZZ » if the need is zero for all the time slots of the identifier transport. Release Type: « From », « To », or « Emergency », given data by the firm requirements. It is viewed in the Picking List. On « Emergency », the delivery is to be shipped imperative for the date/time indicated. Requirement Id. Nr (also called « Identification need number », « card number or carte number», « Carte Kanban » or « RAN » with Renault): identification number allocated by the partner for the tracking, from 8 to 9 lettering. PSA use this form: « Z99999999 » (1 letter and 8 digit). Renault also use it on 8 alphanumeric lettering: « LR0E4VQI », for example. SHU: Simplified Handling Unit, packaging ensuring both the function of PU as containing the parts and the function of HU by the properties of handle to the forklift. SSCC: Serial Shipping Container Code, is 18 digit number of package allowing to identify as unique all logistic unit, whatever being standard or not, homogeneous or heterogeneous. This code appearing on all logistic unit allows to track individual LU (pallet) in shipping operation, distributing or reception. Transport Identifier: identifier number given by Renault for the delivery of the goods. All scheduled transport, whatever the logistic scheme and unscheduled transport organized by Renault are identified by a Transport Id: it corresponds to « Z999999999 » on 10 lettering. This identification is contained in firm delivery instructions (direct flow). If missing, please consult the ELTA portal of Renault website. For indirect flow (passing by the platform), it must be built manually (refers to Renault logistic manuel). User manua l eCar ® Servic e s Confidential document, property of TENOR, 2012 eCar 1.9 Tenor 13/05/2013 Page 51 of 52 User Manual eCar® Services Pictures list Picture 1. Repository user ..................................................................................................................... 10 Picture 2. Symbol for Security parts ...................................................................................................... 14 Picture 3. Symbol for Regulated parts ................................................................................................... 14 Picture 4. Symbol for Quality Control insurance.................................................................................... 14 Picture 5. Repository/Packaging ........................................................................................................... 16 Picture 6. Repository: ETI9 setup .......................................................................................................... 17 Picture 7. ETI9 (210 x 74 mm)............................................................................................................... 17 Picture 8. Complement to ETI9 for box C40 (210 x 40 mm). ................................................................ 17 Picture 9. ETI1 (210 x 148 mm) ............................................................................................................ 18 Picture 10. GS1 label (125 mm x 150 mm) ........................................................................................... 18 Picture 11. Summary of messages ....................................................................................................... 19 Picture 12. Trash ................................................................................................................................... 21 Picture 13. Order (Header) .................................................................................................................... 22 Picture 14. Delivery forecast >Detail ..................................................................................................... 23 Picture 15. List of collection requests (Summary) ................................................................................. 24 Picture 16. Collection request (Detail) ................................................................................................... 25 Picture 17. Method 1: Use of the Picking List (Header) ........................................................................ 27 Picture 18. Method 2: Create a despatch advice manually (Header) ................................................... 28 Picture 19. Ideal delivery: prepare a despatch advice (Detail) .............................................................. 29 Picture 20. Picking lists (Summary) ....................................................................................................... 30 Picture 21. Picking Lists (Detail) ............................................................................................................ 31 Picture 22. Despatch advice (Detail) ..................................................................................................... 36 Picture 23. HU homogeneous (M) ......................................................................................................... 37 Picture 24. HU heterogeneous or mixed (G) ......................................................................................... 37 Picture 25. SHU (S) ............................................................................................................................... 37 Picture 26. Homogeneous DU ............................................................................................................... 38 Picture 27. Heterogeneous DU ............................................................................................................. 38 Picture 28. Despatch advice (DN) ......................................................................................................... 39 Picture 29. Invoice (Header) .................................................................................................................. 40 Picture 30. Summary list of the dematerialised invoice ......................................................................... 41 Picture 31. Dematerialised partner ........................................................................................................ 42 Picture 32. Your account ....................................................................................................................... 43 Picture 33. Tools .................................................................................................................................... 44 Picture 34. Preferences ......................................................................................................................... 45 Picture 35. Preferences: put the messages into the trash .................................................................... 46 Picture 36. Preferences: managing of the automatic numbering .......................................................... 46 Picture 37. Feedback ............................................................................................................................. 47 Picture 38. Making an expedition with the Web EDI eCar® .................................................................. 48 User manua l eCar ® Servic e s Confidential document, property of TENOR, 2012 eCar 1.9 Tenor 13/05/2013 Page 52 of 52