1
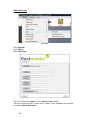
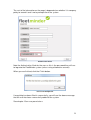
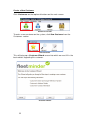
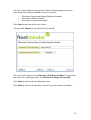
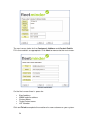
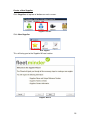
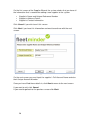
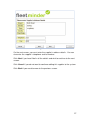
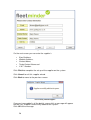
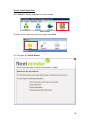
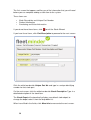
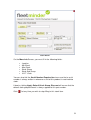
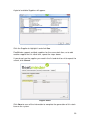
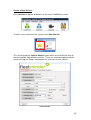
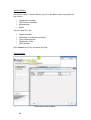
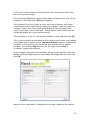
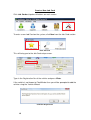
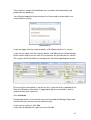
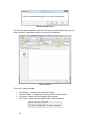
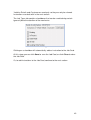
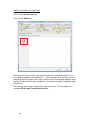
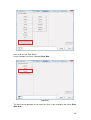
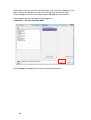
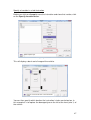
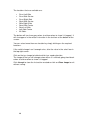
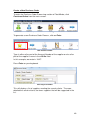
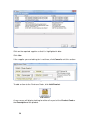
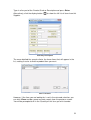
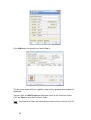
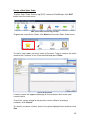
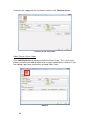
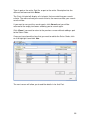
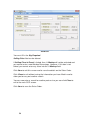
Chapter 2
Basics
19
Add a New User
New User
Click System.
Click Users.
Click New User.
User Wizard
The first screen that appears is the General Info section.
You must enter the user’s name at this stage. In our example, we used the
username Arthur Simmons.
20
The rest of the information on the page is dependent on whether it is company
policy to record it and is not a prerequisite of the system.
Authorisation Code
Note the Authorisation Code for the user as this is the password they will use
to log onto the FleetMinder system (unless using a biometric scanner).
When you are finished, click the Finish button.
Successful Completion
If everything has been filled in successfully, you will see the above message
that the user has been successfully added to the system.
See chapter 13 on user permissions.
21
Create a New Customer
Click Customers on the top bar of buttons on the main screen.
Customers Section
To enter a new customer on the system, click New Customer from the
Customers section.
New Customer
This will bring up a Customer Wizard screen into which we must fill in the
basic details regarding this customer.
Customer Wizard
22
The first screen welcomes you to the Customer Wizard and points out the
main three items that are needed to enter a customer:
•
•
•
Customer’s Name and Unique Reference Number
Customer’s Address Details
Customer’s Contact Information
Click Next to continue to the next screen.
You can click Cancel at any time to exit the wizard.
New Customer’s Name
The next screen requests the Customer’s Full Account Name. As you enter
the name, the system generates the Customer’s Unique Account No.
Click Next to continue to the following screen.
Click Back to return to the previous screen if you wish to alter any details.
23
Customer’s Address
The next screen looks for the Customer’s Address and Contact Details.
Fill in these details as appropriate. Click Next to move onto the next screen.
Contact Information
On the final screen there is space for:
•
•
•
•
•
Email address
WWW website address
Contact Name
Trade Contact name
VAT Number.
Click on Finish to complete the creation of a new customer on your system.
24
Create a New Supplier
Click Suppliers at top bar of buttons on main screen.
Suppliers section
Click New Supplier.
New Supplier
This will bring you to the Supplier Wizard section.
Supplier Wizard
25
On the first screen of the Supplier Wizard, the system checks that you have all
the information that is needed for adding a new supplier to the system:
•
•
•
Supplier’s Name and Unique Reference Number
Supplier’s Address Details
Supplier’s Contact Information
Click Cancel if you wish to exit this screen
Click Next if you have this information and want to continue with the next
screen.
Supplier’s Details
On the next screen you must input the supplier’s Full Account Name and also
their Unique Account Number.
Once you have filled these details in, click Next to move to the next screen.
If you want to exit, click Cancel.
If you need to go back to the previous screen click Back.
26
Supplier’s Address
On the next screen, you must enter the supplier’s address details. You can
also enter the supplier’s telephone and fax number.
Click Next if you have filled in all the details and wish to continue to the next
screen.
Click Cancel if you do not want to continue adding this supplier to the system.
Click Back if you need to move to the previous screen.
27
Supplier’s Contact Details
On the next screen you can enter the supplier’s:
•
•
•
•
•
Email Address,
Website Address,
Contact Name,
Trade Contact Name and
V.A.T. Number.
Click Finish to complete the set up of the supplier on the system.
Click Cancel to exit this supplier wizard.
Click Back to move to the previous screen.
Successfully Added Supplier
Once you have added in all the details successfully a message will appear
that will say “Supplier successfully added to the system”.
Click OK to the message.
28
Create a New Stock Item
Click Stock on top bar of buttons on main screen.
Stock Section
To enter a new stock item onto the system click New.
New Stock Item
This will open the Stock Wizard.
Stock Wizard
29
The first screen that appears notifies you of the information that you will need
before you can complete adding a stock item to the system.
These items are:
•
•
•
Stock Description and Unique Part Number
Product Information
Purchasing and Sales Information
If you do not have these items, click
to exit the Stock Wizard.
If you have these items, click Part/Description to proceed to the next screen.
Part Number / Description / Depot
Click the white box beside Unique Part No. and type in a unique identifying
number for that stock part.
On the next screen, click the white box beside Stock Description. Type in a
detailed description of the stock item.
The Stock Depot will automatically display your default stock depot, to
change the depot select it from the drop down list.
When have filled in the fields, click More Info to move onto the next screen.
30
Stock Details
On the More Info Screen, you must fill in the following fields:
•
•
•
•
•
•
Location
Min Stock
Max Stock
Stock Group
Stock Sub Group
V.A.T. Code
You can also tick the Serial Number Required box to ensure that a serial
number is always written in whenever a unit of this product is received into
stock.
Likewise, ticking Apply Default Stock Group Discount will ensure that the
default stock group discount is always applied to this part number.
Click
if at any time you wish to stop filling in this stock item.
31
Product Sales Details
On this screen you must enter:
•
Purchase Price
Optional fields that can be entered at this time are:
•
•
•
•
•
•
V.O.R. Price
Selling Price
Selling Unit
Purchase Unit
Purchase Ledger Description
Sales Ledger Description
Click Suppliers and in the Supplier field, type in some or the entire name of
the supplier you wish to find and press Enter.
Supplier Search
32
A grid of available Suppliers will appear.
Select Supplier
Click the Supplier to highlight it and click Use.
FleetMinder supports multiple suppliers for the same stock item, so to add
another supplier for this stock item, repeat the steps above.
If you do not see the supplier you need in the list and wish to exit to repeat the
search, click Cancel.
Supplier Added
Click Save to save all the information to complete the generation of this stock
item on the system.
33
Stock Added Successfully
A message will be displayed confirming that this item was successfully added
to stock.
34
Create a New Vehicle:
Click Vehicles at top bar of buttons on the main FleetMinder screen.
Vehicles Section
To enter a new vehicle on the system, click New Vehicle.
New Vehicle
This will bring up the Vehicle Wizard screen which must be filled in with all
the basic details regarding the vehicle. There are numerous optional details
which will help you keep a comprehensive overview of each vehicle.
Vehicle Details
35
Vehicle Details
On the first screen, Vehicle Details, you fill in the basic necessary details of
the vehicle:
•
•
•
•
Registration Number
VIN (Chassis Number)
Manufacturer
Model
You can also fill in the:
•
•
•
•
•
Engine Number
Odometer (in Kilometres or Miles)
Year of Manufacture
Registration Date
Fleet Number
Click Cancel to exit this wizard at anytime.
Owner Details
Search for the Vehicle Owner
36
To fill in the Vehicle Owner we need to search for a customer to see if they
are on the system already.
Click on the text box below Vehicle Owner label and type in part, or all, of the
customer’s name then press Enter on keyboard.
If the customer is on the system, or there are a few customers with names
containing the search input that you wrote (for example, if you only wrote in a
surname, “Jones” then the system would display all your customers with
Jones in the name, “Jones Transport”, “Martin Jones” and so forth) then the
system will display a list of all relevant results.
If the customer is in the list, click on the customer’s name and then click OK.
If the system cannot find a customer of that name on the system, it will prompt
you to add a new customer via the Customer Wizard. Likewise, if none of the
customers in the result-list was the correct one and you want to add the
customer, then click on New and carry out the steps as described in
Customers section of the Manual.
In this example, there were two customers on the system with the name Alan
McGee so we will choose the one from Ardee. We simply click on it and then
click OK.
Vehicle Owner
Now you must select who is invoiced when any work is done on the vehicle.
37
If the invoicee is the same as the Vehicle Owner, then click the Same As
Owner box, as in this example.
However, if the customer who is invoiced, is different to that of the vehicle
owner (in circumstances where vehicles are leased, for example) you must
carry out a search on the Invoice To side of the owner details as you did with
the Vehicle Owner section.
Type part, or all, of the invoicee’s name in the text box beneath the Invoice To
label. Press Enter on the keyboard.
If the invoicee is on the system in the list of customers then it will bring up
their details for your selection.
If not, it will point out that this customer is not on the system and bring you to
the Customer Wizard as described in Customers section in this manual.
Different Invoicee to Vehicle Owner
At this stage you can click Finish to complete the Vehicle Wizard.
However, you can also fill in the optional sections.
38
Optional Details
Optional Details Sections
The tabs Optional Details and Reminder are optional and can be skipped. If
you want to fill them in, some or all of the following details must be known.
In the Optional Details section you can fill in:
•
•
•
•
•
•
•
•
•
•
Colour
Radio Code
Key Number
Basis of Assessment
Gross Vehicle Weight
Tachograph Make
Road Speed Limiter Make
Body Type
Vehicle Category
Number of Axles
In the Reminder section you can fill in any reminder for the vehicle that you
wish to appear next time you are generating a Job Card. In this example, we
noted that “Tax Book Not Received”. When you generate a Job Card for this
vehicle it will recognise this note and prompt you accordingly.
Reminder
39
Create a New Job Card
Click Job Cards at top bar of buttons on main screen.
Job Cards Section
To enter a new Job Card on the system, click New from the Job Card section.
New Job Card
This will bring you to the Job Card setup screen.
Job Card
Type in the Registration No. of the vehicle and press Enter.
If the vehicle is not known to FleetMinder then you will be prompted to add the
vehicle using the Vehicle Wizard.
Unknown Registration
40
If the vehicle is known to FleetMinder then its details will automatically be
pulled from the database.
You will be prompted to check whether the Owner and Invoicee details are
correct before starting.
Check Invoicee
If you are happy with the invoicee details, click Yes to confirm it is correct.
If you are not happy with the invoicee details, click No and you will be brought
to the section where you can alter the invoicee for the job card for this vehicle.
The system will fill the details at the top of the Job Card regarding the vehicle.
Vehicle Details
Ensure that the mileage/km is correct as this is relevant for the updating of the
Service/ Calibration area which is triggered by distance travelled as well as
amount of time that is passed.
Click Continue.
Fleetminder queries as to whether you have checked the Mileage Figure and
also whether you actually want to create the job.
If you want to continue, click Yes.
If you want to abandon this job card, then click No.
41
Odometer Confirmation
You will then be brought to a reduced version of the job card where you can
enter the basic information necessary to start the job card.
Basic Job Card
There are 4 tabs available:
•
•
•
•
Instructions – see the next section for details
Vehicle Details – a read-only summary of the vehicle details
Customer – details of the customer and invoicee
Job Types – details on the type of work to be carried out.
Tabs
42
Vehicles Details and Customer are read-only so they can only be viewed.
Instructions are dealt with in the next section.
The Job Types tab contains checkboxes that can be used to bring certain
types of job to the attention of the mechanics.
Job Types
Clicking on a checkbox will automatically add an instruction to the Job Card.
At this stage you can click Save to save the Job Card, or click Close to close
the Job Card.
Or, to add instructions to the Job Card, continue to the next section.
43
Add an Instruction to a Job Card
Click on the Instructions tab.
Click on the Add button.
Add an Instruction
During setup of the system, your administrator will have generated a list of
instruction categories and sub-details. In the example here, we have used a
frequently occurring item, but it may not be in the same location and you must
familiarise yourself with your companies’ selected Instruction Categories and
Sub-Details.
Click on the Instruction Category that you wish to use. Our example has
selected Clutch and Transmission button.
44
Select Instruction Category
Next, click on the Sub-Detail.
In our example, we have selected Gear Box.
Sub-detail
The next screen prompts us to select an Item, in our example, we select Gear
Box Seal.
45
When we click on the item we want to select, a list of Actions appears to the
right. Click on the Action you wish to instruct to carry out on the Item.
In our example, we have one action button, Fit new and so we click it.
At the bottom the constructed sentence appears:
“Gear Box – Fit new Gear Box Seal.”
Selecting the Item and Action
Click Accept to complete the instruction generation process.
46
Specify a Location in a Job Instruction
Before you click on Accept to save the instruction and close that section, click
on the Specify Location button.
Specify Location
This will display a basic aerial image of the vehicle.
Choose a Location
You can then specify which location the instruction is to be carried out on. In
this example it is to replace the damaged tyre on the left at the front (axle 1) of
the vehicle.
47
The locations that are available are:
•
•
•
•
•
•
•
•
•
Front Left Side
Front Side Centre
Front Right Side
Right Side Centre
Rear Right Side
Rear Side Centre
Rear Left Side
Left Side Centre
All Sides.
The button will turn from grey colour to a blue colour to show it is logged. It
will also appear in the written instruction in the text box at the bottom of the
screen.
You can select more than one location by simply clicking on the required
locations.
If the vehicle image hasn’t enough axles, alter the value in the axles’ box in
the top right corner.
Click on the tyre image to indicate which tyre needs attention.
The image of the tyre will change colour when it is clicked, going from black
colour to a blue colour to show it is logged.
Click Accept to store the Instruction created or click on Close Image to exit
without saving.
48
Create a New Purchase Order
To enter the Purchase Order Processing section of FleetMinder, click
Purchase Orders from the main screen.
POP (Purchase Order Processing) Section
To generate a new Purchase Order Process, click on Enter.
New Purchase Order
Type in either all or part of the Account Number of the supplier or else all or
part of the supplier’s name in the AC No. field.
In this example, we wrote in “ASC”.
Press Enter on your keyboard.
Selecting A/C number
This will display a list of suppliers meeting the search criteria. The more
detailed the search criteria, the fewer suppliers that will be suggested in the
list.
49
Select the Supplier
Click on the required supplier so that it is highlighted in blue.
Click Use.
If the supplier you are looking for is not there, click Cancel to exit this section.
Supplier Selected
To add an item to the Purchase Order, click Add Product.
Add Product
A new screen will display looking for either all or part of the Product Code or
the Description of the product.
50
Type in all or part of the Product Code or Description and press Enter.
Alternatively, click the display button (
Supplier.
) to show the full list of items from this
Search by Description
The more detailed the search criteria, the fewer items that will appear in the
list, making it easier to find the product item you want.
Select a Product
However, if the item you are looking for is not in the returned selection, you
can click Close and do a more accurate search from the previous screen.
You will be prompted to fill in the Quantity of this item you wish to order.
51
Enter Quantity
Click Add once the quantity has been filled in.
Purchase Order
The purchase order with the supplier name and the product to be ordered is
displayed.
You can click on Add Product to add more items to the Purchase Order.
Click on Save to save the Purchase Order.
Note – the Purchase Order will not be put on order until you click on Put On
Order.
52
Create a New Sales Order
To enter Sales Order Processing (SOP) section of FleetMinder, click SOP
button from the main menu.
SOP (Sales Order Processing) Section
To generate a new Sales Order, click New from the main Sales Order menu.
New Sales Order
To start a sales order, you must select a Customer. Type in some or the entire
name of the Customer in the Customer field and press Enter.
Select the Customer
A search screen will appear displaying all the customers that match your
search criteria.
To exit this screen and go to the previous screen without selecting a
customer, click Cancel.
To select a customer, click on them in the grid to highlight them and then click
Use.
53
Once you are happy with the customer’s details, click Continue button.
Customer on the Sales Order
Add a Part to a Sales Order
Click Add Part button to add a part onto the Sales Order. This is the same
process whether you adding a part onto a newly created Sales Order or if you
are adding a part onto a previously created Sales Order.
Add Part
54
Type in part or the entire Part No. or part or the entire Description into the
relevant text box and click Enter.
The Parts List grid will display a list of parts that are matching your search
criteria. The more refined your search criteria, the more accurate your search
results will be.
If you want to carry out the search again, click Cancel and you will be
returned to the empty text boxes allowing you to search again.
Click Close if you want to return to the previous screen without adding a part
to the Sales Order.
Once you have found the item that you want to add to the Sales Order, click
on it to highlight it and click Use.
Select a Part
The next screen will allow you to add the details in for that Part.
55
Add Details
You must fill in the Qty Required.
Selling Price field can be altered.
If Selling Price is Preset is ticked, then % Markup will not be activated and
you cannot enter a new Markup Percentage. However, if this box is not
ticked, you cannot enter any value into the % Markup field.
Click Save to exit this screen and to save the details on the Sales Order.
Click Close to exit without saving the information you have filled in and to
allow you to carry out another search.
You can now enter a search for another part or else you can click Close to
exit to the main SOP screen.
Click Save to save the Sales Order.
56