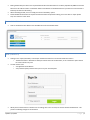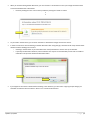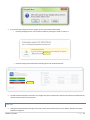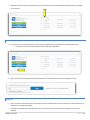
1
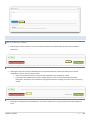
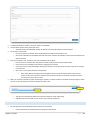
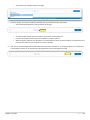
PROFESSIONAL SERVICE S CMD ANALYST U S E R M A N UA L REVISED: 07/07/2015 SFBid Help Desk (415) 934-5703 [email protected] This document is designed to help CMD Analysts use SFBid. If you are not a CMD Analyst, please use the manual associated with your user role in the “Help” section on the SFBid website. Table of Contents Log in .......................................................................................................................................................................................................... 3 Request New SFBid Account Role .......................................................................................................................................................... 3 View Action Items on Landing Page ........................................................................................................................................................... 4 Review & Set LBE Goal ............................................................................................................................................................................... 5 Edit ......................................................................................................................................................................................................... 5 LBE Goal ............................................................................................................................................................................................. 5 RFP Document.................................................................................................................................................................................... 6 Comment ......................................................................................................................................................................................... 11 Actions ................................................................................................................................................................................................. 12 Send to Contract Owner .................................................................................................................................................................. 12 Return to Contract Owner for Rework ............................................................................................................................................. 12 Save .................................................................................................................................................................................................. 12 Answer Vendor Questions ....................................................................................................................................................................... 13 Comment/Answer and Return to Contract Analyst ............................................................................................................................. 13 Assign Questions to be answered by others ........................................................................................................................................ 14 Updated 7/17/2015 P a g e |2 LOG IN As a city employee, you are already registered with SFBid. 1. Go to https://sfbid.sfwater.org 2. Click on the blue “log in” icon in the top right corner of the screen. 3. Log in using your @sfwater.org email address (e.g. [email protected]) 4. Enter your password o Your password is the same password you use to log in to your computer in the morning. REQUEST NEW SFBID ACCOUNT ROLE You may need to contact us to be assigned the correct user role in the system. Send an email to [email protected] to get set up with the correct user role. o Please be sure to have your supervisor’s approval for the role which you are requesting. You will receive confirmation that your account has been updated with your role(s). Updated 7/17/2015 P a g e |3 VIEW ACTION ITEMS ON LANDING PAGE 1. Log in to SFBid (see Log In section above for instructions) 2. Your landing page upon log in will be your My SFBid (to return to this location at any time, click star icon (My SFBid) in the top right corner of the screen). 3. On the My SFBid page, you can review Action Items and My Contracts o The Action Items queue includes all tasks which are waiting for you to perform an action. o The My Contracts queue includes all contracts for which you have a role in the workflow. Click anywhere on the Action Item row to jump to that Action Item. Updated 7/17/2015 P a g e |4 REVIEW & SET LBE GOAL After the Contract Owner and Contract Analyst have created a new RFP, it will arrive in the CMD Manager’s queue to assign a CMD Analyst. When your manager has assigned you an RFP, you will receive an email from SFBid to “Review & Set LBE Goal.” Click on the blue Review & Set LBE Goal link in the email to jump into SFBid and log in using your email address and password. After you log in, you will be redirected to the Contract Web Form. Review the information entered by the Contract Owner and/or Contract Analyst. o Click on the top of each blind to expand and see the fields of information. Review any comments made at the bottom of the RFP Web Form. Below the Edit line are your tasks: o LBE Goal o RFP Document o Comment (optional) Below the Actions line is your action: o Send to Contract Owner o Return to Contract Owner for Rework EDIT Based on the information that you ascertain from the Summary of Scope of Services and the Service Types (a.k.a. categories), you can determine who to assign for each RFP. LBE GOAL You will only need to enter the sub category values, SFBid functionality is designed to automatically calculate the total LBE percentage at the top of the blind. You will not need to enter this number. o Always double check that these numbers all add up, just in case. Updated 7/17/2015 P a g e |5 Sub-Categories include: o MBE (Minority Business Enterprise) o WBE (Women’s Business Enterprise) o OBE (Other Business Enterprise) Enter these figures to the necessary decimal place. If CMD opts to waive the LBE Goals for the RFP, slide the Yes/No switch to the “Yes” (slide the white dot to the right). RFP DOCUMENT The RFP Document is a preformatted document based on the standard RFP Template. As information is filled into the Contract Web Form, the RFP Document will populate the information following the prescribed format. The schedule, tasks, etc. will populate to the RFP Document as both the Contract Owner and Contract Analyst enter the information. The Scope of Work can be expanded upon and contractual clarifications and specifics should all be added directly to the RFP Document. Updated 7/17/2015 P a g e |6 Editing should always be done in the response field outside of the document if it has been populated by SFBID into the RFP Document. This will be noted in a notification ribbon at the bottom of the RFP Document if you click into a text area that is locked by the web form formatting. When Reviewing the RFP, users can simply choose the “Read Only” option. Should additional information be required and the Document be opened for editing, users must click on “Open (Check Out)” and “Check In” when done. DOCUMENT ACTIONS Click on the RFP Document blind to view available actions for the RFP Document. OPEN (CHECK OUT) Clicking on the “Open (Check Out)” link will open the RFP Document from the central SharePoint location. o The RFP Document in SharePoint is always the latest version of the document, so the “Check Out” option should be used in almost every case. You will need to enter: o Your @sfwater email address o Your password (same password that you use on your work computer. While you have the document “checked out” for editing, other users can view, but cannot edit the RFP Document. This prevents conflicting changes to the document. Updated 7/17/2015 P a g e |7 When you are done editing the RFP Document, you must “Check In” the document to save your changes and allow others to view the RFP Document in SharePoint. o Do this by clicking the “File” menu at the top and then pressing the “Check In” button. As you check in the document, you can enter comments to describe the changes saved to this version. In order to continue to continue working on the RFP Document after saving changes, check the box for “Keep the document checked out after checking in this version.” o Checking in the document as you work allows other users/contributors to see the most up-to-date RFP. o If you keep the document checkout, other contributors can only see it in the Read-Only version and are unable to make edits until you have checked the document back in. If you happen to close out the window before checking in the document, you will receive a pop-up prompt asking if you would like to check the document back in. Select “Yes” to check the document in. Updated 7/17/2015 P a g e |8 If you do not wish to keep any of your changes, you can select to Discard Check Out o Do this by clicking the “File” menu at the top and then pressing the “Check In” button; or o Do this by closing out the document and clicking on the red “Discard Check Out” The Discard Check Out option will remove any changes that you have made to the document and will not be reflected in the “Previous Version History” and comments. READ ONLY Clicking this link downloads a local copy of the latest version of the RFP Document to your desktop, but does not include SharePoint integration. Updated 7/17/2015 P a g e |9 You cannot edit the document until you check it out, which can be done within the Read Only document. o The yellow ribbon at the top of the page will have a “Check Out” button. Click this and enter your email and password information. If you open a read only copy of the document and share it outside of SharePoint, local copies will not be saved in SFBid. Should a more recent version of the document need to be entered into SFBid and is outside of SharePoint, you will need to upload the newest version of the document to the system. o Please note that documents uploaded to SharePoint through SFBid will remove previous versions which may have changes that were made between the times that the RFP Document was downloaded from the website and returned in a modified version. o It is recommended that documents not be shared and modified outside of the SFBid/SharePoint system, however should this happen, click the blue “Upload New Version” button and browse your local files for the document you wish to upload. VIEW HISTORY Updated 7/17/2015 P a g e | 10 Clicking the “View History” link will expand the form to show all the versions of the SharePoint RFP Document, including user comments. ADD CONTRIBUTORS You can click on the “Add Contributors” link to invite your colleagues to give contribute to the drafting of the RFP. o Contributors can view and edit the RFP Document with you in SharePoint. Select users from the searchable drop-down list and click the “Share” button to send your colleagues an email. COMMENT Type in comments and click the blue “Add Comment” button to add comments to the Contract for the Team members and managers to see along the workflow. Comments are editable and removable later; however, comments are not private and are viewable by all users in the workflow. Updated 7/17/2015 P a g e | 11 ACTIONS SEND TO CONTRACT OWNER Click the green “Send to Contract” to move the Contract forward in the workflow after you have intered all relative information. RETURN TO CONTRACT OWNER FOR REWORK Choosing this action will return the RFP Web Form to the Contract Owner for rework, after which point it must be resubmitted to you for your input and/or review. o Note: You must add a comment in order to move an RFP back in the workflow for rework. o If you believe that the RFP needs to return multiple steps (i.e. return to the Contract Analyst for further information, include this in the comments by noting what information is lacking and to whom you are returning the RFP. SAVE All Changes are AutoSaved in the RFP Web Form. You will not need to save as you go (outside of the Proposal Response Form). Updated 7/17/2015 P a g e | 12 ANSWER VENDOR QUESTIONS COMMENT/ANSWER AND RETURN TO CONTRACT ANALYST If the Contract Analyst receives a question from a Vendor User and they either need your input or for you to answer the question, then they will send you the question in SFBid, which will generate email and move the question to your Action Items queue. Click the blue Answer Question link in the email to jump into SFBid. Log in using your email address and password if prompted. Click on the details icon to the right side of the table. This will bring you to the “Question Details” screen. The question details screen appears, which contains the following: Updated 7/17/2015 P a g e | 13 A “Submitted Question” label for reference, which is not editable. The formatted question to be posted (text area) o The field contains the submitted question by default, but can be edited by the Contract Analyst. The “Answer to be posted”. o Here you may fill in the answer which will be posted to the RFP for the Vendors to see. o Be as clear as possible and remember that while the answer may later be amended, it cannot be removed from the RFP once posted. Post any comments in the “Comment” text area at the bottom of the blind. o Comments are not required, but may help the Contract Analyst to answer the questions better. o Comments are only viewable by internal users assigned to the contract. o You may use this to clarify something to the Contract Analyst or to let them know that they may want to reassign it to another user. o Click “Save” to post your comments to the question. Note: Saving without selecting from the dropdown does not send the question back to the Contract Analyst. It saves the comment to the Discussion thread (if a comment is entered) and leaves the RFP in your queue for you to return to later. When you are done commenting and/or answering the question, use the drop down in the bottom left of the page to select the user to send the question to (Contract Analyst) and click “Save”. o o This will return the Question back to the Contract Analyst for review and posting. CMD does not have the ability to post answers, only Contract Analysts do. ASSIGN QUESTIONS TO BE ANSWERED BY OTHERS Send the question to be answered by another person on the Contract o Use the drop down on the bottom left of the page to select the user Updated 7/17/2015 P a g e | 14 o Email the question to someone outside the workflow who can provide the relative information. o Click the blue Email Question link on the bottom of the page. o o o Then click save on the bottom right of the page An email window will pop up with a template, which can be customized by you. Enter the email address of the person you would like to send the email to. When the person responds, they will reply to your Active Directory email, so please check for the answer there and enter the information to post the question as soon as possible. Click “Save” if you have populated any information which you wish to maintain or are sending the question to another user in the workflow, whether or not the question is being posted to the Contract Opportunity Page. Updated 7/17/2015 P a g e | 15