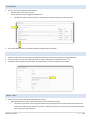
1
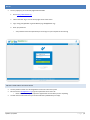
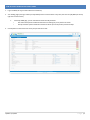
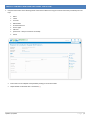
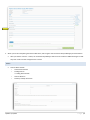
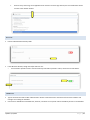
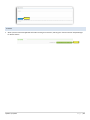
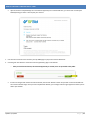
CONSTRUCTION CONTRACT ANALYST U S E R M A N UA L REVISED: 7/17/2015 SFBid Help Desk (415) 934-5703 [email protected] This document is designed to help Construction Contract Analysts use SFBid. If you are not a Construction Contract Analyst, please contact the SFBid Help Desk for the relevant user manual. Table of Contents Log in .......................................................................................................................................................................................................4 Request new SFBid account role ................................................................................................................................................................... 4 View Action Items on My SFBid Page .......................................................................................................................................................5 Start New Contract...................................................................................................................................................................................6 Complete Contract Web Form and Submit for Review .............................................................................................................................7 Basics............................................................................................................................................................................................................. 8 Labels ............................................................................................................................................................................................................ 9 User Info ........................................................................................................................................................................................................ 9 Bid Schedule ................................................................................................................................................................................................ 10 Pre-Bid Conference ...................................................................................................................................................................................... 10 Service Types ............................................................................................................................................................................................... 10 LBE Goal ...................................................................................................................................................................................................... 11 Comments ................................................................................................................................................................................................... 11 Actions......................................................................................................................................................................................................... 12 Create Contract Opportunity Page ......................................................................................................................................................... 13 Configure Contract Opportunity ............................................................................................................................................................. 14 Upload Documents to Contract Opportunity .......................................................................................................................................... 15 Create Bid Submission Form ................................................................................................................................................................... 16 Sections ....................................................................................................................................................................................................... 16 Fields ........................................................................................................................................................................................................... 18 Preview ........................................................................................................................................................................................................ 20 Save Form .................................................................................................................................................................................................... 20 Return to Opportunity ................................................................................................................................................................................. 20 Manage Bid Submission Form ..................................................................................................................................................................... 21 Manage Secure Documents .................................................................................................................................................................... 22 Vendor view of secure documents (for Contract ANalyst reference only) ............................................................................................. 23 Make the Contract Opportunity Visible to the Public ............................................................................................................................. 25 Update Information on the Contract Opportunity .................................................................................................................................. 26 Updated 7/17/2015 P a g e |2 Deadline for Bid Submissions ...................................................................................................................................................................... 26 Updates ....................................................................................................................................................................................................... 26 Project Description ...................................................................................................................................................................................... 26 DOcuments .................................................................................................................................................................................................. 27 Review and Answer Questions on Bid Documents (QBD) ....................................................................................................................... 28 Post QBD ..................................................................................................................................................................................................... 28 Revisions to QBD ......................................................................................................................................................................................... 30 Updated 7/17/2015 P a g e |3 LOG IN As a city employee, you are already registered with SFBid. 1. Go to https://sfbid.sfwater.org 2. Click on the blue “log in” icon in the top right corner of the screen. 3. Log in using your @sfwater.org email address (e.g. [email protected]) 4. Enter your password o Your password is the same password you use to log in to your computer in the morning. REQUEST NEW SFBID ACCOUNT ROLE You may need to contact us to be assigned the correct user role in the system. Send an email to [email protected] to get set up with the correct user role. o Please be sure to have your supervisor’s approval for the role which you are requesting. You will receive confirmation that your account has been updated with your role(s). Updated 7/17/2015 P a g e |4 VIEW ACTION ITEMS ON MY SFBID PAGE 1. Log in to SFBid (see Log In section above for instructions) 2. Your landing page upon log in will be your My SFBid (to return to this location at any time, click star icon (My SFBid) in the top right corner of the screen). 3. On the My SFBid page, you can review Action Items and My Contracts o The Action Items queue includes all tasks which are waiting for you to perform an action. o The My Contracts queue includes all contracts for which you are the primary Contract Analyst. Click anywhere on the action item row to jump to that action item. Updated 7/17/2015 P a g e |5 START NEW CONTRACT 1. From the My SFBid page, click on the blue Start New Contract button at the top left of the page. 2. Enter the following information: 3. If you don’t see this button, it is likely because you do not have the appropriate user role assigned in SFBid. Contact the SFBid help desk to resolve this issue. Contract Title City Department – SFPUC Contract Type – Construction Optional: Check the box to enter a Contract Number manually o If you choose to allow a system generated contract number it will appear as PUC.CON.xxxx Click Create. The SFBid spinner will spin while your contract is generated and you will be re-directed to the Contract Web Form. You will also receive an email informing you that your contract has been created. Updated 7/17/2015 P a g e |6 COMPLETE CONTRACT WEB FORM AND SUBMIT FOR REVIEW 1. Complete each section of the following blinds of the Contract Web Form using the contract information provided by Contract Prep: Basics Labels User Info Bid Schedule Pre-Bid Conference Service Types LBE Goal (Comments – add your comments as needed) Action Each section can be collapsed and expanded by clicking on the section header. Required fields are denoted with a red asterisk (*) Updated 7/17/2015 P a g e |7 2. When you are done completing the Contract Web Form, click the green Send to Contract Analyst Manager for Review button. After you click the “Send to…” button, the Contract Analyst Manager will receive an email from SFBid informing them that they have a task to review and approve this contract. BASICS Contract Basics include: o Total Contract Amount o Funding Sources Funding Source Details o Contract Duration o Summary of Scope of Services Updated 7/17/2015 P a g e |8 LABELS Contract Basics include: o Program Category o Select Enterprise(s)/Division(s) o Service Type o Solicitation Type o Administrative Code o Operational Type o Project Number o Community Benefits USER INFO Complete the User Info blind to select the users who will be assigned tasks on the Contract through the workflow. o Contract Owner Information Name (select to Contract Owner’s name by typing in the search box and using the dropdown to locate his/her name. Selecting the Contract Owner will populate the contact information for that person. o Contract Team CMD Analyst City Attorney o City Department Information (Information is populated by SFBid, but can be edited as needed) Updated 7/17/2015 P a g e |9 BID SCHEDULE There are two ways to populate the Bid Schedule o Manually enter all the dates and times o Click on the blue “Generate suggested schedule” link This will enter dates and times based on a standard timeline determined by the Construction team You can add additional events to the bid schedule by clicking the blue “Add Event.” PRE-BID CONFERENCE The date and time of the Pre-Bid Conference will be populated by the information you filled in to the Bid Schedule. nd Enter the Location name of the Pre-Bid Conference (i.e. SFPUC, O’Shaughnessy Conference Room, 2 Fl.) The Address will be populated by the selection of the Department, but can be adjusted here as needed. SERVICE TYPES Enter the types of services that will be required by this contract. o Begin typing the service tags or use the drop down to click on and select the types These service types are the service tags that Vendors select upon registration and subsequently when contracts are posted containing these tags, Vendors will receive a notification email that a contract has been posted containing the service tags their business provides. Updated 7/17/2015 P a g e | 10 Select as many service tags as are applicable to the contract. The more tags selected, the more notifications will be sent out to the relevant Vendors. LBE GOAL Enter the LBE Goal determined by CMD. If the LBE Goal is Waived, change the Yes/No switch to Yes” o You will need to provide a reason. If the Contract Prep team did not provide a reason, contact the Contract Owner. COMMENTS Type in comments and click the blue “Add Comment” button to add comments to the Contract for the Team members and managers to see along the workflow. Comments are editable and removable later; however, comments are not private and are viewable by all users in the workflow. Updated 7/17/2015 P a g e | 11 ACTIONS When you have entered all applicable information relating to the contract, click the green “Send to Contract Analyst Manager for Review” button Updated 7/17/2015 P a g e | 12 CREATE CONTRACT OPPORTUNITY PAGE After the Contract Analyst Manager has reviewed and approved your Contract Web Form, you will receive an email from SFBid informing you that it is time to post your contract. 1. Use the link in this email or the link from your My SFBid page to jump to the Contract Web Form. 2. Click the green Post button to create this contract opportunity page on the website. o After you click the Post button, the Contract Opportunity is created, but is not yet visible to the public. If there are changes that need to be made to the RFP, click the red “Rework” button and you will re-enter the workflow at the contract initiation stage. Once you have completed the Rework, your manager will once again approve it before you are able to post the RFP. Updated 7/17/2015 P a g e | 13 CONFIGURE CONTRACT OPPORTUNITY After clicking Post from the Contract Web Form, you will be redirected to the Contract Opportunity. 1. On this page, you can change the Deadline for Bids time using the time picker in the top right corner of the screen. 2. Review the bid information to make sure that everything looks correct. If need be, you can update the Project Description with details about the project. Updated 7/17/2015 P a g e | 14 UPLOAD DOCUMENTS TO CONTRACT OPPORTUNITY 1. From the Contract Opportunity, click on the Documents tab. 2. On this tab, you can see two sections: Existing and New Click the “Add the first Document” link in the New blind to browse on your computer to select the file(s) you want to upload. When you are ready, click the green Upload Documents to Website button. You can upload more than one document at once. You can edit the name of the file using the Name column. You can replace existing documents on the website with a newer version. When you are uploading the new version, select the old version in the Replaces column. You can mark a document as security-sensitive by clicking on the padlock icon in the Security column. See Manage Secure Documents section below. You can remove a document from the website before it has been downloaded by clicking on the (x) icon next to the document name. If a document has already been downloaded, it cannot be removed from the site and the (x) icon will disappear. You can reorder documents in the Existing section by changing the index value in the # column or dragging and dropping the entire row. Updated 7/17/2015 P a g e | 15 CREATE BID SUBMISSION FORM To create a new bid submission form, click the green “Create Bid Submission Form” button located on the top left of the Contract Opportunity. o Check the box to begin with a blank template or to use an existing system template. o Click the green “Create” button to generate the form builder. SECTIONS Blinds in the Form Builder are called “Sections” Click the blue “Add the first section” link on the left to open the first section. Click the blue “Add another section” at the bottom of the page to add additional sections. Updated 7/17/2015 P a g e | 16 When you add a new section, you will be prompted to click the pertinent link for: o Add New Blank Section o System Templates o User created Templates Note the blue options are what are available to you; if they appear gray, then there are no available templates in your profile. The numeral to the right of the options indicates the number of templates available to you. Type in the name of this section into the “Section Title” field. Select an icon to represent this field (optional; the default icon is a cube). Click the blue “OK” button located in the lower right of the window. Sections can be dragged up and down by clicking and holding the navigation icon Updated 7/17/2015 at the top left of each blind. P a g e | 17 o A tan area will appear where the dragged section will land upon release. FIELDS Click to drag the first field into the new blind. Multiple fields can be dragged and dropped into each section or “blind,” creating the visible frames between relative information. Ask questions, create response forms, request information/documentation and construct agreements using the various fields in the form builder. Updated 7/17/2015 P a g e | 18 All fields have a line for help text along with the field title/question. o With the exception of the Instructions field, since there is no response box to this field directly. o Use help text to clarify questions, how questions should be answered, etc. For Advanced Options, each field type has its own categories including, but not limited to: o Required (will be indicated with a red asterisk *) o Minimum/Maximum length o Validation Email Phone Dollar Amount Default Value Updated 7/17/2015 P a g e | 19 Each time you are finished creating a field, click the green “OK” button to collapse the options and format the data. If you do not wish to save the information you have populated, simply click the red “Cancel” button. o This will return the field to the most recent version of the information you have populated within the particular field. To remove a field that you have added, click the green “OK” button, then mouse over the top right of the field and click on the gray “x” to remove. o A pop-up window ensuring that you wish to do this action will appear. o Click “OK” if you wish to continue with the removal of the field. To edit a field after it has been collapsed to the formatted version, mouse over the top right of the field, and click on the cog icon to open for editing. You will need to expand the Advanced Options again if there are changes that need to be made beyond the basics of the field. PREVIEW To preview the form, first click the blue “Save Form” (1) button, then “Preview” (2). o The “Preview” option allows you to see and test out the form as the Vendors would see it. o This will help you see where you have missed “required” options, have typos and need to add help text. 2 1 SAVE FORM As you build the form, be sure to click the “Save” as you go to record the entry/entries or change(s) made. If you need to go back to the opportunity page, log out or wish to preview your form, click save before leaving the form builder page, and again when you have made any reasonable quantity of entries or corrections. RETURN TO OPPORTUNITY To return to the Contract Opportunity landing page, click the red “Return to Opportunity” button on the bottom left of the form builder page. o Remember to click the “Save Form” button before leaving the page. Updated 7/17/2015 P a g e | 20 MANAGE BID SUBMISSION FORM To continue work on the submission form with form builder, click the green button at the top of the Contract Opportunity landing page. Updated 7/17/2015 P a g e | 21 MANAGE SECURE DOCUMENTS 1. You can mark a document as security-sensitive by clicking on the padlock icon in the Security column. Marking the document as secure will give you a pop-up warning and will make the document unavailable for download by Vendors who do not have security clearance. 2. After a document is marked as secure, the padlock icon next to the document will appear locked. In order for Vendor users to download secure documents, they have to go through extra levels of approval: i. Vendor users must be marked as “trusted” by the SFBid site administrator after a verification process administered by the construction team. This “trusted” status is valid across the entire SFBid system. ii. Vendor users must electronically sign the secure documents confidentiality agreement for the specific contract in question. This confidentiality agreement is valid only for the specific contract in question. After the Contract Opportunity is made visible to the public, you will see a blue bar at the top of the Documents tab which lists the number of users who have signed the confidentiality agreement for this contract. Click on the blue bar to see the list of users who have signed the confidentiality agreement. Note: if there are not any locked documents uploaded to the opportunity, then the blue security bar will not appear. Vendor users who have downloaded secure documents are also required to report distribution of these documents to subcontractors or suppliers. You can view a list of the parties to whom the secure document has been distributed by clicking on the Vendor User’s name in the Secure Bid Documents pop-up window. Updated 7/17/2015 P a g e | 22 Clicking on this blue banner will show you a list of Vendor Users who have “signed” the Confidentiality agreement for Contract Secure Documents, when they signed it and with whom it has been shared. VENDOR VIEW OF SECURE DOCUMENTS (FOR CONTRACT ANALYST REFERENCE ONLY) Vendor Users will see a red bar along the top of the Documents tab informing them that they must sign the confidentiality document in order to view the secure documents attached to the Opportunity. Once a vendor clicks on the link in the red bar, they will see an agreement window appear which will be a legally binding agreement to which they will check a box and populate their business license number to proceed. After click “OK” Vendor Users will show a green bar along the top of the Documents tab indicating that they have secure access to the documents below Updated 7/17/2015 P a g e | 23 Vendors click the “Report secure document distribution to subs/suppliers” inside this green bar A window appears in which the Vendor can add users and see who has agreed to the terms and viewed the document(s). Updated 7/17/2015 P a g e | 24 MAKE THE CONTRACT OPPORTUNITY VISIBLE TO THE PUBLIC To make the Contract Opportunity visible on the SFBid Website, for public access and for vendors to respond to the RFP Change the Yes/No switch, located on the lower left of the Contract Opportunity landing page from “NO” (default) to “Yes” This will make the RFP immediately available on the SFBid website and will also generate a notification email to all vendors who have selected the relative service tags in their profile. Updated 7/17/2015 P a g e | 25 UPDATE INFORMATION ON THE CONTRACT OPPORTUNITY Information on the Contract Opportunity landing page is editable; however depending on what it is, the window of being able to do this may vary. 1. Available for updates always. Deadline for Bid Submissions (time) “Updates” 2. Only available to update until the Contract is made visible on the website. Project Description 3. Only available for editing/updating until it has been downloaded by at least one Vendor user. Documents DEADLINE FOR BID SUBMISSIONS The Deadline for Bid Submissions is able to be modified any time, whether or not is has been made visible on the website. UPDATES “Updates” can be added to the Contract Opportunity at any time, whether or not is has been made visible on the website. Updates are similar to addendum in that they are additional information regarding contract specifics. Updates are permanently attached to the Contract opportunity and cannot be removed once posted. PROJECT DESCRIPTION The Project Description (populated by the Summary of Scope of Services in Contract Basics) can be elaborated upon, updated, and edited until the Contract has been made visible to the public. Once this has occurred, the Project Description becomes locked and the only way to clarify any mistakes or uncertainties is to add an update in the Updates section. Updated 7/17/2015 P a g e | 26 DOCUMENTS Until the Contract Opportunity has been made public, you are able to add, edit and remove documents at will. Once a Contract Opportunity has been made visible and a document has been downloaded by a Vendor User, it is no longer removable or editable. o What you can do at this point is to upload a revision of the document. This will essentially archive the older version and users who have already viewed the documents and favorited the Contract Opportunity will receive an email informing them of a change to the Contract that they are interested in. o All Previous Versions of documents will remain visible on the website, but will appear as grayed out and below the document they have been replaced with. Documents that have not yet been downloaded will appear with a gray “X” on the far right of the document line, which when clicked will remove the document from the Documents queue: Documents that have already been downloaded will appear without the “X”: Updated 7/17/2015 P a g e | 27 REVIEW AND ANSWER QUESTIONS ON BID DOCUMENTS (QBD) When a Vendor User submits a question, you will receive an email notifying you that there is a question on your Contract from a Vendor. The email will contain the question and the Contract name and number. Click on the blue Review Question link to be directed to the question (you will have to log in in order to see the question and respond). This link will take you to the Questions tab of the Contract Opportunity where you will see a Submitted Questions (Not Posted Yet) blind. POST QBD Click on the details icon to the right side of the table. This will bring you to the “Question Details” screen. Here you can o Change the Question Category o Reformat questions o Answer questions Updated 7/17/2015 P a g e | 28 o o o Comment on the question for other internal (SFPUC) users to see Note for addenda needed Post question to Contract Opportunity page for viewing before answering o o Send the question to be answered by another person on the Contract; or Email the question to someone outside the workflow who can provide the relative information. Click “Save” if you have populated any information which you wish to maintain or are sending the question to another user in the workflow, whether or not the question is being posted to the Contract Opportunity Page. To post the answered/reformatted question: o o Check the box on the left side of the un-posted question Select the “Post” action from the dropdown to the right of the Submitted Questions blind. Updated 7/17/2015 P a g e | 29 This will move the question from the Submitted Questions blind to the Posted Questions and Answers blind. REVISIONS TO QBD If there are revisions to the posted question o Click the Question Details icon to the right of the question. o Click the blue Revise Question to the bottom right of the page. o A pop-up window will appear. o Click the Revise Posted Question to continue. Type in the revised answer to the question and click “Save.” The revised Q&A will appear in the Submitted Questions blind. o Note: the Previous version will remain in the Posted Questions and Answers blind with a note “Currently being revised” (Vendor Users will also see this note). Check the box on the left side of the un-posted question. Select the “Assign to Contract Analyst Manager” action from the dropdown to the right of the Submitted Questions blind. Updated 7/17/2015 P a g e | 30 Only the Contract Analyst Manager can post the revised Q&A to the Opportunity page. Previous versions of each Q&A can be found by expanding a question and clicking “Previous Revisions” Updated 7/17/2015 P a g e | 31