1
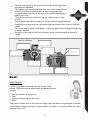
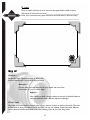
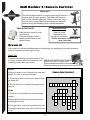
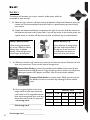
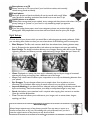
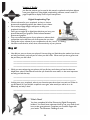
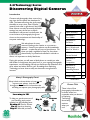
4-H Technology Series Discovering Digital Cameras Introduction Cameras and photography have come a long way since the first photo was developed in 1826. The latest technology has given people the ability to snap a shot, view it almost instantly, and erase it right there if they wish. Most cameras not only have easily adjustable settings, but many know how to adjust themselves! In almost two hundred years, the art and science of photography has grown closer to the convenience and functionality of computer technology. Table of Contents We take photos for many reasons including to be creative or to preserve a memory. Some of your photos may be immediately deleted - maybe they are just not good photos. For those you keep, regardless of how you store them electronically or printed and collected in a binder or album, it is important to clearly label them. During this project you will want to label photos to remind you what skill builder or assignment they came from. In your ongoing photography experiences, correct labeling will help you find them and remember who, what, where and when. Build on your knowledge from Exploring Technology to know how to safely use electronic storage and the internet! Marty’s Photography Facts! Dream It Do It Project Summary 2 Skill Builder 1: Good Habits 3 Skill Builder 2: The Basics 6 Skill Builder 3: How it Works and How You Work it 9 Skill Builder 4: Camera Survival 12 Skill Builder 5: Creative Composition 15 Skill Builder 6: Polishing and Preserving Pictures 18 Showcase Challenge 21 Portfolio Page 23 Picture This! Learning is 3D! Dig It 1 - Draft 2009 - Marty is back to share advice on how you can improve your photos. Look for him throughout the manual for information that will help you improve your photography skills! To help you get the most out of your learning, each project meeting has the following parts: Dream it! Plan for success Do it! Hands on learning Dig it! What did you learn? Introduction There is lots of free photography information to be found online, but remember what you learned in Exploring Technology about being cautious when you surf. What Skills Will You Learn? Each section or ‘Builder’ in this project has activities that will help your project group learn to do by doing while learning new skills and having fun! To complete this project, you must Complete the activities in each ‘Builder’ OR a similar activity that focuses on the same skills as you and your leader may plan other activities Plan and complete the Showcase Challenge Complete the Portfolio Page Participate in your club’s Achievement. (See the inside back cover for more information about 4-H Achievements.) Members will be able to... Activities Page Skill Builder 1 Good Habits Recognize hazardous situations Use professional courtesies Properly prepare for outings Safety Sensitive Get Ready Capturing Danger 3 4 4 Skill Builder 2 The Basics Recognize a point-and-shoot camera from a DSLR camera Name and understand the function of basic camera parts Use basic camera features Parts and Pieces Feature Functions My Camera 6 7 8 Skill Builder 3 How it Works and How You Work it Understand how cameras record images Identify lighting situations Use exposure settings Faulty Photography An Eye for Photography Limitless Lighting 9 10 10 Camera Survival Safely handle a camera in many environments Clean and maintain camera Identify suitable batteries and memory cards Camera Care Work With it Cleaning the Camera Hectic Handling 12 13 14 14 Do You See What I See The Rule of Thirds Locating Lighting 15 16 16 What Now? Storing and Sharing Digital Touch-ups Scrapping it Together 18 18 19 20 Skill Builder 4 Skill Builder 5 Skill Builder 6 Creative Composition Make use of “the rule of thirds” Use different lighting effects Use different perspectives Polishing and Preserving Pictures Safely store digital photos Use photo-enhancing software Create a digital scrapbook When you successfully complete your builders, you will showcase what you have learned. Showcase & Portfolio Explain success in using the skills listed above 2 Showcase Challenge My Portfolio Page 21 23 Skill Builder 1: Good Habits Marty Says… Digital cameras are relatively new on the technology scene, especially when you compare them with film cameras which have been around for more than one hundred years. Some things never change though, and professional habits and techniques from film photography often apply just as much to digital practices. Important words SKILLS CHECKLIST Watch for these important words throughout this builder: Photo shoot, courtesy Recognize hazardous situations Use professional courtesies Properly prepare for outings Dream it! Whether you’re new to photography or have been doing it for a while already, there are some things that everybody needs reminding of. Safety and professionalism can easily be forgotten when you see an opportunity for that perfect picture, but sometimes it’s this forgetfulness that can cost you the shot. Safety-Sensitive Think of the situations people take pictures of, then think of the hazards . Here are some silly situations. How could a photographer deal with these hazards or situations? “Nice cliff. I think I’ll just lean out here a bit and . . . ahhhhhh!” “Wow! Look at those flames! If I can just get a little closer . . .” “I’ll just lean in a bit closer and get a picture of those whirling gears. My long hair keeps flipping in the way.” “That new mother is blocking my view of the new calf. Guess I’ll have to get in the pen with her.” “I wonder how fast polar bears can run?” “What a great electrical storm! If I shelter under this tree, it will keep my camera dry while I take shots.” “These silly yellow police tapes keep flapping in my way. I’ll just step over and . . .” 3 Use the situations described on the previous page to come up with some safety guidelines, which you can keep in mind when you’re setting up to take your photographs. _____________________________________________ _____________________________________________ _____________________________________________ _____________________________________________ Get Ready Look closely at the photos in this builder. Can you think of anything the photographer would have had to prepare for before setting out on their photo shoot? Make a quick list of things you might need or need to check before you set out to take photos. _____________________________________ _____________________________________ _____________________________________ A Camera Mouse’s Manners Marty knows that not everyone likes to have their picture taken. There are a few courtesies to keep in mind when taking pictures: Ask someone before you take their picture, and respect their answer. Never publish someone’s picture without their permission. Don’t display someone’s picture if it makes them look terrible! Think how you would like to be treated. Get permission to go on someone else’s property, and leave it in the same or better condition than you found it. If there is a sign saying “No Photos,” obey it. Otherwise you may lose your memory stick or your entire camera. If it is a military zone, you might have some explaining to do! Do it! Capturing Danger Find a picture and attach it to the next page, that you think would be exciting or interesting to take. You can take a few pictures with your own camera and choose one, or look through old newspapers and magazines to find something you like. If you can’t find anything you like, draw your own situation! 4 What are the hazards in this picture? _____________________________________________ What preparations need to be done before setting out to take this picture? _____________________________________________ What would a courteous photographer need to do to take this picture? _______________________________________________________ Why did you choose this picture? _______________________________________________________ Dig it! Now that you know how to spot potentially hazardous situations you understand some common courtesies when taking pictures, and know how to prepare before you start your photo shoot, you can practice teaching what you know. Have a short discussion with a friend and/or family member on the photo you chose above, and explain to your audience about the hazards, preparations, and necessary courtesies in the picture. What’s next? You know what to look out for when you’re taking your pictures, but are you familiar with your camera yet? Understanding your camera inside and out will help you take even better pictures! 5 Skill Builder 2: The Basics Marty Says… You might have known how to push a shutter button on a camera for quite some time. But do you know what that actually does? You know you take pictures with a camera, but how exactly does the camera take the pictures? Understanding how photographs are created will allow you to manipulate certain elements of your camera to create better quality pictures. Important words SKILLS CHECKLIST Recognize a point-and-shoot camera from a DSLR camera Name and understand the function of basic camera parts Use basic camera features Watch for these important words throughout this builder: Point and shoot, DSLR, LCD, lens Dream it! Take a good look at everyone’s cameras. Can you name any of their parts? How do you think cameras work? Talk with the other members in your group and see if you can figure out how a camera records images. Jot some ideas down below. ___________________________________________________ ___________________________________________________ Does everyone’s cameras look the same? There are different types of cameras. Two of the main types include the “point and shoot” camera and the “DSLR” (digital single lens reflex) camera. A basic difference between them is that a DSLR camera has a detachable lens, and gives more control over camera settings. In this project we will focus on point and shoot cameras. Marty says… Camera equipment is expensive! It’s understandable that people can be protective of it. Never handle camera equipment without the owner’s permission. Parts and Pieces Try to match up the descriptions on the next page with the camera parts in the diagram. Write the box numbers in the descriptions that fit what the box points to. Then, write in the names of the parts inside the empty boxes. Discuss your answers with other members and your leader to find out what each part is called. 6 ___ ___ ___ ___ ___ ___ ___ ___ Cameras have this part to show you what the unprocessed image looks like before it is digitalized. This is where your camera sends data to be stored onto a memory card. When it is too dark for good pictures, or when a bright light casts unwanted shadows, this part of the camera can provide extra lighting to balance your shot. This light can be used to reduce the “red eye” effect present in some pictures. This scrolls through exposure settings to set the camera for specific situations. Possibly the most important part, this collects light and focuses it onto a sensor inside the camera. The camera uses this liquid crystal display to show you what it sees, although the image may be slightly distorted. Every part of the camera is built onto this piece, which is usually designed to be easy to handle. Parts of a Camera 1. 2. 5. 6. 3. 4. 7. 8. Do it! Feature Functions It’s time to get better acquainted with your camera’s basic features. Take a few pictures which display the following features in action: 1. 2. 3. 4. Red eye reduction (if you have it) Flash Exposure settings (choose just a few) Zoom Take before and after shots to show what the image looks like without using the feature, and then how the feature changes the image. Put these photos in an album or a computer folder and clearly label what they show. 7 My camera Draw or attach a picture of your camera in the space below. Label it’s parts. What type of camera do you have?_________________________ Does your camera have any parts that were not listed before? What are they? ____________________________________________ Dig it! Check it… Review the Skills Checklist on page 6. What skills have you developed? Do you need more practice? Record it . . . Discuss what you have learned with your leader and record the information on your Portfolio Page. Apply it . . . How could you teach someone when to use one of the basic features (red eye reduction, flash, different exposure settings)? What’s next? Now that you understand the outside parts of your camera, it’s time to look at the inside. The next builder looks at how your camera works and how you can use it better. Experiment with different camera features and functions before the next meeting. How do you think they work? 8 Skill Builder 3: How it Works and How You Work it Marty says… How exactly is your camera able to see? How does it record an image? This builder will help you find the answers to these questions while at the same give you more tips for taking your photos. You’ll find that once you understand how the camera works, you will know how to use it to the best of its abilities. Important words SKILLS CHECKLIST Understand how cameras record images Identify lighting situations Use exposure settings appropriately Watch for these important words throughout this builder: Aperture, pixel, processor, shutter, exposure, tungsten, fluorescent Dream it! To understand how a camera works, you need to understand how your eyes work. A camera sees in the same basic way that we see things! As you read this page, light from a light source in the room is beaming onto the paper. The light bounces off of the paper and straight into your eyes! Ouch! Actually as you’ve probably guessed, you don’t feel the light entering your eyes. The only way to know that you see light is by, well, seeing! Without light you wouldn’t see anything at all. Your eyes can “read” the light when it enters them, and they tell your brain what they read. Cameras work the same way, but instead of eyes and a brain they have pixels and a processor. Pixels are millions of little light sensors which read light, and then send the information to a processor which makes sense of the information. Faulty Photography Instructions 1. Take several pictures from areas with different situations of light. Take a few photos lit by sunlight, fluorescent light, tungsten light, and limited light or darkness. Use the same exposure settings for each photograph. 2. Write down some comments below about how the images turned out. Which exposure setting were you on? Did your camera try to adjust itself? Which picture turned out the best? Which one turned out the worst? Comments on my photos: _ __________________________ Setting used: ____________ __________________ __ __ __ __ __ __ __ __ __ lf? itse st Did it adju ________ ure was: ______________ pict t bes the in ting ligh of e typ The ______________ __ __ __ __ : was ure pict rst wo the in ting The type of ligh 9 Message from Marty! On-board flash systems on your camera can light up a dark image, or chase away shadows in up-close portraits. Sometimes cameras use this automatically, others get you to set it off when you want it. An Eye for Photography How does the camera adjust the amount of light it lets in? The same way your eyes do! Camera apertures work the same way as human pupils do. How do your eyes adjust to light? Write down the difference between an eye in bright light and an eye in low light. Apertures work this way too! ________________________________________________________ Viewfinder Pentaprism How a Camera Works Digital Sensor Light Path Lens Shutter Shutter Body In addition to the aperture, the camera has another lightcontrolling feature. The shutter opens and shuts quickly when the shutter button is pushed, letting a controlled amount of light (determined by the aperture!) to focus through the lens and onto the digital sensor. Mirror Mouse’s Mention Do it! Limitless Lighting Lenses can focus the light in such a way that the light is magnified. This translates into a “zoom” feature on your camera which can make images appear bigger than they are. Great for capturing pictures from far off or for getting details close up! Cameras come equipped with technology that can automatically adjust the shutter, aperture, and other parts to meet specific light conditions. Take a look at the different settings on your exposure dial. Here are examples of the most common settings and what they are used for: focus of the camera 10 Does your camera have settings that are not listed in this builder? Draw their icon in the spaces below, and give a brief description of what they are used for (you can learn this from looking at your camera or by reading your owner’s manual). _____________________________________ _____________________________________ _____________________________________ Get familiar with your settings by taking pictures using at least five of the preset exposures. Hints: Take more than one picture for each setting. Digital = free! Take as many pictures as you like and choose some as your favourites. Try taking the same picture under different lighting conditions or with different exposure settings. Experiment using flash and zoom to see what you like. Try taking photos multiple times with and without zoom or flash, so that you can really see what a difference they make. Dig it! 1. Which exposure settings did you use? _____________________ _____________________ _____________________ _____________________ _____________________ _____________________ 2. How did you decide which settings to use? _______________________________________________________ _______________________________________________________ _______________________________________________________ 3. Did you find special ways of using any of the settings or features such as zoom and flash? List at least one use that you think will be particularly handy in your future photos, and why it’s useful. _______________________________________________________ _______________________________________________________ _______________________________________________________ What’s next? Now that you have a good understanding of how to use the technical parts of your camera, the next builder will show you ways of protecting and handling your camera. These techniques will prepare you for photo-shoots in some unusual situations. 11 Skill Builder 4: Camera Survival Marty says… The job that digital cameras do requires that they be clean and in good repair to work properly. This builder will show you how to care for and protect your camera, so that you can go out and use it in many different environments and situations without risking the well-being of your valuable equipment. Important words SKILLS CHECKLIST Watch for these important words throughout this builder: Secure data card, compact flash card, corrosion Safely handle a camera in many environments Clean and maintain camera Identify suitable batteries and memory cards Dream it! Your camera is a valuable and delicate piece of technology, but with proper care and maintenance you’d be surprised just how long it can last! Camera Care Complete the following crossword puzzle to find out some common issues you’ll encounter, and Want more info on camera care? hopefully prevent, with your camera. www.youtube.com/watch?v=oomHLUldwDQ Across Camera Care Crossword 2 Put your camera in one of these if you must take photos in a rainy or dusty environment. 3 These tiny particles can ruin your camera if they get inside of it. 6 This can be lost or corrupted, erasing all of your pictures. 1 2 Down 3 1 These can corrode inside your camera, leaving residue. 4 5 6 4 Wearing this at all times can prevent you from dropping your camera. 5 If this gets dirty, it can ruin any pictures you take. 7 Using this will protect your camera when it’s not in use. 12 7 Do it! Work With It This activity will introduce you to your camera’s smaller parts, which are susceptible to wear and tear. 1. A) Make sure your camera is off, then remove the batteries. What kind of batteries does your camera use? Common examples include AA, AAA or a special battery type used only by your camera. B) Inspect the batteries and battery compartment for signs of corrosion. Rub the contacts on the batteries and camera with a clean cloth. If you see any marks on the contact points, use a pencil eraser to rub them off. Brush out any dust, and discard any corroded batteries. Marty’s Battery Banter Mouse Memory Tip When buying new batteries, try to buy a NiHM or lithium battery over an alkaline battery. These will give you a much longer shooting time. If you need lots of storage space, get a few small cards instead of one big one. If you lose a card or it becomes corrupted, you won’t lose all of your photos. 2. A) While your camera is off, remove your memory card from the camera. What kind of card does your camera use? There are two kinds of storage cards: Secure Data Cards are some of the smallest cards available, and are used in both point and shoot and DSLR cameras. They can also be used as memory for cell phones, video game systems, MP3 players, and PDA’s. Mini SD cards are also available. Compact Flash Cards are mostly used in DSLR cameras and have the benefit of a built in controller chip, allowing for faster transfer rates. B) Here is a general guide to how many images will fit on each size of memory card, based on 6-10 mega pixel cameras. Camera: How much storage does your card have? 6 MP What about other cards you may own? 8 MP 1st storage card: ____________________________ 10 MP 2nd storage card: ____________________________ 3rd storage card: _________________ 13 Memory Card 1 GB 4 GB 16 GB 32 GB 300 1,200 4,800 9,600 230 920 3,680 7,360 165 660 2,640 5,280 Cleaning the Camera It is always a good idea to keep the exterior of the camera clean using a lint free cloth. To clean the lens, use a lens pen or a can of compressed air. For fingerprints, use lens cleaner and lens paper and wipe gently so as to not damage the lens. Digital single lens reflex (DSLR) cameras have more parts and are more complicated to clean. Check your user’s manual for directions. Practice cleaning your camera. Hectic Handling Taking your camera out for photo-shoots can present unforeseen risks for your camera. Luckily, there are a few things you can do to protect it. Try taking pictures in the following situations to get used to certain methods of protecting your camera. Always use a wrist or neck strap with your camera. Strap your camera on, and take pictures in any position except standing up. Some positions might be a little unsteady, but your strap should help prevent you from dropping your camera. Hold your camera with two hands. This helps steady it and makes it harder to accidently drop your camera. To further steady your camera, tuck your arms in against your chest or sides. Try taking pictures of moving objects or animals while doing this. Rain and dust are both terrible for your camera. If you are taking pictures on a dusty or rainy day, place your camera inside a sandwich bag and cut a hole just big enough for the lens to poke through. Practice taking pictures with a bag on your camera. Store it safely! Cameras are vulnerable even when not in use. Store your camera in its case whenever you are not taking pictures. When travelling with your camera, make sure it is secure. Extreme temperatures can damage your camera, so don’t leave it where it can get very hot or cold. Dig it! Check it… Review the Skills Checklist on page 12. What skills have you developed? Do you need more practice? Record it . . . Discuss what you have learned with your leader and record the information on your Portfolio Page. Apply it . . . What advice would you give to someone who was buying memory cards and batteries for their camera? What’s next? After finishing this builder, you should be better prepared for getting more creative with your photography. The next builder will go over basic elements of what makes an appealing picture. Take a look at pictures you’re drawn to. What is it that you like about them? 14 Skill Builder 5: Creative Composition Marty says… Deciding how to put together your photo is called “composition.” When a professional photographer composes their pictures, they ask themselves questions like: Where is the light coming from? What will be the subject of my image? What is the best angle to take this picture from? This builder will help you ask yourself these same questions and add some creativity to your compositions. SKILLS CHECKLIST Important words Make use of “the rule of thirds” Use different lighting effects Use different perspectives Dream It! Marty’s Camera Jargon Do You See What I See? 1. Which photo has the best angle? 2. Which has the best subject? 3. Which uses the best lighting? In the space provided below, answer these questions using these four pictures and explain why you chose your answers: A Watch for these important words throughout this builder: Viewpoint, subject, composition The “subject” of your picture is what you are actually taking a photo of. Usually, you want to compose your picture in such a way that everything in your image compliments the subject somehow. B C D _________________________________________________________________________ ______________________________________________________ ______________________________________________________ ______________________________________________________ Which photo did you like the best? Compare your ideas with other members. Do they share your thoughts? Or were their answers very different from yours? What makes a good photograph is a matter of personal taste! Everyone likes different photos for different reasons. Here is a look at some of those reasons. 15 Do it! The Rule of Thirds One of the most valuable rules to learn is the “Rule of Thirds”. Placing your subject using this rule will help draw interest to your subject and make the picture more appealing overall. What is the rule of thirds? Imagine four lines placed evenly across your image to create three columns and three rows, like a tic-tactoe board. You will notice that the lines intersect in four spots. These are the “sweet spots,” and placing the subject of your photograph close to one of these spots can drastically improve the visual appeal of your image. While you complete the next two activities, practice and experiment with the rule of thirds in your photos. Locating Lighting As you already know, light plays a very important role in photography. Knowing the different effects which light can have on an image is crucial to taking good photographs. The direction that light comes from determines what sorts of shadows will be cast in your picture, which can greatly alter the mood or feeling of your image. The most common examples of directional lighting are: Front lighting - light comes from directly in front of the subject Side lighting - light comes from either the left or right side of the subject Back lighting - light source is directly behind the subject Top lighting - light source is directly above the subject Choose a couple of people or objects to use as subjects, and portray each subject in at least one photograph for each example of directional lighting. Back Lighting Front Lighting Side Lighting 16 Top Lighting Hedgehog, Human, Hawk In addition to where you place your subject in the picture, the angle at which you view your subject is also important. Consider different points of view when you compose your shots. Select a couple of subjects and photograph them from three different viewpoints. Shoot from the viewpoint of a hedgehog, a human and a hawk, and compare the results of the different perspectives. Try experimenting with different lighting, too! Want to learn more about composition? Try searching “camera composition reginald green” for a quirky informational video. Or, check out www.photoinf.com/General for lots of composition information. Dig it! 1. Take a look at your pictures from the Hedgehog, Human, Hawk activity. Discuss the following questions: How does the hedgehog’s viewpoint affect the picture? How does the hawk’s viewpoint change the way things appear? How does the angle and height affect what your eye is first drawn to? 2. What effects did lighting play in your photos? Examine all of the pictures you took in this activity. Which direction of lighting did you use most in your Hedgehog, Human, Hawk activity? Why do you think this is? 3. The composition basics that were introduced in this builder are present in virtually all photos, regardless of whether or not the photographer chose to manipulate them. Can you think of other art or media forms which may have rules of composition? _________________________________________________ _________________________________________________ What’s next? Now that you’re well on your way into photography, it’s time to find out how you can make your best pictures even better! There are lots of things you can do with photos once you have them, and this last activity will help you discover your options. 17 Skill Builder 6: Polishing and Preserving Pictures Marty says… Now that you have lots of photos and the know-how to create many more, this builder will show you what to do with them. Which ones are your best photos? Can you make them better? How can you keep them safe for years to come? These are all questions that this builder will help you answer. Important words SKILLS CHECKLIST Watch for these important words throughout this builder: Post-processing, resolution, mood Safely store digital photos Use photo-enhancing software Create a digital scrapbook Dream it! What Now? Talk with other project members or family members to learn how people have been displaying and storing their photos. List ideas below, and brainstorm advantages and disadvantages for each idea. How it’s stored/displayed Advantages Disadvantages Do it! There are many things you can do with digital photos. The three ideas covered in this builder are: Storing photos where they will be safe for years to come Enhancing photos using post-processing software Creating a digital scrapbook to better display your photos Storing and Sharing With all the photos you can take, you will want to share them with others and store them safely and securely so that people can view them any time. Be sure to label your photos. Correct labeling will help you find them and remember who, what , where and when. Choose at least one activity from the list on the following page. Your leader can help you choose and guide you through it. 18 Store photos on a CD Photos stored on a CD are not lost if your hard drive crashes, and are easily shared among friends and family. E-mail photos Send your photos to friends and family all over the world with e-mail! When saving photos for emailing, resolution size should be no more than 72 dpi. Upload photos to a website Online photo storage sites let you upload, store, manage and share photos with others. Set your privacy settings to “private” so your work is only viewed by people you approve. Print photos If you use quality photo paper, most home computer printers can produce high quality photographs. Many department stores have self-serve kiosks that can print your images. Digital Touch-ups Choose three of your photos which you would like to edit using post-processing software. While you are editing them, make sure that you use at least three of the following tools at some point: Blur/ Sharpen: The Blur tool removes detail from the selected area, drawing interest away from it. Sharpen has the opposite effect, and makes an area clearer and more eye-catching. Burn/ Dodge: The dodge tool takes darkness out of images. Burning adds dark to your images. Lightening shadows can enhance portraits, while darkening changes where the eye is drawn to. Clone: Displayed as a stamp, the clone tool is a fantastic way to rid your image of unwanted elements by cloning and copying from a different area of the image. Crop: Crop is best used to enhance your composition or to crop out distracting elements from your photos. Eye Dropper: The eye dropper allows you to sample colour from anywhere on your document. This is fantastic when trying to match colours from your photo or document. Layers & Masking: As you become more advanced with your editing, familiarize yourself with layers and masking. These tools enhance your ability to manipulate images in many ways. Patch: Used when a more seamless look is required when copying from one area to another. Great for wrinkles & blemishes. Text: The text tool allows you to add text to your images, such as names, dates, slogans, anything you’d like! Mouse Message! Always keep a separate copy of any photos you edit! You may want to return to a picture at a later time to try out a new editing trick you’ve learned, but if you don’t have the original version of the photo you may be out of luck! 19 ! Scrapping it Together Just like the cameras you’ve used in this manual, scrapbooks and photo albums have gone digital too! Using digital scrapbooking software, create a small 2-3 page scrapbook to display some of your best photos. Digital Scrapbooking Tips Choose a theme for your scrapbook, and try to choose photos and scrapbook graphics that relate to your theme. Use a variety of page designs and layouts to keep your scrapbook interesting. Don’t get so caught up in digital doo-dads that you bury your pictures beneath your graphics! Find a balance between pictures and graphics. Crop out unnecessary parts of your photos to enhance their composition and make the most of the space that you have. Change the colour scheme of your scrapbook to set the “mood” or “feeling.” Use text to tell the who, what, when, where and why of your pictures. Dig it! How did you store or share your photos? List one thing you liked about the method you chose and why you liked it, and one part of it that you didn’t like. What could you do to get around the part that you didn’t like? _________________________________________________ _________________________________________________ _________________________________________________ While you were enhancing your photos, did you find any tools that you found to be more helpful than others? Describe the tool that you found the most useful, or the most important and why you feel that way. ________________________________________________ ________________________________________________ Looking over your scrapbook, what is your favourite part about how it turned out? What do you like about it? If you did this scrapbook over again, what would you add to it or do differently, and why is that? ________________________________________________ ________________________________________________ What’s Next? You have completed all of the Discovering Digital Photography builders! You should now understand how to use your camera, and how to take great pictures! Complete your Portfolio Pages with your leader. The Showcase Challenge is next! 20 Showcase Challenge Bringing it all together! Now that you have finished this project, it is time to think about how you will share your experiences and knowledge with others. You may put your new skills to work by helping at a community event or at your club Achievement or teaching others about your topic. The goal of the Showcase Challenge is to help highlight your new skills and help you understand how you can use them. It can be an opportunity to receive feedback from others on your project. So go back through your manual and find some highlights of your learning (what you are proud of) and think about how you will “showcase” it. Dream It! Here are some Showcase Challenge Suggestions: Demonstrate something you made or learned about Make a pamphlet Give a speech Make a poster or display Make a computer presentation (e.g. PowerPoint) Write a report Use your new skills to help with the Or come up with your own idea. It is Club Achievement plans up to you and your leader! My Showcase Challenge Plan My showcase idea: __________________________________________________________ ________________________________________________________________________ What materials and resources do I need? _________________________________________ ________________________________________________________________________ Who do I need to help me? ___________________________________________________ ________________________________________________________________________ When do I need to have things done by? _________________________________________ ________________________________________________________________________ 21 Do It! Insert or attach your finished product or a photo of you sharing your skills in your Showcase Challenge. Dig It! Now that you have showcased your project skills; How did your Showcase Challenge go? What would you do differently next time? How will you use your new skills in the future? (in different situations?) 22 My 4-H Portfolio Page Name: __________________ Date: _____________ Year in 4-H: ____ Club: _____________ Hours Spent on 4-H: ____(Project and Other 4-H Activities) Discovering Teams Project Skills Chart To be completed by the leader and the member based on observations and conversations throughout the project. Skill Builder 1 Members will be able to… We know this because… Each Builder had a Skills Checklist which identified the skill you will learn. Identify activities completed and record observations and information from discussions about activities. Recognize hazardous situations Use professional courtesies Properly prepare for outings Recognize a point-and-shoot camera from a DSLR camera Name and understand the function of basic camera parts Use basic camera features 2 3 4 5 6 Showcase Challenge Understand how cameras record images Identify lighting situations Use exposure settings Safely handle a camera in many environments Clean and maintain camera Identify suitable batteries and memory cards Make use of “the rule of thirds” Use different lighting effects Use different perspectives Safely store digital photos Use photo-enhancing software Create a digital scrapbook Explain Success in using the skills listed above Additional Comments/Activities: Leader Point of Praise! I am most impressed by… I acknowledge that the member has completed the 4-H project requirements. Leader’s Signature: _______________________________ 23 Above and Beyond! In addition to project skills, 4-H also increases skills in meeting management, communications, leadership, community involvement through participation in club, area, or provincial 4-H events or activities. List below any activities you participated in this year in 4-H. (Some examples include Executive Positions Held, Workshops, Communication, Community Service, Rally, Bonspiels, Conferences, Judging, Camps, Trips, Awards, Representation to Area or Provincial Councils, etc) _____________________________________ _______________________________________ _____________________________________ _______________________________________ _____________________________________ _______________________________________ _____________________________________ _______________________________________ _____________________________________ _______________________________________ _____________________________________ _______________________________________ **Feel Free to add additional pages that include awards, certificates, new clippings, photos or other items that describe your 4-H involvement. Member Point of Pride! What I learned… What I need to improve on… What I want others to notice… Member’s Signature: _______________________________ Point of Praise! Another’s perspective on your achievements in 4-H. (community professionals, MAFRI staff, 4-H club head leaders, 4-H Ambassadors, friends of 4-H) I am most impressed by… I believe that you have learned… In the future I encourage you to… Signature: _______________________________ 24 4-H Achievement 4-H Achievement is… a 4-H club celebration when members have completed their projects. Achievements are planned by the club to give recognition to members and leaders for their accomplishments in their 4-H projects and club activities. A 4-H Achievement can take many different formats: from choosing a theme, to member project displays, to members using their new skills for the event (entertainment, food, decorating, photographer, etc.), to members presenting their project to the whole group, the options are endless and open to the creativity of the members and leaders in each club! Clubs may also plan their Achievement to promote 4-H to the community or to recognize sponsors and others who have helped the club. Members and leaders - be sure to check your project books for the project completion requirements, so you will be ready for your club’s Achievement celebration! If you have any questions, comments or suggestions for this or other 4-H projects contact: Manitoba 4-H Projects Manitoba Agriculture Food and Rural Initiatives 1129 Queens Avenue Brandon, MB R7A 1L9 Email: [email protected] Phone: 204-726-6613 Fax: 204-726-6260 This manual is for educational use only and is not intended as professional advice. For more information about 4-H and the many 4-H opportunities available please visit http://www.gov.mb.ca/agriculture/4-h/ What is 4-H? 4-H is an international youth organization involving more than 7 million members in 80 countries around the world. In Canada, 4-H began in 1913 in Roland, Manitoba as a communitybased organization dedicated to growth and development of rural youth. Today’s 4-H program reaches both farm and non-farm youth across Canada. The motto of “Learn to Do by Doing” is embodied in the program, as 4-H focuses on skill development as well as personal development of life skills such as communications, leadership and citizenship. 4-H Motto “Learn To Do by Doing” 4-H Pledge I pledge, My HEAD to clearer thinking, My HEART to greater loyalty, My HANDS to greater service, My HEALTH to better living, For my club, my community, and my country. 4-H Quality Equation Principles Quality People Promote responsibility, respect, trust, honesty, fairness, sportsmanship, citizenship, teamwork and caring. Quality Experiences Provide members with personal development and skill development experiences. Quality Projects Promote and value quality effort. Promote high quality, safe food production within industry standards. Manitoba 4-H project material is developed by Manitoba Agriculture, Food and Rural Initiatives (MAFRI)