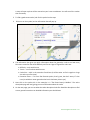
1
Leaders Manual 4-H Outdoor Living Series Discovering Geocaching Learning is 3D! To help you get the most out of your learning, each project meeting has Dig It the following parts: Dream it! Plan for success Do it! Hands on learning Dig it! What did you learn? Dream It Do It What Skills Will You Learn? To complete this project, members must: Spend a minimum of 15 - 20 hours completing the project work. Complete the listed activities, OR a similar activity that focuses on the same skills, as you and your members may plan other activities. Plan and complete the Showcase Challenge Complete the Portfolio Page. Participate in your club’s Achievement (see the inside back cover for more information about 4-H Achievement). This project is being offered in Manitoba, with permission from Saskatchewan 4-H Council. Achievement (project completion) requirements for 4-H Manitoba apply to this project and are described above. The amount of time spent on project work may exceed the minimum 15 hours, depending on the project that you have chosen and the activities within the project. This project was selected to be offered by 4-H Manitoba because it provides members with the opportunity to meet Manitoba 4-H project learning objectives. These objectives include technical skills, communication, meeting management, leadership skills, as well as community involvement and real world experiences. Showcase Challenge and My Portfolio Page At the end of the member’s section are the “Showcase Challenge” and “My Portfolio Page”. The “Showcase Challenge” page gets members to think about their accomplishments and explain or demonstrate how they were successful. There is information to help them decide how they will best “Showcase” their learning to family and friends. Record Keeping is an important part of every 4-H project. “My Portfolio Page” is used to keep track of members’ 4-H experiences. As each member learns skills this is recorded on the portfolio page. When the Portfolio Page has been completed and confirmed by the leader, then it becomes a record of the member’s completion of the project and participation in other 4-H activities beyond the project. 2 Leaders Information Page 4-H leader assessment of members will occur throughout the project as you observe the progress and learning of each member. Record what you see and hear. Your feedback should be positive and specific (not just “well done”). Share feedback with members often so they can act on your suggestions. How you choose to observe and record is up to you. Remember that members may improve throughout the project year and that records should be updated to reflect when they showed their best learning. Projects promote technical, communication, meeting management, and leadership skills, as well as community involvement and real-world experiences. In addition to the specific skills members are to learn in each activity, these learning goals for members are important: Following instructions - Working with others - Using supplies safely - Using the key words - Improving with Practice - Respecting timelines. 4-H LEADER TIPS FOR SUCCESS! Page 2 in each guide summarizes what the member must do to complete the project. Depending on time available, groups size and member abilities, you may wish to break the activities in each section into more than one project meeting. The internet has lots of interesting websites and educational activities. We do not endorse any website or any products they may sell. Information/products will be used at your own discretion. Safety is a number one priority. Care has been taken to create safe, age appropriate activities throughout this manual. As leaders, it is important for you to emphasize safety rules and adapt activities to safely match your members’ abilities. Ensure members have a good understanding of safe practices when using tools, that they use the right safety equipment when necessary, and that good supervision is provided. A quality experience needs to be a safe experience. The multiple intelligences theory teaches us that people learn in at least 8 different ways. All individuals will be stronger in some ways of “intelligences” and weaker in others. It follows that the more ways we teach, the more members we will reach. Throughout this project, you will find a mix of teaching and learning methods. Teaching projects using a broad blend will help increase the learning potential of all members. Projects are designed to teach many skills, but the 4-H member is always more important that the subject matter. Stress cooperation in the activities to develop teamwork and cooperation skills. These are valuable life skills. Ensure the work is completed in a manner that members feel good about themselves and their efforts. This can be done by assigning tasks based on member’s individual abilities. Modelling and expecting supportive behaviour (i.e. no “put-downs”) in the group also contributes to a positive experience. 3 4-H LEADER TIPS FOR SUCCESS! There will be opportunity for experimentation and applying skills that members have learned throughout this project. Experimenting can be frustrating, but learning through trial and error is an important life skill. Explain to members that is is alright to either go on to the next activity or do the activity again if they need the practice. Help the members work through their challenges until they are satisfied with the final results. Creating inventive 4-H members will be very rewarding. Celebrating success is an important but sometimes overlooked part of our lives. We encourage you to use the final section to empower the members by celebrating all they have learned in a fun manner. Anything that you do to add to the spirit of fun and the sense of accomplishment of each member will likely be remembered as the highlight of their 4-H year. Have fun and thanks for your belief in young people! Showcase Challenge Have members use their Member Manual to help them in organizing what they have learned. The form of the showcase can vary according to the wishes of the members and leaders, and the member’s ability. Information could be presented in many forms, some of which are: posters, pamphlets, written reports, speeches, computer presentations displays, etc. Suggestions are listed on the Showcase Challenge page at the back of the Member Manual. The best results are almost always obtained when members are allowed to present their information in the style of their choice. Portfolio Page Once members have completed all the activities they will have a lot of information recorded in their manuals. These are products of their learning. As a final exercise in the project, members and leaders will pull together all this learning in completing the Portfolio Page in the Member Manual. Members and leaders must indicate how they know the member was successful at a particular skill. Leaders will find evidence if they think about what they have observed members doing, what discussions they have had with members, and what the members have produced. If leaders think that members need to go back and improve on any skill, this chart helps them clarify what needs to be done. 4 Showcase Challenge Bringing it all together! Now that you have finished this project, it is time to think about how you will share your experiences and knowledge with others. You may put your new skills to work by helping at a community event or at your club Achievement or teaching others about your topic. The goal of the Showcase Challenge is to help highlight your new skills and help you understand how you can use them. It can be an opportunity to receive feedback from others on your project. So go back through your manual and find some highlights of your learning (what you are proud of) and think about how you will “showcase” it. Dream It! Here are some Showcase Challenge Suggestions: Demonstrate something you made or learned about Act out a play Teach a class Use your new skills to help with the Or come up with your own idea. It is Club Achievement plans up to you and your leader! Make a poster or display Make a video or slideshow Organize a special event My Showcase Challenge Plan My showcase idea: __________________________________________________________ ________________________________________________________________________ What materials and resources do I need? _________________________________________ ________________________________________________________________________ Who do I need to help me? ___________________________________________________ ________________________________________________________________________ When do I need to have things done by? _________________________________________ ________________________________________________________________________ Do It! Insert or attach your finished product or a photo of you sharing your skills in your Showcase Challenge. Dig It! Now that you have showcased your project skills; How did your Showcase Challenge go? What would you do differently next time? How will you use your new skills in the future? (in different situations?) Above and Beyond! In addition to project skills, 4-H also increases skills in meeting management, communications, leadership, community involvement through participation in club, area, or provincial 4-H events or activities. List below any activities you participated in this year in 4-H. (Some examples include Executive Positions Held, Workshops, Communication, Community Service, Rally, Bonspiels, Conferences, Judging, Camps, Trips, Awards, Representation to Area or Provincial Councils, etc) _____________________________________ _______________________________________ _____________________________________ _______________________________________ _____________________________________ _______________________________________ _____________________________________ _______________________________________ _____________________________________ _______________________________________ _____________________________________ _______________________________________ **Feel Free to add additional pages that include awards, certificates, new clippings, photos or other items that describe your 4-H involvement. Member Point of Pride! What I learned… What I need to improve on… What I want others to notice… Member’s Signature: _______________________________ Point of Praise! Another’s perspective on your achievements in 4-H. (community professionals, MAFRI staff, 4-H club head leaders, 4-H Ambassadors, friends of 4-H) I am most impressed by… I believe that you have learned… In the future I encourage you to… Signature: _______________________________ 24 4-H Achievement 4-H Achievement is… a 4-H club celebration when members have completed their projects. Achievements are planned by the club to give recognition to members and leaders for their accomplishments in their 4-H projects and club activities. A 4-H Achievement can take many different formats: from choosing a theme, to member project displays, to members using their new skills for the event (entertainment, food, decorating, photographer, etc.), to members presenting their project to the whole group, the options are endless and open to the creativity of the members and leaders in each club! Clubs may also plan their Achievement to promote 4-H to the community or to recognize sponsors and others who have helped the club. Members and leaders - be sure to check your project books for the project completion requirements, so you will be ready for your club’s Achievement celebration! If you have any questions, comments or suggestions for this or other 4-H projects contact: Manitoba 4-H Projects Manitoba Agriculture Food and Rural Development 1129 Queens Avenue Brandon, MB R7A 1L9 Email: [email protected] Phone: 204-726-6613 Fax: 204-726-6260 This manual is for educational use only and is not intended as professional advice. For more information about 4-H and the many 4-H opportunities available please visit http://www.gov.mb.ca/agriculture/4-h/ What is 4-H? 4-H is an international youth organization involving more than 7 million members in 80 countries around the world. In Canada, 4-H began in 1913 in Roland, Manitoba as a communitybased organization dedicated to growth and development of rural youth. Today’s 4-H program reaches both farm and non-farm youth across Canada. The motto of “Learn to Do by Doing” is embodied in the program, as 4-H focuses on skill development as well as personal development of life skills such as communications, leadership and citizenship. 4-H Motto “Learn To Do by Doing” 4-H Pledge I pledge, My HEAD to clearer thinking, My HEART to greater loyalty, My HANDS to larger service, My HEALTH to better living, For my club, my community, and my country. 4-H Quality Equation Principles Quality People Promote responsibility, respect, trust, honesty, fairness, sportsmanship, citizenship, teamwork and caring. Quality Experiences Provide members with personal development and skill development experiences. Quality Projects Promote and value quality effort. Promote high quality, safe food production within industry standards. Manitoba 4-H project material is developed by Manitoba Agriculture, Food and Rural Development (MAFRD) 4-H MOTTO Learn to do by doing. 4-H PLEDGE I pledge My HEAD to clearer thinking, My HEART to greater loyalty, My HANDS to larger service, My HEALTH to better living, For my club, my community and my country. 4-H GRACE (Tune of Auld Lang Syne) We thank thee, Lord, for blessings great On this, our own fair land. Teach us to serve thee joyfully, With head, heart, health and hand. This project was developed through funds provided by the Canadian Agricultural Adaptation Program (CAAP). No portion of this manual may be reproduced without written permission from the Saskatchewan 4-H Council, phone 306-933-7727, email: [email protected]. Developed in July 2013. Writer: AnnMarie Nielsen Cover image: Signal the Frog is the official Groundspeak mascot. Used with permission. Table of Contents Introduction Objectives ............................................................................................................................. 1 Resource and Material Requirements .................................................................................. 1 Getting the Most from this Project ...................................................................................... 1 Achievement Requirements ................................................................................................. 2 What is Geocaching? ............................................................................................................ 2 What is a GPS Device? .......................................................................................................... 3 Outdoor Safety ..................................................................................................................... 4 Online Safety ........................................................................................................................ 5 Where to Learn More ........................................................................................................... 5 Unit 1 – A Little Background How Geocaching Began ........................................................................................................ 7 Understanding Latitude and Longitude ................................................................................ 8 How do Satellites and Imaginary Lines Help me Find Anything? ......................................... 9 Buying a GPS Device for Geocaching .................................................................................... 10 Most Commonly Used GPS Devices for Geocaching ............................................................ 14 Using a Smartphone as a GPS Device ................................................................................... 16 Benefits of Geocaching ......................................................................................................... 17 Geocaching Rules ................................................................................................................. 19 Geocaching Etiquette (Geocachers’ Creed) .......................................................................... 19 Unit 2 – Finding Your First Geocache Creating a Geocaching Account ............................................................................................ 23 How to Choose Your First Geocache .................................................................................... 26 What to Bring with You (What I can trade?) ........................................................................ 30 Setting a goto on your GPS Device ....................................................................................... 30 The Hunt Begins! .................................................................................................................. 31 Do I Have to be Sneaky when I’m Geocaching? ................................................................... 32 What do I do When I Find the Cache? .................................................................................. 32 What if I don’t find the Cache? ............................................................................................. 33 Logging Your Find Online ...................................................................................................... 33 Unit 3 – Beyond the Basics Learning the Lingo – Special Terms ...................................................................................... 35 More About Geocache Listing Details .................................................................................. 36 What are Trackable Items and What do I do with Them? .................................................... 37 GPS Device Features – What else can it do? ........................................................................ 41 Recalibrating ......................................................................................................................... 43 What is a Topographic Map and do I need it? ..................................................................... 43 Unit 4 – Hunting Geocaches The Geobag ........................................................................................................................... 44 Geocache Sizes ..................................................................................................................... 45 Types of Geocaches .............................................................................................................. 50 Geocaching at Night ............................................................................................................. 54 Geocache Ratings – Is this a good cache for me? ................................................................ 54 Tags ....................................................................................................................................... 56 Unit 5 – Geocachers and the Environment ................................................................................ 57 Cache In Trash Out (CITO) .................................................................................................... 57 Taking Care of the Geocachers’ Playground ......................................................................... 59 Unit 6 – Hiding Geocaches ......................................................................................................... 60 Choosing a Location .............................................................................................................. 60 Making a Cache Container .................................................................................................... 62 Publishing Geocaches ........................................................................................................... 64 Reviewers ............................................................................................................................. 66 Unit 7 – Other GPS-based Activities .......................................................................................... 67 Waymarking .......................................................................................................................... 67 Munzee ................................................................................................................................. 67 BIT Caches™ .......................................................................................................................... 67 Resources Geocaching Associations and Discussion Forums ................................................................ 68 Canadian Businesses that Sell Geocaching Supplies ............................................................ 69 Downloadable Cache Notes and Labels ............................................................................... 69 Cache Note ........................................................................................................................... 70 Glossary ...................................................................................................................................... 71 Introduction Objectives Upon successful completion of this project, members should be able to: • Use a geocaching website for all tasks related to geocaching. • Understand how a GPS device works. • Use the different functions of a handheld GPS device for geocaching. • Successfully find a variety of geocaches in different types of terrain . • Understand the six (traditional, multi, unknown, CITO, earth, event) most common types of geocaches. • Understand and use appropriately ten common geocaching abbreviations (FTF, TFTC, TN, LN, SL, STF, DNF, BYOP, GZ, CITO). • Plan and prepare for safe geocaching outings. • Understand and apply the guidelines for creating and hiding geocaches. • Participate in geocaching with respect for landowners and the environment. • Enjoy geocaching and its benefits! Resource and Material Requirements • At least one GPS device per two members; ideally each member will have his/her own to use during meetings. • Use of a desktop or laptop computer, or notepad with access to the internet, as well as a printer. • First aid kit, plus emergency items appropriate to the needs of the region (such as a tick removal tool). • Geocache creation supplies: camouflage tape or paint, Geocache stickers (not strictly necessary, but advised), log books (or materials to make them – paper, staples, scissors), small trinkets for trading, natural materials (bark, pine needles, pine cones, feathers, etc.), and weather-proof glue. • Volunteer drivers on several occasions. Getting the Most from this Project • Attend club activities regularly. • Listen and ask questions. You will learn from other members as well as your leaders. • Learn to use your GPS device – geocaching is more fun when you can load and use the GPS device yourself. Geocaching Resource Guide • 1 • Find a local or provincial geocaching association that has an online discussion forum – chances are good that any of your geocaching-related questions have already been asked and answered in a discussion forum. • Take note of any geocaches that you especially enjoy finding, and think about the reasons. That knowledge can help you decide what kind of geocaches you would like to place yourself. • Learn about local geological features (such as bogs, forests, ravines, rivers, etc.), and learn how to get through or around them safely. • Learn about local flora and fauna (plants and animals), especially those that may be harmful (such as stinging nettle, poison ivy, poison sumac, giant hogweed, ticks, bears, elk, badgers, etc.), and how to recognize and avoid them. Achievement Requirements • • • • • • • • • • • A completed record book. Describe at least three safety habits that geoachers should follow when in the outdoors. Describe one safety habit that geocachers should follow when communicating online. Create a muggle card or pamphlet to explain geocaching. Describe or demonstrate how satellites make geocaching possible. Create a geocaching account. Explain your choice of geoname. Describe four types of geocaches. At least one must be a type of event. Load at least 10 geocaches onto a GPS device. Use a GPS device to find at least five geocaches and log them online. Create at least three different sizes and styles of geocaches that include the required elements. Hide at least two geocaches in two different ways (take photos of the hides when being placed). Create cache pages and publish the caches. • Explain at least two ways that geocachers can help to protect the environment. • Participate in an environmental clean-up (official CITO, if possible). What is geocaching? First, let’s be sure you know how to pronounce the word. In most of the world, it’s “gee-oh-kash-ing”. In Australia, however, they call it “gee-oh-kay-shing”. Geocaching is often described as a high-tech treasure hunt or an outdoor scavenger hunt. Both are good comparisons. Geocaching is an outdoor (mostly) game where players use a GPS device to find their way to an area where a container is hidden, and then they try to find the container. 2 • Geocaching Resource Guide Video YouTube GoGeocaching channel: What is Geocaching? It sounds simple and easy, doesn’t it? After all, how hard can it be to find a container when you have equipment that points an arrow directly to where a geocache (often called just “cache”) is hidden? Many caches are easy to find, to be sure. However, many factors can make it more difficult to find. Some caches are very tiny; some are placed in a challenging spot, such as up a tree; some are camouflaged extremely well; and some require solving a puzzle or a riddle. Geocaches are hidden in all kinds of places, from rarely visited backcountry forests and hiking trails to city parks and streets. They are hidden by geocachers around the world (usually after they have found several geocaches themselves first). What is a GPS device? A GPS device is a piece of electronic equipment that can tell you where you are located, and how far you are from your destination. It usually shows your location using coordinates, given in latitude and longitude (you will learn more about that later). It works by using a network of satellites called the Global Positioning System (GPS). Thirty GPS satellites orbit the earth, and as long as at least three of them can be “seen” by a GPS device, the device can calculate where on earth it is. GPS technology is used for all forms of navigation: planes, trains, boats, cars and people on foot. Different features are included with different types of GPS devices, depending on what is needed. Some GPS devices have specialized maps, electronic compasses or voice navigation (like a car GPS). Some even have built-in digital or video cameras. If I use a GPS device, can someone track where I am? Not at all! GPS devices only receive signals. They do not send any signals out. Geocaching Resource Guide • 3 Outdoor Safety Geocaching is fun, and it is easy to get caught up in hunting for “just one more.” But because you are outdoors (whether in the country or a town or city), there are a few rules you should always remember. Think about the places you might go when geocaching and the possible dangers. The following are a few situations that geocachers sometimes find themselves in. What could go wrong? How could they be handled better? • “Sure, the sign says ‘No Trespassing’, but the shortest way to the cache is through that field. I won’t be long – no one will ever know I was here.” • “It’s getting dark and I didn’t bring my flashlight, but if I do just two more caches, then I’ll have found them all in this area.” • “I know that there is a bridge further up the trail, but the cache is just across this river. That log looks pretty solid. Why should I go all the way to the bridge and back down the other side?” • “A new cache was just published! If I rush out now, I can be the first one to get it. No one is at home, and I don’t want to waste time writing a note. And anyway, I’m sure I’ll be right back.” Situations like these can quickly lead to trouble and even danger. It is important to make safe choices and to respect other people’s property. Here are a few tips: • Dress appropriately for the weather as it is when you start out, as well as for what it is predicted to be later in the day, if you’re going out for a long time. • Always tell someone (preferably an adult) where you’re going, when you’re leaving, and when you expect to be back. If possible, bring a friend with you! • Respect the power of nature. Do not plan for a long trip outside if weather warnings are in effect for storms, extreme heat or cold, or high winds. Geocaching can wait for better weather. • Respect your own physical limits. For example, if you have a sprained wrist, tree climbing can wait until you are sure you can manage the climb up and back down. • Remember that trails and natural areas are used for different activities. If you are on foot, ATV or snowmobile riders may use the trail as you, and they may not be watching for hikers. During hunting seasons, stay away from known popular hunting areas, and be sure to wear a bright cap or jacket when you are in any forested area. • If you plan to be out for a few hours or more, bring a filled water bottle and backpack with food and extra clothing (a change of dry clothes and a rain jacket are good ideas), a first aid kit, sunscreen and a cell phone. A map of the area would be helpful, especially if it’s an area that you are not familiar with. • Always ask permission if you want to go on someone else’s land. If “No Trespassing” signs are posted, and you don’t know who the land owner is, obey the signs! No geocache is worth putting yourself or your geocaching partners in danger! 4 • Geocaching Resource Guide Online Safety To participate in geocaching requires going online to download cache listings and to record your finds. As well, many geocaching associations have websites with discussion forums, and social media sites like Facebook or Tumblr have open or private groups for geocachers. It can be helpful to chat with other geocachers from other areas—for example, you can learn about local events—but you do need to ensure your own safety, as well as the safety of your fellow club members. Use the following guidelines: • NEVER give any personal information (names, addresses, phone numbers, birthdate, what school you attend, etc.) to the questions you post online (most geocachers will come to know you by your geocaching name, anyway). • ALWAYS REMEMBER the person you are talking to in a forum may not be the person they claim to be. • When using social networking sites like Facebook or Tumblr, set your on-line profile to private, and never friend anyone whom you don’t know or trust. That way, the only people who will be able to see your profile will be those that you approve. Don’t give out your passwords to anyone but your parent or guardian. And never privately meet anyone that you just met on these sites. • If anything happens on-line that makes you feel scared, uncomfortable, or creeped out, ALWAYS tell your parent or guardian. Always report any inappropriate comments or messages if they violate the terms of service for that site. Where to Learn More People • Other geocachers are almost always happy to share tips. Books and magazines • FTF Geocacher (www.ftfgeocacher.com) • Geocaching for Dummies by Joel McNamara (Indianapolis: Wiley Publishing Inc., 2004). Websites, blogs or online forums • • • • • • Geocaching.com Groundspeak Discussion Forum (go to geocaching.com, select “Community”, then “Discussion Forums”) The Geocaching Blog (blog.geocaching.com) Geocacher-u.com (Geocacher University) Provincial geocaching association websites (complete list in Additional Resources) YouTube – GoGeocaching channel has many instructional videos in geocaching skills (some are listed throughout this book where they are useful to help explain a concept) • ACGA Geocaching Articles and Tutorials (atlanticgeocaching.com/index.php/2012-03-05-22-43 -59/articles-a-tutorials) • Geocaching Wiki (geocaching.wikia.com) Geocaching Resource Guide • 5 Organizations • National and provincial park staff can tell you what kinds of plants and animals in the area you should be cautious of. • Municipality offices can give you information about land ownership, as well as any policies they may have about geocaching on municipal property (town parks, community pastures, etc.) 6 • Geocaching Resource Guide Unit 1 A Little Background How Geocaching Began Geocaching started on May 3, 2000, when Dave Ulmer hid the first geocache near Beavercreek, Oregon, USA. However, he didn’t call it a geocache then, and he wasn’t even sure that anyone would try to find it. To get the full story, we have to back up a little bit. To be able to geocache, you need a GPS device, which shows where you are with the help of satellites orbiting Earth. The first satellites were launched by the United States, and before May 2, 2000, the signals from the satellites were meant for American military use only. Other GPS devices could receive the satellite signals, but they were degraded, or weaker than, the military signals. The accuracy of nonmilitary GPS receivers was about 100 meters – with an area that big to search in, you could not reasonably find anything smaller than a house. Mr. Ulmer was curious. He wanted to know if the Can I still find the first geocache? satellite signals and GPS devices were strong enough to Mr. Ulmer’s first geocache is allow someone to find something small, so he hid a black gone, but a plaque has been put bucket in the woods. He filled it with prizes, and he added on the site. A new geocache, a notebook and pen so that he could see how many Original Stash Tribute Plaque people found it. He recorded the latitude and longitude (GCGV0P), was placed nearby. (we’re getting to that in the next section!) with his GPS receiver, and then he posted that information in an Internet discussion group. He called it a “GPS stash”, and he added one rule for anyone who might find it: “Take some stuff. Leave some stuff.” In only three days, two people found his stash and wrote about it online. Other people heard about it, and they did the same thing. Videos YouTube GoGeocaching channel: • Geocaching.com Presents: A Brief History of Geocaching • This Is Groundspeak • Highest & Lowest Cache The first person to find Mr. Ulmer’s stash was Mike Teague. He liked the idea so much that started keeping a list on his own website of all the stashes that other people were posting, calling it the “GPS Stash Hunt”. People signed up to have the list emailed to them. More and more stashes were being hidden, and soon, Mr. Teague’s home page and email list could not keep Geocaching Resource Guide • 7 up. Another early stash-hunter, Jeremy Irish, created a website dedicated to the activity. Someone had earlier suggested calling the new activity geocaching instead of “stash-hunting” (“geo” refers to Earth, and “cache” is the French word for “hide”, as well as a word related to computers), so Mr. Irish called his website www.geocaching.com. It was launched on September 2, 2000, just four months after the very first stash was hidden. It had 75 geocaches listed from around the world. By February 2013, over two million geocaches were listed on www.geocaching.com, in 184 countries. There are now geocaches in Antarctica, deep in the ocean and even one orbiting Earth: International Space Station (GC1BE91). Canada’s first geocache Geocache – Canada’s 1st geocache (GCBBA) which was placed near Chester, Nova Scotia, on June 28, 2000, is still active. Understanding Latitude and Longitude Latitude and longitude are imaginary lines that go around Earth, in two different directions. Latitude lines are parallel to the equator. Longitude lines are far apart at the equator and get closer together until they meet at the North Pole and the South Pole. Longitude lines look like the lines on a basketball. Latitude lines measure how far north or south a place is from the equator. Longitude lines measure how far east or west a place is from the Prime Meridian (a line that runs through Greenwich, England, that was chosen to be the starting longitude line). Because each of these lines makes a big circle, they are measured in degrees. Degrees are divided like a clock into 60 minutes (') and 60 seconds (") to help pinpoint a place between each line. Latitude starts as 0° at the equator and ends as 90° at the poles. Each line is about 111 km apart. Longitude starts at 0° at the Prime Meridian, and goes up to 180° at the International Date Line (directly opposite the Prime Meridian). At their widest point (the equator), longitude lines are also about 111 km apart. 8 • Geocaching Resource Guide Using this system, every place on earth has a unique combination of measurements that show where it is. It can be written a few different ways, but latitude always comes first. Sometimes north, south, east or west is shown by using N, S, E or W after or before the degrees. In decimal degrees format, east and south are sometimes shown with a minus sign. The latitude and longitude measurements are separated by just a space. Format Latitude Longitude Degrees, Minutes, Seconds (DMS) DD°MM'SS.SS"N DDD°MM'SS.SS"W *Degrees, Decimal Minutes (DDM) NDD°MM.MMM’ WDD°MM.MMM’ Decimal Degrees (DD) DD.DDDDDD° -DDD.DDDDDD° For a real-life example, the Credit Union Centre in Saskatoon is at: • 52°11'21.35"N 106°40'44.55"W • N52° 11.356' W106° 40.743' • 52.189264° -106.679042° *It’s a bit confusing, isn’t it? Just remember, most of the time in geocaching, DDM format is used (N52° 11.356' W106° 40.743'). Don’t be fooled if you find a cache listing that uses a different format! How do Satellites and Imaginary Lines Help me Find Anything? A GPS device works like a radio. Just as a radio receives signals that are broadcast from many different radio stations, a GPS device receives signals that are broadcast from many different satellites. A radio can use only one signal at once, but a GPS device uses many signals at the same time, and the more signals it gets, the better it works. Thirty GPS satellites constantly orbit Earth, and each one regularly sends out a signal at light speed about its location (latitude and longitude) and the exact time that it sent the signal. When a GPS device receives signals from at least three different satellites, it can read how long it took the signal to reach it, and it uses that information to calculate your location. This process is called trilateration. The picture to the right shows how it works. Satellite Satellit Satellite Imagine you are standing anywhere on Earth. There are at least three satellites in the sky above you. If Geocaching Resource Guide • 9 you know how far away you are from satellite A, then you know you must be standing somewhere on the dashed circle. If you also know how far away you are from satellites B and C, you can figure out where you are by seeing where the three circles come together. A GPS device does the same thing, except that it uses spheres (so it can also calculate your altitude, or how high above sea level you are). And of course, it does it much faster than any human can! The more satellites that your GPS device can “see” (all the ones that are above the horizon, with no mountains, thick trees or tall buildings in the way), the more accurate it will be when it calculates where you are. The GPS satellites are not the only ones in orbit. A network of 24 Russian satellites, called Global Navigation Satellite System (GLONASS), became fully functional in 2012. Most North American GPS devices cannot receive GLONASS satellite signals yet, but as GPS device models are updated, they will probably include GLONASS. More satellites mean more reliable information and speedier GPS devices. Buying a GPS Device for Geocaching GPS technology is used for all forms of navigation – planes, trains, boats, cars – and activities, such as hiking, running, mountaineering, fishing, hunting and, of course, geocaching. Different features are included with different types of GPS devices, depending on what it will be used for. For geocaching, the type of GPS device you need is a handheld. Many options for handheld GPS devices are available, so it can be confusing to know which one to pick. Start by asking yourself: • How much am I willing to spend? New handheld GPS devices are priced anywhere between $100 and $700. • How much am I going to use this device? If you plan to use it only occasionally, it may not make sense to buy an expensive model. • How good is my eyesight? It may seem like a funny question. But the screen size on some models is quite small. Other models can be difficult to see in bright sunlight. It doesn’t help to buy a cheaper model, if you can’t see the screen. 10 • Geocaching Resource Guide Can’t I just use the car GPS device that I already have? Many people have GPS devices for car navigation, and some people try to use them for geocaching. For most car GPS devices, this is not a good idea. Car GPS devices are meant to be used where it is dry, so if they get even a little bit wet, they could be ruined. Also, many car GPS devices have something called a “snap to road” feature: if you take it away from a road, it thinks that something has gone wrong with the satellite signal, and it tries to estimate your location by forcing the displayed position back to the nearest road. As you can imagine, this is a problem if you are trying to find a container in the woods. • Do I want to use the device for other purposes? Many GPS devices include a built-in digital camera. If you like to take photos of your geocaching adventures, this feature can save the extra baggage of a separate camera. One model can also act as a car GPS device. Of course, you do not have to buy a new GPS device. If you prefer to look for something second-hand, you may be able to find discontinued models on websites such as ebay.ca or kijiji.ca. You may also be able to find second-hand devices privately if you ask around on local geocaching discussion forums, Facebook groups for geocachers in your area or the Groundspeak forum (GPS Garage Sale thread). Whether you buy new or second-hand, you should learn about the options available. Following is a list of features that are most helpful for geocaching. High-sensitivity receiver Most newer GPS devices are equipped with a receiver that provides better accuracy than older devices. With a high-sensitivity receiver, the GPS device will be accurate up to 3-5 metres. Without it, most GPS devices are accurate up to about 15 metres. The less accurate the GPS device is, the larger the area is that you will have to search for the cache. Look for a GPS device that has a “high-sensitivity receiver”, is “WAAS-enabled”, or that “tracks both GPS and GLONASS satellites.” Accuracy The two circles show the search areas with 5 metres and 15 metres accuracy. **Try standing in a parking lot and ask someone to measure 5 metres all around you and then 15 metres all around you to see the real-world difference. 5 metres accuracy 15 metres accuracy Waterproof Your GPS device has to be able to work in all types of weather, including rain and snow. After all, you don’t want to have to turn around and go back if you are halfway to a cache when it starts to rain. And accidents can happen to anyone, whether it be dropping a GPS device into a puddle or falling into a creek (geocachers call that “getting a soaker”). Most newer GPS devices, as well as many older models, are waterproof to IPX-7 standard. This means that they can stay under water to a depth of one meter for up to 30 minutes, long enough in most cases to let you scoop it up before it is damaged. Geocaching Resource Guide • 11 A few models are also buoyant – they will float on top of the water. If you plan to travel often to caches by water, you may want to look for a GPS device with this feature, but they are more expensive. Topographic maps A topographic map is one that shows the geographical features of an area. It shows you where there are steep hills, rivers, swamps, and so on. When you are trying to figure out the best way to get to a cache in an area that is new to you, having that information at your fingertips can save a lot of time and ensure your safety. Basic GPS devices have only what is called a base map, which does not show detailed information. This can be fine, if you are not a frequent geocacher, and you do not geocache often in unfamiliar areas. Some devices come with a topographic map already installed, and others have a micro SD card slot, so that you can use whichever topographic (or street) map you choose. If it comes with a preloaded map, you should check to be sure that it is updatable. Paperless geocaching This feature allows you to look at cache page details, such as the description, hints and past logs, directly on the GPS device. It also lets you record notes about the cache directly to your device (field notes) and upload them later, which is helpful if you are doing a lot of caches in one day. NOTE: you need a premium account with geocaching.com to be able to make the most use of this feature. Memory At least 500MB of memory will ensure that you can add enough cache listings, other waypoints and tracks to your GPS device to keep you going for a day of geocaching. Many devices also have a memory card slot that allows you to increase the basic memory of the unit (and make it easier to switch out maps). Long battery life A GPS device should operate anywhere from 10 to 20 hours on one set of batteries (usually two AA’s). Most GPS devices also have a suspend feature that dims the display if there has been no activity for a set amount of time. Breadcrumbs A very handy feature to have is a track log, or breadcrumb trail (on some GPS devices, the track even looks a little like bread crumbs). The device records the trail where you have walked. If you lose your way, you can just turn on your track log and follow your steps back. The following features can be nice to have, though they are not necessary. USB interface All newer GPS devices use USB cables to connect to your computer. If you are buying a discontinued model, you may want to look for one that uses USB cables instead of serial cables, since most computers 12 • Geocaching Resource Guide now have USB ports, rather than serial ports. (If you have no choice but to use a GPS device with a serial cable, serial/USB adapters are available.) Colour display Some GPS devices have only a monochrome screen, that is, only shades of grey. A colour display, especially transflective colour, is easier to see in bright sunlight, and can show more detail. Photo viewing Some cache listings include photos as part of the description. The cache description may not make much sense without seeing the photo, but not all GPS devices can display photos. 3-axis electronic compass Without this feature, you must hold your GPS device level in order for it to get an accurate reading of your location, and you must be moving for the device to know which direction you need to go to get to your destination. With a 3-axis electronic compass, even when you are standing still, the GPS device will be able to accurately point you in the right direction. Chirp reception A chirp is a small electronic unit (a bit bigger than a quarter) that wirelessly sends information that has been programmed into it by its owner. Only some GPS devices can receive chirp transmissions. Some cache owners use them as part of cache set-ups, but they must also provide another way for geocachers to get the same information. So while it may be fun to receive a chirp message, it is not necessary to have a GPS device that can do so. Wireless data sharing This allows information from one GPS device to be shared with another device (that can also send and receive wireless data). For example, if you are the only one in your geocaching group that downloaded a nearby new cache listing onto your GPS device, you could “beam” it to everyone else. Of course, it is useful only if other geocachers in your group have a device with the same feature. See Chart 1 for information about several GPS device models. The eTrex 10 or 20 and the Magellan eXplorist GC or 310 are often recommended by GPS reviewers as suitable starter GPS devices. A good website for detailed reviews of GPS devices is www.gpsinformation.net If you are looking for a second-hand unit, there is a good chance that you will come across discontinued models. Good models to look for (though they can be hard to find) are the Garmin eTrex Legend H and Garmin GPSMAP 60Cx. Geocaching Resource Guide • 13 Most Commonly Used GPS Devices for Geocaching These are GPS device models that are available (as of July 2013) and brief information about any unique features. If you are purchasing a new GPS device, be sure to check the specifications to be sure that you are getting what you want. Photo (base model) 14 • Geocaching Resource Guide Brand Model/Series Notes Garmin eTrex 10 eTrex 20 eTrex 30 • Base model is just over $100 • Uses both GPS and GLONASS satellite networks • eTrex 30 has electronic compass • 2.2” screen Garmin GPSMAP 62 GPSMAP 62s GPSMAP 62st GPSMAP 62sc GPSMAP 62stc • 62s and higher models have electronic compass • 62 sc and stc models have a built-in digital camera Garmin GPS 72H • Floats Garmin GPSMAP 78 GPSMAP 78s GPSMAP 78sc • 78s and 78sc have electronic compass • Floats Garmin Dakota 10 Dakota 20 • Touchscreen • Dakota 10 has 3-axis compass • Dakota 20 has electronic compass Garmin Oregon 450 Oregon 450t Oregon 550 Oregon 550t Oregon 600 Oregon 600t Oregon 650 Oregon 650t Garmin Montana 600 Montana 650 Montana 650t Magellan eXplorist GC eXplorist 310 eXplorist 510 eXplorist 610 eXplorist 710 • Touchscreen • Electronic compass • The 600 and up models use both GPS and GLONASS satellite networks • 450 and higher models have electronic compass • 3.0” screen • 550 and up models have a built-in digital camera • 650t model floats • Touchscreen • Electronic compass • Can also be mounted horizontally in a car • Gives spoken turn-by-turn voice directions • 4.0” screen • 650 and 650t models have a built-in digital camera • Touchscreen (510 and up) • 510 has built-in camera • 3-axis electronic compass (610 and 710) • Built-in camera, microphone and speaker (610 and 710) Delorme Earthmate PN-60 Earthmate PN-60w • 3-axis electronic compass • 2.2” screen Lowrance Endura Out&Back Endura Safari • This brand cannot load geocache files directly from geocaching.com. Geocaching Resource Guide • 15 Using a Smartphone as a GPS Device An option that is gaining in popularity is using a smart phone as a GPS device. There are a few benefits and of course a few drawbacks. Some benefits: • If you have a generous enough data plan, you can always have an up-to-date list of geocaches with you, without having to download anything before you leave your house. • If you are geocaching away from home, you always have access to local caches and street maps. Some drawbacks: • Cell phones are not built for rugged outdoor use. A waterproof case is a wise purchase. Many styles are available, including ziplock-style plastic bags that can fit any phone model and fitted cases tailored to a particular model. There are even cases that can make a phone float. Prices range from about $10 to $100. • Battery life for a cell phone used as a GPS device is much shorter than the battery life of a regular GPS device. You may wish to get an extra battery, or if you are driving between caches, be sure to plug into a car charger while driving. The most widely used phones for geocaching are iPhones and Android phones. Blackberry is another option. Accuracy Smart phone accuracy varies, as it does with other GPS devices. In general, the more recent a model you have, the more accurate it is, and the faster its navigation will work. You will have the best success with a phone that uses assisted GPS (A-GPS). Remember, a GPS device usually needs at least three satellite signals to calculate location, and tall buildings or trees can cause lost satellite reception before a phone is finished getting a location fix. Then the phone has to start all over again, making for a long wait when you are trying to see where you are. A phone with A-GPS needs to “see” only two satellites, because it can also use cell towers. This helps get a location fix faster than waiting for more satellite signals. As well, being able to receive signals from the GLONASS satellites in addition to the GPS satellites helps to improve accuracy and speed. The iPhone 4S and 5 models use both A-GPS and GLONASS. Several Android models use A-GPS. Check the specifications for your model. 16 • Geocaching Resource Guide Apps An official Geocaching app is available for both iPhone and Android cell phones (but not Blackberry). Many other free or paid apps are also available to use instead of the Geocaching app, or to help with particular geocaching problems. To use your phone for geocaching, the following apps are recommended. Be sure to check that an app is compatible with your phone’s operating system version. Finally, keep in mind that almost all navigational geocaching apps work best if you have a premium account with geocaching.com. iPhone Android Navigational Geocaching Apps • • • • • • • • • • Geocaching Geocaching with Geosphere Geo Bucket Geocaching Buddy iGeoknife (used alone orin conjunction with a geocaching program called GSAK [Geocaching Swiss Army Knife]) Geocaching CacheSense c:geo Neongeo A:DRAKE Other Geocaching Apps • Geocaching Tool Kit • GC Tools • Geocaching Tools • GeoFormel Lite or Pro Benefits of Geocaching By now you have realized that getting started with geocaching means learning new things and maybe buying some equipment. It might seem like it is a lot to do to get started with a hobby. So why do so many people like it so much? The first answer is easy: geocaching is FUN in many different ways! You can geocache alone or with a group of friends, so it’s enjoyable for both lone wolves and social butterflies. It can be as cooperative or as competitive as you want it to be – you can work together with a group to solve puzzles and riddles, or you can work at it frantically by yourself to try to be the first one to figure it out and find that new cache before anyone else. You can stroll leisurely to just one or two caches once in a while, or you can run (or bike or ski or paddle…) to dozens of caches in one day. Geocaching can be combined with other hobbies, like photography, cycling, hiking, running, camping, canoeing, birdwatching, etc. Geocaching Resource Guide • 17 Other benefits of geocaching include: • Better health: A small number of caches allow you to drive right up to them – “park and cache” – but most of them require some walking or other form of exercise, such as walking, cycling, hiking, climbing, snowshoeing, skiing and even swimming or diving. Many people, even those living in rural areas, spend too much time indoors, in schools and workplaces. Time spent outdoors reduces stress and helps us get more vitamin D (needed for healthy bones). • Exploring local or new/tourist areas: Many caches are placed in areas that you may not have ever thought of visiting. You may find some interesting places that you didn’t know about, even in your home area. Most popular tourist destinations have at least a few caches placed nearby, and they will often give you more information than any tourist guidebook. A cache could even help you find a location that is not a regular tourist spot but is every bit as beautiful or interesting. • Increased confidence: Geocaching is fun, but you do need to learn new skills to be successful at it. Mastering the skills needed for geocaching will help increase your self-confidence. • Meeting new people: Geocaching events are regularly held in most large centres. If you attend even one event every now and then, you can meet a lot of other geocachers quickly. As well, you may bump into other geocachers in your area from time to time while heading to or from a cache. (And most geocachers are fun people to hang out with!) • Family time: Geocaching is an activity that a family can do together. Young children often like to find the “treasure” in a cache and make exchanges for toys that they bring along. Older family members can enjoy the time together to chat while heading to a cache, or may like to combine geocaching with other hobbies. • New knowledge or skills: Some caches require solving a puzzle before you can look for it. To solve the puzzle, you may have to look up information about a topic that is new to you, or you may have to use a math formula or computer skill. If you choose to do these types of caches (and you don’t have to), you can increase your knowledge in areas that you wouldn’t normally know a lot about. • Sharing your own knowledge: When you place your own caches, you can use it to bring other people to interesting areas that you know about. You can also create your cache with a theme or puzzle that lets you share one of your other interests. You could introduce a lot of people to the fascinating world of iceberg surfing or collecting bread clips! (P.S. Those are real things – just look them up online!) 18 • Geocaching Resource Guide Geocaching Rules There are three simple rules for geocaching: • If you take something from the geocache, leave something of equal or greater value. • Write about your find in the cache logbook. • Log your experience at www.geocaching.com. That’s it, that’s all! But wait! There may not be many hard and fast rules, but there are some strong guidelines that most geocachers and geocaching.com agree on and follow, because it helps everyone to enjoy the game. And that leads us to the next section: geocaching etiquette. Geocaching Etiquette (Geocachers’ Creed) Etiquette is a set of behaviour guidelines that people choose to follow. The type of etiquette that most of us are familiar with is table manners. For instance, most of us agree that it is rude to spit out halfchewed food onto someone else’s plate. We wouldn’t appreciate someone doing it to us, and we don’t do it to others, either. The geocaching community also has a code of behaviour that most geocachers choose to follow. They are based on the idea that geocaching behaviour must be safe, legal and ethical. Several years ago, a group of geocachers led an internet discussion group with hundreds of other geocachers to create a set of guidelines that everyone could agree on. They called it the Geocachers’ Creed, and they published it on its own website. The creed is below, but if you want more information about it, you can visit the website at www.geocreed.info. Geocachers’ Creed When placing or seeking geocaches, I will: • Not endanger myself or others • Observe all laws and rules of the area • Respect property rights and seek permission where appropriate • Avoid causing disruptions or public alarm • Minimize my and others' impact on the environment • Be considerate of others • Protect the integrity of the game pieces Geocaching Resource Guide • 19 What do you think each of these points mean? Read on to see some suggested actions for following the creed. Of course, there are many more. Can you think of any others? Not endanger myself or others In the Outdoor Safety section in the Introduction, you learned some safety tips, such as being prepared for changing weather conditions and avoiding activities that are beyond your physical abilities. You also need to be aware of safety for others when you place a cache. If there are any possible dangers in the area (anything from a steep river bank to old barbed wire fences), you should warn people about them on your cache listing, since your finders may not know the area as well as you do. Never leave anything hazardous in a cache, such as batteries or lighters. (Believe it or not, it has happened!) Do not leave anything that has a strong scent (even if it’s in a sealed bag), including snacks and candy, toothpaste, scented candles, or scratch and sniff stickers. Strong scents attract both big and small animals. Even if no dangerous wildlife are attracted to the cache, small animals like mice, squirrels, skunks or porcupines can damage or destroy the cache container trying to get at whatever they smell inside. Observe All Laws and Rules of the Area Never break a law to place or find a cache, and never place illegal items in a cache. Respect Property Rights and Seek Permission Where Appropriate Landowners’ rights should always be respected, whether the owners are individuals, companies or municipalities. If “No Trespassing” signs are posted in an area, obey them. They may be placed there to prevent people from going into a dangerous area. And even if there is no danger to avoid, disobeying them gives geocachers a reputation for being disrespectful – and that makes it more difficult for all geocachers. Check if permission is required before placing a cache on private property, and respect the landowner's wishes. Some caches are placed in libraries (one of the few types of caches found indoors), but you must always get permission from the library to place a cache there. Check if public land has a geocaching policy and be sure to follow them, if they do. In national parks, for example, geocaches are allowed, but only with written permission first from Parks Canada, and only if the container meets certain requirements (you will learn more about those in Unit 6 – Hiding a Geocache). As long as all geocachers follow these rules, we can continue to use national park lands for geocaching. If too many geocachers break the rules, Parks Canada may not allow geoacaching to continue. Remove your cache as soon as possible, if the landowner asks. Finally, NEVER damage or interfere with the function of any buildings or signs. 20 • Geocaching Resource Guide Avoid Causing Disruptions or Public Alarm Don’t place a cache near schools unless the staff members are fully aware of the placement. When searching for caches that are placed in locations like these, be sure that you are not searching at a time when you are likely to cause a disruption, such as during school hours. Use caution near playgrounds and parks where children play. Parents are naturally concerned when strangers are near their children. Even if you are a young person yourself, parents may still be concerned if you are “acting strangely”, and someone who is geocaching may indeed look a little strange to other people. Do not place a cache near any building or structure that might be considered a terrorist target, such as a bridge or federal government building. Police and security guards are extra-attentive to areas like this, and become very suspicious about people who seem to be lingering too long in one spot for no apparent reason. Do not create a cache that could be mistaken for a pipe bomb. These types of caches are generally made using PVC plumbing pipes. Non-geocachers who accidentally spot these are naturally suspicious and tend to call the police, who have to send a bomb squad to check into it—which is time-consuming and expensive. Often, by the time the police determine that it is not a bomb, they don’t have much of a sense of humour about it. Minimize My and Others' Impact on the Environment Whenever possible, follow Leave No Trace ethics. Basically, this means that you disturb as little as possible in the environment. You can learn more about Leave no Trace at this website: www.leavenotrace.ca/principles When hunting or hiding caches, leave the area as you found it or better. If there is trash in the area, pick it up on your way out. Do not abandon a cache. If you lose interest in the game, remove the cache and archive its listing. Be Considerate of Others Treat other geocachers politely, whether on the trail or online. Don't spoil the hunt for others. Let them have the same fun finding a cache as you did, and as its owner intended. Don’t give spoilers in your logs (no comments that take away the fun of the challenge for other geocachers). If you accidentally post a spoiler, and the cache owner asks you to change your log, do it right away and don’t grumble about it to others. If there is a problem with a cache, let the cache owner know as soon as possible. Make minor repairs if you can to save the owner a trip. Some geocachers carry a small cache repair kit for this purpose. When you log your find, write more than just “found it”. Talk about your experience, even if it’s just a sentence or two. You will appreciate it when others do the same for caches that you hide. Geocaching Resource Guide • 21 If you exchange trade items, be fair: think about the kinds of things you would like to find, and leave something equal to or better than what you take. If you place a traveling item (more about these later) into a cache, attach a tag that describes its goal, so that others can help it along. If you pick up a traveling item with a tag describing its goal, move the item toward its goal if possible. Contact its owner if you have had it for more than a couple of weeks or so. If you really like someone else’s idea for a cache, and you would like to copy it, get their permission and give them credit in your cache listing. Protect the Integrity of the Game Pieces Always take care to keep a cache in good condition. Make sure the container is properly closed to prevent the contents from getting wet or destroyed. Avoid attracting attention when you are searching for, signing in, and replacing a cache. Caches are often vandalized by people who don’t know about geocaching. Put the cache back where you found it and hide it well. Don’t move a cache—if you think that the cache is not in the right spot, hide it as best you can and tell the owner as soon as possible where you have hidden it. Don’t collect traveling items meant to stay in the game. This is theft, because items like that belong to someone else. Don’t tamper with or involve a game piece in "alternate" games without the owner’s permission. 22 • Geocaching Resource Guide Unit 2 Finding your First Geocache Creating a Geocaching Account Before you head outside to find your first cache, you first need to do a few things at a computer inside. Remember that one of the three rules of geocaching is that you must log your experience online at geocaching.com. To do that, you must first create an account. NOTE: According to the Terms of Use for geocaching.com, if you are under 13, your parent or guardian must officially be the account-holder. There are two levels of geocaching accounts: basic and premium. A basic account is free, and a premium account is about $10 US/3 months or $30 US/year. A premium account offers features like instant notification (having new cache listings sent to you immediately), and many other features that allow you to make full use of your GPS device’s features. More information is available on geocaching.com, if you are interested. Geocaching.com is not the only website devoted to caching. Other websites are: • Opencaching.com • Terracaching.com • Navicache.com However, geocaching.com is by far the most popular website, with the largest number of cache listings. You can explore these websites as well, if you like. For this project, we will use only geocaching.com. For beginning geocachers, a premium account is not necessary. You can always change your mind later, if you discover that you are a hard-core geocacher! Below are the steps to signing up for an account. Follow through and read carefully. 1. Creativity required! You may have been given the name you use every day, but for geocaching, you get to choose your own name – that is, your username, or “geoname” or “geohandle.” What name do you want other geocachers to know you by? You can choose the name of a superhero, or a fictional character (cartoon, book, movie or video game, etc.) like Scooby Doo, Princess Peach, or Superman. You could connect it to your province (anyone want to use SaskCache-Wander-Kid?). Or you could choose a name related to another hobby, like Karate Kid or Drama Queen, or to geocaching itself (Sir Cache-a-lot?). I’m sure you get the idea. Come up with several options, because with millions of geocachers on the planet, someone may have already taken your idea. Of course, you can adjust your favourite idea by using numbers on the end (e.g. Scooby Doo 2) or substituting numbers for letters (e.g. Sc00by D00). Geocaching Resource Guide • 23 Once you have a username chosen, you can continue on to the next step – setting up an account, IF you have a: • computer handy with Internet access, and • parent or guardian on stand-by to help with any information you need. 2. In your browser’s URL window, type in www.geocaching.com. You should see this page: 3. Click on Join 24 • Geocaching Resource Guide 4. You should now see this page. This is where that username that you created is needed. Fill in all the required blanks. Take special note of the points below: If you know a geocacher who first introduced you to geocaching, you can enter their username. Be sure that both you and your parent or guardian read the Terms of Use and the Privacy Policy. If you want to have a basic account, click on “Create My Account”. 5. You will see a request to validate your email. Click on “Validate my email”. 6. Within a few minutes, you will receive an email from Geocaching. Two video links are included in the email. They are not long, but they have great information to help you get started. If you can Geocaching Resource Guide • 25 spare six minutes to watch them, it is well worth the time. When you are finished watching the videos, click the “Validate now” link in the email. 7. The “Validate now” link will take you back to geocaching.com, and you will have two options to click on: Learn how to get started with geocaching or Add information a photo to your profile. However, before you do that… 8. There is one important change that you should make to your profile. You will be able to find caches near you more easily if you tell geocaching.com where you live: • Hover your cursor over “Your Profile” in the dark green bar at the top of the page. • From the menu options that drop down, select “Account details”. • In the box labeled “Your location”, click on the word “Change”. • If you know the coordinates of your house or town, you can enter them. If you don’t know, then just enter a street address or the name of your town or city. • Once you have it adjusted, click on “Save changes.” 9. You can now make whatever other changes you wish to your profile (remember online safety guidelines). In the “Your preferences” box, you may wish to change your time zone, distance units and date format. 10. And now, for the fun part – hover your cursor over “Play” and then click “View geocache map”. It will be centred on your home location, so you can see right away how close the nearest cache is. Let the games begin! How to Choose Your First Geocache Now that you have a geocaching account, and you have told it where your home area is, you are ready to find the caches that are nearby, and choose a few that look good to start with. Video YouTube GoGeocaching channel: Selecting Your First Geocache 1. From the menu bar, hover your mouse over Play, then click on View Geocache Map. 26 • Geocaching Resource Guide A map will open up that will be centred on your home coordinates. You will see all the caches that are nearby. 2. To find a good starter cache, look for this symbol on the map: 3. Click once on the symbol, and an information box will pop up. 4. The information box gives you quick information about the geocache. Look to see how many blue stars come after the words Difficulty and Terrain. Signs of a good first cache are: • Difficulty – only one blue star • Terrain – no more than two blue stars. • Cache Size – red X in the second to fourth box (it will be easier to find a regular or large size cache your first time). • Favourite Points – if it has a few favourite points, that’s great, but don’t worry if it has none (it could be a newer geocache that hasn’t had many visitors yet). 5. Now click on the cache title. In the example, it is “The Easter Bunny’s Mailbox”. The cache description page will load, giving you more information about the cache. 6. On the next page, you can see what the cache description looks like. Read the description to find out any special instructions or detailed information you should know. Geocaching Resource Guide • 27 7. The last point to check is the recent logs. If they are all smileys (“Found it” logs), then the cache is likely where it should be, ready for the next finder – hopefully, you! 8. If you have a Garmin, Magellan or DeLorme GPS device, connect it to your computer with its cable. If you do not have one of these models, you will have to enter the coordinates by hand. Your owner’s manual will have instructions for how to do that. If you are using a phone, be sure that you have data access, whether wi-fi or a cellular network. Open your geocaching navigation app, and enter the GC number (found in the top right corner of the cache listing page) in the online caches list. The cache page will open in the app. 9. Click on “Send to my GPS”. The geocache file will be uploaded onto your GPS device. The first time you do this step, you may get a pop-up message, with instructions for installing software for your GPS device. This is normal. (If you have trouble uploading to your GPS device, check the manual, since every GPS device is a bit different.) Note: If you have a basic account, you can download the cache listing as an LOC file, which contains only basic information—coordinates, cache name, difficulty rating, and terrain rating. It is a good idea to print the cache page (click on the printer icon), and at least the last five logs, so that you have the full cache description with you, as well as any hints from the cache owner or past finders. If you have a premium account, the cache listing will be downloaded as a GPX file, which also contains the cache description, any hints and the 20 most recent logs. 28 • Geocaching Resource Guide Below is an example of a cache listing page. Type of cache GC number Difficulty and terrain rating Cache size Cache title Cache owner Posted coordinates Click here to send the cache listing to your GPS device Cache description You can sometimes get a hint about the cache by clicking here. No hint is given for this cache. Geocaching Resource Guide • 29 What to Bring with You (What can I trade?) Before you go rushing out to find your first cache, take a few minutes to be sure that you have: • Weather-appropriate clothing • Pen or pencil (they often disappear from cache containers) • Items to trade. These can include small toys, Video collectible pins, hair accessories, small tools, small YouTube household items, etc. All tradeable items should be in GoGeocaching channel: good condition (ask yourself if you are leaving Finding Your First Geocache something that you would like to get). Setting a goto on your GPS device Each brand and model is a little different, so you should review your owner’s manual. Most GPS devices come with quick start instructions that should have you heading out the door quickly. The first step is to turn on your GPS device and leave it where it has a clear view of the sky. It may need a few minutes to find the satellites and get updated. In general, if you have loaded the cache listing into your GPS device using the cable, you should be able to follow these steps. If your GPS device has a “Find” button… 1. Select “Find”. You should see “Geocache” as one of the options. 2. Select “Geocache”. You will see the list of the geocache listings that you downloaded. 3. Select the cache that you would like to find first, and then select “Goto”. 4. You may have to choose “Follow Road” or “Off Road”. You can choose “Follow Road” if you want driving directions, but remember to switch to “Off Road” when you are ready to walk to the cache. Once you make your selection, you will see on your map screen a triangle (you) and a line leading to a treasure box icon (the cache). 5. Switch to your compass screen, and you will see an arrow pointing in the cache direction, as well as the distance to the cache. If your GPS device has a series of screens with different icons… 1. Select the “Geocaches” icon. 2. Select “Find a Geocache”. You will see a list of the geocache listings that you downloaded. 3. Select the cache that would like to find first. 30 • Geocaching Resource Guide 4. On your screen should be a “Go” button. Select it. Once you make your selection, you will see on your map screen a triangle (you) and a line leading to a treasure box icon (the cache). 5. Close the map screen. 6. Select “Compass”. You will see an arrow pointing you to the cache, as well as the distance to the cache. If you are using a smart phone with geocaching.com app… 1. Be sure you have internet access (either wi-fi or network). 2. In the “Search by GC code” field, enter the GC number for the cache. The cache listing will open. If you want to stay connected to the network while you geocache… 1. Select “Navigate to Geocache”. 2. The map will open with your location (blue dot) shown, and a line drawn to the geocache. 3. Tap on “Compass”. The compass screen tells you how far away the geocache is, and which direction you need to go. If you do not want to stay connected to the network while you geocache… 1. If you want to navigate to the geocache using just the GPS chip in the phone (which uses no data), tap on the box in the top right corner of the screen (it has three white dots in it). 2. From the drop down menu, select “Save to Offline List”. 3. Tap on “Create New List”. Enter the name you prefer (e.g. Home Area Geocaches). Select what you would like to download with the geocache listing: Cache Images (could be helpful); OpenStreetMap and/or OpenCycleMap. Neither one is necessary, but if you prefer those maps, you can download them. Select “Done”. The geocache listing page will open again. 4. Select “Navigate to Geocache”. 5. The map will open with your location (blue dot) shown, and a line drawn to the geocache. 6. Tap on “Compass”. The compass screen tells you how far away the geocache is, and which direction you need to go. The Hunt Begins! Follow the arrow on the compass screen of your GPS device until you are about 10 metres (30 feet) from where the cache is supposed to be. Remember that GPS device accuracy can vary (both yours and the cache owner’s), so the cache may not be at exactly the 0 metres point. Remembering how big the cache is supposed to be will help your search (small is about a sandwich container size; regular is about a shoebox size; large is about a big bucket size). Geocaching Resource Guide • 31 Geocaches are often covered with sticks or hidden in logs and empty tree trunks. Sometimes they are even suspended high in a tree. Look for piles of sticks or anything that looks a little unnatural. You can also check the hint, if the cache owner gave one. If you have past finder logs with you, you can read those to see if there is a hint. If you are having trouble, a good technique is to follow your GPS arrow until you are at 0 metres. Drop your backpack or something identifiable at that point, and then expand your search in a spiral from there. (Just don’t forget it when you leave!) Do I Have to be Sneaky when I’m Geocaching? When you’re geocaching in a busy area, geocachers usually try not to draw too much attention to their activities. This helps to keep the cache safely hidden from muggles who may not understand geocaching and think that the container is trash. Sometimes, a muggle may “catch you” geocaching. If this happens, the best thing to do is introduce them to geocaching! Explain to them that you are playing a game called geocaching. Even better, be prepared by having a few “muggle cards” with you to hand out – it saves time explaining, and gives the muggle something to refer to later. You can see a sample muggle card in Resource section. What do I do When I Find the Cache? 1. Take note of how it is hidden. When you are finished, you will need to place it back in the same way. 2. Open the container carefully, especially if it is raining or the ground it wet. You don’t want the items inside to scatter on the ground or get wet. 3. Take a look at the items inside, and if you want to, make a trade for something that you brought with you. The golden rule is to trade even or trade up (leave something worth more than what you took). (If you see a coin or a metal rectangle attached to another item, and they have tiny letters and/or numbers printed on them, you can take one of those without trading, but read about trackable items in Unit 3! These are not items for people to keep.) 4. Next, sign the log book. That is, write a short note and sign your geoname in the notebook, or logbook, that you will find in the cache container. 5. The logbook note can be short, and if space is really limited, only your geoname is necessary. When you open up the logbook in your first cache, take a few minutes to flip through it to see the notes left by other geocachers. Geocachers understand that placing a cache takes some effort, so a thank-you is almost always included in the log entry – usually like this: TFTC (Thanks for the cache). 32 • Geocaching Resource Guide 6. Place everything back in the container, and replace it as you found it. Be sure to replace any camouflage that was used (sticks, bark, leaves, etc.) What if I Don’t Find the Cache? Don’t worry – a lot of geocachers don’t find a cache on their first attempt. Many beginning geocachers believe that if they didn’t find it the first time, it must have gone missing. This is not usually the case. Probably, you just need a better idea of what the container looks like. It’s amazing what you can’t see until you know what colour, shape or size of container you are looking for. To get more help, you can: • Email the cache owner to ask for more information (click on the geoname under the cache title, and it will take you to the cache owner’s profile page, where you can send a message to them). • Ask a recent finder for a hint (click on the finder’s geoname to go to their profile page). • Bring in reinforcements! The more eyes and hands you have searching, the more likely you are to find it. • Ask an experienced geocacher to help you. Logging Your Find Online Remember that the third rule of geocaching is to write about your experience online. So, let’s get started! 1. When you get home after your cache find, go to geocaching.com on your computer and open up the cache listing page again. Video YouTube GoGeocaching channel: How to Log a Geocache on Geocaching.com 2. In the top right corner of the page is a box under the word Navigation. Click on “Log your visit” to start logging your cache find online. Geocaching Resource Guide • 33 3. You will see the page below. Click on “Found it”. Then write a little bit about your experience in the Comments box. You can add a smiley to your log by clicking on the “Insert Smilie” link, then copying and pasting the characters for the smiley(s) you want to use. When you are done, scroll to the very bottom of the page, and click on “Submit Log Entry”. Congratulations! You have found and logged your first geocache! 34 • Geocaching Resource Guide Unit 3 Beyond the Basics Learning the Lingo – Special Terms As you get out geocaching more and read more cache descriptions, you will come across a few words and abbreviations that you haven’t heard before. There are many more than the ones listed below, but these will be a good start. More are in the glossary. Bushwack: Going off-trail. This usually happens on the way to the cache; only after finding the cache do most geocachers then find the nice easy trail that they could have followed. BYOP: Bring Your Own Pen/Pencil. Often used in a cache description for a cache that is not big enough to hold a pen or pencil. Cache: Short form of geocache. CITO: Cache In Trash Out, a type of geocaching event (more about that later), and also refers to picking up trash while geocaching. CO: Cache Owner. That is, the person who hid the cache. DNF: Did not find. If your search for a cache is not successful, you should log a DNF (it is one of the options on the “Log your visit” page.) FTF: First to find. Many geocachers like to race out to see who can be the first one to find a newly published cache. Sometimes a cache owner will leave a small prize for the first finder, but the real prize for an FTF is the satisfaction! Geoswag: Items that are placed in a cache or carried by a geocacher, for the purpose of trading in caches. Log: An online entry on geocaching.com that tells of the geocacher’s experience while searching for a cache. Muggle: Harry Potter fans will know this word, which means anyone who is not magical. Geocachers borrowed the word to describe anyone who does not know about geocaching. Muggled: Describes a cache that has been removed or vandalized by a non-geocacher. Geocaching Resource Guide • 35 SL: Signed log. Used by some geocachers in their cache logs. Smiley: A cache find. Refers to the "smiley-face" icon attached to "Found It" logs. TFTC: Thanks for the cache. TNLN: Took nothing, left nothing. Used by some geocachers in their cache logs. Waypoint: A set of coordinates (latitude and longitude). More About Geocache Listing Details You already know a lot about the sections of a cache listing page: the cache title, the description, the difficulty and terrain ratings, cache size and past logs. There are a few more sections that can be helpful. Attributes An attribute is a characteristic, or a quality, of something. For instance, snowy winters are one of Canada’s attributes. When you are deciding on which geocache(s) you would like to do, it can be helpful to know if, for example, dogs are allowed on a certain trail, if the cache is suitable for young children, or if the cache will take a long time to find. A set of symbols was created to show geocachers at a glance what they can expect a cache to be like. Each attribute that cache owners give their caches are included on the cache listing page, on the right hand side. If you don’t know what a symbol means, you can hover your cursor over it, and its title will pop up. You can also click on “What are Attributes?” and you will see a long list of symbols and what they mean. Attributes include hazard warnings (e.g. poisonous plants or hunting area), equipment requirements (e.g. a boat, a flashlight or tree climbing), what kinds of facilities are nearby (e.g. washrooms or public transportation), special permissions (e.g. quads, snowmobiles or horses) and special conditions (e.g. accessible in winter, night cache or long hike). If you have a premium account, you can search for a group of geocaches that include or leave out certain attributes. For example, you could search for all of the caches near you that allow dogs on the trail. 36 • Geocaching Resource Guide Additional waypoints Sometimes the coordinates that are listed for the geocache (the posted coordinates) are not the only set of coordinates, or waypoint, you need. A cache owner may post additional waypoints to point out where you can park, where a trailhead is or scenic spots on the way to the cache. Find… Click on any of the options to find caches hidden or found by the cache owner, or to find other caches nearby. You can also find nearby waymarks. (Waymarking is an activity much like geocaching, with a website run by Groundspeak, the company that runs geocaching.com. You can learn more about waymarking later in this project.) For online maps… If you would like to see the geocache location in a different version of map, just click on one of the options, and it will open in a new window. What are Trackable Items and What do I do with Them? Many geocachers enjoy finding and moving along trackable items. These are objects that have a unique tracking code (combination of numbers and letters) engraved on them. The code is registered to the owner of the trackable. When you find one, you can take it without trading anything for it, but your mission is to move it along, not keep it. Trackables are sometimes called hitchhikers, since that is how they move from cache to cache. Videos YouTube GoGeocaching channel: • Geocaching.com Presents: Travel Bugs • Finding a Trackable – What to do? A Geocaching.com Presentation • How to Log a Trackable – A Geocaching.com Presentation Trackables are sometimes a way for their owners to see more of the world (they will ask you to take a photo of something in your area, for example). For others, it’s another fun way to compete with other geocachers (some trackables are in races with others). Other owners just enjoy seeing where their trackables end up. Geocaching Resource Guide • 37 Types of travelbugs • Geocoin: these are custom-designed coins, and they are often used to celebrate special events, important milestones, certain geocachers or just to allow a geocacher to share with others something that they enjoy or think is important. Geocoins can be any shape. Examples: • Travel Bug: These look like ID tags that people sometimes wear as a necklace. They can be attached to anything, from toy cars to stuffed toys to tools! They are given a mission, usually to travel to a certain location, or to visit certain kinds of places. Examples: Unattached Travel Bug Stuffed Toy (usually inside a Ziploc bag) Travel Bug with a Mission Card • Others: A trackable code can be added to just about anything. Other trackable items include vehicle decals or magnets, shirts, hats, jewellery, pens, etc. Some people even get tattooed with the Travel Bug logo or the geocaching logo and a tracking code, turning themselves into one giant trackable! Examples: Vehicle decal 38 • Geocaching Resource Guide Upper arm tattoo Earrings If you find a trackable, you have a few choices: 1. Leave it in the cache – You do not have to take a trackable. If you know that it will be a problem for you to move a trackable along soon, you should leave it in the cache for the next finder, who will hopefully be able to move it to a new cache. 2. Discover it – Even if you leave the trackable in the cache, you can still log it online later, if you make a note of its tracking code. Your “Discovered it” note will be sent to the trackable owner. This lets them know that their trackable is safely in a cache. This is especially nice for the owner to know when their trackable has not been logged for a long time. (And of course, in the case of a tattooed Travel Bug, this is your only option!) 3. Retrieve it – You can take the trackable from the cache. When you get home, you should log it online right away, so that the next cache finder doesn’t report the trackable as being missing. If you think you will move it to another cache before you can log it online, record the tracking code on a notepad. As soon as you can get online, log it out of the cache where you found it. Then immediately log it into the cache where you dropped it off. Some owners will include an information sheet with their trackable, or they will provide information on the trackable’s web page. Read the information carefully, especially its mission, to see how you can help it along. When you take a Travel Bug, you should place it in another cache within two or three weeks. If you can’t, email the owner to let them know that their trackable is not lost, and tell them when you expect that you will be able to move it along. Logging a Trackable after Taking it out of a Cache 1. Start by going to geocaching.com. (Do NOT enter the tracking code in your log entry for the cache where you found it. The tracking code is meant to be shared with only the people who have actually seen the trackable that it belongs to.) 2. Hover your mouse over “Play”, then select “Find Trackables” from the drop-down menu. This is the page that you will see. Geocaching Resource Guide • 39 You can click here for instructions. Enter the tracking code here. 3. Type the tracking code in the box under “Enter the Tracking Code of the Item”, then click on “Track”. 4. The web page for the trackable will open. On the right side of the page, you will see this. Click on “Found it? Log it!” 5. The next screen will give you four options (only three if the trackable is not logged into a cache, but is with a geocacher instead). Select “Retrieve from (name of the cache).” Add any comments. At the bottom of the page, click on “Submit Log Entry” 40 • Geocaching Resource Guide Logging a trackable after dropping it off in a cache When you log a cache, at the bottom of the page you will see a list of any trackables that you have logged in. Select “Dropped Off” for the trackable that you left in the cache that you are logging. GPS Device Features – What else can it do? After you get used to using a GPS device for loading cache listings and navigating to the cache, it is a good time to explore some of the other features of your GPS device. Some caches require you to know how to use more advanced features. Explore the options on your GPS device, if you haven’t already. Get to know its options. Most recent models have the following features, though not all. Check your user manual, if you are not sure. Settings Many settings can be changed on your GPS device. Here are a few that you should start with. • North reference – When you use regular compass, the needle always points to magnetic north. Most often, magnetic north is at least a few degrees east or west of true geographic north (the North Pole). Posted coordinates use true north, so you should keep your GPS device set to the same reference. Take note, however, that occasionally, a cache listing will tell you to change coordinates to magnetic north. • Position format – Remember that coordinates can be written in a few different ways. Posted coordinates use the format hddd°mm.mmm’ so it is a good idea to set your GPS device to the same format. • Map Datum – This should be set to WGS 84. (If you are curious, WGS means World Geodetic System.) • Units – Set to metric (metres and kilometres) or Imperial (feet and miles), as you prefer. When you are approaching a cache, your GPS device will tell you how close you are using whichever units you choose. Geocaching Resource Guide • 41 Mark waypoint A waypoint is a set of coordinates that marks your current location and automatically gives it a title (usually something creative like 001). You can edit it by changing the numbers or the title. Marking a waypoint is used in a number of ways: • Some caches are set up to send you to several spots, but you have go to one spot before you can get the information for the next, so you have to enter new coordinates on the go. • When you hide your own cache, marking a waypoint gives you the coordinates of your cache to include with your cache listing. • When you head into the forest in an unfamiliar area, it’s a good idea to waypoint the car. If you get disoriented, you can set your GPS device to point you back. Waypoint averaging This tells the GPS device to keep taking location readings until you tell it to stop. When you stop it after dozens of readings, the GPS averages all of the readings to give you one set of coordinates. This increases the accuracy of any waypoint that you enter (as long as you do it while you are at the waypoint itself). When you place a cache, you should always use waypoint averaging to get the best set of coordinates possible. Anyone searching for your cache will appreciate the improved accuracy. Track (often called bread crumbs) When you use this feature, the GPS device tracks everywhere you go, just like in the fairy tale Hansel and Gretel, when Hansel drops the bread crumbs behind them to give them a trail to follow back home. You can choose to have it always visible, or you can choose to see it only when you need to. Measure distance It can be hard to judge distance on a small GPS device screen. If you need to know how far you are from the car, for example (if you marked a waypoint at the car), you can just measure the distance. It is useful to know how much farther you need to go, if you are tired or have limited time. Some advanced caches may also require you to measure distance and do some calculations to find the final coordinates. Proximity circles, proximity alarms or geofencing With this feature, you can tell the GPS device to mark a circle (or other shape, in the case of geofencing) around a certain waypoint or cache, at whatever distance you choose. The GPS device can display more than one proximity circle at a time, so you can see where the circles overlap. Some caches make use of this feature. Projections From a geocache or waypoint, you can create a new waypoint that is a certain distance at a certain bearing from a known waypoint. For example, you may know that the final cache coordinates are 175 metres from the huge rock you’re standing next to, at a bearing of 100°. When you enter the distance and bearing into the projection function, the GPS device will tell you the coordinates for the cache location. 42 • Geocaching Resource Guide Routes This is like a connect-the-dots game for a GPS device. You can create a route, or path, between several waypoints or caches. This feature is sometimes used to create a giant X or other shape, with the cache being at the centre. Different models of GPS devices all work a little differently from the other ones. To get directions for how to use a feature on your GPS device, check the user manual. Recalibrating To keep your GPS device as accurate as it can be, every now and then, it needs to be re-adjusted, or recalibrated. Your user manual will have instructions. You should recalibrate: • After a battery change; • After traveling a large distance quickly, with the GPS device turned off (such as a plane trip); or • Anytime the compass is “misbehaving” (for example, pointing behind you when you know that the cache is ahead of you, or when the accuracy is not as good as usual). What is a Topographic Map and do I need it? A topographic map has special markings that show you more detail about terrain than you see on normal road maps. They show elevations (how high above sea level an area is), how steep or flat the land is, where there are bodies of water, vegetation and more. They may also show public land. Topographic maps use contour lines to show elevations. When you look at a topographic map, you will notice that sometimes the lines are far apart and other times, they are closer together. Where they are close together, you can expect a steep climb. If you plan to do any caches on long trails or in backcountry areas, you will need a topographic map. For other geocaching (even in a city), topographic maps can save you a long detour around a river that you wouldn’t otherwise know was there. Geocaching Resource Guide • 43 Unit 4 Hunting geocaches If you enjoyed your first geocache hunt, you may be itching to get out to do more. Preparation is the key to keeping geocaching fun. There are some things you can do to make sure you always have what you need. It will also help you to have good idea what to expect from certain kinds of caches. The Geobag Picture it: you’ve spent the last half hour traipsing down a rough trail and then another 10 minutes bushwacking. Your GPS device says that you are now only 12 metres from the cache. You start looking around, eager to find that container and earn another smiley. You spot it! It’s a thin bison tube nestled in a hollowed-out dead branch. Clever, you think, but not clever enough to fool me. You unscrew the lid… and then realize that the logbook is hopelessly jammed in the bottom of the bison tube. If only you had a pair of tweezers! Oh, but wait, even if you had tweezers, you have no way to sign the logbook, anyway, because you forgot to bring a pen or pencil! Well, maybe you could take a photo of the cache to send to the cache owner as proof that you found it, instead of signing the log. Darn it –no camera with you either! Cranky and grumbling, you put the lid back on and head back to the trail with nothing to show for your efforts. Something like this has happened to many geocachers at some point. With a little preparation, you do not have to be one of them. Keeping a small backpack or bag stocked with helpful items, ready to just pick up on your way out the door will help to prevent disappointments while caching. Following is a list of items that many geocachers carry with them. Use this list as a guideline to creating your own “must-have” list of items for your geobag: • Your GPS device • Small first aid kit • Bug spray • Toilet paper 44 • Geocaching Resource Guide • • • • • • • • • • • • • • • • • • Extra batteries Flashlight Safety glasses (for after-dark geocaching in the forest) Weatherproof pen or pencil Pointy-nose tweezers (sometimes the log book in a bison tube or a nano cache needs a little extra help) A strong magnet and rubber bands (you may need to improvise a “picker-upper” for a metal container) A multi-tool Sandwich-sized Ziploc-style bags (if you find a cache that needs a replacement bag around the logbook, you can do it as a kindness to the cache owner) Pencil sharpener (or a few, so if you come across a cache with only a pencil, you can leave the sharpener) A small mirror with an extendible handle (you may want to use it in big holes in trees, to make sure that no critter is in there before you look more closely for the cache; some of these come with a magnetic end, as well) A small garden hand shovel (even winter accessible caches occasionally need to be dug out of a bit of snow) Rubber or gardening gloves (if a hole in a tree looks icky, gloves help) Dry socks A light windbreaker jacket (depending on the season) Dry gloves or mittens (depending on the season) Plastic grocery bags or garbage bags (if you see litter on the way to or from the cache, why not pick it up while you’re there?) Small binoculars (good for spotting caches that are high in a tree) Small camera Geocache Sizes Geocachers are a creative bunch of people, so new cache set-ups and containers are always being created. However, here are some examples of different types of cache containers for each of the different sizes. Remember, many containers are not easy to find. Most small and micro containers are camouflaged in some way, whether tucked inside a stump; covered with sticks, leaves, bark or pine needles; or placed somewhere very unexpected. Geocaching Resource Guide • 45 Large These containers are usually not that difficult to spot. However, because they are difficult to hide, they tend to be placed in more remote locations, where muggles are less likely to stumble onto them. If a container can hold 20 litres or more, it is a large cache size. The container behind this geocacher’s head is an emptied and repainted ammo can (metal containers used to store ammunition). A five-gallon bucket was used for the first ever geocache, and they are still sometimes used. 46 • Geocaching Resource Guide Regular These containers are between 1 litre and 20 litres. Most of them are plastic containers or smaller ammo cans, somewhere around the size of a large shoebox. Most geocaches in the woods are either regular or small size. These two containers are ammo cans. A common cache set-up is an ammo can in the crook of a few trees. Plastic “lock and lock” containers are also popular cache containers. This photo is shows a regular size lock and lock and two small sizes. These containers are also often covered with camouflage tape, or they are spray-painted with camouflage colours. Geocaching Resource Guide • 47 Small Small containers are those between 100 millilitres and one litre. Most often, they are about the size of a sandwich container. Because these containers are smaller, they are easier to camouflage, so they can be more difficult to find. Many geocaches are made from empty peanut butter jars (thoroughly washed and bleached to remove any food odour). The container on the left was created to look like a tornado was inside the container. Another popular choice for small size cache containers is old vitamin or pill bottles. These must also be thoroughly washed and bleached to remove any odours before you place it as a cache. 48 • Geocaching Resource Guide Sandwich-size lock and lock plastic containers are popular cache containers. They seal tightly, locking closed on all sides, so the contents stay dry. Micro Less than 100ml. Examples: a 35 mm film canister or a tiny storage box typically containing only a logbook or a logsheet. A nano cache is a common sub-type of a micro cache that is less than 10ml and can only hold a small logsheet. These metal containers are called bison tubes. They can be hidden inside a larger container, or they can be hung from a tree or fence, etc. on their own. Other micro containers can be magnetic key holders or fake bolts. These tiny containers are actually nano size, but they fall under the micro category. The one below is magnetic, so this type is often used in urban cache hides (such as on the underside of park benches). Geocaching Resource Guide • 49 Other Sometimes, cache owners do not want to reveal the cache size in the listing, because they want to surprise finders. Below are two examples of other size caches. Being large and easy to spot does not necessarily mean that you will be able to find the logbook easily. It may be inside a bison tube somewhere behind a trick opening. If the cache size were listed as micro, it would be a big clue to finders. Types of Geocaches So you have a good idea of what kinds of containers you might be hunting for. But there is more to the geocaching experience than just the search for the container. For example, sometimes, you need to go to several different spots for clues (see the Tag section below) before you get to the container, or you have to solve a puzzle to find out where you should look. To give geocachers a better idea of what is involved in a certain geocache, they are sorted into types. In the top left corner of a cache listing page, just before the title, is a little picture, or icon. Each icon represents a different type of geocache. The type of geocache does not affect its size. 50 • Geocaching Resource Guide Video YouTube GoGeocaching channel: Geocaching.com Presents: Cache Types Caches with containers However differently geocaches might be set up, most of them have containers that you must find, and then sign the log book included in it. Traditional Cache This is the original geocache type. It always has at least a container and a log book or logsheet. Larger containers usually include a pen or pencil and geoswag (items for trading). The coordinates posted on the cache listing page provide the cache’s exact location. Multi-Cache A multi-cache (“multiple”) takes you to two or more locations. The final location is where you will find the container with the logbook. Most multi-caches have a hint to find the second location, which has a hint to the third, and so on. The clues can be in containers, or on tags placed on trees or other objects. The clues can also come from information available at the location, for example on signs already there. The posted coordinates may be your starting point, or it may be another significant spot for the cache. Read the description carefully to find out where to start. Mystery or Puzzle Caches This type of cache may involve puzzles, whether simple or complicated, that you need to solve to determine the coordinates for the final container. If a cache set-up includes elements of both multi-caches and mystery/puzzle caches, or if the cache set-up doesn’t properly fit any other type of cache, it’s generally categorized as a mystery/puzzle. Most often, the cache location is within one kilometer of the posted coordinates, but for a few of these cache types (mostly older ones), the actual cache location can be tens of kilometres away. Letterbox Hybrid Letterboxing is another form of treasure hunting that uses clues instead of coordinates. It has been around much longer than geocaching. In some cases, the letterbox owner has made their container both a letterbox and a geocache and posted its coordinates on Geocaching.com. If you find a stamp inside a Letterbox Hybrid, it is not swag for trading; every letterbox has a unique stamp that letterboxers use to stamp in a special booklet that they carry. And each letterboxer has their own stamp that they use in the letterbox logbook. To learn more about letterboxing, visit www.letterboxing.org. Wherigo™ Cache Wherigo is a program or app for both GPS devices and smartphones. It lets you play GPSbased adventures in the real world—a bit like being in your own video adventure game. Many Wherigo caches are set up similar to a multi-cache, but with an extra gaming element added (such as interacting with characters on the way to the cache container). To play a Wherigo, you have to first download a cartridge to your GPS device or smartphone (remember that not all GPS devices can play Wherigo cartridges). Learn more at Wherigo.com. Geocaching Resource Guide • 51 Container-less cache types Some cache types do not require finding a container. They are focused on different kinds of experiences. A cache page is still created for them, and you can log them, but you will get “Attended” as a choice instead of “Found it”. They count toward your total number of caches found. Event Cache An event cache is a gathering of local geocachers or geocaching organizations to discuss geocaching. The event cache page specifies a time for the event and provides coordinates to its location. Event caches are often held at restaurants or community centres. There is a logbook to sign, and trackables are often exchanged. After the event, the cache is archived. Mega-Event Cache A mega-event cache is an event cache that is attended by at least 500 people. Mega-events must offer at least one day of planned activities, but there are often several days of additional activities. Some mega-events attract geocachers from all over the world and are held annually or bi-annually. Event Etiquette You should always post a “Will attend” log for event, mega-event and CITO caches, so that the organizers can plan properly for the right number of attendees. If your plans change, be sure to update or delete your log. After the event, remember to post an “Attended” log to get your smiley! Cache In Trash Out Event Cache In Trash Out (CITO) is an activity that recognizes the importance of the environment for geocaching – anytime while searching for caches, geocachers are encouraged to collect litter along the way and properly dispose of it. Cache In Trash Out events are larger gatherings of geocachers that focus on cleaning up garbage, removing invasive species, planting new vegetation or building trails. Often, new caches are placed in an area where a CITO event is being held, so that geocachers can hunt caches while they are working. EarthCache An EarthCache is a location people can Video visit to learn about a unique geological YouTube feature. The coordinates for an GoGeocaching channel: EarthCache are not for a container; in fact, Geocaching.com Presents: there is no container to find. The coordinates take you to EarthCaches a specific spot to see something special or to a trailhead. EarthCache pages include educational notes. To log a find for an EarthCache, you are usually required to take a photo of something or to answer some questions about the area, which you have to email to the cache owner. For more information about EarthCaches, visit www.earthcache.org. 52 • Geocaching Resource Guide Rare geocache types If you want to do one of these types of caches, you will have to travel—these caches are only available in one particular place (although the GPS Adventures Maze Exhibit cache does travel). Groundspeak Headquarters Cache The Headquarters Cache is located at Groundspeak headquarters (HQ) in Seattle, Washington. Anyone can visit HQ to find and log the cache, but you should send an email first to [email protected]. GPS Adventures Maze Exhibit The GPS Adventures Maze Exhibit is a traveling exhibit that goes to museums and similar locations all over Canada and the United States. GPS Adventures Mazes are designed to teach people of all ages about GPS technology and geocaching through interactive science experiences. If you go to the exhibit, you can log your attendance, and it counts toward your total number of caches found. You can learn more about it at gpsmaze.com. Project A.P.E. Cache In 2001, fourteen caches were placed together with 20th Century Fox to support the movie Planet of the Apes. Each cache represented a fictional story in which scientists revealed an Alternative Primate Evolution. They were in specially marked ammo cans, and each cache had an original prop from the movie. Only one Project A.P.E. cache still exists today, in São Paulo, Brazil—Mission 4: Southern Bowl (GCC67). Grandfathered Cache Types Grandfathered caches were placed before some of the rules changed. They are still active and can be logged, but geocaching.com does not allow any new caches of this type to be created. These cache types are all container-less. For virtual, webcam and locationless caches, similar categories for them exist on geocaching.com’s sister website, waymarking.com. Virtual Cache Like an EarthCache, a virtual cache is about discovering a location rather than a container. The difference is that virtual caches can be any kind of place, not just those with interesting geographical or geological features. The place can be interesting because of its historical significance, the view… The requirements for logging a virtual cache vary—you may have to answer a question about the location, take a picture, complete a task, etc. Whatever it is, you must visit the coordinates before you can post your log. Webcam Cache These caches use existing web cameras placed by individuals or agencies that monitor various areas like parks or business areas. To log this type of cache, you need to first get in front of the camera. You’ll need a friend to visit the website that displays the camera shot while you Geocaching Resource Guide • 53 are there, so that they can save the picture of you. You usually have to post the photo of you with your “Found it” log. If you have a smartphone and a data plan, you may be able to take your photo yourself, if you visit the webcam’s website while you are still in front of the webcam. Locationless (Reverse) Cache The idea of a locationless cache is that it works in the opposite way to a traditional cache. Instead of finding a hidden container at posted coordinates, you find a specific object and log its coordinates. 10 Years! Event Cache A 10 Years! event cache is a special type that was developed for events held April 30-May 3, 2010 to celebrate ten years of geocaching. Because they were for events only, and no new ones are being created, it is impossible to find any of this cache type. However, you may see the icon from time to time in another cacher’s profile. Geocaching at Night Geocaching after dark is almost unavoidable in Canada, unless you skip a few seasons. Just be sure to be properly prepared with extra clothing and a flashlight. Safety glasses are a good idea, too—small branches are hard to see at night, and many geocachers have been poked in the eye. Some caches can be found more easily, or even only, after dark. Most night caches use reflectors placed on trees or other objects to mark the trail to the cache. These are most visible at night, if you use a regular flashlight (the light from LED flashlights does not reflect as well). Geocache Ratings—Is this a good cache for me? Taking note of the difficulty and terrain ratings for a cache can help make your geocache hunt as successful as possible (not to mention ensure your safety). When you were selecting your first cache to hunt, you learned about the blue stars for difficulty and terrain. You might remember that there are up to five stars for each. Look at the chart on the next page for more details about what they mean. Difficulty and terrain ratings These descriptions are generalizations. Some cache owners may interpret the ratings differently, so you always have to be prepared for the possibility that the terrain may be more difficult than you were expecting. Ratings can include half-stars as well. 54 • Geocaching Resource Guide Stars Difficulty Easy – Cache is in plain sight or location is fairly obvious. Moderate – Cache could be in one of several locations. Hunter may have to look for a while. Challenging – Cache may be very well hidden, may be multi-leg, or may use clues to location. Difficult – Cache likely requires special skills, knowledge, or indepth preparation to find. May require multiple days or trips to find. Extreme – Finding this cache requires very specialized knowledge, skills, or equipment. This is a serious mental or physical challenge. Terrain Wheelchair accessible – Paved pathways (asphalt, concrete, or boardwalks). Only slight elevation changes. Easy to do in a wheelchair, stroller, bike, etc. No trail overgrowth. Moderate terrain – Trail is well-packed dirt. You could ride a regular bicycle or push a stroller on this trail without too much effort. Elevation changes slight enough that someone could ride a bike up such a slope. Light overgrowth that an adult could step over. Challenging terrain – Trail could be gravel, sand, mud, etc. or just an animal trail. If you're riding a bike, it had better be a mountain bike. Elevation changes are so steep that you probably could not ride a bike up this slope, but could push it up. Overgrowth could be waist-high, and could include thorny or poisonous plants. Experienced outdoor enthusiasts – There is no real trail, though you could be following a stream bed. Severe elevation changes. The only way up the slope is to use your hands. Going down may require the use of your backside. Very heavy overgrowth, almost certain to include thorny or poisonous plants. Special equipment required – You may need a canoe/kayak, or equipment for diving, mountain climbing, ice climbing, or caving (spelunking), for a few examples. Geocaching Resource Guide • 55 Tags Some caches (multi-caches) require you to go to a first location, and get information from a tag on a tree, post or other object. Using that information, you can figure out where to go next, where you will probably find another tag. After a few repeats, you will get to the cache. Tags are small, so it helps to know what you can expect to find the first time you try to find one. There are different types of tags. Here are two examples. This is a plastic, or dymo, tag. They can be black, blue or red. The numbers or letters are punched onto the plastic. 56 • Geocaching Resource Guide These are copper tags. They are easier to spot when they are new, because they are still shiny. As they get older, their brown colour blends into the tree more, and they can become very tricky to find. Geocachers and the Environment Unit 5 Fun and safe geocaching depends on a healthy environment. When the natural world is functioning normally, geocachers have more options for good hiding places for caches, as well as safer and more enjoyable travels to find caches. Camouflaging containers in a healthy ecosystem, whether forest, prairies or anywhere else, is easier than trying to hide them in a polluted and sickly ecosystem. In a forest, for example, trees with lots of leaves and a rich network of branches are good spots for geocaches. Part of a healthy forest ecosystem also includes fallen trees, leaving stumps and empty logs that are perfect for a hiding a cache container. Undergrowth that is thick and varied helps to hide caches, too, even those that might otherwise be visible a long way off. Getting to a cache is safer and more enjoyable when there is no litter or pollution along the way. Broken glass, rusted metal and chemical spills (old battery acid, paint solvents, oil and gasoline, for a few examples) are hazardous for people and animals alike. Chemical spills can give off toxic fumes, which can harm you before you even know they’re there. Even if the fumes are not harmful, they can also cause bad odours, making for an unpleasant trip to a cache location. For these reasons and more, geocachers do what they can to reduce litter in natural places. They also try to cause as little environmental damage as possible themselves. Cache In Trash Out (CITO) CITO is something that geocachers do regularly while they are geocaching. When you are geocaching on a trail, you may find food wrappers, empty water bottles, old tires, etc. If you are prepared with a plastic bag for garbage, you can pick up small items right away, and carry it in your pack until you are finished geocaching, then dump it into a garbage can. Larger items may or may not be easily removed from the trail. If you can’t take it with you right away, you can mark a waypoint for the spot, and come prepared if you are back on that trail again soon. If there are a lot of large items or a lot of litter generally, you may want to consider calling in extra help – why not organize a CITO event?! Geocaching Resource Guide • 57 CITO events get a cache listing page, and are open for anyone who wants to participate. Since 2002, geocachers around the world have participated in annual International Cache In Trash Out weekends, held around the same time as Earth Day (April 22). However, a CITO event can be held at any time. Many CITO event organizers partner with local conservation authorities or trail associations. Success! One full garbage bag for each geocacher. In just one morning, this large group of geocachers dragged several truckloads of garbage out of a large trail system. They found dozens of tires, some mattresses, a couch and even an antique wringer-washer. Want to organize a CITO event? Visit www.geocaching.com/cito/ for tips and to download a CITO logo for your cache listing. Another helpful website is geocacher-u.com (click on Geocaching 201 – The Art of the Hide, then click on Organizing a CITO Event). 58 • Geocaching Resource Guide Taking Care of the Geocachers’ Playground In Unit 1, you learned about the Geocachers’ Creed. One of the points in the Creed is “When placing or seeking geocaches, I will minimize my and others' impact on the environment.” In other words, geocachers should avoid damaging the environment. The Geocachers’ Creed mentions Leave No Trace principles. Leave no Trace is an organization that encourages responsible outdoor recreation. They created a set of principles (general ideas) and suggestions to help people understand how they can enjoy outdoor activities without damaging the environment. These are some practical suggestions for Leave no Trace geocaching: • Learn about the special concerns for the area that you will be in. For instance, are any species of animals or plants endangered? Should you do anything special to avoid harming them? • Stick to established trails as much as possible. • If you are geoaching with a large group and you are going off-trail, try to split up into smaller groups so that not everyone is trampling the same area. • Whatever you carry in with you to a cache, you should be carrying out (except for swag that you leave in a cache, of course). • If you have to “go” while in the forest, dig a hole for solid waste and cover it back up. Used toilet paper should be stored in a Ziploc-style bag and carried back out. • Leave everything as you found it, whether it be rocks, plants or some kind of historic artifact, except… • If there is trash in the area, pick it up on your way out. • When you place a cache, do not harm trees or destroy vegetation. If you need to attach something (like a tag) to a tree, use only thumbtacks or very small nails. • If you have placed a cache and then later lose interest in geocaching, be sure to go pick up your container and archive the listing. An abandoned cache is just more litter. • If you encounter wildlife, do not follow or approach them. Do not feed them. Can you think of any other suggestions? The better care we take of the environment now, the longer we can continue to enjoy it for geocaching and all other outdoor activities. Geocaching Resource Guide • 59 Unit 6 Hiding Geocaches Many new geocachers quickly become excited about geocaching and want to immediately hide a cache of their own. The enthusiasm is great, but it must be matched by taking the time to learn how to do a good job of hiding a cache. It is frustrating and disappointing to hide a cache, only to have it muggled or to get negative comments from other geocachers. This unit is near the end of this book, because you should have lots of practice finding geocaches before you go out to hide one. Some people suggest waiting until you have found at least 100 caches! If you try to find a variety of types and sizes of caches, with a range of difficulty ratings, then just a couple dozen caches should be enough experience to hide one, as long as you follow the advice in the next few sections. Finding that many will give help you learn about Video different ways to hide a cache, and will help you find out YouTube what your preferences are. If you hide a cache that is GoGeocaching channel: something you would enjoy finding, chances are good that Basics of Hiding a Geocache other geocachers will like it, too. Before you decide what kind of a cache to hide and where, read the tips and suggestions in the next sections. You can also visit this web page for more information: www.geocaching.com/about/hiding.aspx. Choosing a Location A good location is the most important factor for hiding a good cache. Factors to think about include legal issues, privacy concerns and safety concerns. Certain buildings and locations are not allowed to have caches placed near them, or they have rules of their own. For example: • No caches are allowed on airport properties, nor within 50 metres of a railroad track. • In Ottawa, no caches are allowed near the Parliament buildings. • Most federal and provincial government buildings will not allow caches on their property (and remember that you need the permission of a the owner to place a cache on their property) – security guards naturally become suspicious when they see people “wandering” on the grounds. • Parks Canada does allow caches in national parks, but only with permission and only if the cache is made and placed a certain way. Details are on this web page: www.pc.gc.ca/eng/docs/pc /guide/geocache/index.aspx • Caches may not be banned on city bridges, but they are not a good idea. Many such caches have been mistaken for bombs, and police have had to be called in to remove them. 60 • Geocaching Resource Guide The cache reviewers at geocaching.com will not publish cache listings if they do not follow certain guidelines. They are listed below, but you can get more detailed information about them on this web page: www.geocaching.com/about/guidelines.aspx Geocaching.com’s Geocache Placement Guidelines 1. All local laws and documented land management policies apply. 2. You assure us that you have the landowner's and/or land manager's permission before you hide any geocache, whether placed on private or public property. 3. Geocaches are never buried, neither partially nor completely. 4. Geocache placements do not damage, deface or destroy public or private property. 5. Wildlife and the natural environment are not harmed in the pursuit of geocaching. 6. Geocaches are not placed in restricted, prohibited or otherwise inappropriate locations. 7. Physical elements of different geocaches should be at least 0.10 miles (528 ft or 161 m) apart. 8. Geocaches are allowed in space, on other planets and in spacecraft. Even if a location is legal, it may not be a good choice if it causes concern about privacy and safety. Caches should not be placed near someone’s private property if it is likely to upset them or cause a disturbance (some geocachers may come searching at night with flashlights; as well, if there is a dog in someone’s yard, it likely will not keep quiet if people are rustling in shrubs nearby). Caches in or very near playgrounds or schools are especially awkward for adult geocachers who are geocaching alone. As well, do not place a cache in a dangerous spot, such as near busy highways or on slippery riverbanks. Those are a lot of “don’t’s”, so here are some “do’s”. Good locations include: • Those with something special to see, like a great view, interesting natural features or historically significant structures. The crooked trees near Hafford and the War Veterans Memorial in Shell Lake are both good examples. • Those that take you down a great trail to get to them. • A place that is special to you for a sentimental reason. • A place that offers a special challenge to other geocachers, such as a rock wall where you can place an especially tricky hide. • A place that you (or a very reliable friend or family member) can get to a few times a year for cache maintenance. • A place that you have permission to use. Geocaching Resource Guide • 61 When you have determined the spot where you want to place your cache, you need to find the perfect hiding spot. Remember – geocaches can’t be buried. If you find a natural hole, you can use it, but remember that no one will be able to find your cache when there is snow, so you will have to disable it during winter. Look for natural features that will provide a good hidey-hole or will camouflage a container. Good spots include holes in trees (but be sure you’re not disturbing a critter), tree “elbows” (where a branch connects to a tree) or “crotches” (the point where three or more trees come together), fallen trees (either the log or the stump), rocky outcrops, or evergreen trees. When you are certain of your spot, take several readings of the coordinates (use average waypoint feature, if your GPS device has it). Making a Cache Container Once you have a location you are happy with, and you are pretty sure that it is not too close to anyone else’s cache, check out the hiding spots available. Look for the biggest spot you can find that is still well hidden from muggles. The container you choose should fit in that spot. Appropriate containers If you need ideas for cache containers, review Unit 4 – Hunting Geocaches. You probably already have some ideas, based on other caches that you have found now. A few points to consider are: • Be sure that it is weather-proof. Cache containers in Canada must be not only waterproof, but also below-freezing proof. Most light plastic containers (the disposable plastic kind) do not last more than one or two seasons. Freezing and thawing is hard on the plastic, and the lid will warp, letting water in to the container. • If it is a small to regular size container, especially one that will be placed in or near an urban centre, some part of it should be transparent (the bottom is good), even after you have camouflaged it. If a muggle should stumble on it, they can see that there is nothing dangerous inside. • If you use a container that held food (such as a peanut butter or mayonnaise jar), check to see that it still seals well. Then wash and bleach it thoroughly to remove any hint of food smell. Animals have sensitive noses and they will chew on containers that smell good to them. Containers to avoid: • No cache should ever resemble a pipe bomb. For example, some caches made out of plumbing pipes have caused bomb squads and police to be called out to deal with them, because muggles spotted them and became suspicious. • Glass containers are not a great choice, because they break easily and could hurt someone when they do. How do I camouflage a container? First, every geocache should have a label on it, identifying it as a geocache. This is especially important if you use an ammo can as a container. The label should cover up the markings on the side of the 62 • Geocaching Resource Guide container, so that it is not mistaken for still holding ammunition. Many styles and sizes of labels are available from geocache suppliers (see list in the Resources section), or you can make your own. Just be sure to allow for a spot for the label when you plan your container’s camouflage. There is an endless variety of ways that caches can be camouflaged, or made to blend in to their hiding spot. The best camouflage matches the environment where you are placing the cache. Some common ways to camouflage a container include: • Hunter’s camouflage tape (duct tape with a green and brown toned leaves and twig print on it). • Other kinds of duct tape that are close in colour to where the cache is hidden (grey duct tape if the cache is in a rock wall, for example). • Spray paint (green, brown or grey tones). • Gluing bark, moss, sticks or twigs, etc. to the top and sides of a container. • Create or purchase a special container, such as a fake rock, or big pine cone, etc. Both of these contain geocaches. There are no rules about camouflage. Be creative! If you think something will work and will stand up to the weather, give it a try. What should I put in a geocache? The size of your container will limit what can be put into it. At the very least, every container, even the nanos, must contain a logbook or log sheet. Larger containers should also include: • A pen or pencil (a couple of them are ideal) • A sharpener (if you’ve included a pencil) • Enough swag (trading items) to comfortably fit in the container (be sure to include some swag for children) Geocaching Resource Guide • 63 • A small prize for the first finder, if you like (common first to find [FTF] prizes are $5 coffee cards or other gift cards, FTF buttons or pins, special lanyards, etc.) • A cache note to tell accidental finders what the container is for. A sample note from geocaching.com is included in the Resource section. Other sizes of the same note are available from Geocacher University (geocacher-u.com) on the Downloads and Printables page Publishing Geocaches Once you have a location and a container ready to go, you are ready to start the process of creating your cache listing. It is helpful to think of a cache name ahead of time, as well as prepare the description that you want to use for your cache, so that you can copy and paste it into the online form at geocaching.com. About mystery/puzzle cache listings If you are creating a mystery/puzzle cache, you may want to consider adding a solution checker to the cache listing. Visit the website, enter the information for your puzzle solution, and follow the instructions for placing a link on your cache listing page: www.geochecker.com 1. Go to geocaching.com. Under “Play”, click on “Hide & Seek a Cache”. On the right side of the page, you will see this box: Click here to begin filling in the information for your cache listing. Click on one of these links to download and print a cache note. 64 • Geocaching Resource Guide 2. Click on “online form”. 3. Enter the name of your cache, your geoname under “Cache Placed By”(if it isn’t already in the field). Select which type of cache you are placing. Check the boxes at the bottom to show that you “have read and agree to the Terms of Use Agreement” (do read them first!), and that you “have read and understand the Cache Listing Requirements and Guidelines.” 4. Enter your cache coordinates, then click on “Check coordinates on map”. Once you are sure that the location is correct, click on “Continue”. 5. If you have additional waypoints to include, enter them. Suggested parking or trailhead coordinates are always nice to include if there is any question about either. To save any additional waypoints, click on the little disk icon under “Actions”. Once you are finished on this page, click “Continue”. 6. The next page has boxes for a cache summary and cache description. Under “Cache Summary”, type in a short description of what geocachers can expect from your cache. For instance, “This traditional cache will take you to the best lake sunset view in northern Saskatchewan.” Under “Cache Description”, enter the longer description that you prepared earlier. 7. If you would like to: • Include a hint, select “Yes” after “Include a hint?” Then enter the text for it in the box that opens up. • Include a photo as the background for your cache listing, it must be available on the Internet somewhere, such as a Flickr account or your own web page. Include the URL in the box. • Add a link to an informational web page, include the URL in the box. Links to commercial sites are not allowed. Click on “Continue”. 8. Select the cache size, and the difficulty and terrain rating. You can refer to the chart in Unit 4 – Hunting Geocaches, or, better yet, click on the link to geocaching.com’s rating system. It is a short questionnaire, and you will immediately see the suggested rating for your cache. 9. Select any attributes that will be helpful for geocachers doing your cache. Click on “Continue”. 10. The next page asks you for any special notes for the reviewer. When you are done, click “Save and Exit”. You will get a chance to review all your information before it is actually sent to the reviewer. 11. On the next page, you will see what your cache listing will look like. If you need to make any adjustments, click on “Edit Listing”. You will see a page that summarizes all the information you entered. Make the changes you need to, then click “Submit Changes”. A note will appear at the top of the page: Your cache has been edited. view listing. Click on “view listing” to go back to your cache listing page. 12. When you are happy with your cache listing page, click in the box beside “Yes, the cache is in place and ready to be found”, then click on “Submit for Review”. Geocaching Resource Guide • 65 Reviewers Before it gets published, every cache listing must be reviewed to be sure that it follows the guidelines. Over 400 volunteers from about 40 countries take on this job. Reviewers are generally assigned to one region, so once you’ve seen several new geocaches published for your area, you may start to recognize the reviewers’ geonames. Volunteers are fellow geocachers who have a lot of experience with geocaching. They are knowledgeable and very enthusiastic. They also have regular jobs. Because they volunteer during their spare time, they can’t always review a cache listing right away – you may have to wait a few days before you hear anything about your submitted cache listing. Be patient. The reviewer may have questions for you, since he or she may not live in the same area as you and are relying only on what they can see from satellite maps. Giving them as much information as you can from the beginning will speed things along, and will be appreciated by the reviewer. And when your cache is published, be sure to thank your reviewer! 66 • Geocaching Resource Guide Unit 7 Other GPS-based Activities Geocaching is not the only activity that uses GPS technology, and it isn’t even the only one that involves hunting for something. Depending on what you like about geocaching, you might be interested in trying one or more of the following activities. Waymarking Waymarking is a way to mark unique locations to point them out to other people. You use your GPS to mark any interesting locations as a waymark, or to go to a waymark created by someone else. The locations are sorted into categories, so that anyone who is interested in, say, ghost towns can see all of the ghost town waymarks created by other people. Waymarking.com is run by Groundspeak, the company that runs geocaching.com. Munzee Munzee is a scavenger hunt game for smartphones only. The goal is to find items that other people have marked with a QR-code style barcode, and “capture” it by scanning the QR code. You earn points by capturing other people’s munzees or when other people capture yours. You then level up and gain rank based on your score. Munzees can be hidden in containers, camouflaged or even in plain view. They can also be found at businesses. BIT CachesTM BIT stands for “Bound ID Tag” – the cache is bound in plastic (laminated). It has no container, log sheet or swag. BIT caches are actually a type of cache on opencaching.com. A BIT cacheTM is a laminated tag with a password and other identifying information printed on it, including the password you need to log the cache. Geocaching Resource Guide • 67 Resources Geocaching Associations and Discussion Forums Province Association or Forum Website Alberta • • • • • forums.calgarycachers.ca • geocachingedmonton.com/forum/ • geocachingedmonton.com/forum/ British Columbia Saskatchewan Manitoba Ontario Quebec New Brunswick Calgary Area Cachers Geocaching Edmonton Geocaching Edmonton South East Alberta Region Cache Hunters • British Columbia Geocaching Association • Geocaching Community of Greater Victoria • Metro Vancouver Geocachers • Mid Island Geocachers • Prince George Cachers • Vancouver Island GPS • Saskatchewan Cachers • Saskatoon and Area Geocaching Association • Manitoba Geocaching Association • Ontario Geocaching Association: • Canada’s Capital Cachers • Haldimand-Norfolk Area Geocachers • Northern Ontario Geocachers • Kingston Area Geocachers • NorWest Ontario Geocachers • Toronto Area Geocachers • Association Géocaching Québec • Amicale des Géocacheurs de la Grande Région de Québec • Géocaching Montréal • Québec Geocaching • Cache Up NB • Atlantic Canada Geocaching Association (N.B., Nfld. and Labrador, N.S. and P.E. I.) 68 • Geocaching Resource Guide • http://searchmh.com • • • • • • http://www.bcgeocaching.com www.gcgv.ca mvgeocaching.com www.migeocaching.org www.pgcachers.ca www.vigps.com • www.saskcachers.com or www.skgeocaching.com • saskatoongeocachers.weebly.com • www.mbgeocaching.ca • • • • • • • • • • • www.ontgeocaching.com www.canadascapitalcachers.ca www.kwic.com/~hnag/ forum.northernontariogeocachers.com kingstongeocaching.com www.nwogeocachers.com www.torontogeocaching.com www.geocaching-qc.com www.aggrq.com/forum/index.php www.geocaching-montreal.com www.quebecgeocaching.ca • www.cacheupnb.com • www.atlanticgeocaching.com • www.atlanticgeocaching.com Nova Scotia • Atlantic Canada Geocaching Association (New Brunswick, Newfoundland and Labrador, Nova Scotia and Prince Edward Island) Newfoundland and Labrador • Geocaching Newfoundland and Labrador • Atlantic Canada Geocaching Association (New Brunswick, Newfoundland and Labrador, Nova Scotia and Prince Edward Island) • www.geocachingnewfoundland.ca • www.atlanticgeocaching.com • Atlantic Canada Geocaching Association (New Brunswick, Newfoundland and Labrador, Nova Scotia and Prince Edward Island) • www.atlanticgeocaching.com Prince Edward Island Nunavut, Yukon and North West Territories • Nothing as of July 2013 Canadian Businesses that Sell Geocaching Supplies • • • • • • Cache at Night (Cambridge, ON) Cacher’s Corner Store (Whitby, ON) Cacher’s Toy Box (Peterborough, ON) Landsharkz (Victoria, BC) NL Geocaching (Clarke’s Beach, NL) GeoWyrm’s Geocaching Supplies (Calgary, AB): stores.geowyrm.com/StoreFront.bok Downloadable Cache Notes and Labels • Geocacher’s University (Downloads and Printables): geocacher-u.com Geocaching Resource Guide • 69 Cache Note Geocache Site – Please Read Congratulations, you've found it! Intentionally or not! What is this hidden container sitting here for? What the heck is this thing doing here with all these things in it? It is part of a worldwide game dedicated to GPS (Global Positioning System) users, called Geocaching. The game basically involves a GPS user hiding “treasure” (this container and its contents), and publishing the exact coordinates so other GPS users can come on a "treasure hunt" to find it. The only rules are: if you take something from the cache, you must leave something for the cache, and you must write about your visit in the logbook. Hopefully, the person that hid this container found a good spot that is not easily found by uninterested parties. Sometimes, a good spot turns out to be a bad spot, though. If you found this container by accident: Great! You are welcome to join us! We ask only that you: • Please do not move or vandalize the container. The real treasure is just finding the container and sharing your thoughts with everyone else who finds it. • If you wish, go ahead and take something. But please leave something of your own for others to find and write it in the logbook. • If possible, let us know that you found it, by visiting the web site listed below. Geocaching is open to everyone with a GPS and a sense of adventure. There are similar sites all over the world. The organization has its home on the Internet. Visit our website if you want to learn more, or have any comments: http://www.geocaching.com If this container needs to be removed for any reason, please let us know. We apologize, and will be happy to move it. 70 • Geocaching Resource Guide Glossary AMIAT: A Micro In A Tree. A type of cache that many geocachers love to hate. Ammo can: A metal container that is used to hold ammunition. They are strong, durable and waterproof, so they are often used as cache containers. Bushwack: Going off-trail. This usually happens on the way to the cache; only after finding the cache do most geocachers then find the nice easy trail that they could have followed. BYOP: Bring Your Own Pen/Pencil. Often used in a cache description for a cache that is not big enough to hold a pen or pencil. Cache: Short form of geocache. CITO: Cache In Trash Out, picking up trash while geocaching. Also a type of geocaching event. CO: Cache Owner. That is, the person who hid the cache. DNF: Did Not Find. If your search for a cache is not successful, you should log a DNF. FTF: First To Find. Geocoin: A type of trackable item. It is meant to be passed along to another cache, not kept as a souvenir or used for trading in other caches. Geoname/geohandle: A geocacher’s username on geocaching.com. Log: The online entry that a geocacher submits to tell about their experience while searching for the cache. Geoswag: Items that are placed in a cache or carried by a geocacher, for the purpose of trading in caches. GPS: Short for Global Positioning System, also sometimes used to refer to GPS devices. GRC: GuardRail Cache. A magnetic cache placed on a metal guard rail at the side of a road. GZ: Ground Zero or Geo-zone. The spot where your GPS device is at or very near 0 metres from the cache. Log: An entry on geocaching.com that tells of the geocacher’s experience while searching for a cache. Geocaching Resource Guide • 71 LPC: Light Post Cache. Also called a skirt-lifter. A cache hidden under the “skirt” of a light post, usually in a parking lot. Another type of cache that many geocachers love to hate. MKH: Magnetic Key Holder. Muggle: Anyone who does not know about geocaching. Muggled: Describes a cache that has been removed or vandalized by a non-geocacher. PAF: Phone-A-Friend. The friend in this case is someone who has already done the cache and you are trying to get a hint. Park and cache: A type of cache that does not require any kind of walk to the container. PLC: Parking Lot Cache. You won’t have to walk far for this cache. SL: Signed Log. Used by some geocachers in their cache logs. Smiley: A cache find. Refers to the “smiley-face” icon attached to “Found It” logs. STF: Second To Find the cache, just after it was published. TFTC: Thanks For The Cache. TFTH: Thanks For The Hunt or Hide or Hike. It shares the same purpose as TFTC, but can also be used when the cache was not found, but you enjoyed the walk and the search, anyway. TNLN: Took Nothing, Left Nothing. Used by some geocachers in their cache logs. TravelBugTM: A type of trackable item; a specially marked ID tag that can be attached to any item. Waypoint: A set of coordinates (latitude and longitude). XN: Exchanged Nothing. Combines TN and LN; nothing was removed or added to the cache. 72 • Geocaching Resource Guide 3830 Thatcher Avenue Saskatoon, Saskatchewan S7R 1A5 306-933-7727 • 306-933-7730 (fax) www.4-h.sk.ca • [email protected]