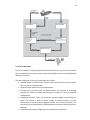
1
BRIDGE PROCEDURES MANUAL (BPM) for mpsv Rem Mermaid Anders Gerhard Wiberg Examensarbete för Sjökapten (YH)-examen Utbildningsprogrammet för sjöfart Åbo 2015 BACHELOR’S THESIS Author: Anders Wiberg Degree Programme: Degree Programme in Maritime Studies, Turku Specialization: Bachelor of Marine Technology Supervisors: Tony Karlsson Title: Bridge procedure manual (BPM) for mpsv Rem Mermaid _________________________________________________________________________ Date: 06.10.2015 Number of pages: 16 Appendices: 1 _________________________________________________________________________ Summary The Bridge procedures manual (BPM) I made for the Rem Mermaid is to help new bridge officers and other authorized personnel with the familiarization of the work and procedures on the bridge of Rem Mermaid. The manual is a general debriefing in how different parts of the ship work. One of the most important things in the manual is the emergency procedures in case of a failure or an unexpected event, vile in operation. The other purpose of this thesis is to describe what features to include in a good manual, how it can help a company and how to develop such a manual. I have described an order in with to start planning and writing a manual. I have collected the most important things to think about according to my opinion. Manuals can be written in as many ways as there are writers. This manual is made in my way and it was accepted by our company. This is the first version and the manual will be edited in time. _________________________________________________________________________ Language: English Key words: Manuals, bridge manual, BPM _________________________________________________________________________ EXAMENSARBETE Författare: Anders Wiberg Utbildningsprogram och ort: Utbildningsprogrammet för sjöfart, Åbo Inriktningsalternativ/Fördjupning: Sjökapten YH Handledare: Tony Karlsson Titel: Bridge procedure manual (BPM) for mpsv Rem Mermaid _________________________________________________________________________ Datum: 06.10.2015 Sidantal: 16 Bilagor: 1 _________________________________________________________________________ Sammanfattning Bridge procedures manual (BPM) som jag gjort för Rem Mermaid är till för att hjälpa nya officerare på bryggan samt annan behörig personal med familisering av arbetet och förfaranden på bryggan av Rem Mermaid. En allmän genomgång av hur olika delar av fartyget fungerar. En av de viktigaste sakerna i manualen är de akuta åtgärderna vid händelse av ett fel under drift eller i en oväntad händelse. Det andra syftet med denna avhandling är att försöka beskriva vad som är en bra manual och hur man utvecklar en sådan. Samt hur den kan hjälpa ett företag. Jag har beskrivit i vilken ordning man skall börja planera och skriva manualen. Jag har samlat de viktigaste sakerna att tänka på enligt min mening. Manualer kan göras på lika många sätt som det finns skribenter. Den här är gjord på mitt sätt och den godtogs av företag jag jobbar för. Detta är den första versionen och manualen kommer att redigeras i framtiden. _________________________________________________________________________ Språk: English Nyckelord: Manual, bryggmanual, BPM _________________________________________________________________________ Förvaras: Examensarbetet finns tillgängligt antingen i webbiblioteket Theseus.fi eller i Novias bibliotek. Table of contents 1 2 Introduction ................................................................................................................ 1 1.1 Objective ............................................................................................................. 1 1.2 Delimitation......................................................................................................... 1 1.3 Research question ................................................................................................ 2 1.4 Method ................................................................................................................ 2 Background ................................................................................................................ 2 2.1 The general purpose of manuals........................................................................... 3 2.2 Lack of time and the amount of unnecessary information..................................... 3 2.3 The content of the manual.................................................................................... 3 2.4 What kind of manual............................................................................................ 4 2.5 The benefits of a good manual ............................................................................. 4 3 The development process of a manual......................................................................... 5 4 Making a manual ........................................................................................................ 6 4.1 Planning the Manual ............................................................................................ 6 4.2 Determining the purpose of the manual............................................................. 6-7 4.3 Determining goals................................................................................................ 7 4.4 Identifying the reader........................................................................................ 7-8 4.5 Make an outline and estimate the number of pages............................................... 8 4.6 How to gather information ................................................................................ 8-9 4.7 The level of detail and the choice of words ........................................................ 10 4.8 The right information in the right way................................................................ 10 4.9 Editing and reviewing ................................................................................... 10-11 4.10 Test Sections...................................................................................................... 11 4.11 Final editing.................................................................................................. 11-12 4.12 Control of the manual ........................................................................................ 12 4.13 Indexing the manual...................................................................................... 12-13 4.14 Responsibility for maintenance and revision of the manual ................................ 13 5 Bridge procedure manual for mpsv Rem Mermaid .................................................... 13 5.1 Purpose and planning of the manual................................................................... 14 5.2 Collecting information .................................................................................. 14-15 5.3 Making the manual ............................................................................................ 15 6 Summary ............................................................................................................. 15-16 7 References ................................................................................................................ 17 8 Appendices ............................................................................................................... 17 8.1 Appendix1: BPM manual for Rem Mermaid...................................................... 18 1 1 Introduction On board we have a ton of different manuals. On the bridge where I work we have manuals for every unit and device we have on board. These manuals are usually very good but also very specific. It can be difficult to get an overview of the basic procedures and functions if you need to read through every manual. This is why it was decided that a bridge procedure manual (BPM) is needed. The intention of this manual is to take the most important pieces from the other manuals and put them in to one. The bridge procedure manual should be easy to read and understand. It should contain only the most important procedures for running the vessel. The bridge procedure manual is also a requirement from some of the oil companies. The manual should be visible on the bridge so anybody can read it. 1.1 Objective The purpose of this thesis is to make a functional and user friendly bridge procedure manual. Incorporated only the most essential and important things. This manual were ordered by Rem Offshore ASA when they decided to make the BPM a part of their TQMS (total quality management system) system. 1.2 Delimitation One of the demands from company was that the manual should not be full of technical data and legal issues, these types of manuals already exist. There is no doubt that technical data and legal issues are important. However, the goal of this manual was to include the most relevant information and aim the main focus on the practical side. The manual is limited to what we on-board and the office think is the most essential and important thinks to include. These limitations are based on an open dialog between the crew and the office. Our charter has also been consulted. The bridge procedure manual is already in use on board the Rem Mermaid. It is a living document so it will be altered when things needs to be updated or changed. This is an important thing to remember when making or reading these kinds of 2 manuals. You always have be a little sceptic and give comments if something is wrong or not up to date. There was no specific criteria about the layout of the manual given from the company. 1.3 Research question The research question was how to make an easy to read and understand bridge procedure manual. What information to include and what information should be left outside. The manual is based on literature, research and group discussions. Discussions involved crew and office. I also underline the important of inputs from all bridge crew members. This is used this as a red line from the beginning. The bridge crew have given me feedback and pointers during the making of the manual, so I can be sure that I’m on the right track. 1.4 Method The methods that I have used for this thesis is according to literature and research on the subject. I have combined different methods to try to cover as much different angels as possible. I started with consulting the office on what kind of manual that they wanted. When the delimitation was established I picked out the manuals that to be included and read them. I had discussions with the bridge crew and the office to get their opinion. I wrote down all the things I thought was important and altered the information along the way. I kept some more meetings with the bridge crew to discuss their views on pros and cons. I made changes on the manual so that all parties were satisfied. One important notice is that this is the first version and this manual will be altered from time to time depending on our current job status. 2 Background Last time you read a manual, did you read it from the beginning all the way to the end? Probably not. If you are like most readers you read the manual hoping that it would help you to solve a problem, give answers to a question or simply help you to understand how something works. 3 You probably started with the table of contents in the front, scanned the headlines of the chapters and then after the topic that would likely contain the information you seek. Alternatively you started with the index at the back of the manual looking for the topic you are interested in. When you found the right section of the manual you probably started by turning the pages quickly and skim the headlines. When you have found the correct headline then you probably began skimming down through each paragraph with a word here and there. Only when you thought you were in the right place you began to read. Sounds familiar? This is how most people read a manual. It is important to remember that people do not read a manual like they read a book, from cover to cover. Most manuals are information sources. The reader is skimming and looking for information, only reading the relevant information. This means you cannot be sure where in the manual the reader will start. You also don’t know if the reader will or already have read other sections. Usually the lack of time and the amount of unnecessary information makes the reader quickly skim through the manual. 2.1 The general purpose of manuals Various types of manuals may have different purposes. For example a company can create manuals to monitor and communicate important decisions or to provide information about its activities and administration. Different types of manuals can be used for employees and outsiders. Then there are the pure technical manuals that only explain how something is put together, these manuals usually include drawings and part lists. There are also different manuals for different purposes. 2.2 Lack of time and the amount of unnecessary information People usually have more things to do than they have time for. Downsizing and budget cuts have increased the workload of employees. This leaves little time left to do extra things. So when we pick up a manual we simply do not have the time to read it thoroughly whether we like it or not. One of the most critical factors for the success of a manual is how long it takes for the reader to find the information he or she is looking for (Weiss, 1991, p. 17). 4 2.3 The content of the manual Quick access to information is one of the most important aspects when making a manual. This aspect determines how you should organize information, headlines and navigational aids, such as table of contents and index. It is important to bring only the important information to the reader and to exclude all other information. The writing should be as brief as possible with few unnecessary words or thoughts (Weiss, 1991, p. 21). You should make some assumptions about what the reader already have read. For example if you have introduced a technical term in the first chapter it does not mean you can constantly use the same term without defining it again (Weiss, 1991, p. 43). 2.4 What kind of manual Before you start writing you need to decide what type of manual you should make. Various manuals can have different aims and objectives. You should find out if documentation is already available on your subject in your company or if you need to start from zero. Then you need to consider how the new manual will fit in and what purpose it should serve. Identifying the reader is one of the most important things. Don’t start before you have a good plan and know what to do. 2.5 The benefits of a good manual The benefits of good and “up to date” a manual are many. Here are some examples: Manuals for explaining the roles and responsibilities of various departments and groups. Without clear procedures for every department and group tasks can be performed incorrectly or important jobs left undone. Reduce errors and mistakes. Mistakes cost time and money to fix. If the mistake is severe enough the company may be faced with legal charges. Clear step by step instructions will help to carry out duties correctly. 5 Customers expect to receive the same standard of service every time they use your company. Manuals provide instructions so that key functions are performed in the same way every time and the same standard of service can be provided every time. Improve efficiency and productivity. The manual itself will not make the business more efficient, but a carefully made, revised and updated manual can spear the company from costly inefficiencies such as unnecessary operations or outdated practices. Manuals help educate employees. Manuals are an excellent orientation tool for educating new and old employees. The manuals give information and guidelines to help employees to do their work. On hand information from manuals is a good way to save time, so that old employees don’t need to supervise new employees more than necessary. Meet legal and regulatory requirements. If the organization is heavily regulated by the law a well-documented and thorough manual provide better prerequisites to avoid problems (Robinson & Etter, 2000, p. 45-49). 3 The development process of a manual In addition to the benefits described in chapter 2.5 the benefits of good a manual, your company will also benefit from the process of developing a manual. The process itself can be as valuable as the end product. Here are some of the ways your company can be benefited by the process: Systematic evaluation of the operations. Making an operations manual forces the company to look carefully at every aspect of the company’s operations. This examination sometimes reveals areas where policies need to be developed, modified or changed to support the company’s goals and strategic direction. One of the best times to make or review an operations manual is under a significant organizational change, such as a reorganization or restructuring. The process of writing the manual helps to focus on and implement changes. Streamlined procedures. When you write about procedures, it sometimes becomes apparent that some procedures can be improved or changed to make them more effective. A key advantage of a good manual is that you get a smoother functioning organization. 6 Improved of staff relations. Buy bringing employees together to work on a manual will also provide them an opportunity to contribute with ideas on how to improve systems, procedures and avoid misunderstanding. Increased commitment. Employees involved in the process of developing a manual will mostly also increase their engagement in the company and in their correspondences with the policies and procedures available (Robinson & Etter, 2000, p. 76-82). 4 Making a manual The making of a manual is divided up into several different steps that should be done thoroughly. The manual and its sections should be produced in a certain sequence. This will help you to get a much better overview of the work. It will also facilitate the process when you have a clear idea of its contents. The theoretical parts before the actual writing is the basis for what the manual will include and how good it will be. 4.1 Planning the Manual Many people start writing a manual without a plan. It is tempting to quickly get progress, but do not start on your project before you have a clear picture of what it is that you want to get across to the reader. Plan your manual properly before you start writing, this helps you to ensure that the manual will meet its goals. A good planning will also save time, as the manual will need less altering later (Hackos, 1994, p. 12). It is also much easier to write if you know exactly what to write about. Planning the manual also helps coordinate any others involved in the writing. 4.2 Determining the purpose of the manual Start by asking; why do I write this manual and what purpose should it have. This will help you focus on the purpose of the manual. Manuals take much time and effort to produce, so it is important that these questions are carefully discussed and that all the parties agree. 7 Changes in purpose and goal late in the writing process will force you to make significant changes. Look at the context in which the manual should be. Find out if there is already a similar one. Identify and review other manuals, literature and information sources that already exist in the same context. There is no point in duplicating information or leave out important information that is not covered by other literature (Robinson & Etter, 2000, p. 94). 4.3 Determining goals Keep in mind the purpose of the manual and the goals you want to achieve. For the goals to be useful they should be clear and measurable. For example, if you are making a manual on procedures how to guide the bridge crew on the bridge routines, then the goal is to provide step by step instructions how the instruments work. You can have many goals for the manual. The more precisely you define the goals, the more likely you will achieve them. You should be careful with excessive or vague goals. For example, a goal of documenting each task for each position in the organization so that a new employee can take over a new position with no education, is probably not possible. Manuals can never eliminate the need for experienced professionals with good knowledge. Make a list of specific goals that you made for the manual. When you are ready to test the manual, look at your list and use these goals to guide your reading. If the goals are clear and well written in the text you should be able find them easily (Robinson & Etter, 2000, p. 13-15). 4.4 Identifying the reader Once you have determined the purpose and goals of the manual, then you should identify and profile the reader. You should talk to as many future readers as possible and possibly also with subject matter experts to obtain a greater understanding of what they require. Who is the manual intended for? Managers? Office workers? Operators? If your target group is well defined you have much better chance to provide the correct information. 8 Different target groups have different information needs. By understanding who is going to use the manual, you can identify in with manner the manual should be written in. That way you use the correct terminology so that the readers will understand (Katzin, 1985, p. 11). Here are some questions you can ask about the readers: What is their job? Do they have a specific task? What is their education level? How much do they already know about the subject? Are they motivated? Once you understand what kind of reader will use the manual, it will facilitate the provision of information. For example, if the manual is used in the field you should take into account that it should be easy to carry. Uploading the manual on to the internet or intranet is a good and easy way for everyone to get access to the manual. 4.5 Make an outline and estimate the numbers of pages The first thing to make is an outline. The outline shows the chapters, sections and headlines. The chapters, sections and headlines should be addressed in the same order they are presented in. Start with the chapters. When you are satisfied with the list of chapters, then list the sections in each chapter. You should not be afraid to try different variations for the chapters, some may need to be split or merge. When you are satisfied with the chapters and sections then choose a suitable headline for each section. Either list the headlines with one word or as a short paragraph. A good way to identify potential manuals is to look at the manuals developed by other companies. Many companies have placed their manuals on the Internet. Use their manuals to create ideas for your manual. Do not forget to list the title page, table of contents, introduction, glossary, appendices and other parts on the front and back of the manual (Robinson & Etter, 2000, p. 92). Once you have the outline done, go back and estimate the number of pages in each section. Include forms and other material. The number of pages is one of the most efficient way for you to estimate how long it will take to complete the manual. 9 4.6 How to gather information Making a manual consists of gathering all the necessary information, review it and then select only the necessary information to include in the manual. After that, you prepare notes and then the text. Necessary information for your manual may come from other documents, from subject matter experts, work flow analysis or from your own knowledge and experience. The challenge is to get this information compressed in to a document that you then can use in your manual. Examples of documents that you can benefit from: Earlier manuals of your organization Manuals from other organizations Manufacturer's documentation, specifications or operating and maintenance instructions Laws and regulations Complaints Problems identified by other organizations Search the internet for manuals and ideas from other organizations. If you want to integrate all or parts of their manual, ask them for permission first. You can get information from subject matter experts either by interviewing them or allowing them to prepare a draft, which you can then edit. Interviews and subject matter statements usually take a little longer to prepare but the facts are more reliable and can ultimately save you some time. The people who will use the final manual are usually the best sources of information and should be consulted and involved as much as possible. The success of the manual often lies with them. In the choice of subject matter experts, try to get representatives from different backgrounds, levels of experience and geographic areas (Robinson & Etter, 2000, p. 15). If you need to write instructions for the operation or maintenance of certain equipment, ask your subject matter expert to go through the steps in the use of the equipment. Then you see how the whole process works and it becomes easier to write about it. 10 4.7 The level of detail and the choice of words Consider how much detail that the reader needs. Often you need more details for beginners because they are unfamiliar with the topic, while experts may need general guidance. Provide just the right amount of information, because it will have a significant impact on the success or failure of your manual. Obviously, to determine the appropriate level of detail, you need to know exactly who your readers are. Having multiple audiences, both beginners and experts, will complicate the writing and it can result in you giving either too little or too much information. Choose short, everyday words. If possible, use the simplest words that define your meaning. Short simple words are easier and quicker to read for all levels of readers. Do not worry that you will "talk down" to your readers, even the most educated people will appreciate simple and easy to understand wording (Weiss, 1991, p. 117). 4.8 The right information in the right way The content is not the only important thing in the manual. It is also very important that you write in a way that the reader will not misunderstand the content of the text. The writer should try to imagine him/her self as the reader and think about what information he needs from the manual. The writer should always write from the reader's perspective. Although the writer believes that the information is good, sufficient and easy to understand the reader may not have same opinion. Therefore the writer should use a third party to read through the manual in order to get a different perspective. Only essential information that helps the reader should be included. A notice where to find more detailed description can be added as a parenthesis in the instruction. Analyse the text to give correct information and so that it cannot be misinterpreted. 11 4.9 Editing and reviewing When you have written a section you should send a copy to the subject matter expert for reviewing. This is an informal review immediately after writing a section but before editing it. Ask the subject matter experts to look for the following: Missing information Unnecessary information Technical content Appropriate organization Make it clear that you are not interested in spelling or grammatical issues. The content and organization can be improved considerably, so any fine tuning at this stage would be a waste of time. You may need to go back and forth several times until both you and the subject matter expert are satisfied with the section (Robinson & Etter, 2000, p. 14). 4.10 Test Sections It is important that those who actually will use the manual will get a change to test a section for usability, completeness and accuracy. Enough time should be used for this process to detect potential problems. When you involve users in this test it gives the users a sense of ownership of the manual. This may increase the changes that they will use the manual when it is ready. Manuals are often tested as part of the technical review on the product itself. To ensure that all necessary tests are performed you can assign responsibility to other people to test different parts of the manual. If your manual contains instructions which, if used improperly, can lead to personal injury or death or could result in substantial damage to equipment or loss of data, have these tests performed and examined very carefully. You must review the manual more critically so that it is not possible for a user to do wrong. 12 4.11 Final editing The final editing of each section should be done after the technical evaluation and after testing each section, but before the final review of the final manual. The focus will be on: Style and Grammar Spelling Punctuation Use Formats Typography Each section has already had a basic editing were issues with the content, style or things like that have been corrected. Anything else will now be corrected and edited in this step. As the final editing is directed to a wider range of issues the text may need to be read several times. Read the text and look for errors in style, grammar, spelling, punctuation and usage. Then read it again, but this time for errors in the layout, headers/footers and typography (Plotnik, 1982, p. 69-71). 4.12 Control of the manual Once all sections have been written and edited, including the entire front and rear parts (except the indexes), then give the manual a final check. The initial and final editing was done section by section. This is your first and last control of the whole manual. Check that: All sections are complete; including the front and rear sections (except index) and that these are in the correct order. Section coincides with each other. Table of contents entries and cross references are correct. Any changes or reviews to the final manual after the final inspection must be proofread. The person who makes the changes should also do the proofreading. To proofread, print a copy of each reviewed and edited page. Carefully check the review page against the old 13 page. Ensure that all changes have been made and no errors have been introduced (Robinson & Etter, 2000, p. 185). 4.13 Indexing the manual The last section is the alphabetical index. Do not skip this important navigational tool because many people prefer the index before the table of contents. If you already have electronically tagged your keywords in the word processor, you can now devise an index. If necessary the index may be circulated for review. 4.14 Responsibility for maintenance and revision of the manual It's never too early to start thinking about how the manual should be updated. Too many organizations stop thinking about their manuals after they are completed and let them go out of date. The result is a manual which is unreliable and unusable. Manuals must be updated regularly to reflect new legislation, new updates or corrections of found faults. Keep in mind that the manuals should go through two phases: the development phase and maintenance phase. Often nobody has been given the responsibility for ensuring that the manuals are kept up to date. The result is manuals that cease to be reliable sources of information. Make sure that somebody is responsible for periodically reviewing the manuals and make changes. This person will be responsible for the tasks documented in the manual. All comments about the manuals and proposed changes should go to this person, who then makes the final decision to revise the manual (Weiss, 1991, p. 92). 5 Bridge procedure manual for mpsv Rem Mermaid I work for a Norwegian offshore company called Rem Offshore. The company owns and operates a small fleet of different offshore vessels. I was contacted by the captain on the behalf of the company. Some off our charters have criteria that the vessels they charter have to have a Bridge procedure manual. As the name indicates it is a manual for different procedures in the bridge. So a decision was made by the office that a Bridge procedure manual specific for each vessel should be made. This is a measure to avoid agreement 14 conflicts because many of our vessels are in the spot market and constantly changes charters. I made the manual for our vessel and some independent consults made manuals for the other vessels. 5.1 Purpose and planning of the manual I started by identifying what kind of manual to make. The manual should be easy to understand and read so that people not familiar with the bridge can understand its contents. The manual also needed to be advanced enough so that officers on the bridge find it useful and actually use it. The finished manual will be implemented in the company’s TQMS system so I also talked with the company and the captain about what the criteria from the company were. This gave me the frame work for how they wanted the manual to be. Our charter at the time had no criteria for such a manual so I used manuals from other ships where the charters had criteria as an example. For future charter criteria the manual has to be revised so that the charters standards are met. 5.2 Collecting information I used the methods from chapter 4.6 as a guideline when I started collecting information. The methods collected from my references proved to be useful and they worked well. I started collecting information from equipment manuals on-board. I looked through all the relevant manuals for relevant information. I have been working on this ship for four years so for most part the procedures are familiar. We use most of the procedures on a daily basis. Technical information I got from other manuals. I also involved other crew members to get more insight in different routines and also tips on what to include in the manual. I used the internet to check updates on information that I planned to use. Somethings have changed over the years and only the newest and valid information should be inserted in the manual. 15 The companies TQMS system was also used as a reference point to keep the manual in the framework specified in the TQMS. When the manual starts to come together you can notice, like I did, that you are missing some information. You get new ideas along the way and some ideas that you have had do not work. You need to start a second or sometimes a third round of gathering information. This excessive gathering of information needs to continue until you feel that you have everything that you need. To this manual everything had to be correct on a technical level because the manual is not based on opinions. 5.3 Making the manual After collecting the information I needed, I started to wright in a brainstorming type of way. By that I mean I put all my thoughts and ideas down on paper. This is an easy way to get your ideas on paper. After that I started to organize the text into different sections. A plan on what should be implemented had been made before so the general guidelines were in place already. Everything may not have gone according to the guidelines on how to write a manual but this worked for me on this manual. An important thing is to have an open dialog with the other bridge officers so that they can give inputs along the way. On some part also the engine department was involved. They are happy to assist as usually. The manual contains some pictures as well. Pictures are a good resource when trying to explain something technical. It is usually easy to understand something when you can see it on a picture. So it is sometimes easier to start with a picture and write the text afterwards. Basically you need to test out different ways to approach a procedure so the final result is simple and easy to understand. 16 6 Summary The aim of the thesis was to make a bridge procedures manual for the Rem mermaid. The manual should be in accordance whit the charters criteria’s and the company’s TQMS manual. The problem to solve was how to make the manual easy to understand and functional so that it would serve a purpose and it would be used. The second part of the thesis, or actually the first part when you read it, is to make a collaboration on how to write a good manual and how to do it systematically. There are many ways of doing this but I collected the references I found to be of value. There are better and more complex ways to write a manual but the most important thing to keep in mind is that the end result should be great. The thing I almost immediately realized was that you have to start by collection good information on how to write a manual and what it should contain. Only after that should you start collecting information for the manual itself. The information I collected on how to make a manual comes from different sources. I only picked in my opinion the most important for this thesis. I used them when writing the manual for Rem Mermaid. I made the manual and the collaboration at the same time so I picked only thing that I thought that worked for the collaboration. You have to decide the boundaries in which to stay or otherwise it will become hard to know when to stop. Therefore you should start with a proper planning and only after that start to create the manual. During this process I have gained a better understanding of how to organize the preparation of writing a manual. Safety is the most important thing at sea. Continuously improving manuals is an important job, so that misunderstandings and thereby unnecessary incidents can be avoided. Fail in communicating the context and misunderstanding manuals is still a problem. Many suppliers of instruments and independent consults make far too complicated and advanced manuals. That can lead to incidents. It is important that you think from the reader's perspective all the time. Just because you understand your own text does not mean others will. By testing the different sections before final editing you can save a lot of time. I involved other crew members to read through different sections and give their opinion. This is a good and quick method to see if you are on the right track. 17 The manual that I made for the Rem Mermaid is a living document which means that it should be reviewed and revised when new procedures or new equipment are installed. Procedures are reviewed all the time In the TQMS and that will affect the BPM also. 7 References Weiss, E.H., 1991. How to write usable user documentation. California: The Oryx Press. Hackos, J.A., 1994. Managing Your Documentation Projects. New York: John Wiley & Sons, Inc., Katzin, E., 1985. How to Write a Usable User Manual. New York: Van Nostrant. Plotnik, A., 1984. The elements of editing: a modern guide for editors and journalists. USA: Macmillan. Novick, D. & Ward, K., 2006. Why don´t people read the manual? [Online] http://digitalcommons.utep.edu/cgi/viewcontent.cgi?article=1010&context=cs_ papers [retrieved 25.03.2014] Robinson, P.A., & Etter, R., 2000. Writing and designing manuals. 3rd edition. USA: CRC Press Rosteck, T., 2001. Why aren´t users reading the manual? [Online] http://www.asponline.com/manual.html [retrieved: 02.03.2014] Spolsky, J., 2000. Designing for people who have better thing to do with their lives. [Online] http://www.joelonsoftware.com/uibook/chapters/fog00000 00062.html [retrieved: 24.04.2014] Rem Offshore ASA, Rem mermaid, 2015. TQMS manual. Internal documents. 18 8 Appendices 8.1 Appendix 1 BRIDGE PROCEDURES MANUAL MPSV REM MERMAID IMO NUMBER: 9418705 PORT OF REGISTRY: FOSNAVAAG 19 Section 0 - Document Description 0.1 DISTRIBUTION Copy Number Recipient 1 2 M/V Rem Mermaid Rem Offshore ASA office 0.2 DOCUMENT INFORMATION Document Title Document Identification Replaces Document File 0.3 Bridge Procedures Manual New REVISION STATUS Rev No. Description Prepared Controlled Approved Date 20 Table of Contents SECTION 0 DOCUMENT DESCRIPTION .................................................................................. 19 0.1 0.2 0.3 DISTRIBUTION ...................................................................................................................19 DOCUMENT INFORMATION ..............................................................................................19 REVISION STATUS..............................................................................................................19 TABLE OF CONTENTS .......................................................................................................... 3-4 SECTION 1 INTRODUCTION ............................................................................................. 5 1.1 Manual Purpose and Description........................................................................................5 SECTION 2 VESSEL SPECIFICATION ................................................................................... 6 2.1 2.2 2.3 2.4 2.5 2.6 2.7 2.8 2.9 2.10 2.11 2.12 2.13 2.14 2.15 2.16 SECTION 3 3.1 3.1.1 3.1.2 3.1.3 3.1.4 3.2 3.2.1 3.2.2 3.3 3.3.1 3.3.2 3.3.3 3.3.4 3.4 3.4.1 3.4.2 3.4.3 3.5 3.5.1 3.5.2 3.5.3 General Spec’s.....................................................................................................................6 Contact info.........................................................................................................................6 Tonnage...............................................................................................................................6 Dimensions...................................................................................................................... 6-7 Machinery ...........................................................................................................................7 Thrusters .............................................................................................................................7 Speed/Consumption ...........................................................................................................7 Cargo Capacities.............................................................................................................. 7-8 Cargo Discharge Rates.........................................................................................................8 Deck Equipment ..................................................................................................................8 Accommodation.............................................................................................................. 8-9 Navigation Equipment.........................................................................................................9 Communications .................................................................................................................9 Dynamic Positioning............................................................................................................9 Anti Rolling System .............................................................................................................9 Safety Equipment.......................................................................................................... 9-10 MANEUVERING CONTROL SYSTEM ................................................................ 10 Maneuvering System – General........................................................................................10 Main Engines .....................................................................................................................10 Main Thrusters (Azimuth) ........................................................................................... 10-11 Bow Thruster............................................................................................................... 11-12 Steering Gear.....................................................................................................................12 Efficiency ..................................................................................................................... 12-13 Azimuth Thruster ..............................................................................................................13 Bow Thruster.....................................................................................................................13 Helicon-X3 Control System for Rolls--Royce Propellers and Thrusters.............................13 Helicon-X3 ................................................................................................................... 13-14 Helicon-X3 Control Leaver Units ................................................................................. 14-15 Helicon-X3 Control Panel ............................................................................................ 15-16 System Overview......................................................................................................... 16-17 Initial Start-up Procedures ............................................................................................ 1-18 Main Engines .....................................................................................................................18 Bow Thruster............................................................................................................... 19-21 Azimuth Thruster ........................................................................................................ 38-24 Manual Controls................................................................................................................25 Main Thrusters ..................................................................................................................25 Fwd Thrusters control panel ...........................................................................................406 Controls aft......................................................................................................................406 21 3.5.4 3.5.5 3.5.6 3.5.7 3.6 3.6.1 3.7 3.7.1 3.7.2 3.7.3 3.7.4 3.7.5 3.7.6 3.7.7 3.8 3.8.1 3.8.2 3.8.3 SECTION 4 4.1.1 4.1.2 4.1.3 4.1.4 4.1.5 4.1.6 4.1.7 4.1.8 4.1.9 4.1.10 4.1.11 4.1.12 4.1.13 4.2 Maneuvering Mode Selector Switch...............................................................................427 POSCON (Joystick Control System) ........................................................................... 427-29 Centre of Rotation...........................................................................................................459 Heading Priority ..............................................................................................................459 Variable Thrust Power Configurations ...................................................................... 459-30 Power management System ....................................................................................... 30-31 Dynamic Positioning System (DP) ............................................................................... 31-32 Basic Operational Modes ..................................................................................................32 Main Components....................................................................................................... 32-34 Thrust Allocation ......................................................................................................... 34-35 Signal Processing...............................................................................................................35 Vessel Model (Filtering and Estimation) ...........................................................................35 Trajectory Generator.........................................................................................................35 Feedback and Feedforward Control............................................................................ 35-36 DP Operator Desk..............................................................................................................36 Graphical Display......................................................................................................... 36-37 Joystick Device ..................................................................................................................37 Positioning Device.............................................................................................................37 CHANGEOVER PROCEDURES.......................................................................... 38 Manual Steering to Autopilot............................................................................................38 Autopilot to Manual Steering............................................................................................38 Manual Steering to Wheel Control ............................................................................. 38-39 Wheel Control to Manual Steering ...................................................................................39 Manual Steering to Emergency Control............................................................................39 Emergency Control to Manual Control .............................................................................39 Fwd Control Station to Aft Control Station and Vice Versa ........................................ 39-40 Manual Controls to Joystick Controls ...............................................................................40 Joystick Control to Manual Controls .................................................................................40 Emergency Pitch Control of the tunnel Thrusters.............................................................41 Emergency Control of the Azimuth Thruster ....................................................................41 To Pass Control to the DP Desk................................................................................... 41-42 Releasing DP Control.........................................................................................................42 Power Failures (Blackouts).......................................................................................... 42-44 SECTION 5 MANOEUVRING DATA ................................................................................. 44 SECTION 6 FMEA – EFFECT OF FAILURE OF CRITICAL COMPONENTS ............................... 45 SECTION 7 RECORD OF INCIDENTS ................................................................................. 45 7.1 7.2 Purpose ....................................................................................................................... 45-46 Incident Log.......................................................................................................................47 SECTION 8 APPENDIX........................................................................................................... 48 22 Section 1 - Introduction 1.1 Manual Purpose and Description This Manual is intended to provide guidance for Deck Officers into the effective use of maneuvering controls and systems onboard. The information contained in this manual, although in a common format, is specific to this vessel and should form part of the induction process of Deck Officers new or unfamiliar with the vessels characteristics. It should also be kept available and easily accessible as a reference document for the bridge team. The document is intended to be kept as up to date as possible and should be continuously developed to become a useful reference tool to the mariner. This document is only intended to be used as a supplement to operational manuals provided by the Company (refer to UniSea TQMS) and equipment manuals provided by the various producers of equipment referred to. Nothing in this manual relieves the reader from acquiring appropriate knowledge from either of these sources, especially with respect to statutory requirements and industry best-practice guidelines such as the NWEA. 23 Section 2 - Vessel Specification This Rem Mermaid has the following principal specifications; 2.1 General Spec’s Call Sign: Classification: Design: Builder: Delivered: Flag: Port of Registry: Owner: LALM DNV +1A1, E0, SF, Dynpos AUTR, Clean, Comf V3, dk (+), HL (2.5), LFL*Naut OSV MT 6009-L Simek Flekkefjord, Norway 2008 NOR Fosnavaag Rem Ship ASA 2.2 Contact info Callsign: MMSI: GSM phone: V-Sat Bridge: Fleet 77 Phone: Fleet 77 Fax: LALM 258423000 +47 941 71 042 +47 21 03 80 65/66/67 +870 600 922 811 +870 764 841 895 2.3 Tonnage Gross Tonnage: Net Tonnage: Deadweight Displacement (summer) Light Ship 3296 tonnes 1053 tonnes 3698 tonnes 5835 tonnes 2137 tonnes 2.4 Dimensions Length Overall-LOA Length Between p.p.-LBP Moulded Breadth Moulded Depth Maximum Draft Summer Freeboard 79.67 metres 72.00 metres 16.40 metres 7.45 metres 6.22 metres 1.24 metres 24 Minimum Operational Draft 4.84 metres 2.5 Machinery Main Engines: Emergency Generator: Fuel Type: 4 x Cummins KTA50D (M1) 1291 kW, 4 x 1730 BHP John Deere, 1 x 115 kW MGO 2.6 Thrusters Stern Thrusters (Azimuth): Bow Thrusters: 2 x Ulstein-Aquamaster (US 205 CRP) by Rolls-Royce, 2 x 1470 kW 2 x Kamewa Ulstein Tunnel Thruster (TT2000DPN FP) by Rolls-Royce, 2 x 800kW 2.7 Speed/Consumption Max Speed: Economic Speed: 12 Knots: 10 Knots: DP Operations: Port Consumption: 16 m3/24hour 09 m3/24hour 12 m3/24hour 09 m3/24hour 5.5 m3/24hour 0.5 m3/24hour 2.8 Cargo Capacities Fuel Oil: Fresh Water: Drill Water: Ballast Water: Brine (S.G 2.0): Liquid Mud (S.G 2.5): Base Oil: Methanol: Cement: Barite: Glycol: Lub. Oil: 1251 m3 652 m3 1074 m3 1247 m3 424 m3 1079 m3 347 m3 206 m3 320 m3 320 m3 1284 m3 32.6 m3 25 2.9 Cargo Discharge Rates Fuel Oil: Fresh Water: Drill Water: Ballast Water: Brine (S.G 2.0): Liquid Mud (S.G 2.5): Base Oil: Methanol: Cement: Barite: Glycol: Lub. Oil: 200 m3/hour, 5 inch Line, 4 inch Todo Copl. 200 m3/hour, 5 inch Line, 4 inch Weco Copl. 150 m3/hour, 5 inch Line, 4 inch Weco Copl 150 m3/hour, 5 inch Line, 4 inch Weco Copl 125 m3/hour, 5 inch Line, 4 inch Weco Copl 075 m3/hour, 5 inch Line, 4 inch Todo Copl 150 m3/hour, 5 inch Line, 4 inch Weco Copl 075 m3/hour, 4 inch Line, 4 inch Todo Copl 035 m3/hour, 5 inch Line, 5 inch Weco Copl 035 m3/hour, 5 inch Line, 5 inch Weco Copl 125 m3/hour, 5 inch Line, 4 inch Weco Copl Flange 2.10 Deck Equipment Deck Area: Deck Load (max): Deck Strength: Deck Dimension: Capstan: Mooring Winch/Anchor Winch: Deck Crane Port: Deck Crane Starboard: Tugger Winch: Cargo Securing Winches: 729 m2 1677 tonnes 5 t/m3 54 meter x 13.5 meter Rolls-Royce, 2 x 10 tonnes Rolls-Royce, 2 x 9 tonnes Hydramarine, 1 x 3 tonnes at 10m Hydramarine, 1 x 1 tonnes at 8m Rolls-Royce, 2 x 10 tonnes Odim AS, 3 x 4.6 tonnes 2.11 Accommodation Single Cabins: Single Cabin + Pullman bed: Double Cabins: Total: 6 3 17 46 pers 2.12 Navigation Equipment Radars: Autopilot: Gyros: 1 x Furuno X-Band (FAR-2817 chart radar) 1 x Furuno S-Band (FAR 2837S) 1 x Anschutz PilotStar D 2 x Anschutz Gyro Compass STD 22 1 x Anschutz Satellite Compass STD 21(GPS) 26 Navtex: GPS: Echo Sounder: ECDIS: Voyage Recorder: 1 x Furuno NX-700-B 2 x Furuno GP 150 (one with DPGS) 1 x Furuno FE-700 2 x Furuno TECDIS 1 x Furuno VDR VR-3000 2.13 Communications GMDSS Type: Intercom: VHF: V-SAT: A3 VingtorZenitel Maine 2 x Furuno FM-8800, 2 x Furuno RB-2721 Shipequip System 2.14 Dynamic Positioning DP Class: DP Type: Reference Systems: Sensors: 2 (AUTR) Rolls-Royce Icon 2 x DGPS Veripos, 1 x CyScan 2 x Wind Anemometers, 2 x Gyro Compass, 1 x Satellite Compass 2 x VRUs 2.15 Anti Rolling System Roll reduction tank: 1 x passive tank 2.16 Safety Equipment Life rafts: Rescue boat: 6 x 16 pers (Viking) Mare FRB 700, 15 persons Section 3 - Maneuvering Control System 3.1 Maneuvering System – General The Rem Mermaid have a diesel-electric propulsion system. This system contains of 4 x Cummins KTA50D (M1) engines that powers two Ulstein-Aquamaster US 205 CPR stern azimuth thrusters and two Kamewa Ulstein Tunnel Thruster (TT2000 DPN FP). Each stern thruster can turn freely 360 degrees and are used for main maneuvering. For maneuvering purposes the Rem Mermaid is also outfitted with two tunnel thrusters (880kW each). 27 3.1.1 Main Engines Rem Mermaid is fitted with 4 Cummins KTA50D (M1) main engines each producing 1291 kW (1730 BHP) a total of 5164 kW (6920 BHP), each engine provides power for a shaft generator. The generators are normally subject to the Power Management System (PMS). Rem Mermaid has no harbour or auxiliary engines. A main engine is required to be in operation at all times, even when the vessel lies in port. 3.1.2 Main Thrusters (Azimuth) The main thrusters is of type Ulstein-Aquamaster US 205 CRP by Rolls-Royce. CRP stands for contra-rotating propellers. The inner propeller diameter is 2700mm and the outer propeller diameter is 2350mm. Both propellers is of Kaplan design. The thruster is powered by an electric motor (B5J 500 LCG) and a drive system (SES 1500kW AFE Drive System) from Scandinavian Electric Systems. Each thruster system delivers 1470 kW. Figure 1: Ulstein-Aquamaster 28 3.1.3 Bow Thruster Rem Mermaid is fitted with two electrically driven bow tunnel thrusters (Kamewa Ulstein Tunnel Thruster (TT2000 DPN FP) by Rolls-Royce. These thrusters has a fixed pitch propeller (skew design) of 2m in diameter. Thruster are driven by an electric motor (B4J 450 LD6) and a drive system (SES 800 kW AFE Drive System) from Scandinavian Electric Systems. Each thruster system delivers 800 kW. Figure 2: Bow Thruster 3.1.4 Steering Gear The vessel has no rudders as it is fitted with two Ulsterin-Aquamaster US 205 CRP by Rolls-Royce azimuth thrusters. The thrusters can be synchronized or controlled independently. Both thrusters can be steered unrestrictedly in both directions 360 degrees. 3.2 Efficiency The Rem Mermaid is equipped whit Helicon-X3 remote control system for controlling the thrusters. The Helicon-X3 combinator control allows accurate and reliable control of the 29 propeller motor speed (RPM). The combinator curve optimises the speed performance to give the best operational conditions and fuel economy. Rem mermaid is also equipped with Ulstein-Aquamaster US 205 CRP stern thrusters. The Rolls-Royce azimuthing Contra-Rotating Propeller overall benefits are better outline arrangement, better propulsion efficiency, better fuel economy and better course keeping. 3.2.1 Azimuth Thruster The Rolls-Royce azimuthing Contra-Rotating Propeller is the world’s first thruster system designed and built especially for merchant/offshore vessels. It combines the benefits of contra-rotating propellers with steerable thrusters. The latest bearing, gear and shaft technology are the keys to the CRP – refined and developed through decades. The CRP also represents a new way of designing and building ships, and to arrange its power and auxiliary systems for maximum economy, utilisation and comfort. Every unit is specifically designed and built for the particular ship it is going to serve. The overall benefits are better outline arrangement, better propulsion efficiency, better fuel economy and better course keeping. 3.2.2 Bow Thruster Rem Mermaids bow thrusters are conventional, so no special considerations apply. However, navigators need to be aware of that thruster effect is severely limited the more headway the vessel makes. Increased speed both vertically and horizontally reduces the effective inflow of water flow to the thruster tunnel. At speeds above 4 to 5 knots all tunnel thrusters are in practice rendered useless, but a reduced effect will be evident long before that. 3.3 Helicon-X3 Control System for Rolls-Royce Propellers and Thrusters System Description 3.3.1 Helicon-X3 The Helicon-X3 remote control system is a microprocessor based system. The Helicon-X3 is the latest model of Helicon propeller and thruster (P&T) control systems. Following main functions are included: Combinator control, allowing accurate and reliable control of the propeller motor speed (RPM). The combinator curve optimises the speed performance to give the best operational conditions and fuel economy. 30 Direction control, allowing accurate and reliable control of the thrust direction. Switching between normal and back-up control (both are follow-up control systems) from control leavers. Figure 3.1: System overview The Helicon-X3 control system is fully based on Rolls-Royce Common Control Platform (CCP) technology, using standard hardware and software modules that are common across all new control products developed by Rolls-Royce. 3.3.2 Helicon-X3 Control Leaver Unit The control lever controls RPM and Azimuth direction. The Control lever has integrated buttons and indication lamps for command transfer, backup system on/off, alarm indication/buzzer and pushbutton for reset buzzer. The display in the base shows set command (power and direction) from leaver. The leaver contains two redundant electronics circuits, one for the normal control system and one for the back-up system 31 Figure: Azimuth thruster leaver Figure: Bow thruster leaver 3.3.3 Helicon-X3 Control Panel The control panel (10.4 inch touch screen computer panel) is the main user interface for the operator. It shows the status of the system, indicates thruster forces, displays alarms and shows selected modes. The flat button on the top of the screen is for dimming the illumination of the LCD display. The screen is divided in two areas, a menu area in the left part of the screen and a bigger command area to the right. The menu buttons to the left selects the content of the command area. There is one command page for each thruster in addition to one System Overview page and one Alarm page. The System Overview page shows the most essential information for all thrusters, but to activate functions or to view all available information for a thruster, the particular thruster page must be selected. 32 Figure: The user interface 3.3.4 System Overview The system overview page gives an overview of the most essential information for all thrusters. The system overview page is the normal view if not activation of functions or alarms require attention to other pages. The Common command change buttons are located on this page. Using these buttons it is possible to take command for all thrusters by pressing only one button + accept. 33 3.4 Initial Start-up Procedures Always inform the duty engineer before starting any thrusters or other heavy power consumers. Every thruster consists of a hydraulic servo pump in addition to the electric motor that drives the actual thruster. Servo pumps should be started and allowed to warm up about five minutes before the actual unit is started. This may prompt an alarm on the Helicon panel (“Filter Clogged”), especially during cold weather conditions or if the unit has not been used for some time. Each thruster has its individual control screen on the Helicon panel, which can be accessed from both the forward as well as the aft conning positions. However, in order to execute an order, the relevant Helicon panel needs to be In Command. See Section 4 for details on how to assume command. Note: All orders issued on the Helicon panel must be accepted before they are executed by the system. When pressing any button (such as when attempting to start an Oil Pump or a Thruster, or if attempting to take Command) a round “Accept” button will start flashing blue on the screen. This button must be pressed. If it is not pressed within a few seconds, the button will 34 disappear and the attempted order cancelled. The button initially pressed will then remain it original grey or blue colour. 3.4.1 Main Engines As Rem Mermaid is diesel electric the engine department never gives control of the main engines (generators) to the bridge. However, it is the bridge that decides how many generators should be up and running prior to commencing any operation. Normally, three generators should be up and running for port manoeuvring and steaming. During DP 2 operations, four generators will be used. Simply inform the duty engineer of how many generators are required. The engineer will start them up and then call back to the bridge when they are online and phased in. This process usually takes no more than five minutes. 35 3.4.2 Bow Thruster How to START the bow thrusters. Confirm thruster readiness with the duty engineer. Ensure the relevant Helicon panel is “In Command” (the button should be fixed blue). Ensure enough generators are online for the intended operation. Ensure the manoeuvre handles are set to zero. Each bow thruster should be started separately, but in the same way. In this example BOW 1 is used. 36 Start the Oil Pump on the required thruster by pressing 1. “START” and 2. “ACCEPT”. Allow the pump time to warm up before starting the actual thruster. An alarm may now go off. Start the required thruster by pressing 3.”Start” and 4.”Accept” on the thruster’s individual screen on the Helicon panel. The “Start” button will start flashing green. When the thruster is online, the button will be fixed green. If more than one thruster is required, make sure to start them up one at a time. If at berth: Confirm the thruster is running by applying carefully power towards the berth. The feedback indicator, located below the bridge roof at both conning positions, will show if the thruster is responding. If possible and practicable, confirm propeller water stream visually. 37 If at sea: Confirm the thruster is running by applying about 50% pitch. The feedback indicator, located below the bridge roof at both conning positions, will show if the thruster is responding. The thruster should also be audible at this level of thrust, giving further confirmation of its operability. Test the Backup control of the thruster by pressing the “!” button on the manoeuvre handle. It will assume a red light. Confirm the thruster is responding in the same way as during normal operation. Reset emergency controls by reducing the thrust to zero and pressing the emergency button again. The red light should now disappear. Repeat testing procedure for both thrusters, if applicable. The thrusters are now ready for us 38 3.4.3 Azimuth Thruster How to START the azimuth thrusters. Inform the engineers that you intend to start main thrusters and confirm readiness. Ensure the relevant Helicon panel is “In Command” (the button should be fixed blue). Ensure enough generators are online for the intended operation. Ensure the manoeuvre handles are set to zero. Each Azimuth thruster should be started separately, but in the same way. In this example BOW 1 is used. Start the Oil Pump on the required thruster by pressing 1. “START” and 2. “ACCEPT”. Allow the pump time to warm up before starting the actual thruster. An alarm may now go off. 39 Start the first thruster by pressing 3. “Start” and 4. “Accept” on the thruster’s individual screen on the Helicon panel. The “Start” button will start flashing green. When the thruster is online, the button will be fixed green. Start the second thruster by repeating the above procedure. It is important that the thrusters are started one at a time, to reduce the effects of power surge. Confirm the thruster is running by turning it and applying careful power. The feedback indicators, located below the bridge roof at both conning positions, will show if the thruster is responding. If possible and practicable, confirm propeller water stream visually. 40 Test the Backup control of the thruster by pressing the “!” button on the manoeuver handle. It will assume a red light. 3.5 Confirm the thruster is responding in the same way as during normal operation. Note that engaging the emergency mode will apply emergency operation of both the propeller’s thrust as well its azimuth angle. Reset emergency controls by reducing the pitch to zero and pressing the emergency button again. The red light should now disappear. Repeat testing procedure for both thrusters. The thrusters are now ready for use. Manual Controls 3.5.1 Main Thrusters Control of the vessel’s steering mode is more or less completely controlled by the Helicon panel’s System Overview screen. The Azimuth thruster’s can be steered in Autopilot mode 41 (using one or both thrusters for heading control), in Wheel mode or in Manual Steering (using a common handle or the thrusters separately). To engage Autopilot mode, ensure that the thrusters is facing forward. Press the “Autopilot” button on the respective thruster on the Helicon panel. As always the command must be acknowledged by the “Accept” button appearing. The Autopilot is now engaged and heading is controlled by operating the actual Autopilot unit (Anschutz PilotStar D). Thrust is controlled on the thruster manoeuvre handles. Manual Steering mode is the default mode whenever the thrusters are started. Steering is now performed by turning the manoeuvre handle of the respective thruster to the desired angle. The operator can select to operate both levers individually, or to assume common command on the starboard thruster handle, on the Helicon panel. Whether individual “Separate Lever” or common steering “Common Stbd” is engaged will be apparent from whichever of the two buttons are blue. Note that this command mode governs both propeller thrust and azimuth angle command. Important note: In this mode, turning the thruster to starboard (i.e. pointing the arrow on the manoeuvre handle to starboard) will cause the vessel to swing to port. To engage Wheel mode, press the “Rudder Lever On” button on the Wheel panel. The two yellow “Rudder Lever On” buttons on the panel will now be lit and the wheel can be operated. Important note: In this mode, turning the wheel to starboard will cause the vessel to swing to starboard, i.e. behave as a vessel with conventional steering. This is not the case with Manual Steering mode. 42 3.5.2 Forward Thrusters control panel 3.5.3 Controls aft All the controls on the aft control panel are the same as on the fwd. panel, but in a slightly different configuration. In addition we also have the POSCON joystick control as described as followed. 43 3.5.4 Maneuvering Mode Selector Switch The “Maneuvering Mode Selector Switch” lets you choose which maneuvering mode you want to use. When the switch is on “MAN” or “0” the ships is maneuverable manually, on autopilot or in wheel mode. When you switch it to “DP Control” or “2” controlling the ship in DP is possible. When switching it to “Joystick Control” or “1” it’s possible to use the Ship Joystick Control System. Note: When the switch is in position “1” or “2” and the devises (DP or Joystick control system is NOT turned on you can still maneuver the ship manually by the maneuver handles. In this way you never loose control of the maneuverability. 3.5.5 POSCON (Joystick Control System) The POSCON joystick control system is primarily used as a backup system to the vessel’s DP system. While based on the same operating software (Rolls-Royce) it is primarily designed to control the vessel’s heading and receives input from Gyro 1 & 2. The system also receives input from the Veripos GNSS 1 system (DGPS) and can be used to control sway in addition to heading. The POSCON system consists of two components – the graphical display (1) and joystick device (2). The joystick device controls vessel movement. By moving the joystick to port, the vessel will move to port. Moving the joystick forward will order the vessel to move forward. Rotating the joystick clockwise will prompt a starboard swing. Rem Mermaid has one POSCON system unit. The unit is stationed in the aft. control desk but can be shifted between all connection points. Connection points are located on each bridge wing and on the forward control panel (refer to Section 4.1.8). Command is assumed switching the switch on the “Maneuvering Mode Selector Switch” to 2 “Joystick control”. Then press button (1) “System activation”. 44 The “Command transfer” (2) button should now be blue and that means that the unit is in command. Heading is locked by double pressing button (4) on the joystick. The system will now automatically maintain heading and the operator will control vessel sway and surge by operating the joystick handle (10). Refer to Section 3.5.10 on how the vessel will now behave if excessive power is ordered on lateral movement. When the heading is locked it can be adjusted stepwise by operating buttons (6) “Decrement” or (7) “Increment”. Each order must be confirmed by pressing the “Accept” button on top of the joystick handle (8). Heading can be unlocked by double pressing button (4) on the joystick unit. Heading can now be adjusted by rotating the joystick handle (10). A clockwise order will prompt the vessel to swing to starboard, whereas a counterclockwise order will prompt the vessel to swing to port. On the Rolls-Royce graphical display, settings for the system can be adjusted. Center of Rotation, Rate of Turn, gain etc. For complete details on how this system should be used, the navigator needs to consult the relevant manuals supplied for this equipment. It is beyond the scope of this manual to describe the joystick system in its entirety. 45 3.5.6 Centre of Rotation The vessel’s Center of Rotation can be selected on the Rolls-Royce graphical display. The different options can be found under “Settings” and “Pivot”. Midship, Bow and Stern centers of rotation are available for selection. The operator should be aware of that bow and stern centers of rotation will severely limit thrust availability, as the system will now attempt to keep the selected center of rotation stationary. See Section 3.5.7 for details on how the vessel will behave. 3.5.7 Heading Priority The Rolls-Royce joystick control system fitted on this vessel will give priority to the heading of the vessel. Maximum available thrust will be limited or reduced until the unit has brought the heading of the vessel to within defined limits. You may find that the vessel is not doing what you want it to do, it may ignore or limit commands to the thrusters from the joystick when the heading is outside of set limits, the unit will priorities the heading until it is brought back to within defined limits. Normally any maneuvering operations at offshore installations are controlled using the maneuvering station located at the aft end of the bridge. This position also has a full suite of communications systems and cargo system controls. 3.6 Variable Thrust Power Configurations Rem Mermaids forward propulsion system (the two Azimuth thrusters), can be set to two different modes; Power Mode and RPM Mode. The wanted mode is selected on the Helicon panel’s System Overview display. In Power Mode the vessel will attempt to maintain an even load on the vessel’s generators. The RPM of the propeller will therefore sway up and down, depending on the weather conditions. For steaming purposes this mode is more economic and will be kinder on the vessel’s engines, especially when sea conditions are rough. The command given on the maneuvering handles will correspond to a percentage of total maximum power consumption. For example, a command of 50% on the handles will keep the generators on whatever load is required to supply 2.500 kW (2.500 kW x 2 thrusters x 50%). In RPM Mode the priority is the opposite. The vessel will now attempt to maintain whatever RPM is ordered on the maneuvering handles. In heavy seas the load on the vessel’s generators will therefore sway, increasing the stress on them. For DP and 46 maneuvering operations, this mode is used. Figure Note: When switching between Power- and RPM Mode, it is important to be mindful of the command active on the maneuvering handles. Generally speaking, the load on the vessel’s generators will drop substantially when switching from Power Mode to RPM Mode. However, the opposite applies when switching from RPM Mode to Power Mode. Depending on how many generators are running, whatever generators are available can be forced to a load that they are unable to supply (e.g. and 80% RPM command which is suddenly switched into a Power command will demand 4.000 kW (2.500 kW x 2 thrusters x 80%), which is above the maximum theoretical output of two dedicated generators (1.980 kW x 2). Depending on the generator setup, this may force the cold start of a standby generator (see Section 3.6.2). More likely, however, is that a Load Reduction command is automatically issued to the thrusters. 3.6.1 Power Management System (PMS) The Rem Mermaid, as most other vessels with a diesel electric propulsion, is fitted with a Power Management System (PMS). The PMS will handle the automatic start and stop of generators according to parameters set by the vessel’s engineers, if power is demanded by the vessel’s heavy consumers. The PMS settings can be viewed from the bridge by using the IAS system (located at the aft control station, port side). By pressing the “Power” button on the bottom left the PMS screen will appear and the same picture as shown on Figure 20 will be displayed. The most important information here is “Gen. No.” Min / Max. This shows how many generator are online (Min) and how many generators are available if the system should demand it (Max - Min). Normally one generator is in standby-mode and will start up if power demand exceeds the pre-set limit. This limit will vary but in the example shown here it is set to 70% & 5 seconds (Start Limit / Start Delay). This means that if the load on the generators currently running exceeds 70% for a period of 5 seconds, the backup generator will start up and supply additional power to the system. The system will in a similar manner shut down generators according to the “Stop Limit” and “Stop Delay” settings, but never more than are specified by the “Min” number of generators. If there is still not enough power available, more generators will be started (assuming they are set to standby). If no generators are available the system will enter a state of Load Reduction. The Load Reduction state means that the propulsion units will be limited as to how much power they can demand from the system. The operator needs to be aware of that this means that desired thrust may not be achieved. For example; if the operator sets the azimuth thrusters to 100% thrust they will demand 5.000 kW from the power system. If two generators are running, only 3.960 kW is theoretically available. In reality it will be less, as these generators supply power to other consumers currently online. The operator will as such not receive 100% thrust on the azimuth thrusters. 47 During DP operations the vessel normally has three generators online, with the fourth in standby at 80% / 10 seconds. During in-field standby and port stays the setup is normally one generator online with one additional in standby. During steaming the PMS is normally switched off altogether, and the only generators available are those already online. Note: PMS settings may vary at any time depending on what is agreed between the vessel’s engineers and the bridge team. It is prudent to be aware of the PMS settings when engaged in DP operations or other activities where it may influence the navigator’s decision making. Reference should always be made to the “Guidelines for the Safe Management of Offshore Supply and Anchor-Handling Operations (NW European Area)”, current edition in particular the section on Collision Risk Avoidance and Adverse Weather Working when choosing the power configuration. The vessel must at all times be able to maneuver to a safe position so should always have sufficient reserve power available to achieve this, particularly in strong tidal- or marginal weather-conditions. 3.7 Dynamic Positioning System (DP) Note: This chapter is not intended to replace nor override any information or guidance supplied by system manufacturer. Personnel involved in operation of the system must have relevant experience and training with regards to the use the same. The operation of the RollsRoyce Icon system is related to the fundamental axes of horizontal motion – surge (alongship), sway (athwartships) and yaw (rotation about the selected center of rotation). By automatic control of the propulsion system, thruster forces in surge and sway and thruster moment in yaw will be applied in order to achieve the desired vessel motion, position, heading or path. 3.7.1 Basic Operational Modes The main operational modes of the system are: Standby The ‘Standby’ is a monitoring function where the Icon system will not generate any control outputs (such as thruster action). If sensors and position reference systems are 48 available, all signals can be monitored on the operator station(s). Joystick The ‘Joystick’ comprise all operational modes in surge, sway and yaw for operating the vessel by means of the joystick lever and manual/automatic heading control. Positioning The ‘Positioning’ comprise all joystick functionality. In addition, the vessel can be kept in a fixed position utilizing inputs from one or more positioning reference systems. The Rem Mermaid has three such systems: 2 x DGNSS systems 1 x CyScan system In addition to the above reference systems, the DP will also utilize input from auxiliary reference systems. Such systems include wind anemometers (2 pcs) and motion reference units (2 pcs). It is important that all operators of the DP system read and fully understand the DP operator manual and the FMEA so that they are fully conversant with the benefits and limitations of the system. Whenever the system is in use there must always be at least one fully trained and qualified DP operator on the bridge. All company DP procedures, as well as the Master’s standing orders for DP operations, must be followed when using the system. 3.7.2 Main Components The redundant Icon DP 2 system is based on a triple controller solution with a redundant fiber-optic network. Interface to sensors and position reference systems, power system and thruster system are split into logical groups, based on class requirements and system segregation. The connected nodes do not need special functionality to handle network redundancy. With the DP system integrity preserved, the DP network is separated from networks of other applications. The DP cabinets, operator stations, sensors and position reference systems are dual powered from the redundant UPS system. A typical system may consist of the following: Three control cabinets (triple redundant controllers), alternatively a large single cabinet. Redundant fiber-optic network Two or more Icon operator stations with: - High-resolution color LCD with touch-screen interface - Joystick device - Positioning device 49 - Remote display controller Printer(s): - For printing of alarms, trendings etc. Maneuvering mode selector switch Sensors and position reference systems (of different types) Two UPS (Uninterruptible Power Supply) Interfaces to thruster devices (I/O modules or Rolls-Royce HeliconX3). Reference systems available are: and sensors 2 x DGNSS systems 1 x CyScan 3 x Gyro Compasses 2 x Wind Anemometers 2 x VRUs The DP system acquires measurements from the propulsion system, power system, sensor and position reference systems, and applies thrust set points to the propulsion system, satisfying the commanded surge and sway forces and yawing moment. The control loop of the Icon system is illustrated here. 50 3.7.3 Thrust Allocation The force demands in surge and sway and moment demand in yaw from the controller have to be distributed to each thruster as pitch and/or RPM set points and (if applicable) directional set points. The thrust allocation in the Icon system takes into account: Available power on each bus bar. The Icon system will not enforce thruster action that exceeds the available power. Optimal thruster utilization in normal operations. Turning rate of thrusters, pitch and RPM response. The direction of azimuthing thrusters can either be variable (auto direction) or fixed in a set of pre-defined configurations. Grouping of thrusters. Two or more thrusters can be arranged to be working as a group. The purpose is often to reduce changes in thruster direction. In cases where thrusters cannot produce negative thruster force (reverse direction), this ensures that the thrust demand is fulfilled without unnecessary turning of thruster direction. Fixed thruster direction configurations or variable thruster direction. 51 Forbidden sectors for thruster direction. 3.7.4 Signal Processing All measurements to the DP system have to pass several levels of testing and processing before being used in the control of the vessel. The type of testing and processing functions used, is dependent on the signal source. 3.7.5 Vessel Model (Filtering and Estimation) Oscillatory motion caused by waves will not be compensated by the thrusters, main propellers and rudders in auto heading and auto position control. Advanced adaptive wave-filtering and estimation techniques in combination with the internal vessel model are used to generate estimates of the low-frequency motion of the vessel that automatically adjusts to the varying sea-states and operational conditions. The estimated motion (vessel speed, rate-of-turn, position and heading) is used in the feedback control of the vessel. 3.7.6 Trajectory Generator During automatic change heading and change position operations, the internal trajectory generator ensures a smooth change of the vessel heading and position. The vessel motion is according to the operator defined motion settings (maximum surge and sway speed and rate-of-turn). The start-up and end phase of the movement are automatically adjusted according to the capacity of the propulsion equipment installed. 3.7.7 Feedback and Feedforward Control The feedback controller computes the required surge and sway forces and yawing moment to keep the vessel on the desired position, heading or track in automatic control modes of operation. The individual position and heading control gain settings influence how aggressive the system will respond to deviations in position and heading. Automatic control modes also use reference feedforward control action, based on the trajectory generator to speed up the response of the system in change position and change heading operations. Wind measurements are used for wind compensation. I.e. the wind force and moment acting on the vessel is derived from wind speed and direction, wind drag coefficients and wind areas scaled by draught measurements. The corresponding wind feedforward counter force and moment are commanded. 3.8 DP Operator Desk 1) Joystick / DP selector switch 52 2) Helicon panel 3) Manual thruster controls 4) DP Graphical Display (OS 2) 5) Joystick/Positioning Device (OS2) 6) Integrated java retainment recess Normally all DP operations are conducted from OS 2, which is shown in Figure 24. OS 1 is located at the other bridge position (aft port side), from where cargo controls are also accessed. 3.8.1 Graphical Display The main interface of the DP system is its graphical display. Here, the status of all reference systems are shown. The display is a touch-screen and all controls can be operated by pressing the icons on the actual screen. However, for comfort purposes a HDI (mouse) is connected to the system as well. A green symbol in front of any reference system or thruster indicates that they are being utilized by the DP system. A grey symbol indicates that a component has either been disabled or is not available for the system to use. 1. Wind direction and resulting force 2. Vessel position 3. Stack panels 4. Vessel speed and rotation 5. Order indicator 6. Heading indicator 7. Position indicator 8. Class monitoring visualisation 9. Power visualisation 10. Toolbar 11. Alarm message area 12. Status bar 3.8.2 Joystick Device Reference is made to Section 3.5.8 (Joystick Control System). The DP joystick device functions in the same way and has identical functions. However, in the case of the DP system, the joystick is supplemented by a more advanced Graphical Display and a Positioning Device. 3.8.3 Positioning Device The positioning device is used for the maneuvering of the vessel when DP positioning 53 mode is engaged. In accordance with DP philosophy, no command is possible without a confirming action. On the buttons available on the Positioning Device, confirming a desired order is performed by double tapping the respective button. In order to confirm vessel movement orders or heading changes using the control knobs, the operator can confirm the intended order by pressing the Acknowledge button (9) on either the Positioning Device or the Joystick Device. Section 4 - Changeover Procedures The following procedures shall be followed when changing over control; 4.1.1 Manual Steering to Autopilot On the Helicon panel in command, press the “Autopilot” button (1) on the main display. The “Accept” button starts flashing blue at location (2). Press it. There is one button for each thruster. They need to be put in autopilot mode individually, if this is required, even if the system is set to “Common Stbd”. The autopilot is now in command and is controlled by the separate unit located forward of the Helicon panel at the forward control station. Autopilot rudder limitations apply. 54 4.1.2 Autopilot to Manual Steering Reverse procedure as described in section 4.1.1 If the physical maneuver handle is operated (i.e. an azimuth angle command is given) the Autopilot will be overridden and the manual angle order applied. The Helicon panel will give off an alarm and the “Autopilot” buttons start to flash blue. They need to be reactivated before the Autopilot can once again assume control of the thrusters. 4.1.3 Manual Steering to Wheel Control Press the “Rudder Lever On” button (1). The “Rudder Lever On” indicator lights (2) will assume yellow lights. The wheel can now be used to steer the vessel. Note that the wheel is of Follow Up type. Also note that the wheel works as a conventional rudder, i.e. that a starboard turn will prompt a starboard swing. 4.1.4 Wheel Control to Manual Steering Press the “Rudder Lever Off” button, next to the “Rudder Lever On” (1) button. 4.1.5 Manual Steering to Emergency Control Emergency control is activated in the same manner for all individual thrusters onboard. Emergency control applies to both thrust and azimuth angle, whenever applicable. To engage emergency control, simply press the “!” button on the maneuver handle. A red light at the button will indicate that emergency mode has been successfully activated. 4.1.6 Emergency Control to Manual Control Reverse procedure as in Section 4.1.5. Note: If emergency control is disengaged while the physical thruster still has pitch, this pitch will remain as it was when emergency control was relinquished until a new command is issued by operating the maneuver handle. 4.1.7 Fwd Control Station to Aft Control Station and Vice Versa 55 If there are two navigators on the bridge, who have assumed command of different control stations, details regarding how or when the command change shall take place should be discussed. The navigator at the control station in charge will set all maneuver handles to zero thrust. Before command is switched to the other control station, the navigator at the control station currently in command will confirm that he/she is ready to relinquish command. At the control station to assume command: Before taking command, ensure that all maneuver handles are set to zero thrust. Preferably, thruster azimuth angles should be set in such a way as to match current physical angle. Alternatively, they can be set in the positions at which the navigator will desire to have them upon assuming command. On the Helicon panel’s main screen, press the “In Cmd” button. The “Accept” button will appear and flash blue. Press this button. Upon successful command transfer a loud beep will go off (approx. 1 second long). All individual thrusters’ command indicators on the screen will now assume a blue color, indicating successful transfer. All the command indicator lights on the maneuver handles will assume a blue light. Command has now been transferred. Thruster azimuth angles / thrust will now automatically match active orders at the new control station in command. 4.1.8 Manual Controls to Joystick Controls There is one joystick selector switch on the Rem Mermaids bridge, the switch is located on the aft. control desk. Turn the switch to “Joystick control” on the Joystick / DP selector switch. The indicator above the button will assume a white light. Double tap the power button (3) on the joystick device. The joystick is now in command. By default, neither heading nor axis is locked. For details on how to operate to joystick control system, refer to Section 3.5.8. Note: Joystick mode can be engaged directly from DP mode as well. 4.1.9 Joystick Control to Manual Controls Unlock heading control by double tapping button (7) on the joystick device. Double tap the power button (3). The Helicon control station that was last in command (normally aft station) is now in control of the vessel and thruster maneuver handles can be operated. 56 For emergency release to manual: Lift the lid and turn the switch to “MAN” on the Joystick / DP selector switch. 4.1.10 Emergency Pitch Control of the tunnel Thrusters Refer to Section 4.1.5. Emergency control is separate for Bow Thruster 1 & 2 and applies for thrust only. 4.1.11 Emergency Control of the Azimuth Thruster Refer to Section 4.1.5. 4.1.12 Passing Control to the DP Desk DP mode will normally only be engaged when the aft control station is in control of the vessel. OS 2, on the starboard aft bridge console, is normally utilized. If inside the 500m zone of an installation, ensure that the vessel is clear of any obstructions before engaging the DP. Also ensure that the vessel is not drifting towards any obstruction at a speed which will put the vessel at risk during the time it will take to set up the DP properly. If practicable, stabilize vessel heading and bring the vessel to minimum speed over ground manually. Set all thrust on the maneuver handles to zero. Press the DP button on the Joystick / DP selector switch (only available at the aft control station). The DP Mode indicator above the button will assume a white light. Double press the power button (1) on the DP joystick (A: Figure 35). The DP is now active. All available thrusters will be automatically allocated to the DP system. Maneuver handles can no longer be utilized. Note: In addition to automatically engaging thrusters, the Rolls-Royce Icon DP will enable available gyros and DGNSS reference systems. Ensure the OS is in command by checking that the indicator lamp on the 57 “Command” button (2) is lit blue. If it is not, assume command by double tapping the button. By default, the DP is now in joystick mode with both heading, sway and surge unlocked. Stabilize vessel heading by turning the joystick handle (A). Rate of Turn is displayed on the DP graphical display (C). When Rate of Turn is approaching zero the heading can be locked by double tapping the “Lock Heading” button on the joystick lever (refer to Section 3.5.8 for details on the Joystick controls). Bring the vessel to a standstill by operating the joystick (A). When surge / sway is approaching zero, the respective axis can be locked by double tapping the corresponding button on the DP positioning device (B). To lock surge, double tap (3). To lock sway, double tap (4). When both surge and sway have been locked the vessel is in DP mode. The Rem Server’s vessel specific DP checklist should now be completed by the DP operator. For full details on how to operate the DP system, refer to Rolls-Royce manuals and company procedures. How to operate the DP, once engaged, is beyond the scope of this manual. 4.1.13 Releasing DP Control Before the DP is disengaged the vessel should be moved well clear of any installation. At the very least the DP should be ordered in such a way so that the vessel makes speed away from any obstructions before DP controls are released to manual. Unlock sway, surge and heading control individually as appropriate by double tapping the respective buttons on the DP control handles (refer to Section 4.1.12). Note: Disable both DGNSS reference systems on the DP control screen. If this is not done the DP will print alarms - en masse - relating to DGNSS lack of accuracy. Disengage the DP by double tapping the power button on the DP joystick device. The vessel is now in manual control at the aft control station. Command will now normally be transferred to the forward control station. Refer to Section 4.1.7. For emergency release to manual: Lift the lid and turn the switch to “MAN” on the Joystick / DP selector switch. 58 4.2 Power Failures (Blackouts) Reference is made to company procedure “Power Failure”, Doc. Ref OM-08-0133 in the UniSea TQMS. In accordance with the document the following procedure is to be followed in case of a blackout: Call the Master Inform the Charterer’s representative Exhibit “Not Under Command” signals If there is danger of grounding, consider anchoring or towage Inform shipping in vicinity of own vessel Inform the Company If a blackout occurs the real work will rest with the vessel’s engineers. While the desire for information is understandable, it is best to allow the engineers to solve the problem undisturbed. In reality the likelihood of a total blackout occurring on the Rem Mermaid is slim. If a generator trips it will be automatically disconnected from the main switchboard. Power demand will then be absorbed by the remaining generators. If these are unable to supply the required power the system will enter a state of Load Reduction, meaning that maximum thrust on the vessel’s propulsion system will be reduced to within available power limits. This is a safety barrier designed to prevent the tripping of the generators remaining online. If a generator trips, the Power Management System will automatically attempt to start a backup generator. If this fails the system will attempt to start yet another available generator. Only if all four generators have failed to start the vessel will suffer a total blackout, and the emergency generator will start. The emergency generator will supply power to the 230V and 440V systems only. While this will means there is no power available for propulsion, power will still be available for critical systems such as radios, radars, lanterns, lighting and the emergency fire pump. The risk of a blackout occurring is at its highest during two circumstances; When load on the power system is rapidly and radically increased. When load on the power system is rapidly and radically decreased. When the vessel was first delivered she had incidents leading to blackouts relating to both circumstances. The first instance (radical load increase) would, as an example, occur when the main propulsion system was switched from RPM Mode to Power Mode without first having reduced thrust on the maneuver handles (refer to Section 3.6.1). The thrusters would then demand more power from the system than was available and trip the generators. This has now been solved by calibrating the system to enter a state of 59 Load Reduction – effectively limiting the amount of power that the propulsion system can demand from the power distribution system. The second instance (radical load decrease) would occur when main propulsion thrust was rapidly decreased from a high RPM to a low RPM. This would cause the propellers to spin “backward” and start generating power instead of consuming it. The bus tie breaker and the generators would then trip. This problem has been solved by installing a security barrier at the thrusters known as an Active Front – the thrusters are now unable to feed power back to the vessel’s switchboard. Section 5 - Manoeuvring Data 60 Section 6 - FMEA (Effect of failure of critical components) The vessel’s FMEA can be found in the bridge library. It is the most critical piece of DP documentation onboard and accounts for the results of the testing process that every DP vessel is subjected to upon delivery and at 5-yearly intervals (or after substantial alterations to the system). The FMEA focuses on testing every single component that can cause a loss of the vessel’s station keeping ability. As the navigator will be aware of DP philosophy relies on redundancy – meaning that no single fault should be able to cause a drift off. When performing an FMEA every component of the DP system is artificially forced to “fail”, and the response of the system is then documented. It is this documentation that comprises the bulk of the FMEA. Because of the above it is very important that DP operators have knowledge of the contents of the FMEA and of how the vessel will behave in case of critical failures. The FMEA will have identified the most critical failures that can occur onboard the vessel, and the operator should pay particular attention to these ones. In the Rem Server’s case, the most critical errors are those that will result in the loss of either of the vessel’s switchboards (port or starboard) – as this means that 50% of available thrust will be effectively lost. Depending on what side the Azimuth thruster is currently connected to, more than a 50% loss of thrust can actually occur. Errors leading to such a loss will typically be short circuits on either of the switchboards. However, loss of a switchboard can also occur if transformers that supply power to the generator system’s auxiliary pumps are lost. The simplest way to minimize the consequences of a single worst case occurring is to never operate the vessel in DP mode under conditions requiring more than 50% of the vessel’s available thrust. In this case, even if 50% of the available thrust is lost, the vessel will still be able to maintain station keeping ability. Another prudent way to minimize the consequences of a single worst case is to operate on the lee side of an installation, if possible. In case thrust is lost and the vessel is unable to maintain position it will then drift away from the installation as opposed towards it. Section 7 - Record of Incidents. 7.1 Purpose On every occasion that an incident or failure of equipment occurs, even if this incident does not result in injury to personnel or damage to equipment or to the vessel, an incident investigation must take place. The purpose of the investigation is to ascertain the reason for the failure so that, hopefully, future occurrence can be avoided. It will also give an indication to the likely sequence of events following the failure of such equipment and the best course of action to take. 61 No matter how small the incident it must be investigated and the findings recorded in BPM section 7. The corrective measures taken to prevent re-occurrence must also be included in the incident log. I am sure that you can see the benefits of having the past history of incidents recorded in this manual; it will alert new crew and your opposite number of the likely outcome of failures of equipment and how to deal with such failures and what to expect if failure does occur. It will also give an indication of what actions should be avoided. This is also to include incidents involving human error, for example pressing the wrong button or pulling the wrong lever, anything that we can learn from. 62 7.2 Incident Log Incident Log Date : Time : Location : Wind : Sea : Current : What happened : Result of Incident : Corrective measures / how to avoid re-occurrence Date: Name: Signature: Section 8 Appendix Please see UNISEA for checklist and other relevant information. 63