1
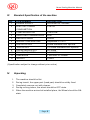
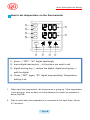
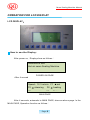
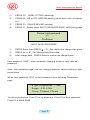
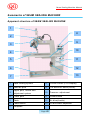
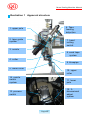
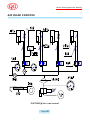
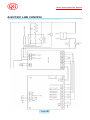
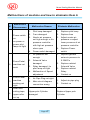
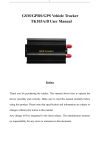
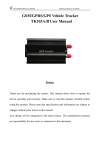
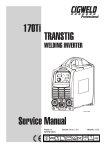
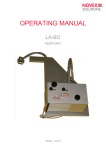
SEAM SEALING MACHINE
USER’S MANUAL
Qiaoge (Shanghai) Enterprise Co, Ltd
Address: No.381, Meizhou Road, Yangpu District, Shanghai, China
Tel: +86 21 65437622
Email: [email protected]
Seam Sealing Machine Manual
ENGLISH OPERATION MANUAL
I.
Purpose
Seam sealing Machine, has the following purpose.
1.
Most of the fabric required for waterproof need taping, because the
water permeate the fabric through the needle hole.
2.
This machine is designed for the waterproof of seam part by taping
with hot air.
II.
Application of the machine
The machine is designed to provide a fast, simple and reliable method
for application of a hot melt tape over a sewn seam or glued joint to
create a waterproof product.
Marine Suits
Rainwear, Dry suits, Waders
Industrial Protective and High Visibility Clothing
Military, Emergency Services, Public Services
Leisure Waterproofs
Golf, Ski, Motorcycle, sailing, fishing, walking, Tents, Boat Covers
Chemical Protective Clothing
Advertisement balloon
Page 1
Seam Sealing Machine Manual
III.
Standard Specification of the machine
No.
ITEM NUMBER
DESCRIPTION
1
POWER SUPPLY
AC220V±10%, 50/60HZ
2
ELECTRIC POWER
2.5K VA
CONSUMPTION
3
COMPRESSED AIR
3.8KG/CM²
4
DRIVE AND TRANSMISSION
60W
5
HEATER POWER
2000W
6
NOZZLE TEMPERATURE
Adjustable 0~750 C
7
ROLLER WIDTH
25MM standard/other optional
8
TAPE WIDTH
14-22MM standard/other optional
o
9
UPPER ROLLER LIFT
20-30MM
10
ROLLER VELOCITY
1-23M/MIN
11
DIMENSION
1180 x600 x 1700MM
12
WEIGHT
150KG
(Specification subject to change without prior notice)
IV.
Unpacking
1.
The machine should be flat.
2.
During transit, the upper part (head part) should be solidly fixed.
3.
Completely remove rust with cleaner.
4.
During moving indoor, the wheel should be OFF-state.
5.
When the machine arrived at installed place, the Wheel should be ONstate.
Page 2
Seam Sealing Machine Manual
V.
Installation
1.
The machine should be installed away from the wall not less than
500mm.
2.
The machine should be installed confirming the following
conditions.(Before power switch is on)
VI.
1)
Air pressure is 0.3Mpa
2)
Air connect
3)
Confirm the power S/W is off state and 220V
4)
Pick A Nozzle hole wire to confirm the clean hole
How to Work
1.
Plug in
2.
Power switch on
3.
Input the temperature(400~600 C)
o
Page 3
Seam Sealing Machine Manual
How to set temperature on the thermometer
7
OUT
8
AT
9
ALM1
10
ALM2
PV
6
SV
5
SET
XMT-C100
Smart
1
2
3
4
1) press ① “SET”, “SV” digital sparklingly
2) move digital moving key② to the place you want to set
3) digital moving key ③ reduce the digital, digital moving key ④
add the digital.
4) Press①“SET” again, “SV” digital stop sparkling. Temperature
setting is ok.
5) Press the heating switch, heater will heat to the setting
temperature, when the temperature is around setting
1.
When input the temperature, the temperature is going up. If the temperature
temperature, is ok.
is not going up, then we have to check whether the heater air pressure is
below 1kg/CM²
2.
Start to work when the temperature is increased at the input temp. (About
2~3 minutes)
Page 4
Seam Sealing Machine Manual
3. How to stop work
1) Setting the temp.(000)
2) Wait until below 50 ℃
3) Air off
4) Power off
Caution: Do not off the air before below 50℃, it can cause the
heater broken.
Control of Pedal
1) Put your foot on pedal.
*Position of pedal and the height of chair are controlled by worker’s
physical condition.
2) Upper roller up and down
Upper roller up and down each time the right pedal is stepped on.
3) How to start
The nozzle and machine is start to working when the upper roller is
down state.
①If the upper roller is up-state, nozzle heater is not moving even
though the felt pedal is stepped on.
②The roller moves only while the left pedal is stepped on.
③Auto cutting:
While the left pedal stepped on, the tape is automatically cut while right
pedal is stepped on simultaneously.
Panel Control
Parameter setting and adjustment on the machine control center LCD
DISPLAY:
Page 5
Seam Sealing Machine Manual
OPERATION FOR LCD DISPLAY
LCD DISPLAY:
How to use the Display:
After power on,Display show as follows:
Welcome to use
Hot air seam Sealing Machine
POWER ON PAGE
After 4 second
Speed:12.3 m/min F1
set
F2
shearing
F4
heating
F3
reverse
F5
fit tape
MAIN PAGE
After 4 seconds, automatic to MAIN PAGE, show as above page. In the
MAIN PAGE, Operation function as follows :
Page 6
Seam Sealing Machine Manual
(1)
PRESS F2, HAND CUTTING (shearing);
(2)
PRESS F4, ON or OFF HEATING(heating words black color is heating
on);
(3)
PRESS F3, ROLLER REVIND (reverse);
(4)
PRESS F1, Display show INPUT PASSWORD PAGE, as following page:
Please input password:
****
INPUT PASSWORD PAG
F5=Return
INPUT DATA PROCEDURE:
(1)
PRESS Enter, then PRESS
(2)
PRESS ▲ or ▼ ,Can change flash place data;
(3)
After change data,PRESS Enter to confirm the changed data;
/ F1, Can choose the change data place;
User password “2222”,other parameter changing similar to input data as
password.
show user parameter page, user can change parameter data according to data
period show;
When input password “2222” is User password, show following Parameters
page:
e. gun-in synchrony 1 .00s
Range:0.01-2.00s
F2=up F3=down F5=exit
As above photo show, Press F2 to up parameter, Press F3 to Next parameter,
Press F5 to MAIN PAGE.
Page 7
Seam Sealing Machine Manual
As Sequence of a\b\c…, explanation as following:
a:Work speed---it is to adjust the speed of upper and lower Rubber roller.
Reference value: 10m/min
b:Reverse speed---it is to adjust the reverse speed of upper and lower Rubber
roller.
Reference value: 7m/min
c:Micro-recede speed---it is to adjust the micro-recede speed of Rubber roller when
the hot air gun in and out.
Reference value: 7m/min
d:Tape feeding speed---it is to adjust the speed of tape feeding to set position after the
clipping.
Reference value: 7m/min
e:Gun-in synchrony---it is to adjust the timing of gun-in to make sure when the gunin the rubber roller can actions at the same time.
Reference value: 0.30s
f:Gun-out synchrony---it is to adjust the time of pinch wheel stop in order to make
sure the hot air gun out and the pinch wheel stop at the same
time.
Reference value: 0. 10s
Page 8
Seam Sealing Machine Manual
g:Micro-recede delay---it is to adjust the time of rubber roller recede when the working
is suddenly stopped.
Reference value: 0.02s
h:Shearing speed---it is to adjust the speed of openi ng and closing of the shearing
when tape clipping.
Reference value: 0.20s
i:Tape pressing delay---it is to adjust the time of pressing the left tape after clipping.
Reference value: 0.55s
j:Tape feeding delay---it is to adjust the time of sending tape to the set position after
clipping and left tape feeding.
Reference value: 0.40s
k:Shearing pattern---it is to set the mode of tape feeding, which including automatic
tape shearing and manual tape shearing.
m:Blow tape delay---it is to adjust the time of tape blowing after tape
Page 9
Seam Sealing Machine Manual
Summarize of SEAM SEALING MACHINE
Apparent structure of SEAM SEALING MACHINE
1
8
2
9
3
10
4
5
11
6
12
7
13
1
Tape feeding system
8
Control center (LCD display)
2
Send air pole
9
Full direction wheel(Inside)
10
Pressure adjustment
3
Upper pole, nozzle and
adjustment system
4
Lower pole
11
Power switch
5
Table
12
Air blow(Inside)
6
Pedal switch
13
Oil and water separator
7
Soleplate
Page 10
Seam Sealing Machine Manual
Illustration 1 Apparent structure
6. Tape
feeding
defection
system
1. upper pole
2. tape guide
system
7. hand
cutting
switch
3. nozzle
8. send tape
system
4. cutter
9. blowpipe
5. lower roller
10. upper
roller
14. nozzle
switch
system
11. lower
pole
12. 3dimensional
adjust
system
13. process
switch
Page 11
Seam Sealing Machine Manual
Illustration 2 Upper pole, nozzle and adjustment system
1. Digital show
control
thermometer
3. control
center power
light
2. LCD display
4. Main control
power
5.up roller
pressure
8. Main power
light
6. up roller
pressure
adjustment
7. Main power
switch
Introduction of the parts and relevant functions
The machine is mainly composed of machine shelf, transmission system,
nozzle system, nozzle adjustment, upper pole and lower pole, table and pedal
switch etc. and electric control system.
Page 12
Seam Sealing Machine Manual
Following is the introduction of the main parts and relevant functions:
◆ UPPER POLE:(Illustration 1 No.10)
used for press and transfer the tape and material for process, it can slip
up and down, the height can adjust from 0 MM to 30 MM;
◆ LOWER POLE: (Illustration 1 No.11)
used for press and transfer the tape and material for process, been fixed
on the table;
◆ NOZZLE: (Illustration 1 No.3)
a heater in the nozzle and the end is nozzle, it can transfer the hot air to
work area;
◆ NOZZLE SWING SYSTEM: (Illustration 1 No.14)
used for swing the nozzle in and out;
◆ THREE-DIMENSIONAL ADJUST SYSTEM: (Illustration 1 No.12)
used for adjust the position of the nozzle;
◆ PEDAL SWITCH: ( I. No.6)
used for control up and down of the upper pole、auto tape cutter and
circumrotate of the upper roller and lower roller;
◆ CUTTER: (Illustration 1 No.4)
cut the tape (manual control by Illustration 2 No.7 and auto control);
◆ CONTROL PANEL: (Illustration 2 No.4)
there are many switches for heat thermometer 、 feeding speed and
upper roller pressure etc.
◆ POWER SWITCH: (Illustration 2 No.7)
power switch of the machine;
Page 13
Seam Sealing Machine Manual
◆ OIL AND WATER SEPARATOR: (I.No.12)
separate the oil and water from the air source, there are one pressure
gauge and one tie-in the pressure gauge can adjust the pressure of the
ingoing air, the tie-in can connect with the air source;
◆ TAPE FEEDING DEFECTION SYSTEM:: (Illustration 1 No.12)
used for control the position and width of the feeding tape;
Following is the introduction of the parts and relevant functions on
the control panel:
● DIGITAL SHOW CONTROL THERMOMETER: (Illustration 2 No.1)
show the air temperature from the nozzle and set the temperature from
the nozzle that needed;
● CONTROL CENTER POWER SWITCH: (Illustration 2 No.4)
Control LCD display and main card, control center power on, light
(Illustration 3 No.3) will lighting.
● MAIN POWER SWITCH: (Illustration 2 No.7)
General power switch for whole machine, power on, light (Illustration 3
No.8) will lighting.
● UP POLE AIR PRESSURE ADJUST SWITCH: (Illustration 2 No.6)
Adjust the up pole air pressure, the air pressure barometer can tell the
pressure
Page 14
Seam Sealing Machine Manual
AIR ROAD CONTROL
PICTURE(6) Air road control
Page 15
Seam Sealing Machine Manual
ELECTRIC LINE CONTROL
Page 16
Seam Sealing Machine Manual
Malfunctions of machine and how to eliminate them A
N
Malfunction
Power switch
on,
1
Malfunction Reason
Phenomenon
Eliminate Malfunction
1.
Pilot lamp damaged
1.
Replace pilot lamp
2.
Fuse damaged
2.
Replace fuse
3.
Nozzle air pressure
3.
Adjust nozzle air
no power or
power pilot
lamp not light
not high enough or Air
pressure or adjust
pressure controller
lower pressure of air
with high air pressure
pressure controller
when open
4.
Power switch damaged
1.
Air pressure not
4.
switch
1.
enough
Press Pedal,
2
machine not
work
2.
Solenoid Valve
3
machine
working not
right
1.
Air Pipe Plug not right
2.
Main circuit diagram
connection wrong
Replace related
Solenoid Valve
3.
Malfunction of Speed
adjustment
Press Pedal,
0.35M Pa
2.
Relay damaged, its
pilot lamp not light
4.
Improve general
enter air pressure to
damaged
3.
Replace Power
Replace related
Relay
4.
Contact us
1.
Adjust air pipe plug
2.
Contact us
After auto
4
cutting tape,
Upper pole Cylinder
Replace Upper pole
upper roller
damaged
Cylinder
not up
Page 17
Seam Sealing Machine Manual
Malfunctions of machine and how to eliminate them B
N
Malfunction
Motor move
5
Malfunction Reason
Phenomenon
first, Nozzle
not down
1.
Adjustment Bolt
Eliminate Malfunction
1.
position not right
2.
Machine set wrong
position and lock it
2.
parameter
control
6
1.
appear wrong
temperature
guidance of our
technician ) or
Thermometer
2.
Adjust Thermometer
parameter (Under
Set not suitable
parameter in the
thermometer
Reset Machine
Parameter
1.
Digital show
Adjust Adjustment Bolt
according to this
Heater short
Manual
2.
Replace Heater
Contact us
7
Others
Tel: +86 21 65437622
Email: [email protected]
Page 18
Quality win the market
Service win the customer