1
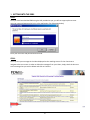
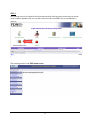
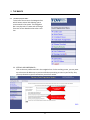
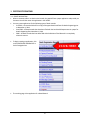
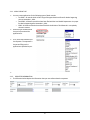
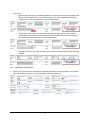
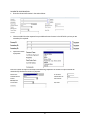
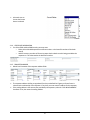
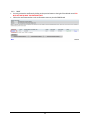
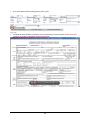
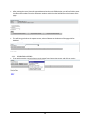
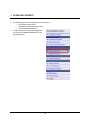
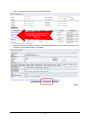
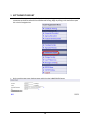
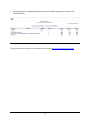
VIRGINIA DEPARTMENT OF HEALTH DIVISION OF VITAL RECORDS ELECTRONIC DEATH REGISTRATION SYSTEM (EDRS) USER MANUAL FOR LOCAL HEALTH DEPARTMENTS Contents 1. GETTING INTO THE EDRS ...................................................................................................................... 2 2. THE BASICS ............................................................................................................................................ 4 3. 2.1. THE NAVIGATION BAR - ................................................................................................................ 4 2.2. SETTING USER PREFERENCES – ..................................................................................................... 4 CERTIFICATE PRINTING ......................................................................................................................... 5 3.1. CREATE APPLICATION ................................................................................................................... 5 3.1.1. APPLICATION TYPE ................................................................................................................ 6 3.1.2. REQUESTER INFORMATION .................................................................................................. 6 3.1.3. REGISTRANT INFORMATION – .............................................................................................. 7 3.1.4. PAYMENT & ID INFORMATION ............................................................................................. 8 3.1.5. CERTIFICATE INFORMATION ................................................................................................. 9 3.1.6. REQUESTER ADDRESS ........................................................................................................... 9 3.2. SAVE AND PRINT ......................................................................................................................... 10 3.2.1. SAVE .................................................................................................................................... 10 3.2.2. PRINT ................................................................................................................................... 11 3.2.3. RE-PRINTING A RECORD ...................................................................................................... 13 4. APPROVING PERMITS.......................................................................................................................... 14 5. SETTLEMENT REPORT.......................................................................................................................... 16 1 1. GETTING INTO THE EDRS STEP 1. Once you have launched the EDRS using the URL provided to you, you will see a pop-up box to enter your user name and password to log in to the application. (See illustration below) Enter your username and password and click OK. STEP 2. You may view your messages in the inbox displayed on the resulting screen. Click on Continue to navigate to the next screen. In order to delete the messages from your inbox, simply check the box next to the message that you wish to delete and click on Continue. 2 STEP 3. The resulting screen is the Virginia Vital Events and Screenings Tracking System Screen and may include various modules. Based on your role, you will only have access to the EDRS. Click on the EDRS link to continue. The resulting screen is the EDRS Home screen. 3 2. THE BASICS 2.1. THE NAVIGATION BAR To the left of the screen is the Navigation Bar which houses various links allowing you to move around in the system. This Navigation Bar is very dynamic in nature and will change from user to user based on what roles a user has. 2.2. SETTING USER PREFERENCES – Click on the user preferences link in the navigation bar. On the resulting screen, you may enter up to three e-mail addresses to receive notifications pertaining to cases in your facility. Also, you may choose the type of notifications you wish to receive. 4 3. CERTIFICATE PRINTING 3.1. CREATE APPLICATION When a customer walks-in to obtain a vital record, they would fill out a paper application and provide you the same. You will then enter this application in the VVESTS. You may create applications for the following types of death records. o Pre-EDRS – all records which will be a copy of the paper death certificate for deaths happening prior to November 1, 2014 o Post-EDRS – All death records that have been filed with the Local Health Department via a paper for deaths happening after November 1, 2014. o EDRS – all death records that have been filed with the Division of Vital Records in a completely electronic manner. To begin creating an application, click on the CERTIFICATE PRINTING link in the left navigation bar. The resulting page is the application for a Death Record. 5 3.1.1. APPLICATION TYPE You may create applications for the following types of death records. o Pre-EDRS – all records which will be a copy of the paper death certificate for deaths happening prior to November 1, 2014. o Post-EDRS – All death records that have been filed with the Local Health Department via a paper for deaths happening after November 1, 2014. o EDRS – all death records that have been filed with the Division of Vital Records in a completely electronic manner. Select the type of EDRS record that you have received the application for . Then, select the relationship of the requester. The requester is the person filling out the application as provided to you. 3.1.2. REQUESTER INFORMATION The illustration below depicts the information that you must collect about the requester. 6 If you select – o Agency as the relationship, it will disable the fields for you to enter the name of the requester and also the Funeral Home field. You must select the agency from the pre-defined list launched by clicking on the ‘L’ next to the agency box. (See Illustration below) 3.1.3. o Funeral Home as the requester relationship, it will disable the Agency field and the requester name fields. You must select the Funeral Home from the pre-defined list launched by clicking on the ‘L’ next to the Funeral Home box. (See Illustration below) o Any other relationship, other than the above, you must enter the following information about the requester. REGISTRANT INFORMATION – Enter as much information you know about the registrant (decedent) from the application. The minimum information required is the Last name and the date of death of the decedent. 7 PAYMENT & ID INFORMATION Enter the relevant information in the section below. Choose a valid ID that the requester has provided and enter the same in the ID Fields. A primary or two secondary ID is required. Choose the mode of payment Enter the number of copies of the death certificate being requested. The number of copies entered will automatically calculate the amount of payment. 8 Also make sure to choose the Current Status is selected 3.1.4. CERTIFICATE INFORMATION For all Pre-EDRS and Post-EDRS records, you must enter o Either the local health department certificate number or the State File number of the death record) o And the inventory numbers of all security paper that the death record is being provided to the requester on. This is denoted as the document number. 3.1.5. REQUESTER ADDRESS Below is an illustration of the requester address fields. The requester address shall be pre-populated from the pre-defined list if agency or funeral home is selected as the relationship of the requester. If not, then you must enter the address for the requester. If the mailing address is the same as that provided by the requester, select the “USE ABOVE ADDRESS” checkbox. If not, then enter the mailing address. 9 3.2. SAVE AND PRINT 3.2.1. SAVE Once all information has been entered, click on the SAVE button at the bottom of the page. Based on the application type – o For all EDRS records, the system will search for the decedent record and display the matches as below. o if you have entered all information about the registrant and are unable to locate a record for them, try to search again with less criteria, typically, the first name, last name and the date of death. To do a wild card search, you can also enter the first letter of the first name with a percent sign. For example, if you are searching for JOHN SMITH, you may try “J%” in the first name field and smith in the last name field. Click on the New Query Button to search again. o For all Pre-EDRS and Post-EDRS records, the system shall display a success message indicating that the application was successfully created. Now, you may provide a copy of the paper death certificate to the requester. 10 3.2.2. PRINT You may preview the certificate by clicking on the preview button to the right of the desired record. DO NOT USE THIS TO PRINT THE CERTIFIED COPY!! Click on the certificate number on the confirmation screen to print the EDRS Record 11 Then, at the bottom of the resulting screen, click on print. The EDRS will open the death certificate in a PDF format which you may now print. Do not re-size this certificate. It has been optimized to fit the security paper. 12 After printing the record, close this pop window and on the main EDRS window, you will see fields to enter the document numbers. Enter the document numbers and click on the SAVE button at the bottom of the page. This will bring you back to the request screen, where all buttons at the bottom of the page shall be disabled. 3.2.3. RE-PRINTING A RECORD If you wish to reprint a record, select a reprint reason from the previous screen, and click on re-print 13 4. APPROVING PERMITS The following permits may be assigned to you for approval – o Out of State Transit Permits o Disinterment and Reinterment Permits o Communicable Disease letters. In order to view a list of all permits assigned to you, click on the PENDING PERMITS Link in the left navigation bar. 14 Then, select the permit by clicking on the DECEDENT NAME. All permits that you may approve shall have an APPROVE PERMIT button at the bottom of the page. Click this button. (the illustration below is an example) A confirmation message shall indicate that the permit was successfully approved. 15 5. SETTLEMENT REPORT At the end of the day, or a time specified by the business per day, you may run a settlement report to tally transactions and monies collected from Vital Records Printing. Begin by clicking on the settlement report link in the left navigation bar. On the resulting page, enter the date range and click on the SUBMIT QUERY button 16 The resulting screen shall display the Settlement report for the date range entered, click print. (see illustration below) This concludes the user manual. For any questions, please contact [email protected] 17