1
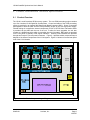
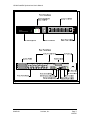
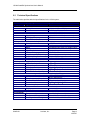
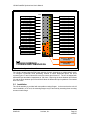
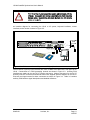
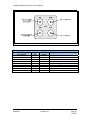
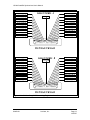
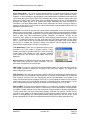
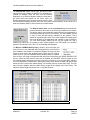
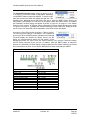
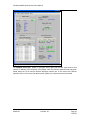
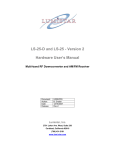
LS-044 Series Rackmount Multi-channel Digital Bit Synchronizer Hardware and Software User’s Manual Document: Date: Release: U44000101 6 December, 2007 R4 Lumistar, Inc. 2701 Loker Ave. West, Suite 230 Carlsbad, CA 92010 (760) 431-2181 www.lumi-star.com This document is the intellectual property of Lumistar, Inc. The document contains proprietary and confidential information. Reproduction, disclosure, or distribution of this document is prohibited without the explicit written consent of Lumistar, Inc. This document is provided as is, with no warranties of any kind. Lumistar, Inc. disclaims and excludes all other warranties and product liability, expressed or implied, including but not limited to any implied warranties of merchantability or fitness for a particular purpose or use, liability for negligence in manufacture or shipment of product, liability for injury to persons or property, or for any incidental, consequential, punitive or exemplary damages. In no event, will Lumistar, Inc., be liable for any lost revenue or profits, or other indirect, incidental and consequential damages even if Lumistar, Inc. has been advised of such possibilities, as a result of this document or the usage of items described within. The entire liability of Lumistar, Inc. shall be limited to the amount paid for this document and its contents. RESTRICTED RIGHTS LEGEND Use, duplication, or disclosure by the Government is subject to restrictions set forth in subparagraph (c)(1)(ii) of the rights in Technical Data and Computer Software clause in DFARS 252.227-7013. Lumistar, Inc. and its logo are trademarks of Lumistar, Inc. All other brand names and product names contained in this document are trademarks, registered trademarks, or trade names of their respective holders. © 2007 Lumistar, Inc. All rights reserved. Lumistar, Inc. 2701 Loker Avenue West Suite 230 Carlsbad, CA 92010 (760) 431-2181 (760) 431-2665 Fax www.lumi-star.com LS-044 Quad Bit Synchronizer User’s Manual 1. INTRODUCTION ........................................................................................................................................ 5 1.1 1.2 2. GENERAL .................................................................................................................................................. 5 MANUAL FORMAT ...................................................................................................................................... 5 PRODUCT OVERVIEW AND TECHNICAL SPECIFICATIONS ............................................................... 6 2.1 2.2 3. PRODUCT OVERVIEW................................................................................................................................. 6 TECHNICAL SPECIFICATIONS ...................................................................................................................... 8 HARDWARE CONFIGURATION / INSTALLATION ................................................................................. 9 3.1 3.2 HARDWARE CONFIGURATION ..................................................................................................................... 9 INSTALLATION.......................................................................................................................................... 10 4. SOFTWARE APPLICATION.................................................................................................................... 14 5. MAINTENANCE ....................................................................................................................................... 24 U4400101 Lumistar, Inc. Page 3 12/07/07 LS-044 Quad Bit Synchronizer User’s Manual List of Figures Figure 2-1: LS-40 Block Component Layout Diagram........................................................................................... 6 Figure 2-2: LS-44 Front and Rear Panel Views .................................................................................................... 7 Figure 3-1: Configuration Shunt Blocks............................................................................................................... 10 Figure 3-2: LS-44 connections to AC power and PC peripherals ....................................................................... 11 Figure 3-3: LS-44 Primary PCM Processing Engine Interface Connections....................................................... 12 Figure 3-4: LS-44 Auxiliary PCM Processing Engine Interface Connections ..................................................... 13 Figure 4-1: LS-44 QBS Host Software Status Display ........................................................................................ 14 Figure 4-2: LS-44 QBS Host Software Status ..................................................................................................... 15 Figure 4-3: Bit Sync Setup Display...................................................................................................................... 16 Figure 4-4: Bitsync FSP History Display ............................................................................................................. 19 Figure 4-5: BERT Pattern Disabled ..................................................................................................................... 21 Figure 4-6: BERT Pattern Source - Internal ........................................................................................................ 21 Figure 4-7: LS-44 QBS Remote Software Status Display................................................................................... 22 Figure 4-8: Network Management Host .............................................................................................................. 23 List of Tables Table 2-1: LS-44 Technical Specifications ............................................................................................................ 8 Table 3-1: PCM Channel Configuration Shunt Block Reference Designators ...................................................... 9 Table 3-2: LS-44 Auxiliary PCM Processing Engine Signal Definitions .............................................................. 12 Table 4-1: LS-40 Supported PCM Input Codes (normal or inverted) .................................................................. 17 Table 4-4-2: LS-40-DB Supported PCM Output Codes ...................................................................................... 17 Table 4-3: Extended Functions LED Meanings................................................................................................... 20 U4400101 Lumistar, Inc. Page 4 12/07/07 LS-044 Quad Bit Synchronizer User’s Manual 1. Introduction 1.1 General This document is the Hardware and Software User’s Manual for the Lumistar LS-44 Series 1U Rackmount Multi-channel Bit Synchronizer chassis. The intent of this document is to provide unit specifications, operational information, and maintenance instructions for the end user. The Lumistar LS-44 Multi-channel Digital Bit Synchronizer chassis provides a means of obtaining correlated clock and data recovery from up to four independent PCM streams. For each PCM input stream, the LS-44 provides independently controllable translation of various PCM formats and provides a user programmable PCM output format, which may be used for tape storage or as a means of providing PCM format translation. Each PCM processing channel may be programmed to receive inputs from 100bps to 20Mbps for NRZ PCM codes and 100bps to 10Mbps for all other support PCM codes. The LS-44 enclosure is a space saving, 1U, 19-inch rackmount chassis. The unit can be purchased with an optional 1U rackmount monitor/keyboard drawer that contains a built-in 8channel keyboard/video/mouse switch. The optional keyboard would allow a single point of control for up to eight separate LS-44 chassis’. 1.2 Manual Format This manual is separated into the following sections: Chapter 1 provides an introduction to this manual Chapter 2 provides a brief product overview and technical specifications Chapter 3 provides hardware configuration and installation instructions Chapter 4 provides software application instructions Chapter 5 provides maintenance instructions U4400101 Lumistar, Inc. Page 5 12/07/07 LS-044 Quad Bit Synchronizer User’s Manual 2. Product Overview and Technical Specifications 2.1 Product Overview The LS-44 is a self-contained PCM recovery system. The core PCM processing engine contains up to four Lumistar LS-40 Digital Bit Synchronizers. Control and status of the PCM processing engine is provided by an internal 586-class Single-Board Computer (SBC). Power is converted and supplied to both the SBC and the PCM processing engine by an ATX-style power supply. Filtered cooling air is supplied to internal components via four 10.8 CFM fans. Evacuation airflow is provided via the sides and the rear of the unit. To allow for future upgrades, the unit also contains a 1.44MB floppy drive which is accessible from the front panel. BNC jacks are provided on the rear panel for primary PCM engine interfaces. Auxiliary PCM interfaces are provided through two D-style 37-pin rear panel connectors. Figure 2-1 provides a block component layout diagram of the internal components of the LS-44 system. Figure 2-2 shows a front and rear panel view of the LS-44 chassis. Figure 2-1: LS-40 Block Component Layout Diagram U4400101 Lumistar, Inc. Page 6 12/07/07 LS-044 Quad Bit Synchronizer User’s Manual Figure 2-2: LS-44 Front and Rear Panel Views U4400101 Lumistar, Inc. Page 7 12/07/07 LS-044 Quad Bit Synchronizer User’s Manual 2.2 Technical Specifications The table below provides technical specifications for the LS-44 system. Table 2-1: LS-44 Technical Specifications Category: Specifications: Details: Mechanical Chassis Dimensions 19”(W) x 21”(D) x 1.75” (H) Form Factor 1U Chassis Weight Approx. 35lbs/15.9Kg Electrical Supply Voltage 100-120/200-240VAC (Auto switched) AC Supply Frequency 47-63 Hz Total Power < 300W PCM Input Channel Characteristics (1-4 channels) Quantity 1 SE/Differential Input; Jumper Selected Impedance 50, 75 or 1K Ω; Jumper Selectable Rates 50-20Mbps NRZ Codes; 50-10Mbps others Polarity Normal or Inverse; Software Programmable Signal Amplitude 0.1V to 10V p-p Maximum Voltage permissible 25V RMS Loop Bandwidth (LBW) settings 0.01 to 2% (data rate dependent) Acquisition Range +/- (4 x LBW Setting) Tracking Range +/- (10 x LBW Setting) Mean Acquisition Time 100-150 bits PCM Output Channel Characteristics (1-4 channels) NRZ-L Data Output +TTL, -TTL +TTL, -TTL 0° Clock Output PCM Output 1V p-p @ 50 Ω; Programmable Line Codes PCM PRN Output (future) +TTL, -TTL; Programmable Line Codes PCM PRN Patterns (future) 211-1, 215-1; Programmable PCM Line Codes Non-return to Zero Codes NRZ-L, NRZ-M, NRZ-S Bi-Phase Codes BiΦ-L, BiΦ-M BiΦ-S Delay Modulation (Miller) Codes DM-M, DM-S, M2M, M2S Return to Zero Codes RZ Randomized Codes RNRZ-L, RNRZ-S, RNRZ-M Randomizing Sequences 211-1, 215-1, 217-1, 223-1 PC Control/Status Display 640x480 VGA Keyboard/Mouse Standard PS2-style interfaces Environmental Temperature, Operational 0° to 70° C (Commercial) Temperature, Storage -20° to 70° C Humidity, non-condensing <40° C 0-90%, >40° C 0 to 75% U4400101 Lumistar, Inc. Page 8 12/07/07 LS-044 Quad Bit Synchronizer User’s Manual 3. Hardware Configuration / Installation 3.1 Hardware Configuration The LS-44 has been shipped with the internal hardware configuration set for the most common operating environments. The LS-44 does not require access of any internal configuration settings under normal circumstances. However, in situations where differential inputs are required for one or more PCM processing channels, it is necessary to remove the top cover of the unit and adjust internal configuration jumpers. The top cover of the unit is attached with eight (8) #4, flathead, Philips screws. Remove and retain these screws to expose the interior of the unit. Once the cover has been removed, the interior will appear as shown in Figure 2-1. Viewing the unit from the front panel of the chassis, four groups of configuration blocks will appear along the right-hand edge of the PCM Processing Engine motherboard assembly. Silk-screen nomenclature will appear along the right-hand chassis wall identifying which channel each individual PCM processor is controlling. Each PCM processor has a respective configuration header. Table 3-1 identifies the configuration jumper headers for each PCM processing channel. Table 3-1: PCM Channel Configuration Shunt Block Reference Designators PCM Channel Number Ref. Designator 1 JP1 2 JP2 3 JP3 4 JP4 A silk-screened reference designator will appear next to each PCM processor configuration shunt block indicating the Pin 1 location of each header. These headers are used to route various signals to and from the rear panel interface connectors, to configure the input source selection, and to adjust termination values for the differential input signals. Figure 3-1 provides a detailed drawing of the configuration shunt blocks. Default jumper configurations are shown. The user should not alter the first nine installed shunts. Shunts designated with an asterisk in Figure 3-1 are user configuration items. U4400101 Lumistar, Inc. Page 9 12/07/07 LS-044 Quad Bit Synchronizer User’s Manual Figure 3-1: Configuration Shunt Blocks The LS-44 is shipped with the PCM input selection for each channel set to “single-ended” mode. To configure a particular PCM processing channel to utilize differential inputs, the shunt connecting pins 31 and 34 should be moved to connect pins 34 and 37. The unit is shipped with differential input termination impedances of 100 ohms. Removing the shunt between pins 29 and 32, and the shunt between pins 35 and 38 will allow the differential input impedance to be loaded with 7.5K ohms. 3.2 Installation The LS-44 assembly is provided with removable mounting flanges. In the event that the unit will not be installed in a 19” rack, the mounting flanges may be removed by extracting three mounting screws on each flange. U4400101 Lumistar, Inc. Page 10 12/07/07 LS-044 Quad Bit Synchronizer User’s Manual An interface diagram for connecting the LS-44 to AC power, keyboard interfaces, mouse interfaces, and a monitor is shown in Figure 3-2. Figure 3-2: LS-44 connections to AC power and PC peripherals Interconnection to primary PCM interfaces are made via BNC-male cables at the rear panel of the LS-44. Connections to a PCM processing channel are shown in Figure 3-3. Auxiliary PCM interfaces are made via the two DC-37 female connectors. Mating connectors for the DC-37 Auxiliary PCM I/O connectors and shrouds have been supplied with the shipment of the LS-44. Pins-outs and signal names for these connectors are shown in Figure 3-4. Table 3-2 contains auxiliary PCM interface signal descriptions and detailed definitions. U4400101 Lumistar, Inc. Page 11 12/07/07 LS-044 Quad Bit Synchronizer User’s Manual Figure 3-3: LS-44 Primary PCM Processing Engine Interface Connections Table 3-2: LS-44 Auxiliary PCM Processing Engine Signal Definitions Auxiliary Signal Input/ Signal Characteristics Signal Name Type Output Threshold Discrete Output Gnd/5VDC; Active low PLL Lock Discrete Output Gnd/5VDC; Active low Es/No Quality >5dB Discrete Output Gnd/5VDC; Active low BIT Status Discrete Output Gnd/5VDC; Active low PRN Generator Signal Baseband Output ~2Vp-p around ground; Z=75 ohms NRZL(-) Logic Output TTL; Inverted NRZL(+) CLK (-) Logic Output TTL; Inverted CLK(+) Differential PCM (+) Logic Input RS-422 Levels; 100 ohms loaded (default) Differential PCM (-) Logic Input RS-422 Levels; 100 ohms loaded (default) U4400101 Lumistar, Inc. Page 12 12/07/07 LS-044 Quad Bit Synchronizer User’s Manual Figure 3-4: LS-44 Auxiliary PCM Processing Engine Interface Connections U4400101 Lumistar, Inc. Page 13 12/07/07 LS-044 Quad Bit Synchronizer User’s Manual 4. Software Application The LS-44 is configured with a Microsoft Windows application for both local and remote (IP network) control and setup of the bit sync hardware. The LS-44 QBS software consists of two executables. The Host application (shown in figure 4-1 below) runs on the LS-44 and provides graphical setup and control for up to four LS-40 bit syncs. The Remote application (shown in Figure 4-7 on page 22) runs on a separate desktop or other Windows PC and provides graphical setup and control for up to four LS-40 bit syncs installed in the remote LS-44 chassis. Figure 4-1: LS-44 QBS Host Software Status Display U4400101 Lumistar, Inc. Page 14 12/07/07 LS-044 Quad Bit Synchronizer User’s Manual Upon power up of the LS-44 chassis, the LS-44 QBS Host software application will begin running automatically. The Host application will initially be in an un-configured state, as shown in figure 4-2 below. The Host application’s top-level commands include: File, Config, Reload, and About. Each will be described in subsequent paragraphs. Figure 4-2: LS-44 QBS Host Software Status Display in Un-configured State The first step in configuring the LS-44 is to specify the number of LS-40 bit syncs installed in the chassis. From the Config menu, select the Number of Bitsync command and then enter the number of bit syncs in the resulting dialog box as shown below. The user may also customize the appearance of the displays by selecting the Colors command from the Config menu. The color scheme may be configured for the Background, the Data text, and the Labels. Select the item of interest from the colors menu and select the desired color from the resulting dialog box as shown below. The use may select a color from a pre-defined pallet of colors, or define a new custom color. U4400101 Lumistar, Inc. Page 15 12/07/07 LS-044 Quad Bit Synchronizer User’s Manual After configuring the LS-44 QBS software, save the configuration by selecting the File command from the top-level menu, and then select the Save As command as shown left. Enter a file name for the configuration from the resulting file dialog box and click the Save button. After the configuration has been saved in this manner, it may be recalled and loaded by selecting the Recall command from the file menu. The LS-44 QBS Host software status display, shown in Figure 4-1 on page 14, has six major functional status display areas. These include: Bitsync Setup, Network Info, Bitsync Status Scan, Lock State, Bitsync FSP History, and Extended Functions. Each will be discussed in the following paragraphs. The Bitsync Setup display, shown in figure 4-3 below, will have from one to four individual tabs corresponding to each LS-40 bit sync installed in the chassis. To configure any of the eight (8) setup parameters shown in the display, simply place the mouse cursor anywhere within the display. Immediately, a text box will appear stating, “Right click to set up the bitsync.” Figure 4-3: Bit Sync Setup Display The eight bit sync setup functions are shown right. They include: Bit Rate, Input Code, Loop Bandwidth, Use Filter, Output Code, Quick React Mode, FSP Mode, and FSP Mode Setup. Each setup function will be described in the following paragraphs. Bit Rate. The LS-40-DB20 Bit Synchronizer can operate over an input range of 100 bits per second to 20 Mbps for all NRZ codes, or from 100 bits per second to 10 Mbps for the Bi-Phase and Miller codes. The LS40-DB10 is limited to 10 Mbps for NRZ codes and 5 Mbps for the Bi-Phase and Miller codes. By invoking the Bit Rate command, the user may enter the required input data rate in bits per second. U4400101 Lumistar, Inc. Page 16 12/07/07 LS-044 Quad Bit Synchronizer User’s Manual Input Code. The LS-40 Bit Synchronizer supports the PCM input code types specified in the figure below. Both normal and inverted variants are available. To select the appropriate input code, invoke the Input Code command and select the specific input code from the drop-down list. Table 4-1: LS-40 Supported PCM Input Codes (normal or inverted) NRZ codes RZ codes Split phase codes Miller codes Randomized codes Randomization sequence NRZ-L, NRZ-M, NRZ-S RZ BiPhase-L, BiPhase-M, BiPhase-S DM-M, DM-S, M2-M, M2-S RNRZ-L, RNRZ-M, RNRZ-S 211-1, 215-1, 217-1, 223-1 Loop Bandwidth. The Loop-Bandwidth of the PLL circuit in the LS-40 may be programmed by the user from 0.01% to 2% depending on the bit rate of the input signal. The Acquisition Range (0.04% to 8%, depending on the Loop-Bandwidth selected) and the Tracking Range (0.1% to 20%, again depending on the Loop-Bandwidth selected) are both heavily dependent on the loop bandwidth of the PLL. To select the appropriate loop bandwidth, invoke the Loop Bandwidth command and select the specific value from the drop-down list Use Filter. The user may enable additional data filtering, prior to the actual phase lock loop of the bit synchronizer by invoking the Use Filter command. The additional filter uses a “Raised-Root Cosine” topology and is used to improve the performance metric of the bit synchronizer. Output Code. The LS-40 Bit Synchronizer supports the PCM output code types specified in the table below. Both normal and inverted variants are available. To select the appropriate output code, invoke the Output Code command and select the specific output from the drop-down list. Table 4-2: LS-40-DB Supported PCM Output Codes NRZ codes NRZ-L, NRZ-M, NRZ-S, INV_NRZ-L RZ codes Split phase codes Miller codes Randomized codes Randomization sequence U4400101 Lumistar, Inc. RZ, INV_RZ BiPhase-L, BiPhase-M, BiPhase-S, INV_BIOL DM-M, DM-S, M2-M, M2-S RNRZ-L, RNRZ-M, RNRZ-S 211-1, 215-1, 217-1, 223-1 Page 17 12/07/07 LS-044 Quad Bit Synchronizer User’s Manual Quick React Mode. The LS-40 bit sync design features an enhanced acquisition mode that greatly increases the speed of reacquisition when the incoming signal experience fades, dropouts, or other interruptions. By selecting the Quick React Mode command from the menu, the control loops that govern signal offset, AGC (automatic gain control), and the Costas Loop are all placed into a quasi “freeze” state. When the input signal interruption ends, the LS-40 attempts to reacquire the signal with all of its internal loop states essentially the same as before the interruption. The Quick React Mode should not be used when the LS-40 is trying to acquire a signal for the first time. For this reason, the Quick React Mode is always disabled when the Host application first starts running. FSP Mode. The LS-40 bit sync has the unique feature of being able to lock onto the frame sync pattern of an incoming signal. To achieve this, a frame synchronizer is employed with a correlator & state machine circuitry that recognize the unique bit patterns indicating the beginning of a minor frame of data. The frame synchronizer typically “searches” for patterns, “checks” for the recurrence of the pattern in the same position for several frame periods, and then “locks” on the pattern. To enable this feature, the user must select the FSP Mode command from the setup menu. A check mark next to the command will result indicating the status. Also note that when this function is enabled, the Framesync Status Lock indicator will also appear in the Bitsync Status display window shown in Figure 4-3 on page 16. FSP Mode Setup. There are four paremeters that must be specified for the FSP mode to operate correctly. These include: the length of the frame (Bits Per Frame), the length of the pattern (FSP Length), the FSP correlator tolerance (FSP Tolerance), and the frame sync pattern value (FSP Msw/Lsw). Bits Per Frame. To define the major frame length in bits, the user must invoke the Bits per Frame command. The user must enter a length from 24 to 65,535 bits. FSP Length. To enter the required frame synchronization pattern, the user must first invoke the FSP Length command to specify the bit length of the frame sync pattern. The length of the pattern may be up to 64-bits. FSP Tolerance. The user may specify the number of bits in the acquired sync pattern that may be different from the ideal pattern and still achieve & maintain synchronization by invoking the FSP Tolerance command. The user may specify that the received pattern must contain no bit errors, and would thus set the tolerance to Zero (0). In a noisy signal environment, such a setting would likely result in the LS-40 NEVER acquiring or maintaining frame synchronization. For the noisy, real world environment, the user may set the bit error tolerance from 1 to 16 bits. FSP Lsw/Msw. The frame synchronization pattern is a unique binary bit pattern used to indicate the beginning of a telemetry minor frame. To achieve this, a frame synchronizer is employed with a correlator & state machine circuitry that recognizes unique bit patterns indicating the beginning of minor frame data. The frame synchronizer typically “searches” for patterns, “checks” for the recurrence of the pattern in the same position for several frame periods, and then “locks” on the pattern. In this application, the frame synchronization pattern entered by the user in two, 32-bit words, designated as FSP Msw (most significant word) and FSP Lsw (least significant word). U4400101 Lumistar, Inc. Page 18 12/07/07 LS-044 Quad Bit Synchronizer User’s Manual The Network Info display, shown right, lists both the host name and its local network IP address. This information is needed for example, when the user runs the Remote Application on a different Windows machine connected to the same local area network as the LS-44. Note: the Remote Application has only been tested where the LS-44 and the Remote Windows machine are on the same LAN. Remote operation of the LS-44 over a wide area network (WAN) or the Internet has not been tested. The Bitsync Status Scan, and the Lock State display, both shown left, present information about the LS-40 bit sync(s) installed in the chassis. The Bitsync Status Scan shows the operator that the Host application is running and scanning each LS-40 for status. The scan display is really a, “hey, I’m alive and still running” indication for the operator. This is helpful for scenarios where none of the other displays are changing and one might question if the application had crashed or was not working. The Lock State display shows both the bit sync signal lock, and if enabled, the frame sync lock states for each LS-40 installed. If the FSP Mode is not enabled, then the LED indicator next to the “F/S” in the display will disappear. The Bitsync FSP/BER History display, shown in figure 4-4 below, will have from one to four individual tabs corresponding to each LS-40 bit sync installed in the chassis. To enable this display, the user must first check the View History box as shown below. When the FSP mode is enable for a bit sync, the FSP/BER History display shows in a tabular form the time, sync state, and expected and actual rate of the frame sync pattern defined for the bit sync. When the FSP mode for a bit sync is disabled, and the BERT mode is turned on from the extended functions display (see figure 4-5 and 4-6 on page 21), then the time, BER, and error count are displayed in a tabular form. Placing the mouse cursor above the table and right clicking allows the user to control the tabular display. The resulting menu is shown above right. The user may Pause the display, define the Max History Length of the display, and Clear History. The maximum history length may be set from 1 to 86,400 seconds. Figure 4-4: Bit Sync FSP/BER History Display U4400101 Lumistar, Inc. Page 19 12/07/07 LS-044 Quad Bit Synchronizer User’s Manual The Extended Functions display, shown in figures 4-5 & 45 on page 21, has several modes of appearance, depending on what BERT pattern mode was selected. To set the mode, place the mouse cursor within the display and right click. The resulting menu, displayed above right, allows the user to select the BERT Pattern Source, the PRN Pattern, and optionally to Force Error in the pattern. When the Pattern Source is Disabled, the Extended Functions display will appear as shown in Figure 4-5 on page 21. If the Pattern Source is either Internal, or External, then the Extended Functions display will appear as shown in Figure 4-6 on page 21. To display the individual meaning of each of the LEDs, simply hover the mouse cursor over each LED and an explanation of the LEDs function will appear. A summary of the LED functions is shown in Table 4-3 below. The user may select either an 11-bit pattern, or a 15-pattern as shown right. When the BERT pattern is disabled, the Extended Functions display will indicate the Pattern Source, the BIT status, the Communications status, the SW Version, Power Management status, the Clock Count, the Offset Frequency (Hz), the AGC Threshold Voltage, and the Es/No measured by the bit sync. In addition, when the BERT pattern is Internal or External, the Extended Functions display will also indicate the PRN Pattern selected, the Forced Error mode status, the Error Count, and the BER (Bit Error Rate) measured by the BERT. Table 4-3: Extended Functions LED Meanings 1) Bitsync Status 2) Input Signal Above Threshold 3) PLL Lock 4) Input Quality Above Threshold 5) Overall Health Flag 6) Synchronization Flag 7) Power Source Error 8) Serial Error 9) Hardware Error 10) Power-Up BIT Error 11) Overflow 12) Semantic Error U4400101 13) Syntax Error 14) Protocol Error 15) +3.3 VDC 16) -5 VDC (Analog Ref) 17) +5 VDC (Analog Ref) 18) –12 VDC 19) +12 VDC 20) VCC (5 VDC) 21) PRN Correlator Locked 22) PRN Correlator History 23) Error Count Overflow Lumistar, Inc. Page 20 12/07/07 LS-044 Quad Bit Synchronizer User’s Manual Figure 4-5: BERT Pattern Disabled Figure 4-6: BERT Pattern Source - External The Extended Functions Display The Remote application shown in figure 4-7 below runs on a separate desktop or other Windows PC and provides graphical setup and control for up to four LS-40 bit syncs installed in the remote LS-44 chassis. With the slight exception of the Network Info section, the displays of the Remote application are identical to those of the Host application described earlier. U4400101 Lumistar, Inc. Page 21 12/07/07 LS-044 Quad Bit Synchronizer User’s Manual Figure 4-7: LS-44 QBS Remote Software Status Display The Network Info display, shown in the figure above right, lists the host name and its local network IP address of the selected LS-44 chassis. Note: the Remote Application has only been tested where the LS-44 and the Remote Windows machine are on the same LAN. Remote operation of the LS-44 over a wide area network (WAN) or the Internet has not been tested. U4400101 Lumistar, Inc. Page 22 12/07/07 LS-044 Quad Bit Synchronizer User’s Manual To configure the Remote Application, first invoke the Config command from the top-level menu and select the Hosts command as shown upper right. The resulting display is shown in figure 4-8 below. Enter the IP address of each LS-44 chassis to be controlled remotely and then click the Accept button. Next, select a specific host LS-44 chassis to control remotely by invoking the Select Host command from the top-level menu and select the desired IP address from the list as shown right. To shut down a specific host chassis, invoke the Host Shut Down Single command from the Config menu and select the desired IP address from the list as shown lower right. To shut down all of the LS-44 chassis defined in the host table shown in figure 4-8, invoke the Host Shut Down All command from the Config menu. Figure 4-8: Network Management Host U4400101 Lumistar, Inc. Page 23 12/07/07 LS-044 Quad Bit Synchronizer User’s Manual 5. Maintenance The LS-44 Rack Mount system requires minimal maintenance. The only user maintenance that is required is the periodic cleaning of the air inlet filter and the inspection/cleaning of the air exhaust ports. Refer to the Figure 2-2 on page 7. To clean the air inlet filter, remove the two thumbscrews on the front panel of the LS-44. Remove the filter insert and clean excess dust from the filter with a clean, dry pressurized air. Reinstall the filter and reattach the filter cover using the thumbscrews. Inspection of the airflow exhaust vents can be made from the rear of the LS-44. If there is an excess of dust build up in the air exhaust ports, perform the following steps: 1.) 2.) 3.) 4.) 5.) 6.) 7.) 8.) 9.) U4400101 Remove AC power from the LS-44. Remove the unit from its mounting fixture. Remove the top cover by removing the eight securing screws. Direct a clean, dry pressurized air source at the rear panel air exhaust ports from the inside of the unit. Direct a clean, dry pressurized air source at the side panel air exhaust ports from the inside of the unit. Inspect the power supply fan assembly and air inlet ducts for excessive dust. Remove if necessary. Reinstall the top cover. Reinstall in the mounting fixture. Reapply AC power to the LS-44. Lumistar, Inc. Page 24 12/07/07