Transcript
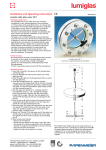
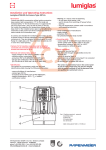
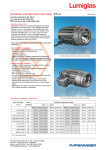
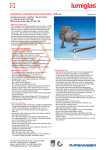
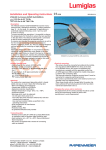
Installation and Operating Instructions
0093.032.00 c
Lumistar Luminaire Crescent Design
ME 65, ME 80, ME 100, ME 125, Stainless Steel
For applications with a combined sight and light port.
Suitable for circular screw-type sight glass fittings according
to DIN 11851 or similar.
•Important, please note:
If it is intended to retrofit the Lumistar Luminaire Crescent
Design ME to an already existing screwed sight glass
fitting, the slotted cover nut should be ordered as well;
otherwise the existing one will need to be adapted accordingly (see bore diameter ‘d 8’ referred to in DIN 11851).
•Mechanical installation:
-Caution: Do not look into light – danger of impaired
eyesight!
-Loosen the slotted cover nut on the screwed sight glass
fitting.
-Pass the slotted cover nut over the connecting cable and luminaire housing.
-Make sure that the sight glass disk is correctly seated in the fitting.
-Focus the luminaire by aligning the centring feature on the bead and the opening in the slotted cover nut
(see drawing).
-Screw the slotted cover nut onto the weld-on neck with the luminaire in position.
Centring point
•Caution:
Do not establish the electrical connections until the
mechanical installation has been completed!
•Electrical connection:
-Lumistar Luminaires Crescent Design ME are works-fitted with a 3 m cable tail (Lapptherm 105, up to 90°C/194°F).
-The cable is firmly connected to the luminaire by way of the cable gland.
-The cable is already terminated to the internal wiring in the luminaire and is supplied ready for use.
Lumistar Luminaire Crescent Design ME
•Fitting a new or different connecting cable:
- Select a connecting cable which is suitable for the operating
conditions.
- The diameter of the cable should be the same as that of the
cable gland.
- Remove the reflector.
- Insulate the cable ends.
- Insert the cable through the cable gland into the lamp
chamber and wire to the terminals or push-on blades
(leading the protective earth along the housing wall).
- Tighten the cable gland.
- Re-install the reflector.
- It is easier to carry out the connection process if the filament lamp is first removed. The user then has more space,
and damage to the lamp is prevented.
•Changing the lamp:
-Caution! Before opening the luminaire, check that it is not
too hot!
- Disconnect the luminaire from the power supply
- Tip: By loosening the cable gland slightly it is easier to
work on the luminaire as the internal wiring then has more
space. Tighten again once the lamp has been replaced!
- Open the cover and pull it out together with the installed
lamp holder and the defective filament lamp.
- Remove the defective lamp.
- Using a protective cloth to hold the new filament lamp,
insert it carefully into the 2-pin socket and push it into
place.
- Replace the cover with lamp holder and new filament lamp,
check that the cables are in the correct position before
screwing on the cover.
- Tighten the cable gland once the lamp has been replaced.
- Reconnect the power supply.
All dimensions in mm unless stated otherwise. Subject to change without prior notice. 03.14
F.H.Papenmeier GmbH & Co. KG · division Lumiglas
Talweg 2 · 58239 Schwerte · GERMANY
phone: +49-2304 205-0 · fax: +49-2304 205-206
[email protected] · www.lumiglas.de