1
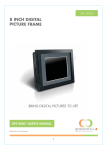
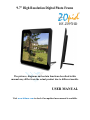
9.7” High Resolution Digital Photo Frame
HF-Z097HD
The pictures, diagrams and certain functions described in this
manual may differ from the actual product due to different models.
USER MANUAL
Visit www.hittusa.com to check if an updated user manual is available
SAFETY AND GENERAL INFORMATION
IMPORTANT INFORMATION ON SAFE AND EFFICIENT OPERATION OF
THIS PRODUCT
Before operating your Digital Frame, please read all these safety and operating
instructions completely and then retain this manual for future reference.
Keep all parts and accessories out of children’s reach
The Digital Picture Frame is for indoor use only.
Never cover the digital frame, while in use, (e.g. with clothes, towels or
blankets).
Position the digital frame and AC adapter to allow adequate ventilation.
Never use or place digital frame in moist places or near water. For example, do
not use near a bathtub, washbowl, laundry tub, kitchen sink, in a wet basement,
etc.
To prevent overheating, keep the digital frame and AC adapters away from
heat sources such as radiators, heat registers, stoves or other appliances
(including amplifiers), which produce heat.
Keep digital frame out of direct sunlight.
Do not store in very cold areas. When the system warms up, the moisture can
form inside the case, which may damage electronic circuit boards.
Do not attempt to open the case. Non-expert handling of the device may
damage the system.
Avoid dropping or strong shocks.
Disconnect the AC adapter from wall outlets during long periods of non-use.
Use only the AC adapters provided. Use of any others may damage the digital
frame.
If traveling abroad, make sure that the voltage shown on the power adapters
corresponds to the local power, before plugging in the AC adapters into the
electric outlets.
CLEANING THE LCD SCREEN
Treat the screen gently; if not handled properly, the screen on the Digital
Picture Frame can be scratched or broken.
If fingerprints or dust make the LCD screen dirty, we recommend using
a soft, non-abrasive cloth such as a camera lens cloth to clean the LCD
screen.
If you use an LCD Cleaning Kit sold on the market, apply the cleaning
liquid to the cloth and not directly to your LCD screen.
1
TABLE OF CONTENT
Introduction......................................................................................................3
Main Features...................................................................................................3
Setting up Frame for First Time Use..............................................................4
Remote Control / Keys on the Frame.............................................................5
Storage Media Slots/Ports on the Frame........................................................6
Basic Operations...............................................................................................6
Viewing Photos in Slideshow Mode................................................................6
Main Menu........................................................................................................7
Slideshow from a Selected Folder…...............................................................8
Viewing Individual Pictures............................................................................9
Playing Video Files.........................................................................................11
Listening To MP3 Music................................................................................13
Playing a Slideshow with Background Music.............................................13
Copying/Deleting files using FILE Function...............................................14
SETUP Function.............................................................................................16
Calendar and Clock Display.........................................................................16
Connecting Frame to a Computer…............................................................17
Copying Media Files from a Computer........................................................17
Technical Specifications…………….............................................................18
Frequently Asked Questions………..............................................................20
Troubleshooting Tips………………..............................................................20
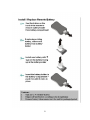
Installing/Replacing Remote Control Battery.............................................21
Warranty & Service…………………...........................................................22
Regulatory Compliance…………….............................................................23
End-of-Life Disposal………………..............................................................24
2
Introduction
Congratulations on your purchase of this digital photo frame.
Before operating the unit, please read this manual carefully, and then retain it
for future reference.
This manual will help you use the many useful features that will make your
photo frame viewing more enjoyable. It includes a step by step guide to the
basics on photo frame operation including instructions on uploading and
playing photos, music or video.
You will also be able to create a slideshow using multiple transition effects or
display one picture at a time.
Main Features
High Resolution TFT-LCD display produces sharp and bright images
with rich colors, and offer a wide viewing angle
Create an automatic slide show with multiple transition effects and
optional background music.
Orientation sensor changes photo orientation when frame is turned.
Display JPEG images up to 16000x16000 pixel resolution.
Play MP3 music with the integrated stereo speakers.
Play MPEG1, MPEG2 and MPEG4 movie files with resolution up to
480p (60Hz-NTSC) / 570p (50Hz-PAL).
Accepts SD, MMC or MS cards as well as USB flash drives.
Connect frame directly to a digital camera or an external storage
device to view pictures
Calendar mode with slideshow and alarm.
User friendly on screen display lets you easily access all features.
Remote control and Universal AC adapter included.
3
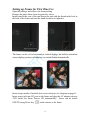
Setting up Frame for First Time Use
Open the package and remove the foam packing.
Remove the photo frame from its protective sleeve.
Install stand at the rear of the unit (Insert the end with the thread in the hole in
the back of the frame and turn the stand clockwise to tighten it.
The frame can be set for horizontal or vertical display; the built-in orientation
sensor displays pictures in landscape or portrait format automatically.
Insert storage media (if needed) into correct slot/port (see diagram on page 6).
Insert power jack into DC port on the frame and plug the AC adapter into any
120V outlet, the frame Powers ON automatically. Power can be turned
OFF/ON using Power key
on the remote or the frame.
4
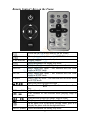
Remote Control / Keys on the Frame
Power on/off (Use as Esc/Exit key on the Frame)
Mute, does not work if frame is in SETUP Mode.
CALENDAR
OSD
EXIT
PHOTO
MUSIC
VIDEO
ENTER
VOL+
VOL-
MENU (frame)
Display calendar
Show information bar during Play mode
Exit from the current mode – go to previous function
Enter Photo play mode – this function does not work
while in SETUP mode
Enter Music play mode – this function does not work
while in SETUP mode
Enter Video lay mode – this function does not work while
in SETUP mode
Move the cursor up/down/left/right
Confirm & enter
key on the frame works as Enter
key
Adjust the volume.
Fast Forward or Fast Rewind while playing songs or
movies
Play previous or next file (photo, song or video)
Play or pause the file (Use as Enter Key on the Frame)
In the photo view or the music playing status, press it to
display the photo with the background music.
Show information bar during Play mode
5
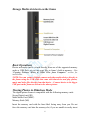
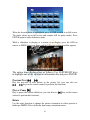
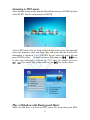
Storage Media slots/ports on the frame
Basic Operations
Photos and media can be viewed directly from one of the supported memory
cards or USB Drive or you can copy files to frame’s built-in memory – See
“Copying Pictures, Music & Video Files from Computer” section for
instructions.
NOTE: You can connect Digital camera and other media devices directly to
the frame using the USB cable that came with that device and play photos,
music and video files directly from that device – Connect device to the bigger
USB port on the frame as shown in the above picture.
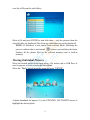
Viewing Photos in Slideshow Mode
The digital picture frames is compatible with the following memory cards:
Secure Digital card (SD)
Multi Media Card (MMC)
Memory Stick (MS)
Insert the memory card with the front label facing away from you. Do not
force the memory card into the memory slot, if you are unable to easily insert
6
the memory card, you may have inserted it the wrong way. Reverse it and try
again.
NOTES:
The digital picture frame displays pictures stored in JPEG format. Digital
pictures stored in other formats are ignored by the frame.
Make sure you have at least one picture stored on the built-in memory (NAND)
or memory card. Some of the frame features may not function properly it there
are no pictures stored on the selected storage media.
You can also use a USB flash drive. It functions the same way as the memory
cards. Simply insert the flash drive into the USB host plug on the side of the
frame.
The slideshow begins to play automatically. The slideshow plays your photos
in the order which they are listed on your memory card. You can rearrange
them using a PC or see page 8 for instruction to display pictures from a
selected folder
To select and view an individual picture, see “Viewing Individual Pictures” on
page 9.
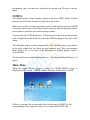
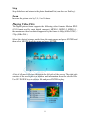
Main Menu
When the digital Picture Frame is turned on, MAIN MENU screen is
displayed on the screen. NOTE: Built-in Memory is labeled as “NAND”
If there is a storage device inserted in the card slot and/or USB Port, the
corresponding icon(s) appears on the screen along with SETUP and
7
CALENDAR icons.
If selected storage device is removed, it disappears from the Main Menu and
another device icon is highlighted.
IMPORTANT: The slide show starts automatically, if the built-in memory or
the memory card inserted in the slot has pictures stored on it when the frame is
powered on. Press & Release Exit key on the remote or Power button on the
frame to stop slide show and return to the Main Menu.
NOTE: if there are MP3 music files on the same storage media as pictures, the
music also plays with the slideshow. These settings can be changed using the
SETUP option from the Main Menu.
Slideshow from a Selected Folder
Select one of the available storage media from the Main Menu (if a media card
is used it appears as an icon) and press ENTER.. Select “File” option from the
menu and press ENTER.
A list of Files and Folders on the selected Storage Device appear.
Use UP/DOWN keys to highlight the desired Folder and press ENTER to
8
view list of files and/or sub-folders.
Select a file and press ENTER to start slide show – only the pictures from the
selected folder are displayed (files from any sub-folders are not be displayed)
NOTE: If slideshow is not started from selected folder following the
process outlined above and instead
button is pressed then the frame
displays all the photos files on the selected memory card or built-in
memory.
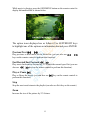
Viewing Individual Pictures
Select the desired media on the main menu - if a media card or USB Drive is
used, it appears as a new icon in the Main Menu.
Select the “Photo” option from the menu and press “ENTER”.
A photo thumbnail list appears. Use the UP/DOWN, LEFT/RIGHT arrows to
highlight the desired photo.
9
When the desired photo is highlighted, press ENTER to view it on full screen.
The photo shows up on full screen and remains still (in pause mode). Press
ENTER again to begin slideshow mode.
While a slideshow is playing or a picture is on display, press the OSD on
remote or MENU button on frame and the following information Bar appears.
The option icons displayed are as follows (Use LEFT/RIGHT keys
to highlight one of the options on information bar and press ENTER:
Previous/Next
Play the previous or next picture in the picture list (you can also use
keys on the remote control to perform this function)
Play or Pause
Play or pause the current slideshow (you can also use
control to perform this function).
key on the remote
Rotate
Use the rotate function to change the picture orientation to either portrait or
landscape NOTE: This is different from using orientation sensor
10
Stop
Stop slideshow and return to the photo thumbnail list (can also use Exit key)
Zoom
Increase the picture size by 2, 4, 8 or 16 times.
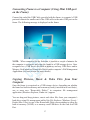
Playing Video Files
The digital picture frame supports the following video formats: Motion JPEG
(AVI format used by most digital cameras), MPEG-1, MPEG-2, MPEG-4 –
the maximum video resolution supported by the frame is 480p (60Hz-NTSC) /
570p (50Hz-PAL)
Select the desired storage media from the main menu and press ENTER and
then select MOVIE from the menu and press ENTER.
A list of all movie files are shown on the left side of the screen. The right side
consists of the movie preview window and information about the selected file.
Use UP/ DOWN keys to select a file and press ENTER to play.
11
While movie is playing, press the OSD/MENU button on the remote control to
display Information Bar as shown below.
The option icons displayed are as follows (Use LEFT/RIGHT keys
to highlight one of the options on information bar and press ENTER:
Previous/Next
Play previous or next movie in the folder list (you can also use
keys on the remote control to perform this function).
Fast Rewind/Fast Forward
Play movie backward or forward by 2/3/4 times the normal speed list (you can
also use
keys on the remote control to perform this function).
Play or Pause
Play or Pause the movie (you can also use
perform this function).
key on the remote control to
Stop
Stop the movie and return to the playlist (can also use Exit key on the remote)
Zoom
Increase the size of the picture by 2/3/4 times.
12
Listening to MP3 music
Select desired storage media from the Main Menu and press ENTER and then
select MUSIC from the menu and press ENTER.
A list of MP3 music files are listed on the left side of the screen. The right side
shows the frequency chart and Status Bar, and below that the selected file
information is displayed. Use UP/DOWN keys to select the music file and
press ENTER to play. To play Previous or Next song use
keys;
to play song backward or forward by 2/3/4 times the normal speed use
keys, and to Play or Pause the song use
key on the remote.
Play a Slideshow with Background Music
Make sure that there is at least one MP3 music file saved along with JPEG
13
pictures on the storage media you want to use for slide show.
Select the desired storage media from the Main Menu and then press the
button on the remote control to begin the slideshow with background music.
Copying/Deleting files using FILE function
After Selecting the Storage Media from the Main Menu select File Icon
from the Sub-Menu.
From the file list select the file you want to copy using UP/DOWN keys and
then press the RIGHT key to confirm the selection (a box with check mark
appears next to that file – Repeat this process to select additional files you
want to copy
When done with file selection, press the OSD button on the Remote or
MENU key on the frame - the screen shows COPY and DELETE options
Use the UP/DOWN keys to select COPY and press ENTER to confirm – all
available storage devices to Copy file(s) to appear on the screen.
Use the UP/DOWN keys to select storage device – Pressing RIGHT key to
display any sub-folders on the storage device. Select sub-folder (if you
want to) and press ENTER key to start file copy.
14
File copy status is displayed on the screen and when done the screen
displays “Finished”.
Press ENTER key to return to File/Folder List.
Press EXIT key to return to the Main Menu
SETUP Function
Many of the picture frame functions can be changed through the SETUP
Menu. The following functions can be setup using the SETUP option from the
Main Menu:
Function
Description
Language
Slideshow Time
Slideshow Mode
English, French, Deutsch, Spanish, Italian, Chinese
3,5,10,15 sec, 1,15min, 1 hr
Off, Random, Fading, Bottom-to top, top-to- button,
15
(transition effects)
Music Repeat Mode
Movie Repeat Mode
Display Mode
Time
Alarm
Brightness
Contrast
Saturation
Auto Power On
Auto Power Off
Start Mode select
Default
Left-to-right, right-to-left, door-close, door-open,
hori-cross, verti-cross and many others
Repeat one, repeat all, repeat off
Repeat one, repeat all, repeat off
Normal, Wide
Year Month Date Hours : Minutes
Hours : Minutes Ring1, 2 or 3 On/Off
0-16
0-16
0-16
Hours : Minutes & On/Off
Hours : Minutes & On/Off
Combo, Card Select, Calendar, Picture, Music,
Video
Return to factory default setup
Use UP/DOWN buttons to select the Function and RIGHT/LEFT buttons to
change the selected Function. For functions like Time with multiple settings,
press ENTER when done to save the settings. Press Exit button on remote or
Power button on the frame to go to the Main Menu.
Calendar and Clock Display
From the main MENU screen, select Calendar/clock and press ENTER key,
the Calendar/ Clock screen is displayed. If the Alarm is turned on, the alarm
time is displayed. A picture slideshow is shown in the preview window.
16
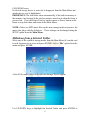
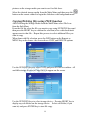
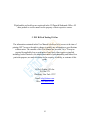
Connecting Frame to a Computer (Using Mini USB-port
on the Frame)
Connect big end of the USB Cable, provided with the frame, to computer’s USB
port and connect the smaller end of the USB cable to the mini-USB port on the
frame. The following message is displayed on the frame:
NOTE: When connected for the first time, it can take a couple of minutes for
the computer to recognize and setup the frame as a USB storage device. Once
recognized as a USB device the built-in memory and any USB-Drive and/or
Memory Card appear as Removable Drives under computer’s File Management
Application (see next section for more details)
Copying Pictures, Music & Video Files from Your
Computer
Once the frame is recognized as a USB storage device, depending on whether
the frame has built-in memory and/or memory card(s) inserted in its card slot(s),
one or more new “Removable Disk(s)” in computers file management
application (Windows Explorer, Finder etc.) appear.
You can drag and drop pictures, music and video files from your computer’s
hard-drive using file management utility like File Explorer (Windows Users) /
Finder (Mac Users) to one of the Removable Disks corresponding to either the
built-in memory (NAND) or a memory card/USB-drive in the card slot/USB
Port.
17
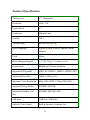
Technical Specifications
Viewing Area
9.7” (Diagonally)
Resolution
1024 x 768
Display Mode
4:3
Luminosity
400cd/m2 max.
Contrast
500:1
Viewing Angle
89/89/89/89 (CR=10)
Menu Languages
English, French, Deutsch, Spanish, Italian,
Chinese
Clock
Alarm
Photo Changing Interval
3, 5, 10 , 15 sec; 1, 15 min; or 1 hr
Picture Setup
Brightness, Contrast, Saturation
Supported File Formats
JPEG, AVI, MPEG1, MPEG2, MPEG4, MP3
Maximum Photo Size
16000 x 16000 pixels
Maximum Video Resolution
480p (60Hz-NTSC) / 570p (50Hz-PAL)
Supported Storage Media
SD/MMC/MS/USB
Maximum Readable Card
Size
SD/MMC/MS/USB: 8GB
USB ports
USB Host, USB Slave
Audio & Video Output
Built-in Speakers, Earphone Jack
18
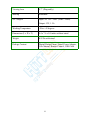
Viewing Area
9.7” (Diagonally)
Start-up
Slideshow
A/C Adapter
Input: AC 110—240V (50Hz—60Hz)
Output: 12V, 1.5A
Working Temperature
-20 to +45 degrees
Dimensions (L x W x T)
9.4 x 7.6 x 0.9 inches without stand
Weight
0.95 lbs with stand
Package Content
Digital Picture Frame, Stand, Power Adapter,
User Manual, Remote Control, USB Cable
19
Frequently Asked Questions
Q: Why do my photos take so long to load?
A: Generally the higher the resolution of the photo, the longer it takes to load.
Resizing your photos to a lower resolution quickens the processing time.
Q: How do I copy music files to the frame?
A: The Digital Picture Frame only plays MP3 files, so audio files in other
formats like WMA, ACC (iTunes) etc. must be converted first. Use a personal
computer and popular audio editing software to convert your music to MP3
format. See “Copying Pictures, Music & Video Files from Computer”
section to see how to copy music files to the frame.
Q: Why doesn’t Digital Picture Frame show some of my photos?
A: The Digital Picture Frame is designed to show photos following the same
camera industry standards format as digital cameras. This format is a JPEG
format. Images, such as web images, scanned images, or photos in RAW
format, are not stored according to camera industry standards and therefore
cannot be displayed correctly on the Digital Picture Frame. Please use your PC
applications to convert such images into standard JPEG format before copying
them to the built-in memory on the Digital Frame or a memory card.
Q: Why can’t I play a video file on the frame?
A: Please make sure the video file is in one of the supported video file formats
and has resolution of no more than 480p (60Hz-NTSC) / 570p (50Hz-PAL).
Troubleshooting Tips
Digital Picture Frame does not power on
The POWER connector to the unit is not securely inserted.
When you connect the AC adapter to the frame and power up the
unit, even without a memory card, you should see the Main Menu.
If you don’t see the lit screen, check if the power is connected to
the Digital Picture Frame and make sure it is securely attached.
Memory card is not recognized by the frame
Make sure the card is inserted properly – Make sure the front label
of the memory card is facing AWAY from you. Also make sure
that the card is one of the supported card type and of the supported
capacity
IMPORTANT: Do not force the memory card into the slot.
20
21
Warranty & Service
Coverage: Hi-Tech Trading USA Inc. ("HiTT") warrants this digital frame ("Product")
against defects in materials and workmanship under normal consumer use for 1 year
from the date of purchase. HiTT, at its option, will at no charge repair or replace this
Product should it not conform to this warranty. This limited warranty is a consumer's
exclusive remedy, extends only to the first consumer purchaser, is not transferable and
is valid only on Products purchased by consumers in the United States or Canada.
Exclusions:
Normal Wear and Tear: Periodic maintenance, repair and replacement of parts due to
normal wear and tear are excluded from coverage.
Miscellaneous: This warranty does NOT cover defects or damage that result from: (a)
improper operation, storage, misuse or abuse, accident or neglect, such as physical
damage (cracks, scratches, etc.) To the surface of the Product resulting from misuse; (b)
contact with liquid, water, rain, extreme humidity or heavy perspiration, sand, dirt or
the bike, extreme heat, or food; (c) use of the Product for commercial purposes or
subjecting the Product to abnormal usage or conditions; (d) service, installation,
alteration, or modification in any way by someone other than HiTT and, (e) other acts
which are not the fault of HiTT.
Obtaining Service: To obtain service or information, please send email to
[email protected]. You will receive instructions on how to ship the Product, at your
expense, to a HiTT Service Center. To obtain service, you must include a copy of your
receipt. Copy of receipt is not required if you registered this product on our website
www.hittusa.com within 30 days of purchase date.
22
Regulatory Compliance
CE Declaration of Conformity
Attestation RSH05080201-1, RSH06080201-2
We declare under our responsibility that the product is in conformity with the
following standards
EN55022: 1998 (Radio Disturbance requirement of Information
Technology Equipment)
EN55024: 1998 (Immunity requirement of Information Technology
Equipment)
EN61000-3-2: 2000 (Limits for Harmonic Current Emission)
As assessed by the following applications standards:
89/336/EEC Electromagnetic Compatibility
This Product is produced by a manufacturing organization on ISO9000 level.
Federal Communications Commission (FCC) Notice
(U.S. and Canada)
This equipment has been tested and found to comply with the limits for a Class
B digital device, pursuant to Part 15 of the FCC Rules. These limits are
designed to provide reasonable protection against harmful interference in a
residential installation. This equipment generates uses and can radiate radio
frequency energy and, if not installed and used in accordance with the
instructions, may cause harmful interference to radio communications.
However, there is no guarantee that interference will not occur in a particular
installation. If this equipment does cause harmful interference to radio or
television reception, which can be determined by turning the equipment off and
on, the user is encouraged to try to correct the interference by one or more of the
following measures:
• Reorient or relocate the receiving antenna.
• Increase the separation between the equipment and receiver.
• Connect the equipment into an outlet on a circuit different from that to which
the receiver is connected.
• Consult the dealer or an experienced radio/TV technician for help.
Changes or modifications not expressly approved by the party responsible for
compliance could void the user's authority to operate the equipment.
Connections to this device must be made with shielded cables with metallic
RFI/EMI connector hoods to maintain compliance with FCC Rules and
Regulations.
To prevent damage, which may result in fire or shock hazard, do not expose this
appliance to rain or excessive moisture.
23
THIS CLASS B DIGITAL APPARATUS MEETS ALL REQUIREMENTS OF
THE
CANADIAN
INTERFERENCE-CAUSING
EQUIPMENT
REGULATIONS.
This device complies with Part 15 of the FCC Rules. Operation is subject to the
following two conditions:
(1) This device may not cause harmful interference, and (2) this device must
accept any interference received, including interference that may cause
undesired operation.
End-of-Life Disposal
Your new product contains materials that can be recycled and reused.
Specialized companies can recycle your product in order to reuse components
of the product and to minimize waste.
Please find out about the local regulations on how to dispose of your old unit
from your local municipality.
(For Customers in Canada and U.S.A)
Dispose of in accordance to local state, provincial, municipal or federal
regulations. For additional information on recycling in the U.S.A, contact
www.eiae.org (Consumer Education Initiative).
Please find out about the local regulations on how to dispose of your old unit
from your local municipality.
24
ZOpid and the stylized logo are registered in the US Patent &Trademark Office. All
other product or service names are the property of their respective owners.
© 2011 Hi-Tech Trading USA Inc
The information contained in this User Manual is believed to be correct at the time of
printing. HiTT reserves the right to change or modify any information or specifications
without notice. The contents of this User Manual are provided "as is." Except as
required by applicable law, no warranties of any kind, either express or implied,
including, but not limited to, the implied warranties of merchantability and fitness for a
particular purpose, are made in relation to the accuracy, reliability, or contents of this
guide.
Hi-Tech Trading USA Inc
P.O. Box 179
Woodbury, New York 11797
Email: [email protected]
Web: www.hittusa.com
25