1
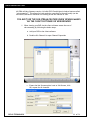
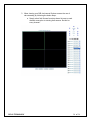
Client Software User Manual
H.264 Network Digital Video Recorder
CONTENTS
Section
Page
VERSION DESCRIPTION………………………………………………………………………………… 3
CLIENT SOFTWARE INSTALLATION
NOTICE…………………………………………………………………………………………… 4
INSTALLATION…………………………………………………………………………………… 5
CLIENT SOFTWARE OPERATION
SYSTEM LOGIN……………………………………………………………………………….… 6
MAIN INTERFACE…………………………………………………………………………….… 7
SYSTEM CONFIGURATION
SURVEILLANCE SETUP…………………………………………………………………
REMOTE DVR SETUP…………………………………………………………………..
LOCAL PC SETUP………………………………………………………………………
USER MANAGEMENT…………………………………………………………………..
9
18
30
31
NETWORK PREVIEW
AUDIO PREVIEW………………………………………………………………………. 32
MULTI-WINDOW PREVIEW………………………………………………………………33
SEQUENCE PREVIEW………………………………………………………………….. 34
CAPTURE PREVIEW IMAGE……………………………………………………………………. 35
CLIENT PC RECORDING
SCHEDULE RECORD…………………………………………………………………… 36
MANUAL RECORD……………………………………………………………………… 37
CLIENT ALARM RECEIPT………………………………………………………………………. 38
VOICE TALK……………………………………………………………………………………. 39
CLIENT LOG…………………………………………………………………………………….. 40
PLAYBACK
REMOTE FILE PLAYBACK……………………………………………………………… 41
LOCAL FILE PLAYBACK………………………………………………………………… 42
VIEW BMP FILE………………………………………………………………………… 43
PLAYBACK BY TIME…………………………………………………………………… 44
REMOTE PTZ CONTROL……………………………………………………………………….. 45
REMOTE VIDEO PARAMETERS………………………………………………………………… 46
NETWORK OPTIMIZATION GUIDE……………………………………………………………………… 47
GEN IV TECHNOLOGY
2
of 56
VERSION DESCRIPTION
This manual is intended for use with DVR Client Software 1.4 and DVR firmware version
1.4. New features included in this release are:
• Remote Setup via Internet Explorer
• Dual Stream Support – Main Stream and Sub Stream
• 4 Private Masking Areas per Channel
• 128 Preset Support for PTZ Cameras
GEN IV TECHNOLOGY
3
of 56
NOTICE
In order to achieve maximum video performance and quality, please ensure a
quality video graphics card is installed in the PC prior to installation. Lower
specification display adapters may not display the video properly or at all.
Display adapters that have been tested include, but are not limited to:
• ATI Rage 128 Pro 16MB
• Radeon 7000 and above
• nVidia TNT2 M64 32MB
• nVidia TNT2 Pro
• nVideo GeForce2 MX Series
-Windows 2003 operating systems require the Hardware Acceleration
feature set to FULL under Advanced Display Properties and DirectX’s
DirectDraw Acceleration and Direct3D Acceleration to be enabled
within the DirectX Diagnostic Tool.
-Please ensure the display settings for your monitor are set to 1024 x
768. This will ensure the application will fit your screen area.
GEN IV TECHNOLOGY
4
of 56
INSTALLATION
Double-click the client software setup file named “HcNetClientSetup(V1.4).exe”.
The software will automatically install and you can find the software named
“HcNetClient” in your Programs list.
GEN IV TECHNOLOGY
5
of 56
SYSTEM LOGIN
Please complete the initial setup of the DVR prior to accessing the client
program. The DVR’s network settings must be correct in order for the client
software to communicate.
NOTE: Network setup tutorials are available in Appendix A
1. Run the HcNetClient.exe application
2. At the login prompt, enter the username and password
•
•
GEN IV TECHNOLOGY
Default username: super
Default password: super
6
of 56
MAIN INTERFACE
The main interface is divided into 5 main sections. For detailed
information on some of these functions, please see the corresponding
section.
1. Preview Window
2. Preview Window Number Selection
3. Function Icons
Enable PTZ Controls
Playback Local or Remote Files
GEN IV TECHNOLOGY
Adjust Image Quality
Local and Remote Setup
7
of 56
4. Function Icons
Record to PC
Voice Chat
Close Application
Sequence Live Images
Screen Capture
5.
Enable Alarm Info
View Alarm Info
Status Lamps
Preview and PC record status
•
Alarm Status
Preview and PC Record Status: Each lamp represents one channel
- Preview only, not recording to PC
- PC recording active
•
Alarm Status: Each lamp represents one DVR
- Receiving alarms from the DVR is enabled
- Alarms have been received. Press the
button to view details.
GEN IV TECHNOLOGY
8
of 56
SYSTEM CONFIGURATION
Surveillance Setup
-Click the System Conf icon on the main interface to enter system setup
The following functions can be performed from this interface
1.
2.
3.
4.
5.
6.
7.
8.
9.
GEN IV TECHNOLOGY
Add/Remove DVRs
Set Channel Properties and Enable Sub-streaming
Set Preview Sequence
Firmware Upgrade
Remote Reboot
Remotely Control a DVR
Obtain DVR Status
Log Information
Remotely Setup a DVR
9
of 56
1. Adding DVRs
NOTE: Up to 16 DVRs may be managed via the client software
Click the Add DVR button to view the following dialog.
DVRDVS Name: Enter a description of the DVR to add
DVRDVS IP: Enter the appropriate IP address to connect to the DVR
User Name: Enter the username configured in the DVR [default: admin]
Password: Enter the password configured in the DVR [default: 12345]
Channel Number: Enter the number of channels the DVR supports
Multicast IP: Enter a Class D multicast IP for your network. Omit this option if
multicasts are not adopted in your network
Port: Enter the Client Port configured in your DVR [default: 8000]
DVRDVS Type: Select DVR_HCI model
NOTE: After Adding a DVR, you can edit these settings by double-clicking the DVR
name.
GEN IV TECHNOLOGY
10 of 56
2. Set Channel Properties and Enable Sub-Streaming
NOTE: These changes must be made for all channels independently
Double-Click the channel you wish to modify
Channel Name: Enter a description
Channel Number: Displays the channel you are modifying
DVRDVS Name:Displays the DVR you are modifying
DVRDVS IP: Displays the DVRs IP address
User Name: Enter the username of the DVR [default: admin]
Password: Enter the password of the DVR [default: 12345]
Net Protocol: Select TCP
Net Stream: Select Sub Stream (this setting enables sub-streaming)
NOTE: Sub-streaming is a very important feature. For more information on substreaming and setup, please see the Network Optimization Guide included
with this manual
GEN IV TECHNOLOGY
11 of 56
3. Setting Live Preview Sequence
If live preview sequencing is enabled, you can choose to sequence
multiple channels from any DVR that has been added.
NOTE: To enable live preview sequencing in the client software, refer to the
Local PC Setup section of this manual
-Moving cameras to the right-side box will allow those cameras to be
sequenced during live preview. You can also change the order in which
the cameras are sequenced.
NOTE: To start sequencing during live preview, refer to the Sequence Preview
section of this manual
GEN IV TECHNOLOGY
12 of 56
4.Firmware Upgrade
To upgrade the firmware of the DVR simply select the DVR you
wish to upgrade. Click the Upgrade button and browse to the
upgrade file and click Upgrade. The DVR will automatically reboot
after the upgrade is complete.
NOTE: Please do not press any buttons or power down the unit during an update
GEN IV TECHNOLOGY
13 of 56
5. Remote Reboot
Some settings require a reboot of the DVR to take effect. Simply
select the DVR you wish to reboot and click the Reboot button.
6. Remotely Control a DVR
You may send commands to the DVR to remotely control the DVR.
These commands are the same found on the front panel of the DVR
system. Simply click select the DVR and click the Remote Key
button.
GEN IV TECHNOLOGY
14 of 56
7.Obtain DVR Status
By selecting a DVR and pressing the DVR Status button you are able
to view DVR information including: device status, local PC status,
hard drive consumption and status, channel record status, signal
loss, hardware status, network connections, and max bit rates.
Press the Get Status button to display updated information
NOTE: The status info refreshes every 5 seconds. Press the Get Status button to
get current information.
DVR Status
-Normal
-Abnormal
PC Status
-Normal
- Greater than
85% CPU usage
-Hardware error
HDD Storage
HDD Status
-Active
-Sleep (idle)
-Abnormal
Record Status
Network Links
-Record
-Unrecord
Active
Connections
Signal Status
-Normal
-Signal Lost
Bit rate
Current Max Bit
Rate
Hardware Status
-Normal
-Abnormal
GEN IV TECHNOLOGY
15 of 56
8. Log Information
By selection a DVR and clicking the Log button you are able to
view the system’s detailed log.
NOTE: The log only displays a limited amount of entries. To view additional
entries narrow your search by time from the Query Type list.
GEN IV TECHNOLOGY
16 of 56
9. Remotely Setup a DVR
To remotely setup a DVR:
a. Add a DVR to the list
b. Select a DVR
c. Right-click and choose Remote Setup
NOTE: View the Remote DVR Setup section for details of this function
GEN IV TECHNOLOGY
17 of 56
SYSTEM CONFIGURATION
Remote DVR Setup
-To access the remote setup page, please see page 17.
-If you modify any parameter, click OK prior to moving to another page or
channel. Click “Save Para.” when all parameters for all channels have been set
and the client software will send this information to the DVR. Reboot the DVR for
the changes to take effect.
The following functions can be performed from this interface
1.
2.
3.
4.
5.
GEN IV TECHNOLOGY
Server Parameters
Channel Parameters
Serial Parameters
Alarm Parameters
DVR User Parameters
18 of 56
1. Server Parameters
-For detailed information, please review DVR user manual.
Save Para.
Sends configuration to DVR
Default Para.
Sets DVR to default
configuration
Check Sys Time
Syncs DVR time with PC
Format Disk
Formats and clears all hard
drives installed
DVRDVR Name: Description of DVR
HDD: Number of hard drives installed
DEV ID: Device ID set in the DVR
DNS IP: DDNS IP address if software has been developed for such use
IP Address: IP Address of the DVR
Multicast IP: Multicast IP of the DVR
Port Number: Client port (> 2000)
Gateway IP: Gateway (router) IP address
MASK IP: Subnet Mask
Net Interface: Select network
speed/duplex
NFS IP: Network File Server IP (future feature)
NFS Directory: Directory on NFS (future feature)
Firmware Version: Firmware version
Remote Host IP: Central Server IP if software has been developed for
such use
Remote Host Port: Central Server port if software has been developed
for such use
PPPoE: Status of PPPoE setup for DSL modems
Hardware Version: Hardware version
PPPoE User: PPPoE username provided by the DSL ISP
Front Panel Version: Panel version
PPPoE Password: PPPoE password provided by the DSL ISP
DSP Version: DSP version
PPPoE IP: PPPoE IP retrieved from ISP
Alarm In: Amount of alarm inputs
Cycle Record: DVR hard drive overwrite option
Alarm Out: Amount of alarm outputs
DVRDVS Type: DVR model
Serial Number: Serial number
Http Port: Web port used to access embedded web server through IE
MAC address: MAC address of the DVR
Channel Number: Number of channels
GEN IV TECHNOLOGY
19 of 56
2. Channel Parameters
-This section allows users to modify channel parameters, including:
a.
b.
c.
d.
e.
f.
Setup Main Stream and Sub Stream recording parameters
Set Recording Schedule
Set Motion Detection
Set Privacy Mask
Set View Tampering Alarm
Set Video Lost Alarm
g. Set OSD Options and Pre/Post Recordings
2-a. Main Stream Recording: Parameters at which video will be recorded
to
the DVR’s hard drive(s)
Sub Stream: Parameters at which video will be displayed when
accessing remotely from the web browser or client
software
NOTE: Please review the Network Optimization Guide at the end of this manual
for details on configuring the Sub Stream
GEN IV TECHNOLOGY
20 of 56
2-b. Set Recording Schedule
-Press the Setup Button next to Schedule to set recording parameters
All Day: Check this option to use the same recording method throughout the day.
Uncheck this option to use different recording methods throughout the day.
Section1 – Section4: Specify the time period and recording method this channel
should use for the day(s) selected.
GEN IV TECHNOLOGY
21 of 56
2-c. Set Motion Detection
-Press the Setup Button next to Motion Detect Alarm in Channel
Parameters
Sensitivity: Selects the motion sensitivity to be used for the channel.
• Close - Motion Detection Disabled
• 1 – Lowest Sensitivity
• 5 – Highest Sensitivity
Trigger Record Channel: Upon motion detection, the corresponding channel will begin
recording. Recording time based off of PostRec Time in
Channel Parameters
Motion Alarm Handle Method: Upon motion detection, the DVR will respond based on
the options chosen.
Schedule: Set the schedule when this channel will use motion detection
NOTE: The Upload to Center option will enable the DVR to send alarm
information and screenshots to the client software. The client software
must be configured to receive alarm information (see the Client Alarm
Receipt section to enable)
GEN IV TECHNOLOGY
22 of 56
2-d. Set Privacy Mask
-Press the Setup Button next to Private Mask in Channel Parameters. This
feature hides areas of the picture from preview and does not record these
masked areas.
NOTE: Up to 4 masks may be set to hide from preview and recordings
GEN IV TECHNOLOGY
23 of 56
2-e. Set View Tampering Alarm
-Press the Setup Button next to View Tampering Alarm in Channel
Parameters. This feature will trigger an alarm when the camera is
intentionally blocked.
Sensitivity: Selects the sensitivity to be used for the channel.
Motion Alarm Handle Method: Upon triggering, the DVR will respond based on the
options chosen.
Schedule: Set the schedule when this channel will use View Tampering
NOTE: The Upload to Center option will enable the DVR to send alarm
information and screenshots to the client software. The client software
must be configured to receive alarm information (see the Client Alarm
Receipt section to enable)
GEN IV TECHNOLOGY
24 of 56
2-f. Video Loss Alarm
-Press the Setup Button next to Video Lost Alarm in Channel Parameters.
Upon loss of the camera’s video signal, the DVR will respond based on
the options chosen.
Video Loss Handle: Upon loss of video, the DVR will respond based on the options
chosen.
Schedule: Set the schedule when this channel will use Video Loss Alarms
NOTE: The Upload to Center option will enable the DVR to send alarm
information and screenshots to the client software. The client software
must be configured to receive alarm information (see the Client Alarm
Receipt section to enable)
GEN IV TECHNOLOGY
25 of 56
2-g. Set OSD Options and Pre/Post Recordings
-
Pre/Post Record: If alarms (motion, view tampering, etc.)trigger recording,
the time set will specify how long before and after that
event took place to save the recordings.
OSD: Specify various On Screen Display properties per channel
GEN IV TECHNOLOGY
26 of 56
3. Serial Parameters
-This section allows users to modify serial parameters for RS-232, dialup,
and RS-485 devices attach to the DVR
RS-232 Properties: Set the parameters for the RS-232 connection.
• Console Mode – For RS-232 keyboard controller or HyperTerminal
• PPP Mode – For RS-232 dial-up modem
• Transparent – For all other RS-232 devices
PPP Transfer Mode: Configure dial-up modem properties. Please contact your
ISP for details.
RS485 Properties: Set the parameters for Pan/Tilt/Zoom cameras
GEN IV TECHNOLOGY
27 of 56
4. Alarm Parameters
-This section allows users to modify the alarm inputs and relay outputs
Set alarm input
schedule and
parameters
Set relay output
schedule and
parameters
Enable PTZ presets
or cruise upon
triggering alarms
Set the time to
trigger output relay
after alarm has
been made
NOTE: The Upload to Center option will enable the
DVR to send alarm information and
screenshots to the client software. The
client software must be configured to
receive alarm information (see the Client
Alarm Receipt section to enable)
GEN IV TECHNOLOGY
28 of 56
5. DVR User Parameters
-This section allows for user maintenance on the local DVR and embedded
web server.
User rights for local
DVR access
User rights for
client software and
embedded web
server
Enable IP: Apply IP filter and only allow that IP to connect with the specified
user credentials
Enable MAC: Apply MAC filter and only allow that MAC to connect with the
specified user credentials
GEN IV TECHNOLOGY
29 of 56
SYSTEM CONFIGURATION
Local PC Setup
-Click the Local Setup Tab to configure local PC settings
Enables the PC to
record video via
a schedule
Determines the
interval when
new files will be
created from PC
recordings
Enables HDD
overwrite when
PC recording is
used
Synchronizes DVR
time with PC
clock at the
specified Check
Time
PC Record files
are saved in
C:\mpeg4record
Cycle Play: Enables live preview sequencing
NOTE: To setup sequencing, please refer to page 12
Use Hard Decoder: If the optional hardware decoder card is installed in your
PC, the client software will use the decoder card to preview
live images and output an analog video signal for external
display (TV, projector, etc.)
PC CPU Usage:
GEN IV TECHNOLOGY
By default, the client software will use the PC CPU to
uncompress the video image. If you want to decrease the PC
CPU usage, you can select to throw the B frame when the
image is being decoded.
30 of 56
SYSTEM CONFIGURATION
User Management
-Click the User Management Tab to configure client software users
Power
•
•
•
GEN IV TECHNOLOGY
Administrator – Full control
Super Operator – Local control, playback, and PTZ only. No control over
DVR or system configuration (System Config, Video
Para., Alarm, and Log disabled)
Operator – Local control only. Allows only for PC record, image capture,
Voice, and live preview
31 of 56
Network Preview
Audio Preview
-To enable audio via the client software, right-click the image and choose Open Audio.
To disable, right-click and choose Close Audio
GEN IV TECHNOLOGY
32 of 56
Network Preview
Multi-Window Preview
-The Multi-Window feature enables the video to maximize full screen. This feature
functions for all screen division options. Right-click an image and choose Multiwindows.
To disable, double-click an image.
GEN IV TECHNOLOGY
33 of 56
Network Preview
Sequence Preview
-You can sequence the live video channels from single or multiple DVRs from
any screen division option. Follow the below steps to utilize this feature.
•
•
•
GEN IV TECHNOLOGY
Enable this feature (Cycle Play) in Local Setup (see page 30)
Setup the channels you wish to sequence (see page 12)
Click the
button twice to start the sequence.
34 of 56
IMAGE CAPTURE
-Images can be taken at any time. Simply select the camera on screen and
click the
icon.
NOTE: By default, images are saved to the C:\Picture folder. See page 30 for
folder settings
NOTE: Images will be saved according to the Resolution setting of that particular
channel. Please use the sub-stream option when viewing video and all
captures will be in CIF (352x240) or QCIF (176x120)
2CIF Capture
(704x240)
CIF Capture
(352x240)
QCIF Capture
(176x120)
GEN IV TECHNOLOGY
35 of 56
CLIENT PC RECORDING
Schedule Record
-To enable automatic PC recording based from a schedule, follow the below
steps. See page 30 for more details.
•
•
•
Enter Local Setup
Check the Auto checkbox
Click the Setup Icon to set a schedule
NOTE: By default, video is saved to the C:\mpeg4record folder
GEN IV TECHNOLOGY
36 of 56
CLIENT PC RECORDING
Manual Record
-To enable manual PC recording, follow the below steps. See page 8 for more
details.
•
•
•
Access the main interface
Press the
button to start recording
Press again to stop recording
NOTE: By default, video is saved to the C:\mpeg4record folder
GEN IV TECHNOLOGY
37 of 56
CLIENT ALARM RECEIPT
-The client software can receive event messages from the DVR and notify the
user via a pop-up window when events have been received. To enable the
client software to receive alarm messages from the DVR follow the below
steps. This setup is required for options set to “Upload to Center”. See pages
8 and 22 for more information associated with this feature.
•
•
•
•
GEN IV TECHNOLOGY
Access the main interface
Press the
button
Select the DVR(s) you wish to enable
Click Fortify/Cancel to enable/disabled selected DVRs
38 of 56
VOICE TALK
-The client software allows two-way audio between the PC and DVR. Simply select the
button, select your DVR, and click Start. Click the voice button to stop.
GEN IV TECHNOLOGY
39 of 56
CLIENT LOG
-If client alarm receipt is enabled, you can view the messages received from the DVR by
simply selecting the
button.
GEN IV TECHNOLOGY
40 of 56
PLAYBACK
Remote File Playback
-To access the remote playback page click the Play Back icon, please see page 7.
-This section will allow remote playback of video, saving playback video, and
downloading backups of video.
NOTE: All video downloaded and reviewed from this screen is native to the
Recording Resolution and does not use Sub-Stream. It is recommended to
use the playback feature on the local network, T1, or higher broadband
connection to accommodate the large 2CIF streaming video or download
the video prior and view the video in the file player.
Search
Parameters
Select file to
playback or
download
NOTE: For downloading, multiple files can be selected by holding down the CTRL
key. Ranges can be selected by holding down the SHIFT key.
File Size: Size of file in bytes
Start/End Time: Year_Month_Day_Hour_Minute_Second
GEN IV TECHNOLOGY
41 of 56
PLAYBACK
Local File Playback
-To access the local playback page click the Play Back icon, please see page 7.
-This section will allow playback of downloaded files. See page 41 to download
video.
GEN IV TECHNOLOGY
42 of 56
PLAYBACK
BMP Search
-To access the BMP Search page click the Play Back icon, please see page 7.
-This section will allow viewing of saved BMP images
Sequence Parameters
GEN IV TECHNOLOGY
Enable Sequence
43 of 56
PLAYBACK
Remote Playback by Time
-To access the remote playback page click the Play Back icon, please see page 7.
-This section will allow remote playback of video, saving playback video, and
downloading backups of video by time.
NOTE: All video downloaded and reviewed from this screen is native to the
Recording Resolution and does not use Sub-Stream. It is recommended to
use the playback feature on the local network, T1, or higher broadband
connection to accommodate the large 2CIF streaming video or download
the video prior and view the video in the file player.
GEN IV TECHNOLOGY
44 of 56
REMOTE PTZ CONTROL
-To enable remote PTZ control, press the Pan/Tilt icon on the main
interface. Ensure the screen resolution is set to 1024 x 768.
-Select your camera by clicking on the image.
PTZ Auxiliary
GEN IV TECHNOLOGY
PTZ Light
45 of 56
REMOTE VIDEO PARAMETERS
-Adjustments to the camera image can be made by pressing the Video
Para. icon
-Changes made will apply to the DVR locally and client software view
GEN IV TECHNOLOGY
46 of 56
Network Optimization Guide
H.264 Network Digital Video Recorder
GEN IV TECHNOLOGY
47 of 56
CONTENTS
Section
Page
SUB-STREAM FUNCTION……………………………………………………………………………………………………….. 49
ENABLING ON CLIENT SOFTWARE……………………………………………………………………………….. 49
ENABLING ON INTERNET EXPLORER……………………………………………………………………………. 50
NETWORK PARAMETERS……………………………………………………………………………………………………… 51
SETTING FOR CLIENT SOFTWARE………………………………………………………………………………… 51
SETTING FOR INTERNET EXPLORER……………………………………………………………………………… 53
NETWORK OPTIMIZATION………………………………………………………………………………………………………. 55
GEN IV TECHNOLOGY
48 of 56
SUB-STREAM FUNCTION
All DVRs utilizing firmware version 1.4 build 051215 and higher include a feature called
“sub-streaming”. This allows for high resolution recording to the unit locally (on the
hard drive) and lower resolution for viewing across the Internet or LAN.
YOU MUST USE THE SUB-STREAM FEATURE WHEN VIEWING IMAGES
VIA THE CLIENT SOFTWARE OR WEB BROWSER
1. When viewing your DVR via the client software ensure the use of
sub-streaming by following the below steps.
a. Add your DVR to the client software
b. Double-click Channel1 to open Channel Properties
c. Ensure the Net Stream option is set to Sub Stream, click
OK, repeat for all channels
GEN IV TECHNOLOGY
49 of 56
2. When viewing your DVR via Internet Explorer ensure the use of
sub-streaming by following the below steps.
a. Simply select Sub-Stream from drop down list next to each
channel name prior to viewing that camera. Do this for
every channel.
GEN IV TECHNOLOGY
50 of 56
NETWORK PARAMETERS
After enabling sub-streaming for viewing, you must configure the sub-stream
parameters. These sub-stream parameters will differ from your recording
parameters and will only be used when viewing the images remotely.
1.
When viewing your DVR via the client software configure your
sub-stream network parameters by following the below steps.
a. Add your DVR to the client software
b. Select your DVR name, right-click, select Remote Setup
GEN IV TECHNOLOGY
51 of 56
c. Choose the Channel Para. Tab, edit the Sub Stream
(Network) fields
d. After choosing your parameters for Channel 1, click OK,
select Channel 2, edit parameters, click OK, and repeat for
all channels. Finally, choose Save Para to apply all settings
to the DVR.
NOTE: Changes to Resolution or Stream Type require a reboot after Save Para.
NOTE: Review the optimization section for recommended settings
GEN IV TECHNOLOGY
52 of 56
2.
When viewing your DVR via the client software configure your
sub-stream network parameters by following the below steps.
a. Access your DVR and select the Config option
GEN IV TECHNOLOGY
53 of 56
b. Choose the Channel Para. Tab, edit the Minor Stream (Net)
fields
c. After choosing your parameters for Channel 1, click OK,
select Channel 2, edit parameters, click OK, and repeat for
all channels. Finally, choose Save Para to apply all settings
to the DVR.
NOTE: Changes to Resolution or Stream Type require a reboot after Save Para.
NOTE: Review the optimization section for recommended settings
GEN IV TECHNOLOGY
54 of 56
NETWORK OPTIMIZATION
It is critical to set your sub-stream network parameters to an optimized
state. In order for the user to enjoy the power of H.264, the sub-stream
parameters must be appropriate for your Internet connection at the DVR
installation site. Please follow the below hints to help optimize your system
for the best possible remote viewing experience.
•
•
•
•
•
•
KNOW YOUR UPLOAD RATE. Do an Internet speed test at the site of
the DVR installation to confirm the upload rate from which you will
base your DVR sub-stream configuration. You must be well aware of
this upload rate as this is the limiting factor in your remote viewing
experience. There are many Internet speed test sites, but
www.dslreports.com/speedtest is popular. Run a speed test that will
display the UPLOAD speed (download speed does not matter at the
DVR installation site, UPLOAD is critical to remote viewing).
There is no minimum upload rate required for remote viewing to
work, but lower the upload rate, the slower your video will refresh.
We recommend a connection with no less than 256 Kbps upload, but
even a dial-up connection will allow remote viewing, albeit at a very
slow refresh rate.
The Resolution and Max Bit Rate settings are the most significant
when trying to achieve the highest quality image. Refer to the
recommendations below for various upload rates.
There is always a trade-off between speed and image quality. For
most cases, the frame rate can be dropped to 1-6 FPS to
accommodate slow connections and higher quality images can be
achieved. With low speed upload rates for Internet connections,
there is no way possible to have high quality at real-time frame
rates, since the bottleneck is the upload Internet connection and
never the DVR. For DVR performance, use a local connection for
evaluation.
For low speed connections, it may be preferred to access 1 or 2
cameras simultaneously, rather than all cameras. In this case, you can
set high quality and speed parameters if only 1 or 2 are access at the
same time. In this case, the low upload bandwidth is being used for
just one channel rather than trying to squeeze 4 video streams
through that small connection, this allows for higher quality and speed
settings if you’re using 1 camera for that entire upload bandwidth.
The chart on the next page can be used as a guideline and as a
starting point. Increase parameters only if your upload rate can
support it. Dial-up speed is 56 kbps for reference.
GEN IV TECHNOLOGY
55 of 56
Upload
(kbps)
Configuration
128 - 256
257 - 384
385 - 512
513 - 1024
1024 +
NOTE:
•
•
•
•
•
•
QCIF resolution is best used for split screen view (4, 8, or 16 channel view)
o Use QCIF for low speed connections if accessing all cameras simultaneously
CIF resolution is best used for all views
o Use CIF for higher speed connections or if accessing 1 or 2 cameras on low speed
connections
If a mosaic effect (smearing) is apparent during movement in picture, increase the Max
Bit Rate
Reducing frame rates allow for high image quality via the Max Bit Rate or Resolution
setting
Reducing Max Bit Rate or Resolution settings allow for higher frame rates
Use a low bit rate if there is little motion in the picture.
GEN IV TECHNOLOGY
56 of 56