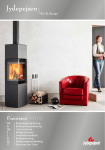
1
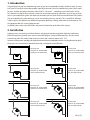
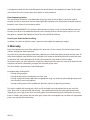
Country Country DKBetjeningsvejledning GB User’s manual 1. Introduction Congratulations on your new wood-burning stove. By now you have probably already installed the stove, and may even have lit it for the first time. Most people, especially those who have had a wood-burning stove in their homes for years, consider operating instructions to be a kind of “last resort” – something to you consult when all else fails. However, we hope that you will take a little time to read these operating instructions, since the way in which you use your wood-burning stove will depend on the model you have purchased. You need to become fully familiar with your wood-burning stove before you can be sure of making the very most of it. This is not difficult, although it does require a little patience. For additional information about heat, stoking, combustion and maintenance, visit the Jydepejsen Web site at www.jydepejsen.com. In addition, please refer to the illustrations and technical information at the back of this manual. 2. Installation Jydepejsen stoves are tested by specialist institutions and approved according to applicable legislative requirements. Before finalCatalog approval is granted, stoves have to successfully complete a variety of combustion tests. The stove tested page Catalog page featured a Country top outlet. The wood usedfor the tests was birch, with a moisture content of 15–21%. 510 Country 760 You must install your stove according to the required minimum distance to combustible materials. See the boiler plate for details. Distance to combustible without insulated flues Distance to combustible without insulated flues Below you can se illustrations of mounted stoves with and without isolated firetubes. Jydepejsen A/S Jydepejsen A/S Ahornsvinget 3-7 Nr. Felding, DK-7500 Holstebro Tlf. 96101200 Fax. 97425216 www.jydepejsen.com Modell: Sheet/Sheets: Ahornsvinget 3-7 Nr. Felding, DK-7500 Holstebro Tlf. 96101200 Fax. 97425216 www.jydepejsen.com Modell: Sheet/Sheets: Country 510 Distance to combustible without insulated flutes Jydepejsen A/S Ahornsvinget 3-7 Nr. Felding, DK-7500 Holstebro Tlf. 96101200 Fax. 97425216 www.jydepejsen.com Catalog page Modell: Sheet/Sheets: Country 510 Catalog page Modell: Distance to combustible without insulated flues Country 760 Jydepejsen A/S Country 760 Distance to combustible without insulated flutes Ahornsvinget 3-7 Nr. Felding, DK-7500 Holstebro Tlf. 96101200 Fax. 97425216 www.jydepejsen.com Sheet/Sheets: Distance to combustible with insulated flues Jydepejsen A/S Catalog page Modell: Country 510 Distance to combustible with insulated flutes Ahornsvinget 3-7 Nr. Felding, DK-7500 Holstebro Tlf. 96101200 Fax. 97425216 www.jydepejsen.com Sheet/Sheets: Country 510 Catalog page Modell: Country 760 Country 760 Distance to combustible with insulated flutes Jydepejsen A/S Ahornsvinget 3-7 Nr. Felding, DK-7500 Holstebro Tlf. 96101200 Fax. 97425216 www.jydepejsen.com Sheet/Sheets: Distance to combustible with / without insulated flues Distance to combustible without insulated flues Jydepejsen A/S Ahornsvinget 3-7 Nr. Felding, DK-7500 Holstebro Tlf. 96101200 Fax. 97425216 www.jydepejsen.com Catalog page Modell: Country 510 Distance to combustible without insulated flutes Sheet/Sheets: Country 510 Distance to combustible without insulated flues Catalog page Modell: Country 760 Jydepejsen A/S Ahornsvinget 3-7 Nr. Felding, DK-7500 Holstebro Tlf. 96101200 Fax. 97425216 www.jydepejsen.com Sheet/Sheets: Distance to combustible with / without insulated flues Country 510 Distance to combustible with insulated flutes Country 760 Distance to combustible with insulated flutes Country 760 Distance to combustible without insulated flutes GB [1,2] It is important to check that the vermiculite panels are correctly fitted in the combustion chamber. The illustration at the back of this manual shows where these panels are to be positioned. Floor/Supporting surface The stove must be installed on a non-flammable surface. This means that if the floor is not tiled or made of concrete, or brick, the stove must meet the locally applicable requirements for distance from flammable materials beneath a stove. Please ask your dealer for advice. ADDITIONAL REQUIREMENTS: The surface on which the stove is placed, as well as minimum 500 mm in front of the stove, must be of a non-combustible material such as concrete, brick or similar material. To place i.e. a steel floor plate on a wooden floor 500 mm in front of the stove will NOT be sufficient. Consult your dealer before installing. In addition, the surface on which the stove is placed must be capable of supporting its weight. 3. Warranty Brand-new wood-burning stoves from Jydepejsen A/S come with a 5-year warranty. The warranty covers defects and burn-through from correct operation. Any claims during the warranty period should be addressed to the dealer from whom you purchased the stove. All stoves from Jydepejsen come with their own individual serial number on the boiler plate on the back of the stove. In connection with service procedured of all kinds, please quote the stove model and serial number. For warranty repairs, you must also present a signed and dated invoice that states the name of the dealer. The warranty does not cover the dismantling, transport and reassembly of your stove. The serial number is printed on the enclosed boilerplate . No compensation will be paid for: - Damage during transport - Damage to other articles resulting from use of the stove - Damage arising from incorrect operation or inappropriate usage, e.g. overheating. Read the operating instruc- tions carefully to avoid such problems. - Damage resulting from a failure to follow the directions stated in the operating instructions. The stove is supplied with wearing parts, which are will inevitably have to be replaced due to your use of the stove. These parts are not covered by the warranty – the regularity with which they need to be replaced varies depending on your usage of your stove. The wearing parts are: Vermiculiteculite panels, baffle plates and sealing bands. In addition, the warranty does not cover glass, ceramic tiles and soapstone. You can order such replacement parts as you may need from your dealer. GB [3] 4. Stoking instructions It is essential to ensure that your chimney draws well. The alpha and omega of stove operation is the interaction between chimney and stove. Your dealer or chimney sweep will be able to give you advice and guidance about chimney conditions. If the chimney has not been used for a long time, check it carefully and remove any blockages before starting to use it. Once you have made sure of this, the next step is to focus the interaction between your stove and chimney. The best way to do this is to follow the operating instructions and to use fuel which ignites easily in the combustion chamber and continues to burn until the chimney draught is sufficient. For additional information about correct lighting and stoking, visit the Jydepejsen Web site at www.jydepejsen.com. ! Please note that the stove paint will harden during the first few lightings. This means that the stove will generate smoke and emit an odour of paint that will dissipate after about an hour. It is a good idea to keep the room well ventilated during this phase. Moreover, avoid touching the stove as this may cause the paint to scale. As the steel panels will expand and contract during the firing/cooling phases, you may hear a crackling sound. This is completely normal for sheet metal components, and cannot be considered a defect in the stove. All Jydepejsen stoves are intermittent. Initial lighting 1. Turn the air wheel to the maximum 2. Add firelighters and billets to the bottom of the fire box (combustion chamber). Maximum height for billets is 11 cm. 3. The billets (about 1,5 kg) are to be built up crosswise. 4. Light the fire. 5. The door should be ajar for a couple of minutes during the lighting phase. 6. The air wheel must be adjusted down after approx. 10 minutes; how much depends on the chimney draught - however, the air supply must be diminished to the point where you obtain steady and calm flames. Stoking Once there is a good bed of embers in the stove, you can add wood. It is important not to open the door while there are flames in the stove, as this may cause smoke to flow out into the room. Add wood on the basis of your heating requirements. The amount of wood you need to add will depend on the season. However, never add more than 2 kg of wood every 1.5–2 hours. Please remember that the exterior surfaces of the stove in particular will become very hot during firing. 1. Turn the air wheel to the maximum. 2. To minimize the underpressure, the door should be ajar for about one minute before you open it completely. 3. Open the door slowly. 4. Add 2 – 3 pieces of firewood to the combustion chamber. 5. Close the door. 6. Turn down the air supply when the fire has caught the wood, to obtain steady and calm flames. GB [4] As the steel panels will expand and contract during the firing/cooling phases, you may hear a crackling sound. This is completely normal for sheet metal components, and cannot be considered a defect in the stove. All Jydepejsen stoves are intermittent. Refuelling onto a low fire bed If there is insufficient burning material in the firebed to light a new fuel charge, excessive smoke emission can occur. Refueling must be carried out onto a sufficient quantity of glowing embers and ash that the new fuel charge will ignite in a reasonable period. If there are too few embers in the firebed, add suitable kindling to prevent excessive smoke. Fuel overloading The maximum amount of fuel specified in this manual should not be exceeded, overloading can cause excess smoke. Dampers left open Operation with the air controls or dampers open can cause excess smoke. The appliance must not be operated with air controls or dampers door left open except as directed in the instructions. ! NB: Only use wood with moisture content less than 20% 5. Maintenance Gaskets and Vermiculite panels are wearing parts which need to be replaced from time to time – depending on how much you use your stove. In some cases, you may need to replace them every year, while in others, replacement every second or third year will suffice. As a rule of thumb, the gasket needs to be replaced when it has become flattened and the door no longer fits tightly against the front of the stove. You can purchase sets of gasket from your local dealer. The Vermiculite panels must be replaced when they have worn thin, or when cracks – if any – become so wide that you can actually see steel through them. If the panels are not replaced at such time, they will lose their capacity to insulate and reflect heat. We recommend that you use original spare parts. Movable and mechanical parts (closing mechanisms, hinges etc) should be greased once a year with a heatresistant lubricant. ! You should have your stove checked regularly by a qualified professional to ensure the optimal function of the stove at all times. Do not make any unauthorised changes to the design of the stove. Not only is this illegal, but it will also invalidate the stove guarantee and test results. Replacing the gasket on the door 1. Remove the gasket from the door. 2. Press new gasket into the track. GB [4,5] Replacing the gasket on the glass 1. Open the door. 2. 6 screws are fastened on the inside of the door. Loosen these screws and remove the glass. 3. Remove the old sealing band from the Glass. 4. Add new sealing band to the Glass. To replace the glass panel, simply reverse the process described above. Interior cleaning It must always be possible to access the chimney for sweeping/cleaning. Replacing the Vermiculite panels (You should also follow these instructions when cleaning your stove, as cleaning necessitates the removal of the combustion chamber cladding). 1. Position the upper baffle plate on the holders. 2. Position the rear panel. 3. Place the baffle plate. 4. Finally, place the side panels and bend the fittings to fix them. 6. Spare parts list Article description Dimensions H x B x D Vermiculiteset (Baffleplate incl.) Vermiculite side panel 275 x 235 x 20 mm Vermiculite rear panel 425 x 160 x 20 mm Vermiculite baffle plate 425 x 220 x 20 mm Vermiculite baffle plate, upper 425 x 220 x 15 mm Article no. 56500010 We are only able to deliver a complete vermiculiteset, and not single parts. Cast iron bottom Shaker grate Glass Ash tray Door gasket Gasket air wheel/glass 384 x 262 x15 mm Ø 162 340 x 275 x 5 Volume 1,7 L 20 x 7 mm 250 x 200 x 5 mm 56500016 55000100 56500027 56500018 44300070 56500040 GB [5,6] 7. Appendix The Clean Air Act 1993 and Smoke Control Areas Under the Clean Air Act local authorities may declare the whole or part of the district of the authority to be a smoke control area. It is an offence to emit smoke from a chimney of a building, from a furnace or from any fixed boiler if located in a designated smoke control area. It is also an offence to acquire an “unauthorised fuel” for use within a smoke control area unless it is used in an “exempt” appliance (“exempted” from the controls which generally apply in the smoke control area). The Secretary of State for Environment, Food and Rural Affairs has powers under the Act to authorise smokeless fuels or exempt appliances for use in smoke control areas in England. In Scotland and Wales this power rests with Ministers in the devolved administrations for those countries. Separate legislation, the Clean Air (Northern Ireland) Order 1981, applies in Northern Ireland. Therefore it is a requirement that fuels burnt or obtained for use in smoke control areas have been “authorised” in Regulations and that appliances used to burn solid fuel in those areas (other than “authorised” fuels) have been exempted by an Order made and signed by the Secretary of State or Minister in the devolved administrations. The Country 510 and 760 have been recommended as suitable for use in smoke control areas when burning wood. Further information on the requirements of the Clean Air Act can be found here : http://smokecontrol.defra.gov.uk/ Your local authority is responsible for implementing the Clean Air Act 1993 including designation and supervision of smoke control areas and you can contact them for details of Clean Air Act requirements Jydepejsen fire by design Ahornsvinget 3-7 Nr. Felding 7500 Holstebro Denmark Tel. +45 9610 1200 [email protected] www.jydepejsen.com