1
A revised edition
Hozo – Ontology Editor
(Distributed Development Version)
Operating Manual
September 2011
Control Device Division, Enegate Co, ltd.
Mizoguchi Laboratory, The Institute of Scientific and
Industrial Research, Osaka University
1
Acknowledgment
This version is revised by Robert Rovetto from motives of his kindness. We greatly
appreciate his kindness and efforts.
This document was compiled as part of the following projects. Publication, reproduction or
duplication of this document without the permission of the University of Tokyo Hospital,
Osaka University, and Enegate Co, ltd. are therefore prohibited.
FY2006 Special Coordination Funds for Promoting Science and Technology
(promotes flexible solutions to critical policy issues)
"Research on the structure of medical knowledge base databases for the analysis of
clinical medical data"
(Representative: Kazuhiko OHE, Faculty of Medicine, Tokyo University, Contributors:
Riichiro MIZOGUCHI, Osaka University, et al.)
FY2007 Commission for Promoting Development of Medical Information Systems
"Research and development of medical knowledge base databases for medical
information systems"
(Representative: Kazuhiko OHE, Faculty of Medicine, Tokyo University, Contributors:
Riichiro MIZOGUCHI, Osaka University, et al.)
[Copyright Holders]
Ohe Research Laboratory, Department of Planning Information and Management,
University of Tokyo Hospital
The Institute of Scientific and Industrial Research, Osaka University, Mizoguchi
Laboratory
Enegate Co, ltd.
2
1. Contents
2. INTRODUCTION ......................................................................................................... 5
3. SYSTEM OVERVIEW .................................................................................................. 6
3.1. SYSTEM REQUIREMENTS (RECOMMENDED ENVIRONMENT)....................................... 6
3.2. SCREEN LAYOUT ......................................................................................................... 7
3.2.1.Ontology Editor Editing Screen .................................................................. 7
3.3. INSTALLATION ............................................................................................................ 9
3.3.1. Installation Instructions ............................................................................. 9
3.3.2. Uninstall Instructions................................................................................. 9
3.3.3. File Structure .............................................................................................. 9
3.4. STARTING THE SOFTWARE ........................................................................................ 10
3.4.1. Starting the Ontology Editor .................................................................... 10
3.4.2. Closing the editor ...................................................................................... 15
4. OPERATION INSTRUCTIONS ..................................................................................16
4.1. EDITING ONTOLOGIES .............................................................................................. 16
4.1.1. Creating a new ontology ........................................................................... 16
4.1.2. Editing Ontologies .................................................................................... 20
4.1.3. Creating Ontology dependency relationships .......................................... 25
4.1.4. Saving Ontologies ..................................................................................... 29
4.1.5. Loading Ontologies ................................................................................... 31
4.1.6. Other features ........................................................................................... 33
4.1.7. Using the Ontology Editor's extended features ....................................... 55
4.2. MANAGING PROJECTS ............................................................................................... 76
4.2.1. Viewing project management ................................................................... 76
4.2.2. Creating a New Project ............................................................................. 78
4.2.3. Operating the Project ................................................................................ 79
4.2.4. Other Features .......................................................................................... 84
4.3. SHARING ONTOLOGIES (DISTRIBUTED MANAGEMENT) ............................................. 90
4.3.1. Uploading Ontologies ................................................................................ 90
4.3.2. Downloading Ontologies ........................................................................... 94
4.3.3. Locking Ontologies .................................................................................... 98
4.3.4. Checking Ontology changes .................................................................... 101
4.3.5. Server Ontology management features ................................................. 106
4.3.6. Tool settings............................................................................................. 115
3
5. EXPLANATION OF THE MENUS ...........................................................................125
6. CONTACT INFORMATION ......................................................................................131
4
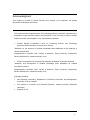
2. Introduction
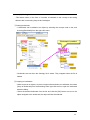
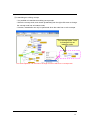
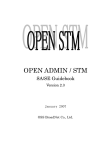
Hozo is a tool for building ontologies in a distributed environment. The
following figure shows the block diagram of Hozo. It consists of three major components:
Ontology editor, Ontology server and Ontology manager. Onto Studio is specialized to
support ontology-building. Users build and use ontologies through the Ontology editor
which has a friendly GUI. Ontology manager manages projects in which several
ontologies are built collaboratively and in a distributed environment through the
internet. It also manages versions of ontologies. Ontology server stores ontologies and
instances and provides APIs for clients.
The main characteristics of Hozo are summarized as follows:
Unlike OWL, its conceptual level is closer to that of human beings. OWL is a low level language
which is good for an interlingua for ontology exchange. If one uses it as an ontology representation
language directly, it would degrade user’s understanding of ontology by restricting their idea to
semantic-network/description-logics levels which are inappropriate and less expressive for
understanding the content of the ontology.
Its representation scheme is based on a frame structure
It helps users build ontologies with Roles in a natural way supported by the advanced theory of Roles.
It represents nested structures of slots. That is, any slot can have its own slots.
Inheritance information is explicit and is always accessible. Two ways of inheritance: one from super
classes through is-a link and the other from class constraint
A user-friendly GUI is available
Version management is available with a useful function for displaying changes.
Ontology building in a distributed environment over internet is supported.
APIs are available for accessing ontologies and instances.
Tracking
Panel
building
( modifying
)
Ontology
Editor
browsing
Onto Studio
(a guide system for
ontology design)
Ontology Server
Ontology
Model
Reference / Install
support
Ontology
Manager
Dependency
Management
Language
Management System
Ontology/Model Developer
Information of
changes /
Support
modification
Clients
(other agents)
5
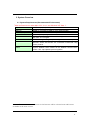
3. System Overview
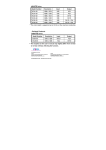
3.1. System Requirements (Recommended Environment)
*Also confirmed to run under Mac OS X 10.4.x, and Windows XP, Vista, 7.
Machine
CPU
Memory
Hard Disk Space
Monitor Resolution
OS*
PC/AT compatible (DOS/V)
Intel Pentium Ⅲ processor, 800MHz or higher
256MB or more RAM (512MB or more recommended)
30MB or more available hard disk space.
1024x768 (XGA) or higher
Windows 2000 or higher (Windows XP or higher recommended),
Mac OS X 10.4 or higher
Java
JRE/JDK 1.5.0_10 or higher (1.6.0 or higher recommended)
Network
Not required if using on a local machine. When sharing within
networks, clients and servers are connected via Ethernet using
TCP/IP protocol.
Other, Supplementary Communication via the Internet 1 will utilize the Jakarta Slide
project's WebDav client module as the WebDav communication
Items
module. URL: http://jakarta.apache.org/slide/
Features for communication via the Internet will be released soon and become
available in the next version.
1
6
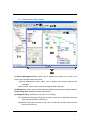
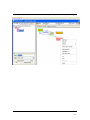
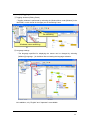
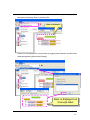
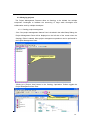
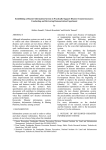
3.2. Screen Layout
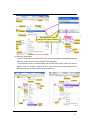
3.2.1.Ontology Editor Editing Screen
←(8)
←(7)
↑(6)
(4)
(3)
(1)
(5)
(2)
(1) Project Management Pane: allows user to display and manage a tree view of the
project and ontologies within the project.
- [Project] Management View: allows user to display and operate projects and
ontologies.
- [Search] View: allows user to search ontologies within the project.
(2) Editing Pane: allows user to switch between multiple ontologies with a tabbed display.
(3) Browsing Pane: displays ontologies graphically.
(4) Navigation Pane: provides an overview of the ontology.
- [WC (Wholeness Concept) Tree] View: provides a tree view of Wholeness Concept
super and sub levels (is-a hierarchy).
- [Relational Tree] View: provides a tree view of Relational Concept super and sub
levels (is-a hierarchy).
7
- [Concept Map] View: Provides a map view of the ontology's concept in its entirety.
- [Search] View: allows user to search the ontologies being edited.
(5) Definition Pane: allows user to display/edit the definitions of the concepts/classes in
the ontology.
(6) Editing Tool Bar: a menu of buttons for editing ontologies.
(7) Operation Tool Bar: menu of buttons used for ontology operations.
(8) Menu Bar: drop-down menu for running various features.
8
3.3. Installation
3.3.1. Installation Instructions
・Decompress the archive you downloaded, and place the decompressed folder in a
location of your choice on your machine.
[Note] This manual assumes the files are installed on c:\
[Note] To use this tool you must have a Java Runtime Environment.
Java Runtime Environment: Java 2 Platform, Standard Edition
(version 1.5.0_10 or higher recommended)
→Can be downloaded from the below site.
http://java.sun.com/javase/downloads/
* Select Java Runtime Environment (JRE), which contains only the
runtime environment, or the Java SE Development Kit (JDK), which
includes a development environment.
[Note] If the "lib" folder in the downloaded folder does not contain all of the following
library files, please download the missing files from the below site.
<Download Site>
http://jakarta.apache.org/slide/
<Required Library Files>
・commons-httpclient.jar
・commons-logging.jar
・jakarta-slide-webdavlib-2.1.jar
・jdom-1.0.jar
3.3.2. Uninstall Instructions
・Delete the installed folder.
[Note] There is no uninstaller.
3.3.3. File Structure
This software is comprised of two programs: Hozo Ontology Editor ver.5 (OE5) and
Model Editor ver.4 (ME4). The contents of the files and folders are as follows.
9
File / Folder Name
Description
oe5.jar
Ontology Editor executable file (jar file)
oe5.bat
AppleScript
file
for
launching
under
Macintosh environments
me5.bat
Explanations of tools (text version)
data3
Settings file for Model Editor
LocalStorage
Settings file for Ontology Editor
ServerStorage
Ontology Editor manual (HTML file)
lib
Stores libraries required by tools
manual
Folder
for
managing
server
projects
(contains samples)
hozo.properties
Folder for managing local projects (contains
samples)
me4.properties
Folder for storing data. Also contains sample
data
readme_jp.txt
Batch file for launching Model Editor
oe5.scpt
Batch file for launching Ontology Editor
3.4. Starting the Software
3.4.1. Starting the Ontology Editor
<Windows>
・ Execute "oe5.bat", located in the tool folder.
[Note] If you are unable to start the software, please check your Java Runtime
Environment version. Please see chapter 5 for directions on checking your Runtime
Environment version.
<Mac OS X>
・ In Macintosh environments (Mac OS X or higher), place the package folder on the
desktop and use the AppleScript file to execute the program.
Alternatively, move to the decompressed folder (see 1.4.1.) in the terminal, and
execute the following command:
> java -cp lib/commons-httpclient.jar:lib/commons-logging.jar:lib/jdom-1.0.jar:lib/Jakarta
-slide-webdavlib-2.1.jar:oe5.jar hozo.oe.OntologyEditorHZ
[Attention] Do not insert line breaks when entering this command.
10
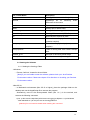
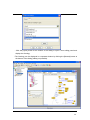
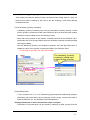
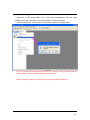
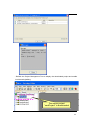
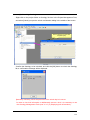
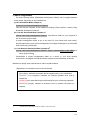
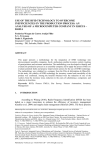
*If the Initial Setup Dialog is displayed in the center of the screen, you have succeeded in
starting the program.
Various settings can be performed in the Initial Setup Dialog, and the program can be set
to launch in the following usage modes.
Figure 3-3. Initial Setup (Dialog)
・The initial setup dialog, shown in Fig. 3-3, will be displayed in the center of the window
at startup. If this is the first time the program has been started, the default username will
be "Author". Follow the dialog's instructions, and change the username to something
other than "Author".
*As of now, usernames are not managed on the server; if identical usernames are used,
they will be handled as the same user. Please take appropriate measures, such as
using mail addresses for usernames, to assure that usernames are not duplicated
among users.
[Attention] These characters cannot be used in usernames:
\/:*?"<>|_
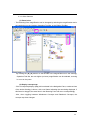
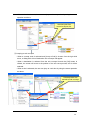
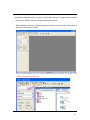
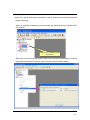
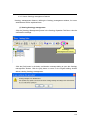
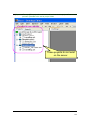
・Click OK to display the Ontology Editing screen.
11
Figure 3-4. Ontology Editor Editing Screen
*The below error message will be displayed if no connection can be made with the
server. If this happens, please try changing the project folder settings or network
(WebDAV) settings (See chapter 4.3.6).
(1) Initial Setup Dialog
12
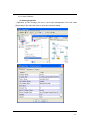
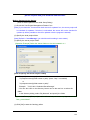
Figure 3-4. Initial Setup Dialog
・The below settings can be performed with the Initial Setup Dialog.
① Change username
② Change referent local project folder
③ Change referent server project folder
④ Enable/disable checking for server updates at startup
⑤ Select whether or not to use project management features
⑥ Network settings
[Reference] Please see chapter 4.3.6 Tool settings for instructions on performing
the above settings.
(2) Checking for server updates
・In order to confirm if there are Ontology updates on the Ontology Server each time the
Ontology Editor is started, check the "Connect to server to check for updates" box in the
Initial Setup Dialog and click OK. The startup process will take several tens of seconds
to several minutes. If the box is unchecked, Ontology Editor will not check for updates.
A progress dialog box (below) will be displayed when checking for updates.
13
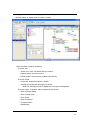
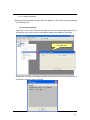
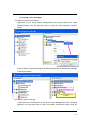
(3) Starting without using project management features
(Use the same interface as the previous version of Ontology Editor)
・To start the Ontology Editor as in previous versions, without the Project Management
Pane, uncheck the "Use project management features" box in the Initial Setup Dialog
and click OK.
Figure 3-5. Initial Setup Dialog (disabled project management)
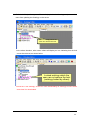
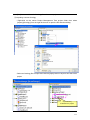
・You can edit the Ontology Editor without using project management features, as shown
in the below editing screen image.
Figure 3-6. Editing screen without project management features
14
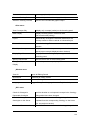
(4) Checking your Java Runtime Environment version
・With regards to start-up errors, if you are unable to start the software as described in
chapter 1.5, please check your Java Runtime Environment version. Follow the below
instructions.
<Windows>
(1) Open a command prompt.
(2) Type "java -version" (without quotes) and press enter to display the version of Java
Runtime Environment currently installed.
(3) If the installed version of Java is older than the one recommended (JRE/JDK
1.5.0_10 or higher), uninstall it and install a version of Java that will allow you to run
the tools.
3.4.2. Closing the editor
・Select [File]-[Close] in the menu bar, or click the [x] on the upper right hand corner of
the screen. The below dialog will be displayed. Click the [Yes] button to close the editor.
Figure 3-8. Dialog that appears when closing the Editor
15
4. Operation instructions
4.1. Editing Ontologies
This section will explain the basic editing functions of the Ontology Editor.
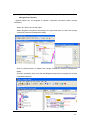
4.1.1. Creating a new ontology
(1) Creating a new ontology (project)
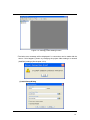
・Select [File]-[Create new...] in the menu bar. The "Create new Ontology" dialog will be
displayed.
・Enter a name for the ontology file in the "New Ontology Name" text box.
・Next, select the project in which the new ontology will be created from the project
folders in the [Project] tab.
16
・ Click the [New] button on the bottom of the dialog to create the ontology file in the
project.
*When creating a project Ontology file, its file extension will be ".ont".
*New projects can be created by right clicking the Project Management Tree and
selecting "Create new project..." from the right-click menu. (Refer to chapter 4.2.2 of
this manual)
*The same operation can be performed by right clicking the project name on the Project
17
Management Tree and selecting [Create new...] from the right-click menu.
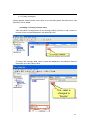
(2) Creating a new Ontology (file)
・Open the "Create New Ontology" dialog as in (1).
・Select the [File] tab to view the list displaying the default Ontology folder, and the
existing Ontology files in that folder.
18
・ Click the [New] button on the bottom of the dialog to create an Ontology file in the
folder.
*When creating a single Ontology file, its file extension will be ".xml".
Single Ontology files are not managed by the project.
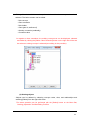
*Ontology files can be deleted by clicking the [Delete] button in the [File] tab of the
"Create New Ontology" dialog. (Refer to chapter 4.2.2)
*Multiple files having the same filename cannot be created in the same folder or one
project (an error message will be displayed).
19
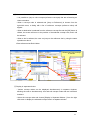
4.1.2. Editing Ontologies
Clicking graphic objects (nodes, slots, links) on the browsing panel will select them, after
which they can be edited.
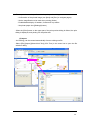
(1) Adding a concept (concept class)
・Click the [NEW Concept] button on the Ontology Editing Tool Bar to add a node (i.e.
concept) to the concepts displayed in the Browsing Pane.
A Concept is added
・To change the concept's label, edit the Label field displayed in the Definition Pane on
the bottom left of the Editing Panel.
The label is
changed to
“bicycle”
20
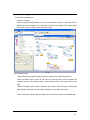
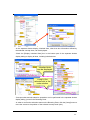
(2) Creating an is-a hierarchy (creating sub concepts)
・If a concept is added as described above while an existing concept is selected, an is-a
link will be added between it and the selected concept ("bicycle" in the below figure) to
indicate an is-a relationship exists.
An is-a link is
added
・To create is-a links between previously defined concepts, click the relevant concepts
while holding the Shift key, clicking the super concept first and the sub concept second,
then click the "Create Link" button.
Create is-a link
21
*The same operation can be performed from the right-click menu after selecting the
concepts.
(3) Creating slots
・Select a concept (node) and click the [Add Slot] button on the Ontology Editing Tool Bar
to add a slot to the selected concept (node).
An slot is added
*The same operation can be performed from the right-click menu after selecting the
concept (node).
・To change the slot's definition, edit the Label field displayed in the Definition Pane on
the bottom left of the editing panel.
Edit a slot
(When a slot is selected)
Edit the a slot
(When a concept
node is selected)
22
・Editing of the slot's definition can be performed when either the concept node or slot is
selected. The below content can be edited.
- Role concept
- Class constraint
- Role holder
- Class (part-of, attribute-of)
- Quantity constraint (cardinality)
- Constraint value
*In regards to class constraints, the existing concept tree can be displayed, selected
and edited by clicking the [Select Class Constraint] button on the right side of the text
box when an existing concept is selected (text editing is also possible).
(4) Deleting objects
・Objects can be deleted by selecting concept nodes, slots, and relationships and
selecting [Delete] from the right-click menu.
*The same operation can be performed with the [Delete] button on the Menu Bar,
Ontology Operation Tool Bar/Editing Tool Bar.
23
・Multiple objects can be selected then deleted by holding the Shift key while clicking.
24
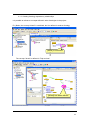
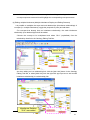
4.1.3. Creating Ontology dependency relationships
It is possible to reference concepts defined in other Ontologies in the project.
Ex.) Below, the concept "wheel" is undefined, but it is defined in another Ontology.
[Wheel] is not defined
The concept "wheel" is defined in "TopLevel.ont".
[Wheel] has been defined
25
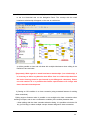
[Operating instructions]
・ Without selecting anything, right-click in the Browsing Pane of the referencing Ontology
(newOntology.ont) to display the right-click menu, and select "Import concept".
・The Import Concept Dialog will be displayed.
Select the Ontology to be referenced from the list, and select the concept to be imported.
26
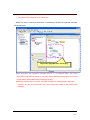
*When a concept is selected to be imported, concepts necessary to that concept will
be selected and imported at the same time.
・When the “Import” button on the bottom of the dialog is clicked, the selected concepts
will be imported.
Imported [dependent concept]
*After importing, the imported concepts will be in a selected state. The node
arrangement will also be moved, so the user should manually rearrange it, or use the
layout feature (select Menu Bar: [Display]-[Layout]).
[Attention] Unlike regular concepts, imported concepts will be displayed in light blue.
However, as they are references only, they cannot be edited in the referencing
Ontology.
27
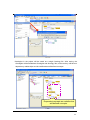
*Importing to the Ontology being edited can also be performed from the right-click menu by
selecting the Ontology to be referenced in the Project Management Tree, and right-clicking
it.
[Operating instructions]
・Open the Ontology that is importing (referencing) a concept in the Editing Panel. (Refer to
chapter 4.1.5)
・Select the Ontology concept to be referenced in the Project Management Tree, bring up
the right-click menu, and select "Import Concept".
・The Import Concept Dialog will be displayed.
Select the Ontology to be referenced from the list, and select the concept to be imported.
*Only the Ontologies to be imported will be displayed in the list.
28
4.1.4. Saving Ontologies
(1) Save
・To save, overwriting the existing file, select [File]-[Save] in the menu bar.
(No confirmation dialog will be displayed)
・When an Ontology file is saved, the icon in the Project Management Tree shows the
local update status (
).
(2) Save as...
・ When [File]-[Save as...] is selected in the menu bar, the file selection dialog is
displayed.
・Enter a filename and click the [Open] button to save to a new Ontology file.
(3) Save without dependency relationships
・Select [File]-[Save without dependency relationships] in the menu bar and click [Yes] on
the confirmation dialog; the file selection dialog is displayed as in (2).
・Enter a filename and click the [Open] button to save to a new Ontology file (file
extension: .xml).
29
*Ontologies in the project will be saved as a single Ontology file. After saving, the
Ontologies will be standalone Ontologies and Ontology files; moreover they will have no
dependency relationships and be redefined as self-defined concepts.
Dependent concepts are redefined as
再定義された依存概念
self-defined concepts.
30
4.1.5. Loading Ontologies
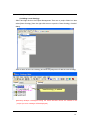
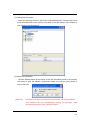
(1) Loading and exiting an Ontology (project)
・Select [File]-[Open] in the menu bar to display the "Open Ontology" dialog.
・ Select the Ontology to be displayed from the project folders on the [Project] tab.
・Click the [Open] button at the bottom of the dialog to open a new editing panel and
display the Ontology.
*The Ontology can be displayed in a separate window by clicking the [Browse] button at
the bottom of the dialog (editing not possible).
*Double click the Ontology file icon in the Project Management Tree, or select [Open]
from the right click menu to perform the same operation.
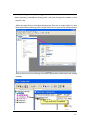
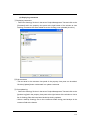
(2) Loading and exiting an Ontology (file)
・Open the "Open Ontology" dialog as in (1).
・Select the [File] tab to view the list displaying the default Ontology folder, and the
existing Ontology files in that folder.
31
・Click the [Open] button at the bottom of the dialog to open a new editing panel and
display the Ontology.
*The Ontology can be displayed in a separate window by clicking the [Browse] button at
the bottom of the dialog (editing not possible).
32
4.1.6. Other features
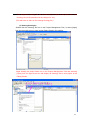
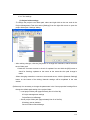
(1) Zoom in/out
・The Browsing Pane magnification can be changed by selecting the magnification rate in
the combo box on the Ontology Operation Tool Bar, or the Editing Tool Bar.
*By clicking the [▲] [▼] buttons on the left side of the magnification list in the Ontology
Operation Tool Bar, the next higher (or lower) magnification can be selected, zooming
in or out on the pane.
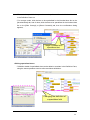
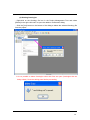
(2) Display concept map
・If the concept map display (Map) tab is selected in the Navigation Pane, a reduced view
of the entire Ontology is shown, with a red frame indicating the area being displayed. If
this frame is dragged, the area drew in the Browsing Pane will move correspondingly.
・Also, when toggling between Wholeness Concepts and Relational Concepts, the
concept map view changes.
33
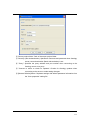
(3) Ontology search
・Displays the Search tab in the Navigation Pane. Enter text for the search criteria and
click the [Search] button; search results will be displayed in a table on the lower part of
the tab.
34
・Selecting a search result column will highlight the corresponding object.
・Objects that can be specified as search objectives are as follows.
① Basic Concept, class
② Role Concept, slot
③ Role Holder
④ Class constraint (Player)
⑤ Value
[Attention] The scope of the search is the open Ontology (being edited) only.
[Reference] See 4.2 on project management features for more regarding searching
Ontologies within a project.
(4) Printing
・Select [File]-[Print Preview...] in the menu bar, or click the [Print Preview...] button in the
Ontology Operation Tool Bar, to open the print preview dialog.
35
・These operations can be performed in the print preview dialog:
- Confirmation of the printed image (use [Next] and [Prev] to navigate pages)
- Set the magnification to be used when printing (Scale)
- Enable/disable display of headers, footers and crop marks
- Set printer paper size ([Settings] button)
・When the [Print] button on the upper part of the print preview dialog is clicked, the print
dialog is displayed, and printing can be performed.
(5) Import
・An Ontology can be created automatically from an existing text file.
・Select [File]-[Import]-[Hierarchical Text] (CSV Text) in the menu bar to open the file
selection dialog.
36
・Select a file and click the [Open] button to import it.
*The below formats are supported
① Hierarchical Text
② CSV Text
③ Hozo Text
④ OWL
Regarding
description
formats,
please
see
the
sample
file
in
"(root
folder)/data3/Import/".
37
(6) Export
・An Ontology file that is being edited can be output to a file with a different format.
・Select [File]-[Export]-[OWL] in the menu bar to open the file output window.
・Click the [Save File] button on the bottom of the output window to display the file
selection dialog; choose a file and click the [Open] button to export the file.
*The below formats are supported
- Text / HTML
- XML-DTD
- DAML+OIL
- RDF(S)
- OWL
38
(7) Ontology editing operations
・Ontology editing operations can be found the menu bar ([Edit] menu), the Ontology
Operations Tool Bar/Editing Tool Bar, and the right click menu of the Browsing Pane.
No
1
2
3
4
5
6
7
Menu item
Undo
Redo
Refresh History
Up slot
Down slot
Input Axiom
Delete
8
Select all
9
Select Child Nodes
10
11
12
13
Cut
Copy
Paste
Tracking back
14
Tracking forward
Description
Performs the Undo operation
Performs the Redo operation
Clears the operation log
Raises slot by one position
Lowers slot by one position
*This item is not used now.
Deletes the selected graphic
object
Selects all graphic objects on the
Browsing Pane
①
●
●
●
●
●
●
●
Selects selected concept's sub
concepts
Cuts the selected graphic object
Copies the selected graphic object
Pastes the selected graphic object
Moves to the previous selected
graphic object
Moves to the next selected
graphic object
●
②
●
●
●
③
④
●
●
●
●
●
●
●
●
●
●
●
●
●
●
●
●
●
●
●
●
●
●
Note) ①: Item located in Menu Bar
②: Item located in Ontology Operation Tool Bar
③: Item located in Ontology Editing Tool Bar
④: Item located in Browsing Pane right click menu
39
(8) Ontology selection operations
① Move to defined concept
・When the graphic object of a constrained concept is clicked on the Browsing Pane,
its defining concept class is selected.
制約概念「人間」をマウスク
リックすると定義元の概念ク
ラスが選択状態に
40
② Selection tracking
・This tool tracks (records) selection of graphic objects with respect to jump functions
such as ①, and screen scrolling during editing.
・To move to the previous selected graphic object, use the selection tracking menu
located in the Menu Bar, Operation Tool Bar or Editing Bar.
③ Scrolling the screen with the mouse
・Scrolling the screen with the mousewheel
The mousewheel scrolls the screen up and down.
To scroll left and right with the mousewheel, hold the Ctrl key.
・Scrolling the screen by dragging the mouse
Press the [Scrolling Mode] button in the Operations Tool Bar; the mouse pointer will
become a hand, and it will be possible to scroll the screen by dragging the mouse.
Press the [Selection Mode] button to return the mouse pointer to normal; it will now
be possible to select objects.
Press the [Scrolling
Mode] button
The mouse pointer will
become a hand
41
(9) Ontology view
① Vertical/Horizontal layout
・Select a concept.
・Select [View]-[Layout]-[Vertical Layout] (or Horizontal Layout) in the Menu Bar to
arrange the sub concepts of the selected concept in a pyramid. (The below figure
shows the concept "artifact" after being arranged)
② Automatic layout
・Select [View]-[Layout]-[Automatic Layout] to switch to automatic layout mode.
・When automatic layout mode is ON, the root concept and its sub concepts are
arranged evenly in the drawing area of the Browsing Pane from upper left to lower
right.
・When automatic layout mode is switched from ON to OFF, the below confirmation
dialog appears and the user can select whether or not to keep the layout.
*When automatic layout mode is enabled, the canvas size is also set automatically.
42
③ Canvas size setting
・Change the canvas size setting to alter the drawing size of the Browsing Pane when
the Ontology grows too large.
・Select [View]-[Canvas Size Setting] from the Menu Bar to open the canvas size
setting dialog; the canvas size setting can now be changed.
43
(10) Toggling windows
① Toggling windows (Editing Panel)
・Toggling windows is performed by selecting the Window Menu under [Window] in the
Menu Bar, or with the tab in the upper part of the Editing Panel.
Tab switching
Windows menu switching
② Language settings
・The language specified for displaying the menus can be changed by selecting
[Window]-[Language...] in the Menu Bar and setting the language submenu.
*At installation, only "English" and "Japanese" are available.
44
(11) Navigation support
・There are features that support navigation on the Browsing Pane for cases in which the
user wants to move to a part that cannot be displayed there, for example when
structuring large scale Ontologies.
① Highlight display
・Highlights concepts that are in an is-a relationship (general-special relationship).
When concept nodes and slots are selected, the super concept (is-a link) is
highlighted in yellow-green, and the sub concept is highlighted in light blue.
② Jumping to super concepts
・When a concept node is selected and [Jump to Super] is chosen from the right click
menu, the screen will move to the position of the super concept node, and it will be
selected.
Selected state has
moved to Super concept.
45
・When a slot is selected, the user can jump to the super slot by using the same
operation as above.
Selected state has
moved to Super slot.
③ Jumping to sub concepts
・When a concept node is selected and [Jump to Sub] is chosen from the right click
menu, a dialog with a list of destination sub concepts will appear.
・When a destination is selected from the sub concept list and the [OK] button is
clicked, the screen will move to the position of the sub concept node, and it will be
selected.
・When a slot is selected, the user can jump to a sub slot by using the same operation
as above.
Selected state has
moved to Sub concept.
46
④ Move to reference concept
・It is possible to jump to role concepts (reference concepts) that are referencing as
class constraints.
・When a concept node is selected and [Jump to Reference] is chosen from the
right-click menu, a dialog with a list of reference concepts (reference slots) will
appear.
・When a destination is selected from the reference concept list and the [OK] button is
clicked, the screen will move to the position of the selected concept node, and it will
be selected.
・When a slot is selected, the user can jump to the reference slot by using the same
operation as above.
*Class referenced as Role Holder
Referenced "role concept"
to moved.
⑤ Display in separate window
・ Various concept nodes can be displayed simultaneously in separate windows,
allowing the user to simultaneously view and edit concept nodes that are in different
locations.
・Select the concept node and choose [Display in Separate Window...] from the right
click menu to display the selected concept class in a separate window.
47
・In the separate window display, inherited slots, other than slot information defined by
the selected concept class, can be displayed.
・Check the [Display Inherited Slots] box in the bottom part of the separate window
display dialog to display all slots, including inherited slots.
Inherited slots
can be displayed.
Jump to the
selected slot in the
main window
・Concept nodes and slot selection operations can be performed in the separate window
display dialog, just as in the Browsing Pane.
・In order to confirm the selection status on the Browsing Pane, click the [Jump] button to
move the screen to the position of the selected concept node (slot).
48
(12) Setting bookmarks
・This feature saves, in the form of a marker, a bookmark in the concept or slot being
edited to aid in structuring large scale Ontologies.
① Setting bookmarks
・A bookmark can be added to an object by selecting the concept node or slot, and
choosing [Bookmark] from the right click menu.
Bookmark is added.
・Bookmarks are set when the Ontology file is saved. They reappear when the file is
loaded.
② Jumping to bookmarks
・Make sure that no objects, such as concept nodes and slots, are selected, and select
[Jump to Bookmark] from the Browsing Pane right click menu to open the bookmark
selection dialog.
・Select the desired bookmark from the list and click the [OK] button to move to the
object assigned to the bookmark; the object will also be selected.
49
Moving to the object
assigned to the bookmark
③ Removing bookmarks
・Select a bookmarked concept node or slot, and choose [Remove Bookmark] from the
right click menu to remove the bookmark from the object.
・It is possible to remove all bookmarks from the Browsing Pane; make sure that no
objects, such as concept nodes and slots, are selected, and select [Remove all
Bookmarks] from the Browsing Pane right click menu.
50
(13) Ontology editing support
・Here, aside from selective editing of class constraints when editing slots (4.1.2(3)), we
will provide a guide to editing by the user as per the Ontology's rules when defining
concepts and slots.
① Edit cardinality (quantity constraint)
・Cardinality (quantity constraint) input can be performed by directly entering a value
into the quantity constraint text field in the Definition Pane, but there are input support
features to ensure editing as per the Ontology's rules.
・Move the mouse pointer to the quantity constraint text field in the Definition Pane,
and double click over the input field to open the cardinality (quantity constraint) editing
input support dialog.
・Set the "Maximum Quantity" and "Minimum Quantity" and click the [OK] button to
update the value of the quantity constraint text field in the Definition Pane.
*If no quantity is specified, the value will be blank.
The cardinality (quantity
constraint) editing input
support dialog is shown.
double click
② Specializing slots
・If two concepts are in an is-a relationship (general-special relationship) property
information (slot information) will be imported from the super concept and used to
refine the definition (i.e. slot inheritance and specialization) .
<Display information on slots inherited from super concepts>
・Information on inherited slots can be viewed by selecting a super concept from the
51
[Super Concept] list in the Definition Pane. Inherited slots will be displayed on the
[Inherited Slots] tab.
Information on slots
inherited from “Vehicle”
are displayed.
<Specialization of slots inherited from super concepts>
・Specialization of slot information inherited from super concepts that are in an is-a
relationship within a sub concept can be performed by selecting the [Specialize] slot
category of the toolbar, and clicking the [Add Slot] button to open a selection dialog
displaying a list of importable slots.
・Click the slot to be specialized in the list on the dialog to import both the slot
information and inheritance information to the sub concept.
*The [Imported Concepts/Slots List] dialog can also be displayed by selecting a
mouse-right-clicking-menu.
selecting
[Specialize]
“target” is added as a
specialized slot.
52
・The same slot specialization operation can be performed from the inherited slot view
in the Definition Pane too.
・For concept nodes, click the item to be specialized in the inherited slots list on the
[Inherited Slots] tab; and for slots, click the item to be specialized in the inherited slots
list on the [Role Concept] or [Class Constraint] tab, then the confirmation dialog
appears, .
“target” is added as a
specialized slot.
<Editing specialized slots>
・Definition details of specialized slots can be edited or rewritten in the Definition Pane,
using the same operations used to edit normal slots definitions.
Changing the definition of
a specialized slot
53
<Editing slot inheritance information>
・To import slot inheritance information only, select a slot, and choose [Select Super
Slot] from the right click menu to open the [Super Slot Candidate List] selection dialog.
Select a candidate from the list and click the [OK] button to change just the inheritance
information.
Inherited information is
changed
<Deleting slot inheritance information>
・ To delete slot inheritance information, select a slot, and choose [Delete Slot
Inheritance Information] from the right click menu to delete inheritance information.
Inheritance information of
slot is Deleted
54
4.1.7. Using the Ontology Editor's extended features
(1) Search for similar concepts (Analogous Concept Search Feature)
When importing large amounts of data, the Analogous Concept Search Feature assists
with conceptualization by comparing concepts with similar properties (i.e. slot structures),
and generalizing those similar concepts.
① Searching for analogous concepts
・Select the node of the concept class to search for, right click to open the pop-up
menu, and choose [Analogous Concept Search] to open the analogous concept
search dialog.
② Display Analogous Concepts
・Clicking an item in the Analogous Concept Search dialog list will select the chosen
node from the list.
・Double click the selected node to open a separate window displaying all inherited
slots and confirm matching slot details.
55
View details in
another window
Selected
analogous
concept
③ Editing analogous concepts
・Editing operations can be performed on the analogous concepts returned as search
results.
・Select an item on the Analogous Concept Search dialog list, and click the [Editing
Assistance] button on the bottom of the dialog to open the Editing Assistance dialog.
・Editing operations can be performed easily on analogous concepts by selecting a
candidate displayed in the editing dialog, and clicking the [Edit] button.
56
(2) Edit alias (Alias Management Features)
In some cases, users want to define a separate name (i.e. label) when defining a
concept. In such cases, multiple labels can be defined for one concept.
① Alias Editing Feature
This feature allows multiple labels to be defined and edited for one concept.
・Select the concept node or slot, and choose [Edit Alias] from the right click menu to
open the alias editing dialog.
・Click the [New] button and edit the alias in the alias editing dialog, then click the
[New] button to add the alias.
*To selectively view by term class, see "② Alias Management Features".
Alias is added
57
・ Aliases
can
be
displayed
in
the
Browsing
Pane
by
selecting
[Alias
Management]-[Display Alias] in the Menu Bar.
Alias is displayed
・Aliases can be displayed as concept labels by toggling alias classes in the Menu Bar,
[Alias Management]-[Select Alias Display].
Alias is displayed as
Concept label
58
② Alias Management Features
Labels can be grouped by term class.
・Select [Alias Management]-[Manage Term Class] in the Menu Bar to open the term
class management dialog.
・Click the [New] button and perform editing in the term class editing dialog, then
click the [New] button to add the term class.
Glossary is added
*Will not be displayed unless the "Display alias of this term class" box is checked.
59
(3)
Labeling
component
structures
(Concept
Component
Structure
Management Features)
Optional labels can be assigned to specific component structures within concept
definitions.
・Select any slot in the concept class.
・Select [Register Component Structure] in the right click menu to open the concept
component structure management dialog.
・Click the [New] button to display the concept component structure management
dialog.
・Enter the necessary items, and click the [Register New] button to register the concept
component structure.
60
・In the concept component structure registration dialog, selecting an item in the
concept component structure list will highlight the corresponding concept structure.
(4) Editing multiple inheritance (Multiple Inheritance Display and Editing Features)
It is possible to multiplex the super and sub relationships (inheritance relationships) of
concepts (i.e. multiple inheritance), toggle the perspective (view) and edit them.
・For concepts that already have an inheritance relationship, the weak inheritance
relationship (is-a relationship) link will be edited.
・ Choose the concept to be multiplexed and select "IS-A" (capitalized) from the
relationship class list in the Ontology Editing Tool Bar.
Selects “IS-A”
・As when editing an is-a relationship link, click the [Add Link] button in the Ontology
Editing Tool Bar, or select [Add Link] from the right-click pop-up menu to add a weak
inheritance relationship (is-a relationship) link.
Inheritance Relation
“IS-A” was added
61
・When a weak inheritance relationship (is-a relationship) link is added, it will be added
to the is-a hierarchal tree on the Navigation Pane. The concept with the weak
inheritance relationship will appear on the tree as a white icon.
・It will be possible to view and edit slots with multiple inheritance when editing in the
Definition Pane and slots.
*[Important]: With regards to weak inheritance relationships (is-a relationship), it
is necessary to define any behavior that differs from is-a relationships based on
the basic Ontology theories put forward by the Mizoguchi Laboratory. Please
use with caution as it is possible that feature specifications will change with
future theoretical development.
5) Setting an OR condition in a class constraint (using extended features for editing
class constraints)
Editing support features make it possible to set multiple slot class constraints when
defining concepts, and to use a combination condition (OR condition) between them.
・When editing with the class constraint selection dialog, it is possible to hold the Ctrl
key (or Shift key) to select multiple concept classes assigned to class constraints.
62
Selecting more than one
concept as a class constraint.
・Click the [Select] button on the bottom of the dialog after making selections to set a
class constraint OR condition.
OR conditions of
Class constraint is
setted.
*It is also possible to edit the text in the Definition Pane ("|": delimiter character).
*Role Holders and Datatypes can also be specified as OR conditions.
63
6) Setting a p-operator in a class constraint (p-operator Editing Feature)
*The "p-operator" is an expanded setting for slot class constraints. By setting a
p-operator for a given concept within a class constraint, the concept (class) to
which it was set, or that instance of a component concept, can be retrieved as
that slot's value.
・When editing with the class constraint selection dialog, select the concept class node,
then toggle the selection display by choosing [Assign as p-operator] in the right click
menu.
Setting a poperator in a
class constraint
・The tree icon assigned as a p-operator will turn green, and it will become possible to
specify p-operators. Click the [OK] button on the bottom of the dialog to set the
p-operator as a class constraint.
*It is also possible to edit the text in the Definition Pane (add the prefix "p-"). If the
corresponding concept class is undefined, it will be displayed in light green in the
Browsing Pane.
64
・Details of component concepts will be displayed underneath concepts assigned
p-operators in the p-operator assignment view. If a component concept is selected and
set, it will be set as a class constraint.
65
(7) Validating Ontologies (Ontology Consistency Check Feature)
・The Ontology Consistency Check feature utilizes the Hozo inference structure to verify
whether or not the Ontology being edited is structured according to the rules.
・Details of the Ontology consistency check are as follows.
-Duplicate labels (Basic Concept, Role Holder)
-Cardinality (quantity constraint) format
-Cardinality (quantity constraint) consistency check
-Slot inheritance consistency check
-Inheritance from super slot
-Inheritance from class constraint
-Class constraint consistency check
-Presence/absence of class constraint concept
-Check consistency between super slot and class constraint concept etc.
① Checking Ontology consistency
・Select [Edit (E)]-[Consistency Check] from the Menu Bar to validate the Ontology being
edited; after validation the results will be displayed in a list.
*The same operation can be performed by making sure no object is selected, then
choosing "Consistency Check" in the right-click menu.
66
*Explanation of the "Ontology Consistency Check Results List" dialog
[Check Again] button: Check Ontology consistency again.
[Close] button: Close dialog screen.
[Editing Support] button: Perform editing operations on error items (explained
later).
② Correcting errors
・Hozo provides the features support editing in order to remove errors.
・Chose an error item on the Ontology consistency check results list and click the
[Editing Support] button to open a dialog that provides editing support according to
each error contents. Editing support for each error is explained below.
<Case-1>Duplicate Label Error
・Clicking the [Editing Support] button for a duplicate label error will open the label
editing support dialog.
67
・Follow the editing support dialog directions to edit duplicate labels.
[Update] button: Updates the label.
[Change Object] button: Changes the object whose label is being edited.
[Cancel] button: Closes the dialog without performing any editing operations.
<Case-2> Cardinality (quantity constraint) Error
・Clicking the [Editing Support] button for a cardinality (quantity constraint) error will
open the cardinality editing support dialog.
68
・Follow the editing support dialog directions to edit cardinality definitions in super slots
and specialized slots.
[Update] button: Updates cardinality definitions.
[Cancel] button: Closes the dialog without performing any editing operations.
*Double clicking on super slot settings and specialized slot role list items will open
the cardinality editing dialog, allowing editing operations to be performed.
Double click
Double click
69
<Case-3> Slot Class Constraint Error
・Clicking the [Editing Support] button for a slot class constraint error will open the class
constraint editing support dialog.
・Follow the editing support dialog directions to perform class constraint creation and
selective editing operations.
[Perform Edit] button: Implements class constraint editing operations.
[Edit Label] button: the concept label can be edited.
[Cancel] button: Closes the dialog without performing any editing operations.
70
(8) Performing searches using slot information (Advanced Concept Search
Feature)
・Searches using slot information (role concept, class constraint) can be performed with
the Advanced Concept Search Feature.
① Assigning search conditions
・When assigning conditions from an existing concept structure, select the slot to be
used as the search condition, and chose [Advanced Concept Search] from the
right-click menu.
・When assigning arbitrary search conditions, select [Edit (E)]-[Advanced Concept
Search] from the main menu.
71
② Editing search conditions
・Performing menu selection will open the Advanced Concept Search dialog.
・Edit slot information.
-Search Conditions: Puts constraints on output concepts.
-Slot Condition Field: Input slot information to use as a search condition.
*It is possible to add/remove slot conditions.
*If this field is left blank, the search condition will be all values (arbitrary).
③ Performing advanced searches
・After assigning search conditions, click the [Perform Search] button on the bottom of
the dialog to perform the advanced search; the view will toggle to the [Search Results]
tab to display search results.
72
④ Viewing search results
・Search results are displayed in order by relevance.
Note) Concepts annotated with a (*) are dependent concepts of the
Specified slots.
・When an item on the search results list is selected, the corresponding concept node
(or slot, if a Role Holder) will be selected. Slots matching the search conditions will
also be selected.
(9) Editing Instances (Simple Instance Editing Feature)
Instances required for Ontology structuring, such as instances used as constraint values
within Ontology definitions, can be created with the Ontology Editor.
① Creating an Instance
・Select the concept node or slot, and choose [Create Instance] from the right click
menu to open the editor (in the Browsing Pane) and create an instance node.
・It is not possible, however, to create sub nodes of an instance, or create instances
without a super concept node.
An instance is added.
73
② Viewing and editing instances
・Instance nodes can be viewed/edited just as concept nodes.
An instance shown on
the is-a tree
Editing the definition of
instance on definition pane
74
③ Instantiating an existing concept
・It is possible to instantiate an existing concept node.
・Select the concept node, and choose [Instantiate] from the right click menu to change
the concept node into an instance node.
・However, instantiation can only be performed when the node has no sub concepts.
The concept node “Asia”
is changed into an
instance node.
*The same operation can be used to change from an instance to a concept node.
75
4.2. Managing projects
The Project Management Features allow an Ontology to be divided into multiple
component Ontologies to facilitate the structuring of large scale Ontologies and
collaborative work by multiple developers.
4.2.1. Viewing project management
・If the "Use project management features" box is checked in the Initial Setup Dialog, the
Project Management Pane will be displayed on the left side of the screen when the
Ontology Editor is started. Most project management operations can be performed in
the Project Management Pane.
Project management pane
・Clicking the [Project View] button in the Ontology Operations Toolbar toggles the
Project Management Pane view.
[Project View] button
76
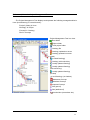
(Reference) About the Project Management Tree view
・The Project Management Tree displays and operates the following managed entities in
Hozo (local directory) in a tree hierarchy:
"Project" (folder) in Hozo
"Ontology" in Project
"Concept" in Ontology
"Slot" in Concept
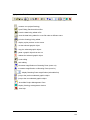
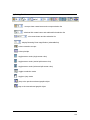
・Project Management Tree icon view
:Root folder
:Project folder
:Local project folder
:Ontology file
:Ontology updated on server
:Ontology updated on server
(Locked)
:(Locked Ontology)
:Ontology with unlock key
:Locally updated Ontology
:Locally updated Ontology
(with unlock key)
:Locally updated Ontology
(Locked)
:Local Ontology (no shadow)
:Wholeness Concept
:Relational Concept
:Imported Concept
:Slot (part-of)
:Slot (attribute-of)
:Inherited slot (overwritten slot)
77
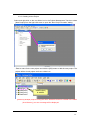
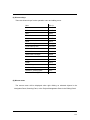
4.2.2. Creating a New Project
Select and right-click on the root folder icon in the Project Management Tree then select
[New Project] from the right-click menu to open the "New Project Creation" dialog.
・Enter a name for the new project and click the [OK] button to add the new project. The
project will be a local project and have a blue icon.
「newProject」
is added.
[Attention] Multiple projects having the same filename cannot be created in the editor
(local directory); an error message will be displayed.
78
4.2.3. Operating the Project
(1) Adding a new Ontology
・Select and right-click on the Project Management Tree root or project folder icon then
select [New Ontology] from the right-click menu to open the "New Ontology Creation"
dialog.
・Enter a name for the new Ontology and click the [OK] button to add the new Ontology.
「newOntology」 is added.
[Attention] Multiple Ontologies having the same filename cannot be created in the
project (an error message will be displayed).
79
(2) Adding an existing Ontology
*Allows importing of standalone Ontology files (.xml) and Ontology files created in other
projects (.ont).
・Select and right-click on the Project Management Tree root or project folder icon then
select [Add Existing Ontology] from the right-click menu to open the file selection dialog.
・Enter a name for the new Ontology and click the [OK] button to add (import) the existing
Ontology.
「TopLevel.ont」 is added.
80
* The designated Ontology file will automatically be copied to the project as a new
Ontology file (its file extension will be changed to .ont).
(This will have no effect on the existing Ontology file.)
(3) Viewing Ontologies
・Double click the Ontology file icon in the Project Management Tree, or select [Open]
from the right-click menu to open a new Editing Panel in the window.
*Right clicking the project folder icon in the Project Management Tree and selecting
[Open] from the right-click menu will display all Ontology files in that project in the
Editing Panels.
81
(4) Deleting Ontologies
・ Right-click on the Ontology file icon in the Project Management Tree and select
[Delete] in the right-click menu to open the deletion confirmation dialog.
・ Click the [Yes] button on the bottom of the dialog to delete the selected Ontology file
from the project.
*It is not possible to delete Ontologies when their files are open (Ontologies that are
being edited). Close the editing panel before proceeding.
82
(5) Deleting projects
・ Right-click on the project folder icon in the Project Management Tree and select
[Delete] in the right-click menu to open the deletion confirmation dialog.
・ Click the [Yes] button on the bottom of the dialog to delete the project folder.
*It is not possible to delete projects that have open Ontology files (Ontologies that are
being edited). Close the editing panel before proceeding.
*When a project is deleted, the Ontologies in that project are also deleted.
83
4.2.4. Other Features
(1) Viewing properties
・ Right-click on the Ontology file icon in the Project Management Tree and select
[Properties] in the right-click menu to open the properties dialog.
84
(Reference) Items shown in the Ontology properties dialog
① "Properties" tab
・Ontology name: the Ontology's name (i.e. filename)
・Ontology path: path of the Ontology file
・Project name: name of the affiliated project
・Last updated by: name of last user to update the Ontology file
・Last update date: date when the Ontology file was last updated
・Explanation: Explanation of Ontology files
・Concept class number: number of concepts stored in the Ontology file
・Server Ontology name: name of Ontology on the server
・Server Ontology path: path of the Ontology file on the server
・Server update: indicates whether the Ontology file on the server is updating
・Locked: indicates whether the Ontology file on the server is locked
・With key: indicates whether or not the unlock key is possessed
② "Dependency Relationship" tab
・Depended Ontology: list of depending (referencing) Ontologies
・Referenced Ontology: list of Ontologies being depended (referenced)
③ "History" tab
・Backup Ontology: list of Ontologies backed up during updates
[Delete] button: delete backup files selected from list
[Replace] button: replace selected file with latest Ontology file
[Browse] button: display selected file's Ontology in a separate window
85
(2) Updating the Project Management Tree
*Project Management Features are applicable to saved Ontology files To apply updates
made to Ontologies it is necessary to update the Project Management Tree.
・ Right-click on the root folder (project folder) icon in the Project Management Tree and
select [Update with Latest Information] to update the Project Management Tree.
*Checks whether the server-side Ontology files are up to date when updating the
Project Management Tree.
It is possible to confirm whether or not the server-side Ontology files are up to date
by clicking the [Yes] button on the above screen.
86
(3) Searching within a project
*Searching Ontologies within a project is performed using the Project Search Feature
found in the "Search" tab of the Project Management Pane.
・Select "Search" tab of the Project Management Pane on the left side of the screen to
open the "Project Search Panel".
*If the "Project Search Panel" is opened while editing an Ontology, the scope of the
search will be that Ontology file.
87
・Assign search conditions in the upper part of the "Project Search Panel" and click the
[Search] button to display search results in a table.
*Items specified in search conditions
① Search text
・Search text: enter a character string to search
・[Search] button: performs search
・[Reset] button: clears search conditions and results
② Search scope
・Project list: designate projects to search
・Ontology list: designate Ontologies to search
*Note) No Ontology list will be displayed if no project is designated
③ Search target: if checked, will be targeted by the search
・Basic Concept (class)
・Role Concept (slot)
・Role Holder
・Class Constraint
・Constraint Value
・Relationship
88
・Select and double click an item on the search result table on the bottom of the panel to
select the corresponding Ontology object.
[Attention] There may be discrepancies when searching Ontologies that are
currently being edited because the project search feature searches the
saved Ontologies. Before searching, always save the file being edited, and
update the Project Management Tree. When searching within Ontologies
that are currently open (being edited), use the search feature in the
Navigation Pane.
*Explanation of search table view
・No: item number
・Label: Ontology or slot label
・Class: shows Ontology class
-"WC": Wholeness Concept
-"C": other concepts
-"RC": Relational Concept
-"R": Other Relationships
-"SL": slot (role concept)
-"(concept)+ 's'": species concept
-"RH": Role Holder
-"'ref.'
+
(concept)":
reference
concept (imported concept)
-"RR": Relational Concept relationship
・Ontology: shows affiliated Ontologies
・Reference: shows path of concept hierarchy within Ontology
・(Status Bar): shows number of search results
*Click the header of the search results table to sort that header's column by ascending
(or reverse) order.
89
4.3. Sharing Ontologies (distributed management)
In order to share Ontologies among multiple users, it is necessary to upload the locally
created Ontology file. Furthermore, features are necessary to restrict (lock) changes to
the uploaded file during editing, and to check the update information of other Ontology
files. The below features will be explained in this chapter.
・Uploading Ontologies (4.3.1)
・Downloading Ontologies (4.3.2)
・Locking Ontologies (4.3.3)
・Checking Ontologies for updates (4.3.4)
・Managing server projects (4.3.5)
Local Project
Server Project
Locked
Download
Read
Save
Upload
Check update
Ontology Server (OS)
Update
Ontology Editor (OE)
4.3.1. Uploading Ontologies
*In order to share Ontologies among multiple users, it is necessary to upload the locally
created Ontology file to the Ontology server so that other users can reference it.
(1) Uploading local projects
・Right-click on the Project Management Tree project folder or Ontology file icon, and
select [Upload to server (check in)] to open the Check-in Dialog in the center of the
screen.
* If the corresponding project does not exist on the server, the project will be added
(appended) on the server. If the project (or Ontology) already exists on the server, an
update will be performed.
90
・Confirm the content to be uploaded, and click the [OK] button to upload the project
folder (Ontology file) to the server; a confirmation message will be displayed.
*Standalone Ontology files are uploaded using the right-click menu of the Ontology file
icon.
91
*Explanation of the Check-in Dialog
①
②
③
④
① Project task/table (center of screen):
・Displays list of items to be handled during check-in. If the check box at the head of
the list is unchecked, it will be excluded from the target and will not be uploaded.
・ When handling is not possible, for example the existing project file is locked
(unchangeable) etc., the list color will change and it will automatically be excluded
from handling.
・Handling details
"append": adds folders or files.
"update": updates folders or files.
"delete": deletes folders or files.
② Ontology lock (check box):
・If checked, Ontology will be locked on update (server updates not possible).
・If unchecked, Ontology will be unlocked on update (server updates possible).
③ Check all (check box):
・If checked, all items on the task list will be checked.
・If unchecked, all items on the task list will be unchecked.
④ Comment (text field);
・Adds comments to the update file.
92
(2) Update server project
*Performs check-in, as in (1), to update an updated project or Ontology to the server
project (Ontology).
As in (1), right-click on the updated project's (Ontology's) Project Management Tree
project folder or Ontology file icon, and select [Upload to server (check in)] to open the
Check in Dialog in the center of the screen.
93
4.3.2. Downloading Ontology
*Downloads a server-side project (Ontology) previously uploaded to the Ontology server
in order to import it into a local project.
*This operation is used when collaborating with other users over a LAN. When
using this feature, please use an installation of Hozo that is in a different location
(PC) from the one used to upload the project.
(1) Downloading Server Projects
・ Right-click on the Root folder icon in the Project Management Tree and select
[Download Server Project] to open the server project selection dialog.
・Select the project file to be downloaded and click the [OK] button on the bottom of the
dialog to bring up the project import confirmation dialog.
・Confirm the content to be downloaded, and click the [OK] button to download the
project folder (Ontology file) from the server. A confirmation message will be displayed.
94
・Refresh the Project Management Tree to display the downloaded project and enable
local browsing/editing.
The server project
“newProject” is downloaded
95
(2) Update local project (check-out)
*Check-out a server-side project (Ontology) in order to update a previously imported local
project (Ontology).
・When an Ontology is updated on the server-side, the Ontology file icon indicates that it
was updated.
“bicycle.ont” is updated on the
server side.
・Right-click on the Ontology file (project folder) icon in the Project Management Tree and
select [Download Server Project] to open the server project selection dialog.
96
・Confirm the content to be downloaded, and click the [OK] button to download the
project folder (Ontology file) from the server to local; a confirmation message will be
displayed.
・ Refresh the Project Management Tree to display the downloaded and updated
Ontology and enable local browsing/editing.
The icon of “bicycle.ont”
is updated.
*Project Management Tree updates occur when downloads/uploads, locking and Hozo
startup occur. If the icon display is not updated, update the Project Management Tree
from the right-click menu of root folder.
97
4.3.3. Locking Ontologies
*Restricts (locks) uploaded Ontology files from updating on the server during local editing
of the Ontology, etc. .
(1) Locking Ontologies
・Right-click on the project folder or Ontology file icon in the Project Management Tree,
and select [Lock] to open the lock confirmation dialog in the middle of the screen.
Check ontology to be locked
and select [OK]
・Confirm the Ontology to be locked, and click the [OK] button to lock the Ontology file; a
confirmation message will be displayed.
98
・Refresh the Project Management Tree to display the locked Ontology and prevent other
users from updating the Ontology on the server.
Locked ontology which the
user can remove the lock.
*In the above situation, other users' editors will display an icon indicating that the lock
cannot be removed, as shown below.
Locked ontology which the
user can not remove the lock.
(ontology locked by others)
*Check the "Lock Ontology" check box when downloading an Ontology to lock it at the
same time it is downloaded.
99
(2) Unlocking Ontologies
・Right-click on the project folder or Ontology file icon in the Project Management Tree,
and select [Unlock] to open the unlock confirmation dialog in the middle of the screen.
Select ontology to be unlocked
and press [OK]
・Confirm the Ontology to be unlocked, and click the [OK] button to unlock the Ontology
file; a confirmation message will be displayed.
[Attention] Unlocking cannot be performed if the unlock key is incorrect.
*In order to view lock information or deliberately remove a lock, it is necessary to use
the Ontology Management Tools (see "4.3.5. (5) Displaying lock information").
100
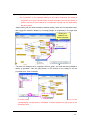
4.3.4. Checking Ontology changes
*Checks changed items by checking against Ontologies that are in dependency relations
and comparing with previous versions of Ontologies with respect to the updated
Ontologies.
(1) Checking changes in depended Ontologies
・Open the Ontology in the Editing Panel.
・Right-click on the Ontology file icon in the Project Management Tree and select [Check
for Changes in Depended Ontologies] in the right-click menu to open the update
confirmation dialog in the center of the screen.
・Click the [OK] button after confirming the updated contents to display a changes
checklist dialog and view an Ontology change log in the Editing Panel.
*Select the "Check by ID" option on the bottom of the update confirmation dialog to
compare changes in each object by ID. Or, select "Check by LABEL" to compare
changes in each object by name (Label).
101
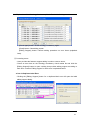
・Selecting an item on the changes checklist will select and highlight the changed items.
Right click a changed object to open the "Accept this change", "Refuse this change"
menu, allowing actions to be selected for each change.
102
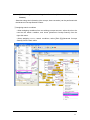
(2) Checking changes with Ontologies on the server
・Open the Ontology in the Editing Panel.
・Right-click on the Ontology file icon in the Project Management Tree and select [Check
for Changes in Ontologies on the Server] in the right-click menu to open the server
Ontology selection dialog in the center of the screen.
・Select the server-side Ontology that will be compared for changes and click [OK] button
to open the check method confirmation dialog; the changes checklist dialog will be
displayed as in (1) and a change log will be displayed in the Editing Panel.
[Note] If there is a "*" in front of the title, it is the latest version on the server.
103
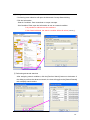
(3) Checking for changes in any Ontology
*Aside from Ontologies managed by the project, standalone Ontologies can also be
checked for changes.
・Put any Ontology in edit mode.
・From the menu bar, select [Diff.]-[Check for differences with any file...].
・Select the Ontology file that will be the comparison target in the file selection dialog.
・Select a file in the file selection dialog and click [Open] to open the options dialog.
Choose comparison options, and click the [OK] button.
・A list of changes will be displayed in the dialog.
・Changed items are indicated by changed icons on the Browsing Pane allowing changes
to be confirmed visually.
・Selecting an item on the changes list will highlight the changed area.
104
(4) Clearing the differential view
・Select [Clear Change Log] in the right-click menu on the Browsing Pane of the Editing
Panel to close the change log view and return to the normal Ontology view.
105
4.3.5. Server Ontology management features
*Ontology management features, utilizing the Ontology management window, for server
administrators will be explained here.
(1) Viewing Ontology management
・Click the [Ontology Management] button in the Ontology Operation Tool Bar to view the
confirmation message.
Ontology
Management button
・Click the [Yes] button in the below confirmation message dialog to open the Ontology
management window. Click the [No] button to return to the original editing window
without viewing Ontology management.
106
*In addition to the local project management features described in 4.2, the Ontology
management window can perform the following operations.
・Changing usernames
→(2)
・Creating server projects
→(3)
・Creating server Ontologies
→(4)
・Viewing lock information
→(5)
・Viewing comments
→(6)
*When opening the Ontology management window, it may take several minutes for the
window to display depending on network conditions. If it takes longer than a few minutes,
check the network settings (4.3.6(2)) and try to reopen the window.
107
(2) Changing usernames
*Allows changing of the username entered the first time Hozo was run.
・Right click the local Project Management Tree and select [Change Username] to open
the Change Username dialog.
・Click the [Yes] button after changing the username.
108
(3) Creating server projects
① Creating a new server project
・Right-click on the server Project Management Tree then select [New]-[Project] from
the right-click menu to open the "New Project Creation" dialog.
・Enter a name for the new project and click the [OK] button to add the new project to
the server.
「newServerProject」 is
added
② Deleting server projects
・ Right-click on the project folder icon in the server Project Management Tree and
select [Delete] in the right-click menu to open the deletion confirmation dialog. Click
the [Yes] button to delete the project from the server.
109
(4) Creating server Ontologies
① Creating a new server Ontology
・ Right-click on the server Project Management Tree project folder, then select
[New]-[Ontology] from the right-click menu to open the "New Ontology Creation"
dialog.
・Enter a name for the new Ontology and click the [OK] button to add the new Ontology
to the server project.
「newServerOntology.ont」
is added
② Deleting a server Ontology
・ Right-click on the Ontology file in the server Project Management Tree and select
[Delete] in the right-click menu to open the deletion confirmation dialog. Click the
110
[Yes] button to delete the Ontology from the server project.
③ Importing a server Ontology
・ Right-click on the server Project Management Tree project folder then select
[Import]-[Ontology] from the right-click menu to open the file selection dialog.
・Select an Ontology file to import and click the [Open] button to import it into the server
project.
「TopLevel.ont」
is added to the project
111
(5) Viewing lock information
① Viewing lock information
・ Select the Ontology file icon in the server Project Management Tree and click on the
[Lock Information] tab in the property view pane on the right bottom of the window to
view Ontology lock information.
② Delete lock information
・ Click the [Delete] button at the bottom of the lock information panel in the property
view pane to open the deletion confirmation dialog and click the [Yes] button to
remove the lock.
[Attention]
This feature will force lock removal, but this action will cause problems
when multiple users are collaboratively working on Ontologies. Take
necessary precautions when using this feature.
112
(6) Displaying comments
① Displaying comments
・ Select the Ontology file icon in the server Project Management Tree and click on the
[Comment] tab in the property view pane at the right bottom of the window to view
Ontology comments that were added when the Ontology was uploaded (check-in).
② Edit comments
・The text area in the comment view panel of the property view pane can be edited.
Click the [Update] button underneath it to update comments.
③ View update log
・ Select the Ontology file icon in the server Project Management Tree and click on the
[Update Log] tab in the property view pane at the right bottom of the window to view a
list of Ontology files that have been backed up during updates.
・Select a backup Ontology file to view comments made during past backups in the
comment field at the bottom.
113
*Click the [View All Comments] button underneath comment view panel of the property
view pane to view a list of past comments; comments can be updated.
114
4.3.6. Tool settings
(1) Project folder settings
・To change the project's root folder path, select and right-click on the root node in the
Project Management Tree then select [Settings] from the right-click menu to open the
project folder path "Settings" dialog.
・After making changes, click the [OK] button to change the username, and/or local and
server folder path.
*Check the "Connect to server to check for updates" box and click the [OK] button to
check for Ontology updates on the server at the same time the path change is
made.
・When changing networks to connect to an external server, click the [Network Settings]
button on the bottom of the dialog. Network settings will be explained in the next
section.
(Reference) It is necessary to change the parameters in the "hozo.properties" settings file to
change the default path setting of the project folder.
・Local project folder path (approximately line 83 of the file)
# Project management settings
ProjectRoot=LocalStorage
・Server project folder path (approximately line 60 of the file)
#Ontology server address
ServerLocation=ServerStorage
115
(2) Setting up the network (WebDAV)
*In order for users to use this system on a network environment, it is necessary to
change the network (WebDAV) settings to work with the environment being used.
・Select and right-click on the root node in the Project Management Tree, then select
[Network Settings] from the right-click menu to open the "Network Settings" dialog.
・After making changes, click the [OK] button to change the network (WebDAV) settings.
*Explanation of the network settings
① "Enable/disable HTTP Communication": Determines whether or not the application's
internal WebDAV module is enabled. Used especially when accessing
Web servers that utilize specific security settings.
*By default, this is unchecked (disabled), but it can still be used because
operating systems from Windows XP and higher versions come standard with
WebDAV support.
*None of the settings can be edited when disabled; settings will become
available when enabled.
116
② "Server project folder": Path of the server project folder.
③ "Security (User Authentication): Specifies a username and password when Ontology
server user authentication (Basic Authentication) is set.
④ "Proxy": Specifies the proxy address and port number when connecting to the
Ontology server via a proxy.
⑤ "Connect to server to check for updates": Checks for Ontology updates when
connecting to the server to make setting changes.
⑥ [Restore Defaults] button: Replaces settings with default parameter information from
the "hozo.properties" setting file.
117
(3)About Usage Modes
The Hozo-Ontology Editor (Distributed Development Edition) can be toggled between
three modes, depending on the intended use.
A) Non-distributed Mode (Chapter 2)
*Uncheck "Use Project Management Feature".
This will start the software in the traditional Ontology Editor interface, without using
distributed development features.
B) Local PC Distributed Mode (Chapter 3)
*Check "Use Project Management Feature", and select a folder on your computer to
use as a server project folder.
A project management folder is set on the local PC (not shared with other users),
allowing dependency and version management for multiple Ontologies to be performed
while constructing Ontologies.
C) Local Network Distributed Mode (Chapter 4)2
*Check "Use Project Management Feature", select a shared folder on the LAN as a
server project folder.
Create/share a project management folder on a server in your local network
environment; Ontologies are shared between multiple users while being structured.
Methods for setting each mode at launch will be explained below.
[Explanation of annotations used in this document]
[Note] (blue): indicates information that is supplementary to the explanation.
[Operation Example](green): indicates an example operation that uses a
sample file.
[Attention] (red): describes things which should be given care during operation.
[Reference] (purple): indicates a reference found in another document (or
chapter).
2
An Internet distributed mode will be released soon.
118
A) Non-distributed Mode (uses traditional Ontology Editor interface)
In this mode, editing can be performed using the traditional Ontology Editor interface.
Furthermore, allows new features "Advanced Search" and "Differential Comparison" to
be used.
Making Settings during Startup
(How to Select Options in the Initial Setup Dialog)
(1) Enter a username (any half-width alphanumeric characters).
[Note] You cannot start the program without entering a username.
These characters cannot be used in usernames: " \ / : * ? " < > | _".
(2) Uncheck the "Use Project Management Feature" box.
[Note] All fields other than username will be disabled.
(3) Click the [OK] button to display the Ontology Editing screen in Non-distributed Mode
(with no Project Management Pane).
119
B). Local PC Distributed Mode (Managing Dependencies in Multiple Ontologies)
In this mode, the project is managed on a local PC. As long as a project management
folder is designated, dependencies and versions can be managed for multiple Ontologies.
Making Settings during Startup
(How to Select Options in the Initial Setup Dialog)
(1)Enter a username (any half-width alphanumeric characters).
(2) Check the "Use Project Management Feature" box.
(3) Designate a name in the "Local Projects Folder" box for the folder that will be used to
manage local projects3.
[Note] Default is "LocalStorage" (you should use this setting in most cases).
(4) Designate a name in the "Server Projects Folder" box for the folder where server
projects will be saved.
[Note] Default is "ServerStorage" (you should use this setting in most cases).
(5) Click the [OK] button to start the Ontology editor in Local Distributed Mode (with the
Project Management Pane displayed).
[Note] If you check the "Connect and check server for updates" box, the server project
will be checked for updates. If this box is unchecked, the server will not be
checked for updates (it will be possible to check for updates once the program is
started).
3
Designate the relative or absolute path for the Hozo installation folder. You can
also click on the directory button next to the text box to select the folder.
120
About the Project Management Screen
・If the Ontology Editor is started in Distributed Mode, the "Project Management
Tree" will be displayed on the left side of the screen.
・The Project Management Tree is composed of:
Root Node: the local project folder.
Project Node: a unit that manages multiple Ontologies (project).
Ontology Node: constructed from Ontologies that are managed by that
project.
These icons may change due to updates.
[Reference] See Appendix B for an explanation of the icons.
[Reference] For details see chapter 4.2. “Managing Projects”, in the Operating
Manual.
・Ontologies can be opened for editing by double clicking on the Ontology Node.
121
C). Network Distributed Mode (Sharing Ontologies over a LAN)
Projects and Ontologies can be shared with multiple users over a LAN by setting the
server project folder to a shared folder on the local network (LAN).
Upload
(check in)
Project-A
Admin
Project-B
Project-C
Project-A
Project-C
Project-B
User A
Local Project
Down load
(check out) (folder)
Project-D
Server Project
(Shared folder)
Project-A
Project-B
Local Area Net work
(LAN)
Project-D
User B
Local Project
(folder)
Creating a Shared Folder
*In order to share Ontologies over a LAN, it is necessary to create in advance a folder to
be used as the server project folder that can be shared on the LAN.
Create a sharable folder on the local network to be used the folder for sharing
Ontologies among multiple users. (Normally, it is recommended you create the shared
folder on a server etc. on the LAN.)
[Operation Example] Hereafter, examples will assume a folder called "share" has been
created on “win_server”, a server computer on the LAN.
(1) In Windows2000/XP, right-click the folder you wish to share and select [Sharing and
Security…] to display the properties dialog.
(2) On the [Sharing] tab, check the boxes labeled [Share this folder on the network], and
[Allow network users to change files] under [Sharing and Security on the network].
[Note] The above steps for creating shared folders may differ
depending on your OS version etc. Please see your OS help
documentation etc. for details.
[Note] File sharing and access permission may not be possible
depending on your network environment. If this is the case,
122
please inquire with your network administrator.
Making Settings during Startup
(How to Select Options in the Initial Setup Dialog)
(1) Check the “Use Project Management Feature” box.
[Note] If you check the “Connect and check server for updates” box, the server project will
be checked for updates. If this box is unchecked, the server will not be checked for
updates (it will be possible to check for updates once the program is started).
(2) Specify the local project folder.
[Note] Default is "LocalStorage" (you should use this setting in most cases).
(3) Specify the server project folder.
[Operation Example] Select the shared folder on the LAN created in 4.1.
[How to Specify the Server Project Folder]
・To specify the server project folder on Windows network, use
"//(computer name)/(folder name or path)" (Note: "http:" not needed)
or
"\\(computer name)\(folder name or path)".
Example:
"//192.168.1.5/webdav/ServerStorage"
・You can also click on the directory button next to the text box to select the
folder.
In the directory dialog, select "My Network" and specify the folder.
[Operation Example] To specify the folder from the previous example, you would use
"\\win_server\share".
(4) Click [OK] to start the Ontology editor.
123
[Operation Example] The project folder icons are blue because the project files have not
yet been uploaded to the server project folder.
These projects do not exist
on the server.
124
5. Explanation of the menus
(1) Menu Bar
・File menu
New
create a new project/Ontology
Open
used to open Editing Panels and load files
Save
save the data being edited to file
Save as...
save the data being edited in a new file under a different
name
Save without dependency
save data being edited with dependency relationships
relationships
removed
Start Model Editor
launch the Model Editor
Import
import a Hierarchical Text/CSV Text file
Expor
export data being edited
Backup File
delete backup file made at save
Page Settings
set printer settings
Print Preview
display a print preview on the screen
Print
print the Ontology being edited
Quit
quit the system
Force Quit
system forced quit (data being edited not saved)
・Edit menu
Undo
undo editing
Redo
redo editing
Clear Editing Log
clear the editing history
Raise Slot by One
raise selected slot by one position in the view
Lower Slot by One
lower slot by one position in the view
Edit Principle
edit principles in selected node or slot
Delete
delete the selected graphic object
Select All
select all graphic objects on the browsing panel
Select Sub Concepts
select the selected node's sub concepts
Cut
cut the selected graphic object
Copy
copy the selected graphic object
125
Paste
paste a graphic object that was cut
Selection Tracking Back
move to the previous selected graphic object
Selection Tracking Forward
move to the next selected graphic object
・View menu
View Concepts Only
display only concepts (nodes) on the browsing panel
B&W Display
display browsing panel in black and white
(for monochrome printing)
Layout
automatically arranges the selected node and its sub
concept nodes in either a vertical or horizontal layout
Source View
view the Ontology Editor source code in a separate
window
View Super Concept
display inherited slots' super concepts on the browsing
panel (super concepts displayed when checked)
Display Page Frame
display a frame indicating the printer paper size on the
browsing panel
Specify Canvas Size
Change
Dependent
set the canvas size of the browsing panel
Node
set the imported concept display mode
Display
・Window menu
View All
open all Editing Panels
Minimize All
minimize all Editing Panels
Close All
close all Editing Panels
Language
toggle Editing Panel language between English and Japanese
・Diff. menu
Check for Changes in
confirm whether or not imported concepts in the Ontology
Depended Ontologies
being edited have been changed
Check for Changes in
confirm whether or not the Ontology being edited has been
Ontologies on the Server
updated from the corresponding Ontology on the server
(i.e. the previous version)
Check for differences with any
check for differences between the Ontology being edited
126
file...
and an existing Ontology file
Clear Change Log
clear the change history in the Diff. display
・Help menu
View Help
open help
Quick Reference
open the Quick Reference
Operating Manual
open the Operating Manual
Version Information
display version information
127
(2) Operation Tool Bar
: create a new project/Ontology
: open Editing Panels and load files
: save the data being edited to file
: save the data being edited in a new file under a different name
: print the Ontology being edited
: display a print preview on the screen
: cut the selected graphic object
: copy the selected graphic object
: paste a graphic object that was cut
: deletes the selected graphic object
: undo editing
: redo editing
: decrease magnification on Browsing Pane (zoom out)
: increases magnification on Browsing Pane (zoom in)
: display Browsing Pane magnification (selectable list)
: jump to the previous selected graphic object
: jump to the next selected graphic object
: show/hide Project Management Pane
: display Ontology management window
: view help
128
(3) Editing Tool Bar
: concept class create button and concept selection list
: relational link create button and relational link selection list
: slot create button and slot selection list
: display Browsing Pane magnification (selectable list)
: select constraint concept
: select principle
: toggle screen mode (single screen view)
: toggle screen mode (vertical split screen view)
: toggle screen mode (horizontal split screen view)
: toggle to selection mode
: toggle to jump mode
: jump to the previous selected graphic object
: jump to the next selected graphic object
129
(4) Shortcut keys
There are shortcut keys for the operation menu and editing menu.
New
Ctrl+ O
Save
Ctrl+ S
Print
Ctrl+P
Quit
Ctrl+E
Force Quit
Ctrl+Q
Undo
Ctrl+Z
Redo
Ctrl+Y
Raise Slot by One
Alt+Up
Lower Slot by One
Alt+Down
Delete
Delete
Select All
Ctrl+A
Select Sub Concepts
Ctrl+N
Cut
Ctrl+X
Copy
Ctrl+C
Paste
Ctrl+V
Vertical Layout
Ctrl+G
Horizontal Layout
Ctrl+H
Selection Tracking Back
Alt+Z
Selection Tracking Forward
Alt+Y
(5) Mouse menu
The mouse menu will be displayed when right clicking on selected objects in the
Navigation Pane, Browsing Pane, or the Project Management Pane in the Editing Panel.
130
6. Contact Information
・Hozo website:
http://www.hozo.jp/
・E-mail for Hozo support:
[email protected]
・Contact person:
Kouji Kozaki
Osaka University
The Institute of Scientific and Industrial Research
[email protected]
http://www.ei.sanken.osaka-u.ac.jp/~kozaki/index_en.html
131