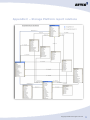
1
Attix5 Pro
Enterprise Reports
V7.x User Manual
Your guide to modifying and
creating Enterprise Reports.
Copyright notice and proprietary information
All rights reserved.
© Attix5, 2013
Trademarks
® - Microsoft Explorer and Microsoft SQL Management Studio are registered trademarks of
Microsoft Corporation.
Copyright © Attix5. All rights reserved.
2
Contents
1. Introduction ....................................................................................... 4
2. Enterprise Report overview ............................................................... 4
2.1. Enterprise Report generation process ............................................................. 5
3. Modifying Attix5 Pro Enterprise Report templates ............................ 6
3.1. Template properties ..................................................................................... 7
3.2. Layout ........................................................................................................ 9
3.2.1. Static content ........................................................................................ 9
3.2.2. Dynamic content.................................................................................. 10
3.2.2.1. Header and footer .......................................................................... 11
3.3. Database queries ....................................................................................... 13
3.3.1. DL- and SE-specific reports ................................................................... 14
3.4 Example: Modifying BackupsNotIn24 ............................................................ 15
4. Creating a new Enterprise Report template ....................................21
Step 1: Create a report category ........................................................................ 22
Step 2: Define the report details and parameters ................................................. 22
Step 3: Create a Report Template ...................................................................... 24
Step 4: Define SQL query/ies ............................................................................. 25
Step 5: Create a report sub-template.................................................................. 25
Full example: Creating an AccountsAll Report Template ........................................ 28
Full example: Creating an HSM report for SE Accounts ......................................... 31
Appendix A – Identifier format types ..................................................35
Appendix B – System functions ...........................................................35
Appendix C – Storage Platform report relations..................................36
3
Copyright © Attix5. All rights reserved.
1. Introduction
Using the Attix5 Pro Storage Platform Console, backup administrators can access two types of
Storage Platform reports: Standard and Enterprise.
Standard Reports are available with every Storage Platform Console installation. For
instructions on how to run and schedule these reports, please refer to the Storage Platform
Console User Manual.
Enterprise Reports are more detailed than Standard Reports and can be modified. This User
Manual describes how to adapt Enterprise Reports to suit your Storage Platform requirements
as well as how to create new reports.
Note: The SP Console Enterprise Reports feature will only be available once it has been
licenced. To acquire a licence, please contact your software provider.
2. Enterprise Report overview
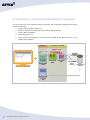
An Enterprise Report is built using several files on the AccountServer:
An XML file
A Report Template
One or more sub-templates
An SQL file
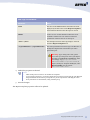
AccountServer files
File
Description
Report Template (HTML)
The Report Template contains the skeleton layout of the report and
often refers to one or more sub-templates.
Sub-template (HTML)
A sub-template contains data references (placeholders for data pulled
from the StoragePlatform database by a corresponding SQL file) and
HTML formatting that controls how the data is displayed in the report.
Notes:
Some sub-templates are report-specific, while others
can be re-used in many different reports (e.g. header
and footer sub-templates).
A complete report can be built using an HTML Report
Template that merely contains a collection of subtemplates.
Changing a sub-template that is used in multiple
reports will change all those reports accordingly.
Copyright © Attix5. All rights reserved.
4
AccountServer files continued...
File
Description
SQL file
Each SQL file on the AccountServer is linked to an HTML sub-template
and contains one or more SQL queries that are sent to the
StoragePlatform database. The information retrieved from the database
is displayed in the report according to the display settings specified in
the sub-template.
XML file
Each report has an accompanying XML file that specifies the report’s
details, such as its filename, description and, if applicable, parameters.
This information is sent to the StoragePlatform database and can then
be retrieved when reports are generated.
Note: XML markup does not have to be standardscompliant.
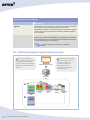
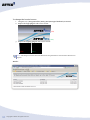
2.1. Enterprise Report generation process
A) A report is generated using a
B) An XML file sends data such as the
Report Template that consists of sub-
report name, description, and any
templates, each of which contains
relevant parameters, to the
references to data in a corresponding
SQL file’s query to the ReportServer
Enterprise Report (Browser view)
database.
AccountServer database. The
database will then use the
information to answer any SQL
queries that request it.
AccountServer
{$DataRef$}
{?SubTemp?}
A
Report Template
(HTML)
B
Report properties
and details (XML)
5
Copyright © Attix5. All rights reserved.
Sub-templates
(HTML)
SQL Queries
(SQL)
StoragePlatform
Reports
StoragePlatform
Database
Database
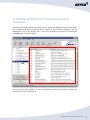
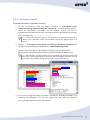
3. Modifying Attix5 Pro Enterprise Report
templates
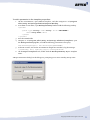
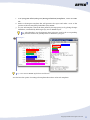
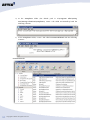
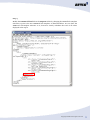
If the Enterprise Reports feature has been licenced, the Storage Platform Console will include a
set of predefined Attix5 Pro Enterprise Report templates. To access these templates, click the
Enterprise node in the Reports tree. A list of the templates will display on the Report
Templates tab, sorted by category:
You can modify these templates to suit your particular backup report needs by editing the
relevant files on the AccountServer.
Copyright © Attix5. All rights reserved.
6
You can modify Report Templates in different ways:
Modify the template properties
Modify the style/layout
Modify the database queries
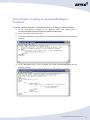
3.1. Template properties
You can modify a Report Template’s properties by editing the XML file that accompanies the
Report Template HTML file in the AccountServer’s report category folder. For instructions, see
below.
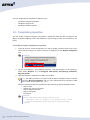
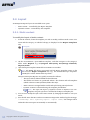
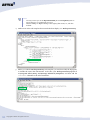
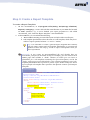
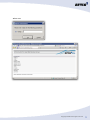
To modify a Report Template’s properties:
1.
In the SP Console, locate the template you wish to modify, and then make a note of its
name and the category to which it belongs (as displayed on the Report Templates
tab).
Example:
2. On the AccountServer, open Windows Explorer, and then navigate to the category’s
folder under Reports. E.g. C:\Program Files\Attix5 Pro\Storage Platform\
Reports\Audit.
3. Open the template’s XML file in an XML or text editor.
Tip: The XML file names correspond with the Report Template names on the SP
Console’s Report Templates tab. E.g. The AuditTrailGroups template’s XML
file is called “AutitTrailGroups_.xml”.
Attix5 Pro Enterprise Reports typically have the following properties defined in XML:
Report name
Admin only access (true/false)
Report template filename
Report description
Parameters
Example:
<report name="AuditTrailGroups" admin="true">
<desc>Audit trail on changes to all Backup Groups.</desc>
<reportFilename>AuditTrailGroups.html</reportFilename>
</report>
7
Copyright © Attix5. All rights reserved.
XML tags and attributes
Attribute
Value
name
The value of the name attribute determines the name
displayed by the SP Console on the Report Templates
tab and Internet Browser when the report is viewed.
admin
A value of “true” for this attribute renders the report
available to admin users only. All users with fewer
permissions will not be able to run the report.
<desc></desc>
The description between these tags displays on the SP
Console’s Report Templates tab.
<reportFilename></reportFilename>
The name specified between these tags is the filename of
the Report Template that controls the layout of the
generated report.
Warning: If you change this value, please
ensure that you change the name of the Report
Template in the Reports/<Category> folder
accordingly. E.g. If <reportFilename>
AuditTrailGrABC</reportFilename> is
defined, the Report Template HTML file, under
Reports/Audit, must be named:
AuditTrailGrABC.html.”
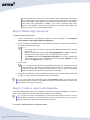
4. Modify the properties as desired.
Notes:
XML markup does not have to be standards-compliant.
If you specify parameters, you need to define those parameters in the SQL file. The XML file
only instructs the SP Console to prompt the user for the information. The SQL file sends
those parameters to the database, along with the query.
5. Save the changes.
The Report Template properties will now be updated.
Copyright © Attix5. All rights reserved.
8
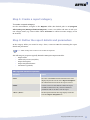
3.2. Layout
An Enterprise Report’s layout is controlled in two parts:
Static content – controlled by the Report Template
Dynamic content – Controlled by sub-templates
3.2.1. Static content
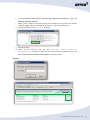
To modify the layout of static content:
1.
In the SP Console, locate the template you wish to modify, and then make a note of its
name and the category to which it belongs (as displayed on the Report Templates
tab).
Example:
2. On the AccountServer, open Windows Explorer, and then navigate to the category’s
folder under Reports. E.g. C:\Program Files\Attix5 Pro\Storage Platform\
Reports\Audit.
3. Open the Report Template HTML file in an HTML or text editor.
Tip: The HTML file names correspond with the Report Template names on the
SP Console’s Report Templates tab. E.g. The AuditTrailGroups template’s
HTML file is called “AutitTrailGroups.html”.
Attix5 Pro Enterprise Reports are typically structured as follows:
The report title is defined within the head element.
The header and footer are positioned within a div element and sub-templates
(which reference a CSS stylesheet) define their style.
Static content is arranged within a table and styled using CSS style classes.
Dynamic content is referenced using sub-template placeholders.
Note: The style and layout of dynamic content is defined in the subtemplate. Only the reference is included in the Report Template file.
4. You can now modify the style of the static content by changing the HTML to suit your
needs.
5.
Save the file. Once the SP Console AccountServer Diagnostics window logs the message:
“<timestamp> Info: Updating report: <report name>,” the changes will be
reflected in the next report run manually or automatically.
9
Copyright © Attix5. All rights reserved.
3.2.2. Dynamic content
To modify the layout of dynamic content:
1.
On the AccountServer, open the Report Template in C:\Program Files\
Attix5 Pro\Storage Platform\Reports\<Category>, as described in 3.2.1 above.
2. Locate the sub-template placeholder for the dynamic content you wish to
reposition/style and make a note of the sub-template name (cited between two question
mark [?] symbols). E.g. <?AuditTrailGroups?>.
Tip: Attix5 Pro Enterprise Report sub-templates are named descriptively to
enable you to determine which sub-templates control the different parts of a
report.
3. Navigate to C:\Program Files\Attix5 Pro\Storage Platform\Templates and
open the relevant sub-template HTML file. E.g. AuditTrailGroups.html.
Attix5 Pro Enterprise Report sub-templates are typically structured as follows:
SQL identifiers, surrounded by dollar signs ($), are placed within an HTML layout.
Tip: The identifiers are those used in a corresponding SQL file that contains full
query/ies to the StoragePlatform database. The sub-template, therefore, merely
places the data pulled by the SQL query/ies into a particular layout.
4. You can now change the display properties of the data by changing the HTML or by
reordering the identifiers. You can also change the SQL query/ies altogether
(See “3.3 Database queries” later in this chapter).
Copyright © Attix5. All rights reserved.
10
3.2.2.1. Header and footer
You can change the Attix5 Pro header by replacing the header images and modify the footer by
altering the footer sub-template.
Note: Changing the header/footer sub-templates on the AccountServer will change the
appearance of all Attix5 Pro Enterprise Reports, as they all use the same sub-templates.
Modifying the header
To change the top-left report logo:
1.
Navigate to: C:\Program Files\Attix5 Pro\Storage Platform\wwwroot.
2. Replace the Logo.png file with your new image.
Warning: Ensure that your new image is the same resolution as the original.
Any variation will result in distortion.
11
Copyright © Attix5. All rights reserved.
To change the header banner background:
1.
Navigate to: C:\Program Files\Attix5 Pro\Storage Platform\wwwroot.
2. Replace the LogoBG.png image with another 1px image. This image will be repeated to
form the header banner background.
Modifying the footer
To modify the footer:
1.
Navigate to: C:\Program Files\Attix5 Pro\Storage Platform\Templates.
2. Open the ReportFooter.html file and edit the HTML as desired.
Copyright © Attix5. All rights reserved.
12
3.3. Database queries
Attix5 Pro Enterprise Reports typically query the StoragePlatform database for information and
display that information in an easy-to-read format on an HTML page. You can modify these
queries and how they display in the Internet browser by editing the report’s SQL file and its
corresponding HTML sub-template.
To modify a report’s SQL query/ies:
1.
On the AccountServer, open the Report Template (as described in 3.2.1 earlier in this
chapter) and make a note of the sub-template that controls the formatting of the SQL
data you wish to change.
Tip: Sub-template placeholders are surrounded by question mark symbols. E.g.
The <?AuditTrailGroups?> placeholder refers to the AuditTrailGroups.html file
in the Templates folder.
2. Navigate to: C:\Program Files\Attix5 Pro\Storage Platform\Templates.
3. Open the sub-template’s corresponding SQL file in an SQL or text editor.
Tip: Each sub-template that contains dynamic data has a corresponding SQL
file. The SQL file has the same filename as the sub-template that controls it.
E.g. AuditTrailGroups.html has an SQL file called “AuditTrailGroups.sql”
that controls the layout and style of the data pulled from the ReportServer by the
SQL query/ies.
4. Modify the SQL query/ies as desired.
Tips:
Use a SQL management tool such as Microsoft SQL Management Studio to
execute test queries.
Refer to the database views (under “StoragePlatform > Views” in default
installations) instead of tables when creating queries for reports.
The TypeId column in the BackupAccountInfo view controls whether the
report will apply to SE or DL Backup Accounts. Specify TypeId=1 for SE
reports and TypeId=0 for DL reports.
5. If reformatting of the data is required, make a note of the identifiers in your
new/modified query, open the sub-template in an HTML or text editor, and then ensure
that the identifiers in the sub-template match those in your new query and that the
HTML defines the desired formatting.
13
Copyright © Attix5. All rights reserved.
3.3.1. DL- and SE-specific reports
Whether information in a report is DL- or SE-specific is controlled by the TypeId field in the
BackupAccount database table. TypeId=0 will request DL-specific information and TypeId=1
will request SE-specific information.
Example: The BackupsNotIn24SEactive report generates a list of all SE Backup
Accounts that have not backed up within in the last 24 hours. To enable it to do this, a
BackupsNotIn24SEactive.sql file containing the following queries requests that the
information retrieved from the BackupAccountInfo view in the StoragePlatform
database has the TypeId value of 1.
To change report information to display DL- or SE-only information:
1.
Open the report template in the Templates folder on the AccountServer (as described
in 3.2.1 earlier in this chapter.)
2. Establish which sub-template controls the information you wish to change (as described
in step 2 of 3.2.2.)
3. Open the sub-template’s corresponding SQL file.
4. Change the TypeId value to suit your needs (DL = 0, SE = 1.)
5.
Save the changes.
6. Run the report.
Copyright © Attix5. All rights reserved.
14
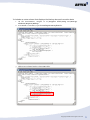
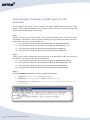
3.4 Example: Modifying BackupsNotIn24
In this example, we are going to modify the BackupsNotIn24 Report Template as follows:
1.
Modify the template properties: Add a parameter that will prompt the user to enter
which Group to run the report on.
2. Modify the style: Change the header banner.
3. Modify the database queries and layout: Include an extra column that displays
the Account’s creation date.
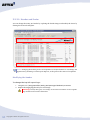
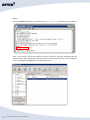
The original Attix5 Pro BackupsNotIn24 Report Template, when run, displays three columns of
information. The information includes the Backup Account name, last backup date and the
length of the backup process:
15
Copyright © Attix5. All rights reserved.
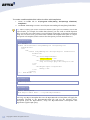
To add a parameter to the template properties:
1.
On the AccountServer, open Windows Explorer, and then navigate to: C:\Program
Files\Attix5 Pro\Storage Platform\Reports\Backup.
2. In an XML or text editor, open BackupsNotIn24.xml and add the following markup:
“<params>
<param type="String" name="Group" alias="GROUPNAME">
<desc>Group Name</desc>
</param>
</params>”
3. Save the amended file.
4. Navigate to: C:\Program Files\Attix5 Pro\Storage Platform\Templates, open
the BackupsNotIn24.sql file, and add the following parameters to the query:
and BA.BackupGroupId = dbo.GetGroupId(@GROUPNAME)
5.
In the SP Console, wait for the AccountServer Diagnostics window to log the message:
“[timestamp] Info: Updating report: BackupsNotIn24”
6. On the Report Templates tab, double-click the BackupsNotIn24 Report Template
name.
A Report Parameters dialog box should appear, prompting you to enter a Backup Group name.
Copyright © Attix5. All rights reserved.
16
To change the header banner:
1.
Navigate to: C:\Program Files\Attix5 Pro\Storage Platform\wwwroot.
2. Replace the logo.png file with a new version:
(old)
(new)
3. Replace the logobg.png file with a new version:
(old)
(new)
Note: The images must have the same dimensions. Any deviation in size will cause distortion in
reports.
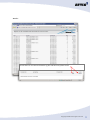
Result:
17
Copyright © Attix5. All rights reserved.
To include an extra column that displays the Backup Account’s creation date:
1.
On the AccountServer, navigate to: C:\Program Files\Attix5 Pro\Storage
Platform\Reports\Backup.
2. In an HTML or text editor, open the BackupsNotIn24.htm file:
3. Add an extra column header to the HTML table:
Copyright © Attix5. All rights reserved.
18
Notes:
You may need to refer to the ReportCSS.html file in the Templates folder to
ensure that your use of CSS styles is correct.
Classes ending in “Right” belong to the right of the screen, i.e., the last
column.
4. Make a note of the sub-template that controls the data display. I.e. BackupsNotIn24.
5. Before you edit the BackupsNotIn24 sub-template, you need to modify the SQL query
to include the create date information. To do this, open BackupsNotIn24.sql file in
C:\Program Files\Attix5 Pro\Storage Platform\Templates, and then add the
createdon identifier to the select statement:
19
Copyright © Attix5. All rights reserved.
6. In C:\Program Files\Attix5 Pro\Storage Platform\Templates, open the
BackupsNotIn24.html file.
7.
Add an extra column to the table, paying close attention to the styles used. (Classes
ending in “Right” belong to the right of the screen, i.e., the last column.) Save.
8. Add a placeholder for the createdon identifier:
9. Save the changes.
10. Open the SP Console,
wait
for
the
“Updating
Report
Template:
BackupsNotIn24” message to display in the AccountServer Diagnostics pane, and
then double-click the BackupsNotIn24 Report Template name.
Results:
Copyright © Attix5. All rights reserved.
20
4. Creating a new Enterprise Report template
You can create your own Enterprise Report templates and make them available from the SP
Console in five steps:
1.
Create a report category (optional)
2. Create an XML file containing the report details and parameters
3. Create a Report Template
4. Define SQL query/ies
5.
Create report sub-templates to format the data pulled by the SQL query/ies or use
existing sub-templates.
Create New
Use Existing / Create New
{$Identifier$}
{?SubTemp?}
Report Template
(HTML)
Report properties
and details
(XML)
21
Copyright © Attix5. All rights reserved.
Sub-templates
(HTML)
SQL Queries
(SQL)
StoragePlatform
Reports
Database StoragePlatform
Database
Step 1: Create a report category
To create a report category:
On the AccountServer, navigate to the Reports folder (The default path is: C:\Program
Files\Attix5 Pro\Storage Platform\Reports), create a new folder and name it with your
new category name (e.g. create a folder called “Accounts” to add an Accounts category to the
SP Console.)
Step 2: Define the report details and parameters
In the category folder you created in step 1 above, create an XML file containing the report
details and parameters.
Note: XML markup does not have to be standards-compliant.
The following are properties typically defined in Enterprise Report XML files:
Report name
Admin only access (true/false)
Report description
Report template filename
Parameters (optional)
XML tags and attributes explained...
Attribute
Value
name
The value of the name attribute determines the name
displayed by the SP Console on the Report Templates
tab and Internet Browser when the report is viewed.
admin
A value of “true” for this attribute renders the report
available to admin users only. All users with fewer
permissions will not be able to run the report.
<desc></desc>
The description between these tags displays on the SP
Console’s Report Templates tab.
Copyright © Attix5. All rights reserved.
22
XML tags and attributes continued...
Attribute
Value
<reportFilename></reportFilename>
The name specified between these tags is the filename of
the Report Template that controls the layout of the
report.
Warning: If you change this value, please
ensure that you change the name of the Report
Template in the Reports/<Category> folder
accordingly. E.g. If<reportFilename>
AuditTrailGrABC</reportFilename> is
defined, the Report Template HTML file, under
Reports/Audit, must be named:
AuditTrailGrABC.html.”
Example: To create a Report Template called “AccountsAll” that is available to admin
users only and describes all Backup Accounts for a specified Group (prompts the user to
define the Backup Group on which to run the report), you can create an XML file called
“AccountsAll_xml” with the following content:
AccountsAll_.xml
<report name="AccountsAll" admin="true">
<desc>All Accounts for specified Backup Group.</desc>
<reportFilename>AccountsAll.html</reportFilename>
<params>
<param type="String" name="Group" alias="GROUPNAME">
<desc>Group Name</desc>
</param>
</params>
</report>
23
Copyright © Attix5. All rights reserved.
Step 3: Create a Report Template
To create a Report Template:
1.
On the AccountServer, in C:\Program Files\Attix5 Pro\Storage Platform\
Reports\<Category>, create a file with the same filename as your XML file but with
an HTML extension, e.g., if you’ve defined your report properties in a file called
“AccountsAll_.xml”, name the Report Template: “AccountsAll.html.”
2. In the HTML file, you can include the following:
a.
Basic HTML formatting to control the layout and style of the overall report
b. Sub-template placeholders (Place the name of a sub-template, which may be reusable or report-specific, between “<?” and “?>” marks)
Tip: It is advisable to create a generic Report Template that contains
only the static content and sub-template placeholders to represent all
dynamic content. See “Step 5: Create a report sub-template” below for
more information.
Example: If you create an AccountsAll.html file and already have an
AccountsAll_.xml file (as described in Step 2’s example), you can create a basic
HTML page that includes a <head> element (in which you can insert a
placeholder for a sub-template containing the report description), and in the
<body> of the report, you could include a <div> element containing a set of subtemplate placeholders that represent a generic report header and footer and a
report-specific sub-template that represents the dynamic content of this Report
Template:
AccountsAll.html
<!DOCTYPE html PUBLIC "-//W3C//DTD XHTML 1.0
Transitional//EN"
"http://www.w3.org/TR/xhtml1/DTD/xhtml1transitional.dtd">
<html xmlns="http://www.w3.org/1999/xhtml">
<head>
<meta content="text/html; charsef=utf-8"
http-equiv="Content-Type" />
<?ReportCSS?>
<title><?ReportDesc?></title>
</head>
<body>
<div>
<?ReportHeader?>
<?AccountsAll?>
<?ReportFooter?>
</div>
</body>
</html>
Copyright © Attix5. All rights reserved.
24
In this example, the contents of a sub-template called “ReportCSS” will replace
the <?ReportCSS?> entry when a report is generated, and similarly, the contents
of the ReportDesc, ReportHeader, AccountsAll, and ReportFooter sub-templates
will replace their placeholders, building a full report containing both static,
generic, and dynamic content. For information on creating sub-templates, see
“Step 5: Create a report sub-template” below.
Step 4: Define SQL query/ies
To define new SQL queries:
1.
On the AccountServer, open Windows Explorer, and then navigate to: C:\Program
Files\Attix5 Pro\Storage Platform\Templates.
2. Create an SQL file and define one or more database queries to retrieve the information
you wish to include in the report.
Tips:
Use a SQL query tool such as Microsoft SQL Management Studio to execute
test queries.
Refer to the database views (under “StoragePlatform > Views” in default
installations) instead of tables when creating queries for reports.
The TypeId column in the BackupAccountInfo view controls whether the
report will apply to SE or DL Backup Accounts. Specify TypeId=1 for SE
reports and TypeId=0 for DL reports.
3. Save the file.
Tip: To make it clear which files are affected by the SQL file, it advised to use the
same filename as the Report Template HTML file that it is created for. E.g. If
creating this SQL file to define the SQL queries to be used by the AccountsAll
Report Template, you should name the file AccountsAll.sql.
4. Using the same filename, create an HTML sub-template to format the data (as described
in “Step 5: Create report sub-templates” later in this chapter).
Tip: To reuse a SQL query already saved in the Templates folder, you need to use the
sub-template that it is linked to (the HTML file with the matching filename) by inserting
a placeholder in the Report Template.
Step 5: Create a report sub-template
If you have defined SQL queries in an SQL file to be used in your Report Template, you need to
create a sub-template to format the information pulled from the database.
Tip: You can also create sub-templates to format information that you wish to reuse in
multiple Report Templates. E.g. Header and footer sub-templates are used to give all
Attix5 Pro Enterprise Reports the same header and footer.
To create a sub-template for dynamic data:
25
Copyright © Attix5. All rights reserved.
1.
In C:\Program Files\Attix5 Pro\Storage Platform\Templates, create an HTML
file.
2. Refer to the Report Template that will generate the report and make a note of the
position of the sub-template placeholder in the HTML.
3. In your sub-template, format the data pulled by the SQL query/ies by placing the SQL
identifiers, surrounded by dollar signs ($), into an HTML layout.
Tip: The identifiers are the dynamic data references used in the corresponding
SQL file that contains the full ReportServer database query/ies.
Example:
Tip: You can use HTML style sheets and classes
You also have the option of creating sub-templates that refer to other sub-templates.
Copyright © Attix5. All rights reserved.
26
To create a sub-template that refers to other sub-templates:
1.
Create an HTML file in C:\Program Files\Attix5 Pro\Storage Platform\
Templates.
2. Use HTML formatting to create a visual layout surrounding sub-template placeholders.
Tip: This is useful if you wish to control an element of the report in isolation, such as the
report header, for example, but within that element, you also wish to include dynamic
data, such as the report description (it would change, depending on the Report Template
being run). In such a case, you could create a header sub-template that refers to a report
description sub-template (which retrieves the description from the AccountServer.)
ReportHeader.html
<!-- Header -->
<table id="container" cellpadding="0" cellspacing="0"
width="100%">
<tr>
<td>
<table cellpadding="0" cellspacing="0" width="100%"
border="0">
<tr>
<td class="ReportName">
<?ReportDesc?></td>
<td class="logo" align="right">
<img src="/Logo.png" alt="Logo"/></td>
</tr>
<tr>
<td height="5px" colspan="2">
</td>
</tr>
</table>
<!-- End Header -->
ReportDesc.htm
l
<$Description$>
ReportDesc.sql
Select Description
From Report where Name = '<?system.ReportName?>'
This way, any Report Template that uses the ReportHeader sub-template will apply the
formatting specified in the ReportHeader.html file and get the relevant report
description from the ReportServer, using the ReportDesc.html sub-template and
ReportDesc.sql file’s SQL query.
27
Copyright © Attix5. All rights reserved.
Full example: Creating an AccountsAll Report
Template
To create a Report Template called AccountsAll in a category called Accounts:
a) On the AccountServer, navigate to the Reports folder (The default path is:
C:\Program Files\Attix5 Pro\Storage Platform\Reports).
b) Create a new folder called “Accounts”.
c) In the Accounts folder, create an XML file called AccountsAll.xml with the following
contents:
d) In the Accounts folder, create an HTML file called AccountsAll.html with the
following contents:
Copyright © Attix5. All rights reserved.
28
e) In the Templates folder (the default path is: C:\Program Files\Attix5
Pro\Storage Platform\Templates), create a file called AccountsAll.sql with the
following contents:
f)
In the Templates folder, create a file called AccountsAll.html with the following
contents:
Console Result:
29
Copyright © Attix5. All rights reserved.
When run:
Copyright © Attix5. All rights reserved.
30
Full example: Creating an HSM report for SE
Accounts
In this example, we’ll create a report similar to the Attix5 HSMAll Enterprise Report, which
displays a list of all HSM activities on the Storage Platform, but the one we’ll be creating will
display results for SE Backup Accounts only.
Step 1
Because this new report will be based on the existing HSMAll report, we’ll locate all the
AccountServer files that are used to build the existing report (excluding the header and footerrelated files, as we will not be changing those):
a) C:\Program Files\Attix5 Pro\Storage Platform\Reports\HSM\HSMAll.html
b) C:\Program Files\Attix5 Pro\Storage Platform\Reports\HSM\HSMAll_.xml
c) C:\Program Files\Attix5 Pro\Storage Platform\Templates\HSMAll.sql
d) C:\Program Files\Attix5 Pro\Storage Platform\Templates\HSMAll.html
Step 2
Create copies of all the related files and rename them to be descriptive of the new version. In
this instance, we’re going to add “SE” to the filenames:
a) C:\Program Files\Attix5 Pro\Storage Platform\Reports\HSM\HSMSEAll.html
b) C:\Program Files\Attix5 Pro\Storage Platform\Reports\HSM\HSMSEAll_.xml
c) C:\Program Files\Attix5 Pro\Storage Platform\Templates\HSMSEAll.sql
d) C:\Program Files\Attix5 Pro\Storage Platform\Templates\HSMSEAll.html
Step 3
Open the HSMSEAll.xml file (b), and then change the following:
1.
Change the <report name> value to “HSMSEALL”.
2. Change the <reportfilename> value to “HSMSEALL.html”.
3. Change the <desc> value to: “Report on all available HSM activities for
SE accounts.”
31
Copyright © Attix5. All rights reserved.
Step 4
Modify the HSMSEAll.html file in the Reports folder by changing the HSMAll sub-template
reference to point to the new HSMSEAll sub-template, as illustrated below. You can leave the
HSMTotal sub-template reference as is, because it merely calculates the total of all values
displayed in the report.
Copyright © Attix5. All rights reserved.
32
Step 5
Open the HSMSEAll.sql file (c), and then add “and TypeId=1” to the Select query as follows:
After a few minutes, the Storage Platform Console should log messages indicating that the
report files have been changed. You will then be able to run the new report by double-clicking its
name on the Report Templates tab, as illustrated below.
33
Copyright © Attix5. All rights reserved.
Result:
Scroll down to view the total number of files and amount of data stored.
Copyright © Attix5. All rights reserved.
34
Appendix A – Identifier format types
Format type
Description
csv
Comma-separated value format
Bare
Does not format value types
Size
Represents the size of the field (K/KB/MB/GB, etc)
Sizeinmb
Represents the size of the field in MB
Sizeingb
Represents the size of the field in GB
Timeperiod
Represents the difference between two time periods
Appendix B – System functions
A list of system functions can be found here:
http://nlog-project.org/wiki/Layout_Renderers.
35
Copyright © Attix5. All rights reserved.
Appendix C – Storage Platform report relations
Copyright © Attix5. All rights reserved.
36