1
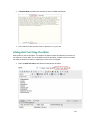
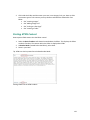
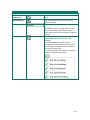
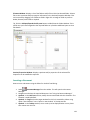
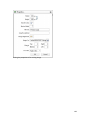
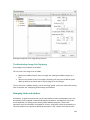
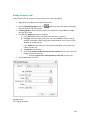
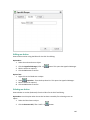
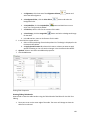
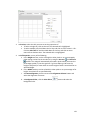
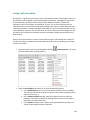
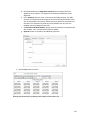
Using Common Tools Editor About the Editor The Editor provides basic and Rich Text Editing (RTE) capabilities across numerous modules. The Rich Text Editor (RTE) Viewing Content in Design or HTML View How to switch between Design and HTML view in the Editor. 1. Click either the Design or HTML tab located below the editor. Adding Basic Text and HTML using Editor How to add basic text into the Basic Text Box of the Editor. You can also paste basic HTML into the basic text box. 1. Select the Basic Text Box radio button located above the Editor. 120 2. At Render Mode (located below the Editor) select the Text radio button. 3. Click inside the Editor and then enter or paste (Ctrl + V) your text. Adding Rich Text Using The Editor How to add rich text to the Editor. This enables the Editor toolbars and displays the content of the Editor as rich text. Note: This is the default view for this Editor, however if you last viewed the Editor as the Basic Text Box, it will display as such until it is changed. 1. Select the Rich Text Editor radio button located above the Editor. 121 2. Click inside the Editor and then enter your text, insert images, links, etc. Here are links to common types of rich content you may choose to add with the default Rich Text Editor: See "Inserting Images" See "Adding a Page Link" See "Linking to a Site Page" See "Inserting a Table" Pasting HTML Content How to paste HTML content into the Editor control. 1. Select the Basic Text Box radio button located above the Editor. This displays the Editor as a Basic Text Box. The content within the Editor is displayed as HTML. 2. At Render Mode (located below the Editor), select Html. 3. Paste in your Html. Tip: HTML can also be pasted into the Raw Render Mode Pasting HTML into the HTML module 122 Modifying Editor Size How to increase or decrease the size of the Editor. 1. Position your mouse over the bottom right corner of the Editor until it becomes a two directional arrow. 2. Click and drag the Editor larger or smaller as desired. Release when the desired size is displayed. Tip: An alternative option is to click the Editor to/from full screen mode. Toggle Full Screen Mode (F11) button to toggle Viewing Word and Character Count The number of words and characters inside the Editor is displayed in the bottom right corner. These are updated each time you click inside the editor after a modification. Toolbars Main Toolbar The main toolbar of the Editor has the following tools: Tool Spellchecker Icon Find And Replace (CTRL + F) Description Click to enable Spell checking mode. Misspelled words are highlighted in yellow. See "Check Spelling" Click the Find And Replace icon (or CTRL + F) to open the Find / Find And Replace dialog box. Select All (CTRL + A) Choose to either find, find and replace, or find and replace all instances of the text entered into the Find text box. Additional options include Match Case, Match Whole Words, and search up or down from the current cursor position. Select all content within the Editor. Cut (CTRL + X) Cut selected content. Copy (CTRL + C) Copy selected content. 123 Tool Paste Plain Text (CTRL + V) Undo (CTRL + Z) Icon Description CTRL + V to paste cut or copied content into the Editor. Option One: Click the Undo icon to undo the last action. Option Two: Click the Arrow icon to view a list of previous actions and undo multiple actions at one time. Option One: Click the Redo icon to redo the last action. Redo (CTRL + Y) Option Two: Click the Arrow icon to view a list of previous actions and redo multiple actions at one time. Check Spelling How to check spelling using the Editor for the Rich Text Editing. 1. Place your cursor inside the Editor. 2. Click the Spellchecker icon. This starts spell checking. Misspelled words are highlighted in yellow. The first misspelled word is ready to perform one of the following actions against: Choose Suggested: Select the correct word from the list of suggested words. If no suggestions are available, then (no suggestions) is displayed. Ignore/Ignore All: Select to ignore this word and continue with spell checking. Change Manually: Select and enter word into the provided text box and then click the Change Manually icon. Add to Dictionary: Select to add the word to your dictionary. 3. Repeat for each misspelled word. 4. Click the Finish Spellchecking button when you are finished - OR - Click the Cancel button to exit Spell checking mode. Tip: Edit any misspelled word by clicking on it. 124 Insert Toolbar The Insert toolbar of the Editor for the Rich Text Editing has the following tools: Tool Insert Media * Document Manager * Template Manager * Save Template Hyperlink Manager (CTRL + K) * Remove Link (CTRL +SHIFT + K) Link to Portal Page Icon Description Opens the Image Manager which enables you to insert images into the Editor. The properties tab enables you to set the properties of the image to be inserted. See "Inserting Images" Opens the Document Manager which enables you to insert a document link into the Editor. Additional link settings are available. See "Inserting a Document" Opens the Template Manager which enables you to insert a template (*.htmtemplate) into the Editor. See "Inserting a Template" Save the content in the Editor as a new template. See "Saving a Template" Insert a link, anchor or email link. Additional settings are available. See "Adding an Email Link", "Adding a URL Link"., or "Adding an Anchor". Removes a link from selected content. See "Deleting a Link" Link to a site of your page. See "Linking to a Site Page" *These tools provide access your site's File Manager where, depending on your authorization level, you can also create folders, as well as upload and manage files. 125 Dropdown Toolbar The Dropdown toolbar of the Editor for the Rich Text Editing has the following tools: Tool Insert Symbol Icon Insert Table New Paragraph Toggle Full Screen Mode (F11) Description Option One: Click the Arrow icon to open the symbol gallery and then select the required symbol to be inserted. Option Two: Click the Insert Symbol icon to insert the symbol that was inserted previously. Click the Insert Table icon to insert a table in the current location - OR - Select Table Wizard to design a more complex table. See "Inserting a Table" Place your cursor in the required location and then select the New Paragraph icon (or CTRL + M) to insert a paragraph break. Select to toggle the Editor to/from full screen mode. Formatting Toolbar The Formatting toolbar of the Editor for the Rich Text Editing has the following tools: Tool Bold (CTRL + B) Italicize (CTRL + I) Indent Icon Description Text Formatting Add/remove bolding to selected content. Add/remove italics to selected content. Indent and Lists Indent selected content. Outdent Outdent selected content. Numbered List (ordered list) Bullet List (unordered list) Create a numbered list. Create a bullet list. 126 Tool Convert to Lower Case Horizontal Rule Paragraph Style Format Stripper Icon Description Other Transforms all letters in the select text to lower case. Inserts a horizontal rule where the cursor is currently located. Select the paragraph style for the selected text. Accessibility: If there is a large amount of text (over 750 characters) then headers make it much easier for all users to navigate through the content. 1. Select the content you want to strip formatting from (such as font color, font heading). 2. Click the Arrow icon beside the Strip Formatting button and then select the type of formatting to be stripped from these options: Strip All Formatting, Strip Css Formatting, Strip Font Elements, Strip Span Elements, Strip Word Formatting 127 Miscellaneous Toolbar Tool Modules Format Code Block XHTML Validator Icon Description Select a module to activate (or deactivate) from the dropdown list. Currently active modules are marked with a check mark. Inactive modules are marked with a cross. Provides the ability to edit and format code blocks of text whether they be HTML, CSS, JavaScript as well as C# and VB code. Uses the W3C XHTML Validator Page to perform validation of the current editor content. XHTML Validator is used for real-time validation of XHTML compliance. This dialog uses the W3C XHTML Validator Page to perform validation of the current editor content. The W3C service returns a compliancy report right within the editor dialog. This feature eliminates the need for manual copy/pasting of the HTML and validation in a separate browser window. 128 Content Toolbar The Content toolbar of the Editor for the Rich Text Editing. Tip: This toolbar is located below the editor. Tool Design Icon Description Click to view content in design mode. This enables all toolbars. HTML Click to view, add or edit the HTML for this content. This disables all tools and toolbars with the exception of the Design button. Preview Click to preview content inside editor. This disables all tools and toolbars with the exception of the Design and Preview buttons. Words* Displays the number of words inside the Editor. Displays the number of characters inside the Editor. How to increase or decrease the size of the Editor. 1. Position your mouse over the bottom right corner of the Editor until it becomes a two directional arrow. 2. Click and drag the Editor larger or smaller as desired. Release your mouse button when you are finished. Characters* Resize Editor** * These fields are updated each time you click inside the editor after a modification. 129 Managing Images and Documents Using the Resource Manager How to navigate to, select or manage folders and files using the Resource Manager of the Editor for the Rich Text Editing. The Resource Manager is commonly used for the Image Manager, Document Manager and Template Manager of the Editor. Note: Access to some tools is restricted by role. The Resource Manager consists of the following toolbar and windows: Resource Manager Toolbar, Folder Window, Filename Window, Preview/Properties Window. 130 Resource Manager Toolbar Tool Back Forward Refresh Icon Description Click to go back by one folder in the Folders window. Click to move forward by one folder in the Folders window. Click to refresh to retrieve newly updated files. New Folder 1. In the Folder window, select the parent folder and then click the New Folder button. 2. In the Enter the new folder name dialog box, replace "NewFolder" with the name for this new folder. 3. Click the OK button to confirm. Delete 1. Select the image or folder to be deleted and then click the Delete button. This displays the message "Are you sure you want to delete the selected file? The selected file may be in use. If deleted, some pages will not be displayed properly. 2. Click the OK button to confirm. 131 Tool Upload Icon Description Clicking the Upload button will open the Upload dialog box. Here you can select one or more files to upload and view the settings for uploading files. Note 1: The maximum file size that can be upload is listed at the base of the Upload dialog box at Max file size allowed. The default setting is 8MB. If you attempt to upload a file of a greater size then the following message is displayed "[FileName]: The size of the uploaded file exceeds max size allowed." Note 2: The list of file extensions that can be uploaded is listed at the base of the Upload dialog box at File extensions allowed. If you attempt to add a file not listed here the following message is displayed "[FileName]: The extension of the uploaded file is not valid. Please provide a valid file!" 1. In the Folder window, navigate to and select the Folder you want to upload the new file to. 2. Click the Upload button. This opens the Upload dialog box. 3. In the Upload dialog box, click the Select button and choose the required file from your computer. 4. Repeat Step 3 to add additional files. 5. Optional. To upload more than three files, click the Add button and then repeat Step 3. 6. At Overwrite if file exists?, check the check box if you wish to overwrite a file of the same name which has been previously uploaded - OR - Uncheck the check box if you don't want to overwrite an existing version of this file. If the file with this name does exist you will be notified by a dialog box when you upload the file. In this case, the new file selected for upload will not be uploaded. 7. Click the Upload button. Tip: Click the Remove button to remove a file which has been selected for upload. Folder Window: This window displays the folders of the File Manager using a hierarchical tree structure. Select a folder to view its sub-folders and/or files in the Filename Window. Folders can be moved by dragging into a different folder. Right click a folder to perform Delete, Rename, New Folder or Upload. 132 Filename Window: Displays a list of the folders and/or files within the selected folder. Select a file to view a preview and/or properties information in the Preview/Properties Window. Files can be moved by dragging into a different folder. Right click an image or folder to perform Delete, Rename, New Folder or Upload. Tip: Click the Collapse/Expand the left pane button to hide/show the Folder Window. This is useful once you have navigated to the required folder as it provides additional space to view files details. Preview/Properties Window: Displays a preview and/or properties of the selected file. Properties can be modified as required. Inserting a Document How to insert a document using the Editor for the Rich Text Editing. 1. Select Document Manager from the toolbar. This will open the Document Manager. 2. Navigate to and select the required document. See "Using the Resource Manager" 3. Optional. In the Link Text text box, modify the text associated with this document. The filename is used by default. 4. Optional. At Target select the target window for this link. Accessibility: When using option “New Window” insert “opens in new window” in Tooltip text box. 5. Optional. In the Tooltip text box, enter a tool tip to be displayed when a user places their mouse over this link. 133 6. Optional. At CSS Class, skip this step. 7. Click the Insert button. Tip: Additional document properties are available. See "Setting Document Properties" Setting Document Properties How to set/edit the optional properties of documents inserted using the Editor for the Rich Text Editing. 1. Insert the document. 2. Right-click on the document and click the Properties... list. This opens the Hyperlink Manager. 3. Add/edit the link, anchor or email address as required. button from the drop down 4. Click the OK button to confirm. Inserting Images How to insert an image using the Editor for the Rich Text Editing. 1. Select Insert Media (CTRL + G) from the toolbar. This opens the Image Manager. 2. Navigate to and select the required image. See "Using the Resource Manager" 3. Optional. Use the Best Fit, Actual Size, Zoom In and Zoom Out buttons to modify the previewed image - these changes cannot be saved. 4. Optional. Click the Image Editor button to edit the way the image is displayed. See "Working with the Image Editor" 5. Optional. Click the Properties tab and set image properties. See "Setting Image Properties" 6. Click the Insert button. 134 Editing an Image How to edit an image inserted in the Editor for the Rich Text Editing. 1. Select the image to be edited. 2. Right-click on the image. 3. Select Properties... from the drop down list. This opens the Properties window. To change the image: At Image Src, click the Image Manager button and then locate and select the new image. Modify any other properties as required. See "Setting Image Properties" 1. Click the OK button to confirm. Tip: The new image will inherit the properties of the previous image. Working with the Image Editor How to use the Image Editor tool in the Image Manager of the Editor for the Rich Text Editing. This topic assumes you are currently inserting a new image. See "Inserting Images" 1. Click the Image Editor button. This opens the Image Editor. 2. Select from these editing options: a. At Opacity, drag the slider to the preferred percentage (%) - OR - Enter the opacity percentage into the % text box. b. In the Resize section: 135 i. At Constrain proportions? check the check box to lock the width/height ratio - OR - Uncheck the check box to allow the width and height to be modified independently. ii. At Width and/or Height, drag the slider to the preferred image size - OR - Click the Decrease and Increase buttons. The pixel size is displayed in the respective Px text boxes to the right. c. At Flip, select a direction to flip the image from these options: None, Flip Horizontal, Flip Vertical, or Flip Both. d. At Rotate, select from None, 90°, 180°, or 270°. e. At Crop, click the Enable Crop button. This displays a red box which defines the area to be cropped. You can now define the area to be cropped: i. In the X and Y text boxes, enter the X (vertical) and Y (horizontal) coordinates for the crop area. ii. In the Width and Height text boxes, enter the width and height in pixels for the crop area. 3. In the Save As... text box, a new name for this edited image is displayed. It is in the format of filename_thumb. Modify this name as desired. Tip: Remove the _thumb from the file name to override the original file. The image will be saved as a .jpg extension file. 2. At Overwrite If File Exists?, check the check box to overwrite a file that exists with the name entered in the Save As... text box - OR - Uncheck the check box if you don't want to override an existing file. This enables warning message if the filename already exists. 3. Click the Save button. Troubleshooting. If the message "A file with a name same as the target already exists!" is displayed, this is preventing you from overwriting an existing image. Repeat Steps 4 and 6. Tip: When Cropping an image drag and resize the crop area on the preview image. 136 Setting Image Properties How to set the optional properties of an image using the Image Manager of the Editor for the Rich Text Editing. 1. If the image has already been inserted, right-click on the image and select Properties... from the drop down list. Alternatively, if you are currently adding the image, click on the Properties tab of the Image Manager. 2. Click the Lock Ratio / Unlock Ratio button to unlock or lock the width/height ratio at any time. Unlocking the ratio enables the width and/or height to be modified independently. 3. In the Width text box, enter the width in pixels which the image will be displayed as. 4. In the Height text box, enter the height in pixels which the image will be displayed as. 5. At Border Color, click the Color Picker button and select the border color. Note: A Border Width must be entered to display the border. 6. In the Border Width text box, enter the pixel width for the border - OR - use the Increase and Decrease arrows. 7. In the Alt Text text box, enter the alternative text for this image. 8. In the Long Description text box, enter the long description for this image. 9. At Image Alignment, click the Alignment Selector button and select the alignment for this image. 10. At Margin, set any of these fields: a. In the Top text box, enter a pixel value or use the Increase and Decrease arrows to set the top margin. b. In the Bottom text box, enter a pixel value or use the Increase and Decrease arrows to set the bottom margin. c. In the Right text box, enter a pixel value or use the Increase and Decrease arrows to set the right margin. d. In the Left text box, enter a pixel value or use the Increase and Decrease arrows to set the left margin. 11. At CSS Class, skip this step. 12. Click the OK button. 137 Setting the properties of an existing image 138 Setting the properties of an image during insertion Troubleshooting: Image Not Displaying Some images may not display in the Editor. This can occur if the image is set as hidden. 1. Remove the Hidden property from the image. See "Setting the Hidden Property of a File". 2. Return to the module to see if the image is displaying. You may need to Refresh (Hold down the Shift key and strike the F5 key) the page to see the changes. This can also occur if module caching is set for too longer period. In this case, extend the caching time as required. See "Configuring Cache Settings for a Module" Managing Links and Anchors Accessibility: To generate content that can be interpreted by assistive technologies such as the Accessibility Tools integrated in Microsoft Windows (the Narrator, the Magnifier, and the OnScreen Keyboard). By making content Section 508 or WCAG2 compliant, it means that equivalent access to information is available for all users. A hyperlink can be interpreted by the narrative software if you specify an additional description in the "Tooltip" field. Note that link 139 text should never be “click here” or “more information”. The link text should always describe specifically where the user will navigate to once activating the link. Adding an Email Link How to add an email link to text or an image using the Editor for the Rich Text Editing. Clicking the link opens the user's email program with the selected email address in the "Send To" field. Tip: If you type an email address with a recognized extension directly into the Editor it will automatically add a "send to" link to the address. 1. Highlight the text/object for the link - OR - Place you cursor where you want to insert the link. button. This opens the Hyperlink Manager. 2. Click the Hyperlink Manager (CTRL + K) 3. Select the E-mail tab. 4. In the Address text box, enter the email address. If you have selected a recognized email address it will be displayed here. 5. In the Link Text text box, enter the text for this link. Note: This field is not displayed when adding a link to an image. 6. In the Subject text box, enter a subject which will populate the subject field of the email message. 7. Optional. At CSS Class, skip this step. 8. Click the OK button to confirm. 140 Adding a Page Link How to insert a link to a page within this site using the Editor for the Rich Text Editing. 1. Highlight the text/object for the link - OR - Place you cursor where you want to insert the link. 2. Click the Hyperlink Manager (CTRL + K) button. This opens the Hyperlink Manager with the Hyperlink tab selected. 3. At Page, select the page for this link from the drop down list. This displays the URL of the selected page in the URL field below. Note: Disabled pages appear in the list, however they cannot be selected. 4. The following optional setting are available: a. In the Link Text text box, edit the linked text. Note: This field is not displayed when adding a link to an image. b. At Target, select the target window for this link. The default option is None which opens the link in the current window. Accessibility: When using option “New Window” insert “opens in new window” in Tooltip text box. c. In the Tooltip text box, enter a tool tip to be displayed when a user places their mouse over this link. d. At CSS Class, skip this step. e. Check the Track the number of times this link is clicked, skip this step. NSU uses Google Analytics for tracking. i. Check the Log the user, date and time for each click, skip this step. 5. Click the OK button. 141 Adding an Anchor Link How to create a link to an anchor using the Editor for the Rich Text Editing. 1. Highlight the text/object to be linked to the anchor. button. This opens the Hyperlink Manager 2. Click the Hyperlink Manager (CTRL + K) with the Hyperlink tab pre-selected. 3. At Existing Anchor, select the anchor name. This displays the anchor URL in the URL field. E.g. #Fair Labor 4. The following optional settings are available: a. In the Link Text text box, enter/edit the linked text as required. b. At Target, select the target for this link - OR - Select None to use the existing window. Accessibility: When using option “New Window” insert “opens in new window” in Tooltip text box. c. In the Tooltip text box, enter the text to be displayed when a user places their mouse over this link. d. At CSS Class, skip this step. e. Check the Track the number of times this link is clicked, skip this step. NSU uses Google Analytics for tracking. i. Check the Log the user, date and time for each click, skip this step. 5. Click the OK button to confirm. Related Topics: See "Adding an Anchor" 142 Adding a URL Link How to insert a link to a URL located on another web site using the Editor for the Rich Text Editing. 1. Highlight the text/object for the link - OR - Place you cursor where you want to insert the link. 2. Click the Hyperlink Manager (CTRL + K) button. This opens the Hyperlink Manager with the Hyperlink tab pre-selected. 3. In the URL text box, enter the URL address for this link. 4. Optional. In the Link Text text box, enter the text for this link. If you highlighted text at Step 1, then this field will be pre-populated with that text. Note: This field is not displayed when adding a link to an image. 5. Optional. At Target, select the target window for this link. Accessibility: When using option “New Window” insert “opens in new window” in Tooltip text box. 6. Optional. In the Tooltip text box, enter a tool tip to be displayed when a user places their mouse over this link. 7. Optional. At CSS Class, skip this step. 8. Click the OK button to confirm. 143 Linking to a Site Page How to link to any page of your site using the Editor for the Rich Text Editing. Note: You can only select links which you are authorized to view. 1. Highlight the text/object for the link - OR - Place you cursor where you want to insert the link. 2. Click the Link to Portal Page drop down list on the actions toolbar. 3. Maximize the Portal Links heading to display a list of your site pages. 4. Locate and select the page for this link. Tip: If you didn't select any text/object at Step 1, then the page name is used as the linked text. E.g. If you link to the Home page, then a Home link is inserted. Editing an Email or URL Link How to edit a link in the Editor for the Rich Text Editing. Option One: 1. Select the linked text or object. 2. Click the Hyperlink Manager (CTRL + K) button. This opens the Hyperlink Manager. 3. Edit the link as required. For more details on the available fields, see "Adding an Email Link" or "Adding a URL Link" 4. Click the OK button. Option Two: 1. Right-click on the linked text or object. 2. Select Properties... from the drop down list. This opens the Hyperlink Manager. 144 3. Edit the link as required. For more details on the available fields, see "Adding an Email Link" or "Adding a URL Link" 4. Click the OK button. Editing a Site Page Link How to edit a link to a page in your site in the Editor for the Rich Text Editing. 1. Click on or highlight the linked text/object. 2. Click the Link to Portal Page drop down list on the actions toolbar. 3. Select a new link. Deleting a Link How to remove a link from the Editor for the Rich Text Editing. Option One: 1. Select the linked text or object. 2. Click the Remove Link (CTRL + SHIFT + K) button. Option Two: 1. Right-click on the linked text or object. 2. Select Remove Link from the drop down list. This opens the Hyperlink Manager. Adding an Anchor How to create an anchor using the Editor for the Rich Text Editing. An anchor is a location within this content which can be linked to using the Hyperlink Manager. Note: Links to this anchor can only be created in this instance of this module. 1. Place your cursor where you want to insert the anchor - OR - Highlight the text or object for the anchor. Note: Text may display link formatting even though there is no link. 2. 3. 4. 5. Click the Hyperlink Manager (CTRL + K) button. This opens the Hyperlink Manager. Select the Anchor tab. In the Name text box, enter an anchor name. Click the OK button to confirm. 145 Editing an Anchor How to edit an anchor using the Editor for the Rich Text Editing. Option One: 1. Select the anchored text or object. 2. Click the Hyperlink Manager (CTRL + K) 3. Edit the anchor as required. 4. Click the OK button to confirm. button. This opens the Hyperlink Manager. Option Two: 1. Right-click on the linked text or object. 2. Select Properties... from the drop down list. This opens the Hyperlink Manager. 3. Edit the anchor as required. 4. Click the OK button to confirm. Deleting an Anchor How to delete an anchor (bookmark) from the Editor for the Rich Text Editing. Option One: Use this option when the anchor has been created by first selecting text or an object. 1. Select the linked text or object. 2. Click the Remove Link (CTRL + SHIFT + K) button. 146 Managing Tables Inserting a Table How to insert a table using the Editor for the Rich Text Editing. 1. Place you cursor where you want to insert the table. button. 2. Click the Insert Table 3. Select for these options: To insert a basic table, move your cursor to highlight the number of rows or columns for the table and then click to select it. This displays the basic table in the Editor. To design a more complex table, click the Table Wizard button. See "Setting the Table Design" 147 Editing a Table How to edit a table using the right click menu or the Table Wizard of the Editor for the Rich Text Editing. 1. Place your cursor inside the table. Note: If you want to use the drop down list to modify the table design (rather than the Table Wizard) then place your cursor in the cell where you want to perform the modification. 2. Right-click using your mouse. This displays the drop down list. 3. Select an option to modify the rows, columns or cells of the table - OR - Select either the Table Properties or Cell Properties option to use the Table Wizard to modify the table. 4. Click the OK button to confirm. 148 Editing a Table Setting Table Properties How to set the optional properties of a new or existing table using the Table Wizard of the Editor for the Rich Text Editing. 1. Open the Table Wizard. See "Inserting a Table" - OR - Right-click on an existing table and then select Table Properties from the drop down list. 2. Go to the Table Properties tab and set any of these optional settings: 3. In the Dimensions section: a. In the Height text box, set the table height in either pixels or as a percentage by either typing a value into the text box or by using the Increase and Decrease buttons. The value will automatically be saved in pixels unless you enter the percentage symbol (%) into the text box. E.g. Enter 100px or 100 to set the height as 100 pixels, or enter 100% to set the height as 100%. Leave blank for no specified height. b. In the Width text box, set the table width in either pixels or as a percentage as for height. Leave blank for no specified width. 4. In the Layout section: a. In the Cell Spacing text box, enter a number to set the pixel spacing between cells - OR - Use the Increase and Decrease buttons. b. In the Cell Padding text box, enter a number to set the pixel padding between cells - OR - Use the Increase and Decrease buttons. 149 c. At Alignment, click the arrow of the Alignment Selector select the table alignment. d. At Background Color, click the Color Picker background color. button and button and select the e. At Style Builder, click the Style Builder button and build one or more styles. See "Using the Style Builder" f. At CSS Class, select a class for the content of this table. g. At Back Image, click the Image SRC button and select a background image for the table. h. In the Id text box, enter an Id reference for this table. 5. In the CSS Class Layout section: a. Select a CSS layout design from the drop down list. The design is displayed in the Preview window below. b. At Apply Special Formats To, select which rows or column you want to apply special formatting to. You can see the changes in the Preview window below. 6. Optional. Select a new tab to set additional properties. 7. Click the OK button. Setting Table Properties Showing/Hiding Table Border How to hide or show the table borders using the Table Wizard of the Editor for the Rich Text Editing. 1. Place your cursor on the outer edge of the table. The cursor will change to show the table can be selected. 150 2. Right-click and select Show/Hide Border from the drop down list to either hide or show the table border. Setting Cell Properties How to set the optional cell properties of a new or existing table using the Table Wizard of the Editor for the Rich Text Editing. The below tutorial demonstrates how to add a background color to the first row of your table. 1. Right-click inside a cell of an existing table and select down list. Cell Properties from the drop 2. This opens the Cell Properties tab of the Table Wizard. 151 3. At Preview, select the cells you want to set the properties of: To select a single cell, click on that cell. The selected cell is highlighted. To select multiple cells, hold down the Ctrl key and click on cell to select it - OR Click the Select All link and then hold down the Ctrl key and click on one or more cells to deselect them. The selected cells are highlighted. 4. At Cell Properties, set any of the following: a. In the Height text box, set the cell height in either pixels or as a percentage by either typing a value into the text box or by using the Increase and Decrease buttons. The value will automatically be saved in pixels unless you enter the percentage symbol (%) into the text box. E.g. Enter 100px or 100 to set the height as 100 pixels, or enter 100% to set the height as 100%. Leave blank for no specified height. b. In the Width text box, set the cell width in either pixels or as a percentage as for height. Leave blank for no specified width. c. At Content Alignment, click the arrow of the Alignment Selector button and select the alignment of content. d. At Background Color, click the Color Picker background color. button and select the 152 button and build one or more e. At Style Builder, click the Style Builder styles. See "Using the Style Builder" f. At CSS Class, select a class for this/these cells. g. At Back Image, click the Image Manager button and select a background image for the table. h. In the Id text box, enter an Id reference for this/these cells. i. At No Text Wrapping, check the check box to disallow text within this/these cells from wrapping to another line - OR - Uncheck the check box to allow text to wrap. 5. Click the OK button to confirm. Alternatively, you can select another tab of the Table Wizard to set more properties. Setting Cell Properties 153 Setting Table Accessibility Accessibility: To generate content that can be interpreted by assistive technologies such as the Accessibility Tools integrated in Microsoft Windows (the Narrator, the Magnifier, and the OnScreen Keyboard). By making content Section 508 or WCAG2 compliant, it means that equivalent access to information is available for all users. The narrative software uses the information from the Accessibility table fields (heading rows, columns, caption alignment and summary) to produce a Tooltip message for each table cell. Users with impaired vision can see those Tooltips as they hover over the cells with the mouse. Also assistive technologies are able to read the text included in these fields and make it available through synthesized speech or Braille output. How to set the accessibility of a new or existing table using the Table Wizard of the Editor for the Rich Text Editing. The below tutorial demonstrates how to set one heading row and add a caption to the table. 1. Right-click inside a cell of an existing table and select the Table Wizard (See "Inserting a Table") Table Properties - OR - Open 2. Select the Accessibility tab and set any of these Accessibility Options: a. In the Heading Rows text box, enter the number of rows which are headings. The maximum number of heading rows for the current table is displayed to the right of this field. E.g. 1 b. In the Heading Columns text box, enter the number of columns which are headings. The maximum number of heading columns for the current table is displayed to the right of this field. c. In the Caption text box, enter a caption to be displayed above the table. The caption should specify the title of the table. 154 d. Row associated with the Alignment Selector button and then select the alignment of the caption. If no alignment is selected, the default is center alignment. e. In the Summary text box, enter a summary of the table contents. The table summary isn't displayed on the page, but can be read using accessibility tools such as text readers. Summary is used to give more details on the contents of the table. This attribute only needs to be completed if user sets 2 for the Heading rows or Heading columns field. f. At Associate Cells With Headers, always check the check box to associate cells with headers - OR - uncheck the check box to disable. g. Optional. Select a new tab to set additional properties. 3. Click the OK button to confirm. Setting Table Accessibility by adding a table caption and a header row. 155 Using the Table Wizard How to design a table using the Table Wizard of the Editor for the Rich Text Editing. 1. Click the Insert Table button. 2. Select Table Wizard. This opens the Table Wizard on the Table Design tab. A table of two columns by two rows is displayed as the basis for your design. 3. Optional. Select a cell. This enables the Increase and Decrease buttons which are available to change the design. 4. Select an Increase or Decrease button to modify the table design. You can choose to add columns and rows, as well as span columns and rows. 5. Optional. Change tabs to set other properties. 6. Click the OK button to confirm. Setting the Table Design How to set the design a table using the Table Wizard of the Editor for the Rich Text Editing. Table Properties - OR - Open the Table 1. Right-click on an existing table and select Wizard. See "Inserting a Table" 2. Select the Table Design tab. If you are adding a new table, a table of two columns by two rows is displayed as the basis for your design. If you are editing an existing table, your current design is displayed. 3. To modify the table, perform any of these actions: To add a column: At Columns, click the Increase button. To remove a column: At Columns, click the Decrease button. To insert a column span: select a cell and then at Column Span, click the Increase button. To remove a column span: select a cell and then at Column Span, click the Decrease button. To add a row: At Rows, click the Increase button. To remove a row: At Row, click the Decrease button. To insert a row span: select a cell and then at Row Span, click the Increase button. To remove a row span: select a cell and then at Row Span, click the Decrease button. 4. Optional. Select a new tab to set additional properties. 156