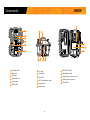
1
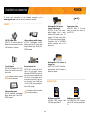
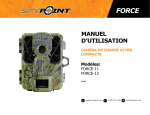
FORCE USER MANUAL ULTRA COMPACT TRAIL CAMERA Models: FORCE-11 FORCE-12 v1.0 support.spypoint.com 1-888-779-7646 [email protected] THANK YOU FOR CHOOSING A SPYPOINT PRODUCT. ABOUT US This manual will guide you through all the features of your device so that you will get optimal use out of your SPYPOINT product. GG Telecom’s mission is to offer products that are easy to use, innovative, affordable and of exceptional quality. Our SPYPOINT products are mainly used for hunting and residential/commercial surveillance. They are distributed and shipped all over the world and the market never stops growing. Prosperous and respected, GG Telecom is a company that constantly keeps abreast of new technologies and listens to its customers to deliver cutting-edge products with practical solutions that improve hunting and outdoor activities. Our priority is to provide outstanding customer service. If you need support for your product, please contact the SPYPOINT technical support or visit our website. CONTACT 1-888-779-7646 JOIN THE SPYPOINT COMMUNITY [email protected] facebook.com/SPYPOINT www.spypoint.com twitter.com/SPYPOINTcamera youtube.com/SPYPOINTtrailcam mySPYPOINT.com is an online camera & photo management system. This incredible tool for hunters is available for all SPYPOINT cameras. NON-CELLULAR CAMERAS CELLULAR CAMERAS Visit mySPYPOINT.com to create your free basic account. Visit mySPYPOINT.com to learn more about the different accounts available. For the latest version of the activation procedure, go to support.spypoint.com/activation. FORCE Table of contents Package contents.......................................................................... 4 Components.................................................................................. 5 Power............................................................................................ 7 Memory card................................................................................. 8 BUSY LED...................................................................................... 8 Mounting bracket.......................................................................... 9 Settings........................................................................................10 Sound recording...........................................................................14 File transfer to a computer...........................................................15 Troubleshooting...........................................................................16 Error messages............................................................................17 Available accessories....................................................................18 Specifications FORCE-11......................................................................................20 FORCE-12......................................................................................21 Regulation....................................................................................22 Limited warranty..........................................................................23 Repair service...............................................................................23 3 FORCE Package contents INT FORCE In the box Getting started 1. REMOVE THE CAMERA FROM THE MOUNTING BRACKET Note: Memory card and batteries are sold separately. Quick start guide Camera Installation strap 2. Before inserting or removing a memory card, always turn off the camera to prevent loss or damage of the photos already recorded. CHOOSE A POWER SOURCE DC 12V 12 Made in China | Fabriqué en Chine Navigation buttons 14 Configurationscreen Cable lock hole 6 12V Jack 15 Viewing screen (FORCE-12) 16 SD card slot v2.3 (FORCE-11) 5 Detection lens 13 14 15 7 BUSY LED 12V power source 16 6 alkaline AA batteries 8 Microphone Slot for installation strap 11 Tripod mount Lithium battery pack LIT-09/LIT-C-8 We recommend the use of new batteries to ensure maximum performance of the camera. Rechargeable AA batteries are not recommended. 9 Battery case 10 www.spypoint.com 13 Test light 4 INT ON-OFF/OK button Photo lens 3 ATTENTION: Pour réduire les risques de feu ou de brûlures, - Ne pas essayer d’ouvrir, désassembler, ou de réparer la pile. - Ne pas frapper, percer, court-circuiter les contacts externes de la pile ou mettre dans le feu ni l’eau. 12 2 RECHARGEABLE 7.4 VOLT LI-ION POLYMER BATTERY 2.0 Ah RECYCLE OR DISPOSE OF PROPERLY [email protected] 10 Li-ion 9 Models: LIT-09: Battery only LIT-C-8: LIT-09 Battery & charger 1-888-779-7646 11 7 WARNING: To reduce risk of fire or burns, - Do not attempt to open, disassemble, or service the battery pack. - Do not crush, puncture, short external contacts, or dispose of in fire or water. 3 5 SPYP support.spypoint.com INSERT THE MEMORY CARD Insert an SD/SDHC memory card (up to 32 GB capacity) in the card slot. The card is inserted correctly when a click is heard. Components 1 Invisible LEDs 3. • Push the tab to release the camera from the mounting bracket. • Remove the camera. 8 4 Mounting bracket 6 2 Quick start guide Ultra compact trail camera Models: FORCE-11 FORCE-12 1 SPYP v1.1 INT FORCE Quick start Guide de démarrage rapide guide Modèles: FORCE-11 FORCE-12 1. Note: Carte mémoire et piles sont vendues séparément. Caméra 6 1 Caméra de chasse ultra compacte 8 • Retirer la caméra. 3 4 11 Guide de démarrage rapide 7 9 10 Courroie d'installation 2. Composants Fente pour courroie d’installation 12 DC 12V Support pour trépied Made in China | Fabriqué en Chine ON-OFF/OK 13 Boutons de navigation 14 15 (FORCE-11) 15 Écran de visionnement 16 Fente pour carte SD v2.3 7 Lumière BUSY 13 16 Source 12V Bloc pile lithium LIT-09/LIT-C-8 6 piles AA alcalines (FORCE-12) 8 Microphone 9 Compartiment à piles www.spypoint.com [email protected] 12 14 Écrandeconfiguration INT 6 Prise 12V ATTENTION: Pour réduire les risques de feu ou de brûlures, - Ne pas essayer d’ouvrir, désassembler, ou de réparer la pile. - Ne pas frapper, percer, court-circuiter les contacts externes de la pile ou mettre dans le feu ni l’eau. 5 Lentille de détection RECHARGEABLE 7.4 VOLT LI-ION POLYMER BATTERY 2.0 Ah RECYCLE OR DISPOSE OF PROPERLY 11 1-888-779-7646 Li-ion Ouverture pour câble cadenas Models: LIT-09: Battery only LIT-C-8: LIT-09 Battery & charger Lumière de test 4 WARNING: To reduce risk of fire or burns, - Do not attempt to open, disassemble, or service the battery pack. - Do not crush, puncture, short external contacts, or dispose of in fire or water. 10 Lentille photo 3 support.spypoint.com Avant d’insérer ou de retirer une carte mémoire, toujours mettre la caméra à OFF pour éviter que les images présentes sur la carte soient supprimées ou endommagées. CHOISIR UNE SOURCE D'ALIMENTATION SPYP 1 DEL invisibles 2 INSÉRER UNE CARTE MÉMOIRE Insérer une carte mémoire de type SD/SDHC (jusqu’à une capacité de 32 Go) dans la fente pour carte SD. La carte est correctement insérée lorsqu’un clic se fait entendre. RETIRER LA CAMÉRA DU SOCLE • Poussersurlalanguetteafindedégagerlacaméradusocle. 2 5 Socle de fixation 3. Mise en route Dans la boîte SPYPOINT camera SPYP Nousrecommandonsl’utilisationdepilesneuvesafind’assurerun rendement maximal de la caméra. Les piles AA rechargeables sont déconseillées. v1.1 In der box Startem 1. ENTFERNEN SIE DIE KAMERA VON MONTAGE-KLAMMER Hinweis: Speicherkarte und Batterien separat erältlich. Schnellstartanleitung Kamera Überwachungs kamera Modelle: FORCE-11 FORCE-12 Montage klammer 9 10 2. DC 12V 12 Made in China | Fabriqué en Chine v2.3 14 15 SD-Kartensteckplatz Externen 12V Batterie 16 9 Batteriefach v1.1 SPYP INT FORCE Löcher für den Befestigungsgurt 11 Stativgewinde 2. Prima di inserire o di togliere una scheda memoria, spegnete sempre la telecamera, per evitare il danneggiamento o la perdita di dati registrati. SCEGLIERE LA FONTE D'ENERGIA Componenti 1 LED invisibili 12 ON-OFF/OK tasto DC 12V Telecomando 12 v2.3 6 Connessione 12V Made in China | Fabriqué en Chine 14 Schermatadiconfigurazione Fori per il cavo lucchetto 5 Lente di rilevazione www.spypoint.com 13 LED test 4 INT Lentefotografica 3 (FORCE-11) 15 Diplay visualizzativo (FORCE-12) 16 Lettore SD 13 14 15 7 BUSY LED 16 6 pile AA alcaline Presa esterna da 12 Volt Pacco pile Lithio LIT-09/LIT-C-8 Consigliamo di utilizzare batterie nuove, per avere il Massimo della telecamera. Inoltre si sconsiglia l’uso di batterie ricaricabili. 9 Vano batterie FORCE 10 Fori per il nastro di posizionamento 11 Filettatura per treppiede En la caja Cámara Modelos: FORCE-11 FORCE-12 10 2. Antes de insertar o retirar la tarjeta de memoria, apague la cámara para prevenir que las imágenes ya tomadas sean dañadas o borradas. SELECCIONE SU FUENTE DE CORRIENTE Componentes 11 Trípode 14 Pantalladeconfiguración Tecla ON-OFF/OK 12 DC 12V Botones de ajustes Made in China | Fabriqué en Chine v2.3 7 BUSY-LED 12 13 (FORCE-11) 15 Pantalladevisualización 14 15 (FORCE-12) 16 www.spypoint.com 13 Orificiosparaelcandado del cable 6 12V INT Luz de prueba 5 Lentedeladetección ATTENTION: Pour réduire les risques de feu ou de brûlures, - Ne pas essayer d’ouvrir, désassembler, ou de réparer la pile. - Ne pas frapper, percer, court-circuiter les contacts externes de la pile ou mettre dans le feu ni l’eau. Lentesfotográficas 3 4 RECHARGEABLE 7.4 VOLT LI-ION POLYMER BATTERY 2.0 Ah RECYCLE OR DISPOSE OF PROPERLY [email protected] 9 Li-ion 7 Models: LIT-09: Battery only LIT-C-8: LIT-09 Battery & charger +49 (0) 36331 50540 11 5 Cinturón defijación 2 INTRODUZCA UNA TARJETA DE MEMORIA Inserte una tarjeta de memoria SD/SDHC (de hasta 32 GB) en el lector detarjetasdelacámara.Cuandooigaclicestosignificaráquelatarjeta ha sido correctamente colocada. 3 4 Guía de inicio rápido WARNING: To reduce risk of fire or burns, - Do not attempt to open, disassemble, or service the battery pack. - Do not crush, puncture, short external contacts, or dispose of in fire or water. SAQUE LA CÁMARA DEL SOPORTE DE MONTAJE • Presione la pestaña para soltar la cámara del soporte de montaje. • Retire la cámara. 8 SPYP support.spypoint.com 6 2 Soporte de montaje 1 LED invisibles 1 Cámara de vigilancia 3. Para empezar 1. Nota: La tarjeta de memoria y las pilas se venden por separado. Guía de inicio rápido 16 Ranura de la tarjeta SD 8 Micrófono Salida externa de 12 voltios 6 pilas alcalinas AA • Una batería de litio LIT-09/LIT-C-8 Le recomendamos emplear nuevas pilas para obtener los mejores resultados de su cámara. Además, no se recomienda el uso de baterías AA recargables. 9 Compartimento de las pilas v1.1 10 ATTENTION: Pour réduire les risques de feu ou de brûlures, - Ne pas essayer d’ouvrir, désassembler, ou de réparer la pile. - Ne pas frapper, percer, court-circuiter les contacts externes de la pile ou mettre dans le feu ni l’eau. INT 9 8 Microfono v1.1 SPYP 7 Cinghia di fissaggio RECHARGEABLE 7.4 VOLT LI-ION POLYMER BATTERY 2.0 Ah RECYCLE OR DISPOSE OF PROPERLY [email protected] 11 5 Li-ion INSERIRE LA SCHEDA DI MEMORIA InseriteunaschedaSD/SDHC(finoa32GB)nell’appositafessura.Se è udibile un click la scheda è stata inserita correttamente. 3 4 Models: LIT-09: Battery only LIT-C-8: LIT-09 Battery & charger +49 (0) 36331 50540 3. RIMUOVERE LA VIDEOCAMERA DAL GANCIO DI MONTAGGIO • Prema il tasto sul dispositivo di montaggio. • Stacchi la telecamera. WARNING: To reduce risk of fire or burns, - Do not attempt to open, disassemble, or service the battery pack. - Do not crush, puncture, short external contacts, or dispose of in fire or water. 8 SPYP support.spypoint.com 6 2 Guida di avvio rapido Gancio di montaggio 2 1 Telecamera Modelli: FORCE-11 FORCE-12 Lithium-Akku-Pack LIT-09/LIT-C-8 Avvio 1. Nota: Scheda di memoria e batterie acquistabili separatamente. Telecamera per sorveglianza 6 Alkaline AABatterien Wir empfehlen, neue Batterien zu verwenden, um die maximale Leistung aus Ihrer Kamera herauszuholen. Weiterhin wird die VerwendungvonwiederaufladbarenAABatteriennichtempfohlen. Nella confezione Guida di avvio rapido www.spypoint.com 13 Betrachtungs-Bildschirm (FORCE-12) 10 INT (FORCE-11) 15 16 7 BUSY LED ATTENTION: Pour réduire les risques de feu ou de brûlures, - Ne pas essayer d’ouvrir, désassembler, ou de réparer la pile. - Ne pas frapper, percer, court-circuiter les contacts externes de la pile ou mettre dans le feu ni l’eau. 14 Konfigurations-Bildschirm Löcher für das Kabelschloss 6 12V Anschluss RECHARGEABLE 7.4 VOLT LI-ION POLYMER BATTERY 2.0 Ah RECYCLE OR DISPOSE OF PROPERLY ON-OFF/OK-Taste 13 Bedienschaltfläche Test-LED 5 Erfassungslinse 8 Mikrofon [email protected] Vor dem Einsetzen oder Entfernen einer Speicherkarte, schalten Sie die Kamera immer vorher aus, um einen Verlust oder eine Beschädigung von den bereits vorhandenen Aufnahmen zu verhindern. Li-ion 12 Fotolinse 4 Mounting bracket WÄHLEN SIE IHRE STROMQUELLE Models: LIT-09: Battery only LIT-C-8: LIT-09 Battery & charger +49 (0) 36331 50540 11 7 Komponenten 3 LEGEN EINE SIM-KARTE EIN Legen Sie eine SD/SDHC Speicherkarte (bis zu 32 GB) in den Kartenleser der Kamera. Wenn ein klicken zu hören ist, wurde die Karte korrekt eingelegt. 3 Montage klammer 2 3. 5 WARNING: To reduce risk of fire or burns, - Do not attempt to open, disassemble, or service the battery pack. - Do not crush, puncture, short external contacts, or dispose of in fire or water. • Drücken Sie die Lasche an der Montage halterung. • Entfernen Sie die Kamera. 8 SPYP Installation strap support.spypoint.com www.spypoint.info 6 4 Schnellstartanleitung 1 Unsichtbare LEDs 1 2 FORCE INT 10 Orificiosparalacintade fijación 4 SPYP FORCE Components 13 1 7 8 2 3 4 14 5 15 16 17 6 9 1 Invisibles LEDs 2 Photo lens 3 Test light 4 Cable lock hole 5 Light sensor 6 Fresnel lens 10 11 12 7 12V jack 13 ON-OFF/OK button 8 Microphone 14 Navigation buttons 9 BUSY LED 15 Configuration screen 10 Slot for installation strap 16 Viewing screen 17 SD card slot 11 Tripod mount 12 Battery case 5 (FORCE-11) (FORCE-12) FORCE Components 1 Invisible LEDs Night lighting to obtain black and white photos and videos. 10 Slot for installation strap Allows the user to install the camera using the installation strap included. 2 Photo lens Image sensor and infrared filter. 11 Tripod mount Standard ¼-20" tripod mount. 3 Test light Flashes in TEST mode when there is detection and flashes 60 seconds in PHOTO/VIDEO mode to allow the user to leave without being photographed or recorded. 12 Battery case Case for AA batteries or a rechargeable lithium battery pack. 13 ON-OFF/OK button Allows the user to turn on/off the camera and to make a selection. Navigation buttons Buttons to set the camera. Configuration screen Allows the user to configure the settings of the camera through the main menu. Viewign screen Allows the user to access the main menu and view photos/videos. SD card slot An SD card is required to record photos/ videos. 4 Cable lock hole Allows the user to install a CL-6FT cable lock, sold separately. 14 5 Light sensor Allows the lighting of the LEDs panel at night. 15 6 Fresnel lens Expands the detection area and increases the sensitivity of the camera’s motion sensor. 16 17 7 1) 12V power jack 1)This camera can be powered from an external 12-volt DC input such as a 12V battery or a 12V adapter, each sold separately. 8 Microphone Records sound in video mode. 9 BUSY LED Lights up when TEST mode is activated. 6 (FORCE-11) (FORCE-12) FORCE Power EXTERNAL (12V) This camera can also be powered by an external 12-volt DC input such as a 12-volt battery (KIT-12V, BATT-12V or KIT6V/12V) or a 12-volt adapter (AD-12V), sold separately. The battery level is shown in the bottom right corner of the screen when the camera is in TEST mode. When a single line remains,the camera will continue to take photos. However, we strongly recommend to change the AA batteries or charge the lithium battery pack before they are empty. If a video is being recorded and the battery level reaches 0%, the camera saves the file before shutting down. AA BATTERIES DC 12V Models: LIT-09: Battery only LIT-C-8: LIT-09 Battery & charger SPYP RECHARGEABLE 7.4 VOLT LI-ION POLYMER BATTERY 2.0 Ah RECYCLE OR DISPOSE OF PROPERLY Li-ion WARNING: To reduce risk of fire or burns, - Do not attempt to open, disassemble, or service the battery pack. - Do not crush, puncture, short external contacts, or dispose of in fire or water. This camera requires 6 AA batteries (1.5V). The use of alkaline or lithium batteries is strongly recommended. Insert the batteries as indicated inside the battery case. Battery polarity must be followed. INT v2.3 www.spypoint.com Made in China | Fabriqué en Chine ATTENTION: Pour réduire les risques de feu ou de brûlures, - Ne pas essayer d’ouvrir, désassembler, ou de réparer la pile. - Ne pas frapper, percer, court-circuiter les contacts externes de la pile ou mettre dans le feu ni l’eau. Please note that the voltage of rechargeable AA batteries (1.2V) is insufficient to power the SPYPOINT camera. We also recommend the use of new batteries to ensure maximum performance of the camera. For the available accessories, see p.18. LITHIUM BATTERY PACK Models: LIT-09: Battery only LIT-C-8: LIT-09 Battery & charger SPYP v2.3 INT Made in China | Fabriqué en Chine www.spypoint.com ATTENTION: Pour réduire les risques de feu ou de brûlures, - Ne pas essayer d’ouvrir, désassembler, ou de réparer la pile. - Ne pas frapper, percer, court-circuiter les contacts externes de la pile ou mettre dans le feu ni l’eau. RECHARGEABLE 7.4 VOLT LI-ION POLYMER BATTERY 2.0 Ah RECYCLE OR DISPOSE OF PROPERLY Li-ion WARNING: To reduce risk of fire or burns, - Do not attempt to open, disassemble, or service the battery pack. - Do not crush, puncture, short external contacts, or dispose of in fire or water. This SPYPOINT camera can be powered by a rechargeable lithium battery pack LIT-09/LIT-C-8 (sold separately). This type of battery is less affected by cold temperatures and lasts up to 3 times longer than an alkaline batteries. 7 FORCE Memory card / "BUSY" LED / Mounting bracket INSERTING THE MEMORY CARD Insert an SD/SDHC memory card (up to 32 GB capacity) in the card slot. The card is inserted correctly when a click is heard. MEMORY CARD A memory card is required to record photos and videos. The camera is compatible with SD/SDHC memory cards, up to 32 GB capacity (sold separately, p.18). The percentage of used space on SD card appears in the top right corner of the screen in TEST mode, and the number of photos left appears in the bottom left corner. Here is a table of the approximate number of photos and length of videos that can be recorded with different memory card capacities. Many photo and video resolutions are noted, see those corresponding to the camera. Before inserting or removing a memory card, always turn off the camera to prevent loss or damage of the photos already recorded. Note: This SPYPOINT camera is equiped with continuous file recording. When the memory card is full, the camera will continue to record photos or videos by deleting the first recorded files. 4 GB 8 GB 16 GB 32GB 3 MP 4100 8200 16400 32800 4 MP 3800 7600 15200 30400 5 MP 3400 6800 13600 27300 6 MP 3200 6300 12600 25300 REMOVING THE MEMORY CARD Lightly press the memory card into the camera once to pop it out of the slot and remove it. Photo 7 MP 2700 5500 10900 21800 8 MP 2400 4800 9500 19000 9 MP 2200 4500 8900 18000 10 MP 1900 3800 7600 15200 11 MP 1700 3400 6700 13400 12 MP 1600 3200 6300 12600 4h 8h 16 h 32 h 2h10 4h10 8h20 16h40 40 min 1h20 2h40 5h20 BUSY LED The BUSY light is located at the back of the camera and is covered by a rubber cap. In order to see the BUSY light, the rubber cap has to be removed. It is a diagnostic tool. It lights up when the camera starts, when the camera records a file and in TEST mode at the same time as the test light (located in front of the camera). Video 320 x 240 640 x 480 1280 x 720 When the camera is turned on and no memory card is used, the camera beeps. In TEST mode, the screen displays "Insert Memory Card". 8 Memory card / "BUSY" LED / Mounting bracket MOUNTING BRACKET To remove the camera from the mounting bracket: 1. Push the tab to release the camera from the mounting bracket. 2. Remove the camera. 9 FORCE FORCE Settings INSTALLATION WITH THE SUPPLIED STRAP Use the and buttons to navigate in the interface and modify the selection, the OK button to select and the button to return to the previous menu. PHOTO Allows the user to take photos. When the PHOTO mode is selected, the test light in front of the camera will flash for 60 seconds and a countdown will appear on the screen to allow the user to leave the area without being photographed. VIDEO Allows the user to take videos. When the VIDEO mode is selected, the test light in front of the camera will flash for 60 seconds and a countdown will appear on the screen to allow the user to leave the area without being recorded. Use the mounting bracket or the camera slot for installation strap to fix the camera. The dimensions of the strap (included) is 1" X 60". TEST Allows the user to test the detection system of the camera. When the TEST mode is selected, no photo or video is recorded. Walk perpendicularly in front of the camera. When the camera detects a movement, the busy light and the test light blink to indicate that normally, a photo or video would have been recorded. If the system does not detect the movement, increase the detection distance using the "Sensitivity" option in the settings menu. Realigning the camera can also be required. In TEST mode, it is possible to take a photo by pressing the OK button (FORCE-12 only). The photo is saved and appears in the VIEW mode. 1. Insérez l’extrémité de la courroie dans la fente qui se trouve au dos du mécanisme. 2. Insérez la courroie dans la fente sous le levier et faites-la ressortir en arrière. 3. Créer une tension sur la courroie en la tirant vers la droite, puis rabattez vers la gauche le levier pour maintenir la position. Recommended installation height: about 3 feet above the ground. Do not place the camera facing the sun. 10 FORCE Settings VIEW (FORCE-12 only) Allows the user to view or delete recorded photos and videos on the camera screen. When a large photo in opened, press OK to view the different options available: Viewing with the screen of the camera: When the VIEW mode is selected, the latest photos or videos recorded appear as thumbnails on the screen. Press or to navigate this page, and press OK to view a photo in large format. To view next or previous large photo, press or . Press back to return to the thumbnail view. 2 3 1 1 9/9 Selected photo / total number of photos 2 The play icon indicates that this element is a video 3 The white outline indicates which photo is selected 11 Play: Allows the user to play or pause the video on the screen (this option is available only for videos). Zoom: Allows the user to zoom in or out. Date and time: Allows the user to view the date and time printed on the photo. Protect: Allows the user to protect a photo or video to prevent it from being deleted by selecting "Erase All". Erase: Allows the user to erase the photo or the video seen on the screen from the memory card. Erase all: Allows the user to erase from the memory card all stored photos and videos, with the exception of protected files. Format: Allows the user to format the memory card and delete all protected photos and videos. Exit: Allows the user to exit the menu and return to the viewing screen. FORCE Settings PHOTO SETTINGS Sets the options of the PHOTO mode. TIME LAPSE SETTINGS Sets the options of the TIME LAPSE mode. Delay: Interval: Allows the user to choose the time interval between each detection before the camera records the next photo. A longer delay minimizes the number of photos taken and maximizes the battery life. A shorter delay maximizes the number of photos taken but requires more battery power. The shorter times interval are recommended when the camera is used for security purposes. Allows the camera to take photos at regular preset intervals. For example, if the option "5m" is selected in the TIME LAPSE mode, the camera takes a photo every 5 minutes even if there is no detection. This option allows the user to obtain photos of game outside the detection range of the camera. (30s/1m/3m/5m/15m/30m/1h) (Instant/10s/1m/3m/5m/10m/15m/30m) Note: The TIME LAPSE mode only applies for photos, not videos. When the TIME LAPSE mode is selected, the DELAY option and the MULTI-SHOT mode are disabled. Multi-shot: (1/2/3/4/5/6 consecutive shots) Takes up to 6 consecutive shots at each detection, with a 10-second delay between each photo. This option allows the user to get up to 6 photos from different angles when the camera is in PHOTO mode. VIDEO SETTINGS Sets the options of the VIDEO mode. Delay: (10s/1m/3m/5m/10m/15m/30m) Allows the user to choose the time interval between each detection before the camera records the next video. A longer delay minimizes the number of videos taken and maximizes the battery life. A shorter delay maximizes the number of videos taken but requires more battery power. The shorter times interval are recommended when the camera is used for security purposes. Recommended settings The camera can be configured for usage in trails. This situation usually presents low activity level, fast subjects and a small number of photos is expected. These settings increase the chances of capturing animals that follow each other. The camera can also be configured for usage at a feeder's site. This situation usually presents high activity level, slow subjects and a large number of photos is expected. These settings moderate the number of photos taken while capturing overall activity on feeder's site. Video length: (10s/30s/60s/90s) Allows the user to select the duration of the recording when the camera is set in VIDEO mode. Here is a table showing the suggested settings for each situation: Trail Feeder Delay Instant 5 min Multi-shots 1 2-3 Photo first When this option is enabled, a photo is taken immediately before each video. Note: The file name of the photo corresponds to the digit before the video file name. For example, if the name of the photo is PICT001, the name of the video will be PICT002. When these recommended settings are not adapted to the situation, battery life can be affected. 12 FORCE Settings GENERAL SETTINGS Sets the general options of the camera. Info on photos: (Yes/No) Device name Allows the user to have date, time, temperature and moon phases printed on the photos. Allows naming the camera with the electronic keyboard to identify it clearly. This option is particularly useful for users with more than one camera. New moon: Waxing Crescent: First Quarter: Language: (English/Français/Deutsch/Italiano/Español/Norsk/Svenska/Dansk/ Čeština/Polska/Magyarország) Waxing Gibbous: Allows the user to select a language for the camera menus. Waning Gibbous: Full moon: Last Quarter: Waning crescent: Sensitivity: (Low/Medium/High) Allows the user to choose the detection sensitivity of the camera. A higher sensitivity allows the user to take more photos. Temp. units: (°C/°F) The camera will only detect sources of heat in movement. Make sure to have the least possible objects in front of the camera during the positioning. This prevents the camera of taking photos when oriented towards the sun while an object moves in front of the camera (e.g. a branch). Allows the user to select the temperature display. About the device: Displays system information: Date format: - Version number of firmware - Model - Device name (MM/DD/YY, DD/MM/YY) Allows the user to set the date as Month/Day/Year or as Day/Month/Year. Time: Allows the user to set the time as Hour/Minute. 13 FORCE Sound recording The SPYPOINT camera offers the possibility to record sound in VIDEO mode. When the VIDEO mode is selected, the camera automatically records the sound. Microphone 14 FORCE File transfer to a computer To transfer photos/videos to a computer: 1.Turn OFF the camera. 2.Remove the SD card from the camera. 3.Insert the SD card into the computer slot, or use a memory card adaptor. 4.The computer will detect the card and install the driver automatically. 4.Click on "My Computer" and select "Removable Disk". 5.Then click on "DCIM" and "100DSCIM" to find all recorded photos and videos. 6.Drag or save the files to the desired location. 15 FORCE Troubleshooting Problem No person/animal •Sunrise or sunset can trigger the sensor. Camera on photos must be re-orientated. •At night, the motion detector may detect beyond the range of the IR illumination. Reduce sensibility setting. •Small animals may trigger the unit. Reduce sensibi lity setting and/or raise height of camera. • Motion detector may detect animals through foliage. •If a person or animal moves quickly, it may move out of the camera’s field of view before the photo is taken. Move the camera further back or redirect the camera. •Make sure the mounting post or tree is stable and does not move. Possible solutions Impossible to turn • Verify if there are batteries in the camera. on the camera • Verify if the batteries are correctly installed. •Verify if the LIT-09 charger option is set accordingly to the power source. •Install the latest update (available on www.spy point.com under SUPPORT section). •Replace alkaline batteries or recharge the lithium battery pack. The screen of the camera turns off •The camera may be set to PHOTO or VIDEO mode and the screen turns off after a period of 60 seconds in order to preserve battery life. •The camera automatically resets itself to PHOTO or VIDEO mode (depending of the latest mode used or selected) after 2 minutes of inactivity on the main menu. • To return to the screen, turn off the camera and turn it on again. The camera beeps •Insert a memory card. The camera does not respond •Remove the batteries and reinstall them. •Replace alkaline batteries or recharge the lithium battery pack. Impossible to take photos/ videos •Verify if there are batteries in the camera. •Replace alkaline batteries or recharge the lithium battery pack. •Verify if the camera is turned on. Red light in front of the camera blinks • Camera is set in TEST mode. •Camera is set in PHOTO or VIDEO mode. The red light in front of the camera flashes for 60 seconds to allow the user to leave without being photographed or recorded. 16 FORCE Error messages Error message Possible solutions Insert memory card The use of a memory card is required to record photos and videos. Card error The camera cannot access the memory card. • Turn off the camera and turn it on again • Remove the memory card and insert it again. • Verify if the gold contacts are clean. • Format the memory card. Low battery Appears on the screen just before the camera turns off. Recharge the batteries or insert new ones. Always verify the battery level before using the camera. No image There are no files to view. Verify if the memory card contains photos/videos. Protected file It is impossible to delete the file because it is protected. To delete this file and all the others, just format the memory card. 17 FORCE Available accessories To obtain more information on the available accessories, www.spypoint.com. Here are the main accessories available: go to POWER 12V DC Power cable #CB-12FT, 12 ft power cable with alligator clips at one end to connect a 12V battery to a camera. 12-volt Adaptor #AD-12V, AC adaptor (6V to 12V). Powers the camera from an electrical outlet. An extension cable is required to use this accessory. Lithium battery pack & charger #LIT-C-8, Rechargeable lithium battery pack and AC charger with charge indicator light. Fits all SPYPOINT cameras. Spare power cable #PW-12FT, Spare 12 ft power cable, to connect the camera to the KIT-12V. Rechargeable 12V battery & charger set #BATT-12V, 12-volt 7.0Ah rechargeable battery and AC charger to power the camera. Universal power kit #KIT6V-12V, Universal kit with 6 volts or 12 volts output. Compatible with all SPYPOINT products or any other products equipped with a 6 volts or 12 volts power jack. 6 connectors included to fit any device. Includes 6 volts (5.6Ah) and 12 volts (2.8Ah) output configuration and AC charger. MEMORY CARD SPYP INT /RFN An extension cable is required to use this accessory. /RFN Lithium battery pack #LIT-09, Additional rechargeable lithium battery pack. Fits all SPYPOINT cameras. Rechargeable 12V battery, charger & housing kit #KIT-12V, 12-volt 7.0Ah rechargeable battery with a water resistant ABS plastic case, AC charger, 12 ft power cable (#PW12FT) and carrying strap included. Compatible with all SPYPOINT products equipped with a 12V power jack. HIGH SPEED/HAUTE VITESSE ULTRA HIGH SPEED/ULTRA HAUTE VITESSE Memory Card Carte Mémoire Memory Card Carte Mémoire SD Memory card 8GB #SD-8GB, SDHC memory 8 GB, High speed Class 6. 18 16 GB card SD Memory card 16GB #SD-16GB, SDHC UHS-1 memory card 16 GB, ultra high speed Class 10. FORCE Available accessories INSTALLATION AND SECURITY Cable lock #CL-6FT, 6 ft cable lock fits all SPYPOINT cameras. Steel security box #SB-FORCE, Steel box to secure the camera against theft. It also protects it from breakage caused by bears or other animals. Fits all 42 LED SPYPOINT cameras. Camera mount #MA-360, Adjustable mounting arm, fits all cameras that have a standard ¼-20" tripod mount. It can rotate 360° and tilt approx +/90°. Also available in black. Tripod #TP-CAM, SPYPOINT Lightweight tripod, in black aluminum, with a unique anchor system and a removable quick release plate. Max. height: 4.9 ft (1.5 m), min. height: 1.7 ft (0.5 m), max. load weight: 11 lbs (5 kg). Fits most SPYPOINT products. 19 Specifications (FORCE-11) Photo recording Detection system Photo resolution 11 MP Motion sensor PIR File format JPG Detection angle 55° Time lapse mode Predefined intervals from 30 s to 1 h Detection range Adjustable from 5 to 65 ft Multi-shot mode Up to 6 photos per detection Delay between each detection Adjustable from 10 s to 30 min Stamp (only on photos) Date, time, temperature (°C/°F) and moon phase Night time illumination system LEDs 42 LEDs Capture mode Color by day, black and white by night Type Invisible LEDs Video resolution 1280 x 720 (HD 720p) Exposure Automatic infrared level adjustment File format AVI Optical field of view Sequence lenght Adjustable from 10 to 90 s 40° Capture mode Color by day, black and white by night Dimensions Video recording 3.8” W X 5.0” H X 3.2” D Audio Recommendations Sound recording Mono (automatically recorded in video mode) Memory storage Support •Internal memory: none •External memory : SD/SDHC card (up to 32 GB) Viewing Built-in screen ACL 2.4’’ TV output Composite video (PAL/NTSC) Computer output USB 2,0 Power source Accessories sold separately, p.18 Alkaline or lithium batteries 6 x AA Lithium battery pack Rechargeable battery pack (LIT-09/LIT-C-8) External (12V jack) 12V battery (KIT6V-12V, KIT-12V, BATT-12V) or 12V adapter (AD-12V) 20 Operating temperature (-30 °C to + 50 °C) (-22 °F to +122 °F) Storage temperature (-40 °C to + 60 °C) (-40 °F to +140 °F) Specifications (FORCE-12) Photo recording Detection system Photo resolution 12 MP Motion sensor PIR File format JPG Detection angle 55° Time lapse mode Predefined intervals from 30 s to 1 h Detection range Adjustable from 5 to 65 ft Multi-shot mode Up to 6 photos per detection Delay between each detection Adjustable from 10 s to 30 min Stamp (only on photos) Date, time, temperature (°C/°F) and moon phase Night time illumination system LEDs 42 LEDs Capture mode Color by day, black and white by night Type Invisible LEDs Exposure Automatic infrared level adjustment Video recording Video resolution 1280 x 720 (HD 720p) File format AVI Sequence lenght Adjustable from 10 to 90 s Capture mode Color by day, black and white by night Optical field of view 40° Dimensions 3.8” W X 5.0” H X 3.2” D Audio Recommendations Sound recording Mono (automatically recorded in video mode) Memory storage Support •Internal memory: none •External memory : SD/SDHC card (up to 32 GB) Viewing Built-in screen ACL 2.4’’ TV output Composite video (PAL/NTSC) Computer output USB 2,0 Power source Accessories sold separately, p.18 Alkaline or lithium batteries 6 x AA Lithium battery pack Rechargeable battery pack (LIT-09/LIT-C-8) External (12V jack) 12V battery (KIT6V-12V, KIT-12V, BATT-12V) or 12V adapter (AD-12V) 21 Operating temperature (-30 °C to + 50 °C) (-22 °F to +122 °F) Storage temperature (-40 °C to + 60 °C) (-40 °F to +140 °F) Regulation FCC REGULATIONS FCC Part l5 This equipment has been tested and found to comply with the limits for a Class B digital device, pursuant to Part 15 of the Federal Communications Commission (FCC) rules. These limits are designed to provide reasonable protection against harmful interference in a residential installation. This equipment generates, uses and can radiate radio frequency energy and, if not installed and used in accordance with the instructions, may cause harmful interference to radio communications. However, there is no guarantee that interference will not occur in a particular installation. If this equipment does cause harmful interference to radio or television reception, which can be determined by turning the equipment off and on, the user is encouraged to try to correct the interference by one or more of the following measures: • Reorient or relocate the receiving antenna. • Increase the separation between the equipment and receiver. • Connect the equipment into an outlet on a circuit different from that to which the receiver is connected. • Consult the dealer or an experienced radio/TV technician for help. Changes or modifications to this equipment not expressly approved by the party responsible for compliance could void the user’s authority to operate the equipment.This device complies with Part 15 of the FCC rules. Operation is subject to the following two conditions: (1) this device may not cause harmful interference, and (2) this device must accept any interference received, including interference that may cause undesired operation. Hereby, GG Telecom declares that this camera is in compliance with the essential requirements and other relevant provisions of Directive 2004/108/EC. The user can obtain a copy of the Declaration of Conformity by e-mail at [email protected]. 22 Limited warranty and repair This SPYPOINT product designed by GG Telecom, is covered by a one (1) year warranty on material and workmanship starting from the original date of purchase. The sales receipt is the client’s proof of purchase and must be presented if warranty service is needed. This warranty will be honored in the country of purchase only. INSTRUCTIONS FOR REPAIR SERVICE GG Telecom will repair the product without charge or replace it at its discretion with an equivalent product, if it has a manufacturing defect covered by the warranty described previously. GG Telecom will pay the shipping costs only for the return of the products covered by the warranty. The shipping costs for an item sent will be assumed by the customer. This GG Telecom warranty does not apply: (a) to consumable parts, including but not limited to batteries, which performance is designed to decrease over the course of time; (b) to damage caused by misuse, use with another product, neglect, accidents, liquid contact, fire, earthquake or any other external cause; (c) to GG Telecom products that have been purchased online from an unauthorized dealer; (d) to products that have had any modification or tampering; (e) to cosmetic damage including but not limited to scratches and broken plastic; (f) to damage caused by operating the GG Telecom product outside of GG Telecom’s recommendations. Repairs for damages not covered by the warranty will be subject to a reasonable charge. The customer will pay all shipping costs. 1. BEFORE sending a product for repair, the costumer is welcomed to contact GG Telecom technical support team at 1-888-779-7646 or [email protected] and to clearly describe the problem and give a phone number where she or he can be reached. It happens regularly that some problems can be solved over the phone. 2. If a product needs to be sent, an RMA number will be given to the customer (Return Merchandise Authorization). 3. The original receipt or a copy must be sent along with the package. 4. The RMA number must be written on the outside of the package and sent to: CANADA GG Telecom 120 J.Aurèle-Roux Victoriaville, QC G6T 0N5 United States GG Telecom 555 VT route 78 Swanton, Vermont 05488 IMPORTANT: Under no circumstances will GG Telecom accept returned products without a Return Material Authorization number (RMA). It is essential to contact GG Telecom before making a return. The customer is liable for loss or damage to the product that may occur during the transport to GG Telecom. We recommend the use of a traceable method of shipping to ensure protection. WWW.SPYPOINT.COM 23