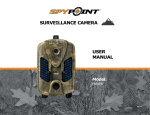
1
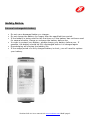
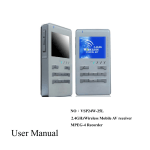
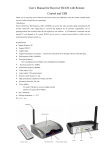
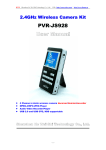
ZC-PVR-01 User Manual 2.4GHz wireless Mobile AV receiver and MPEG-4 Recorder ZedCam PVR-01 User manual V1b www.zedcam.com E&OE page 1 Safety Notice Internal rechargeable battery Do not use a damaged battery or charger. Do not charge the battery for longer than the specified time period. If the battery is being used for the first time or if the battery has not been used for several months, charge or recharge the battery before use. In order to protect your battery, please charge your battery before use. If possible, the battery should be fully discharged before it is charged again Overcharging will shorten the battery life. If the usage period of a fully charged battery is short, you will need to replace your battery. ZedCam PVR-01 User manual V1b www.zedcam.com E&OE page 2 Connect to AC socket (to charge the battery) Before using this product, please charge using the supplied DC adapter The battery indicator will light Red when it is charging. The battery indicator may light Green when it is fully charged – some versions do light Green and some switch off the Red light when fully charged Before first use, please charge the battery for circa 4 hours in order to fully charge the battery. Charge period is circa 4 hours from fully discharged. Important notice: During video recording or when transferring files, data errors may occur when using a nearly empty battery. In order to prevent this, check the battery level before using this product. If necessary, fully charge the battery before use. ZedCam PVR-01 User manual V1b www.zedcam.com E&OE page 3 Wireless receiving mode Use wireless receiving mode to receive video/audio signal Slide the receiving mode key to “R” (Wireless receiver). Press the Key to select the video channel – note that, by default, ZedCam cameras are set to channel 4: o CH1: 2414MHz; CH2: 2432MHz; CH3: 2450MHz; CH4 2468MHz. Press REC key to save the video/audio to the SD card Press REC button, to stop recording. After recording, the files will be in the folder: Multimedia menu\DCIM\100COACH The files will be sequentially named PICT001, PICT002 as MPEG files in AVI format. The volume cannot be adjusted during recording and ZedCam has replaced the earphone socket with the long range antenna. If internal/SD card memory is full, recording will stop. Note that the video/audio data is stored in half hour long files, and that if the device runs out of memory, then it may lock up and the last file is not retrievable. This means you will lose between 0 and 30 minutes of data. Hence it is important that you manually stop recording, before the memory card is full. If the PVR locks up, then press a thin item into the RESET hole on the base of the unit. An unfolded paper clip works well for this purpose. Multimedia player mode Use multimedia player file Slide the receiver mode key to “P” mode and the PVR will display the main menu of the Multimedia explorer, showing four file folders (MP3, VIDEO, DCIM, PHOTO). Press / key to select the function menu. Press to enter the function menu /: moves up and down to select a file folder. Press to access the file. +/-: moves to the selected file. Press : to play the file. Press to stop play and move back to the previous file During play mode, use +/- to adjust audio volume. When a file has completed playing, it will start playing the next file. ZedCam PVR-01 User manual V1b www.zedcam.com E&OE page 4 Connect to external equipment Use AV Cord to connect to external equipment Play video/audio through a TV Connect AV connector to the AV OUT plug of the PVR, connect 3 RCA plugs to TV set: Yellow is Video; the White ones are Audio (L); and Audio (R) Turn TV to AV mode (external input), to receive video from the ZedCam PVR. The screen will display the operating instructions. See previous section to playback a file Use wire cable to record AV file (not usually required for ZedCam) Connect AV cable to the AV IN plug of the PVR, connect 3 RCA plugs to the TV set. Yellow: Video; White: Audio (L); Audio (R) Slide receiver mode to “P” (multimedia receiver) mode, select recording function to record video from external equipment. Resolution setting: slide receiver mode switch to “P” (multimedia receiver) mode, select recording menu, press MENU Key to enter the Resolution, AV Quality sub-menu. Press the +/- key to select the function. Press Key to enter function menu; press +/- Key to select setting; press MENU key to select either “320 x 240” or “640 x 480” resolution. The factory default setting is “640 x 480”. Connect to external equipment This product supports the industry standard OTG (On the Go – see (http://en.wikipedia.org/wiki/USB_On-The-Go), which connects to a Udisk or removable hard disk for accessing and storage. ZedCam PVR-01 User manual V1b www.zedcam.com E&OE page 5 Delete and Copy function: If there is a SD card inserted, the PVR will default to that SD card. If no SD card is inserted or if the SD card has been inserted after the power has been turned on, the default memory card needs to be selected. When selecting “copy a file”, you need to set the memory type in advance. In player mode there is only one “ memory”. It cannot precede copy process. When memory is set to memory, entering into multimedia player will have four options (MP3, VIDEO, DCIM, PHOTO). When memory is set to Udisk, entering the multimedia player will display a listing of the main memory. Enter player; select the file or player option. Pressing MENU key will display “delete, copy to” operation, select / key to select option. Select “copy to” option, press to enter, will display “memory”, “main key memory” or “Udisk”. Select the appropriate memory using +/-. Press to complete the copy process. key to display “all, present and cancel” options. Press +/- press then Press key, it will display “Yes” or “No” options. Select “Yes” to delete or “No” to cancel the delete operation. Connect to external equipment Gently open the rubber cover on the bottom of the receiver; use a USB cable to connect with the PC using a USB 1.0/2.0 interface. Parameter setting Slide the receiver mode switch to “P” (Multimedia player) and the Mode, Main menu will appear. key to confirm and display the Press / to select Setup function. Press the following sub-menu: Time & Date setting, voice setting, language setting, memory setting, display, logo, contrast setting, default setting, system upgrade, auto shut down and format. ZedCam PVR-01 User manual V1b www.zedcam.com E&OE page 6 key and 3 options appear: Press +/- to select “Storage” Menu. Press “Storage” Main memory, U disk (Nand Flash, MSDC, U Disk), press +/- key, to confirm, Press to exit. Note MSDC is select storage location, use short for Memory SD Card : When SD is inserted, system default is SD card. If no SD is inserted select “Storage Media”. to access the initial screen. Press +/- to shift to (Logo) function menu, press “DATE/TIME” SETTING: to enter 3 sub Press +/- to shift to date & Time menu. Press functions: Date Format, Date Setting and Time Setting. Press to exit. to enter Press +/- to shift to the “Date Format” submenu, press to exit. “YY/MMM/DD” or DD/MM/YY, use +/- key to select. Press to enter. Press Press +/- to shift to the “Date Setting” submenu. Press / to move to desired location, press +/- again to make a change. to confirm and to exit. After you have made your change, press to enter. Press +/- to shift to the “Time Setting” submenu. Press Press / to move to desired location. Press +/- to change your setting. to confirm and to exit. After this has been done, press to enter. This function is Press +/- shift to “Beep” function menu. Press to confirm used to control the “on/off” key tone. Press +/- to select. Press and exit. to enter. Press / to Press +/- to enter the “Brightness” submenu. Press to confirm and to exit. adjust the brightness. Press to enter the three options Press +/- to shift to the “Format” submenu. Press available: Storage, Main memory Disk (Nand Flash, MSDC, U Disk). Use +/ to select the desired option. Select Yes or No for each option. Press +/use to confirm and to exit. to select. Press to enter. The choices are Press +/- and select “Language” menu. Press to confirm and to exit. English and Chinese. Press to enter. Setting time option: 1 Press +/-, select “Power Off” menu. Press min, 5 min, No auto-power off. Select and press +/- to confirm and exit. ZedCam PVR-01 User manual V1b www.zedcam.com E&OE page 7 to enter. Three options are Press +/- shift to “Display” menu. Press available: LCD, PAL, NTSC LCD. Make connection with “receiver” and “TV set”, PAL and NTSC are TV modes, please select suitable TV mode for your country – PAL in the United Kingdom. Press key to exit operation. Press +/- to reach default sub-menu. Press to enter, press +/- to enter. Select “Yes” or “No”, if “No” is chosen, the PVR will keep the existing settings. Settings Information status e.g. [Storage capacity [memory card capacity] [U disk capacity] [version]. Slide receive mode switch to “P” (multimedia receiver) mode, enter inquiry menu, press +/- to select the desired information. Press to enter Storage capacity Main memory U disk Version Displays the used and free capacity of the internal receiver/player memory Display the used and free capacity of SD card (only when SD card present, otherwise it will display “Card not in!”) Display the used and free capacity of U disk (only when U disk present, otherwise it will display “Card not in!”) Shows the software version of this machine ZedCam PVR-01 User manual V1b www.zedcam.com E&OE page 8 Product Specification Item Wireless receiver Video Audio Picture Storage Operating system supported Battery Standby time Item Receiver channel Receiver channel Specification 4 Channels Ch1: 2414MHz; CH2: 2432 MHz CH3: 2450 MHz CH4: 2468 MHz DB level -90dB Frequency FM 2.4 MHz LCD 2.5 TFT 882x228 Transflective LCD Video out mode NTSC/PAL Video mode NTSC/PAL Resolution 640x480 / 320x240 Compressed MPEG-AVI Max 30 frames per video format second Play file format MEPG-1/MEPG-4/ AVI/ASF/ADPCM Frequency range 20Hz – 20kHz Output channel Stereo Earphone output Not available – antenna instead Play file format MP3/MP2.5 Speaker 1W File format JPG/JPEG Flash memory 64 MB Storage media SD/MMC/SX/U disk/HDD IBM-PC Windows ME; 2000; XP; Vista Serial bus USB 2.0; USB OTG 1.1 Disk file format FAT32 Language English AC adapter 5V DC 2A Internal battery Li-ion battery 2500mAh Wireless recorder 4.5 hrs Player 7 hrs ZedCam PVR-01 User manual V1b www.zedcam.com E&OE page 9 Caution This product is controlled by a microprocessor; improper use may cause the PVR software to “hang”. Please switch off and on again. If the battery is not fully charged it may cause a serious system error when recording and transferring video files. Do not open the cover! Danger of electrical shock! Voltages of in excess of 100V are present inside PVR Please read this User Manual carefully. Caution: Protect this product from water and liquid otherwise electrical shock and fire damage may occur. For your own safety, please use only the DC converter provided. (ZedCam will not accept any responsibility for any damages or loss caused by the use of a DC converter not provided by ZedCam) ZedCam PVR-01 User manual V1b www.zedcam.com E&OE page 10