1
NOTICE
Note that when converting this document from its original format to a .pdf file,
some minor font and format changes may occur causing slight variations. When
viewing and printing this document, we cannot guarantee that your specific PC or
printer will support all of the fonts or graphics. Therefore, when you view the
document fonts may be substituted and your individual printer may not have the
capability to print the document correctly.
and
System Administration Terminal (SAT)
End-User Manual
CD Stock Number 750837
Document Revision 2a
(Applies to Release 1000
through Release 2500)
Contents of this manual are subject to change without prior notice at the discretion
of NEC Unified Solutions, Inc. This document has been prepared for the use of
employees and customers of NEC Unified Solutions, Inc. and may not be
reproduced without prior written approval of NEC Unified Solutions, Inc.
Dterm, Electra Elite and ElectraMail are registered trademarks of NEC America,
Inc. Windows is a registered trademark of Microsoft Corporation. AT&T is a
registered trademark of AT&T Wireless Services, Inc.
Copyright 2004
NEC America, Inc.
6535 N. State Highway 161
Irving, TX 75039-2402
Technology Development
TABLE OF CONTENTS
___________________________________________________________________________________
Chapter 1
Introduction
Section 1
Chapter 2
General Information ............................................................................ 1-1
SAT End-User Programming
Section 1
PC Requirements ................................................................................. 2-1
Section 2
Features of SAT End-User Programming .......................................... 2-1
Section 3
Software Installation ........................................................................... 2-2
3.1 Installing Electra Elite IPK/Electra Elite System Administration
Terminal (SAT) End-User Software ................................................... 2-2
Section 4
Using SAT ............................................................................................ 2-3
Section 5
IP Connection (Configuration) ........................................................... 2-4
5.1 Configuring SAT to Communicate via LAN/WAN ............................... 2-4
Section 6
Wizard ................................................................................................. 2-10
Section 7
Programming Screens ...................................................................... 2-12
Section 8
Toolbar ............................................................................................... 2-15
Section 9
Electra Elite IPK/Electra Elite Pulldown Menus .............................. 2-17
___________________________________________________________________________________
SAT End-User Manual
i
Document
Revision 2a
Electra Elite IPK
___________________________________________________________________________________
THIS PAGE INTENTIONALLY LEFT BLANK
___________________________________________________________________________________
ii
Table of Contents
LIST OF FIGURES
___________________________________________________________________________________
Figure 2-1
Password Screen .................................................................................................2-3
Figure 2-2
Connection Type Screen ......................................................................................2-5
Figure 2-3
Host Setup Screen ...............................................................................................2-5
Figure 2-4
IP Connection Setup Screen ................................................................................2-6
Figure 2-5
Search for Device Screen .....................................................................................2-7
Figure 2-6
Device Search Results Screen .............................................................................2-7
Figure 2-7
Example of IP Connection Setup ..........................................................................2-8
Figure 2-8
IP Connection Setup .............................................................................................2-8
Figure 2-9
Successful Configuration Screen .........................................................................2-9
Figure 2-10
Connect Screen ....................................................................................................2-9
Figure 2-11
IP Address on Connect Screen ..........................................................................2-10
Figure 2-12
Selecting Wizard for a Feature ...........................................................................2-11
Figure 2-13
Sample Wizard ...................................................................................................2-12
Figure 2-14
Electra Elite IPK/Electra Elite System Administration Terminal Software
Screen Samples .................................................................................................2-14
Figure 2-15
File Menu ............................................................................................................2-17
Figure 2-16
Edit Menu ...........................................................................................................2-19
Figure 2-17
Basic Menu .........................................................................................................2-21
Figure 2-18
User Menu ..........................................................................................................2-23
Figure 2-19
Communications Menu .......................................................................................2-24
Figure 2-20
Help Menu ..........................................................................................................2-26
___________________________________________________________________________________
SAT End-User Manual
iii
Document
Revision 2a
Electra Elite IPK
___________________________________________________________________________________
THIS PAGE INTENTIONALLY LEFT BLANK
___________________________________________________________________________________
iv
List of Tables
Introduction
Chapter 1
___________________________________________________________________________________
SECTION 1
GENERAL INFORMATION
Congratulations! You have purchased the System Administration Terminal (SAT)
End-User program for the Electra Elite IPK/Electra Elite Key Telephone System. The
SAT End-User is a user-friendly Windows application that allows the user to program
and configure several features of the Electra Elite IPK/Electra Elite KTS from the PC
environment.
This application allows the customer to change certain end-user based parameters,
such as:
J
J
J
J
J
J
J
J
J
J
J
J
J
J
J
J
All Call Page
Alphanumeric Display
Attendant Add-on Console
Automatic Day/Night Switching Time
Barge-In {Privacy Override}
Bilingual LCD Indication
Customized Message
Delayed Ringing
Direct Station Selection DSS
Distinctive Ringing
Electric Volume Control
Flexible Line Assignment
Flexible Ringing Assignment
Flexible Timeouts
Full Handsfree Operation
Handsfree Answerback
___________________________________________________________________________________
SAT End-User Manual
1-1
Document Revision 2a
Electra Elite IPK
___________________________________________________________________________________
J
J
J
J
J
J
J
J
J
J
J
Headset Operation
Internal Voice/Tone Signaling
Internal Zone Paging (Meet-Me)
Music On Hold (MOH)
Night Transfer
Off-Hook Ringing
Ringing Line Preference
Speed Dial Station
Speed Dial Stored Characters
Speed Dial System
Voice Prompt Selection
It is no longer necessary to call an authorized NEC technician to program these basic
system features. Meeting the requirements of a company’s day-to-day
communications needs just got easier!
Electra Elite IPK/Electra Elite SAT software makes programming the system easy.
You simply connect the PC that is running Electra Elite IPK/Electra Elite SAT software
to the KTS via a direct or remote connection. Make the programming changes in SAT,
upload the changes from SAT and KTS, and then exit.
SAT End-User is compatible with PCs running Windows 95, 98, ME, XP, 2000 or
NT 4.0 (or higher) operating system, and connects to the Electra Elite IPK/
Electra Elite KTS either directly (using the serial cable included) or remotely
using a modem.
Direct Connection - this method is used when the PC is located at the KTS
system. A serial cable connection between the PC and the Electra Elite IPK/
Electra Elite KTS is required.
Remote Connection - this method is used, over telephone lines, when the KTS
is located at a remote location. A modem in both the PC and the KTS is
required.
IP Connection - this method is used over a LAN/WAN network in conjunction
with the Elite LAN Programming Device allowing a PC, connected to the LAN/
WAN, to remotely program the Electra Elite IPK.
___________________________________________________________________________________
1-2
Introduction
SAT End-User
Programming
Chapter 2
___________________________________________________________________________________
SECTION 1
PC REQUIREMENTS
This manual provides detailed information for programming using the Electra Elite
IPK/Electra Elite System Administration Terminal (SAT) End-User software.
PC requirements:
J
J
J
J
J
SECTION 2
Pentium Processor
Microsoft Windows 95, 98, ME, XP, 2000 or NT 4.0 (or higher) operating system
At least 13 MB of free hard disk space
Unused PC serial communication port
MNP Class 4 or V.42 bis modem (if remote programming is required)
FEATURES OF SAT END-USER PROGRAMMING
Some of the features of SAT End-User Programming include:
Wizard – allows a user to select a feature using wizard. Wizard prompts the user to
program the necessary system data items associated with the feature. When wizard
is selected, a tabbed list of information is provided.
(For a detailed discussion of wizard, refer to Section 6 Wizard on page 2-10.)
System Data Upload/Download – allows system data to be transferred from/to a
personal computer to provide backup of data.
___________________________________________________________________________________
System Hardware Manual
2-1
Document Revision 2a
Electra Elite IPK
___________________________________________________________________________________
SECTION 3
SOFTWARE INSTALLATION
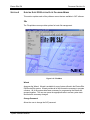
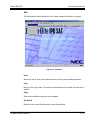
3.1
Installing Electra Elite IPK/Electra Elite System Administration
Terminal (SAT) End-User Software
Important: Consult your authorized NEC Dealer for
proper setup of the KTS for SAT programming.
1.
Insert the SAT End-User CD in your CD ROM drive.
2.
Click the Windows Start button.
3.
Select Run.
4.
Enter (CD drive letter [i.e. d:\]) \EliteIPKSATEU.exe and click OK.
5.
Follow the on-screen instructions of the installation program.
6.
To start the SAT End-User program:
•
Click the Start button.
•
Select PROGRAMS, Electra Elite IPK EU SAT for End-User.
•
Click Electra Elite IPK SAT EU.
•
Choose the following KTS Type:
<=S7000: This is used when system software is S7000 or below.
S8000: This is used when system software is S8000 only.
IPK:
•
This is used when the system is Electra Elite IPK R1000
or higher.
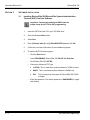
Enter the password. The default password is PASSWORD (in upper
case letters).
___________________________________________________________________________________
2-2
SAT End-User Programming
Electra Elite IPK
Document Revision 2a
___________________________________________________________________________________
Figure 2-1 Password Screen
SECTION 4
USING SAT
When you first begin SAT End-User, all the buttons and menu items are disabled
(grayed out) – except for these menu items:
COMMUNICATIONS/CONNECT/SETUP
Important: To enable the menu items, you must first
connect to the KTS using the following procedure:
1.
Select COMMUNICATIONS/SETUP/PC SERIAL PORT.
2.
Choose the PC COM Port that is connected to the KTS. The serial cable provides a direct connection to the KTS, while a modem provides for a remote connection.
3.
Set up the baud rate and line settings.
4.
For a direct connection, install the serial cable (provided) from the PC serial
port selected in Step 2, to COM1 on the KTS.
For a modem connection, when the KTS is at a remote location, connect a
modem to the SAT PC. See your authorized NEC Dealer for configuration of the
KTS for modem connection.
For IP connection, use the Elite LAN Programming Device connected to the
KSU. See your authorized NEC Dealer for installation of the Elite LAN PC
Programming device.
___________________________________________________________________________________
System Hardware Manual
2-3
Document Revision 2a
Electra Elite IPK
___________________________________________________________________________________
5.
Select COMMUNICATIONS/CONNECT, and choose either DIRECT, MODEM
or IP CONNECTION.
Refer to Section 5 IP Connection (Configuration) for the procedures for
setting up the SAT End-User program when IP connection is selected.
6.
Enter a password if the KTS requires one. See your authorized NEC Dealer for
password information.
7.
Click the CONNECT or DIAL button, depending on the type of connection.
8.
Once a connection is established, Electra Elite IPK SAT EU will automatically
perform a complete download of all system data from the KTS to the PC.
9.
When downloading is completed, all the menu items and buttons are enabled.
Begin programming the features using the various menu items in SAT.
10.
Complete programming. Select COMMUNICATIONS/UPLOAD and press the
Start button to upload all of the changes and programming to the KTS.
SAT End-User cannot save any data to the PC hard disk. When
closing Electra Elite IPK SAT EU, all programming and changes
are cleared from the PC.
SECTION 5
IP CONNECTION (CONFIGURATION)
When the IP connection is used, the Elite LAN PC Programming Device must be
installed.
5.1
Configuring SAT to Communicate via LAN/WAN
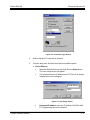
1.
With SAT already open click: COMMUNICATION/CONNECT. The
Connection Type screen appears.
___________________________________________________________________________________
2-4
SAT End-User Programming
Electra Elite IPK
Document Revision 2a
___________________________________________________________________________________
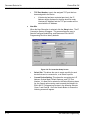
Figure 2-2 Connection Type Screen
2.
Ensure that the IP Connection is selected.
3.
From the drop down list chose from the two available options:
J
Direct Ethernet
H
H
When the Direct Ethernet is selected, click the Setup button.
The Host Setup Screen will appear.
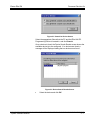
This screen allows the IP Address and TCP Port of an already
installed device to be assigned.
172.24.232.76
10001
H
Figure 2-3 Host Setup Screen
Hostname/IP Address: type the IP Address of the Elite LAN
PC Programming Device to contacted.
___________________________________________________________________________________
System Hardware Manual
2-5
Document Revision 2a
Electra Elite IPK
___________________________________________________________________________________
H
TCP Port Number: type in the assigned TCP port that has
been assigned to the device.
J
If the device has been contacted previously, the IP
Address will be displayed in the drop down list under
Hostname/IP Address and the TCP port number will be
saved with the IP Address.
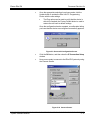
New Site
When the New Site option is selected, click the Setup button. The IP
Connection Screen will appear. This screen allows the user to
Search/Configure/Update/Ping, and Restore an Elite LAN PC
Programming Device to factory defaults.
H
H
Figure 2-4 IP Connection Setup Screen
Select Site: This allows the user to create a profile for each
device that can be connected to, or to Delete a profile.
Current Device Setting: This shows the current device’s IP
Address, Subnet Mask, Default Gateway, and TCP Port
Number. If a New Site is selected in the Select Site drop down
list, the Search option can be used to search the Network for
Elite LAN PC Programming Devices in the following Subnets:
Class C and Class B. Once the Search Button is chosen the
following screen will appear.
___________________________________________________________________________________
2-6
SAT End-User Programming
Electra Elite IPK
Document Revision 2a
___________________________________________________________________________________
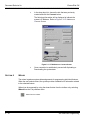
Figure 2-5 Search for Device Screen
Select the appropriate Subnet that the PC and the Elite LAN PC
Programming Device is located in, and click Search.
Once a device is found, the Device Search Results screen shows the
available device(s) to be configured. If no devices are found, a
message will be displayed stating that no devices were found.
H
Figure 2-6 Device Search Results Screen
Select the device and click OK.
___________________________________________________________________________________
System Hardware Manual
2-7
Document Revision 2a
Electra Elite IPK
___________________________________________________________________________________
The IP Connection Setup Screen will open with the current Device
Settings.
H
H
Figure 2-7 Example of IP Connection Setup
Once the Elite LAN PC Programming Device is located
configuration can be performed.
Figure 2-8 IP Connection Setup
Using the New Device Settings: the following items can be
configured: DHCP Yes or No, IP Address / Subnet Mask /
Default Gateway / TCP Port Number.
If DHCP Service is selected a static IP Address can not
be assigned. When the Use DHCP IP Assignment is
unchecked then the IP Address / Subnet Mask / Default
Gateway options will be allowed.
___________________________________________________________________________________
2-8
SAT End-User Programming
Electra Elite IPK
Document Revision 2a
___________________________________________________________________________________
H
Once the appropriate selections have been made, click the
Update button to update the Elite LAN PC Programming
Device with the new settings.
The Ping option can be used to verify that the device is
able to be reached, the Factory Default button is used to
restore the unit back to default settings.
Once the configuration has be accepted, a confirmation letting
you know that the device was configured successfully appears.
H
H
Figure 2-9 Successful Configuration Screen
Click the OK button, and then close the IP Connection Setup
window.
Now you are ready to connect to the Elite IPK System by using
the Connect Screen.
Figure 2-10 Connect Screen
___________________________________________________________________________________
System Hardware Manual
2-9
Document Revision 2a
Electra Elite IPK
___________________________________________________________________________________
H
In the drop down list, choose the site that was previously
created and click the Connect button.
The following information will be displayed to indicate the
system’s IP address. Refer to Figure 2-11 IP Address on
Connect Screen.
H
SECTION 6
Figure 2-11 IP Address on Connect Screen
Once connection is established, proceed with Uploading or
Downloading the system data.
WIZARD
The wizard organizes system data assignments for programming individual features.
When the user selects wizard, the system provides a tabbed list of information related
to the selected feature.
Wizard can be accessed by using the wizard button from the toolbar or by selecting
Wizard from the File pulldown menu.
Select from the toolbar.
___________________________________________________________________________________
2 - 10
SAT End-User Programming
Electra Elite IPK
Document Revision 2a
___________________________________________________________________________________
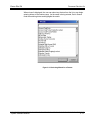
When wizard is displayed, the user can select any feature from the list or can begin
entering letters of the feature name. As the name is being entered, Quick Search
finds the matching letters and highlights the match.
Figure 2-12 Selecting Wizard for a Feature
___________________________________________________________________________________
System Hardware Manual
2 - 11
Document Revision 2a
Electra Elite IPK
___________________________________________________________________________________
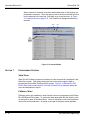
When a feature is selected, all system related data items for that feature are
presented in sequence. Enter the required values in the current tab and click
next to advance to the next tab. Click back to go to previous tab. In Figure
2-13 Sample Wizard on page 2-12. The Flexible Line Assignment feature is
selected.
Back
Next
Tab
Count
(for the
selected
feature
wizard)
Figure 2-13 Sample Wizard
SECTION 7
PROGRAMMING SCREENS
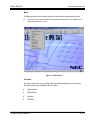
Main Menu
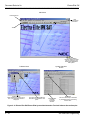
When the SAT software program is launched, the first screen that is displayed is the
Main Menu screen. This screen allows the user to access the options used to
program the Electra Elite IPK/Electra Elite system. Figure 2-14 Electra Elite IPK/
Electra Elite System Administration Terminal Software Screen Samples shows the
menu and describes the layout.
Pulldown Menu
Pulldown menus are available for each function involved in programming the Electra
Elite IPK/Electra Elite system. To access the data associated with the function, click
on the function name on the Main Menu. Some of the options on the initial pulldown
menu offer several selections. An arrow to the right of the option name indicates
___________________________________________________________________________________
2 - 12
SAT End-User Programming
Electra Elite IPK
Document Revision 2a
___________________________________________________________________________________
additional selections are available. Refer to Figure 2-14 Electra Elite IPK/Electra Elite
System Administration Terminal Software Screen Samples for an example of a
Pulldown Menu.
System Data Screen
When an option is selected from a pulldown menu, a screen is displayed that allows
the user to program data for the function selected. Figure 2-14 Electra Elite IPK/
Electra Elite System Administration Terminal Software Screen Samples shows an
example of a System Data Screen. This screen indicates three tabs. The tabs
indicate system data items that are grouped together for programming. The active tab
group is indicated by a box around the tab title. To access another tab group, press
the tab or use the keyboard shortcut. Keyboard shortcuts are displayed at the bottom
of the screen in the Information Bar.
___________________________________________________________________________________
System Hardware Manual
2 - 13
Document Revision 2a
Electra Elite IPK
___________________________________________________________________________________
Main Menu
Pulldown Menus
Help
Accesses help
information.
Toolbar
Connection Status
Indicates whether the data
path is connected to the
Electra Elite IPK/Electra
Elite system.
Pulldown Menu
Pulldown Menu
Make selections by clicking on an
item. The associated screen is
displayed.
The arrow indicates additional
information is available for this
option.
System Data Item
Screen
Information Bar
indicates
Keyboard
Shortcut.
Tab Groups
The active Tab Group is indicated
by the darkened box surrounding
the tab name.
Figure 2-14 Electra Elite IPK/Electra Elite System Administration Terminal Software Screen Samples
___________________________________________________________________________________
2 - 14
SAT End-User Programming
Electra Elite IPK
Document Revision 2a
___________________________________________________________________________________
SECTION 8
TOOLBAR
Several icons are provided to allow the user to navigate the program. The icons in
the toolbar are explained in this section The availability of the individual tools
depends on the activity the user is performing. When the icon appears shadowed,
the tool is not available. When the icon is dark, the tool is available. Refer to Figure
2-14 Electra Elite IPK/Electra Elite System Administration Terminal Software Screen
Samples for an example.
Accesses the Job Specifications printing option.
Accesses the wizard for individual features. The F10
special function key provides a shortcut to this
wizard.
Sets the defaults for all items on the open tab.
Sets the defaults for the individual system data items
(on the screen the default is set for the item where
the cursor is blinking).
Allows data items to be copied between ports. The
F3 special function key provides a shortcut to this
feature.
Allows values between two ports to be swapped. The
F5 special function key provides a shortcut to this
feature.
Allows the user to undo the current edits and return
to the previous editing operation.
Allows the user to return to the previous editing
operation. The F11 special function key provides a
shortcut to this feature.
___________________________________________________________________________________
System Hardware Manual
2 - 15
Document Revision 2a
Electra Elite IPK
___________________________________________________________________________________
Accesses Quick Search. Quick Search provides a
detailed list of system data items. The F8 special
function key provides a shortcut to this feature.
Returns to the previous tab group. The Shift + F6
special function key provides a shortcut to this
feature.
Advances to the next tab group. The F6 special
function key provides a shortcut to this feature.
Displays the help contents for the Electra Elite IPK
SAT End-User software program. The F1 special
function key provides a shortcut to this feature.
Scrolls up displaying the previous page.
Scrolls down displaying the next page.
Advances to the first page.
Advances to the last page.
Brings up the Connection dialog box. The F7 special
function key provides a shortcut tot his feature.
___________________________________________________________________________________
2 - 16
SAT End-User Programming
Electra Elite IPK
Document Revision 2a
___________________________________________________________________________________
SECTION 9
ELECTRA ELITE IPK/ELECTRA ELITE PULLDOWN MENUS
This section explains each of the pulldown menus that are available in SAT software.
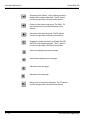
File
The File pulldown menu provides options for basic file management.
Figure 2-15 File Menu
Wizard
Accesses the Wizard. Wizard is available for every feature offered in the Electra Elite
IPK/Electra Elite system. Wizard provides all of the information necessary to program
a feature. All of the system data items necessary for programming the feature are
grouped together. The user can press the appropriate tabs to access system data
and make the necessary changes.
Change Password
Allows the user to change the SAT password.
___________________________________________________________________________________
System Hardware Manual
2 - 17
Document Revision 2a
Electra Elite IPK
___________________________________________________________________________________
Print
Provides two print options: Job Specifications and Designation Labels (requires a
standard inkjet or laser printer).
When Job Specifications is selected, a menu is displayed. There are three options for
printing the Job Specifications: printing a family (group) such as system-wide, trunk
group, or tenant, printing a range of Memory Blocks, or printing an individual Memory
Block.
Designation Labels
Electra Elite IPK SAT End-User version does not support exporting data to the DESI
Label printing software. This menu item is disabled. However, if you chose to install
DESI during SAT installation, you can still run DESI separately by clicking the
Windows START button, and then selecting:
PROGRAMS/DESI for Windows/DESI
Print Setup
Allows access to the printer setup screen. This allows the printer configuration to be
modified.
Exit
Exits the programming software. If changes were made, the technician is prompted
to upload the changes before the program shuts down.
___________________________________________________________________________________
2 - 18
SAT End-User Programming
Electra Elite IPK
Document Revision 2a
___________________________________________________________________________________
Edit
The Edit pulldown menu allows files to be edited, swapped, defaulted, or copied.
Figure 2-16 Edit Menu
Undo
Allows the user to undo current edits and return to the previous editing operation.
Copy
Brings up the copy screen. This allows port information to be copied from one port to
another.
Swap
Allows values between two ports to be swapped.
Set Default
Defaults to the current field where the cursor is positioned.
___________________________________________________________________________________
System Hardware Manual
2 - 19
Document Revision 2a
Electra Elite IPK
___________________________________________________________________________________
Set Default All
Allows the user to set all values to default on the open tab.
Quick Search
Allows the user to search the Memory Blocks by Memory Block Number, Memory
Block Name, or Tab Name. After the search method is specified, a list is provided.
The user can scroll through the list and click on the desired Memory Block. System
data can then be modified as necessary.
___________________________________________________________________________________
2 - 20
SAT End-User Programming
Electra Elite IPK
Document Revision 2a
___________________________________________________________________________________
Basic
The Basic pulldown menu allows access to basic end-user programming items.
Some menu items may be disabled if the appropriate hardware is not assigned, or a
dependent data item is not set.
Figure 2-17 Basic Menu
Terminals
This option allows the user to assign terminal related assignments to the system.
Several selections are available with this option.
J
J
J
J
System Wide
Station Base
Multiline
DSS/BLF
___________________________________________________________________________________
System Hardware Manual
2 - 21
Document Revision 2a
Electra Elite IPK
___________________________________________________________________________________
CO/PBX Trunks
This option allows user to program system data related to trunk assignments.
One selection is available with the System-Wide option.
Intercom
This option allows the technician to program system data related to intercom
assignments.
Speed Dialing
This option allows data related to system and station speed dialing to be
programmed.
System Timers
This option allows the user to change the Call Forward – Busy/No Answer and CO/
PBX incoming Ringing Alarm tone.
Forced Account Codes
This option allows the user to assign account codes.
___________________________________________________________________________________
2 - 22
SAT End-User Programming
Electra Elite IPK
Document Revision 2a
___________________________________________________________________________________
User
The User pulldown menu allows access to system data items related to speed
dialing.
Figure 2-18 User Menu
Speed Dialing
This option allows the user to program both System and Station Speed Dial memory
locations. Each Multiline Terminal in the Electra Elite IPK/Electra Elite can be
assigned individual speed dial numbers.
Station Speed Dial can be denied in System Programming. If no Station Speed Dial
memory locations are available, consult your authorized NEC Dealer.
___________________________________________________________________________________
System Hardware Manual
2 - 23
Document Revision 2a
Electra Elite IPK
___________________________________________________________________________________
Communications
The Communications pulldown menu allows access to system data items relating to
direct and remote connections to the Electra Elite IPK/Electra Elite system.
Figure 2-19 Communications Menu
Connect
This option allows the user to connect to the Electra Elite IPK/Electra Elite system.
Disconnect
This option allows the user to disconnect from the Electra Elite IPK/Electra Elite
system.
Upload
This option allows the user to upload programming changes and configurations to the
KTS.
___________________________________________________________________________________
2 - 24
SAT End-User Programming
Electra Elite IPK
Document Revision 2a
___________________________________________________________________________________
Download
This option allows the user to download the current Electra Elite IPK/Electra Elite
configuration.
Verify
This option allows the user to compare the configuration programmed in the KTS with
that of the PC.
Setup
This option allows the user to set up the PC serial port. This is the serial port
connected to the KTS.
___________________________________________________________________________________
System Hardware Manual
2 - 25
Document Revision 2a
Electra Elite IPK
___________________________________________________________________________________
Help
The Help pulldown menu allows access to online help.
Figure 2-20 Help Menu
Using Help
This option provides access to the help topics window that describes how to use the
help function.
Contents
This option provides access to the help topics that are available for the Electra Elite
IPK/Electra Elite System Administration Terminal system.
Help Topics
This options provides a list of help topics. The user can bookmark topics that they
may want to refer to again.
___________________________________________________________________________________
2 - 26
SAT End-User Programming
Electra Elite IPK
Document Revision 2a
___________________________________________________________________________________
Show MB Numbers
When enabling this option, the memory block number is displayed above the cursor,
when positioning the cursor over a data field.
About
This option provides information about the System Administration Terminal (SAT)
End-User software.
___________________________________________________________________________________
System Hardware Manual
2 - 27
Document Revision 2a
Electra Elite IPK
___________________________________________________________________________________
THIS PAGE INTENTIONALLY LEFT BLANK
___________________________________________________________________________________
2 - 28
SAT End-User Programming
and
SYSTEM ADMINISTRATION TERMINAL (SAT)
END-USER MANUAL
NEC America, Inc.
Document Revision 2a
(Applies to Release R1000
through Release R2500