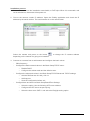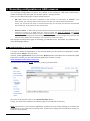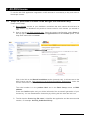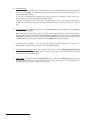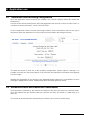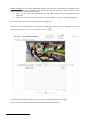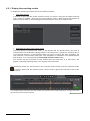
1
AX-POS Recording of transactions data application for Axis cameras ENGLISH User Manual ÍNDEX 1 REQUIREMENTS .................................................................................................................. 2 1.1 MANUAL CONTENTS ....................................................................................................................................2 1.2 SOFTWARE REQUIREMENTS AND COMPATIBLE CAMERAS ...............................................................................2 1.3 DATA TRANSMISSION TO THE CAMERA ..........................................................................................................2 2 AXIS CAMERA NETWORK INSTALLATION ........................................................................ 2 3 RECORDING CONFIGURATION ON AXIS CAMERAS ........................................................ 4 4 AX-POS INSTALLATION ...................................................................................................... 4 5 AX-POS LICENSE ................................................................................................................. 5 5.1 STEPS TO PURCHASE A LICENSE CODE AND GET THE ACTIVATION KEY. ...........................................................5 6 APPLICATION USE ............................................................................................................... 7 6.1 TRANSACTION DATA RECORDING CONFIGURATION ........................................................................................7 6.2 ADVANCED SEARCH AND TRANSACTION VISUALIZATION .................................................................................7 User manual - 1 1 Requirements 1.1 Manual contents This manual contains detailed information about the installation, configuration and use of the AXPOS software. The software is installed on AXIS cameras with SD or NAS recording and it stores the transaction data and overwrites them on the video images. The transaction data is retrieved to perform data searches over recorded video from the local interface and from the Supervisor X application; you can download it for free in our web: http://www.videosafe.net/SupervisorX_Index.html 1.2 Software requirements and compatible cameras The AX-POS application is installed on AXIS cameras. The access and configuration are carried out through web browsers: Internet Explorer 10 and above. The camera must have configured a recording resource (SD or NAS), for further information please consults the section 3 Recording configuration on AXIS cameras. The AX-POS can be installed on AXIS cameras with AMBARELLA, ARTPEC 3 and ARTPEC 4 processors, please consult the list of available models and versions on our web. Note: Remember the camera default access passwords: root/pass. 1.3 Data transmission to the camera The transactions are sent to the camera through the local network by HTTP. The software developer of POS/ATM has to integrate a small software development for the sending of transactions from a POS/ATM, and its reception in the application. Consult your POS/ATM software provider. There is a user for the sending of transactions: pos and the password is posuser. This user belongs to the application and cannot be modified on the camera configuration. The password can be changed in the AX-POS configuration screen. 2 AXIS camera network installation To install an AXIS camera it is necessary: A laptop with a web browser (Explorer, Chrome or Firefox). To connect to the camera and check it’s operational. The IPUtility.exe application. This application allows you to configure the camera IP address; you can find it on the camera CD or download it from the AXIS web. PoE power supply. The cameras has PoE (IEE 802.3af) power, is a solution for powering to network video products. Use a PoE injector or ensure that the switch/router is PoE. User manual - 2 Installation process 1. Connect the camera to the installation router/switch, or PoE inject. When it is connected a red led is switched on, that means it has power on. 2. Give to the camera a static IP address. Open the IPUtility application and check the IP address by the serial number. The serial number in on the camera label. Select the camera and press on the button depending on the network it’s going to be installed. to change the IP camera address 3. Connect to a camera from a web browser and configure the basic values: - 50Hz frequency. - Configure the basic network values in the Basic Setup/TCP/IP menu: - - o Disable DHCP o Configure the subnet mask and the default router. Configure the advanced values in the Basic Setup/TCP/IP/Advanced TCP/IP settings. o Add the DNS servers: 8.8.8.8 y 8.8.4.4 o Add http port o Save the configuration before exit Configure date and time into Basic Setup/Date&Time Settings. o Select the option: Use the following NTP server address. o Configure the NTP server as poo.ntp.org o Select the time zone: GMT+1 and active the Daylight saving option. User manual - 3 3 Recording configuration on AXIS cameras The recording configuration is made on the camera, it can records on a SD card or NAS device. Select the Setup menu and open the System options / Storage section. Here you can define two types of video storage devices: SD card: Once the SD card is installed on the camera it is necessary to format it. Use Ext4 format, the camera offers other options, but this one has the best performance. When you check the SD card is mounted and ready, fix the time the camera will maintain the recordings, is the same for the motion data. Network Share: A NAS disk provides shared network resources (Network Shares). For a camera to record on a NAS disk you need to know the NAS IP address, the shared resource name (Network Share) and the user/password to access. You can configure it on the camera: Setup/System Options/Storage/NetworkShare. Don’t forget to fix the time the camera will maintain the recordings, is the same for the motion data. Don’t forget to configure the type of recording you wanted to use, time-lapse, by schedule, etc... in the Recordings section. 4 AX-POS Installation You have to install the application on the camera starting on the camera’s configuration screen, first step select Setup in the top menu. Second, inside Applications screen press the Browse button and select the corresponding EAP camera file, remind you can download the application file from our web: www.videosafe.net/AX-POS_Index.html The file has the following format: AX-POS_version_processor.EAP Once the file is selected, click in the Upload Package button. Finally, the AX-POS is installed; the following step is to install the license key. Note: Please bear in mind that the application modifies the text overlay settings to overwrite the transactions on live video and recording video. Please don’t change this configuration so the AXPOS can work properly. User manual - 4 5 AX-POS license To use the AX-POS application integrated in AXIS cameras it is necessary to buy and active a license per camera. 5.1 Steps to purchase a license code and get the activation key. These are the steps: A. Buy a license: contact to your distributor, remember that each camera should have its own license. The distributor will provide a license code for each camera you wanted to use. B. How to get the AX-POS Activation Key. Open the camera configuration, select Setup in the top right menu, in the left menu selects Applications and the AX-POS option, in the drop down menu click in License. Click in the link on the Manual Installation section (ww.axis.com), it will connects to the AXIS license service (http://www.axis.com/techsup/compatible_applications/). Insert the license code and the camera’s serial number. The serial number is in the product label and in the Basic Setup screen as MAC address. Press the Confirm option and you will be informed of the successful generation of your license key. You can download the license key by clicking the link under the lock icon. C. The link has the license key file name, it identifies the application and the camera serial number , for example: Ax-POS_00408cdc0533.key User manual - 5 D. Considerations If you try to get a license key of camera that has been activated already with a different license, it will appear a warning message to avoid spending a license needlessly on a camera with one already. If you don’t remember the license code used to active the camera, Visual Tools can provide this information knowing the camera license. There is no problem, if you have lost the camera license key or you have to activate it again, with the license code and the camera serial number you can generate the license key. E. Trial License. You can also request for a Trial License which will allow you to test the application for 30 days. After this period it will stop working. To get a trial license connect to the AXIS license service (http://www.axis.com/techsup/compatible_applications/), and select the option Get Trial Key, choose from the list the AX-POS application and enter the camera serial number where it is going to be installed, press Confirm to end the process. F. It appears the message: “Your license key was successfully generated”, the link to download the license file it is placed under the padlock image. G. License key installation. Go to the camera and select the menu Setup/Applications/AXPOS/License. Click the Browse button to select your license key file and then press the Install button to install the license. H. Final check. Click again on the Applications menu, select the AX-POS application in the list and check that it is running and that the license is installed (if the application is stopped, click on the Start button to make it run) User manual - 6 6 Application use 6.1 Transaction data recording configuration Once the application and the license are installed, you need to configure where are stored the transactions. Connect to the camera and open the AX-POS application from the link on the live video screen. It is located in bottom left corner: “Visual Tools AX-POS”. In the Configuration section choose the storage resource for the transaction data. On the top of the screen check the application is running and it access properly the storage resource. The data are stored for time set on the recording configuration: System options / Storage. It is possible to modify the size and position of the text with the transaction information that appears over the image. Whether the application is not running or the selected storage resource is not available, an error message is displayed on screen. Please follow the instructions given on screen. 6.2 Advanced search and transaction visualization The transactions collected by the camera are shown on live video and stored on recorded video. They are labeled with the date/time that are received and they are stored in a data base for a later use. The search of the transactions collected by the camera can be done in several ways: User manual - 7 On the camera: The AX-POS application displays the live video screen with the transantion text and the transaction value. Select the date and the time interval where you want to search. There are two options for transaction searches: a. Text: you can search the transaction text, the whole word or part, both uppercase and lowercase. b. Value: you can search the transaction text, with options: more than, equal and less than. Once the criteria has been established press the icon. Double clic on the transaction you wanted to display, the selected video is displayed on the top screen, to come back to live video press the button . To refresh the transaction screen it is neccesary to press the search button Please ensure the time interval includes the last transactions received. User manual - 8 . Through the Supervisor X: This an application used for searching images with transactions on recorded video. The Supervisor X has an advanced search tool into the recorded video tab. Open the Supervisor X application, select the recorded video tab and add the camera you wanted to watch recorded video, press the icon and a new window will be open where you can configure the data relative to the searching. Select the date and time at the top of the window. The search range is 24 hours including two days. Choose the Search Text option and introduce the text string or the value you wanted to search at the bottom box. A new window will be open with the results found. Third party software integration: there is an API http available to ask the camera for stored transactions between two dates. It can make transactions searches by text strings, for further information please consults the application manufacturer the integration possibility. The application has a user to send the transactions named: pos, with the password posuser. This user belongs to the application and cannot be modified on the camera configuration. The password can be changed in the AX-POS configuration screen. User manual - 9 6.2.1 Display the searching results To display the searching results there are two different options: View list of results A window is open with the search result list, when you select a list input the Watch selected video option is enabled. There are two more options, make a New Search that deletes all data and comes back to the homepage and Download the video of the search result. Download the video of the search result Pres this option to download the video, a new window will be opened where you have to indicate where the download is being stored, in the Supervisor X (inside the eventlog tab) or in an external directory. In the following option you have to choose the video resolution, the less resolution, less recording video size. Then it appears an estimation of the download size and duration, if it is correct press the Download recorded video button. This window can be minimized to keep working with the Supervisor X, in that case it will appear a message reporting there is an ongoing video download. The searching results can also be seen in the recorded video window, pres the minimize button in the time panel over the recording strip, it will be mark in green the intervals of time of the search result. The simplest way to browse into the results and access to the video sequence is using the result list and the previous/next buttons. User manual - 10 User manual - 11 ENGLISH AX-POS User manual DOCAXPOSUM00EN_150815v1.12