1
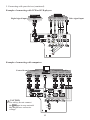
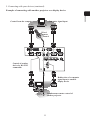
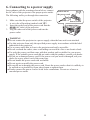
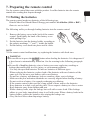
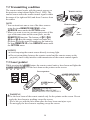
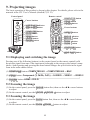
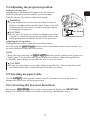
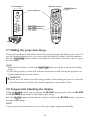
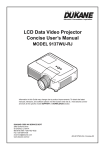
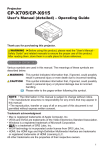
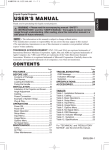
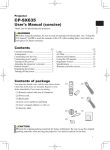
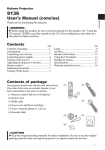
IN5542/IN5542c/IN5544/IN5544c User's Manual (concise) Thank you for purchasing this product. Before using this product, please read through this manual in order to use this product well and safely. NOTE * In this manual, unless any comments are accompanied, “the manuals” means all the documents provided with this product, and “the product” means this projector and all the accessories came with the projector. WARNING ● Read all the manuals before using the product. Keep the manuals in a safe place for future reference. ● Heed all warnings and cautions in the manuals and on the product. ● Follow all the instructions in the manuals and on the product. Contents 1. First of all.............................................2 9. Projecting images..............................16 1.1 Entries and graphical symbols............... 2 1.2 Important safety instructions.................. 2 1.3 Regulatory notices.................................. 3 9.1 Displaying and switching the image.... 16 9.2 Focusing the image.............................. 16 9.3 Zooming the image.............................. 16 9.4 Adjusting the projection position......... 17 9.5 Selecting an aspect ratio....................... 17 9.6 Correcting the keystone distortion....... 17 9.7 Hiding the projection image................. 18 9.8 Temporarily blanking the display......... 18 2. Checking the contents of package.....5 3. Attaching the lens unit........................5 4. Placing the projector...........................6 4.1 Installation environment......................... 6 4.2 Projection style....................................... 6 4.3 Projection distance................................. 7 4.4 Placement............................................... 8 10. Maintenance....................................19 10.1 Lamp unit........................................... 19 10.2 Filter unit............................................ 21 10.3 Internal clock battery.......................... 22 10.4 Others................................................. 22 4.5 Supplementary anti-theft means......8 5. Connecting with your devices............9 6. Connecting to a power supply..........12 7. Preparing the remote control...........13 11. Using the CD manual......................23 12. Specifications...................................24 13. Troubleshooting - Warranty and after service........26 7.1 Putting the batteries.............................. 13 7.2 Transmitting condition......................... 14 7.3 Laser pointer......................................... 14 8. Turning the projector on/off.............15 8.1 Turning on............................................ 15 8.2 Turning off........................................... 15 QR82691 1 ENGLISH Projector 1. First of all 1.1 Entries and graphical symbols explanation The following entries and graphical symbols are used for the manuals and the product as follows, for safety purpose. Please know their meanings beforehand, and heed them. WARNING CAUTION NOTICE This entry warns of a risk of serious personal injury or even death. This entry warns of a risk of personal injury or physical damage. This entry notices of fear of causing trouble. 1.2 Important safety instruction The following instructions are important to safely use the product. Always follow them when handling the product. WARNING ● Never use the product in or after an abnormality (ex. the projector smokes, smells strange, has liquid or an object inside, or is broken, etc.) If an abnormality should occur, unplug the projector immediately. ● Keep the product away from children and pets. ● Do not use the product when there is the possibility of thunder or lightening. ● Unplug the projector from the power outlet if the projector is not used for an extended period of time. ● Do not connect the projector to a power supply when a lens unit is not attached to it. ● Do not open or remove any portion of the product, unless the manuals direct it. For internal maintenance, leave it to your dealer or their service personnel. ● Use only the accessories specified or recommended by the manufacturer. ● Do not modify the projector or its accessories. ● Do not let liquid or other items enter inside the projector. ● Do not let the product get wet. ● Do not shock or apply pressure to this product. - Do not place the product on an unstable surface such as an uneven surface or leaning table. - Do not place the product where it is unstable. Place the projector so that it (even the lens part installed) does not protrude from the surface where the projector is placed on. - Always move the projector with two or more people. Place your hands in the indented handles on the bottom of the projector when carrying the projector. - Remove all the attachments including the power cord and cables, from the projector when carrying the projector. Indented handles - Do not lengthen the elevator feet beyond 30 mm. ● Do not look into the lens and the openings on the projector, while the lamp is on. ● Do not approach the lamp cover or exhaust vents while the projection lamp is on or just after the lamp is turned off since they can be too hot. ● Do not apply the laser beam of the remote control to anything except the screen. 2 1.3 Regulatory notices WARNING : This is a Class A product. In a domestic environment this product may cause radio interference in which case the user may be required to take adequate measures. This device complies with part 15 of the FCC Rules. Operation is subject to the following two conditions: (1) This device may not cause harmful interference, and (2) this device must accept any interference received, including interference that may cause undesired operation. This equipment has been tested and found to comply with the limits for a Class A digital device, pursuant to Part 15 of the FCC Rules. In Canada NOTICE: This Class A digital apparatus complies with Canadian ICES-003. These limits are designed to provide reasonable protection against harmful interference when the equipment is operated in a commercial environment. This equipment generates, uses, and can radiate radio frequency energy and, if not installed and used in accordance with the instruction manual, may cause harmful interference to radio communications. Operation of this equipment in a residential area is likely to case harmful interference in which case the user will be required to correct the interference at his own expense. Some cables have to be used with a ferrite core set. Use the accessory cable or a designated type cable for the connection. For cables that have a core only at one end, connect the ferrite core to the projector. CAUTION: Changes or modifications not expressly approved by the party responsible for compliance could void the user’s authority to operate the equipment. 3 ENGLISH About Electro-Magnetic Interference 1.3 Regulatory notices (continued) About Waste Electrical and Electronic Equipment The mark is in compliance with the Waste Electrical and Electronic Equipment Directive 2002/96/EC (WEEE). The mark indicates the requirement NOT to dispose the equipment including any spent or discarded batteries or accumulators as unsorted municipal waste, but use the return and collection systems available. If the batteries or accumulators included with this equipment, display the chemical symbol Hg, Cd, or Pb, then it means that the battery has a heavy metal content of more than 0.0005% Mercury or more than, 0.002% Cadmium, or more than 0.004% Lead. 4 2. Checking the contents of package Soon after purchasing this product, check that all the following items are included in the package. If any items are missing, contact your dealer immediately. (4) (2) (5) ENGLISH (1) (1) Projector (2) Lens adapter (3) Hexagon wrench (for installation of the optional lens unit) (4) Power cord (5) Computer cable (6) Remote control (batteries not included) (7) User documentation (3) (6) ER OR LAS CAT INDI CE R UTE MP CO UR ON MY SO EO VID L BY/ ND STA ID ID ID ID (7) ITA DIG 3 1 4 ER LAS 2 NK BLA ER ENT NU ME ET RES R ION SIT TTE EZE PO SHU FRE Y O ECT NIF AUT ASP MAG P Pby ON TON 3 MY BUT OFF 1 4 NE STO 2 KEY FT M ZOO S SHI LEN + US FOC - + - NOTE * This product is supplied without a lens unit, so that you can choose from a range of lenses ( 24) that can meet your requirements. Ask your dealer about purchasing one or more lenses with this product. * Additional accessories or services may be required for your application. We recommend consulting your dealer beforehand. CAUTION ● Keep the original packing materials, and use them correctly when transporting or storing the product. 3. Attaching the lens unit Ask your dealer to help you with lens installation. Removing and attaching the lens unit should only be accomplished by authorized service personnel. WARNING ● Only use the lens unit specified by the manufacturer. ● Removing and attaching the lens unit should only be accomplished by authorized service personnel. ● Read and keep the user’s manual of the lens unit. ● Be extremely cautious and do not drop or hit the lens against anything. ● Do not transport the projector with the lens attached. CAUTION ● Keep the original packing materials for the lens unit, and use them correctly when transporting or storing the lens unit. NOTICE ● Do not touch the lens surface directly. ● Keep the dust protector of the projector, and use it when no lens unit is attached to the projector. 5 4. Placing the projector Read this chapter through first. Then install the projector into place. 4.1 Installation environment This product must be installed in a stable, cool and airy location. Check your installation environment in accordance with the following. WARNING ● Do not place the product on an unstable surface surface such as an uneven, tilted, or vibrating location. ● Do not place the product near water - for example, near a bathtub, washbowl, kitchen sink, or laundry tub; in a wet basement, near a swimming pool, beach; or outdoors. CAUTION ● Do not place the product in a dusty, smoky, or humid place - for example, in a passageway, in a smoking space, in a kitchen, or outdoors. ● Do not place the product near heat sources - for example, radiators, heat registers, stoves, or other product (including amplifiers) that produces heat. ● Do not place this product in a magnetic field. NOTICE ● Do not place the product in a place where radio interference may be caused. ● Do not place the projector in a place where any strong light hit the remote sensors. 4.2 Projection style Choose the projection style suitable to your use, referring to the illustration below. (2) Ceiling mount (suspended from a ceiling) (1) Standard style (placed on a table) NOTE * When installing the projector in a special situation such as a ceiling mount, specific mounting accessories ( 24) and service may be required. Before installing the projector, consult your dealer about your installation. WARNING ● Consult with your dealer about installation beforehand. ● Use only the mounting accessories the manufacturer specified, and leave installation and removal of the projector with the mounting accessories to the service personnel. ● Read and keep the mounting accessory’s user manuals used. 6 Refer to the following to arrange the projector and your screen. The values shown in the following table were calculated for the model IN5542/IN5542c with the standard lens unit LENS-068. See the lens unit user’s manual for your specific situation. The values differ for every combination of the projector and the lens unit. * The values shown in the table are calculated for full size screen 1024 x 768. (a) Screens size (diagonal) (b) Projection distance (±10%) (c) Screen height (±10%) when the vertical lens shift is set full upward. (c) up (a) Projector top (c) down Projector bottom (Installation side) (b) (a) Screen size [inch (m)] 4 : 3 screen (b) Projection distance (c) Screen height [m (inch)] [cm (inch)] up min. max. down 40 (1.0) 1.7 (66) 2.3 (89) 60 70 80 90 100 120 150 200 250 300 350 400 500 600 700 (1.5) (1.8) (2.0) (2.3) (2.5) (3.0) (3.8) (5.1) (6.4) (7.6) (8.9) (10.2) (12.7) (15.2) (17.8) 2.6 3.1 3.5 4.0 4.4 5.4 6.7 9.0 11.3 13.6 15.9 18.2 22.8 27.4 32.0 (103) (121) (139) (157) (175) (211) (266) (356) (447) (537) (628) (718) (899) (1081) (1262) 3.5 4.0 4.6 5.2 5.8 7.0 8.8 11.8 14.8 17.8 20.7 23.7 29.7 35.6 41.6 (136) (159) (183) (206) (230) (277) (347) (464) (582) (699) (816) (934) (1168) (1403) (1638) -23 -34 -40 -45 -51 -56 -68 -85 -113 -141 -169 -198 -226 -282 -339 -395 (-9) (-13) (-16) (-18) (-20) (-22) (-27) (-33) (-44) (-56) (-67) (-78) (-89) (-111) (-133) (-156) 84 125 146 167 188 209 251 313 418 522 627 731 835 1044 1253 1462 (33) (49) (58) (66) (74) (82) (99) (123) (164) (206) (247) (288) (329) (411) (493) (576) 16 : 9 screen (b) Projection distance (c) Screen height [m (inch)] [cm (inch)] min. max. down up 1.3 (53) 1.8 (72) 2.1 2.5 2.9 3.2 3.6 4.4 5.5 7.4 9.2 11.1 13.0 14.9 18.6 22.4 26.2 (83) (98) (112) (127) (142) (172) (216) (290) (364) (438) (512) (586) (734) (882) (1030) 2.8 3.3 3.8 4.3 4.7 5.7 7.2 9.6 12.0 14.5 16.9 19.4 24.2 29.1 34.0 (110) (129) (148) (168) (187) (225) (283) (379) (474) (570) (666) (762) (954) (1145) (1337) NOTICE ● Do not use a polarized screen, since it can cause a red image. 7 -33 -49 -58 -66 -74 -82 -99 -123 -164 -206 -247 -288 -329 -411 -493 -576 (-13) (-19) (-23) (-26) (-29) (-32) (-39) (-49) (-65) (-81) (-97) (-113) (-130) (-162) (-194) (-227) 83 124 145 165 186 207 248 310 414 517 620 724 827 1034 1241 1447 (33) (49) (57) (65) (73) (81) (98) (122) (163) (204) (244) (285) (326) (407) (488) (570) ENGLISH 4.3 Projection distance 4.4 Placement Heed the following and install the projector in accordance with the preceding paragraph 4.3. WARNING ● Keep the projector away from anything that could catch fire. ● Do not block or cover the openings on the projector, and keep sufficient space for ventilation around the projector. - Do not use the projector on a cushioned surface such a rug, a carpet or bedding. - Keep the projector away from light-weight materials such as a piece of paper that can stick to the intake holes. ● Do not use the projector on an unstable surface surface such as a cart. ● Place the projector so that nothing enters inside of the projector. - Keep the projector away from small items such as paperclips that can fall into the inside. - Keep the projector away from any liquids that can spill or leak into the product. CAUTION ● Keep the projector away from anything that is heat conductive such as metal. - Do not use the projector on a metallic table. ● Keep the projector away from anything that is susceptible to heat such as some types of plastics. NOTICE ● Place the projector so that there is nothing that blocks the projection light to the screen. ● Avoid exposing the remote sensor directly to strong light. 4.5 Supplementary anti-theft means This projector has a security bar for a commercial anti-theft chain or wire up to 10 mm in diameter, and also the security slot for the Kensington lock. For details, see your security tool manual. NOTE * These will not prevent theft, but will help prevent against theft. WARNING ● Do not use the security slot to prevent the projector from falling, since this is not what it is designed for. CAUTION ● Do not place the anti-theft chain or wire near the projector’s exhaust vents, since the chain or wire heated by the hot exhaust may cause burns. 8 Before connecting the projector to your devices, check the device manual to ensure that the device is compatible with this projector and to check what is required for the connection. Consult your dealer when the required accessory did not come with the product or the accessory is damaged. It may be regulated under some standard. After making sure that the projector and the devices are turned off, perform the connection, according to the following instructions. Refer to the illustrations on subsequent pages. NOTE * For this product, the optional cable cover is available for purchase. To place an order for it, please tell your dealer the part name of it. ( 24) WARNING ● Use only the accessories specified or recommended by manufacturer. Do not modify the projector or its accessories. ● Read and keep the accessory’s user manual. ● Do not connect or disconnect the projector with devices while they are connected to a power supply except when directed by the device manuals. CAUTION ● Some connecting cables may have to have a specific length, or a ferrite core at the end to connect to the projector, under the regulation of electro-magnetic interference. When a ferrite core is attached to the specified cable only at one end, connect to the end with the ferrite core to the projector. ● Be careful not to connect a cable into the wrong port or the wrong way. ● Be careful not to damage the cables. Route the cables so they will not be stepped on or pinched. NOTICE ● Do not turn your device on prior to the projector, except when directed by the device manuals. 9 ENGLISH 5. Connecting with your devices 5. Connecting with your devices (continued) Example of connecting with VCR or DVD players Digital signal input S-VIDEO VIDEO COMPONENT VIDEO OUT OUT Y Cb/Pb Cr/Pr OUT HDMI Video signal input LAN HDMI CONTROL IN DVI-D REMOTE CONTROL OUT CONTROL MONITOR OUT S-VIDEO IN COMPUTER IN1 COMPUTER IN2 OUT VIDEO 1 G/Y R/Cr/Pr BNC B/Cb/Pb H V VIDEO 2 Y Cb/Pb Cr/Pr K Example of connecting with computers Control from the computer RS-232C Computer signal input RGB OUT RGB OUT DVI-D LAN LAN HDMI CONTROL IN DVI-D REMOTE CONTROL OUT CONTROL S-VIDEO MONITOR OUT IN COMPUTER IN1 COMPUTER IN2 OUT VIDEO 1 CAUTION ● For safety, do not connect the LAN port to any network that might have excessive voltage. R/Cr/Pr G/Y Y Cb/Pb Cr/Pr K 10 BNC B/Cb/Pb H V VIDEO 2 RGB OUT 5. Connecting with your devices (continued) Control from the computer Computer signal input RS-232C RGB OUT R LASE ATOR INDIC Y/ON NDB STA MY RCE SOU ER PUT COM O VIDE ID ID TAL DIGI 3 1 ID ID 4 R LASE Wired remote control 2 K BLAN ER ENT U MEN T RESE N ITIO POS TER EZE FRE SHUT O ECT ASP NIFY AUT PbyP MY MAG ON TON 3 BUT 1 OFF 4 NE STO KEY 2 M ZOO US FOC + T S SHIF + LEN - - LAN HDMI CONTROL IN DVI-D REMOTE CONTROL OUT CONTROL S-VIDEO MONITOR OUT IN COMPUTER IN1 COMPUTER IN2 OUT VIDEO 1 R/Cr/Pr Control of another device by RS-232C commands G/Y BNC B/Cb/Pb H V VIDEO 2 Y Cb/Pb Cr/Pr K Redirection of a computer signal input to another display device RGB IN RS-232C Simultaneous remote control of another projector REMOTE CONTROL IN 11 ENGLISH Example of connecting with another projector or a display device 6. Connecting to a power supply In accordance with the warnings shown below, connect the AC inlet of the projector to the proper power outlet. The following walks you through the connection. 1. Make sure that the power switch of the projector is set to the off-position (marked with “O”). 2. Insert the socket end of the power cord into the AC IN (AC inlet) of the projector. 3. Plug the other end of the power cord into the power outlet. Socket end of the power cord AC IN Power switch WARNING ● Do not connect the projector to a power supply when the lens unit is not attached. ● Use this projector from only the specified power supply in accordance with the label indication on the projector. ● Use a power outlet that is close to the projector and easily accessible. ● Do not overload the outlet, since overloading can result in a fire or an electric shock. ● Use only the power cord that came with this product and is suitable for your power supply. If the suitable power cord did not come with this product, consult your dealer. ● Do not use a damaged power cord. If the power cord you need is damaged, ask your dealer for a new power cord of the same type. ● Do not handle the power cord with wet hands. ● Do not repair or modify the power cord. ● Be careful not to damage the power cord. Route the power cord so that it is unlikely to be walked on or pinched by items placed upon or against them. ● Firmly connect the power cord to avoid loose connections. Do not use a loose or unsound power outlet. 12 7. Preparing the remote control 7.1 Putting the batteries The remote control needs two batteries of the following type. Hitachi Maxell or Hitachi Maxell Energy part number AA Alkaline (LR6 or R6P) Batteries not included. The following walks you through loading batteries into the remote control. 1. Remove the battery cover in the back of the remote control. Push lightly the knob of the battery cover while pulling it up. 2. Put the batteries into the battery holder, according to the polarity markings “+” and “-“ inside the holder. 3. Put the battery cover back into place until it clicks. NOTE * If the remote control malfunctions, try replacing the batteries with fresh ones. WARNING ● Be careful not to press the LASER button when loading the batteries. It is dangerous if a laser beam is unintentionally turned on. See the warning in the following paragraph 7.3. ● Be careful of handling batteries, since a battery can cause explosion, cracking or leakage that could result in a fire, injury, or environment pollution. - Use only the specified batteries. Do not use batteries of different types. - When replacing the batteries, replace both of the batteries with new batteries of the same type. Do not use a new battery with a used battery. - Do not use a battery with damage, such as scratches, dents, rust or leakage. - Make sure the plus and minus terminals are correctly aligned when loading a battery. - Do not work on a battery; for example recharging or soldering. - If the remote control is not used for a long period of time, remove the batteries. - Keep batteries in a dark, cool and dry place. Never expose a battery to a fire or water. - Keep batteries away from children and pets. - When a battery leaks, wipe the leakage out well with a waste cloth. If the leakage adhers to your body, immediately rinse it well with water. When a battery leaks in the battery holder, replace the batteries after wiping the leakage out. - Obey the local laws when disposing a battery. 13 ENGLISH Use the remote control that came with the product. Load the batteries into the remote control after reading this chapter through. 7.2 Transmitting condition The remote control works with the remote sensors on the projector using infrared light (Class 1 LED). The remote sensor senses the remote control signals within the range of (to right and left) and about 3 meters from the sensor. Remote sensors NOTE * You can inactivate one or two of the three sensors using the item REMOTE RECEIVE. of the SERVICE menu under the OPTION menu. * When you want to use two or more projectors of this type at the same time and the same place, use the REMOTE ID function. The buttons of ID 1, ID 2, ID 3 and ID 4 on the remote control can name the projector given the same ID number as the button by the item REMOTE ID of the SERVICE menu under the OPTION menu. Remote sensor 30° STANDBY/O N MY SOURCE ID 3 ID 4 LASER ENTER FREEZE ASPECT SHUTTER PbyP MY 1 - VIDEO DIGITAL 30° 3m about OFF ZOOM + - POSITION MAGNIFY ON 4 MENU RESET AUTO BUTTON 3 2 FOCUS + LASER INDICATOR COMPUTER ID 1 ID 2 BLANK KEYSTONE LENS SHIFT NOTICE ● Avoid exposing the remote sensor directly to strong light. ● Do not put anything between the remote control and the remote sensor on the projector, since it may interfere with transmission of the remote control signals. 7.3 Laser pointer While pressing the LASER button, the remote control emits a laser beam and lights the LASER INDICATOR. Use the laser beam as the pointer on the screen. AVOID EXPOSURE- C A U T I O N LASER RADIATIONDO NOT STARE INTO BEAM MAX. OUTPUT: 1mW WAVE LENGTH: 650nm CLASS2 LASER PRODUCT IEC60825-1 :1993 + A1 : 1997 + A2 : 2001 レーザ光 ビームをのぞきこまないでください。 最大出力 1mW 波長 650 n m クラス2レーザ製品 JIS C 6802:1997/98 LASER INDICATOR LASER RADIATION IS EMITTED FROM THIS APERTURE C A U T I O N LASER RADIATION DO NOT STARE INTO BEAM CLASS2 LASER PRODUCT MAX OUTPUT : 1mw WAVE LENGTH : 650nm Laser aperture AVOID EXPOSURE- LASER RADIATION IS EMITTED FROM THIS APERTURE or LA IN SE DI R CA TO R LASER RADIATIONDO NOT STARE INTO BEAM MAX. OUTPUT: 1mW WAVE LENGTH: 650nm CLASS2 LASER PRODUCT LASER RADIATION DO NOT STARE INTO BEAM CLASS2 LASER PRODUCT MAX OUTPUT : 1mw WAVE LENGTH : 650nm IEC60825-1 :2007 EN60825-1:2007 レーザ光 ビームをのぞきこまないでください。 最大出力 1mW 波長 650 n m クラス2レーザ製品 JIS C 6802:2005 LASER button WARNING ● Use the laser beam of the remote control only for the pointer on the screen. Do not apply the laser beam to anything except the screen. - Never hit eyes with the laser beam since the laser beam can injure eyes. - Do not apply the laser beam to anything except the screen. 14 8. Turning the projector on/off 1. Make sure that the power cord is firmly and correctly connected to the projector and the outlet. 2. Press down the side marked “I” on the power switch. The POWER indicator will light up in steady orange. Wait for the buttons to become ready. It may take several seconds. 3. Press the STANDBY/ON button (on the projector or the remote control). The projection lamp will light up and the POWER indicator will begin blinking in green. When the power is completely on, the indicator will stop blinking and light in steady green. Power switch POWER indicator SHUTTER SECURITY LAMP TEMP POWER STANDBY/ON button STANDBY/ON STANDBY/ON button STANDBY/ON 8.2 Turning off 1. Press the STANDBY/ON button on the projector or the remote control. The message “Power off?” will appear on the screen for about 5 seconds. 2. Press the STANDBY/ON button again while the message is shown. The projector lamp will go off, and the POWER indicator will begin blinking in orange. Then the POWER indicator will stop blinking and light in steady orange when lamp cooling is complete. 3. After making sure that the POWER indicator lights in steady orange, and press down the side marked “O” on the power switch. The POWER indicator will go off. NOTE * When the item DIRECT ON of the OPTION menu is set to the ON, and that the projector was turned off by only the power switch without using the STANDBY/ON button, switching the power switch turns the projector automatically. WARNING ● Do not look directly into the lens or the openings on the projector while the lamp is on. ● Do not approach the lamp cover and the exhaust vents for a while after the lamp goes out, since they may be hot and could cause burns. NOTICE ● Do not turn your device on prior to the projector, except when directed by the device manuals. Turn your device off prior to the projector, except when directed by the device manuals. 15 ENGLISH 8.1 Turning on 9. Projecting images The basic operation of this product is shown in this chapter. For details, please refer to the manuals in the CD “User’s Manual (detailed)”( 23). Remote control Control panel STANDBY/ON LASER INDICATOR Cursor buttons STANDBY/ON MY SOURCE COMPUTER VIDEO LENS SHIFT indicator LENS SHIFT button MENU LENS SHIFT COMPUTER ZOOM VIDEO FOCUS DIGITAL SHUTTER COMPUTER button ZOOM button VIDEO button FOCUS button DIGITAL button ID 1 ID 3 DIGITAL ID 2 COMPUTER button VIDEO button DIGITAL button ID 4 BLANK LASER ENTER Cursor buttons ASPECT button MENU FREEZE ASPECT SHUTTER RESET PbyP AUTO POSITION MY BUTTON MAGNIFY 1 3 ON 2 4 OFF FOCUS ZOOM + + - - FOCUS + button FOCUS - button ZOOM + button ZOOM - button KEYSTONE LENS SHIFT KEYSTONE button LENS SHIFT button 9.1 Displaying and switching the image Pressing one of the following buttons (on the control panel or the remote control) calls the picture signal from one of the input ports belonging to the category the button’s name shows. And repeating and pressing the same button changes the port to take in the signal from in the order shown below. (1) COMPUTER button: COMPUTER IN1 COMPUTER IN2 BNC (2) VIDEO button: Component (Y, Cb/Pb, Cr/Pr) S-VIDEO VIDEO 1 VIDEO 2 (3) DIGITAL button: HDMI DVI-D 9.2 Focusing the image (1) On the control panel, press the FOCUS button first, then use the ◄/► cursor buttons to adjust. (2) On the remote control, use the FOCUS +/FOCUS – buttons to adjust. 9.3 Zooming the image (1) On the control panel, press the ZOOM button first, then use the ◄/► cursor buttons to adjust. (2) On the remote control, use the ZOOM +/ZOOM – buttons to adjust. 16 9.4 Adjusting the projection position WARNING ● Do not lengthen the elevator feet more than 30 mm. If the foot is lengthened beyond this limit, it may come off and drop the projector down, possibly causing an injury or damaging the projector. CAUTION ● Do not place the projector with an inclination more than 5 degrees. Leaning the projector beyond this limit could cause malfunction and shorten the life of the projector. ENGLISH Using the elevator feet Lengthening or shortening the length of the elevator feet shifts the projection position and the projection angle. Turn the elevator feet each to adjust their length. max. 30 mm Adjusting the lens position Shifting the lens position shifts the projection position. After pressing the LENS SHIFT button (on the control panel or the remote control), use the cursor buttons to shift the lens position. NOTE * While the lens is moving, the LENS SHIFT indicator (on the control panel) lights up or blinks green. The projector may ignore operation by buttons while moving the lens. * Generally, better images occur when the lens is set to the center. CAUTION ● Do not put your fingers or any other things around the lens. The moving lens could catch them in the space around the lens and result in an injury. 9.5 Selecting an aspect ratio Use the ASPECT button (on the remote control). Each time you press the button, it changes the aspect ratio of the image in turn. 9.6 Correcting the keystone distortion Pressing the KEYSTONE button (on the remote control) displays the KEYSTONE dialog. Use the cursor buttons according to the dialog, checking the image. 17 Remote control Control panel STANDBY/ON LASER INDICATOR Cursor buttons BLANK button STANDBY/ON MY SOURCE COMPUTER VIDEO ID 1 ID 3 ID 2 ID 4 DIGITAL BLANK LASER MENU ENTER LENS SHIFT COMPUTER ZOOM VIDEO FOCUS DIGITAL SHUTTER SHUTTER indicator SHUTTER button MENU FREEZE ASPECT SHUTTER RESET PbyP AUTO POSITION MY BUTTON MAGNIFY 1 3 ON 2 4 OFF FOCUS ZOOM + + KEYSTONE LENS SHIFT - - 9.7 Hiding the projection image Closing the mechanical lens shutter blocks the projection light and blackens the screen. If you use another monitor device, you can operate the display, hiding it from the audience. Press the SHUTTER button (on the control panel or the remote control) to close, or open the lens shutter. NOTE * While the lens shutter is closed, the SHUTTER indicator (on the control panel) blinks yellow. * Even if the projector is turned off with the lens shutter closed, turning the projector on opens automatically the lens shutter. WARNING ● Do not leave the shutter closed for long periods of time during projector use, since the closed lens shutter could raise the inside temperature, and result in a fire. 9.8 Temporarily blanking the display Using the BLANK button, you can display the BLANK image preset by the item BLANK of the SCREEN menu instead of the input signal image. Press the BLANK button (on the remote control), to display the BLANK image, or recover the input signal image. NOTE * Some projector operations may recover the input signal image automatically. 18 10. Maintenance 10.1 Lamp unit A worn out lamp bulb could burn or burst. It is recommended to keep a spare lamp unit on hand and to replace the lamp unit when the projected image darkens or color reproduction becomes poor. To purchase a spare, contact your dealer and tell the following type number. Optional lamp part number: SP-LAMP-079 If the projector is installed in a special state such as ceiling mount, or if the lamp bulb has broken, also ask the dealer to replace the lamp unit. Otherwise, follow the procedure shown below to replace the lamp unit. 1. Make sure that the projector is unplugged and cooled down. 2. Loosen the screw (marked by arrow) of the lamp cover. Then slide and take it off. 3. Loosen the 3 screws (marked by arrow) of the lamp unit. Then picking the handles of the unit, gently take it from the projector. 4. Gently set the new lamp unit into place. Then retighten the screws of the lamp unit. 5. Put the lamp cover back into place, and retighten the screw of the lamp cover. 6. Reset the LAMP TIME value. (1) Turn the projector on. (2) To display the ADVANCED MENU, press the MENU button (on the control panel or the remote control). On the EASY MENU, select the “ADVANCED MENU” using the ▲/▼ cursor buttons, then press the ► cursor button. (3) To select the OPTION menu, select the “OPTION” using the ▲/▼ cursor buttons in the left column, then press the ► cursor button. (4) To display the LAMP TIME dialog, select the “LAMP TIME” using the ▲/▼ cursor buttons in the right column, then press the ► cursor button. (5) Use the ► cursor button according to the dialog, Selecting “OK” resets the LAMP TIME value. Lamp cover Lamp unit Handles NOTE * The value shown on the OPTION menu as the LAMP TIME is the amount of usage which has occurred since the last time the LAMP TIME was reset. Refer to the value for proper maintenance. NOTICE ● Be sure to reset the LAMP TIME after you have replaced the lamp unit. 19 ENGLISH Before maintaining the projector, be sure to turn off, unplug, and cool it down. Especially when maintaining the lamp, allow the projector to cool for about 45 minutes. WARNING HIGH VOLTAGE HIGH TEMPERATURE HIGH PRESSURE ● The projector uses a high-pressure mercury glass lamp. The lamp can break with a loud bang, or burn out, if jolted or scratched, handled while hot, or worn over time. Note that each lamp has a different lifetime, and some may burst or burn out soon after you start using them. In addition, when the bulb bursts, it is possible for shards of glass to fly into the lamp housing, and for gas containing mercury to escape from the projector’s vent holes. ● About lamp disposal: This product contains a mercury lamp; do not put it in a trash. Dispose of it in accordance with environmental laws. - For lamp recycling, go to www.lamprecycle.org (in the US). - For product disposal, contact your local government agency or www.eiae.org (in the US) or www.epsc.ca (in Canada). For more information, call your dealer. ● If the lamp should break (it will make a loud bang when it does), unplug the power cord from the outlet, and make sure to request a replacement lamp from your local dealer. Note that shards of glass could damage the inside of the projector, or cause injury during handling, so please do not try to clean the projector or replace the lamp yourself. Disconnect the plug from the ● If the lamp should break (it will make a loud bang when it does), ventilate the room well, and make sure not to breathe the gas that power outlet comes out of the projector vents, or get it in your eyes or mouth. ● Before replacing the lamp, turn the projector off and unplug the power cord, then wait at least 45 minutes for the lamp to cool sufficiently. Handling the lamp while hot can cause burns, as well as damaging the lamp. ● Never unscrew except the appointed (marked by an arrow) screws. ● Do not open the lamp cover while the projector is suspended from a ceiling. This is dangerous, since if the lamp’s bulb has broken, the shards will fall out when the cover is opened. In addition, working in high places is dangerous, so ask your local dealer to have the lamp replaced even if the bulb is not broken. ● Do not use the projector with the lamp cover removed. When replacing the lamp, make sure that the screws are screwed in firmly. Loose screws could result in damage or injury. ● Use only the specified lamp type. ● If the lamp breaks soon after the first time it is used, it is possible that there are electrical problems elsewhere besides the lamp. If this happens, contact your local dealer or a service representative. ● Handle with care: jolting or scratching could cause the lamp bulb to burst during use. ● Using the lamp for long periods of time, could cause it to darken, not to light up or to burst. When the pictures appear dark, or when the color tone is poor, please replace the lamp as soon as possible. Do not use old (used) lamps; this is a cause of breakage. 20 To keep the interior venting properly, keep a spare and replace the filter unit periodically, although frequent replacement is not needed for this product. To purchase a spare, contact your dealer and tell the following type number. Optional filter part number: SP-FILTER-01 The following walks you through the steps to replace the filter unit. 1. Make sure that the projector is unplugged and cooled down. 2. Use a vacuum cleaner on and around the filter cover. 3. Pick and pull up the filter cover knobs to take it off. 4. Pinch and pull out the filter unit knobs to take it off. 5. Use a vacuum cleaner on and around the intake vents of the projector. 6. Set the new filter unit into the place. 7. Put the filter cover back into the place. 8. Reset the FILTER TIME value. (1) Turn the projector on. (2) To display the EASY MENU, press the MENU button (on the control panel or the remote control). On the ADVANCED MENU, select the “EASY MENU” using the ▲/▼ cursor buttons in the left column, then press the ► cursor button. (3) To display the FILTER TIME dialog, select the “FILTER TIME” using the ▲/▼ cursor buttons, then press the ► cursor button. (4) Use the ► cursor button according to the dialog, Selecting “OK” resets the FILTER TIME value. Filter cover Filter cover knob Filter unit knob Intake vents NOTE * The value shown on the EASY MENU as the FILTER TIME is the amount of usage which has occurred since the last time the FILTER TIME was reset. Refer to the value for proper maintenance. * You can use the message function, which is set up by the item FILTER TIME of the OPTION menu, to notify you when to replace the lamp. WARNING ● Before checking or replacing the filter unit, turn off, unplug, and cool down the projector. ● To keep ventilation of the inside normal, replace the filter unit periodically. ● Use only the manufacturer specified type of the filter unit. NOTICE ● Be sure to reset the FILTER TIME after you have replaced the filter unit. 21 ENGLISH 10.2 Filter unit 10.3 Internal clock battery This projector can be loaded with a battery for the internal clock that the network function needs. When the clock does not work correctly, ask your dealer to check the battery and to replace if needed. For replacement, prepare a new battery of the following type. You can buy it at the store or order it from your dealer. Hitachi Maxell or Hitachi Maxell Energy part Number CR2032 or CR2032H (Battery not included.) WARNING ● Be careful when handling the battery since it can explode, crack or leak possibly resulting in a fire, injury or environmental pollution. - Use only the specified battery. - When replacing the battery, replace it with a new battery. - Do not use a battery with damage, such as scratches, dents, rust or leakage. - Do not work on a battery; for example recharging or soldering. - Keep a battery in a dark, cool and dry place. Never expose a battery to a fire or water. - Keep a battery away from children and pets. Be careful not to let them swallow a battery. - When a battery leaks, wipe the leakage out well with a waste cloth. If the leakage adhers to your body, immediately rinse it well with water. When a battery leaks in the battery holder, replace the batteries after wiping the leakage out. - Obey the local laws when disposing batteries. 10.4 Others For the lens Be careful not to scratch, crack, dirty, or fog the lens surface, since it affects the image quality. When the lens surface is fogged or dirty, gently wipe it only with the commercial cloth or paper lens cleaner. For the inside of the projector In order to ensure the safe use of your projector, please have it cleaned and inspected by your dealer about once every year. For the cabinet of the projector and remote control For the dirty cabinet of the projector or remote control, use soft cloth. Dip a soft cloth in water or a neutral cleaner diluted in water, and wipe the cabinet lightly after wringing it well. Then, wipe again lightly with a soft and dry cloth. WARNING ● Before checking or cleaning the lens, turn off, unplug, and cool down the projector. ● Do not scratch the projector and knock it against something. Use special caution with the lens surface. ● Do not let the product get wet. Do not let any liquids enter the inside. Do not use a spray. NOTICE ● Do not directly touch the lens surface with hands. ● Do not use cleaners or chemicals other than those specified in this manual. 22 The detailed manuals for this product are on the CD titled “User’s Manual (detailed)” which came with this product. Before using the CD, read the following to ensure the proper use. System requirements For using the CD manual, the following system is required. Windows®: OS:Microsoft® Windows® 98, Windows® 98SE, Windows NT® 4.0, Windows® Me, Windows® 2000/Windows® XP, or the later CPU: Pentium® processor 133MHz / Memory: 32MB or more Macintosh®: OS: Mac OS® 10.2 or the later CPU: PowerPC® / Memory: 32MB or more CD-ROM drive: 4x CD-ROM drive Display: 256 color / 640x480 dots resolution Applications: Microsoft® Internet Explorer® 4.0 and Adobe® Acrobat® Reader® 4.0 or the later How to use the CD 1. Insert the CD into the CD-ROM drive of your computer. 2. When using it on the Macintosh® system, start the web browser by the following. (1) Double-click on the “Projectors” icon displayed on the computer’s desktop. (2) Then click on the “main.html” file. When using it on the Windows® system, the web browser automatically starts. 3. The web browser displays the initial window of the manual. On the window, select the model name of your projector, and the language you want to read the manuals with. The manual in the selected language will open. NOTE * The information in the CD is subject to change without notice. * The manufacturer assumes no responsibility for any obstacle and defect to hardware and software of your computer as a result of the use of the CD. * The reproduction, transfer or copy of all or any part of the information in the CD is not permitted without express written consent. CAUTION ● Only use the CD in a computer’s CD drive. Never insert the CD into a CD drive of a non-computer device such as an audio device. Inserting the CD into an incompatible CD drive may produce a loud noise, which may result in damage to ears and speakers. ● While the CD is not used, put it into its envelope. Avoiding the CD from direct rays, a high temperature, and high humidity. Be careful not to scratch or press the CD. 23 ENGLISH 11. Using the CD manual 12. Specifications The general specifications of this product are shown below. Item Product name Specifications Liquid crystal projector TFT active matrix drive system Liquid crystal panel IN5542/ IN5542c 3.3 cm (1.3 type), 786,432 pixels (1024 horizontal x 768 vertical) IN5544/ IN5544c 3.1 cm (1.22type), 1,092,800 pixels (1366 horizontal x 800 vertical) Lamp 350 W UHB Power supply AC 110-120V/6.0A, AC 220-240V/3.1A Power consumption 540W Temperature range 5 to 35°C (Operating) Ports HDMI.......................................................................... HDMI port x1 DVI-D..........................................................................DVI-D port x1 LAN................................................................................RJ45 port x1 MONITOR OUT......................................D-sub 15 pin mini port x1 CONTROL IN................................................... D-sub 9 pin plug x1 CONTROL OUT............................................... D-sub 9 pin plug x1 REMOTE CONTROL IN............................. 3.5 stereo mini port x1 REMOTE CONTROL OUT........................ 3.5 stereo mini port x1 S-VIDEO...................................................... DIN 4 pin mini port x1 VIDEO 1........................................................................RCA port x1 VIDEO 2........................................................................BNC port x1 COMPUTER IN1....................................D-sub 15 pin mini port x1 COMPUTER IN2....................................D-sub 15 pin mini port x1 BNC (R/Cr/Pr, G/Y, B/Cb/Pb, H, V)..........................BNC port x5 Component (Y, Cb/Pb, Cr/Pr)..................................RCA port x3 Weight (mass) 13.1 kg approx. Size 476 (W) x 272 (H) x 469 (D) mm approx. * See the drawing below. Optional parts Lens unit LENS-067 (Ultra short throw lens) LENS-066 (Short throw lens) LENS-065 (Short throw lens) LENS-068 (Standard lens) LENS-062 (Standard lens) LENS-064 (Long throw lens) LENS-063 (Ultra long throw lens) Lamp unit SP-LAMP-079 Filter unit SP-FILTER-01 Cable cover SP-COVER-01 Lens adapter unit SP-LENS-ADPT-01 24 I 469 O ENGLISH 12. Specifications (continued) 272 476 [unit: mm] 25 13. Troubleshooting – Warranty and after service If an abnormality (ex. the projector smokes, smells strange, is broken or has liquid or an object inside) should occur with this product, stop using the projector immediately. After ensuring that there is no emergency, ask your dealer to check and repair the product. If an abnormality has not occured, please refer to the “Troubleshooting” section of the Operating Guide on the CD first. It may help you resolve the problem. If it does not resolve the problem, consult your dealer. The dealer or the service company that is designated by your dealer will tell you if the product is under warranty. The latest information for this product can be found on the website: www.infocus.com/support ************************************************************************ NOTE * The information in the manuals is subject to change without notice. * The manufacturer assumes no responsibility for any errors that may appear in the manuals. * The reproduction, transfer or copy of all or any part of the manuals is not permitted without express written consent. Trademark acknowledgment All the trademarks are the properties of their respective owners. According to the indication on the official site of each company, we describe as follows. - Macintosh® and Mac OS® are registered trademark of Apple Inc. - Pentium® is registered trademark of Intel Corp. - Microsoft® and Internet Explorer®, Windows®, Windows NT® are registered trademarks of Microsoft Corporation in the U.S. and/or other countries. - Adobe® and Acrobat®, Reader® are registered trademarks of Adobe System Incorporated. - PowerPC® is a registered trademark of International Business Machines Corporation. - DVI is a trademark of Digital Display Working Group. - HDMI, the HDMI logo and High-Definition Multimedia Interface are trademarks or registered trademarks of HDMI Licensing LLC. 26